
Windows Phone 7 появился в продаже совсем не давно и для того, чтобы помочь тем, кто заказал его в Россию, разобраться в нем в первые дни после приобретения, мы будем охватывать различные темы по его настройке. Cегодня остановимся на электронной почте – это одна из первых вещей, которую вы настроите при приобретении смартфона WP7.
Настройка учетной записи Windows Live ID
При запуске Windows Phone в первый раз вам будет предложено настроить аккаунт Windows Live ID. На этом этапе вы можете решить, использовать ваш Windows Live ID на телефоне или отказаться от его пользования и связанных с ним услуг. Если у вас нет Windows Live ID, но он вам нужен, вы сможете создать его на телефоне.
К указанию Windows Live ID подойдите ответственно, так как вы потом не сможете удалить его после завершения настройки телефона. Кроме всего прочего, Live ID даст вам возможность использовать XBOX Live и Zune на вашем телефоне. Если вы не используете XBOX Live и Zune, вы можете войти в систему с вашего Windows Live ID и использовать только для электронной почты.

Если вы не знаете, нужен ли вам Windows Live ID или какой именно из своих использовать для телефона, вы можете пропустить этот этап настройки при первом запуске телефона. У вас всегда есть возможность добавить Windows Live ID на телефон позже. Вы также можете добавить несколько Windows Live ID, но только на первом из них будет выводиться информация об аккаунтах XBOX Live и Zune.
Если вы не настроили Windows Live ID при первом старте, то можно настроить его позже пройдя эти шаги:
- Находясь на домашнем экране проведите пальцем влево, для перехода к списку приложений. Перейдите в «Настройки» и затем выберите «Email и аккаунты»
- Нажмите «Добавить аккаунт» и выберите «Windows Live»
- Введите свой Windows Live ID в соответствующем поле
- Введите пароль от аккаунта
- Нажмите «Войти»
Если вы ввели данные правильно, то почта, контакты, фотографии, календарь будут синхронизированы с телефоном. Также синхронизируются ваши данные в XBOX Live и Zune, если вы пользуетесь данными сервисами.
Создание дополнительных учетных записей электронной почты
Электронная почта может быть автоматически настроена на следующие сервисы: Windows Live, Outlook / Exchange, Yahoo и Gmail. Для них вам достаточно ввести адрес электронной почты и пароль, телефон автоматически подберет соответствующие настройки для сервера.
Если у вас есть аккаунт электронной почты на персональным домене или у провайдера, вы можете настроить стандартные IMAP и POP сервера для данных записей электронной почты. Расширенные настройки также доступны для тех, у кого уникальные настройки сервера или проблемы в процессе автоматической конфигурации. Рекомендации по настройке различных типов учетных записей электронной почты читайте ниже.
Настройка учетных записей электронной почты для сервисов, имеющих предустановки

Большинство людей используют в качестве основной учетной записи для электронной почты такие системы как: Gmail, Yahoo или Exchange. Windows Phone разработан с учетом этого и предлагает набор предварительно настроенных сервисов электронной почты. Все, что вам нужно, это ваши имя пользователя и пароль, телефон сделает все остальное сам. Выполните следующие шаги для настройки подобных аккаунтов:
- Находясь на домашнем экране проведите пальцем влево, для перехода к списку приложений. Перейдите в «Настройки» и затем выберите «Email и аккаунты»
- Нажмите «Добавить учетную запись» и выберите соответствующий сервис (Google, Exchange, Yahoo, Windows Live, и т.д.)
- Введите имя пользователя вашей учетной записи в окне адреса почтового ящика
- Введите пароль от аккаунта
- Нажмите «Войти»
Ваш Windows Phone свяжется с выбранным сервисом, получит настройки сервера и синхронизирует содержимое. Что именно будет синхронизироваться зависит от выбранного сервиса, так Google будет синхронизировать электронную почту, контакты и календарь (только основной календарь, а не вторичные), Yahoo будет синхронизировать только электронную почту. Вы можете иметь несколько учетных записей для каждого сервиса.
В некоторых случаях, телефон не сможет автоматически настроить вашу электронную почту, в этом случае вам придется настроить свою учетную запись вручную, используя метод, описанный ниже в разделе «Что делать, если ничего не получилось».
Настройка POP и IMAP для учетных записей электронной почты
Многие используют для почты не только Google и Yahoo сервисы, имеют почту на персональном домене или у провайдера. Для этих учетных записей необходимо вручную настроить параметры серверов, выполнив следующие шаги:
- Находясь на домашнем экране проведите пальцем влево, для перехода к списку приложений. Перейдите в «Настройки» и затем выберите «Email и аккаунты»
- Нажмите «Добавить учетную запись» и выберите «Другие»
- Введите имя пользователя вашей учетной записи в окне адреса почтового ящика
- Введите пароль от аккаунта
- Нажмите «Войти»
Телефон автоматически постарается для данных серверов определить POP и IMAP сервера, если не получится, то тогда необходимо это сделать вручную.
Что делать, если ничего не получилось

Иногда телефон не сможет сам определить необходимые параметры, тогда придется вам вручную указать сервера для приема и отправки сообщений:
- Тип учетной записи (POP или IMAP)
- Входящий адрес сервера электронной почты
- Исходящей сервер (SMTP) электронной почты
- Настройки проверки подлинности сервера
- SSL требования для входящей почты и исходящей электронной почты
- Домен (для учетных записей Exchange)
Обычно данную информацию можно найти на сайте сервиса, которым вы пользуетесь, а для настроек рабочей записи Exchange необходимо обратиться к администратору вашей сети. Внести данные настройки можно следуя этим шагам:
- Находясь на домашнем экране проведите пальцем влево, для перехода к списку приложений. Перейдите в «Настройки» и затем выберите «Email и аккаунты»
- Нажмите «Добавить учетную запись» и выберите «Расширенная настройка»
- Введите имя пользователя вашей учетной записи в окне адреса почтового ящика
- Введите пароль от аккаунта
- Нажмите «Далее»
- Выберите «Exchange ActiveSync», если вы настраиваете учетную запись Exchange или выберите адрес электронной почты в Интернете, если вы настраиваете личную или предоставленную провайдером электронную почту
- Заполните текстовые поля информацией, полученной ранее. Для учетных записей Exchange, вы можете выбрать элементы для синхронизации, включая электронную почту, контакты и календарь
- Нажмите «Войти», чтобы сохранить настройки
Параметры для учетных записей электронной почты

После настройки технических параметров учетной записи, вы можете перейти к настройке дополнительных, выполнив следующие действия:
- Находясь на домашнем экране проведите пальцем влево, для перехода к списку приложений. Перейдите в «Настройки» и затем выберите «Email и аккаунты»
- Выберите настроенную учетную запись электронной почты
- В этом разделе вы можете изменить:
- имя учетной записи
- частоту скачивания (по мере поступления, 15 минут, 30 минут, и т.д.)
- период для загрузки старых сообщений (последние 3 дня, за 7 дней, и т.д.)
- выбрать элементы для синхронизации, например — электронную почту, контакты или календарь
- имя пользователя, пароль или настройки сервера электронной почты
- По завершении настройки параметров нажмите кнопку «Изменить»
Уведомления, еще один важный аспект электронной почты, настраиваются в разделе «Мелодии и звуковые настройки». К сожалению, Windows Phone 7 не настолько гибок в настройках мелодий для учетных записей, как BlackBerry. Вы можете назначить только одно уведомление для всех учетных записей электронной почты.
С появлением в продаже Windows Phone 7 на мою почту приходят письма от пользователей Windows Phone 7, которые при настройке новых устройств столкнулись с запросом на активаций учетной записи Windows LiveID. Симптомы этой проблемы с LiveID (она не касается функционирования других служб/программ/возможностей телефона Windows Phone 7, а также – работоспособности вашего LiveID для работы с другими службами Windows Live) следующие:
· При первичной настройке телефона пользователь вводит свой Windows LiveID и пароль для синхронизации почты Hotmail, контактов и других облачных служб Windows Live с телефоном;
· или в уже работающем телефоне без настроенной синхронизации с Windows Live пользователь открывает Marketplace и вводит свой LiveID и пароль;
 · При первичной настройке телефона пользователь вводит свой Windows LiveID и пароль для синхронизации почты Hotmail, контактов и других облачных служб Windows Live с телефоном;
и получает дополнительное окно запроса на активацию LiveID из пяти полей примерно такого вида (см.изображение справа). Этот запрос на активацию LiveID в Windows Phone 7 возникает только в некоторых случаях и связан с механизмом избирательной защитной проверки для недопущения автоматической массовой регистрации LiveID на телефонах.
Как разрешить проблему активации LiveID на Windows Phone 7? В сообщении указано о необходимости обращения в службу поддержки Майкрософт. В Украине вы это можете сделать несколькими способами:
1. Обратиться в службу поддержки по телефону (044) 230 51 01, 0 800 308 800 (бесплатный звонок со стационарных телефонов по этой линии) – здесь вам продиктуют код активации для вашего LiveID
2. Заполнить форму запроса (на украинском/русском языках) на последнем шаге мастера запроса помощи на сайте поддержки Windows Live www.windowslivehelp.com по адресу http://www.windowslivehelp.com/ask.aspx?productid=10. Дойти до последнего шага, где есть поле свободного ввода текста и опишите проблему и запросите код активации.
Как показывает опыт – проблема с активацией LiveID на Windows Phone 7 разрешается службой поддержки в телефонном режиме за 5 минут.
Хотелось бы еще дать пару советов насчет LiveID тем пользователям, которые планируют приобрести Windows Phone 7 или сделать «сброс к заводским настройкам».
1. Заведите себе LiveID до того, как вы планируете начать пользоваться Windows Phone 7.
2. Установите регион в настройках Windows как США – это позволит вам работать с Marketplace из приложения Zune, которое может быть использовано не только для переноса файлов с компьютера на Windows Phone 7 (и наоборот), но и для загрузки приложений Windows Phone 7 из Marketplace на компьютер с последующей установкой на телефон (что позволяет сэкономить мобильный трафик).
3. Познакомьтесь с базовыми настройками Windows Phone 7, где может использоваться Windows LiveID. Предлагается к просмотреть следующее видео, которое рассматривает базовую настройку Windows Phone 7.
Windows Phone 7 – начальная настройка
Windows Phone 7–подключение к ПК
Весь плейлист с видео по настройке и операциям с Windows Phone 7 вы можете просмотреть здесь.
После того, как вы закончили настройку LiveID для работы с Marketplace, для русификации/украинизации телефона Windows Phone 7 вы можете использовать бесплатную утилиту UkrRusWP7, доступную на Marketplace и которая позволяет писать на русском/украинском SMS, электронные сообщения, выполнять поиск. Загрузить это приложение через Zune вы можете по этой ссылке. Видеообзор данной русской клавиатуры для Windows Phone 7 ниже:
Обзор бесплатной украинской/русской клавиатуры для Windows Phone 7
Также в Marketplace вы можете найти русифицированный бесплатный клиент для социальной сети ВКонтекте – VKontakte client application. Приложение заняло первое место на конкурсе разработчиков программ для Windows Phone 7 – Windows Phone 7 Jedi. Видеообзор клиента ВКонтакте для Windows Phone 7:
Видеорепортаж с финала конкурса программ для Windows Phone 7 вы можете увидеть в этом плейлисте.
Краткий обзор бесплатных программ для Windows Phone 7, доступных на Marketplace и полезных в повседневном использовании, вы можете увидеть в данном видеообзоре:
Обзор бесплатных приложений для Windows Phone 7
Читайте далее на блоге о использовании в повседневной жизни возможностей WIndows Phone 7 
Yes, there’re a couple of options. A complete description is here:
http://blogs.msdn.com/b/eugeniop/archive/2011/03/24/authentication-in-wp7-client-with-rest-services-part-i.aspx
(Which uses a similar approach as described in the ACS sample)
and here (this one doesn;t use an embedded browser):
http://blogs.msdn.com/b/eugeniop/archive/2011/04/02/authentication-in-wp7-client-with-rest-services-part-ii.aspx
With the first approach, you can use any authentication method supported by ACS (not just LiveID).
ACS (Access Control Service) is a service in the Windows Azure Platform for identity management. Out of the box it allows you to federate identity with LiveID, Google, Yahoo!, Facebook and any Open-ID and WS-Federation/WS-Trust identity provider.
You might be surprised to learn that despite the close integration of Windows Live ID and Windows Phone there is no way to make use of the existing Windows Live ID credentials within a third party application. This means that if you want to access the user’s Windows Live profile, their list of contacts or any other data that is available via the new Messenger Connect API you will have to get the user to authenticate against Windows Live ID from within your application. In this post you’ll learn how to work with the Messenger Connect APIs for authenticate from within a Windows Phone application.
Updated Terms of Use for Mobile Applications
The Windows Live Developer Services – Terms of Use was updated June 2011 to permit the use within mobile applications (see section 2). However, it’s important to note that the agreement states that “Developing or distributing applications for mobile devices that use Version 3 or Version 4 of the Windows Live API … is not authorized”. This means that you can’t use the old Web or Delegated authentication, you now need to use the Messenger Connect implementation of OAuth 2.
Step 1: Creating a Windows Live Application
Open a web browser and go to the Windows Live Developer Portal. You’ll need to sign in with a Windows Live ID. As you sign in there is a notice which states that if there are going to be multiple developers working on the application you should create a company Live ID to which the application can be registered. Important: There is no way to transfer an application from one Live ID to another. This means that if you create an application with a personal Live ID account it will not be possible to transfer it to another Live ID should you leave the company, or wish to sell the rights to the application. My recommendation would be to take a moment and think about the strategy that works for you. You may decide to use your Live ID, a company Live ID or even create a Live ID that is specific to the application. The last option is most suited for an application you may wish to sell in the future.
Once you’ve signed in, click on the My Apps tab and then on the Create application link. This will prompt you for an application name and language of the application as seen in Figure 1.
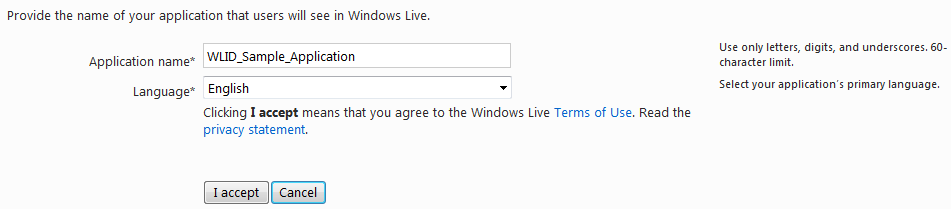
Figure 1
Once you click the “I accept” button you’ll be allocated a Client ID and Client secret as shown in Figure 2.
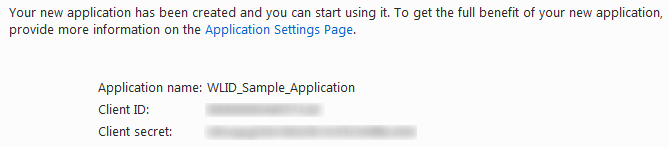
Figure 2
At this point you should navigate back to the Application Settings Page and add as much information about the application as you can (icon, description etc). When the user goes to authenticate using Windows Live ID within your Windows Phone application they will be informed as to what Windows Live application is requesting them to authenticate. This will include the information you’ve entered into the Application Settings Page – the more accurate and informative, the more likely the user will agree to authenticate using Windows Live ID.
Step 2: Creating the Shell WP7 App
We’ll start with a very basic application consisting of a Button, to initiate the authentication process, a WebBrowser control, into which the user will enter their credentials to authenticate against Windows Live, and lastly a couple of TextBlock elements to display information about the authenticated user.
<phone:PhoneApplicationPage x:Class="WindowsLiveIdSampleApp.MainPage"
    xmlns="http://schemas.microsoft.com/winfx/2006/xaml/presentation"
    xmlns:x="http://schemas.microsoft.com/winfx/2006/xaml"
    xmlns:phone="clr-namespace:Microsoft.Phone.Controls;assembly=Microsoft.Phone">
    <Grid>
        <StackPanel x:Name="LayoutRoot" Background="Transparent">
            <Button Content="Authenticate" Click="AuthenticateClick" />
            <TextBlock x:Name="UserNameText" />
            <TextBlock x:Name="UserIdText" />
        </StackPanel>
        <phone:WebBrowser x:Name="AuthenticationBrowser" Visibility="Collapsed" Navigated="BrowserNavigated" IsScriptEnabled="True" />
    </Grid>
</phone:PhoneApplicationPage>
Step 3: Create the Login URL
In essence the purpose of OAuth is to delegate the responsibility of authenticating the user to the Windows Live service. This includes the capture of username and password information – the host application should never come in direct contact with or attempt to cache this information. To achieve this in a Windows Phone application you need to navigate a WebBrowser control to the appropriate page for the user to login and authorise the host application.
This step involves building the correct URL to navigate the WebBrowser control to. The URL consists of a number of elements:
- Base URL: https://oauth.live.com/authorize
- Query String Parameters:
- Client ID: The Client ID of your Windows Live Application created earlier
- Response Type: The type of authentication to use (we’re going to use “token”)
- Scope: The parts of the users account the host application is requesting access to
- Redirect URL: The URL that the browser will redirect to after authentication has been completed. For web applications this would be a page within your web site which will pick up the access token. However, because we’re building a client application you need to specify
https://oauth.live.com/desktopwhich is a dedicated page provided for the purpose of extracting the access token. - Display: Determines how the login prompt will be styled. Use “touch” in order to get the most usable interface for a touch driven device.
The only trick to this step is making sure that all the parameters are correctly concatenated and appropriately URL encoded.
var uriParams = new Dictionary<string, string>() {
    {"client_id", "<your_client_id>"},
    {"response_type", "token"},
    {"scope", "wl.signin,wl.basic,wl.offline_access"},
    {"redirect_uri", "https://oauth.live.com/desktop"},
    {"display", "touch"}
};

StringBuilder urlBuilder = new StringBuilder();
foreach (var current in uriParams) {
  if (urlBuilder.Length>0) {
      urlBuilder.Append("&");
  }
  var encoded = HttpUtility.UrlEncode(current.Value);
  urlBuilder.AppendFormat("{0}={1}", current.Key, encoded);
}
var loginUrl= "https://oauth.live.com/authorize?" + urlBuilder.ToString();
In this case the scope we’ve specified requests permission for the application to authenticate (wl.signin), access profile information (wl.basic) and persist the access token (wl.offline_access). Don’t forget to replace (including the angled brackets) with your Client ID that you got when you created the Windows Live Application in Step 1.
Step 4: Prompt Windows Live ID Login
To get the user to login, all you have to do is to navigate the WebBrowser control to the loginUrl you just created. In the case of the application you’ll also need to display the WebBrowser control.
AuthenticationBrowser.Navigate(new Uri(loginUrl));
AuthenticationBrowser.Visibility = Visibility.Visible;
Step 5: User Logs In and Approves the Application
The user will see a number of screens which will prompt them to enter their credentials and then grant the requested permissions to the application, as seen in Figure 3.
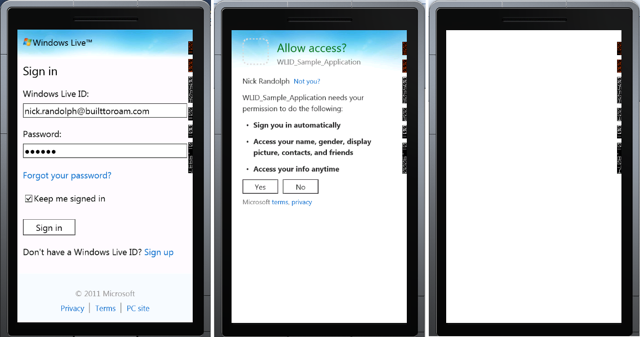
Figure 3
In Figure 3, the final image is of a blank page. This is actually the redirect URI, i.e. https://oauth.live.com/desktop which should never be shown. Instead your application should parse the URI query string for this page and extract the access token, before hiding the WebBrowser control.
public string AccessToken { get; set; }
private void BrowserNavigated(object sender, NavigationEventArgs e) {
  if (e.Uri.AbsoluteUri.ToLower().Contains("https://oauth.live.com/desktop")) {
    string text = HttpUtility.HtmlDecode(e.Uri.Fragment).TrimStart('#');
    var pairs = text.Split('&');
    foreach (var pair in pairs) {
      var kvp = pair.Split('=');
      if (kvp.Length == 2) {
        if (kvp[0] == "access_token") {
          AccessToken = kvp[1];
          MessageBox.Show("Access granted");
        }
      }
    }

    if (string.IsNullOrEmpty(AccessToken)) {
        MessageBox.Show("Unable to authenticate");
    }

    AuthenticationBrowser.Visibility = System.Windows.Visibility.Collapsed;
  }
}
Step 7: Accessing Content from Windows Live
Whilst having the Access Token verifies that the user is a legitimate Windows Live ID user it shouldn’t be used to uniquely identify the user. To get information about the signed in user you need to make one more request, this time to the Messenger Connect API itself. All requests to the Messenger Connect APIs (v5) start with the base URL of https://apis.live.net/v5.0 and in the case of requesting the user’s profile you simply have to append /me. Make a request to this URL, specifying the Access Token in the query string and you’ll get back a JSON string that represents the current logged in user. The following code illustrates this using the HttpWebRequest class.
private void RequestUserProfile() {
    var profileUrl = string.Format("https://apis.live.net/v5.0/me?access_token={0}", HttpUtility.UrlEncode(AccessToken));

    var request = HttpWebRequest.Create(new Uri(profileUrl));
    request.Method = "GET";
    request.BeginGetResponse(result => {
        try {
            var resp = (result.AsyncState as HttpWebRequest).EndGetResponse(result);
            using (var strm = resp.GetResponseStream()) {
                var serializer = new DataContractJsonSerializer(typeof (WindowsLiveProfile));
                var profile = serializer.ReadObject(strm) as WindowsLiveProfile;
                this.Dispatcher.BeginInvoke((Action<WindowsLiveProfile>) ((user) => {
                    this.UserIdText.Text = user.Id;
                    this.UserNameText.Text = user.Name;
                }), profile);
            }
        }
        catch (Exception ex) {
            this.Dispatcher.BeginInvoke( () =>
            MessageBox.Show("Unable to attain profile information"));
        }
    }, request);
}

[DataContract]
public class WindowsLiveProfile {
    [DataMember(Name="id")]
    public string Id { get; set; }
    [DataMember(Name="name")]
    public string Name { get; set; }
}
The final output is the user’s name and ID appearing in the relevant TextBlock controls as seen in Figure 4.
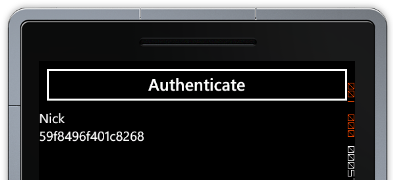
Figure 4
In this post you’ve seen how to authenticate against Windows Live and use the Messenger Connect APIs to retrieve information about the current user. There are other aspects of the users profile you can request access too, such contacts, events, email and even the ability to add to the user’s activity feed and update their status. These can all be accessed by specifying the appropriate scope and then accessing the corresponding Messenger Connect API path. More information is available via the Windows Live Developer Portal and the Messenger Connect documentation.
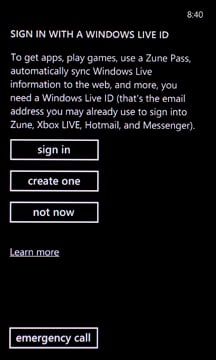
We’ve made mention that one way to prepare for Windows Phone 7 is to establish a Windows Live ID. If you times slipped by and you haven’t created a Windows Live ID, don’t worry. During the initial set-up of your Windows Phone 7 device, you’re given the option to sign in with an existing Live ID, skip the step all together or create a Windows Live ID from your phone.
While some may opt to choose «not now» and skip the Windows Live ID all together, to make the most of Windows Phone 7 you really need the ID. As the screen shot mentions,
«To get apps, play games, use a Zune Pass, automatically sync Windows Live information to the web, and more, you need a Windows Live ID.»
In establishing a Windows Live ID doesn’t mean you can’t use Google, Yahoo, or another Exchange Server for your email, contacts and calendar. It simply opens more doors for your Windows Phone to access.
All the latest news, reviews, and guides for Windows and Xbox diehards.
George is the Reviews Editor at Windows Central, concentrating on Windows 10 PC and Mobile apps. He’s been a supporter of the platform since the days of Windows CE and uses his current Windows 10 Mobile phone daily to keep up with life and enjoy a game during down time.