 В Windows 10 (впрочем, это было и в 8.1) присутствует возможность включить «Режим киоска» для учетной записи пользователя, представляющий собой ограничение использования компьютера этим пользователем только одним приложением. Функция работает только в Windows 10 редакций профессиональная, корпоративная и для образовательных учреждений.
Если из вышесказанного не совсем ясно, что такое режим киоска, то вспомните банкомат или терминал оплаты — большинство из них работает на Windows, но доступ вы имеете только к одной программе — той, которую видите на экране. В указанном случае это реализовано иначе и, вероятнее всего, работает на XP, но суть ограниченного доступа в Windows 10 та же самая.
Примечание: в Windows 10 Pro режим киоска может работать только для приложений UWP (предустановленных и приложений из магазина), в версиях Enterprise и Education — и для обычных программ. Если же вам требуется ограничить использование компьютера не только одним приложением, тут могут помочь инструкции Родительский контроль Windows 10, Учетная запись Гость в Windows 10.
Как настроить режим киоска Windows 10
В Windows 10 начиная с версии 1809 October 2018 Update включение режима киоска незначительно изменилось по сравнению с предыдущими версиями ОС (для предыдущих шаги описаны в следующем разделе инструкции).
Для настройки режима киоска в новой версии ОС выполните следующие шаги:
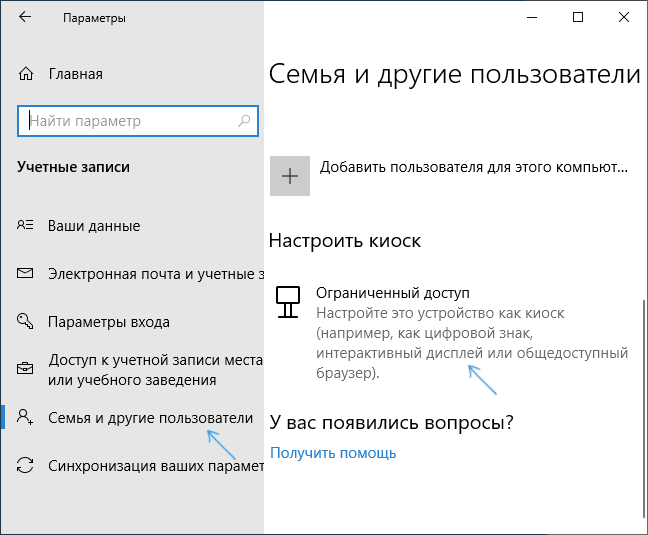
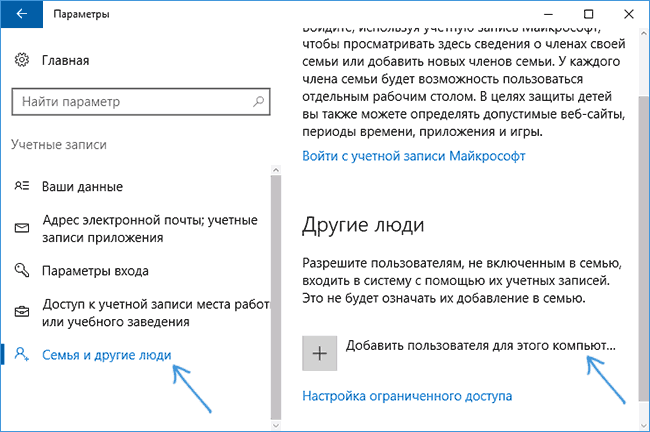
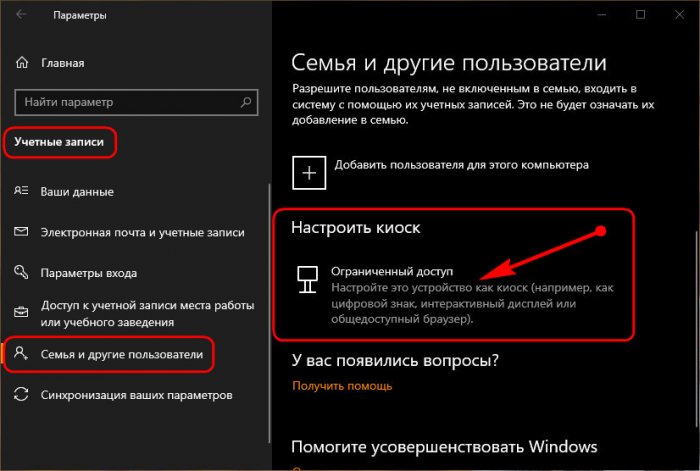
- Зайдите в Параметры (клавиши Win+I) — Учетные записи — Семья и другие пользователи и в разделе «Настроить киоск» нажмите по пункту «Ограниченный доступ».

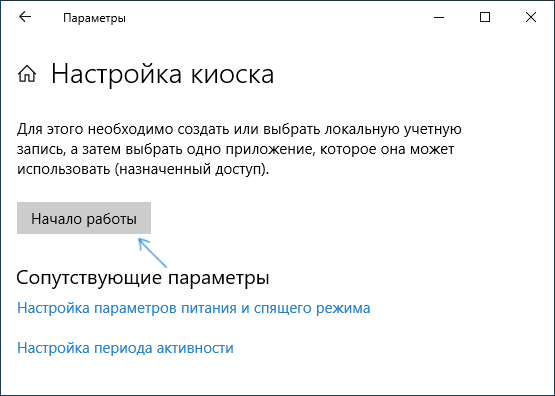
- В следующем окне нажмите «Начало работы».

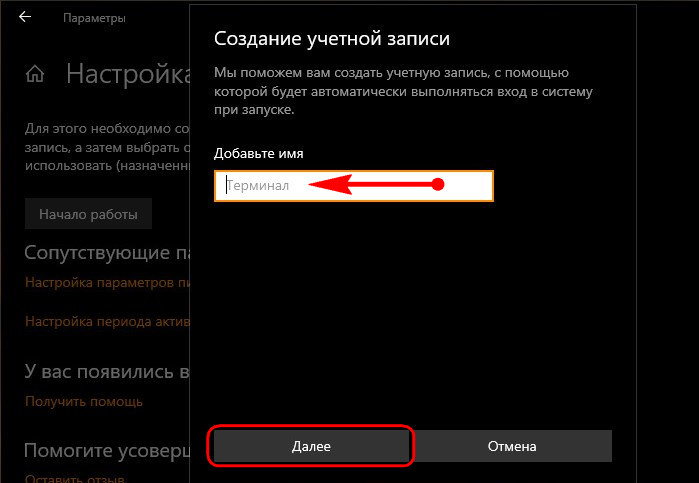
- Укажите имя новой локальной учетной записи или выберите имеющуюся (только локальная, не учетная запись Майкрософт).

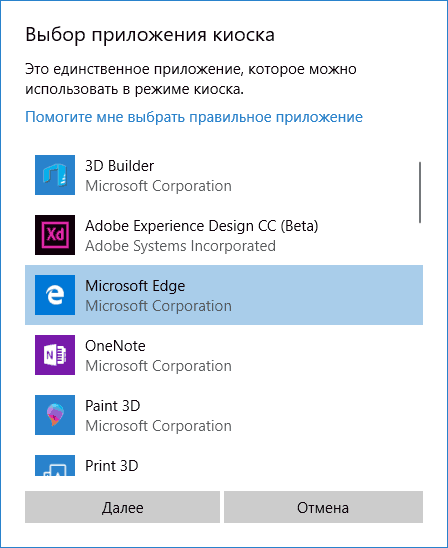
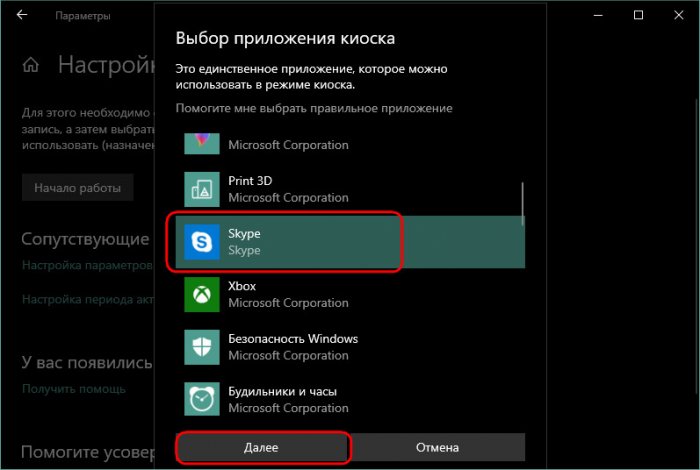
- Укажите приложение, которое можно будет использовать в этой учетной записи. Именно оно будет запускаться на весь экран при входе под этим пользователем, все остальные приложения будут недоступны.
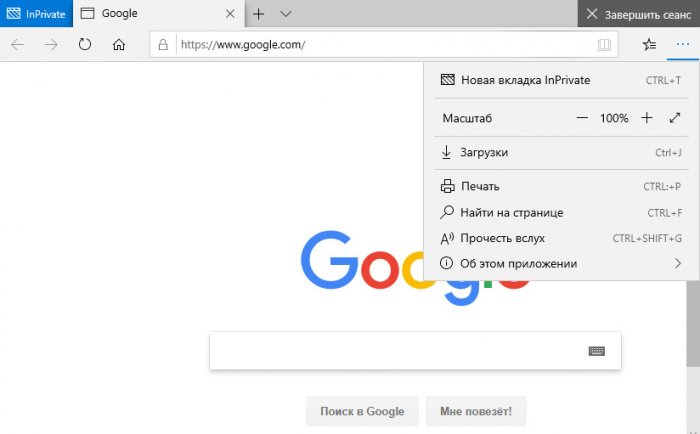
- В некоторых случаях дополнительные шаги не требуются, а для некоторых приложений доступен дополнительный выбор. Например, в Microsoft Edge можно включить открытие только одного сайта.


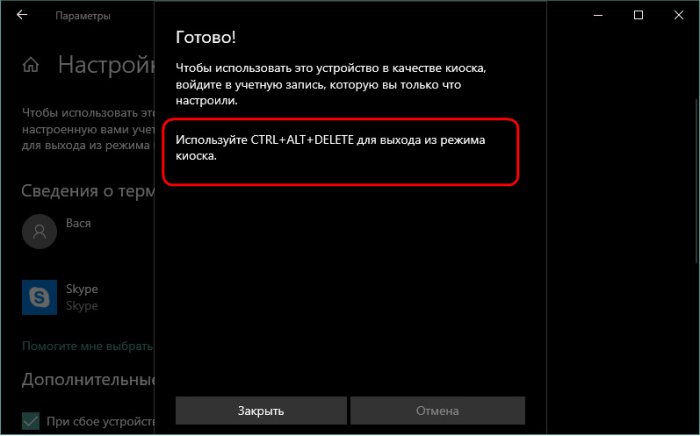
На этом настройки будут завершены, а при входе в созданную учетную запись с включенным режимом киоска будет доступно лишь одно выбранное приложение. Это приложение при необходимости можно поменять в том же разделе параметров Windows 10.
Также в дополнительных параметрах вы можете включить автоматический перезапуск компьютера при сбоях вместо отображения информации об ошибках.
Включение режима киоска в ранних версиях Windows 10
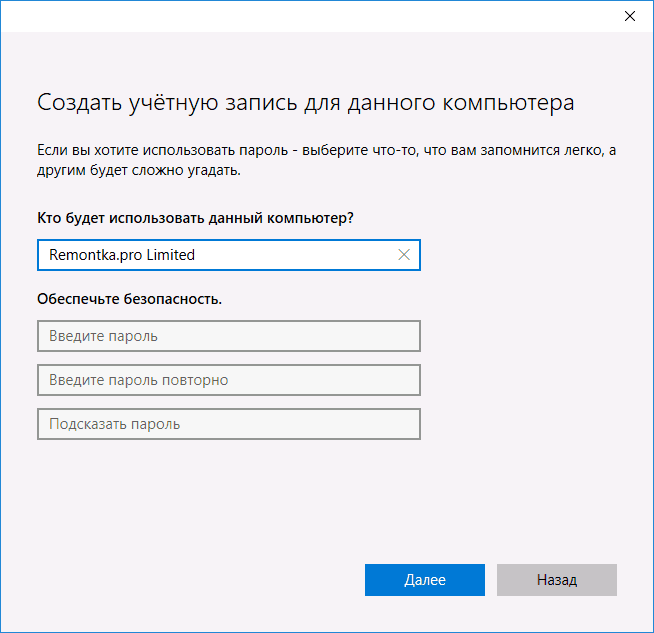
Для того, чтобы включить режим киоска в Windows 10, создайте нового локального пользователя, для которого будет установлено ограничение (подробнее на тему: Как создать пользователя Windows 10).
Проще всего это сделать в Параметры (клавиши Win+I) — Учетные записи — Семья и другие люди — Добавить пользователя этого компьютера.
При этом, в процессе создания нового пользователя:
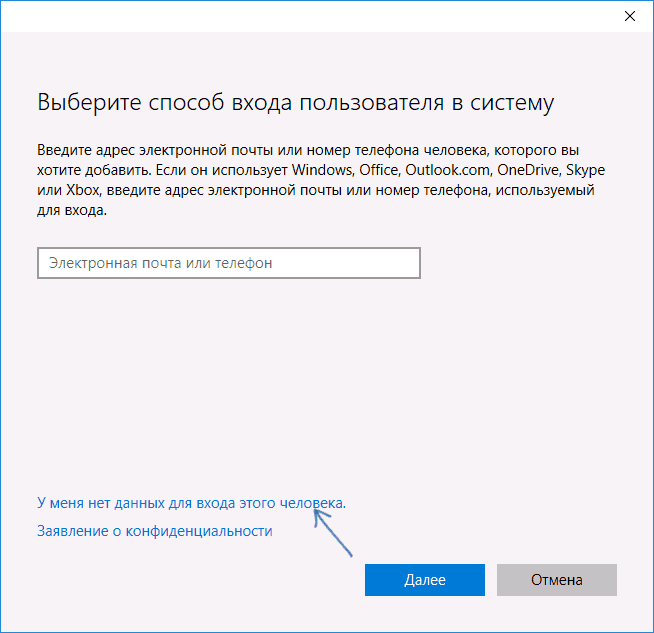
- При запросе электронной почты нажмите «У меня нет данных для входа этого человека».

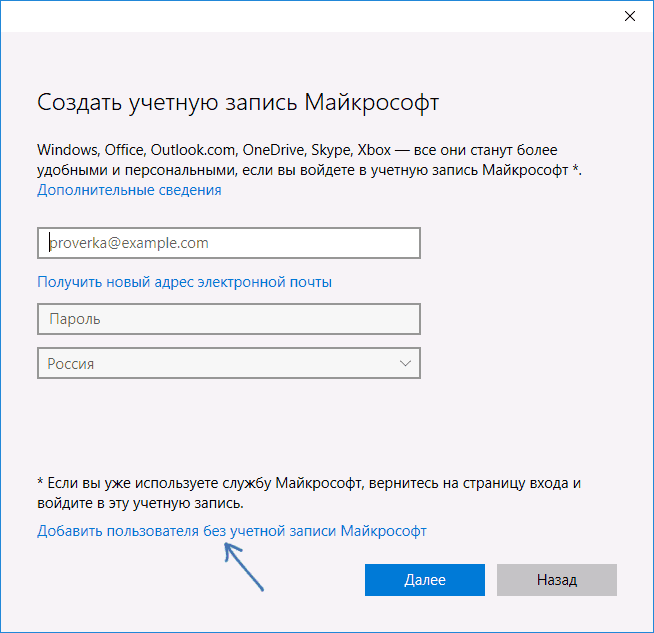
- На следующем экране, внизу, выберите «Добавить пользователя без учетной записи Майкрософт».
- Далее введите имя пользователя и, если нужно, пароль и подсказку (хотя для ограниченной учетной записи режима киоска пароль можно и не вводить).
После того, как учетная запись будет создана, вернувшись в параметры учетных записей Windows 10, в разделе «Семья и другие люди», нажмите «Настройка ограниченного доступа».
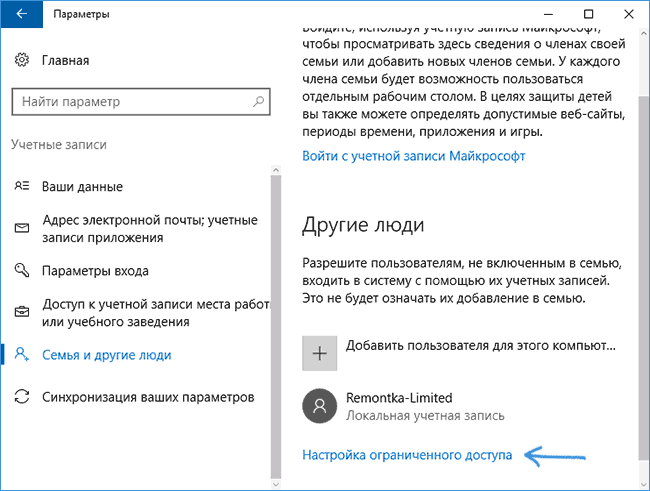
Теперь, всё что останется сделать — это указать учетную запись пользователя, для которой будет включен режим киоска и выбрать приложение, которое будет автоматически запускаться (и которым будет ограничен доступ).
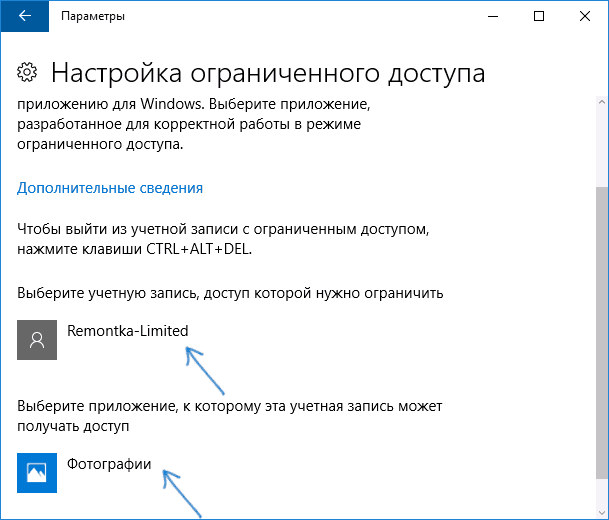
После указания этих пунктов можно закрыть окно параметров — ограниченный доступ настроен и готов к использованию.
Если зайти в Windows 10 под новой учетной записью, сразу после входа (при первом входе некоторое время будет происходить настройка) на весь экран откроется выбранное приложение, а получить доступ к другим компонентам системы не получится.
Для того, чтобы выйти из учетной записи пользователя с ограниченным доступом, нажмите клавиши Ctrl+Alt+Del, чтобы перейти к экрану блокировки и выбрать другого пользователя компьютера.
Не знаю точно, зачем режим киоска может пригодиться рядовому пользователю (дать бабушке доступ только к пасьянсу?), но может оказаться, что кому-то из читателей функция окажется полезной (поделитесь?). Еще интересное на тему ограничений: Как ограничить время использования компьютера в Windows 10 (без родительского контроля).
Microsoft’s Windows 10 has quite a few amazing features, most of which are overrated. However, this is one underrated feature available by default on your Windows 10 operating system, which is not very popular. That feature is the Kiosk Mode on Windows 10, which converts your machine into a Kiosk, and the users are only able to use a single predetermined application.
A PC converted to a Kiosk device can run only a specified task, which has to be an app from the Microsoft Store. All other access, settings, and even the desktop are disabled. This feature is useful in-service centers, where you have to register and assign a ticket to the customers, or in the waiting lobby where the guest can surf the internet. It can also be used to run a particular game if you are hosting a party at your home without the risk of kids accessing your computer.
Steps To Enable Kiosk Mode On Windows 10
The following steps will enable you to run one app in full screen while disabling all other features of Windows 10:
Step 1. Open the Settings window by pressing the two keys together, Windows + I on your keyboard.
Step 2. Click on Accounts from the various setting options.

Step 3. Locate Other Users on the list of options displayed on the left, and click on it.
Step 4. From the options on the right side, click on Assigned Access under Set up a kiosk.

Step 5. Click on Get Started.

Step 6. In the New window that pop-ups, you will be prompted to add a name. Type in a name, and click on Next.
Step 7. The next step would be to choose an app from the list displayed. Click Next after you have made your selection.

Note: Only the apps installed from the Microsoft Store would be displayed. You will not be able to set any third-party app as a standalone app in Kiosk Mode.
If you want to play Minesweeper on Windows 10, click here.
Step 8. Click on Close, and you are all done as the Kiosk Mode in Windows 10 has been enabled.

Step 9. To experience the Windows 10 Kiosk Mode, you need to restart your computer.
Also Read: Learn All About Windows 10 in S Mode.
Some Important Facts About The Windows 10 Kiosk Mode
Other uses of a Kiosk Mode on Windows 10 can be to set up a jukebox or you can install a streaming app to make it a streaming device. The Kiosk Mode would greatly reduce the Malware Infections, Corruption of System Files, other Windows Errors and most importantly reduce the CPU usage as the PC is dedicated to using a single app. Some features to keep in mind before you enable the Kiosk Mode are:
- The Windows 10 Kiosk Mode can support only one application at one time.
- The Application must be installed from the Microsoft Store.
- Once the Kiosk Mode has been enabled in your Windows 10 PC, it will always boot into the Kiosk Mode as its first priority.
- To exit the Kiosk Mode while it is running, press CTRL + ALT + DEL. You will be redirected to a login screen where you can sign in using your username and password.
- Once you sign in using your credentials, your normal Windows 10 will load up.

Note: It takes considerable time to load into the kiosk mode, the first time you enable it. After that, it is quick as your normal account.
Also Read: How To Enable Dark Mode in Windows 10?
Steps To Disable Kiosk Mode In Windows 10
If you want to disable the Kiosk mode in Windows 10, then you can follow the below-mentioned steps:
- Access the Windows settings.
- Open the Account Settings.
- Click on Other Users on the left, and Assigned Access on the right.

- You will see your Kiosk account information instead of the Get Started Button.
- Click on your Kiosk Account Name, and then click on Remove Account.

- This will disable the Windows 10 Kiosk Account from your system.
- Your system will now boot into your primary account.
Note: If you want to change the predetermined application you have set up in the Windows 10 Kiosk Mode, then you must follow the above steps and click on the application name instead of the account name. This will open the list of applications and allow you to select another app instead.
Also Read: How to Boot into Windows 10 Safe Mode?
Your Thoughts On Kiosk Mode In Windows 10
As I mentioned earlier, the Windows 10 Kiosk Mode is an understated feature, which can be used to great benefits. There are countless uses of such a feature, however, it depends on the need of the user. One major drawback of the Kiosk Mode on Windows 10 is that it allows the user to set one application only. An administrator must have the option to set at least three applications in the Kiosk Mode and the users can then choose through them.
Having a problem while running multiple programs on the computer makes its processing difficult. In Windows 10, you will get some specific functions or programs to make the processing fast and smooth.
Windows 10 Kiosk mode is one of those functions that can help you in this regard. The main focus of this specific article is to discuss this mode, its working, and how to enable it. Let’s get started and check how to enable Kiosk mode in Windows 10.
What Is Kiosk Mode?
It is a specific method that can restrict the system from using multiple programs and running a single one. Kiosk mode in Windows 10 will enable IT experts or administrative admins to limit the device’s processing.
Kiosk mode will limit the processing of the device to a specific application or program. It will help the admin to make changes in the registry and get full control over different issues. This specific method will help the user lock down the system and focus on processing a single program.
The user can do multiple actions with the help of Windows 10 Kiosk mode. Abide by the discussion of those actions, let us show you how to set up this mode in your device with Windows 10.
How to Set Up Kiosk Mode in Windows 10?
As mentioned above, the Kiosk mode will restrict the processing of the device. It will let you get signed in and run a limited number of Microsoft apps to run in your user account. Here is the method to follow to set up Kiosk mode in Windows 10.
Step 1. Go to Windows settings by tapping Win + I Keys simultaneously
Step 2. Check for the Accounts option and click on it

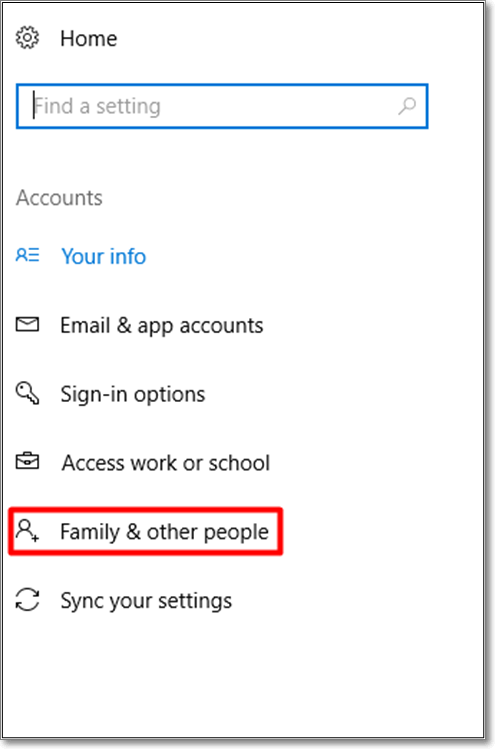
Step 3. Under the menu, look for the Family & other people option
Step 4. Look at the right navigation bar and check for the Kiosk tab
Step 5. Tap on the Assigned access option given below the Kiosk tab
Step 6. Wait until the next page will be opened
Step 7. Click on «Get started»
Step 8. Set your Kiosk account name properly and tap on the Next button
Step 9. Choose the Microsoft app from the list and click on «Next»
Once you have followed the above steps, it is time to stick with your computer screen. Now, you need to follow on-screen instructions to complete this operation. Keep in mind that those instructions might be different a little bit according to your operating system or settings.
- How to Turn On Kiosk Mode?
- How to Turn Off Kiosk Mode?
How to Turn On Kiosk Mode?
When you have set up the Windows 10 Kiosk mode, you might be wondering how to turn it on instantly. It will not take even more than a few minutes to perform this task. But you can do this by following the upcoming simple steps.
Step 1. Go to the Other people option using the above steps
Step 2. Click on «Set up» assigned accounts
Step 3. Choose the account that you have created before
Step 4. Choose an application to add to Windows 10 Kiosk mode
Step 5. Close the tabs and restart the computer
By doing this, you will be able to operate your computer in Kiosk mode without extra power usage. You only have to follow these steps to turn on and choose the app carefully because only that application will be accessible upon turning on the system.
How to Turn Off Kiosk Mode?
If you want to get your computer to normal, you only have to turn off Kiosk mode. To do this, you should follow these steps one by one.
Step 1. Go to settings and navigate to family and other people using the same procedure
Step 2. Under the Kiosk setup option, just look for assigned accounts
Step 3. Click on any of those accounts and choose to Remove access
It will remove a specific account from the Kiosk mode. You only need to restart your computer and log in using that account details.
FAQs
1. Does Windows 10 pro have kiosk mode?
Yes, Windows 10 pro supports Kiosk mode. It is available in Version 1709 and its later operating systems.
2. Can Windows 10 home run in kiosk mode?
Kiosk mode is not available for Windows 10 Home. You can only enable this mode if you are using Windows 10 Pro, Enterprise, or Education.
3. How do I add a third-party app to Kiosk mode?
To do this, you only have to follow the above-mentioned steps and then choose your desired app in the last step.
4. How do I open Chrome in Kiosk mode?
To open Chrome in Kiosk mode, you only need to go to chrome and click on the manage extension. Here you will get a box with Manage Kiosk applications, here you only need to add the Kiosk app ID and click on Add button.
Привет, друзья. Осеннее накопительное обновление для Windows 10 пополнило штат системы новыми возможностями, в числе которых — появившийся в параметрах учётных записей режим киоска. О нём мы вкратце упоминали в общем обзоре October 2018 Update, в этой же статье разберём эту функцию детально. Что являет собой режим киоска в Windows 10?
Режим киоска в Windows 10
Режим киоска – это ранее существовавшая в системе настройка ограниченного доступа для отдельных учётных записей в виде возможности запуска всего лишь одного приложения из числа UWP. Об этой настройке мы говорили в статье о способах ограничения возможностей пользователей Windows 10 (п. 3 статьи). Идею существования пользовательской учётной записи, ограниченной запуском только одного приложения, Windows 10 унаследовала от Windows 8.1. Только в Windows 8.1 в качестве единственного доступного приложения можно выбрать что-нибудь из убогого выбора приложений Modern UI. В свою очередь в Windows 8.1 эта идея была реализована как эволюционная трансформация учётной записи гостя, которая в Windows 7 являла собой решение на случай, когда владельцу компьютера необходимо дать его во временное пользование встречному-поперечному человеку.
В новой версии Windows 10 ограниченный одним приложением доступ к компьютеру немного доработан, и эта функция названа киоском. Почему киоском? Видимо, Microsoft считает, что именно это понятие как нельзя лучше отображает суть работы компьютера в режиме запуска всего лишь одного приложения. В киоск, работающий с единственным приложением, можно превратить свой компьютер, если его приходится делить с другими членами семьи, например, с малыми детьми. В качестве такого приложения можно настроить какую-нибудь игру из Microsoft Store или любой детский сайт в окне браузера Microsoft Edge. И детишки если захотят залезть туда, куда им не следует, а они обязательно захотят, попросту не смогут сделать это.
Режим киоска, как и ранняя его реализация в виде настройки ограниченного доступа для отдельных учётных записей, недоступна в Windows 10 Home. Доступна только в редакциях, начиная с Pro. Настраивается киоск в параметрах учётных записей семьи и других пользователей. Здесь добавился новый пункт «Настроить киоск». Кликаем этот пункт.
И для создания киоска жмём «Начало работы».

Вводим имя, это может быть имя пользователя, который будет работать в рамках ограниченной учётной записи. Жмём «Далее».
Теперь выбираем приложение из числа UWP, включая Microsoft Edge. Он, кстати, ранее не поддерживался, но теперь его можно использовать наряду с прочим UWP-контентом. Если нужно увлечь ребёнка игрой, скачиванием игру в Microsoft Store и указываем эту игру на следующем этапе выбора приложения. Если ребёнка нужно увлечь мультиками, добавляем приложение «Кино и ТВ», а потом сами видеофайлы мультфильмов помещаем в папку «Видео» профиля киоска по пути C:\Users\kioskUser. Если ребёнок хочет пообщаться с друзьями по Скайпу, выбираем, соответственно, приложение Skype.
Далее увидим информацию, что выход из режима киоска осуществляется клавишами Ctrl+Alt+Del.
И всё – можем запускать киоск с экрана блокировки Windows 10.
Если же ребёнку или какому-нибудь левому человеку нужно дать доступ к Интернету, в перечне приложений кликаем Microsoft Edge.
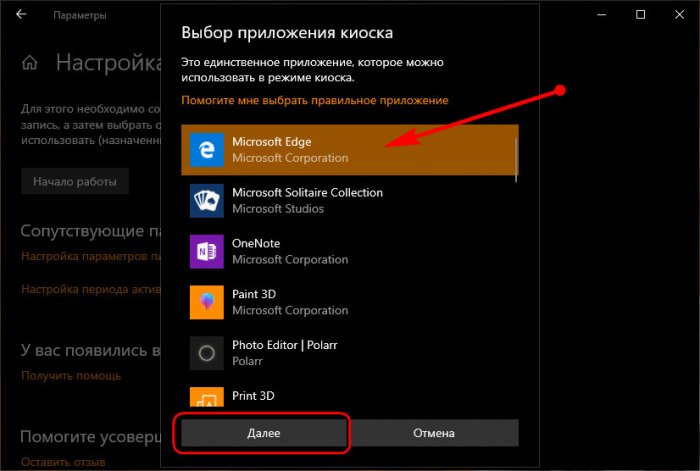
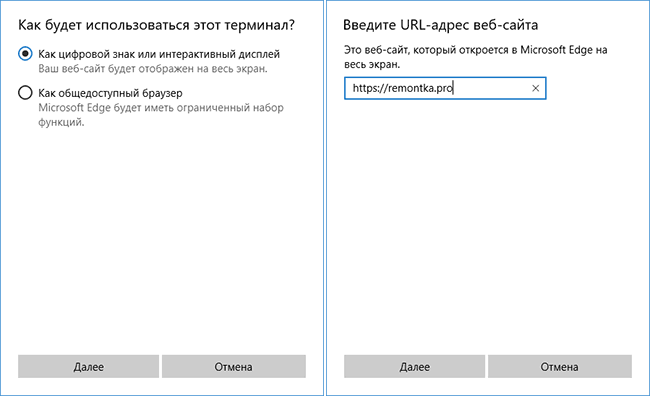
Microsoft Edge в режиме киоска может функционировать в двух вариантах:
• Как интерактивный дисплей – это доступ только к одному сайту и его отображение по типу веб-приложения;
• Как общедоступный браузер – это доступ к любым сайтам в обычном окне браузера.
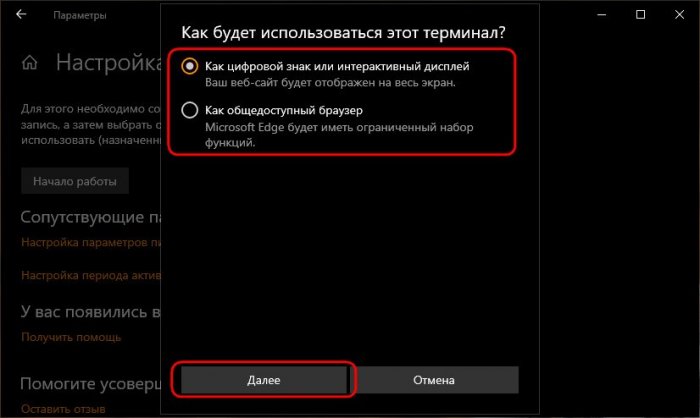
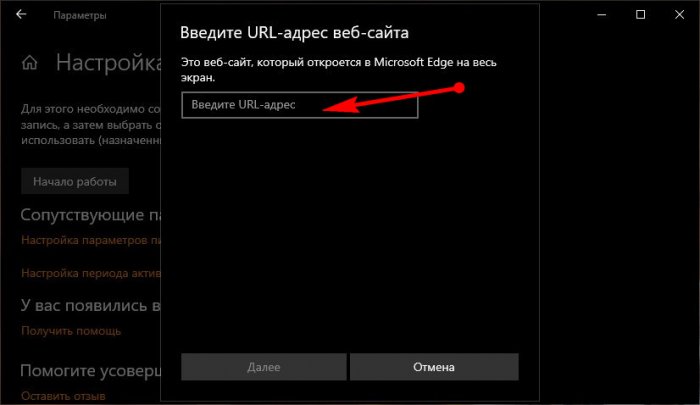
При выборе интерактивного дисплея с доступом только к одному сайту необходимо, соответственно, указать адрес этого сайта.
Варианты функционирования Microsoft Edge в дальнейшем можно оперативно менять в настройках киоска. Как и в случае с обычными приложениями, выход из ограниченного режима Microsoft Edge осуществляется клавишами Ctrl+Alt+Del.
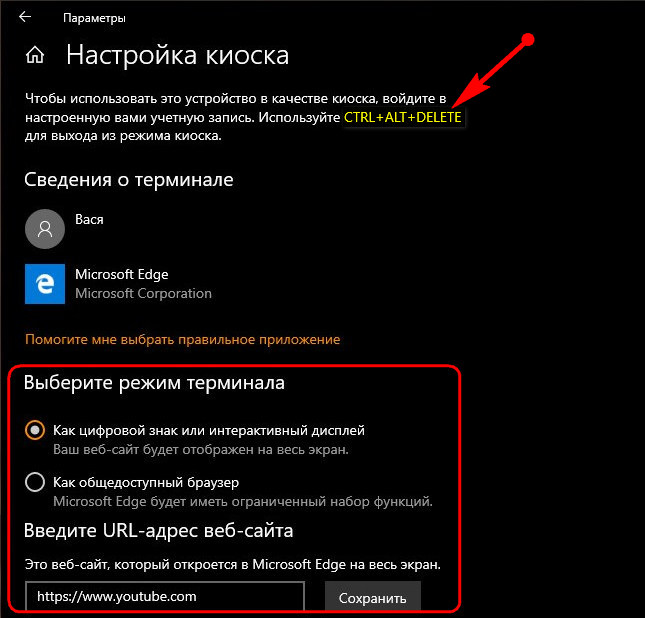
При выборе варианта интерактивного дисплея у пользователя не будет возможности доступа к другим сайтам. Он лишь будет видеть полноэкранный режим одного указанного для киоска веб-ресурса.

При выборе варианта как общедоступного браузера это будет ограниченный функционально режим Microsoft Edge с зачисткой истории по завершении работы.
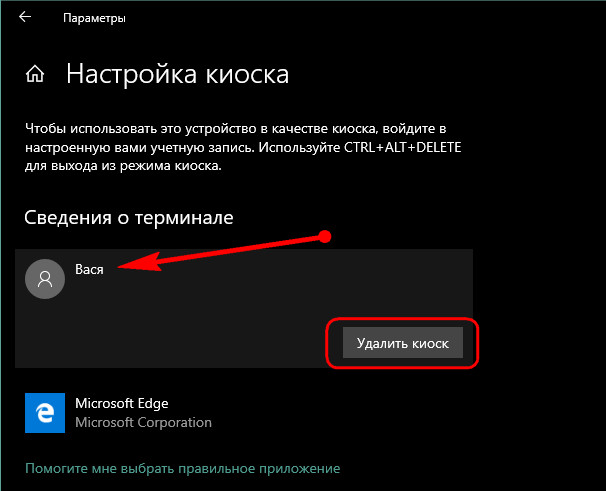
Для удаления киоска в его настройках кликаем имя пользователя и жмём «Удалить киоск».
Windows 10 brings with it a plethora of features designed to enhance user experience and increase operational flexibility. One such feature is the Kiosk mode. But what is Kiosk mode? It’s a built-in feature of both Windows 11 and Windows 10, enabling a computer to run a singular UWP app in full-screen mode for a designated local user account. This is especially useful for interactive displays, digital signage, and other public-facing roles where system-wide access is neither required nor desirable. Once Kiosk mode is activated on your computer, it ensures that only the specified app runs, effectively limiting all guest accounts’ interactions.
However, before plunging into the setup of Kiosk mode, here are some important pointers to keep in mind:-
- It only supports local user accounts. That means neither a Microsoft account nor an administrator account can be set up in Kiosk mode.
- After setting up Kiosk mode for a user account, typical Windows interfaces like the Start menu, taskbar, File Explorer, and Desktop won’t be visible or accessible.
- Don’t expect to use common hotkeys to launch apps such as the Settings app or File Explorer.
- And if you’re wondering how to exit this restrictive mode, the magic combination is the Ctrl+Alt+Del hotkey.
For those keen on leveraging this feature, this RiseWindows article is your go-to guide. Follow along as we unravel the steps to configure or enable Kiosk Mode in Windows 10.
How to Create a Standard User Account on Windows 10?
To make a standard or restricted user account on Windows 10, do the following steps:-
Step 1. Firstly, open Windows Settings.
Step 2. Next, click on Accounts.

Step 3. Then, select Family & other users in the left side pane.

Step 4. After that, on the right side of “Family & other users,” click the button Add someone else to this PC.
Step 5. In the pop-up window, type the “User name” and click the Next button if you want them to sign in automatically.

Note: If you’re asked for the email or phone of the person so they can sign in, click on “I don’t have this person’s sign-in information” and click Next.
How to Set up Kiosk Mode in Windows 10?
After creating a standard account on your Windows 10 machine, do the following steps to configure Kiosk Mode:-
Step 1. Firstly, open Windows Settings.
Step 2. Next, click on Accounts.
Step 3. Then, select Family & other users in the left pane.

Step 4. After that, click the Assigned access under the “Set up a kiosk” section on the right sidebar.
Step 5. Click the Get started button.

Step 6. Then, click the link Choose an existing account.

Step 7. Next, click on the user account you have created for the Kiosk and then hit the Next button.

Step 8. Select a UWP app and click the Next button.

Step 9. Select the option that suits your environment and click the Next button.

Step 10. Type the web page address you want to set for the home page. Then, specify the time before Microsoft Edge restarts the session if no one uses the device.

Step 11. Next, Click Next.
After the above steps, restart your computer to start in kiosk mode.
How to Change App for Kiosk Mode on Windows 10?
To change the app for Kiosk in Windows 10, do the following steps:-
Step 1. Firstly, open Windows Settings.
Step 2. Next, click on Accounts.
Step 3. Then, select Family & other users in the left side pane.
Step 4. After that, click the app, which will be visible just below the Kiosk user name.

Step 5. Then, click the Change kiosk app button.
Step 6. Select a new app in the list and click the Next button.

How to Disable Kiosk Mode in Windows 10?
To disable kiosk mode, do the following steps:-
Step 1. Firstly, open Windows Settings.
Step 2. Next, click on Accounts.
Step 3. Then, select Family & other users in the left pane.
Step 4. Click the Kiosk user name.

Step 5. Click the Remove button in the pop-up window. It will delete all kiosk settings and sign out of the selected account. However, the user account will remain available on your PC.

How to Remove Kiosk User in Windows 10?
If you do not require Kiosk, you might want to delete it permanently from your Windows 10 machine.
To remove the user account on your Windows 10 PC, do the following steps:-
Step 1. Firstly, press Windows + R keys on the keyboard to open the Run dialog box.

Step 2. Type cmd in the Run box and press Ctrl + Shift + Enter to launch an elevated Command Prompt.
Step 3. Then, type the following in the Command Prompt and hit Enter on the keyboard:-
net user "username" /delete
Note: Please replace the word username with the user name you created for Kiosk. For instance, we have created a kiosk account with the Kiosk name. So, my command will be:-
net user "Kiosk" /delete

Conclusion
Windows 10’s Kiosk mode is a versatile feature that is ideal for public displays, digital signage, and other scenarios where system-wide access is unnecessary. The feature allows a device to run a single UWP app in full-screen mode for a designated local user account. Although the process of setting up and managing Kiosk mode requires some steps, the result offers a streamlined user experience with minimized distractions. This article provides a comprehensive guide on setting up, modifying, and removing Kiosk mode and its user accounts in Windows 10.