- Home
- Security
- General IT Security
- How-tos
-
Share
Opens a new window
-
Facebook
Opens a new window -
Twitter
Opens a new window -
Reddit
Opens a new window -
LinkedIn
Opens a new window
-
Sign Up
If you want to use a self signed certificate to secure your web-mail.
Steps to install SSL CA Certificate in Windows
Step – 1
Open MMC; Click on Start -> Run -> type MMC -> Click OK
Step – 2
Go to ‘File’ and click on Add/Remove Snap-in…

Step – 3
Click on ‘Certificates’ >’Add’

Step – 4
Select the ‘User Account’ & Click on ‘Finish’
Click on ‘OK’

Step – 5
Now, you need to expand Certificates -> Trusted Root Certification Authority -> Certificates
Right click on the right pane -> All Tasks -> Import

Step – 6
The next step is to import certificate wizard
Browse to the certificate file, Click Next, Select Trusted Root Certification Authorities, Click Next, and then Finish.
You will be asked the security warning, click yes.

Note: Once you have imported the certificate then you will not get prompted about the website’s certificate.
⏬ ⏬ Get rid of “⚠️ Not Secure” warning with these trusted SSL Certificates ⏬ ⏬
![]()
$6.55
Vendor Price: $41.73
Coupon Code: ASCSCPSSL4
Get It Now
![]()
$13.45
Vendor Price: $69
Coupon Code: ASRSRSSL2
Get It Now
![]()
$17.54 – 2 SAN Included
Vendor Price: $41.73
Coupon Code: ASCSCPMD4
Get It Now
AboutSSL’s Best Stuff
Disclosure: AboutSSL appreciates your continuous support. It helps us tremendously to keep moving in the competitive SSL industry. Here most of the links which direct you to buy any SSL/TLS related service or products earns us a certain percentage of referral commission. Learn More
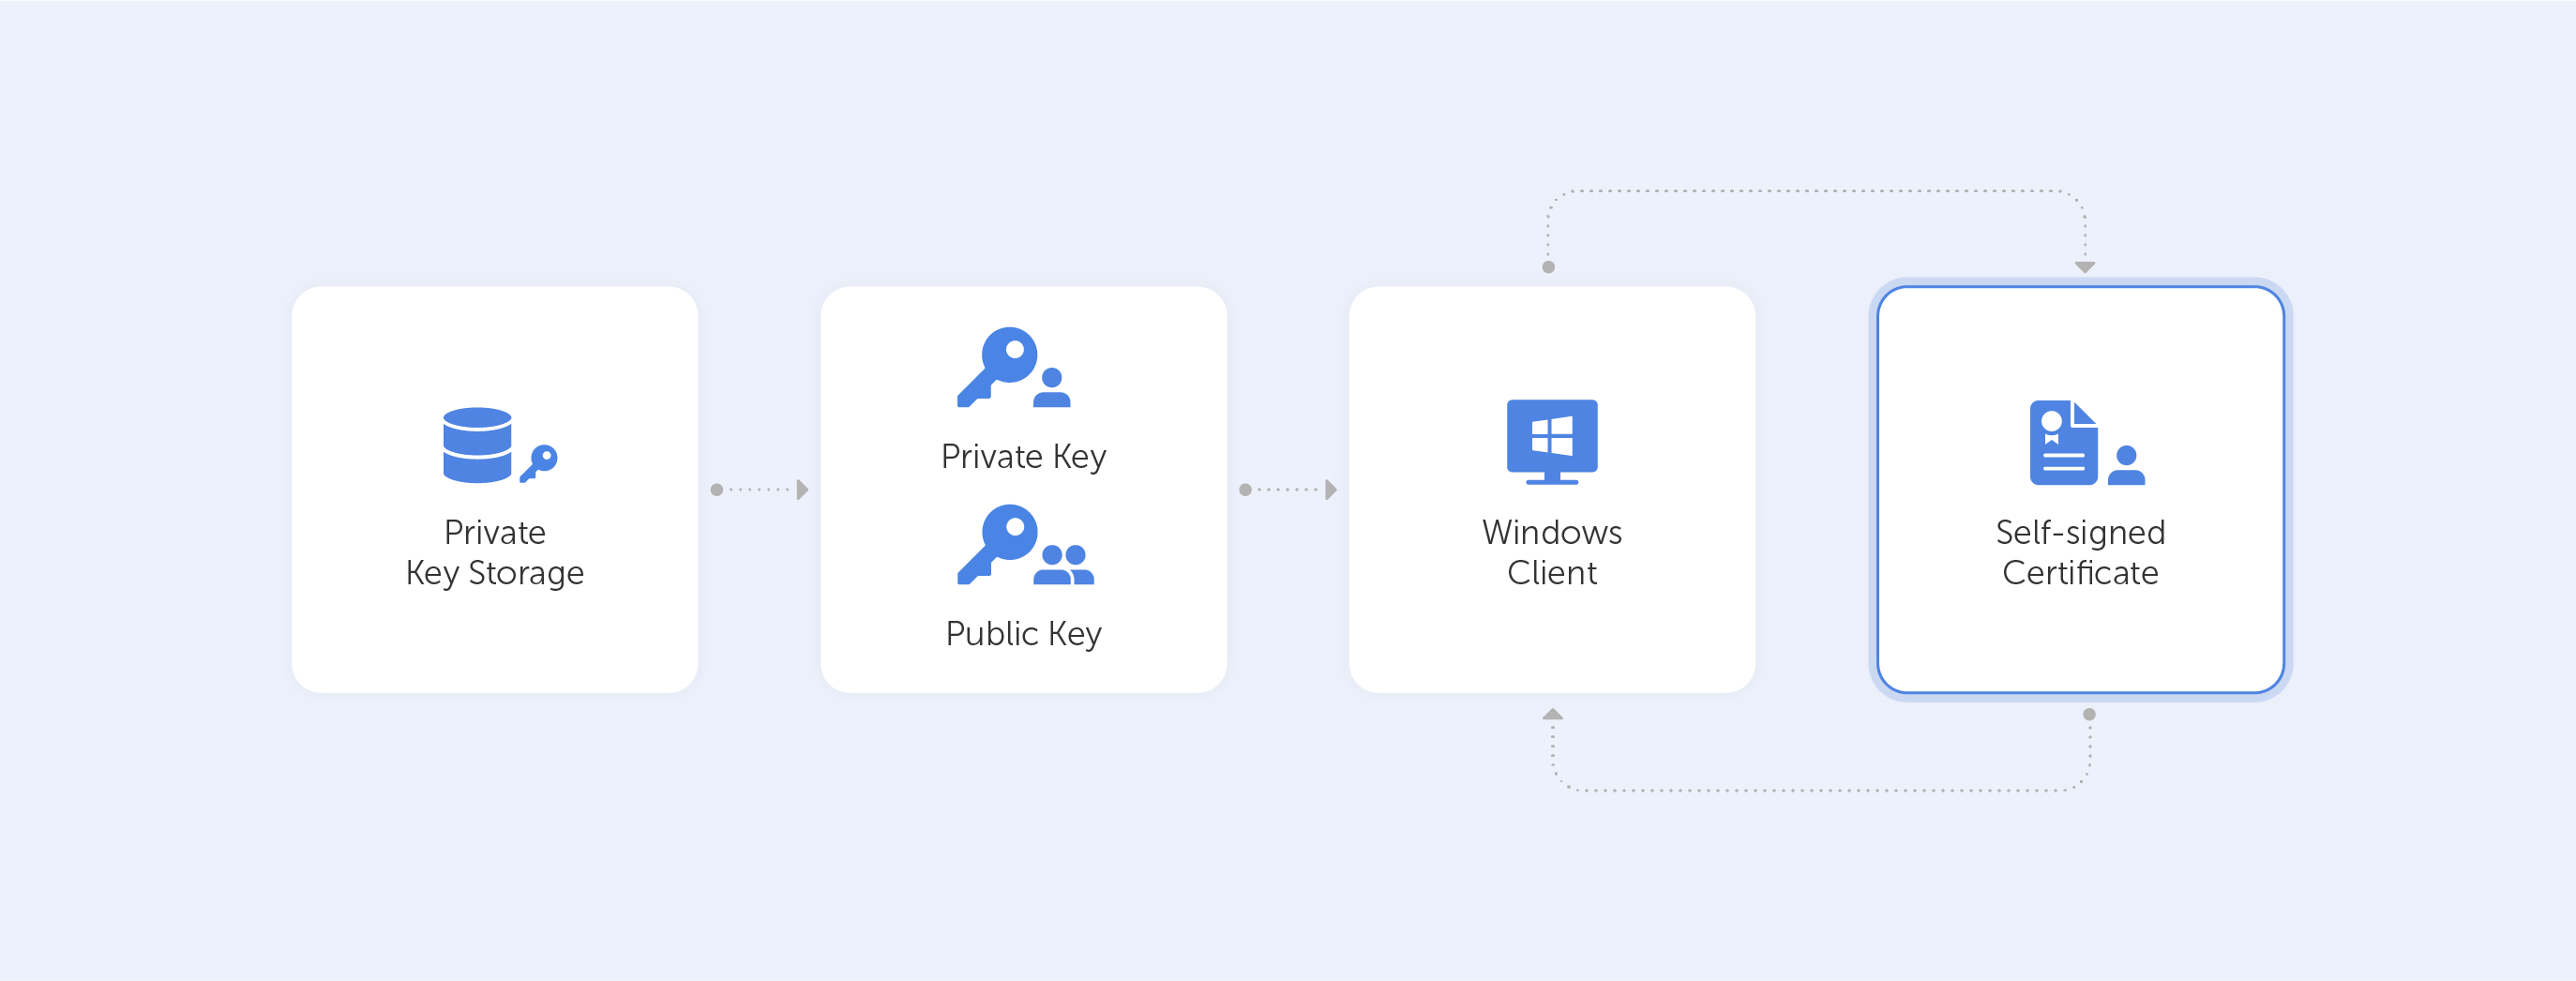
Self-signed certificates are widely used in testing environments and they are excellent alternatives to purchasing and renewing yearly certifications.
That is of course if you know how and, more importantly, when to use them. Remember, that A self-signed certificate is not signed by a publicly trusted Certificate Authority (CA). Self-signed certificates are considered different from traditional CA certificates that are signed and issued by a CA because self-signed certificates are created, issued, and signed by the company or developer who is responsible for the website or software associated with the certificate.
You are probably reading this article because for some reason, you need to create a self-signed certificate with Windows. So, we’ve tried to outline the easiest ways to do that. This article is up-to-date as of December 2021. By the way, we’re referring to Windows 10 for all the following tutorials. As far as we know, the processes for Windows 11 are identical.
So what are our options?
Using Let’s Encrypt.
These guys offer free CA certificates with various SAN and wildcard support. The certificate is only good for 90 days, but they do give an automated renewal method. This is a great alternative for a quick proof-of-concept. Other options would require more typing, for sure.
But this option works only if you want to generate a certificate for your website. The best way to start is by going to Getting Started, the instructions thereafter are very easy to follow.
Other one-click option:
We’ve reviewed different online services that allow you to easily generate self-signed certificates. We’ve sorted them from one-click to advanced, and the first one is:
Selfsignedcertificate.com
Just enter your domain name — and you are ready to go:
Getacert.com
Fill out the following fields:
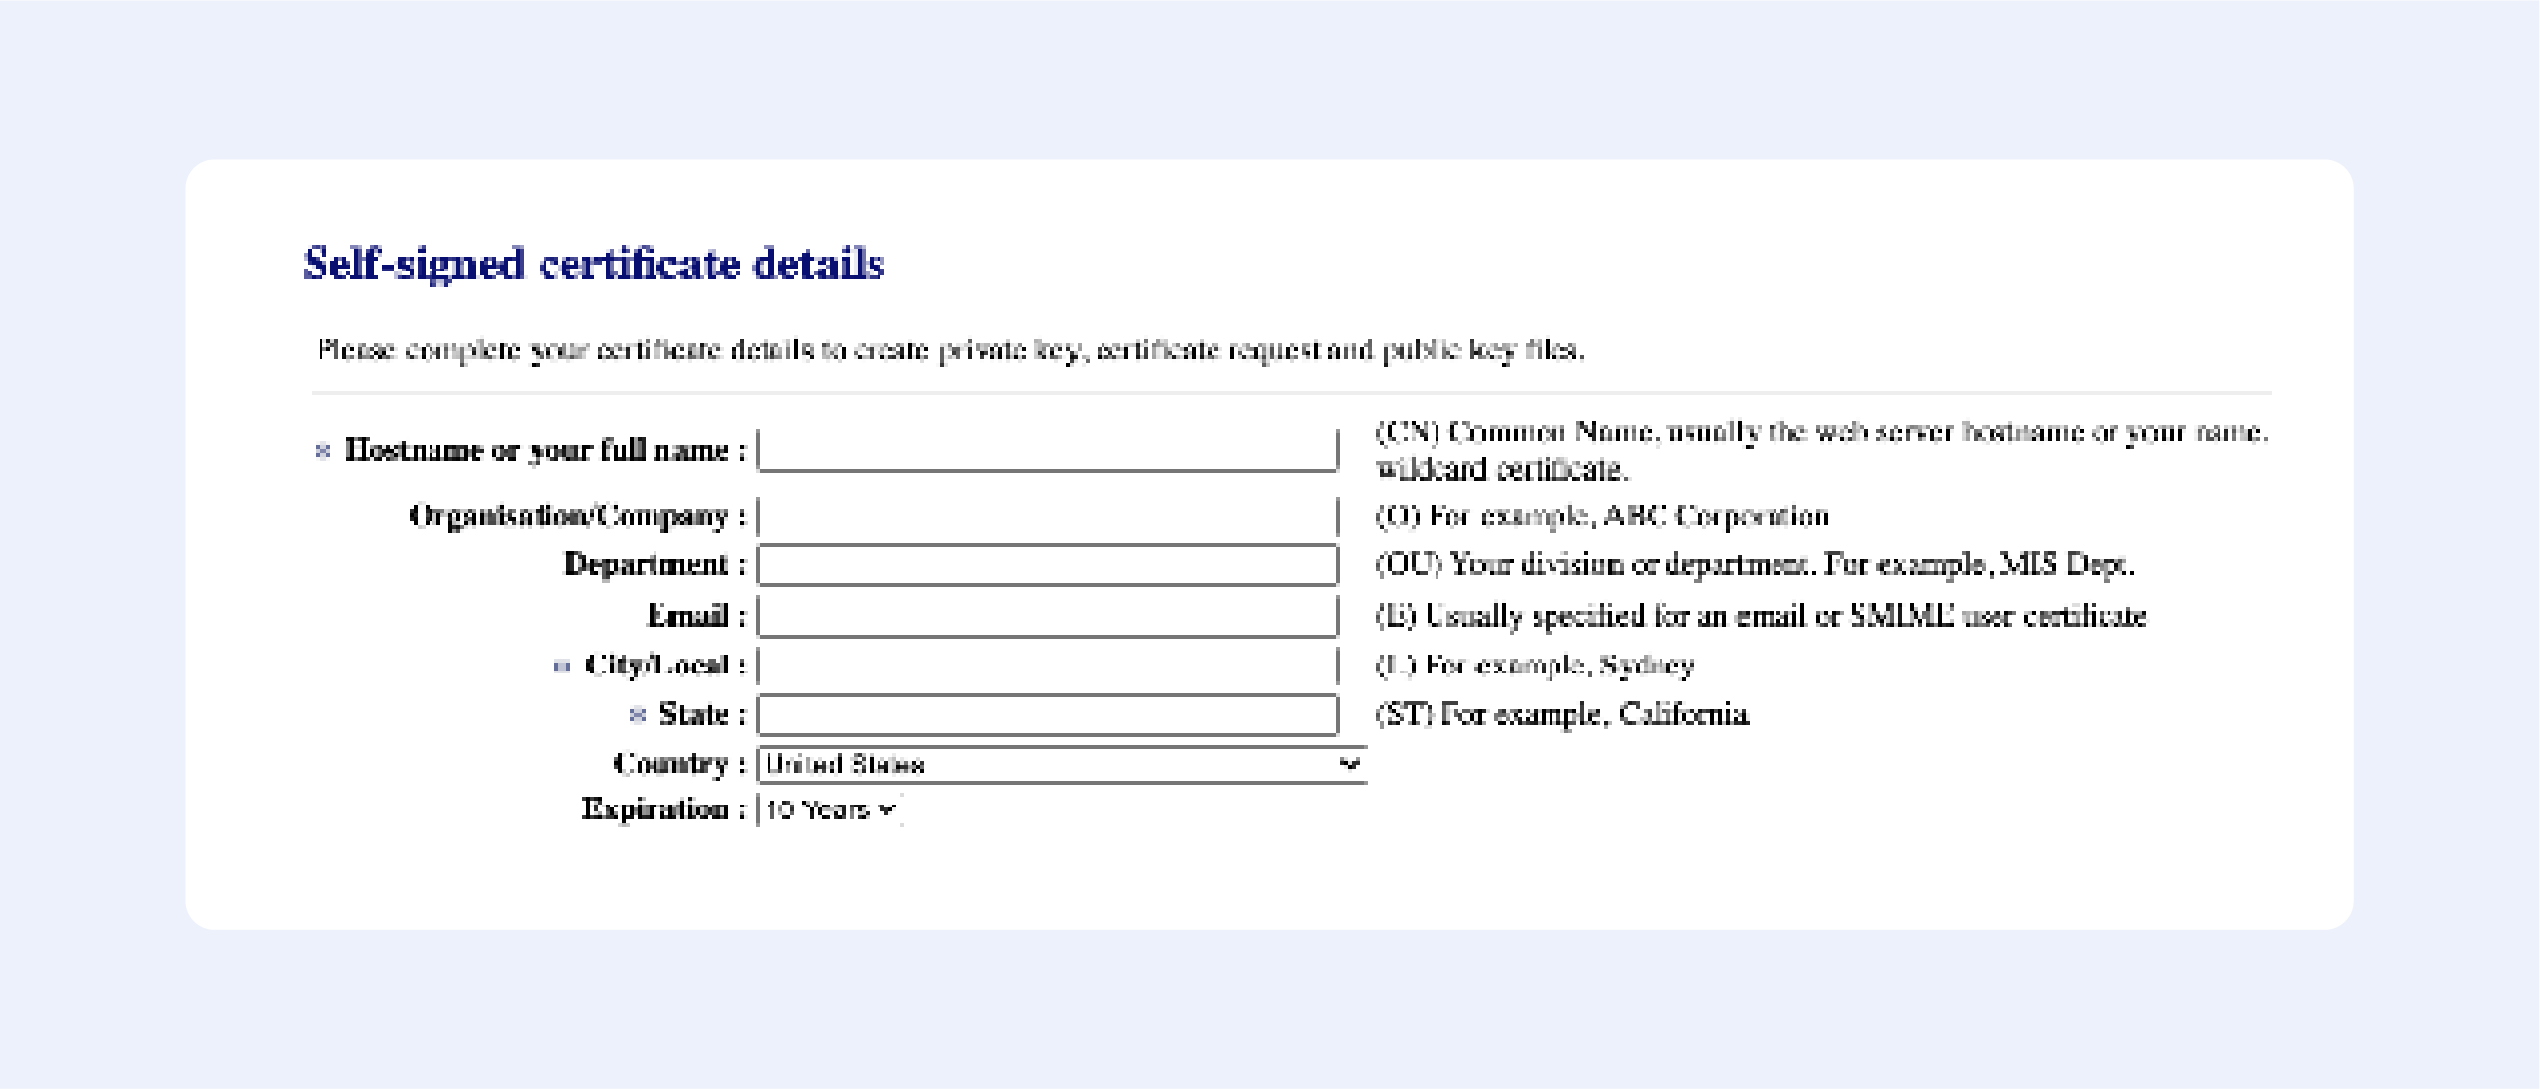
Press “Next”, then confirm your details, and get your certificate:
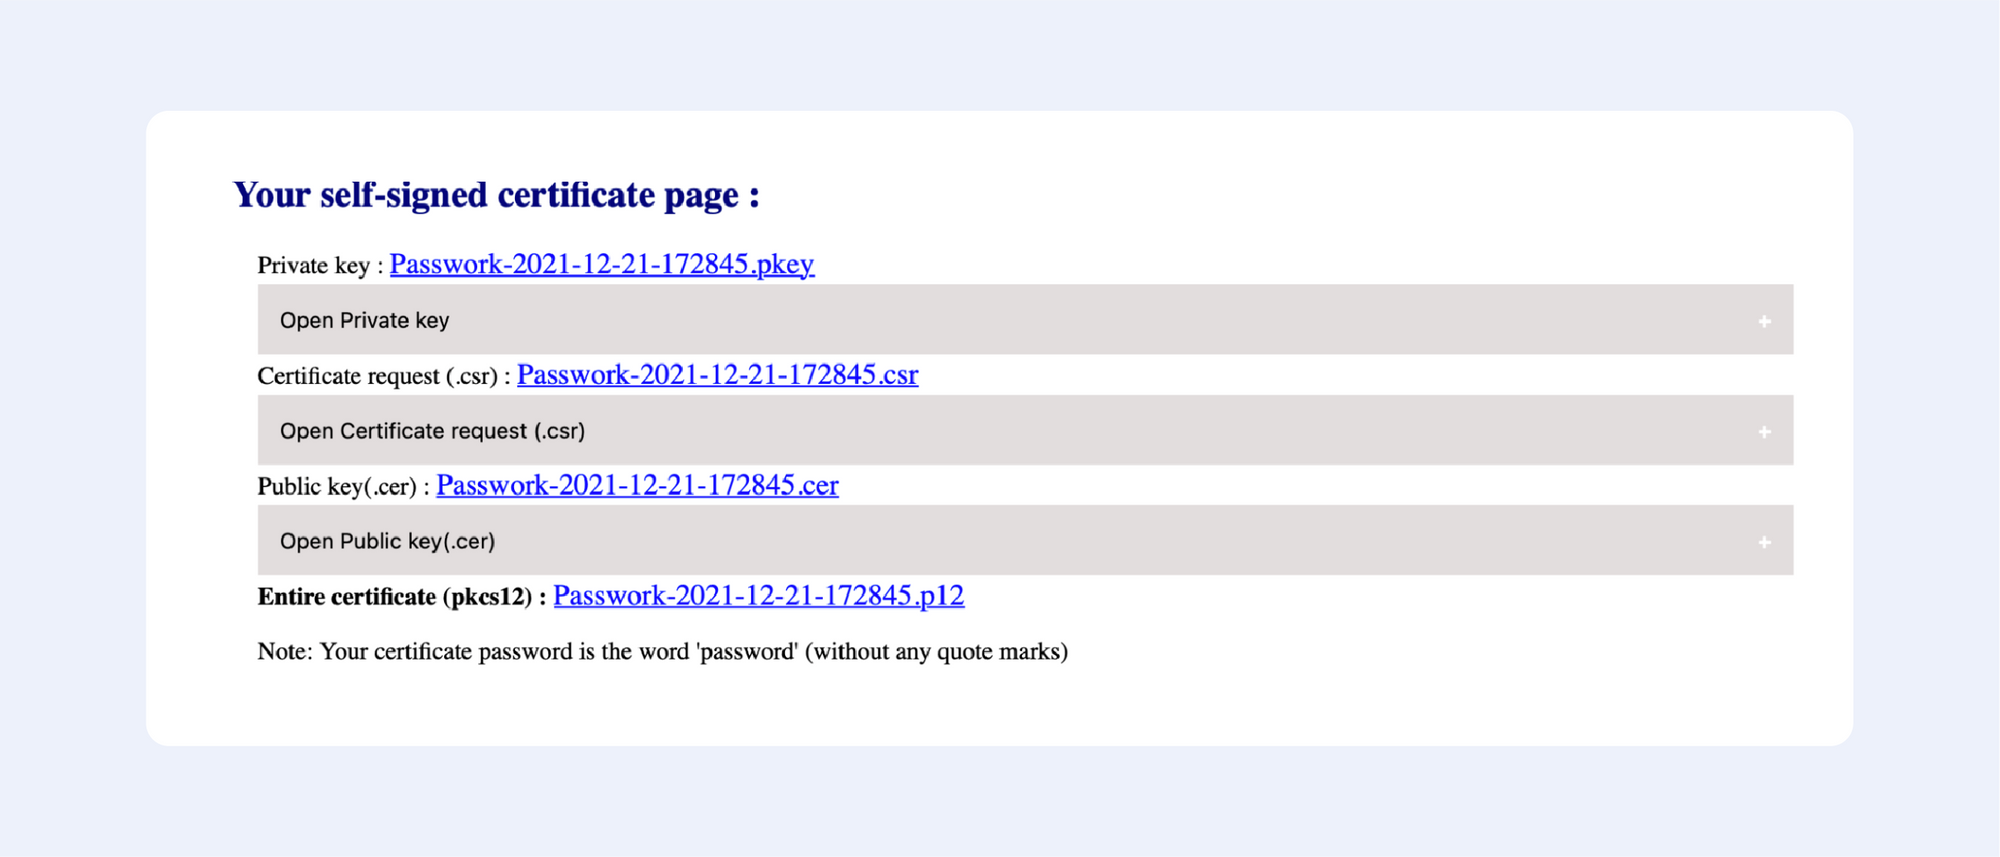
It’s that easy!
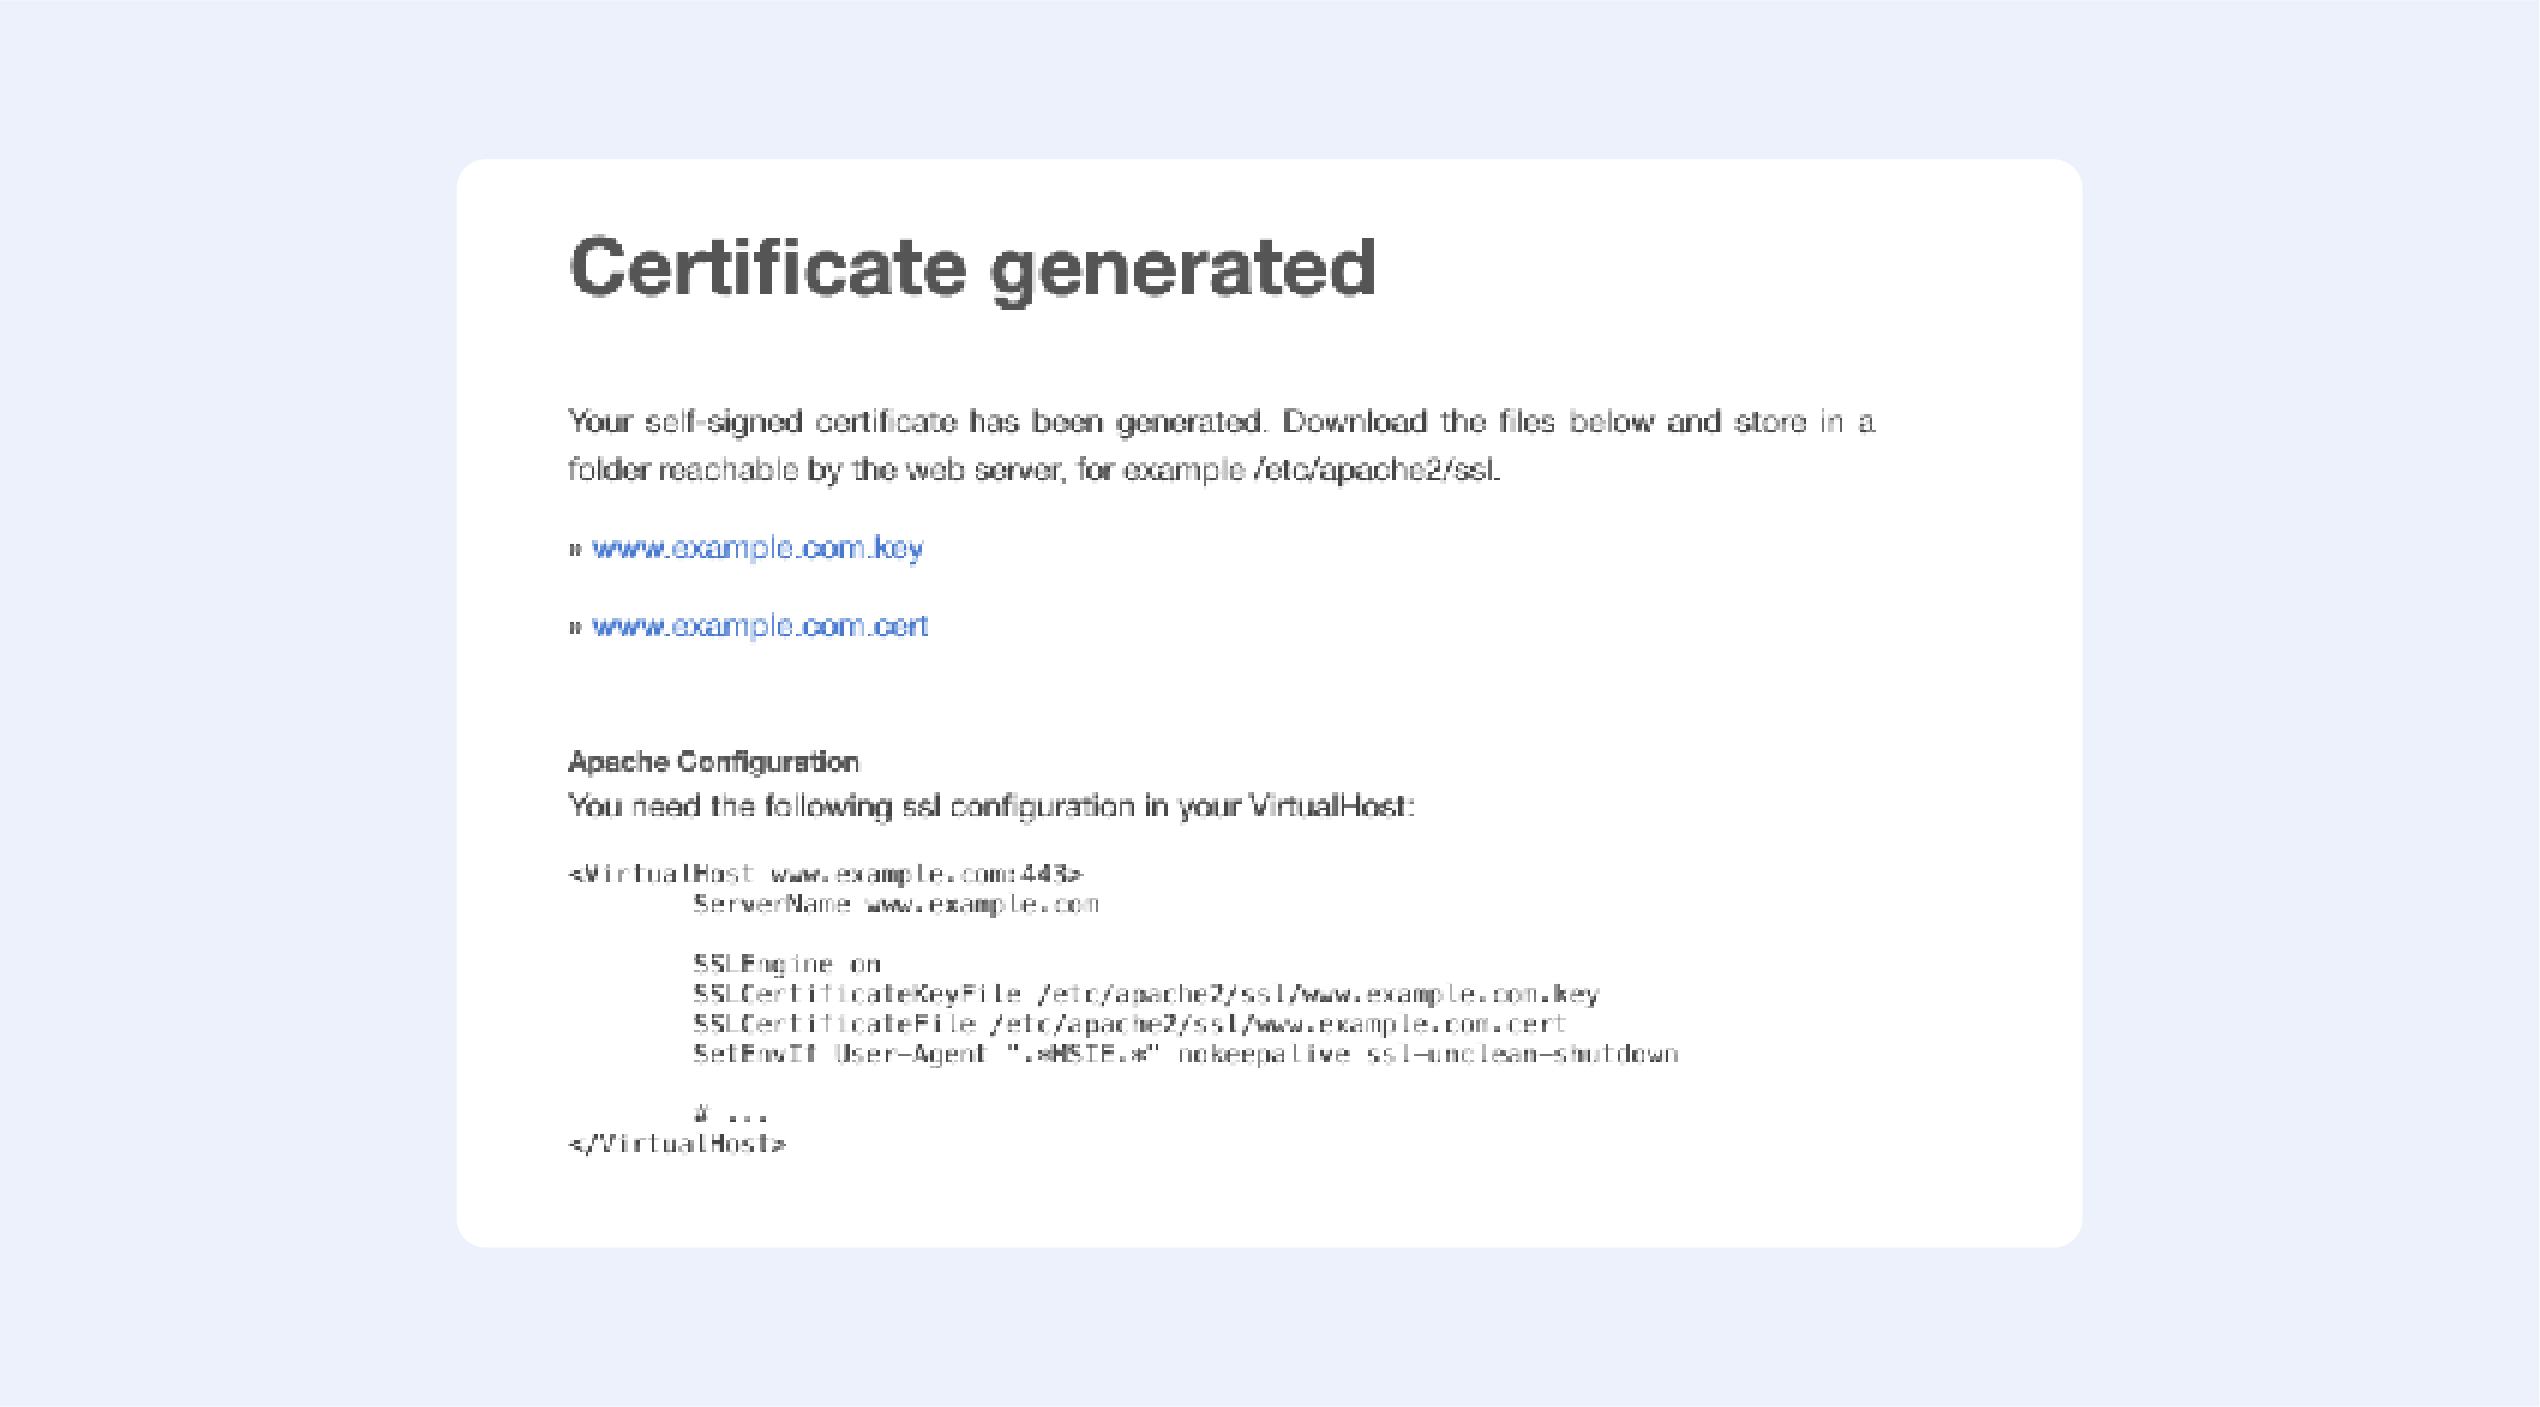
Сertificatetools.com
Among the online services that allow you to generate self-signed certificates, this one is the most advanced; just look at all available options to choose from:

Now let’s continue with offline solutions, that are a bit more advanced:
PowerShell 4.0
1. Press the Windows key, type Powershell. Right-click on PowerShell and select Run as Administrator.
2. Run the New-SelfsignedCertificate command, as shown below.
$cert = New-SelfSignedCertificate -certstorelocation
cert:localmachinemy -dnsname passwork.com
3. This will add the certificate to the locater store on your PC. Replace passwork.com with your domain name in the above command.
4. Next, create a password for your export file:
$pwd = ConvertTo-SecureString -String ‘password!’ -Force -AsPlainText5. Replace password with your own password.
6. Enter the following command to export the self-signed certificate:
$path = 'cert:localMachinemy' + $cert.thumbprint
Export-PfxCertificate -cert $path -FilePath
c:tempcert.pfx -Password $pwd
7. In the above command, replace c:temp with the directory where you want to export the file.
8. Import the exported file and deploy it for your project.
Use OpenSSL
1. Download the latest OpenSSL windows installer from a third-party source;
2. Run the installer. OpenSSL requires Microsoft Visual C++ to run. The installer will prompt you to install Visual C++ if it is already not installed;
3. Click Yes to install;
4. Run the OpenSSL installer again and select the installation directory;
5. Click Next;
6. Open Command Prompt and type OpenSSL to get an OpenSSL prompt.
The next step would be to generate a public/private key file pair.
1. Open Command Prompt and create a new directory on your C drive:
C: >cd Test2. Now go to the new directory:
C: Test>3. Now you need to type the path of the OpenSSL install directory followed by the RSA key algorithm:
C: Test>c:opensslbinopenssl genrsa -out privkey.pem 40964. Run the following command to split the generated file into separate private and public key files:
C: Test>c:opensslbinopenssl ssh-keygen -t rsa -b 4096 -f privkey.pemOnce you have the public/private key generated, follow the next set of steps to create a self-signed certificate file on Windows.
1. Go to the directory that you created earlier for the public/private key file:
C: Test>2. Enter the path of the OpenSSL install directory, followed by the self-signed certificate algorithm:
C: Test>c:opensslbinopenssl req -new -x509 -key privkey.pem -out cacert.pem -days 1093. Follow the on-screen instructions;
4. You need to enter information about your organization, region, and contact details to create a self-signed certificate.
We also have a detailed article on OpenSSL – it contains more in-depth instructions on generating self-signed certificates.
Using IIS
This is one of those hidden features that very few people know about.
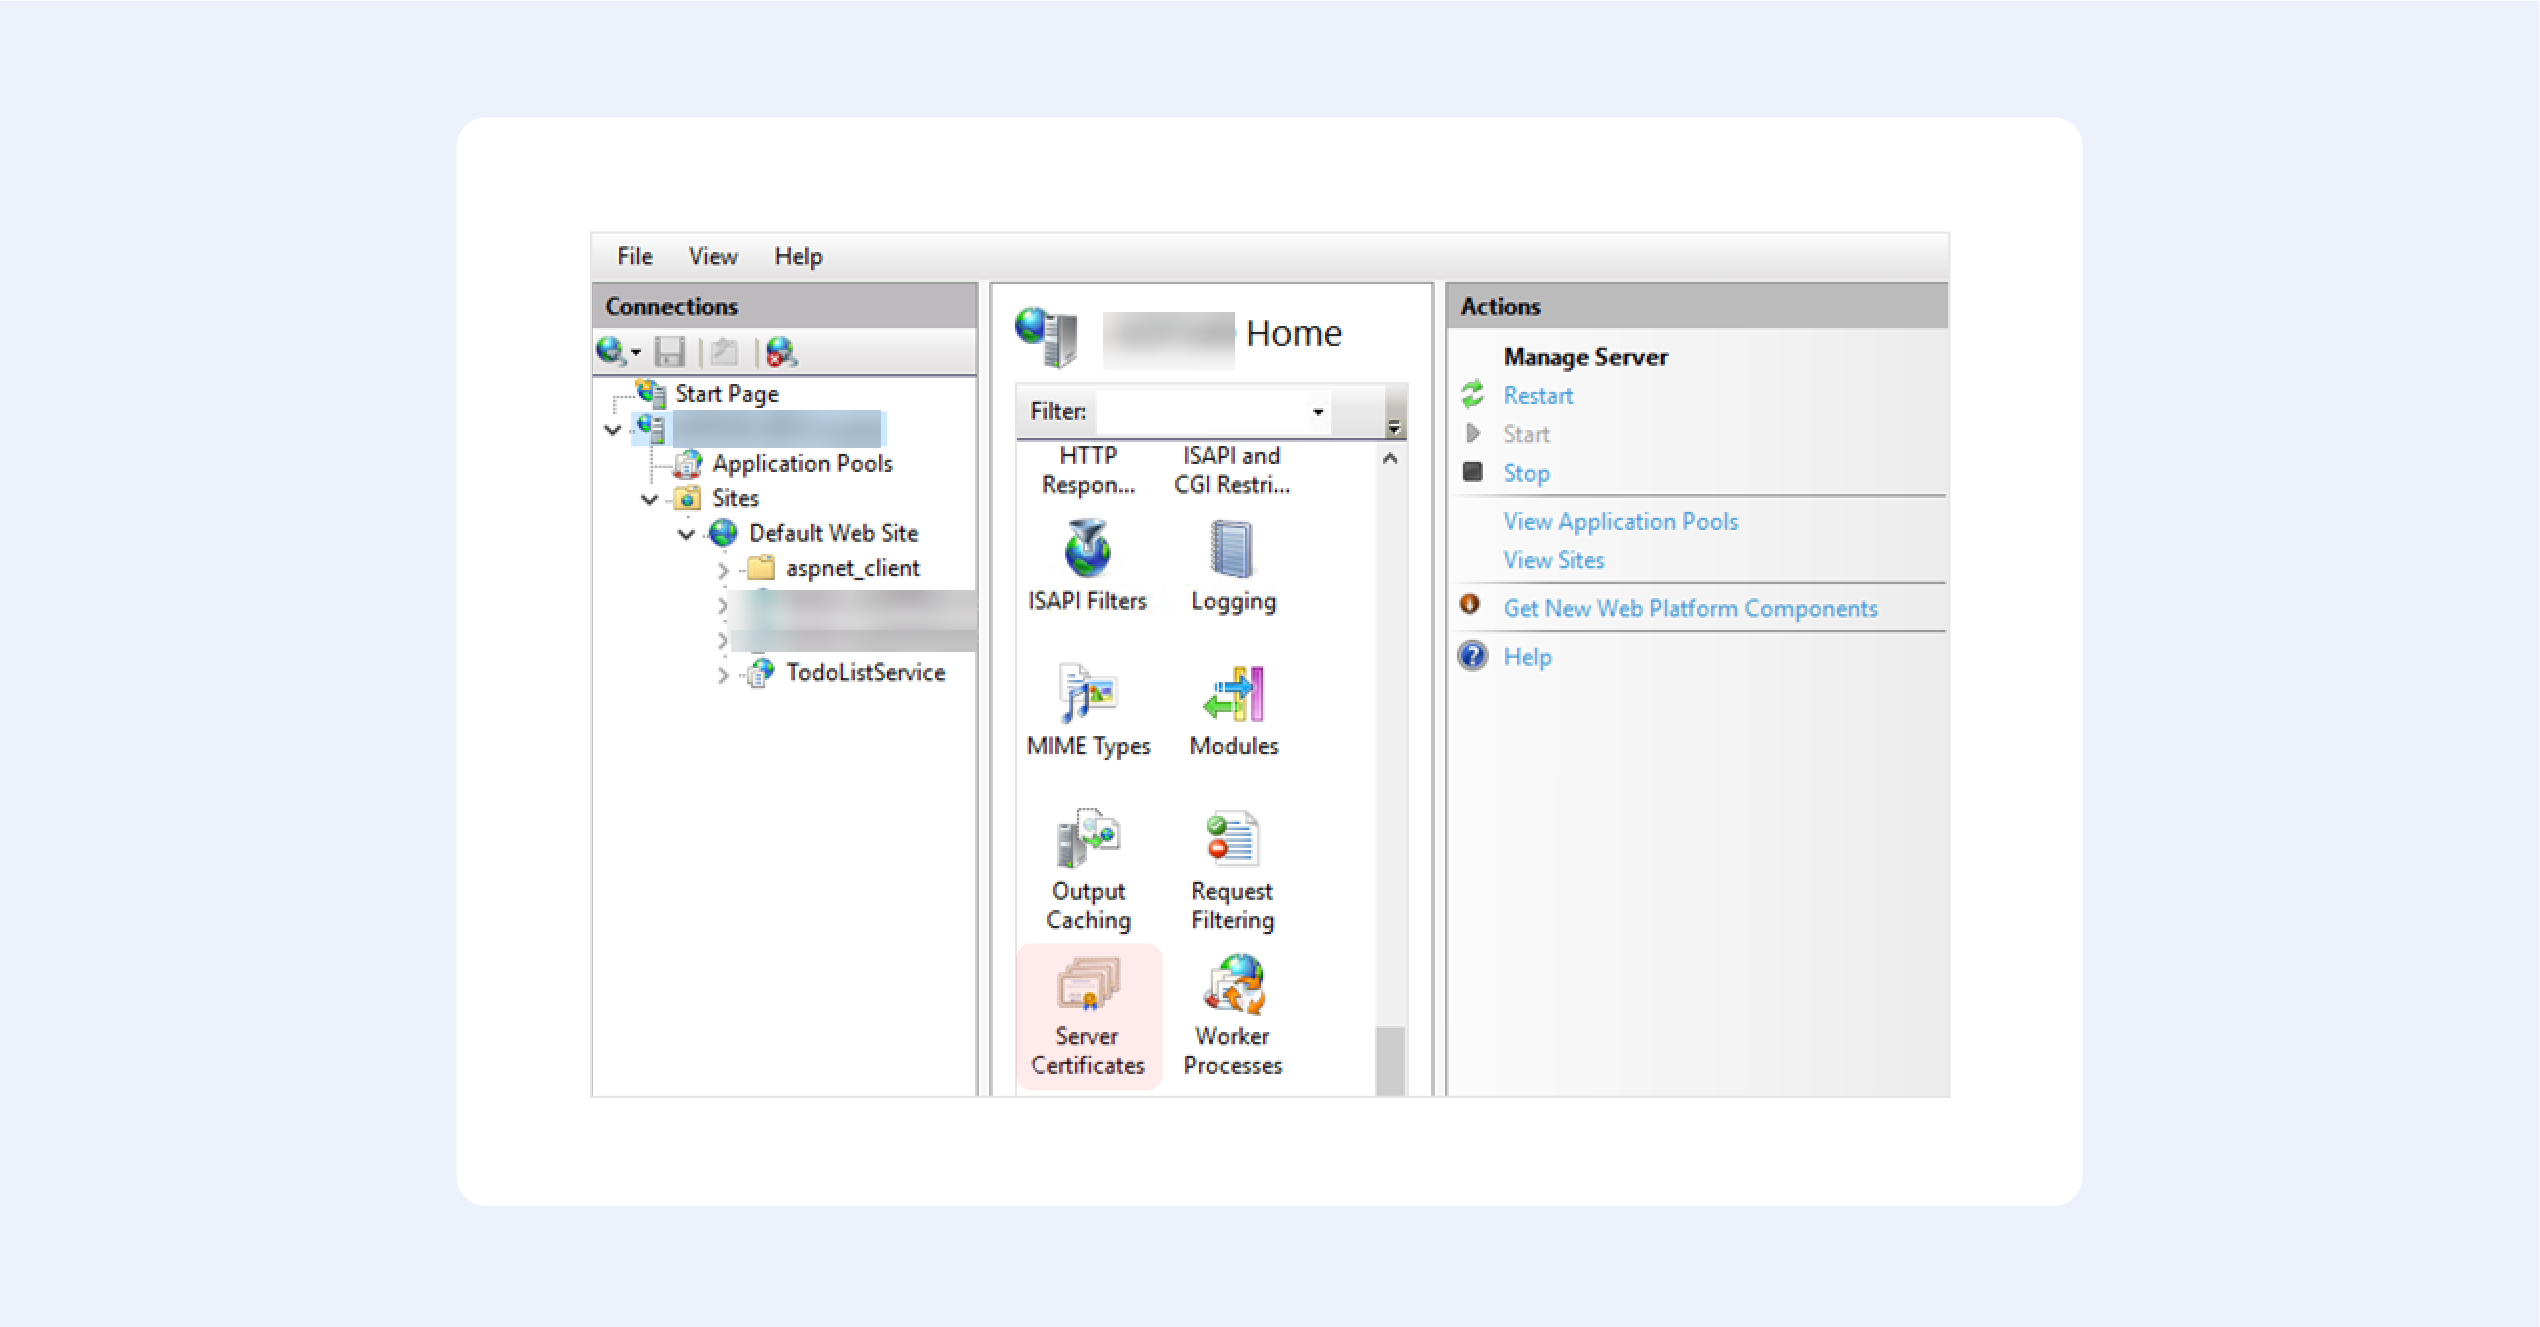
1. From the top-level in IIS Manager, select “Server Certificates”;
2. Then click the “Create” button on the right;
3. This will create a self-signed certificate, valid for a year with a private key. It will only work for “localhost”.
We hope this fruit bowl of options provides you with some choice in the matter. Creating your own self-signed certificate nowadays is trivial, but only until you begin to understand how they really work.
Our option of choice is, of course, OpenSSL — after all, it is an industry-standard.
How to: Installing Self-Signed CA Certificate in Windows Step 1: Open MMC on the machine that you are getting the warning. Step 2: Click on File -> Add/Remove Snap-in Step 3: Click on Certificates -> Add> Step 4: Click on User Account -> Finish.
Import the self-signed certificate to the client Windows computer. On the Windows computer, start MMC (mmc.exe). Add the Certificates snap-in for the computer account and manage certificates for the local computer. Import the self-signed certificate into Trusted Root Certification Authorities > Certificates.
How do I create a self signed certificate in Windows?
Click Control Panel. The Control Panel window opens. The Programs screen appears. The Windows Features window opens. Locate and select the checkbox Internet Information Services. The search results appear. The Server Certificates window opens. Create Self-Signed Certificate window opens.
How do I install a self signed certificate in Trusted Root Certification Authorities?
Select Computer account, and then click Next. In the Select Computer window that opens, click Finish. In the tree pane, select Certificates (Local Computer) > Trusted Root Certification Authorities, right-click Certificates, and then select All Tasks > Import. The Certificate Import Wizard starts.
Do we need to install self-signed certificate?
Self signed certificates or any type of certificate that isn’t universally recognized (such as certificates issued by a public certificate authority are) must be added to the trusted root store of the servers that host the Platform Server. This will allow to successfully establish the trust relationship.
What does a self-signed certificate do?
In cryptography and computer security, a self-signed certificate is a security certificate that is not signed by a certificate authority (CA). Website visitors who bypass such warnings are exposed to a risk that a third party could intercept traffic to the website using the third-party’s own self-signed certificate.
How do I get a self-signed certificate?
Procedure Write down the Common Name (CN) for your SSL Certificate. Run the following OpenSSL command to generate your private key and public certificate. Review the created certificate: Combine your key and certificate in a PKCS#12 (P12) bundle: Validate your P2 file. In the Cloud Manager, click. Select TLS.
Can I generate my own SSL certificate?
Creating a Certificate Signing Request (CSR) If you need an official SSL certificate, you send it to an official certificate authority (CA). They use the CSR to generate an official certificate. We, however, will use this request to generate a certificate ourselves, a self-signed certificate.
How can I tell if a Windows certificate is self signed?
msc in the windows search bar and choosing “Run as administrator.” Expand both the “Personal” and “Trusted Root Certification” directories. In the Personal Certificates folder, you will find both the CA and the Self-Signed Certificate that we created in the previous steps.
How do I change a self-signed certificate to trusted?
On the XTAM installation host server open the file {XTAM_HOME}/web/conf/catalina. Scroll down to the section labeled # SSL Certificate. Enter the path to your certificate for the parameter xtam.cert.path= Enter the password for your certificate in the parameter xtam.cert.password= Save and close this file.
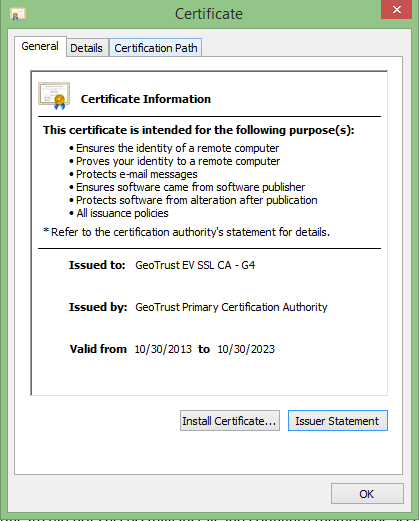
How do you get Chrome to accept a self-signed certificate?
Navigate to the site with the cert you want to trust, and click through the usual warnings for untrusted certificates. In the address bar, right click on the red warning triangle and “Not secure” message and, from the resulting menu, select “Certificate” to show the certificate.
Can self-signed certificate be trusted?
However, when properly and appropriately used, a self-signed certificate provides acceptable security in some situations. For many uses of public key infrastructure (PKI), the correct method for signing a certificate is to use a well-known, trusted third party, a certificate authority (CA).
How long can a self-signed certificate last?
For a self-signed certificate, there is no revocation, so you can make the certificate valid for 20 years.
What is the difference between self-signed certificate and trusted certificate?
While Self-Signed certificates do offer encryption, they offer no authentication and that’s going to be a problem with the browsers. Trusted CA Signed SSL Certificates, on the other hand, do offer authentication and that, in turn, allows them to avoid those pesky browser warnings and work as an SSL Certificate should.
What is the problem with self-signed certificate?
Compromised self-signed certificates can pose many security challenges, since attackers can spoof the identity of the victim. Unlike CA-issued certificates, self-signed certificates cannot be revoked. The inability to quickly find and revoke private key associated with a self-signed certificate creates serious risk.
How do I fix a self signed certificate error?
How to Fix SSL Certificate Error Diagnose the problem with an online tool. Install an intermediate certificate on your web server. Generate a new Certificate Signing Request. Upgrade to a dedicated IP address. Get a wildcard SSL certificate. Change all URLS to HTTPS. Renew your SSL certificate.
Where is self signed certificate stored?
While at this point the certificate is ready to use, it is stored only in the personal certificate store on the server. It is a best practice to also have this certificate set in the trusted root as well.
What is SSL certificate Cannot be trusted?
The certificate not trusted error indicates that the SSL certificate is not signed or approved by a company that the browser trusts. This occurs most often for one of the following reasons: The web site is using a self-signed certificate.
How do I create a self-signed TLS certificate?
How to generate self-signed TLS certificates Create basic folder hierarchy. Create a custom openssl. Create CA certificate and private key. Generate a certificate signing request (CSR) Sign the certificate. Copy the certificate to Aerospike directory. Copy the certificate to other nodes. Define tls-name in aerospike.
How do I get a TLS certificate?
Building an SSL/TLS certificate is as easy as one-two-three-four-five. Determine the number of domains that need to be secured. Decide the level of identity assurance you want to provide to website visitors. Set aside a budget. Generate a certificate signing request, CSR.
How do I create a trusted certificate?
Windows 10 — Chrome, IE11, and Edge Double-click on the certificate ( ca. Click on the “Install Certificate” button. Select whether you want to store it at the user or machine level. Click “Next.” Select “Place all certificates in the following store.” Click “Browse.” Select “Trusted Root Certification Authorities.”.
![]()
Introduction
This document will list how to install Self-Signed SSL certificates on Windows servers.
-
We will be using the tool OpenSSL for creating a Self-Signed SSL certificate on a windows machine.
-
The OpenSSL is an open-source library that provides cryptographic functions and implementations.
-
OpenSSL is a defacto library for cryptography-related operations and is used by a lot of different applications.
-
OpenSSL is provided as a library and application.
-
OpenSSL provides functions and features like SSL/TLS, SHA1, Encryption, Decryption, AES, etc.
Before proceeding with the SSL installation Load the following modules for SSL in httpd.conf
LoadModule ssl_module modules/mod_ssl.so
Include conf/extra/httpd-ssl.conf
LoadModule socache_shmcb_module modules/mod_socache_shmcb.so
Setting up OpenSSL for Windows
With the below commands we can install OpenSSL on the windows server:
Open SSL is not available for windows in .exe format the easiest way to install is by using a third-party software CHOCOLATEY.
Install “Chocolatey” a package management software for windows by using the below command.
Open Powershell.exe with Administrator Privilege, Paste the below command and hit enter
Set-ExecutionPolicy Bypass -Scope Process -Force; [System.Net.ServicePointManager]::SecurityProtocol = [System.Net.ServicePointManager]::SecurityProtocol -bor 3072; iex ((New-Object System.Net.WebClient).DownloadString('https://community.chocolatey.org/install.ps1'))
It may ask for permission please select yes for all and when the installation is over then enter the below command.
Open the command prompt with Administrator privilege and enter the below command to install OpenSSL.
It will prompt and ask for ‘yes’ give ‘yes’ and wait till the installation gets done.
Steps
- Generate a private key for the CA (Certificate Authority).
- Generate a certificate signing request for the CA.
- Generate a root certificate.
- Create a private key for the certificate.
- Create a certificate signing request.
- Create a certificate and sign it with the CA private key.
- Compiling the created certificate and key file as a .pfx file.
- Installing the SSL certificate.
Generate a private key for the CA
Create a directory named SSL under C directory like C:\SSL, the following commands will create the SSL files those files will be saved in the directory which we create.
- Open Command Prompt from the SSL directory that we created,
- Run the below command to create a Private key for the rootCA this command will save a file name faveoroot.key in the SSL folder.
openssl ecparam -out faveoroot.key -name prime256v1 -genkey
Generate a certificate signing request for the CA
- From the command prompt run the below command which will create a CSR (certificate signing request) for the Root CA.
openssl req -new -sha256 -key faveoroot.key -out faveoroot.csr
-
The above command will ask for the below information if needed you can provide them or you can just hit enter and skip them but it is recommended to give the meaningful details.
- Country Name.
- State Name.
- Organization.
- Common name (Leave this as blank or provide the company domain not the faveo domain).
- Email address.
-
The above command will save a file in the name faveoroot.csr in the SSL directory.
Generate a root certificate
- The below command will create the Root CA certificate which we will use to sign the SSL certificates.
openssl x509 -req -sha256 -days 3650 -in faveoroot.csr -signkey faveoroot.key -out faveorootCA.crt
- The above command will create a file and save it as faveorootCA.crt in the SSL directory.
Create a private key for the certificate
- The below command will create a private key file for the server SSL certificate.
openssl ecparam -out private.key -name prime256v1 -genkey
- The above command will save a key file with the name private.key for the server SSL certificate.
Create a certificate signing request for the server SSL
- The below command will create a Certificate Signing Request for the Server SSL.
openssl req -new -sha256 -key private.key -out faveolocal.csr
-
It will ask for the details below we should give the details as shown below.
- Country Name.
- State Name.
- Organization.
- Common name (Here please provide the Domain or the IP through which you need to access faveo).
- Email address.
-
The rest can be left blank and after this is completed it will create the CSR file and save it with the name faveolocal.csr in the SSL directory.
Create a certificate and sign it with the CA private key
- The below command will create the server SSL certificate which is signed by the Root CA that we created above.
openssl x509 -req -in faveolocal.csr -CA faveorootCA.crt -CAkey faveoroot.key -CAcreateserial -out faveolocal.crt -days 3650 -sha256
- The above command will create a server SSL file and save it in the name faveolocal.crt, this certificate will be valid for 3650 days which is ten years.
Compiling the created certificate and key file as .pfx file
- As windows need the certificate file in .pfx format which will contain the both certificate and the key file and the CA file for the installation, so we need to convert the created files to .pfx format, this can be done with the below command.
openssl pkcs12 -export -out cert.pfx -inkey private.key -in faveolocal.crt -certfile faveorootCA.crt
- The above command will create a .pfx file with the name cert.pfx in the SSL directory.
Installing the SSL certificate
-
The installation of the SSL certificate is simple in windows machines we need to double click on the cert.pfx file that we created from the above step which will open the certificate installation wizard.

-
Click on install certificates and all the settings to be left default and once the installation is successful it will prompt the installation is successful.
-
Once the Certificate is installed we need to add the faveorootCA.crt file content to the cacert.pem file which will be in the below location:
- After adding that we need to edit the host file which will be in this location
(C:\Windows\System32\drivers\etc)
- And add the below line by replacing the ‘yourdomain’ with the domain that we used to create the server SSL certificate.
- if the above is done we need to edit the php.ini file which is found inside the PHP root directory. Uncomment and add the location of cacert.pem to “openssl.cafile” like.
openssl.cafile = "C:\php\cacert.pem"
- Edit the
C:\Apache24\conf\extra\httpd-ssl.conffile, search for <VirtualHost _default_:443> - Turn SSL Engine on & add the certificate paths respectively as shown below:
SSLEngine on
SSLCertificateFile "C:\SSL\faveolocal.crt"
SSLCertificateKeyFile "C:\SSL\private.key"
SSLCACertificateFile "C:\SSL\faveorootCA.crt"
The certificate is installed successfully, since this is a self-signed certificate the browser will show not valid since the faveo consider’s the server-side SSL certificates in the probe page Domain SSL will be valid.