Usage#
Unix/macOS
python -m pip install [options] <requirement specifier> [package-index-options] ...
python -m pip install [options] -r <requirements file> [package-index-options] ...
python -m pip install [options] [-e] <vcs project url> ...
python -m pip install [options] [-e] <local project path> ...
python -m pip install [options] <archive url/path> ...
Windows
py -m pip install [options] <requirement specifier> [package-index-options] ...
py -m pip install [options] -r <requirements file> [package-index-options] ...
py -m pip install [options] [-e] <vcs project url> ...
py -m pip install [options] [-e] <local project path> ...
py -m pip install [options] <archive url/path> ...
Description#
Install packages from:
-
PyPI (and other indexes) using requirement specifiers.
-
VCS project urls.
-
Local project directories.
-
Local or remote source archives.
pip also supports installing from “requirements files”, which provide
an easy way to specify a whole environment to be installed.
Overview#
pip install has several stages:
-
Identify the base requirements. The user supplied arguments are processed
here. -
Resolve dependencies. What will be installed is determined here.
-
Build wheels. All the dependencies that can be are built into wheels.
-
Install the packages (and uninstall anything being upgraded/replaced).
Note that pip install prefers to leave the installed version as-is
unless --upgrade is specified.
Argument Handling#
When looking at the items to be installed, pip checks what type of item
each is, in the following order:
-
Project or archive URL.
-
Local directory (which must contain a
setup.py, or pip will report
an error). -
Local file (a sdist or wheel format archive, following the naming
conventions for those formats). -
A requirement, as specified in PEP 440.
Each item identified is added to the set of requirements to be satisfied by
the install.
Working Out the Name and Version#
For each candidate item, pip needs to know the project name and version. For
wheels (identified by the .whl file extension) this can be obtained from
the filename, as per the Wheel spec. For local directories, or explicitly
specified sdist files, the setup.py egg_info command is used to determine
the project metadata. For sdists located via an index, the filename is parsed
for the name and project version (this is in theory slightly less reliable
than using the egg_info command, but avoids downloading and processing
unnecessary numbers of files).
Any URL may use the #egg=name syntax (see VCS Support) to
explicitly state the project name.
Satisfying Requirements#
Once pip has the set of requirements to satisfy, it chooses which version of
each requirement to install using the simple rule that the latest version that
satisfies the given constraints will be installed (but see here
for an exception regarding pre-release versions). Where more than one source of
the chosen version is available, it is assumed that any source is acceptable
(as otherwise the versions would differ).
Obtaining information about what was installed#
The install command has a --report option that will generate a JSON report of what
pip has installed. In combination with the --dry-run and --ignore-installed it
can be used to resolve a set of requirements without actually installing them.
The report can be written to a file, or to standard output (using --report - in
combination with --quiet).
The format of the JSON report is described in Installation Report.
Installation Order#
Note
This section is only about installation order of runtime dependencies, and
does not apply to build dependencies (those are specified using PEP 518).
As of v6.1.0, pip installs dependencies before their dependents, i.e. in
“topological order.” This is the only commitment pip currently makes related
to order. While it may be coincidentally true that pip will install things in
the order of the install arguments or in the order of the items in a
requirements file, this is not a promise.
In the event of a dependency cycle (aka “circular dependency”), the current
implementation (which might possibly change later) has it such that the first
encountered member of the cycle is installed last.
For instance, if quux depends on foo which depends on bar which depends on baz,
which depends on foo:
Unix/macOS
$ python -m pip install quux
...
Installing collected packages baz, bar, foo, quux

$ python -m pip install bar
...
Installing collected packages foo, baz, bar
Windows
C:\> py -m pip install quux
...
Installing collected packages baz, bar, foo, quux

C:\> py -m pip install bar
...
Installing collected packages foo, baz, bar
Prior to v6.1.0, pip made no commitments about install order.
The decision to install topologically is based on the principle that
installations should proceed in a way that leaves the environment usable at each
step. This has two main practical benefits:
-
Concurrent use of the environment during the install is more likely to work.
-
A failed install is less likely to leave a broken environment. Although pip
would like to support failure rollbacks eventually, in the mean time, this is
an improvement.
Although the new install order is not intended to replace (and does not replace)
the use of setup_requires to declare build dependencies, it may help certain
projects install from sdist (that might previously fail) that fit the following
profile:
-
They have build dependencies that are also declared as install dependencies
usinginstall_requires. -
python setup.py egg_infoworks without their build dependencies being
installed. -
For whatever reason, they don’t or won’t declare their build dependencies using
setup_requires.
Requirements File Format
This section has been moved to Requirements File Format.
Requirement Specifiers
This section has been moved to Requirement Specifiers.
Per-requirement Overrides
This is now covered in Requirements File Format.
Pre-release Versions#
Starting with v1.4, pip will only install stable versions as specified by
pre-releases by default. If a version cannot be parsed as a compliant PEP 440
version then it is assumed to be a pre-release.
If a Requirement specifier includes a pre-release or development version
(e.g. >=0.0.dev0) then pip will allow pre-release and development versions
for that requirement. This does not include the != flag.
The pip install command also supports a —pre flag
that enables installation of pre-releases and development releases.
VCS Support
This is now covered in VCS Support.
Finding Packages#
pip searches for packages on PyPI using the
HTTP simple interface,
which is documented here
and there.
pip offers a number of package index options for modifying how packages are
found.
pip looks for packages in a number of places: on PyPI (if not disabled via
--no-index), in the local filesystem, and in any additional repositories
specified via --find-links or --index-url. There is no ordering in
the locations that are searched. Rather they are all checked, and the “best”
match for the requirements (in terms of version number — see PEP 440 for
details) is selected.
See the pip install Examples.
SSL Certificate Verification
This is now covered in HTTPS Certificates.
Caching
This is now covered in Caching.
Wheel Cache
This is now covered in Caching.
Hash checking mode
This is now covered in Secure installs.
Local Project Installs
This is now covered in Local project installs.
Editable installs
This is now covered in Local project installs.
Build System Interface
This is now covered in Build System Interface.
Options#
- -r, —requirement <file>#
-
Install from the given requirements file. This option can be used multiple times.
- -c, —constraint <file>#
-
Constrain versions using the given constraints file. This option can be used multiple times.
- —no-deps#
-
Don’t install package dependencies.
- —pre#
-
Include pre-release and development versions. By default, pip only finds stable versions.
- -e, —editable <path/url>#
-
Install a project in editable mode (i.e. setuptools “develop mode”) from a local project path or a VCS url.
- —dry-run#
-
Don’t actually install anything, just print what would be. Can be used in combination with —ignore-installed to ‘resolve’ the requirements.
- -t, —target <dir>#
-
Install packages into <dir>. By default this will not replace existing files/folders in <dir>. Use —upgrade to replace existing packages in <dir> with new versions.
- —platform <platform>#
-
Only use wheels compatible with <platform>. Defaults to the platform of the running system. Use this option multiple times to specify multiple platforms supported by the target interpreter.
- —python-version <python_version>#
-
The Python interpreter version to use for wheel and “Requires-Python”
compatibility checks. Defaults to a version derived from the running
interpreter. The version can be specified using up to three dot-separated
integers (e.g. “3” for 3.0.0, “3.7” for 3.7.0, or “3.7.3”). A major-minor
version can also be given as a string without dots (e.g. “37” for 3.7.0).
- —implementation <implementation>#
-
Only use wheels compatible with Python implementation <implementation>, e.g. ‘pp’, ‘jy’, ‘cp’, or ‘ip’. If not specified, then the current interpreter implementation is used. Use ‘py’ to force implementation-agnostic wheels.
- —abi <abi>#
-
Only use wheels compatible with Python abi <abi>, e.g. ‘pypy_41’. If not specified, then the current interpreter abi tag is used. Use this option multiple times to specify multiple abis supported by the target interpreter. Generally you will need to specify —implementation, —platform, and —python-version when using this option.
- —user#
-
Install to the Python user install directory for your platform. Typically ~/.local/, or %APPDATA%Python on Windows. (See the Python documentation for site.USER_BASE for full details.)
- —root <dir>#
-
Install everything relative to this alternate root directory.
- —prefix <dir>#
-
Installation prefix where lib, bin and other top-level folders are placed. Note that the resulting installation may contain scripts and other resources which reference the Python interpreter of pip, and not that of
--prefix. See also the--pythonoption if the intention is to install packages into another (possibly pip-free) environment.
- —src <dir>#
-
Directory to check out editable projects into. The default in a virtualenv is “<venv path>/src”. The default for global installs is “<current dir>/src”.
- -U, —upgrade#
-
Upgrade all specified packages to the newest available version. The handling of dependencies depends on the upgrade-strategy used.
- —upgrade-strategy <upgrade_strategy>#
-
Determines how dependency upgrading should be handled [default: only-if-needed]. “eager” — dependencies are upgraded regardless of whether the currently installed version satisfies the requirements of the upgraded package(s). “only-if-needed” — are upgraded only when they do not satisfy the requirements of the upgraded package(s).
- —force-reinstall#
-
Reinstall all packages even if they are already up-to-date.
- -I, —ignore-installed#
-
Ignore the installed packages, overwriting them. This can break your system if the existing package is of a different version or was installed with a different package manager!
- —ignore-requires-python#
-
Ignore the Requires-Python information.
- —no-build-isolation#
-
Disable isolation when building a modern source distribution. Build dependencies specified by PEP 518 must be already installed if this option is used.
- —use-pep517#
-
Use PEP 517 for building source distributions (use —no-use-pep517 to force legacy behaviour).
- —check-build-dependencies#
-
Check the build dependencies when PEP517 is used.
- —break-system-packages#
-
Allow pip to modify an EXTERNALLY-MANAGED Python installation
- -C, —config-settings <settings>#
-
Configuration settings to be passed to the PEP 517 build backend. Settings take the form KEY=VALUE. Use multiple —config-settings options to pass multiple keys to the backend.
- —global-option <options>#
-
Extra global options to be supplied to the setup.py call before the install or bdist_wheel command.
- —compile#
-
Compile Python source files to bytecode
- —no-compile#
-
Do not compile Python source files to bytecode
- —no-warn-script-location#
-
Do not warn when installing scripts outside PATH
- —no-warn-conflicts#
-
Do not warn about broken dependencies
- —no-binary <format_control>#
-
Do not use binary packages. Can be supplied multiple times, and each time adds to the existing value. Accepts either “:all:” to disable all binary packages, “:none:” to empty the set (notice the colons), or one or more package names with commas between them (no colons). Note that some packages are tricky to compile and may fail to install when this option is used on them.
- —only-binary <format_control>#
-
Do not use source packages. Can be supplied multiple times, and each time adds to the existing value. Accepts either “:all:” to disable all source packages, “:none:” to empty the set, or one or more package names with commas between them. Packages without binary distributions will fail to install when this option is used on them.
- —prefer-binary#
-
Prefer older binary packages over newer source packages.
- —require-hashes#
-
Require a hash to check each requirement against, for repeatable installs. This option is implied when any package in a requirements file has a —hash option.
- —progress-bar <progress_bar>#
-
Specify whether the progress bar should be used [on, off] (default: on)
- —root-user-action <root_user_action>#
-
Action if pip is run as a root user. By default, a warning message is shown.
- —report <file>#
-
Generate a JSON file describing what pip did to install the provided requirements. Can be used in combination with —dry-run and —ignore-installed to ‘resolve’ the requirements. When — is used as file name it writes to stdout. When writing to stdout, please combine with the —quiet option to avoid mixing pip logging output with JSON output.
- —no-clean#
-
Don’t clean up build directories.
- -i, —index-url <url>#
-
Base URL of the Python Package Index (default https://pypi.org/simple). This should point to a repository compliant with PEP 503 (the simple repository API) or a local directory laid out in the same format.
-
Extra URLs of package indexes to use in addition to —index-url. Should follow the same rules as —index-url.
- —no-index#
-
Ignore package index (only looking at —find-links URLs instead).
- -f, —find-links <url>#
-
If a URL or path to an html file, then parse for links to archives such as sdist (.tar.gz) or wheel (.whl) files. If a local path or file:// URL that’s a directory, then look for archives in the directory listing. Links to VCS project URLs are not supported.
Examples#
-
Install
SomePackageand its dependencies from PyPI using Requirement SpecifiersUnix/macOS
python -m pip install SomePackage            # latest version
python -m pip install 'SomePackage==1.0.4'   # specific version
python -m pip install 'SomePackage>=1.0.4'   # minimum version
Windows
py -m pip install SomePackage            # latest version
py -m pip install "SomePackage==1.0.4"   # specific version
py -m pip install "SomePackage>=1.0.4"   # minimum version
-
Install a list of requirements specified in a file. See the Requirements files.
Unix/macOS
python -m pip install -r requirements.txt
Windows
py -m pip install -r requirements.txt
-
Upgrade an already installed
SomePackageto the latest from PyPI.Unix/macOS
python -m pip install --upgrade SomePackage
Windows
py -m pip install --upgrade SomePackage
Note
This will guarantee an update to
SomePackageas it is a direct
requirement, and possibly upgrade dependencies if their installed
versions do not meet the minimum requirements ofSomePackage.
Any non-requisite updates of its dependencies (indirect requirements)
will be affected by the--upgrade-strategycommand. -
Install a local project in “editable” mode. See the section on Editable Installs.
Unix/macOS
python -m pip install -e .                # project in current directory
python -m pip install -e path/to/project  # project in another directory
Windows
py -m pip install -e .                 # project in current directory
py -m pip install -e path/to/project   # project in another directory
-
Install a project from VCS
Unix/macOS
python -m pip install 'SomeProject@git+https://git.repo/some_pkg.git@1.3.1'
Windows
py -m pip install "SomeProject@git+https://git.repo/some_pkg.git@1.3.1"
-
Install a project from VCS in “editable” mode. See the sections on VCS Support and Editable Installs.
Unix/macOS
python -m pip install -e 'git+https://git.repo/some_pkg.git#egg=SomePackage'          # from git
python -m pip install -e 'hg+https://hg.repo/some_pkg.git#egg=SomePackage'            # from mercurial
python -m pip install -e 'svn+svn://svn.repo/some_pkg/trunk/#egg=SomePackage'         # from svn
python -m pip install -e 'git+https://git.repo/some_pkg.git@feature#egg=SomePackage'  # from 'feature' branch
python -m pip install -e 'git+https://git.repo/some_repo.git#egg=subdir&subdirectory=subdir_path' # install a python package from a repo subdirectory
Windows
py -m pip install -e "git+https://git.repo/some_pkg.git#egg=SomePackage"          # from git
py -m pip install -e "hg+https://hg.repo/some_pkg.git#egg=SomePackage"            # from mercurial
py -m pip install -e "svn+svn://svn.repo/some_pkg/trunk/#egg=SomePackage"         # from svn
py -m pip install -e "git+https://git.repo/some_pkg.git@feature#egg=SomePackage"  # from 'feature' branch
py -m pip install -e "git+https://git.repo/some_repo.git#egg=subdir&subdirectory=subdir_path" # install a python package from a repo subdirectory
-
Install a package with extras.
Unix/macOS
python -m pip install 'SomePackage[PDF]'
python -m pip install 'SomePackage[PDF] @ git+https://git.repo/SomePackage@main#subdirectory=subdir_path'
python -m pip install '.[PDF]'  # project in current directory
python -m pip install 'SomePackage[PDF]==3.0'
python -m pip install 'SomePackage[PDF,EPUB]'  # multiple extras
Windows
py -m pip install "SomePackage[PDF]"
py -m pip install "SomePackage[PDF] @ git+https://git.repo/SomePackage@main#subdirectory=subdir_path"
py -m pip install ".[PDF]"  # project in current directory
py -m pip install "SomePackage[PDF]==3.0"
py -m pip install "SomePackage[PDF,EPUB]"  # multiple extras
-
Install a particular source archive file.
Unix/macOS
python -m pip install './downloads/SomePackage-1.0.4.tar.gz'
python -m pip install 'http://my.package.repo/SomePackage-1.0.4.zip'
Windows
py -m pip install "./downloads/SomePackage-1.0.4.tar.gz"
py -m pip install "http://my.package.repo/SomePackage-1.0.4.zip"
-
Install a particular source archive file following PEP 440 direct references.
Unix/macOS
python -m pip install 'SomeProject@http://my.package.repo/SomeProject-1.2.3-py33-none-any.whl'
python -m pip install 'SomeProject @ http://my.package.repo/SomeProject-1.2.3-py33-none-any.whl'
python -m pip install 'SomeProject@http://my.package.repo/1.2.3.tar.gz'
Windows
py -m pip install "SomeProject@http://my.package.repo/SomeProject-1.2.3-py33-none-any.whl"
py -m pip install "SomeProject @ http://my.package.repo/SomeProject-1.2.3-py33-none-any.whl"
py -m pip install "SomeProject@http://my.package.repo/1.2.3.tar.gz"
-
Install from alternative package repositories.
Install from a different index, and not PyPI
Unix/macOS
python -m pip install --index-url http://my.package.repo/simple/ SomePackage
Windows
py -m pip install --index-url http://my.package.repo/simple/ SomePackage
Install from a local flat directory containing archives (and don’t scan indexes):
Unix/macOS
python -m pip install --no-index --find-links=file:///local/dir/ SomePackage
python -m pip install --no-index --find-links=/local/dir/ SomePackage
python -m pip install --no-index --find-links=relative/dir/ SomePackage
Windows
py -m pip install --no-index --find-links=file:///local/dir/ SomePackage
py -m pip install --no-index --find-links=/local/dir/ SomePackage
py -m pip install --no-index --find-links=relative/dir/ SomePackage
Search an additional index during install, in addition to PyPI
Warning
Using this option to search for packages which are not in the main
repository (such as private packages) is unsafe, per a security
vulnerability called
dependency confusion:
an attacker can claim the package on the public repository in a way that
will ensure it gets chosen over the private package.Unix/macOS
python -m pip install --extra-index-url http://my.package.repo/simple SomePackage
Windows
py -m pip install --extra-index-url http://my.package.repo/simple SomePackage
-
Find pre-release and development versions, in addition to stable versions. By default, pip only finds stable versions.
Unix/macOS
python -m pip install --pre SomePackage
Windows
py -m pip install --pre SomePackage
-
Install packages from source.
Do not use any binary packages
Unix/macOS
python -m pip install SomePackage1 SomePackage2 --no-binary :all:
Windows
py -m pip install SomePackage1 SomePackage2 --no-binary :all:
Specify
SomePackage1to be installed from source:Unix/macOS
python -m pip install SomePackage1 SomePackage2 --no-binary SomePackage1
Windows
py -m pip install SomePackage1 SomePackage2 --no-binary SomePackage1
Step 1: Download
1. Go to [python.org/downloads/windows](https://www.python.org/downloads/windows/)
2. Pick Python 3.10.X (replace X with the highest number available)
3. Verify there’s a `Windows embeddable package` or a `Windows Installer`
4. Select 64bit or 32bit to match your system.
Need help selecting 64/32 bit?
— Do a Cortana search for `System Information`, open it
— look for `System Type`
— mine says `x64-based PC` which means mine is 64-bit and I should download the `Windows x86-64 executable installer`
Step 2: Open Python Installer
1. Navigate to the Python installer you downloaded in step 1.
2. Open it
3. Do not Tick/Select `Add Python 3.10 to PATH`. We’ll call python directly in later steps.
4. Select `Customize Installation` (this is important)
5. Tick/Select `pip` (others, leave as default)
6. Hit next
7. Tick/Select:
— `Install for all users`
— `Add Python to environment variables`
— `Create shortcuts for installed applications`
— `Precomplie standard library`
8. Customize Install Location and use:
«`
C:\Python310
«`
Personally, I like using this location for all my installs of python so I can know exactly what command to type to grab the version I might need. (Such as `C:\Python310\python.exe` for Python 3.10 or `C:\Python38\python.exe` for Python 3.8)
9. Hit `Install`
Step 3: Verify Python Installed via PowerShell
1. Search/Open **Windows PowerShell**
2. Type:
«`
C:\Python310\python.exe -V
«`
3. Hit enter. You should see the following:
«`
Python 3.10.2
«`
4. If typing the above fails, try:
— `python -V` (this means you added it to your `PATH` which is not recommended)
— Restart Computer
— Uninstall python and redo step 2 above.
5. Verify pip by entering:
«`
C:\Python310\python.exe -m pip freeze
«`
If you see `The term ‘pip’ is not recognized as the name…` then you do the installation incorrectly and might need to revert to a previous step. Otherwise, you’re good.
Step 4: Update PowerShell Settings
You should only have to do this 1 time, if done correctly.
1. Search Windows Powershell (a search is important)
2. Right click, select _Run as Administrator_; confirm security pop-up if needed
3. Enter:
«`
Set-ExecutionPolicy Unrestricted
«`
Step 5: Create Dev Folder
1. Open `Windows PowerShell` (not needed to run as Admin now)
2. Type:
«`
cd ~/
mkdir Dev
«`
I use the `Dev` folder to store all of my Python projects as well as other code-related projects.
Step 6: Update Pip
In `PowerShell` write the following command:
«`
C:\Python310\python.exe -m pip install pip —upgrade
«`
Let’s break this down:
— `C:\Python310\python.ex -m` is the command to run built-in modules for python
— `pip` is a built-in Python module. It’s called the Python Package Installer which allows you to install third-party Python packages from pypi.org
— `pip install pip`; yes pip is attempting to install itself
— `—upgrade` this is what you’ll do when you need to update any of your python packages automatically
Step 7: Create a Virtual Environment
Remember how in step 1 we installed the latest version of Python 3.10? What if we wanted our system to use Python 3.6? Or Python 3.8?
Technically speaking, this is *definitely* possible but it poses a new problem:
**If you write a program using a specific version of Python, it may or may not work using another version of Python.**
Hopefully you see the logic in the fact that if you use Python 2.7 to write a program it *might not* run on Python 3.10 simply because they are different versions.
How do we solve version issues?
By using `Virtual Environments`
As a beginner, this step might *feel pointless* but I promise as your skills grow you will certainly come to appreciate this step.
Here’s what you need to do:
1. Create a Project directory
«`
cd C:\Dev
mkdir my_test_project
«`
2. Initialize the virtual environment
«`
C:\Python310\python.exe -m venv myvenv
«`
Do you see how we used `C:\Python310\python.exe -m` again? Yup, `venv` is a built-in package to Python.
`myvenv` is the name of the virtual environment (in this case).
3. Activate your virtual environment
«`
.\myvenv\Scripts\activate
«`
4. Update pip
«`
(myvenv) python -m pip install pip —upgrade
«`
Notice how I no longer have to use `C:\Python310\python.exe`?
5. Deactivate and reactivate
To deactivate, just type:
«`
(myvenv) deactivate
«`
To reactivate type:
«`
.\myvenv\Scripts\activate
«`
You will *reactivate* your virtual environment(s) every time you need to run code related to this project.
Step 8: Install any Python Package
Let’s continue from our virtual environment in the previous step:
Open up PowerShell and run:
«`
cd Dev
cd my_test_project
.\myvenv\Scripts\activate
(myvenv) python -m pip install Django
(myvenv) python -m pip install requests
«`
This will install the latest version of Django and Python requests.
Let’s explore Python and Pip in this post and learn “How to install python on windows 10 properly“. We will discuss the latest version available today for Python (3.9.1) and pip (20.2.3). Also, I will explain how to modify and uninstall Python software. In case either additional feature needs to add/remove or you want to get rid of the old python version.
I am confident, even if you are new to Python, you will be able to install it easily, following this post step by step. So let’s deep dive in.
What are Python and pip
Python is a simple, Object-oriented, interpreted, high-level programming language with dynamic semantics. Due to its non-complicated syntax and fast edit-test-debug cycle, the Programmer community loves it. Python also reduces the cost of software management due to its simple nature.
Pip is a package manager for python, it allows you to install and manage additional libraries and dependencies that are not distributed or part of the standard library.
Linux users can check out my post on “How to install the latest Python in Linux“.
Pre-requisite to install python on Windows 10
- Windows 10 machine
- Internet connection
- Approx. 200MB of disk space (varies according to features and options selected).
Let’s find out the steps to install Latest Python and pip –
Step1- Python and pip download
You can download the latest python version 3.9.1 for windows or your respective operating system from python.org website.
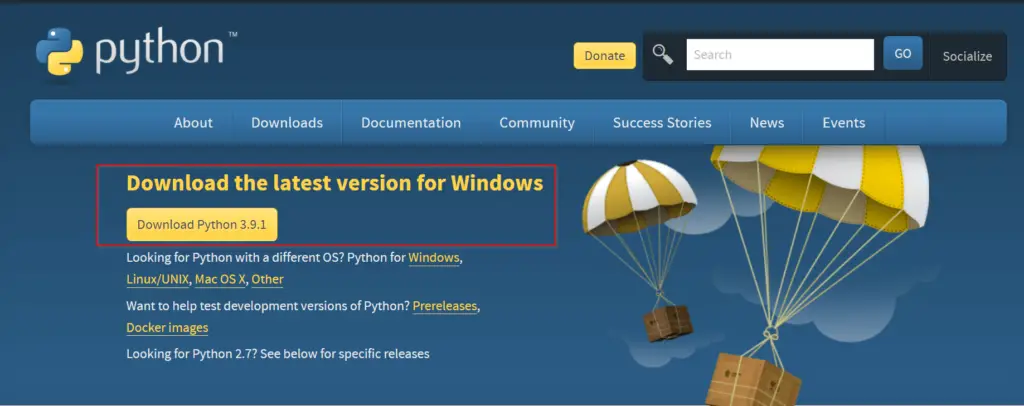
Otherwise, you can simply click on the below-mentioned button to download python for windows 10.
Click here to download an older release of Python like 3.8 or 2.7, for your project. Once you click on this link, scroll down and select your old python version as shown in the image.

You don’t need to download pip separately as it’s part of Python 3.9.1 software. You will know it while following this post further.
Step2- Run Python 3.9.1 (64-bit) installer
Once your download completes, visit your “download” directory. Then double click python-3.9.1-amd64 file to start the python setup wizard.

Step3- Choose “Install Now” or “Customize” installation
At this point, You will get two installation options –
- Install Now – This option is helpful if you are a newbie. Just select “Install now” and it will install Python 3.9 with default settings. Python default installation directory would be “C:\users\”your-username”\AppData\Programs\Python\Python39”. It will also install IDLE, pip, documentation and shortcuts.
- Customize installation – If you are a pro and need to know, what all features will be installed with python. Also, in case you already have python installed and want to test the latest version. Using the Customize installation option, you can choose a different installation folder and can keep both python versions.
Keep following this post, if you want to see options covered in Customize installation.
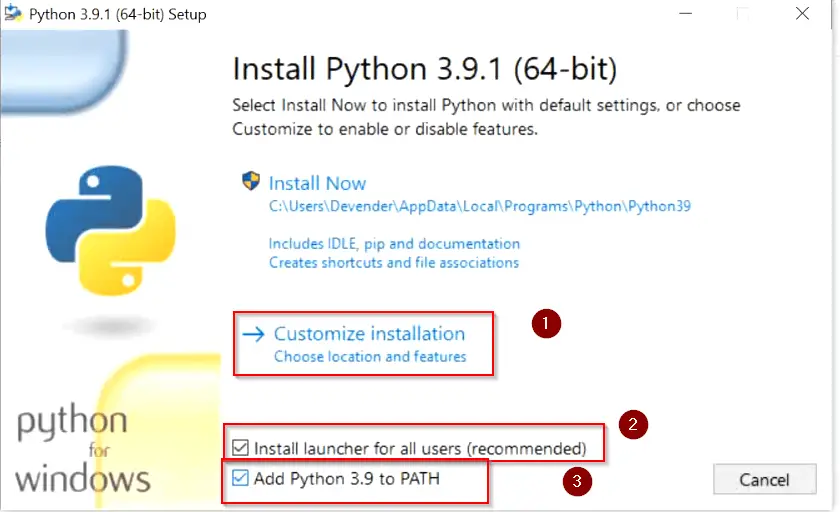
There are two more checkboxes to look into –
- “Install launcher for all users (recommended)” – Select this check box and it will make a python launcher shortcut for all user profiles exist in your machine. Whomsoever will login to your system will be able to use python 3.9.
- Add python 3.9 to path – Select this check box to add Python and pip “Path Variables” in the system environment automatically. If you will not select this option now, you need to add the path variable manually later after installation. My recommendation is to select it here itself.
So let’s click on “Customize installation” and check both the boxes as shown in the image.
Step4- Add or remove “Optional Features“
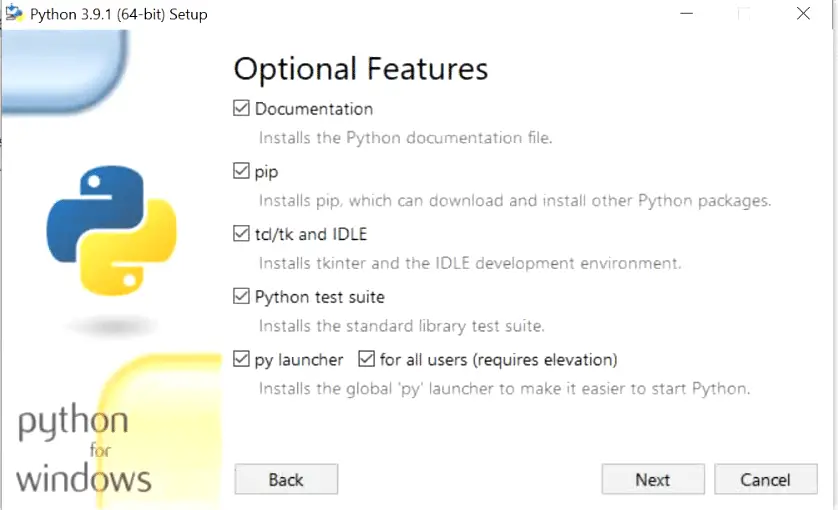
On this window, you can add or remove optional features, available with python 3.9. Let’s see few details of each optional feature available –
- Documentation:- Selecting this box will install all the Python documentation and manuals.
- pip:- As I informed you in Step 1 download section. Pip is already part of python 3.9. Select this check box, If you want to install pip automatically with Python 3.9 (which I strongly recommend).
- tcl/tk and IDLE:- Selecting this check box will install Tkinter and the IDLE development environment. You don’t need to install it separately then.
- Python test suite:- Installs the standard library suite.
- py launcher for all users (requires elevation):- Installs the global ‘py launcher‘ for all users. It requires admin rights (elevation) to perform it. Because it will allow all users to launch python easily from their user profiles.
Choose your required optional features and click Next. I will suggest you to keep all options checked.
Step5- Choose “Advanced Options” of python 3.9
These are the advanced options available, which are self-explanatory.
- Install for all users – Python 3.9 will install for all users in your machine. In my case, I am the only user. So this option really doesn’t matter much for me.
- Associate files with Python (requires the py launcher) – Link associated files to the py launcher
- Create shortcuts for installed applications – Create shortcuts icons for Python, pip and installed optional features.
- Add python to environment variables – Add environment variable for python and pip
- Precompile standard library – Adds precompiled libraries.
- Download debugging symbols – You can download and install the debugging symbol, which attaches additional information to the symbol table.
- Download debug binaries (requires VS 2017 or later) – To install required and dependent debugging binaries.
If you are a pro and know your required options. Select those options as per your need. In case you are a newbie, you can proceed with default selected options as shown in the image.
Click Install –

Step6 (optional)- Select custom install location folder
If you already have Python version installed and want to keep it safe. Also, you want to install a newer python version for testing. To make this happen, On Step 5, click Browse – Select your destination installation folder – click OK and click Install.

Step7- Allow Python 3.9.1 to make changes
Choose “Yes” to allow Python 3.9 to make changes to your system.

Step8- Let Python 3.9 and pip setup complete
Sit back and relax. Python and pip installation will take some time to complete.

Step9- Select “Disable path length limit”
At this point, Python and pip have been installed successfully in windows 10. But you need to select “Disable path length limit” here. Because it allows python to bypass the 260 characters “MAX_PATH” limitation. Basically, it means, if the number of characters exceeds 260 in your installation directory path. Python will not be able to add it to the path variable. It’s a limitation of Windows 10.
Select “Disable path length limit” – then Allow Python 3.9 in user access control and Select Close.

How to Check Python and Pip version on Windows 10
Follow below mentioned steps to check python and pip version. Additionally, it will also validate path variable is added properly in system environment.
Step10- Validate Python and pip versions
- Open elevated command prompt “as administrator” by typing “cmd” in search bar of windows 10.
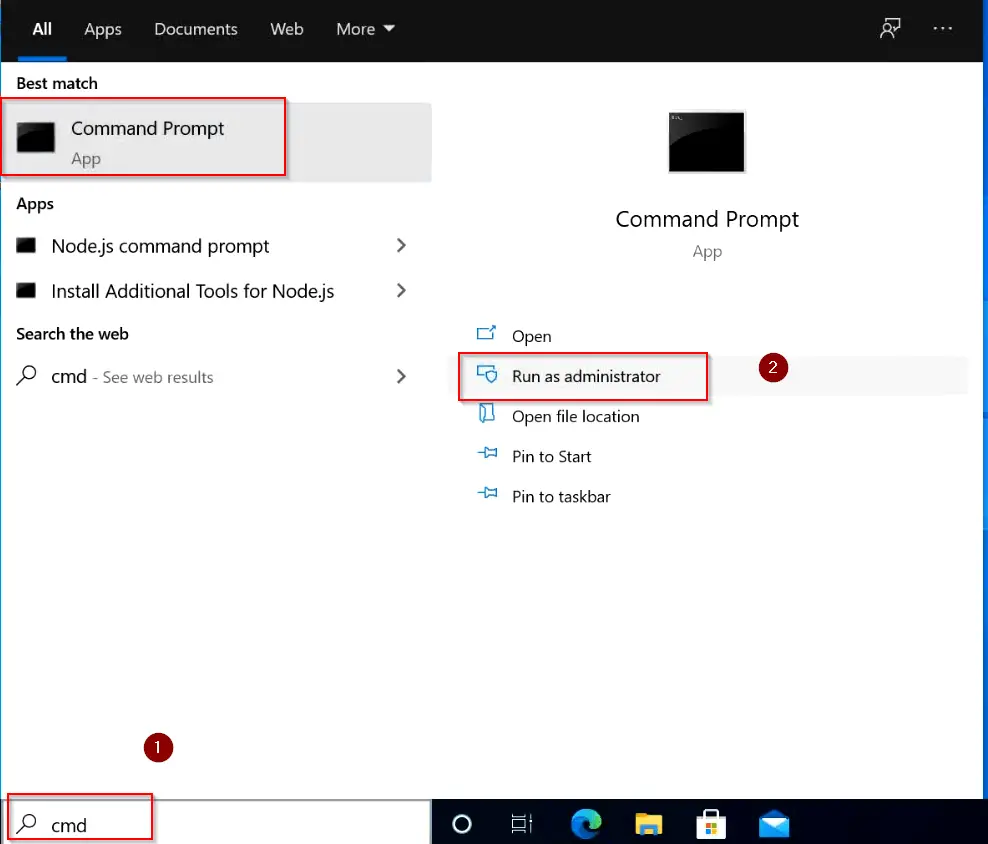
- Run python or py (short form) command to check Python version. You can see it’s version 3.9.1 installed in my case. You will see your installed version.
C:\> py
### OR ###
C:\> python
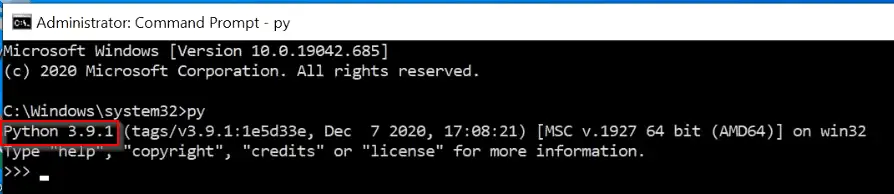
Type exit() or press “Ctrl + Z” on your keyboard to exit from python prompt.
- To check Python-pip version, type pip –version command. it will show you the pip version. it’s pip 20.2.3 in my case.
C:\> pip --version

Running pip and python version command successfully also validates, that your python and pip path variables are added successfully in Windows 10. Check out this post, if you are still getting ‘pip’ is not recognized as an internal or external command, operable program or batch file.
Step11- Launch Python alternative method
I showed you how to get python prompt and version from the command prompt. Let me show you an alternate way to launch the Python console.
- Type “Python” in the search bar of windows 10. Click “open“.
- (optional) If you will check bullet 3 in the image, I have shown you that if you need open or check Python manuals or documentation. You select one of them and open. Additionally, you can open IDLE from the search bar.

- After opening, it will take you to python 3.9 window. Enjoy and start your python projects.

How to install python on windows 10 (command line)
Although preferred and recommended option to install Python and pip in windows 10 is through GUI. But in case you want to learn python 3.9 version installation from the command line. Follow these simple steps –
Step1 –
- Open elevated command prompt by typing “cmd” in search bar.
Step2 –
- Go to your Downloads directory and Run “Python-3.x.x exe” as shown. In my case, it’s Python 3.9.1-amd64.exe. Below mentioned are the arguments and options used in the command –
- /quiet – means no interactive wizard.
- InstallAllUsers=1 – Install for all users
- PrependPath=1 – Install Python variable path
- Include_test=0 – Don’t include or install test suite
0 – means disable (don’t install)
1 – enable (install)
C:\> cd "path to your home directory"
C:\> python-3.x.xexe /quiet InstallAllUsers=1 PrependPath=1 Include_test=0
For example –
C:\> cd "users\devender\Downloads"
C:\> python-3.9.1-amd64.exe /quiet InstallAllUsers=1 PrependPath=1 Include_test=0

Just wait for a couple of minutes and latest python will install. Enjoy..
How to repair or modify Python in windows 10
There are some scenarios when you are not confident about additional features and options. Later you realize that you need that feature or advance option as shown in step4 and step5 in this post during installation. Then you don’t need to worry, it’s easy to add or remove features and advance options even after installation is done.
Follow these easy steps –
- You need to type “Control Panel” in the windows search bar. Click Open.

- Select “uninstall a program“

- Select “Python 3.9.1” or your version and click “Change“.

- Select “Modify” and press Next. You can also repair your installation using this wizard, in case installation issues.

Select Features and advanced option as per your need and complete installation. Refer Step4 and Step5 for further reference as shown in “How to install Python on Windows 10 using GUI” section.
How to uninstall Python in windows 10
If you have installed the latest Python and pip version by following this post. Now you want to get rid of your old Python version. Follow these simple steps to remove or uninstall Python in Windows 10.
Step1. Open Control panel from search bar
To start the uninstallation process of older Python and pip software from your windows 10. You need to type “Control Panel” in the windows search bar. Click Open.
Step2. Select “Uninstall a program“
Step3. Select Python and click “Uninstall or change a program”.
Step 3.1 – I have shown Python version 3.9.1, but you need to select your old Python version. Once you select, click “uninstall“.
- Wait for uninstallation progress bar to complete and click “Close“.

Step 3.2(optional) – Once python uninstallation completes and if you can see Python Launcher also.
- Then, Just select “Python launcher” and click “Uninstall“.
- Select “Yes” in “uninstall python launcher” dialogue box as shown in image.

- Permit in allow “User access control” box and uninstallation of Python will be done.
Hurray, You have got rid of old version of Python.
Video tutorial
If you don’t like reading, watch this tutorial to know “How to Install Python on Windows 10“. Also “Uninstallation of Python from windows 10“.
Conclusion
Congrats!! Now you know approximately everything on how to install, modify and uninstall Python in windows 10. Also, you must have a good idea of pip installation with Python3. Nowadays, Microsoft also recommends installing development software on WSL (windows subsystem for Linux).
If you like this post, you can share it on your social media wall to help others.
Frequently Asked Questions:-
Is Python EXE safe?
Yes, Python exe is completely safe. Make sure you download it from python.org website or from legitimate source only. Then you should be good with the installation. In case you have not installed it and still, you can see in your system. Go to control panel – click on “Uninstall a program” – Then check for Python software installation. If it is visible there and you don’t want, you can uninstall it. If you don’t found it in programs, then it may be a virus or malware. Scan your system and remove it.
Is Python free to download?
Yes, Python is free opensource software. You can download and install it in your system from https://www.python.org/downloads/ website.
How do I run Python on Windows 10 from the command line?
Open elevated command prompt – type py or python and hit enter.
Can I learn Python by myself?
Yes, it’s one of the easy languages with no complex syntax. There are many websites with free tutorials. Checkout free Python tutorials.
Why Python is not working?
May be either python is not installed or you have not set up Python path variable in the system environment.