- Click to view our Accessibility Policy
- Skip to content
Oracle Instant Client ODBC Installation Notes
Oracle’s Instant Client ODBC software is a standalone package that offers the full functionality of the Oracle ODBC driver (except the Oracle service for Microsoft Transaction Server) with a simple install.
The ODBC driver has Oracle’s standard client-server version interoperability, see Support Doc ID 207303.1. For example Instant Client ODBC 19c can connect to Oracle Database 11.2 or later.
Installing Oracle Instant Client Basic and Basic Lite
Instant Client ODBC requires the Oracle Instant Client Basic or Basic Light package (depending on your locale requirements) also be installed. Download the desired package from OTN for your operating system and follow the installation instructions on the download page. For example, unzip the package to C:\instantclient_19_3 on Windows, unzip to /opt/oracle/instantclient_19_3 on Linux or other platforms, or use yum to install the RPM packages on Linux.
More details on Oracle Instant Client is in the Oracle Call Interface Programmer’s Guide.
Installing Oracle Instant Client ODBC
On Linux and UNIX
1. Download Install the Instant Client Basic or Basic Light package as described above.
2. Download the Instant Client ODBC package. Unzip it in the same directory as your Basic or Basic Light package. Or, if using the RPM package on Linux, install it with yum.
3. Install the unixODBC driver manager if it is not already available. Refer to the «Recommended unixODBC Driver Manager version» section in this document for more information.
4. Execute odbc_update_ini.sh from the Instant Client directory.
5. Set any Oracle Globalization variables required for your locale. See the Oracle Database Globalization Support Guide for more information. For example on Linux you could set export NLS_LANG=JAPANESE_JAPAN.JA16EUC to work in the JA16EUC character in Japanese.
Usage: odbc_update_ini.sh <ODBCDM_Home> [<Install_Location> <Driver_Name> <DSN> <ODBCINI>]
| Parameter | Description |
|---|---|
| ODBCDM_Home | unixODBC driver manager home directory path |
| Install_Location* | Oracle Instant Client directory path. The default path is the current directory |
| Driver_Name* | Driver name to identify the Oracle ODBC driver residing in current Oracle Instant Client home. The default name will be like «Oracle 19c ODBC driver» |
| DSN* | Sets ODBC DSN name. The default name will be «OracleODBC-19c» |
| ODBCINI* | Directory path of the .odbc.ini file. The default path is the user’s home directory, for example ~/.odbc.ini |
* — Optional parameters
On Windows
- Install the Instant Client Basic or Basic Light package, as described above.
- Download the Instant Client ODBC package. Unzip it in the same directory as your Basic or Basic Light package.
- Execute
odbc_install.exefrom the Instant Client directory. If Instant Client is 11g or lower, start the command prompt with the Administrator privilege. To install with Japanese language support, execute the commandodbc_install.exe JA.
Environment setup for ODBC applications
An ODBC application has to load the Oracle Instant Client ODBC driver’s shared library file (see next section) to connect to Oracle Database. On Linux/Unix the directory path of the shared library should be set in the environment variable LD_LIBRARY_PATH, or platform equivalent. It can also be configured in /etc/ld.so.conf. On Windows it should be set in the PATH environment variable.
Refer to the topics Environment Variables for OCI Instant Client and Database Connection Strings in the Oracle Call Interface Programmer’s Guide for setting up the Database Connection string and related environment variables like TNS_ADMIN, TWO_TASK, LOCAL etc.
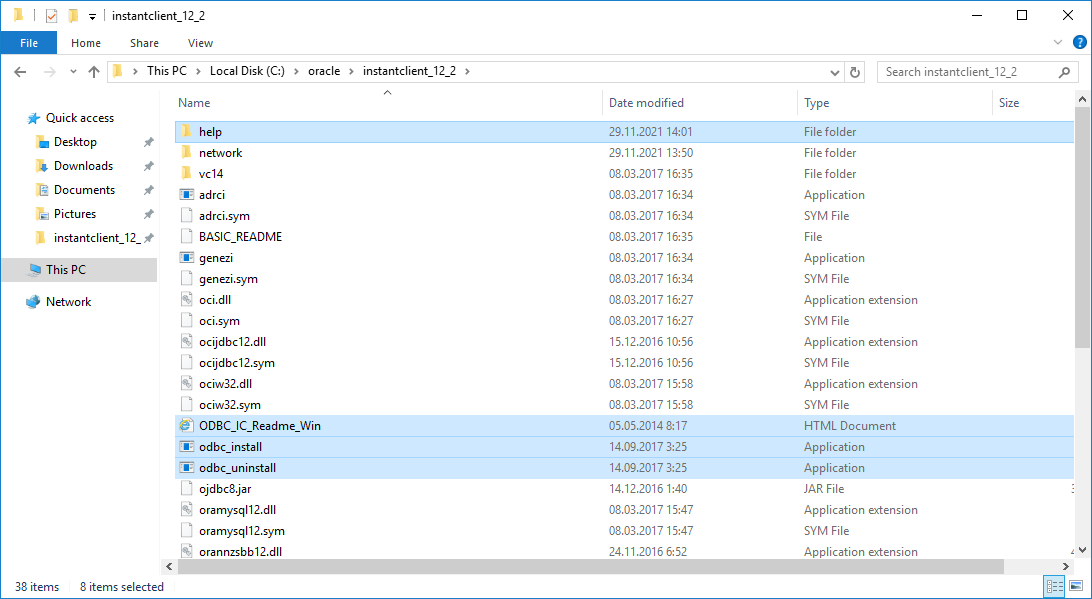
Contents of the Oracle Instant Client ODBC Package
| Description | Linux and UNIX | Windows |
|---|---|---|
| Oracle ODBC driver shared library | libsqora.so.XX.Y. For example libsqora.so.19.1 | sqora32.dll |
| Installation file | odbc_update_ini.sh | odbc_install.exe, odbc_uninstall.exe |
| Oracle ODBC driver configuration dialog window (GUI) | Not available | sqoras32.dll, sqresus.dll, sqresja.dll |
| Help System | help/ | help/ |
Patching Oracle Instant Client ODBC
Note: Backup the Oracle ODBC driver shared library and other files before patching them.
On Linux and UNIX Patching the Instant Client ODBC driver on Linux/UNIX can be done by generating the Instant Client ODBC package and Basic or Basic Light package in a patched ORACLE_HOME. The procedure for patching and generating Instant Client ODBC, Basic and Basic Light packages is given in the Oracle Call Interface Programmer’s Guide. These new packages should then be unzipped into the Instant Client directory that needs to be patched. This method of patching is recommended.
Alternatively the Oracle Instant Client ODBC driver can be patched by copying the files that are listed below from a patched ORACLE_HOME:
- ODBC driver shared library file:
For 19c: libsqora.so.19.1
For 18c: libsqora.so.18.1
For 12c: libsqora.so.12.1
For 11g: libsqora.so.11.1 - Required additional files when using Oracle Instant Client Basic:
For 19c: libociei.so, libclntshcore.so.19.1, libclntsh.so.19.1, libnnz19.so, libons.so
For 18c: libociei.so, libclntshcore.so.18.1, libclntsh.so.18.1, libnnz18.so, libons.so
For 12c: libociei.so, libclntshcore.so.12.1, libclntsh.so.12.1, libnnz12.so, libons.so
For 11g: libclntsh.so.11.1, libociei.so, libnnz11.so - Required additional files when using Oracle Instant Client Basic Light:
For 19c: libclntsh.so.19.1, libclntshcore.so.19.1, libociicus.so, libnnz19.so, libons.so
For 18c: libclntsh.so.18.1, libclntshcore.so.18.1, libociicus.so, libnnz18.so, libons.so
For 12c: libclntsh.so.12.1, libclntshcore.so.12.1, libociicus.so, libnnz12.so, libons.so
For 11g: libclntsh.so.11.1, libociicus.so, libnnz11.so
On Windows Patching the Instant Client ODBC driver on Windows can be done only by manually copying the ODBC driver shared library files and supporting library files from a patched ORACLE_HOME or from an unpacked Oracle Database Bundle patch. These should be copied into the Instant Client directory. Generating an Instant Client ODBC package is not available on Windows.
The files that must be copied to the Instant Client directory:
- ODBC driver shared library files: sqora32.dll, sqoras32.dll, sqresus.dll, sqresja.dll
- Required additional files when using Oracle Basic Instant Client:
For 19c: oraociei19.dll, orannzsbb19.dll, oci.dll, oraons.dll, ociw32.dll, oraociei19.sym, orannzsbb19.sym, oci.sym, ociw32.sym
For 18c: oraociei18.dll, orannzsbb18.dll, oci.dll, oraons.dll, ociw32.dll, oraociei18.sym, orannzsbb18.sym, oci.sym, ociw32.sym
For 12c: oraociei12.dll, orannzsbb12.dll, oci.dll, oraons.dll, ociw32.dll, oraociei12.sym, orannzsbb12.sym, oci.sym, ociw32.sym
For 11g: oraociei11.dll, orannzsbb11.dll, oci.dll, ociw32.dll, oraociei11.sym, orannzsbb11.sym, oci.sym, ociw32.sym - Required additional files when using Oracle Basic Light Instant Client:
For 19c: oraociicus19.dll, orannzsbb19.dll, oci.dll, oraons.dll, ociw32.dll, oraociicus19.sym, orannzsbb19.sym, oci.sym, ociw32.sym
For 18c: oraociicus18.dll, orannzsbb18.dll, oci.dll, oraons.dll, ociw32.dll, oraociicus18.sym, orannzsbb18.sym, oci.sym, ociw32.sym
For 12c: oraociicus12.dll, orannzsbb12.dll, oci.dll, oraons.dll, ociw32.dll, oraociicus12.sym, orannzsbb12.sym, oci.sym, ociw32.sym
For 11g: oraociicus11.dll, orannzsbb11.dll, oci.dll, ociw32.dll, oraociicus11.sym, orannzsbb11.sym, oci.sym, ociw32.sym
Note: While copying from the Oracle Database Bundle patch, some of the files above may be missing. This implies that those files are unchanged and do not need to be patched.
Uninstalling Oracle ODBC Instant Client
On Linux and UNIX
The procedure to uninstall Instant Client ODBC on Linux/UNIX is:
- Remove the Oracle ODBC driver entry from the
odbcinst.inifile of the unixODBC driver manager. The default name of this entry is like [Oracle 19c ODBC driver]. - Remove the DSN entry of the Oracle ODBC driver from
odbc.ini. The default name of the DSN entry is like[OracleODBC-19c]. - Delete all files and directories in the Instant Client ODBC directory.
On Windows
The procedure to uninstall Instant Client ODBC on Windows is:
- Remove the DSN associated with the Oracle ODBC driver in the ODBC Data Source Administrator (odbcad32) console.
- Execute
odbc_uninstall.exefrom the Instant Client ODBC directory. - Delete all files and directories in the Instant Client ODBC directory.
Recommended unixODBC Driver Manager versions for Linux/UNIX
For Instant Client 18 and 19:
| Platform | unixODBC Driver Manager Version |
|---|---|
| Linux 32bit, 64bit | 2.3.4 |
| Solaris SPARC64 32bit, 64bit | 2.3.4 |
| Solaris 32bit, 64bit | 2.3.4 |
| AIX 5L 32bit, 64bit | 2.3.4 |
| HP IA64 32bit, 64bit | 2.3.4 |
| z/Linux 31bit, 64bit | 2.3.4 |
For Instant Client 12.1 and 12.2:
| Platform | unixODBC Driver Manager Version |
|---|---|
| Linux 32bit, 64bit | 2.3.1 |
| Solaris SPARC64 32bit, 64bit | 2.3.1 |
| Solaris 32bit, 64bit | 2.3.1 |
| AIX 5L 32bit, 64bit | 2.3.1 |
| HP IA64 32bit, 64bit | 2.3.1 |
| z/Linux 31bit, 64bit | 2.3.1 |
For Instant Client 11g:
| Platform | unixODBC Driver Manager Version |
|---|---|
| Linux 32bit, 64bit | 2.2.11, 2.2.14 |
| Solaris SPARC64 32bit, 64bit | 2.2.11 |
| Solaris 32bit, 64bit | 2.2.11 |
| AIX 5L 32bit, 64bit | 2.2.11 |
| HP IA64 32bit, 64bit | 2.2.11 |
| z/Linux 31bit, 64bit | 2.2.11 |
Oracle ODBC Driver Resources
- Oracle Instant Client — Download ODBC
- Oracle C and C++ Interfaces — Home page
- Using the Oracle ODBC Driver — Database Development Guide
- Oracle ODBC — Discussion forum
- ODBC Driver Release Notes — Release information
Related Technologies
- Scripting Languages — Using Node.js, PHP, Python and Ruby with Oracle Database
- Oracle Database 12c Application Development — More great technologies
- VirtualBox — Desktop virtualization
- Database App Development VM — Prebuilt VirtualBox VM with Oracle Database 12c installed
- Oracle Database Cloud Service — Database cloud service supporting any size workload
- Oracle Databasec and Oracle Database «XE» Express Edition — Free Developer Downloads
- Oracle Linux — Free yum repository server, with the latest errata
Apply these quick steps now
by Matthew Adams
Matthew is a freelancer who has produced a variety of articles on various topics related to technology. His main focus is the Windows OS and all the things… read more
Updated on
- When you install an Oracle ODBC driver in Windows 10, you can connect to an Oracle database with Access and other ODBC-compliant database applications.
- Users can download and install an ODBC driver for Oracle 19c, which is the current release with a high level of stability.
- You can establish an Oracle ODBC connection in Windows 10 by setting up an ODBC data source after installing the ODBC driver.
- You’ll also need to have installed certain Visual C++ packages for the Oracle setup.
Oracle Database is one of the foremost DBMS (Database Management Systems) for Windows. However, Windows 10 doesn’t include any built-in Oracle ODBC connection tool.
So, you’ll need to install an Oracle ODBC driver to connect to an Oracle database with an ODBC-compliant application.
You have to do more than download and install an ODBC package to connect to an Oracle database with an application.
On top of that, you’ll also need to add new environment variables and set up a DSN for the driver before you can connect with the Oracle database.
How can I install an Oracle ODBC driver in Windows 10?
1. Download and extract the Oracle packages
- First, open the Oracle Instant Client page in your browser.

- Next, click the Instant Client for Microsoft Windows 32 or 64-bit link (or an alternative one that matches your PC’s platform).
- Click the Basic package download link.
- Scroll down and click the SDK package hyperlink to download that archive.
- In addition, click the download link for the ODBC package.
- Open the File Explorer window by clicking the folder taskbar button for it.
- Click the C: root drive in File Explorer.
- Then right-click a space within the C: drive and select New > Folder.

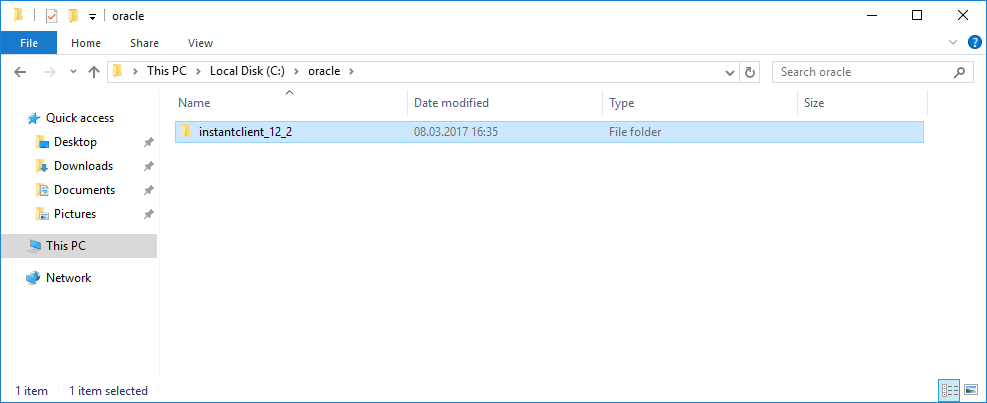
- Enter Oracle as the new folder name. Then you should have a new folder with this path:
C:\Oracle - Move all three of the downloaded Oracle ZIP archives into the Oracle folder. You can do that by selecting the ZIP files, clicking the Move to button, and selecting Choose location within File Explorer.
- Next, extract all three of the ZIP archives into the Oracle folder. To extract a ZIP, select it and click the Extract all button on File Explorer’s Compressed Folder Tools tab.
 folders window")
- Then you can click the Browse button in the Extract Compressed window to select the Oracle folder. Click the Extract button.
- Open the extracted instantclient-basic-windows.x64-19.11.0.0.0dbru folder.
- Move the instantclient_19_11 subfolder from there into the Oracle folder.
- Then erase the now empty instantclient-basic-windows.x64-19.11.0.0.0dbru folder that previously included the instantclient_19_11 subfolder by right-clicking it and selecting Delete. Thereafter, you’ll have a single instantclient_19_11 folder within the Oracle directory.


 folders window")
The ODBC and basic ZIP archives must be unzipped to exactly the same folder. Select to extract the ODBC ZIP to the path of your unzipped Basic package.
How we test, review and rate?
We have worked for the past 6 months on building a new review system on how we produce content. Using it, we have subsequently redone most of our articles to provide actual hands-on expertise on the guides we made.
For more details you can read how we test, review, and rate at WindowsReport.
Delete instantclient_19_11 at the end of the path in the Extract Compressed window so that an additional subfolder isn’t included.
The SDK package is a non-essential optional one. However, it’s recommended you download that package too.
The SDK ZIP archive should also be extracted to the same instantclient_19_11 folder that includes the Basic and ODBC package files.
In case that did not help, you can give a try to Outbyte Driver Updater which has a big database of drivers and might have the right ones for Oracle, besides that, updating your drivers is a common good practice for maintaining a functional PC.
2. Add an Oracle Client directory environment variable
- Press the Windows and S keys simultaneously to open a search box.
- Type the keyword system environment variables with the search text box.
- Click Edit the system environment variables to open the window in the screenshot directly below.

- Press the Environment Variables button.

- Click the New button for system variables.
- Next, input OCI_LIB32 within the Variable name box.
- Input your Oracle folder path in the Variable value box. If you followed the guidelines above, that folder path would be this:
C:\Oracle\instantclient_19_11.
- Next, Double-click Path in system variables to open the window in the snapshot directly below.

- Click the New button, and enter the same folder path you input within the Variable value box.
- Press the OK button.


NOTE
To get the list of TNS services when establishing ODBC connections, you’ll also need to set up a TNS_ADMIN system environment variable that points to the directory that includes the tnsnames.ora file.
3. Install your ODBC Oracle client package
To install the ODBC client, open the instantclient_19_11 folder you extracted the ODBC package to in File Explorer. Then right-click odbc_install.exe and select the Run as administrator option.
Note that there isn’t any kind of GUI installation wizard for that file. So, that’s all you need to do here.

4. Set up the DSN for Oracle driver
- Bring up the search tool within Windows.
- Enter ODBC Data Sources in the search box.
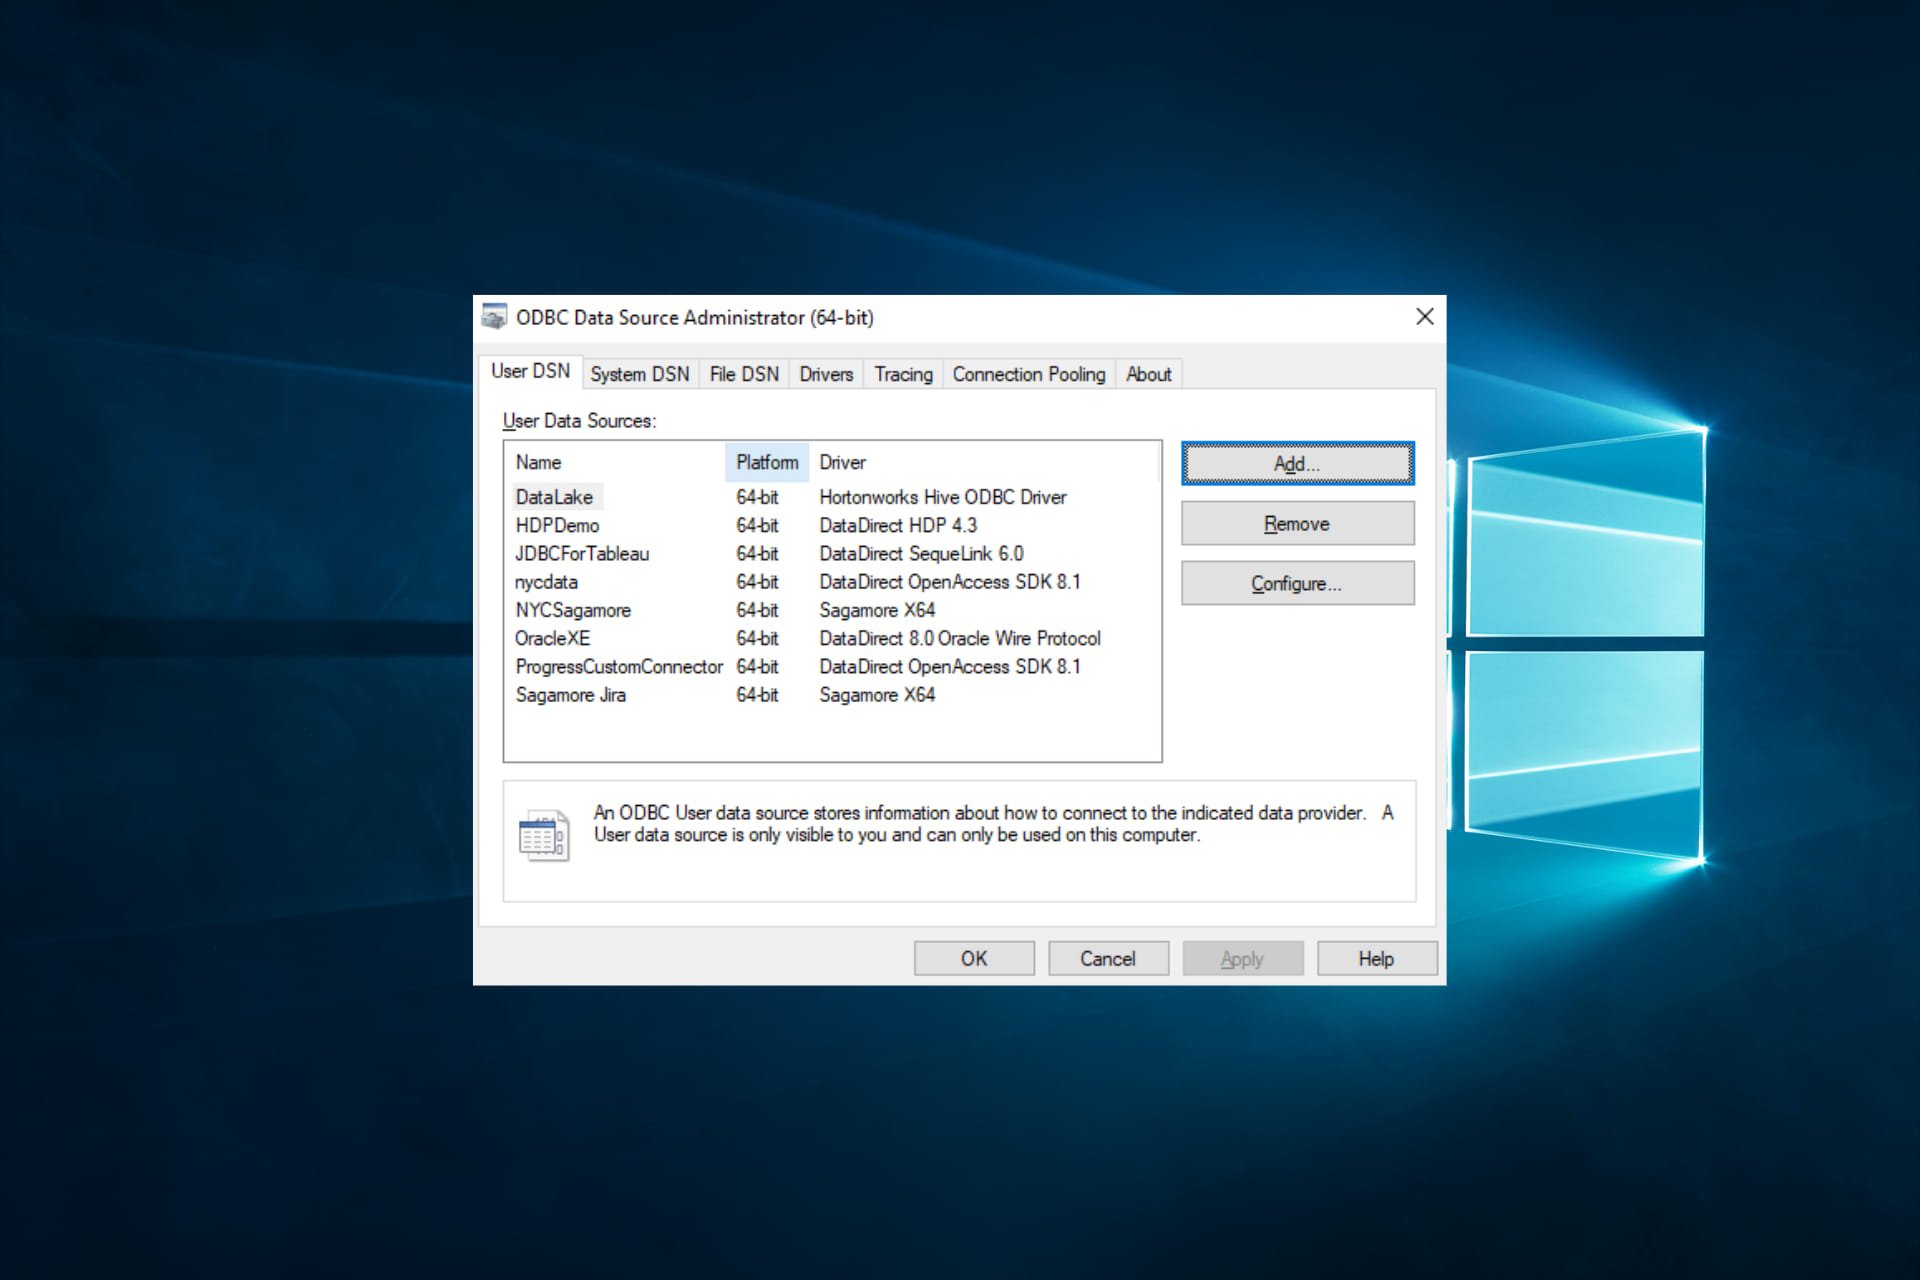
- Click ODBC Data Sources to open the window in the screenshot directly below.
 window")
- Next, click the Add button on the User DSN (or System) tab to open the Create New Data Source window.

- Select your Oracle ODBC driver, and press the Finish button.
- Fill out the required details on the ODBC configuration window.
- Click Test Connection to check your Oracle Database Server connection.
- Press the OK button to exit.
 window")

5. Install missing Visual C++ libraries
You can’t set up data sources for an Oracle driver with the ODBC Data Source Administration if a required Visual C++ package for it is not installed on your PC.
If an error message pops up when your try to set up an Oracle driver data source, you might be missing a required Visual C++ package.
You’ll need to have Visual Studio 17 installed for the current Oracle 19 client. You can download Visual Studio 2017, and older redistributable packages, via the C++ downloads page.
Then click the VC EXE file you downloaded to install the Visual Studio package. So, that’s how you can install the Oracle ODBC driver on Windows 10.
When you’ve installed the current Oracle ODBC driver, you can connect to Oracle Database DBMS versions from 11.2 up to 19.1 with the 19c client.
Moreover, if you need to fix Windows 10 ODBC issues, just check out our dedicated article. As for your opinion, the comments area is waiting for you.
![]()
Драйвер Oracle ODBC или Open Database Connectivity помогает подключать системы Windows к другим сетям Oracle. В этом отношении настройка не встроена в Windows 10 или любую другую версию операционной системы. Поэтому вам необходимо установить эту настройку отдельно, а затем подключить ее к другим сторонним сетям.
Кроме того, Oracle является ведущей системой управления данными для Windows. Установка драйвера сложна, особенно если вы считаете себя технически сложным. Но это возможно.
В этом сообщении блога я подробно обсудил методы, разработанные непосредственно экспертами в этой области. Кроме того, я также попытался добавить советы и ответил на общие вопросы, которые могут возникнуть в процессе.
Пошаговый метод загрузки и установки драйвера ODBC

Часть 1. Установка и извлечение пакетов Oracle
Шаг 1. В интернет-браузере перейдите на веб-сайт Oracle Instant Client .
Шаг 2. В зависимости от платформы вашего ПК выберите и щелкните ссылку Мгновенный клиент для 32-разрядной или 64-разрядной версии Microsoft Windows.
Шаг 3: Перейдите к базовому пакету и щелкните ссылку для загрузки.
Шаг 4: В появившемся окне опустите курсор вниз и нажмите на гиперссылку пакета SDK . Это поможет вам в загрузке файла.
Шаг 5: Кроме того, вам также необходимо скачать ссылку на пакет ODBC.
Шаг 6: Запустите проводник и нажмите кнопку на панели задач папки.
Шаг 7: В проводнике щелкните корневой диск C:
Кроме того, выполните следующие действия
Шаг 8: На диске C: найдите место и щелкните его правой кнопкой мыши. Затем в раскрывающемся меню выберите « Создать » и « Папка » .
Шаг 9: Переименуйте новую папку в Oracle , что даст вам путь C:\Oracle .
Шаг 10: Отправьте ZIP-файлы Oracle в эту новую папку, выбрав их и нажав «Переместить в». В разделе « Проводник » выберите « Выбрать местоположение » .
Шаг 11: Кроме того, вам необходимо извлечь все папки Oracle Zip. Для этого выберите все файлы и нажмите кнопку « Извлечь все » . Вы можете сделать это на вкладке «Инструменты для сжатых папок» Проводника.

Шаг 12: Чтобы выбрать папку Oracle, перейдите в окно «Извлечь сжатое» и нажмите кнопку « Обзор » . Нажмите «Извлечь » .
Шаг 13: Кроме того, вы можете открыть папку Instant client-basic-windows.x64-19.11.0.0.0 dbru и отправить подпапку Instantclient_19_11 в папку Oracle.
Шаг 14: Кроме того, удалите старую папку мгновенного клиента, чтобы у вас осталась только одна из них.
Извлеките все папки мгновенного клиента из ZIP-папок и, наконец, удалите папку мгновенного клиента. Это позволит убедиться, что у вас нет лишних ненужных подпапок. Более того, специалисты рекомендуют скачать пакет SDK и сохранить его в файле Instant_client .
Часть 2. Как добавить переменную среды Oracle Client Directory
Теперь, когда вы загрузили пакет Oracle, вам нужно добавить его в каталог клиента. И если у вас возникли проблемы с выполнением всего этого самостоятельно, следуйте нашим шагам один за другим.
Шаг 1: Одновременно нажмите кнопку Windows + S на клавиатуре, чтобы открыть окно поиска.
Шаг 2: В поле «Текст поиска» введите « Ключевое слово системные переменные среды » .

Шаг 3: Далее нажмите « Редактировать переменные системной среды », автоматически открыв окно, показанное ниже.

Шаг 4: Кроме того, нажмите на опцию « Переменные среды » . Затем нажмите на окно « Создать в системной переменной» .
Шаг 5: Введите OCI_LIB32 в поле имени переменной. Вам также необходимо ввести путь к папке Oracle, который будет выглядеть так: C:\Oracle\Instantclient_19_11 .

Шаг 6: Чтобы открыть окно в моментальном снимке, дважды щелкните « Путь» в «Системных переменных» .
Шаг 7: Нажмите « Создать » и введите путь к папке в поле «Значение переменной». И нажмите «Ок » .
Часть 3: Установка клиентского пакета ODBC Oracle
Следующая часть — установить клиент ODBC, открыв папку Instant_client_19_11 из пакета ODBC в проводнике. Кроме того, щелкните правой кнопкой мыши параметр odbc_install.exe и нажмите «Запуск от имени администратора».
Часть 4: Настройка сети источника данных
Четвертая часть — настроить сеть источника данных или DSN. Сделать это:
Шаг 1: Запустите средство поиска в Windows и введите источники данных ODBC .
Шаг 2: Нажмите на источники данных ODBC , чтобы открыть новое окно. Кроме того, нажмите «Добавить» в пользовательской системе DSN и откройте параметр «Создать новый источник данных».
Шаг 3: Кроме того, выберите драйвер Oracle ODBC и нажмите «Готово». В окне конфигурации заполните необходимые данные.
Шаг 4: Проверьте подключение к серверу базы данных Oracle , нажав « Проверить подключение» . Чтобы выйти, нажмите « Выход » .
Часть 5. Установка отсутствующих библиотек Visual C++
Теперь мы находимся в последней части, которая проста. Для начала вы можете настроить источники данных с источником данных ODBC для драйвера Oracle. Однако вы можете сделать это только в том случае, если у вас еще не установлен визуальный C++. Обычно выскакивает сообщение об ошибке. В этом случае вы можете загрузить Visual Audio 2017 и другие пакеты распространения.
Нажмите на загруженный файл VC EXE , и это способ установить драйвер Oracle ODBC в Windows 10.
Как установить Oracle Instant Client ODBC в Linux и UNIX?
Шаг 1: В операционных системах Linux и UNIX загрузите и установите клиентский пакет Oracle . И еще раз разархивируйте его в каталог. Если вы используете пакет RPM в Unix, вы можете установить его с помощью yum.
Шаг 2: Если драйвер UnixODBC недоступен, установите его.
Шаг 3: Перейдите в Instant Client Directory и запустите odbc_update_ini.sh .
Шаг 4: В зависимости от вашей локали установите переменную Oracle Globalization, которая будет выглядеть как export NLS_LANG=JAPANESE_JAPAN.JA16EUC для JA16EUC на японском языке.
Для использования: odbc_update_ini.sh <ODBCDM_HOME> [<Install_Location><Driver_Name><DSN><ODBCINI>]
Чтобы лучше понять это, см. этот список параметров и описание.
- ODBCDM_Home : путь к домашнему каталогу диспетчера драйверов unixODBC.
- Install_Location : Текущий каталог мгновенного клиента Oracle является путем по умолчанию.
- Driver_Name : идентифицирует драйвер Oracle ODBC в текущем домашнем каталоге Oracle Instant Client. Имя может быть чем-то вроде Oracle 19c ODBC Driver.
- DSN : имя по умолчанию для DSN — Oracle ODBC-19c.
- ODBCINI: это путь к файлу .odbc.ini, который является домашним каталогом пользователя по умолчанию.
Как удалить Oracle Client ODBC в Windows 10?
Шаг 1: В Windows 10 вы можете удалить ODBC клиента Oracle, удалив сеть источника данных. Он связан с драйвером Oracle ODBC, присутствующим в консоли администратора источника данных ODBC.
Шаг 2. В каталоге Instant client запустите odbc_uninstall.exe .
Шаг 3: Кроме того, вы можете удалить все файлы и каталоги один за другим из каталога Client ODBC.
Вывод
Выполните действия, описанные в этой статье, чтобы загрузить клиентский пакет Oracle и удалить его, когда он вам не нужен. Если есть какой-либо другой способ, который проще сделать в Windows 10, сообщите нам об этом в комментариях ниже.

Hello everyone, welcome to my blog. In this article, I am going to show you how to install Oracle ODBC Driver on Windows 10. I have a working Oracle Database 12c on another computer on my home network. I am trying to connect to my Oracle database from Microsoft Access using ODBC connection. By default, Windows 10 does not shipped with Oracle ODBC connection utility. In other word, I was unable to connect to my Oracle database from MS Access.
Installing Oracle ODBC Driver on Windows 10 is a bit tricky. It’s not as simple as installing PostgreSQL ODBC driver or MySQL ODBC Driver. I was struggling to get it works. The following method works very well on my home network. So let’s dig inside.
My Setup
- I have a Windows 10 running Oracle Database 12.2
- I am going to connect to my Oracle Database via ODBC from another computer, running Windows 10 as well.
Step 1. Install Oracle Instant Client Basic
Oracle ODBC Driver needs this Instant Client package to run. So, we need to download this package from the official download website of Oracle.
https://www.oracle.com/technetwork/database/database-technologies/instant-client/downloads/index.html

Select the correct architecture of your system either 32 bit or 64 bit. In this example I am going to install the 32 bit version since I have MS Office 32 bit version.

Next, download the Instant Client Basic package as shown on the picture above. Also, you will need to download the Instant Client SDK and Instant Client ODBC as shown below

So now we have three packages:
- instantclient-basic-nt-12.2.0.1.0.zip
- instantclient-sdk-nt-12.2.0.1.0.zip
- instantclient-odbc-nt-12.2.0.1.0-2.zip
Now Create a new folder for the Oracle client. For example, in this case I created a new folder : C:\Oracle\Product\client. Put all those three zip packages in that new directory. Next, extract them all. It will produce a new directory called: instantclient_12_2. If you download the different version, for example version 18.3, it will create new directory instantclient_18_3.
Step 2. Add the Oracle Client directory to the PATH environment
Now we need to add our Oracle Client directory to the Windows PATH environment. Right-click My Computer >> Advanced System Settings >> Environment Variables

On the System Variables, click New and then enter the following details:

- Variable name: OCI_LIB32
- Variable Value: C:\Oracle\Product\client\instantclient_12_2
Change C:\Oracle\Product\client\instantclient_12_2 with your actual Oracle Client folder.
Next step is to add the Oracle Client directory to system path. Double click the path and create a new entry as follow

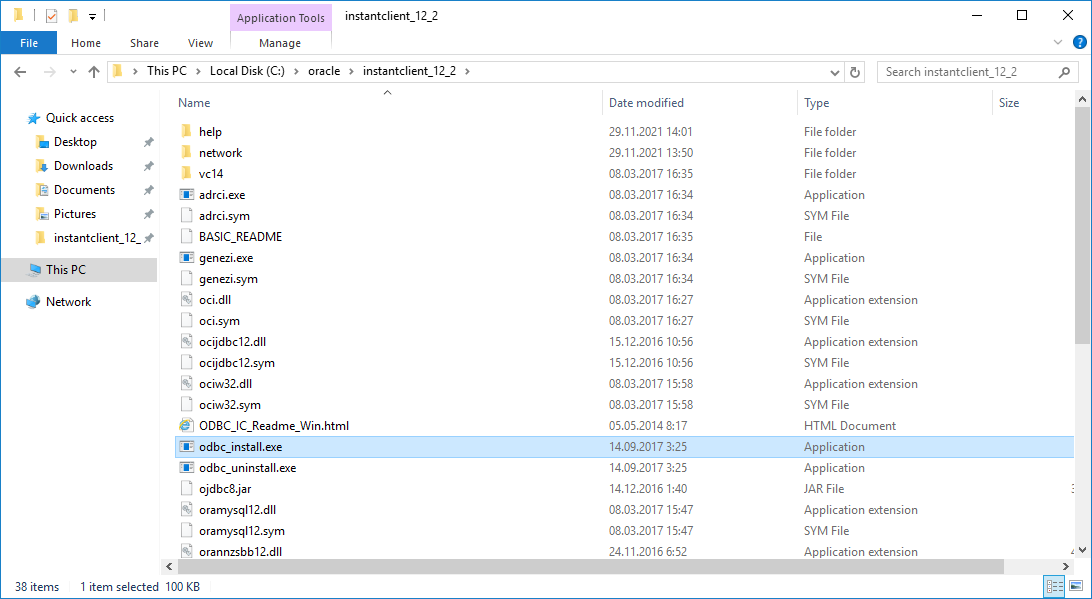
Step 3. Install the Oracle ODBC Client
Now open the folder instantclient_12_2, in your Oracle Client folder created on the Step 1 and double click the file odbc_install.

Please note that there is no GUI installation wizard when you open this file.
Step 4. Create a new ODBC Data Source on Windows 10
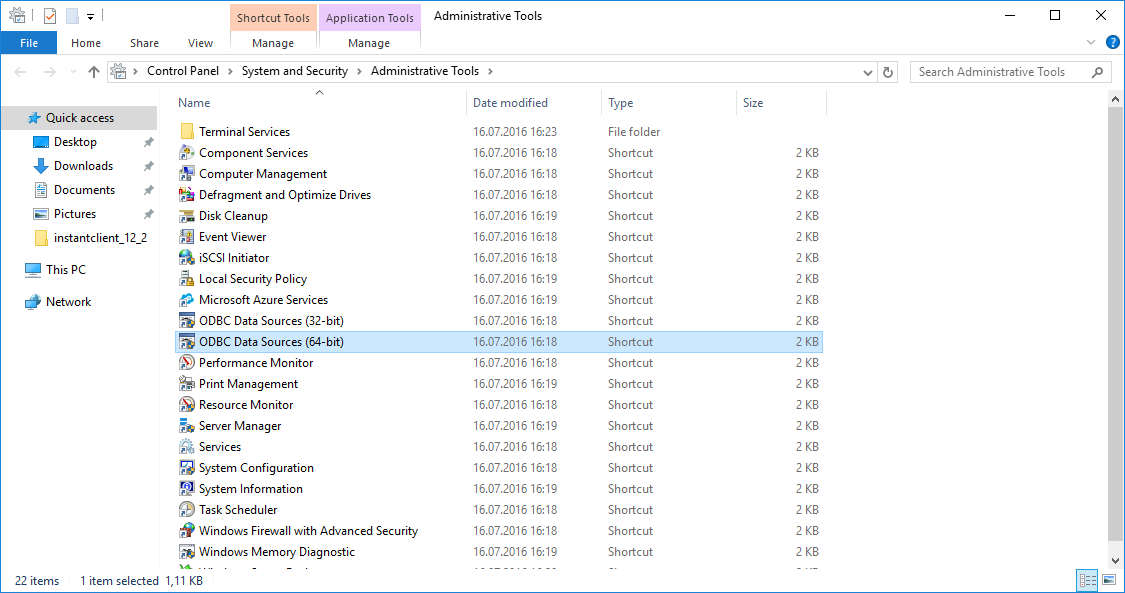
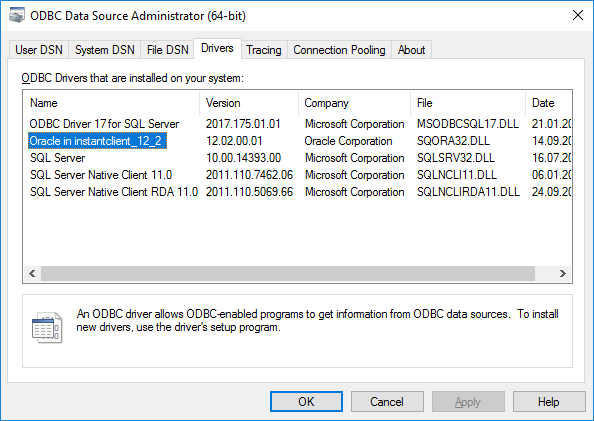
To create a new Oracle ODBC Data Source, open Control Panel >> Administrative Tools >> ODBC Data Sources (32bit). If you are using 64 bit version, choose the ODBC Data Sources (64bit).
Click Add to add a new DSN. Select “Oracle in instantclient_12_2” from the list. Click Finish. Next, enter the Oracle ODBC Driver Configuration. Give the new Data Source Name, select TNS Service Name and User ID. Click Test Connection to validate the connection to the Oracle Database Server.


Troubleshooting
On my first attempt, I cannot get the list of the TNS Service when creating a new ODBC Connection. To solve this, we need to copy or create the tnsnames.ora in the Oracle Client Directory. Open Notepad and then copy and paste these lines and then save it as tnsname.ora. Save the file in the Oracle Client directory (C:\Oracle\Product\client\instantclient_12_2).
This is the content of my tnsnames.ora which is works well
LISTENER_ORCL =
   (ADDRESS = (PROTOCOL = TCP)(HOST = localhost)(PORT = 1521))
ORACLR_CONNECTION_DATA =
   (DESCRIPTION =
     (ADDRESS_LIST =
       (ADDRESS = (PROTOCOL = IPC)(KEY = EXTPROC1521))
     )
     (CONNECT_DATA =
       (SID = CLRExtProc)
       (PRESENTATION = RO)
     )
   )
ORCL =
   (DESCRIPTION =
     (ADDRESS = (PROTOCOL = TCP)(HOST = 192.168.100.51)(PORT = 1521))
     (CONNECT_DATA =
       (SERVER = DEDICATED)
       (SERVICE_NAME = orcl)
     )
   )
MYDB01 =
   (DESCRIPTION =
     (ADDRESS = (PROTOCOL = TCP)(HOST = 192.168.100.51)(PORT = 1521))
     (CONNECT_DATA =
       (SERVER = DEDICATED)
       (SERVICE_NAME = mydb01)
     )
   )
After that, we need to tell the system to use this tnsnames.ora config file. Open the Environment Variable again and add a new entry with the following value:
- Variable Name: TNS_ADMIN
- Variable Value: C:\Oracle\Product\client\instantclient_12_2
Don’t forget to change the variable value with your Oracle Client Directory.

Now you should be able to pick or select the TNS service. Thanks for reading this how to install Oracle ODBC driver on Windows 10. Cheers

![]()
На сервере с операционной системой Windows Server 2016 потребовалось установить Oracle Instant Client 12.2 с драйвером ODBC.
Ничего сложного в установке нет, но почему-то не всегда это получается сделать с первого раза.
Установка Oracle Instant Client 12.2
Внимательно читаем инструкцию:
https://www.oracle.com/ru/database/technologies/instant-client/winx64-64-downloads.html#ic_winx64_inst
Скачиваем пакет instantclient-basic-windows.x64-12.2.0.1.0.zip. Распаковываем. Внутри находится папка instantclient_12_2. Копируем её на диск C:\ в папку oracle так, чтобы получился путь:
C:\oracle\instantclient_12_2
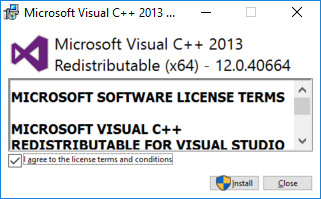
Для работы пакета 12.2 требуется Microsoft Visual Studio 2013 Redistributable. Скачиваем и устанавливаем.
В переменную PATH добавляем путь C:\oracle\instantclient_12_2. Для этого в свойствах компьютера нажимаем Environment Variables…
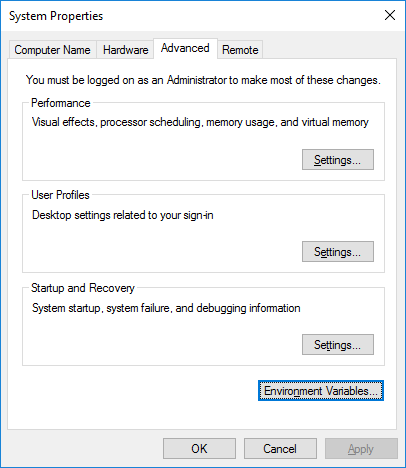
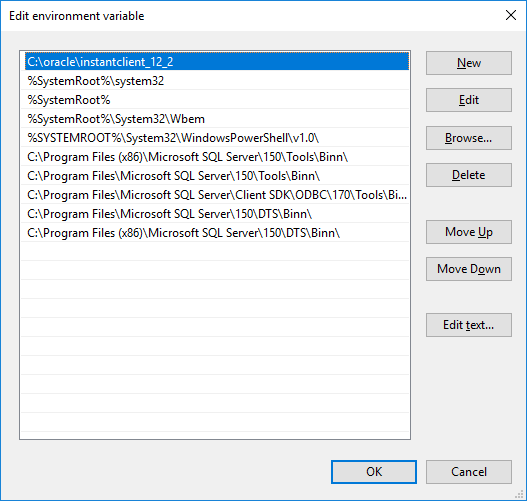
В нижней секции System variables находим переменную Path и редактируем, Edit…
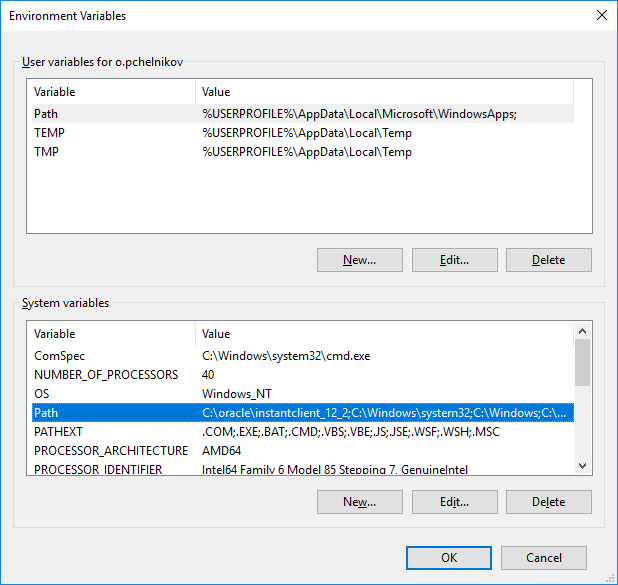
Добавляем путь C:\oracle\instantclient_12_2 и кнопкой Move Up перемещаем его вверх.
Ok.
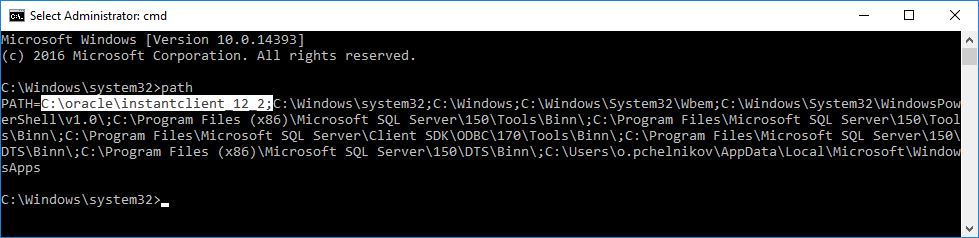
Проверим что получилось. В командной строке под администратором выполняем команду:
pathВ пути долен присутствовать элемент «C:\oracle\instantclient_12_2;».
Если нам нужно использовать собственные конфигурационные файлы: tnsnames.ora, sqlnet.ora, ldap.ora, или oraaccess.xml; то создаём директорию:
C:\oracle\instantclient_12_2\network\admin
и копируем эти файлы в неё. Если необходимо использовать конфигурационные файлы в другой директории, то укажите путь к ней в серверной переменной TNS_ADMIN.

Установка ODBC
Там же где скачивали Oracle Instant Client 12.2, находим для той же версии пакет ODBC instantclient-odbc-windows.x64-12.2.0.1.0-2.zip. Скачиваем, распаковываем.
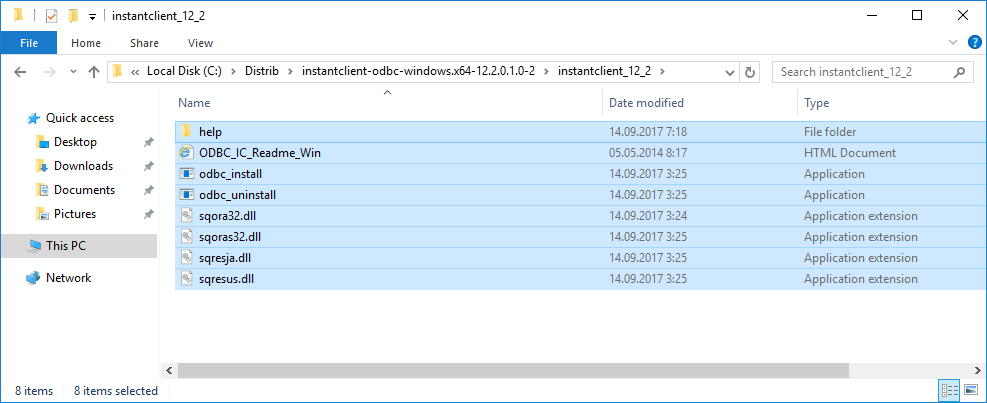
Содержимое копируем в C:\oracle\instantclient_12_2.
ODBC устанавливается путём запуска файла odbc_install.exe.
Для удобства запускаем его из командной строки под администратором.
Oracle ODBC Driver is installed successfully.

При запуске можно увидеть ошибку:
Oracle ODBC driver with same name already exists

В этом случае добавляем пользователя под которым работаем в группу локальных администраторов и бэкап-операторов. После чего снова запускаем командную строку под администратором и устанавливаем ODBC. Недостаточно просто быть в доменной группе, которая добавлена в локальные администраторы. Пользователь должен явно числиться локальным админом.
Проверяем в Administrative Tools. Запускаем ODBC Data Sources (64-bit).
Во вкладке Drivers должен появится пункт «Oracle in instantclient_12_2».
Перезагружаем сервер, чтобы наши приложения подцепили новый PATH.
Ссылки
Установка Oracle Instant Client на Ubuntu