![]()
Download Article
An in-depth guide to stop your Windows 10 computer or laptop from updating automatically
![]()
Download Article
- Disabling the Update Service
- Using a Metered Connection
- Using Group Policy Editor
- Disabling App Updates
- Video
- Q&A
- Tips
- Warnings
|
|
|
|
|
|
|
Do you want to turn off auto updates on your Windows 10 computer? While there is no way to permanently disable automatic updates, you can delay them indefinitely by using the Services program or by setting your Wi-Fi as a metered connection. You can also disable automatic updates for the apps and drivers on your computer. Be advised that stopping Windows updates will make your system more vulnerable to viruses and malware. This wikiHow will show you how to turn off automatic updates on your Windows 10 computer.
Things You Should Know
- Open «Start» and enter «Services». Click «Services» → «Windows Services» → «Manual» → select «Disabled» → «Apply» → «OK».
- Open «Settings» → «Network & Internet» → «Wi-Fi» → click your network → toggle on «Set as metered connection».
- Disabling Windows 10 updates will increase your risk for viruses and malware.
-

1
Press the Windows key on your keyboard. This opens the Start menu and activates the search bar.
-
Understand the limitations of this method. While disabling the automatic update service will temporarily halt any Windows 10 cumulative updates, the service will re-enable itself after a certain amount of time.[1]
-
Understand the limitations of this method. While disabling the automatic update service will temporarily halt any Windows 10 cumulative updates, the service will re-enable itself after a certain amount of time.[1]
-
2
Type services, and click Services in the search results. Doing so will open the Services window.
- You can also press the Windows key + R to open the Run window. Type services.msc and press Enter.
Advertisement
-
3
Scroll down and double-click Windows Update. Doing so opens the Windows Update Properties window.
-
4
Click the «Startup type» menu and select Disabled. It’s in the middle of the window. Selecting Disabled will prevent the Windows Update service from automatically starting itself for the time being.
- If you don’t see this option, first make sure that you’re on the right tab by clicking General at the top of the Properties window.
-
5
Click the Stop button. You’ll find this option near the bottom of the window. Clicking it prompts the Windows Update service to stop running.
-
6
Click Apply, then click OK. Both options are at the bottom of the window. Doing so will apply your settings and close the Properties window. The Windows Update service should now be disabled.
-
7
Check the update service periodically. Any time you restart your computer or go more than two days without shutting down, open Services and check the «Windows Update» status to ensure that it’s still disabled. While the Windows Update service shouldn’t turn itself back on often, it will occasionally do so.
- If you see «Disabled» to the right of the «Windows Update» heading, Windows Update is still disabled.
- If you see anything other than «Disabled» to the right of the «Windows Update» heading, disable the Windows Update again.


Advertisement
-
1
Open your Windows Settings
. You’ll find this gear icon in the Start menu, which is typically at the bottom-left corner of the screen. Click the gear in the lower-left side of the Start menu opens your Settings.
- This method won’t work for Ethernet connections. You can only disable automatic updates by using this method on a Wi-Fi connection.
-
2
Click
Network & Internet. It’s in the Settings window.
-
3
Click the Wi-Fi tab. You’ll find this option in the upper-left side of the window.
-
4
Click your current connection’s name. It’s near the top of the page. Doing so will open the Wi-Fi connection’s settings page.
-
5
Scroll down to «Set as metered connection» and turn the feature On
. This sets your connection to metered, which will prevent Windows from downloading updates over your currently connected network.
- If this switch is colored and has «On» next to it, your Wi-Fi is already set up as a metered connection.


Advertisement
-
1
Make sure that you’re using the right version of Windows. You’ll need a pre-Anniversary edition of Windows 10 Pro or an equivalent. You can’t use this method if you’re using Windows 10 Home edition.
- The Windows 10 Education and Enterprise editions also include the Group Policy Editor.
- You can check your version of Windows by typing system into Start, clicking System Information near the top of the menu, and looking for «Microsoft Windows 10 Professional» to the right of the «OS Name» heading.
- The Windows Anniversary update removed the option to turn off automatic updates from the Group Policy Editor, so this method will not work if you’ve been keeping Windows 10 up to date.
-
2
Press ⊞ Win+R. Pressing these two keys at the same time opens the Run dialog window. You can also get here by typing run into the Search bar.
-
3
Type gpedit.msc into the Run window and click OK. The Group Policy Editor window will open.
-
4
Navigate to the «Windows Update» folder. In the sidebar on the left side of the Group Policy Editor window, do the following:
-
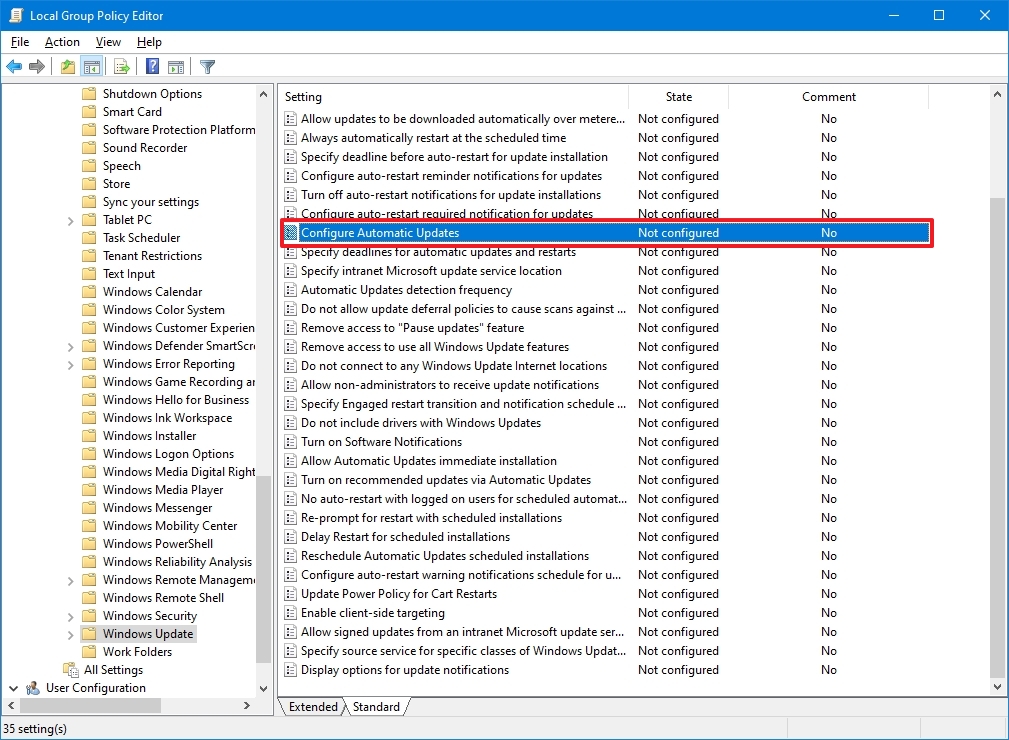
5
Click Configure Automatic Updates. It’s an item in the main Group Policy Editor window. Doing so selects this item.
-
6
Open the «Configure Automatic Updates» properties window. Right-click the selected Configure Automatic Updates item, then click Edit in the resulting drop-down menu.
-
7
Check the «Enabled» box. It’s in the upper-left side of the window.
-
8
Click the «Configure automatic updating» drop-down menu. This option is on the left side of the window.
-
9
Click 2 — Notify for download and notify for install. It’s in the drop-down menu. This option ensures that you’ll be asked before updates are installed, allowing you to decline the updates.
-
10
Click Apply, then click OK. Doing so saves your changes.
-
11
Apply your changes. To do so:
- Open Start
- Open Settings
- Click Update & Security
- Click Windows Update
- Click Check for updates
- Wait for Windows to identify available updates (Windows will not install these updates).
- When finished, restart your computer. Once your computer finishes restarting, your update preferences will be saved.
- You’ll still be able to manually allow updates as they become available.


Advertisement
-
1
Open Start
. Click the Windows logo in the bottom-left corner of the screen. The Start menu will pop up.
-
2
Click
Microsoft Store. You should usually see this option on the right side of the Start menu.
- If you don’t see the Store icon in the Start menu, type store into the search bar at the bottom of the menu and then click Store when it appears at the top of the menu.
-
3
Click ⋯. It’s in the top-right corner of the window. This will prompt a drop-down menu.
- On older versions of Windows 10, you’ll click your profile picture in the upper-left corner of the Windows Store.
-
4
Click Settings. This is in the drop-down menu.
-
5
Click the colored «Update apps automatically» switch
. Doing so will turn off the switch
.
- If this switch is off, updates for Windows apps are already disabled.


Advertisement
Add New Question
-
Question
What do I do if the Windows Update Service keeps turning itself back on when I disable it?

When you are disabling the Microsoft Update Service, on tabs you’ll see «recovery» is set to «one» in «one minute» and «at restart.» change that to «9999,» «day» and no restart. This will prevent it from restarting the service automatically, unless you restart it manually.
-
Question
If updates are disabled, will my PC still boot?
Yes. Updates simply keep the system more up-to-date and secure.
-
Question
Why does Windows need updates?
There are different types of updates. Security updates help fix any vulnerabilities in Windows so that malware cannot infect your system. Feature updates add new features and interface changes, and are usually delivered a few times a year. Bug fixes fix any software errors and glitches that make it work improperly. These updates can either be delivered alone or bundled with each other in a Windows update.

See more answers
Ask a Question
200 characters left
Include your email address to get a message when this question is answered.
Submit
Advertisement
Video
-
Automatic updates often improve the use and security of Windows, though these updates can eventually slow down an older computer.
Thanks for submitting a tip for review!
Advertisement
-
Disabling Windows Updates makes your system vulnerable to malware. It is strongly recommended that you do not disable updates in Windows.
Advertisement
About This Article
Article SummaryX
1. Type «services» into the Windows search bar.
2. Click Services.
3. Double-click Windows Update.
4. Select Disabled from the «Startup type» menu.
5. Click Stop.
6. Click Ok.
7. Click Ok.
Did this summary help you?
Thanks to all authors for creating a page that has been read 312,386 times.
Is this article up to date?

Contents
- 1 How to Disable Automatic Updates Using Windows Settings
- 2 How to Disable Automatic Updates in Windows 11 / Windows 10 Permanently Using Group Policy
- 3 How to Disable Automatic Updates Using Windows Registry
- 4 How to Turn Off Automatic Updates in Windows 11 / Windows 10 Using a Metered Connection
- 5 Extra: How to Turn off Automatic Updates for Microsoft Store Apps
Automatic updates in Windows 11 / Windows 10 are a feature that allows your PC to download and install the latest security patches, bug fixes, and feature enhancements from Microsoft. Automatic updates help keep your PC running smoothly and securely.
However, sometimes they can cause problems such as blue screen errors, missing drivers, incompatible applications, or server configuration issues. These problems can affect your device’s performance, stability, or functionality. If you encounter any of these problems after updating Windows 11 / Windows 10, you can try some troubleshooting steps to fix them.
By Default, When Will Windows Install Software Updates?
By default, Windows 11 / Windows 10 will install software updates at 3:00 A.M. every morning. This is to ensure that the system is up-to-date and secure without interrupting the user’s work or leisure time. You can change this setting by adjusting the active hours.
Should I Turn off Automatic Windows Updates?
There are several ways to turn off automatic updates in Windows 10 and Windows 11, such as pausing them for up to 35 days, setting your Wi-Fi as a metered connection, or disabling the Windows Update service. However, be aware that stopping automatic updates can make your system more vulnerable to viruses and malware, so you should always check for updates manually and install them as soon as possible.
One thing to consider regarding Windows Updates when on the go might be the amount of data transferred for downloading the packages. The volume of this “data overhead” for Windows updates depends on several factors, such as the size and number of updates, the settings for delivery optimization, and the network conditions. A typical monthly update can be around 200 MB to 500 MB in size, while a major feature update can be up to 4 GB. However, these numbers may vary depending on how often Windows Update checks for updates and what kind of updates are available.
⚠️ Please note: The methods described below are the same in Windows 11 as in Windows 10. However, bear in mind that we’ll be using screenshots from Windows 11, so your UI may look a little different.
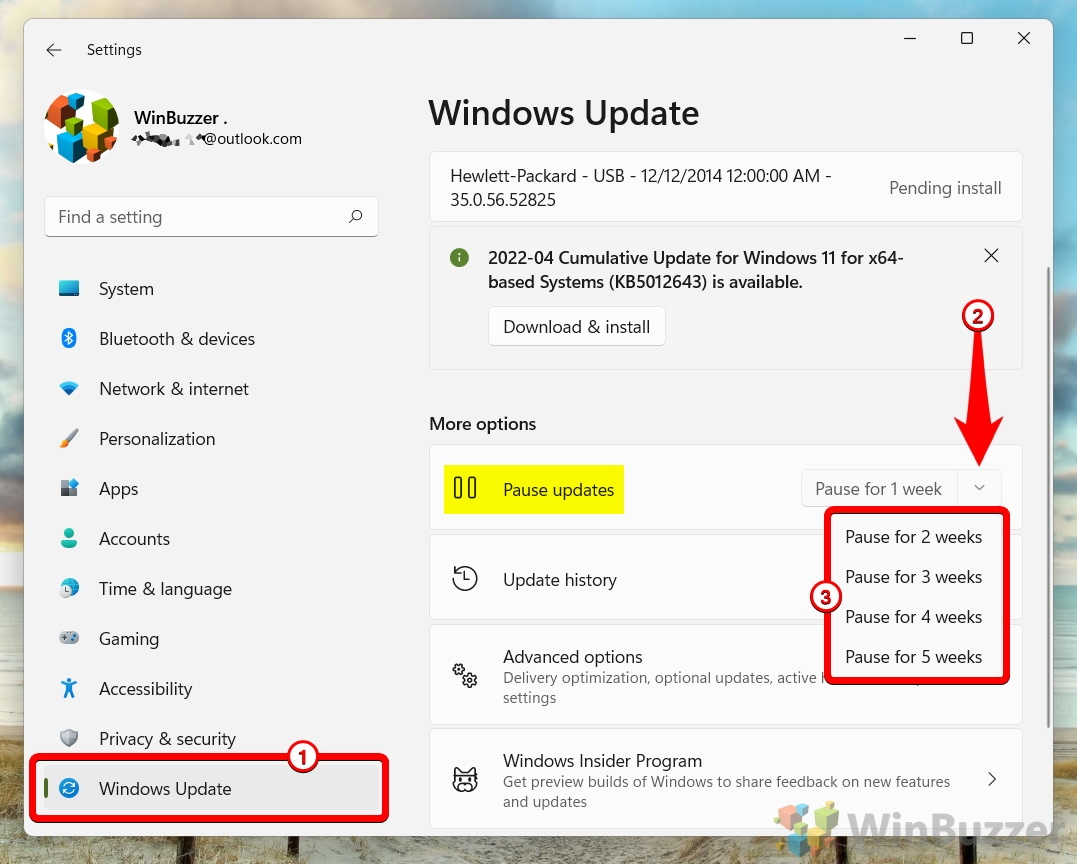
How to Disable Automatic Updates Using Windows Settings
Via Windows 11 / Windows 10 Settings you can pause automatic Windows updates for up to 35 days. Once this time has passed Windows updates will be reactivated and downloaded again automatically.
- Click the Windows button or hit the Windows key on your keyboard and open Settings

- Switch to “Windows Update” and pause automatic Windows updates as desiredYou can turn off automatic updates in Windows 11 / Windows 10 for 2, 3, 4, or 5 weeks. This is the easiest way to block Windows update downloads temporarily.

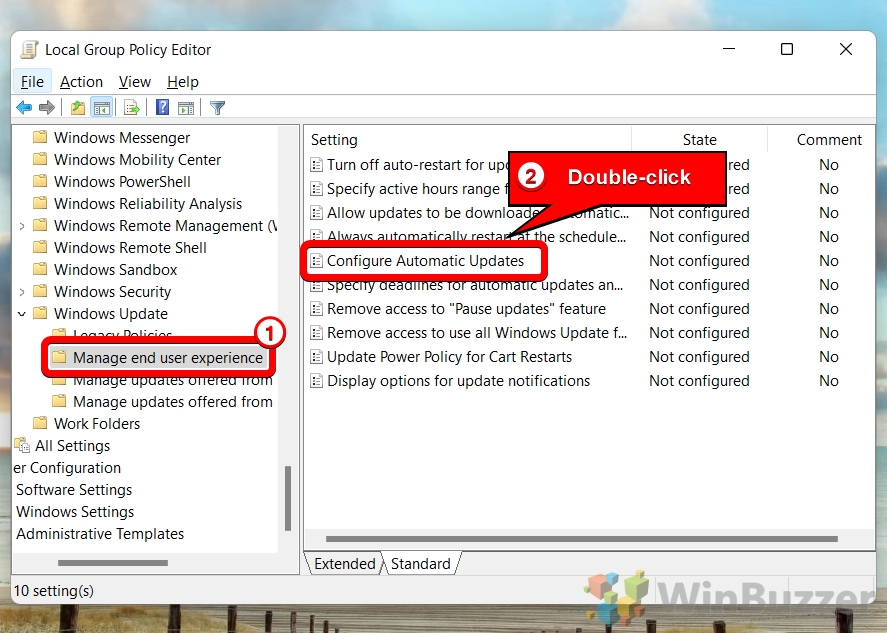
How to Disable Automatic Updates in Windows 11 / Windows 10 Permanently Using Group Policy
This option requires the Group Policy Editor which is missing in Windows 11 Home if you don´t install it manually.
If you disable automatic Windows updates using Group Policy, you will stop receiving any updates from Microsoft unless you manually check for them or use another method such as Windows Update Assistant. This means that your system may become vulnerable to security risks or compatibility issues over time. Therefore, it is recommended that you only disable automatic windows updates if you have a valid reason and a backup plan for keeping your system updated.
- Open the Group Policy Editor with a search for “gpedit”

- Open the “Configure Automatic Updates” group policy via double clickThe “Configure Automatic Updates” group policy is located in “Computer Configuration\Administrative Templates\Windows Components\Windows Update\Manage end user experience” of the Group Policy Management Console.

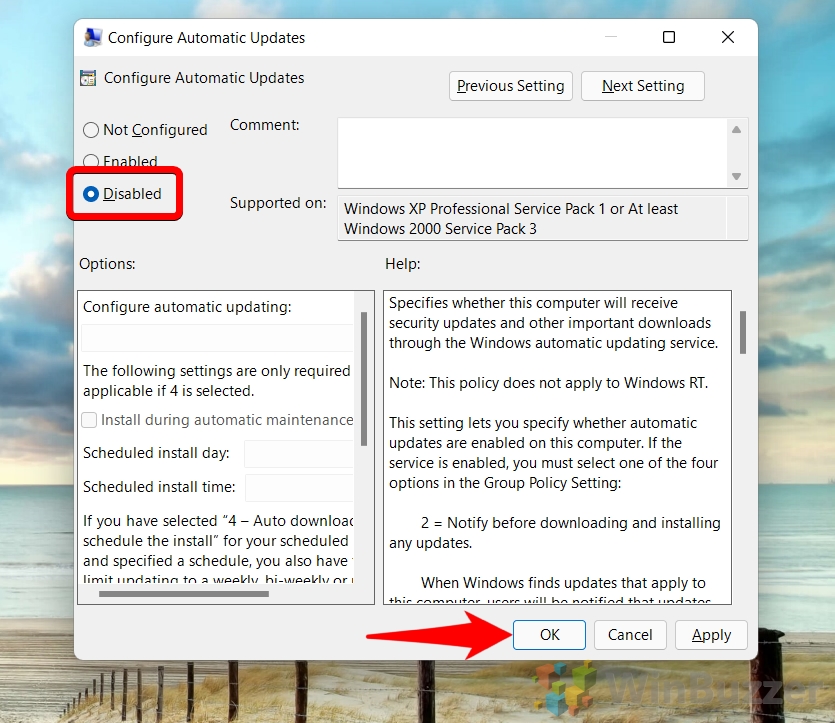
- Turn off the automatic Windows update checkerThe “Configure Automatic Updates” group policy has four options: Not Configured, Disabled, Enabled with scheduled installation, and Enabled with notify for download and notify for installation. Choose “Diabled” and “OK” to turn off auto updates in Windows 11 / Windows 10 completely.

- Revert to “Not Configured” to turn on automatic Windows updates againIf the “Configure Automatic Updates” group policy is set to “not configured”, it means that Windows Update will use the default settings for downloading and installing updates.

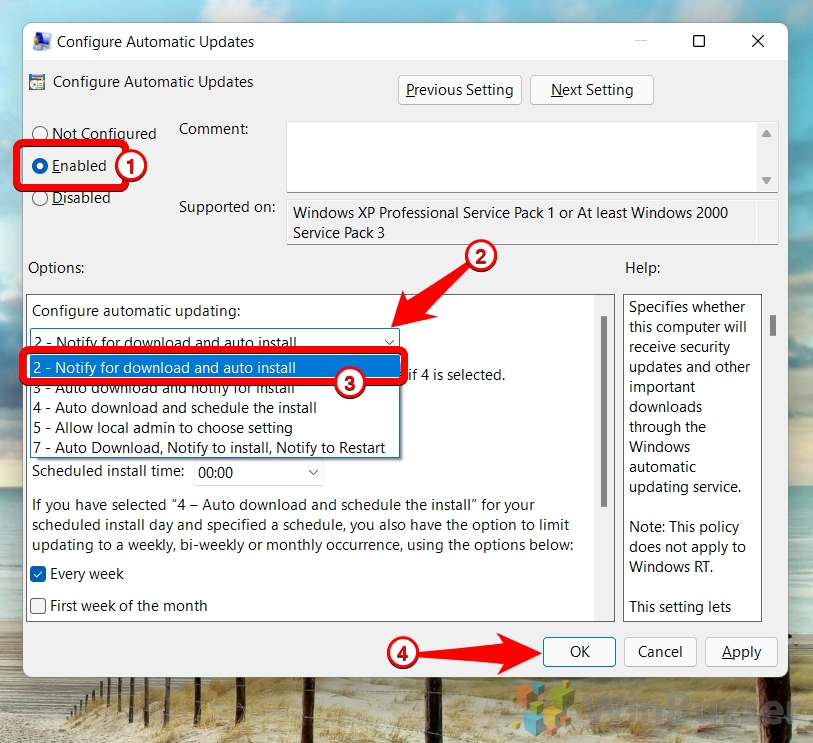
- Select “Enabled” to define the exact update beaviour
When you choose “Enabled” in the “Configure Automatic Updates” group policy, you can specify how and when Windows updates are installed on your computer. You have different options to choose one of the available Windows 11 update methods:
– Option 2 (Notify for download and auto install): This option notifies you before downloading updates and automatically installs them at a scheduled time.
– Option 3 (Auto download and notify for install): This option automatically downloads updates and notifies you when they are ready to be installed.
– Option 4 (Auto download and schedule the install): This option automatically downloads updates and installs them at a scheduled time that you specify.
– Option 5 (Allow local admin to choose setting): This option allows the local administrator to choose one of the above options on each computer.
– Option 7 (Auto download, Notify for install, Notify to Restar ): This option automatically downloads updates, notifies you when they are ready to be installed, and also notifies after installation for you to manually restart the PC


How to Disable Automatic Updates Using Windows Registry
One way to disable automatic updates on Windows 11 is to use the Registry Editor. As the Group Policy Editor is not available in the Home editions of Windows 11 / Windows 10 if you don´t install it manually, this method is the only one available there to turn off Windows automatic updates completely.
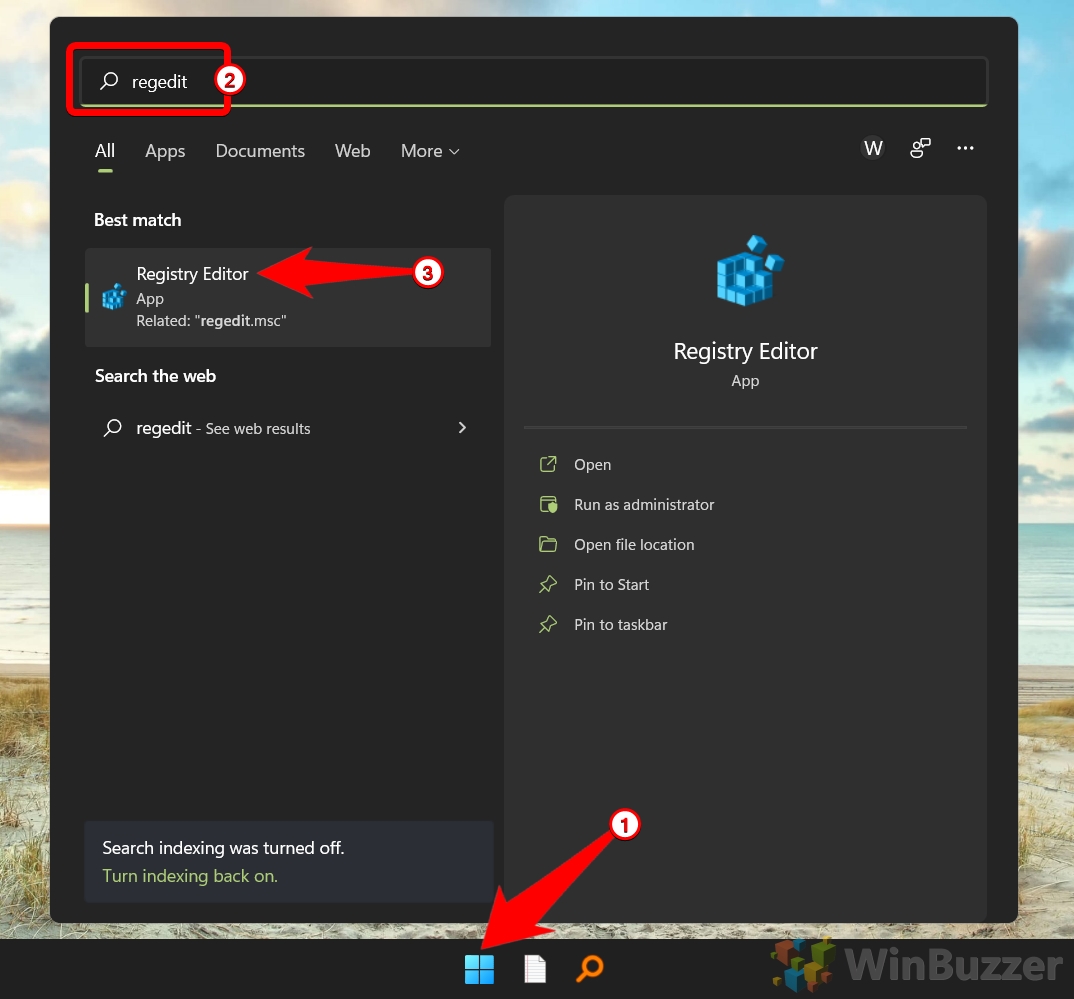
- Open Search by pressing the Windows key or hitting the start button, type “regedit” and start the “Registry Editor”

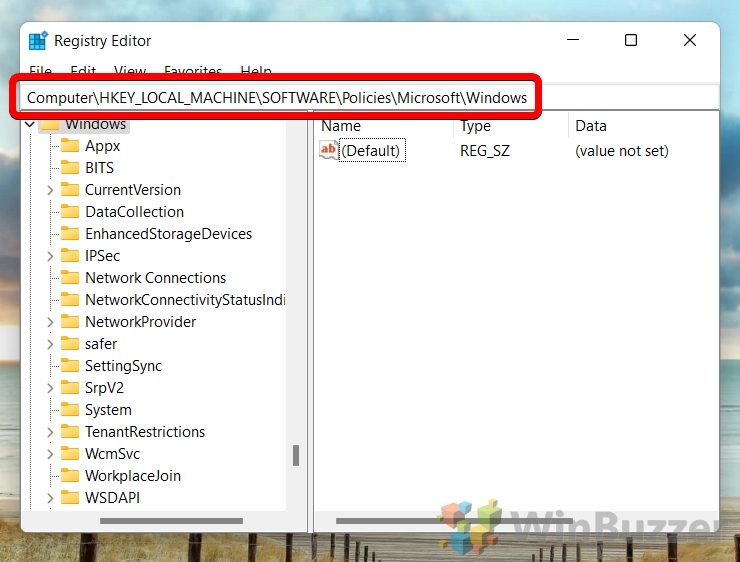
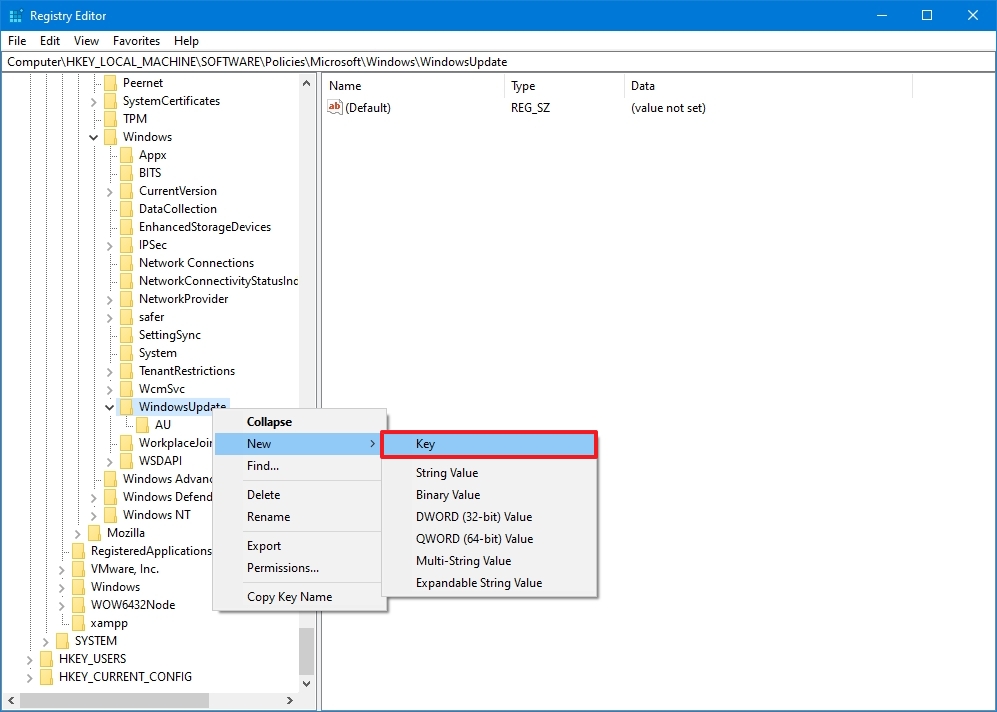
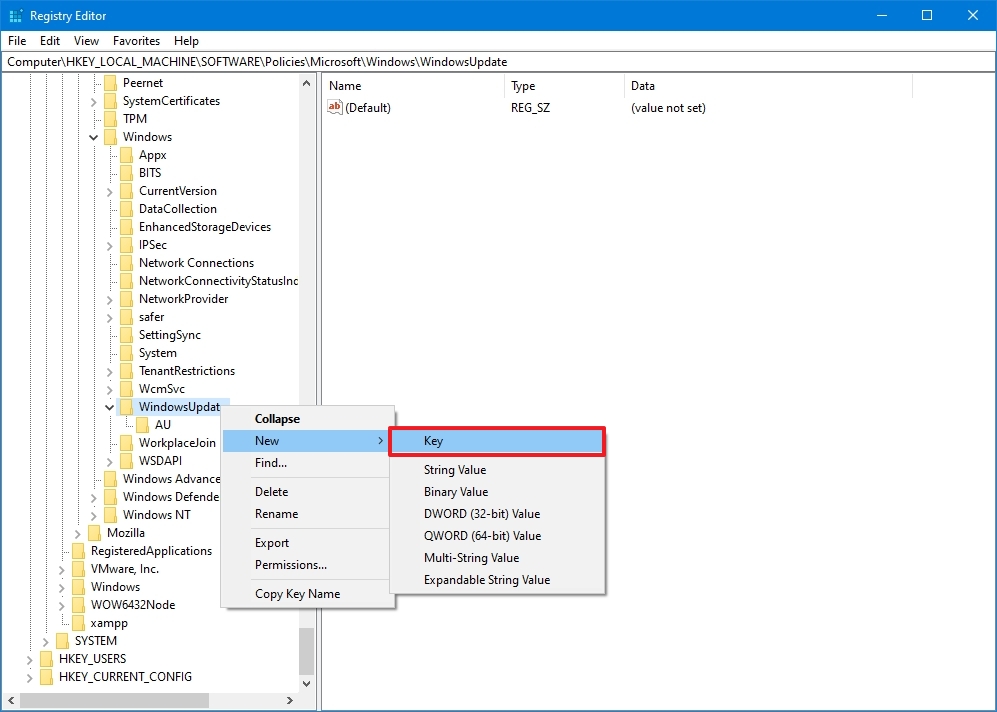
- Navigate to HKEY_LOCAL_MACHINE\SOFTWARE\Policies\Microsoft\Windows

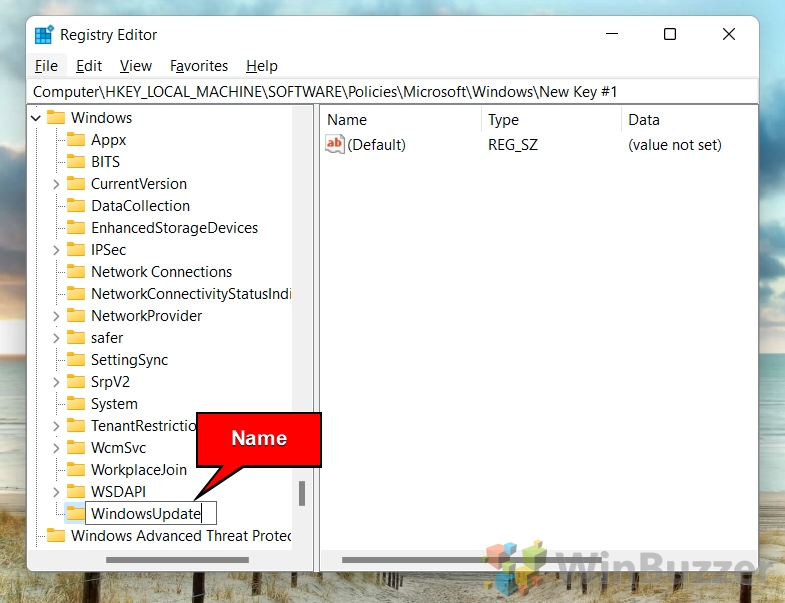
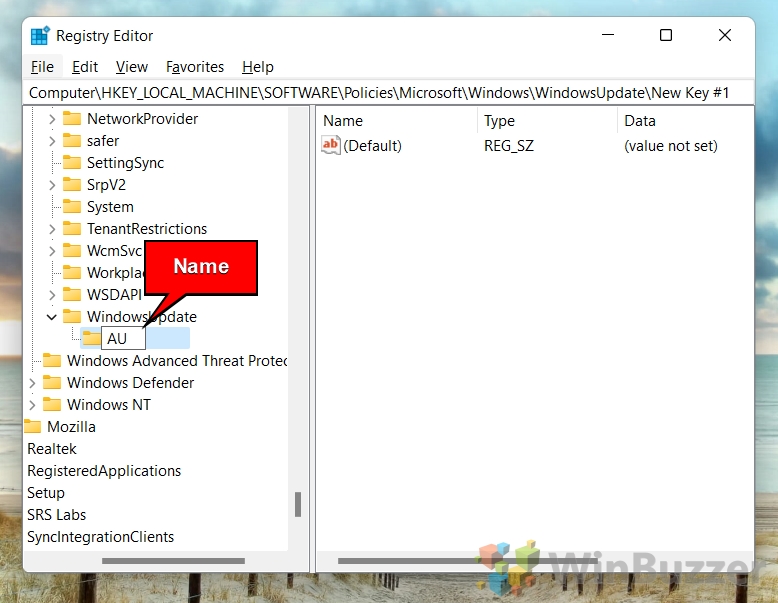
- Right-click on “Windows”, select “New” and then “Key”This step can be ignored if the registry key folder “WindowsUpdate” exists already.

- Name the new registry key “WindowsUpdate”

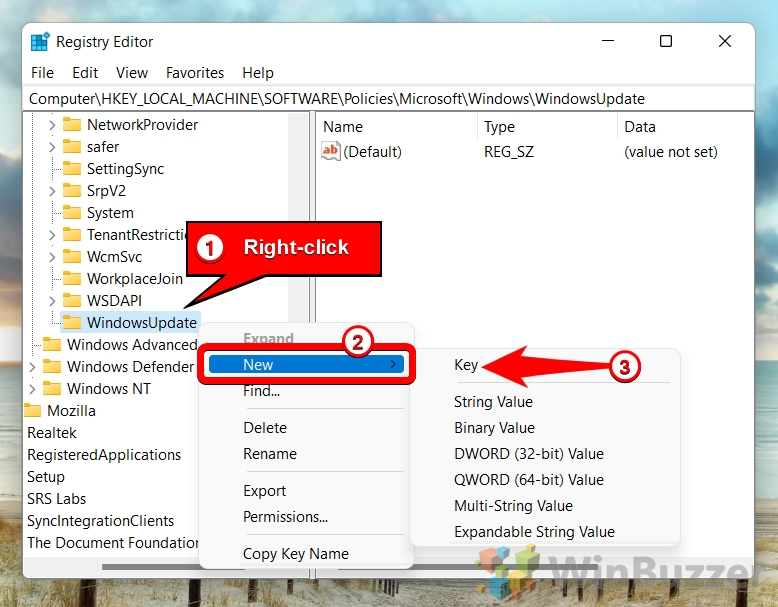
- Right-click “WindowsUpdate”, select “New” and click “Key”

- Name the registry key “AU”

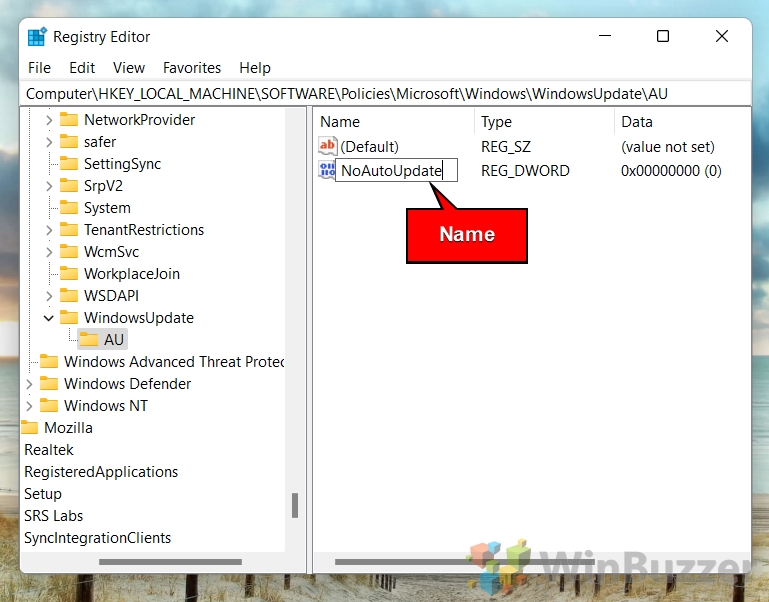
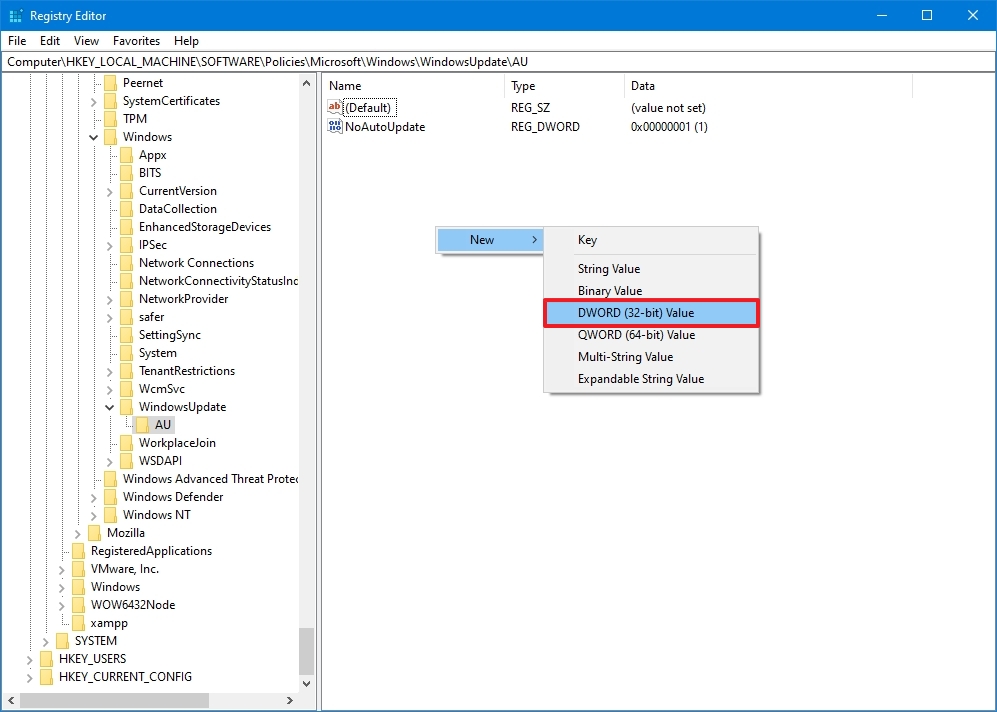
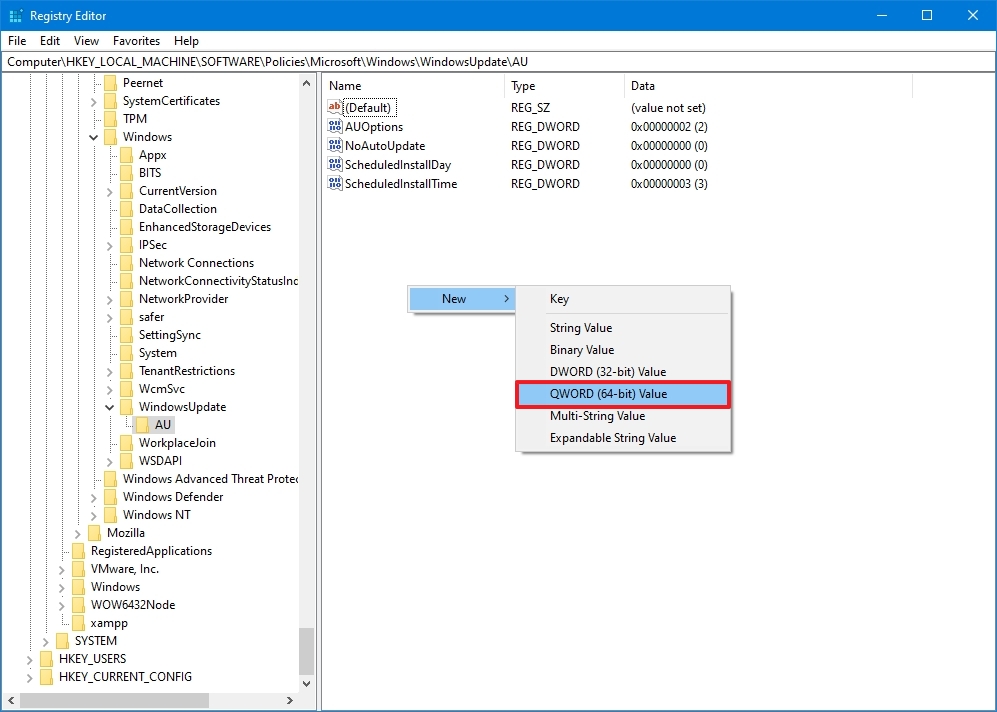
- Right-click in the right pane and choose “New” – “DWORD (32-bit) Value”

- Name the DWORD “NoAutoUpdate”

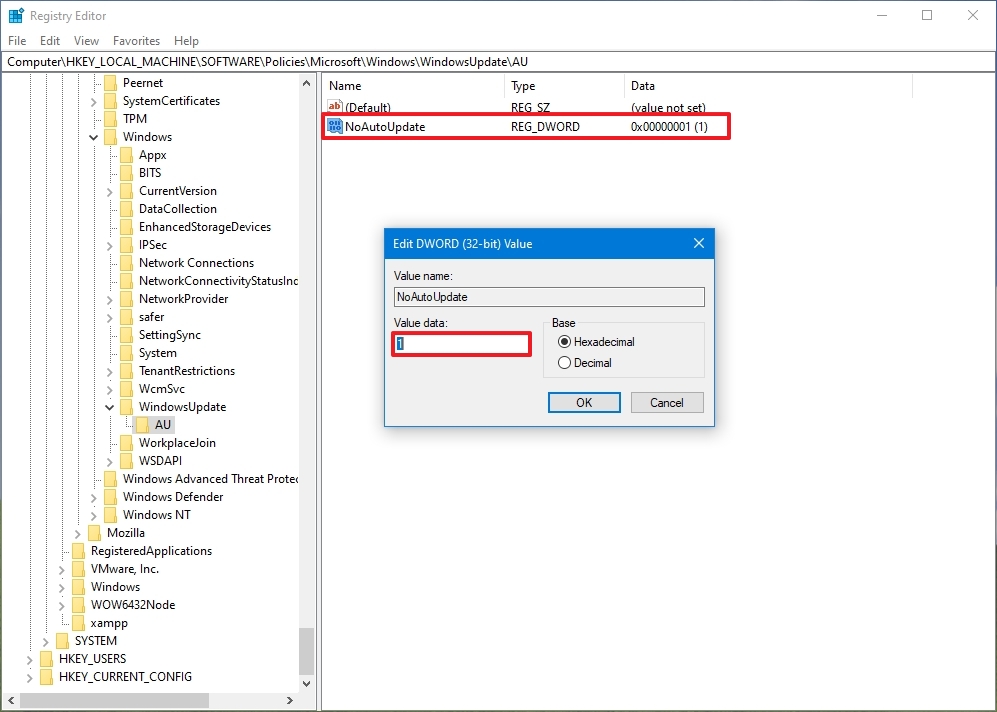
- Disable Windows 11 update downloads and installationDouble-click the DWORD “NoAutoUpdate”, write “1” in “Value data” and save via “OK”.

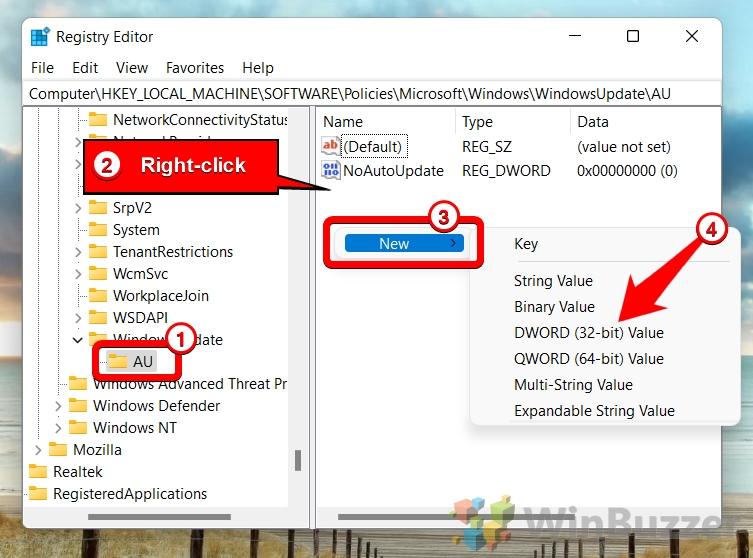
- Optional: Set automatic update behaviorInstead of completely turning off automatic updates in Windows 10 / Windows 11 you can use another registry edit to choose additional settings, just like in the Group Policy Editor. To do that, right-click again in the right pane and choose “New” – “DWORD (32-bit) Value”.

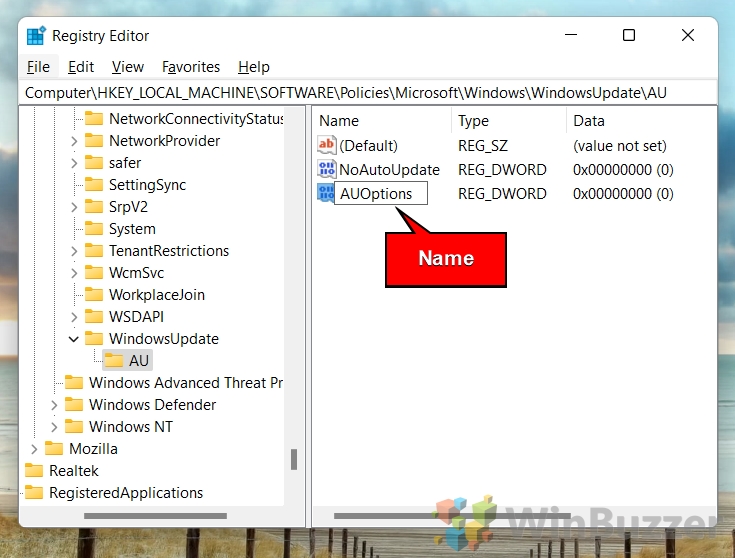
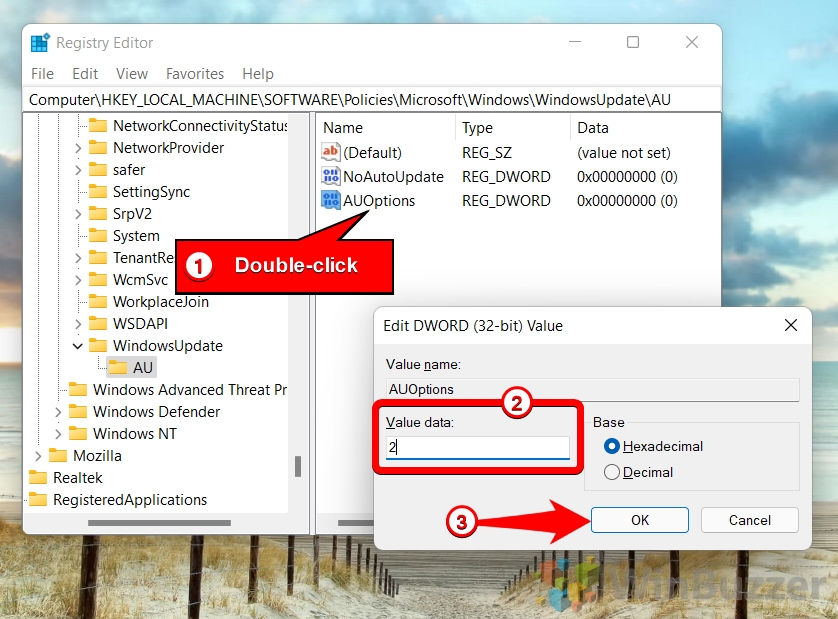
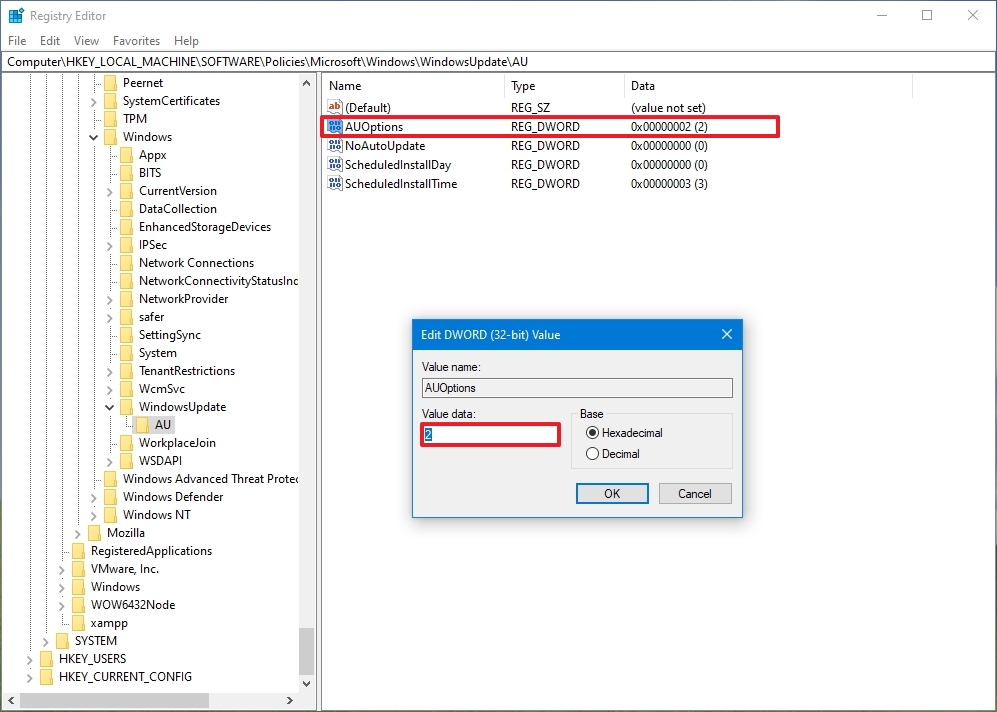
- Name the DWORD “AUOptions”

- Set the desired option for Windows updates
Double-click on “AUOptions”, set the desired option in “Value data” and save with “OK”. The value of this DWORD determines the various Windows 11 update methods. According to Microsoft, these are the possible values:
– 2: This option notifies you before downloading updates and automatically installs them at a scheduled time.
– 3: This option automatically downloads updates and notifies you when they are ready to be installed.
– 4: This option automatically downloads updates and installs them at a scheduled time that you specify.
– 5: This option allows the local administrator to choose one of the above options on each computer.
– 7: This option automatically downloads updates, notifies you when they are ready to be installed, and also notifies after installation for you to manually restart the PCBy default, Windows 11 uses value 4. To disable automatic updates, you can change it to value 2 or 3. However, this method is not recommended as it may cause security issues or compatibility problems.


How to Turn Off Automatic Updates in Windows 11 / Windows 10 Using a Metered Connection
You might want to consider to stop automatic updates in Windows 11 / Windows 10 using a metered connection for specific environments. A metered connection is an internet connection that has a data limit associated with it. Setting a metered connection in Windows can help reduce your data usage by preventing some apps and updates from using too much bandwidth. You can set a metered connection for Wi-Fi, Ethernet, or Cellular networks in Windows 10 by following some simple steps . This can be useful if you have a limited or expensive data plan, or if you want to save data for other purposes.

The Windows Store’s ability to update apps automatically can be a very useful tool, but it can also be a nuisance. Often, users will notice that the service host network service is taking up a lot of their bandwidth and slowing things down. Like automatic Windows updates, you might want to turn off automatic updates for apps, as shown in our other guide.
The automatic update feature, as the name suggests, automatically downloads and installs new updates in Windows. This is quite useful as newer updates contain security patches, bug fixes, and additional features. However, they aren’t always reliable as recent updates can contain bugs and security vulnerabilities of their own.
Windows updates generally come in the form of a feature and quality update. Feature updates bring massive changes to your operating system, and while they are automatically downloaded, you will need to manually install them. On the other hand, quality updates get automatically downloaded and installed, but you can choose to turn them off.
So, if you want to skip some of the updates that are known to be glitchy or avoid having to sit through an update installation in random intervals, you can try turning off the Windows automatic updates feature.
From Settings
The simplest way to turn off automatic updates is from Settings. However, you can only temporarily turn off automatic updates or pause them for a certain amount of time from Settings. After the set time is up, you will need to install new updates to be able to pause it again.
While this won’t be useful if you want to permanently disable Windows updates, it can come in handy when you want to temporarily stop updates due to reasons like bugs or known vulnerabilities in the newer updates.
- Launch Settings by pressing Windows + I
- Click on the Windows Update tab in the left sidebar.
- Besides Pause updates, click on the drop-down menu to select how long you want to pause the updates for.

- You can click on the same drop-down menu to extend your pause time if you want. (You can pause your updates for up to 5 weeks at a time.)

- If you want to resume your Windows updates early, you can click on the Resume updates button.


From Windows Services
You can permanently turn off your Windows updates by disabling the Windows update service startup. This service handles the detection, download and installation of all new Windows updates on your computer.
- Press Windows + R shortcut key to open Run box.
- Type
services.mscand press Enter to open Windows Services. - Locate the Windows Update service and double-click it.

- Next to Startup type, select Disabled from the drop-down menu.

- Click on the Stop option, and select Apply and OK.


The above steps will make sure the Windows update service will not start automatically whenever your computer boots up. However, you need to make sure there are no applications like Windows update assistant on your computer that can start the Windows update service. You can uninstall Windows update assistant to prevent this from happening.
From Group Policy Editor
Another way you can permanently disable your Windows automatic updates is from the Group Policy Editor. However, this utility tool is only available for the Pro and Enterprise edition of Windows. So, this method will not be useful for users with Windows Home edition.
- Launch Run box with the Windows + R shortcut key.
- Type
gpedit.mscand press Enter to open Group Policy Editor.
- Navigate to
Computer Configuration > Administrative Templates > Windows Components > Windows Update > Manage end user experience - Right-click the Configure Automatic Updates policy and select Edit.

- Select the Disabled option.

- Click Apply and OK.


After you disable this policy, Windows won’t perform automatic updates, but you will still be able to manually check for updates, and download and install them.
Additionally, you can also configure this policy to set up how your Windows automatic updates get installed or downloaded.
- Follow the above method till Step 4.
- Select the Enabled option.
- From the drop-down menu under Configure automatic updates, select how you want your automatic updates to behave. (If you want to turn off automatic updates, select 2 – Notify for download and auto install.)

- Click Apply and OK.

From Registry Editor
You can also turn off Windows automatic updates from the Registry Editor. Furthermore, unlike the Group Policy Editor, the Registry Editor can be accessed in all editions of Windows to disable automatic updates.
However, editing your Registry can have some serious consequences if done improperly. So, you should first backup your Registry
- Open Run Utility by pressing Windows + R keys.
- Type
regeditand press Enter to open Registry. - Navigate to
HKEY_LOCAL_MACHINE\SOFTWARE\Policies\Microsoft\Windows - Right-click on the Windows key, select New, and click on Key.

- Type WindowsUpdate as the new key’s name. (If the key is already present, skip these steps.)
- Right-click the WindowsUpdate key, select New, and click Key.

- Name the newly created key as AU and select it.
- Right-click on the blank area in the right panel, and select New > DWORD (32-bit) Value.

- Set the new entry’s name as NoAutoUpdate.

- Double-click on the NoAutoUpdate entry and set its value as
1.
- Click Ok and exit Registry.
- Restart your computer.


Disabling automatic updates in Registry is pretty much the same as disabling it in Group Policy Editor. In fact, you can also configure how your Windows automatic updates get installed or downloaded from Registry.
- Follow the above method till step 7.
- Right-click on the blank area in the right panel, and select New > DWORD (32-bit) Value.
- Name the new entry as AUOptions.

- Double-click the AUOptions entry and set its value to one of the following options:

- Click OK and exit Registry.
- Restart your Computer.


Turn On Metered Connection
Lastly, you can use a simple and effective workaround of turning on a metered connection to stop automatic updates. The metered connection reduces the data usage of your PC, but it also ensures no updates except critical security updates are being automatically downloaded.
- Press Windows + I to launch Settings.
- Click on Network & internet from the sidebar.
- Select Wi-Fi or Ethernet depending on your network type.

- Toggle on Metered connection. (If you’re connected through Wi-Fi, you will need to click on your Wi-Fi properties first.)


Additionally, if your Windows updates are still getting downloaded over a metered connection, make sure to toggle off the Download updates over metered connection option in Settings > Windows Update > Advanced options.
On Windows 10, cumulative updates download and install automatically as soon as they become available. Although this approach allows laptops and desktop computers to receive security updates to patch vulnerabilities, improve performance, and bring enhancements without user interaction, it is a very controversial feature.
Typically, it’s because updates contain bugs that can negatively affect the experience in many ways. For example, they could break existing features, introduce driver and application compatibility problems, or cause the Blue Screen of Death (BSoD), and they require a system restart to complete the installation, which can disrupt your workflow.
If you experience more problems than benefits during updates, or if you have a good reason to use a device without updates, depending on your edition of Windows 10, you can disable automatic updates using the Settings app or permanently with Group Policy and Registry.
This guide will walk you through the steps to prevent Windows Update from automatically downloading and installing updates on Windows 10.
How to disable automatic updates using Settings
You do not need to disable Windows Update permanently if you want to prevent the system from downloading a specific update immediately. Instead, you could pause updates for up to seven days.
To disable automatic updates temporarily, use these steps:
- Open Settings.
- Click on Update & Security.
- Click on Windows Update.
- Click the «Pause updates for 7 days» option.
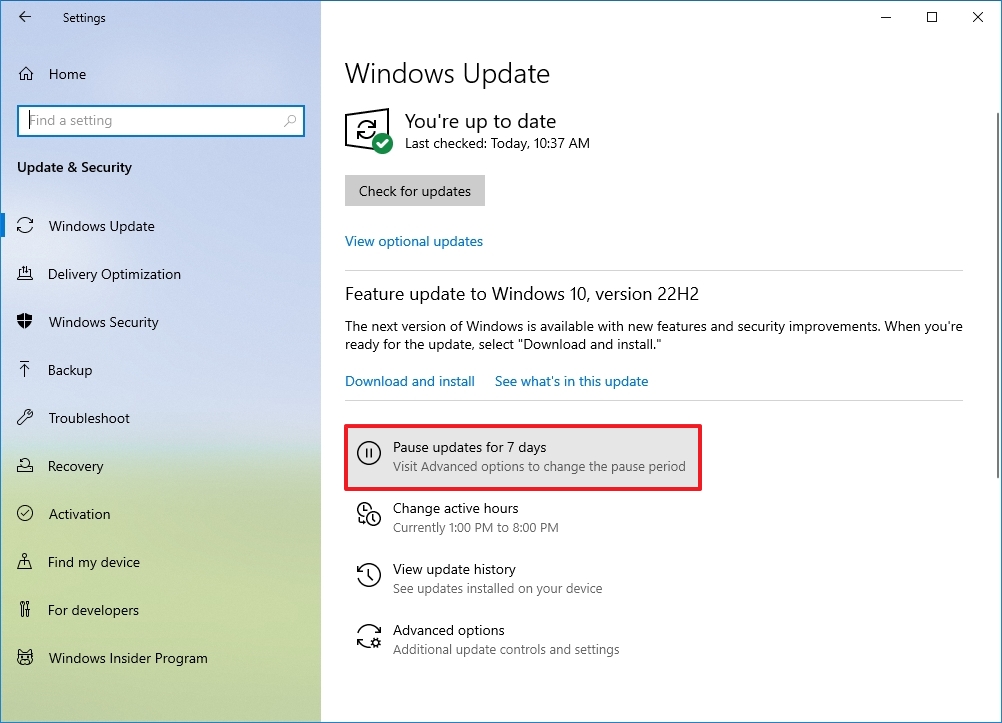
Once you complete the steps, Windows Update will no longer download for the time you specified. When the system reaches the pause limit, you will need to install the latest patch available to make the option available again.
You can always undo the changes with the instructions outlined above, but on step 4, choose the Select date option. Alternatively, you can accomplish the same effect by clicking the Resume updates button.
How to disable automatic updates using Group Policy
On Windows 10 Pro, the Local Group Policy Editor includes policies to permanently disable automatic updates or change the update settings to choose when patches should be installed on the device.
Disable Windows 10 updates
To disable automatic updates on Windows 10 permanently, use these steps:
- Open Start.
- Search for gpedit.msc and click the top result to launch the Local Group Policy Editor.
- Navigate to the following path: Computer Configuration > Administrative Templates > Windows Components > Windows Update
- Double-click the «Configure Automatic Updates» policy on the right side.
- Check the Disabled option to turn off automatic Windows 10 updates permanently.
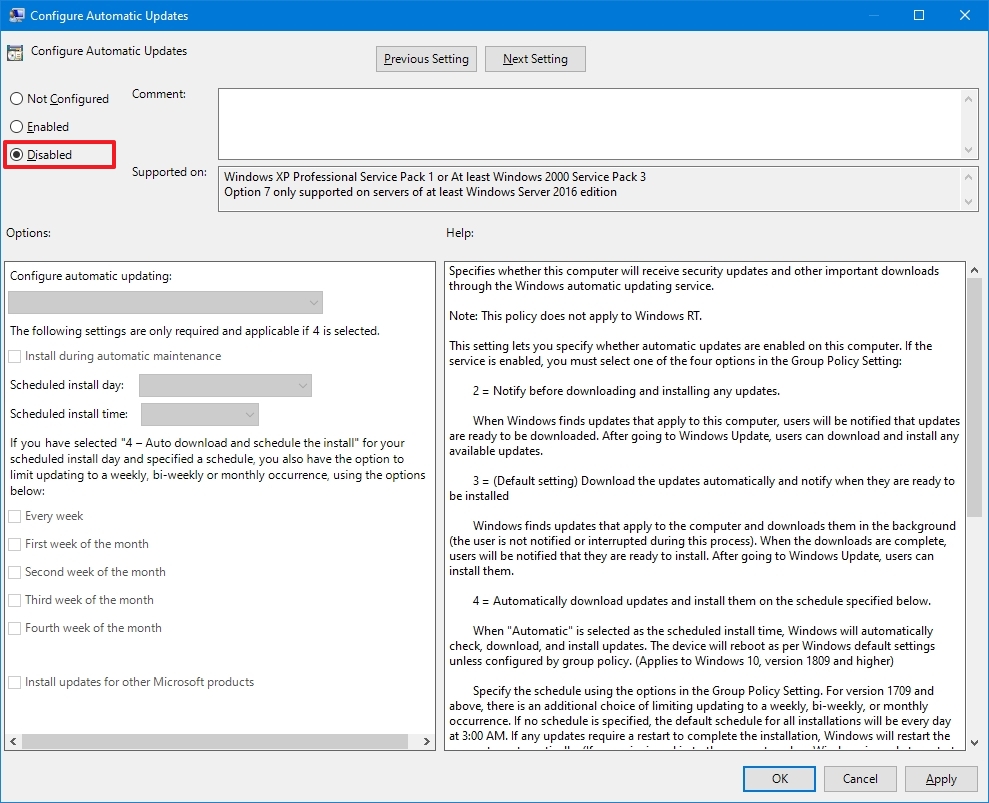
- Click the Apply button.
- Click the OK button.
After you complete the steps, Windows 10 will stop downloading updates automatically. However, the ability to check for updates manually will continue to be available on Settings > Update & Security > Windows Update, and clicking the Check for updates button to download the most recent patches as needed.
If you want to enable automatic updates on the computer again, you can use the same instructions outlined above, but in step 5, make sure to select the Not Configured option.
Limit Windows 10 updates
The Local Group Policy Editor also lets you choose how to disable automatic updates.
To manage Windows Update automatic downloads with Group Policy on Windows 10, use these steps:
- Open Start.
- Search for gpedit.msc and select the top result to launch the experience.
- Navigate to the following path: Computer Configuration > Administrative Templates > Windows Components > Windows Update
- Double-click the Configure Automatic Updates policy on the right side.
- Check the Enable option to turn on the policy.
- Under the «Options» section, select the option to prevent updates from downloading automatically on Windows 10:
- 2 — Notify for download and auto install.
- 3 — Auto download and notify for install.
- 4 — Auto download and schedule the install.
- 5 — Allow local admin to choose setting.
- 7 — Auto Download, Notify to install, Notify to Restart.
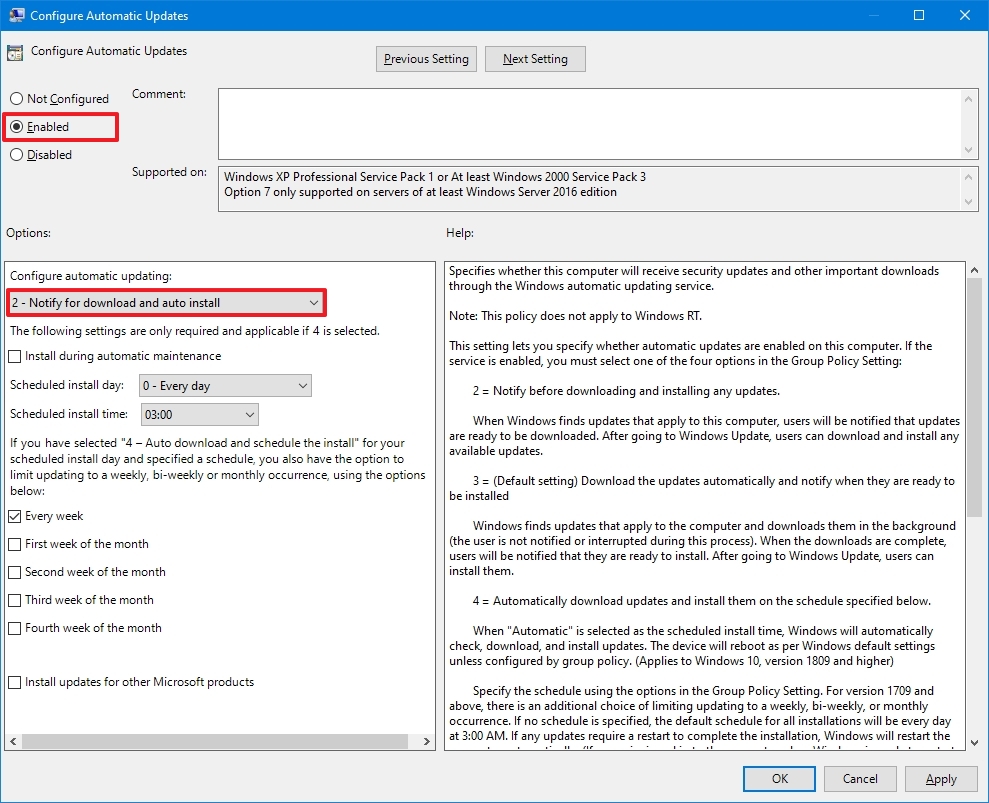
- Quick tip: The best option to disable automatic updates is the 2 — Notify for download and auto install option, but you can make a different selection. If you choose option 2, updates won’t download automatically. Instead, you will now see an «Install now» button to manually trigger an update on the Windows Update settings page.
- Click the Apply button.
- Click the OK button.
Once you complete the steps, automatic updates will be permanently disabled on Windows 10. However, when new updates become available, you can install them manually from the Windows Update settings page.
How to disable automatic updates with Registry
You can also use the Registry in two different ways to disable automatic updates on Windows 10.
Warning: This is a friendly reminder that editing the Registry is risky and can cause irreversible damage to your installation if you don’t do it correctly. Before proceeding, it’s recommended to make a backup of your PC.
Disable updates
To disable Windows 10 updates permanently by changing the Registry settings, use these steps:
- Open Start.
- Search for regedit and click the top result to launch the Registry Editor.
- Navigate to the following path: HKEY_LOCAL_MACHINE\SOFTWARE\Policies\Microsoft\Windows
- Right-click the Windows (folder) key, select the New submenu and choose the Key option.
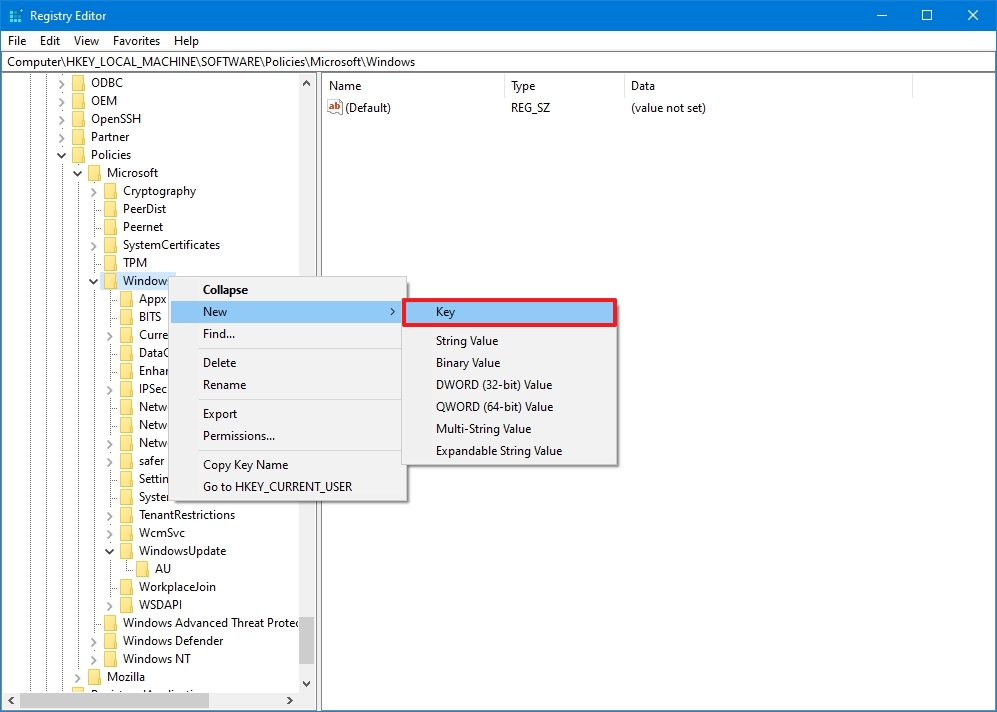
- Name the new key WindowsUpdate and press Enter.
- Right-click the newly created key, select the New submenu, and choose the Key option.
- Name the new key AU and press Enter.
- Right-click the AU key, select the New submenu, and choose the DWORD (32-bit) Value option.
- Name the new key NoAutoUpdate and press Enter.
- Double-click the newly created key and change its value from 0 to 1.
- Click the OK button.
- Restart the computer.
After you complete the steps, automatic updates will be disabled permanently on the device. However, you will still be able to download updates by clicking the Check for updates button on the Windows Update settings page.
If you want to undo the changes, you can use the same instructions outlined above, but on step 4, right-click the WindowsUpdate key, select the Delete option, then reboot the computer to apply the settings.
Limit updates
Finally, you can use the Registry to configure the system settings to decide how to get updates on Windows 10.
To use the Registry to stop automatic updates (but choosing how to receive updates), use these steps:
- Open Start.
- Search for regedit and click the top result to open the Registry Editor.
- Navigate to the following path: HKEY_LOCAL_MACHINE\SOFTWARE\Policies\Microsoft\Windows
- Right-click the Windows (folder) key, select the New submenu and choose the Key option.
- Name the new key WindowsUpdate and press Enter.
- Right-click the newly created key, select the New submenu, and choose the Key option.
- Name the new key AU and press Enter.
- Right-click the AU key, select the New submenu, and select the DWORD (32-bit) Value option.
- Name the new key AUOptions and press Enter.
- Double-click the newly created key and change the value (number only) to:
- 2 — Notify for download and auto install.
- 3 — Auto download and notify for install.
- 4 — Auto download and schedule the install.
- 5 — Allow local admin to choose settings.
- 7 — Auto Download, Notify to install, Notify to Restart.
- Quick note: These options are the same as the Group Policy settings, and option 2 is the closest to disable Windows Update permanently.
- Click the OK button.
- Restart the computer.
Once you complete the steps, cumulative updates will no longer download and install automatically. However, when a new update becomes available, you will find the option to install it manually from the Windows Update settings.
You can use the same instructions outlined above to restore the original settings, but on step 4, right-click the WindowsUpdate key, select the Delete option, and reboot the computer.
Updates are essential to fix security vulnerabilities, resolve issues, and improve the overall experience, no matter the version of Windows you use. However, you may still need to disable this feature in some situations. For instance, when you want to have complete control over updates on Windows 10, when you want to avoid issues since bugs are common in most rollouts, or when you are using a critical app or equipment and you do not want to encounter any compatibility issues.
More resources
For more helpful articles, coverage, and answers to common questions about Windows 10 and Windows 11, visit the following resources:
- Windows 11 on Windows Central — All you need to know
- Windows 10 on Windows Central — All you need to know
All the latest news, reviews, and guides for Windows and Xbox diehards.
Mauro Huculak is technical writer for WindowsCentral.com. His primary focus is to write comprehensive how-tos to help users get the most out of Windows 10 and its many related technologies. He has an IT background with professional certifications from Microsoft, Cisco, and CompTIA, and he’s a recognized member of the Microsoft MVP community.
Windows 10 offers Feature Updates (New Version of Windows 10) twice in a year (spring and fall) and monthly Quality Updates (maintenance and security).
Quality Updates (AKA Cumulative Updates) are smaller in size and install within minutes on the computer, while Feature Updates take up a long time.
On both Windows 10 Home and Pro Versions, the Quality Updates can be delayed or deferred up to a period of 35 days.
If you are using an older option of Windows 10, you won’t find the option to defer Windows updates. In which case you can use methods 2 & 4 as provided below.
1. Set Metered Connection
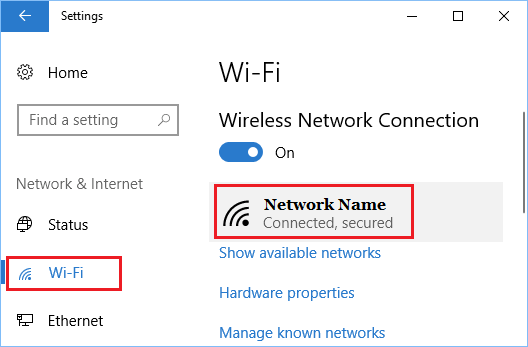
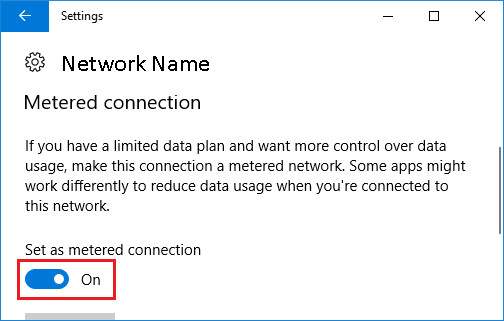
An easy way to Stop Windows 10/11 from automatically downloading updates is to set the WiFi connection on the computer as being Metered.
Go to Settings > Network & Internet > Select WiFi in the left-pane and click on your WiFi Network Name in the right-pane.
On the next screen, scroll down and move Set as metered connection toggle to ON position.
If you are connected to Ethernet, select Ethernet in the left pane, click on your active Ethernet Network in the right pane and enable Set As Metered Connection option on the next screen.
2. Disable Automatic Updates Using Administrative Tools
If you are using an older version of Windows 10, you can disable Auto Updates by signing into your Admin Account and following the steps below.
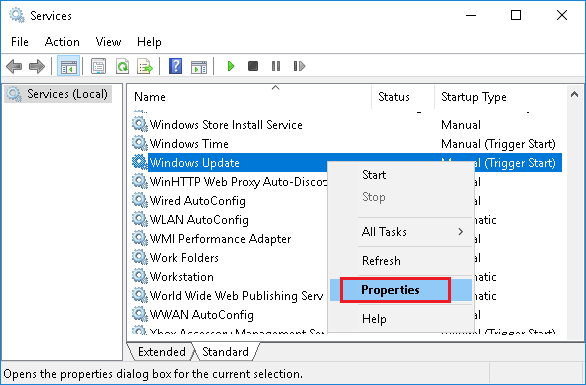
Right-click on the Start button and click on Run. In Run Command window, type services.msc and click on OK.
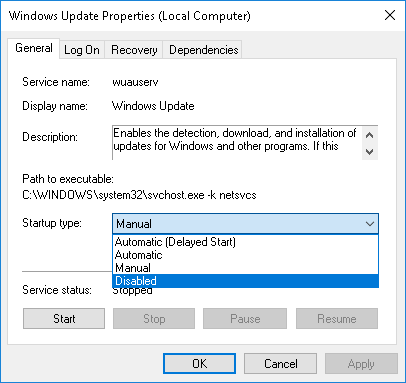
On the Services screen, right-click on Windows Update and select Properties in the menu that appears.
On Windows Update Properties screen, click on Startup type down-arrow and select the Disabled option.
Make sure you click on Apply and OK to save this change on your computer.
After disabling Updates using this method, it is important that you periodically check for Updates by going to Settings > Update & Security > Check for Updates.
You may see a message reading “updates were stopped on your computer” or similar. In such cases, click on Retry to download and install available updates on your computer.
If your computer has missed multiple updates, you may have to click on Check for Updates multiple times, until your computer says that it is up to date with Updates.
3. Delay Auto Updates up to 35 Days
Windows 10 also provides the option to Pause Updates for up to 35 Days.
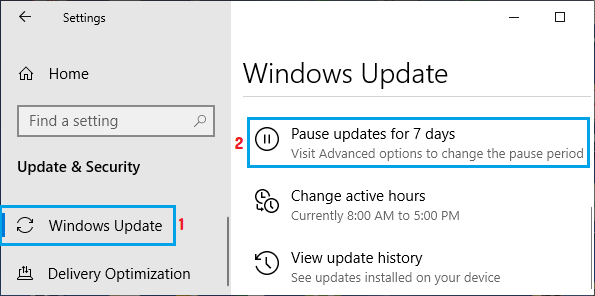
Go to Settings > Update & Security > Select Windows Update in the left-pane. In the right-pane, scroll down and click on Pause updates for 7 days option.
This will Pause Updates on your computer for a period of 7 days.
If required, you can keep clicking on Pause Updates for 7 more Days option, until you reach 35 days and Pause Updates option becomes grayed out.
4. Delay Auto Updates Until a Selected Date
Windows 10 also provides the option to delay Auto Updates up to a selected date.
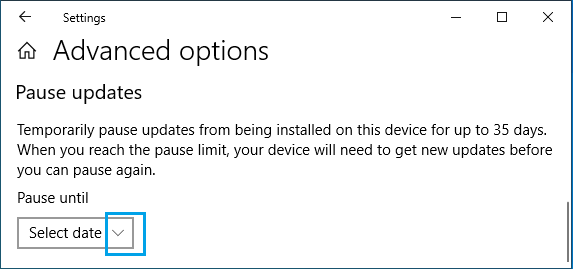
Go to Settings > Update & Security > Select Windows Update in the left-pane and click on Advanced options in the right-pane.
On the next screen, click on Pause until drop-down and select the Date up to which you want to stop Windows Auto Updates.
This will delay Windows Updates on your computer, until the specific date that you selected in the drop-down.
When the selected date arrives, Windows will automatically download and install the available updates on your computer.
Why Users Want to Disable Auto Updates
A common reason for disabling Auto Updates on a Windows 10 computer is to prevent the possibility of your work being interrupted during working hours.
Another reason for disabling Auto Updates is to prevent chances of an Update causing problems or becoming incompatible with Apps and programs installed on the computers.
After disabling or delaying Auto Updates, it is recommended that you periodically check for Updates and install them manually on the computer.
How to Fix Stuck Windows 10 Update How to Remove Bloatware From Windows 10 PC