To use the Snipping Tool when you have a mouse and a keyboard:
-
Press Windows logo key + Shift + S. The desktop will darken while you select an area for your screenshot.
-
Rectangular mode is selected by default. You can change the shape of your snip by choosing one of the following options in the toolbar: Rectangular mode, Window mode, Full-screen mode, and Free-form mode.
-
The screenshot is automatically copied to your clipboard. A notification also appears once you’re finished taking a screenshot, select it for more editing options.
To use the Snipping Tool with only a mouse:
-
To open the Snipping Tool, select Start, enter snipping tool, then select it from the results.
-
Select New to take a screenshot.
-
Rectangular mode is selected by default. You can change the shape of your snip by choosing one of the following options in the toolbar: Rectangular mode, Window mode, Full-screen mode, and Free-form mode.
-
The screenshot is automatically copied to your clipboard. A notification also appears once you’re finished taking a screenshot, select it for more editing options.
Learn more about screenshots and the Snipping Tool
Need more help?
Want more options?
Explore subscription benefits, browse training courses, learn how to secure your device, and more.
Communities help you ask and answer questions, give feedback, and hear from experts with rich knowledge.
Things You Should Know
- Press the Windows key + Print Screen key to capture the entire screen. The image will save to the Screenshots folder inside of your Pictures folder.
- Press Windows Key + Shift + S to use Snipping Tool, which lets you capture the whole screen, individual windows, or certain areas.
- Press the Print Screen (PrtSc) key to capture the screen to your clipboard. You can then paste it anywhere using Ctrl + V, or by right-clicking and selecting «Paste.»
-

1
Go to the screen that you want to capture. When you screenshot your entire screen, everything that’s open will be captured in your screenshot. Be sure to close any windows you don’t want open.
- This method will quickly capture everything on your screen and save the image to your PC. Once you’ve saved the screenshot, you can edit it or share it with anyone.
-
2
Find the ⎙ Print Screen key on your keyboard. The Print Screen key is most often found in the upper-right side of the keyboard, not counting the numeric keypad.
- The Print Screen key will usually be abbreviated to «PrtSc» or something similar.
Advertisement
-
3
Take your screenshot. You have two options for capturing your entire screen:
- Instantly save the screenshot as an image: Press the Windows key and the PrtSc keys at the same time. This saves your screenshot as a PNG file to the Screenshots folder in your Pictures folder. On most keyboards, the Windows key is located in the bottom left corner on the same row as the spacebar. Upon pressing this key combination, the screen may dim briefly to indicate that the screenshot was captured.
- Copy the screenshot so you can paste it: Press the Print Screen key alone to copy the screen to your PC’s clipboard. You can then paste the copied screenshot into a document, email message, or social media post by right-clicking the desired location and selecting Paste.
- On some Windows laptops, you will need to hold down the Fn key as you press the Print Screen key.
-
4
Find the screenshot. If you used Windows key + Print Screen to capture the screenshot, follow these steps to find the file:
- Open File Explorer by pressing Windows key + E on your keyboard.
- If you see a folder called Pictures in the left panel, click it. If not, click This PC, and then double-click the Pictures folder.
- Double-click the Screenshots folder.
- Each screenshot that you take is labeled «Screenshot (number).» Depending on the version of Windows you’re using, the file name will either end with a number that corresponds with the number of screenshots you’ve taken, or the date and time at which you captured the screenshot.
- If you can’t find your screenshot, try using the Snipping Tool instead. See Snipping Tool (Windows 11) or Snipping Tool (Windows 10 and earlier).


Advertisement
-
1
Click the window that you want to capture. If you only want to screenshot a single window, click anywhere on the window you want to capture. Make sure the window is in front of all your other windows.
-
2
Hold down Alt and press ⎙ PrtScr. This copies an image of the window to the clipboard.
- You will not see any confirmation that the screenshot has been taken.
- On some Windows keyboards, you will need to also hold down the Fn key when you use print screen.
-
3
Open Paint. This program comes installed on all Windows computers. To open it:
- Press Windows key + S to activate the search bar.
- Type paint.
- Click Paint.
-
4
Press Ctrl+V to paste the screenshot. You will now see your one-window screenshot in the Paint window.
- You can also paste the screenshot into other programs, such as Word or into the body of an email. Simply open the program that you want to paste the image into and press Ctrl + V.
- Alternatively, you can paste the screenshot into any open document, email, or other area using this shortcut.
- If your screenshot doesn’t appear, try using the Snipping Tool instead. See Snipping Tool (Windows 11) or Snipping Tool (Windows 10 and earlier).
-
5
Save your screenshot as an image. Click File, click Save, enter a file name, click a location on the left side of the page, and click Save.
- You can change the screenshot’s file type by clicking the «Save as type» drop-down box at the bottom of the window and then clicking a different format (e.g., JPEG) in the drop-down menu.


Advertisement
-
1
Open the Snipping Tool. The Windows 11 Snipping Tool makes it incredibly easy to capture and edit full-screen and partial-screen screenshots. To open the tool, click Search in the taskbar, type snip, and then click Snipping Tool.
-
2
Select a screenshot mode. Click the Mode menu, which is the down-arrow at the top of the screen. Then, choose an option:
- Rectangle mode: Let’s you capture any part of the screen by drawing a rectangle around an area.
- Window mode: Allows you to capture an individual window without getting anything else in the screenshot.
- Full-screen mode: Captures everything on the screen.
- Free-form mode: Lets you draw any shape around an area of the screen to take a screenshot.
-
3
Click + New. It’s at the top-right corner of Snipping Tool.
-
4
Capture your screenshot.
- In Rectangle mode, click and drag a rectangle around the desired area to instantly capture a screenshot.
- In Window mode, click the window you want to capture to take the screenshot.
- In Full-screen mode, the entire screen will instantly capture.
- In Free-form mode, draw an outline around the part of the screen you want to capture.
-
5
Click the Snipping Tool icon in the taskbar to view your screenshot. Now you’ll see a preview of your screenshot, which gives you a chance to edit it if you’d like.
-
6
Edit your screenshot (optional). If you’d like to crop the screenshot, click the crop tool at the bottom, then select the part of the screenshot you want to keep. You can also use the other editing tools at the bottom to draw on or erase part of the screenshot, which is helpful if you need to redact something.
-
7
Save your screenshot. Now that you’ve taken a screenshot, you can save it easily:
- Click the disk icon at the top.
- Select a location to save your screenshot.
- Name your file and click Save.
-
8
Use the Snipping Tool shortcut in the future. Now that you know how to use Snipping Tool, you can use this handy shortcut next time you want to take a screenshot: Windows key + Shift + S.
- When you use the keyboard shortcut, you’ll see a smaller version of Snipping Tool at the top of the screen. Each icon on the Snipping Tool indicates a different screenshot type—Rectangle Mode, Window Mode, Full-screen Mode, and Free-form Mode.
- Click the mode you’d like to use, then capture your screenshot.


Advertisement
-
1
Open the Snipping Tool. The Snipping Tool is an great way to take all kinds of screenshots, including full-screen, individual windows, and even a particular area of the screen.[1]
- On Windows 10, press Windows key + S, type snip, and click Snipping tool.
- On Windows 8.1, swipe in from the edge, select Search, type snipping, and then select Snipping Tool.
- On Windows 7, click the Start menu, type snipping, and then click Snipping Tool.
-
2
Choose the shape of the Snip. «Rectangular Snip» is chosen by default. Click the Arrow button next to the Mode button to change the Snip shape:.
- Free-form Snip lets you draw any shape with your mouse. The area inside the shape will be snipped.
- Rectangular Snip lets you select a rectangular area, which will be snipped.
- Window Snip lets you choose a window to snip.
- Full-screen Snip snips the whole screen, with all windows (except the Snipping Tool window) included.
-
3
Create a new Snip. Click the New button to start the selection. The screen will fade, and you can draw your Snip area, or select the window if you chose Window Snip. Release the mouse to take your screenshot.
- If you had Full-screen Snip selected, your Snip will automatically be created once you click New.
-
4
Annotate the Snip (optional). Once you create the Snip, it will open in a new window. You can use the Pen tool to draw on it and make notes, and use the Highlight tool to draw attention to text.
- The Erase tool will only erase annotations, not the screenshot itself.
-
5
Save the Snip. Click the floppy disk icon to open the save dialog. Type in a name for the screenshot and change the «Save as type:» field if desired. You can now send the screenshot by email or put it on a website.
- PNG is the default format in Windows 8 and later. The default format in earlier versions is JPG.
-
6
Paste or save the Snip. By default, the Snip is copied to the clipboard when you create it. This means you can paste it into Paint or Word, much like you would with a full-screen screenshot. In Paint, you can make more edits than you can in the Snip annotation editor.
- To paste the Snip, open a window that supports pasting and press Ctrl+V.


Advertisement
-
1
Go to the view that you want to screenshot. Open the program or screen that you want to take a picture of, making sure that any windows or items that you don’t want on-screen are out of the way.
-
2
Press ⊞ Win+⇧ Shift+S. Doing so will cause your screen to turn grey, and your mouse will turn into a crosshairs icon. The Snipping Tool will open at the top of the screen.
- By default, the shortcut will open Snipping Tool in Rectangle Snip Mode, which means you can click and drag a rectangle around the area of the screen you want to capture.
- On Windows 10, you can select a different screenshot mode from the Mode menu. For example, if you want to capture the whole screen, select Full-screen Snip (which takes the screenshot automatically). To capture a single window, select Window Snip.
- On Windows 11, you can select a different mode to take a screenshot using the icons at the top. . The icons in order are Rectangle Mode (the default), Window Mode, Full-screen Mode (which takes the screenshot automatically), and Free-form Mode.
-
3
Select an area to screenshot. Click and drag your mouse from the top-left corner of the area that you want to screenshot to the bottom-right corner. When you release the mouse button, the screenshot will be captured, as well as copied to your clipboard.
- If you selected a full-screen screenshot, you can skip this step.
-
4
Paste or save your screenshot. You can now paste your screenshot into any program that allows pasting photos (e.g., Paint, Word, an email, etc.) by pressing Ctrl+V. You should see the section of the screen that you selected appear in your program.
- Alternatively, save your screenshot as an image file by pressing Ctrl + S, entering a name, selecting a save location, and clicking Save.


Advertisement
-
1
Open the Xbox Game Bar. The Game Bar is a handy tool that makes it easy to capture screenshots of games, as well as any other open windows on your PC. To open the tool, press Windows key + G at the same time.
- You can even use the Xbox Game Bar to record your screen in real time.
-
2
Click the Widget menu. It’s the it’s the second icon from the left in the Game Bar at the top of the screen.[2]
-
3
Click Capture. You’ll see this near the top of the menu. The Capture widget will appear.
-
4
Click the pushpin icon on the Capture widget. This pins the widget to your screen so it won’t disappear when you navigate away.
-
5
Click the window you want to capture. You can capture any single window on your screen, such as your web browser, a game, or a document.
-
6
Click the camera icon on the Game Bar. This captures a screenshot of the activate window and saves it to your screenshots folder.
-
7
Click See my captures to view your screenshots. You’ll see this option at the bottom of the Capture widget. Here, you’ll find all of the screenshots you’ve captured using the Game Bar.
- When you’re finished taking screenshots, follow these steps to unpin the Capture widget:
- Press Windows key + G to reopen the Game Bar.
- Click the pushpin icon.
- Click anywhere on the screen.
- When you’re finished taking screenshots, follow these steps to unpin the Capture widget:


Advertisement
-
1
Press and hold the Windows logo. This is the logo on the bezel of the tablet, not the Windows button on your desktop.
- If there is no Windows button on the tablet, press the Power button instead.
-
2
Press the Volume Down button (or Volume Up if using the Power button). The screen will dim momentarily to indicate a screenshot was taken.
- Your screenshot will be stored in the Screenshots folder, which you can access by Opening File Explorer and navigating to Pictures → Screenshots.


Advertisement
-
1
Go to the initial screen that you want to screenshot. This should be the first page in the sequence of pages that you want to screenshot.
- Understand how this works. The Windows Steps Recorder allows you to record up to 100 different screens and save them all to one document. This program also makes a note of where you click and which actions you perform on each screen.
-
2
Press ⊞ Win+S. This activates the Windows search bar.
-
3
Type psr.exe and press ↵ Enter. This opens the Windows Steps Recorder.
-
4
Click Start Record. This is at the top of the toolbar. Doing so turns on the Steps Recorder, which will record the next 25 screen changes.
- If you want to record more than 25 changes, first click
on the right side of the toolbar, click Settings…, and change the «Number of recent screen captures to store» number.
- If you want to record more than 25 changes, first click
-
5
Click through your different screens. Each time your screen changes (other than simply moving your mouse), the Steps Recorder will take a screenshot.
-
6
Click Stop Record. It’s at the top of the toolbar. Doing so stops recording screen changes and opens the results window.
-
7
Review your screenshots. Scroll down through the window to make sure that you captured all of the screenshots that you wanted to save.
-
8
Save your screenshots to a ZIP folder. Click Save at the top of the window, enter a file name and select a save location, and click Save.
- This will save the screenshots in one HTML file. You can open the HTML file in your browser in order to view its contents.


Advertisement
Add New Question
-
Question
What versions of Windows include the Snipping Tool?

The Snipping Tool is included in all versions of Windows since Windows Vista. This includes Vista, 7, 8, 10, Server 2008, and Server 2012. The only versions of Windows that it is not included in are Windows 7 Starter and Windows 7 Home Basic. If you are using either of these two versions, you will need to find another utility for taking screenshots, or use the keyboard shortcuts.
-
Question
After I capture a screenshot, how do I create arrows and circles?
You have to load your previous screenshot into a photo editing software (e.g., Adobe Photoshop, Picasa, or even MS Paint) to edit your photo. Then you can draw arrows/circles on your screenshot and save the picture.
-
Question
The screenshots came out fine, but the actual image came out distorted, for example drawers in a dresser appear «squished.» What do I do?
Anuj_Kumar1
Community Answer
Try taking a screenshot at maximum possible resolution for getting good quality shots. Also, you may check the screenshot saving app for the maximum output quality setting. You can take high resolution screenshots in virtual machines (even greater resolution than your monitor screen).

See more answers
Ask a Question
200 characters left
Include your email address to get a message when this question is answered.
Submit
Advertisement
-
For those with Microsoft OneNote, pressing ⊞ Win+S brings up the option to take a rectangular snip of the screen. Doing so causes the snapshot to appear as an image in OneNote.
-
On laptop keyboards, the ⎙ PrtScr key might be combined with another key. This means that you have to press the Fn key or «Function» key to access it. Such a key is usually found on the bottom row of the keyboard.
Advertisement
-
Saving a screenshot in some file types (such as bitmaps) will result in a very large file. Because of this, it’s highly recommended to use the PNG or JPEG format.
-
Most screenshots will not show the mouse cursor.
-
DRM-protected content will not be visible in your screenshot and will be blanked out.
Advertisement
About This Article
Thanks to all authors for creating a page that has been read 36,892,220 times.
Is this article up to date?
#Руководства
-
0
Понятное руководство по тому, как сделать, отредактировать и сохранить снимок экрана за пару секунд.
Кадр: мультфильм «Ральф против Интернета» / Walt Disney Studios Motion Pictures

Редактор и иллюстратор. Перепробовал пару десятков профессий — от тестировщика до модели, но нашёл себя в удалёнке. Учится в Skillbox и делится в своих текстах новыми знаниями.
Скриншот (англ. screenshot) — это снимок экрана компьютера или ноутбука. На нём видно то же, что видите на экране вы в момент снимка. С помощью скриншота можно сохранить интересную информацию, зафиксировать ошибку программы — или проиллюстрировать текст.
Этот материал Skillbox Media — для тех, кто впервые делает скриншот или ищет самый удобный способ создать снимок экрана. Рассказываем о четырёх способах и пошагово показываем, что нажимать.
- Кнопка Print Screen
- Инструмент «Ножницы»
- Программа «Набросок на экране»
- Специальные программы для скриншотов
Print Screen — специальная кнопка для скриншотов, она есть на любой клавиатуре ПК или ноутбуков. Бывает, что она совмещена с какой-то другой, например Insert. Также она может быть подписана иначе — например, PrntScrn, PrtScn, PrtScr или PrtSc.
Нажимая эту кнопку отдельно или вместе с другими, можно получить разные результаты. Разберём сочетания клавиш на компьютере и ноутбуках.
Print Screen — клавиша скриншота для компьютеров. Если нажать на кнопку, снимок всего экрана сохранится в памяти компьютера (буфере обмена).
Чтобы сохранить скриншот, нужно вставить его в какую-то программу. Для этого поставьте курсор на место, куда вы хотите вставить скриншот, и нажмите Ctrl + V. Например, можно открыть программу Paint, вставить скриншот и сохранить его как изображение. А можно поместить скриншот сразу в нужное окно — в Word или в электронное письмо.
На ноутбуке нужно нажать Fn + Print Screen. Но на некоторых моделях ноутбуков скриншот делается без нажатия Fn, как на ПК. Также кнопка Print Screen может быть расположена в цифровом блоке. В этом случае скриншот делается только при выключенной кнопке Num Lock. Это работает и для всех сочетаний клавиш, о которых мы расскажем ниже.
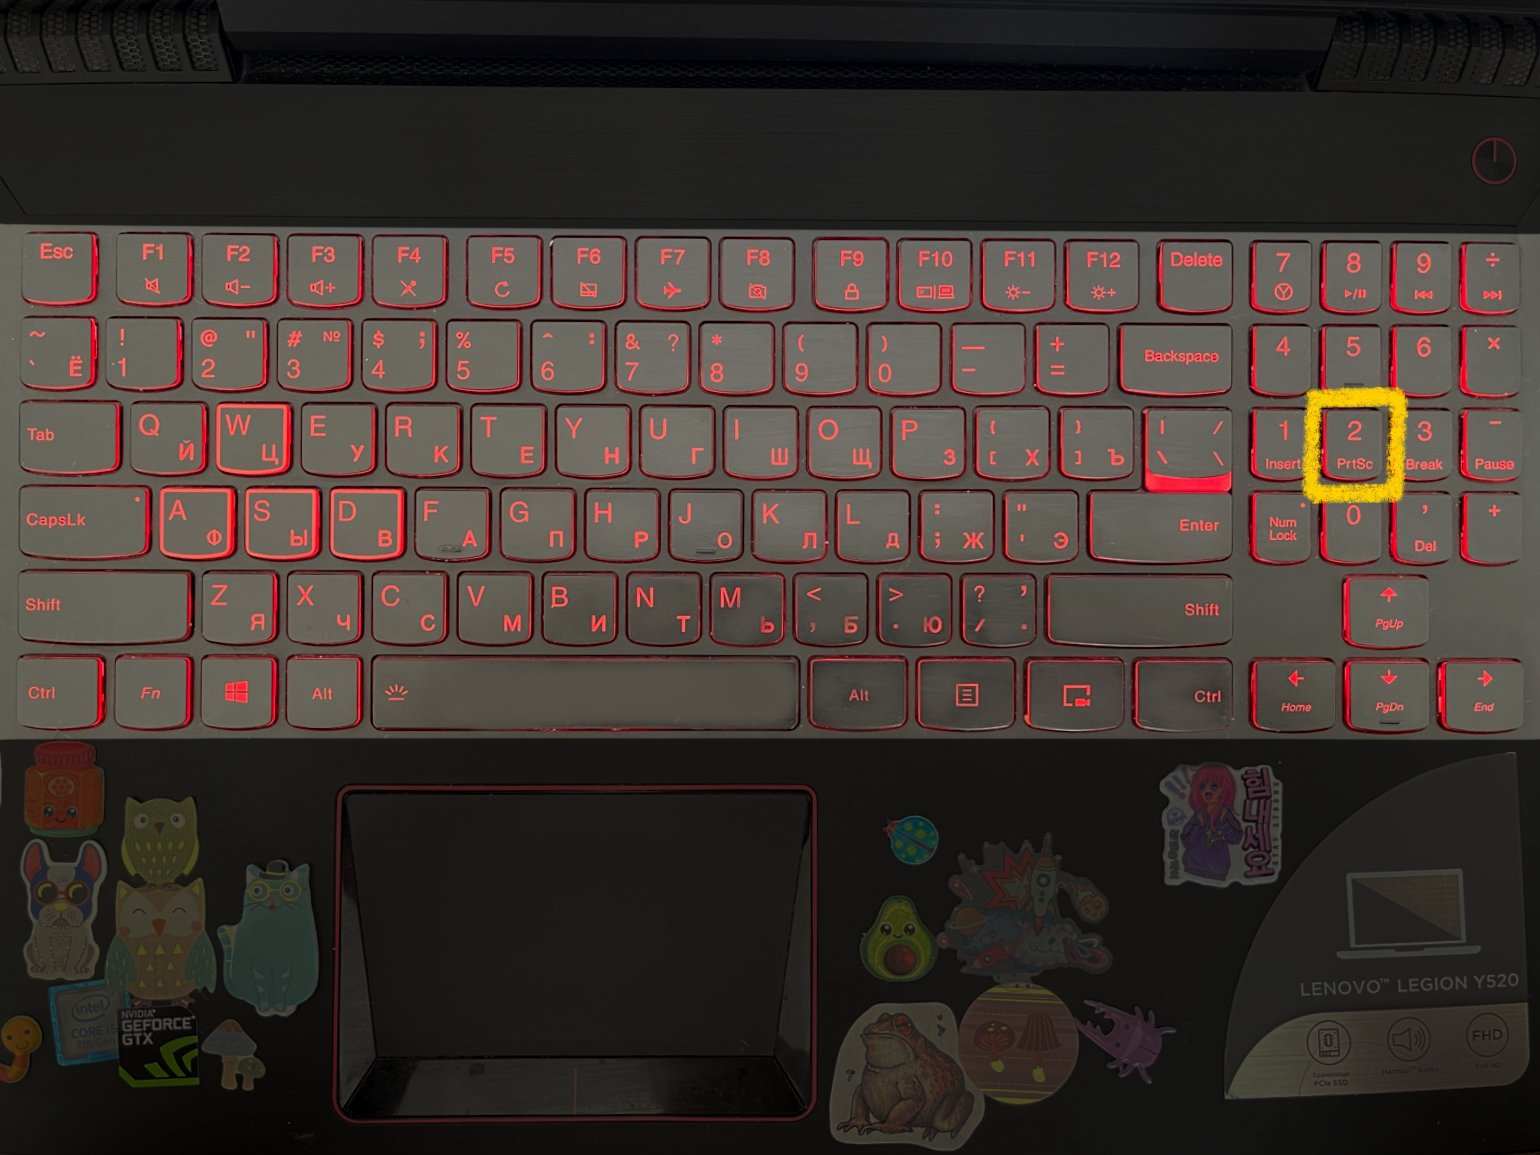
Фото: Skillbox Media
Alt + Print Screen — в буфере обмена сохранится снимок только активного окна. То есть будет сделан скриншот окна, которое расположено поверх всех остальных и в котором вы сейчас работаете. На ноутбуке для этого нужно нажать Fn + Alt + Print Screen.
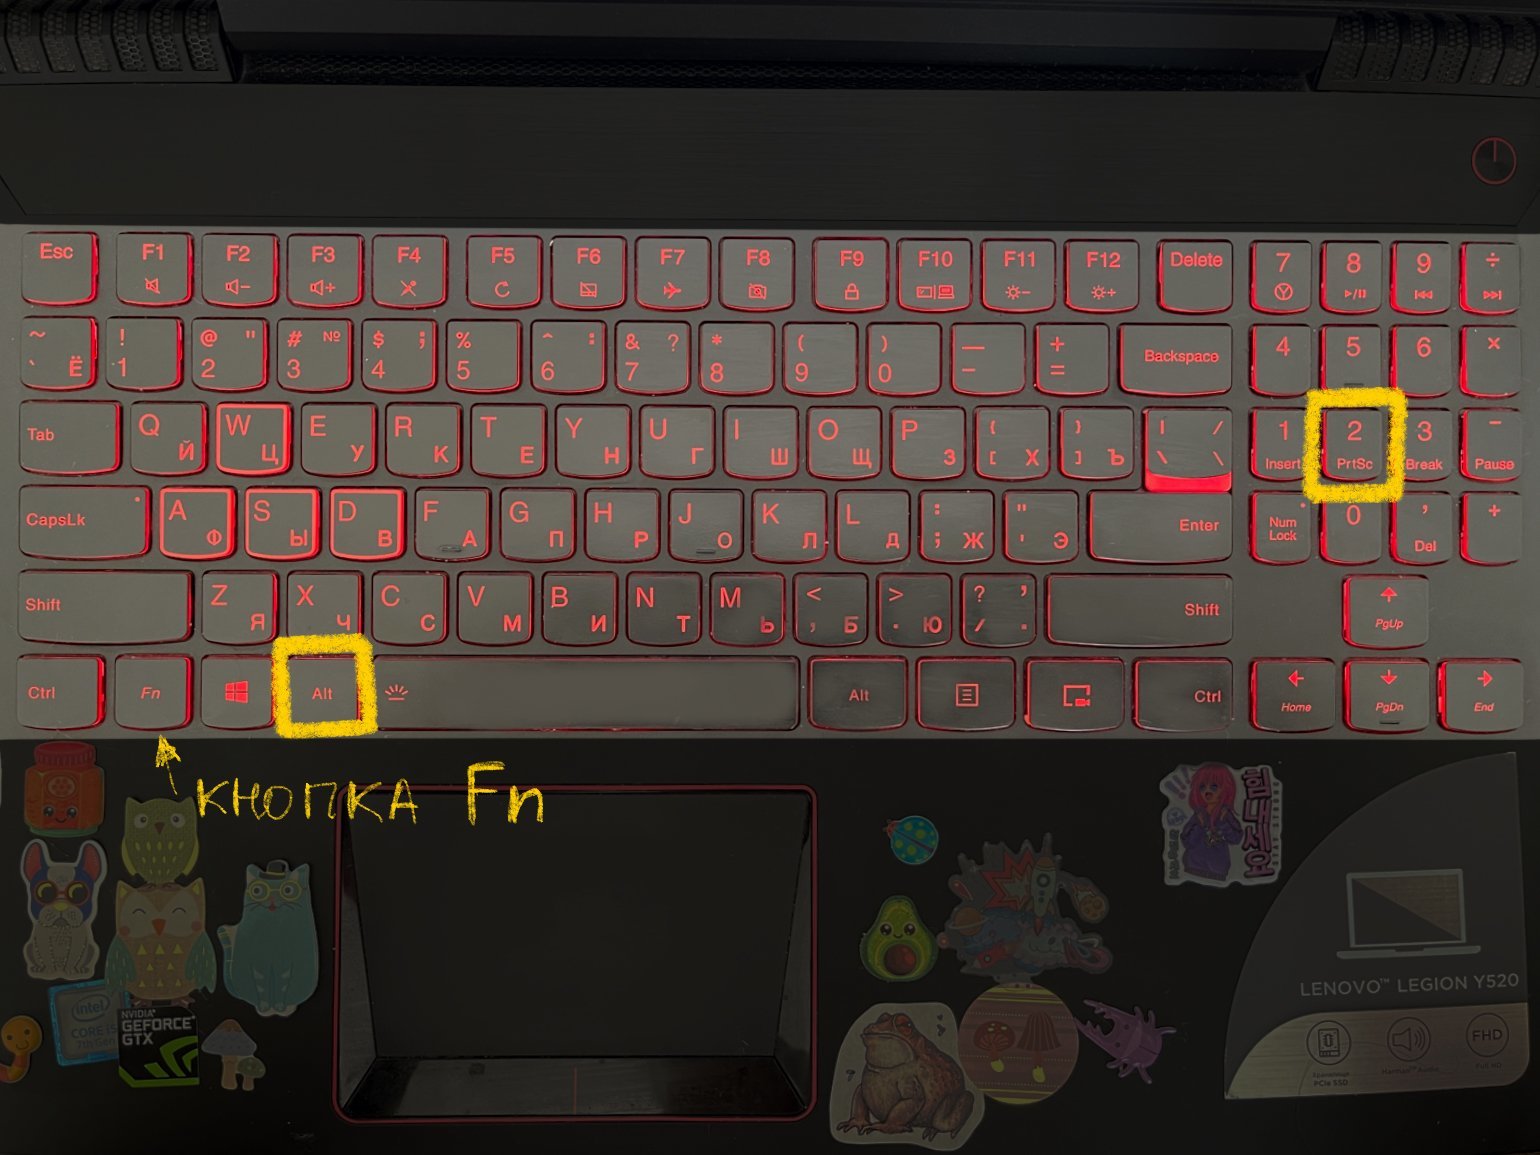
Фото: Skillbox Media
Windows + Print Screen — скриншот всего экрана автоматически сохранится в формате PNG в папке «Снимки экрана». Путь к этой папке: «Пользователи» → «Имя пользователя» → «Изображения» → «Снимки экрана». Это работает и на компьютере, и на ноутбуке.
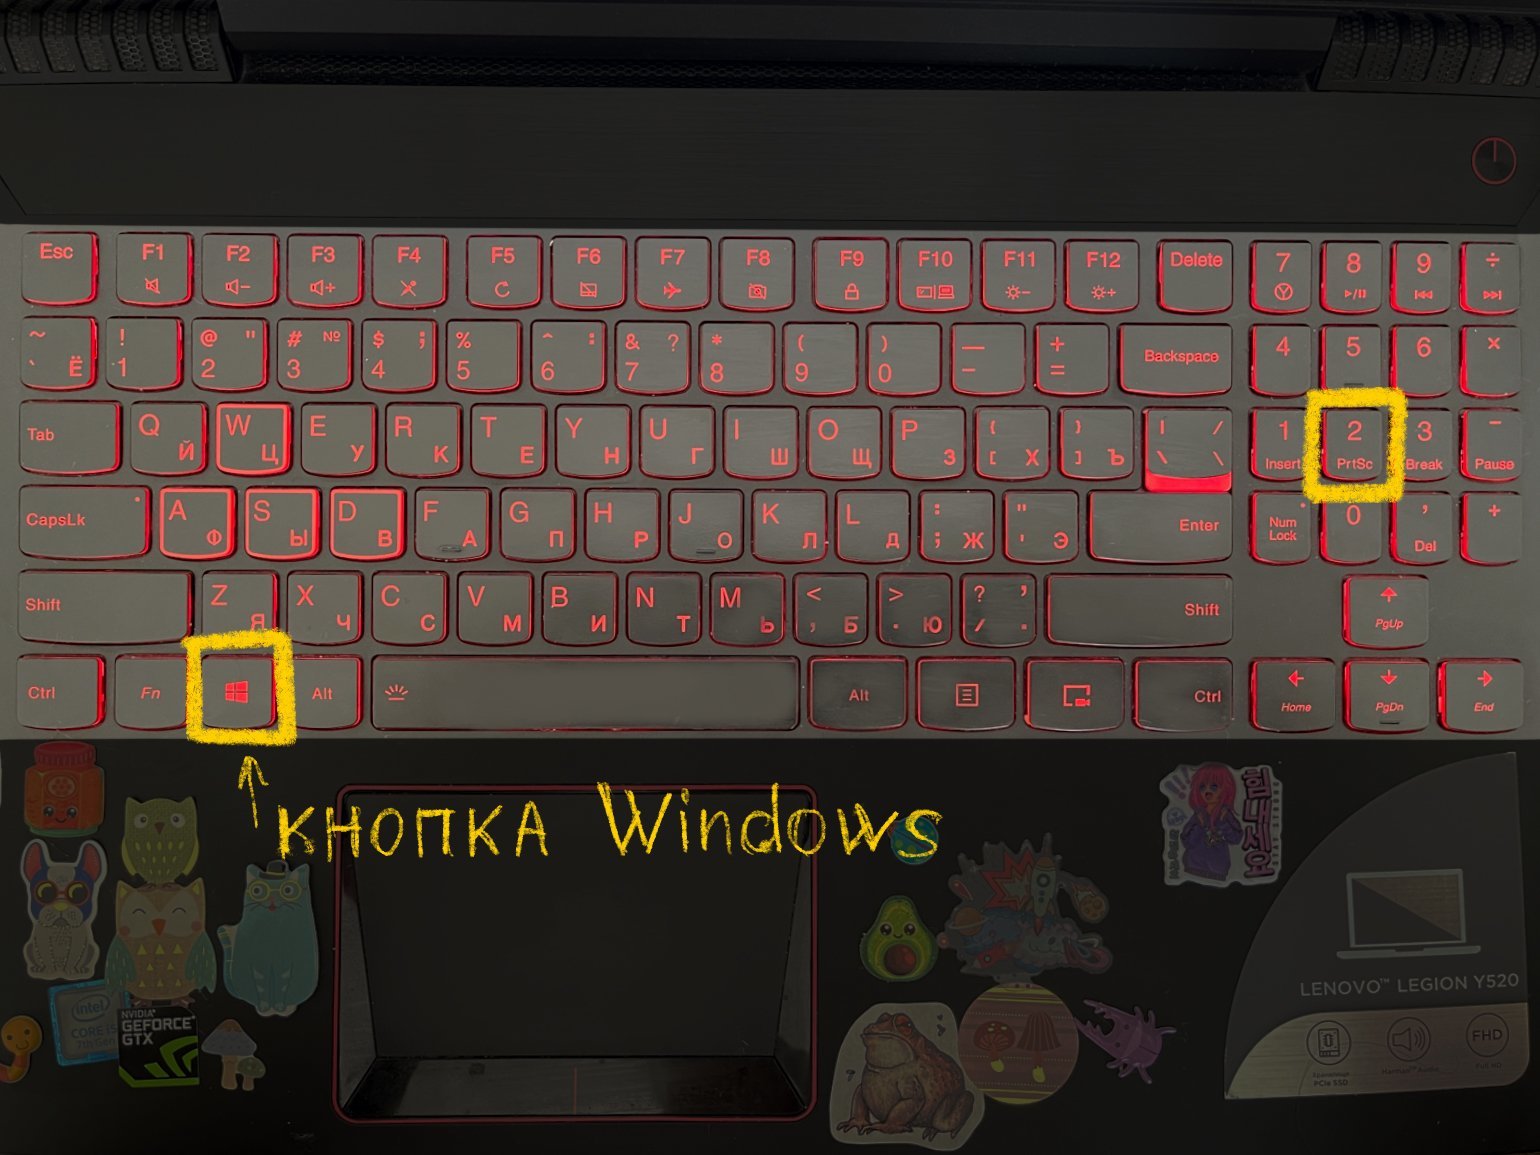
Фото: Skillbox Media
Если у вас установлен «Яндекс Браузер», при первой попытке сделать фотографию экрана он предложит заменить стандартные инструменты на приложение «Яндекс Скриншот». Если вы согласитесь, сочетания клавиш будут следующие:
- Print Screen — снимок всего экрана откроется в приложении «Яндекса», после чего его можно будет сохранить на устройстве или на «Яндекс Диске».
- Alt + Print Screen — появится курсор, с помощью которого можно выделить нужную область экрана, а потом уже откроется «Яндекс Скриншот».
- Windows + Print Screen — скриншот всего экрана автоматически сохранится в формате PNG в папке «Снимки экрана».
Скриншот: Skillbox Media
«Ножницы» — инструмент для Windows. Он работает на Windows 10, но в следующих версиях ОС его заменят программой «Набросок на экране».
Чтобы открыть приложение, введите в строке поиска «ножницы» и нажмите на ярлык инструмента в списке.
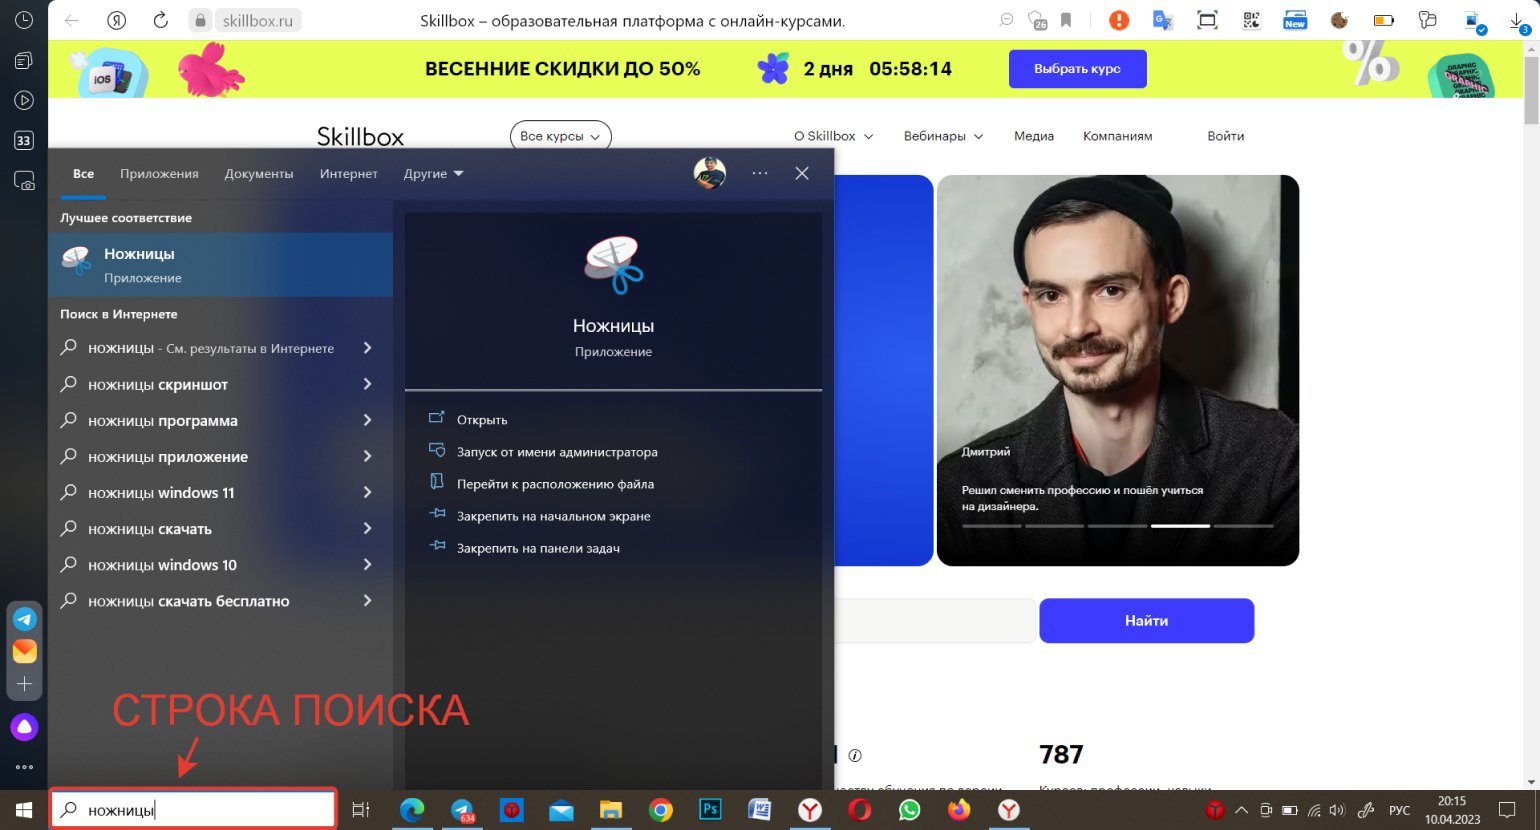
Скриншот: Skillbox Media
Когда откроется программа, вы сможете выбрать один из четырёх режимов скриншота:
- «Произвольная форма» — чтобы нарисовать любую фигуру вокруг объекта.
- «Прямоугольник» — чтобы выделить прямоугольную форму.
- «Окно» — чтобы выбрать окно, которое требуется захватить. Например, только браузер с открытыми «Одноклассниками».
- «Весь экран» — чтобы сделать снимок всего экрана.
Если выберете режимы «Произвольная форма» или «Прямоугольник», нужно будет зажать левую кнопку мыши и передвинуть курсор так, чтобы получилась нужная вам форма скриншота. В случае с «Окном» — выбрать окно. Если выберете «Весь экран», программа сделает скриншот сама.
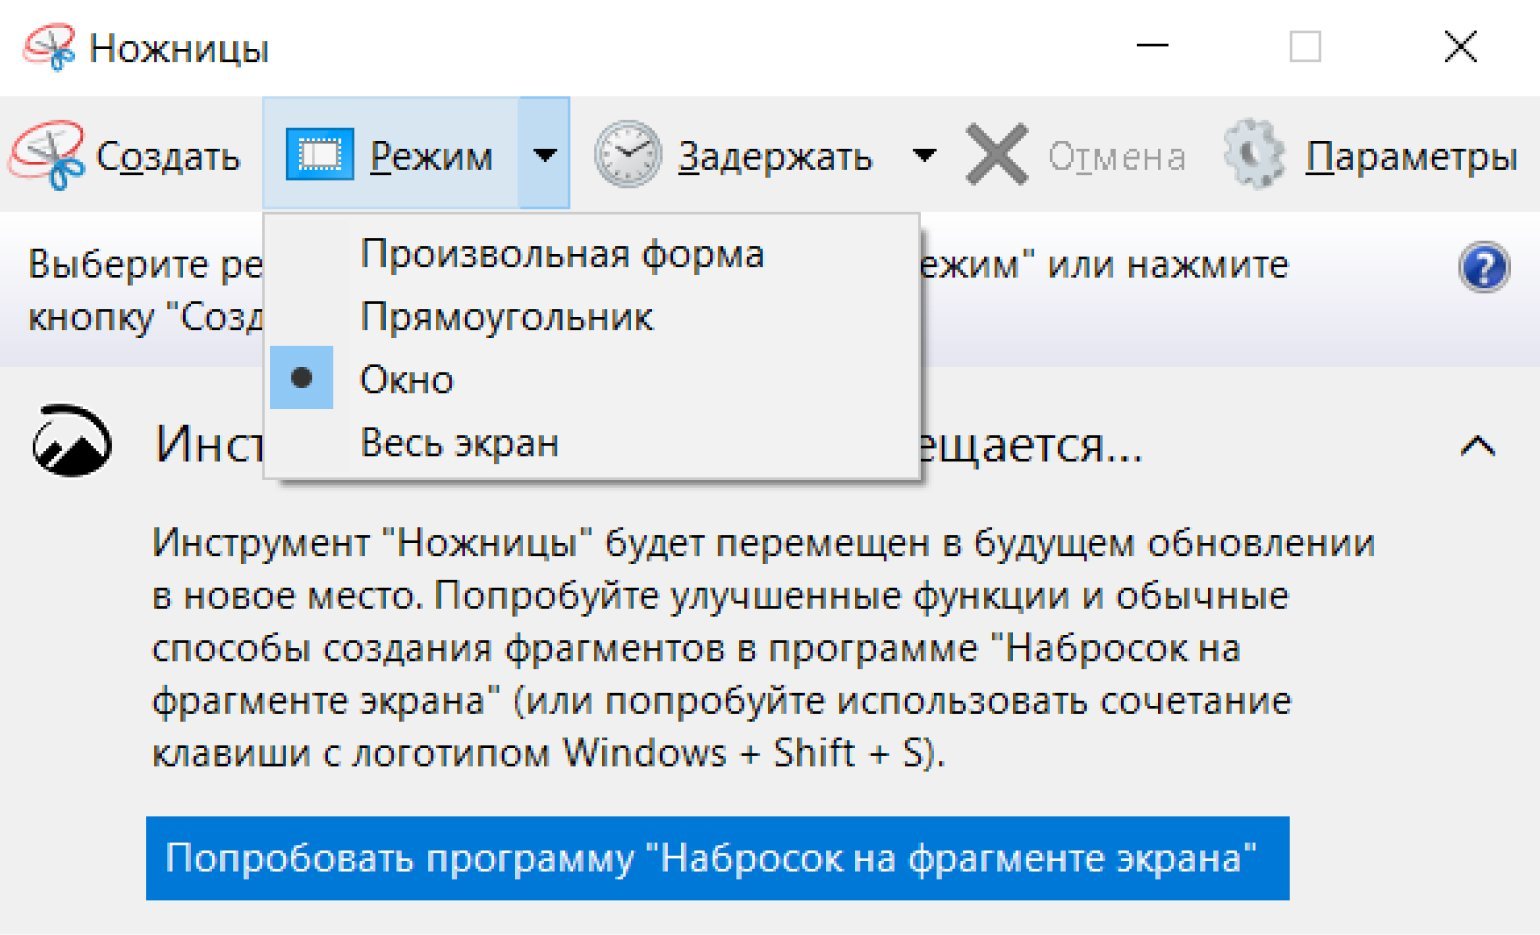
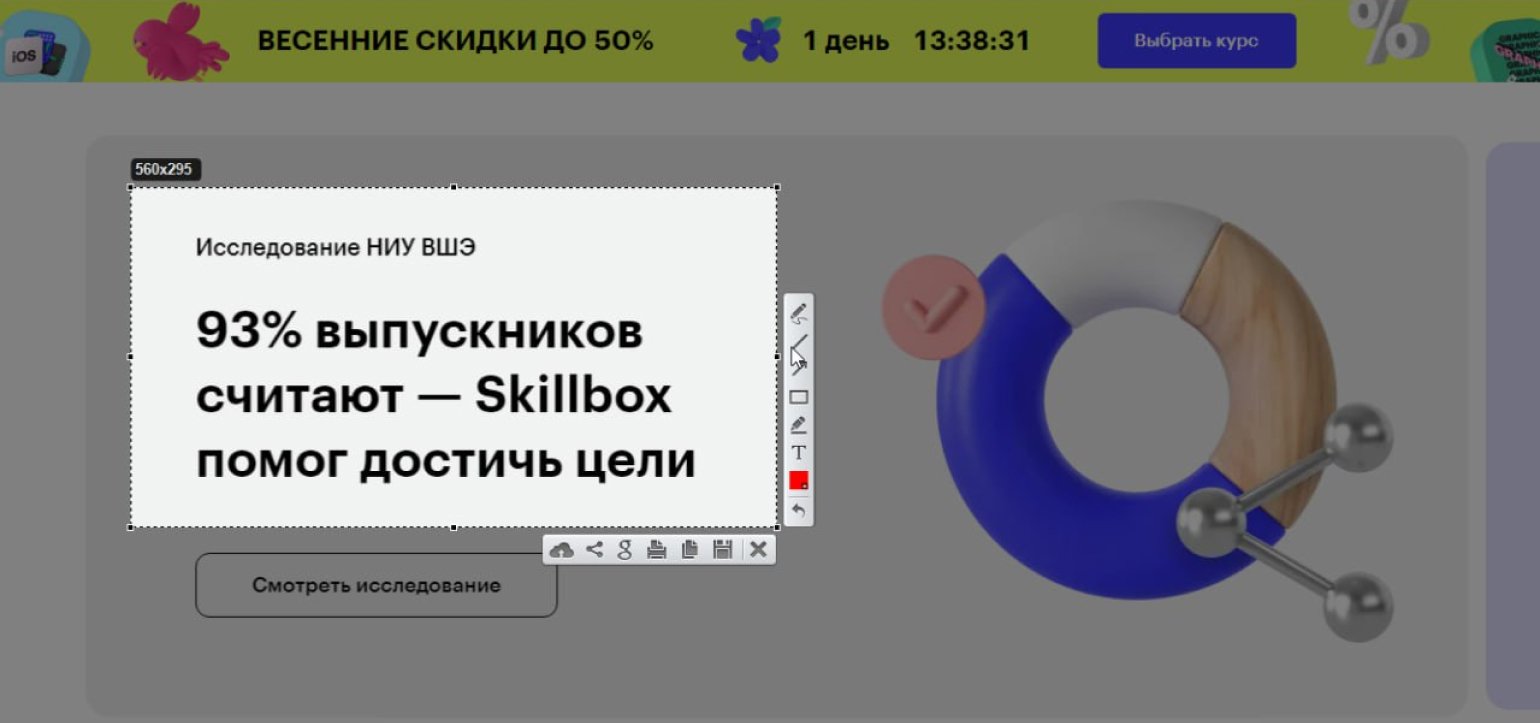
Скриншот: Skillbox Media
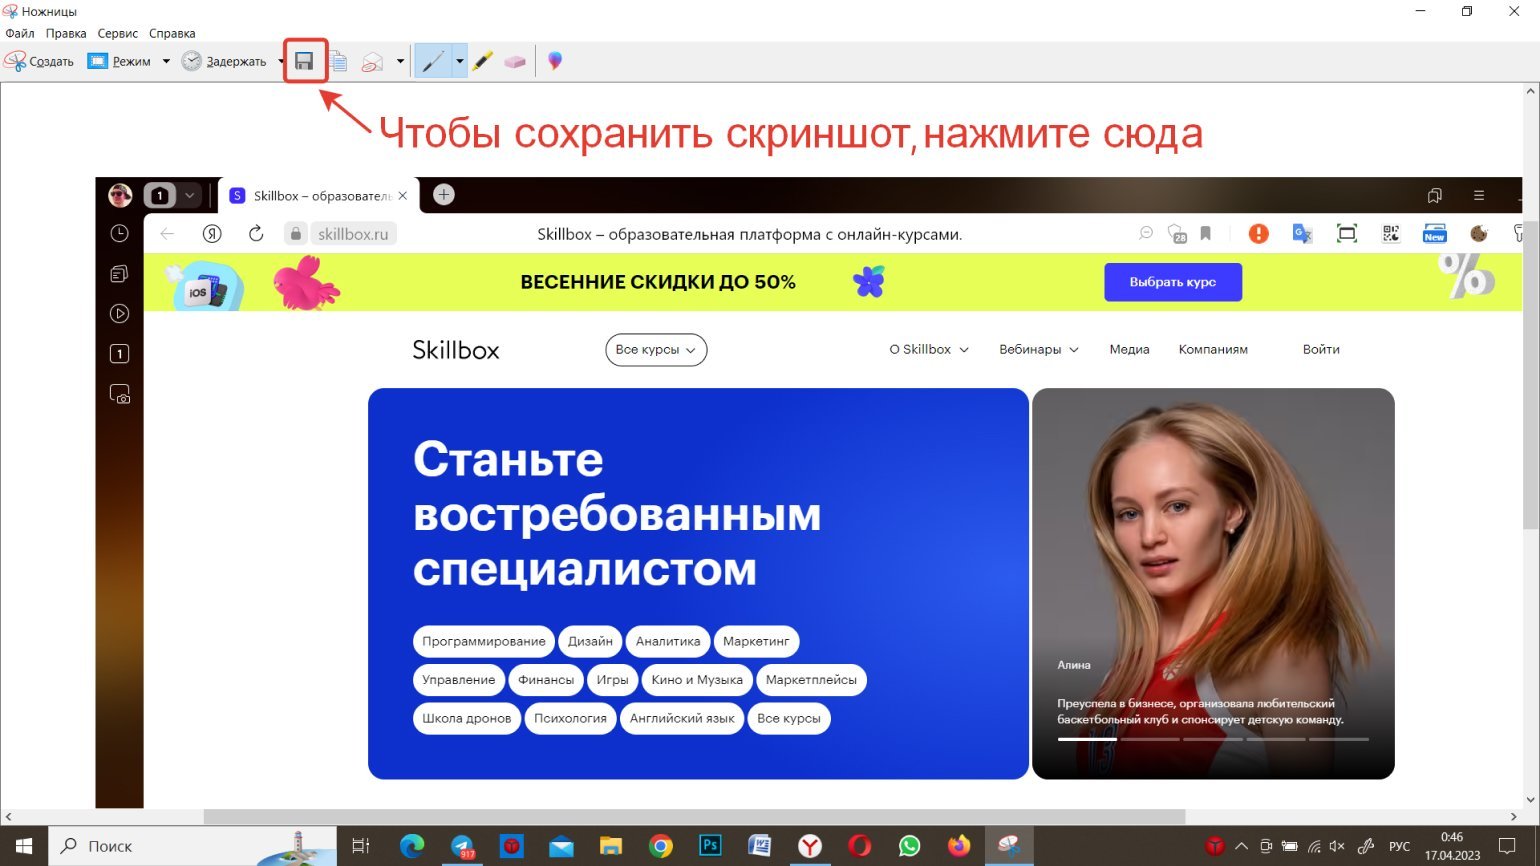
Сделанный скриншот откроется в окне приложения, где вы можете добавить на него пометки и сохранить. По умолчанию скриншот будет сохранён в папке «Этот компьютер» → «Изображения» в формате PNG.
Скриншот: Skillbox Media
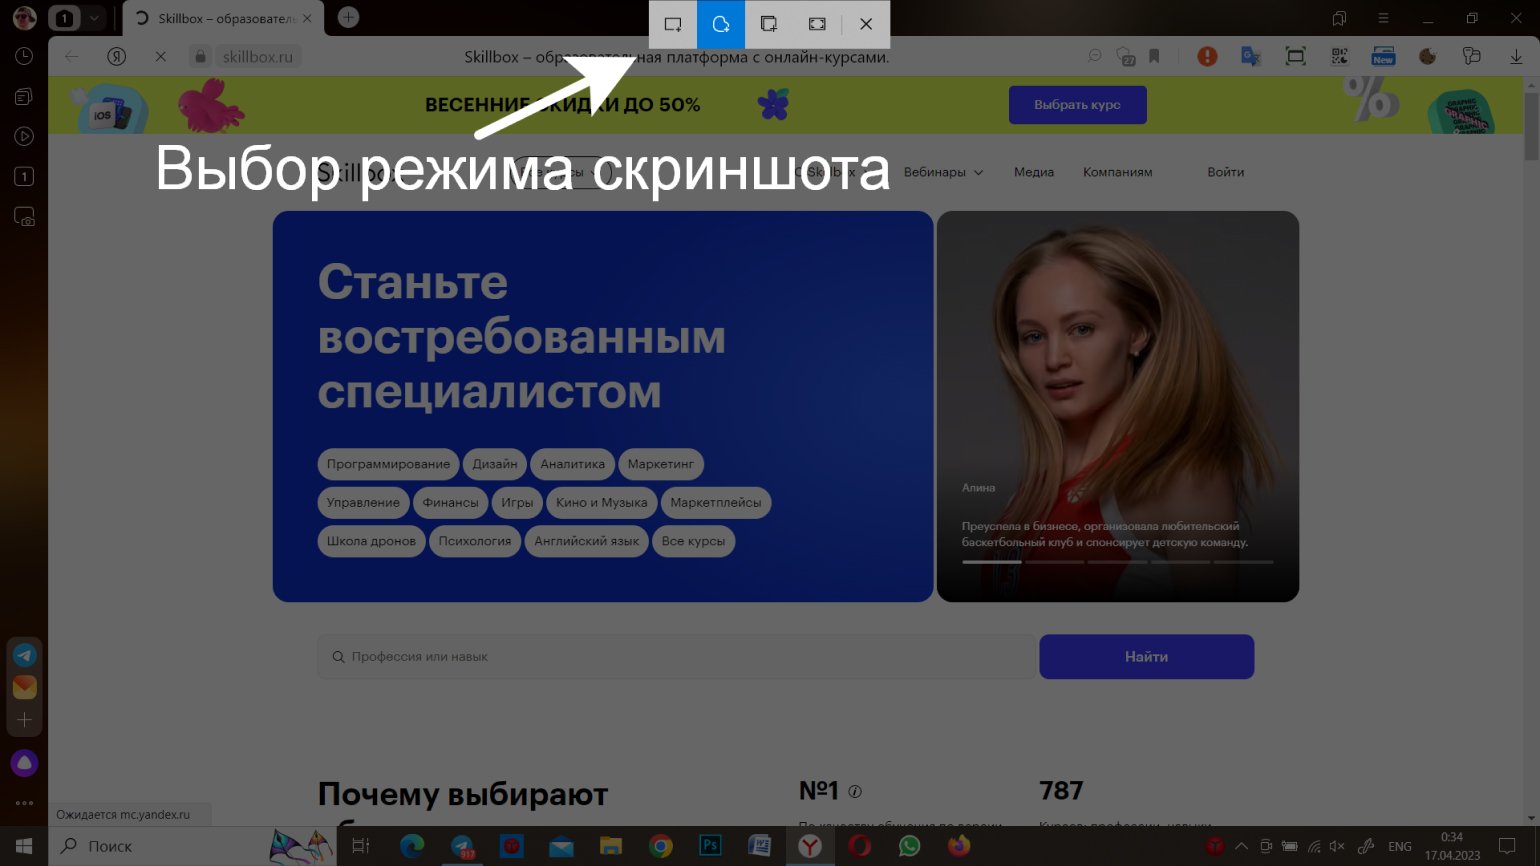
Чтобы сделать скриншот с помощью программы «Набросок на экране», нужно нажать комбинацию клавиш Windows + Shift + S.
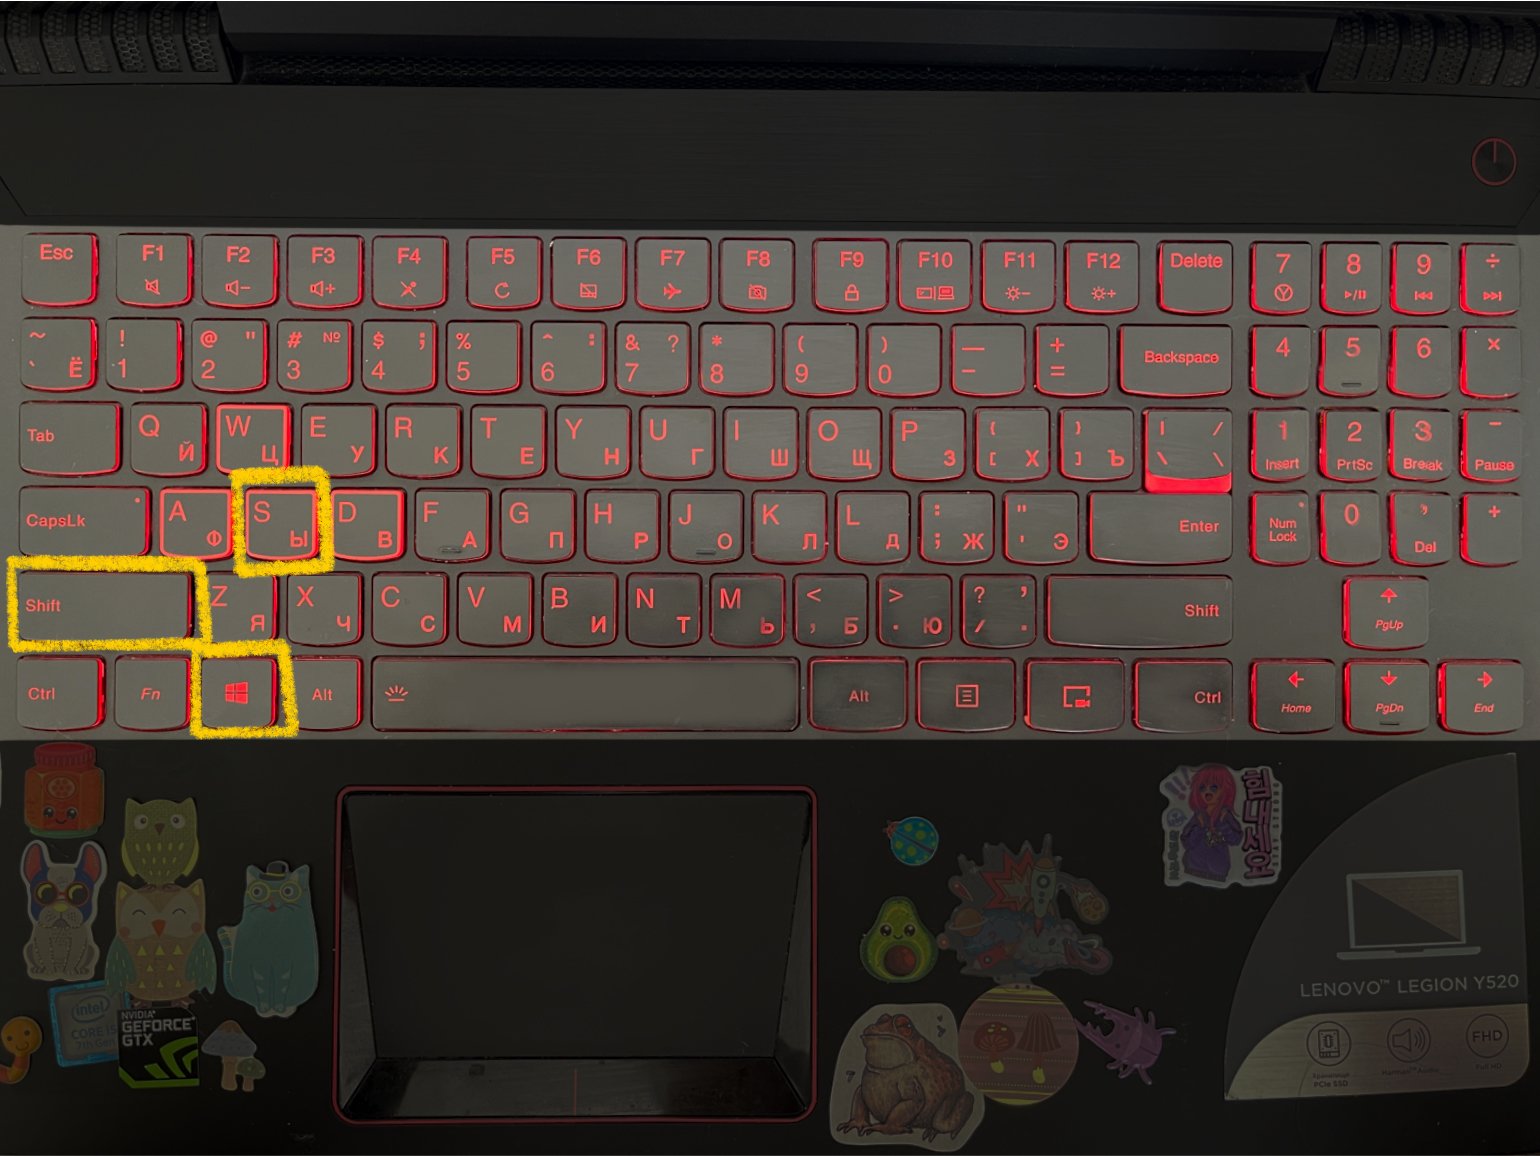
Фото: Skillbox Media
После этого выберите нужный режим:
- прямоугольный фрагмент — для выделения прямоугольной области;
- фрагмент произвольной формы — для выделения произвольной области;
- оконный фрагмент — чтобы снять отдельное окно;
- полноэкранный фрагмент — чтобы снять весь экран.
Сделанный скриншот программа сохраняет в буфере обмена. Его можно вставить в нужном приложении с помощью клавиш Ctrl + V. Второй вариант — нажать на системное уведомление, которое появляется после снимка, чтобы сделать на скриншоте пометки или сохранить его как отдельный файл. По умолчанию скриншот будет сохранён в папке «Этот компьютер» → «Изображения» в формате PNG.
Скриншот: Skillbox Media
На компьютер и ноутбук можно установить специальные программы для скриншотов и использовать их вместо встроенных инструментов. Одну такую программу, «Яндекс Скриншоты», мы упоминали выше. Также можно использовать Monosnap, Lightshot, Greenshot, Shottr, CleanShot, ShareX, «Скриншотер» и другие решения.
Эти программы позволяют делать скриншот всего экрана или выбранной области. Можно добавлять на сделанные с их помощью снимки текст, фигуры и стрелочки, скрывать ненужные фрагменты. Изображение можно сохранить или загрузить его на сайт программы — и скопировать ссылку, чтобы переслать её. Когда человек перейдёт по ссылке, он увидит ваш скриншот.
Скриншот: Skillbox Media
В большинстве случаев программы работают так же, как встроенные средства компьютера или ноутбука. Чтобы сделать скриншот, нужно нажать на Print Screen, выбрать область, отредактировать скриншот при необходимости. Потом сохранить изображение или поделиться ссылкой на него.
- Клавиша Print Screen делает скриншот всего экрана и сохраняет его в буфер обмена.
- Комбинация Alt + Print Screen делает скриншот активного окна и сохраняет в буфер.
- Комбинация Windows + Print Screen делает скриншот всего экрана и сохраняет изображение в формате PNG в папке «Снимки экрана».
- Программа «Ножницы» позволяет выбрать область скриншота, отредактировать и сохранить его.
- Комбинация Windows + Shift + S вызывает встроенную программу «Набросок на экране» — по возможностям она похожа на «Ножницы».
- Программы для скриншотов делают снимок экрана после нажатия на Print Screen и позволяют отредактировать скриншот, сохранить его и загрузить на сайт программы.

Жизнь можно сделать лучше!
Освойте востребованную профессию, зарабатывайте больше и получайте от работы удовольствие. А мы поможем с трудоустройством и важными для работодателей навыками.
Посмотреть курсы
Создать снимок экрана можно разными способами. В последней версии ОС от Microsoft для этого появились дополнительные инструменты. В статье вы узнаете, как сделать скриншот на Windows 11 при помощи встроенных средств и стороннего софта.
Комбинации клавиш Print Screen
Скриншоты можно создавать по хоткеям. Ниже мы расскажем, какую клавишу нужно нажать, чтобы сделать снимок экрана на компьютере.
Print Screen (иногда сокращается, например, до Prtscr или Prt Scr). Клавиша появилась еще на первых персональных компьютерах. Если нажать принтскрин на клавиатуре, изображение скопируется в буфер обмена. После вставьте в строку сообщений мессенджера, в офисное приложение/графический редактор.
Alt + Print Screen. Копирует изображение активного окна. Эту информацию также можно передать через мессенджер или вставить в документ.
Win + Print Screen. Сохраняет изображение на мониторе в PNG-файл. Скриншоты, которые создаются инструментами Windows, хранятся в библиотеке пользователя: Изображения → Снимки экрана.
Win + Alt + Print Screen. Создает PNG-файл с изображением текущего окна.
Встроенные приложения Windows
В операционной системе есть полезные программы для создания снимков монитора. Они предлагают больше настроек и режимов работы, чем стандартные функции с хоткеями.
Xbox Game Bar
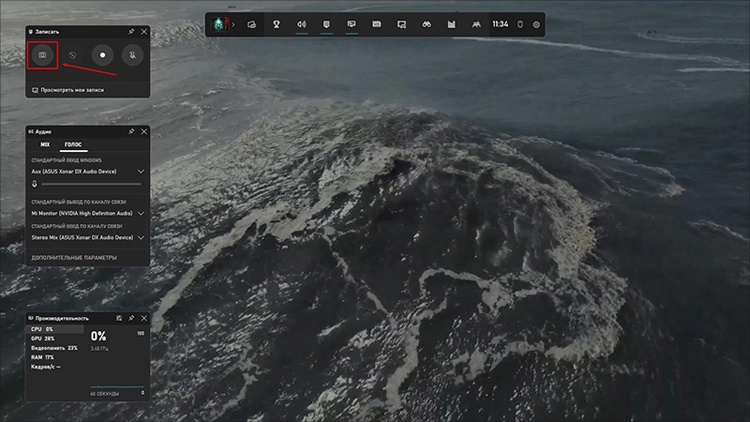
Приложение для геймеров. Позволяет просматривать игровые достижения, искать напарников для многопользовательских сражений, отслеживать производительность ПК. Также есть функции видеозахвата и скриншотов. Стоит учитывать, что программа предназначена главным образом для игр. Она может некорректно работать на рабочем столе. Например вместо обоев на скрине будет однотонная заливка.
Как пользоваться:
- Запустите приложение через меню Пуск или клавишами Win + G.
- Интерфейс Xbox Game Bar предстален несколькими плавающими панелями. Инструмент для снимков дисплея находится на панели Записать — кнопка со значком фотоаппарата, крайняя слева. Нажмите ее.
- Инструмент снимает весь экран или выделенное окно. Переключение между этими режимами происходит автоматически. Так, если окно открыто, не развернуто на весь экран и находится не в фокусе, то сохранится рабочий стол.
- Изображения создаются в PNG-формате. Расположены в библиотеке пользователя — Видео → Запись.
Ножницы
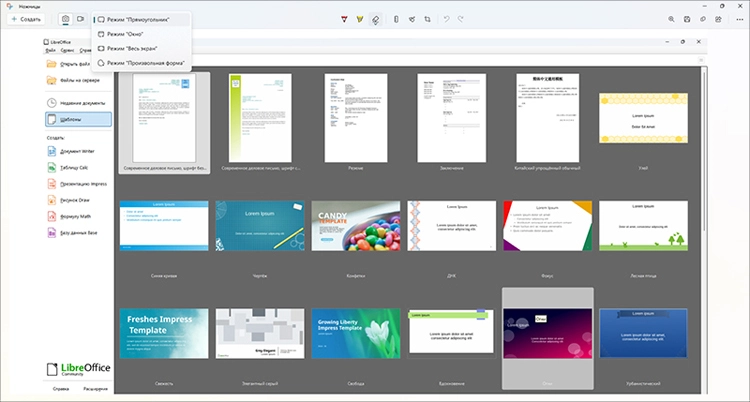
Программа со множеством дополнительных функций. Позволяет производить видеозапись дисплея. Умеет снимать в полноэкранном режиме, делать скриншот указанного окна и выделенной области с прямоугольной или произвольной формой. Можно добавлять к каждому снимку рамку с заданным цветом и толщиной. На созданных изображениях можно делать пометки, измерять расстояния и углы с помощью линейки и транспортира. Есть инструмент для кадрирования. Готовые файлы можно сохранять в JPEG/PNG.
Как пользоваться:
- Запустите Ножницы с помощью меню Пуск и нажмите Создать. Также можно использовать сочетание клавиш Win + Shift + S — при этом сразу активируется режим создания.
- На панели вверху в центре выберите способ создания. Далее выделите мышью область на экране или кликните по нужному окну. Полноэкранный снимок создается автоматически.
- Изображение скопируется в буфер обмена. Также происходит сохранение графического файла в папке Снимки экрана каталога Изображения в библиотеке Windows.
- Если вы делали скрин через хоткеи, кликните уведомление, которое появится в правой нижней части монитора, чтобы отредактировать файл в программе. Нажав на Создать, приложение откроется само.
- При необходимости кадрируйте снимок и сделайте на нем пометки. Чтобы сохранить изменения, кликните по значку дискеты вверху справа.
Фрагмент и набросок
Так какое-то время называлось приложение Ножницы. У старой и обновленной версии почти одинаковый функционал. Из явных отличий — отсутствие видеозахвата.
Как пользоваться:
- Запустите программу через Пуск или клавишами Win + Shift + S.
- Выберите режим создания и сделайте снимок.
- Вставьте полученное изображение через буфер обмена.
- Если необходимо изменить файл, кликните по уведомлению в углу монитора. Внесите нужные правки и сохраните работу. Приложение не всегда автоматически делает файл. Поэтому, если он вам нужен, запустите режим редактирования и сохраните скриншот принудительно (нажмите кнопку с дискетой).
Бесплатные программы для создания снимков экрана
Специальные приложения содержат больше инструментов для создания и редактирования снимков дисплея. Этот софт умеет загружать изображения на интернет-сервер, что удобно, если вам нужно поделиться файлом с другими людьми — достаточно отправить им ссылку.
ФотоСКРИН
Простая и удобная программа на русском. Позволяет добавлять изображение с экрана в буфер обмена, сохранять его как PNG- или JPEG-файл или загружать на сервер. На снимок можно добавлять стрелки, выделения, надписи и отметки с нумерацией (например, так можно обозначать последовательность действий). Есть функция размытия фрагментов, что пригодится для скрытия конфиденциальных сведений.
Скачайте современное приложение для скриншотов бесплатно:
Скачать бесплатно
 Для Windows 11, 10, 8, 7 и XP
Как пользоваться:
- Откройте ФотоСКРИН. Через настройки можно включить автозагрузку приложения. Оно всегда будет работать в фоновом режиме и не придется каждый раз запускать его вручную.
- Одновременно нажмите левую и правую кнопку мыши.
- Выделите рамкой область на мониторе, которую нужно заскринить.
- При необходимости добавьте пометки.
- С помощью вертикальной панели справа выберите, что нужно сделать со скриншотом — скопировать, сохранить в виде файла или загрузить в интернет.
PicPick
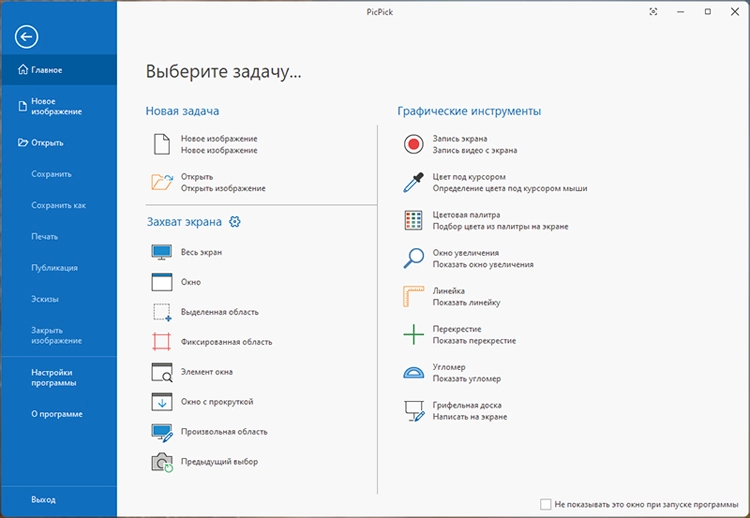
Продвинутое приложение для скриншотов. Есть функция видеозаписи со звуком. Позволяет рисовать на дисплее, как на грифельной доске, добавлять надписи и выделения. Предусмотрены угломер и линейка. Программа умеет сохранять окна с прокруткой — по итогу получится длинное вертикальное изображение.
Как пользоваться:
- Запустите PicPick.
- На вкладке в разделе Захват экрана выберите подходящий способ съемки и сделайте скриншот.
- Откроется редактор, в который автоматически импортируется созданный графический файл.
- Внесите нужные изменения и сохраните результат. Поддерживаются PNG, BMP, JPEG, GIF и PDF.
Выводы
Теперь вы знаете, как сделать скриншот на Виндовс 11. Метод с горячими клавишами позволяет копировать монитор ноутбука или ПК через буфер обмена или сохранять в PNG-формате. Xbox Game Bar имеет схожие возможности, но нестабилен на рабочем столе. Ножницы (прежде программа называлась Фрагмент и набросок) более удобны и надежны. ФотоСКРИН умеет добавлять снимки на сервер, накладывать выделения, стрелки и различные надписи. PicPick предлагает большой набор инструментов для редактирования. Однако для обычных пользователей такой функционал избыточен.
- To take a screenshot on Windows 10 or 11, you can use the Print Screen button or Snipping Tool.
- You can also take a screenshot with the Game Bar by pressing the Windows Key + G.
- Third-party apps offer even more features, like automatically uploading screenshots to the internet.
Loading
Something is loading.
Thanks for signing up!
Access your favorite topics in a personalized feed while you’re on the go.

If you want to take a screenshot on your Windows 10 or Windows 11 computer, there are several methods you can use.
Whether you want to save the entire screen or just a piece of it, we’ve rounded up all the best ways to take a Windows screenshot.
The Print Screen button
William Antonelli/Insider
The easiest way to take a screenshot of your entire screen on Windows 10 or Windows 11 is by pressing the Print Screen (PrtScn) button on your keyboard.
The screenshot will be copied to your clipboard, or you can save it to your screenshots folder. To save the file, paste the screenshot into any program that allows you to insert images, like Microsoft Word or Paint.
William Antonelli/Insider
The Windows key + Print Screen
William Antonelli/Insider
To take a screenshot on Windows 10 or Windows 11 and automatically save the file to the Screenshots folder, press the Windows key + PrtScn. Your screen will go dim and a screenshot of your entire screen will be saved to the folder.
Alt + Print Screen
To only capture the active window you’re working in, press Alt + PrtScn. The screenshot will be copied to your clipboard, and you’ll need to paste it into another program to save it.
The Snip & Sketch tool in Windows 10
The Windows 10 Snip & Sketch app is the best way to screenshot on Windows if you’re looking to customize, annotate, or share your screen captures. This is the best way to annotate your screenshots before sharing them, as it gives you editing capabilities like an eraser, a ruler, and cropping tools.
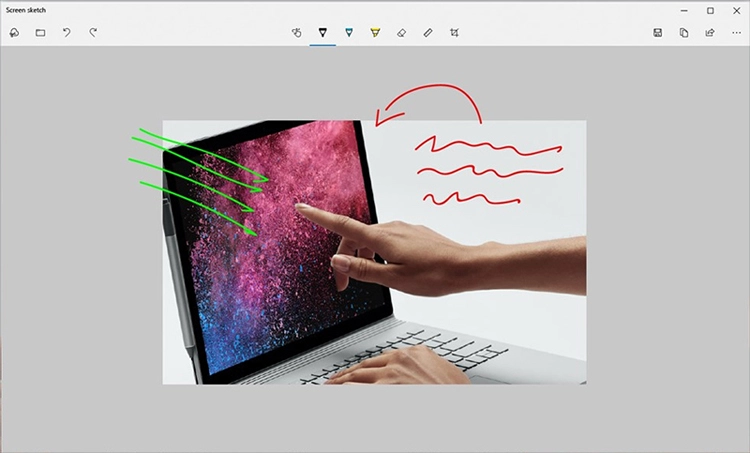
To activate Snip & Sketch, use the keyboard shortcut Windows Key + Shift + S. Your screen will go dim and a mini menu will appear at the top of your screen, giving you the option to take a rectangular, free-form, window, or full-screen capture.
William Antonelli/Insider
With these Snip & Sketch options, you can choose how you’d like to take a screenshot:
William Antonelli/Insider
After you capture the screenshot, it’ll be saved to your clipboard and a preview notification will appear in the bottom-right corner of your screen.
Click on the preview notification to open the Snip & Sketch app, where you can save, share, or edit the screenshot with the available drawing tools.
The Snipping Tool in Windows 11
Although the Snipping Tool exists in Windows 10, it’s not usually the screenshot tool you’ll want to use. In Windows 11, the Snipping Tool got a major upgrade and it’s now the best way to take custom screenshots.
To start the Snipping Tool in Windows 11, you can search for it or press the Windows Key + Shift + S. Like Snip & Sketch, your screen will go dim and a toolbar of screenshot options will appear at the top of the screen. This toolbar will let you take a rectangular, freeform, full-window, or a full-screen capture, as well as time your screenshot for the amount of seconds you’ll need to pull up the window you need to capture.
William Antonelli/Insider
Once you’ve taken your screenshot, it can be copied to your clipboard, saved to the Screenshots folder, or printed right away. If you click the preview that pops up in the bottom-right corner of your screen, you’ll be able to save and edit it further.
The Game Bar
The Game Bar is an overlay you can use within most Windows apps and games to take screenshots and record videos. Follow the steps below to open and use it:
1. Press Windows Key + G.
2. In the overlay menu, click the Capture button – the camera icon – in the top menu to bring up the Capture menu.
William Antonelli/Insider
3. In the Capture menu, click the camera icon to take a screenshot. You can also record a video clip by pressing the record button, with the option to include audio by clicking the microphone icon.
Screenshots and video clips captured by the Game Bar are saved in PNG and MP4 format and you can find them in the Videos > Captures folder in File Explorer. You can also find them through the Game Bar’s Gallery, by clicking Show my captures > See my captures underneath the screenshot and recording buttons in the Capture menu.
Power + Volume Up
To take a screenshot on Windows 10 with a Microsoft Surface device, press the Power Button + Volume Up Button. The screen will go dim, and your screenshot will save to the Pictures > Screenshots folder.
Third-party screenshot apps for Windows
If you’re unsatisfied with any of the built-in Windows methods, there are third-party screenshot tools worth considering, each with its own extra offerings.
William Antonelli/Insider
- Lightshot is a free screenshot tool designed for quick social sharing. When you download and install Lightshot on Windows 10, it replaces the Print Screen function and offers more editing capabilities.
- Greenshot is another free tool that allows you to edit and customize screenshots, as well as the option to capture a complete scrolling web page.
- ScreenRec is a free Windows recording tool that allows you to capture and share videos and screenshots. It also provides tools for annotating your recordings and screen grabs, as well as instantly creating a link that you can share with others so they can view them.
- Snagit is a screenshot tool that allows you to create animated GIFs, take full-page screenshots, and more. The downside? The premium version costs $50. There’s a 30-day free trial option but any picture you capture during the trial will be watermarked.
- Screencast-O-Matic is a web-based video editor and screen-sharing tool for recording your on-screen activities. It also has the ability to take screenshots, you’ll just need to sign up for a free account. You can also upgrade to a premium account to unlock advanced features, starting at $4 a month.
William Antonelli
Tech Reporter for Insider Reviews
William Antonelli (he/she/they) is a writer, editor, and organizer based in New York City. As a founding member of the Reference team, he helped grow Tech Reference (now part of Insider Reviews) from humble beginnings into a juggernaut that attracts over 20 million visits a month.
Outside of Insider, his writing has appeared in publications like Polygon, The Outline, Kotaku, and more. He’s also a go-to source for tech analysis on channels like Newsy, Cheddar, and NewsNation.
You can find him on Twitter @DubsRewatcher, or reach him by email at wantonelli@insider.com.
Read more
Read less