Updated by
Sherly on Aug 30, 2023
Overview of How to Boot From USB on Windows 11:
| ⚙️Complex Level | Low, Beginners |
| ⏱️Duration | 5-10 minutes |
| 💻Applies to | Boot from USB on Windows 11/10/8/8.1/7 |
| ✏️Stages |
Stage 1. Format USB as FAT32 Stage 2. Create Bootable USB Stage 3. Boot From USB on Windows 11 |
| 🔨Tools | USB, Windows PC, EaseUS Partition Master |
Before we go to the tutorial, you need to prepare a reliable USB and a formatting tool — EaseUS Partition Master. This tool stands out during our tests. The reason why we recommend it is that it has a clear interface and is easy to use, making it friendly to beginners.
- ✅Prepare a USB — Buy a certificated USB with enough capacity.
- ✅Download the reliable format tool — EaseUS Partition Master by clicking the blue button in advance. (This tool allows you to format a USB larger than 32 GB to FAT32, while Windows built-in tools don’t.)
Now, let’s start learning how to boot from a USB on Windows 11. In this article, we divide the whole process into three stages. First, make your USB well-prepared for the bootable USB.
Further Reading: Boot Windows from SD Card
1️⃣Stage 1. Format USB as FAT32
Creating a bootable USB drive has specific file system format requirements; the USB flash drive must be set to FAT32 format first. However, Disk Management and CMD can’t format a USB larger than 32 GB to FAT32. You need to turn to a third-party format tool. Our tests verify that EaseUS Partition Master is a stable formatting utility. It can format 64/128/256 GB USB to FAT32. Download this tool and follow the guide below to try it.
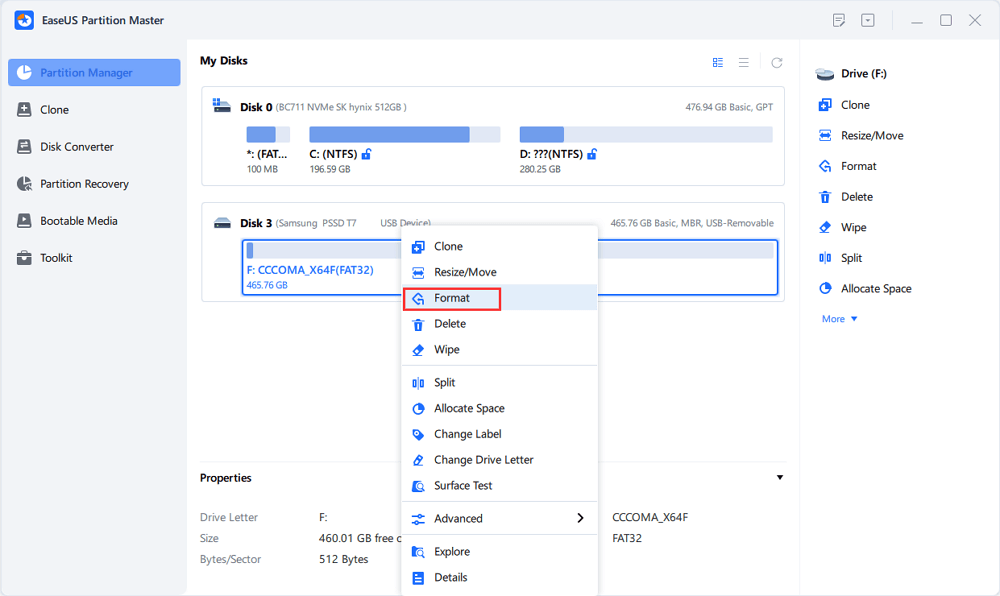
Step 1. Launch EaseUS Partition Master, right-click the partition on your external hard drive/USB/SD card which you want to format and choose the «Format» option.
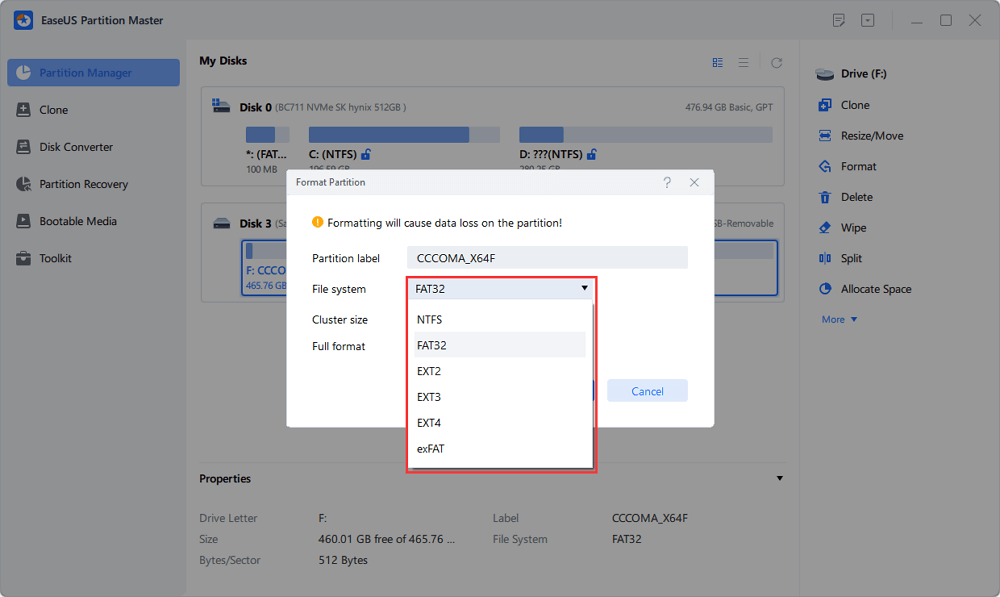
Step 2. Assign a new partition label, file system (NTFS/FAT32/EXT2/EXT3/EXT4/exFAT), and cluster size to the selected partition, then click «OK».
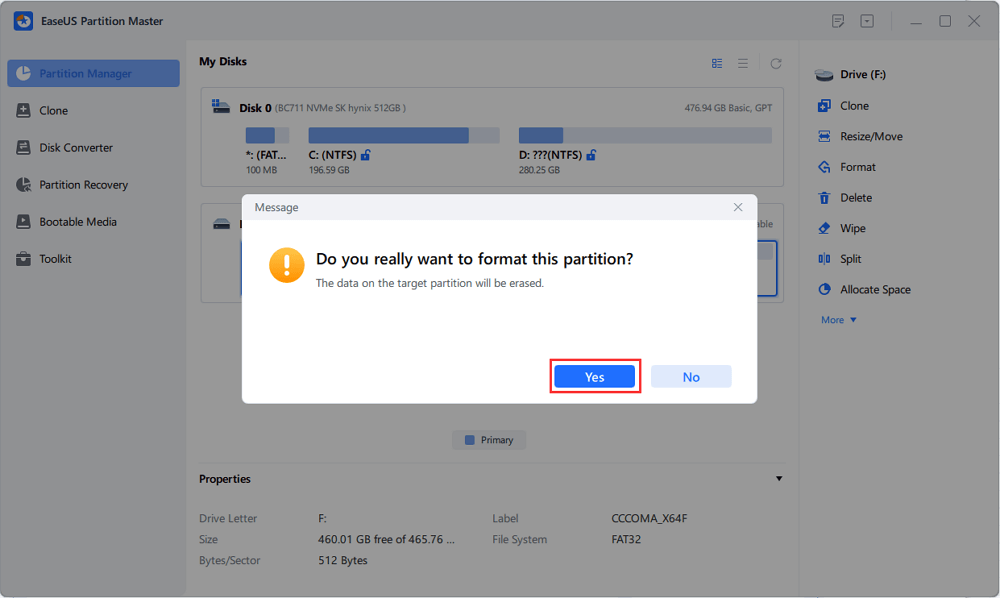
Step 3. In the Warning window, click «Yes» to continue.
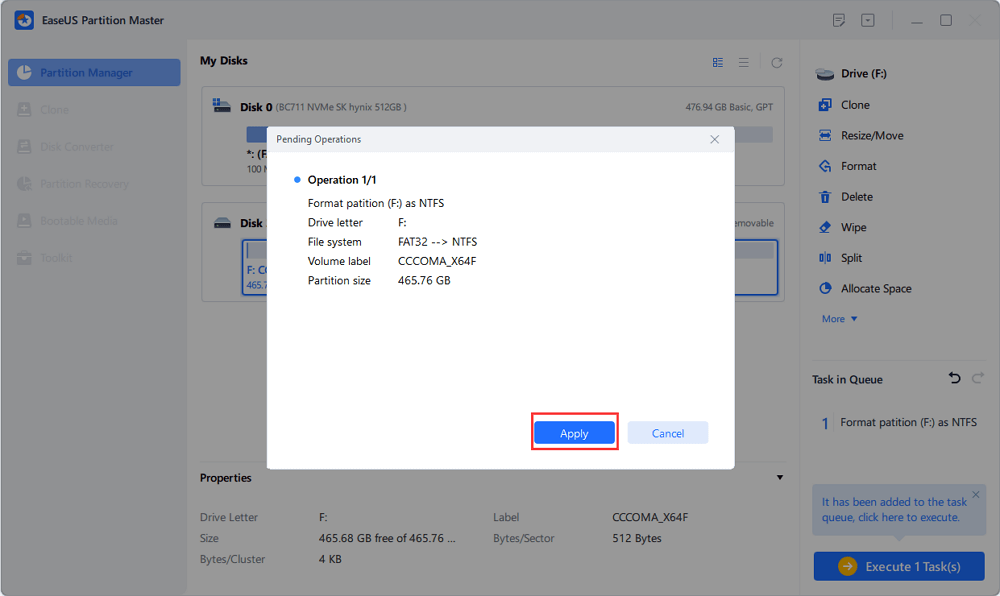
Step 4. Click the «Execute 1 Task(s)» button in the top-left corner to review the changes, then click «Apply» to start formatting your external hard drive/USB/SD card.
FAT32 is the best USB format to boot Windows 11; now, let’s go to Stage 2 and learn how to create a bootable USB.
2️⃣Stage 2. Create a Bootable USB
Creating a bootable USB can be complicated if you are not a pro; we need to choose trustworthy third-party software. To create a bootable USB, you can turn to EaseUS OS2GO. The following link can help you learn how to use it to create a bootable USB.
🔎Read this article to get more information: How to Create a Bootable USB on Windows 10
3️⃣Stage 3. How to Boot From USB on Windows 11 — 2 Cases
When you need to boot from USB on Windows 11, you may encounter two main situations. One situation is that your computer is working fine, and you can access the startup disk settings from the Windows Settings app portal. The other is when your computer goes wrong and crashes and doesn’t work properly, at which point you need to access the boot menu and boot your computer from USB in the BIOS. Now, let’s learn about each method.
Case 1. PC Can Start Properly — From Settings
Windows Settings can help you start from a USB; follow the given tutorial below to boot Windows 11 from USB while your computer still runs smoothly.
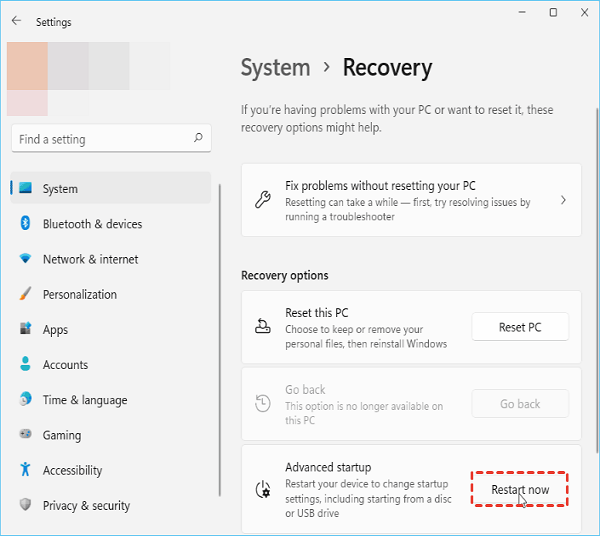
Step 1. Insert the bootable USB drive into your Windows 11 computer. Press Windows + I to open Settings, and select the «System» > «Recovery» option.
Step 2. Click the Restart Now button to the right of Advanced Startup. In the popup window, Windows 11 will let you know that it’s going to restart your device and that you’d better save your work until then.
Step 3. Afterward, your PC will restart and load into the recovery environment. Under the Choose an option window, select the Use a device option.
Step 4. Your PC will list the bootable devices your computer can use, including the USB drive you connected to your PC earlier. Click and select it.
Finally, your computer can reboot and boot from the USB drive you set up.
Case 2. PC Fails to Start — From Boot Menu
When your computer doesn’t boot, you need to access BIOS to boot Windows 11 from USB. Here’s how:
Step 1. Connect the bootable USB drive to the correct USB port. Then, press the Power button to boot your laptop/PC. When it starts loading, keep tapping the appropriate Boot Menu key, such as ESC, F2, F8, or F10 (The key can vary depending on the motherboard’s manufacturer and model) to enter the BIOS setup.
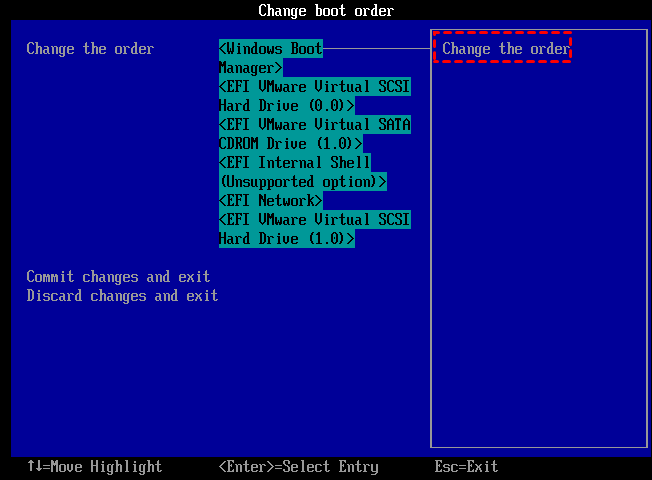
Step 2. In the boot menu, look for the Boot order option and move the bootable USB drive that you want to boot from to the top of the list.
Step 3. When you confirm your changes/settings, press the F10 key to save and exit. Upon exiting, your PC will automatically boot from the USB flash drive.
Conclusion
If you want to start Windows 11/10 from a USB flash drive but don’t know how to do it, then you can refer to the method in this tutorial to solve this problem easily. First, prepare a qualified USB flash drive and format it into FAT32; create a bootable USB; finally, change the boot order and set the bootable USB as the boot drive. Then, you can boot Windows 11 from the USB. It’s worth mentioning that you’ll need to access the BIOS to boot from USB if the computer isn’t working properly.
Click these buttons and share this detailed tutorial to help others in need.
How to Boot From USB on Windows 11 FAQs
There are many situations where you may wish to use a USB to boot Windows 11 on your computer, perhaps to boot a new Windows system, for troubleshooting, or to enjoy the same configuration on multiple PCs. Here are some more related questions and answers. Read on.
1. Why is Windows 11 not booting from USB?
Not all USB drives can be considered bootable USB devices. Regular USB drives are not bootable by default. So the reasons why Windows 11 cannot boot from USB are as follows:
- USB drive is not a bootable device
- Bootable USB drive not showing up in BIOS
- USB drive is too old
- USB drive is damaged by mistake
- USB drive format does not support
- Wrong boot order
2. How to load Windows 11 from USB in BIOS?
To load Windows 11 from a USB in BIOS, you need to make the USB bootable first. Then, connect the bootable USB to a PC and set the USB as the boot drive; then, you can boot Windows 11 from the USB.
3. When do we need to boot from a USB on Windows 11?
The reasons for booting the system from USB are as follows:
- Boot the new Windows system. Boot the new system on a USB stick to prevent it from affecting the version you are running.
- To troubleshoot. The second reason is that your computer operating system does not start properly, shows a blue screen on Windows 11, or keeps crashing due to viruses, malware, etc. At this point, you need a bootable USB disk to boot your computer properly.
- Booting the new computer from the USB boot disk with the old system will allow you to enjoy the same computer configuration.
This wikiHow will teach you how to boot your Windows PC from a USB drive by configuring the BIOS. If you haven’t already, you will need to make a bootable USB drive before you can boot from the USB drive.
-

1
Open Start
. Click the Windows icon in the bottom-left corner of the taskbar or press the ⊞ Win key to open the Start Menu.
-
2
Click
. It’s the gear icon in the left column of the Start Menu. This will open the Settings menu.
-
3
Click Update and Security. It’s the last option on the page and has an icon of two looping circular arrows.
-
4
Click Recovery. It’s in the left column.
-
5
Click Restart Now under the «Advanced Startup» heading. This will start the restart process but open a new page of options.
-
6
Click Troubleshoot. It’s the second option on the page next to the icon of a screwdriver and wrench.
-
7
Click Advanced options. This is the second option on the page next to the icon of a checklist.
-
8
Click UEFI Firmware Settings.
- If you don’t see this option listed (computers more than 4 years old might not have this option) you will have to access the BIOS manually by pressing a specific key during startup.
-
9
Click Restart.
- If you don’t have the UEFI Firmware Settings in Windows, you can restart your computer normally and enter the BIOS manually.


-
1
Look for the «Boot» section in your BIOS settings. This option might be labeled «Startup» or «Boot Order» or something similar. By default your Boot order is probably set to boot from the hard drive first, then the CD/DVD drive, and then USB. You’ll want to find the settings needed to
- Enable CSM if needed. On some motherboards, CSM or Compatibility Support Mode is required to change BIOS settings. Enable CSM and then find the «Save & Exit» option in your BIOS.
-
2
Change the Boot Order. Using the arrow keys, once you’ve found the Boot section of the BIOS options, change the «1st Boot Device» to either «Removable Media» or «USB».
- Different PC manufacturers might call it something different. Look for the option that is most likely to be USB, and select it as the first place to boot the computer from.
-
3
Plug in your Bootable USB drive. After you’ve changed the boot order in the BIOS, plug in your bootable USB drive to a USB slot on your computer if you haven’t done so already.
-
4
Save and Exit. After you’ve changed the boot order to boot from USB, look for the option to Save and Exit. This restarts your computer and will boot from the flash drive you plugged into your computer instead of the operating system on your hard drive.
- The key for saving and exiting is often the F10 key, but it may be something different on your computer.


Ask a Question
200 characters left
Include your email address to get a message when this question is answered.
Submit
About this article
Thanks to all authors for creating a page that has been read 182 times.
Is this article up to date?
Download Windows Speedup Tool to fix errors and make PC run faster
By default, your Windows 11 or Windows 10 PC is set to boot from the first connected internal hard drive. If you want to boot from a USB drive or an external drive, you need to change the boot order. In this post, we will walk you through the steps on how to boot from USB Drive within Windows 11/10.

Normally, if you are unable to boot into Windows and cannot access your files, you can create a bootable drive and use the media to boot and repair your OS installation.
Perhaps, not widely known by PC users, there is an option to boot from a USB drive within a running Windows OS installation. If Fast Boot is enabled in UEFI/BIOS, you may not be able to boot from a USB flash drive unless you boot from the USB within Windows; otherwise, you will have to temporarily disable Fast Boot or Ultra Fast Boot to be able to boot from a USB drive.
To Boot from USB Drive within Windows 11/10, do the following:
- Plug in a bootable USB drive to a USB port on your PC.
- Boot to Advanced Startup Options via Settings app.
- After the computer restarts, click/tap on the Use a device option.
- On the next screen, click/tap on the USB drive that you want to boot from.
The computer will now restart and boot from the selected USB drive.
That’s it!
How do I boot my PC from a USB drive?
To boot from USB drive on Windows 11/10, follow these steps:
- Press the Power button for your computer.
- During the initial startup screen, press ESC, F1, F2, F8 or F10.
- When you choose to enter BIOS Setup, the setup utility page will appear.
- Using the arrow keys on your keyboard, select the BOOT tab.
- Move USB to be first in the boot sequence.
Can Windows boot from a USB connected drive?
If you have a bootable USB drive, you can boot your Windows 10 computer from the USB drive. The easiest way to boot from USB is to open the Advanced Startup Options by pressing and holding the Shift key when you choose the Restart option in the Start menu.
How do I get USB to show in boot menu?
You can enable the Quiet Boot option in the Main Menu. Under the Advanced menu, ensure that the Legacy USB Support option is enabled. Do the following:
- Restart the system into the BIOS.
- Ensure the Boot Mode is set to EFI (or UEFI). This is found in the Boot Options menu.
- Make sure that the USB Boot Priority is enabled.
- Save the changes and exit.
Is bootable USB safe?
The short answer: Yes. It is safe to run an operating system from a USB flash drive. But keep in mind that if you do decide to install Windows to a USB drive, a Flash Drive(UFD) drive, ESATA drive or store Windows Native Boot VHD on USB/UFD drive, this scenario will not be supported by Microsoft.
Anand Khanse is the Admin of TheWindowsClub.com, a 10-year Microsoft MVP (2006-16) & a Windows Insider MVP (2016-2022). Please read the entire post & the comments first, create a System Restore Point before making any changes to your system & be careful about any 3rd-party offers while installing freeware.
How to Set Windows Computer to Boot from USB Drive [Two Ways]

Blake Sullivan Updated on Apr 14, 2022 6:23 PM
If you would like to use a CD/DVD-ROM instead, learn how to set computer to boot from CD/DVD-ROM.
Today, most PCs can boot from USB device so you can run special kinds of software to troubleshoot problems or update operating system. The computer BIOS Setup Utility allows you to configure the order that the machine searches physical devices (CD-ROM, DVD, Hard drive, or an external USB drive) for the boot sequence. The first device in the order list has the first boot priority.
To boot from a USB device instead of a internal hard drive where you install the operating system, you’ll have to move USB device ahead of the hard drive to has boot sequence priority. This tutorial will walk you through on how to boot from a password reset USB drive within a Windows computer (10, 8.1, 8, 7, Vista, XP, Server).
- Option 1: Set computer to boot from USB drive with Boot Menu (Recommended)
- Option 2: Set computer to boot from USB drive using BIOS Setup
Option 1: Set computer to boot from USB drive with Boot Menu
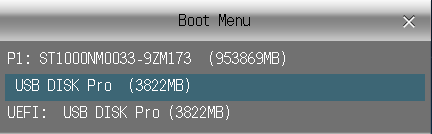
Insert the password reset USB drive to computer and power on it. When Vender logo appears, press Boot Menu key (F12 in generally, check Keys for popular PCs in table below) repeatedly to enter Boot Menu, and then choose USB Flash Drive to boot from. If fail to enter Boot Menu, you can reboot and try again.
![]()
Choosing either «USB xx» or «UEFI USB xx» option is OK. Be aware that the interface of Boot Menu may be slightly different on some computers.
Example 1. Set Dell laptop boot from USB flash drive
Insert the password reset USB device and restart the computer. When Dell logo appears, press F12 repeatedly until Boot Menu appears, and then you can select USB flash drive to boot from.
Example 2. Set HP laptop to boot from USB flash drive
Insert the password reset USB Flash drive and start HP computer. When HP Logo appears, press F9 repeatedly until Boot Menu appears, and then choose USB flash drive to boot from.
- HP PCs — Recovering your computer from a USB flash drive
- HP PCs — Secure Boot (Windows 10)
Note: In some cases, it might be necessary to enable Legacy Support and disable Secure Boot in BIOS in order to boot the computer from USB device.
Boot Menu Keys for laptops and Desktop computers:
| Manufacturer | Laptop | Desktop computer |
|---|---|---|
| HP | F9 or Esc | F12 |
| DELL | F12 | Esc |
| Acer | F12 | F12 |
| Lenovo | F12 | F12 |
| Thinkpad | F12 | F12 |
| Asus | Esc | F8 |
| GIGABYTE | F12 | F12 |
| MSI | F11 | F11 |
| Samsung | F12 | F12 |
| Sony | Esc | Esc |
| Toshiba | F12 | F12 |
| Fujitsu | F12 | F12 |
| Gateway | F12 | F12 |
| Microsoft Surface Pro | volume- | volume- |
If you fail to boot from USB device using Boot Menu, you can try to boot from a USB device using BIOS Setup, keep on reading.
Option 2: Set Computer to Boot from USB Drive Using BIOS Setup
Basic steps
- Power on locked computer, press the noted key (F2, Del, etc.) on your keyboard to enter BIOS interface. If you don’t catch the message the first time, simply restart the machine try again.
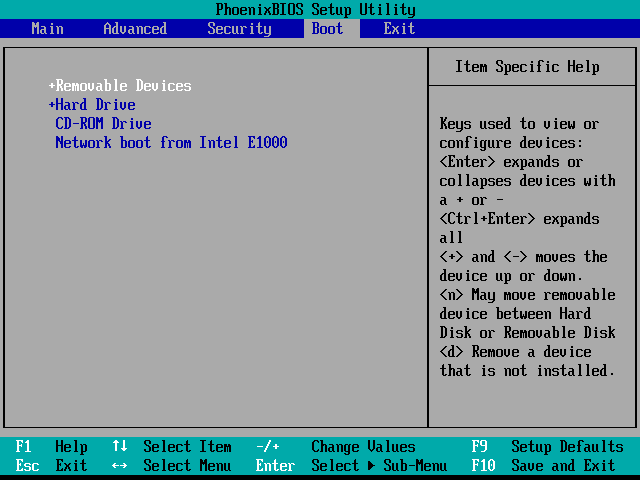
- Navigate to Boot tab, then expand Boot Device Priority, it commonly shows a list of devices, such as Floppy, CD-ROM, First Hard Disk etc.
- In First Boot Device, move USB Device to the top of the physical devices list.
- Press F10 to save and exit. You PC will restart and boot from the USB disk.
Example: Set PhoenixBIOS to boot from USB drive
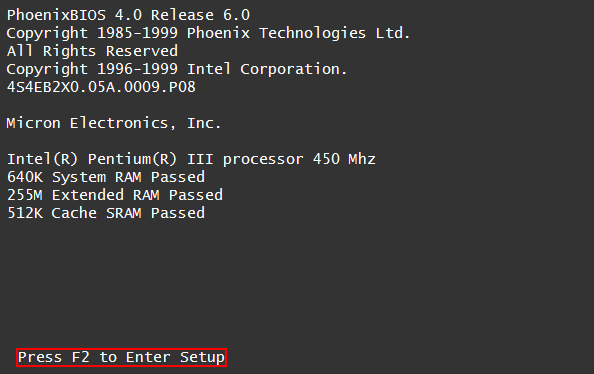
Step 1. Insert the password reset disk to the computer and power on it. Pay close attention to the first screen that appears. You should see something that says «Press [Key] to enter Setup«, «Setup =[Key]» or something similar, press that key repeatedly until BIOS Setup screen appears. Here we press F2 to enter PhoenixBIOS.
Tip: In the bottom of the article, we sum up a list of the most common access keys used to enter BIOS Setup on Windows computer.
When you’re in the BIOS screen, look for a menu that lets you see and change the boot devices or boot priority. Use the keys given at the bottom/right corner of the screen to navigate through the BIOS. To select something, press Enter.
Step 2. In this example, head to Boot tab, Use +/— key to move Removable Devices to the first order. In most PCs, the USB boot option will show up under one of the following headings: «Hard Disk Drive», «USB HDD», «[USB brand name]» or «Removable Device «, so be sure to dig around if you’re having trouble finding the right one to choose.
![]()
1. Some PC manufacturers may have different BIOS setup interfaces. Anyway, find the boot order option (it might be called «Boot Device Priority», «Advanced BIOS Features», «First Boot Device», «Boot Sequence») and set the boot priority.
2. Some BIOS may put USB Flash Disk option under Hard Drive. If that’s the case, you’ll have to expand Hard Drive option, and select USB Flash Disk as the first position in the priority list.
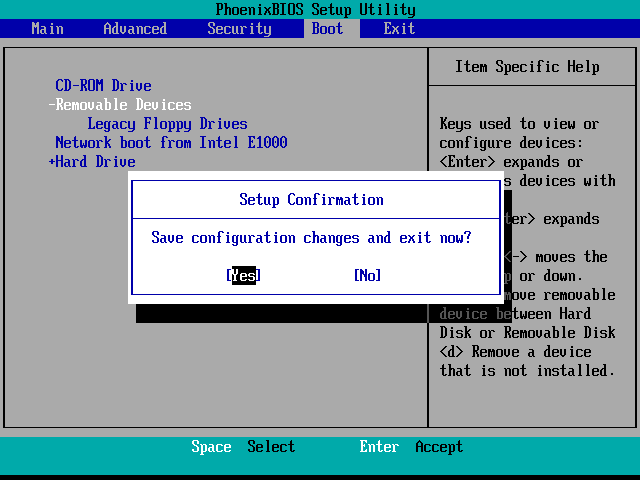
Step 3. Once done, simply press F10 key to save changes you made and exit. Or head to Exit Menu and press Exit Saving Changes (or similar words) to save the settings and exit BIOS.
>> Here are some other common interfaces you might see for setting boot order priority.
Common Keys to Enter BIOS Setup on Windows Computers
![]()
- Acer — Aspire, Power, Veriton, Extensa, Swift, Ferrari, TravelMate, Predator, Altos, etc.
- • Press Del or F2 immediately after powering on.
- • The BIOS on the Acer Altos 600 server uses the Ctrl+Alt+Esc key and the F1 key for advanced options.
- • Older Acer computers may also use the F1 or Ctrl+Alt+Esc keys to access BIOS.
![]()
- ASUS — VivoBook, Zen AiO, Zenbook, B, S, Q, V, X, K, T, U series, etc.
- • Press F8 repeatedly to enter BIOS > Advanced Boot Option.
- • Press F2 repeatedly to start the BIOS setup utility.
- • Some Asus laptops might use Del, Esc, or F10 key.
- • Older ASUS computers may required you to press the ESC key until Boot Device Selection screen appears, then select Enter Setup from the menu.
![]()
- HP — Pavilion, TouchSmart, Pro, Vectra, Stream, Vectra, OMEN, ENVY, OmniBook, EliteBook, ProBook, Zbook, Tablet
- • Press the F1, F10, or F11 key until you see the BIOS screen.
- • HP Tablet PCs may use F10 or F12.
- • Other HP computers may allow access to BIOS using the F2 or Esc keys.
- • Some of old PCs might require that you press the Esc key and then F10.
![]()
- Lenovo (formerly IBM) — ThinkPad, IdeaPad, Yoga, 3000 Series, Legion, ThinkCentre, ThinkStation, H535, 3000 Series, N Series, etc.
- • Press F1 or F2 after powering on the computer.
- • Press F12 to access BIOS.
- • Some Lenovo laptop have a small Novo button on the side (next to the power button), press and hold it to enter the BIOS setup utility.
- • Older PCs may use Ctrl+Alt+F3, Ctrl+Alt+Ins, or Fn+F1.
![]()
- Dell — XPS, Dimension, Inspiron, Latitude. OptiPlex, Precision, Alienware, Vostro
- • Press F2 when the Dell logo appears. Press every few seconds until the message Entering Setup appears.
- • Older Dell desktops and laptops may instead use Ctrl+Alt+Enter or Del to enter BIOS.
- • Older Dell laptops may use Fn+Esc or Fn+F1.
![]()
- Shuttle — Glamor G-Series, D’vo, Prima P2-Series, Workstation, XPC, Surveillance
- • Press F2 or Del on startup.
![]()
- Sony — VAIO, PCG-Series, VGN-Series
- • Press F1, F2 or F3 after turning on the computer.
![]()
- Samsung — Notebook, ATIV Book, ATIV One, ArtPC PULSE, etc.
- • Press F2 key after turning on the computer.
![]()
- Toshiba — Portégé, Satellite, Tecra, Equium
- • Press F1 or Esc after powering on to access BIOS.
- • Press F12 on a Toshiba Equium.
![]()
- Compaq — Presario, Prolinea, Deskpro, Systempro, Portable
- • Press F10 while the cursor in the top right corner of the screen is blinking.
- • Older Compaq computers may use the F1, F2, F10, or Del key to enter BIOS.
![]()
- eMachines — eMonster, eTower, eOne, S-Series, T-Series
- • Press Tab or Del while the eMachine logo displays on screen.
- • Other eMachine computers may use F2 to enter BIOS.
![]()
- Fujitsu — LifeBook, Esprimo, Amilo, Tablet, DeskPower, Celsius
- • Press F2 once the Fujitsu logo appears.
![]()
- Gateway — DX, FX, One, LT, GM, NE, GT, GX, NV, Profile, ONE, SX, Astro
- • Press the F1 or F2 key repeatedly after restarting the computer.
![]()
- IBM — PC, XT, AT
- • Press F1 immediately after powering on the computer.
- • Older IBM computers may utilize the F2 key for BIOS entry.
![]()
- Micron (MPC Computers) — ClientPro, TransPort
- • Press F1, F2 or Del immediately after powering on the PC.
![]()
- NEC — PowerMate, Versa, W-Series
- • Press F2 to enter the BIOS Setup.
![]()
- Packard Bell — 8900 Series, 9000 Series, Pulsar, Platinum, EasyNote, imedia, iextreme
- • Press F1, F2, or Del to enter BIOS.
![]()
- Sharp — Notebook Laptops, Actius UltraLite
- • Press F2 after the computer starts.
- • Some very old Sharp PCs require a Setup Diagnostics Disk to access BIOS.
![]()
- Sharp — SC17, SC15
- • Press Del repeatedly to access BIOS Setup