
![]()
bdbch
Posted on
• Updated on
![]()
![]()
![]()
![]()
![]()
Welcome to my first official guide on Dev.to. Today I want to explain how you can setup SSH and Git on your Windows 10 computer.
Note: This is not about 100% securing your keys but about how to generate keys for use with GitHub.
Thanks to garethdd for his constructive feedback.
What is SSH?
SSH stands for Secure Shell and is an awesome way to authenticate yourself on remote servers (for example the Github server) without typing in a password everytime.
SSH works via two keys, the Private Key and the Public Key. While the private key should always stay private and safe, the public key can be shared around the internet without any problems.
The private key allows you to get access to servers that have your public key registered, so your access can only be stolen if the attacker somehow gets your Secret Key so keep it safe!
SSH should be preinstalled on new Windows 10 machines.
What is Git?
Git is a free version management tool that helps you to versionize your code and potentially save it on a remote server (for example Github, Gitlab or Bitbucket).
You can install Git from here:
https://git-scm.com/download/win
You can also install Git via chocolatey:
choco install git -Y
Enter fullscreen mode
Exit fullscreen mode
Create a SSH Key
The first step is to generate a new SSH key. Use cmd or Powershell and run the following command:
ssh-keygen -t rsa -b 4096 -C "your_email@example.com"
Enter fullscreen mode
Exit fullscreen mode
You can but don’t need to give it a passphrase since you should never share your secret key around but using one will secure your keys. Keep in mind that everybody can have as many private keys as they want.
This generates a new private SSH key with rsa encryption and 4096 bits. It also generates a public key from the secret key which you can share around.
There will be a new folder and files in your Windows user folder.
In general you can create as many keys as you want. The id_rsa key is the default key generated by ssh and will be automatically be used by your ssh-agent if you don’t tell it to use another key.
What is an ssh-agent?
An ssh-agent is the agent process used to actually authenticate yourself with ssh. There are a few out there (PuTTY with Pageant for example) but for this example we’ll use the ssh-agent provided by the native and default Windows 10 ssh-agent.
If you want to you can use PuTTY and Pageant to make your keys even more secure. Read this post on Digital Ocean for more information.
If you want to change the key used by your ssh-agent, you must first start the service. The service will be disabled on Windows 10 by default. Search for Services and open the Services settings and look for the «OpenSSH Authentication Agent» and Activate it:

Now you will be able to access the ssh-agent from your console via ssh-agent.
For this example we’re going to try to load another key called example into our agent and use it instead of the id_rsa key. To do this you can run the following command:
ssh-add example
Enter fullscreen mode
Exit fullscreen mode
Now you will have both keys available for this session.
Register your SSH Key on Github
The next step is to register your generated SSH key on Github. For that, run the following command:
type C:\Users\your_user_name\.ssh\id_rsa.pub
Enter fullscreen mode
Exit fullscreen mode
and copy the output string into your clipboard. Now go to your Github keys settings and add a new SSH key with your public key and save it.
Congratulations! You now are able to get and push code to Github without any password!
Note: There should also be a C:\Users\your_user_name\.ssh\id_rsa file. This is your private key, don’t share this around!
Setup Github in your Shell
Now it’s time to setup Git on your machine. After installing it from the link above, open a new cmd or Powershell window. Now we need to set your public Git name and Git email address. This will always be public when pushing code.
Luckily Github gives you a privatized email address for use. Go to https://github.com/settings/emails and you will find a @users.noreply.github.com email address for your account. Copy this email address.
Next register your name and email in Git:
git config --global user.name "Your Name"
git config --global user.email your_email@users.noreply.github.com
Enter fullscreen mode
Exit fullscreen mode
Congratulations! Now all your Commits will be registered as being commited from your Github user.
Signing your GitHub commits (Optional Step)
To sign your commits you first must install the GPG command line tools. After you installed the GPG toolkit, you can run the following command to generate a new gpg key:
gpg --full-generate-key
Enter fullscreen mode
Exit fullscreen mode
This will ask you what kind of key you want. Go for RSA and RSA.

Now you need to enter a bit length. The recommendation is 4096 bits.
After that you can specify a expiration length or if the key should never expire. Pick as you want. Expiring keys are more secure in general because you have to renew them every now and then.
Now enter your personal informations to verifying your identity with your gpg key.
When you’re done you will be asked for a passphrase. Give it a secure passphrase and you will be done with your gpg-key generation.
After that you will be able to find your key in your users .gnupg folder as specified in the success message.
If you want to list your gpg keys, simply run
// short version
gpg --list-secret-keys

// long version
gpg --list-secret-keys --keyid-format LONG
Enter fullscreen mode
Exit fullscreen mode
Your GPG key you can share with Github is the key coming after sec rsa4096/ so for example in
/Users/hubot/.gnupg/secring.gpg
------------------------------------
sec   4096R/3AA5C34371567BD2 2016-03-10 [expires: 2017-03-10]
uid                          Hubot
ssb   4096R/42B317FD4BA89E7A 2016-03-10
Enter fullscreen mode
Exit fullscreen mode
the gpg key would be 3AA5C34371567BD2
To get your public key block, simply run
gpg --armor --export YOUR_GPG_KEY
Enter fullscreen mode
Exit fullscreen mode
which will output your public GPG Key Block. Copy it and paste it to your GitHub Account here.
From now on your commits will be signed when commited.
Use Git
Now you’re ready to actually use Git. From now you can clone repositories via git clone or push new code to Github. Here is a quick reference:
# Clone a repository to the current directory
git clone [REPOSITORY_CLONE_URL]

# Create a new commit with a message
git commit -m "Your commit message"

# Add files to the commit
git add .
git add ./filename.ext

# Push your commits to Github
git push origin master
git push origin [YOUR_BRANCH_NAME]

# Reset your repo to the last version
git reset --hard

# Create a new branch
git checkout -b [YOUR_BRANCH_NAME]

# Switch branches
git checkout [YOUR_BRANCH_NAME]
git checkout master

# Reset a single file
git checkout ./filename.ext
Enter fullscreen mode
Exit fullscreen mode
Conclusion
Thanks for reading this post. I hope it helped you with the setup. If you need help or have questions let me know!
Инструменты
Git SSH Windows — пошаговое руководство
Дата размещения статьи 08/12/2019 👁31067
Git SSH Windows — пошаговое руководство
Настроим пошагово Git SSH для Windows 10. Это позволит вам выполнять команды git без ввода пароля от своей учетной записи GitHub.
Порядок действий:
- Генерация ключа SSH.
- Добавление SSH-ключа в ssh-agent.
- Добавление ключа SSH в учетную запись GitHub.
Генерация ключа SSH
Откройте bash/терминал. Добавьте следующий текст, подставив свой адрес электронной почты GitHub.
ssh-keygen -t rsa -b 4096 -C "ваша@почта.com"Будет создан ключ ssh, используя e-mail в качестве метки.
Когда вам будет предложено «Введите файл, в котором вы хотите сохранить ключ», нажмите Enter. Это установит в местоположение по умолчанию.
Enter a file in which to save the key (/c/Users/you/.ssh/id_rsa):[Press enter]
Далее введите безопасную фразу-пароль дважды или просто нажмите Enter.
Enter passphrase (empty for no passphrase): [Type a passphrase]
Enter same passphrase again: [Type passphrase again]
Добавление SSH-ключа в ssh-agent
Чтобы запустить ssh-агент введите следующую команду.
На экране отобразится похожая строка.
Agent pid 31724
Добавим свой закрытый ключ SSH в ssh-agent. Если вы создали свой ключ с другим именем (или добавляете существующий ключ с другим именем), замените в команде id_rsa на имя вашего файла закрытого (приватного) ключа.
Ключ будет успешно добавлен в ssh-агент.
Добавление ключа SSH в учетную запись GitHub
Мы сгенерировали у себя на компьютере закрытый ключ SSH и добавили его в ssh-агент. Теперь нам необходимо добавить SSH ключ в учетную запись GitHub.
Сейчас нам необходимо скопировать SSH ключ в буфер обмена.
Способов есть несколько, но я же вам предлагаю следующее решения для Windows 10: введите команду ниже.
Прямо в терминале вы увидите содержимое необходимого файла с ключем. Скопируйте его в буфер.
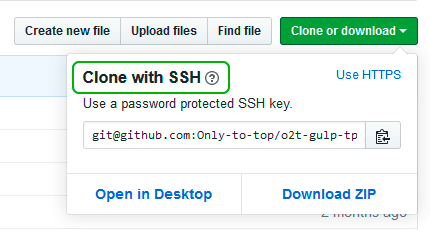
Теперь зайдите на вашу страницу GitHub » Settings.
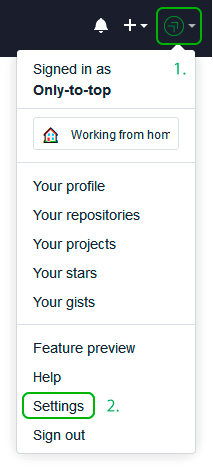
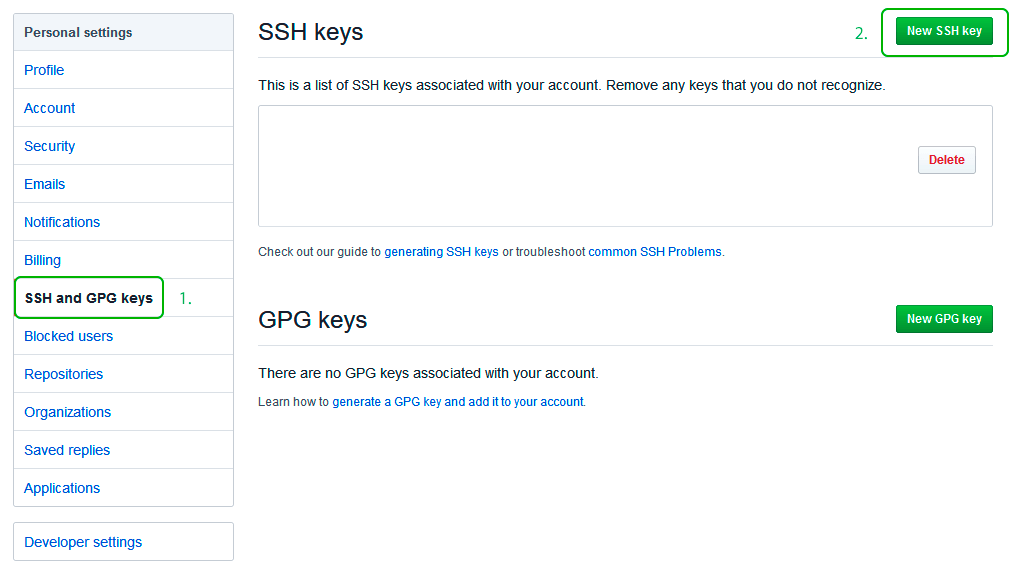
Перейдите во вкладку SSH and GPG keys и нажмите на кнопку New SSH key для добавления SSH ключа в вашу учетную запись GitHub.
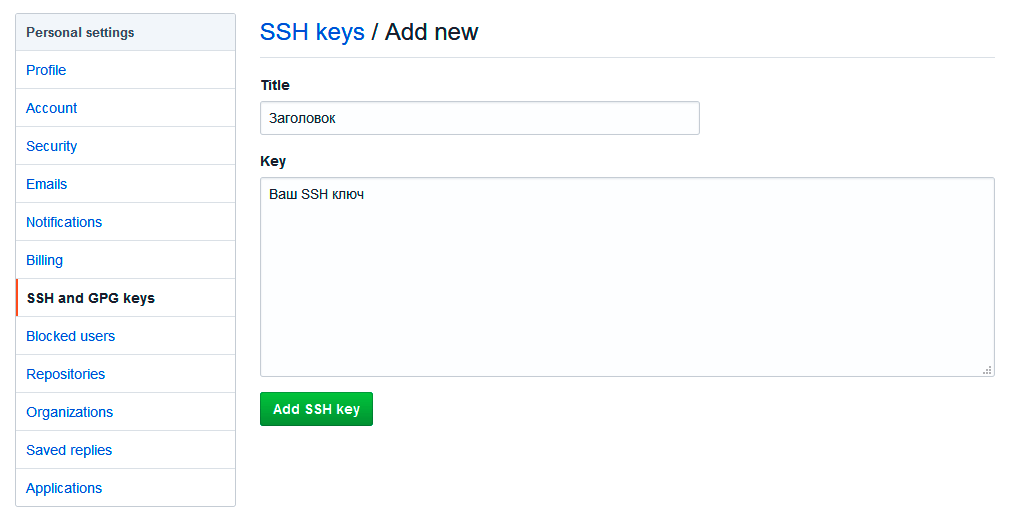
В поле Title добавьте заголовок для данного ключа. Например, если вы захотите настроить SSH доступ на нескольких устройствах, то вы будите понимать какой ключ принадлежит какому устройству.
В поле Key добавьте свой ssh-ключ, который вы скопировали в буфер обмена на предыдущем шаге.
Нажмите Add SSH key.
Для подтверждения вам потребуется ввести свой пароль от учетной записи GitHub.
На этом настройка SSH для вашего устройства завершена, теперь вы можете работать с git без ввода пароля от своей учетной записи.
Если вам понравилась данная статья, можете прочитать как настроить моментальную загрузку сайта на хостинг и синхронизацию файлов.
JavaScript: Window Location Checkbox Checked — Проверка Состояния Чекбокса ✔️
Надеюсь, вам понравилась данная информация. Если вам интересна тема web-разработки,
то можете следить за выходом новых статей в Telegram.
- Настройка Gulp Babel
- Микроразметка сайта
- Как перенести сайт WordPress на хостинг
- Настройте показ всего текста во время загрузки веб-шрифтов
- Сниппеты в VS Code
- Не удается проверить так как не задан исполняемый PHP-файл
Prepararation
- Create a folder at the root of your user home folder
(Example:C:/Users/uname/) called.ssh. - Create the following files if they do not already
exist (paths begin from the root of your user home
folder):.ssh/config.bash_profile.bashrc
Create a New SSH Key
Follow the steps in the section named «Generating a new SSH
Key» found in the following documentation from GitHub:
Generating a new SSH key and adding it to the ssh-agent
Configure SSH for Git Hosting Server
Add the following text to .ssh/config (.ssh should be found
in the root of your user home folder):
Host github.com
 Hostname github.com
 IdentityFile ~/.ssh/id_rsa
Enable SSH Agent Startup Whenever Git Bash is Started
First, ensure that following lines are added to .bash_profile,
which should be found in your root user home folder:
test -f ~/.profile && . ~/.profile
test -f ~/.bashrc && . ~/.bashrc
Now, add the following text to .bashrc, which should be found
in your root user home folder:
# Start SSH Agent
#----------------------------

SSH_ENV="$HOME/.ssh/environment"

function run_ssh_env {
  . "${SSH_ENV}" > /dev/null
}

function start_ssh_agent {
  echo "Initializing new SSH agent..."
  ssh-agent | sed 's/^echo/#echo/' > "${SSH_ENV}"
  echo "succeeded"
  chmod 600 "${SSH_ENV}"

  run_ssh_env;

  ssh-add ~/.ssh/id_rsa;
}

if [ -f "${SSH_ENV}" ]; then
  run_ssh_env;
  ps -ef | grep ${SSH_AGENT_PID} | grep ssh-agent$ > /dev/null || {
    start_ssh_agent;
  }
else
  start_ssh_agent;
fi
The third-party Git Credential Manager (GCM) can be used as alternative method of connecting to Bitbucket Cloud from the Git CLI. If you do not want to configure SSH access for your Bitbucket Cloud account, you can use the GCM, which is installed by default with Git for Windows, or you can download and install it from Git Credential Manager on GitHub. Note that the GCM works over HTTPS, not SSH. Ensure your Git remotes are using HTTPS, such as:
git clone https://{username}@bitbucket.org/{workspace}/{repository}.git
The Secure Shell protocol (SSH) is used to create secure connections between your device and Bitbucket Cloud. The connection is authenticated using public SSH keys, which are derived from a private SSH key (also known as a private/public key pair). The secure (encrypted) connection is used to securely transmit your source code between your local device and Bitbucket Cloud. To set up your device for connecting Bitbucket Cloud using SSH, you need to:
-
Install OpenSSH on your device.
-
Start the SSH service.
-
Create an SSH key pair.
-
Add your key to the SSH agent.
-
Provide Bitbucket Cloud with your public key.
-
Check that your SSH authentication works.
Install OpenSSH on Microsoft Windows
There are 3 methods for installing OpenSSH on Microsoft Windows:
-
Download and run the Git for Windows installer.
-
Use winget to run the Git for Windows installer.
-
Install the Windows version of OpenSSH.
Download and install Git for Windows
-
Download and run the installer from https://gitforwindows.org/. The options at each step should be suitable. When you reach the step about choosing the SSH executable, ensure the bundled OpenSSH is selected.
-
Once the installation is complete, open Git Bash from the Start menu.
In the terminal, check that OpenSSH has been successfully installed by running the following command:
1
ssh -V
The output should show the installed version of OpenSSH.
Install Git for Windows with winget
To install OpenSSH as part of Git for Windows with the Windows package manager winget:
-
Check that winget is installed. Open PowerShell and run:
1
winget -v -
To install Git for Windows using winget install, run:
1
winget install --id Git.Git -e --source winget -
Once the installation is complete, open Git Bash from the Start menu.
In the terminal, check that OpenSSH has been successfully installed by running the following command:
1
ssh -V
The output should show the installed version of OpenSSH.
Install the Windows version of OpenSSH
This procedure assumes Git is already installed and accessible in PowerShell. If Git is installed and not accessible in PowerShell, you may need to add Git to the PATH environmental variable.
To install the Windows version of OpenSSH, follow the instructions in the Microsoft Docs Get Started with OpenSSH for Windows guide. Once OpenSSH is installed, you need to configure Git to use OpenSSH.
In PowerShell, check that OpenSSH has been successfully installed by running the following command:
1
ssh -V
The output should show the installed version of OpenSSH.
To find where ssh was installed, run Get-Command. For example:
1

2

3

4

5
> Get-Command ssh
CommandType Name Version Source
----------- ---- ------- ------
Application ssh.exe 8.1.0.1 C:\Windows\System32\OpenSSH\ssh.exe
To configure Git to use the Windows version of OpenSSH, update the SSH command with git config, such as:
1
git config --global core.sshCommand C:/Windows/System32/OpenSSH/ssh.exe
Start the SSH agent
To allow git to use your SSH key, an SSH agent needs to be running on your device. The method for starting the SSH agent depends on how OpenSSH was installed.
Git for Windows users (including Winget-based Git installations)
From a git bash terminal, check if the SSH agent is running using the ps command. If the ssh-agent is already running, it should appear in the output, such as:
1

2
$ ps -a | grep ssh-agent

tkelly      3291  0.0  0.0   6028   464 ?        Ss   07:29   0:00 ssh-agent
To start the agent:
1
eval $(ssh-agent)
You may need to add this command to your ~/.bashrc to ensure the agent starts when you open a Git Bash terminal.
Windows OpenSSH users
From a PowerShell, check if the SSH Agent is running using the Get-Service command. For example:
1

2

3

4

5
> Get-Service ssh-agent
Status Name DisplayName
------ ---- -----------
Stopped ssh-agent OpenSSH Authentication Agent
To start the agent:
1
> Start-Service ssh-agent
To configure the SSH agent to start each time the device is started, use the Set-Service command, such as:
1
> Set-Service -Name sshd -StartupType 'Automatic'
Create an SSH key pair
To create an SSH key pair:
-
Open a terminal and navigate to your home or user directory using cd, for example:
1
cd ~ -
Generate a SSH key pair using ssh-keygen, such as:
1
ssh-keygen -t ed25519 -b 4096 -C "{username@emaildomain.com}" -f {ssh-key-name}Where:
-
{username@emaildomain.com} is the email address associated with the Bitbucket Cloud account, such as your work email account.
-
{ssh-key-name} is the output filename for the keys. We recommend using a identifiable name such as bitbucket_work.
-
-
When prompted to Enter passphrase, you can either provide a password or leave the password empty. If you input a password, you will be prompted for this password each time SSH is used, such as using Git command that contact Bitbucket Cloud (such as git push, git pull, and git fetch). Providing a password will prevent other users with access to the device from using your keys.
Once complete, ssh-keygen will output two files:
-
{ssh-key-name} — the private key.
-
{ssh-key-name}.pub — the public key.
These files will be stored in your user folder, such as C:\Users\<username>\<ssh-key-name>.
Add your key to the SSH agent
To add the SSH key to your SSH agent (ssh-agent):
-
Run the following command, replacing the {ssh-key-name} with the name of the private key:
1
ssh-add ~/{ssh-key-name} -
To ensure the correct SSH key is used when connecting to Bitbucket, update or create your SSH configuration file (~/.ssh/config) with the following settings:
1

2

3
Host bitbucket.org

  AddKeysToAgent yes

  IdentityFile ~/.ssh/{ssh-key-name}
Where {ssh-key-name} is the location of the private key file once it has been added to the ssh-agent.
Provide Bitbucket Cloud with your public key
To add an SSH key to your user account:
-
Select the Settings cog on the top navigation bar.
-
From the Settings dropdown menu, select Personal Bitbucket settings.
-
Under Security, select SSH keys.
-
Select Add key.
-
In the Add SSH key dialog, provide a Label to help you identify which key you are adding. For example, Work Laptop <Manufacturer> <Model>. A meaning full label will help you identify old or unwanted keys in the future.
-
Open the public SSH key file (public keys have the .pub file extension) in a text editor. The public key should be in the .ssh/ directory of your user (or home) directory. The contents will be similar to:
1
ssh-ed25529 LLoWYaPswHzVqQ7L7B07LzIJbntgmHqrE40t17nGXL71QX9IoFGKYoF5pJKUMvR+DZotTm user@example.com -
Copy the contents of the public key file and paste the key into the Key field of the Add SSH key dialog.
-
Select Add key.
-
If the key is added successfully, the dialog will close and the key will be listed on the SSH keys page.
-
If you receive the error That SSH key is invalid, check that you copied the entire contents of the public key (.pub file).
-
Check that your SSH authentication works
To test that the SSH key was added successfully, open a terminal on your device and run the following command:
1
ssh -T git@bitbucket.org
If SSH can successfully connect with Bitbucket using your SSH keys, the command will produce output similar to:
1

2

3
authenticated via ssh key.
You can use git to connect to Bitbucket. Shell access is disabled
March 1st, 2021
Maybe you have a team of Windows developers that are onboarding for your new Git server installation or maybe you’ve decided to drop http password authentication to your existing Git server (due to it’s many problems). Your next steps may well be into a rough and rocky rabbit hole when you were holding out hope for simplicity (you know the kind you’ve fallen into before if you’ve been in tech for more than about 45 minutes).
The common Internet guidance for setting up Git with SSH authentication on Windows are unnecessarily complex.
My inner tool smith really loathes when the very first steps into something new are fraught with rocky rabbit holes – so I took on the challenge of creating an easier way.
The resultant tool is a 20 line PowerShell script that deploys Git, configures SSH and leaves the public key on your clipboard so you can paste it into GitLab or any other Git collaborative webserver. There is also an optional connectivity test.
Reasons For Moving to SSH
There are multiple reasons you may want to move your Windows developers to SSH authentication for Git:
- You want to get away from git storing local passwords – whether in the git config or in Windows Credentials (with the windows credential helper) because it is painful to walk people through how to find and update this password when they change it on the Git server.
- You want to avoid both http passwords and the http protocol for git CLI operations.
Conventional Wisdom on SSH Configuration
The conventional wisdom solution offers many steps that are roughly:
- Installing git manually.
- Installing the well known Windows SSH client Putty.
- Installing Putty’s key generator.
- Converting the non-compatible putty generated key into an ssh compatible one.
- Precisely placing the SSH key on disk.
- Precisely and manually permissioning the SSH key and it’s parent folder (ssh is purposely fussy about this in order to keep the key secure).
Most of this can be avoided by simply using the full SSH client that is embedded inside of the Windows git client install.
The Cleanest Way (With Working Automation Code)
Mission Impossible Code is an evolving hypothesis I have about how specific architectural design heuristics can yield simpler, more flexible and robust solutions. If you become curious to know more, you can checkout the post Mission Impossible Code Heuristics for Creating Super-Spy Code That Always Gets the Job Done on my blog at missionimpossiblecode.io.
Mission Impossible Coding Principal 1: Steal Lessons From Desired State Automation
The code in this article is idempotent or “desired state oriented” – meaning that it always checks if the system is already in the desired state and only takes action if it is not. While coding this way takes a little extra effort, there are multiple rewards:
- Reduction in runtime if something is already installed or configured correctly.
- Does not accidentally upgrade software nor destroy existing configurations (e.g. this code will not accidentally overwrite a pre-existing primary ssh key).
- If the code fails, it can be run again until it works because it picks up where it left off.
Mission Impossible Coding Principal 2: Reduce Unnecessary Complexity
This code also lowers complexity in other ways:
- By using the presence of a data value as a switch. In this case, if SSHEndPointToGitForTesting contains a value, then an SSH connect test is done, otherwise the test is simply assumed to be disabled on purpose.
- The parameters for triggering a test can be hard coded or passed in environment variables – keeping the code simple, but compatible with the possibility of multiple git server endpoints and with enclosing automation.
- By selecting a single test that tests for the maximum problematic connectivity conditions. In this case, using an SSH login tests all end-to-end connectivity at all ISO layers between the client and the git server as well as SSL configuration. It also tests the authentication mechanisms of the server and that the SSH key was added to the correct place in the git server. Another great trick for simpler scenarios is using a tcp connect test instead of ping. This could also be updated to do a tcp connect test only if the ssh login fails – sort of building in self-diagnosing intelligence.
Mission Impossible Coding Principal 3: Enable Zero Footprint Execution of the Latest Version (Directly From Repository)
Like many Mission Impossible Code examples, this one is designed and test to be executed directly from a git raw URL to make it easily used from a single repository location. The first code snippet under Solution Details below shows how to use this feature.
Code Behavior
- If not present, automatically installs Git.
- If not present, automatically installs chocolatey to install Git.
- If not present, automatically generates an SSH key.
- Key generation always uses the Git’s built-in SSH client to create SSH keys (avoids much of the complexity of the above conventional wisdom approach).
- Copies the public key to the clip board and pauses for the user to add it to the Git server (in their profile).
- Optionally does a SSH login test (only if you provide a value for: $SSHEndPointToGitForTesting).
Solution Details
This code can be run directly from GitLab with this command:
Invoke-Expression -command "Invoke-WebRequest -uri 'https://gitlab.com/missionimpossiblecode/MissionImpossibleCode/-/raw/master/install-gitwithssh.ps1' -UseBasicParsing -OutFile ./install-gitwithssh.ps1" ; . ./install-gitwithssh.ps1
If you want to download dynamically, but also want the test and instructions to work, then set these environment variables before calling the above:
$env:YourGitServerhttpURL="https://gitlab.com"
$env:GitSSHUserAndEndPointForTesting="git@gitlab.com" #some Git servers might want the windows userid "git", which is specified as $env:username
You can also simply copy the code, hardcode the two variables and distribute it in your organization.
Main Code
# Set environment variables before calling in order to test
If ((Test-Path env:YourGitServerhttpURL) -and (!(Test-Path variable:YourGitServerhttpURL))) {$YourGitServerhttpURL="$env:YourGitServerhttpURL"}
If ((Test-Path env:GitSSHUserAndEndPointForTesting) -and (!(Test-Path variable:GitSSHUserAndEndPointForTesting))) {$GitSSHUserAndEndPointForTesting="$env:GitSSHUserAndEndPointForTesting"}
# $YourGitServerhttpURL="https://gitlab.com"
# $GitSSHUserAndEndPointForTesting="$env:username@gitlab.com" #Optional to trigger testing Use "git@gitlab.com" for GitLab.

If (!(Test-Path 'C:\Program Files\git\usr\bin\ssh-keygen.exe'))
{
  Write-Host 'Installing latest git client using Chocolatey'
  If (!(Test-Path env:chocolateyinstall))
  {
    Write-Host "Chocolatey is not present, installing on demand."
    iwr https://chocolatey.org/install.ps1 -UseBasicParsing | iex
  }
  cinst -y git
}
If (!(Test-Path $env:userprofile\.ssh\id_rsa.pub))
{
  Write-Host 'No default ssh key present in $env:userprofile\.ssh, generating a new one.'
  Write-Warning 'Press enter for default file name and twice for password to set it to not have a password'
  & 'C:\Program Files\git\usr\bin\ssh-keygen.exe'
}
get-content $env:userprofile\.ssh\id_rsa.pub | clip
write-host "Your public ssh key is now on your clipboard, ready to be pasted into your git server at $YourGitServerhttpURL"

If (Test-Path variable:GitSSHUserAndEndPointForTesting)
{
  Write-Host 'NOTE: Sometimes it takes a while for your Git server to propagate your key so it is available for authentication after first adding it!'
  Write-Host 'After you have setup the key, to test the connection, press any key to continue...';
  $null = $Host.UI.RawUI.ReadKey('NoEcho,IncludeKeyDown');
  #Use git's open ssh:
  Write-Host "...Testing ssh login as ${GitSSHUserAndEndPointForTesting} using key $env:userprofile\.ssh\id_rsa on port 22"
  $env:term = 'xterm256colors'
  push-location 'c:\program files\git\usr\bin'
  .\ssh.exe "${GitSSHUserAndEndPointForTesting}" -i $env:userprofile\.ssh\id_rsa -p 22
  pop-location
  Write-Host 'After observing the test result above (note it may take time for your new key to propagate at the server), press any key to continue...';
  $null = $Host.UI.RawUI.ReadKey('NoEcho,IncludeKeyDown');
}
Code For This Article
install-gitwithssh.ps1
![]()
DarwinJS
Senior Solutions Architect, GitLab