- What are SSH keys
- Prerequisites
-
Supported SSH key types
- ED25519 SSH keys
- ED25519_SK SSH keys
- ECDSA_SK SSH keys
- RSA SSH keys
- See if you have an existing SSH key pair
-
Generate an SSH key pair
- Configure SSH to point to a different directory
- Update your SSH key passphrase
- Upgrade your RSA key pair to a more secure format
- Generate an SSH key pair for a FIDO2 hardware security key
-
Generate an SSH key pair with a password manager
- Generate an SSH key pair with 1Password
- Add an SSH key to your GitLab account
- Verify that you can connect
- Use different keys for different repositories
- View your account’s SSH keys
- Use different accounts on a single GitLab instance
- Configure two-factor authentication (2FA)
- Use EGit on Eclipse
- Use SSH on Microsoft Windows
- Overriding SSH settings on the GitLab server
-
Troubleshooting
- TLS: server sent certificate containing RSA key larger than 8192 bits
- Password prompt with
git clone Could not resolve hostnameerrorKey enrollment failed: invalid formaterror
Git is a distributed version control system, which means you can work locally,
then share or push your changes to a server. In this case, the server you push to is GitLab.
GitLab uses the SSH protocol to securely communicate with Git.
When you use SSH keys to authenticate to the GitLab remote server,
you don’t need to supply your username and password each time.
What are SSH keys
SSH uses two keys, a public key and a private key.
- The public key can be distributed.
- The private key should be protected.
It is not possible to reveal confidential data by uploading your public key. When you need to copy or upload your SSH public key, make sure you do not accidentally copy or upload your private key instead.
You can use your private key to sign commits,
which makes your use of GitLab and your data even more secure.
This signature then can be verified by anyone using your public key.
For details, see Asymmetric cryptography, also known as public-key cryptography.
Prerequisites
To use SSH to communicate with GitLab, you need:
- The OpenSSH client, which comes pre-installed on GNU/Linux, macOS, and Windows 10.
- SSH version 6.5 or later. Earlier versions used an MD5 signature, which is not secure.
To view the version of SSH installed on your system, run ssh -V.
Supported SSH key types
To communicate with GitLab, you can use the following SSH key types:
- ED25519
- ED25519_SK (Available in GitLab 14.8 and later.)
- ECDSA_SK (Available in GitLab 14.8 and later.)
- RSA
- DSA (Deprecated in GitLab 11.0.)
- ECDSA (As noted in Practical Cryptography With Go, the security issues related to DSA also apply to ECDSA.)
Administrators can restrict which keys are permitted and their minimum lengths.
ED25519 SSH keys
The book Practical Cryptography With Go
suggests that ED25519 keys are more secure and performant than RSA keys.
OpenSSH 6.5 introduced ED25519 SSH keys in 2014, and they should be available on most
operating systems.
ED25519_SK SSH keys
To use ED25519_SK SSH keys on GitLab, your local client and GitLab server
must have OpenSSH 8.2 or later installed.
ECDSA_SK SSH keys
To use ECDSA_SK SSH keys on GitLab, your local client and GitLab server
must have OpenSSH 8.2 or later installed.
RSA SSH keys
Maximum RSA key length changed in GitLab 16.3.
Available documentation suggests ED25519 is more secure than RSA.
If you use an RSA key, the US National Institute of Standards and Technology in
Publication 800-57 Part 3 (PDF)
recommends a key size of at least 2048 bits. Due to limitations in Go,
RSA keys cannot exceed 8192 bits.
The default key size depends on your version of ssh-keygen.
Review the man page for your installed ssh-keygen command for details.
See if you have an existing SSH key pair
Before you create a key pair, see if a key pair already exists.
- Go to your home directory.
- Go to the
.ssh/subdirectory. If the.ssh/subdirectory doesn’t exist,
you are either not in the home directory, or you haven’t usedsshbefore.
In the latter case, you need to generate an SSH key pair. -
See if a file with one of the following formats exists:
Algorithm Public key Private key ED25519 (preferred) id_ed25519.pubid_ed25519ED25519_SK id_ed25519_sk.pubid_ed25519_skECDSA_SK id_ecdsa_sk.pubid_ecdsa_skRSA (at least 2048-bit key size) id_rsa.pubid_rsaDSA (deprecated) id_dsa.pubid_dsaECDSA id_ecdsa.pubid_ecdsa
Generate an SSH key pair
If you do not have an existing SSH key pair, generate a new one:
- Open a terminal.
-
Run
ssh-keygen -tfollowed by the key type and an optional comment.
This comment is included in the.pubfile that’s created.
You may want to use an email address for the comment.For example, for ED25519:
ssh-keygen -t ed25519 -C "<comment>"For 2048-bit RSA:
ssh-keygen -t rsa -b 2048 -C "<comment>" -
Press Enter. Output similar to the following is displayed:
Generating public/private ed25519 key pair. Enter file in which to save the key (/home/user/.ssh/id_ed25519): -
Accept the suggested filename and directory, unless you are generating a deploy key
or want to save in a specific directory where you store other keys.You can also dedicate the SSH key pair to a specific host.
-
Specify a passphrase:
Enter passphrase (empty for no passphrase):
Enter same passphrase again:
A confirmation is displayed, including information about where your files are stored.
A public and private key are generated. Add the public SSH key to your GitLab account
and keep the private key secure.
Configure SSH to point to a different directory
If you did not save your SSH key pair in the default directory,
configure your SSH client to point to the directory where the private key is stored.
-
Open a terminal and run this command:
eval $(ssh-agent -s) ssh-add <directory to private SSH key> -
Save these settings in the
~/.ssh/configfile. For example:# GitLab.com Host gitlab.com PreferredAuthentications publickey IdentityFile ~/.ssh/gitlab_com_rsa # Private GitLab instance Host gitlab.company.com PreferredAuthentications publickey IdentityFile ~/.ssh/example_com_rsa
For more information on these settings, see the man ssh_config page in the SSH configuration manual.
Public SSH keys must be unique to GitLab because they bind to your account.
Your SSH key is the only identifier you have when you push code with SSH.
It must uniquely map to a single user.
Update your SSH key passphrase
You can update the passphrase for your SSH key:
-
Open a terminal and run this command:
ssh-keygen -p -f /path/to/ssh_key -
At the prompts, enter the passphrase and then press Enter.
Upgrade your RSA key pair to a more secure format
If your version of OpenSSH is between 6.5 and 7.8, you can save your private
RSA SSH keys in a more secure OpenSSH format by opening a terminal and running
this command:
ssh-keygen -o -f ~/.ssh/id_rsa
Alternatively, you can generate a new RSA key with the more secure encryption format with
the following command:
ssh-keygen -o -t rsa -b 4096 -C "<comment>"
Generate an SSH key pair for a FIDO2 hardware security key
To generate ED25519_SK or ECDSA_SK SSH keys, you must use OpenSSH 8.2 or later:
- Insert a hardware security key into your computer.
- Open a terminal.
-
Run
ssh-keygen -tfollowed by the key type and an optional comment.
This comment is included in the.pubfile that’s created.
You may want to use an email address for the comment.For example, for ED25519_SK:
ssh-keygen -t ed25519-sk -C "<comment>"For ECDSA_SK:
ssh-keygen -t ecdsa-sk -C "<comment>"If your security key supports FIDO2 resident keys, you can enable this when
creating your SSH key:ssh-keygen -t ed25519-sk -O resident -C "<comment>"-O residentindicates that the key should be stored on the FIDO authenticator itself.
Resident key is easier to import to a new computer because it can be loaded directly
from the security key byssh-add -K
orssh-keygen -K. -
Press Enter. Output similar to the following is displayed:
Generating public/private ed25519-sk key pair. You may need to touch your authenticator to authorize key generation. -
Touch the button on the hardware security key.
-
Accept the suggested filename and directory:
Enter file in which to save the key (/home/user/.ssh/id_ed25519_sk): -
Specify a passphrase:
Enter passphrase (empty for no passphrase):
Enter same passphrase again:
A confirmation is displayed, including information about where your files are stored.
A public and private key are generated.
Add the public SSH key to your GitLab account.
Generate an SSH key pair with a password manager
Generate an SSH key pair with 1Password
You can use 1Password and the 1Password browser extension to either:
- Automatically generate a new SSH key.
- Use an existing SSH in your 1Password vault to authenticate with GitLab.
- Sign in to GitLab.
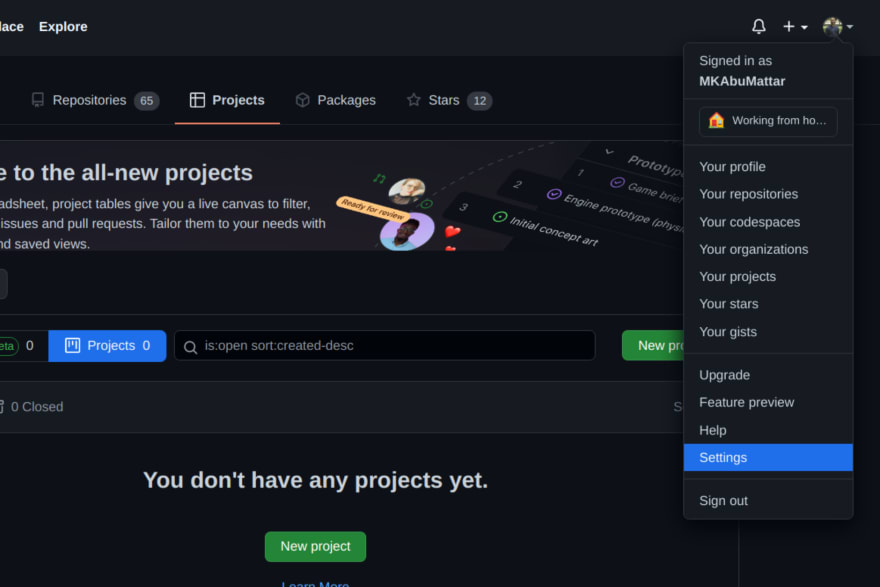
- On the left sidebar, select your avatar.
- Select Edit profile.
- On the left sidebar, select SSH Keys.
- Select Key, and you should see the 1Password helper appear.
- Select the 1Password icon and unlock 1Password.
- You can then select Create SSH Key or select an existing SSH key to fill in the public key.
- In the Title box, type a description, like
Work Laptopor
Home Workstation. - Optional. Select the Usage type of the key. It can be used either for
AuthenticationorSigningor both.Authentication & Signingis the default value. - Optional. Update Expiration date to modify the default expiration date.
- Select Add key.
For more information about using 1Password with SSH keys, see the 1Password documentation.
Add an SSH key to your GitLab account
Version history
- Suggested default expiration date for keys introduced in GitLab 15.4.
- Usage types for SSH keys added in GitLab 15.7.
To use SSH with GitLab, copy your public key to your GitLab account:
-
Copy the contents of your public key file. You can do this manually or use a script.
For example, to copy an ED25519 key to the clipboard:macOS
tr -d '\n' < ~/.ssh/id_ed25519.pub | pbcopyLinux (requires the
xclippackage)xclip -sel clip < ~/.ssh/id_ed25519.pubGit Bash on Windows
cat ~/.ssh/id_ed25519.pub | clipReplace
id_ed25519.pubwith your filename. For example, useid_rsa.pubfor RSA. - Sign in to GitLab.
- On the left sidebar, select your avatar.
- Select Edit profile.
- On the left sidebar, select SSH Keys.
- Select Add new key.
- In the Key box, paste the contents of your public key.
If you manually copied the key, make sure you copy the entire key,
which starts withssh-rsa,ssh-dss,ecdsa-sha2-nistp256,ecdsa-sha2-nistp384,ecdsa-sha2-nistp521,
ssh-ed25519,sk-ecdsa-sha2-nistp256@openssh.com, orsk-ssh-ed25519@openssh.com, and may end with a comment. - In the Title box, type a description, like
Work Laptopor
Home Workstation. - Optional. Select the Usage type of the key. It can be used either for
AuthenticationorSigningor both.Authentication & Signingis the default value. - Optional. Update Expiration date to modify the default expiration date.
In:- GitLab 13.12 and earlier, the expiration date is informational only. It doesn’t prevent
you from using the key. Administrators can view expiration dates and use them for
guidance when deleting keys. - GitLab checks all SSH keys at 02:00 AM UTC every day. It emails an expiration notice for all SSH keys that expire on the current date. (Introduced in GitLab 13.11.)
- GitLab checks all SSH keys at 01:00 AM UTC every day. It emails an expiration notice for all SSH keys that are scheduled to expire seven days from now. (Introduced in GitLab 13.11.)
- GitLab 13.12 and earlier, the expiration date is informational only. It doesn’t prevent
- Select Add key.
Verify that you can connect
Verify that your SSH key was added correctly.
The following commands use the example hostname gitlab.example.com. Replace this example hostname with your GitLab instance’s hostname, for example, git@gitlab.com.
- To ensure you’re connecting to the correct server, check the server’s SSH host keys fingerprint. For:
- GitLab.com, see the SSH host keys fingerprints documentation.
- GitLab.com or another GitLab instance, see
gitlab.example.com/help/instance_configuration#ssh-host-keys-fingerprintswheregitlab.example.comisgitlab.com(for
GitLab.com) or the address of the GitLab instance.
-
Open a terminal and run this command, replacing
gitlab.example.comwith your
GitLab instance URL:ssh -T git@gitlab.example.com -
If this is the first time you connect, you should verify the
authenticity of the GitLab host. If you see a message like:The authenticity of host 'gitlab.example.com (35.231.145.151)' can't be established. ECDSA key fingerprint is SHA256:HbW3g8zUjNSksFbqTiUWPWg2Bq1x8xdGUrliXFzSnUw. Are you sure you want to continue connecting (yes/no)? yes Warning: Permanently added 'gitlab.example.com' (ECDSA) to the list of known hosts.Type
yesand press Enter. - Run the
ssh -T git@gitlab.example.comcommand again. You should receive a Welcome to GitLab,@username! message.
If the welcome message doesn’t appear, you can troubleshoot by running ssh
in verbose mode:
ssh -Tvvv git@gitlab.example.com
Use different keys for different repositories
You can use a different key for each repository.
Open a terminal and run this command:
git config core.sshCommand "ssh -o IdentitiesOnly=yes -i ~/.ssh/private-key-filename-for-this-repository -F /dev/null"
This command does not use the SSH Agent and requires Git 2.10 or later. For more information
on ssh command options, see the man pages for both ssh and ssh_config.
View your account’s SSH keys
- Sign in to GitLab.
- On the left sidebar, select your avatar.
- Select Edit profile.
- On the left sidebar, select SSH Keys.
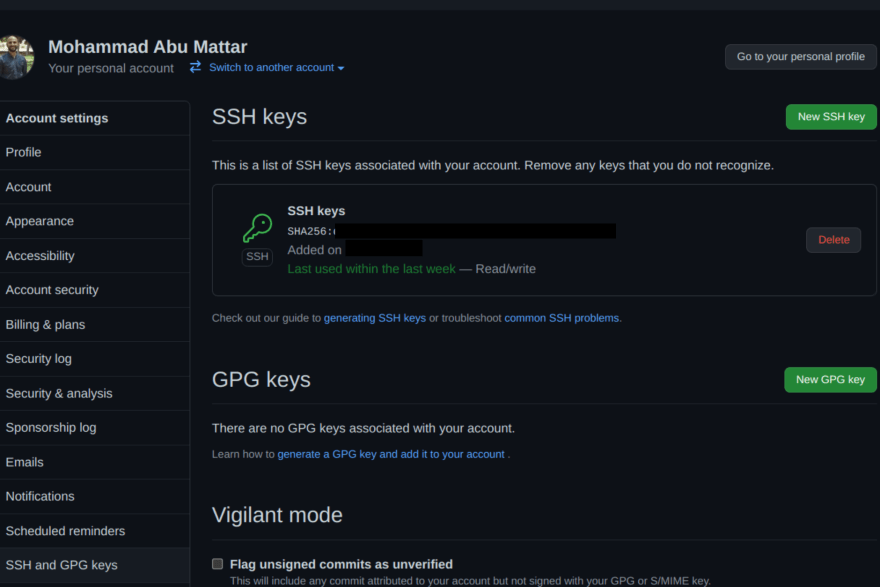
Your existing SSH keys are listed at the bottom of the page. The information includes:
- The key’s:
- Name.
- Public fingerprint.
- Expiry date.
- Permitted usage types.
- The time a key was last used. On GitLab.com this value is unavailable, and you are unable to see if or when an SSH key has been used. For more information, see issue 324764.
Select Delete to permanently delete an SSH key.
Use different accounts on a single GitLab instance
You can use multiple accounts to connect to a single instance of GitLab. You
can do this by using the command in the previous topic.
However, even if you set IdentitiesOnly to yes, you cannot sign in if an
IdentityFile exists outside of a Host block.
Instead, you can assign aliases to hosts in the ~/.ssh/config file.
- For the
Host, use an alias likeuser_1.gitlab.comand
user_2.gitlab.com. Advanced configurations
are more difficult to maintain, and these strings are easier to
understand when you use tools likegit remote. - For the
IdentityFile, use the path the private key.
# User1 Account Identity
Host <user_1.gitlab.com>
  Hostname gitlab.com
  PreferredAuthentications publickey
  IdentityFile ~/.ssh/<example_ssh_key1>

# User2 Account Identity
Host <user_2.gitlab.com>
  Hostname gitlab.com
  PreferredAuthentications publickey
  IdentityFile ~/.ssh/<example_ssh_key2>
Now, to clone a repository for user_1, use user_1.gitlab.com in the git clone command:
git clone git@<user_1.gitlab.com>:gitlab-org/gitlab.git
To update a previously-cloned repository that is aliased as origin:
git remote set-url origin git@<user_1.gitlab.com>:gitlab-org/gitlab.git
Configure two-factor authentication (2FA)
You can set up two-factor authentication (2FA) for
Git over SSH. We recommend using
ED25519_SK or ECDSA_SK SSH keys.
Use EGit on Eclipse
If you are using EGit, you can add your SSH key to Eclipse.
Use SSH on Microsoft Windows
If you’re running Windows 10, you can either use the Windows Subsystem for Linux (WSL)
with WSL 2 which
has both git and ssh preinstalled, or install Git for Windows to
use SSH through PowerShell.
The SSH key generated in WSL is not directly available for Git for Windows, and vice versa,
as both have a different home directory:
- WSL:
/home/<user> - Git for Windows:
C:\Users\<user>
You can either copy over the .ssh/ directory to use the same key, or generate a key in each environment.
If you’re running Windows 11 and using OpenSSH for Windows, ensure the HOME
environment variable is set correctly. Otherwise, your private SSH key might not be found.
Alternative tools include:
- Cygwin
- PuttyGen
Overriding SSH settings on the GitLab server
GitLab integrates with the system-installed SSH daemon and designates a user
(typically named git) through which all access requests are handled. Users
who connect to the GitLab server over SSH are identified by their SSH key instead
of their username.
SSH client operations performed on the GitLab server are executed as this
user. You can modify this SSH configuration. For example, you can specify
a private SSH key for this user to use for authentication requests. However, this practice
is not supported and is strongly discouraged as it presents significant
security risks.
GitLab checks for this condition, and directs you
to this section if your server is configured this way. For example:
$ gitlab-rake gitlab:check

Git user has default SSH configuration? ... no
  Try fixing it:
  mkdir ~/gitlab-check-backup-1504540051
  sudo mv /var/lib/git/.ssh/id_rsa ~/gitlab-check-backup-1504540051
  sudo mv /var/lib/git/.ssh/id_rsa.pub ~/gitlab-check-backup-1504540051
  For more information see:
  doc/user/ssh.md#overriding-ssh-settings-on-the-gitlab-server
  Please fix the error above and rerun the checks.
Remove the custom configuration as soon as you can. These customizations
are explicitly not supported and may stop working at any time.
Troubleshooting
TLS: server sent certificate containing RSA key larger than 8192 bits
In GitLab 16.3 and later, Go limits RSA keys to a maximum of 8192 bits.
To check the length of a key:
openssl rsa -in <your-key-file> -text -noout | grep "Key:"
Replace any key longer than 8192 bits with a shorter key.
Password prompt with git clone
When you run git clone, you may be prompted for a password, like git@gitlab.example.com's password:.
This indicates that something is wrong with your SSH setup.
- Ensure that you generated your SSH key pair correctly and added the public SSH
key to your GitLab profile. - Try to manually register your private SSH key by using
ssh-agent. - Try to debug the connection by running
ssh -Tv git@example.com.
Replaceexample.comwith your GitLab URL. - Ensure you followed all the instructions in Use SSH on Microsoft Windows.
Could not resolve hostname error
You may receive the following error when verifying that you can connect:
ssh: Could not resolve hostname gitlab.example.com: nodename nor servname provided, or not known
If you receive this error, restart your terminal and try the command again.
Key enrollment failed: invalid format error
You may receive the following error when generating an SSH key pair for a FIDO2 hardware security key:
Key enrollment failed: invalid format
You can troubleshoot this by trying the following:
- Run the
ssh-keygencommand usingsudo. - Verify your FIDO2 hardware security key supports
the key type provided. - Verify the version of OpenSSH is 8.2 or greater by
runningssh -V.
Search code, repositories, users, issues, pull requests…
Provide feedback
Saved searches
Use saved searches to filter your results more quickly
Sign up
Introduction
Git connects to remotes by default via HTTPS, which requires you to enter your login and password every time you run a command like Git pull or git push, using the SSH protocol. You may connect to servers and authenticate to access their services. The three services listed allow Git to connect through SSH rather than HTTPS. Using public-key encryption eliminates the need to type a login and password for each Git command.
Make sure a Git is installed
Make sure Git is installed before you start. Run the following command in your Windows terminal to see if Git is installed on your computer:
git --version
Enter fullscreen mode
Exit fullscreen mode
Install Git
To install Git, you can download the latest version from the official Git website. You can also install Git using Chocolatey or Winget package manager.
Install Git official website
To install Git from the official website, follow the steps below:
- Go to the official Git website and download the latest version of Git for Windows.
- Run the installer and follow the steps below:
- Click Next on the first two screens to accept the default options.
- Click Next on the Select Components screen.
- Click Next on the Choosing the default editor used by Git screen.
- Click Next on the Choosing the default terminal emulator screen.
- Select the Use Git from the Windows Command Prompt option.
- Select the Checkout Windows-style, commit Unix-style line endings option.
- Select the Use Windows’ default console window option.
- Click Next on the Configuring the line ending conversions screen.
- Click Next on the Configuring the terminal emulator to use with Git Bash screen.
- Click Install on the Choosing HTTPS transport backend screen.
- Click Finish on the Completing the Git Setup screen.
- Open a new command prompt window and verify that Git is installed correctly by typing
git --version.
Install Git using Chocolatey
To install Git using Chocolatey, follow the steps below:
- Open Windows Terminal.
- Run the following command to install Git:
choco install git -y
Enter fullscreen mode
Exit fullscreen mode
- Verify that Git is installed correctly by typing
git --version.
Install Git using Winget
To install Git using Winget, follow the steps below:
- Open Windows Terminal.
- Run the following command to install Git:
winget install --id=Git.Git -e
Enter fullscreen mode
Exit fullscreen mode
- Verify that Git is installed correctly by typing
git --version.
Note: Don’t forget to specify global Git settings using the following command after installing git:
git config --global user.name 'USERNAME'
git config --global user.email 'YOUR_EMAIL@EXAMPLE.COM'
Enter fullscreen mode
Exit fullscreen mode
Generate SSH keys
To generate SSH keys, follow the steps below:
- Open Windows Terminal.
- Run the following command (change your
YOUR_EMAIL@EXAMPLE.COMwith your email address) to establish a new SSH key pair:
ssh-keygen -t rsa -b 4096 -C "YOUR_EMAIL@EXAMPLE.COM"
Enter fullscreen mode
Exit fullscreen mode
- It will ask you where you want to save the private key (id rsa), and you may accept the default location by pressing Enter.
Whether you already have a private key, it will ask if you want to override it:
Overwrite (y/n)?
Enter fullscreen mode
Exit fullscreen mode
- If this happens, hit Enter and type y. Then, enter and re-enter the following passcode (think of it as a password):
Enter a file in which to save the key (/c/Users/you/.ssh/id_rsa): [Press enter]
Enter fullscreen mode
Exit fullscreen mode
- Enter a secure passphrase.
Enter passphrase (empty for no passphrase): [Type a passphrase]
Enter same passphrase again: [Type passphrase again]
Enter fullscreen mode
Exit fullscreen mode
- The SSH key pair is created in ~/.ssh, and the whole interaction should look like this:
Enter fullscreen mode
Exit fullscreen mode
- Verify that the SSH key was created by running the following command:
ls .\.ssh\
Enter fullscreen mode
Exit fullscreen mode
Add SSH key to the ssh-agent to your account
Copy the SSH key to your clipboard by running the following command:
Get-Content .\.ssh\id_rsa.pub | Set-Clipboard
Enter fullscreen mode
Exit fullscreen mode
GitHub
Sign in to your GitHub account using a browser by going to github.com and entering your username and password. Click your profile photo in the upper-right corner of the page, then Settings:
Select SSH and GPG keys from the user settings sidebar. Then select New SSH key from the drop-down menu. Put a descriptive label for the new key in the Title area (for example, your computer’s name) and paste your public key into the Key field. Last but not least, click Add SSH key:

The key is now visible in the list of SSH keys linked to your account:
GitLab
Sign in to your GitLab account using a browser by going to gitlab.com and entering your username and password. Click your profile photo in the upper-right corner of the page, then Settings:

Click SSH Keys in the User Settings sidebar. In the Key area, paste your public key. Fill in the Title area for the new key with a descriptive term (for example, the name of your computer). Finally, click the Add key:

The key is now visible in the list of SSH keys linked to your account:

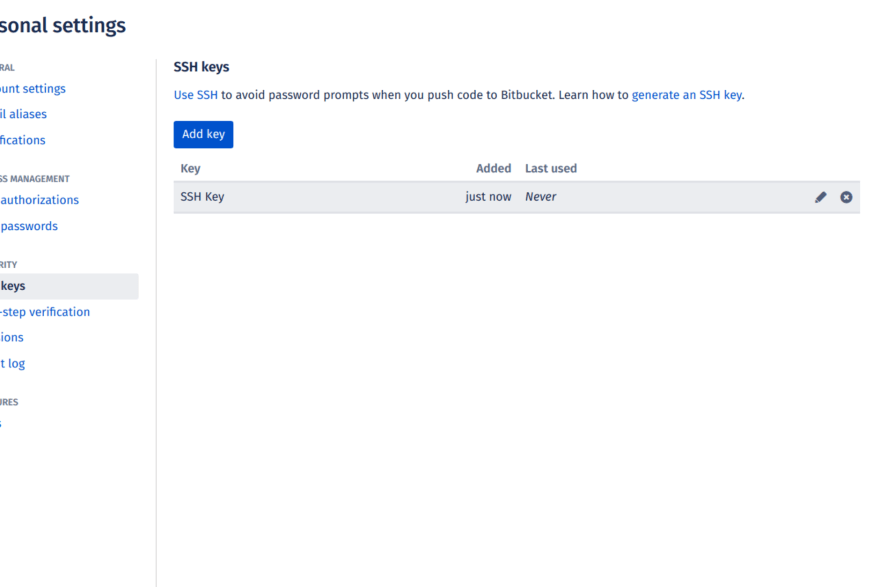
Bitbucket
Log in to your Bitbucket account using a browser by going to bitbucket.org and entering your username and password. Click your profile photo in the lower-left corner of the website, then Bitbucket settings:

SSH keys may be found in the Settings sidebar’s Security section. After that, select Add key from the drop-down menu. Fill up the Description box with a descriptive label for the new key (such as your computer’s name), and then paste your public key into the Key field. Last but not least, choose to Add key:

The key has now been added to your account’s list of SSH keys:
Test connecting via SSH
Before utilizing SSH with Git, GitHub, GitLab, and Bitbucket allow you to verify whether the connection has been set up successfully.
GitHub Test Connecting via SSH
Open the terminal once you’ve added your SSH key to your GitHub account and type:
ssh -T git@github.com
Enter fullscreen mode
Exit fullscreen mode
If you’re connecting to GitHub over SSH for the first time, the SSH client will ask if you trust the GitHub server’s public key:
The authenticity of host 'github.com (140.82.113.4)' can't be established.
RSA key fingerprint is SHA256:a5d6c20b1790b4c144b9d26c9b201bbee3797aa010f2701c09c1b3a6262d2c02.
Are you sure you want to continue connecting (yes/no)?
Enter fullscreen mode
Exit fullscreen mode
Press Enter after typing yes. GitHub has been added to the list of trustworthy hosts in the SSH client:
Warning: Permanently added 'github.com,140.82.113.4' (RSA) to the list of known hosts.
Enter fullscreen mode
Exit fullscreen mode
You won’t be asked about GitHub’s public key again once you’ve added it to the list of known hosts.
The server notifies you that you have successfully authenticated and ends the connection: Because this remote access through SSH is offered by GitHub only for testing purposes and not for practical usage, the server informs you that you have successfully authenticated and terminates the connection:
Hi YOUR_USER_NAME! You've successfully authenticated, but GitHub does not provide shell access.
Enter fullscreen mode
Exit fullscreen mode
If you passed the test, you may now utilize SSH with GitHub.
The entire interaction should look something like this:
ssh -T git@github.com

The authenticity of host 'github.com (140.82.113.4)' can't be established.
RSA key fingerprint is SHA256:a5d6c20b1790b4c144b9d26c9b201bbee3797aa010f2701c09c1b3a6262d2c02.
Are you sure you want to continue connecting (yes/no)? yes
Warning: Permanently added 'github.com,140.82.113.4' (RSA) to the list of known hosts.
Hi your_user_name! You've successfully authenticated, but GitHub does not provide shell access.
YOUR_USER_NAME@YOUR_HOST_NAME:~>
Enter fullscreen mode
Exit fullscreen mode
GitLab Test Connecting via SSH
The test is pretty similar if you’ve added your SSH key to your GitLab account:
ssh -T git@gitlab.com

The authenticity of host 'gitlab.com (35.231.145.151)' can't be established.
ECDSA key fingerprint is SHA256:4ac7a7fd4296d5e6267c9188346375ff78f6097a802e83c0feaf25277c9e70cc.
Are you sure you want to continue connecting (yes/no)? yes
Warning: Permanently added 'gitlab.com,35.231.145.151' (ECDSA) to the list of known hosts.
Welcome to GitLab, @YOUR_USER_NAME!
Enter fullscreen mode
Exit fullscreen mode
If you passed the test, you may now utilize SSH with GitLab.
Bitbucket Test Connecting via SSH
The test is pretty similar if you’ve added your SSH key to your Bitbucket account:
ssh -T git@bitbucket.org

The authenticity of host 'bitbucket.org (104.192.143.1)' can't be established.
RSA key fingerprint is SHA256:fb7d37d5497c43f73325e0a98638cac8dda3b01a8c31f4ee11e2e953c19e0252.
Are you sure you want to continue connecting (yes/no)? yes
Warning: Permanently added 'bitbucket.org,104.192.143.1' (RSA) to the list of known hosts.
logged in as YOUR_USER_NAME.

You can use git or hg to connect to Bitbucket. Shell access is disabled.
Enter fullscreen mode
Exit fullscreen mode
If you passed the test, you may now utilize SSH with Bitbucket.
References
- GitHub SSH Key Setup
- GitLab SSH Key Setup
- Bitbucket SSH Key Setup
I’ve tried following this guide on generating an ssh key in order to use gitlab.
Before I know if I should generate a key I must check if there is one already like this:
type %userprofile%\.ssh\id_rsa.pub
If it says this, then I must generate the key:
the system cannot find the path specified
What is the next step? Because the guide doesn’t say anything in case this is the message I get.
Edit: I’ve tried
ssh-keygen -t rsa -C "[email protected]"
And I get
'ssh-keygen' is not recognized as an internal or external command,
operable program or batch file.
Edit 2: I am on windows.
![]()
Warren P
66k40 gold badges181 silver badges317 bronze badges
asked Dec 14, 2016 at 17:35
![]()
8
ON windows if you have git for windows installed, run git-gui. Then click Help then click Show Ssh Key, then click Generate Key.
While you’re at it, then copy to the clipboard, and then go to your Gitlab account page and add the SSH key to your Gitlab account’s ssh settings.
![]()
answered Dec 20, 2016 at 3:46
![]()
Warren PWarren P
66k40 gold badges181 silver badges317 bronze badges
3
The intention here is for %userprofile% to be an environment variable present in your system that contains your actual user’s home directory. Either check why this environment variable isn’t set on your system and fix it, or for a quick fix, replace %userprofile% in the above command with your actual user’s home directory.
answered Dec 14, 2016 at 17:45
![]()
AsaphAsaph
160k25 gold badges198 silver badges200 bronze badges
3
If you want to go along with creating the key in windows without relying on git, you can go to Apps & Features > Optional Features > OpenSSH client (install).
Once that is done the keygen command will be available to you. Please note that one needs to specify the bits (-b) as the default size will not be accepted by gitlab.
Will look like this: ssh-keygen -b 2048 -t rsa -C "[email protected]"
answered Feb 21, 2021 at 16:25
![]()
augsteyeraugsteyer
1,03910 silver badges25 bronze badges
Use SSH keys to communicate with GitLab (FREE)
Git is a distributed version control system, which means you can work locally,
then share or push your changes to a server. In this case, the server you push to is GitLab.
GitLab uses the SSH protocol to securely communicate with Git.
When you use SSH keys to authenticate to the GitLab remote server,
you don’t need to supply your username and password each time.
Prerequisites
To use SSH to communicate with GitLab, you need:
- The OpenSSH client, which comes pre-installed on GNU/Linux, macOS, and Windows 10.
- SSH version 6.5 or later. Earlier versions used an MD5 signature, which is not secure.
To view the version of SSH installed on your system, run ssh -V.
Supported SSH key types
To communicate with GitLab, you can use the following SSH key types:
- ED25519
- ED25519_SK (Available in GitLab 14.8 and later.)
- ECDSA_SK (Available in GitLab 14.8 and later.)
- RSA
- DSA (Deprecated in GitLab 11.0.)
- ECDSA (As noted in Practical Cryptography With Go, the security issues related to DSA also apply to ECDSA.)
Administrators can restrict which keys are permitted and their minimum lengths.
ED25519 SSH keys
The book Practical Cryptography With Go
suggests that ED25519 keys are more secure and performant than RSA keys.
OpenSSH 6.5 introduced ED25519 SSH keys in 2014 and they should be available on most
operating systems.
ED25519_SK SSH keys
Introduced in GitLab 14.8.
To use ED25519_SK SSH keys on GitLab, your local client and GitLab server
must have OpenSSH 8.2 or later installed.
ECDSA_SK SSH keys
Introduced in GitLab 14.8.
To use ECDSA_SK SSH keys on GitLab, your local client and GitLab server
must have OpenSSH 8.2 or later installed.
RSA SSH keys
Available documentation suggests that ED25519 is more secure than RSA.
If you use an RSA key, the US National Institute of Science and Technology in
Publication 800-57 Part 3 (PDF)
recommends a key size of at least 2048 bits. The default key size depends on your version of ssh-keygen.
Review the man page for your installed ssh-keygen command for details.
See if you have an existing SSH key pair
Before you create a key pair, see if a key pair already exists.
-
On Windows, Linux, or macOS, go to your home directory.
-
Go to the
.ssh/subdirectory. If the.ssh/subdirectory doesn’t exist,
you are either not in the home directory, or you haven’t usedsshbefore.
In the latter case, you need to generate an SSH key pair. -
See if a file with one of the following formats exists:
Algorithm Public key Private key ED25519 (preferred) id_ed25519.pubid_ed25519ED25519_SK id_ed25519_sk.pubid_ed25519_skECDSA_SK id_ecdsa_sk.pubid_ecdsa_skRSA (at least 2048-bit key size) id_rsa.pubid_rsaDSA (deprecated) id_dsa.pubid_dsaECDSA id_ecdsa.pubid_ecdsa
Generate an SSH key pair
If you do not have an existing SSH key pair, generate a new one.
-
Open a terminal.
-
Type
ssh-keygen -tfollowed by the key type and an optional comment.
This comment is included in the.pubfile that’s created.
You may want to use an email address for the comment.For example, for ED25519:
ssh-keygen -t ed25519 -C "<comment>"For 2048-bit RSA:
ssh-keygen -t rsa -b 2048 -C "<comment>" -
Press Enter. Output similar to the following is displayed:
Generating public/private ed25519 key pair. Enter file in which to save the key (/home/user/.ssh/id_ed25519): -
Accept the suggested filename and directory, unless you are generating a deploy key
or want to save in a specific directory where you store other keys.You can also dedicate the SSH key pair to a specific host.
-
Specify a passphrase:
Enter passphrase (empty for no passphrase): Enter same passphrase again: -
A confirmation is displayed, including information about where your files are stored.
A public and private key are generated.
Add the public SSH key to your GitLab account and keep
the private key secure.
Configure SSH to point to a different directory
If you did not save your SSH key pair in the default directory,
configure your SSH client to point to the directory where the private key is stored.
-
Open a terminal and run this command:
eval $(ssh-agent -s) ssh-add <directory to private SSH key> -
Save these settings in the
~/.ssh/configfile. For example:# GitLab.com Host gitlab.com PreferredAuthentications publickey IdentityFile ~/.ssh/gitlab_com_rsa # Private GitLab instance Host gitlab.company.com PreferredAuthentications publickey IdentityFile ~/.ssh/example_com_rsaFor more information on these settings, see the
man ssh_configpage in the SSH configuration manual.
Public SSH keys must be unique to GitLab because they bind to your account.
Your SSH key is the only identifier you have when you push code with SSH.
It must uniquely map to a single user.
Update your SSH key passphrase
You can update the passphrase for your SSH key.
-
Open a terminal and run this command:
ssh-keygen -p -f /path/to/ssh_key -
At the prompts, type the passphrase and press Enter.
Upgrade your RSA key pair to a more secure format
If your version of OpenSSH is between 6.5 and 7.8,
you can save your private RSA SSH keys in a more secure
OpenSSH format.
-
Open a terminal and run this command:
ssh-keygen -o -f ~/.ssh/id_rsaAlternatively, you can generate a new RSA key with the more secure encryption format with
the following command:ssh-keygen -o -t rsa -b 4096 -C "<comment>"
Generate an SSH key pair for a FIDO/U2F hardware security key
To generate ED25519_SK or ECDSA_SK SSH keys, you must use OpenSSH 8.2 or later.
-
Insert a hardware security key into your computer.
-
Open a terminal.
-
Type
ssh-keygen -tfollowed by the key type and an optional comment.
This comment is included in the.pubfile that’s created.
You may want to use an email address for the comment.For example, for ED25519_SK:
ssh-keygen -t ed25519-sk -C "<comment>"For ECDSA_SK:
ssh-keygen -t ecdsa-sk -C "<comment>"If your security key supports FIDO2 resident keys, you can enable this when
creating your SSH key:ssh-keygen -t ed25519-sk -O resident -C "<comment>"-O residentindicates that the key should be stored on the FIDO authenticator itself.
Resident key is easier to import to a new computer because it can be loaded directly
from the security key byssh-add -K
orssh-keygen -K. -
Select Enter. Output similar to the following is displayed:
Generating public/private ed25519-sk key pair. You may need to touch your authenticator to authorize key generation. -
Touch the button on the hardware security key.
-
Accept the suggested filename and directory:
Enter file in which to save the key (/home/user/.ssh/id_ed25519_sk): -
Specify a passphrase:
Enter passphrase (empty for no passphrase): Enter same passphrase again: -
A confirmation is displayed, including information about where your files are stored.
A public and private key are generated.
Add the public SSH key to your GitLab account.
Add an SSH key to your GitLab account
To use SSH with GitLab, copy your public key to your GitLab account.
-
Copy the contents of your public key file. You can do this manually or use a script.
For example, to copy an ED25519 key to the clipboard:macOS:
tr -d '\n' < ~/.ssh/id_ed25519.pub | pbcopyLinux (requires the
xclippackage):xclip -sel clip < ~/.ssh/id_ed25519.pubGit Bash on Windows:
cat ~/.ssh/id_ed25519.pub | clipReplace
id_ed25519.pubwith your filename. For example, useid_rsa.pubfor RSA. -
Sign in to GitLab.
-
On the top bar, in the top right corner, select your avatar.
-
Select Preferences.
-
On the left sidebar, select SSH Keys.
-
In the Key box, paste the contents of your public key.
If you manually copied the key, make sure you copy the entire key,
which starts withssh-rsa,ssh-dss,ecdsa-sha2-nistp256,ecdsa-sha2-nistp384,ecdsa-sha2-nistp521,
ssh-ed25519,sk-ecdsa-sha2-nistp256@openssh.com, orsk-ssh-ed25519@openssh.com, and may end with a comment. -
In the Title box, type a description, like
Work Laptopor
Home Workstation. -
Optional. In the Expires at box, select an expiration date. (Introduced in GitLab 12.9.)
In:- GitLab 13.12 and earlier, the expiration date is informational only. It doesn’t prevent
you from using the key. Administrators can view expiration dates and use them for
guidance when deleting keys. - GitLab 14.0 and later, the expiration date is enforced. Administrators can
allow expired keys to be used. - GitLab checks all SSH keys at 02:00 AM UTC every day. It emails an expiration notice for all SSH keys that expire on the current date. (Introduced in GitLab 13.11.)
- GitLab checks all SSH keys at 01:00 AM UTC every day. It emails an expiration notice for all SSH keys that are scheduled to expire seven days from now. (Introduced in GitLab 13.11.)
- GitLab 13.12 and earlier, the expiration date is informational only. It doesn’t prevent
-
Select Add key.
Verify that you can connect
Verify that your SSH key was added correctly.
-
For GitLab.com, to ensure you’re connecting to the correct server, confirm the
SSH host keys fingerprints. -
Open a terminal and run this command, replacing
gitlab.example.comwith your GitLab instance URL:ssh -T git@gitlab.example.com -
If this is the first time you connect, you should verify the
authenticity of the GitLab host. If you see a message like:The authenticity of host 'gitlab.example.com (35.231.145.151)' can't be established. ECDSA key fingerprint is SHA256:HbW3g8zUjNSksFbqTiUWPWg2Bq1x8xdGUrliXFzSnUw. Are you sure you want to continue connecting (yes/no)? yes Warning: Permanently added 'gitlab.example.com' (ECDSA) to the list of known hosts.Type
yesand press Enter. -
Run the
ssh -T git@gitlab.example.comcommand again. You should receive a Welcome to GitLab,@username! message.
If the welcome message doesn’t appear, you can troubleshoot by running ssh
in verbose mode:
ssh -Tvvv git@gitlab.example.comUse different keys for different repositories
You can use a different key for each repository.
Open a terminal and run this command:
git config core.sshCommand "ssh -o IdentitiesOnly=yes -i ~/.ssh/private-key-filename-for-this-repository -F /dev/null"This command does not use the SSH Agent and requires Git 2.10 or later. For more information
on ssh command options, see the man pages for both ssh and ssh_config.
Use different accounts on a single GitLab instance
You can use multiple accounts to connect to a single instance of GitLab.
You can do this by using the command in the previous topic.
However, even if you set IdentitiesOnly to yes, you cannot sign in if an IdentityFile exists
outside of a Host block.
Instead, you can assign aliases to hosts in the ~.ssh/config file.
- For the
Host, use an alias likeuser_1.gitlab.comand
user_2.gitlab.com. Advanced configurations
are more difficult to maintain, and these strings are easier to
understand when you use tools likegit remote. - For the
IdentityFile, use the path the private key.
# User1 Account Identity
Host <user_1.gitlab.com>
  Hostname gitlab.com
  PreferredAuthentications publickey
  IdentityFile ~/.ssh/<example_ssh_key1>

# User2 Account Identity
Host <user_2.gitlab.com>
  Hostname gitlab.com
  PreferredAuthentications publickey
  IdentityFile ~/.ssh/<example_ssh_key2>
Now, to clone a repository for user_1, use user_1.gitlab.com in the git clone command:
git clone git@<user_1.gitlab.com>:gitlab-org/gitlab.gitTo update a previously-cloned repository that is aliased as origin:
git remote set-url origin git@<user_1.gitlab.com>:gitlab-org/gitlab.gitNOTE:
Private and public keys contain sensitive data. Ensure the permissions
on the files make them readable to you but not accessible to others.
Configure two-factor authentication (2FA)
You can set up two-factor authentication (2FA) for
Git over SSH. We recommend using
ED25519_SK or ECDSA_SK SSH keys.
Use EGit on Eclipse
If you are using EGit, you can add your SSH key to Eclipse.
Use SSH on Microsoft Windows
If you’re running Windows 10, you can either use the Windows Subsystem for Linux (WSL)
with WSL 2 which
has both git and ssh preinstalled, or install Git for Windows to
use SSH through PowerShell.
The SSH key generated in WSL is not directly available for Git for Windows, and vice versa,
as both have a different home directory:
- WSL:
/home/<user> - Git for Windows:
C:\Users\<user>
You can either copy over the .ssh/ directory to use the same key, or generate a key in each environment.
Alternative tools include:
- Cygwin
- PuttyGen
Overriding SSH settings on the GitLab server
GitLab integrates with the system-installed SSH daemon and designates a user
(typically named git) through which all access requests are handled. Users
who connect to the GitLab server over SSH are identified by their SSH key instead
of their username.
SSH client operations performed on the GitLab server are executed as this
user. You can modify this SSH configuration. For example, you can specify
a private SSH key for this user to use for authentication requests. However, this practice
is not supported and is strongly discouraged as it presents significant
security risks.
GitLab checks for this condition, and directs you
to this section if your server is configured this way. For example:
$ gitlab-rake gitlab:check

Git user has default SSH configuration? ... no
  Try fixing it:
  mkdir ~/gitlab-check-backup-1504540051
  sudo mv /var/lib/git/.ssh/id_rsa ~/gitlab-check-backup-1504540051
  sudo mv /var/lib/git/.ssh/id_rsa.pub ~/gitlab-check-backup-1504540051
  For more information see:
  doc/user/ssh.md#overriding-ssh-settings-on-the-gitlab-server
  Please fix the error above and rerun the checks.
Remove the custom configuration as soon as you can. These customizations
are explicitly not supported and may stop working at any time.
Troubleshooting
Password prompt with git clone
When you run git clone, you may be prompted for a password, like git@gitlab.example.com's password:.
This indicates that something is wrong with your SSH setup.
- Ensure that you generated your SSH key pair correctly and added the public SSH
key to your GitLab profile. - Try to manually register your private SSH key by using
ssh-agent. - Try to debug the connection by running
ssh -Tv git@example.com.
Replaceexample.comwith your GitLab URL.
Could not resolve hostname error
You may receive the following error when verifying that you can connect:
ssh: Could not resolve hostname gitlab.example.com: nodename nor servname provided, or not knownIf you receive this error, restart your terminal and try the command again.
Key enrollment failed: invalid format error
You may receive the following error when generating an SSH key pair for a FIDO/U2F hardware security key:
Key enrollment failed: invalid formatYou can troubleshoot this by trying the following:
- Run the
ssh-keygencommand usingsudo. - Verify your IDO/U2F hardware security key supports
the key type provided. - Verify the version of OpenSSH is 8.2 or greater by
runningssh -v.