Tested and trusted ways to fix this hard drive issue
by Madalina Dinita
Madalina has been a Windows fan ever since she got her hands on her first Windows XP computer. She is interested in all things technology, especially emerging technologies… read more
Updated on
- If you are getting the Windows found errors on the drive warning message, it might be due to bad disk sectors.
- You can fix this issue quickly and effectively by running the CHKDSK command.
XINSTALL BY CLICKING THE DOWNLOAD
FILE
Hard drives are susceptible to occasional failures, some leading to a total hard disk crash and, subsequently, costly data losses. One prominent issue is the Windows found errors on this drive that need to be repaired warning message.
And just like the fatal error external hard drive problem, it’s essential to act before the disk suffers severe damage. So to help you get past the error, we have prepared the solutions to help you solve this issue in this guide.
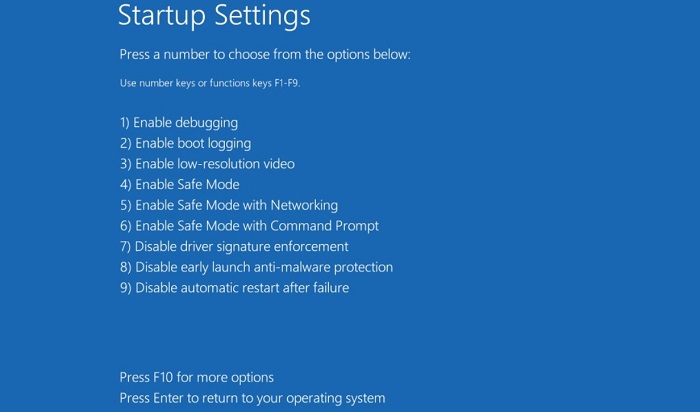
Why does Windows found errors on this drive message appear?
A series of factors can cause the Windows found errors on this drive warning message. Below are some of the prevalent causes:
- Presence of corrupt files: Sometimes, you might we found errors on a drive to repair these errors and prevent loss of data prompt on your PC because of corrupt files. You need to eliminate these files to solve the issue.
- Corrupt disk sectors: In some cases, this issue can be caused by bad disk sectors. The solution is to repair the corrupt sectors using the Check Disk utility.
How do I fix the Windows found errors on this drive that need to be repaired?
- Why does Windows found errors on this drive message appear?
- How do I fix the Windows found errors on this drive that need to be repaired?
- 1. Run the CHKDSK utility
- 2. Use PowerShell
- 3. Security and Maintenance Check
- 4. Using your installation disk
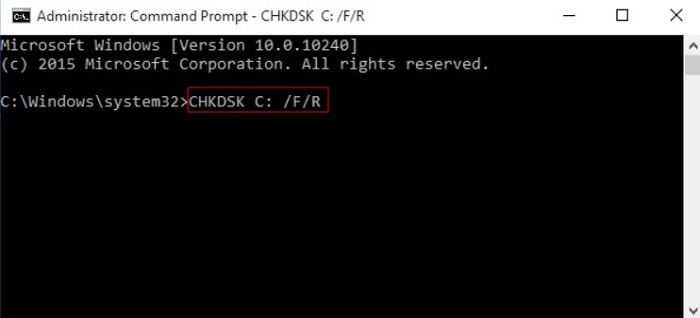
1. Run the CHKDSK utility
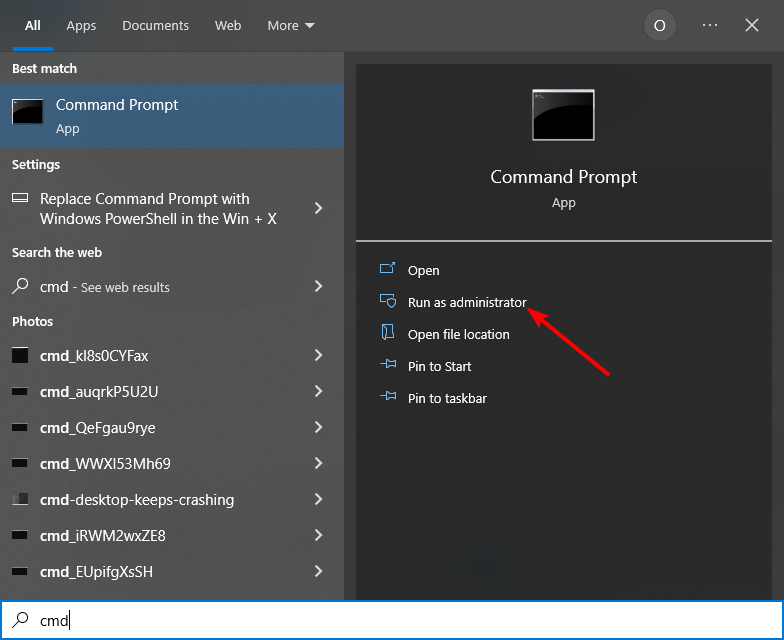
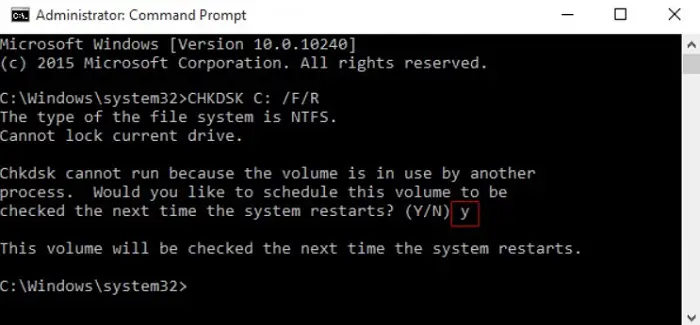
- Press the Windows key, type cmd, and click Run as administrator under Command Prompt.

- Type the command (replace c with your drive letter) below and hit Enter to run it:
chkdsk c: /f /r
- Finally, press Y when prompted and restart your PC to start the process.

The bad disk sector is the most prominent cause of this issue. Thankfully, the built-in CHKDSK utility on Windows PCs can fix this.
How we test, review and rate?
We have worked for the past 6 months on building a new review system on how we produce content. Using it, we have subsequently redone most of our articles to provide actual hands-on expertise on the guides we made.
For more details you can read how we test, review, and rate at WindowsReport.
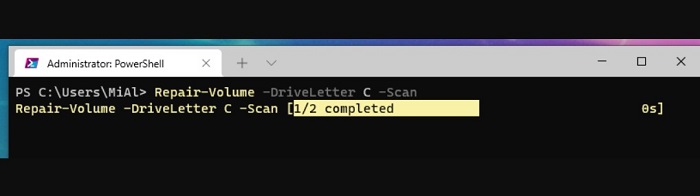
2. Use PowerShell
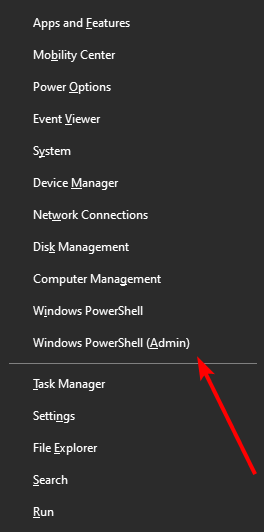
- Press the Windows key + X and select Windows PowerShell (Admin).

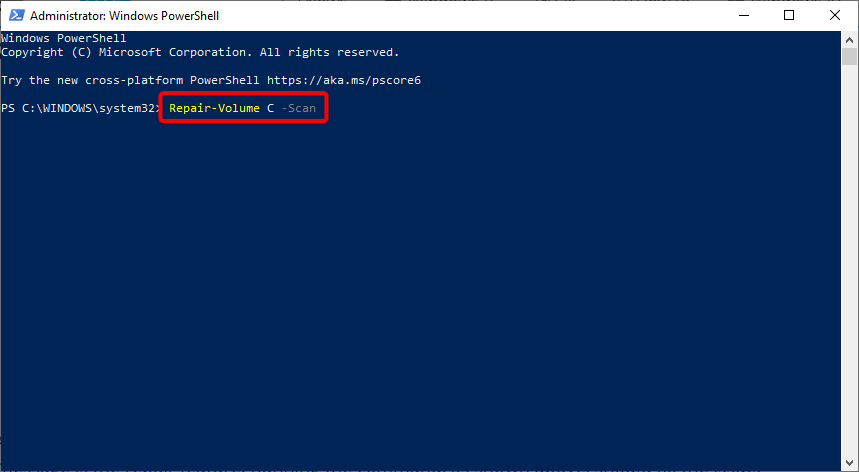
- Type the command (replace C with your drive letter) below and hit Enter to run it:
Repair-Volume C –Scan
- If any error is detected, run the command below:
Repair-Volume C –OfflineScanAndFix - Finally, restart the PC and check if the problem has been fixed.

Another built-in tool you can use when you get the Windows found errors on this drive warning message is the repair feature. Running the command, as shown above, should fix the issue.
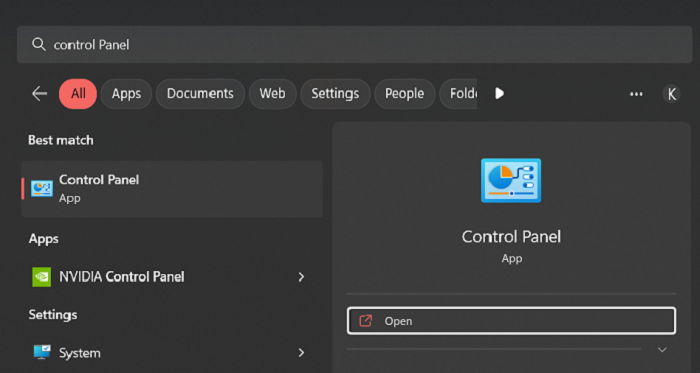
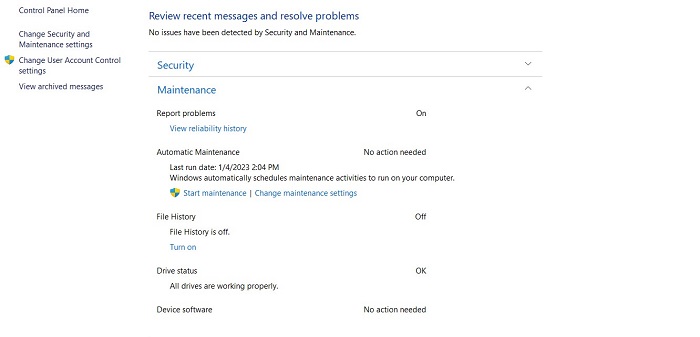
3. Security and Maintenance Check
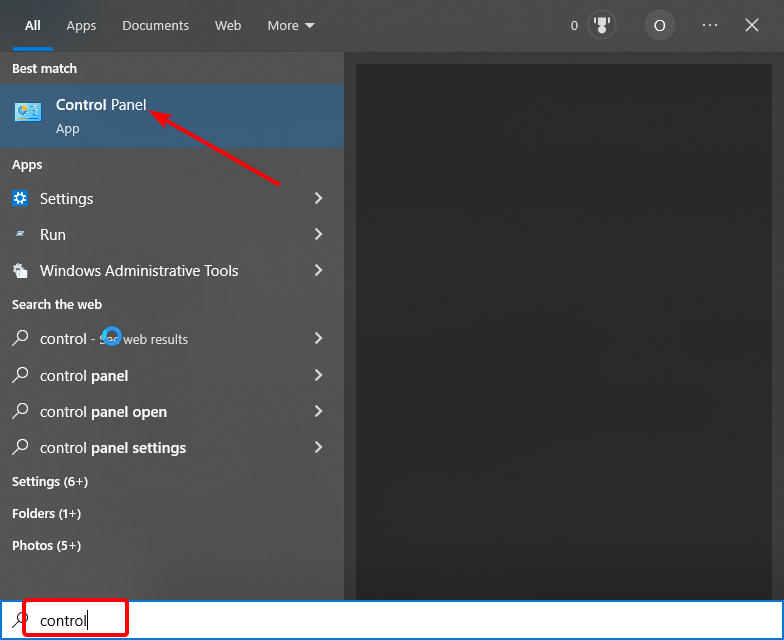
- Press the Windows key, type control, and select Control Panel.
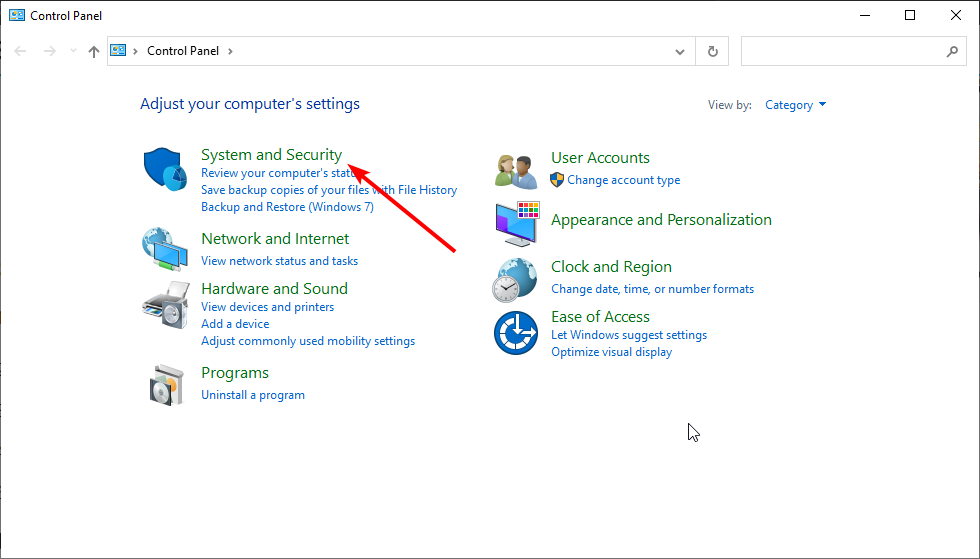
- Choose System and Security.

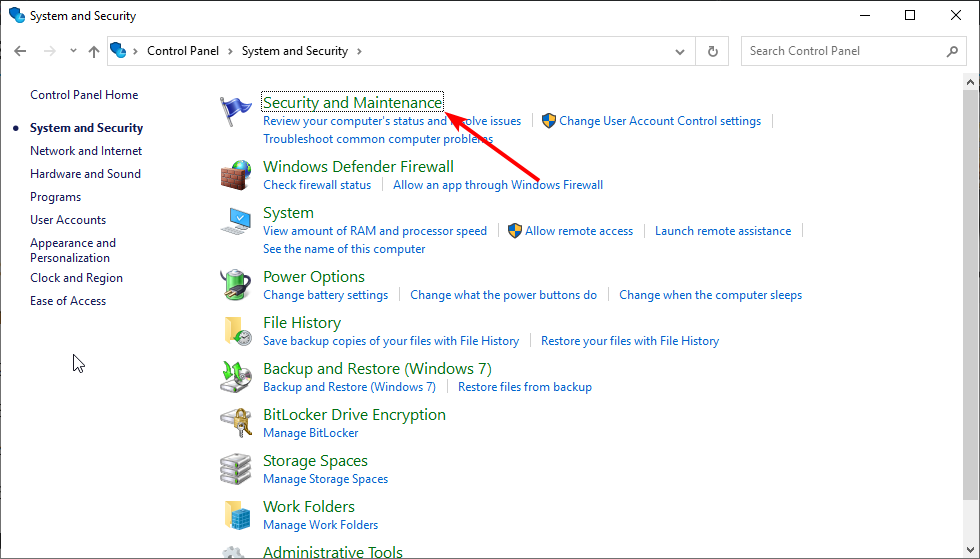
- Now, select the Security and Maintenance option.
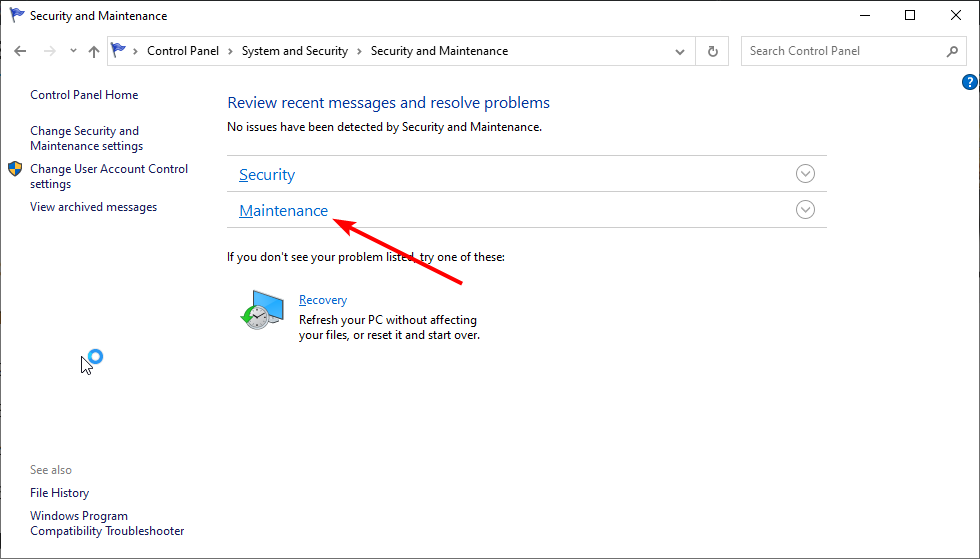
- Click to expand the Maintenance.
- Finally, select the Drive status option and check if any hard drive issues are reported.
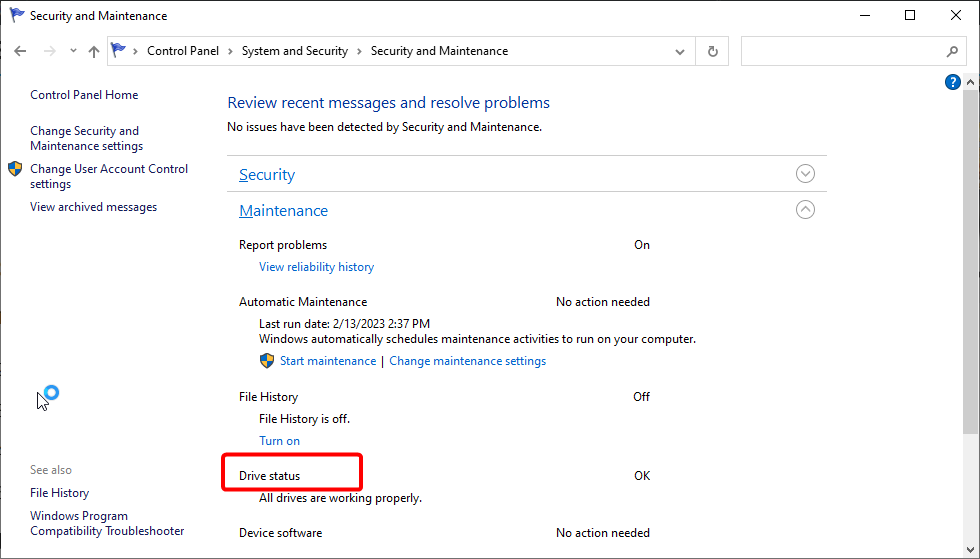
The Windows 10 Security and Maintenance section keeps you updated on issues affecting your computer’s general health.
It can thus help you identify problems with the hard drive hardware and software as long as your PC is booting. In addition, this helps detect the potential causes of the Windows found errors on this drive error message.
- Fix: This Alias Cannot be Added to Your Account Error on Windows 11
- How to fix the Thinkpad if it Won’t Wake Up
4. Using your installation disk
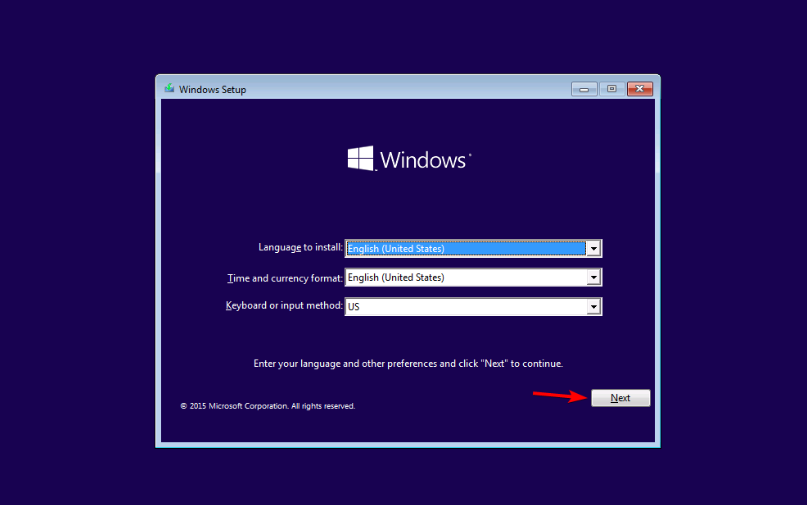
- Create and insert a Windows 10 installation disc/USB flash drive
- Boot your PC from the bootable drive. If your PC does not boot from the drive, you must enter BIOS to change the order.
- Now, select your Language and other information and click Next.

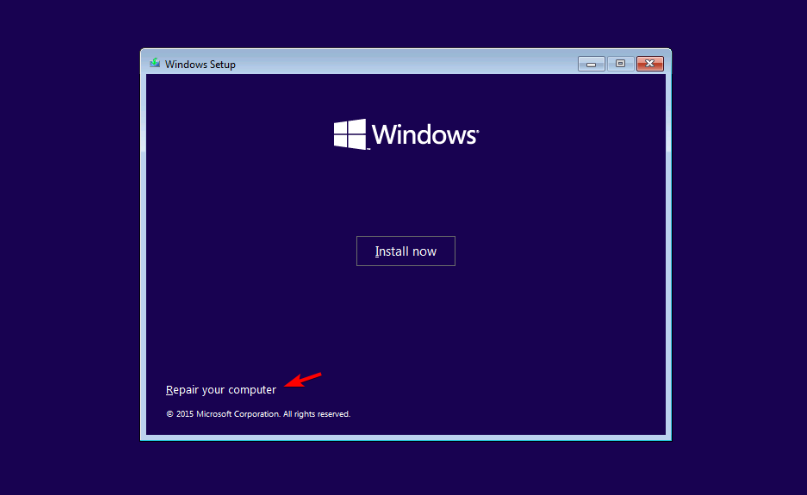
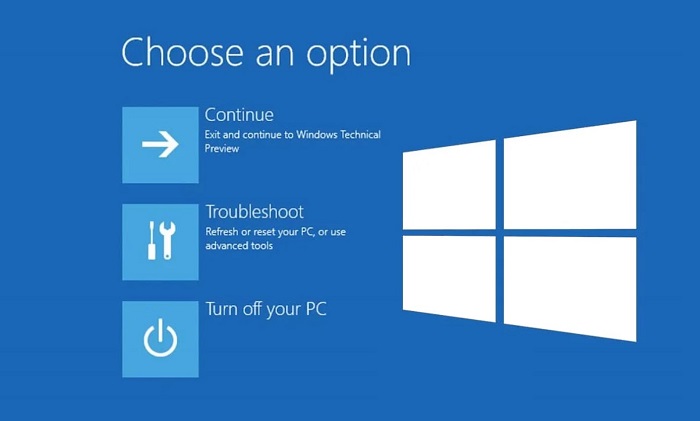
- Select Repair your computer in the bottom left corner.

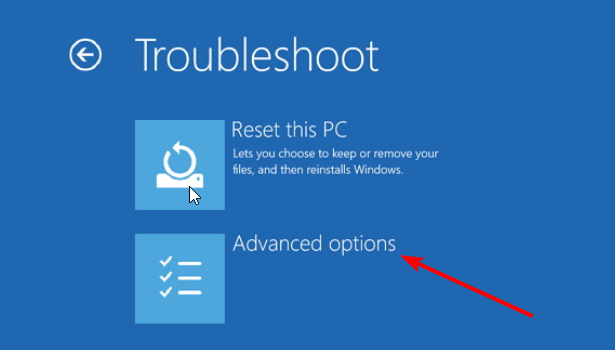
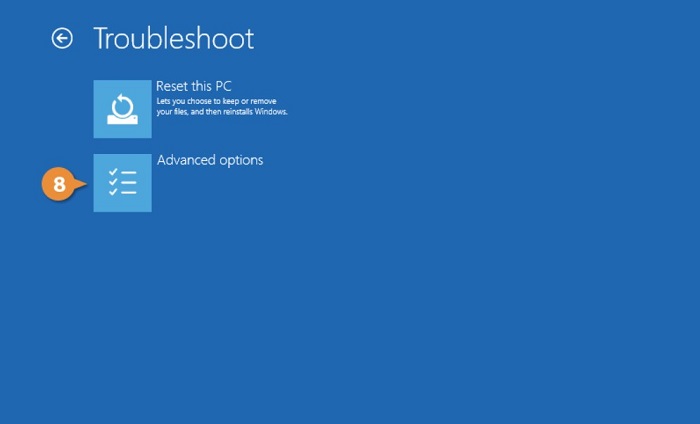
- Choose the Troubleshoot option under Choose an option.

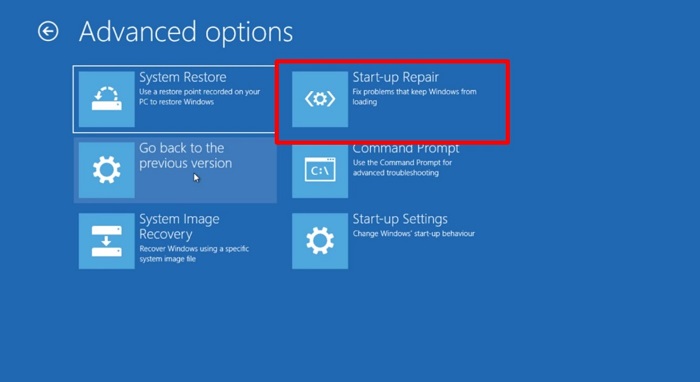
- Next, click Advanced Options.

- Now, select the Command Prompt option.

- Finally, type the command below and hit Enter to run it:
chkdsk c: /f /r

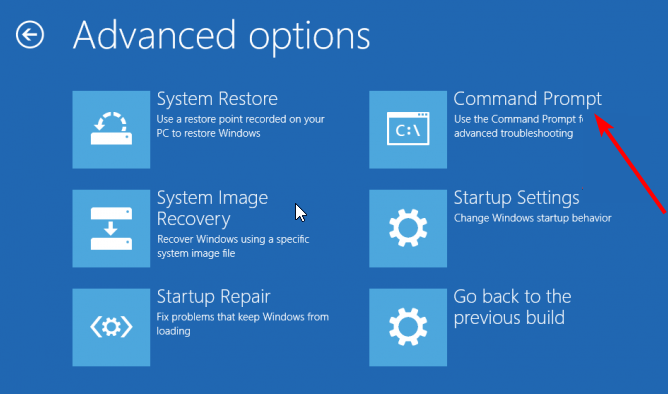
If you cannot boot into your PC because of the Windows found errors on this drive warning message, the easiest way to fix it is to use an installation media. This will allow you to boot from it and repair your PC.
With this, we can conclude this detailed guide. All you have to do now is follow the instructions carefully, and the issue should be fixed.
If you need a list of the best hard drive repair tools, check our guide for the top options.
Have you had problems with Word not going to the next page? The highlighted guide will help you fix that.
Feel free to let us know the solution that helped you fix this issue in the comments below.
![]()
Did you receive the warning message that Windows found errors on this drive that need to be repaired? Many others asserted that they got a message from Windows warning them that there were problems on their drive that required correction. Sometimes, hard drives will malfunction, which could result in a complete hard disk crash and expensive loss of data. Thus, fixing this error is essential.
Sometimes, hard drives will malfunction, which could result in a complete hard disc crash and expensive data loss. Fortunately, current hard drives come equipped with advanced failure prevention systems and built-in self-checks that send out alerts whenever they determine that your drive is in danger. There are numerous approaches to solving the issue, ranging from simple actions to challenging ones. Merely trying to restart the computer or running a DISM and SFC scan can resolve the problem.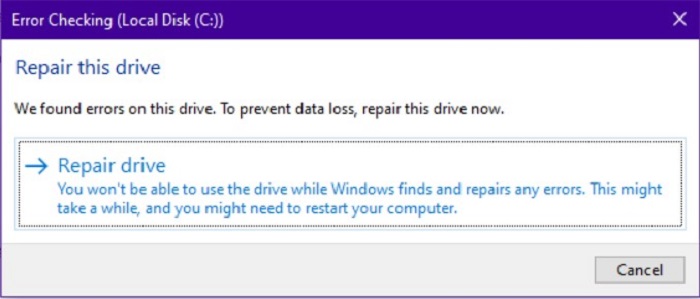
The error Windows found errors on this drive that need to be repaired solutions are listed up front, and you can test them individually to find whichever works best for your system.
Table of Contents
- 1 Fix for Windows found errors on this drive that need to be repaired
- 1.1 Restart your computer
- 1.2 Examination of the Disc
- 1.3 Scan with DISM and SFC
- 1.4 Using Safe Mode
- 1.5 Check for Security and Maintenance
- 1.6 Activate Startup Repair
- 1.6.1 Steps to activate Startup Repair
- 2 FAQs
- 2.1 Why am I getting ‘restart to repair drive faults’ so frequently?
- 2.2 How do I get around the Windows repair drive?
- 2.3 How to repair drive on windows 10?
- 2.4 Are hard discs repairable?
- 3 Conclusion
There is a discussion of potential remedies upfront. Examine them to see which is best for your System.
Restart your computer
Restarting your machine is the first and most fundamental step. Restarting your computer can sometimes resolve “Restart to repair disc errors.”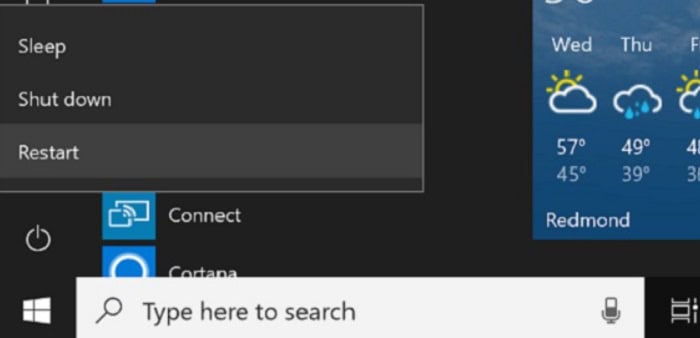 However, if you restart your computer and the error notice continues to appear on your screen, then close this dialog box and then repair the drive, and move on to the next repair.
Examination of the Disc
A command-line tool, Chkdsk(Check Disk in Full), is used in operating systems built on the DOS and Windows platforms to examine the metadata of file systems and the general health of your system’s hard discs. It lists any disc faults already present and automatically fixes them. Attempt the chkdsk procedure to fix Windows found errors on this drive that need to be repaired on Windows 10 error.
Steps to examine the hard disk:
- Open Cmd Prompt from the search bar of windows.

- Windows Found Errors On This Drive That Need To Be Fixed cmd prompt
- Click the Command Prompt (Desktop app) option you found in the results. When the UAC prompts you, choose Yes as well.

- Enter the command chkdsk d: /f /r /x (note the gaps), then click Y to approve the procedure in the following box (replace D with the letter representing your drive).

- On this drive, Windows discovered problems. The command chkdsk
- The f parameter tells the software to correct any faults, and the r parameter tells it to find and repair any corrupted sectors. Finally, x instructs your hard disc to demount to start the exercise.

See Also: 10 Ways To Fix Steam Disk Write Error In Windows 10
To start error checking, you can use the following GUI (graphical user interface) commands:
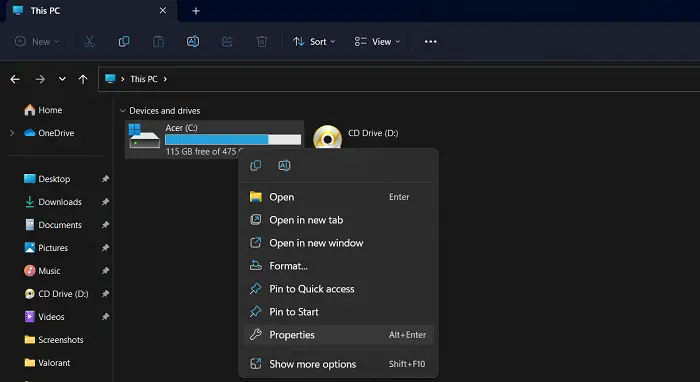
- Use the keyboard shortcut CTRL+E to launch File Explorer.
- To enlarge this computer, click it (see screenshot below).
- Right-click on the desired hard disc (C, D, etc.).

- In the drive properties window, Windows discovered problems.
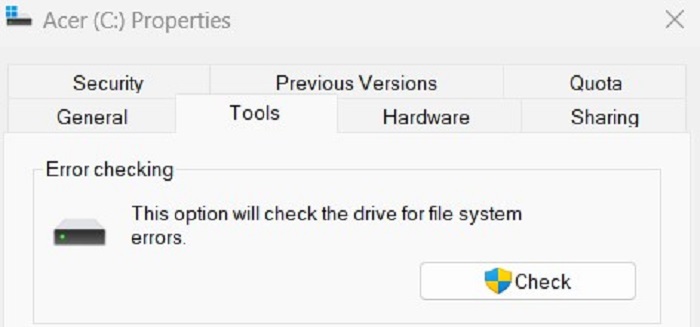
- Select Tools after choosing Properties.
- Select Check.

- Windows 10 check button for drive scan and repair.
- Press Scan Drive once more, and wait for it to finish.

- Reload your Windows machine to check if the problem has been resolved.

If this approach fails to work, verify the drive’s condition.
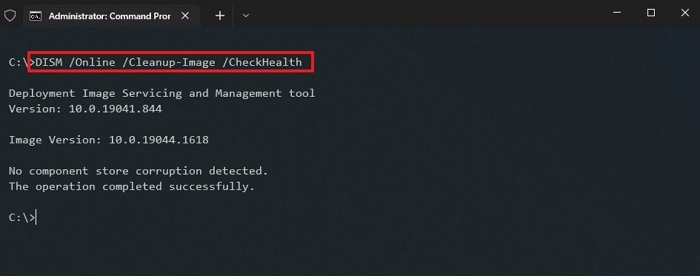
Scan with DISM and SFC
Windows found errors on this drive that need to be repaired? You can repair damaged system images with the command-line tool DISM (Deployment Image Servicing and Management). The SFC tool scans the system files for damage and replaces any damaged or corrupted copies with the proper ones.
Steps to scan the system files using DISM:
- Run Cmd Prompt as administrator and enter the code.
DISM.exe /Online /Cleanup-image /Restorehealth
- Enter the key to continue.
- Allow the procedure to finish. Once finished, enter the sfc/scannow command.
- Be patient because fixing corrupted or damaged system files could take some time.
- After finishing, close the window, and restart the computer.
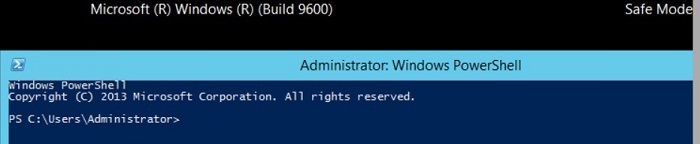
Using Safe Mode
To scan Disk on Windows 10 for any drive issues and repair them, you will be utilizing PowerShell to execute the Repair-Volume-DriveLetter command. Follow the steps to fix the problem:
Steps to scan disk using Safe Mode:
- Launch Safe Mode on Windows 10 first.

- Enter “Powershell” in the search box to display the menu. Choosing Windows PowerShell with the right mouse click will launch it as an administrator.

- Type “repair-volume -drive letter x” (where “x” is the title of the drive you would like to fix) on the command line. Afterward, hit Enter.

- Restart your computer when the scanning and repair process is complete, and check the problem’s status.
Check for Security and Maintenance
Microsoft’s Windows 10 Security and Maintenance section keeps your computer’s overall health up to date. As long as your computer is booting, it can therefore assist you in locating issues with the hard drive’s hardware and software.
Step to check for security and maintenance:
- Type “control panel” into the Windows 10 search box.
- Choose Control Panel from the selection of outcomes.

- Opt for security and system.
- Go to Maintenance and Security.

- Locate the Drive Status option by clicking the Maintenance tab’s expandable button.

- Check for the status of the drive.

Activate Startup Repair
One of the System Recovery Options is Startup Repair, which can assist you in fixing issues like the System Won’t Boot, Reboot and selecting the Proper Boot Device, Windows drive repair, and more.
To fix “Windows found error on this drive” issues, you can use Startup Repair. To run Startup Repair, you must have Windows installation discs. Adhere to the instructions:
Steps to activate Startup Repair
- Turn off your computer. Connect the Windows 10 installation media to a computer (USB drive recommended).

- Refresh your system by pressing the Power key.

- When prompted, hit a button, select your language, and afterward, select Next.
- When asked, choose to Troubleshoot

- Click Advanced settings in the window.

- After that, select Startup Repair on the Advanced options box.
- Select the admin account now, and then type the password. To submit, select Continue.
- When done, reset your computer to verify the status of the problem.


See Also: 10 Ways To Fix Class Not Registered Error In Windows 10
FAQs
Why am I getting ‘restart to repair drive faults’ so frequently?
The warning indicates that there are issues with your hard drive. Failures with Windows updates and an overstuffed Windows registry are possible additional causes of this problem.
How do I get around the Windows repair drive?
You can use one of the following methods to stop Drive C from scanning and fixing: In Safe Mode, run a CHKDSK examination. Utilize the Windows Error-checking tool. Run the Repair-Volume-DriveLetter command in Safe Mode.
How to repair drive on windows 10?
Choose This PC in the left panel. Click the hard drive you want to repair with the right mouse button under the ‘Devices and drives’ section, then choose Properties. Select the Tools tab. Select ‘Error-checking’ and then press the Check button.
Are hard discs repairable?
Although hard drives are fixable, they shouldn’t be used again after recovery; instead, they should have their data retrieved immediately and then thrown away because they cannot be relied upon to continue functioning.
Conclusion
Numerous people stated that Windows had issued a warning that Windows found errors on this drive that need to be repaired. Similar to the fatal error external hard drive issue and other issues, it’s crucial to take action before substantial damage to the disc forces you to replace your hard drive entirely. The aforementioned discussion covered the many causes and solutions.
Aloukik Rathore is a Delhi-based entrepreneur, musician, writer, and tech nerd. He has been blogging for about 7 years now.
-
Home
-
News
- How to Fix Windows Found Errors on This Drive?
By Aurelie | Follow |
Last Updated
Windows 10 found errors on this drive appears when there are some bad sectors or corrupted system files on your computer. Therefore, it is essential to take some measures before the disk suffers from severe damage. With the help of solutions on MiniTool Website, you can fix this issue easily.
We Found Errors on This Drive
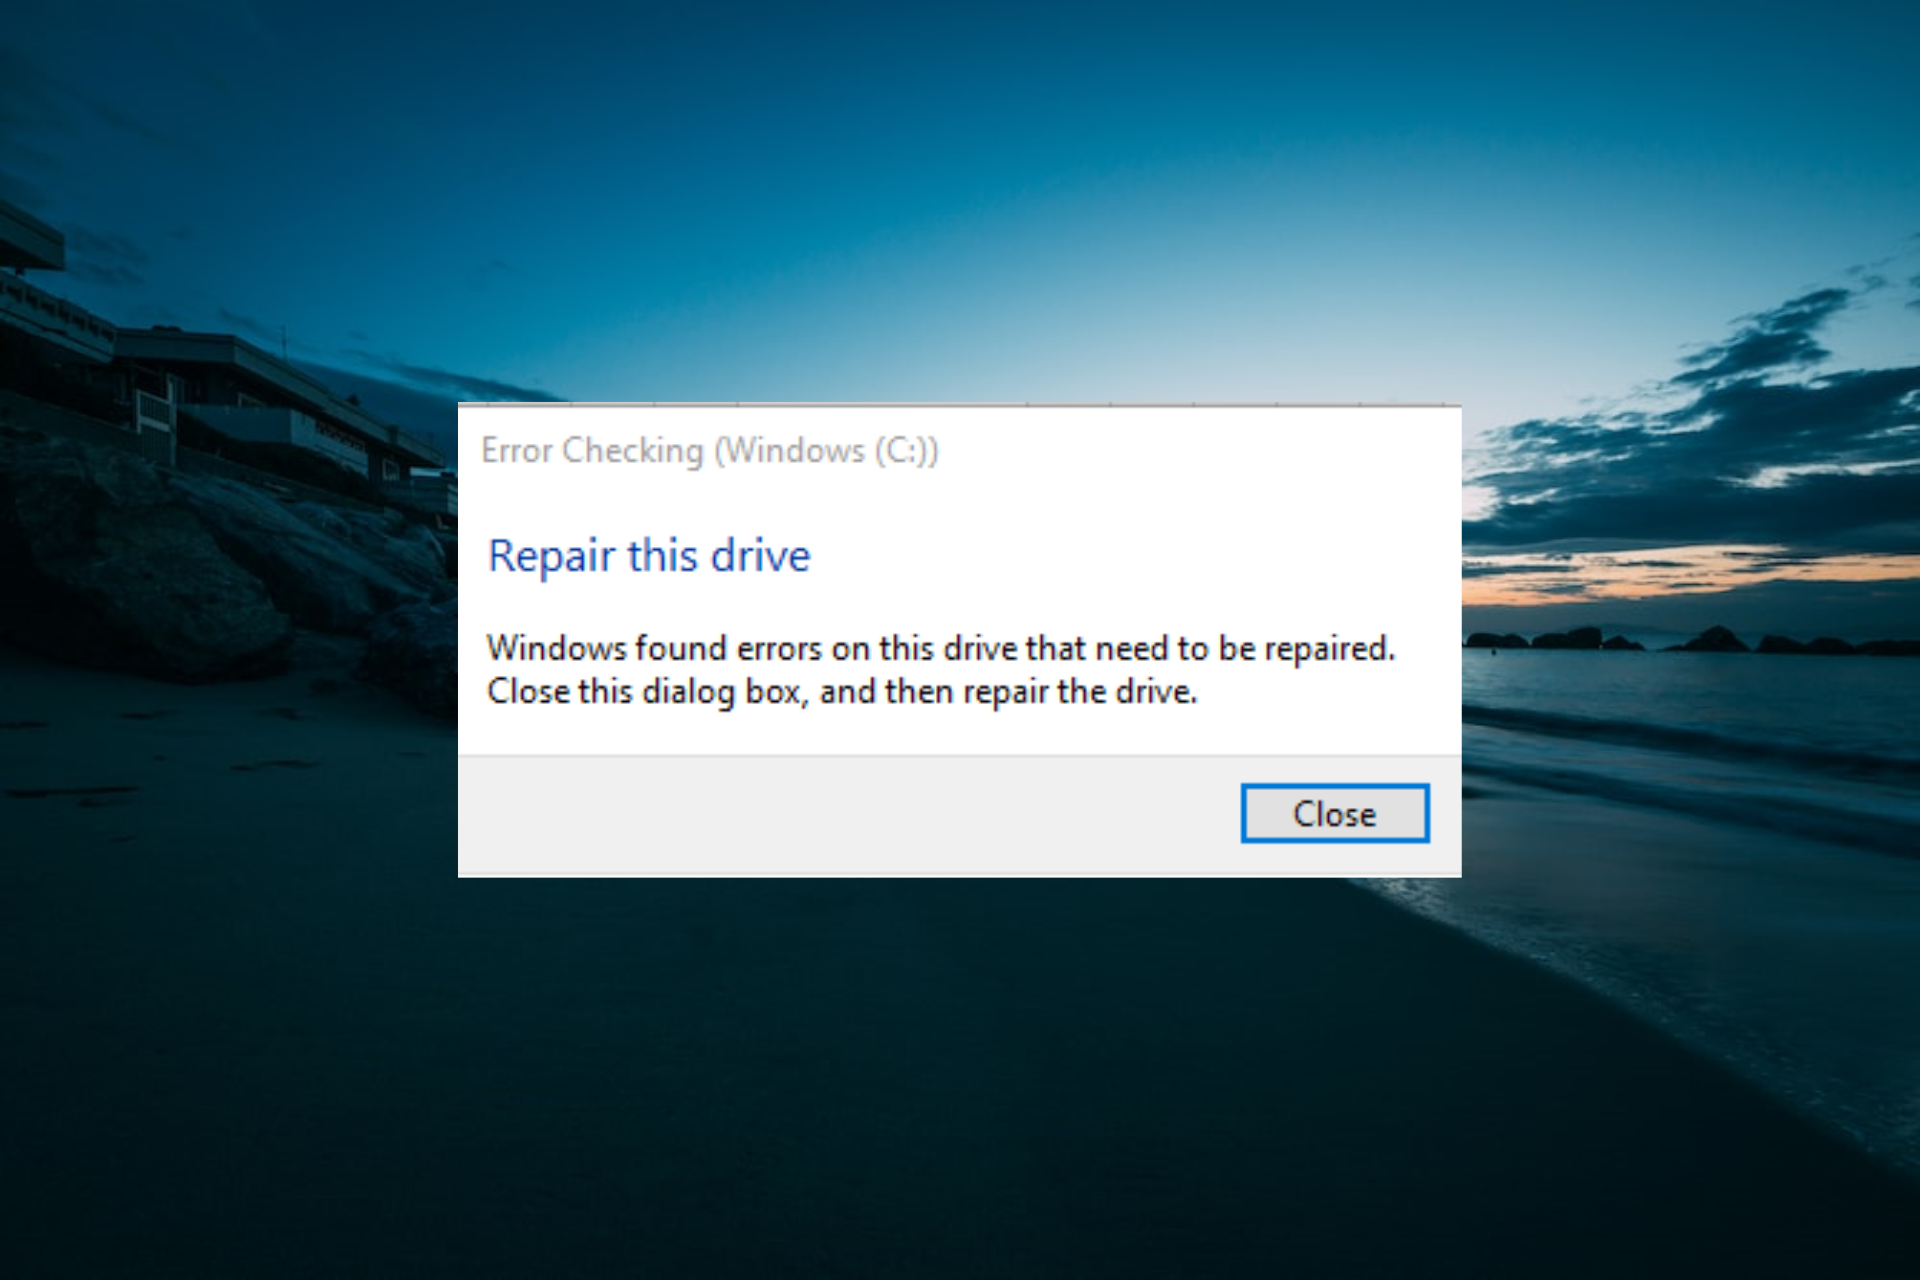
If are prompted by the Windows found errors on this drive error message, it might due to the bad sectors and faulty system files. The complete error message is:
Windows found errors on this drive that need to be repaired. Close this dialog box and then repair the drive.
Even occasional hard disk failures can trigger severe damage or costly data loss. Therefore, you must follow these guidelines carefully and back up your crucial data in advance.
Suggestion: Back up the Data on the Drive Before Proceeding
As mentioned earlier, you need to back up your important data beforehand. However, what should you choose among multiple backup software in the market? Here, a reliable backup software – MiniTool ShadowMaker is more favorable by most Windows users.
This tool offers a variety of backup services for you to choose from, including backing up files, folders, systems, disks, and partitions. Here’s how to create a file backup with this tool:
Step 1. Run this freeware and click on Keep Trial.
MiniTool ShadowMaker TrialClick to Download100%Clean & Safe
Step 2. In the Backup functional page, go to SOURCE > Folders and Files to select the important files on the disk that you are dealing with. In DESTINATION, you can choose an external hard drive or USB flash drive as a destination path for the backup task.
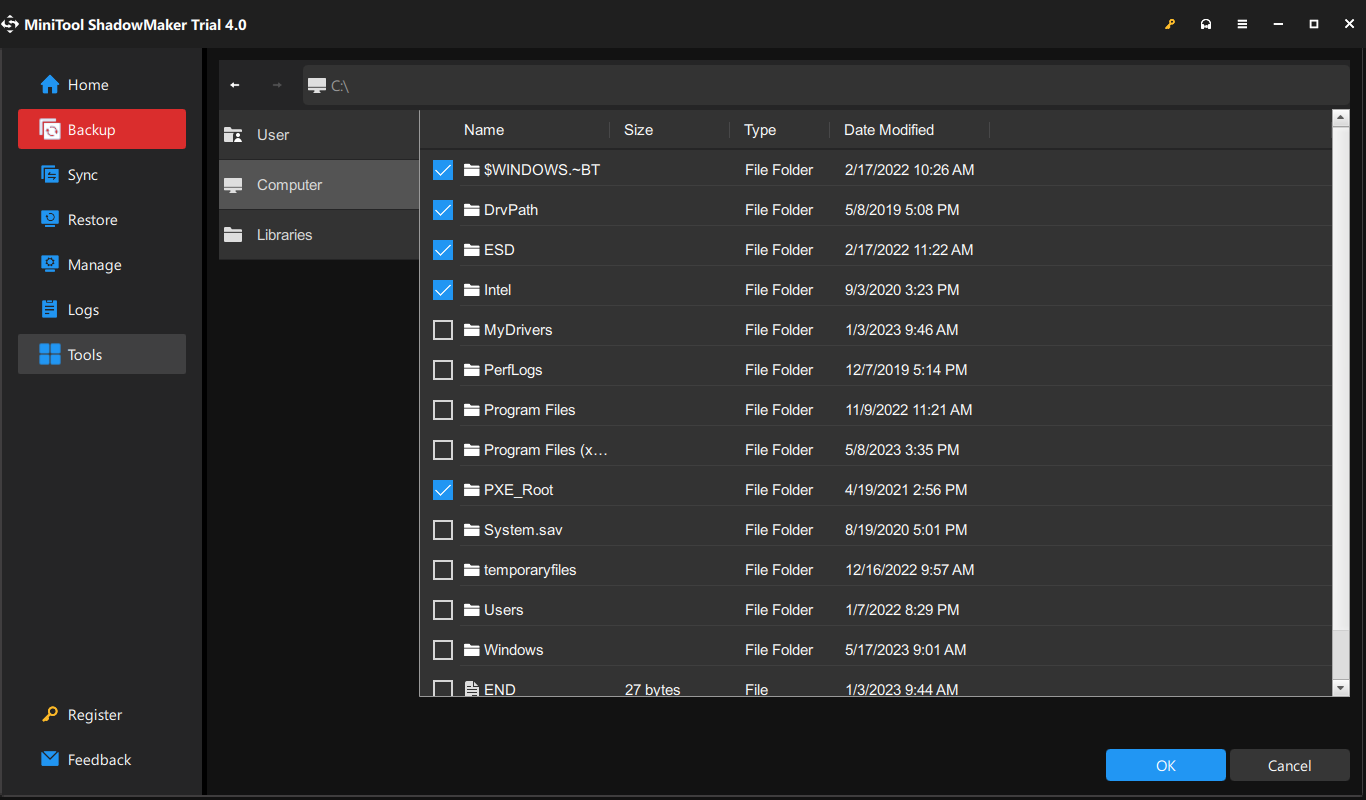
Step 3. Click on Back Up Now to start the process right now.
How to Fix Windows Found Errors on This Drive?
Fix 1: Run CHKDSK
To check and fix bad sectors on your PC, you can use the inbuilt utility – CHKDSK.
Step 1. Run Command Prompt with administrative rights.
Step 2. Type the following command in the command window and hit Enter. Replace c with your target drive letter.
chkdsk c: /f /r
Step 3. After the process is done, reboot your system.
Fix 2: Check Security and Maintenance
You can check your computer’s healthy in the Security and Maintenance screen. As long as you computer is booting, it can help you to identify issues with the hardware and software.
Step 1. Type control panel in the search bar and hit Enter.
Step 2. Go to System and Security > Security and Maintenance > expand Maintenance to check Drive status.

Fix 3: Run SFC & DISM
The presence of corrupted system files can also be a possible culprit of repair this drive Windows found errors Windows 10. Follow these steps to repair them:
Step 1. Run Command Prompt as an administrator,
Step 2. In the command window, type sfc / scannow and hit Enter.

Step 3. After the process is complete, restart your system, launch an elevated Command Prompt and then run the following command one by one:
DISM.exe /Online /cleanup-image /scanhealth
DISM.exe /Online /cleanup-image /restorehealth
DISM /Online /cleanup-Image /startcomponentcleanup
Step 4. Restart your PC.
Fix 4: Use PowerShell
When encountering the Windows found errors on this drive warning message, you can use the repair feature in Windows PowerShell.
Step 1. Press Win + X to open the Quick menu and select Windows PowerShell (Admin).
Step 2. Type Repair-Volume C –Scan and hit Enter. Replace C with your drive letter.

Step 3. If an error is detected, run this command: Repair-Volume C –OfflineScanAndFix.
Step 4. Restart your computer to see if Windows found errors on this drive is fixed.
About The Author

Position: Columnist
Aurelie is a passionate soul who always enjoys researching & writing articles and solutions to help others. Her posts mainly cover topics related to games, data backup & recovery, file sync and so on. Apart from writing, her primary interests include reading novels and poems, travelling and listening to country music.
Are you getting error “Restart To Repair Drive Errors” on your Windows 10? Don’t worry this tutorial will give you all possible solutions to fix the error without losing your data. And the method to back up your data before rebooting.
When running into some problems on the computer, users tend to try to fix it by restarting the PC. Similarly, when any problems are found by the error checking tool (whose main function is scanning and repairing drive), the system will suggest you to restart to repair drive errors.

As you can see from the above picture, the Restart to repair drive errors (Click to restart your PC) message will appear in the action centre on a Windows 10 computer. What does this error mean exactly? To be precise, this error indicates the following things:
Windows found errors on this drive that need to be repaired.
You need to restart your PC to repair drive errors found by the built-in Windows checking tool.
You are not able to access your data until you restart PC after repairing the drive.
The Restart Repair Error Is Annoying
If you do click to reboot your computer, you may get the following result:
The problem has been fixed automatically by the system after reboot.
The problem persists; you are still asked to do a restart for fixing the drive errors.
The second result may drive you crazy (see above picture), right? Undeniably, the Windows disk errors are quite a common thing; that’s why there’s a disk diagnostic tool built in all the Windows systems to scan and fix disk errors (check the integrity of your hard disk and fix various errors like file system error). Yet, it becomes annoying and equally devastating when the problems can’t be fixed after you have done what Windows suggests you do – restart your computer.
Taking a look at the error again, you’ll find that your data on the target drive may get lost since Windows says To prevent data loss, repair this drive now. On this occasion, I advise you to recover data from the drive that needs to be repaired after you have tried a reboot and failed. Then, you may try the feasible methods that’ll be mentioned later in this article to fix the reboot to repair drive error.
Table of Contents
How to Recover Data When Windows Asks You to Repair This Drive
Since Windows won’t allow you to access the drive until the repair this drive error has been fixed, you can’t copy files from it to keep data safe. In this case, you should recover data from the inaccessible drive with reliable data recovery software. Another way to ensure data security is to make a data backup with powerful backup software.
In the following content, I’ll mainly focus on telling you how to recover data with the amazing recovery tool of MiniTool power data recovery.
Our readers get a special 20% discount coupon code for MiniTool power data recovery. Just visit our MiniTool discount coupon page for the coupon code.
Data Recovery Steps
Step one: Get the setup program of a reliable tool – download it properly. Then, click on the setup application to run the installation process and follow the instructions to complete installing the tool.
Step two: run the recovery tool and you’ll be brought to its main window after a quick disk loading process.
Step three: you’ll see four options located on the left side of the software main window: This PC, Removable Disk Drive, Hard Disk Drive, and CD/DVD Drive. Please select the drive that is most suitable for your case.

Step four: find the drive on which the restart to repair drive error appears. Then, double click on it or single click on the Scan button to start the drive scanning process (it will be initialized immediately after clicking).

Step five: you’ll see a progress bar now which indicates the progress of the scan.

Step six: now, you can expand the found partitions and folders to see whether your needed files are contained.
- If all the important data you need on the problematic drive have been found, you should end the scan and check them to recover by clicking on the Save button.
- If there are still some files not found yet, you should wait for the scan and check all the items you need to recover when they have been finally found.

- Related: How to Create a Windows 10 Image Backup with Ease?
- 5 Best Windows file recovery Softwares (Free & Professional)
The restart to repair drive errors on Windows 10 are talked frequently in 2018. Many methods have been put forward by different people to try to fix the error. Here, I summarize 5 methods to help you settle down the repair this drive problem easily.
Method One: Run SFC – System File Checker Tool
- Click on the Cortana icon on the left side of the taskbar and type cmd to find command prompt.
- Right click on Command Prompt under the Best match and choose Run as administrator.
- Select Yes in the prompt window to allow the app to make changes to your device.
- Type sfc /scannow into the command prompt panel and then press Enter key to run the System File Checker.
- Then, the system scan will be started immediately and the prompt command tool will tell you that the process will take some time, so you need to wait patiently.
- Once the scan process has been completed, this tool will fix all problems it has found; you just need to wait for the completion.

Method 2: Run Check Disk to fix Restart To Repair Drive Errors on Windows 10
- Repeat step 1 to step 3 mentioned in method one.
- Type chkdsk *: /f into the command prompt tool and hit Enter in the keyboard.
- Wait for the disk checking process, which consists of mainly three stages (examining basic file system structure, examining file name linkage, and examining security descriptions).
- Any problems found by this command will be fixed automatically at the end of the scan.

Method 3: Run DISM to Fix Restart To Repair Drive Errors
The Deployment Image Servicing and Management (DISM) is actually a command-line tool embedded in Windows systems to do a lot of things, such as manage .wim files, update Windows features, and fix corrupt system files.
- Open the Start Menu.
- Scroll down to find Window Systems folder.
- Expand it and right click on Command Prompt inside.
- Choose More from the pop-up menu and choose Run as administrator from the submenu.
- Select Yes in the prompt window.
- Type exe /Online /Cleanup-image /Restorehealth and press Enter.
- Wait please when the tool is obtaining the system files online in order to restore back with the corrupt files.

Please note: sometimes, the DISM may fail to get the files. At this time, you may turn to the USB or DVD for help.
- Connect the USB or DVD to computer.
- Type DISM.exe /Online /Cleanup-Image /RestoreHealth /Source:* /LimitAccess (* stands for the path of your USB/DVD).
- Then, press Enter and wait.
Method Four: Automatic Repair or Startup Repair
In this method, the Windows bootable installation CD/DVD is necessary, you need to find it and make it ready for use.
- Connect the Windows bootable installation CD/DVD to the computer properly.
- Restart your Windows PC.
- When prompted to continue, you need to press any key in order to boot from this CD/DVD.
- Choose the language you like from language preferences and click on the Next button.
- Click on the Repair your computer option, located in the bottom-left corner.
- Select Troubleshoot in the Choose an option screen.
- Select Advanced options then to see the following window.
- Click on the Automatic Repair (Fix problems that keep Windows from loading) option (you can also select Startup Repair).
- Wait for the completion of Automatic Repair or Startup Repair.
- Restart your computer when it finishes and then boot into the Windows PC.

Method Five: Execute System Restore in Safe Mode
With the help of System Restore, you can bring your computer back to a point before the restart your PC to repair drive errors appear (you can recover files after System Restore if any important data are lost).
How to run system restore in safe mode:
- Shut down your computer properly and then power it on.
- Press F8 or another key (varies from computer to computer) before the Windows logo appears.
- Select Safe Mode with Command Prompt and press Enter under Advanced Boot Options.
- Type exe and press Enter.
- Type system restore into the textbox and press Enter.
- Follow the System Restore instructions to choose an available restore point from the list so as to restore your computer.
- Wait for the end of the restore, and then reboot your PC.

That’s all I want to talk about how to repair drive errors on Windows 10. If you have other good suggestions, please leave a message below to help more people.
- You Might Like: 3 Ways To Repair/ Fix Hard Drive Become Unallocated Issue
- What is Dynamic Disk Invalid Issue? and 2 Ways to Fix it
In the end, I provide you with five practical ways to fix the error you have met. These methods are said to have helped many people get out of the Restart To Repair Drive Errors On Windows 10. Hope they also work well in your case! If you like this tutorial please share it and follow whatvwant on Facebook, Twitter, and YouTube.
Проблема с этим диском, вот как это исправить!
Последнее обновление: 21 апреля 2023 г. Автор: Ангелос Хронис
У технологий есть этот сверхъестественный способ заставить человека чувствовать себя на вершине мира, открывая сотни возможностей.
Однако вещи могут легко скиснуть когда что-то перестает работать. И плохая сторона компьютеров, которые не работают, заключается в том, что если вы не технический специалист, вы не можете знать, что не так.
Это тот случай, когда вы получаете следующую ошибку: «WС этим диском возникла проблема”; очень общая ошибка это неизбежно произойдет с каждым, кто в какой-то момент владеет компьютером с Windows и оставит его беспомощным и без доступа к своим данным.
Это должно быть очень неприятно, особенно учитывая тот факт, что добавление оскорбления к травме, в отличие от сценариев, где вы просто PDF-файл, который был поврежден у вас также есть проблемы с использованием остальной части вашего ПК, а не только части проблемного диска.
Но есть решения для каждого вопроса. И если вы пришли сюда в поисках одного, вы пришли в нужное место. Читайте дальше, и мы покажем вам, что делать, если вы получили сообщение «С этим диском возникла проблема».
Меню
- Способ 1, чтобы исправить «С этим диском возникла проблема»: Используйте обслуживание Windows
- Способ 2, чтобы исправить «С этим диском возникла проблема»: Проверьте работу диска в дополнительных параметрах Windows.
- Способ 3, чтобы исправить «С этим диском возникла проблема»: Воспользуйтесь программой восстановления данных Windows с помощью EchoShare.
- Заключение
Первое, что мы собираемся попробовать, это использовать инструменты предоставлено Windows; Безопасность и обслуживание. С его помощью вы можете выполнять техническое обслуживание вашего оборудования, а также защищать его от вирусов и хакеров.
Обычно ОС Windows уже активное планирование Это обеспечивает правильную работу вашей машины и позволяет заранее узнать о любых проблемах.
Однако никогда не помешает запустить проверку вручную, особенно при ошибках типа «Проблема с этим диском«появляются внезапно.
Вот как это сделать.
- Тип панель управления на панели поиска на панели задач.
- Щелкните на панели управления.
- Выберите систему и безопасность и перейдите к Безопасность и обслуживание.
- Щелкните, чтобы развернуть Обслуживание вкладку, найдите и нажмите кнопку Состояние диска опцию.
Все ваши проблемы с жестким диском будут здесь.
Способ 2, чтобы исправить «Проблема с этим диском»: проверьте работу диска в дополнительных параметрах Windows
Вышеупомянутое решение является диагностический инструмент. Вы запускаете техническое обслуживание Windows, чтобы увидеть, какие проблемы влияют на аппаратное обеспечение вашего компьютера, и вы даже можете применять решения, предлагаемые самой Windows.
Однако, если бы проблема была такой простой, Windows бы нашла ее и решила в фоновом режиме. Таким образом, именно с помощью этого инструмента мы можем по-настоящему диагностировать проблему, когда получаем сообщение «С этим диском возникла проблема».
Как следует из названия, это исправление немного более сложное, поэтому, если вы не хотите возиться со сложными процедурами, вы можете перейти к самому простому и быстрому решению, которое мы можем предложить.
Но давайте продолжим с текущим исправлением.
Короче говоря, мы попытаемся загрузить Windows из другого места (загрузочный диск Windows или флэш-накопитель), а затем попытаться запустить диагностику на нашем жестком диске, а также на частях основной системы.
Итак, прежде чем мы двинемся дальше, вам понадобится загрузочный диск Windows которые вы получили, когда впервые купили ПК или ОС. Если у вас его нет, вы можете создать диск или флэш-накопитель с помощью средства создания дисков восстановления Windows. Просто выполните поиск по термину в Интернете, и это будет первый или второй результат, который вы получите.
Вот остальная часть процесса:
- Перезагрузите компьютер и вставьте носитель для восстановления.
- Загрузите Windows с установочного диска или носителя восстановления (диска или привода).
- Следуйте инструкциям по настройке Windows в Установка Windows появившееся диалоговое окно и нажмите Следующая.
- Нажмите на Восстановление системы.
- Нажмите на Устранение неполадок на Выберите экран выбора.
- Выберите Дополнительные параметры.
- Выберите Командная строка на следующем экране.
- Затем введите chkdsk c:/f/r и нажмите enter.
Способ 3, чтобы исправить «Проблема с этим диском»: используйте Echoshare Windows Data Recovery
Приведенные выше решения хороши и все такое, но они не охватывают возможности вашего жесткого диска. на самом деле испорчен. В этом случае обслуживание и расширенные настройки не принесут вам пользы, и вам, вероятно, придется отформатировать диск если его вообще можно использовать. Однако есть один последнее решение это не включает в себя сложную серию шагов, перечисленных выше, и вы не рискуете случайно удаление всех ваших данных. Более того, он даже восстановит данные для вас. EchoShare Восстановление данных Windows.
- Это настолько быстро, что вы сможете восстановить свои данные в кратчайшие сроки.
- Работает в 100% случаев без ошибок.
- Он работает на всех Windows и на любых машинах.
- Он настолько прост в использовании, что любой может восстановить данные всего за несколько простых шагов.
Посмотрим как.
Первый шаг:
Загрузите, установите и запустите программу Echoshare Windows Data Recovery.
Шаг второй:
Выберите Я не знаю поскольку вы не знаете, в чем проблема с вашим жестким диском, и выберите все поля ниже (если вы не имеете в виду определенный тип файла). Нажмите на Следующая после этого.
Шаг третий:
Когда приложение завершит восстановление данных, выберите файлы, которые вы хотите восстановить, и нажмите Recover.
Вот и все! Ваши файлы в целости и сохранности, и теперь вы можете выбросить или отформатировать проблемный жесткий диск.
Заключение
Жесткие диски — это мозг компьютера. Именно здесь хранятся все данные и даже операционная система компьютера. Без них компьютер не смог бы функционировать, а особенно в наше время, в эпоху постоянно расширяющихся данных, пространство для хранения важнее, чем когда-либо. Вот почему всегда важно иметь инструменты для ремонта проблемных дисков или спасения наших данных с них, когда они неизбежно умирают.
Часто задаваемые вопросы
1Можете ли вы починить поврежденный жесткий диск?
Поврежденный жесткий диск можно починить, если повреждение минимально или если речь идет только о фрагментации данных. Другое дело, если диск столкнулся с какой-либо механической неисправностью или если он сохранил какое-то повреждение. В таких случаях жесткие диски редко можно починить.
2SSD надежнее?
Технология SSD делает их быстрее и намного надежнее, чем жесткие диски с более длительным сроком службы. Однако это не означает, что они полностью защищены от всех проблем, с которыми обычно сталкиваются носители данных, таких как повреждение данных и сбои оборудования.