Visual Studio позволяет быстро и удобно писать программы, которые могут общаться с скетчами Arduino через последовательный порт.
Консоль
Создайте консольное приложение и напишите код. За общение с последовательным портом отвечает пространство имён System.IO.Ports.
using System;
using System.IO.Ports;
using System.Threading;

namespace ConsoleApp1
{
    class Program
    {
        static SerialPort serialPort;

        static void Main(string[] args)
        {
            serialPort = new SerialPort();
            serialPort.PortName = "COM4";
            serialPort.BaudRate = 9600;
            serialPort.Open();
            while (true)
            {
                string msg = serialPort.ReadExisting();
                Console.WriteLine(msg);
                Thread.Sleep(200);
            }
        }
    }
}
В приложении явно прописан номер порта, измените его в случае необходимости. В цикле while ждём поступление данных от Arduino.
Напишем скетч.
void setup() {
  Serial.begin(9600);
}

void loop() {
  Serial.print('1');
  delay(200);
}
Прошиваем плату. Она начинает посылать единицы в порт. Запускаем консольное приложение. В окне консоли должны отобразиться принятые единицы. Базовый пример показывает, как просто взаимодействуют приложения на C# с Arduino.
WinForms
Напишем приложение со свистелками и перделками, т.е. GUI-приложение. Создадим новый проект Desktop-типа. Добавим на форму кнопки, выпадающий список. На панели инструментов найдите элемент управления SerialPort и добавьте его на рабочую панель. Все настройки оставляем без изменений. Кстати, можно было получить доступ к SerialPort программным путём, но я решил показать простой привычный способ.
Файл Form1.Designers.cs получился следующим. Первая кнопка получает доступные порты и добавляет их в выпадающий список. Вторая кнопка соединяется по указанному порту. Третья и четвёртая кнопки посылают символы ‘1’ и ‘0’ соответственно, чтобы включить или выключить светодиод.
Показать код (щёлкните мышкой)
namespace DesktopApp1
{
    partial class Form1
    {
        ///
        /// Required designer variable.
        ///
        private System.ComponentModel.IContainer components = null;

        ///
        /// Clean up any resources being used.
        ///
        /// true if managed resources should be disposed; otherwise, false.
        protected override void Dispose(bool disposing)
        {
            if (disposing && (components != null))
            {
                components.Dispose();
            }
            base.Dispose(disposing);
        }

        #region Windows Form Designer generated code

        ///
        /// Required method for Designer support - do not modify
        /// the contents of this method with the code editor.
        ///
        private void InitializeComponent()
        {
            this.components = new System.ComponentModel.Container();
            this.arduinoButton = new System.Windows.Forms.Button();
            this.serialPort = new System.IO.Ports.SerialPort(this.components);
            this.comboBox = new System.Windows.Forms.ComboBox();
            this.connectButton = new System.Windows.Forms.Button();
            this.turnOnButton = new System.Windows.Forms.Button();
            this.turnOffButton = new System.Windows.Forms.Button();
            this.SuspendLayout();
            //
            // arduinoButton
            //
            this.arduinoButton.Location = new System.Drawing.Point(81, 35);
            this.arduinoButton.Name = "arduinoButton";
            this.arduinoButton.Size = new System.Drawing.Size(121, 23);
            this.arduinoButton.TabIndex = 0;
            this.arduinoButton.Text = "Get COM-port";
            this.arduinoButton.UseVisualStyleBackColor = true;
            this.arduinoButton.Click += new System.EventHandler(this.arduinoButton_Click);
            //
            // comboBox
            //
            this.comboBox.FormattingEnabled = true;
            this.comboBox.Location = new System.Drawing.Point(81, 64);
            this.comboBox.Name = "comboBox";
            this.comboBox.Size = new System.Drawing.Size(121, 21);
            this.comboBox.TabIndex = 4;
            //
            // connectButton
            //
            this.connectButton.Location = new System.Drawing.Point(81, 91);
            this.connectButton.Name = "connectButton";
            this.connectButton.Size = new System.Drawing.Size(121, 23);
            this.connectButton.TabIndex = 5;
            this.connectButton.Text = "Connect";
            this.connectButton.UseVisualStyleBackColor = true;
            this.connectButton.Click += new System.EventHandler(this.connectButton_Click);
            //
            // turnOnButton
            //
            this.turnOnButton.Location = new System.Drawing.Point(104, 178);
            this.turnOnButton.Name = "turnOnButton";
            this.turnOnButton.Size = new System.Drawing.Size(75, 23);
            this.turnOnButton.TabIndex = 6;
            this.turnOnButton.Text = "On";
            this.turnOnButton.UseVisualStyleBackColor = true;
            this.turnOnButton.Click += new System.EventHandler(this.button3_Click);
            //
            // turnOffButton
            //
            this.turnOffButton.Location = new System.Drawing.Point(104, 219);
            this.turnOffButton.Name = "turnOffButton";
            this.turnOffButton.Size = new System.Drawing.Size(75, 23);
            this.turnOffButton.TabIndex = 7;
            this.turnOffButton.Text = "Off";
            this.turnOffButton.UseVisualStyleBackColor = true;
            this.turnOffButton.Click += new System.EventHandler(this.button4_Click);
            //
            // Form1
            //
            this.ClientSize = new System.Drawing.Size(284, 261);
            this.Controls.Add(this.turnOffButton);
            this.Controls.Add(this.turnOnButton);
            this.Controls.Add(this.connectButton);
            this.Controls.Add(this.comboBox);
            this.Controls.Add(this.arduinoButton);
            this.Name = "Form1";
            this.Load += new System.EventHandler(this.Form1_Load_1);
            this.ResumeLayout(false);

        }

        #endregion

        private System.Windows.Forms.Button arduinoButton;
        private System.IO.Ports.SerialPort serialPort;
        private System.Windows.Forms.ComboBox comboBox;
        private System.Windows.Forms.Button connectButton;
        private System.Windows.Forms.Button turnOnButton;
        private System.Windows.Forms.Button turnOffButton;
    }
}
Сам код для коммуникации.
using System;
using System.Windows.Forms;
using System.IO.Ports;

// This is the code for your desktop app.
// Press Ctrl+F5 (or go to Debug > Start Without Debugging) to run your app.

namespace DesktopApp1
{
    public partial class Form1 : Form
    {
        bool isConnected = false;

        public Form1()
        {
            InitializeComponent();
        }

        private void Form1_Load(object sender, EventArgs e)
        {

        }

        private void arduinoButton_Click(object sender, EventArgs e)
        {
            comboBox.Items.Clear();
            // Получаем список COM портов доступных в системе
            string[] portnames = SerialPort.GetPortNames();
            // Проверяем есть ли доступные
            if (portnames.Length == 0)
            {
                MessageBox.Show("COM PORT not found");
            }
            foreach (string portName in portnames)
            {
                //добавляем доступные COM порты в список
                comboBox.Items.Add(portName);
                Console.WriteLine(portnames.Length);
                if(portnames[0] != null)
                {
                    comboBox.SelectedItem = portnames[0];
                }
            }
        }

        private void connectToArduino()
        {
            isConnected = true;
            string selectedPort = comboBox.GetItemText(comboBox.SelectedItem);
            serialPort.PortName = selectedPort;
            serialPort.Open();
            connectButton.Text = "Disconnect";
        }

        private void disconnectFromArduino()
        {
            isConnected = false;
            serialPort.Close();
            connectButton.Text = "Connect";
        }

        private void Form1_FormClosing(object sender, FormClosingEventArgs e)
        {
            // При закрытии программы, закрываем порт
            if (serialPort.IsOpen) serialPort.Close();
        }

        private void button3_Click(object sender, EventArgs e)
        {
           if(isConnected)
            {
                serialPort.Write("1");
            }
        }

        private void button4_Click(object sender, EventArgs e)
        {
            serialPort.Write("0");
        }

        private void connectButton_Click(object sender, EventArgs e)
        {
            if (!isConnected)
            {
                connectToArduino();
            }
            else
            {
                disconnectFromArduino();
            }
        }

        private void Form1_Load_1(object sender, EventArgs e)
        {

        }
    }
}
Скетч для приёма сообщений.
char commandValue; // данные, поступаемые с последовательного порта
int ledPin = 13; // встроенный светодиод

void setup() {
  pinMode(ledPin, OUTPUT); // режим на вывод данных
  Serial.begin(9600);
}

void loop() {
  if (Serial.available()) {
    commandValue = Serial.read();
  }

  if (commandValue == '1') {
    digitalWrite(ledPin, HIGH); // включаем светодиод
  }
  else {
    digitalWrite(ledPin, LOW); // в противном случае выключаем
  }
  delay(10); // задержка перед следующим чтением данных
}
Запускаем приложение на C#, соединяется с платой и посылаем либо «1» (третья кнопка), либо «0» (четвёртая кнопка). В зависимости от нажатой кнопки на плате светодиод будет загораться или гаснуть.

Реклама
Serial Communication [read serial port example] in C#
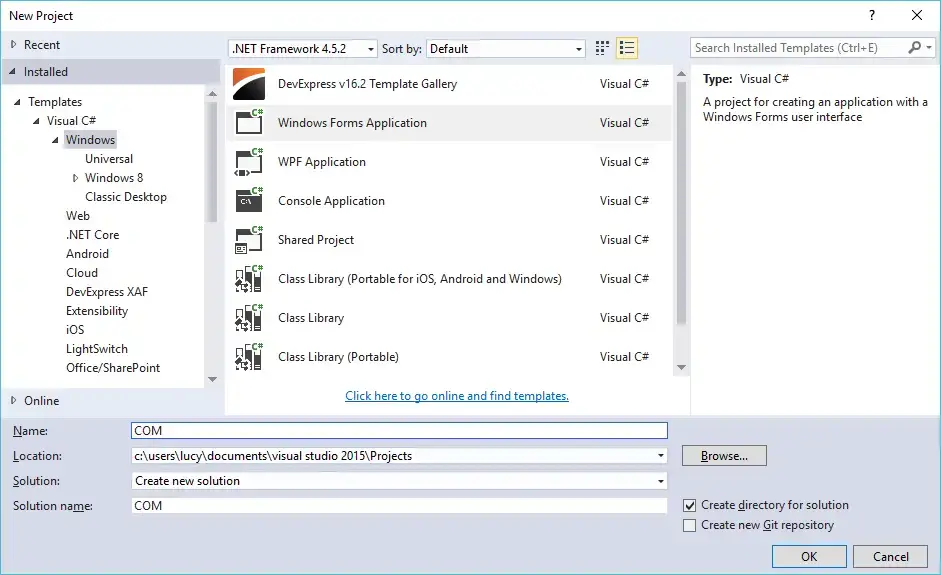
Step 1: Click New Project, then select Visual C# on the left, then Windows and then select Windows Forms Application. Name your project «COM» and then click OK
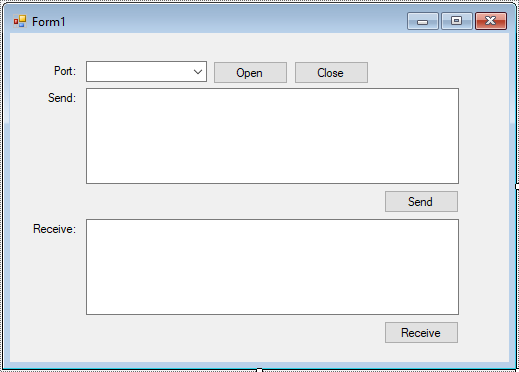
 Step 2: Design your form as below
Step 3: Add code to button click event handler as below
using System;
using System.Collections.Generic;
using System.ComponentModel;
using System.Data;
using System.Drawing;
using System.IO.Ports;
using System.Linq;
using System.Text;
using System.Threading.Tasks;
using System.Windows.Forms;

namespace COM
{
    public partial class Form1 : Form
    {
        public Form1()
        {
            InitializeComponent();
        }

        private void Form1_Load(object sender, EventArgs e)
        {
            //Get all ports
            string[] ports = SerialPort.GetPortNames();
            cboPort.Items.AddRange(ports);
            cboPort.SelectedIndex = 0;
            btnClose.Enabled = false;
        }

        private void btnOpen_Click(object sender, EventArgs e)
        {
            btnOpen.Enabled = false;
            btnClose.Enabled = true;
            try
            {
                //Open port
                serialPort1.PortName = cboPort.Text;
                serialPort1.Open();
            }
            catch(Exception ex)
            {
                MessageBox.Show(ex.Message, "Message", MessageBoxButtons.OK, MessageBoxIcon.Error);
            }
        }

        private void btnSend_Click(object sender, EventArgs e)
        {
            try
            {
                if (serialPort1.IsOpen)
                {
                    //Send text to port
                    serialPort1.WriteLine(txtMessage.Text + Environment.NewLine);
                    txtMessage.Clear();
                }
            }
            catch (Exception ex)
            {
                MessageBox.Show(ex.Message, "Message", MessageBoxButtons.OK, MessageBoxIcon.Error);
            }
        }

        private void btnClose_Click(object sender, EventArgs e)
        {
            btnOpen.Enabled = true;
            btnClose.Enabled = false;
            try
            {
                serialPort1.Close();
            }
            catch (Exception ex)
            {
                MessageBox.Show(ex.Message, "Message", MessageBoxButtons.OK, MessageBoxIcon.Error);
            }
        }

        private void btnReceive_Click(object sender, EventArgs e)
        {
            try
            {
                if (serialPort1.IsOpen)
                {
                    //Read text from port
                    txtReceive.Text = serialPort1.ReadExisting();
                }
            }
            catch (Exception ex)
            {
                MessageBox.Show(ex.Message, "Message", MessageBoxButtons.OK, MessageBoxIcon.Error);
            }
        }

        private void Form1_FormClosing(object sender, FormClosingEventArgs e)
        {
            if (serialPort1.IsOpen)
                serialPort1.Close();
        }
    }
}
VIDEO TUTORIALS
Related Posts
You can implement «SerialPortDataReceivedEvent» to read data from serial port.
Before opening connection to serial port register with «DataReceivedEvent», Inside
button1_Click event add below code.
serialPort1.DataReceived += new SerialDataReceivedEventHandler(mySerialPort_DataReceived);
Then add below event handler
private static void mySerialPort_DataReceived(
                    object sender,
                    SerialDataReceivedEventArgs e)
{
    SerialPort sp = (SerialPort)sender;
    string indata = sp.ReadExisting();
    //data received on serial port is asssigned to "indata" string
    //Console.WriteLine("Received data:");
    //Console.Write(indata);
}
Also, try to configure other properties like Parity, StopBits, DataBits etc. similar to the device on other end (with which you are trying to communicate).
Update data on UI:
what you need is a delegate method that sets the Text property of your text box with a given string. You then call that delegate from within your mySerialPort_DataReceivedhandler via the TextBox.Invoke() method. Something like this:
public delegate void AddDataDelegate(String myString);
public AddDataDelegate myDelegate;

private void Form1_Load(object sender, EventArgs e)
{
  //...
  this.myDelegate = new AddDataDelegate(AddDataMethod);
}

public void AddDataMethod(String myString)
{
 textbox1.AppendText(myString);
}

private void mySerialPort_DataReceived(object sender, SerialDataReceivedEventArgs e)
{
 SerialPort sp = (SerialPort)sender;
 string indata = sp.ReadExisting();

 textbox1.Invoke(this.myDelegate, new Object[] {indata});
}
Let us know if you need further clarification.
Hope this helps..
Sending and receiving of C# Serialport
preface:
Last time, the blogger explained the configuration of serial port control for you. In this issue, we will explain the sending and receiving of serial port. This serial port communication control provides a lot of methods for the communication between host computer and single chip microcomputer. It is convenient for you to use and easy to use.
Once a day to prevent puppy love:

1.SerialPort serial port control sending configuration
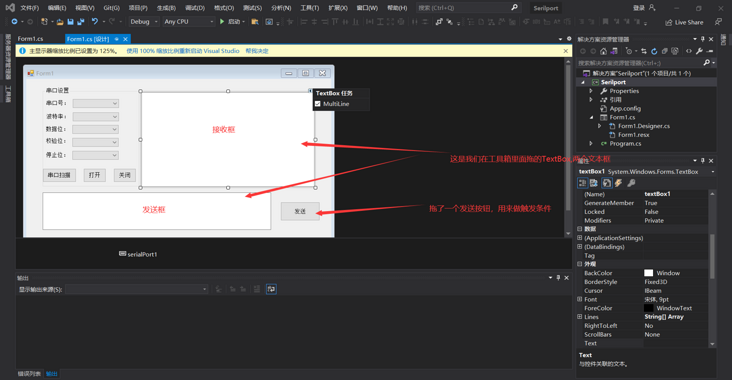
1.1 take the item of the previous article. I set it based on that item. If I can’t, I can see the previous article of the blogger and put a link( https://juejin.cn/post/702183… )First, we need to set the interface, including send box, receive box and send button
1.2 let’s first learn about the sending of serialPort, which provides several interfaces:
public void Write(byte[] buffer, int offset, int count);
    Writes the specified number of bytes to the serial port using the data in the buffer.
        // buffer: an array of bytes containing the data to be written to the port.
        //   Offset: the byte offset from zero in the buffer parameter, from which bytes are copied to the port.
        //   count: number of bytes to write.
public void Write(string text);
    Writes the specified string to the serial port.
      text:  Output string.
public void Write(char[] buffer, int offset, int count);
    Writes the specified number of characters to the serial port using the data in the buffer.
        //   buffer: character array containing the data to be written to the port.
        //   Offset: the byte offset from zero in the buffer parameter, from which bytes are copied to the port.
        //   count: the number of characters to write.
public void WriteLine(string text);
        //     Writes the specified string and System.IO.Ports.SerialPort.NewLine value to the output buffer.
        //     text: the string to write to the output buffer.
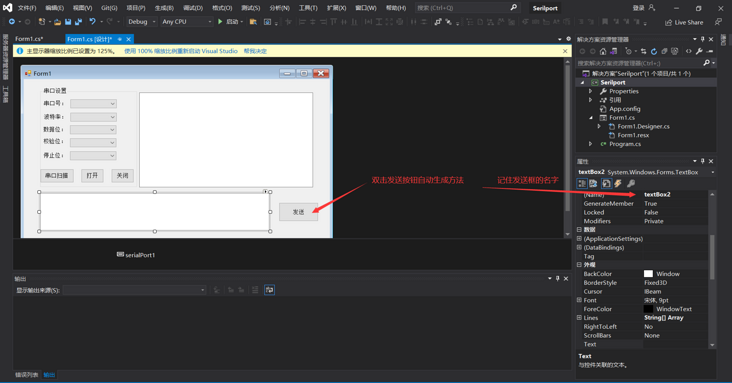
- 3. Double click the send button to automatically generate the method function and write the method we sent:
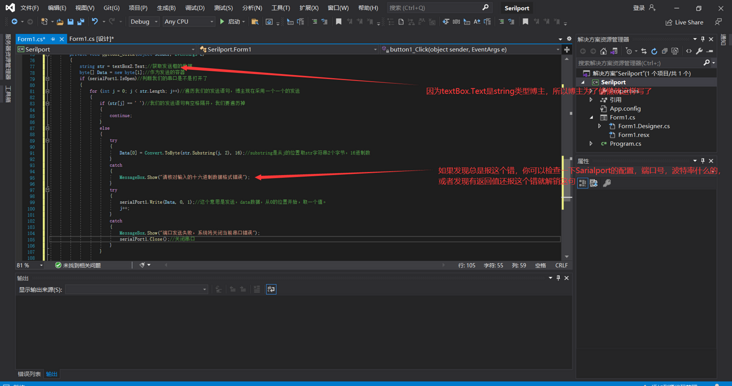
1.4 the code is as follows: it can be used directly, provided that your interface is the same as that of the blogger. Pay attention to whether the controls of the interface correspond to the function trigger of the blogger, not to change the trigger of the interface. For details, refer to the previous article.
using System;
using System.Collections.Generic;
using System.ComponentModel;
using System.Data;
using System.Drawing;
using System.IO.Ports;
using System.Linq;
using System.Text;
using System.Threading.Tasks;
using System.Windows.Forms;

namespace Serilport
{
    public partial class Form1 : Form
    {
        public Form1()
        {
            InitializeComponent();
            System.Windows.Forms.Control.CheckForIllegalCrossThreadCalls = false;
        }
        private void SearchAndAddSerialToComboBox(object sender, EventArgs e)
        {
            string Buffer;
            comboBox1.Items.Clear();    //Records scanned before the beginning of the Qing Dynasty
            for (int i = 0; i < 20; i++)
            {
                try
                {
                    Buffer = "COM" + i.ToString(); //Obtain COM1-20
                    serialPort1.PortName = Buffer;     //Get COM information
                    serialPort1.Open();                 //Open serial port
                    comboBox1.Items.Add(Buffer);
                    comboBox1.Text = Buffer; //Add serial port to get Recordset
                    serialPort1.Close();                 //Close the serial port
                }
                catch { }
            }
        }

        private void button4_Click(object sender, EventArgs e)
        {
            try
            {
                serialPort1.PortName = comboBox1.Text;
                serialPort1.BaudRate = Convert.ToInt32(comboBox2.Text, 10);
                serialPort1.DataBits = Convert.ToInt32(comboBox3.Text, 10);
                if (comboBox4.Text == "None") { serialPort1.Parity = Parity.None; }
                else if (comboBox4.Text == "Odd check") { serialPort1.Parity = Parity.Odd; }
                else if (comboBox4.Text == "Parity check") { serialPort1.Parity = Parity.Even; }
                else if (comboBox4.Text == "Mark") { serialPort1.Parity = Parity.Mark; }
                else if (comboBox4.Text == "Space check") { serialPort1.Parity = Parity.Space; }
                if (comboBox5.Text == "1")
                {
                    serialPort1.StopBits = StopBits.One;
                }
                else if (comboBox5.Text == "1.5")
                {
                    serialPort1.StopBits = StopBits.OnePointFive;
                }
                else if (comboBox5.Text == "1.5")
                {
                    serialPort1.StopBits = StopBits.Two;
                }
                //serialPort1.ReadTimeout(2000);
                serialPort1.Open();
                button2.Enabled = false;//The open serial port button is not available
                //button3.Enabled = true;// Close the serial port
            }
            catch
            {
                MessageBox.Show("Port error,Please check the serial port", "error");
            }
        }

        private void button1_Click(object sender, EventArgs e)
        {
            string str = textBox2.Text;//Get the data of the send box
            byte[] Data = new byte[1];//As a container for sending
            if (serialPort1.IsOpen)//Judge whether our serial port is open
            {
                for (int j = 0; j < str.Length; j++)//Traversing our sending statements, bloggers now send one by one
                {
                    if (str[j] == ' ')//Our sending statements are separated by spaces. We have to traverse them
                    {
                        continue;
                    }
                    else
                    {
                        try
                        {
                            Data[0] = Convert.ToByte(str.Substring(j, 2), 16);//substring is a hexadecimal number that takes 2 bytes of str string from the position of j
                        }
                        catch
                        {
                            MessageBox.Show("Please check the hexadecimal data format error");
                        }
                        try
                        {
                            serialPort1.Write(Data, 0, 1);//This means sending data, starting from the position of 0, and taking a value.
                            j++;
                        }
                        catch
                        {
                            MessageBox.Show("Port sending failed. The system will close the current serial port error");
                            serialPort1.Close();//Close the serial port
                        }
                    }

                }
            }
        }
    }
}
2.SarilPort serial port control receiving configuration
2.1 understanding the interface of SerialPort receiving method
public int Read(char[] buffer, int offset, int count);
      from System.IO.Ports.SerialPort Reads some characters from the input buffer and writes them to the offset specified in the character array.
         //  buffer: an array of bytes to which input is written.
        //   Offset: offset in the buffer to write bytes.
        //   Count: the maximum number of bytes read. If count is greater than the number of bytes in the input buffer, fewer bytes are read.
public int Read(byte[] buffer, int offset, int count);
     from System.IO.Ports.SerialPort The input buffer reads some bytes and writes those bytes to the offset specified in the byte array.
         // buffer: an array of bytes to which input is written.
        //   Offset: offset in the buffer to write bytes.
        //   Count: the maximum number of bytes read. If count is greater than the number of bytes in the input buffer, fewer bytes are read.
public int ReadByte();
     from System.IO.Ports.SerialPort A byte is synchronously read from the input buffer.
public int ReadChar();
     from System.IO.Ports.SerialPort One character is synchronously read from the input buffer.
public string ReadExisting();
     On the basis of coding, read System.IO.Ports.SerialPort All immediately available bytes in the stream and input buffer of the object.
public string ReadLine();
     Read all the way to the input buffer System.IO.Ports.SerialPort.NewLine Value.
public string ReadTo(string value);
    Reads up to the specified in the input buffer value String of.
     value: A value indicating where the read operation stops.
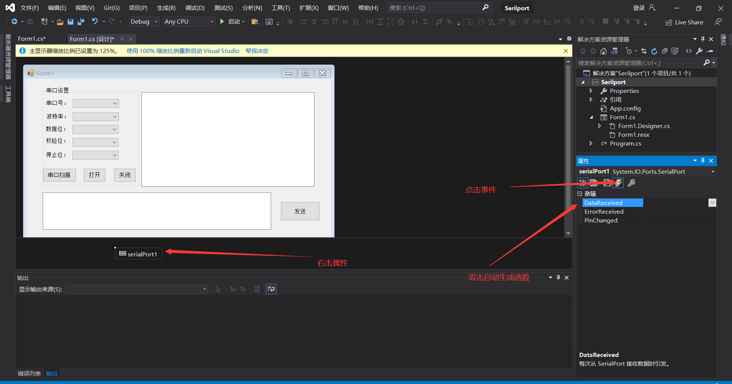
2.2. Create a receiving function according to the screenshot, and SerialPort automatically receives data
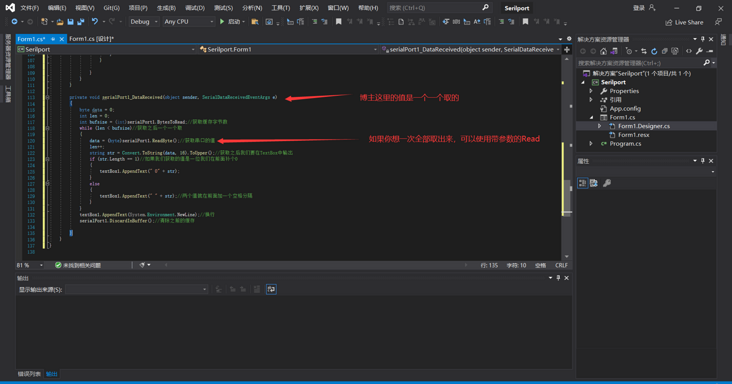
2.3 if you don’t want to use the loop, you can read the data at one time, so it won’t be so troublesome. Read its own interface carefully and find a suitable interface. I’ll send my code to you for reference:
private void serialPort1_DataReceived(object sender, SerialDataReceivedEventArgs e)
        {
            byte data = 0;
            int len = 0;
            int bufsize = (int)serialPort1.BytesToRead;//Get cache bytes
            while (len < bufsize)//Get one after another
            {
                data = (byte)serialPort1.ReadByte();//Get the value of serial port
                len++;
                string str = Convert.ToString(data, 16).ToUpper();//After obtaining, we will output it in TextBox
                if (str.Length == 1)//If the value we get is a bit, we fill in 0 before it
                {
                    textBox1.AppendText(" 0" + str);
                }
                else
                {
                    textBox1.AppendText(" " + str);//The two values are separated by a space in front
                }
            }
            textBox1.AppendText(System.Environment.NewLine);//Line feed
            serialPort1.DiscardInBuffer();//Clear previous cache

        }
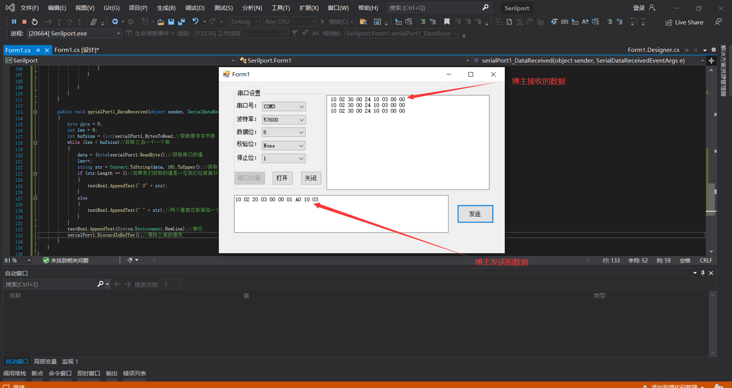
3. Show me the sending and receiving of SerialPort. The blogger happens to have a single chip microcomputer here to show you. If you are interested in this, you can also use the virtual serial port to simulate and play.
Note: the blogger reported a thread error C# exception when running: thrown: «invalid inter thread operation: access to the control» textBox1 «from a thread that is not creating it.» (System.InvalidOperationException), you need to add the code System.Windows.Forms.Control.CheckForIllegalCrossThreadCalls = false in Form1; It is forbidden to catch calls to the wrong thread.
Summary:
The blogger just briefly introduced the sending and receiving of C# SerialPort serial port control and demonstrated it. Students interested in this aspect can learn it. The blogger is only a beginner because he is working on a project recently. Few students learn C# and I hope you don’t like it. It’s not easy to create, praise, pay attention and comment.

Introduction
Serial port data can be read in many ways and many devices communicate via the serial port. In my project I had the need to implement serial port communication
for a RFID reader. This is a sample example to read data from the serial port and display on the
Windows Forms TextBox control.
Using the code
To begin, let’s create a C# Windows Forms application in Visual Studio 2008 (hope it will work in VS 2005/2010 also, though not tested by myself).
Add a textbox, a button control and a SerialPort control on to the form.
Declare a string variable as private:
private string DispString;
In the form Load event , write the code as shown below:
private void Form1_Load(object sender, EventArgs e)
{


    serialPort1.PortName = "COM5";


    serialPort1.BaudRate = 9600;
    serialPort1.Parity = Parity.None;
    serialPort1.StopBits = StopBits.One;
    serialPort1.Handshake = Handshake.None;

    serialPort1.Open();
    serialPort1.ReadTimeout = 200;
    if (serialPort1.IsOpen)
    {
        DispString = "";
        txtCardKeyDeactivate.Text = "";
    }
    serialPort1.DataReceived += new SerialDataReceivedEventHandler(serialPort1_DataReceived);
}
Although the code is self explanatory, I will explain little.
When the application starts, the serial port is opened to read the received data,you need to set up an event.
serialPort1.DataReceived += new SerialDataReceivedEventHandler(serialPort1_DataReceived);
It is always better to set up the event before the serial port is opened.
Now lets declare an event handler to handle the event. The code to manipulate the read data can be specified here.
private void serialPort1_DataReceived(object sender, System.IO.Ports.SerialDataReceivedEventArgs e)
{
    if (textBox1.Text.Length >= 12)
    {
        serialPort1.Close();
    }
    else
    {
        DispString = serialPort1.ReadExisting();
        this.Invoke(new EventHandler(DisplayText));
    }
}
In my example the RFID tag had 12 letters value and only one card need to be read till a particular operation is completed.
So, I have set a condition to close the port if string variable has length of 12. Actually RFID readers can read more than 100 tags per minute.
Then you can store the values in some array and according to your need you can manipulate them. But if your tags have the same count like 878BGFFJJJHG, 78766HGGBVVV
and you have to make sure that each tag is read then you can specify some condition like the above code.
You can use threading also but if you don’t like to use threading then you can use a condition.
DispString = serialPort1.ReadExisting();
I insist that you should use condition as the above code for a tag [78766HGGBVVV] may return values of one letter at a time and it will be very fast.
So to make sure that a tag has been read completely find the length and use the condition to do some operation or read another tag.
Now, you can’t assign the value read directly to a textbox in the same event handler as it will throw some exception. You have to use the Invoke method
to call your method, which can do the appending work in case of my program or
manipulation work in your problem etc.
this.Invoke(new EventHandler(DisplayText));
The below DisplayText method is called by the invoke method.
private void DisplayText(object sender, EventArgs e)
{
    textBox1.AppendText(DispString);
}
After the read operation is completed make sure you close the serial port.
if (serialPort1.IsOpen)
serialPort1.Close();
Points of Interest
There are many ways to read data from serial port.
This member has not yet provided a Biography. Assume it’s interesting and varied, and probably something to do with programming.