Работа с формами
Основы форм
Последнее обновление: 31.10.2015
Внешний вид приложения является нам преимущественно через формы. Формы являются основными строительными блоками. Они предоставляют
контейнер для различных элементов управления. А механизм событий позволяет элементам формы отзываться на ввод пользователя, и, таким образом,
взаимодействовать с пользователем.
При открытии проекта в Visual Studio в графическом редакторе мы можем увидеть визуальную часть формы — ту часть, которую мы видим после запуска приложения и куда мы переносим
элементы с панели управления. Но на самом деле форма скрывает мощный функционал, состоящий из методов, свойств, событий и прочее. Рассмотрим
основные свойства форм.
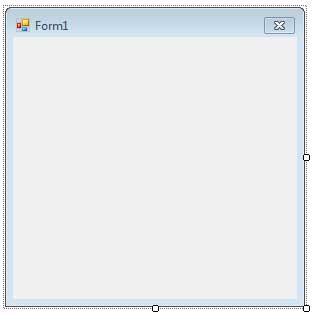
Если мы запустим приложение, то нам отобразится одна пустая форма. Однако даже такой простой проект с пустой формой имеет несколько компонентов:
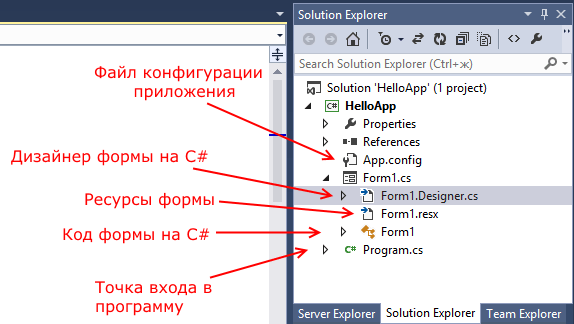
Несмотря на то, что мы видим только форму, но стартовой точкой входа в графическое приложение является класс Program, расположенный в
файле Program.cs:
using System;
using System.Collections.Generic;
using System.Linq;
using System.Threading.Tasks;
using System.Windows.Forms;

namespace HelloApp
{
    static class Program
    {
        [STAThread]
        static void Main()
        {
            Application.EnableVisualStyles();
            Application.SetCompatibleTextRenderingDefault(false);
            Application.Run(new Form1());
        }
    }
}
Сначала программой запускается данный класс, затем с помощью выражения Application.Run(new Form1()) он запускает форму
Form1. Если вдруг мы захотим изменить стартовую форму в приложении на какую-нибудь другую, то нам надо изменить в этом выражении Form1 на соответствующий
класс формы.
Сама форма сложна по содержанию. Она делится на ряд компонентов. Так, в структуре проекта есть файл Form1.Designer.cs, который выглядит
примерно так:
namespace HelloApp
{
    partial class Form1
    {
        /// <summary>
        /// Required designer variable.
        /// </summary>
        private System.ComponentModel.IContainer components = null;

        /// <summary>
        /// Clean up any resources being used.
        /// </summary>
        /// <param name="disposing">true if managed resources should be disposed; otherwise, false.</param>
        protected override void Dispose(bool disposing)
        {
            if (disposing && (components != null))
            {
                components.Dispose();
            }
            base.Dispose(disposing);
        }

        #region Windows Form Designer generated code

        /// <summary>
        /// Required method for Designer support - do not modify
        /// the contents of this method with the code editor.
        /// </summary>
        private void InitializeComponent()
        {
            this.SuspendLayout();
            //
            // Form1
            //
            this.AutoScaleDimensions = new System.Drawing.SizeF(6F, 13F);
            this.AutoScaleMode = System.Windows.Forms.AutoScaleMode.Font;
            this.ClientSize = new System.Drawing.Size(284, 261);
            this.Name = "Form1";
            this.Text = "Привет мир!";
            this.ResumeLayout(false);

        }

        #endregion

    }
}
Здесь объявляется частичный класс формы Form1, которая имеет два метода: Dispose(), который выполняет роль деструктора объекта, и
InitializeComponent(), который устанавливает начальные значения свойств формы.
При добавлении элементов управления, например, кнопок, их описание также добавляется в этот файл.
Но на практике мы редко будем сталкиваться с этим классом, так как они выполняет в основном дизайнерские функции — установка свойств объектов, установка переменных.
Еще один файл — Form1.resx — хранит ресурсы формы. Как правило, ресурсы используются для создания однообразных форм сразу для
нескольких языковых культур.
И более важный файл — Form1.cs, который в структуре проекта называется просто Form1, содержит код или программную логику формы:
using System;
using System.Collections.Generic;
using System.ComponentModel;
using System.Data;
using System.Drawing;
using System.Linq;
using System.Text;
using System.Threading.Tasks;
using System.Windows.Forms;

namespace HelloApp
{
    public partial class Form1 : Form
    {
        public Form1()
        {
            InitializeComponent();
        }
    }
}
По умолчанию здесь есть только конструктор формы, в котором просто вызывается метод InitializeComponent(), объявленный в файле дизайнера
Form1.Designer.cs. Именно с этим файлом мы и будем больше работать.
So far we have seen how to work with C# to create console based applications. But in a real-life scenario team normally use Visual Studio and C# to create either Windows Forms or Web-based applications.
A windows form application is an application, which is designed to run on a computer. It will not run on web browser because then it becomes a web application.
This Tutorial will focus on how we can create Windows-based applications. We will also learn some basics on how to work with the various elements of C# Windows application.
Windows Forms Basics
A Windows forms application is one that runs on the desktop computer. A Windows forms application will normally have a collection of controls such as labels, textboxes, list boxes, etc.
Below is an example of a simple Windows form application C#. It shows a simple Login screen, which is accessible by the user. The user will enter the required credentials and then will click the Login button to proceed.

So an example of the controls available in the above application
- This is a collection of label controls which are normally used to describe adjacent controls. So in our case, we have 2 textboxes, and the labels are used to tell the user that one textbox is for entering the user name and the other for the password.
- The 2 textboxes are used to hold the username and password which will be entered by the user.
- Finally, we have the button control. The button control will normally have some code attached to perform a certain set of actions. So for example in the above case, we could have the button perform an action of validating the user name and password which is entered by the user.
C# Hello World
Now let’s look at an example of how we can implement a simple ‘hello world’ application in Visual Studio. For this, we would need to implement the below-mentioned steps
Step 1) The first step involves the creation of a new project in Visual Studio. After launching Visual Studio, you need to choose the menu option New->Project.

Step 2) The next step is to choose the project type as a Windows Forms application. Here we also need to mention the name and location of our project.

- In the project dialog box, we can see various options for creating different types of projects in Visual Studio. Click the Windows option on the left-hand side.
- When we click the Windows options in the previous step, we will be able to see an option for Windows Forms Application. Click this option.
- We will give a name for the application. In our case, it is DemoApplication. We will also provide a location to store our application.
- Finally, we click the ‘OK’ button to let Visual Studio create our project.
If the above steps are followed, you will get the below output in Visual Studio.
Output:-

You will see a Form Designer displayed in Visual Studio. It’s in this Form Designer that you will start building your Windows Forms application.

In the Solution Explorer, you will also be able to see the DemoApplication Solution. This solution will contain the below 2 project files
- A Form application called Forms1.cs. This file will contain all of the code for the Windows Form application.
- The Main program called Program.cs is default code file which is created when a new application is created in Visual Studio. This code will contain the startup code for the application as a whole.
On the left-hand side of Visual Studio, you will also see a ToolBox. The toolbox contains all the controls which can be added to a Windows Forms. Controls like a text box or a label are just some of the controls which can be added to a Windows Forms.
Below is a screenshot of how the Toolbox looks like.

Step 3) In this step, we will now add a label to the Form which will display “Hello World.” From the toolbox, you will need to choose the Label control and simply drag it onto the Form.

Once you drag the label to the form, you can see the label embedded on the form as shown below.

Step 4) The next step is to go to the properties of the control and Change the text to ‘Hello World’.
To go to the properties of a control, you need to right-click the control and choose the Properties menu option

- The properties panel also shows up in Visual Studio. So for the label control, in the properties control, go to the Text section and enter “Hello World”.
- Each Control has a set of properties which describe the control.

If you follow all of the above steps and run your program in Visual Studio, you will get the following output
Output:-

In the output, you can see that the Windows Form is displayed. You can also see ‘Hello World’ is displayed on the form.
Adding Controls to a form
We had already seen how to add a control to a form when we added the label control in the earlier section to display “Hello World.”
Let’s look at the other controls available for Windows forms and see some of their common properties.
In our Windows form application in C# examples, we will create one form which will have the following functionality.
- The ability for the user to enter name and address.
- An option to choose the city in which the user resides in
- The ability for the user to enter an option for the gender.
- An option to choose a course which the user wants to learn. There will make choices for both C# and ASP.Net
So let’s look at each control in detail and add them to build the form with the above-mentioned functionality.
Group Box
A group box is used for logical grouping controls into a section. Let’s take an example if you had a collection of controls for entering details such as name and address of a person. Ideally, these are details of a person, so you would want to have these details in a separate section on the Form. For this purpose, you can have a group box. Let’s see how we can implement this with an example shown below
Step 1) The first step is to drag the Groupbox control onto the Windows Form from the toolbox as shown below

Step 2) Once the groupbox has been added, go to the properties window by clicking on the groupbox control. In the properties window, go to the Text property and change it to “User Details”.

Once you make the above changes, you will see the following output
Output:-

In the output, you can clearly see that the Groupbox was added to the form. You can also see that the text of the groupbox was changed to “User Details.”
Label Control
Next comes the Label Control. The label control is used to display a text or a message to the user on the form. The label control is normally used along with other controls. Common examples are wherein a label is added along with the textbox control.
The label indicates to the user on what is expected to fill up in the textbox. Let’s see how we can implement this with an example shown below. We will add 2 labels, one which will be called ‘name’ and the other called ‘address.’ They will be used in conjunction with the textbox controls which will be added in the later section.
Step 1) The first step is to drag the label control on to the Windows Form from the toolbox as shown below. Make sure you drag the label control 2 times so that you can have one for the ‘name’ and the other for the ‘address’.

Step 2) Once the label has been added, go to the properties window by clicking on the label control. In the properties window, go to the Text property of each label control.

Once you make the above changes, you will see the following output
Output:-

You can see the label controls added to the form.
Textbox
A textbox is used for allowing a user to enter some text on the Windows application in C#. Let’s see how we can implement this with an example shown below. We will add 2 textboxes to the form, one for the Name and the other for the address to be entered for the user
Step 1) The first step is to drag the textbox control onto the Windows Form from the toolbox as shown below

Step 2) Once the text boxes have been added, go to the properties window by clicking on the textbox control. In the properties window, go to the Name property and add a meaningful name to each textbox. For example, name the textbox for the user as txtName and that for the address as txtAddress. A naming convention and standard should be made for controls because it becomes easier to add extra functionality to these controls, which we will see later on.

Once you make the above changes, you will see the following output
Output:-

In the output, you can clearly see that the Textboxes was added to the form.
List box
A Listbox is used to showcase a list of items on the Windows form. Let’s see how we can implement this with an example shown below. We will add a list box to the form to store some city locations.
Step 1) The first step is to drag the list box control onto the Windows Form from the toolbox as shown below

Step 2) Once the list box has been added, go to the properties window by clicking on the list box control.

- First, change the property of the Listbox box control, in our case, we have changed this to lstCity
- Click on the Items property. This will allow you to add different items which can show up in the list box. In our case, we have selected items “collection”.
- In the String Collection Editor, which pops up, enter the city names. In our case, we have entered “Mumbai”, “Bangalore” and “Hyderabad”.
- Finally, click on the ‘OK’ button.
Once you make the above changes, you will see the following output
Output:-

In the output, you can see that the Listbox was added to the form. You can also see that the list box has been populated with the city values.
RadioButton
A Radiobutton is used to showcase a list of items out of which the user can choose one. Let’s see how we can implement this with an example shown below. We will add a radio button for a male/female option.
Step 1) The first step is to drag the ‘radiobutton’ control onto the Windows Form from the toolbox as shown below.

Step 2) Once the Radiobutton has been added, go to the properties window by clicking on the Radiobutton control.

- First, you need to change the text property of both Radio controls. Go the properties windows and change the text to a male of one radiobutton and the text of the other to female.
- Similarly, change the name property of both Radio controls. Go the properties windows and change the name to ‘rdMale’ of one radiobutton and to ‘rdfemale’ for the other one.
One you make the above changes, you will see the following output
Output:-

You will see the Radio buttons added to the Windows form.
Checkbox
A checkbox is used to provide a list of options in which the user can choose multiple choices. Let’s see how we can implement this with an example shown below. We will add 2 checkboxes to our Windows forms. These checkboxes will provide an option to the user on whether they want to learn C# or ASP.Net.
Step 1) The first step is to drag the checkbox control onto the Windows Form from the toolbox as shown below

Step 2) Once the checkbox has been added, go to the properties window by clicking on the Checkbox control.

In the properties window,
- First, you need to change the text property of both checkbox controls. Go the properties windows and change the text to C# and ASP.Net.
- Similarly, change the name property of both Radio controls. Go the properties windows and change the name to chkC of one checkbox and to chkASP for the other one.
Once you make the above changes, you will see the following output
Output:-

Button
A button is used to allow the user to click on a button which would then start the processing of the form. Let’s see how we can implement this with an example shown below. We will add a simple button called ‘Submit’ which will be used to submit all the information on the form.
Step 1) The first step is to drag the button control onto the Windows Form from the toolbox as shown below

Step 2) Once the Button has been added, go to the properties window by clicking on the Button control.

- First, you need to change the text property of the button control. Go the properties windows and change the text to ‘submit’.
- Similarly, change the name property of the control. Go the properties windows and change the name to ‘btnSubmit’.
Once you make the above changes, you will see the following output
Output:-

Congrats, you now have your first basic Windows Form in place. Let’s now go to the next topic to see how we can do Event handling for Controls.
C# Event Handling for Controls
When working with windows form, you can add events to controls. An event is something that happens when an action is performed. Probably the most common action is the clicking of a button on a form. In C# Windows Forms, you can add code which can be used to perform certain actions when a button is pressed on the form.
Normally when a button is pressed on a form, it means that some processing should take place.
Let’s take a look at one of the event and how it can be handled before we go to the button event scenario.
The below example will showcase an event for the Listbox control. So whenever an item is selected in the listbox control, a message box should pop up which shows the item selected. Let’s perform the following steps to achieve this.
Step 1) Double click on the Listbox in the form designer. By doing this, Visual Studio will automatically open up the code file for the form. And it will automatically add an event method to the code. This event method will be triggered, whenever any item in the listbox is selected.

Above is the snippet of code which is automatically added by Visual Studio, when you double-click the List box control on the form. Now let’s add the below section of code to this snippet of code, to add the required functionality to the listbox event.

- This is the event handler method which is automatically created by Visual Studio when you double-click the List box control. You don’t need to worry about the complexity of the method name or the parameters passed to the method.
- Here we are getting the SelectedItem through the lstCity.SelectedItem property. Remember that lstCity is the name of our Listbox control. We then use the GetItemText method to get the actual value of the selected item. We then assign this value to the text variable.
- Finally, we use the MessageBox method to display the text variable value to the user.
One you make the above changes, and run the program in Visual Studio you will see the following output
Output:-

From the output, you can see that when any item from the list box is selected, a message box will pops up. This will show the selected item from the listbox.
Now let’s look at the final control which is the button click Method. Again this follows the same philosophy. Just double click the button in the Forms Designer and it will automatically add the method for the button event handler. Then you just need to add the below code.

- This is the event handler method which is automatically created by Visual Studio when you double click the button control. You don’t need to worry on the complexity of the method name or the parameters passed to the method.
- Here we are getting values entered in the name and address textbox. The values can be taken from the text property of the textbox. We then assign the values to 2 variables, name, and address accordingly.
- Finally, we use the MessageBox method to display the name and address values to the user.
One you make the above changes, and run the program in Visual Studio you will see the following output
Output:-

- First, enter a value in the name and address field.
- Then click on the Submit button
Once you click the Submit button, a message box will pop, and it will correctly show you what you entered in the user details section.
Tree and PictureBox Control
There are 2 further controls we can look at, one is the ‘Tree Control’ and the other is the ‘Image control’. Let’s look at examples of how we can implement these controls
Tree Control
– The tree control is used to list down items in a tree like fashion. Probably the best example is when we see the Windows Explorer itself. The folder structure in Windows Explorer is like a tree-like structure.
Let’s see how we can implement this with an example shown below.
Step 1) The first step is to drag the Tree control onto the Windows Form from the toolbox as shown below

Step 2) The next step is to start adding nodes to the tree collection so that it can come up in the tree accordingly. First, let’s follow the below sub-steps to add a root node to the tree collection.

- Go to the properties toolbox for the tree view control. Click on the Node’s property. This will bring up the TreeNode Editor
- In the TreeNode Editor click on the Add Root button to add a root node to the tree collection.
- Next, change the text of the Root node and provide the text as Root and click ‘OK’ button. This will add Root node.
Step 3) The next step is to start adding the child nodes to the tree collection. Let’s follow the below sub-steps to add child root node to the tree collection.

- First, click on the Add child button. This will allow you to add child nodes to the Tree collection.
- For each child node, change the text property. Keep on repeating the previous step and this step and add 2 additional nodes. In the end, you will have 3 nodes as shown above, with the text as Label, Button, and Checkbox respectively.
- Click on the OK button
Once you have made the above changes, you will see the following output.
Output:-
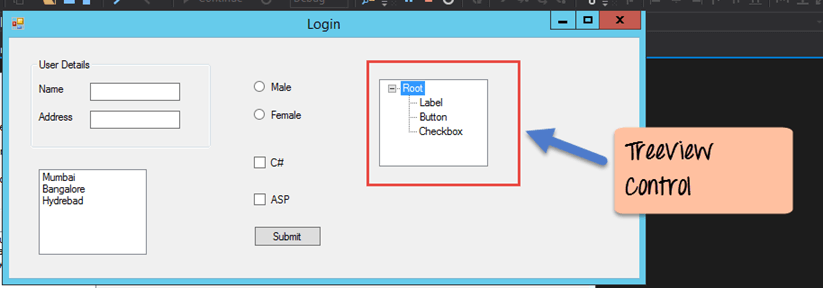
You will be able to see the Tree view added to the form. When you run the Windows form application, you can expand the root node and see the child nodes in the list.
PictureBox Control
This control is used to add images to the Winforms C#. Let’s see how we can implement this with an example shown below.
Step 1) The first step is to drag the PictureBox control onto the C# Windows Form from the toolbox as shown below

Step 2) The next step is to actually attach an image to the picture box control. This can be done by following the below steps.

- First, click on the Image property for the PictureBox control. A new window will pops out.
- In this window, click on the Import button. This will be used to attach an image to the picturebox control.
- A dialog box will pop up in which you will be able to choose the image to attach the picturebox
- Click on the OK button
One you make the above changes, you will see the following output
Output:-

From the output, you can see that an image is displayed on the form.
Summary
- A Windows form in C# application is one that runs on the desktop of a computer. Visual Studio Form along with C# can be used to create a Windows Forms application.
- Controls can be added to the Windows forms C# via the Toolbox in Visual Studio. Controls such as labels, checkboxes, radio buttons, etc. can be added to the form via the toolbox.
- One can also use advanced controls like the tree view control and the PictureBox control.
- Event handlers are used to respond to events generated from controls. The most common one is the one added for the button clicked event.
Windows Forms (or simply forms) are the windows you see in a Windows Application. You can create multiple forms in a single application. Each form inherits the properties and methods of the System.Windows.Forms.Form class. The namespace System.Windows.Forms contains components you will need for creating forms and controls.
The following are the parts of a typical windows form.
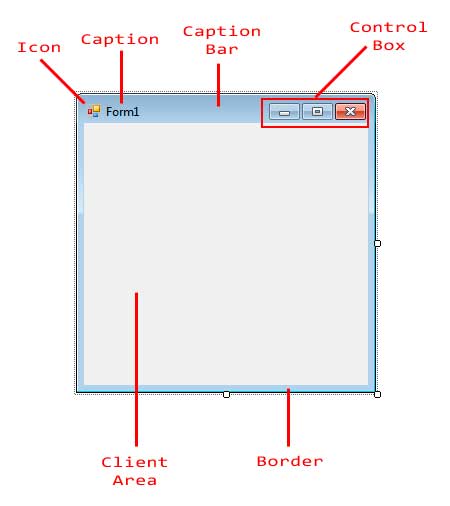
At the top, you will find the Caption Bar. The Caption Bar is composed of the icon, the caption, and the control box. The control box contains buttons such as minimizing, maximizing, closing, or a help button. The Client Area is where we add the controls. The border or frame, which includes the caption bar,encloses the client area and allows you to resize the form.
The following are some of the useful properties of the Form base class.
| Property | Description |
|---|---|
| AcceptButton | The button on the form that is pressed when you hit the Enter key. |
| CancelButton | The button on the form that is pressed when you hit the Esc key. |
| ClientSize | Gets or sets the client area of the form. The client area is the portion of the form inside the frame borders. |
| ControlBox | Specifies whether to show the control box at the top right portion of the form. The control box contains the buttons minimize, maximize, and close. |
| Controls | A collection of Control objects contained inside the form. |
| DesktopBounds | The size and location of the form in the Window’s desktop. |
| Font | The font that the form will use. Controls inside the form will inherit this property. |
| FormBorderStyle | The border style of the form. |
| HelpButton | Shows a help button right before the close button of the form. (minimize and maximize buttons should be disabled) |
| Icon | The icon that will be used by the form. |
| Location | The coordinates of the form in the screen. |
| MainMenuStrip | Indicates the fundamental menu to be utilized by the shape. |
| MaximizeBox | Tells whether the maximize box situated at the upper right is shown. |
| MinimizeBox | Tells whether the minimize box located at the top right is displayed. |
| Modal | Tells whether the form is modal. |
| Name | The name of the form that is used to reference it in the code. |
| OwnedForms | A collection of forms that this form owns. |
| Owner | The form that owns this form. |
| ShowIcon | Tells whether the icon is displayed at the left side of the caption bar. |
| Size | The size of the form. |
| StartPosition | The starting position of the form when it is initially shown. |
| Text | The text that is shown in the caption bar of the form. |
Figure 1
Figure 2 shows some useful methods of the Form class.
| Method | Description |
|---|---|
| Activate | Gives the focus to this form and activates it. |
| AddOwnedForm | Adds a new form that this form owns. |
| CenterToScreen | Centers the position of the form in the screen. |
| Close | Closes the form. |
| Hide | Hides this form. |
| OnLoad | Raises the Load event. |
| Show | Shows the form. |
Figure 2
Figure 3 shows the available events for the form.
| Event | Description |
|---|---|
| Activated | Occurs when the form is activated. |
| Click | Occurs when the form is clicked. |
| Deactivated | Occurs when the form is no longer in focus. |
| FormClosed | Occurs after the form is closed. |
| FormClosing | Occurs when the form is closing. Allows you to halt the closing of the form. |
| HelpButtonClicked | Occurs when the help button is clicked. |
| KeyPress | Occurs when a key on the keyboard is pressed. |
| Load | Occurs when the form is finished loading just before it is displayed. |
| MenuComplete | Happens when the menu of the shape loses center. |
| MenuStart | Happens when the menu of the frame gets center. |
| ResizeBegin | Occurs when the form enters resizing mode. |
| ResizeEnd | Occurs when the form exits resizing mode. |
| Shown | Occurs after the form is shown for the first time. |
Figure 3
The Form class is a child of the System.Windows.Forms.Control base class so the methods and properties from the Control class are also available in the Form class.
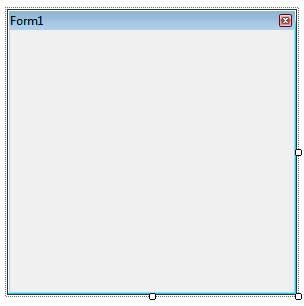
Modifying the Control Box
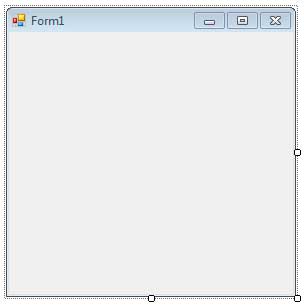
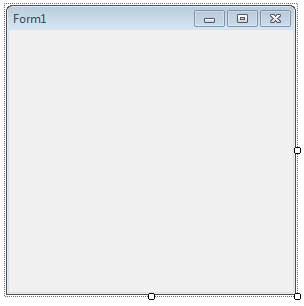
We use the ControlBox property to hide or show the Control Box. This is useful when you are planning to disable minimizing or maximizing of control or you want to only close the form through the code. The image below shows you how the form will look when you set ControlBox property to false.
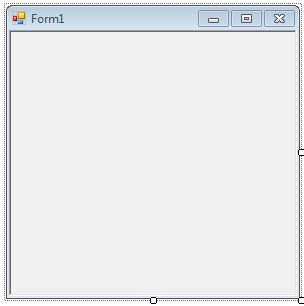
If you want to disable only the minimize or the maximize button, then you can use the MinimizeBox and MaximizeBox and set them to false.
The form above has its minimize and maximize box hidden. Unfortunately, you cannot hide only the close button.
Changing Form’s Border Style
We can change the border style of the form. For example, let’s say you don’t want the user to be able to resize the form The default border of the form allow a user to do that. We can set the FormBorderStyle property to different values of the System.Windows.Forms.FormBorderStyle Enumeration.
| Value | Description |
|---|---|
| None | The form has no border. |
| FixedSingle | The form has a non-resizable single line border. |
| Fixed3D | The shape has a non-resizable 3d fringe. |
| FixedDialog | The frame has a thick, non-resizable, dialog style fringe that has no limit or maximize boxes. |
| Sizable | The default. The form has a resizable border. |
| FixedToolWindow | The form encompasses a non-resizable border that has solely an in depth button. This vogue is used for tool windows. |
| SizableToolWindow | Same as FixedToolWindow but resizable. |
The following are screenshots of forms using different FormBorderStyle.
None
FixedSingle
Fixed3D
FixedDialog
Sizable
FixedToolWindow

SizableToolWindow
Form Icons
We use the Icon property to change the icon displayed at the upper left side of the form. Click the browse button next the Icon property in the Properties Window and find the .ico file which is the file extension for an icon image. The ShowIcon property allows you to hide or show the icon in the caption bar.
Accept and Cancel Buttons
You can add a button control to the form and set them as either an Accept or a Cancel button. You do that using the AcceptButton and CancelButton properties. If a button is an accept button, whenever the user hits Enter while the form is active, that button’s Clickevent will be executed. The Cancel button is activated whenever the Escape key is pressed. Just go to the Properties Window, find the desired property and click the drop down button. You will be presented with the names of all the button control in the form. Choose the desired button. For example, suppose you are creating a login form. You can set the button used for logging in as the Accept button. This way, the user can simply press Enter when he is finished typing the password.
There are many more to discover on windows forms and they will be discussed in later lessons.
-
Работа с формами
-
Создание формы Windows Forms
-
Для
приложения Windows могут понадобиться
несколько форм, помимо основной. В .NET
Framework можно легко добавлять диалоговые
окна, экраны запуска и другие формы
поддержки.
Чтобы
добавить форму Windows Forms, которая наследуется
из класса Form, выполните следующие
действия.
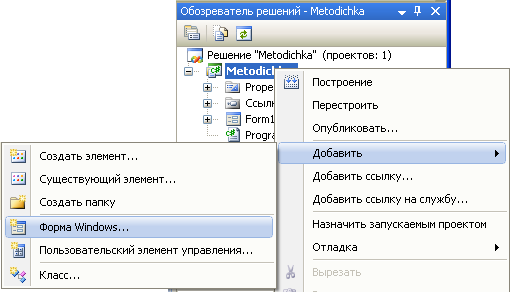
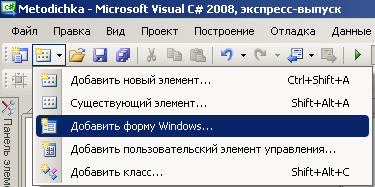
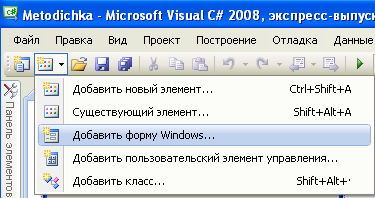
-
Выберите
команду Форма
Windows
одним из следующих способов:
-
в
окне
Обозреватель решений
в контекстном меню к имени проекта
выберите Добавить
и затем команду Форма
Windows;
-
в
программном меню Файл команду Добавить
форму Windows;
Добавить
форму Windows
-
на
панели инструментов нажмите кнопку
Добавить новый элемент:
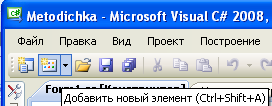
и
далее выберите команду Добавить
форму Windows:
-
c
помощью комбинации клавиш Ctrl+Shift+A.
В
результате откроется окно Добавление
нового элемента.
-
В
области Шаблоны
выберите Форма Windows. -
В
поле Имя введите имя новой формы. -
Нажмите
кнопку Добавить.
-
Исключение
формы из проекта
Чтобы
исключить форму из проекта
в
окне Обозреватель решения в контекстном
меню к файлу имя_формы.cs выберите команду
Исключить из проекта.
Примечание.
После
выполнения команды форма будет исключена
из проекта, но все файлы для этой формы
сохранятся в папке проекта и поэтому
форма может быть успешно восстановлена
в будущем в данном проекте или добавлена
в другой проект.
-
Удаление формы
из проекта
Чтобы
удалить форму из проекта
в
окне Обозреватель решения в контекстном
меню к файлу имя_формы.cs выберите команду
Удалить.
Внимание.
Не игнорируйте
сообщение об удалении.После нажатия
кнопки Ок в выданном сообщении файлы
формы будут не только исключены из
проекта, они будут физически удалены
без возможности восстановления.
-
Добавление
формы в проект
Чтобы
добавить форму в проект выполните
следующие действия.
-
Выберите
в меню Проект команду Существующий
элемент -
В
открывшемся окне Добавление существующего
элемента выберите файл формы имя_формы.cs. -
Нажмите
кнопку Добавить.
Примечание.
Файл будет добавлен вместе со
вспомогательными файлами настройки и
другими метаданными.
-
Создание
дочерней формы
Дочерняя
форма (MDI-форма) – это форма, которая
существует в пределах другой формы
(родительской) и до тех пор, пока не будет
закрыта или сама дочерняя форма или
родительская. Открыть дочернюю форму
без родительской формы невозможно.
Переместить дочернюю форму за пределы
родительской формы невозможно.
Чтобы
создать дочернюю форму
выполните следующие действия:
-
Выберите
форму, которая должна стать родительской. -
В
окне Свойства этой формы присвойте
свойству IsMdiContainer
значение true. -
Создайте
новую форму. -
Вставьте
в обработчик события открытия новой
формы код:
private void
button1_Click(object sender, EventArgs e)
{
//Создание
переменной формы
Form3
frm_child
= new
Form3();
//Присваивание
форме в качестве родителя текущую форму
frm_child.MdiParent
= this;
//Открытие
формы
frm_child.Show();
}
Примечание.
Чтобы предотвратить повторное создание
дочерней формы при уже открытой, выше
прописанный код следует изменить:
-
Создайте
глобальную переменную дочерней формы
(см. п.3.2.6.3) -
Вставьте
в обработчик события открытия новой
формы код:
private
void
button1_Click(object
sender,
EventArgs
e)
{
if
(glob.frm_child
== null)
{
glob.frm_child
= new Form3();
glob.frm_child.MdiParent
= this;
glob.frm_child.Show();
}
}
-
Создать
обработчик события закрытия дочерней
формы
FormClosed:
private
void Form3_FormClosed(object sender, FormClosedEventArgs e)
{
glob.frm_child
= null;
}
В
этой функции глобальной переменной
дочерней формы присваивается значение
null, фактически освобождая память.
Соседние файлы в предмете [НЕСОРТИРОВАННОЕ]
- #
- #
- #
- #
- #
- #
- #
- #
- #
- #
- #
Windows Forms is a Graphical User Interface(GUI) class library which is bundled in .Net Framework. Its main purpose is to provide an easier interface to develop the applications for desktop, tablet, PCs. It is also termed as the WinForms. The applications which are developed by using Windows Forms or WinForms are known as the Windows Forms Applications that runs on the desktop computer. WinForms can be used only to develop the Windows Forms Applications not web applications. WinForms applications can contain the different type of controls like labels, list boxes, tooltip etc.
Creating a Windows Forms Application Using Visual Studio 2017
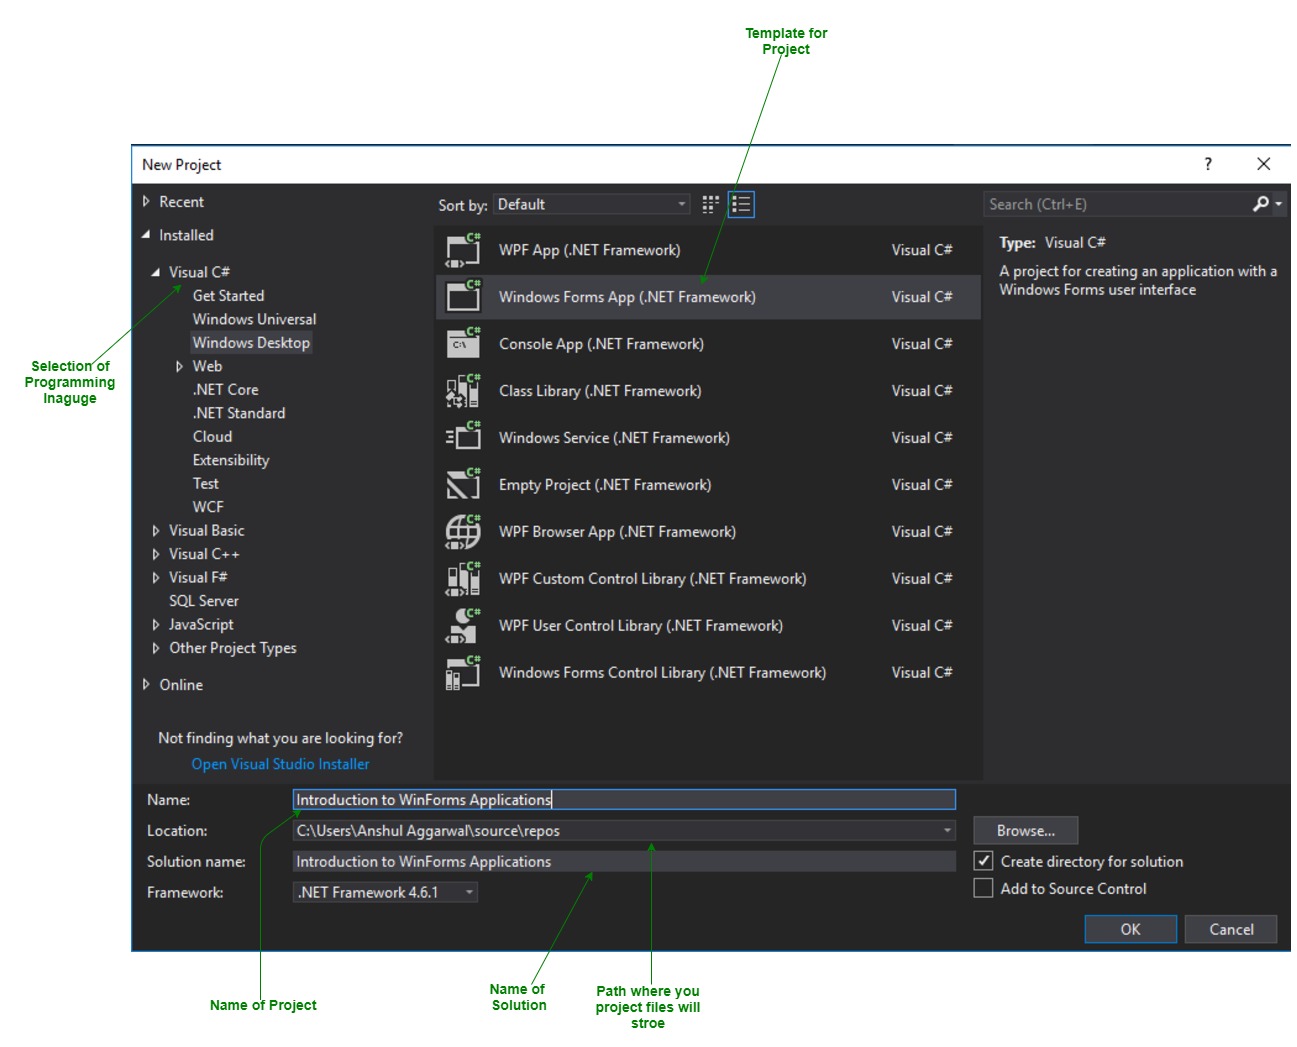
- First, open the Visual Studio then Go to File -> New -> Project to create a new project and then select the language as Visual C# from the left menu. Click on Windows Forms App(.NET Framework) in the middle of current window. After that give the project name and Click OK.
 Here the solution is like a container which contains the projects and files that may be required by the program.
 - After that following window will display which will be divided into three parts as follows:
- Editor Window or Main Window: Here, you will work with forms and code editing. You can notice the layout of form which is now blank. You will double click the form then it will open the code for that.
- Solution Explorer Window: It is used to navigate between all items in solution. For example, if you will select a file form this window then particular information will be display in the property window.
- Properties Window: This window is used to change the different properties of the selected item in the Solution Explorer. Also, you can change the properties of components or controls that you will add to the forms.
- Now to add the controls to your WinForms application go to Toolbox tab present in the extreme left side of Visual Studio. Here, you can see a list of controls. To access the most commonly used controls go to Common Controls present in Toolbox tab.
- Now drag and drop the controls that you needed on created Form. For example, if you can add TextBox, ListBox, Button etc. as shown below. By clicking on the particular dropped control you can see and change its properties present in the right most corner of Visual Studio. In the above image, you can see the TextBox is selected and its properties like TextAlign, MaxLength etc. are opened in right most corner. You can change its properties’ values as per the application need. The code of controls will be automatically added in the background. You can check the Form1.Designer.cs file present in the Solution Explorer Window.
- To run the program you can use an F5 key or Play button present in the toolbar of Visual Studio. To stop the program you can use pause button present in the ToolBar. You can also run the program by going to Debug->Start Debugging menu in the menubar.
 Here the solution is like a container which contains the projects and files that may be required by the program.
 In the above image, you can see the TextBox is selected and its properties like TextAlign, MaxLength etc. are opened in right most corner. You can change its properties’ values as per the application need. The code of controls will be automatically added in the background. You can check the Form1.Designer.cs file present in the Solution Explorer Window.
C# Windows Forms is a graphical user interface (GUI) framework that enables developers to create desktop applications for the Windows operating system. Windows Forms applications are created using the C# programming language and the .NET framework. They are built by dragging and dropping controls such as buttons, text boxes, labels, and other user interface elements onto a form.
- The Windows Forms framework provides a rich set of controls that developers can use to build applications with. These controls are designed to provide a consistent and familiar user interface for Windows users. Developers can customize the appearance and behavior of these controls by setting various properties and handling events.
- To create a Windows Forms application in C#, you can use Microsoft Visual Studio, which is an integrated development environment (IDE) that provides a visual designer to create and layout the user interface elements. The visual designer is a drag-and-drop interface for building your UI, and you can easily configure each control’s properties through a user-friendly interface.
- In addition to the visual designer, Visual Studio also provides a code editor that enables developers to write the C# code for the application’s logic. Developers can handle events and perform tasks such as data validation, data manipulation, and business logic implementation.
- Windows Forms applications are versatile and can be used to create various types of applications such as data entry, management, and reporting applications, as well as games and multimedia applications.
Overall, Windows Forms applications provide an easy-to-use and familiar graphical user interface for Windows users, making it an ideal choice for building desktop applications that require a high degree of interactivity and user engagement.
Last Updated :
04 May, 2023
Like Article
Save Article