Приложения Windows Forms
Если вы захотите писать программы, похожие на привычные приложения Windows, то наверняка воспользуетесь классами из пространства имен System.Windows.Forms. Они позволяют задействовать кнопки, списки, текстовые поля, меню, окна сообщений и множество других «элементов управления». Элементы управления — это то, что вы помещаете в форму. Они нужны для вывода информации, например, текстовой (элемент управления Label ) или графической (элемент управления PictureBox ), либо для выполнения определенных действий, например, выбора значения или перехода к другой форме после нажатия кнопки. Все элементы управления помещаются на форму.
Понятие «форма», принятое в программировании, родственно понятию «форма анкеты» или «форма документа» из обычной жизни. На форме можно в определенном порядке расположить различные элементы (текст, картинки, поля для заполнения и т. д.). Когда нам дают готовую форму документа и просят ее заполнить, мы обычно читаем содержащуюся в ней типовую информацию, а затем вписываем недостающие данные в определенные строки.

В программировании понятие формы во многом похоже: форма позволяет размещать текст, изображения, поля ввода, кнопки и т. п., добиваясь их точного расположения на экране. В консольном приложении на экран выводятся только строки текста.
Компания Майкрософт предоставила в составе библиотеки классов .NET Framework огромное количество «элементов управления», которые можно помещать на формы. Освоив этот инструмент, вы сможете быстро создавать эффектные приложения.
Некоторые полезные классы из пространства имен System.Windows.Forms
Вот некоторые элементы управления, которые можно размещать на формах:
- Label (Надпись).
- Button (Кнопка).
- ListBox (Список).
- CheckBox (Флажок).
- RadioButton (Переключатель).
- MessageBox (Окно сообщений).
- Menu (Меню).
- TabControl (Управление вкладками).
- Toolbar (Панель инструментов).
- TreeView (Дерево).
- DataGrid (Сетка данных).
- PictureBox (Изображение).
- RichTextBox (Текстовое поле с поддержкой формата RTF).
Работа с примерами программ Windows Forms в Visual C# Express
Возможно, вы предпочтете не использовать уже заготовленные примеры проектов, а разрабатывать их «с нуля». В таком случае нужно учесть, что для каждого проекта C# Express сразу же создает два файла (с именами Form1.cs и Program.cs ) и наполняет их исходным кодом на языке C#, то есть вы изначально получаете простейшую, но полноценную программу. Предлагаемый нами способ работы с уже полученным проектом состоит в выполнении следующих действий:
- Удалите файл Form1.cs.
- Замените код в файле Program.cs на код примера, с которым вы работаете.
Оба этих действия не понадобятся, если вы открываете программы с помощью команды «Открыть проект» в меню «Файл» и находите нужный проект в той папке, куда его поместили после разархивации.
Пример программы 3.3
Рассмотрим пример простейшего приложения Windows Forms. Оно всего лишь создает новую форму и выводит определенный текст в заголовок окна формы.
using System.Windows.Forms;
  class SimpleWindowsForm : Form
  {
    // Метод-конструктор нашего класса
    public SimpleWindowsForm()
    {
      // Указываем заголовок окна
      this.Text = "Это простая форма с заголовком";
    }
    static void Main()
    {
      // Создаем новый экземпляр класса
      //и запускаем его на выполнение
      // В результате на экране дисплея откроется форма
      Application.Run(new SimpleWindowsForm());
    }
  }
Листинг
3.3.

Пример программы 3.4
Следующий пример тоже достаточно прост, но мы делаем шаг вперед — размещаем на форме кнопку.
using System.Windows.Forms;
  class SimpleWindowsFormWithButton : Form
  {
    Button button1;

    // Метод-конструктор нашего класса
    public SimpleWindowsFormWithButton()
    {
      // Указываем заголовок окна
      this.Text = "Форма с командной кнопкой";

      // Добавляем кнопку в коллекцию элементов управления формы
      // Хотя на кнопке написано: "Нажми меня!",
      // пока при нажатии ничего не происходит!
      button1 = new Button();
      button1.Text = "Нажми меня!";
      button1.Top = 100;
      button1.Left = 100;
      button1.Height = 50;
      button1.Width = 70;
      this.Controls.Add(button1);
    }

    static void Main()
    {
      // Создаем и запускаем форму
      Application.Run(new SimpleWindowsFormWithButton());
    }
  }
Листинг
3.4.

Пример программы 3.5
Кнопку на форму мы поместили, но при нажатии на нее ничего не происходит. Это скучно.
Нам нужно описать метод, который будет выполнять какое-либо действие при нажатии на кнопку. Пусть при этом текст в заголовке окна будет меняться. Поскольку такой метод отслеживает наступление некоторого события (в нашем случае – нажатие на кнопку) и затем каким-то образом обрабатывает его, он, напомним, называется «обработчик события». Кроме того, надо привязать обработчик события к соответствующему событию, то есть к нажатию на кнопку.
using System;
using System.Windows.Forms;
using System.Drawing;

class FormWithWorkingButton : Form
{
  Button mrButton;
  // Метод-конструктор нашего класса
  public FormWithWorkingButton()
  {
    // Указываем заголовок окна
    this.Text = "Форма с работающей кнопкой!";
    // Добавляем кнопку и привязываем ее к обработчику события
    mrButton = new Button();
    mrButton.Text = "Нажми меня";
    mrButton.Top = 100;
    mrButton.Left = 100;
    mrButton.Height = 50;
    mrButton.Width = 70;
    mrButton.Click += new System.EventHandler(mrButton_Click);
    this.Controls.Add(mrButton);
  }

  static void Main()
  {
    // Создаем и запускаем форму
    Application.Run(new FormWithWorkingButton());
  }

  // Обработчик события, срабатывающий при нажатии кнопки
  void mrButton_Click(object sender, EventArgs e)
  {
    // Изменяем текст
    mrButton.Text = "Кнопка была нажата!";
  }
}
Листинг
3.5.

Пример программы 3.6
Мы добились успеха: наша программа умеет выполнять основные действия. Теперь добавим на форму несколько новых элементов управления, аккуратно разместим их и немного поработаем с ними. Возьмем элементы управления 4-х типов: Button, ListBox, MessageBox и PictureBox.
Обратите внимание: кроме System.Windows.Forms в этом примере упоминается пространство имен System.Drawing. Дело в том, что мы используем элемент управления PictureBox, а для работы с изображениями требуются классы Drawing.
using System.Windows.Forms;
using System.Drawing;

class MyForm : Form
{
  // Объявим элемент ListBox как поле класса:
  // нам придется обращаться к нему из разных методов
  ListBox listBox1;

  // Метод-конструктор нашего класса
  public MyForm()
  {
    //Размеры формы
    this.Size = new Size(400, 400);
    // Создадим элемент PictureBox, поместим в него изображение,
    // добавим его на форму
    PictureBox pictureBox1 = new PictureBox();
    pictureBox1.SizeMode = PictureBoxSizeMode.StretchImage;
    Bitmap image1 = new Bitmap ("..//..//images//Zakat.jpg");
    pictureBox1.ClientSize = new Size(this.Width, 150);
    pictureBox1.Image = (Image)image1;
    this.Controls.Add(pictureBox1);
    // Создаем объект Button, определяем некоторые из его свойств
    Button button1 = new System.Windows.Forms.Button();
    button1.Location = new Point(150, 160);
    button1.Size = new Size(100, 30);
    button1.Text = "Нажми меня";
    button1.Click += new System.EventHandler(button1_Click);
    this.Controls.Add(button1);

    // Создаем ListBox, определяем свойства и добавляем на форму
    listBox1 = new System.Windows.Forms.ListBox();
    listBox1.Location = new System.Drawing.Point(20, 200);
    listBox1.Size = new Size(100, 100);
    listBox1.Items.Add("Лес");
    listBox1.Items.Add("Степь ");
    listBox1.Items.Add("Озеро");
    listBox1.Items.Add("Море");
    listBox1.Items.Add("Океан");
    listBox1.SelectedIndex = 2;
    this.Controls.Add(listBox1);
  }

  // Обработчик события, срабатывающий при нажатии кнопки
  void button1_Click(object sender, System.EventArgs e)
  {
    // Выводим сообщение с указанием выбранного в списке пункта
    MessageBox.Show(this, "Вы выбрали " + listBox1.SelectedItem,
    "Уведомление", MessageBoxButtons.OK);
  }

  static void Main()
  {
    // Создаем и запускаем форму
    Application.Run(new MyForm());
  }

  private void InitializeComponent()
  {
    this.SuspendLayout();
    //
    // MyForm
    //
    this.BackColor = System.Drawing.SystemColors.Control;
    this.ClientSize = new System.Drawing.Size(292, 273);
    this.Name = "MyForm";
    this.ResumeLayout(false);
  }
}
Листинг
3.6.

So far we have seen how to work with C# to create console based applications. But in a real-life scenario team normally use Visual Studio and C# to create either Windows Forms or Web-based applications.
A windows form application is an application, which is designed to run on a computer. It will not run on web browser because then it becomes a web application.
This Tutorial will focus on how we can create Windows-based applications. We will also learn some basics on how to work with the various elements of C# Windows application.
Windows Forms Basics
A Windows forms application is one that runs on the desktop computer. A Windows forms application will normally have a collection of controls such as labels, textboxes, list boxes, etc.
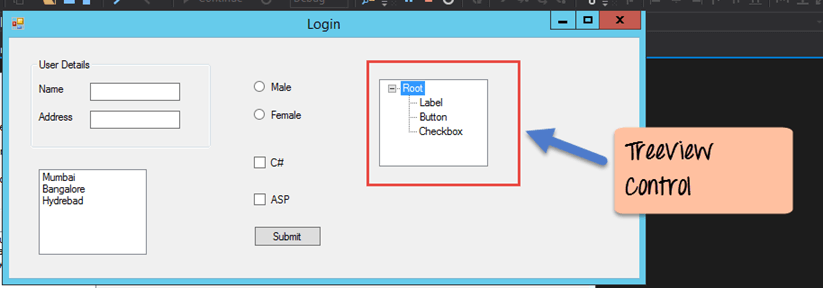
Below is an example of a simple Windows form application C#. It shows a simple Login screen, which is accessible by the user. The user will enter the required credentials and then will click the Login button to proceed.

So an example of the controls available in the above application
- This is a collection of label controls which are normally used to describe adjacent controls. So in our case, we have 2 textboxes, and the labels are used to tell the user that one textbox is for entering the user name and the other for the password.
- The 2 textboxes are used to hold the username and password which will be entered by the user.
- Finally, we have the button control. The button control will normally have some code attached to perform a certain set of actions. So for example in the above case, we could have the button perform an action of validating the user name and password which is entered by the user.
C# Hello World
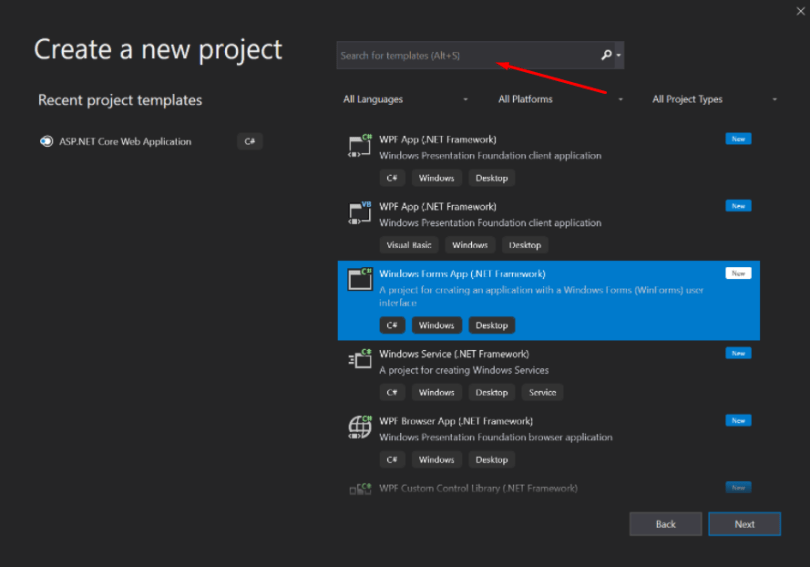
Now let’s look at an example of how we can implement a simple ‘hello world’ application in Visual Studio. For this, we would need to implement the below-mentioned steps
Step 1) The first step involves the creation of a new project in Visual Studio. After launching Visual Studio, you need to choose the menu option New->Project.

Step 2) The next step is to choose the project type as a Windows Forms application. Here we also need to mention the name and location of our project.

- In the project dialog box, we can see various options for creating different types of projects in Visual Studio. Click the Windows option on the left-hand side.
- When we click the Windows options in the previous step, we will be able to see an option for Windows Forms Application. Click this option.
- We will give a name for the application. In our case, it is DemoApplication. We will also provide a location to store our application.
- Finally, we click the ‘OK’ button to let Visual Studio create our project.
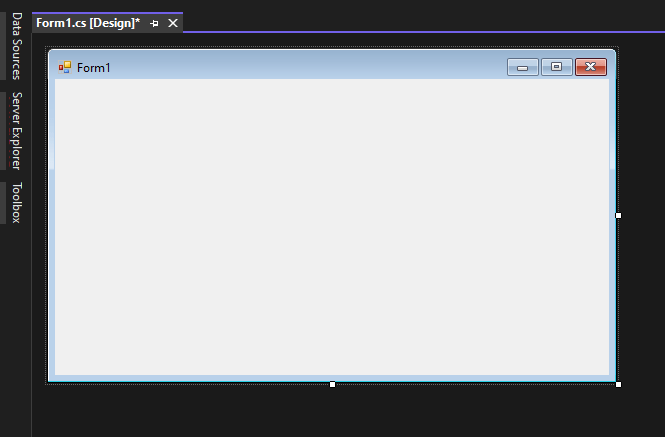
If the above steps are followed, you will get the below output in Visual Studio.
Output:-

You will see a Form Designer displayed in Visual Studio. It’s in this Form Designer that you will start building your Windows Forms application.

In the Solution Explorer, you will also be able to see the DemoApplication Solution. This solution will contain the below 2 project files
- A Form application called Forms1.cs. This file will contain all of the code for the Windows Form application.
- The Main program called Program.cs is default code file which is created when a new application is created in Visual Studio. This code will contain the startup code for the application as a whole.
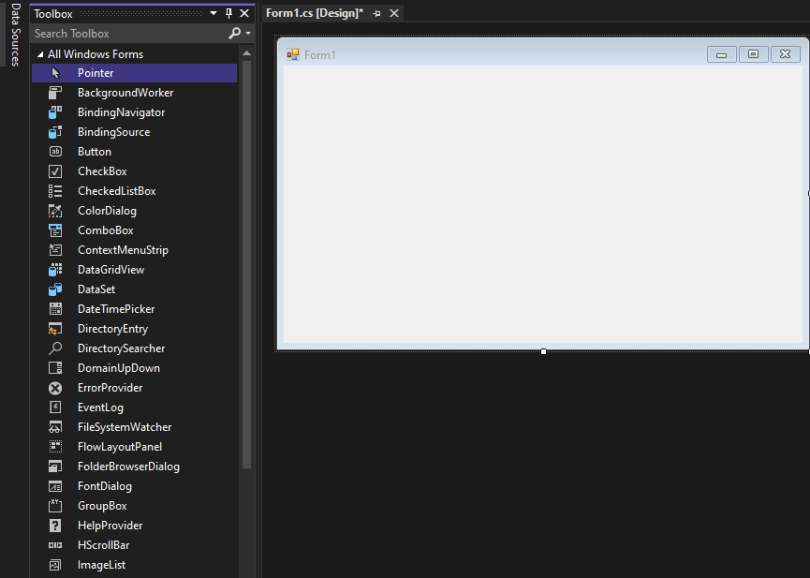
On the left-hand side of Visual Studio, you will also see a ToolBox. The toolbox contains all the controls which can be added to a Windows Forms. Controls like a text box or a label are just some of the controls which can be added to a Windows Forms.
Below is a screenshot of how the Toolbox looks like.

Step 3) In this step, we will now add a label to the Form which will display “Hello World.” From the toolbox, you will need to choose the Label control and simply drag it onto the Form.

Once you drag the label to the form, you can see the label embedded on the form as shown below.

Step 4) The next step is to go to the properties of the control and Change the text to ‘Hello World’.
To go to the properties of a control, you need to right-click the control and choose the Properties menu option

- The properties panel also shows up in Visual Studio. So for the label control, in the properties control, go to the Text section and enter “Hello World”.
- Each Control has a set of properties which describe the control.

If you follow all of the above steps and run your program in Visual Studio, you will get the following output
Output:-

In the output, you can see that the Windows Form is displayed. You can also see ‘Hello World’ is displayed on the form.
Adding Controls to a form
We had already seen how to add a control to a form when we added the label control in the earlier section to display “Hello World.”
Let’s look at the other controls available for Windows forms and see some of their common properties.
In our Windows form application in C# examples, we will create one form which will have the following functionality.
- The ability for the user to enter name and address.
- An option to choose the city in which the user resides in
- The ability for the user to enter an option for the gender.
- An option to choose a course which the user wants to learn. There will make choices for both C# and ASP.Net
So let’s look at each control in detail and add them to build the form with the above-mentioned functionality.
Group Box
A group box is used for logical grouping controls into a section. Let’s take an example if you had a collection of controls for entering details such as name and address of a person. Ideally, these are details of a person, so you would want to have these details in a separate section on the Form. For this purpose, you can have a group box. Let’s see how we can implement this with an example shown below
Step 1) The first step is to drag the Groupbox control onto the Windows Form from the toolbox as shown below

Step 2) Once the groupbox has been added, go to the properties window by clicking on the groupbox control. In the properties window, go to the Text property and change it to “User Details”.

Once you make the above changes, you will see the following output
Output:-

In the output, you can clearly see that the Groupbox was added to the form. You can also see that the text of the groupbox was changed to “User Details.”
Label Control
Next comes the Label Control. The label control is used to display a text or a message to the user on the form. The label control is normally used along with other controls. Common examples are wherein a label is added along with the textbox control.
The label indicates to the user on what is expected to fill up in the textbox. Let’s see how we can implement this with an example shown below. We will add 2 labels, one which will be called ‘name’ and the other called ‘address.’ They will be used in conjunction with the textbox controls which will be added in the later section.
Step 1) The first step is to drag the label control on to the Windows Form from the toolbox as shown below. Make sure you drag the label control 2 times so that you can have one for the ‘name’ and the other for the ‘address’.

Step 2) Once the label has been added, go to the properties window by clicking on the label control. In the properties window, go to the Text property of each label control.

Once you make the above changes, you will see the following output
Output:-

You can see the label controls added to the form.
Textbox
A textbox is used for allowing a user to enter some text on the Windows application in C#. Let’s see how we can implement this with an example shown below. We will add 2 textboxes to the form, one for the Name and the other for the address to be entered for the user
Step 1) The first step is to drag the textbox control onto the Windows Form from the toolbox as shown below

Step 2) Once the text boxes have been added, go to the properties window by clicking on the textbox control. In the properties window, go to the Name property and add a meaningful name to each textbox. For example, name the textbox for the user as txtName and that for the address as txtAddress. A naming convention and standard should be made for controls because it becomes easier to add extra functionality to these controls, which we will see later on.

Once you make the above changes, you will see the following output
Output:-

In the output, you can clearly see that the Textboxes was added to the form.
List box
A Listbox is used to showcase a list of items on the Windows form. Let’s see how we can implement this with an example shown below. We will add a list box to the form to store some city locations.
Step 1) The first step is to drag the list box control onto the Windows Form from the toolbox as shown below

Step 2) Once the list box has been added, go to the properties window by clicking on the list box control.

- First, change the property of the Listbox box control, in our case, we have changed this to lstCity
- Click on the Items property. This will allow you to add different items which can show up in the list box. In our case, we have selected items “collection”.
- In the String Collection Editor, which pops up, enter the city names. In our case, we have entered “Mumbai”, “Bangalore” and “Hyderabad”.
- Finally, click on the ‘OK’ button.
Once you make the above changes, you will see the following output
Output:-

In the output, you can see that the Listbox was added to the form. You can also see that the list box has been populated with the city values.
RadioButton
A Radiobutton is used to showcase a list of items out of which the user can choose one. Let’s see how we can implement this with an example shown below. We will add a radio button for a male/female option.
Step 1) The first step is to drag the ‘radiobutton’ control onto the Windows Form from the toolbox as shown below.

Step 2) Once the Radiobutton has been added, go to the properties window by clicking on the Radiobutton control.

- First, you need to change the text property of both Radio controls. Go the properties windows and change the text to a male of one radiobutton and the text of the other to female.
- Similarly, change the name property of both Radio controls. Go the properties windows and change the name to ‘rdMale’ of one radiobutton and to ‘rdfemale’ for the other one.
One you make the above changes, you will see the following output
Output:-

You will see the Radio buttons added to the Windows form.
Checkbox
A checkbox is used to provide a list of options in which the user can choose multiple choices. Let’s see how we can implement this with an example shown below. We will add 2 checkboxes to our Windows forms. These checkboxes will provide an option to the user on whether they want to learn C# or ASP.Net.
Step 1) The first step is to drag the checkbox control onto the Windows Form from the toolbox as shown below

Step 2) Once the checkbox has been added, go to the properties window by clicking on the Checkbox control.

In the properties window,
- First, you need to change the text property of both checkbox controls. Go the properties windows and change the text to C# and ASP.Net.
- Similarly, change the name property of both Radio controls. Go the properties windows and change the name to chkC of one checkbox and to chkASP for the other one.
Once you make the above changes, you will see the following output
Output:-

Button
A button is used to allow the user to click on a button which would then start the processing of the form. Let’s see how we can implement this with an example shown below. We will add a simple button called ‘Submit’ which will be used to submit all the information on the form.
Step 1) The first step is to drag the button control onto the Windows Form from the toolbox as shown below

Step 2) Once the Button has been added, go to the properties window by clicking on the Button control.

- First, you need to change the text property of the button control. Go the properties windows and change the text to ‘submit’.
- Similarly, change the name property of the control. Go the properties windows and change the name to ‘btnSubmit’.
Once you make the above changes, you will see the following output
Output:-

Congrats, you now have your first basic Windows Form in place. Let’s now go to the next topic to see how we can do Event handling for Controls.
C# Event Handling for Controls
When working with windows form, you can add events to controls. An event is something that happens when an action is performed. Probably the most common action is the clicking of a button on a form. In C# Windows Forms, you can add code which can be used to perform certain actions when a button is pressed on the form.
Normally when a button is pressed on a form, it means that some processing should take place.
Let’s take a look at one of the event and how it can be handled before we go to the button event scenario.
The below example will showcase an event for the Listbox control. So whenever an item is selected in the listbox control, a message box should pop up which shows the item selected. Let’s perform the following steps to achieve this.
Step 1) Double click on the Listbox in the form designer. By doing this, Visual Studio will automatically open up the code file for the form. And it will automatically add an event method to the code. This event method will be triggered, whenever any item in the listbox is selected.

Above is the snippet of code which is automatically added by Visual Studio, when you double-click the List box control on the form. Now let’s add the below section of code to this snippet of code, to add the required functionality to the listbox event.

- This is the event handler method which is automatically created by Visual Studio when you double-click the List box control. You don’t need to worry about the complexity of the method name or the parameters passed to the method.
- Here we are getting the SelectedItem through the lstCity.SelectedItem property. Remember that lstCity is the name of our Listbox control. We then use the GetItemText method to get the actual value of the selected item. We then assign this value to the text variable.
- Finally, we use the MessageBox method to display the text variable value to the user.
One you make the above changes, and run the program in Visual Studio you will see the following output
Output:-

From the output, you can see that when any item from the list box is selected, a message box will pops up. This will show the selected item from the listbox.
Now let’s look at the final control which is the button click Method. Again this follows the same philosophy. Just double click the button in the Forms Designer and it will automatically add the method for the button event handler. Then you just need to add the below code.

- This is the event handler method which is automatically created by Visual Studio when you double click the button control. You don’t need to worry on the complexity of the method name or the parameters passed to the method.
- Here we are getting values entered in the name and address textbox. The values can be taken from the text property of the textbox. We then assign the values to 2 variables, name, and address accordingly.
- Finally, we use the MessageBox method to display the name and address values to the user.
One you make the above changes, and run the program in Visual Studio you will see the following output
Output:-

- First, enter a value in the name and address field.
- Then click on the Submit button
Once you click the Submit button, a message box will pop, and it will correctly show you what you entered in the user details section.
Tree and PictureBox Control
There are 2 further controls we can look at, one is the ‘Tree Control’ and the other is the ‘Image control’. Let’s look at examples of how we can implement these controls
Tree Control
– The tree control is used to list down items in a tree like fashion. Probably the best example is when we see the Windows Explorer itself. The folder structure in Windows Explorer is like a tree-like structure.
Let’s see how we can implement this with an example shown below.
Step 1) The first step is to drag the Tree control onto the Windows Form from the toolbox as shown below

Step 2) The next step is to start adding nodes to the tree collection so that it can come up in the tree accordingly. First, let’s follow the below sub-steps to add a root node to the tree collection.

- Go to the properties toolbox for the tree view control. Click on the Node’s property. This will bring up the TreeNode Editor
- In the TreeNode Editor click on the Add Root button to add a root node to the tree collection.
- Next, change the text of the Root node and provide the text as Root and click ‘OK’ button. This will add Root node.
Step 3) The next step is to start adding the child nodes to the tree collection. Let’s follow the below sub-steps to add child root node to the tree collection.

- First, click on the Add child button. This will allow you to add child nodes to the Tree collection.
- For each child node, change the text property. Keep on repeating the previous step and this step and add 2 additional nodes. In the end, you will have 3 nodes as shown above, with the text as Label, Button, and Checkbox respectively.
- Click on the OK button
Once you have made the above changes, you will see the following output.
Output:-
You will be able to see the Tree view added to the form. When you run the Windows form application, you can expand the root node and see the child nodes in the list.
PictureBox Control
This control is used to add images to the Winforms C#. Let’s see how we can implement this with an example shown below.
Step 1) The first step is to drag the PictureBox control onto the C# Windows Form from the toolbox as shown below

Step 2) The next step is to actually attach an image to the picture box control. This can be done by following the below steps.

- First, click on the Image property for the PictureBox control. A new window will pops out.
- In this window, click on the Import button. This will be used to attach an image to the picturebox control.
- A dialog box will pop up in which you will be able to choose the image to attach the picturebox
- Click on the OK button
One you make the above changes, you will see the following output
Output:-

From the output, you can see that an image is displayed on the form.
Summary
- A Windows form in C# application is one that runs on the desktop of a computer. Visual Studio Form along with C# can be used to create a Windows Forms application.
- Controls can be added to the Windows forms C# via the Toolbox in Visual Studio. Controls such as labels, checkboxes, radio buttons, etc. can be added to the form via the toolbox.
- One can also use advanced controls like the tree view control and the PictureBox control.
- Event handlers are used to respond to events generated from controls. The most common one is the one added for the button clicked event.
In this article, we’ll learn How to how to create a Windows Forms Application in Visual Studio with C#.
Create a New Project
First, you’ll create a C# application project. The project type comes with all the template files you’ll need, before you’ve even added anything.

On the Create a new project window, choose the Windows Forms App (.NET Framework) template for C#.
(If you prefer, you can refine your search to quickly get to the template you want.)
In the Configure your new project window, type or enter HelloWorld in the Project name box. Then, choose Create.

After you select your C# project template and name your file, Visual Studio opens a form for you. A form is a Windows user interface.
On the left-hand side of Visual Studio, you will also see a ToolBox. The toolbox contains all the controls which can be added to a Windows Forms. Controls like a text box or a label are just some of the controls which can be added to a Windows Forms.
Example 1 : Add Two Numbers in C# Windows Form Application.
The following example creates a C# windows Form application with two text boxes, one button,four label controls. When user enters two numbers in to first two text boxes and clicks on button1 then sum has to be calculated for those two numbers and display the result in label4.
Step 1:
Create a windows application and design the form as follows.
Open Visual Studio ->File -> New Project ->Visual C#-> select Windows Forms Application
Give the name of the application and click on OK.

Step 2:
Set the following properties for the controls on the form.
label1 >> Text: First Number
label2 >> Text: Second Number
label3 >> Text: Result
label4 >> Text: Name: lblResult
button1 >> Text: Sum Name: btnSum
textBox1>> Name: txtNumber1
textBox2>> Name: txtNumber2
Step 3:
Double click on the sum button and write the following code in the click event of that button to calculate sum and display the result in result textbox.
|
private void btnSum_Click(object sender, EventArgs e) { int num1, num2, sum; num1=Convert.ToInt32(txtNumber1.Text); num2 = Convert.ToInt32(txtNumber2.Text); sum = num1 + num2; lblResult.Text = sum.ToString(); } |
Output:

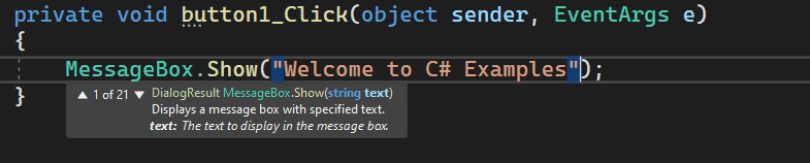
Example 2: MessageBox.Show Method in C#
MessageBox is a class in C# and Show is a method that displays a message in a small window in the center of the Form. MessageBox is used to provide confirmations of a task being done or to provide warnings before a task is done. Create a Windows Forms app in Visual Studio and add a button on it. Something like this below.

Let’s say, you want to show a message on a button click event handler. Here is the code for that.
Note: By default the OK Button will be shown.
MessageBox with Title
The following code snippet creates a simple MessageBox with a title.
|
string message = «Simple MessageBox»; string title = «Title»; MessageBox.Show(message, title); |

MessageBox with Buttons
A MessageBox can have different button combinations such as YesNo and OKCancel. The MessageBoxButtons enumeration represents the buttons to be displayed on a MessageBox and has following values.
- OK
- OKCancel
- AbortRetryIgnore
- YesNoCancel
- YesNo
- RetryCancel
The following code snippet creates a MessageBox with a title and Yes and No buttons. This is a typical MessageBox you may call when you want to close an application. If the Yes button is clicked, the application will be closed. The Show method returns a DialogResult enumeration.
|
string message = «Do you want to close this window?»; string title = «Close Window»; MessageBoxButtons buttons = MessageBoxButtons.YesNo; DialogResult result = MessageBox.Show(message, title, buttons); if (result == DialogResult.Yes) { this.Close(); } else { // Do something } |

MessageBox with Icon
A MessageBox can display an icon on the dialog. A MessageBoxIcons enumeration represents an icon to be displayed on a MessageBox and has the following values.
- None
- Hand
- Question
- Exclamation
- Asterisk
- Stop
- Error
- Warning
- Information
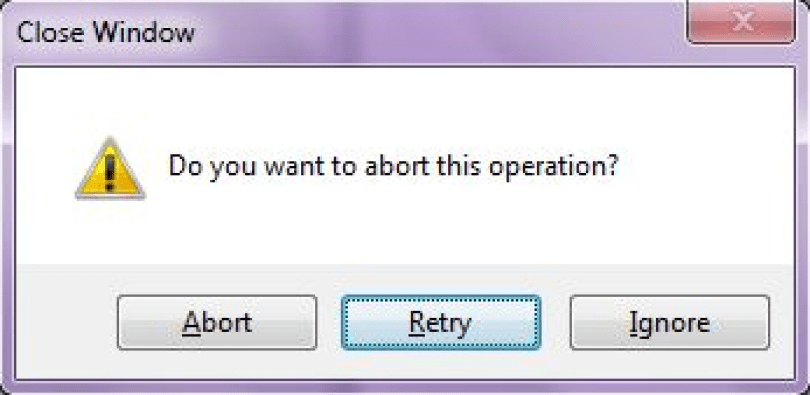
The following code snippet creates a MessageBox with a title, buttons, and an icon.
|
string message = «Do you want to abort this operation?»; string title = «Close Window»; MessageBoxButtons buttons = MessageBoxButtons.AbortRetryIgnore; DialogResult result = MessageBox.Show(message, title, buttons, MessageBoxIcon.Warning); if (result == DialogResult.Abort) { this.Close(); } elseif(result == DialogResult.Retry) { // Do nothing } else { // Do something } |

MessageBox with Default Button
We can also set the default button on a MessageBox. By default, the first button is the default button. The MessageBoxDefaultButton enumeration is used for this purpose and it has the following three values.
- Button1
- Button2
- Button3
The following code snippet creates a MessageBox with a title, buttons, and an icon and sets the second button as a default button.
|
string message = «Do you want to abort this operation?»; string title = «Close Window»; MessageBoxButtons buttons = MessageBoxButtons.AbortRetryIgnore; DialogResult result = MessageBox.Show(message, title, buttons, MessageBoxIcon.Warning, MessageBoxDefaultButton.Button2); if (result == DialogResult.Abort) { this.Close(); } elseif(result == DialogResult.Retry) { // Do nothing } else { // Do something } |
Example 3: Calculate Area and Perimeter of a Rectangle Using C# Windows Form Application
In this example, we’ll learn How to calculate area and perimeter of a rectangle in C# WinForm. To find the area of a rectangle or a square you need to multiply the length and the width of a rectangle.
Form Design:

Source Code:
|
private void button1_Click(object sender, EventArgs e) { int width = Convert.ToInt32(txtWidth.Text); int length = Convert.ToInt32(txtLength.Text); int area = width * length; int perimeter = (width + length) * 2; lblPerimeter.Text = «Perimeter : « + perimeter; lblArea.Text = «Area : « + area; } |
Output:

Example 4:
Первое приложение с .NET CLI
Последнее обновление: 11.11.2022
Для создания графических интерфейсов с помощью платформы .NET применяются разные технологии — Window Forms, WPF, UWP.
Однако наиболее простой и удобной платформой до сих пор остается Window Forms или сокращенно WinForms. Данное руководство ставит своей целью дать понимание принципов создания графических интерфейсов с помощью технологии WinForms
и работы основных элементов управления.
Создадим первое приложение на C# и Windows Forms. Что нам для этого потребуется? Прежде всего необходим текстовый редактор для написания кода программы.
Можно взять любой понравившийся текстовый редактор, например, Visual Studio Code
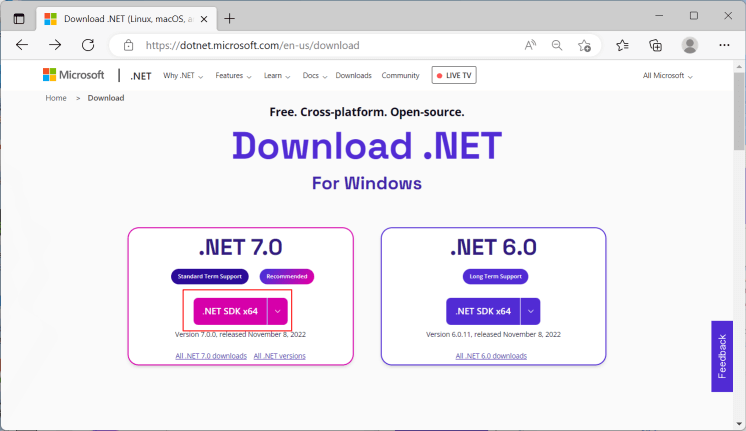
Также для компиляции и запуска программы нам потребуется .NET SDK. Для его установки перейдем на официальный сайт по ссылке
.NET SDK
После установки .NET SDK для первого проекта определим какую-нибудь папку. Например, в моем случае это будет папка C:\dotnet\winforms\helloapp.
Откроем терминал/командную строку и перейдем к созданной папке проекта с помощью команды cd
cd C:\dotnet\winforms\helloapp
В данном случае мы для создания и запуска проекта мы будем использовать встроенную инфраструктуру .NET CLI, которая устанавливается вместе с .NET SDK.
Для создания проекта в .NET CLI применяется команда dotnet new, после которой указывается тип проWindows Formsекта. Для создания проекта
Windows Forms применяется шаблон — winforms. Поэтому введем в терминале команду
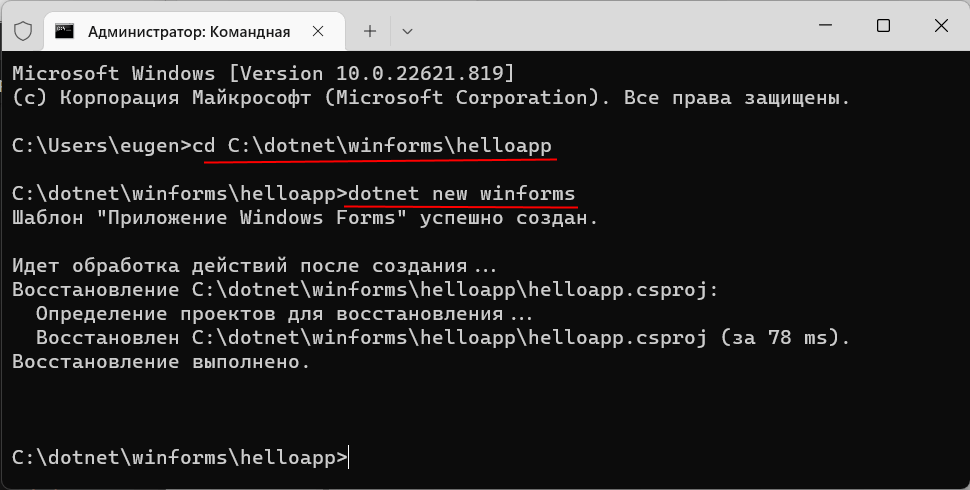
После выполнения этой команды у нас будет создан следующий проект:
Структура проекта Windows Forms
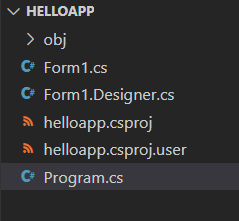
Рассмотрим базовую структуру простейшего стандартного проекта Windows Forms:
-
helloapp.csproj: стандартный файл проекта C#, который соответствует назанию проекта (по умолчанию названию каталога) и описывает все его настройки.
-
helloapp.csproj.user: дополнительный файл проекта C#, который хранит специфичные для текущего пользователя настройки.
-
Form1.cs: содержит класс формы, которая по умолчанию запускается при старте приложения
-
Form1.Designer.cs: он содержит определение компонентов формы, добавленных
на форму в графическом дизайнере (графический дизайнер Windows Forms на данный момент официально доступен только в Visual Studio) -
Program.cs: определяет класс Program, который запускается при старте приложения и запускает форму Form1
Например, посмотрим на содержимое файла helloapp.csproj
<Project Sdk="Microsoft.NET.Sdk">

  <PropertyGroup>
    <OutputType>WinExe</OutputType>
    <TargetFramework>net7.0-windows</TargetFramework>
    <Nullable>enable</Nullable>
    <UseWindowsForms>true</UseWindowsForms>
    <ImplicitUsings>enable</ImplicitUsings>
  </PropertyGroup>

</Project>
Для компиляции приложения Windows Forms указаны следующие настройки:
-
OutputType: определяет выходной тип проекта. Должен иметь значение WinExe — то есть выполняемое приложение с
расширением exe под Windows -
TargetFramework: определяет применяемую для компиляции версию фреймворка .NET. Поскольку при создании проекта
была выбрана версия .NET 7, а сам проект зависит от компонентов Windows, то здесь должно быть значение net7.0-windows -
Nullable: подключает в проект функционалность ссылочных nullable-типов
-
UseWindowsForms: указывает, будет ли проект использовать Windows Forms (для этого устанавливается значение
true) -
ImplicitUsings: подключает в проект функциональность неявно подключаемых глобальных пространств имен
Запуск проекта
Проект по умолчанию не представляет какой-то грандиозной функциональности, тем не менее этот проект мы уже можем запустить. Итак, запустим проект. Для этого выполним команду
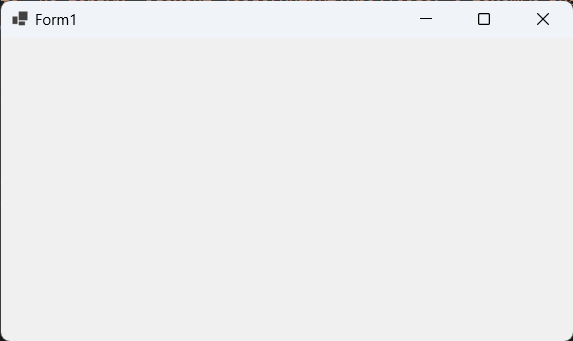
При запуске запускается графическая форма, код которой определяет класс Form1:
Запуск приложения
Файл Program.cs определяет точку входа в приложение:
namespace helloapp;

static class Program
{
    [STAThread]
    static void Main()
    {
        ApplicationConfiguration.Initialize();
        Application.Run(new Form1());
    }
}
Метод Main снабжен атрибутом [STAThread]. Этот атрибут, грубого говоря,
необходим для корректной работы компонентов Windows. В самом методе сначала вызывается метод
ApplicationConfiguration.Initialize()
который устанавливает некоторую базовую конфигурацию приложения
Затем вызывается метод
Application.Run(new Form1());
в который передается объект отображаемой по умолчанию на экране формы.
То есть, когда мы запустим приложение, сработает метод Main, в котором будет вызван метод Application.Run(new Form1()),
благодаря чему мы увидим форму Form1 на экране.
Определение формы
Теперь посмотрим на определение формы и немного изменим его. Для этого откроем файл Form1.cs в текстовом редакторе. По умолчанию он выглядит следующим образом:
namespace helloapp;

public partial class Form1 : Form
{
    public Form1()
    {
        InitializeComponent();
    }
}
Класс формы — Form1 представляет графическую форму — фактически то окно, которое мы увидим на экране при запуске проекта.
Этот класс определяется как частичный (с модификатором partial) и наследуется от встроенного класса Form,
который содержит базовую функциональность форм.
В самом классе Form1 определен по умолчанию только конструктор, где вызывается метод InitializeComponent(), который выполняет инициализацию компонентов формы из файла дизайнера
Form1.Designer.cs. По сути именно код этого файла передается выше через вызов InitializeComponent()
Теперь изменим его код следующим образом:
namespace helloapp;

public partial class Form1 : Form
{
    public Form1()
    {
        InitializeComponent();
        // определяем кнопку
        Button button = new Button();
        // текст кнопки
        button.Text ="Click";
        // положение кнопки
        button.Location = new Point(50, 50);
        // размер кнопки
        button.Size = new Size { Width = 80, Height = 30 };
        // обработчик нажатия кнопки
        button.Click += (o, e) => MessageBox.Show("Hello METANIT.COM!");
        // добавление кнопки на форму
        this.Controls.Add(button);
    }
}
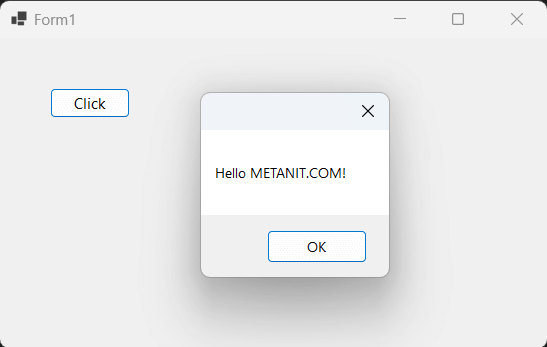
В данном случае на форму добавляется кнопка, и у нее настраиваются различные свойства, как текст, положение на форме, размер, а также обработчик нажатия.
Заново запустим проект, и нам отобразится та же форма, которая теперь будет содержать кнопку. И по нажатию на кнопку появится маленькое окно с сообщением.
Содержание
- Условие задачи
- Выполнение
- 1. Создать новый проект в MS Visual Studio как Windows Forms Application.
- 2. Создание нового представления (view) для отображения данных таблицы Student.
- 3. Размещение элемента управления DataGridView и настройка связи с базой данных.
- 4. Настройка вида элемента управления типа DataGridView.
- 5. Строка Connection String.
- 6. Создание новой формы для демонстрации команд манипулирования данными.
- 7. Добавление кнопок вызова команд манипулирования данными таблицы Student.
- 8. Программирование события клика на кнопке «Insert…«.
- 9. Программирование события клика на кнопке «Edit…«.
- 10. Программирование события клика на кнопке «Delete«.
- Связанные темы
Поиск на других ресурсах:
Условие задачи
Разработать приложение, которое демонстрирует основные операции над данными в базе данных типа MS SQL Server, а именно:
- подключение базы данных к приложению;
- отображение таблиц базы данных на форме;
- добавление новой записи в базу данных;
- редактирование записи;
- удаление записи.
За основу взята база данных Education.dbo, процесс создания которой подробно описывается здесь.
На рисунке 1 отображена структура базы данных Education.dbo. Как видно из рисунка, база данных называется:
sasha-pc\sqlexpress.Education.dbo
Здесь «sasha-pc» – идентификатор компьютера в сети, «sqlexpress» – название сервера баз данных, «Education.dbo» – название базы данных.
. База данных Education.dbo")
Рис. 1. База данных Education.dbo
База данных содержит две таблицы: Student и Session. Структура таблиц следующая.
Таблица Student.

Таблица Session.

⇑
Выполнение
1. Создать новый проект в MS Visual Studio как Windows Forms Application.
Создать новый проект типа Windows Forms Application. Пример создания нового проекта подробно описывается здесь.
⇑
2. Создание нового представления (view) для отображения данных таблицы Student.
Чтобы отображать данные таблиц базы данных, можно использовать разные способы. Один из них – это создание представлений (views), которые формируются средствами MS Visual Studio.
В нашем случае данные таблиц будут отображаться на форме в элементе управления типа DataGridView. После создания представлений, очень удобно их связать с элементами DataGridView.
Для создания представления, нужно вызвать команду «Add New View» из контекстного меню, которое вызывается кликом правой кнопкой мышки на элементе «Views» базы данных Education.dbo (рисунок 2).

Рис. 2. Вызов команды добавления нового представления
В результате откроется окно «Add Table» (рисунок 3). В окне нужно выбрать таблицы, которые добавляются к представлению.

Рис. 3. Выбор таблиц, на которых будет базироваться новое представление
В нашем случае выбираем таблицу Student и подтверждаем свой выбор кликом на кнопке Add. Следующим шагом нужно закрыть окно выбором кнопки Close.
После выполненных действий будет сформировано окно, в котором нужно выбрать поля, которые должны отображаться в представлении (на форме). Выбираем все поля (рисунок 4).
При выборе полей, в верхней части рабочей области отображаются поля таблицы Student. С помощью «мышки» можно выбирать нужные поля для представления.
Соответственно, в средней области окна отображаются названия выбранных полей, таблица в которой они есть (см. рис. 4), возможность сортировки, фильтрование и прочее.
В нижней части области отображается соответствующий текст SQL-запроса, который используется для создания представления.

Рис. 4. Выбор полей таблицы Student для их отображения в представлении
После выбора команды
File->Save All
или
File->Save View1
откроется окно, в котором нужно указать имя представления. Задаем имя «View Student» (рисунок 5).

Рис. 5. Указание имени для представления
После выполненных действий, окно представления будет иметь вид как показано на рисунке 6.

Рис. 6. Представление View Student в базе данных
Теперь можно размещать элемент управления DataGridView и связывать его с представлением.
⇑
3. Размещение элемента управления DataGridView и настройка связи с базой данных.
Перед размещением элемента управления DataGridView нужно перейти в режим проектирования формы «Form1.cs [Design]«.
Элемент DataGridView представляет собой таблицу, которая может отображать данные. Данный элемент управления размещается в панели ToolBox. Сначала немного корректируем размеры формы, а потом размещаем на ней элемент управления DataGridView (рисунок 7). В результате будет создан экземпляр объекта с именем dataGridView1 по умолчанию.

Рис. 7. Элемент управления DataGridView и окно выбора источника данных
После размещения элемента управления типа DataGridView на форме в правом верхнем углу можно выбрать настройку источника данных. Соответственно откроется окно «DataGridView Tasks«. В этом окне нужно выбрать сплывающее меню «Choose Data Source«.
В открывшемся меню выбирается команда «Add Project Data Source…» (рис. 7). После этого открывается окно мастера, в котором последовательно выбирается источник данных.
На рисунке 8 показано окно «Data Source Configuration Wizard«, в котором выбирается тип источника данных. В нашем случае устанавливаем «Database«.

Рис. 8. Выбор типа источника данных
В следующем окне (Рисунок 9) выбирается модель источника данных. Нужно выбрать DataSet.

Рис. 9. Выбор модели источника данных
В окне, изображенном на рисунке 10, нужно задать соединение данных, которое нужно использовать для подключения к базе данных. В нашем случае нужно выбрать базу данных «sasha-pc\sqlexpress\Education.dbo«.

Рис. 10. Выбор соединения данных
В следующем окне (рисунок 11) предлагается сохранить строку соединения Connection String в конфигурационный файл приложения. Оставляем все как есть и переходим к следующему окну.

Рис. 11. Предложение сохранения строки соединения с базой данных Connection String в конфигурационном файле приложения
После создания соединения с базой данных отображается множество объектов базы данных (рисунок 12). В нашем случае нужно выбрать представление «View Student» и все поля из него. Отмеченные поля будут отображаться в компоненте типа DataGridView.

Рис. 12. Выбор объектов базы данных, которые нужно отображать в DataGridView
После выбора кнопки Finish будут отображены выбранные объекты (представление View Student) базы данных Education.dbo (рисунок 13).

Рис. 13. Элемент управления типа DataGridView с выбранными полями представления View Student
Подобным образом можно настроить представления, которые содержат любые поля из любых таблиц базы данных. Также в одном представлении могут отображаться поля из разных таблиц.
⇑
4. Настройка вида элемента управления типа DataGridView.
Если запустить приложение на выполнение, то будут получены данные представления View Student, которое отвечает таблице Student базы данных (рисунок 14).
 Рис. 14. Запуск приложения на выполнение
Как видно из рисунка 14, данные в таблице dataGridView1 отображаются нормально, но оформление можно скорректировать.
Элемент управления типа DataGridView допускает корректирование вида полей, которые отображаются.
Для вызова команд редактирования полей, достаточно вызвать контекстное меню кликом правой кнопкой мышки на элементе управления dataGridView1.
В меню существуют различные полезные команды, которые разрешают управлять видом и работой DataGridView:
- команда блокирования элемента управления (Lock Controls);
- команда редактирования полей, которые отображаются в представлении (Edit Columns…);
- команда добавления новых полей, например вычисляемых (Add Column).
В нашем случае нужно выбрать команду «Edit Columns…» (рисунок 15).

Рис. 15. Команда «Edit Columns…» из контекстного меню
В результате откроется окно «Edit Columns«, в котором можно настроить вид полей представления по собственному вкусу (рисунок 16).
 Рис. 16. Окно настройки вида полей в представлении «View Student«
В окне на рисунке 16 для любого поля можно настроить название, выравнивание, ширину, возможность редактирования данных и т.п.
⇑
5. Строка Connection String
Для того, чтобы в базу данных вносить изменения, нужно получить строку соединения с базой данных Connection String.
Существуют разные способы получения строки соединения с базой данных. Один из них базируется на чтении этой строки в окне Properties базы данных Education.dbo (рис. 17).
 Рис. 17. Определение строки Connection String
Для сохранности строки в программе вводится внутренняя переменная типа string. С помощью буфера обмена копируем строку Connection String в описанную переменную типа string.
В тексте файла «Form1.cs» в начале описания класса Form1 надо описать переменную:
string conn_string = @"Data Source=(local)\SQLEXPRESS;Initial Catalog=Education;Integrated Security=True;Pooling=False";
На данный момент текст класса Form1 следующий:
public partial class Form1 : Form
{
    string conn_string = @"Data Source=(local)\SQLEXPRESS;Initial Catalog=Education;Integrated Security=True;Pooling=False";

    public Form1()
    {
        InitializeComponent();
    }

    private void Form1_Load(object sender, EventArgs e)
    {
        // TODO: This line of code loads data into the 'educationDataSet.View_Student' table. You can move, or remove it, as needed.
        this.view_StudentTableAdapter.Fill(this.educationDataSet.View_Student);
    }
}
⇑
6. Создание новой формы для демонстрации команд манипулирования данными.
Для того, чтобы иметь возможность обрабатывать данные текущей записи нужно создать новую форму. Процесс создания новой формы в MS Visual Studio — C# подробно описывается здесь.
Добавление новой формы осуществляется командой:
Project -> Add Windows Form...
В открывшемся окне «New Item» нужно выбрать элемент «Windows Form«.
Имя файла новой формы оставляем по умолчанию «Form2.cs«.
На рисунке 18 изображен вид новой формы.
Размещаем на форме элементы управления следующих типов:
- два элемента управления типа Button (кнопки OK и Cancel). Соответственно будет получено два объекта с именами button1 и button2;
- четыре элемента управления типа Label для создания информационных сообщений;
- четыре элемента управления типа TextBox для ввода данных в полях Num_book, Name, Group, Year.
Нужно настроить следующие свойства элементов управления:
- в элементе управления button1 свойство Text = «OK«;
- в элементе управления button2 свойство Text = «Cancel«;
- в элементе управления button1 свойство DialogResult = «OK«;
- в элементе управления button2 свойство DialogResult = «Cancel«;
- в элементе управления label1 свойство Text = «Num_book«;
- в элементе управления label2 свойство Text = «Name«;
- в элементе управления label3 свойство Text = «Group«;
- в элементе управления label4 свойство Text = «Year«.
Также настраиваем видимость элементов управления типа TextBox. Для этого во всех элементах управления textBox1, textBox2, textBox3, textBox4 значение свойства Modifiers = «public«.
 Рис. 18. Вид новосозданной формы
⇑
7. Добавление кнопок вызова команд манипулирования данными таблицы Student.
Для дальнейшей работы нужно с помощью мышки переключиться на главную форму Form1.
На главную форму приложения Form1 добавляем три кнопки (Button). Автоматически будет создано три переменных-объекта с именами button1, button2, button3. В каждой из этих кнопок вносим следующие настройки (окно Properties):
- в кнопке button1 свойство Text = «Insert …» (вставить запись);
- в кнопке button2 свойство Text = «Edit …» (изменить запись);
- в кнопке button3 свойство Text = «Delete«.
В результате внесенных изменений главная форма будет иметь вид как показано на рисунке 19.
 Рис. 19. Главная форма приложения
⇑
8. Программирование события клика на кнопке «Insert…«.
Обработчик события клика на кнопке «Insert…» имеет вид:
private void button1_Click_1(object sender, EventArgs e)
{
    string cmd_text;
    Form2 f2 = new Form2();
    if (f2.ShowDialog() == DialogResult.OK)
    {
        cmd_text = "INSERT INTO Student VALUES (" +
        "'" + f2.textBox1.Text + "' , '" +
        f2.textBox2.Text + "' , '" +
        f2.textBox3.Text + "' , " +
        f2.textBox4.Text + ")";

        // создать соединение с базой данных
        SqlConnection sql_conn = new SqlConnection(conn_string);

        // создать команду на языке SQL
        SqlCommand sql_comm = new SqlCommand(cmd_text, sql_conn);

        sql_conn.Open(); // открыть соединение
        sql_comm.ExecuteNonQuery(); // выполнить команду на языке SQL
        sql_conn.Close(); // закрыть соединение

        this.view_StudentTableAdapter.Fill(this.educationDataSet.View_Student);
    }

}
Сначала вызывается форма Form2. После получения результата «OK» (нажатие соответствующей кнопки), в форме Form2 заполненные поля в элементах типа TextBox включаются в строку SQL-запроса. SQL-запрос добавления новой строки имеет вид:
INSERT INTO Student
VALUES (value1, value2, value3, value4)
где value1 отвечает номеру зачетной книжки; value2 – фамилия студента; value3 – группа, в которой учится студент; value4 – год вступления.
Строка соединения с базой данных Connection String описывается в переменной conn_string (см. п. 5). Объект класса SqlConnection осуществляет соединение приложения с источниками данных. Кроме того, класс Connection решает задачи аутентификации пользователей, работу с сетями, идентификацию баз данных, буферизацию соединений и обработку транзакций.
Команда на языке SQL, добавляющая запись к таблице, инкапсулирована в классе SqlCommand. Конструктор класса SqlCommand принимает два параметра: строку запроса на языке SQL (переменная cmd_text) и объект класса SqlConnection.
Метод ExecuteNonQuery() реализован в интерфейсе IDBCommand. Метод реализует SQL-команды, которые не возвращают данные. К таким командам относятся команды INSERT, DELETE, UPDATE а также хранимые процедуры, которые не возвращают данных. Метод ExecuteNonQuery() возвращает количество задействованных ним записей.
⇑
9. Программирование события клика на кнопке «Edit…«.
Обработчик события клика на кнопке «Edit…» имеет вид:
private void button2_Click(object sender, EventArgs e)
{
    string cmd_text;
    Form2 f2 = new Form2();
    int index;
    string num_book;

    index = dataGridView1.CurrentRow.Index;
    num_book = Convert.ToString(dataGridView1[0, index].Value);

    f2.textBox1.Text = num_book;
    f2.textBox2.Text = Convert.ToString(dataGridView1[1, index].Value);
    f2.textBox3.Text = Convert.ToString(dataGridView1[2, index].Value);
    f2.textBox4.Text = Convert.ToString(dataGridView1[3, index].Value);

    if (f2.ShowDialog() == DialogResult.OK)
    {
        cmd_text = "UPDATE Student SET Num_book = '" + f2.textBox1.Text + "', " +
        "[Name] = '" + f2.textBox2.Text + "', " +
        "[Group] = '" + f2.textBox3.Text + "', " +
        "Year = " + f2.textBox4.Text +
        "WHERE Num_book = '" + num_book + "'";

        SqlConnection sql_conn = new SqlConnection(conn_string);
        SqlCommand sql_comm = new SqlCommand(cmd_text, sql_conn);

        sql_conn.Open();
        sql_comm.ExecuteNonQuery();
        sql_conn.Close();

        this.view_StudentTableAdapter.Fill(this.educationDataSet.View_Student);
    }
}
В этом обработчике выполняется SQL-команда UPDATE, которая изменяет текущее значение активной записи.
⇑
10. Программирование события клика на кнопке «Delete«.
Обработчик события клика на кнопке «Delete» имеет вид:
private void button3_Click(object sender, EventArgs e)
{
    string cmd_text = "DELETE FROM Student";
    int index;
    string num_book;

    index = dataGridView1.CurrentRow.Index;
    num_book = Convert.ToString(dataGridView1[0,index].Value);
    cmd_text = "DELETE FROM Student WHERE [Student].[Num_book] = '" + num_book + "'";

    SqlConnection sql_conn = new SqlConnection(conn_string);
    SqlCommand sql_comm = new SqlCommand(cmd_text, sql_conn);

    sql_conn.Open();
    sql_comm.ExecuteNonQuery();
    sql_conn.Close();

    this.view_StudentTableAdapter.Fill(this.educationDataSet.View_Student);
}
В этом обработчике выполняется SQL-команда удаления записи DELETE.
⇑
Связанные темы
- Вывод таблицы базы данных Microsoft Access в компоненте dataGridView
- Подключение к базе данных Microsoft Access в MS Visual Studio 2010
- Перевод базы данных Microsoft Access в формат Microsoft SQL Server
- C# (курсовая). Разработка приложения автоматизации диспетчера касс автовокзала