Последнее обновление: 11.11.2022
Для создания графических приложений на C# можно использовать .NET CLI, но также можно
использовать бесплатную и полнофункциональную среду разработки — Visual Studio Community 2022, которая в ряде случаев облегчает проектирование
приложения. Так, загрузим установщик Visual Studio по адресу:
https://www.visualstudio.com/en-us/downloads.

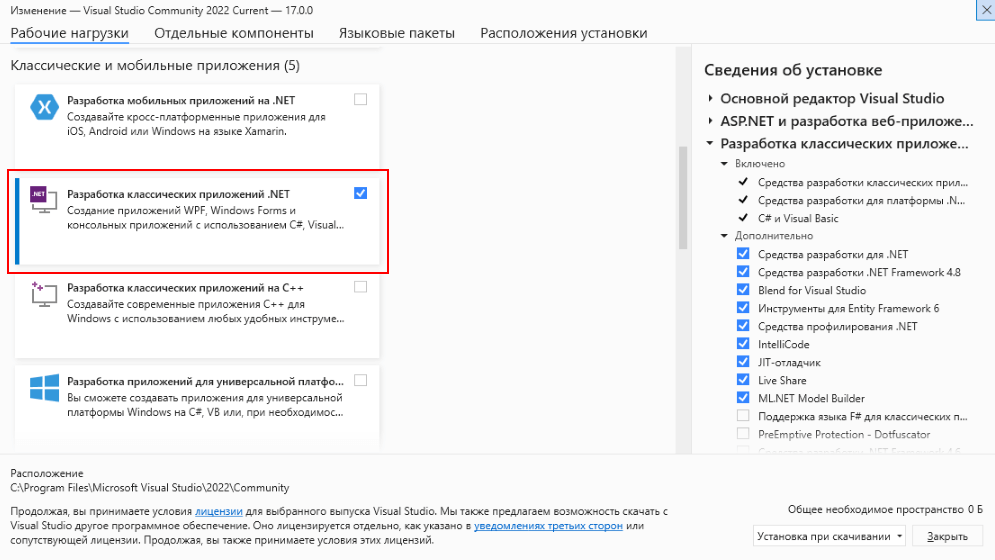
Чтобы добавить в Visual Studio поддержку проектов для Windows Forms и C# и .NET 7, в программе установки среди рабочих нагрузок нужно
выбрать только пункт Разработка классических приложений .NET. Можно выбрать и больше опций или вообще все опции, однако стоит
учитывать свободный размер на жестком диске — чем больше опций будет выбрано, соответственно тем больше места на диске будет занято.
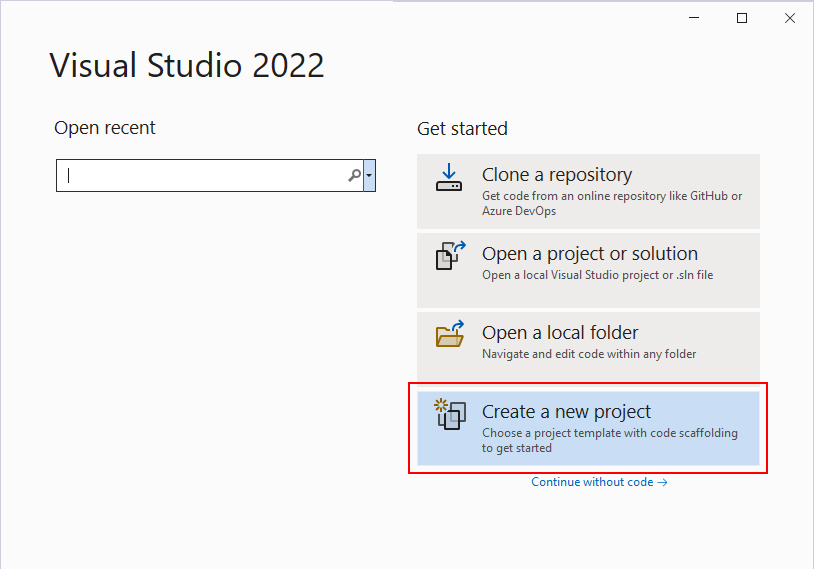
После установки среды и всех ее компонентов, запустим Visual Studio и создадим проект графического приложения.
На стартовом экране выберем Create a new project (Создать новый проект)
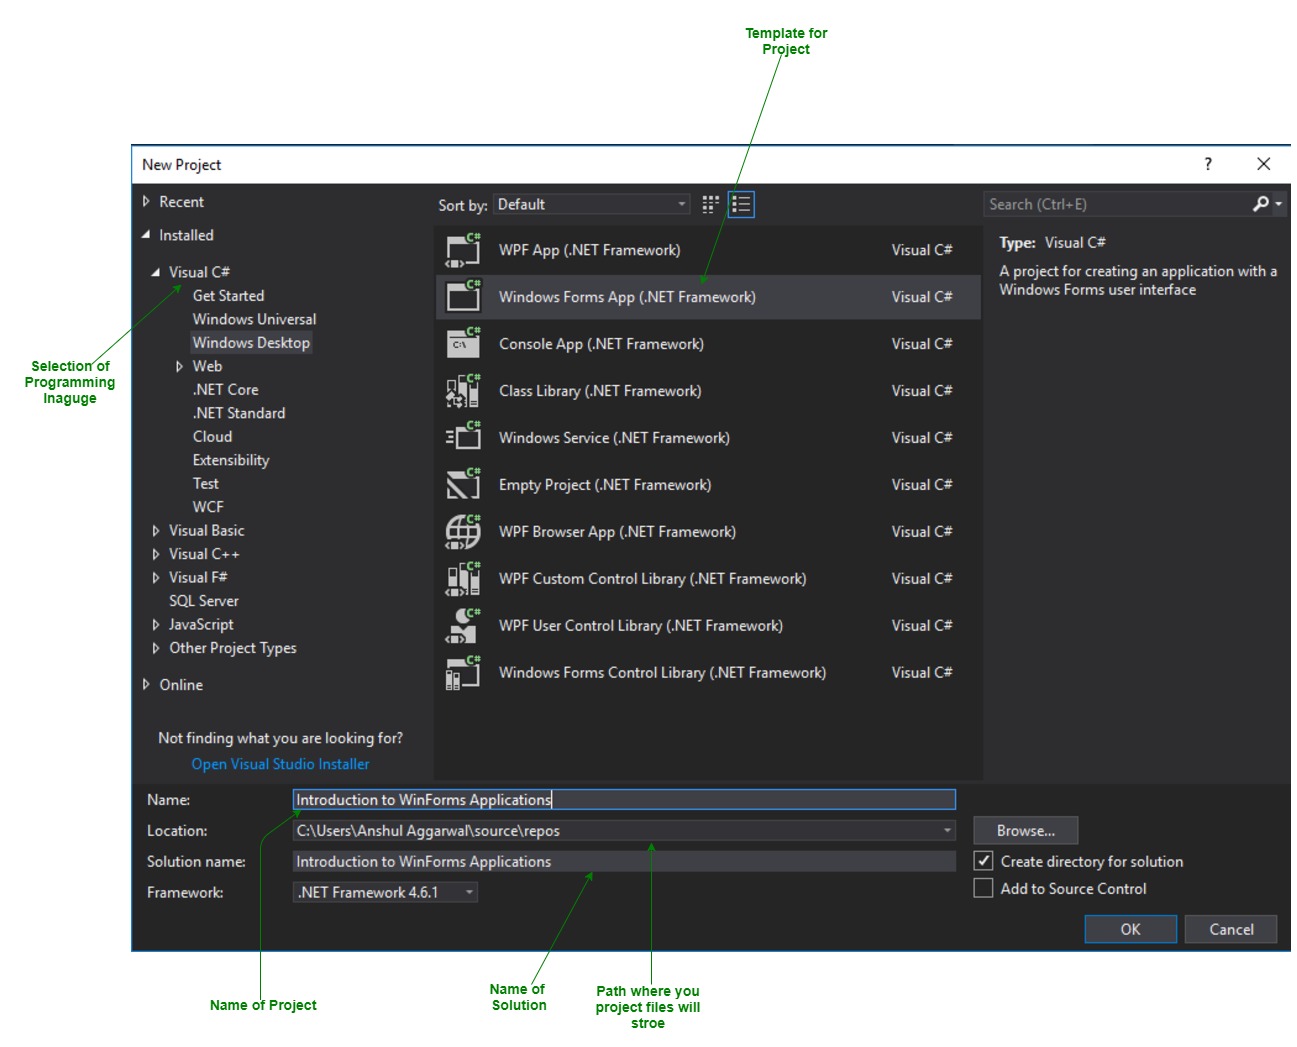
На следующем окне в качестве типа проекта выберем Windows Forms App:

Стоит отметить, что среди шаблонов можно увидеть еще тип Windows Forms App (.NET Framework) — его НЕ надо выбирать, необходим именно тип
Windows Forms App.
Далее на следующем этапе нам будет предложено указать имя проекта и каталог, где будет располагаться проект.
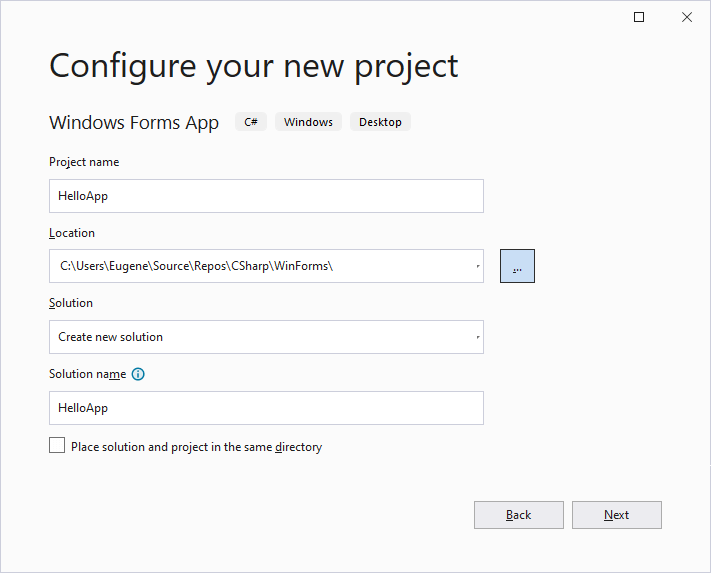
В поле Project Name дадим проекту какое-либо название. В моем случае это HelloApp.
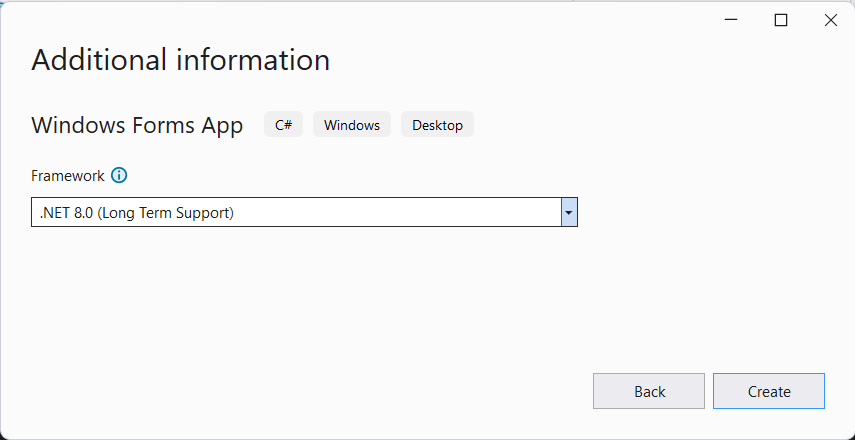
На следующем окне Visual Studio предложит нам выбрать версию .NET, которая будет использоваться для проекта. Выберем последнюю на данный момент версию — .NET 7.0 и нажмен на кнопку Create (Создать) для создания проекта.
После этого Visual Studio откроет наш проект с созданными по умолчанию файлами:
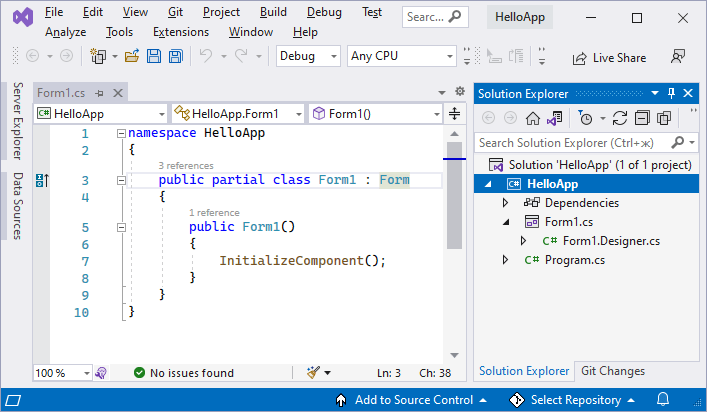
Справа находится окно Solution Explorer, в котором можно увидеть структуру нашего проекта. Практически этот тот же проект, который создается с
помощью .NET CLI:
-
Dependencies — это узел содержит сборки dll, которые добавлены в проект по умолчанию.
Эти сборки как раз содержат классы библиотеки .NET, которые будет использовать C# -
Form1.Designer.cs: он содержит определение компонентов формы, добавленных
на форму в графическом дизайнере -
Далее идет файл единственной в проекте формы — Form1.cs, который по умолчанию открыт в центральном окне.
-
Program.cs определяет точку входа в приложение
Запуск приложения
Чтобы запустить приложение в режиме отладки, нажмем на клавишу F5 или на зеленую стрелочку на панели Visual Studio.
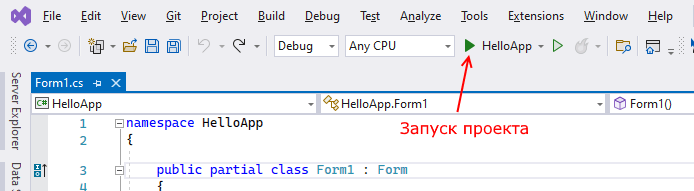
После этого запустится пустая форма Form1 по умолчанию.

После запуска приложения студия компилирует его в файл с расширением exe. Найти данный файл можно, зайдя в папку проекта и далее в каталог
\bin\Debug\net7.0-windows
Рассмотрев вкратце создание проекта графического приложения, мы можем перейти к обзору основных компонентов и начнем мы с форм.
Best practice is to choose «Windows Forms App» for new development.
Visual Studio gives developers the option of creating projects based on .NET Framework or .NET Core. Both have been superseded with the release of .NET 5. Developers still have the option to create projects with the .NET Framework, which is why there are two project types.
.NET Framework is older than .NET Core, and runs on Windows only. .NET Core was created to be cross-platform, and originally did not support Windows desktop apps. They had separate releases through .NET Framework 4.8 and .NET Core 3.1.
When .NET Core 3.0 was released, Microsoft began recommending that new applications, regardless of what type, be developed with .NET Core. Microsoft also announced that there would be no further major update to the .NET Framework:
With the .NET Core 3.0 release in September 2019 we think that all new .NET applications should be based on .NET Core. The primary application types from .NET Framework are supported, and where we did not port something over there is a recommended modern replacement. All future investment in .NET will be in .NET Core.
.NET Framework 4.8 will be the last major version of .NET Framework.
Source: .NET Core is the Future of .NET
Further, .NET 5 is the successor of .NET Core and .NET Framework. From now on, there’s just .NET:
There will be just one .NET going forward, and you will be able to use it to target Windows, Linux, macOS, iOS, Android, tvOS, watchOS and WebAssembly and more.
Source: Introducing .NET 5.
qaa-engineer.ru > Как создавать Windows Forms-приложения на C#?
В этой статье мы рассмотрим, как создать Windows Forms-приложение на C#. Вам нужны только знания основ C#, а также Visual Studio, чтобы следовать инструкциям.
Что такое Windows Forms?
Windows Forms – это библиотека классов .NET, которая обеспечивает функциональность для создания графического интерфейса пользователя для приложений Windows. Она использует систему контейнеров и элементов управления, чтобы помочь вам создать приложение, которое может быть использовано в Windows.
Создание нового проекта Windows Forms
Чтобы создать новое приложение Windows Forms на C#, откройте Visual Studio и выберите «File → New → Project» из меню.
Выберите «Windows Forms App (.NET Framework)» из диалогового окна «New Project», затем введите имя проекта и выберите место сохранения проекта.
После того, как у вас есть новый проект, вы получаете форму, которая будет использоваться в качестве главной формы. Вы можете изменить ее вложенность, используя компоненты «Panel» и «GroupBox».
Добавление элементов управления
Вы можете добавлять элементы управления на форму, перетаскивая их с панели управления контролером или используя Toolbox. Проверьте свойства элемента управления в окне свойств.
Чтобы добавить кнопку, на панели управления перетащите кнопку на форму. После этого измените свойства кнопки в окне свойств.
Чтобы добавить метку, перетащите метку на форму, затем измените свойства этой метки в окне свойств. Добавление текста на метку можно выполнить с помощью свойства Text.
Как привязать события к элементам управления?
Чтобы привязать событие к элементу управления, откройте события элемента управления, щелкнув дважды свойство в окне свойств. Это приведет к созданию обработчика событий в коде проекта.
Пример создания обработчика событий для кнопки:
private void button1_Click(object sender, EventArgs e)
{
   //Код, который будет выполняться при нажатии на кнопку
}
Конечный код для простой Windows Forms-программы:
using System;
using System.Windows.Forms;

namespace WindowsFormsApp2
{
   public partial class Form1 : Form
{
      public Form1()
      {
         InitializeComponent();
      }

      private void button1_Click(object sender, EventArgs e)
      {
         MessageBox.Show("Hello, World!");
      }
   }
}
Это все, что вам нужно знать о том, как создавать Windows Forms-приложение на C#. Вы можете продолжить добавлять элементы и события в свое приложение, получая все больше знаний в процессе создания проекта. С любой лицензией Visual Studio, вы можете создать полнофункциональные приложения и запустить их на любой Windows-машине.
Windows Forms is a Graphical User Interface(GUI) class library which is bundled in .Net Framework. Its main purpose is to provide an easier interface to develop the applications for desktop, tablet, PCs. It is also termed as the WinForms. The applications which are developed by using Windows Forms or WinForms are known as the Windows Forms Applications that runs on the desktop computer. WinForms can be used only to develop the Windows Forms Applications not web applications. WinForms applications can contain the different type of controls like labels, list boxes, tooltip etc.
Creating a Windows Forms Application Using Visual Studio 2017
- First, open the Visual Studio then Go to File -> New -> Project to create a new project and then select the language as Visual C# from the left menu. Click on Windows Forms App(.NET Framework) in the middle of current window. After that give the project name and Click OK.
 Here the solution is like a container which contains the projects and files that may be required by the program.
 - After that following window will display which will be divided into three parts as follows:
- Editor Window or Main Window: Here, you will work with forms and code editing. You can notice the layout of form which is now blank. You will double click the form then it will open the code for that.
- Solution Explorer Window: It is used to navigate between all items in solution. For example, if you will select a file form this window then particular information will be display in the property window.
- Properties Window: This window is used to change the different properties of the selected item in the Solution Explorer. Also, you can change the properties of components or controls that you will add to the forms.
- Now to add the controls to your WinForms application go to Toolbox tab present in the extreme left side of Visual Studio. Here, you can see a list of controls. To access the most commonly used controls go to Common Controls present in Toolbox tab.
- Now drag and drop the controls that you needed on created Form. For example, if you can add TextBox, ListBox, Button etc. as shown below. By clicking on the particular dropped control you can see and change its properties present in the right most corner of Visual Studio. In the above image, you can see the TextBox is selected and its properties like TextAlign, MaxLength etc. are opened in right most corner. You can change its properties’ values as per the application need. The code of controls will be automatically added in the background. You can check the Form1.Designer.cs file present in the Solution Explorer Window.
- To run the program you can use an F5 key or Play button present in the toolbar of Visual Studio. To stop the program you can use pause button present in the ToolBar. You can also run the program by going to Debug->Start Debugging menu in the menubar.
 Here the solution is like a container which contains the projects and files that may be required by the program.
 In the above image, you can see the TextBox is selected and its properties like TextAlign, MaxLength etc. are opened in right most corner. You can change its properties’ values as per the application need. The code of controls will be automatically added in the background. You can check the Form1.Designer.cs file present in the Solution Explorer Window.
C# Windows Forms is a graphical user interface (GUI) framework that enables developers to create desktop applications for the Windows operating system. Windows Forms applications are created using the C# programming language and the .NET framework. They are built by dragging and dropping controls such as buttons, text boxes, labels, and other user interface elements onto a form.
- The Windows Forms framework provides a rich set of controls that developers can use to build applications with. These controls are designed to provide a consistent and familiar user interface for Windows users. Developers can customize the appearance and behavior of these controls by setting various properties and handling events.
- To create a Windows Forms application in C#, you can use Microsoft Visual Studio, which is an integrated development environment (IDE) that provides a visual designer to create and layout the user interface elements. The visual designer is a drag-and-drop interface for building your UI, and you can easily configure each control’s properties through a user-friendly interface.
- In addition to the visual designer, Visual Studio also provides a code editor that enables developers to write the C# code for the application’s logic. Developers can handle events and perform tasks such as data validation, data manipulation, and business logic implementation.
- Windows Forms applications are versatile and can be used to create various types of applications such as data entry, management, and reporting applications, as well as games and multimedia applications.
Overall, Windows Forms applications provide an easy-to-use and familiar graphical user interface for Windows users, making it an ideal choice for building desktop applications that require a high degree of interactivity and user engagement.
Last Updated :
04 May, 2023
Like Article
Save Article
In this article, we’ll achieve numerous goals. First of all, we’ll learn through a step-by-step process to create the project in Visual Studio 2019 and create a windows form application. Within the application, we’ll use the features of the drag and drop low code approach supported for the Designer in Visual Studio 2019. A small part of gamification has been creatively put in to make it interesting for beginners. Later, we run the application and look at the prospective possibilities with the windows from the application.
The previous article, C# Connect to MySQL in Visual Studio 2019 will help you connect to the database for applications in C# and the .NET framework from Visual Studio itself.
Step 1
Let us start with the installation of Visual Studio 2019. The Community edition is free for use. Once installed, the following screen will pop up. Click on Launch.
Step 2
To start a new project, click on Create a new project.
Step 3
Now, as we are making a Windows Forms App, we choose the Windows Forms App (.NET Framework).
If you don’t find the options available, it’s probably not installed yet. You can select the Install more tools and features and then choose the .NET desktop development workload which supports console application building, windows forms application, and WPF.
Step 4
Fill in the project name, the location where the solutions repository will be saved, the solution name, and the .NET framework of your choice. After that, Click on Create.
Step 5
The Visual Studio Solution will be created and the window will look similar to as shown below.
Step 6
In caset he Toolbox is not there, you can opt for it from the View section in Menu.

Step 7
The Toolbox should look similar to the following image.
Now, let us start our project. Choose the Button and then drag and top on the Designer.
I’ve created three buttons here, button1, button2, and button3.
The properties of the button can be seen in the Properties section. The Text shows the displayed name of the button — the first button.
Let us change the text to Press Here.
Moreover, the Name of the Design is the one that will call functions for in the program. Here, we name it btnPresshere.
Step 8
Let us go back to Toolbox and search for labels by typing in the search bar. Select the Label and drag and drop one in the designer.
Step 9
The new label i.e. label1 is placed below the button Press Here.
The reason for the label is to call an action while pressing the Press Here button.
Step 10
Let us change the name of the label to labelPressHere. A good convention is to create label names as per the action it operates to.
Step 11
Now double click the Press Here button from the Designer.
A class will be created automatically in the Form1.cs file that would look similar to the one below.
Now, let us add the following code to create action while pressing the Press Here button.
labelPresshere.Text = “Welcome to C# Corner” Let us test what the program can do now. You can run the program, by clicking the Start button.
Let us see, what happens when we click the Press Here button.
See, label1 changes to Welcome to C# Corner now.
Step 12 — ROCK PAPER SCISSOR
Let us get creative now with button2. Let’s create a small Rock Paper Scissor game.
Let us rename the button to Rock Paper Scissor and the label to labelRPS and create another label called labelDYW.
Double Clicking the Rock Paper Scissor button, new classes are created.
Add the following code for button2_Click action.
private void button2_Click(object sender, EventArgs e) {
    string[] game = {
        "Rock",
        "Paper",
        "Scissor"
    };
    Random rand = new Random();
    int index = rand.Next(game.Length);
    labelRockPaperScissor.Text = game[index];
    labelDYW.Text = "Did you win?";
}
An array of strings named game is created. The random function is called and with randomness for the possible outcome for Rock, Paper, and Scissor – this is now a legit game you can play when you are bored.
Step 13
When we run the program, we can see, how every time we press the Rock Paper Scissor button, the new Round comes out with a different answer. So, Did You Win?
Step 14
Let us go, and change the label text to white spaces. This will make the User Interface of the App, cleaner as follows.
Step 15
Think of something creative of your own and making something out of the button3 from the lessons you learned above.
Conclusion
Thus, in this article, we learned about creating the Windows Form Application in C# using Visual Studio 2019. All the tools and resources in this article are freemium versions. So, you can try it without any payment requirement. Here, we went through a step-by-step procedure to create windows form app, design a simple app, call actions when clicking a button and with a pinch of creativity, literally made a game. I wanted to showcase; how powerful programming is. With this bit of learning, you have now entered a huge possibility of creation. You can now make an app, you might in the future make a fun game. Find out problems that can be solved, and with the stepping stone of today, their possibilities of creation are endless for you in days to come.