Introduction
Firewalls are a critical component of securing modern networks with internet access. Without firewalls in place, malicious actors could easily access and infect devices on a network. Properly configured firewalls substantially reduce undesirable communications.
This article explains how to create firewall rules using the Windows Firewall with Advanced Security console and Windows PowerShell on Windows Server 2016 / 2019 / 2022.
What is a Firewall?
A firewall controls the flow of data packets in and out of a network. It acts like a barrier, similar to how a physical firewall prevents the spread of fire between compartments. The firewall allows or blocks connections according to configured firewall rules.
Computers behind a firewall cannot receive data until it passes the filters. This greatly enhances security and reduces unauthorized access risks. Benefits of firewalls:
- Protect devices by blocking undesired traffic
- Notify administrators of connection attempts
- Log activity for monitoring
- Prevent spread of infections
- Reduce hacking risks
How Windows Server 2016 / 2019 / 2022 Firewalls Work
The Windows firewall acts as a barrier between local network devices and external networks. When a connection is attempted to a server, the firewall intercepts the traffic and evaluates it against the defined rules.
Only network packets that match the configured rules are allowed through. For example, a rule could allow TCP traffic on port 80 while blocking other ports. Carefully configured rules optimize security while allowing desired connections.
Windows provides inbound rules to control incoming traffic and outbound rules to filter outgoing traffic. Rules can be tailored for each network profile.
Windows Firewall with Advanced Security
Windows Firewall with Advanced Security provides the management interface for configuring Windows firewall settings. It comes built-in to Windows Server without needing additional licensing or hardware.
There are three default firewall profiles:
- Domain – For corporate networks with detected domain controllers
- Private – For home or office networks behind a gateway device
- Public – For untrusted public networks with internet access
Profiles allow custom rules per network type. You can enable, disable, or configure profiles independently.
Accessing the Firewall Console
To open the Windows Firewall with Advanced Security console:
- Open Server Manager > Tools > Windows Firewall with Advanced Security
- Search for “firewall” in the Start menu and launch the Windows Firewall shortcut
- Run wf.msc in the Run command (Win + R)
The left menu allows configuring inbound rules, outbound rules, connection security, and monitoring.
Configuring Firewall Rules
Firewall rules control whether to allow or block specific network connections. Rules can filter by:
- Program path
- Port and protocol
- Predefined service
- Source/destination IP
- Network interface
- And more…
Follow these steps to create an inbound firewall rule:
1. Open the Firewall console and select Inbound Rules
2. Click New Rule to launch the rule wizard
3. Select the rule type – Program, Port, Predefined, or Custom
4. Choose All Programs or a Program path
5. Choose Action (allow or block) or allow if connection is secured
6. Choose profiles
7. Name the rule and click Finish
Repeat the wizard for outbound rules. Once created, rules can be edited or disabled from the console.
Rules can also be created from PowerShell. For example:
PS C:\Users\Administrator> New-NetFirewallRule -DisplayName "Allow SSH" -Enabled True -Direction Inbound -Action Allow -Protocol TCP -LocalPort 22Monitor active connections under the Monitoring tab.
Conclusion
The Windows Firewall provides a flexible and granular rule-based firewall solution for Windows Server 2016, 2019 and 2022. The advanced interface allows creating detailed rules to filter incoming and outgoing traffic as needed. Monitor activity to verify your rules are working correctly. Careful configuration enhances security while allowing desired connections.
In Windows Server 2016, Windows Firewall is enabled by default. This allows all outgoing traffic to any destination or port, but limits incoming traffic based on specific rules. We’ll cover how to configure Windows Firewall with Advanced Security by demonstrating how to open it through both the GUI and PowerShell, followed by a demonstration of how to create a custom firewall rule.
This post is part of our Microsoft 70-744 Securing Windows Server 2016 exam study guide series. For more related posts and information check out our full 70-744 study guide.
Windows Firewall – Control Panel
Basic Windows firewall settings can be modified through Control Panel > System and Security > Windows Firewall, as shown below. This interface can also be accessed through PowerShell or Command Prompt by entering ‘firewall.cpl’.
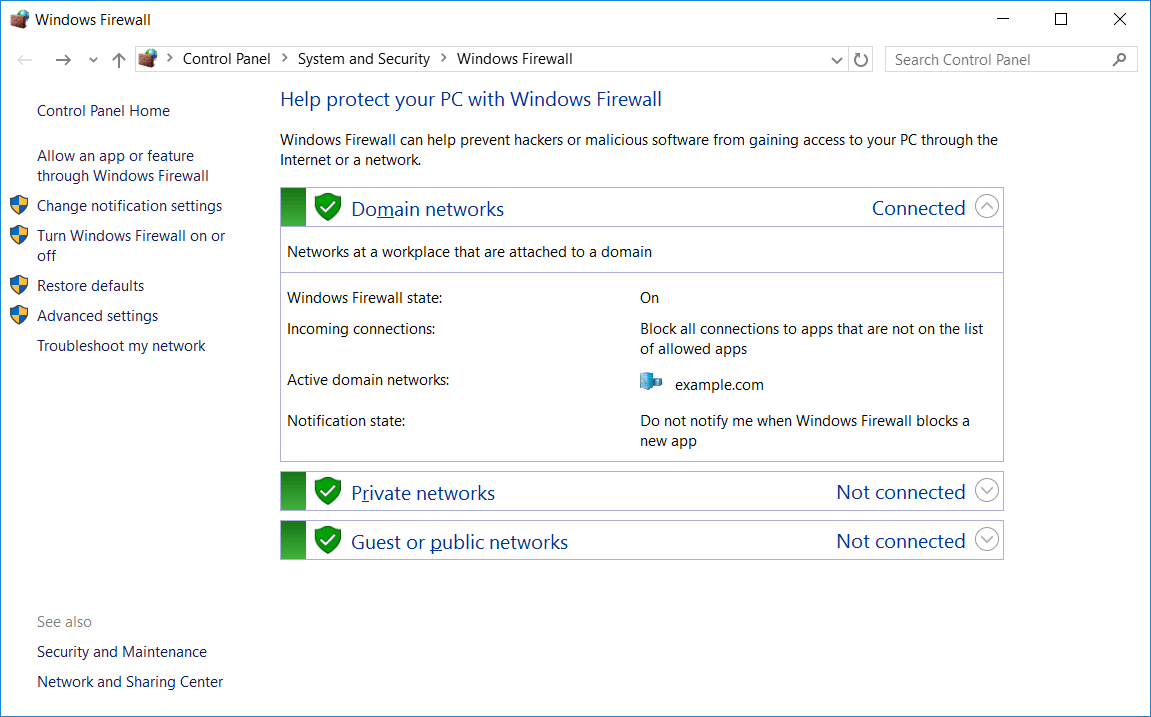
From here we can graphically view the status of the firewall for the domain, private, and public profiles. These different profiles are used depending on your current network connection. For example if you’re joined to an Active Directory domain, the rules applied in the domain profile will be used, while if you’re connected to a public wireless network the settings in the public profile will be used.
In this example, we can see the domain profile is listed as connected, as we’re currently connected to the example.com domain.
The tasks that can be completed here are shown in the menu on the left, we don’t go into detail here as we’re mainly going to be dealing with the advanced settings. To access the advanced settings, you can select the advanced settings link from this menu on the left from within Windows Firewall.
Windows Firewall with Advanced Security
As mentioned above, we can open Windows Firewall with Advanced Security by clicking the advanced settings button in Windows Firewall. We can also run ‘wf.msc’ in either PowerShell or Command Prompt to open the advanced security interface directly. The image below shows the advanced security interface after opening.
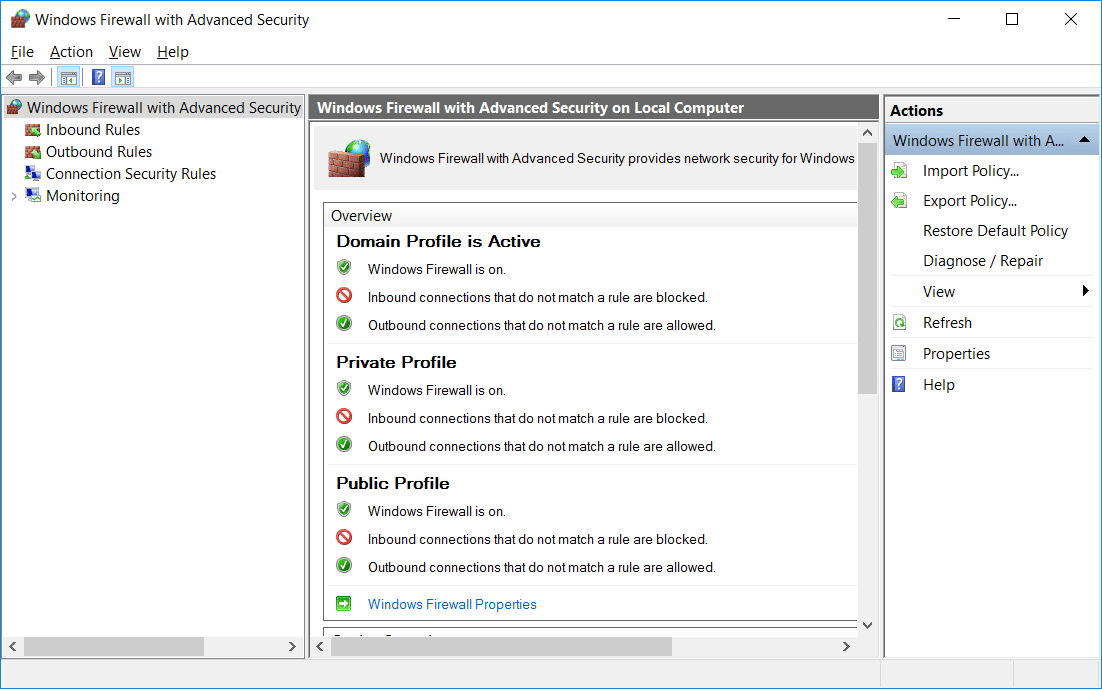
On this window we can see an overview of the domain, private, and public profiles, which by default should all be enabled and blocking inbound traffic and allowing outbound traffic.
From the menu on the left we can select either inbound or outbound rules. As all outbound is allowed by default, we’ll focus on inbound rules here. Connection security rules can also be setup to configure IPSec connections, and monitoring can be used to log various firewall events.
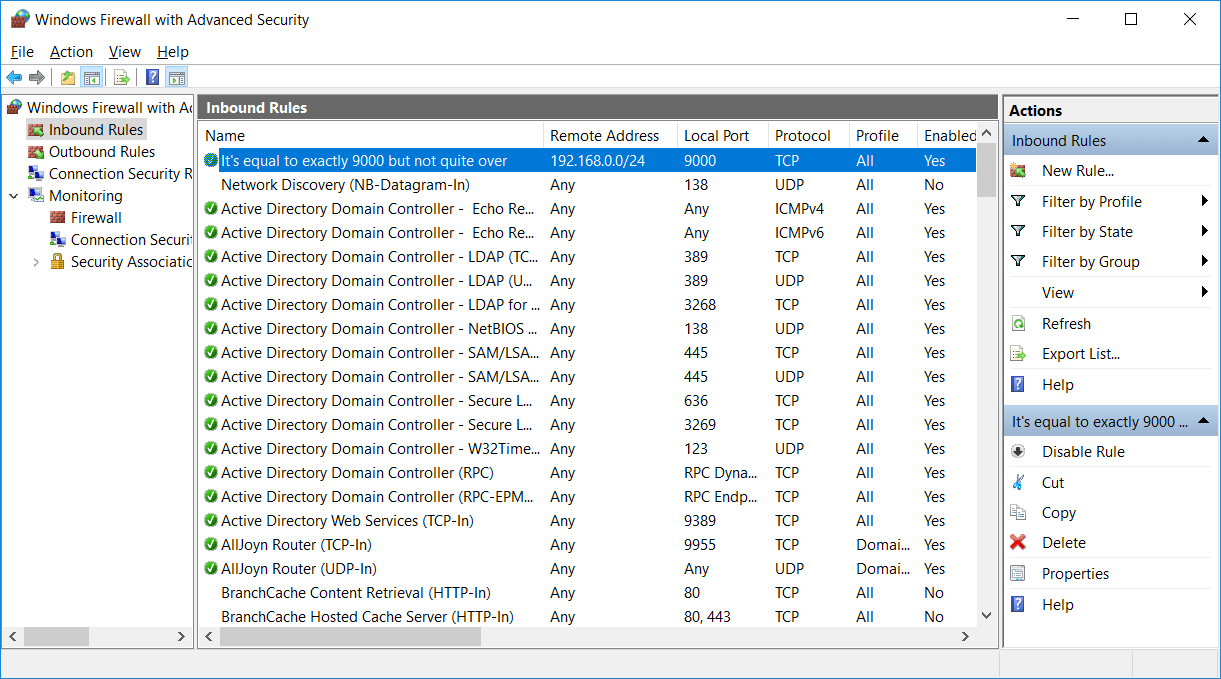
Under inbound and outbound rules we can view the rules that exist and that are currently enabled. These rules are available by default, rules with a green tick icon on the left are enabled and will allow traffic in while rules with no icon are disabled.
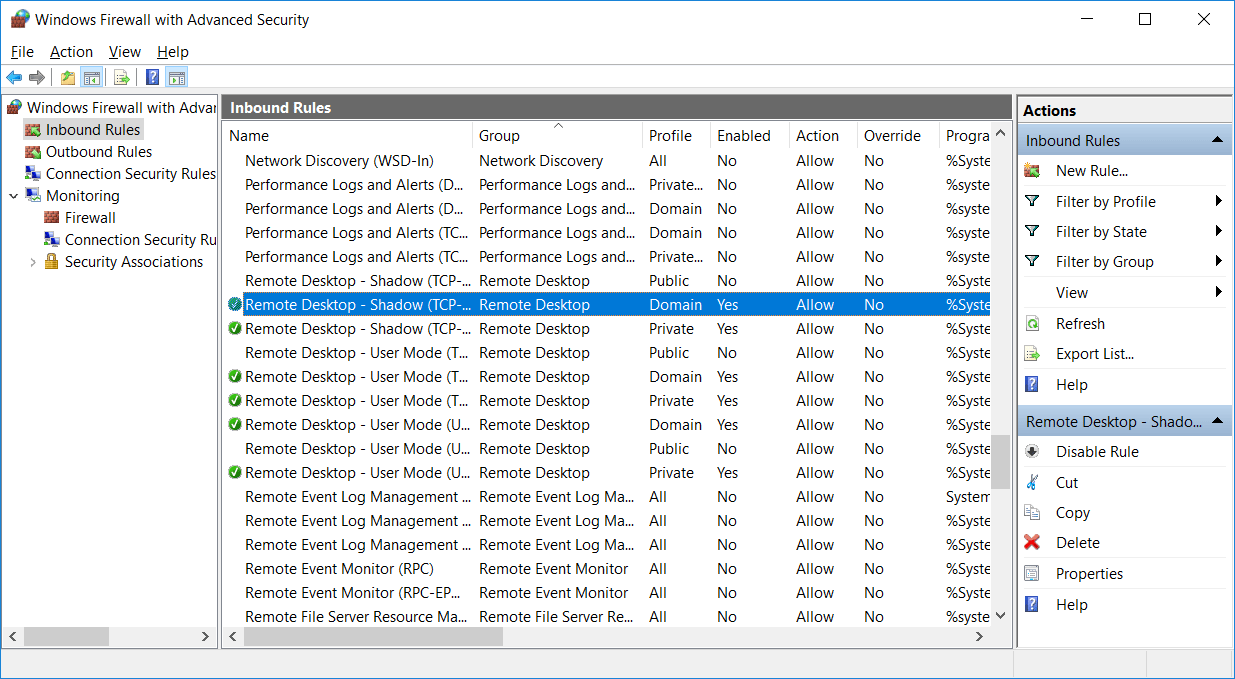
A rule that is disabled can be enabled by simply right clicking it and selecting enable. Likewise we can right click an enabled rule and change it to disabled. We can also view the properties of the rule by right clicking it and selecting properties. This will allow you to see what the rule is actually doing, including the ports that are being allowed through the firewall to specific programs, we’ll see this in more detail next when we create our own rule.
Create a Firewall Rule
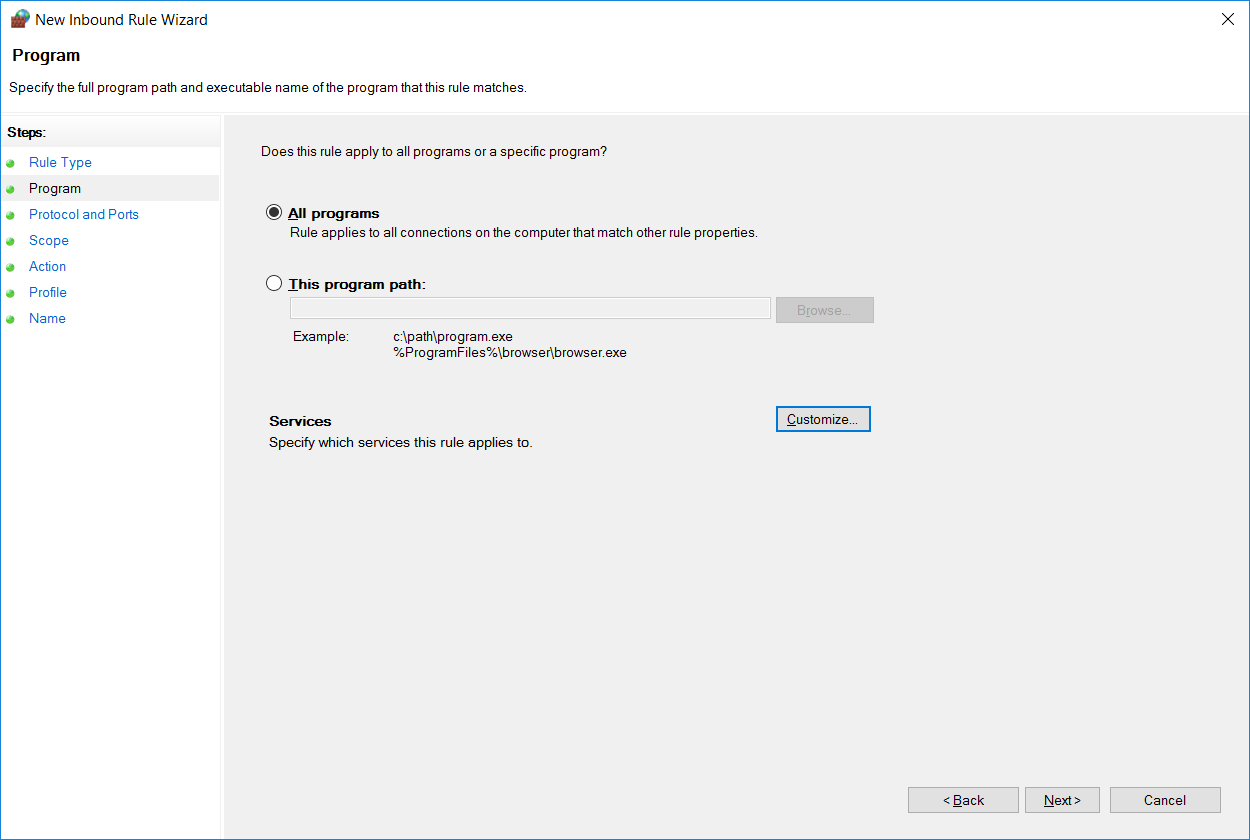
Select Inbound Rules from the menu on the left and then select New Rule from the actions pane on the right. This will open the new inbound rule wizard. From here we can select if we want to create a rule for a specific program, to a specific port, or based off of an existing rule. In this case we’ll select custom as this gives us the most choice.
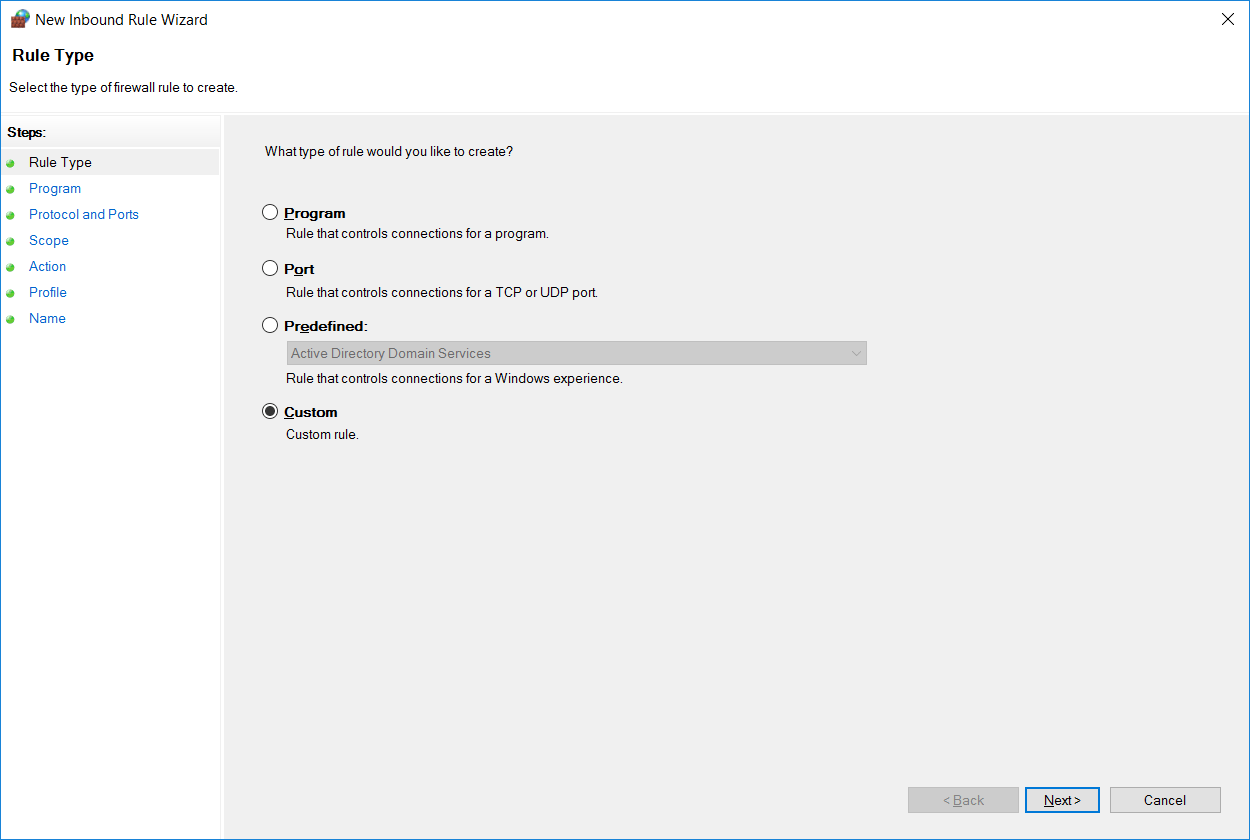
On the next screen we can select the specific program or service that the firewall should allow traffic in for. In this case we’ll just select all programs, however note that this can be used to further lock down a rule, rather than just allowing based on port/IP address we can also only allow traffic to a specific program.
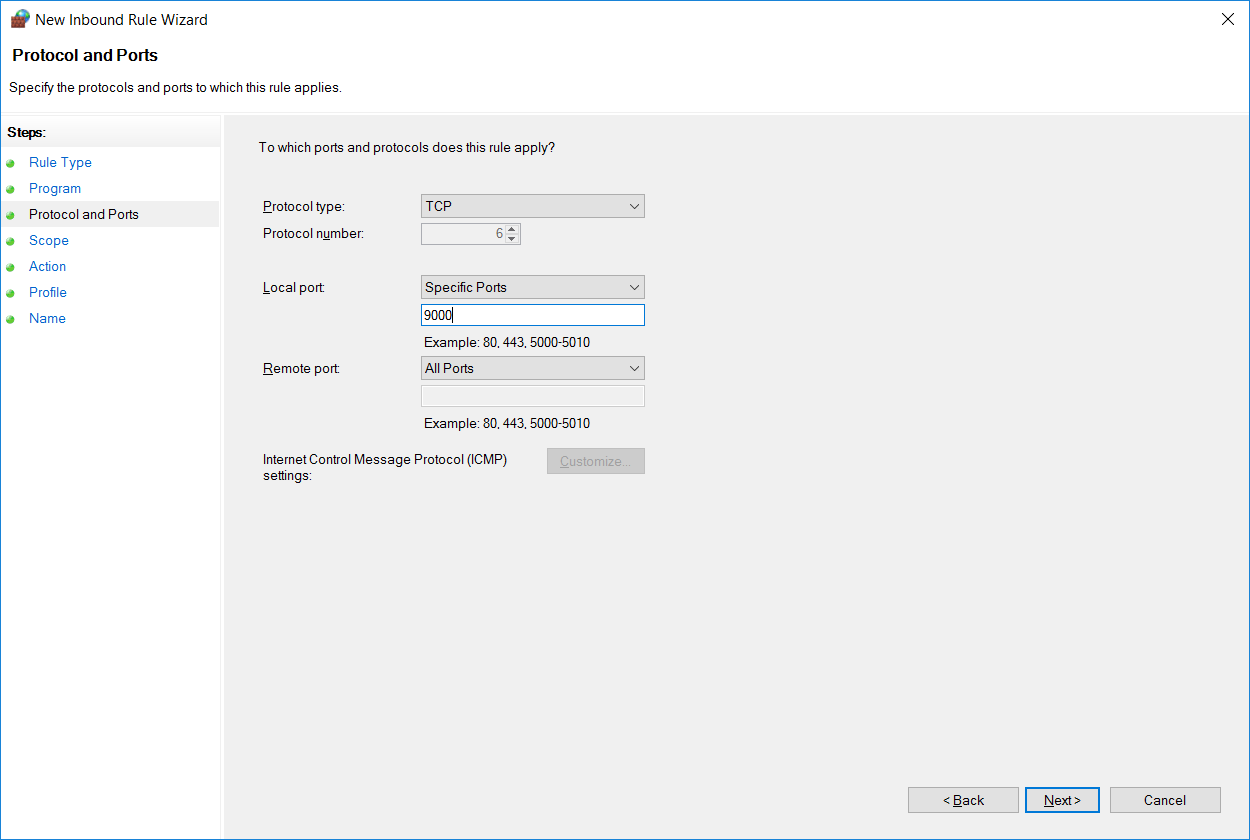
Next we can select the port and protocol that the rule should apply to. There are many different protocols to select from in the drop down, in this example we’re specifying that local TCP port 9000 should be allowed through the firewall. We use local port here as port 9000 is available locally on this server and listening for connections.
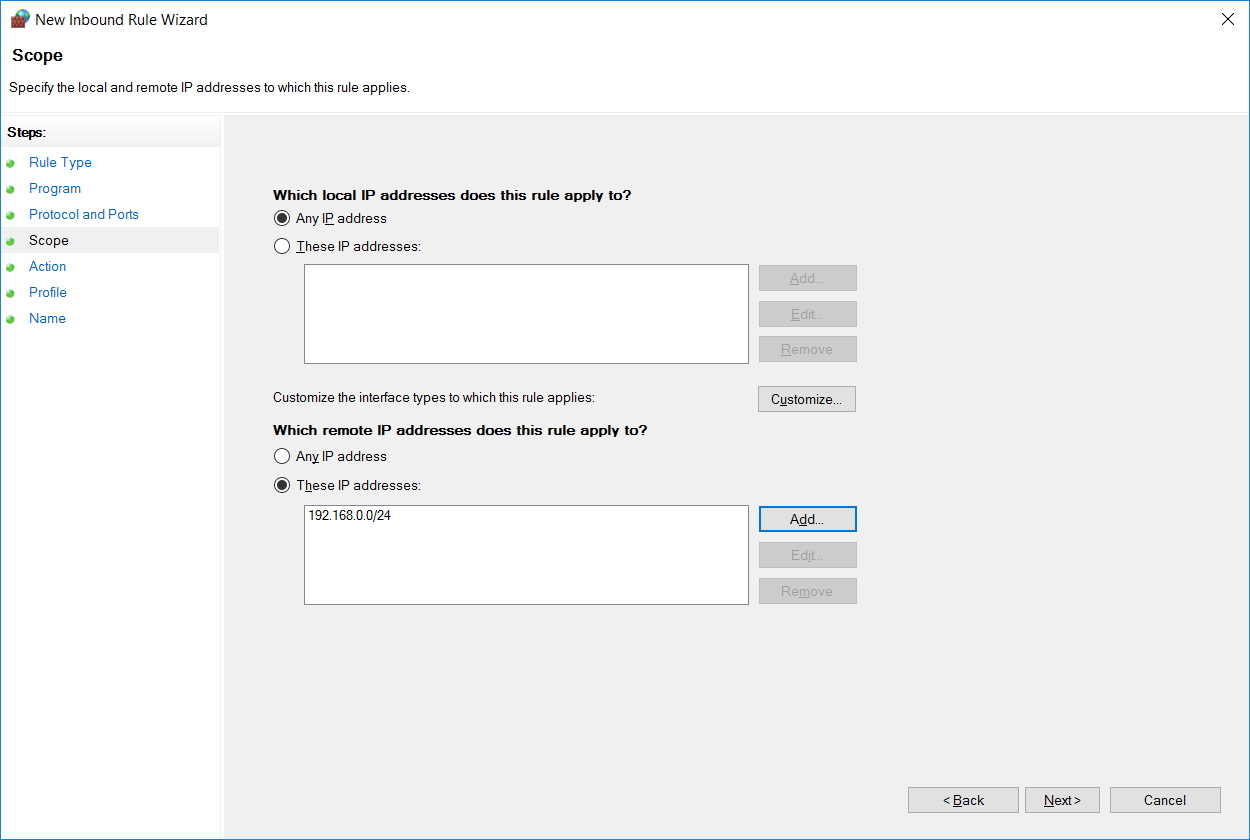
Now we can select an IP address or range of addresses that are allowed in through our firewall rule. In this case I’m allowing the remote address range 192.168.0.0/24 in through the firewall, so only this IP range will be allowed to connect to the server on TCP port 9000.
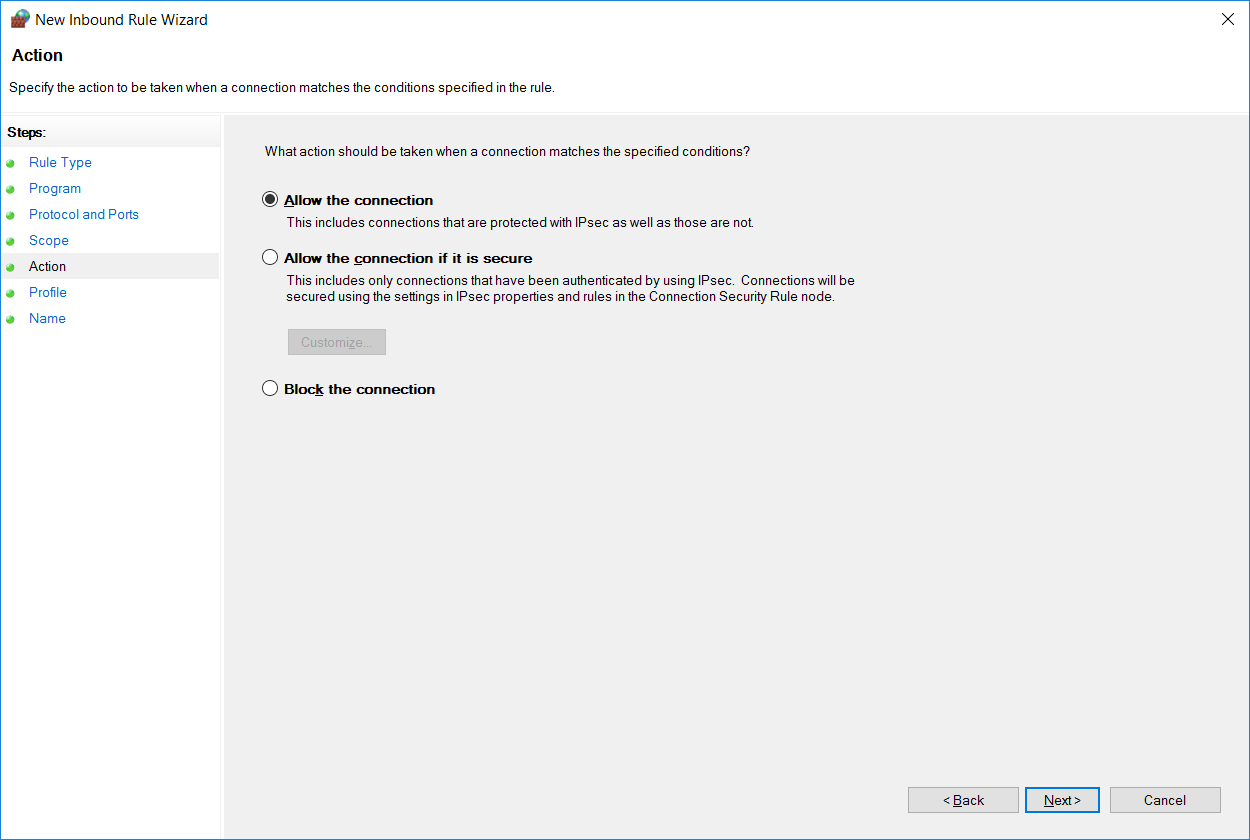
At this point we specify if we want to allow or deny the rule that we’re creating, we’ll leave this on allow as we want to let 192.168.0.0/24 in on TCP port 9000, however we could optionally explicitly block this instead. We could also optionally only allow the connection if it’s secure, which relies on IPSec being configured.
We can select which firewall profiles our new rule applies to. By default all profiles are selected, however you can change this as per your requirements.
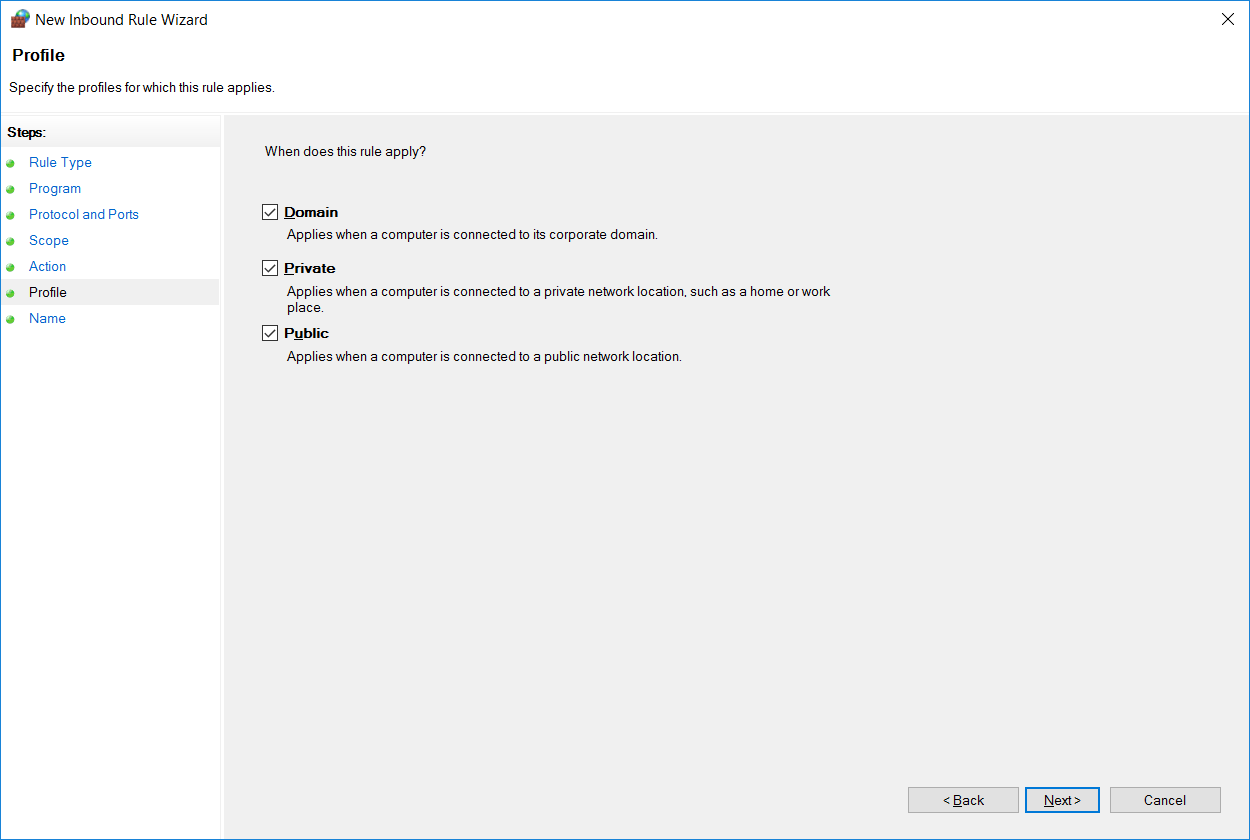
Finally we can specify a name and optional description to identify our rule. Once complete click finish, noting that as soon as you do this the rule will be live as per how you have configured it.
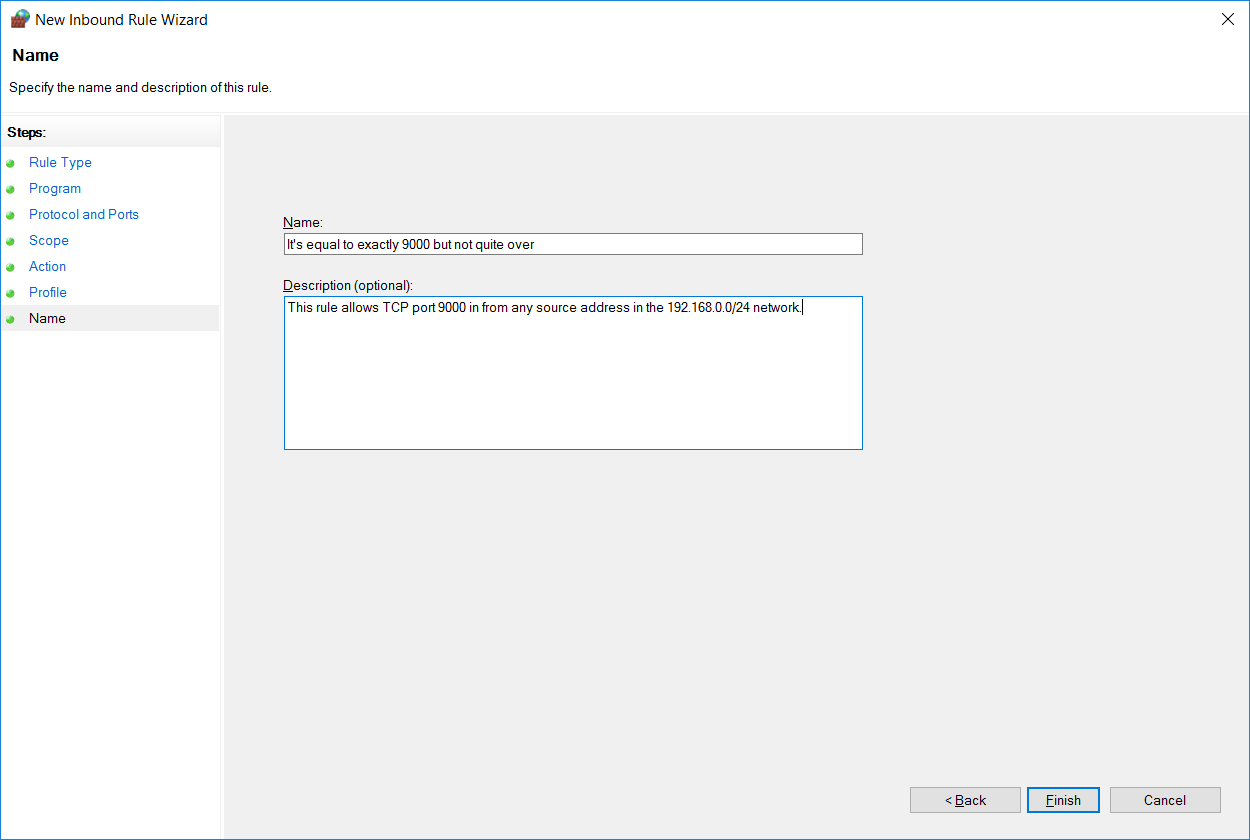
Our new rule will now show at the top of the inbound rule list above all of the default rules. We can identify it by it’s name and see briefly what it’s doing, it’s allowing the remote address range 192.168.0.0/24 into the local port 9000 with the protocol TCP on all profiles and is enabled.
By creating custom firewall rules such as this we can successfully configure windows firewall with advanced security.
Summary
We can configure very basic firewall rules with Windows Firewall, however Windows Firewall with Advanced Security is used to create much more custom and granular rules as we have seen here.
This post is part of our Microsoft 70-744 Securing Windows Server 2016 exam study guide series. For more related posts and information check out our full 70-744 study guide.
Брандмауэр Windows Server 2016 — это важная составляющая безопасности сервера, которая позволяет контролировать трафик и защищать систему от внешних угроз. Настройка брандмауэра может показаться сложной задачей, но с помощью этого шаг за шагом руководства вы сможете настроить его правильно.
Шаг 1: Открытие окна настройки брандмауэра
Для начала настройки брандмауэра откройте «Панель управления» и найдите пункт «Настроить брандмауэр Windows». Щелкните по этому пункту, чтобы открыть окно настроек брандмауэра.
Шаг 2: Включение брандмауэра
В окне настроек брандмауэра найдите вкладку «Общие» и убедитесь, что брандмауэр включен. Если он отключен, поставьте галочку возле пункта «Включить брандмауэр».
Шаг 3: Настройка исключений
Чтобы разрешить доступ к определенным программам или портам, вам нужно настроить исключения. Выберите вкладку «Исключения», а затем нажмите кнопку «Добавить программу» или «Добавить порт», в зависимости от того, что вы хотите разрешить.
Шаг 4: Настройка правил
Дополнительно, вы можете создать свои собственные правила брандмауэра. Для этого перейдите на вкладку «Правила защиты от подключений» и нажмите кнопку «Создать правило». Затем укажите тип правила (входящие или исходящие), порты и протоколы, а также действие, которое должно быть применено к трафику.
Настройка брандмауэра Windows Server 2016 является важной процедурой для обеспечения безопасности сервера. Следуя этому шаг за шагом руководству, вы сможете правильно настроить брандмауэр и защитить свою систему от внешних атак.
Содержание
- Настройка брандмауэра Windows Server 2016
- Шаг 1: Включение брандмауэра
- Шаг 2: Создание и настройка правил доступа
- Шаг 3: Открытие портов в брандмауэре
Настройка брандмауэра Windows Server 2016
В этом руководстве мы рассмотрим шаги по настройке брандмауэра Windows Server 2016:
Шаг 1: Открытие меню «Панель управления»
Для начала настройки брандмауэра необходимо открыть меню «Панель управления». Вы можете сделать это, щелкнув по иконке «Пуск» в левом нижнем углу экрана, а затем выбрав «Панель управления».
Шаг 2: Выбор «Брандмауэр Windows Defender»
В меню «Панель управления» найдите раздел «Безопасность» и выберите «Брандмауэр Windows Defender». Это откроет окно настройки брандмауэра.
Шаг 3: Включение брандмауэра
В окне настройки брандмауэра выберите вкладку «Включен» и убедитесь, что брандмауэр Windows Defender включен. Если он не активирован, выберите соответствующую опцию и нажмите «Применить».
Шаг 4: Настройка правил брандмауэра
Теперь вы можете настроить правила брандмауэра, чтобы контролировать входящий и исходящий трафик. Вы можете создать правила для определенных приложений, портов и протоколов. Щелкните по вкладке «Правила брандмауэра Windows Defender» и выберите «Создать новое правило». Следуйте инструкциям мастера настройки, чтобы создать правило.
Шаг 5: Проверка работоспособности брандмауэра
После настройки брандмауэра рекомендуется проверить его работоспособность. Вы можете использовать инструмент «Мониторинг безопасности Windows Defender», чтобы просматривать логи и события брандмауэра и убедиться, что он функционирует правильно.
Следуя этим шагам, вы сможете настроить брандмауэр Windows Server 2016 и обеспечить безопасность своего сервера.
Шаг 1: Включение брандмауэра
Перед началом настройки брандмауэра в Windows Server 2016, убедитесь, что он включен. Брандмауэр служит первой линией защиты для вашего сервера и блокирует внешние угрозы из интернета.
Чтобы включить брандмауэр в Windows Server 2016, выполните следующие шаги:
- Откройте «Панель управления» на сервере.
- В левой части окна выберите «Система и безопасность».
- В открывшемся окне выберите «Брандмауэр Windows Defender».
- На странице «Брандмауэр Windows Defender» нажмите «Включить брандмауэр Windows Defender».
- После этого брандмауэр будет включен и готов к настройке. Вы можете продолжать с настройкой правил и исключений.
Проверьте, что брандмауэр включен и работает корректно, прежде чем продолжить с настройкой дополнительных параметров.
Включение брандмауэра — важный шаг для обеспечения безопасности сервера. Убедитесь, что вы провели эту процедуру перед настройкой других параметров и правил брандмауэра.
Шаг 2: Создание и настройка правил доступа
После включения брандмауэра Windows Server 2016 переходим к созданию и настройке правил доступа, чтобы определить, какие типы сетевого трафика могут проходить через брандмауэр.
Создание правил доступа предоставляет возможность контролировать входящий и исходящий трафик, а также устанавливать различные параметры для каждого типа сетевого подключения.
Чтобы создать новое правило доступа:
- Откройте «Менеджер сервера» и перейдите в раздел «Инструменты» -> «Брандмауэр Windows с расширенными функциями» -> «Правила входящего подключения».
- Щелкните правой кнопкой мыши на окне «Правила входящего подключения» и выберите «Создать новое правило».
- Выберите тип правила (например, порт, программу, службу) и нажмите «Далее».
- Укажите параметры правила, такие как номер порта или путь к программе, и нажмите «Далее».
- Выберите, разрешить или запретить подключение, и нажмите «Далее».
- Укажите, для каких типов сетевого подключения применяется правило, и нажмите «Далее».
- Введите имя правила и, при необходимости, описание, и нажмите «Готово».
После создания правила оно будет применяться автоматически. Вы можете создать несколько правил для различных типов трафика или использовать уже существующие правила и изменить их параметры.
Настраивая правила доступа, вы можете управлять тем, какие ресурсы и сервисы могут быть доступны по сети, обеспечивая безопасность и защиту вашего сервера.
Шаг 3: Открытие портов в брандмауэре
Когда настраиваешь брандмауэр на Windows Server 2016, важно открыть порты, чтобы разрешить входящий и исходящий сетевой трафик через сервер. Для этого необходимо выполнить следующие действия:
- Откройте «Панель управления» и выберите «Система и безопасность». Выберите «Брандмауэр Windows».
- Нажмите «Дополнительные настройки». В левой панели выберите «Входящие правила».
- Щелкните «Новое правило» в правой панели.
- Выберите тип правила. Если вы хотите открыть порт для конкретного приложения, выберите «Порт». Если вы хотите открыть порт для определенных служб или протоколов, выберите соответствующую опцию.
- Выберите протокол и порт. Введите номер порта или диапазон портов, которые вы хотите открыть.
- Выберите «Разрешить подключение». Это позволит входящему или исходящему трафику использовать выбранный порт.
- Выберите тип сети. Вы можете выбрать «Доменная сеть», «Частная сеть» или «Общественная сеть», в зависимости от вашей конфигурации сети.
- Установите имя правила. Введите описательное имя для правила, чтобы легче ориентироваться в настройках брандмауэра.
- Нажмите «Готово» для завершения создания правила.
Обратите внимание, что настройка брандмауэра может быть сложной и критической задачей для обеспечения безопасности сервера. Рекомендуется учитывать конкретные требования и указания разработчиков приложений, которые будут использовать открытые порты.
Introduction
Greetings, fellow computer enthusiasts! Are you looking for ways to secure your Windows Server 2016 while ensuring high performance? Look no further! In today’s digital age, where data breaches have become more prevalent than ever, having a strong firewall that can keep malicious attacks at bay is essential.
One of the most popular choices for web servers is Apache, which is renowned for providing secure and efficient solutions for websites and web applications. However, it’s important to note that having Apache installed doesn’t mean your server is completely secure. That’s where the Windows Server 2016 Firewall comes in, offering an added layer of protection.
In this article, we’ll be discussing the benefits and drawbacks of using the Windows Server 2016 Firewall with Apache, as well as providing a comprehensive guide on how to set it up. So, sit back, relax, and prepare to learn how to safeguard your system and optimize performance!
What is Windows Server 2016 Firewall? 🛡️
The Windows Server 2016 Firewall is a built-in software that serves as a barrier between your server and the internet, regulating incoming and outgoing traffic. Its main purpose is to protect your system from unwanted and potentially harmful attacks, as well as prevent data leakage and unauthorized access.
The firewall employs a rule-based system, where you can define specific protocols, ports, and programs that are allowed or blocked. This gives you granular control over the traffic that enters and exits your server, allowing you to create a tailored security policy that fits your needs.
Advantages of Using Windows Server 2016 Firewall 🔥
|
Advantages |
Explanation |
|---|---|
|
Free and built-in |
The Windows Server 2016 Firewall is included in the operating system, which means you don’t have to pay for additional firewall solutions and installation costs. |
|
Granular control |
As mentioned earlier, the firewall allows you to create custom rules that dictate what traffic is allowed and blocked. This allows you to have more control over your network and minimize the risk of unauthorized access. |
|
Easy to set up |
The Windows Server 2016 Firewall has a user-friendly interface and can be easily set up by following simple configuration steps. |
|
Offers multiple filtering modes |
You can choose from several filtering modes such as block all, allow all, and custom, making it easier to customize your network security measures according to your preferences. |
|
Complements other security measures |
The Windows Server 2016 Firewall can work with other security measures such as antivirus software, intrusion detection systems, and proxy servers to provide a more robust and comprehensive security system. |
Disadvantages of Using Windows Server 2016 Firewall 🚫
While the Windows Server 2016 Firewall offers many advantages, it’s essential to consider its limitations and drawbacks.
|
Disadvantages |
Explanation |
|---|---|
|
May affect network performance |
Because the firewall monitors incoming and outgoing traffic, it can potentially create bottlenecks and slow down network performance. However, this can be mitigated by fine-tuning the rules and filters. |
|
May block legitimate traffic |
If not configured properly, the firewall can mistakenly block legitimate traffic, causing inconvenience and frustration. |
|
May require frequent updates |
As with any security software, the Windows Server 2016 Firewall requires regular updates to stay effective and relevant. Failing to do so can leave your system vulnerable to newer threats. |
Using Windows Server 2016 Firewall with Apache 🌐
When it comes to web servers, Apache is a popular choice for its performance, security, and reliability. By pairing it with the Windows Server 2016 Firewall, you can enhance your server’s protection against malicious attacks and unauthorized access.
Setting Up Windows Server 2016 Firewall with Apache
Here’s a step-by-step guide on how to set up Windows Server 2016 Firewall with Apache:
- Make sure Apache is installed and running.
- Open Windows Server 2016 Firewall.
- Create a new inbound rule.
- Create a new outbound rule.
- Restart Apache.
Before configuring the firewall, make sure that Apache is installed and running on your server. You can verify this by navigating to your server’s IP address or domain name in a web browser. If Apache is correctly installed, you should see the default Apache page.
You can access the firewall by opening the “Windows Defender Firewall with Advanced Security” app. This can be found in the Start menu by searching for “Firewall.”
Click on “Inbound Rules” and select “New Rule.” Follow the prompts to create a new rule that allows traffic on port 80 (HTTP) and port 443 (HTTPS).
Repeat step 3, but this time, allow traffic on port 80 and 443 for outbound traffic.
Restart Apache (or the entire computer) to apply the changes.
Common Issues and Troubleshooting
While setting up the Windows Server 2016 Firewall with Apache is relatively straightforward, there are some common issues that you may encounter:
Port 80 or 443 is already in use
If you receive an error stating that port 80 or 443 is already in use, it means that another application is already utilizing those ports. To resolve this, you’ll need to identify the application and either change its port settings or terminate it.
Cannot access Apache from the internet
If you’re unable to access Apache from the internet, it’s likely that the firewall is blocking incoming traffic. Check that the inbound rule for ports 80 and 443 is enabled and that your router is configured to forward traffic to your server.
Frequently Asked Questions (FAQs) ❔
Q: Can I use a third-party firewall with Windows Server 2016?
A: Yes, you can use third-party firewalls with Windows Server 2016, but the built-in firewall is more than capable of providing adequate protection.
Q: Does Windows Server 2016 Firewall use machine learning?
A: No, the Windows Server 2016 Firewall does not use machine learning. It relies on predefined rules and filters to regulate traffic.
Q: Can Windows Server 2016 Firewall block specific applications?
A: Yes, you can create rules that block specific applications from accessing the network.
Q: Does Windows Server 2016 Firewall affect network speed?
A: It can potentially affect network speed if not configured properly, but the impact is usually minimal.
Q: How often do I need to update Windows Server 2016 Firewall?
A: It’s recommended to update the firewall regularly, ideally once a week or when a new update is available.
Q: Can I run Apache without a firewall?
A: Technically, you can run Apache without a firewall, but it’s not recommended as it leaves your system vulnerable to attacks.
Q: Can I use Windows Server 2016 Firewall for personal use?
A: Yes, you can use Windows Server 2016 Firewall for personal use, but it’s primarily designed for businesses and enterprise environments.
Q: How do I turn off Windows Server 2016 Firewall temporarily?
A: You can disable the firewall by opening the “Windows Defender Firewall with Advanced Security” app and clicking on “Turn Windows Defender Firewall on or off.” Choose the “Turn off Windows Defender Firewall” option.
Q: Can I customize the Windows Server 2016 Firewall interface?
A: No, the interface is not customizable, but you can change the language settings.
Q: What are the default settings for Windows Server 2016 Firewall?
A: By default, the firewall blocks incoming connections and allows outgoing connections.
Q: How can I test if Windows Server 2016 Firewall is working properly?
A: You can test the firewall by attempting to access your server from a different computer. If the connection is blocked, it means the firewall is working correctly.
Q: Can I use Windows Server 2016 Firewall with other web servers?
A: Yes, you can use the firewall with other web servers such as IIS and Nginx.
Q: How can I monitor incoming and outgoing traffic on Windows Server 2016?
A: You can monitor traffic by using a network analyzer such as Wireshark or Microsoft Network Monitor.
Conclusion: Secure Your System and Optimize Performance with Windows Server 2016 Firewall and Apache 🚀
Now that you’ve learned about the benefits of using the Windows Server 2016 Firewall with Apache, it’s time to put your knowledge into practice. Implementing a robust security system is one of the most critical steps in safeguarding your data and ensuring optimal performance.
Remember, the Windows Server 2016 Firewall is a powerful tool in your cybersecurity arsenal, providing granular control over your network traffic. By configuring it correctly, you can minimize the risk of cyber attacks and provide a secure online environment for your business or personal use.
Closing
We hope you’ve found this article informative and useful in learning how to secure your Windows Server 2016 with Apache. Remember to always keep your firewall updated and configure it according to your network’s specific needs. Stay safe!
Video:Windows Server 2016 Firewall Apache: Protecting Your System and Ensuring High Performance
A firewall generally prevents dangerous attacks on the local network and computer. In simple terms, a wall that prevents fire from moving from one part to another is called a firewall. Generally, a firewall controls the information that is transmitted between computers and the Internet. In this article, we are going to teach you How to Configure Firewall on Windows Server 2016.
What is Firewall?
A Firewall is a network security system that controls and monitors incoming and outgoing network traffic based on predefined security rules. A firewall is a network security device that monitors inbound and outbound network traffic. It protects the network against threats and creates a barrier between a trusted internal network and an unreliable external network such as the Internet. This process is governed by a set of predefined security instructions. It is interesting to know that a Firewall is designed to secure the communication process between different networks. The Firewall prevents unauthorized data from entering computers where ports called ports enter.
How to Configure Firewall on Windows Server 2016
Before starting the steps to configure the firewall, we suggest you visit the Windows VPS and Admin RDP plans provided on our website and configure the firewall after installing Windows Server 2016.
By default, the Windows Firewall with Advanced Security is turned on. Note that you should confirm the current status and turn on the firewall.
To turn on the firewall first, you need to open “Server Manager“, then click on the Tools tab, and then select Windows Firewall with Advanced Security:
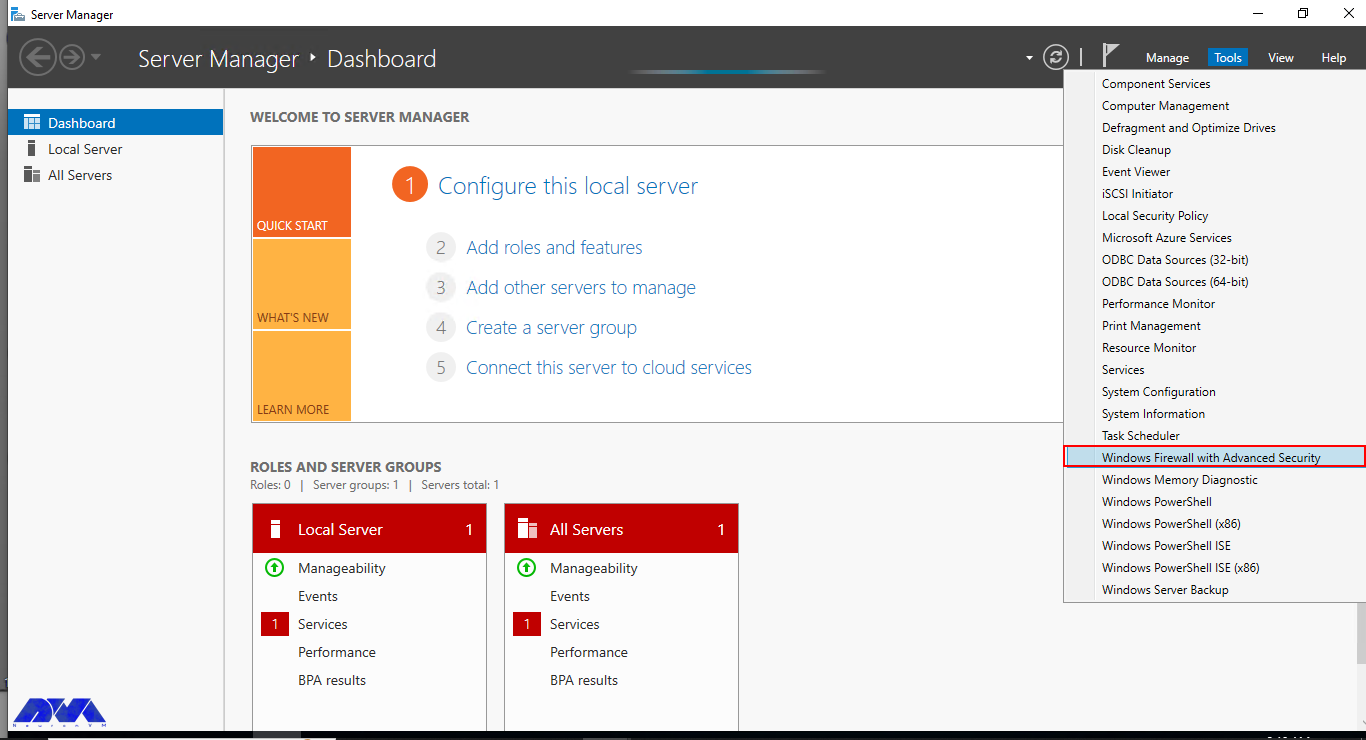
Now you can check the current status of Windows Firewall profiles from open group policy management and if it was not set to On. You need to click on Windows Firewall properties and turn on the service in each profile:
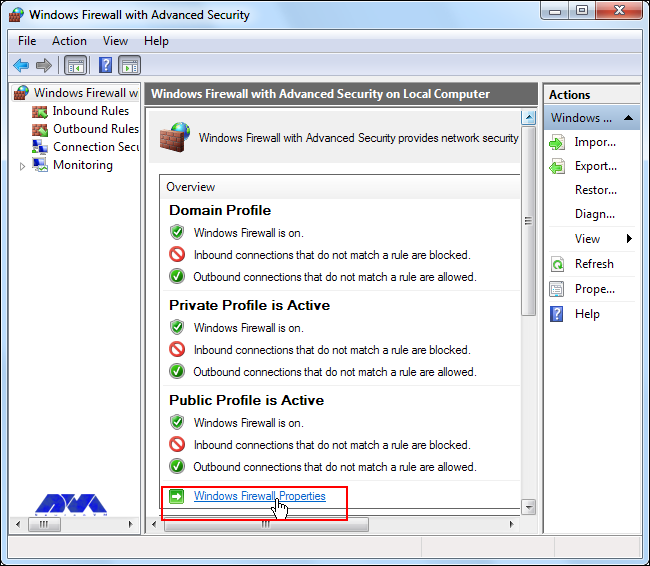
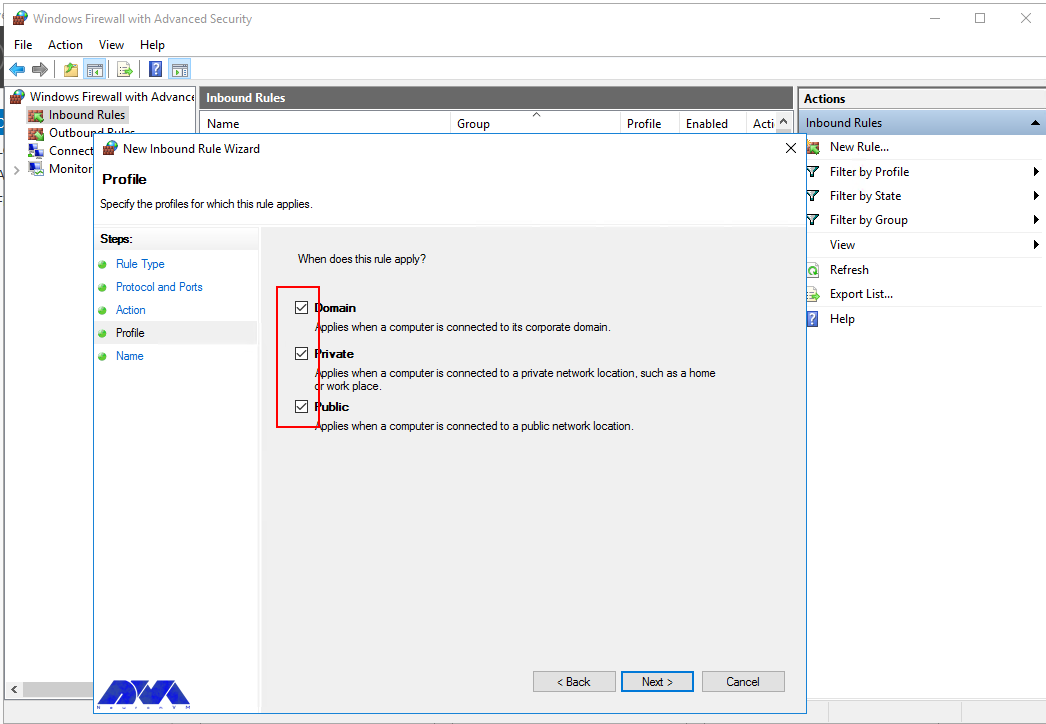
You can permit or block specific input and output network packets on your server and select multiple parameters for each inbound or outbound rule with the help of a Windows Firewall. Windows server profiles include Domain, Private, and Public groups. The Domain represents your server’s connection to a corporate domain network, Private is used to connecting to your home or workplace network, and Public represents insecure public network locations.
How to Open an Inbound Port
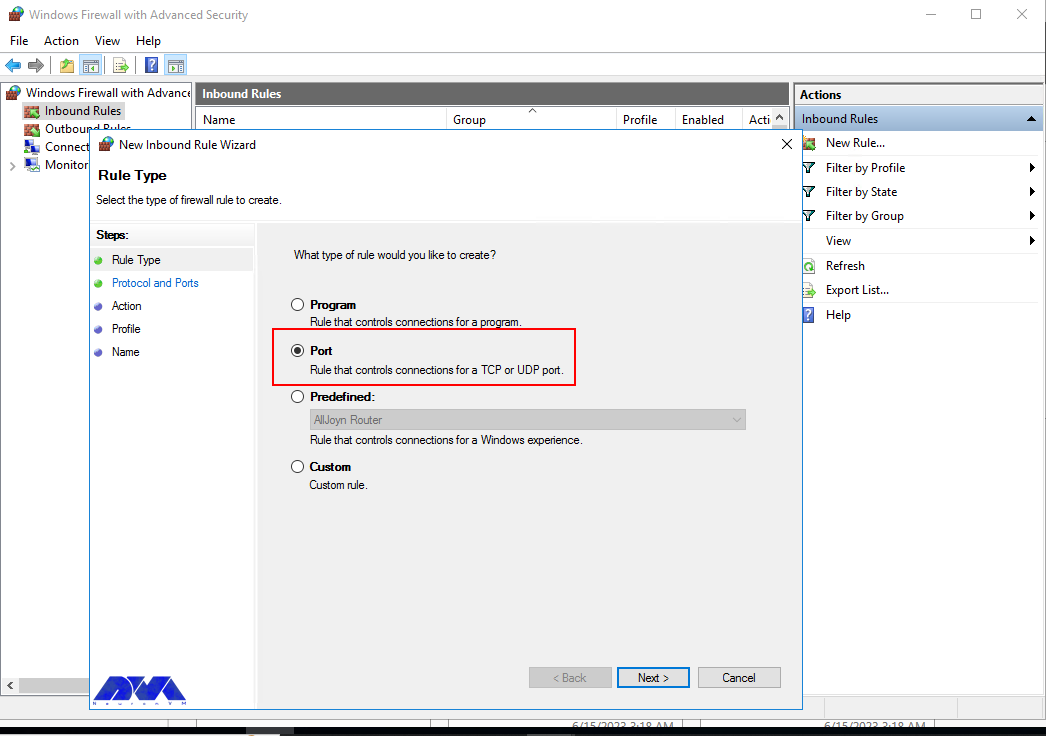
First, you need to launch the Windows Firewall with Advanced Security from the Tools sub-menu under Server Manager. Select Inbound Rules from the left panel of the Firewall console. Then click on New Rule under the right sub-menu of Inbound Rules under Actions:

Now you should select Port in the rule wizard section and then click on Next:
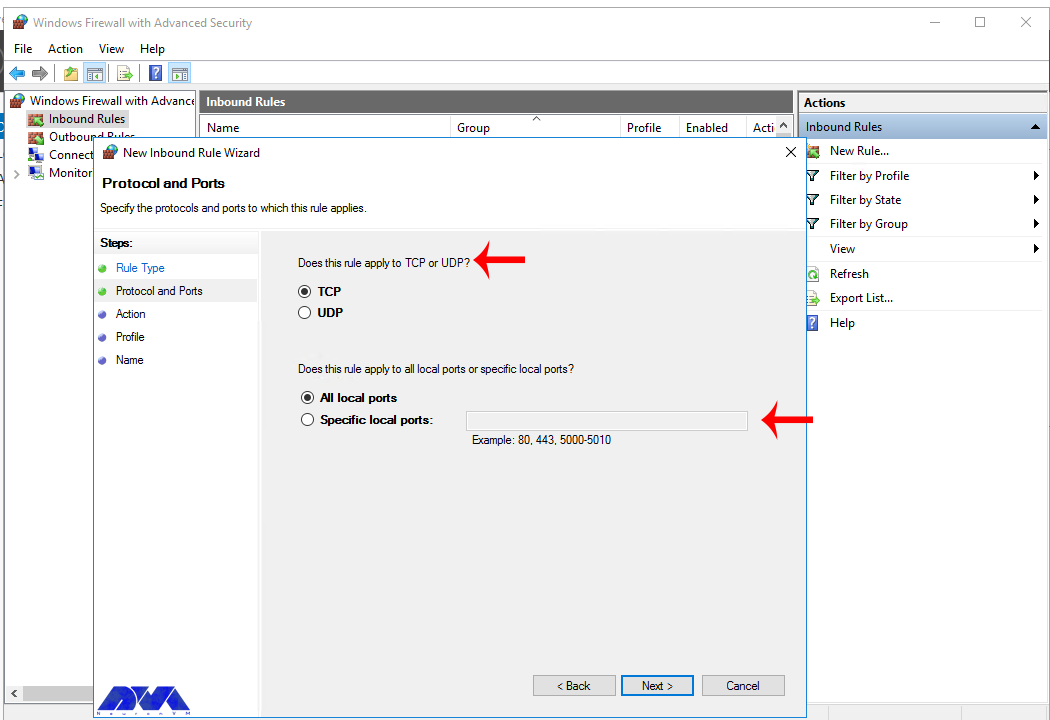
In this step, you have to choose whether the new rule applies to a TCP or UDP port on the server. Then select your desired ports and enter their number. Also, you can enter ports range or multiple ports separated by – and, respectively, and finally click Next:
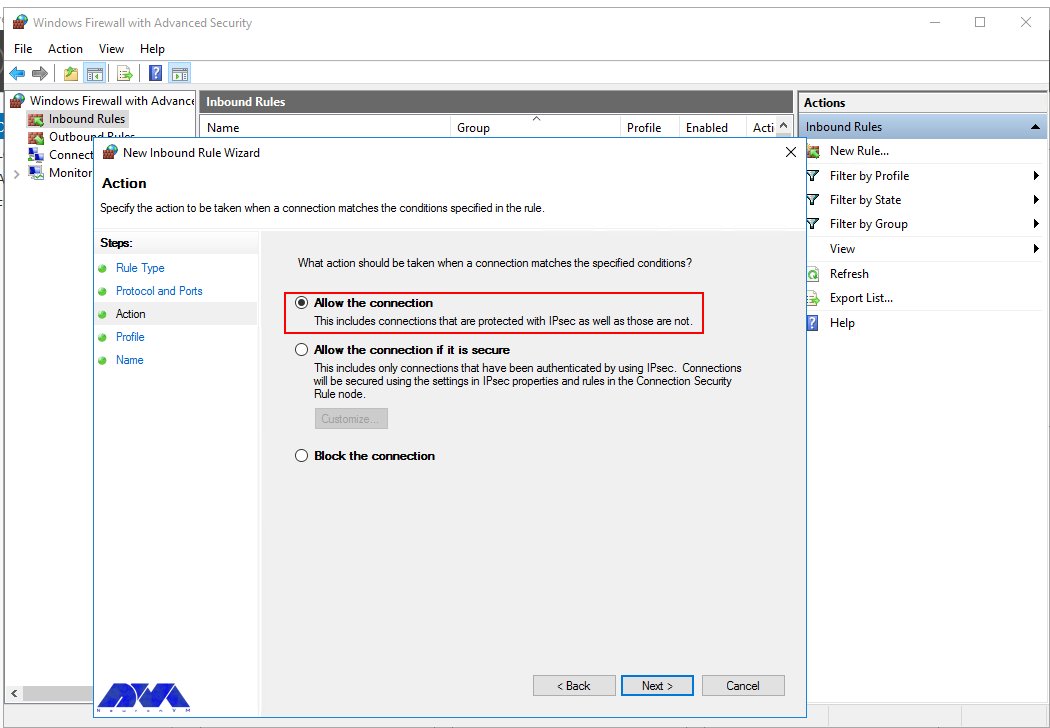
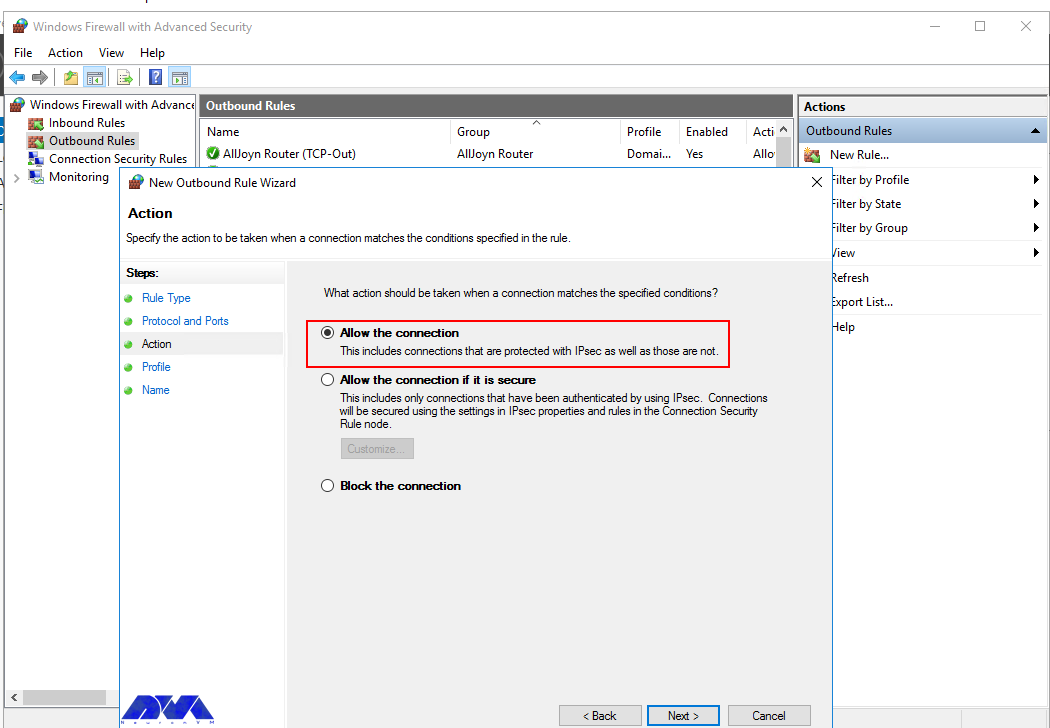
You can use Allow the connection to allow incoming connections to the specified server port.
Allow the connection if it is secure will authenticate with IP security and you can deny or allow the connection. For example, HTTP connections will be allowed and HTTP blocked.
Block the connection will block all incoming connections to your server through the specified port.
In this step, you should select the allow the connection to open port option and then click Next to assign a new rule to the profile:
Now select Domain, Private, and Public, or select all to apply the Firewall rule in multiple profiles:
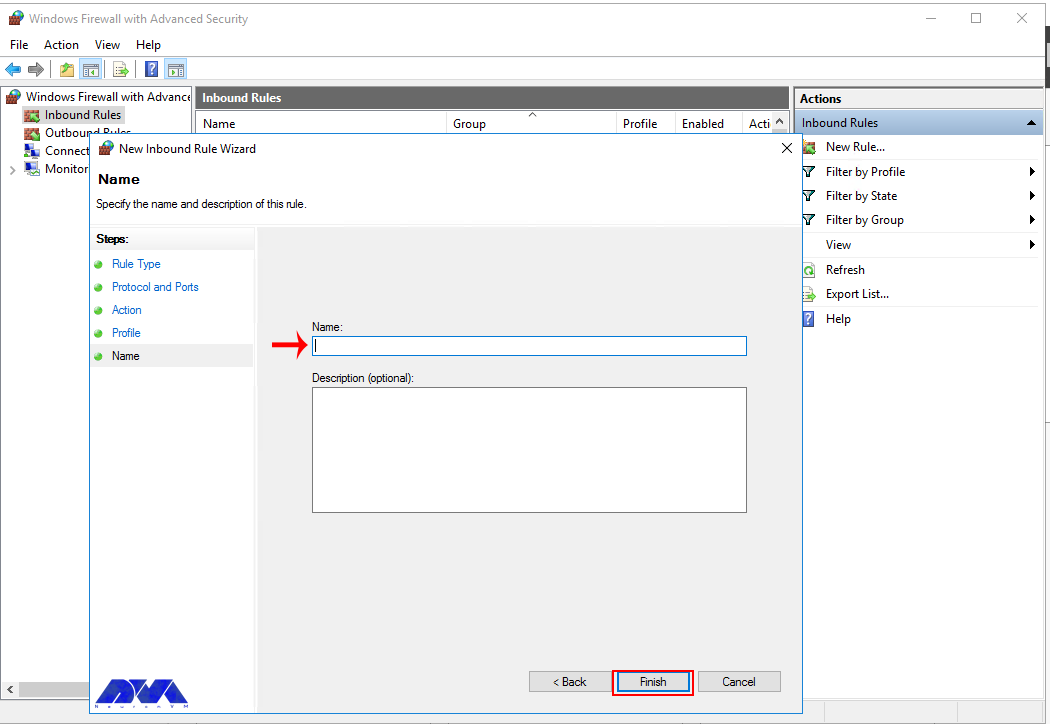
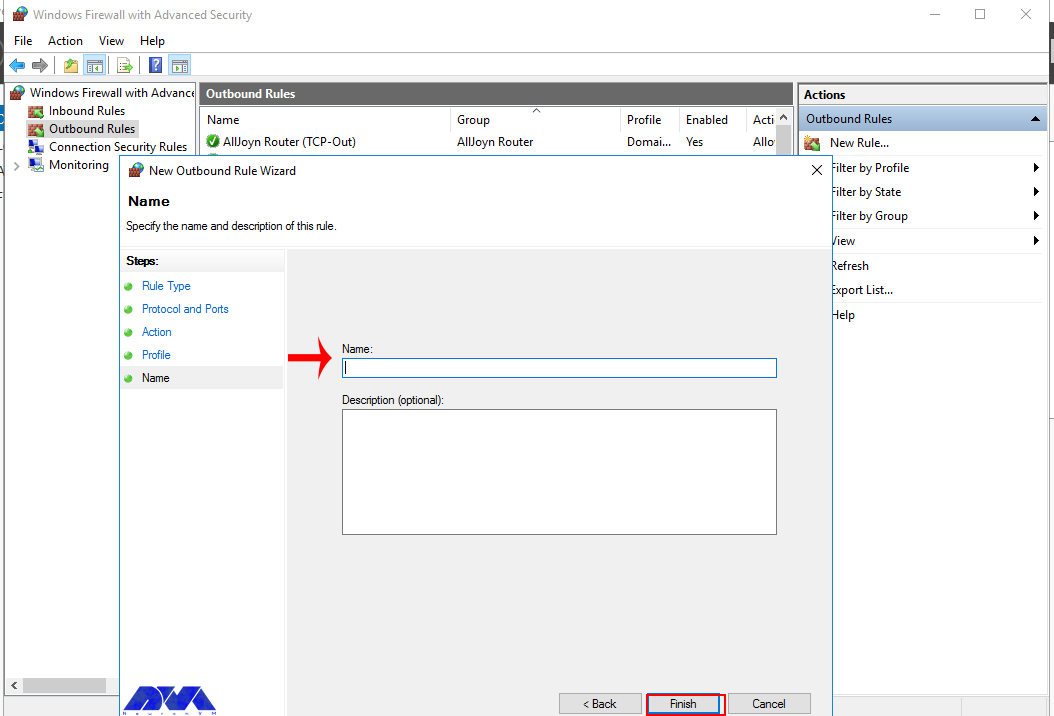
Remember to give your new firewall rule a name and description. Finally, you should click on Finish to enable the new rule. All connections to the server that match the port are accepted:
How to Open an Outbound Port
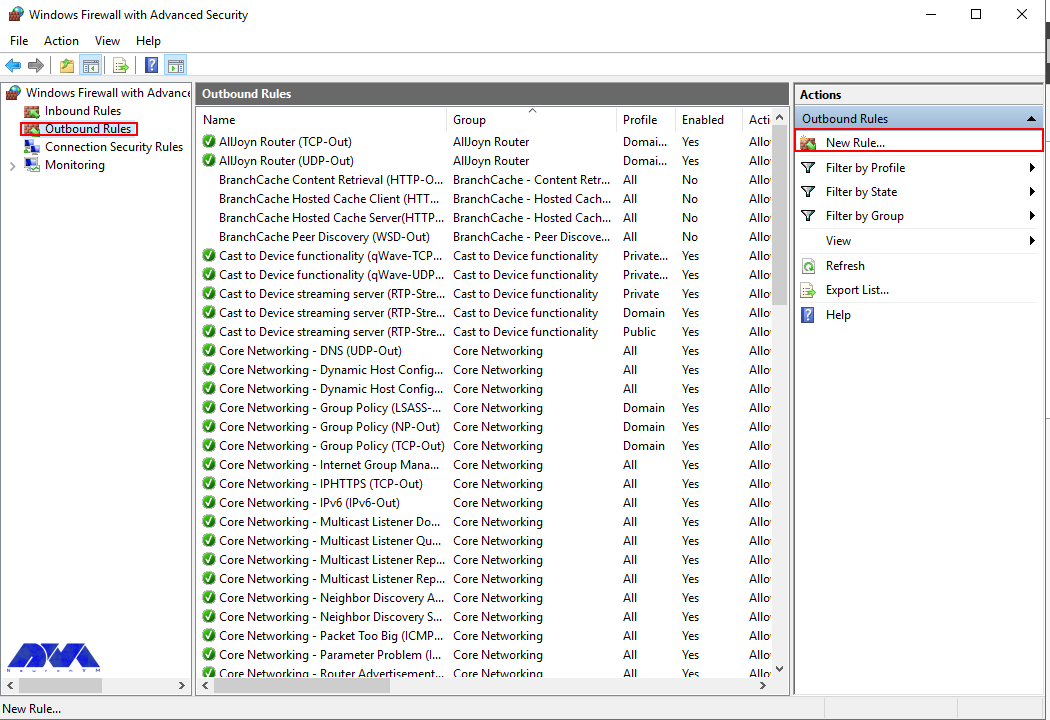
First, you should go to the Windows Firewall with Advanced Security console and click on Outbound Rules on the left pane. Now you will see a list of available outgoing connection rules. Then, you need to click on New Rule on the right pane under the outbound rules node.
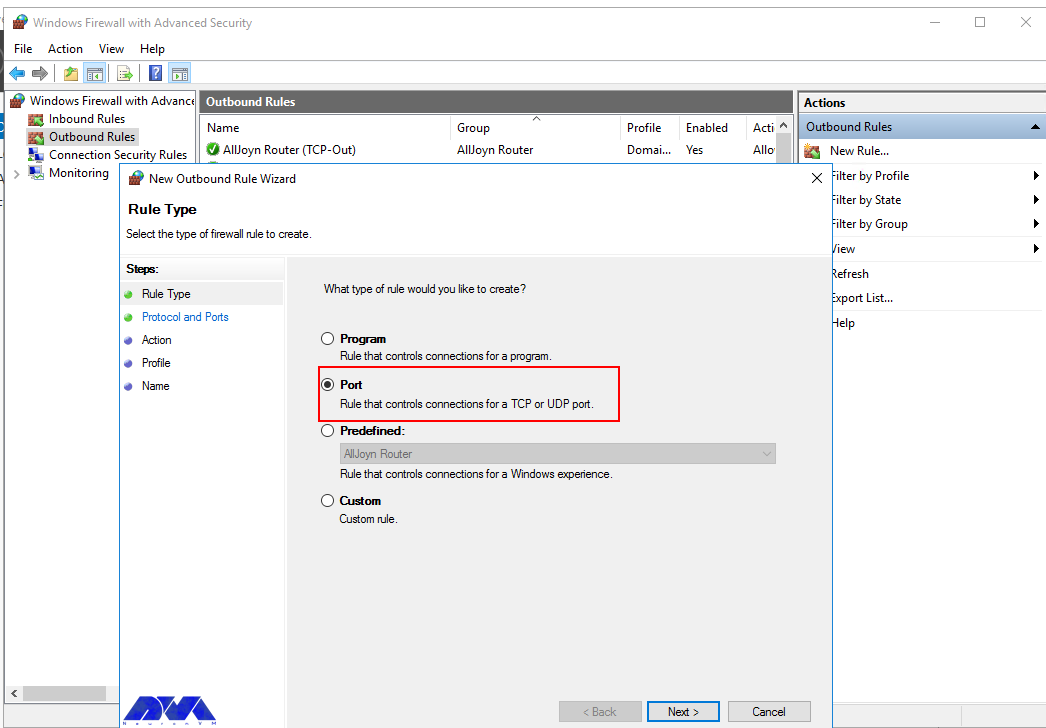
In the next step, you should select Port as the rule type in the new output rule wizard and then click Next:
Next, you have to choose whether the new rule applies to the TCP port or UDP. Select specific remote ports and then enter the port number of the server you want:
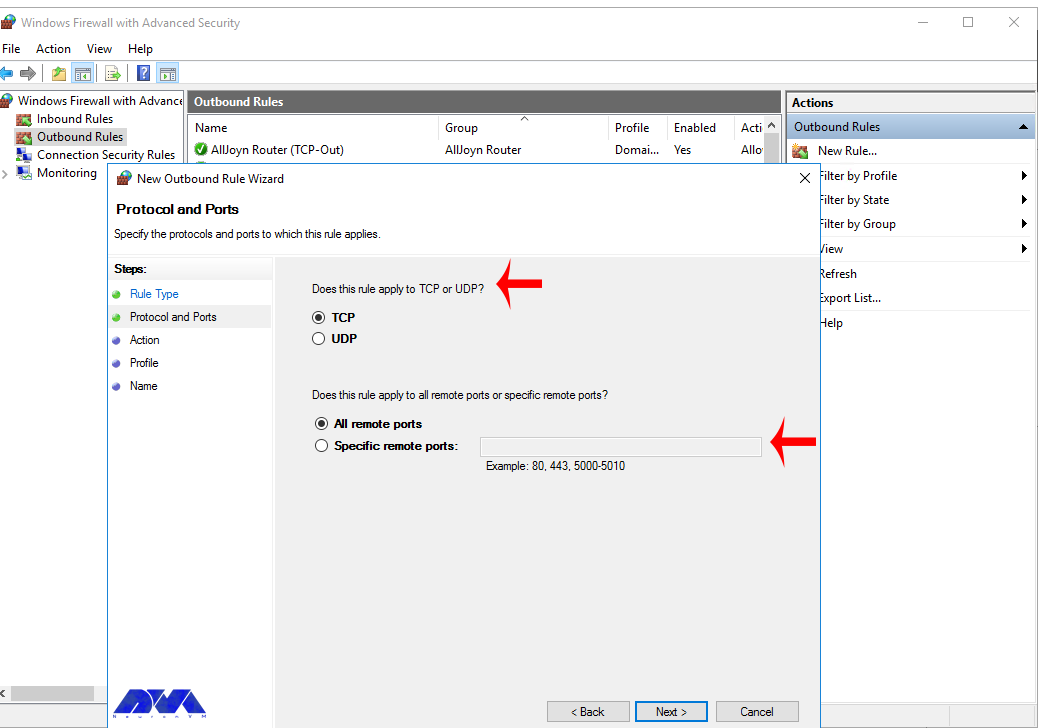
In this step, after selecting Allow the connection on the Action page, you should click Next:
Then you need to select the Server Profile on which the rule should be enabled:

Remember to name the new output rule and describe it. Finally, you should click Finish to enable the outbound rule for the target port on all selected server profiles:
How to Open a Port through Windows PowerShell
To do this first, you should go to the Windows Start menu and search for PowerShell and open it. Then you have to replace your settings in the following command:
New-NetFirewallRule -Enabled:True -LocalPort 21 -Protocol TCP -Direction Inbound -Profile Domain -Action Allow -DisplayName example opening a port rule"
The words in the above command indicate:
New-NetFirewallRule: It will create a new Firewall rule.
Enabled: It enables the new rule and by default, it will be set to True.
LocalPort: It is your target port number.
Protocol: It specifies the protocol associated with your port number.
Direction: It sets your target direction to either Inbound or Outbound.
Profile: It assigns the new rule to a server profile.
Action: It defines the state for the new firewall rule. You should enter Allow.
DisplayName: It sets a custom name for the new firewall rule.
Output:
PS C:\Users\Administrator> New-NetFirewallRule -Enabled:True -LocalPort 21 -Protocol TCP -Direction Inbound -Profile Domain -Action Allow -DisplayName "example opening a port rule"


Name : {427a1b12-ece6-4d54-847d-de482b227c6c}
DisplayName : example opening a port rule
Description :
DisplayGroup :
Group :
Enabled : True
Profile : Domain
Platform : {}
Direction : Inbound
Action : Allow
EdgeTraversalPolicy : Block
LooseSourceMapping : False
LocalOnlyMapping : False
Owner :
PrimaryStatus : OK
Status : The rule was parsed successfully from the store. (65536)
EnforcementStatus : NotApplicable
PolicyStoreSource : PersistentStore
PolicyStoreSourceType : Local
That is it!
Conclusion
This article taught you how to configure the Firewall on Windows Server 2016. You can use this article to open a network port on your Windows Server 2016. The server accepts incoming and outgoing connections through selected ports, but the Firewall blocks profile connections that don’t comply with port rules.
FAQ
Are there any other tools available for managing Windows Firewall?
Yes, you can use a command line provided by Microsoft.
Is it dangerous to turn off Windows Firewall?
It allows all the data packets to enter your network easily and makes it vulnerable to all kinds of Cyber attacks.