В один не самый хороший день, на вашем экране, вместо привычной загрузки операционной системы Windows 10, может появиться ошибка 0x0000034, в сообщении которой находится следующее сообщение:
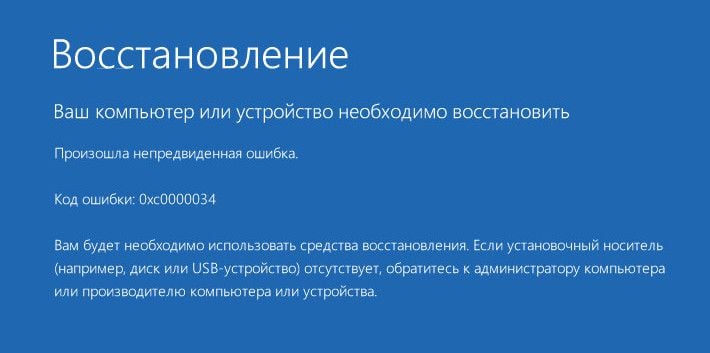
Восстановление
Ваш компьютер или устройство необходимо восстановить
Произошла непредвиденная ошибка.
Код ошибки: 0x0000034
Вам необходимо использовать средства восстановления. Если установочный носитель(например, диск или USB-устройство) отсутствует, обратитесь к администратору компьютера или производителю компьютера или устройства.
Данная ошибка может проявить себя в любое время и без каких-либо симптомов, предвещающих эту беду. Компьютер будет автоматически выключаться и перезагружаться, но на вашем экране снова будет появляться все та же ошибка 0x0000034.
Такая ситуация обычно возникает в результате повреждения конфигурационных файлов системы, которые отвечают за запуск ОС. На вашем экране с ошибкой также может указываться, что файл BCD(загрузчик Windows) отсутствует. Как раз из-за отсутствующего или поврежденного загрузчика Windows ваша система и перестала запускаться.
Произойти такое могло много из-за чего. Некоторые пользователи утверждают, что ошибка 0x0000034 у них появилась после непреднамеренного удаления системного раздела при установке Windows 10. Другие же утверждают, что эта ошибка стала результатом обновления операционной системы.
Чтобы справиться с этой нелегкой ситуацией, вам понадобиться раздобыть или создать Загрузочный диск, с помощью которого мы будем проводить восстановление системы.
Методы решения для ошибки 0x0000034
Метод №1 Использование Загрузочного диска
В этом методе от вас требуется задействовать уже указанный перед этим Загрузочный диск. Инструкции по его созданию вы можете найти на официальном сайте Microsoft в соответствующем разделе.
Как только вы обзавелись нужным предметом, то начните следовать этим шагам:
- Вставьте диск в привод или USB-устройство в ваш компьютер.
- Если ваш ПК не запускается через эти CD/USB, то вам нужно выставить нужный приоритет для загрузки. Для этого сделайте следующее:
- Как только ваш компьютер начнет загрузку, нажмите F10, F11 или ESC(внимательно следите за указаниями на экране во время загрузки и вы поймете какую из них нужно нажать).
- Перед вами появиться меню с множественными опциями. Найдите что-то вроде «Boot order», «Boot options» или «Boot». Выберите с помощью стрелочек пункт с Загрузкой.
- Перед собой вы должны увидеть список с различными устройствами, расположенный в определенном порядке, например, Жесткий диск→Привод→UBS-устройство. Вам нужно сделать так, что ваш Загрузочный диск оказался в первом приоритете. Если это USB-флешка, то передвиньте ее в самый верх загрузок.
- Как только закончите с выставлением приоритетов, то перезагрузите свой компьютер.
- Теперь вы должны будете нормально запуститься именно с Загрузочного диска. Выберите нужный вам язык, время, курс валюты и раскладку клавиатуры, а затем нажмите «Далее».
- Появиться окно для установки Windows. Мы же выбираем не установку, а пункт «Восстановление системы».
- Затем кликните на «Диагностика» и выберите «Автоматическое восстановление».
Восстановление системы должно занять как минимум минут тридцать.
Метод №2 Использование командной строки
Также вы можете использовать командную строку для восстановления системы. Для этого сделайте следующее:
- Снова проделайте шаги, которыми вы пользовались, чтобы добраться до пункта «Восстановление системы» на загрузочном диске.
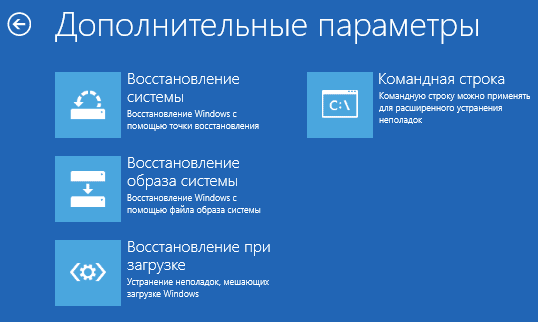
- Выберите «Дополнительные параметры»
- В открывшемся меню, выберите «Командная строка».
- Вводите в нее следующие команды и нажимайте Enter после каждой из них для подтверждения:
- bootrec /fixMBR
- bootrec /fixBoot
- bootrec /rebuildBCD
- Как только вы закончите, появится сообщение с вопросом. Нажмите на Y для подтверждения.
- Затем вы увидите сообщение, в котором вас уведомят об успешном окончании операции.
- Впишите Exit и нажмите Enter.
Перезагрузите свой ПК и проблема с ошибкой 0x0000034 должна будет быть разрешена.
Метод №3 Использование командной строки(альтернатива)
Если вышеуказанный метод не сработал, то вот этот определенно должен. Следуйте нижеописанным шагам:
- Снова загрузите свою систему через Загрузочный диск и запустите Командную строку.
- Введите следующие команды и нажмите Enter после каждой из них:
- diskpart
- list disk
- select disk 0
- Затем впишите list volume и нажмите Enter. Тут вы должны проверить возможность видеть ваш системный раздел(раздел, на котором установлена ваша Windows). Если вы его не видите, то выполните следующие шаги:
- Впишите команду list partition и нажмите Enter.
- Затем впишите команду select partition 2 и нажмите Enter(замените 2 на номер вашего системного раздела).
- Впишите help set и нажмите Enter.
- Впишите set id=ebd0a0a2-b9e5-4433-87c0-68b6b72699c7 и нажмите Enter.
- Теперь ваш раздел более не должен быть скрытым.
- Напишите list volume и нажмите Enter, чтобы продолжить выполнять шаги.
- Впишите команду select volume 2 и нажмите Enter(заменить 2 на сис.раздел).
- Напишите команду assign letter=b: и нажмите Enter.
- Впишите Exit и нажмите Enter.
- Пропишите ряд следующих команд:
- cd /d b:\EFI\Microsoft\Boot\
- ren BCD BCD.bak
- bootrec /fixboot
- bcdboot c:\Windows
- Если у вас появилась ошибка после введения последней команды, то впишите bcdboot c:\Windows /s b: /f ALL и нажмите Enter.
- Впишите ряд следующих команд:
- Bootrec /fixmbr
- Bootrec /fixboot
- Bootrec /scanos
- Bootrec /rebuildbcd
Теперь ваша система должна запускаться как нужно. Проверьте, не будет ли у вас снова ошибки 0x0000034.
Метод № 4 Использовать настройки BIOS
Иногда используя меню BIOS для отключения и включения Загрузчика Windows может заставить систему запуститься и корректно настроиться.
- Как только вы увидите на своем экране ошибку 0x0000034, нажмите клавишу ESC для перехода в меню настроек BIOS.
- Ищите опцию под именем «Advanced Boot Options» или что-то схожее с этим(существует разница в названии этого пункта у различных производителей материнский плат).
- Далее найдите пункт «Boot Manager»(менеджер загрузки).
- В идеале, вы должны будете увидеть две опции: «Windows Boot Manager» и «Disabled»(отключен). Выберите вариант с отключением Загрузчика Windows.
- Сохраните изменения и перезагрузитесь. Вы должны будете видеть сообщение о том, что загрузка системы невозможна, так как отсутствует файл Загрузчика.
- Затем снова вернитесь в BIOS и теперь уже выберите пункт «Windows Boot Manager».
- Снова сохраните изменения в BIOS и перезагрузитесь.
Ваша Windows может все-таки запуститься в режиме восстановления и когда это произойдет — следуйте инструкциям на экране для настройки системы. Процесс восстановления, как уже было указанно в самом первом методе, может занять порядка тридцати минут.
Главная » Windows » Что делать при появлении ошибки «The boot configuration data file is missing some required information» или 0xc0000034 в Windows 8, 8.1, 10?
Возникновение ошибки «The boot configuration data file is missing some required information» часто встречается в операционных системах Windows 8 и выше. Если вы допустили появление этой ошибки, то я вам помогу ее решить. Кстати, вот предыдущая статья об ошибке 0xc0000034.
О загрузчике Windows мы уже немного знаем из предыдущих статей, если система не может найти нужные файлы, которые предназначены для запуска системы, то, в итоге система вообще не запуститься. Файл может либо отсутствовать, либо он повреждён.
Итак, дело конечно же в файле BCDboot, повреждение или отсутствие которого недопустимо. Также вы можете наблюдать следующую ошибку, код которой 0xc0000034:
Многие пользователи идут на крайние жертвы сразу: переустановка Windows, теряя всякие надежды. Кто пытается использовать восстановление системы тоже спешу огорчить – ничего не выйдет.
Я не хочу, чтобы после каждой подобной ошибки пользователи бежали переустанавливать Windows. Не спорю, это поможет, но с удаление всех установленных программ и файлов, которые у вас были на системном диске, а потом все это придётся восстанавливать. Проблему можно решить и другим методом, а именно – использование диска восстановления системы (или флешки).
Вы должны найти диск восстановления именно операционной системы, начиная с Windows 8, подойдёт и версия 8.1 и даже 10. Потом с этого диска (или флешки) загружаетесь, а потом идёте в восстановление системы и там в «Дополнительные параметры». Находите там пункт «Командная строка».
Если у вас каким-то образом не получилось найти командную строку, то нажмите сочетание клавиш Shift+F10.
В открывшейся командной строке вводим команду:
bcdboot c:\windows
С помощью данной команды мы восстанавливаем среду загрузки в полном объеме. Файл BCDboot должен быть на месте.
Но, на практике всё равно возникает множество неудач. Одна из них заключается в том, что команда выше могла не помочь.
Дополнительные способ #1
Снова запускаемся в режиме восстановления и открываем командную строку, в которую вводим три команды:
bootrec.exe /fixmbr
и
bootsect.exe /nt60 all /force
и
bootrec.exe / rebuildbcd
Эти команды восстанавливают MBR и данные загрузки в чистом виде. В итоге команда должна помочь, и система запуститься. При неудаче читаем далее.
Дополнительные способ #2
Снова запускаем командную строку из среды восстановления и пишет команды:
bootrec.exe /fixmbr
и
bootsect.exe /nt60 all /force
Теперь выполняем следующий ряд команд, будьте очень внимательны:
Так как BCD пока что нет, первые две команды могут выдавать ошибки или еще что, но в этом нет ничего страшного.
Делаем следующую команду:
bcdedit.exe /create /d “Microsoft Windows” /application osloader
В итоге вы должны получить сообщение The entry {c0dfc4fa-cb21-11dc-81bf-005056c00008} was successfully created, означающее, что вы все верно делаете.
Полученные данные, которые в фигурных скобках, используем для ввода следующих команд:
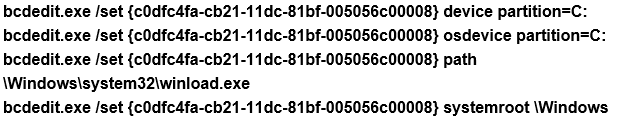
И наконец, последний штрих, новая запись в загрузчике:
bcdedit.exe /displayorder {c0dfc4fa-cb21-11dc-81bf-005056c00008}
Теперь вы можете спокойно перезагрузиться с работающей системой. И не надо ничего переустанавливать. И все же, если ничего из этой статьи не помогло, то поможет только переустановка.
( 4 оценки, среднее 4 из 5 )
Вызвали решить проблему с загрузкой Windows 10. При включении компьютера сразу выходит ошибка File:\boot\BCD status: 0xc0000034. Говорят, оставили компьютер в рабочем состоянии, пришли через полчаса, а он завис. Принудительно выключают компьютер, включают заново, а система не загружается.
В этой статье расскажу, как исправить ошибку 0xc0000034 в Windows 10 и Windows 7 без переустановки системы и потери данных.
Содержание статьи:
- 1 Причины ошибки 0xc0000034 file boot bcd
- 2 Шаг 1. Создаем загрузочную флешку Windows
- 3 Шаг 2. Загружаемся с установочной флешки Windows
- 4 Шаг 3. Открываем командную строку
- 5 Шаг 4. Выясняем схему разделов диска MBR или GPT
- 6 Шаг 5. Исправляем 0xc0000034 Windows с MBR схемой разделов
- 6.1 Как исправить 0xc0000034 в Windows 10
- 6.2 Как исправить 0xc0000034 в Windows 7
- 7 Шаг 6. Исправляем 0xc0000034 Windows 10 с GPT
Причины ошибки 0xc0000034 file boot bcd
Сама ошибка File:\BCD error code: 0xc0000034 указывает на то, что поврежден файл BCD в папке Boot системного раздела.
Причины появления ошибки 0xc0000034:
- Неудачное обновление системы.
- Принудительное выключение компьютера в процессе загрузки или установки обновления системы.
- Установка сторонних не совместимых программ, которые вносят изменения в реестр.
- Сбойные сектора на жестком диске, с которых не могут считаться системные файлы.
- Вирусы повлияли на системные файлы.
- Установка второй Windows на один жесткий диск может повредить загрузчик.
- Некорректные действия пользователя при восстановлении системы после сбоя.
Все эти причины могут создать проблему с загрузкой Windows.
Так как поврежден загрузочный файл, то в безопасный режим не получится войти и восстановление системы не поможет. Чтобы исправить ошибку 0xc0000034 обязательно понадобиться установочная флешка или CD диск с Windows.
Поэтому сначала нужно создать загрузочную флешку с Windows на другом рабочем компьютере.
Видео как создать установочную флешку с Windows.
Ссылка из видео — https://www.microsoft.com/ru-ru/software-download/windows10
Если у вас возникли проблемы с компьютером, то своим подписчикам всегда стараюсь помогать. Вступайте в группу — https://vk.com/ruslankomp

Шаг 2. Загружаемся с установочной флешки Windows
Вставляем загрузочную флешку Windows в компьютер, где выходит ошибка 0xc00000034.
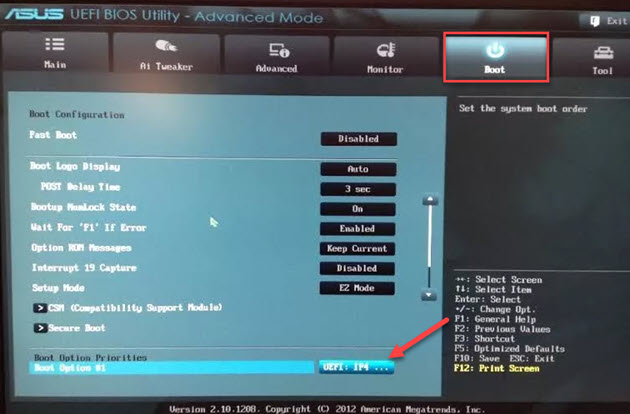
Включаем ПК и выбираем приоритет загрузки с USB флешки. Для этого сразу при включении нажимаем многократно F8 или F10 или F11 или F12 или ESC у всех по-разному, зависит от материнской платы ПК и модели ноутбука. В итоге должно появится вот такое меню загрузки, где из списка выбираем USB.

Если меню загрузки не запускается, то входим в Биос кнопкой Del на ПК или F2 на ноутбуке. В биосе заходим в раздел Boot (Загрузка) и ставим нашу флешку на первое место в списке загрузок, после нажимаем F10 и жмём Enter для сохранения настроек в биосе.
Если все сделали правильно запустится установка Windows.
Шаг 3. Открываем командную строку
Когда загрузится окно установки Windows, где нужно выбрать нужный язык и другие параметры, нажмите одновременно Shift+F10 для вызова командной строки.
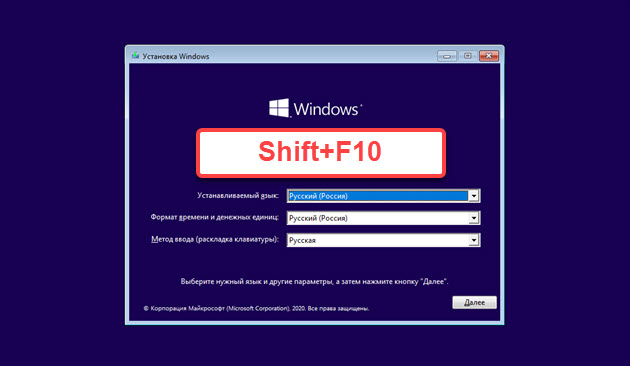
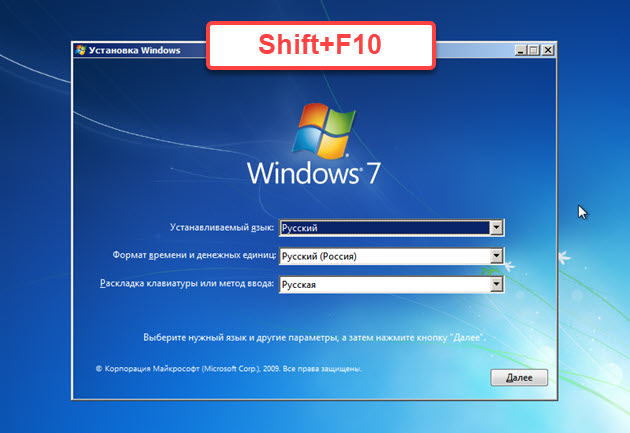
На некоторых моделях ноутбука, чтобы вызвать командную строку, нажмите одновременно Shift+Fn+F10.
Шаг 4. Выясняем схему разделов диска MBR или GPT
Для начала нужно определить схему разделов вашего диска, от этого будет зависеть набор команд в командной строке.
Чтобы определить схему разделов MBR или GPT используем такие команды в командной строке:
- diskpart
- list disk
Если в колонке GPT стоит звездочка, значит у вас схема разделов GPT. Если звездочки нет, значит на вашем диске схема раздела MBR.
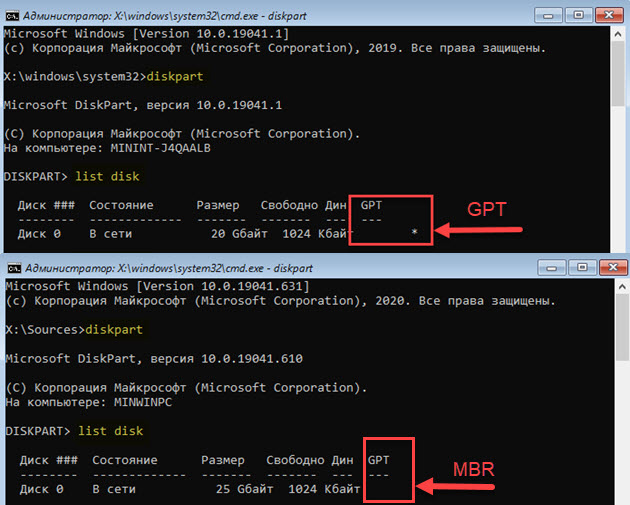
На этом взаимодействие с diskpart закончено, вводим exit и нажимаем Enter.
Важно! Если у вас схема разделов диска MBR, то переходим к шагу 5. Если схема разделов GPT, то набор команд описан в шаге 6.
Для справки! Определить схему разделов диска можно в биосе. Заходим в Bios компьютера клавишей DELETE при включении или на ноутбуке F2. Смотрите параметр загрузки, если стоит UEFI значит схема разделов GPT. Если параметр загрузки Legacy то MBR.
Шаг 5. Исправляем 0xc0000034 Windows с MBR схемой разделов
Итак, мы определили что у нас схема разделов MBR. Теперь начнем устранять ошибку file bcd error code 0xc0000034.
Как исправить 0xc0000034 в Windows 10
В командной строке вводим:
bootrec /rebuildbcd — и нажимаем Enter.
После сканирования и обнаружения установленных систем Windows, предложат добавить систему в список загрузки. Набираем Y и жмем Enter.
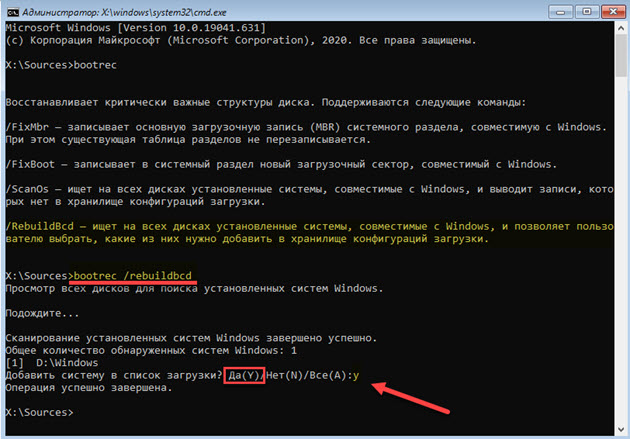
После этого напишет, что операция успешно завершена. Закрываем командную строку, перезагружаем компьютер, не забудьте вынуть загрузочную флешку из порта USB. Система должна удачно загрузится.
Если это не помогло, то проделайте заново шаги 2-5 и примените дополнительные команды.
bootrec /fixmbr — записывает основную загрузочную запись (MBR) системного раздела, совместимую с Windows. При этом существующая таблица разделов не перезаписывается.
bootrec /fixboot — записывает в системный раздел новый загрузочный сектор, совместимый с Windows.
bootrec /scanos — ищет на всех дисках установленные системы, совместимые с Windows, и выводит записи, которых нет в хранилище конфигураций загрузки.
bootrec /rebuildbcd — ищет на всех дисках установленные системы, совместимые с Windows, и позволяет пользователю выбрать, какие из них нужно добавить в хранилище конфигураций загрузки.
Как исправить 0xc0000034 в Windows 7
Покажу на примере Windows 7, как я устранил ошибку 0xc0000034, применяя команды:
bootrec.exe /fixmbr
bootsect.exe /nt60 all /force
bootrec /rebuildbcd
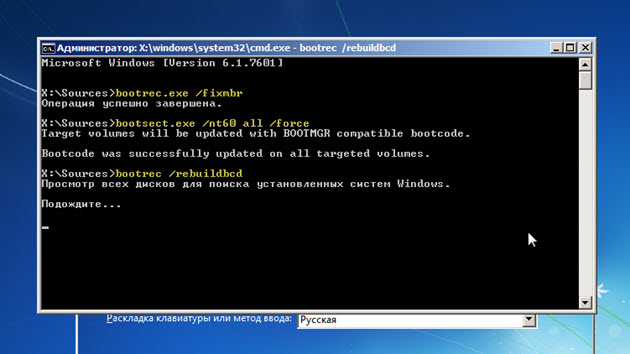
После обнаружения системы, вводим Y и жмем Enter.

Закрываем командную строку и перезагружаемся, отключив флешку с установкой Windows. Система должна успешно загрузится. Если это не помогло, то заново нужно проделать шаги 2-5 и ввести следующие команды:
bootrec /fixmbr
bootrec /fixboot
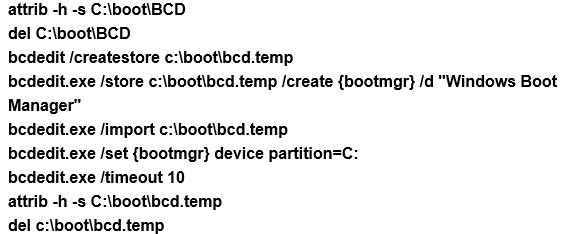
bcdedit /export c:\bcdbackup
attrib c:\boot\bcd -h -r -s
ren c:\boot\bcd bcd.bak
*где С: — это буква системного диска Windows, у вас может быть другая буква, например D:
bootrec /rebuildbcd
Если не получилось, вступайте в группу и напишите мне. Попробуем разобраться вместе — https://vk.com/ruslankomp
Шаг 6. Исправляем 0xc0000034 Windows 10 с GPT
Если схема раздела диска у вас GPT, то применяем такой набор команд:
diskpart — запускает инструмент для работы с дисками.
list disk — выводит список дисков.
sel disk 0 — выбираем disk 0
list partition — выводит список разделов.
list volume — выводит список логических томов.

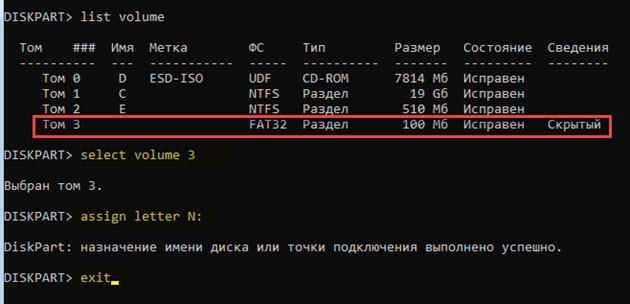
Нас интересует скрытый том 3 с файловой системой FAT32, где находятся загрузочные файлы boot bcd.
Исходя из этого вводим следующие команды:
select volume 3 — выбираем том 3.
assign letter N — назначаем тому букву N.
exit — выходим из управления дисками.
Теперь нужно переименовать файл BCD и пересоздать новый, скопировав файлы среды загрузки UEFI в загрузочный раздел из системного каталога.
cd /d N:\efi\microsoft\boot — переходим в каталог с загрузчиком.
В данном случае N: это назначенная буква системного тома 3.
Если каталог \EFI\Microsoft\Boot\ отсутствует, выходит ошибка The system cannot find the path specified, попробуйте следующие команды:
cd /d N:\Boot\
или
cd /d N:\ESD\Windows\EFI\Microsoft\Boot\
Далее вводим:
attrib bcd -s -h -r — снимаем атрибуты системный, скрытый, только для чтения.
ren bcd bcd.bak — переименовываем файл bcd в bcd.bak.
bcdboot c:\windows /l ru-ru /s N: /f All — копируем файлы среды загрузки Windows.
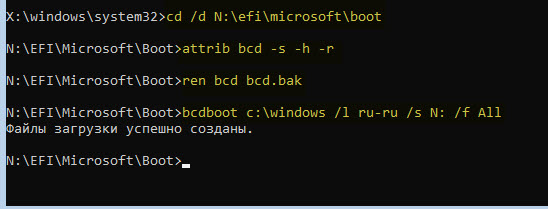
После того как файлы загрузки успешны созданы, закрываем командную строку. Перезагружаем компьютер, отключив загрузочную флешку.
Таким образом можно восстановить загрузку Windows 10 без переустановки системы, сохранив все настройки и данные.
Если вдруг возникли какие-то трудности, то могу помочь разобраться подписчикам группы в контакте — https://vk.com/ruslankomp
Windows Vista Starter Windows Vista Home Basic Windows Vista Home Premium Windows Vista Business Windows Vista Enterprise Windows Vista Ultimate More…Less
Symptoms
You install a Windows Vista service pack on your computer. After the service pack is installed, the computer may freeze, or it may restart. If the computer restarts, you see an error message that resembles the following on a black screen:
!! 0xc0000034 !! 142/53007 (_0000000000000000.cdf-ms)
Note If you restart the computer, you receive the same error message.
Note If you experience this issue on Windows 7 computers, click the following article number to view the article in the Microsoft Knowledge Base:
975484 Your computer may freeze or restart to a black screen that has a «0xc0000034» error message after you install Windows 7 Service Pack 1
Resolution
To resolve this issue, use the following methods starting with Method 1. If Method 1 does not resolve the issue, try Method 2. We recommend that you try Method 3 only if you are an advanced user.
These methods are intended to help you return your computer to a bootable state without the service pack installed. After you successfully return your computer to a bootable state, you should try to install the service pack again.
Note The following methods require the Windows Vista DVD. If your computer manufacturer did not supply a Windows Vista DVD, you may be able to start to Repair tools. To do this, follow these steps:
-
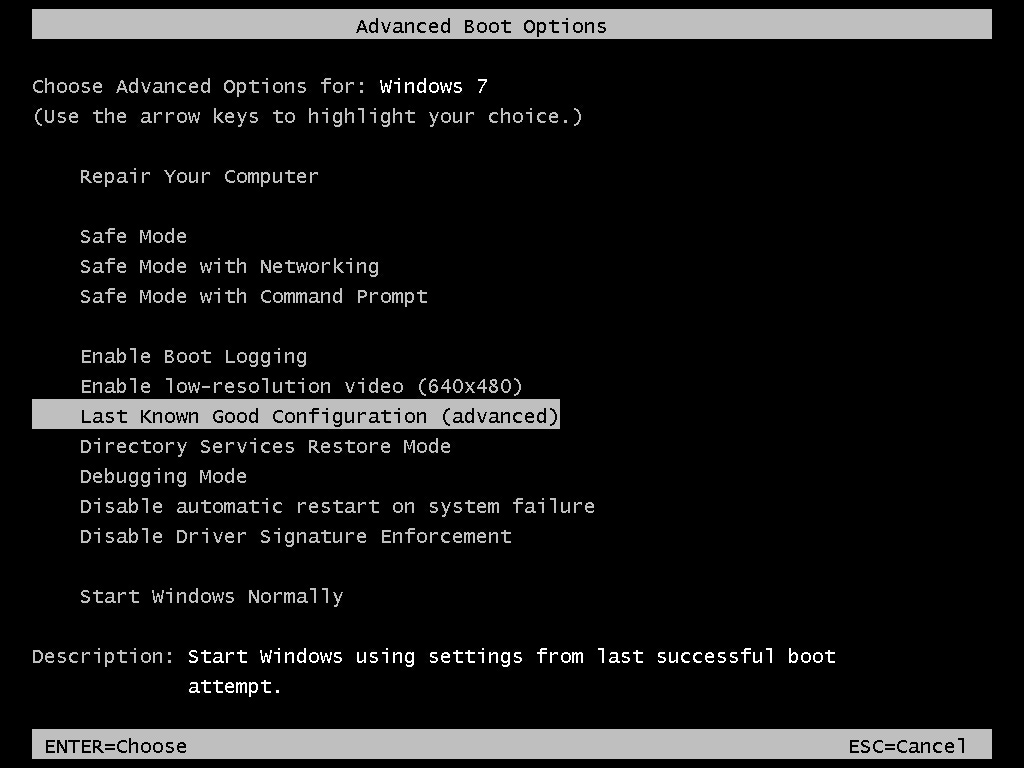
Restart your computer, and then press F8 during the restart process to open the Advanced Boot Options menu. Or, wait for and select the Advanced Options Menu option.
-
Select the option on the menu to repair your computer.
-
Select Administrator, and then press ENTER.
-
Go to step 4 in Method 1 or Method 2.
Method 1: Restore your computer to an earlier point in time by using System Restore
System Restore will restore your computer to an earlier point in time before you experienced this issue, and then it will restart your computer. To restore your system, follow these steps:
-
Insert the Windows Vista DVD in the DVD drive, and then restart your computer from the DVD.
Note When you receive the Press any Key to boot from the CD or DVD prompt, press any key on the keyboard to restart your computer by using the Windows Vista DVD.
-
Select your language setting, and then click Next.
-
Select Repair your computer.
-
Select the Windows Vista installation to be repaired, and then click Next.
-
Under System Recovery Options, select System Restore, and then press ENTER.
Note If the repair process detects a problem when it starts Windows Vista, it will run Startup Repair to automatically fix the problem. If this occurs, click Cancel, and then click View Advanced Options for system recovery and support.
-
In the System Restore Wizard, click Next.
-
Select the restore point that has a date before the date that you received the error message, and then click Next.
Note In most cases, this is the latest restore point in the list.
-
Click Next.
-
Click Finish. System Restore will finish and restart your computer.
Note If you see the black screen and the same error message or a similar error message, you may have to repeat these steps and restore your computer to an earlier date.
Method 2: Use Startup Repair to try to repair any startup issues with your computer
To start Windows from the Windows Vista DVD and use the System Recovery Options, follow these steps:
-
Insert the Windows Vista DVD in the DVD drive, and then restart your computer from the DVD.
Note When you receive the Press any Key to boot from the CD or DVD prompt, press any key on the keyboard to restart your computer by using the Windows Vista DVD.
-
Select your language setting, and then click Next.
-
Select Repair your computer.
-
Select the Windows Vista installation to be repaired, and then click Next.
-
Under System Recovery Options, select Startup Repair, and then press ENTER.
Note If the repair process detects a problem when it starts Windows Vista, it will run Startup Repair to automatically fix the problems. If this occurs, click Cancel, and then click View Advanced Options for system recovery and support.
-
Click Finish when the Startup Repair has finished.
-
Under System Recovery Options, click Restart.
Note If you see a black screen that has the same error message, try Method 3.
Method 3: Delete the poqexec entry from the SetupExecute value (advanced users only)
Note We recommend that you try Method 3 only if you are an advanced user.
Important This section, method, or task contains steps that tell you how to modify the registry. However, serious problems might occur if you modify the registry incorrectly. Therefore, make sure that you follow these steps carefully. For added protection, back up the registry before you modify it. Then, you can restore the registry if a problem occurs. For more information about how to back up and restore the registry, click the following article number to view the article in the Microsoft Knowledge Base: 322756 How to back up and restore the registry in Windows
To delete the poqexec entry from the SetupExecute (REG_MULTI_SZ) value, you must clear the value. To do this, follow these steps:
-
Insert the Windows Vista DVD in the DVD drive, and then restart your computer from the DVD.
Note When you receive the Press any Key to boot from the CD or DVD prompt, press any key on the keyboard to restart your computer by using the Windows Vista DVD.
-
Select your language setting, and then click Next.
-
Select Repair your computer.
Note If you are prompted to do a System Restore, select No, and then press ENTER.
-
Under System Recovery Options, select Startup Repair, and then press ENTER.
Note If the repair process detects a problem when it starts Windows Vista, it will run Startup Repair to automatically fix the problems. If this occurs, click Cancel, and then click View Advanced Options for system recovery and support.
-
Under System Recovery Options, click Command Prompt, and then press ENTER.
-
At the command prompt, type the following commands. Press ENTER after each command:
Reg load HKLM\BaseSystem C:\Windows\System32\config\SYSTEM
Reg Delete «HKLM\BaseSystem\ControlSet001\Control\Session Manager» /v SetupExecute
Reg add «HKLM\BaseSystem\ControlSet001\Control\Session Manager» /v SetupExecute /t REG_MULTI_SZ
Reg unload HKLM\BaseSystem
-
At the command prompt, type exit, and then press ENTER.
-
Restart your computer.
Need more help?
Want more options?
Explore subscription benefits, browse training courses, learn how to secure your device, and more.
Communities help you ask and answer questions, give feedback, and hear from experts with rich knowledge.
Get the fix for the error 0xc0000034 on Windows XP, Windows Vista, Windows 7, Windows 8 and Windows 10.
About “0xc0000034“
The following information on this error has been compiled by NeoSmart Technologies, based on the information gathered and reported by our global network of engineers, developers, and technicians or partner organizations.
Description and Symptoms
The error messages, alerts, warnings, and symptoms below are tied to this error.
Symptom 1: “0xc0000034” error screen on startup
On Windows 7 systems, the error is usually displayed with a simpler error text:
!! 0xc0000034 !!
But this type of error screen is also common on Windows Vista and 7 systems:

The text reads:
Windows failed to start. A recent hardware or software change might be the
cause. To fix the problem:
1. Insert your Windows installation disc and restart your computer.
2. Choose your language settings, and then click "Next."
3. Click "Repair your computer."
If you do not have this disc, contact your system administrator or computer
manufacturer for assistance.
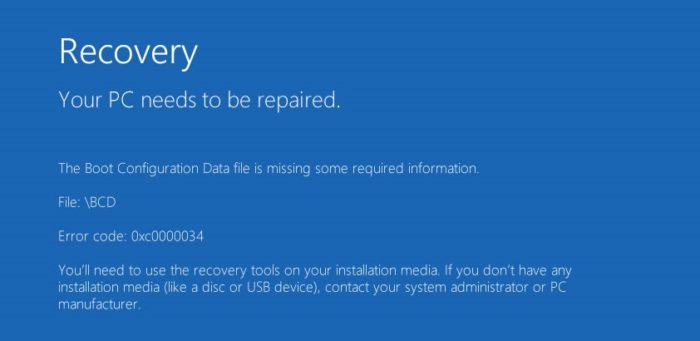
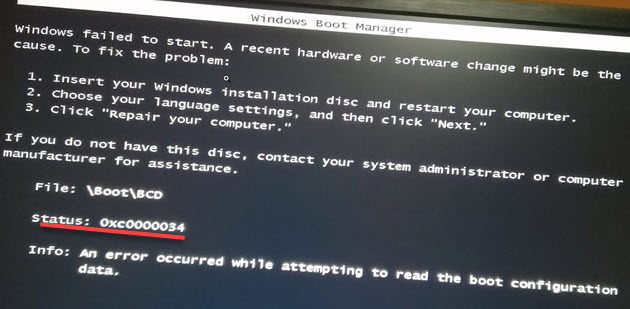
File: \Boot\BCD
Status: 0xc0000034
Info: The Windows Boot Configuration Data file does not contain a valid
OS entry.
On Windows 8, Windows 8.1 and Windows 10 systems, the error code text would be this:

Recovery

Your PC needs to be repaired

The Boot Configuration Data file is missing some required information.

File: \BCD

Error code: 0xc0000034

You'll need to use the recovery tools on your installation media. If you don't have any installation media (like a disc or USB device), contact your system administrator or PC manufacturer.

Press ESC for UEFI Firmware settings.
You can prevent the 0xc0000034 error by installing KB 2533552 update.
Causes of this Error
This error has been known to occur as a result of one of the following causes:
Cause 1: Bootloader files are missing or corrupt
One of the most common causes of this error is the boot-related files that became either missing, corrupt, or misconfigured. That could happen because of disk write errors, power outages, boot sector viruses, or errors made while configuring these files manually.
Fixing “0xc0000034” on Windows
Windows Setup CD/DVD Required!
Some of the solutions below require the use of the Microsoft Windows setup CD or DVD. If your PC did not come with a Windows installation disc or if you no longer have your Windows setup media, you can use Easy Recovery Essentials for Windows instead. EasyRE will automatically find and fix many problems, and can also be used to solve this problem with the directions below.
Fix 0xc0000034 with Easy Recovery Essentials
Easy Recovery Essentials is guaranteed to fix the “0xc0000034” error automatically using its built-in Automated Repair option. EasyRE is currently available for Windows XP, Vista, 7, 8, Windows 10, and Windows 11 and can be downloaded and created on any PC.
- Download Easy Recovery Essentials. Make sure to note your Windows version (XP, Vista, 7, 8, 10, or Windows 11) before you download EasyRE. This guide can help you identify what version of Windows you have installed.
- Burn the image. Follow these instructions on how to burn the bootable ISO image very carefully, as making a bootable CD can be tricky! Alternatively, these instructions explain how to create a bootable EasyRE recovery USB stick/drive.
- Boot up your PC from the Easy Recovery Essentials CD or USB you created.
- Once EasyRE is running, choose the “Automated Repair” option and click Continue.

Choose “Automated Repair” in Easy Recovery Essentials
- After EasyRE scans your computer’s drives, identify and select the drive letter for your Windows installation from the list, and then click on the Automated Repair button to begin.
Choose the drive associated with the Windows installation you’re trying to repair.
- Easy Recovery Essentials will start analyzing the selected drive for problems. EasyRE will test for and attempt to automatically correct errors with the disk, partition, bootsector, filesystem, bootloader, and registry. No intervention is required, as EasyRE’s repair is fully automated:
Easy Recovery Essentials searches for errors and makes corrections to the selected Windows installation.
- Once the process is complete, EasyRE will report its findings. Click on the Restart button to reboot your PC and test the changes.
- The “0xc0000034” error should now be fixed as your PC begins to load:


You can download Easy Recovery Essentials from here.
Fix 0xc0000034 in Windows Vista
Fix #1: Is SP1 Installed
If you installed SP1 for Windows 7, follow the instructions from the 0xc0000034 appears after I install Service Pack 1 chapter below.
If you don’t have SP1 installed or haven’t installed it recently, go to Fix #2 below.
Fix #2: Run chkdsk
To run chkdsk on your Windows Vista computer in an attempt to fix this boot error, follow these steps:
- Reboot your computer with the original Windows Vista installation disc and boot from the disc
If you don’t have your original Windows Vista installation disc, go to Fix 0xc0000034 with Easy Recovery Essentials
- Click Repair your computer
- Click Command Prompt
- Type this command:
chkdsk c: /r
Replace
c:with the letter of the drive where your Windows Vista is installed on.
Press Enter - Restart the computer


chkdsk utility results screen
Fix #3: Run Startup Repair
Follow the same steps from Fix #2: Run chkdsk until you boot into the Windows Vista installation disc:
- Click Repair your computer
- Click Startup Repair
Fix #4: Restore
If Startup Repair didn’t work to fix the 0xc0000034 error, you can also try to restore your Windows Vista to a date before the boot error appeared.
Follow the same steps from Fix #2: Run chkdsk until you boot into the Windows Vista installation disc:
- Click Repair your computer
- At the System Recovery Options screen, click System Restore

Fix 0xc0000034 in Windows 7
Fix #1: Is SP1 Installed
These steps apply only to Windows 7 systems who recently installed Service Pack 1 (SP1).
If you installed the SP1 for your Windows 7 system, follow the instructions from the 0xc0000034 appears after I install Service Pack 1 chapter below.
If you don’t have SP1 installed or haven’t installed it recently, go to Fix #2 below.
Fix #2: Run bootrec
You can run the bootrec utility to rebuild the BCD:
- Boot from the Windows 7 DVD
- Click Repair your computer or press R
- At the System Recovery Options window, click Command Prompt
- When Command Prompt loads, type this command:
bootrec /rebuildbcd
- Press Enter


bootrec utility results screen
Most Windows 7 systems have the System Recovery Options installed which can be accessed without the installation DVD:
- Restart the computer
- Press F8. You need to press the F8 key before the Windows 7 logo appears
- Select Repair Your Computer
- Press Enter
Fix #3: Startup Repair
If bootrec doesn’t work, you can try to run the Startup Repair utility:
- Boot from the installation disc (CD or DVD) and click Repair your computer or press R
- System Recovery Options should now be available
- Click Startup Repair
Fix 0xc0000034 in Windows 8
Fix #1: Run Automatic Repair
Windows 8/8.1 comes buit-in with the Automatic Repair that will attempt to find and fix various errors that prevents your computer to load. On Windows Vista and 7 it was called Startup Repair.
To run Automatic Repair, follow these steps:
- Insert the Windows 8 or Windows 8.1 DVD/USB and reboot your system
If you don’t have your original Windows 8 installation media, go to Fix 0xc0000034 with Easy Recovery Essentials
- Boot from the media
- Click Repair your computer at the Install now screen
- Select Troubleshoot
- Select Automatic Repair
- Follow the wizard instructions to complete the process

Fix #2: Run bootrec
If Automatic Repair didn’t fixed the 0xc0000034 error, try running bootrec to rebuild the BCD:
You need to have the original Windows 8/8.1 install media. If you don’t have it, go to Fix 0xc0000034 Easy Recovery Essentials
- Restart your computer and boot from the DVD/USB
- Click Repair your computer
- Select Troubleshoot and then select Command Prompt
- Type these commands in Command Prompt:
bootrec /FixMbr
bootrec /FixBoot
bootrec /ScanOs
bootrec /RebuildBcd
- Once the last bootrec finished, type:
exit
- Press Enter
- Restart your computer

bootrec utility results screen
Fix #3: Refresh
Performing a refresh of your Windows 8 or Windows 8.1 would not affect your personal files. To run the refresh operating, follow these steps:
- Restart your computer
- Press the F8 key or the F11 key
- Click Troubleshoot
- Click Refresh your PC
- Follow the instructions to complete the process
Fix 0xc0000034 in Windows 10
Fix #1: Run Automatic Repair
Windows 10 comes buit-in with the Automatic Repair that will attempt to find and fix various errors that prevents your computer to load.
To run Automatic Repair, follow these steps:
- Insert the Windows 10 DVD/USB and reboot your system
If you don’t have your original Windows 10 installation media, go to Fix 0xc0000034 with Easy Recovery Essentials
- Boot from the media
- Click Repair your computer at the Install now screen
- Select Troubleshoot
- Select Automatic Repair
- Follow the wizard instructions to complete the process

Fix #2: Run bootrec
If Automatic Repair didn’t fixed the 0xc0000034 error, try running bootrec to rebuild the BCD:
You need to have the original Windows 10 install media. If you don’t have it, go to Fix 0xc0000034 Easy Recovery Essentials
- Restart your computer and boot from the DVD/USB
- Click Repair your computer
- Select Troubleshoot and then select Command Prompt
- Type these commands in Command Prompt:
bootrec /FixMbr
bootrec /FixBoot
bootrec /ScanOs
bootrec /RebuildBcd
- Once the last bootrec finished, type:
exit
- Press Enter
- Restart your computer
bootrec utility results screen
Fix #3: Refresh
Performing a refresh of your Windows 10 would not affect your personal files. To run the refresh operating, follow these steps:
- Restart your computer
- Press the F8 key or the F11 key
- Click Troubleshoot
- Click Refresh your PC
- Follow the instructions to complete the process
Troubleshooting
0xc0000034 appears after I install Service Pack 1
The 0xc0000034 error code can appear on Windows 7 or Server 2008 systems as a black screen error after installing Service Pack (SP1).
The usually error text is:
!! 0xc0000034 !! 142/53007 (_0000000000000000.cdf-ms)
Depending if you can boot into Windows, you have the following options available:
- Restart the computer using the original installation disc
- Run a VBS script from Command Prompt using the original installation disc
- Install the KB 2533552 update
- Reinstall the Windows Service Pack
If you can boot into Windows and the 0xc0000034 error isn’t preventing you from using your computer:
- Install KB 2533552
- Reinstall SP1
If you can’t boot into Windows, follow these 2 fixes:
Fix #1: Restore your computer
- Restart your computer and press the F8 key to boot into the Advanced Boot Options
- Select Repair your computer
- Press Enter
- Select a language, keyboard and click Next
- Enter the Administrator password
- Click OK
- At the System Recovery Options screen, select System Restore
- Click Next
- Browse the available restore points and select the restore point titled as Windows 7 Service Pack 1.If there is no such restore point, select a restore point dated before the date when you installed Service Pack 1.
- Click Next
- Click Finish at the Confirm your restore point screen
- Click Yes
- Click Restart to restart the computer


Fix #2: Run a VBS script
This method is recommended for advanced users. Go to Fix 0xc0000034 with Easy Recovery Essentials for a quick and easy way to fix this error.
- Save the following text as
Script.vbson a USB flash drive:Dim xmlDoc, node, nodeList, fileName, backupFileName, numberOfPOQNodes Set xmlDoc = CreateObject("Microsoft.XMLDOM") If Wscript.Arguments.Count = 0 Then WScript.echo("Error! No XML file specified.") Wscript.quit End If fileName = WScript.Arguments(0) backupFileName = Left(fileName, InStrRev(fileName, ".") - 1) & "_backup.xml" If Not xmlDoc.load(fileName) Then WScript.echo("Failure loading XML file " & fileName & ".") Wscript.quit End If xmlDoc.save(backupFileName) Set nodeList = xmlDoc.documentElement.selectNodes("POQ") numberOfPOQNodes = nodeList.Length For Each node in nodeList xmlDoc.documentElement.removeChild(node) Next xmlDoc.save(fileName) Set xmlDoc = Nothing WScript.echo(numberOfPOQNodes & " POQ nodes removed. Script completed.") - Restart the computer
- Press F8
- Boot into the Advanced Boot Options menu and select Repair your computer
- Press Enter
- Select a language and keyboard and enter the Administrator password, if prompted
- Insert the USB flash drive with the
Script.vsfile - Select Command Prompt, at the System Recovery Options screen
- Navigate to the USB flash drive by typing the letter of the drive:
F:
F:is the USB flash drive - Then type this command:
Cscript Script.vbs C:\Windows\winsxs\pending.xml
Replace
C:with the letter of the drive where your Windows 7 is installed. - Press Enter
- You should see a confirmation message:
2 POQ nodes removed. Script Completed
- Type
exit - Press Enter
- Restart your computer
More Information
Linked Entries
- bootrec
- chkdsk
Support Links
- Easy Recovery Essentials for Windows – our repair and recovery disk.
It’s an easy-to-use and automated diagnostics disk. It’s available for Windows 8, Windows 7 and Windows Vista. It’s also available for Windows XP and Windows Server.
Read more at Windows Recovery Disks.
- The NeoSmart Support Forums, member-to-member technical support and troubleshooting.
- Get a discounted price on replacement setup and installation discs: Windows Vista, Windows 7, Windows 8, Windows 10.
Applicable Systems
This Windows-related knowledgebase article applies to the following operating systems:
- Windows Vista (all editions)
- Windows 7 (all editions)
- Windows 8 (all editions)
- Windows 8.1 (all editions)
- Windows 10 (all editions)
Propose an edit