При работе с Windows 10 многие пользователи сталкиваются с необходимостью эффективно использовать свой исследователь файлов. Одним из способов повышения производительности и удобства является настройка вкладок в проводнике Windows 10. В данной статье мы рассмотрим подробную инструкцию по настройке вкладок в проводнике Windows 10.
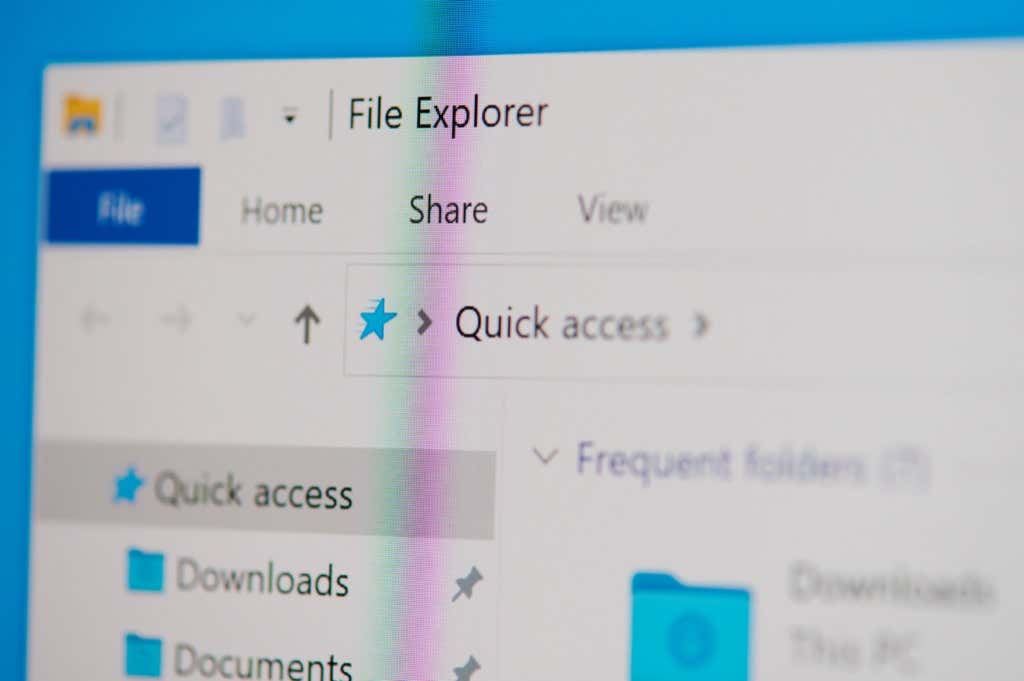
Для начала, открой исследователь файлов в Windows 10. Для этого можно воспользоваться нажатием комбинации клавиш Win + E. После открытия проводника, найдите в верхнем меню раздел «View» и щелкните на нем. Всплывающее меню предложит несколько опций, включая настройку вкладок.
Далее, в меню «View» найдите опцию «Tabs» и выберите ее. В открывшемся списке настроек выберите подходящую для вас опцию. Например, можно включить вкладки, а также выбрать, чтобы вкладки открывались в новом окне или в новой сессии проводника. Эти настройки позволят вам легко переключаться между различными папками и файловыми окнами.
Также, в меню «View» есть дополнительные опции, позволяющие настроить внешний вид и поведение вкладок в проводнике Windows 10. Вы можете выбрать, что делать с вкладкой при двойном щелчке, изменить цвет и размер вкладок, а также настроить автоматическое закрытие неиспользуемых вкладок. Эти настройки позволят вам создать наиболее удобное и эффективное рабочее пространство в проводнике Windows 10.
Содержание
- Подробная инструкция: настройка tab в explorer Windows 10
- Откройте файловый менеджер
- Перейдите во вкладку «Просмотр»
- Выберите «Параметры отображения»
- В окне настройки перейдите во вкладку «Вид»
- Установите нужный режим отображения в «Панель задач»
- Настройте группировку приложений в «Панели задач»
- Примените изменения и закройте окно «Параметры отображения»
Подробная инструкция: настройка tab в explorer Windows 10
- Щелкните правой кнопкой мыши на значке «Пуск» в левом нижнем углу экрана.
- Выберите «Проводник» в контекстном меню.
- В окне «Проводник» щелкните на вкладку «Вид».
- В группе «Параметры» нажмите на кнопку «Параметры».
- Откроется окно «Параметры папки».
- Перейдите на вкладку «Вид» в окне «Параметры папки».
- Необходимо отметить пункт «Всегда показывать значки, никогда непоказывать метки» в секции «Метки папок».
- Нажмите на кнопку «Применить» и затем «ОК», чтобы сохранить изменения.
Теперь tab в explorer Windows 10 будет настроен по вашим предпочтениям.
Откройте файловый менеджер
Для начала настройки вкладок в проводнике Windows 10 вам необходимо открыть файловый менеджер. Есть несколько способов сделать это:
Способ 1: Щелкните правой кнопкой мыши на значке «Проводник» (обычно расположен на панели задач) и выберите «Открыть».
Способ 2: Нажмите клавишу Win + E на клавиатуре. Это быстрый способ открыть проводник.
Способ 3: Откройте меню «Пуск» и введите в поисковой строке «Проводник». Затем щелкните по значку «Проводник» в результате поиска.
После открытия файлового менеджера вы готовы приступить к настройке вкладок в проводнике Windows 10.
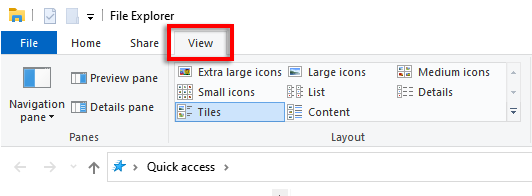
Перейдите во вкладку «Просмотр»
После открытия проводника Windows 10 откройте любую папку, чтобы увидеть панель инструментов верхней части окна. В этой панели инструментов расположены различные вкладки, позволяющие настраивать отображение файлов и папок. Найдите и выберите вкладку «Просмотр».
Во вкладке «Просмотр» вы можете настроить способ отображения файлов и папок в проводнике. К примеру, вы можете изменить размер значков, выбрать способ сортировки элементов, настроить отображение расширений файлов и многое другое.
Ниже приведена таблица со списком основных опций, которые вы можете настроить во вкладке «Просмотр»:
| Опция | Описание |
|---|---|
| Размер значков | Позволяет выбрать размер значков файлов и папок в проводнике. Вы можете выбрать между маленьким, средним и большим размерами. |
| Сортировка | Определяет порядок сортировки файлов и папок. Вы можете выбрать сортировку по имени, дате изменения, типу и другим параметрам. |
| Скрыть расширения для известных типов файлов | Если данная опция включена, то расширения файлов не будут отображаться в проводнике для известных типов файлов. Например, вместо «document.docx» будет отображаться просто «document». |
| Скрытые элементы | Отображает или скрывает скрытые файлы и папки в проводнике. |
Используйте эти настройки, чтобы настроить отображение файлов и папок в проводнике Windows 10 под вашими предпочтениями.
Выберите «Параметры отображения»
После открытия Проводника и выбора нужного таба нажмите правой кнопкой мыши на любом свободном месте в окне Проводника, чтобы открыть контекстное меню.
В контекстном меню выберите опцию «Параметры отображения».
Откроется окно «Параметры отображения», где вы сможете настроить различные параметры своего таба. Здесь вы можете изменить цвета, шрифты, размеры и другие параметры, которые влияют на внешний вид таба.
Используйте доступные опции и настройте таб в соответствии с вашими предпочтениями. Когда вы закончите настройку, нажмите кнопку «Применить» или «Ок» для сохранения изменений.
В окне настройки перейдите во вкладку «Вид»
1. Щелкните правой кнопкой мыши на пустой области панели задач и выберите «Панель задач» из контекстного меню.
2. В открывшемся окне настройки выберите вкладку «Вид».
3. На вкладке «Вид» вы можете настроить следующие параметры:
- Значок на панели задач: выберите, какой значок будет отображаться на панели задач для открытого приложения.
- Расположение панели задач: выберите, где будет располагаться панель задач — внизу, сверху или по бокам экрана.
- Скрыть автоматически: установите флажок, чтобы автоматически скрывать панель задач при неиспользовании.
- Определение активного окна: выберите, как будет выделяться активное окно на панели задач (цветом или подсветкой).
- Закрепление программ и показ нескольких окон: установите флажок, чтобы закрепить программы на панели задач и иметь возможность открывать несколько окон приложения.
- Отображение кнопки «Действия системы»: установите флажок, чтобы отображать кнопку с иконкой «Действия системы» на панели задач.
4. После настройки параметров нажмите кнопку «Применить» или «ОК», чтобы сохранить изменения.
Установите нужный режим отображения в «Панель задач»
В Windows 10 можно настроить режим отображения в «Панель задач» в соответствии с вашими предпочтениями. Вот как это сделать:
| Шаг | Действие |
|---|---|
| 1 | Щелкните правой кнопкой мыши на пустом месте в «Панель задач». |
| 2 | Выберите всплывающее меню «Панель задач». |
| 3 | В открывшемся меню выберите один из трех режимов отображения: «Всегда отображать все значки на панеле задач», «Отображать кнопки только текущих окон» или «Скрыть кнопки панели задач». |
| 4 | После выбора желаемого режима отображения закройте меню. |
Теперь ваша «Панель задач» будет отображаться в выбранном вами режиме. Это позволит вам более комфортно работать с открытыми приложениями и окнами.
Настройте группировку приложений в «Панели задач»
Для настройки группировки приложений в «Панели задач» следуйте инструкциям ниже:
- Щелкните правой кнопкой мыши на пустой области «Панели задач».
- В контекстном меню выберите пункт «Параметры».
- В открывшемся окне «Параметры задач» найдите раздел «Группировка приложений на панели задач».
- Раскройте список рядом с этим разделом и выберите одну из предлагаемых опций:
- Всегда — все приложения будут группироваться на панели задач, даже если у них разные окна или вкладки.
- Когда задачи являются похожими — приложения с одним и тем же значком будут группироваться, независимо от количества открытых окон.
- Никогда — приложения не будут группироваться, каждое будет отображаться отдельно на панели задач.
Выбрав нужную опцию, закройте окно «Параметры задач». Теперь приложения на панели задач будут группироваться в соответствии с вашими настройками.
Группировка приложений в «Панели задач» упрощает навигацию между открытыми окнами и повышает удобство использования операционной системы Windows 10. Попробуйте настроить эту функцию согласно вашим предпочтениям и наслаждайтесь более эффективной работой!
Примените изменения и закройте окно «Параметры отображения»
После того как вы внесете нужные изменения во вкладке «Параметры отображения», не забудьте нажать на кнопку «Применить» внизу окна. Это применит все внесенные вами настройки и сохранит их.
После нажатия на кнопку «Применить», вы увидите, как окно «Параметры отображения» закрывается и вернетесь в обычное окно проводника Windows. Ваши изменения будут сразу же применены и начнут действовать.
One of the most frustrating things about Windows File Explorer is that you can’t have different folders open in separate tabs. It’s a great all-around solution to save time and declutter your desktop, but Windows has historically been against the change.
In 2019, Microsoft added the “Sets” tab management feature to Windows 10, but they soon removed the feature for good. So, what are your options? This article will share eight of the best Windows 10 file management tools that enable tabs in File Explorer.
1. XYplorer
XYplorer is often cited as one of the best File Explorer alternatives and has been around for over 20 years. One of the benefits of XYplorer is that it’s an entirely portable app requiring no installation. This means you can transport it on a USB drive and quickly access it on any computer.
Besides a tabbed browser, XYplorer offers several functions, including an advanced search, a customizable interface, dual pane view, and support for scripts. XYplorer also has a very clean, modern UI and is easy to use. The latest version (22.50.0100) supports Windows Server 2003 to Windows 11.

XYplorer is available as a 30-day free trial, and the full version has a one-time fee of $39.95.
2. Total Commander
Total Commander is probably the most well-known file manager for Windows and has been around for around the same time as XYplorer. It even has an Android version.
Total Commander offers several features that users find helpful, including a dual-pane view, an enhanced search function, a tabbed interface, and several tools for organizing and synchronizing directories. The downside is that Total Commander has an old-looking UI that’s cluttered and relatively confusing.
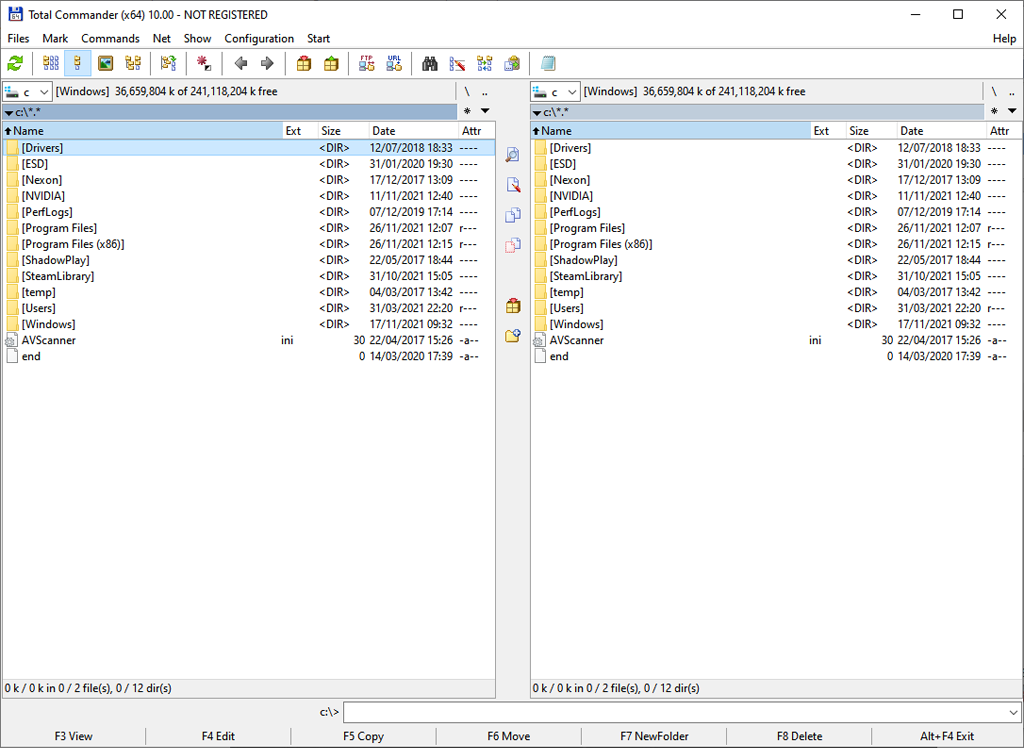
Total Commander version 10.00 is downloadable as a 5MB executable file and supports all versions of Windows up to Windows 11 (32-bit and 64-bit). Total Commander offers a functional demo of the program, which lasts for 30 days, then it must be registered. A lifetime registration costs approximately $42.00.
3. Directory Opus
Directory Opus has support from Windows Server 2003 to Windows 11. Its features are similar to Total Commander and XYplorer, including a dual-pane, tabbed interface, multiple customizations, powerful searching, support for various file types and archives, and a portable USB version.
Directory Opus has two versions: Directory Opus Light ($40.00) and Directory Opus Pro ($70.00). The Light version includes all the features a home user needs, while the Pro edition contains highly configurable and much more complex functionalities. For the Pro version, dual and five computer licenses are also available at additional cost. Directory Opus also offers a 60-day free trial.
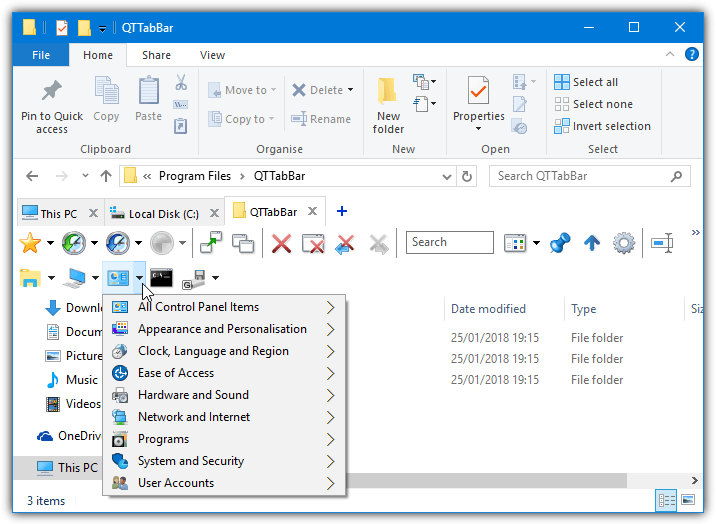
4. QTTabBar
While the first three apps in this list are standalone file managers, QTTabBar is an addition to File Explorer. Beyond a tabbed interface, it also supports plugins, scripting, and limited customizations.
To activate QTTabBar, download and install the program from their official download page. Next, open File Explorer and select the View tab.
Then, select Options and click QTTabBar.
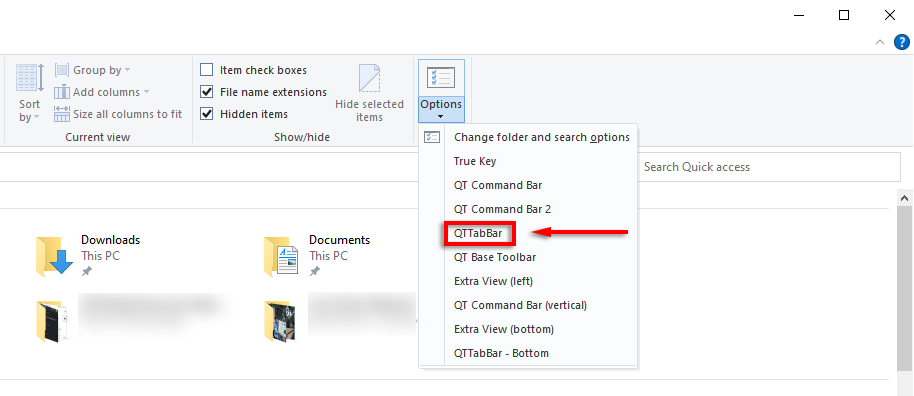
You will now have access to tabs in the normal Windows File Explorer.
QTTabBar is free donationware available for Windows 7, 8, 8.1, 10, and 11.
5. Altap Salamander
Atlap Salamander is another free two-panel file manager for Windows. It looks similar to Total Commander, though much more modern, and has all the necessary features a light user would require.

Atlap stands out from its alternatives because it features a handful of networking features, including FTP, FTPS, SCP, and SCFP protocol support. It also integrates with a password manager and provides the option to encrypt files.
Atlap Salamander is a freeware that supports Windows 10, 8.1, and 7 (32-bit and 64-bit).
6. Free Commander
Free Commander is a great free alternative to some of the paid file managers we’ve listed. It has a stack of features, including a tabbed dual-pane interface, an optional tree view, a built-in file viewer, and much more.
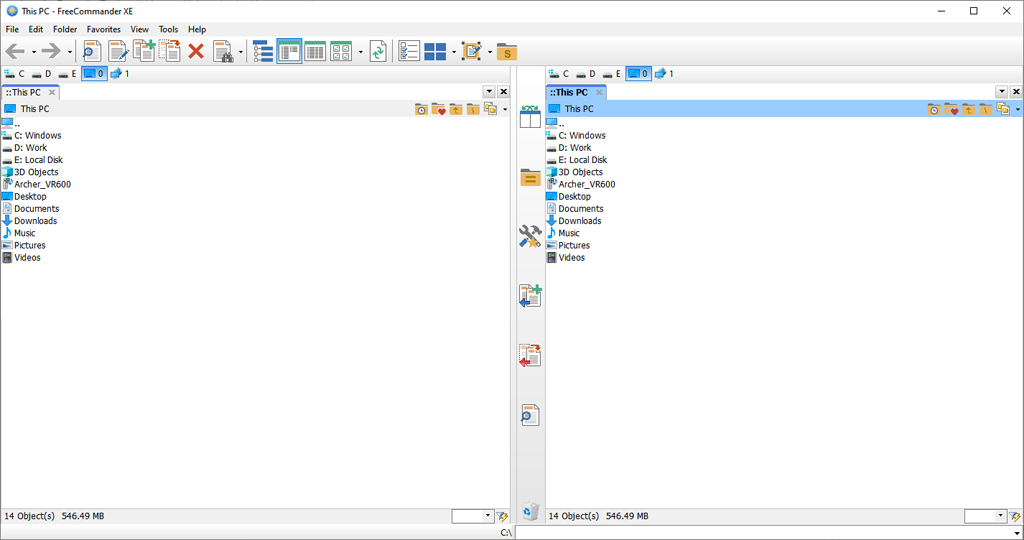
Free Commander’s straightforward interface resembles Total Commander or Atlap Salamander but is much cleaner. It takes a simple approach to adding features to Windows File Explorer without confusing elements that most people wouldn’t use.
Free Commander is entirely free, portable, and supports Windows XP, Vista, 7, 8, and 10 in 32-bit or 64-bit.
Explorer++ is another free tabbed interface file manager designed to increase your productivity in Windows without using system resources. It’s portable, lightweight, and effortless. It largely resembles File Explorer but has more features.

If you’re looking for a file manager that’s simply a more advanced File Explorer, this is the choice for you. It doesn’t have as many functions and customizations as other options on this list, but it’s a great introduction to file managers.
Since it’s entirely portable, Explorer++ is available for all versions of Windows. It’s also completely free.
8. Double Commander
Last but not least, we have Double Commander. Like Free Commander, Double Commander is a free and entirely open-source mimic of the original Total Commander.
If the UI of the alternatives wasn’t for you, Double Commander might be the right choice. It has all the necessary features, including a two-pane view, built-in file viewer, archive support, an extended search function, and support for commands and plug-ins.
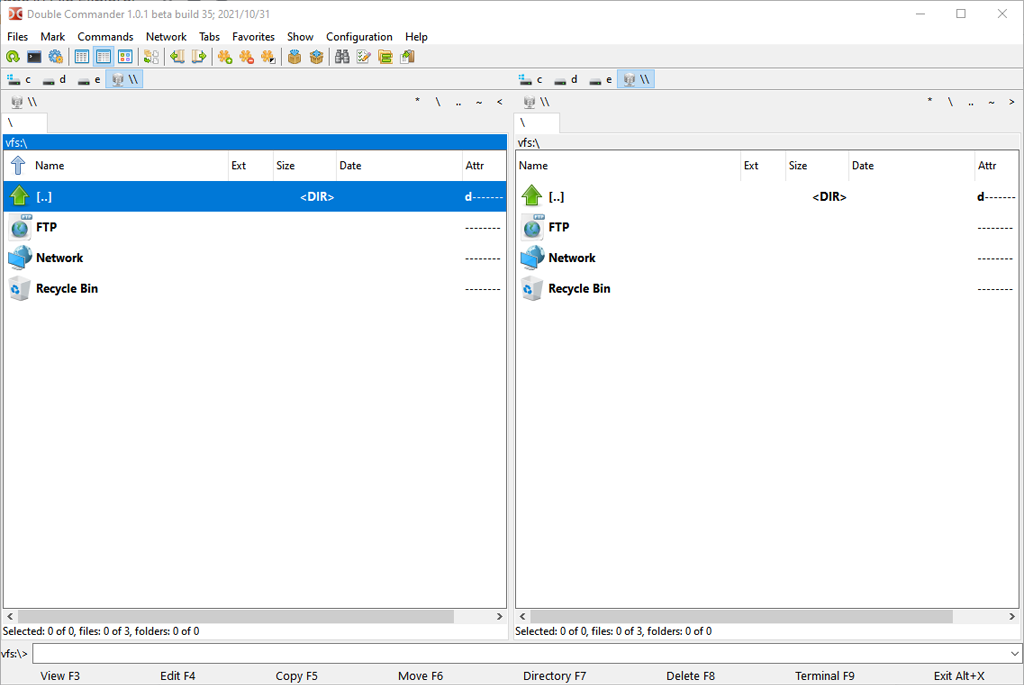
The most recent version is multi-platform and should work on all current versions of Windows, including Windows 10 and Windows 11. Double Commander also offers a portable version.
A New Level of Productivity
To the dismay of many users, File Explorer has remained essentially unchanged throughout the years. So if you’re looking for a file manager that can provide the features neglected by Windows Explorer, hopefully this list will help you decide.
Do you use a different file manager? Let us know in the comments!
For many years now, most web browsers have included the ability to open websites inside separate browser tabs. Being able to quickly switch between tabbed websites is a big time saver It also reduces the clutter on your desktop by having everything contained inside a single window instead of multiple open windows. Tabbed windows are also found in other types of software, like text editors with Notepad++.
Tabs are also a common feature found in third party file managers like Free Commander or Directory Opus. The built in Windows file manager, Explorer, still uses one single window per folder view. Microsoft has so far resisted adding tabs to Explorer, although this may change in future with the Windows 10 Sets feature. The only current option of using Windows Explorer with tabs is with the help of a third party utility.
Here we list six free tools that give you the ability to integrate multiple Explorer windows into a single window with the help of tabs. All tools were tested on Windows 7 and 10 64-bit.
1. QTTabBar
QTTabBar has been around for over a decade, it is also slightly confusing because there are two separate branches of the program with the same name. The main branch version is currently 1038 from 2015, the other branch (v1.5.0.0b2) is several years older and abandoned. QTTabBar is a multi purpose utility with a number of other useful features besides tabbing Explorer windows.
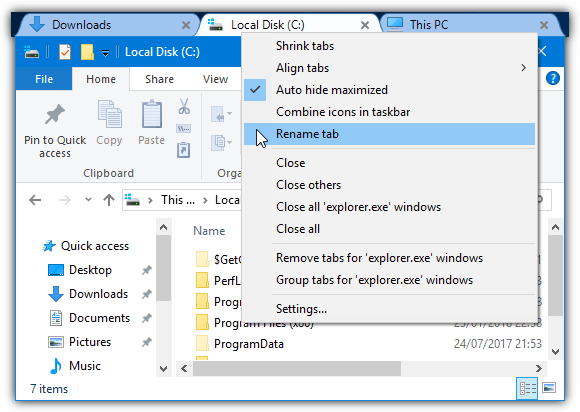
Once tabs are enabled they will appear below the Explorer ribbon in Windows 8/10 or above the Window Vista/7 toolbar. Tabs can be rearranged and grouped together, you can also simply drag a folder onto the tab bar to open a new tab. The right click menu on the tab bar includes some other useful additions like an advanced rename dialog and a keyboard shortcut finder.
Other features available in QTTabBar include button command toolbars, extra folder views (similar to a dual pane file manager), text and media file preview tooltips, application launcher, event triggers, scripting and even free enhancement plugins (available from the website). The options window has literally hundreds of settings to play with. Luckily, there is a reset to default button on each page if you get lost.
Download QTTabBar
Enabling QTTabBar in Explorer
Tabs are not enabled automatically by QTTabBar and you have to turn the tab toolbar on manually from within Explorer.
Windows 10 (and 
After installing QTTabBar, open an Explorer window and go to the View tab on the ribbon. Click on the lower half of the Options button (far right) and select the QTTabBar entry.

If the QTTabBar view option does not appear, close all Explorer windows and try again. Alternatively, logoff or reboot.
Windows 7 (and Vista)
Make sure all Explorer windows are closed and install, open Explorer and hold the Alt key to show the menu bar. Go to View > Toolbars and select QTTabBar to enable the tabs. You may need to close and reopen Explorer again to see the tabs bar.
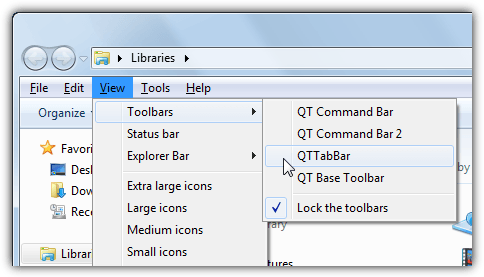
Note that the Explorer menu bar becomes disabled while the tabs bar is enabled.
2. Clover 3
Users of Google Chrome will feel at home using Clover because it offers a faithful representation of Chrome’s tabs inside Explorer. You even get a bookmarks bar with built in bookmark manager for quick access to your most used folders. The biggest issue with Clover is the installer and a couple of program windows are not translated from Chinese. Thankfully, this doesn’t affect day to day usage.
After install, Clover opens an Explorer window with the tabs displayed and ready to be used. Like a browser, tabs can be reordered, ungrouped, cloned, reopened and bookmarked. The bookmark manager will feel quite familiar with options to add and create subcategories. A bookmarks list can be exported and imported as an HTML file from the Settings window. The bookmark bar can be turned off if you don’t need it.
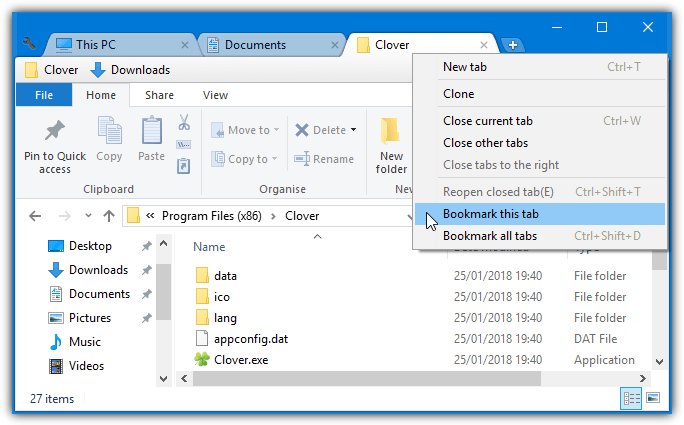
The developer has thoughtfully cloned a number of browser keyboard shortcuts so they behave the same in Clover. For instance, CTRL+T will open a new tab, CTRL+Shift+T will reopen a closed tab and CTRL+D will bookmark the current tab. The nine available shortcuts are listed in the Settings window. A few checkboxes are also in the Settings window, the most notable is the option to go up a directory if you double click in a blank area of the Explorer window.
Download Clover 3
3. TabExplorer
Unfortunately, TabExplorer as a product has long since been abandoned. The last update was in 2012 and the developer’s website has gone. TabExplorer still works though, it just means any encountered bugs or incompatibilities will never be fixed.
After install, a single screen wizard will popup where you actually enable the tabs feature. The rainbow tabs and start with Windows checkboxes are optional, the wizard can be invoked later from the tray icon menu. Tabs will appear above the Explorer window where they can be pinned, cloned, rearranged, renamed or reopened.
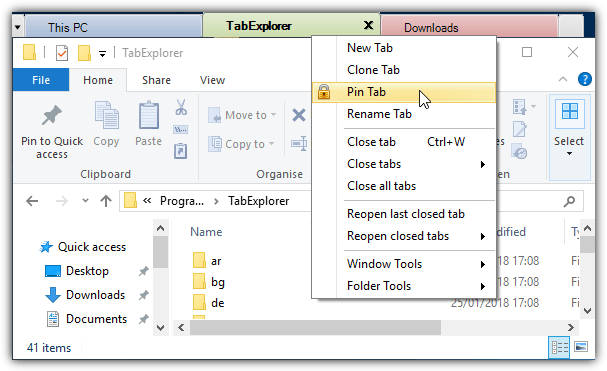
There is a portable mode that saves settings and data in the install folder and a touch mode. You might as well turn update checking off as there aren’t going to be any upates. The feedback, bug report and website buttons also obviously don’t work. A bug in Windows 10 means a blank tab sometimes opens up that cannot be closed. Killing Explorer.exe, logging off or rebooting seems to be the only workaround.
Download TabExplorer
4. TidyTabs
The good thing about TidyTabs is you can add tabs to just about any standard desktop window. Different windows can also be grouped together, so it’s possible to have two Explorer windows and a Command Prompt as a tab group. The free for personal use version does have some limitations, such as only three tabs can be grouped together and no auto grouping, renaming or ordering.
After install, TidyTabs sits in the system tray consuming around 1MB of memory. The tab is situated above the top left of a window and becomes visible if you hover the cursor over it. If the window is near the top of the desktop the tab will move inside the title bar. To group Explorer windows simply drag and drop one tab onto another for a maximum of three. Drag the tab away to ungroup it again.
From the Settings window, there are options to change tab transparency and turn off single tab auto hiding. A useful feature is blacklisting and whitelisting. With it, you can include or exclude specific programs from being tabbed. Note that TidyTabs does not work on Windows 10 UWP apps such as Edge, the Store or Mail and etc. However, it will work on almost all normal desktop windows.
Download TidyTabs
5. WindowTabs
WindowTabs is quite similar to TidyTabs in a number of ways. It displays tabs singularly or as a group above the desktop window. WindowTabs also has the same type of limitation as TidyTabs in that you can only group up to three tabs together in the free version of the program. However, it is not worth paying the $19 to upgrade as this software is not actively maintained with the last update dating back to 2014.
A good thing about WindowTabs is there is a portable version that you can try out without installing. Upon launch, it sits in the background and when you open a window a tab will be displayed at the top left. Drag Explorer or any other window tabs together to create a group. Amazingly for a program of its age, WindowTabs can group together Windows 10 UWP apps like Edge or Mail.
Tabs can be shrunk, renamed, rearranged, aligned and auto grouped. One issue with WindowTabs is it appears to suffer from the same Windows 10 bug as TabExplorer, which is a blank tab sometimes appears and cannot be closed. The workarounds involving closing Explorer (either forcefully or by logging off) seem to be the only things that work here too.
Download WindowTabs
6. BrightExplorer
Instead of simply adding tabs to a standard Explorer window, BrightExplorer wraps its own window around Explorer adding its own tabbed interface. This is noticeable when opening Explorer as a normal window will open and quickly close before the BrightExplorer window opens. It’s free to use although there are a few paid add-ons that can help increase functionality.
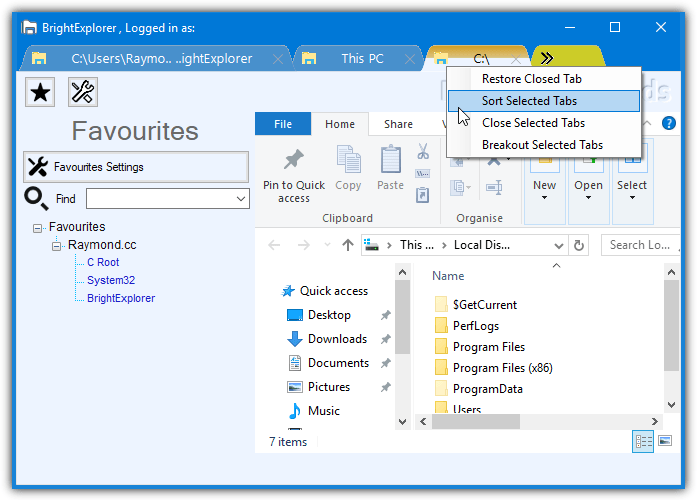
There isn’t that much in the way of configuration or setup options, simply launch the BrightExplorer window from the tray icon or by opening an Explorer window. To add a new tab just click the two arrows or open a new Explorer window which will automatically dock itself to BrightExplorer. Right click to restore a recently closed tab, sort the open tabs or undock the selected tab.
There is a favorites panel that allows you to save locations for quick opening later on, but we found this to be a bit clunky and not very efficient. The panel also has restrictions that are unlocked by purchasing some of the paid add-ons. Unfortunately, there appears to be no way to hide or remove the rather unsightly and sizeable toolbar area below the tabs.
Download BrightExplorer
Windows file explorer is a built-in feature of Windows OS. If you have opened two tabs, you can easily manage them. But what if you have open so many tabs at once? You will find it difficult to manage them. You need to go through each folder minimize each one so that you can try to locate a file that takes a lot of time for you to search. I will show you how to get file explorer tabs in Windows 10.
I have provided a simple solution of this problem. Just like the Google chrome tabs, you can enable the tab features in the File explorer in windows 10. In this way, we can easily navigate through each tab easily. You will have tabs in file explorer and this will be easier for you to locate a file or a folder if you’re working in a Windows operating system environment.
File explorer tabs will make our task easy to navigate the folders especially if you are working with more than two tabs. To get this feature on your windows 10, you have to follow the steps carefully and the procedure is quite simple. This feature is not provided by windows 10 but we have to install the third-party software. First, let’s take a look on requirements.
Prerequisites
You must meet the following requirements in order to follow the steps. The requirements are given:
- Windows Operating System (windows 7, 8, 10 etc.)
- ExplorerMax software
Also Read: How to Change Mouse Pointer Color in Windows 10?
Download And Install the ExplorerMax Software
QTTabBar will make our task easy. I have shown the step by step procedure to download and install this time saving software. The whole procedure is given below:
1) First, download the ExplorerMax software.
2) After downloading, double-click on the software.
3) Click on Install button, the installation will begin.
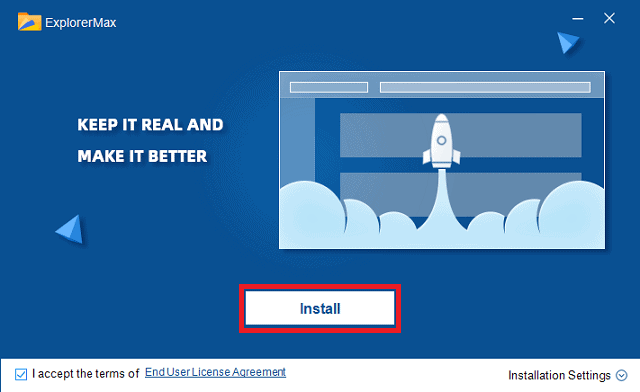
4) After installation, click on Start N0w.
5) Now, we are ready to use.
How to Use Explorer Max?
After installing this incredible software, you just have to launch it. It has premium plan that adds extra functionality to it. But recommend you to stick with its free version since the free plan offers amazing features. However, if like this software then, you can purchase it at a reasonable price.
Now, open This PC and you will see that it will open with Explorer Max. It has beautiful interface and easy to use. In the top bar, you will see tabs just like Google chrome and other browsers.
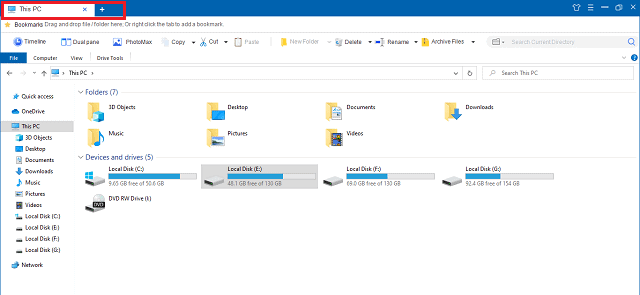
Similarly to add a new tab, click on the plus icon right to the tab and a new tab will be opened for you in no time. In the same way, you can close the tab easily. If you know how to use Chrome, you can easily use this software. It provides some additional features as well that we will discuss them later on.
Now, you can open as many tabs as you need. This is the basic feature of explorer max. In this way, you can easily navigate the tabs in a very short time.
Extra Features Of Explorer Max
I hope you got my first point, how to get file explorer tabs in windows 10. Explorer Max provides so many features and we will explore the main important features. Some of the highlighting features are explained below:
1) Open Folder in New Tab
Just like the Chrome, you can now open the folder or drive in a new tab. This is very useful feature when you want a particular folder to open in new tab i.e., don’t want to leave the current tab. Now, it is possible with this software. To do it, follow the given steps:
1) Navigate to the folder, you want to open in new tab.
2) Right-Click on the folder or drive.
3) Click on Open in new window.
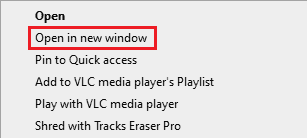
4) The folder will be open in new tab.
5) That’s it.
2) Copy the Path
In chrome, we right-click on any link and copy its address. Similarly by using this amazing tool, we can copy the path of any file. This feature is particularly useful when you are working on command prompt or CLI (Command Line Interface) mode. Follow the given steps to copy the path:
1) Navigate to the desired file or folder.
2) Right-Click on the file.
3) Click on Copy the path
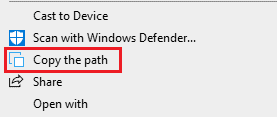
4) The path of a file has been copied.
Also Read: How to Change Wi-Fi Password in Windows 10?
3) History
This feature is also available in windows 10 but Explorer Max take it to the next level. As the name suggest, we can see the history and clear it as well. The history is divided into categorizes like today, yesterday, last week and last month. To explore this feature, follow the steps:
1) In the menu bar of explorer max, click on Timeline
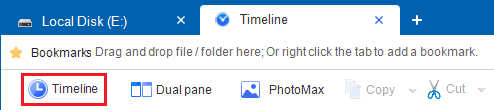
2) It will display the history.
3) You can see the history according to documents, videos, folders and many more.

4) To clear the history, hit on Clear history.
5) This is also an incredible feature.
4) Dual Pane
Moreover, we can divide the screen into two parts. To the right of the timeline, we find the option dual pane. By clicking on this button, the screen will be divided into two parts. Now, you can work on two windows simultaneously. This is very useful when you need to copy the files from one folder to another.
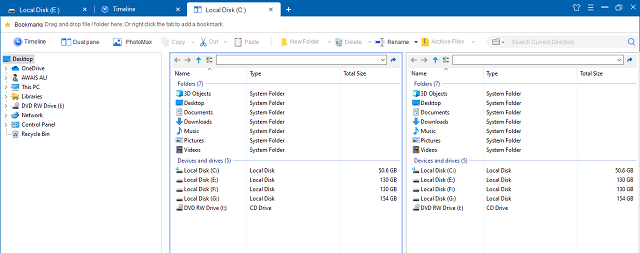
This is also a time saving feature that can be used by using the explorer max software. You can but it’s premium version if this software is really impressing you.
5) Extract/Archive Files
If you are using the winrar or 7zip software then, you are going to uninstall after using this amazing feature because this tool provided you a facility to zip and unzip the files, the same task done by winrar. To do it, follow the procedure given below:
1) Select the file or number of file, you want to zip.
2) Click on Archive Files, in the menu bar

3) The tool will start packing the files into one book.
4) To unzip them, just select it and click on Extract Files.
![]()
5) I hope you find it very helpful.
Looking for more How To posts? Check out our How To Page for all the latest tips on Windows, Microsoft Teams, LinkedIn, and more!
If you make use of an abnormal number of tabs on your browser (which you definitely shouldn’t), then you’d realize how handy tabs can be. If you’re a Windows user, you might be surprised the same feature is now available in your File explorer as well—at least for Windows 11.
Introduced back in a Windows 11 build, the File Explorer tabs will help you quickly switch between your tasks with a few clicks of your cursor.
How to enable tabs on File Explorer
File Explorer is one of the most useful GUIs on a Windows computer. It makes things easy to navigate and helps you easily manage your files and folders. And if you’re a Windows 11 user, then you are in luck, as back in 2022 Microsoft came out with a new update for File Explorer tabs—in Windows 11 Insider build 25136.
With the launch of the new release, you can open multiple tabs in a single File Explorer window on your PC. If you have kept your PC updated, then the new tab feature should be enabled by default. But if you haven’t, then follow the steps below:
- Head to the Settings menu on your Windows.
- Click on Windows Update.
- Now select the Check for updates button to download the feature drop that enables File Explorer tabs.
- Click on Restart now button.

Now, wait for the download to finish. Once the installation is complete, multiple tabs will be enabled on File Explorer from here on.
We also have a simple, no-filler video that takes you through a step-by-step explanation of using your File explorer tabs on Windows 11; don’t hesitate to take a quick look if anything looks confusing about tabs!
Enable File Explorer tabs on your Windows 10
While there’s no in-built method to enable File Explorer tabs on Windows 10, alternate methods exist. One of the popular methods to enable File Explorer on your Windows 10 is XYplorer.

XYplorer is an old player which has been in the market of Windows file managers for a while. Apart from File Explorer tabs, it offers a pack of other handy features like a preview option, tabbed browsing, a powerful file search, a super customizable interface, etc.
XYplorer is available for a 30-day free trial, and you can purchase the complete app for $39.95. You can download the XYplorer from the official website, install it, and enable the tabs feature on our Widows 10 File Explorer as well.
Enabling the File Explorer tab on Windows PC
For most of us, using multiple tabs on our PC is an inevitable part of being a Windows user. While we enjoy the feature from our browsers, Windows File Explorer didn’t use to offer any such feature by default. However, starting with Windows 11 Build 25136, Microsoft has changed that forever. While it’s still not possible to have the tabs feature on Windows 10 through the official Windows way, you can use third-party apps like XYplorer that will give you a similar experience.