Windows 7 Enterprise Windows 7 Home Basic Windows 7 Home Premium Windows 7 Professional Windows 7 Ultimate Еще…Меньше
Введение
В Windows 7 упростилось добавление второго монитора за счет использования нового сочетания клавиш Win+P. Это удобно, когда нужно изменить параметры дисплея во время презентации с помощью проектора, подключенного к ноутбуку.
Далее приведены два способа подключения нескольких мониторов в Windows 7. Прежде всего, убедитесь, что внешние мониторы подключены к ноутбуку или стационарному компьютеру.
Способ 1. С помощью сочетания клавиш «Win+P»
Нажмите на клавиатуре клавишу с логотипом Windows + P. Выберите один из следующих параметров в зависимости от необходимости (снимок экрана для этого шага приведен ниже).
Способ 2. С помощью меню «Разрешение экрана»
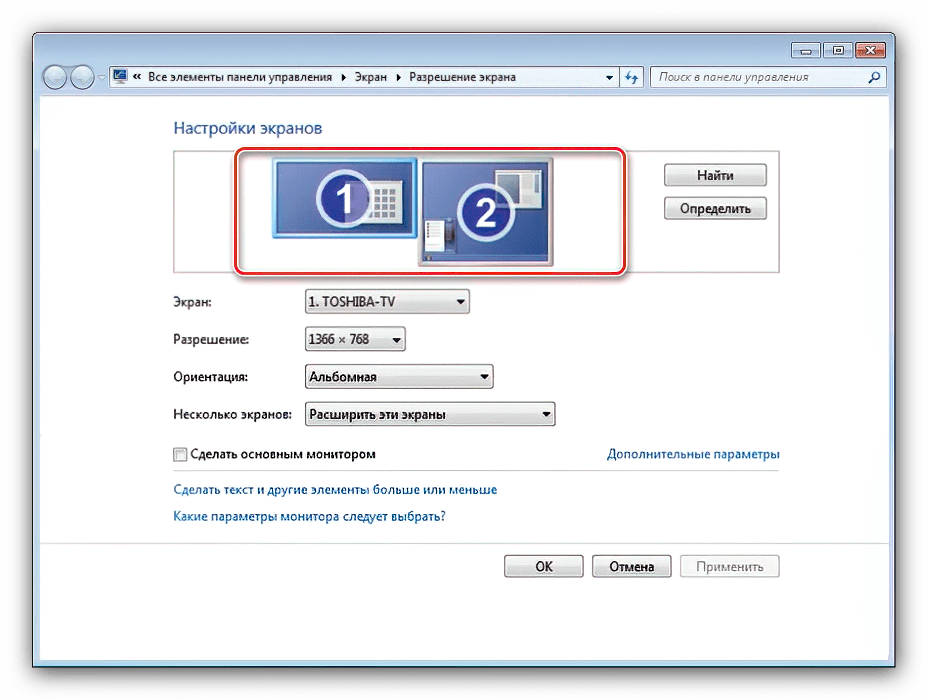
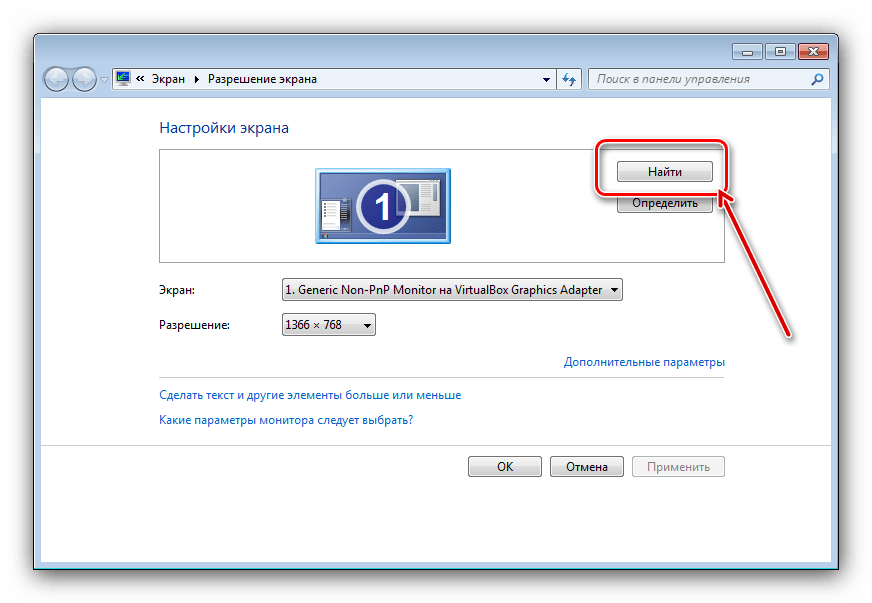
1. Щелкните правой кнопкой мыши свободное место на рабочем столе, а затем нажмите пункт Разрешение экрана (снимок экрана для этого шага приведен ниже).
2. В раскрывающемся списке Несколько экранов выберите элемент Расширить эти экраны или Дублировать эти экраны. Примечание. Если дополнительный монитор (мониторы) не отображаются в списке, нажмите кнопку Найти. Если это не удалось, попробуйте перезагрузить компьютер и повторно выполните шаги 1 и 2 (снимок экрана для этого шага приведен ниже).
Для получения дополнительных сведений перейдите по указанным ниже ссылкам:
973782 Сообщение об ошибке при настройке параметров экрана для использования трех и более экранов на ноутбуке, работающем под управлением Windows 7: «Не удалось сохранить параметры экрана»
Нужна дополнительная помощь?
Нужны дополнительные параметры?
Изучите преимущества подписки, просмотрите учебные курсы, узнайте, как защитить свое устройство и т. д.
В сообществах можно задавать вопросы и отвечать на них, отправлять отзывы и консультироваться с экспертами разных профилей.
Windows 7 Enterprise Windows 7 Home Basic Windows 7 Home Premium Windows 7 Professional Windows 7 Ultimate More…Less
Introduction
In Windows 7, it is easy to add a second monitor by using the new hotkey Win+P. This is convenient when you need to change the display settings during your presentations with a projector connected to your laptop.
Here are two methods to set up multiple monitors in Windows 7. Make sure that you connect the external monitors to your laptop or your desktop computer first.
Method 1: By keyboard shortcut «Win+P»
Press the Windows logo key + P on your keyboard. Select one of the following options according to your needs: (The screen shot for this step is listed below.)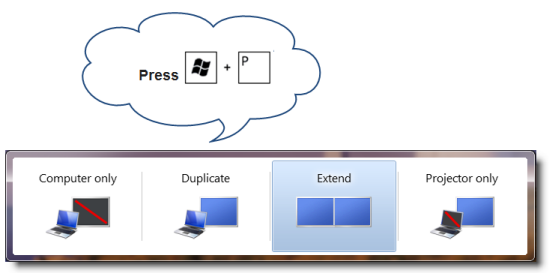
Method 2: By the «Screen Resolution» menu
1. Right-click any empty area of your desktop, and then click Screen resolution. (The screen shot for this step is listed below.)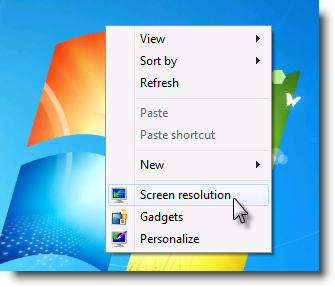
2. Click the Multiple displays drop-down list, and then select Extend these displays, or Duplicate these displays. Note If you cannot see the additional monitor(s) listed, click Detect. If does not work, try restarting your computer and do step 1 to 2 again. (The screen shot for this step is listed below.)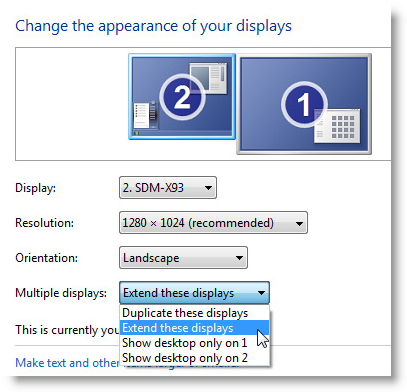
For more information, click the following Microsoft links:
973782 Error message when you configure the display settings to try to use three or more displays on a laptop that is running Windows 7: «Unable to save display settings»
Need more help?
Want more options?
Explore subscription benefits, browse training courses, learn how to secure your device, and more.
Communities help you ask and answer questions, give feedback, and hear from experts with rich knowledge.
Are you looking to increase your productivity by using two monitors in Windows 7? Well, you are in luck! With a few simple steps, you can easily enable dual monitor in Windows 7 and get the most out of your workstation. In this guide, we will explain how to enable dual monitor in Windows 7 and the benefits you can expect to reap. So let’s get started!
Enabling Dual Monitor in Windows 7 is easy. To do this, follow these steps:
- Right-click on your desktop and select Screen Resolution from the dropdown menu.
- Under the Multiple Displays section, select Extend these displays.
- Click Apply and then OK to save the changes.
Your two monitors should now be enabled.
How to Set up Dual Monitors in Windows 7
Having two monitors connected to your computer can be incredibly convenient, allowing you to view two applications side-by-side or extend your desktop over two displays. Setting up dual monitors in Windows 7 is a relatively straightforward process. All you need is two monitors and a compatible video card or port.
Check Your Video Connectors and Video Card
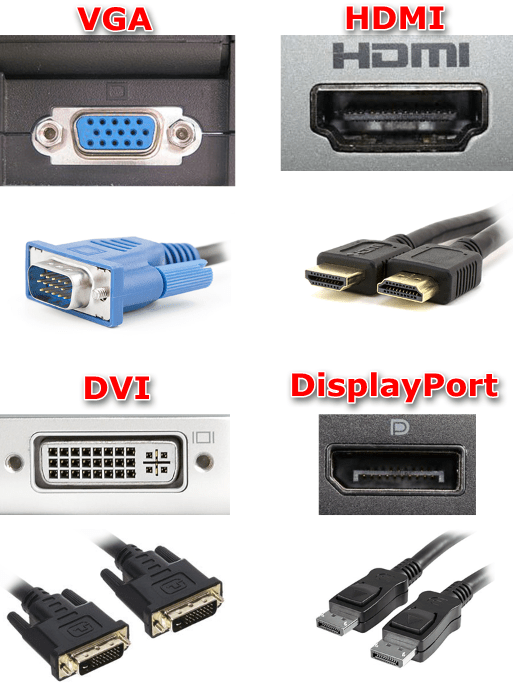
Before you can get started with setting up dual monitors, you will need to make sure that your computer is equipped with the necessary video connectors and video cards. Most modern computers have at least one VGA and one DVI port. You may also have an HDMI port or DisplayPort available. If you have only one video port, you may need to purchase an additional video card in order to add a second monitor.
Configure the Display Settings in Windows 7
Once you have the necessary hardware, you can configure the display settings in Windows 7. To do this, open the Control Panel and select “Appearance and Personalization” > “Adjust Screen Resolution” from the list of options. In the new window, you will see the current display settings for your computer. To set up dual monitors, click the “Multiple Displays” drop-down menu and select “Extend these displays”.
Adjust the Resolution for Each Monitor
The next step is to adjust the resolution for each of your monitors. In the same window, you can select the resolution for each display. It’s important to note that the resolution for each monitor should be the same, as different resolutions can cause display issues. When you’ve finished adjusting the resolution, click “Apply” to save your changes.
Arrange the Monitors
Once you have finished configuring the display settings, you can arrange the monitors on your desk. On the same window, you will see a diagram of your displays. This diagram can be used to determine where each monitor should be placed. You can also adjust the position of each display by clicking and dragging the diagram. When you are satisfied with the arrangement, click “Apply” to save your changes.
Enable Dual Monitor Taskbar
If you want to use the dual monitor taskbar feature in Windows 7, you will need to enable it in the display settings. To do this, open the Control Panel and select “Appearance and Personalization” > “Taskbar and Start Menu”. Then, check the box next to “Show taskbar on all displays”. This will enable the taskbar on both monitors, allowing you to switch between applications on either display.
Customize Your Dual Monitor Setup
Once you have finished setting up your dual monitors, you can customize the display settings to your liking. For example, you can choose which display is the primary monitor, set the background for each display, and adjust the orientation of each display. To access the customization options, open the Control Panel and select “Appearance and Personalization” > “Screen Resolution”. From here, you can adjust the settings for each display.
Top 6 Frequently Asked Questions
1. What is dual-monitor mode?
Dual-monitor mode is a feature of Windows 7 that allows users to extend their desktop across two monitors, allowing for more screen space and more efficient multitasking. This feature is particularly useful in office environments, where multiple tasks need to be completed at once, or for gamers who require a larger display. Dual-monitor mode can also be used to display multiple applications side by side, or to display one full-screen application and one application in a window.
2. How do I enable dual-monitor mode in Windows 7?
Enabling dual-monitor mode in Windows 7 is a relatively simple process. First, you will need to make sure that both monitors are connected to your computer and that they are both working properly. Once the monitors are connected, go to the Control Panel and select “Appearance and Personalization”. Then click on “Adjust Screen Resolution”. Once in the “Adjust Screen Resolution” window, click on the “Multiple Displays” drop-down menu and select “Extend These Displays”. Finally, click “Apply” and then “OK” to save your changes.
3. What are the requirements for dual-monitor mode in Windows 7?
The requirements for dual-monitor mode in Windows 7 are relatively simple. First, you will need two monitors that are both connected to your computer. The monitors must also be compatible with Windows 7 and have the correct drivers installed. Additionally, you will need an appropriate graphics card that is compatible with Windows 7 and supports dual-monitor mode.
4. Does Windows 7 support multiple monitors?
Yes, Windows 7 supports up to 10 monitors in a single system. To enable multiple monitors in Windows 7, you will need to connect all of the monitors to your computer and then configure them in the “Adjust Screen Resolution” window. You can also use the Windows 7 “Snap” feature to quickly move windows between monitors.
5. What are the benefits of dual-monitor mode in Windows 7?
The primary benefit of using dual-monitor mode in Windows 7 is the ability to extend your desktop across two monitors, giving you more screen space and allowing for more efficient multitasking. Additionally, dual-monitor mode allows you to display multiple applications side by side, or to display one full-screen application and one application in a window. It also makes it easier to move windows between monitors.
6. Are there any drawbacks to using dual-monitor mode in Windows 7?
One of the main drawbacks of using dual-monitor mode in Windows 7 is that it can drain your system’s resources, resulting in slower performance. Additionally, if you have an older system or graphics card, there may be compatibility issues that prevent you from using dual-monitor mode. Finally, if you’re using a laptop, dual-monitor mode may not be supported.
How to Use Two Monitors in Windows 7
Enabling dual monitor in Windows 7 is not only easy, but it can open up a new world of productivity. With the right knowledge and hardware, you can quickly and easily set up a dual monitor display in Windows 7. This will allow you to multitask more easily and increase your productivity, no matter what type of work you’re doing. With dual monitors, you’ll be able to open more windows at the same time, quickly switch between tasks, and create a huge workspace to get things done faster. So if you’re looking for a way to increase your productivity, enabling dual monitor in Windows 7 is the way to go.
Содержание
- Этап 1: Подготовка
- Этап 2: Подключение и настройка
- Windows 7 не видит второй монитор
- Вопросы и ответы

Этап 1: Подготовка
Перед выполнением процедуры следует проверить и подготовить как программное, так и аппаратное обеспечение. Начнём с последнего.
- Первым делом убедитесь, что у вашего компьютера есть два разъёма, к которым можно подключать мониторы – в большинстве случаев они располагаются на видеокарте. К таковым выходам относятся VGA, DVI, HDMI, Display Port.
Читайте также: DVI или HDMI: что лучше для монитора
- Если порт только один, тогда понадобится добавить к компьютеру дополнительную видеокарту.
- Иногда можно столкнутся с ситуацией, когда, например, есть два экрана, подключаемых по DVI. Однако на видеокарте присутствует только один соответствующий выход, тогда как второй будет VGA. Решением этой проблемы станет устройство-переходник, в нашем примере — DVI-VGA. Такие девайсы можно без труда приобрести в магазинах электроники или через интернет.
- Теперь проверим программное обеспечение. Рекомендуется обновить драйвера GPU и мониторов, если это требуется.
Подробнее:
Обновление драйверов для видеокарты
Пример установки драйверов для монитора

Этап 2: Подключение и настройка
После выполнения всех подготовительных шагов можно переходить непосредственно к соединению обоих дисплеев.
- Соедините устройства в соответствующие разъёмы и включите оба.
- Теперь переходим к настройке. Наведите курсор на пустое пространство «Рабочего стола» и нажмите правую кнопку мыши. Далее в контекстном меню выберите пункт «Разрешение экрана».
- Откроется утилита настройки – в ней должны быть отображены оба устройства для вывода изображения.

Если там отмечен только один монитор, обратитесь к соответствующему разделу настоящей статьи.
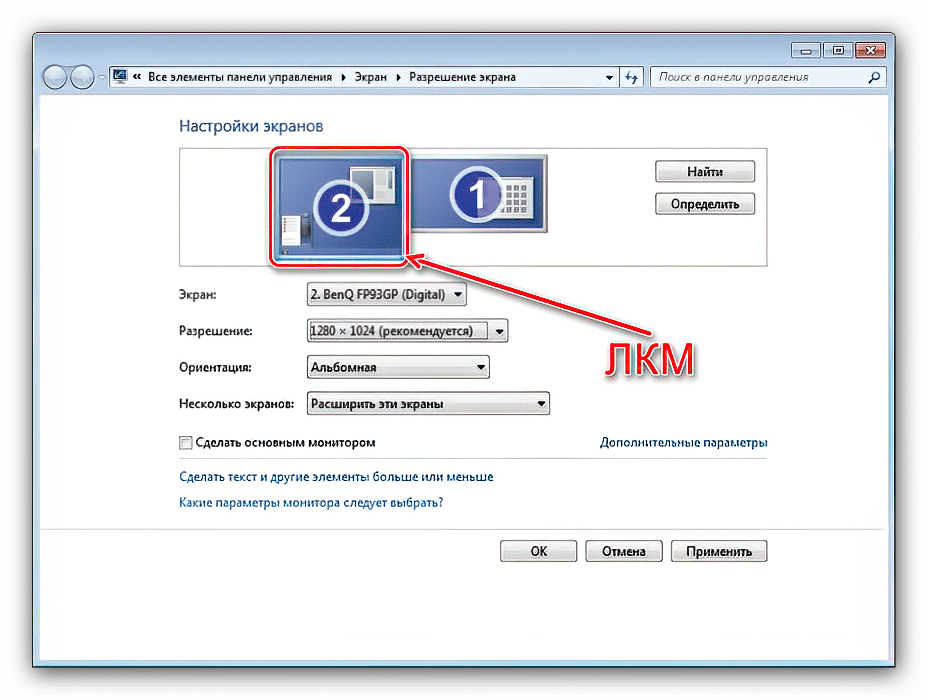
- Каждый экран настраивается отдельно – выделите нужный одиночным нажатием на левую кнопку мыши, после чего укажите требуемые вам параметры с помощью выпадающих меню ниже.
- На одной из настроек остановимся подробнее – а именно на «Несколько экранов». В этом меню доступны следующие параметры:
- «Дублировать эти экраны» – второй дисплей показывает изображение с первичного. Подойдет, если основное устройство имеет низкие разрешение или диагональ;
- «Расширить эти экраны» – в этом режиме второй дисплей служит как бы продолжением первого, отображая расширенную область «Рабочего стола», на которой можно открыть другие программы;
- «Отобразить рабочий стол только на…» – название настройки говорит само за себя – область рабочего пространства будет отображаться исключительно на одном из указанных мониторов.
- После внесения всех изменений нажмите «Применить» и «ОК».


Теперь вторичный дисплей будет работать с выбранными вами параметрами.
Иногда происходит так, что ОС не распознаёт второй девайс для вывода картинки. В такой ситуации действуйте по следующему алгоритму:
- Проверьте качество соединения дисплея и видеоразъёмов – возможно, оно нарушено. При задействовании переходников убедитесь, что устройства заведомо работоспособны. Также важно следить за тем, чтобы они были подключены к одной видеокарте.
- Если дисплей однозначно рабочий и соединение должно функционировать нормально, зайдите в настройки разрешения и воспользуйтесь кнопкой «Найти» – возможно, ОС не смогла самостоятельно взять устройство в работу.

В этом же окне убедитесь, что в строке «Несколько экранов» не установлен параметр «Отобразить рабочий стол только на…».
- Проверьте «Диспетчер устройств»: откройте средство «Выполнить», введите в нём запрос
devmgmt.mscи кликните «ОК».

В оснастке раскройте категорию «Мониторы» – там должны отображаться оба дисплея. Если в значке одного из них присутствует ошибка, выделите проблемную позицию, щёлкните ПКМ и выберите «Удалить».

Далее используйте пункты «Действие» – «Обновить конфигурацию оборудования».
- Снова проверьте версию драйверов для видеокарты и установите самую новую из доступных (см. шаг 3 Этапа 1). Если же наоборот, экран перестал работать после обновления, ПО следует откатить.
Подробнее: Откат драйверов NVIDIA и AMD
- Пользователям, которые соединяют дисплей кабелем HDMI-VGA, будет важно знать нюанс – ваша видеокарта должна поддерживать аналоговый вывод на цифровом выходе, в противном случае кабель работать не будет.


Эти шаги должны помочь вам решить проблемы с распознаванием второго монитора.
Еще статьи по данной теме:
Помогла ли Вам статья?
Dual monitors have become a necessary tool for most professionals and gamers, providing an adequate workspace for multiple tasks at once. Setting up dual monitors on Windows 7 is not that difficult, and if done correctly, can increase work efficiency drastically. Dual monitors allow you to work with multiple applications simultaneously and have a clear view of functions without toggling back and forth through windows. In this blog, we will provide you with step-by-step instructions on how to set up dual monitors on Windows 7.
Video Tutorial:
What’s Needed
Setting up dual monitors is easy, but you need specific hardware to get it done. Here’s what you need:
- A primary monitor
- A secondary monitor
- A video card that supports Dual Monitors
- VGA or HDMI Cable to connect secondary monitor to computer
What Requires Your Focus?
The following pointers are worth considering while setting up dual monitors:
- First, ensure that your monitor is compatible with your computer’s video card.
- Before you start connecting your secondary monitor, make sure that your computer is on.
- If your computer cannot support dual monitors/graphic drivers you can consider purchasing an external graphics card with dual monitor support.
- Make sure that both monitors have the same resolution and refresh rate.
Different Methods to Setup Dual Monitors
Method 1: Using Windows Display Settings
The easiest way to set up dual monitors on Windows 7 is with Windows Display Settings. Follow the below steps:
- Connect your second monitor to your computer – either with an HDMI or VGA cable.
- Right-click on your desktop and select ‘Screen Resolution’ from the context menu.
- The ‘Screen Resolution’ dialog box will open. It shows two numbered displays indicating that Windows can see two monitors.
- Use the “Multiple Displays” drop-down list to select “Extend desktop” or “Duplicate desktop” options or to switch the primary monitor.
- Adjust the orientation, resolution, and the refresh rate of your secondary monitor manually under the section “Display Resolution” and click the Apply button.
- If this does not work, try restarting your computer and Windows should detect the second monitor automatically.
Pros:
- It’s a built-in and straightforward feature within the Windows OS
- You can customize your settings easily and quickly
Cons:
- You may experience problems if the hardware does not support it
- No other customization options are available, except the advanced resolution settings
Method 2: Using the ATI or NVIDIA Control Panel
If you have an ATI or NVIDIA graphics card, you can set up dual monitors through the card’s control panel software. Here’s how you can do it:
- Make sure that the dual graphics card installed in your computer supports dual monitors.
- Right-click on your desktop and select your graphics card control panel software – ATI Catalyst Control Center or NVIDIA Control Panel.
- Locate the Multiple Displays section and select the extended desktop option to start using multiple monitors.
- You can then adjust the display resolution settings manually by selecting each specific monitor listed and customizing the settings and configuring their position accordingly.
- Once the settings are confirmed, click the Apply button and ensure the changes take effect on both displays.
Pros:
- Offers advanced settings options and customizable layouts compared to the native Windows Display settings.
Cons:
- The software needs to be installed, taking up a considerable amount of disk space.
- May cause conflicts with computer hardware and software, leading to system crashes.
Method 3: Via Hardware Connection
Connecting two monitors to a computer through a single video card can be problematic as some hardware does not support this feature. An affordable alternative method of connecting dual monitors is through hardware like a USB to VGA/DVI/HDMI adapter. Below are the steps:
- Connect the USB adapter into your computer’s USB port.
- Connect the adapter with the corresponding VGA, DVI, or HDMI cable to your other monitor.
- Once the adapter is recognized, install the provided software and drivers, and restart your computer if necessary.
- Right-click on your desktop and select ‘Screen Resolution’ from the context menu.
- Once the display configuration options come up, configure your second monitor to reflect the custom settings you want.
Pros:
- This method is useful if your hardware does not support dual monitors.
- This hardware can provide an affordable way to add a second monitor.
Cons:
- Lower-resolution external monitors may cause a significant lag in displaying content on the second monitor.
- Adapter costs, drivers, and software installation issues if using certain brands could cause incompatibilities.
Method 4: Using a Docking Station
If you are using a laptop, another option to extend your display to your external monitor is by using a docking station. A docking station can cost a bit more than hardware adapters, but it is a convenient solution for laptop users. Let’s move onto the steps:
- Insert the docking station into your laptop’s USB port.
- Connect the dock to the external monitor with a VGA, DVI, or HDMI cable.
- Install the provided software and drivers, restart your computer if necessary.
- Once installed, connect the dock to the external monitor.
- Right-click on your desktop and select ‘Screen Resolution’ from the context menu.
- You can then configure your second monitor to cater to your required custom settings.
Pros:
- Makes it easier to connect and disconnect laptops to an external display.
- Can replace the need for an external adapter unless you already have one.
- Docking stations with Dual-monitors support offer other connectivity options like multiple USB ports, Ethernet, and other ports.
Cons:
- More expensive compared to hardware adapters.
- Require drivers and software installation, which can be complicated at times.
Why Can’t I Setup Dual Monitors?
Several reasons can prevent the successful setup of dual monitors. Here are the possible reasons and fixes:
1. My Video Card Does Not Support Dual Monitors
A computer hardware check can help determine if your card supports dual monitors. You can also purchase an external graphics card that supports dual monitors.
Fix: Check if your card supports dual monitors. If not, you purchase an external graphics card with dual-monitor support.
2. My Second Monitor Is Not Recognized by Windows
Connecting the second monitor to a different port might help solve this issue.
Fix: Connect your second monitor to a different port on your graphics card. If that fails, try updating your video drivers.
3. Monitor Settings Are Incorrectly Configured
If the monitor resolution and refresh rates are mismatched, issues like blurry display, poor image quality might occur.
Fix: Ensure both monitors have the same resolution and refresh rate. Modify the display settings if not.
Implications and Recommendations
After the successful setup of dual monitors, here are some recommendations:
- Set the monitor at eye level or slightly below your eye level to avoid neck and eye strain.
- Clutter is distracting. Close applications not in use for better concentration.
- Avoid looking at the second monitor while talking to someone.
Q1: Can I set up dual monitors on Windows 7 using a USB hub?
A: No. A USB hub can connect multiple peripherals like keyboards, mice, and other devices to your computer, not a video signal. A USB port can not support video signals.
Q2: Can I use different models for my dual monitors setup?
A: Yes, you can. However, using the same model makes clean-tune settings an easier task.
Q3: How do I change the primary monitor?
A: Right-click on your Desktop and select “Screen Resolution” from the context menu. Select the monitor you wish to be the primary monitor and select the option, “Make this my main display.”
Q4: Can I use dual monitors for gaming?
A: Yes, you can. Dual monitors can provide you with an extended view of the game.
Q5: Can I set up different wallpapers on the dual monitors?
A: Yes, you can. You can select a different image for each monitor independently by following links like “Background” or “Personalize” in the display settings.
Final Words
Setting up dual monitors can increase productivity and make working with multiple applications more manageable. However, it can be a little tricky, and it is important to ensure your hardware supports the feature. By following the above steps, you will get it done in no time. We hope you found this blog helpful in setting up dual monitors on Windows 7.