Время на прочтение
16 мин
Количество просмотров 15K
Системные программисты, в частности под ОС Windows практически лишены того объема информации, который доступен разработчикам высокоуровневых программ. Можно выделить три основных источника, позволяющих заполнить пробелы при разработке драйверов для Windows:
-
Печатные издания.
-
Официальная документация DDK от Microsoft.
-
Open-source проекты.
Сложно поспорить с тем, что порог вхождения в область разработки драйверов достаточно высокий, однако желание погрузиться в это направление пропадает еще на этапе написания HelloWorld. Начинающему программисту сложно найти ответы на казалось бы банальные вопросы:
-
Как запустить драйвер?
-
Как понять, что драйвер работает?
-
Как отлаживать драйвер?
В этой статье я постараюсь максимально подробно описать несколько (вообще их гораздо больше) способов установки и отладки драйвера, удобные по моему субъективному мнению, на примере реализации простого драйвера, выполняющего единственное действие — вывод при запуске отладочного сообщения «Hello from Windows kernel mode!!».
Предварительные условия
Разрабатывать драйвер я буду в Microsoft Visual Studio 2019 (на момент публикации Microsoft предлагает WDK для Visual Studio 2022, совместимый только с Windows 11, переходить на которую пока не планирую). Для разработки драйвера необходимо скачать установить пакет DDK с официального сайта Microsoft.
Microsoft предлагает несколько версий (соответствуют сборкам самой операционной системы), однако пакеты WDK для Windows 10 имеют обратную совместимость, то есть самая свежая версия WDK позволяет реализовать драйвер для младших сборок Windows. Однако, как обычно, есть один нюанс, касающийся настройки тестовой системы (об этом будет написано ниже), поэтому также стоит скачать пакет WDK для вашей тестовой системы. Посмотреть номер сборки можно утилитой winver, (Win+R -> winver -> Enter).
В моем случае самая свежая версия WDK — это WDK для Windows 10 версии 1903 (статья написана сильно раньше как пособие для студентов, на момент публикации доступна версия 2004) на виртуальную машину будет установлена Windows 10 build 1709, поэтому я также скачиваю (но не устанавливаю) WDK для Windows 10 версии 1709.
Для запуска и отладки драйвера будет использована виртуальная машина с ОС Windows 10 x64 на VMWare Workstation.
Для просмотра отладочных сообщений от драйвера используется утилита DbgView из пакета Sysinternals.
Создание проекта
Сначала предлагается реализовать сам драйвер. Так как по плану он должен обладать минимальным функционалом, то этот процесс займет небольшое количество времени.
Шаг 1. Запустить Microsoft Visual Studio.

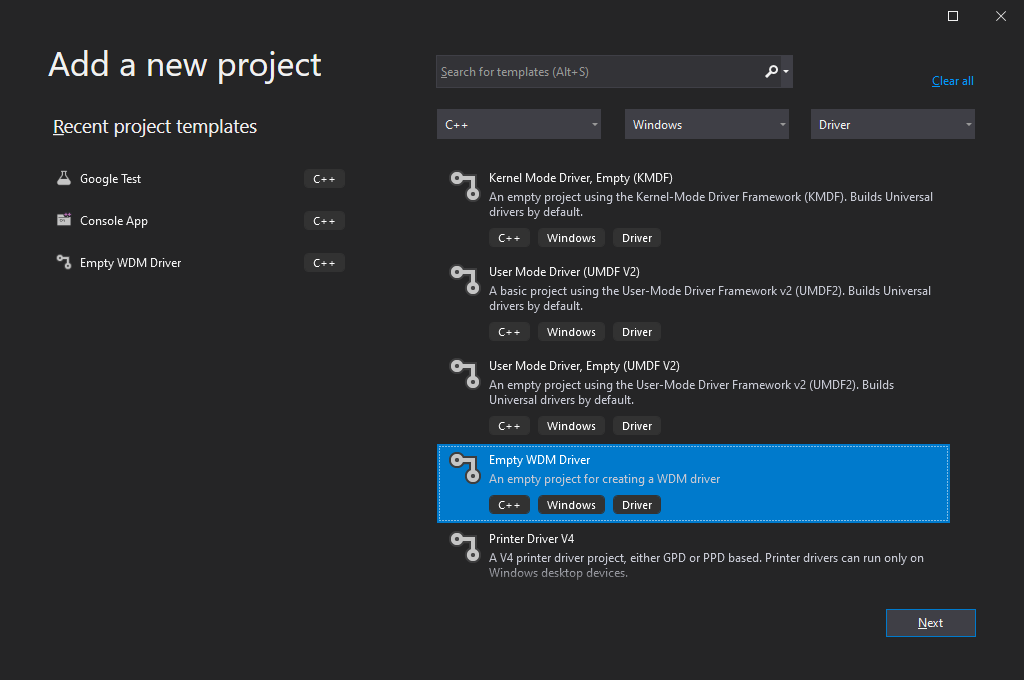
Шаг 2. Приступить к созданию нового проекта KMDF Driver.
Нажать на кнопку создания нового проекта (Create a new project), в списке типов проекта выбрать KMDF Driver, Empty, нажать Next.

Шаг 3. Назначить имя проекта и его расположение.
Я назову проект HelloWorldDriver.

Шаг 4. Добавить файл исходного кода драйвера.
Добавить файл исходного кода Project->Add new Item->C++ File (.cpp). Дать название файлу, например, HelloWorldDriver.c
При вводе имени файла укажите расширение *.c. Visual Studio определяет целевой язык по расширению файла, таким образом исходный код, расположенный в файлах с расширением *.c воспринимается как код на языке Си.

Шаг 5. Написать исходный код драйвера.
Далее приведен исходный код нашего учебного драйвера с короткими комментариями.
Вообще говоря, исходный код несколько избыточен. Функция выгрузки драйвера не является обязательной, однако без нее драйвер будет считаться невыгружаемым, что существенно усложняет установку новой версии. Так, при возможности выгрузки драйвера для его обновления достаточно остановки, замены бинарного файла и запуска, тогда как для невыгружаемого драйвера придется перезагружать систему.
Также не является обязательным примение макроса UNREFERENCED_PARAMETER. По умолчанию (и это правильно) проекты типа Windows Driver компилируются с флагом /WX — Treat Warnings As Errors, что не позволяет скомпилировать драйвер даже с предупреждениями, одним из которых является C4100: unreferenced formal parameter —
неиспользуемый параметр. Можно либо отключить этот флаг в настройках проекта Project->Properties->C/C++->General, параметр Threat Warnings As Errors, однако применение макроса более предпочтительно, так как заставляет разработчика в большей степени отдавать отчет своим действиям.
// Основной файл WDK
#include <ntddk.h>

// Объявление функции выгрузки драйвера
VOID DriverUnload(PDRIVER_OBJECT driverObject);

// Точка входа в драйвер (аналог функции main)
NTSTATUS DriverEntry(IN PDRIVER_OBJECT driverObject, IN PUNICODE_STRING registryPath)
{
  // Отметка параметра неиспользуемым
  UNREFERENCED_PARAMETER(registryPath);

  // Печать отладочного сообщения
  DbgPrint("Hello from Windows kernel mode!!");

  // Регистрация функции выгрузки драйвера
  driverObject->DriverUnload = DriverUnload;

  return STATUS_SUCCESS;
}

// Функция выгрузки драйвера
VOID DriverUnload(IN PDRIVER_OBJECT driverObject)
{
  // Отметка параметра неиспользуемым
  UNREFERENCED_PARAMETER(driverObject);
  // Вывод отладочного сообщения
  DbgPrint("Goodbye!");
}
Шаг 6. Собрать драйвер.
Теперь можно скомпилировать драйвер Build->Build Solution и посмотреть, какие файлы сгенерированы. Необходимо учитывать платформу тестовой системы и осуществлять сборку правильно. У меня в качестве тестовой системы будет 64-разрядная версия Windows, поэтому мне нужно изменить конфигурацию на x64.

В выходной директории (по умолчанию это $SolutionDir\x64\Debug) появились файлы. Краткое описание каждого из них:
-
HelloWorldDriver.cer — сертификат.
Каждый драйвер должен иметь цифровую подпись (начиная с 2017 года все драйверы должны быть подписаны самой Microsoft, обязательное условие — прохождение тестов WHQL), хотя в сегодняшнем примере сертификат не нужен совсем. Вопросы сертификации выходят за рамки данной статьи.
-
HelloWorldDriver.inf — вспомогательный файл для установки драйвера с
использованием Мастера установки Windows. -
HelloWorldDriver.pdb — отладочные символы.
-
HelloWorldDriver.sys — сам драйвер.
Драйвер написан, собран и готов к установке на целевую систему.
Установка драйвера
Можно предложить два основных способа установки драйвера: с помощью мастера установки и вручную, с использованием утилиты SC (вообще говоря можно даже реализовать программу, которая используя функции OpenSCManager, CreateService, OpenService и другие из Windows API позволит управлять драйверами и службами). Однако мастер установки предполагает установку драйверов для устройств, а написанный драйвер таковым не являтеся, поэтому установка будет произведена с помощью утилиты SC.
Перед установкой драйвера (точнее перед первым запуском) необходимо включить тестовый режим, позволяющий устанавливать неподписанные драйверы. Сделать это можно выполнив в командной строке от имени администратора bcdedit /set testsigning ON, после чего необходимо перезагрузить систему. Хотя при сборке проекта был создан самоподписанный сертификат, ОС Windows 10 не позволит запустить драйвер, подписанный таким сертификатом (как было сказано выше, в новых версиях ОС драйвер должны иметь подпись от Microsoft).
Далее необходимо выполнить следующие действия:
Шаг 1. Скопировать файл HelloWorldDriver.sys на целевую систему.

Шаг 2. Открыть командную строку от имени администратора.

Шаг 3. Выполнить команду установки драйвера.
Для установки драйвера при помощи системной утилиты SC нужно исполнить команду SC CREATE <название_драйвера> binPath= <путь_до_sys_файла> type=kernel

Драйвер установлен, но не запущен. Информацию о текущем состоянии драйвера можно получить командой SC QUERY <название_драйвера>

Перед первым запуском предлагается запустить утилиту DbgView и убедиться, что драйвер действительно выводит отладочное сообщение. Утилиту необходимо запустить от имени администратора, а после запуска включить захват сообщения из ядра нажатием Capture->Capture Kernel и включить подробный режим вывода нажатием Capture->Enable Verbose Kernel Output. WDK предлагает расширенную версию функции отладочной печати — DbgPrintEx, которая позволяет задать уровень важности сообщения, это позволяет фильтровать сообщения с уровнем важности меньше заданной.

Запустить драйвер можно командой SC START <название_драйвера>, в окне DbgView должно появиться заданное в исходном коде сообщение.

Может случиться, что после запуска драйвера сообщение в DbgView не появится. В таком случае нужно попробовать перезагрузить систему. Скорее всего, настройки DbgView, касающиеся включения подробного режима, применяются не сразу.
Остановить драйвер можно командой SC STOP <название_драйвера>, а в DbgView снова появится отладочная строка.

Остановить драйвер позволила зарегистрированная «ненужная» функция DriverUnload. В качестве эксперимента можете удалить ее из исходного кода и попробовать повторить действия по запуску и остановке драйвера. Он запустится, но остановить его не получится.
Отладка драйвера
Очень сложно писать программы без ошибок, если это не «Hello world», конечно. Процесс разработки включает внесение ошибок в код, обнаружение наличия ошибок, поиск источников ошибок (конкретных мест в исходном коде) и их устранение. Сложно поспорить с тем, что самым трудоемким процессом из вышеперечисленных является именно поиск, потому как вносятся ошибки чаще всего прозрачно для программиста (то есть случайно), проявляют они себя тоже сами (или их обнаруживают тестировщики, а еще хуже — пользователи).
Отладка программы может осуществляться различными способами. Например, часть моих студентов в курсе, посвященному языку PHP, отлаживают программы путем вставки в определенные участки кода конструкций типа echo ("I'm here42") или print("Var1 = $var1"). Почему так? Ответ на этот вопрос во многом подтолкнул меня к созданию этой статьи. Всё дело в том, что для PHP подключение привычного отладчика (а студенты сначала изучали язык C++ в IDE, где вполне успешно использовали «коробочные» возможности установки точек остановки, пошагового исполнения, окон watch и memory) подразумевает выполнение некоторого обряда: загрузка дополнительной библиотеки для php (xdebug, например), редактирование php.ini, установка расширения в браузере. И это при том, что в сети достаточно источников, описывающих этот процесс. Материалов по отладке драйверов гораздо меньше.
Я выделяю два основных способа отладки драйвера для ОС Windows: нормальный, с помощью утилиты WinDbg, и удобный — средствами Visual Studio.
Подготовка виртуальной машины
Пошаговая отладка драйвера подразумевает остановку его выполнения. Однако в архитектуре на уровне ядра ОС Windows, грубо говоря, деление на различные драйверы достаточно условно, можно представить все ядро как одну программу, где различные компоненты (драйверы) — это библиотеки. Остановка в исполнении любого драйвера подразумевает остановку всей системы. Поэтому отладка должна производиться на удаленном компьютере (хотя методом вставки строк кода с конструкцией DbgPrint(«…») можно отлаживать и локально). Удобно заменить удаленный компьютер виртуальной машиной, как это и делается в подавляющем большинстве случаев.
Так как драйвер исполняется на удаленном компьютере, то связь с отладчиком осуществляется по физическому интерфейсу: COM, Ethernet, USB, FireWire. Наибольшую популярность получила отладка по COM-интерфейсу. Признаюсь, вообще не видел примеров с иными.
На виртуальную машину необходимо добавить последовательный интерфейс, выполнив следующую последовательность действий:
Шаг 1. Открыть настройки виртуальной машины.
Запустить VMWare, открыть настройки виртуальной машины (нажатием Edit virtual machine settings).

Шаг 2. Добавить последовательный интерфейс.
В окне настроек виртуальной машины нажать кнопку Add.

В появившемся окне выбрать Serial Port, нажать Finish.

Шаг 3. Настроить последовательный порт
Для добавленного последовательного порта задать следующие настройки: Connection: Use named pipe, в поле для ввода ввести имя канала: \\.\pipe\<pipename>, а в выпадающих списка выбрать соответственно This end is the server и The other end is an application.

Отладка с использованием WinDbg
Необходимо перевести тестовую систему в отладочный режим. Для этого нужно запустить ее и от имени администратора исполнить команду bcdedit /debug on, а также настроить тип отладки. В примере используется отладка по COM-порту, поэтому в командной строке необходимо выполнить команду bcdedit /dbgsettings serial debugport:2 (значение параметра debugport должно совпадать с номером последовательного порта в настроках виртуальной машины. Скорее всего это будет Serial Port 2). После перезагрузки системы активируется отладочный режим.
После активации режима отладки система может «зависать» при включении и выключении. Я так и не смог разобраться, в каких случаях это проиcходит, а в каких нет. Если при включении или выключении системы она «зависла», то достаточно просто запустить отладчик (об этом ниже) и загрузка продолжится.
WinDbg внешне выглядит не очень современно. Особенно это заметно на фоне привычной разработчикам программ для Windows среды Visual Studio. На момент написания статьи вышла в свет новая версия утилиты отладки — WinDbg Preview, однако она доступна только в Microsoft Store, а у меня Disable Windows Spying отключил возможность установки приложений из магазина. Хотя скриншоты на портале Microsoft выглядят многообещающе.


Теперь необходимо настроить WinDbg. Наиболее подробное описание WinDbg представлено на сайте Microsoft, мы же рассмотрим лишь основы. К основным настройкам WinDbg можно отнести следующие:
-
Тип подключения к отлаживаемой системе, её адрес.
-
Расположение исходных кодов отлаживаемых драйверов.
-
Расположение символьной информации.
WinDbg позволяет задать все эти опции в виде аргументов командной строки, поэтому удобно (я делаю так) создать необходимое количество ярлыков исполняемого файла (сам исполняемый файл WinDbg имеет путь Program Files (x86)\Windows Kits\10\Debuggers\x64\windbg.exe), в свойствах ярлыка задать необходимые параметры:
-
-k. Обозначает режим отладки ядра.
-
com:port=\\.\pipe\Win10,pipe. Обозначает порт отладки (именование канала должно совпадать с тем, которое было указано в настройках виртуальной машины).
-
-y srv*C:\ProgramData\Microsoft\Symbols*http://msdl.microsoft.com/download/symbols. Определяет расположение символьной информации. Если отладочные символы не найдены в локальном хранилище, то они будут загружены из указанного репозитория.
-
-srcpath C:\dev. Определяет расположение файлов исходного кода (можно указывать не директорию конкретного проекта, а директории выше в иерархии).
-
-WF Dark.WEW. Определяет файл с сохраненным рабочим пространством (WorkSpace). В рабочее пространство входит набор и расположение окно, шрифты, цвета шрифтов и фона. Мне показалось очень удобным однажды настроить WinDbg, а далее использовать эти настройки. За основу своего WorkSpace я взял найденную давно темную тему, далее удобно расположил окна, перенастроил некоторые шрифты.

Мне показались удобными такие расцветка и расположение окон:

Теперь давайте отладим драйвер. Для того, чтобы выполнение остановилось, необходимо добавить инструкцию int 3, в исходном коде драйвера это можно сделать, вставив макрос DbgBreakPoint();. Предлагается установить точку останова в первой строке функции DriverEntry и попытаться запустить драйвер. Нет большой разницы, когда запускать WinDbg. В определенные моменты выполнение инструкций прекращается, визуально система «зависает» в ожидании подключения отладчика. То есть можно сначала запустить драйвер, а только потом WinDbg, а можно и наоборот.
Я запустил WinDbg, после чего запустил драйвер. Отладчик подключился к тестовой системе, WinDbg автоматически загрузил исходный код драйвера.

WinDbg позволяет производить привычные действия отладки: шаг с заходом, шаг без захода, исполнение до курсора, а также предоставляет возможность наблюдать за участком памяти, значениями регистров.
Отладка средствами Visual Studio
В новых версиях Visual Studio (начиная с 2013) также появилась возможность отладки драйверов. Кроме непосредственно отладчика Visual Studio предлагает широкие возможности по установке драйвера на удаленную систему, что позволяет производить отладку драйвера практически идентично отладке обычной программы (Сборка->расстановка точек останова->запуск отладки).
Для использования функций Visual Studio также необходимо обеспечить отладочное соединение с тестовой системой, в нашем случае это COM-порт, остальные действия не требуются (включать тестовый и отладочный режимы не нужно). Visual Studio позволяет автоматически настроить удаленную систему. Для этого на тестовую систему нужно установить пакет WDK Test Target Setup, который находится в директории %Program Files (x86)%\Windows Kits\10\Remote\%Платформа%. Этот .msi файл нужно скопировать на тестовую систему и установить.
Теперь пошагово сконфигурируем тестовую систему.
Шаг 1. Запустить Visual Studio.

Шаг 2. Открыть конфигуратор тестовых устройств.
Открыть конфигуратор тестовых устройств можно нажатием кнопки меню Extensions->Driver->Test->Configure Devices.

Шаг 3. Добавить и сконфигурировать тестовое устройство.
В первую очередь необходимо открыть окно конфигуратора нажатием кнопки Add New Device.

В окне ввести отображаемое имя тестовой системы, сетевое имя (можно ввести просто IP-адрес, либо включить сетевое обнаружение на тестовой системе), в Provisioning Options выбрать пункт Provision device and choose debugger settings, нажать Next.

В следующем окне раскрыть вкладку Windows Debugger — Kernel Mode и настроить опции:
-
Connection Type: Serial
-
Baud Rate: 115200
-
Pipe: Checked (отметить)
-
Reconnect: Checked (отметить)
-
Pipe name: \\.\pipe\Win10
-
Target Port: com2 (или иной, должен совпадать с номером в настройках
виртуальной машины)
Нажать Next.

Подождать выполнения настройки системы. В виртуальной машине вы можете наблюдать процессы создания нового пользователя, установку пакетов, выполнение скриптов. Это нормально. По окончании настройки виртуальная машина будет перегружена, а в Visual Studio появится сообщение об окончании настройки. В моем случае возникла одна ошибка при создании точки восстановления системы. Это можно проигнорировать. Нажать Finish.

Настройка тестовой системы почти закончена. На нее установлены средства TAEF — Test Authoring and Execution Framework и WDTF — Windows Driver Test Framework, позволяющие Visual Studio автоматически удалять старую версию драйвера, устанавливать новую, а также проводить автоматическое тестирование (вопрос автоматических тестов выходит за рамки данного материала).
ВНИМАНИЕ!!! В самом начале статьи я рекомендовал выяснить версию Windows на тестовой машине. Если она совпадает с версией установленного пакета WDK, то данный абзац можно не читать. WDK имеет обратную совместимость, то есть установленная WDK 1903 позволяет разрабатывать драйверы для предыдущих сборок (можно найти этот параметр в свойствах проекта, хотя я не сталкивался с ситуацией, когда драйвер не работает на некоторой сборке), однако пакет WDK — это не только набор заголовочных файлов, расширение для Visual Studio, но еще и набор вспомогательных утилит для отладки (тот же WinDbg) и тестирования. В том числе в пакет WDK входит и названный выше WDTF. И он обратной совместимости не имеет (или, возможно, не имеет для некоторых сборок). Для проверки наличия WDTF необходимо проверить на тестовой системе содержимое директории C:\Program Files (x86)\Windows Kits\10\Testing\Runtimes. Если там содержатся поддиректории TAEF и WDTF, то все в порядке, а если только TAEF, как в моем случае, то нужно отдельно установить WDTF из пакета WDK версии, совпадающей с версией тестовой системы (напомню, у меня это Windows 10 1709). На тестовую систему из директории WDK\Installers необходимо скопировать файл Windows Driver Testing Framework (WDTF) Runtime Libraries соответствующей разрядности и попытаться установить его командой msiexec /i «Windows Driver Testing Framework ….». Установщик выдаст ошибку отсутсвия .cab файла. Найдите соответствующий файл в той же директории Installers, скопируйте на тестовую машину и повторите установку. Рядом с директорией TAEF должна появиться WDTF.
Тестовая система готова к загрузке и отладке драйвера. Visual Studio предлагает различные варианты установки (Deploy) драйвера на тестовую систему, настройки доступны в свойствах проекта во вкладке Driver Install->Deployment. В первую очередь нужно выбрать тестовую машину из выпадающего списка. Выше она уже была сконфигурирована и теперь доступна.

Подробно с различными вариантами можно ознакомиться на портале Microsoft. Мне показались наиболее понятными два из них: Install/Reinstall and Verify и Custom Command Line. Стоит отметить, что не совсем корректно работают точки остановки. Даже при их установке выполнение не прерывается. Нужно вставить как минимум одну конструкцию DbgBreakPoint(); (я это делаю первой же строкой функции DriverEntry), дальше отладку можно производить привычным для пользователя Visual Studio образом, пошаговая отладка нормально работает, установленные точки остановки тоже.
При опции Install/Reinstall and Verify драйвер будет установлен (переустановлен) и запущен, однако система будет перезагружена (это долго), а драйвер будет установлен с опцией старта при запуске системы. Для большинства случаев это не должно быть проблемой, однако если для вас важен момент запуска драйвера, то этот способ не подходит. Я устанавливаю конструкцию прерывания в первой строке DriverEntry, а также устанавливаю точку остановки на строке с выводом отладочного сообщения и возвратом из функции и нажимаю привычное F5.

На виртуальной машине можно увидеть исполнение скриптов. Также могут появляться сообщения об ошибках, однако даже с некоторыми ошибками все работает. В моем случае по неизвестным мне причинам установка драйвера не всегда удается с первого раза (в Visual Studio вы увидите сообщение о том, что программа завершила работу с ненулевым кодом). Но со второй-третьей попытки все начинает работать. После исполнения скриптом система перезагрузится, драйвер начнет загружаться, исполнение остановится на конструкции DbgBreakPoint();. Отладчик Visual Studio должен подключиться к виртуальной машине, отобразить в окне с исходным кодом текущую строку и нормальным образом реагировать на пошаговое исполнение, показывать значения переменных, отображать содержимое памяти, и, что важно, останавливаться на установленных средствами Visual Studio точках остановки.
Окно Debugger Immediate Window точно такое же, как и в WinDbg. Точнее говоря, это одно и то же. Поэтому Visual Studio через него поддерживает все команды WinDbg, а среди них много полезных.


Еще один способ установки драйвера, который я использую — это Custom Command Line. Можно создать простой bat-скрипт, содержащий команды по установке и запуску драйвера. Visual Stuio позволяет указать дополнительные файлы, которые нужно скопировать на тестовую систему, однако эта функция не работает. Поэтому создаем файл createandstart.bat на диске C, который содержит две строки: SC CREATE HelloWorldDriver binPath= C:\DriverTest\Drivers\HelloWorldDriver.sys type=kernel и SC START HelloWorldDriver

А в поле ввода под опцией Custom Command Line указать C:\createandstart.bat

При нажатии F5 драйвер установится, запустится и Visual Studio укажет на строку с вызовом макроса DbgBreakPoint();
Простая отладка средствами Visual Studio
Однако все возможности Visual Studio Deployment раскрываются при создании тестов. Для простой отладки все это лишнее, поэтому, возможно, будет гораздо проще настроить тестовую систему для отладки самостоятельно (утилитой bcdedit), далее вручную запускать драйвер, а отлаживать его средствами Visual Studio. Такой подход представляет собой что-то среднее между рассмотренными выше. Для подготовки к отладке необходимо выполнить следующие шаги:
Шаг 1. Подготовить виртуальную машину.
На виртуальной машине нужно включить тестовый и отладочный режимы, а также установть драйвер командой SC CREATE.
Шаг 2. Сконфигурировать Visual Studio.
В Visual Studio открыть конфигуратор тестовых устройств, однако на первом шаге выбрать вариант Manual configure debuggers and do not provision, нажать Next, в следующем окне настроить все идентично, как на рисунке.


Теперь на тестовой системе можно запустить драйвер командой SC START. Выполнение драйвера остановится на строке DbgBreakPoint();, а виртуальная машина будет ожидать подключения отладчика. В Visual Studio нужно нажать Debug->Attach To Process, в появившемся окне в поле Connection type выбрать Windows Kernel Mode Debugger, в поле Connection target — имя настроенной выше тестовой машины, нажать Attach.

Очень вероятно, что вы получите ошибку Frame is not in module:

Введите в поле ввода окна Debugger Immediate Window команду .reload и переключитесь на файл с исходным кодом. Если и это не помогло, скорее всего, вы что-то изменили в исходном коде, скомпилировали, но забыли скопировать новую версию драйвера. Пересоберите (для надежности) проект, скопируйте его на тестовую машину, запустите драйвер, подключие отладчик снова.
Я считаю этот способ самым удобным при отладке драйвера. Он позволяет использовать более комфортную и привычную Visual Studio, при этом не тратить целые минуты на установку новой версии драйвера на тестовую систему.
Заключение
Разработка драйверов для ОС Windows — достаточно увлекательный процесс. Реализация даже мелких и простых драйверов позволяет глубже понять внутреннее устройство Windows, что весьма полезно. Однако начинающих системных программистов отпугивает не столько сложность написания непосредственно кода (как минимум, есть множество примеров), сколько сложность установки и отладки. Надеюсь, что данный материал поможет кому-то не потерять интерес в первом же проекте.
Upd
В комментариях были выражены опасения, что инструкция по установке драйвера некорректная в части отключения подписи драйверов. В результате эксперимента установлено, что все нормально и работает ровно так, как описано. Также попутно выяснилось, что можно смело качать последнюю версию WDK (для 22H2) и SDK (если у вас Windows 10, а не Windows 11) и тогда разработку можно вести в Visual Studio 2022.
It took “a while” but, without any fanfare, sometime in May of 2022, Microsoft released a version of the Windows Driver Kit (WDK) that supports Visual Studio (VS) 2022. This version is referred to as the Windows 11 Version 22H2 WDK. This new version of the WDK is only support on VS 2022. It cannot be used with VS 2019.
Support for VS 2022 is a good thing. Given that many (if not most) Windows driver developers these days often also write some sort of application code, having one tool chain that supports both jobs is both useful and most welcome. There are some nice new features in VS 2022, including native 64-bit support (for the IDE itself) and support for C++ 20.
But, alas, there are a few surprises lurking in this most recent WDK release. Specifically:
- No support for building drivers that target any Windows version before Windows 10. This means that it’s no longer possible to use the latest WDK to build drivers that support Windows 7 or Windows 8, or Windows 8.1.
- No support for building 32-bit drivers, for any platform, x86 or ARM, or for any OS version including 32-bit Windows 10.
These new restrictions will come as unwelcome news to many in the driver development community. Microsoft can wish what they want, but it is beyond question that there is still a significant installed base of Windows 7 and 32-bit Windows systems. Remember that only a couple of years ago (2020) Microsoft was still building, releasing, and supporting 32-bit version of Windows 10. That means there are lots of companies that need to be able to update the drivers for their hardware or software (I’m looking at you, file system minifilter people) on those systems.
Microsoft would have us continue to use the “old” Windows 11 WDK hosted on VS 2019 to build drivers for the platforms that are no longer supported. And, yes… as long as that works, that is a possible way forward. Microsoft assures us that “side by side” (SxS) installation of the VS 2019 and the old Windows 11 WDK and VS 2022 and the new Windows 11 22H2 works, and is supported.
You’ll have to excuse me if I’m a bit skeptical of this claim. Our experience here at OSR with using SxS VS and WDK installs hasn’t exactly been without pain. Heck, for the last few releases, nothing about using the WDK has been without pain. But, we’ll leave that alone for now.
If you’re wondering why Microsoft made these decisions, maybe I can help explain. As you probably know, the WDK is built as part of the Windows build process. In fact, the key header files (wdm.h, ntddk.h, and ntifs.h) are actually “synthetic” files that are created during the build process. These files are composed of extracts from actual, native, Windows OS header files. As you a probably also know, Microsoft is no longer building 32-bit versions of Windows. No Windows dev, when working on the kernel (let’s say) is going to worry about getting the 32-bit defines in the native headers correct, when there are no more 32-bit OS builds being produced. Telling them “the WDK needs this” only goes so far. That means, from a practical standpoint, there’s really no way for anybody to ensure that the 32-bit versions of the WDK header files still work. At least, not without doing really exhaustive and comprehensive testing of real drivers on old 32-bit builds of Windows. That’s complicated, fraught with difficulties and dangers, and not really practical. So, however painful it might be, I totally don’t blame the WDK team for dropping support of 32-bit driver builds.
While the decision not to support 32-bit drivers with the latest WDK is understandable, I think that it’s still likely to cause the driver development community a great deal of pain. Even if you ignore the ancient OS versions, there are a lot of 32-bit Windows 10 systems running out there in the world. OEMs and IHVs will certainly hear from their customers if they just stop fixing bugs on these platforms.
When it comes to no longer supporting Windows 7 as a driver target for 64-bit drivers, I’m afraid that I’ve got no really satisfying explanation. I suspect that it simply comes down to: “Well, if folks will need to have a separate WDK/VS installation to be able to build 32-bit drivers, then they can just as well use that to build their drivers that target both 32-bit and 64-bit Win7 and Win8 and whatnot.” While this decision does not exactly fill me with “undiluted pleasure”, I’ve got to say that if this was the team’s thinking, I sort of get it. It doesn’t make me happy. I’m not sayin’ they should have done it. I’m just saying… I understand.
Where does this leave us, fellow community members? It leaves us having to make some decisions:
- Do you have technical reasons why you need to use VS 2022? Other projects that require VS 2022? Do you lust for the new VS 2022 features? If so, and you still need to support those 32-bit or Win7/Win8/win8.1 targets, you’re going to need to live with a SxS install of VS 2019 and VS 2022 and the most recent versions of their associated WDKs. Hope for the best!
- Or… do you still need to support Win7/Win8/Win8.1 and 32-bit targets… but you can forgo updating to the latest and greatest version of VS. In this case, you can just continue to live with VS 2019 and the older WDK. No risk, no problem.
But wait! We might have an even better option for you: Consider upgrading your VS development environment (and WDK) to VS 2022 and the 22H2 WDK, and building your drivers for 32-bit or down-level OS versions using the Enterprise WDK (EWDK). This option leaves relieves you of any potential problems maintaining a SxS VS/WDK environment might bring. The only “cost” in terms of usability is that the Enterprise WDK only allows you to build from the command line. But, heck, that’s no big deal (you still use MSBUILD and Solution and Project files). And yes, you can still download older version of the EWDK.
If you have other experiences or observations to share about the VS 2022 and the new 22H2 WDK, we’d love to hear about them. Head on over to our Community site and post something there.
Предыстория
Для очередного проекта возникла необходимость написать простенький софтверный драйвер под Windows, но так как опыта в написании драйверов у меня примерно столько же, сколько и в балете, я начал исследовать данную тему. В таких делах я предпочитаю начинать с основ, ибо если кидаться сразу на сложные вещи, то можно упустить многие базовые понятия и приёмы, что в дальнейшем только усложнит жизнь.
После 20 минут поисков по сети я наткнулся на Github Павла Иосифовича (zodiacon — Overview). Личность легендарная в своих кругах, достаточно посмотреть на его репозиторий, публикации и выступления на именитых конференциях. Помимо этого, Павел является автором/соавтором нескольких книг: «Windows Internals» (книга, имеющаяся у меня на полке, которая принесла немало пользы), и «Windows Kernel Programming» 2019 года выпуска (бегло пролистав 11 Глав или 390 страниц, я понял – это то, что нужно!).
Кстати, книгу вы можете купить прямо на сайте Павла
Ссылка скрыта от гостей
Книгу я приобрёл в бумажной версии, чтобы хоть и немного, но поддержать автора. Безупречное качество, несмотря на то, что она издается в мягком переплете. Хорошие плотные листы формата А4 и качественная краска. (книга без проблем пережила вылитую на нее кружку горячего кофе).
Пока я сидел на балконе и читал четвёртую главу книги, в голову пришла мысль: а почему бы не сделать ряд статей на тему «Программирования драйвера под Windows», так сказать, совместить полезное, с еще более полезным.
И вот я здесь, пишу предысторию.
Как я вижу этот цикл статей и что от него ожидать:
Это будут статьи, которые будут базироваться на вышеупомянутой книге, своеобразный вольный и сокращенный перевод, с дополнениями и примечаниями.
Базовые понятия о внутреннем устройстве Windows (Windows Internals)
Для того, чтобы начать разрабатывать Драйвер под Windows, то есть работать на уровне с ядром ОС, необходимо базовое понимание того, как эта ОС утроена. Так как я хочу сосредоточиться на написании драйвера, а не на теории об операционных системах, подробно описывать понятия я не буду, чтобы не растягивать статью, вместо этого прикреплю ссылки для самостоятельного изучения.
Следовательно, нам стоит ознакомиться с такими базовыми понятиями как:
Ссылка скрыта от гостей
Процесс – это объект, который управляет запущенной инстанцией программы.
Ссылка скрыта от гостей
Технология, позволяющая создавать закрытые пространства памяти для процессов. В своем роде — это песочница.
Ссылка скрыта от гостей
Это сущность, которая содержится внутри процесса и использует для работы ресурсы, выделенные процессом — такие, как виртуальная память. По сути, как раз таки потоки и запускают код.
Ссылка скрыта от гостей
В своем роде это прокладка, которая позволяет программе отправлять запросы в Ядро операционной системы, для выполнения нужных ей операций.
Ссылка скрыта от гостей
Это сложно описать словами коротко, проще один раз увидеть картинку.
В упрощённом виде это выглядит так:

Ссылка скрыта от гостей
Дескрипторы и объекты необходимы для регулирования доступа к системным ресурсам.
Объект — это структура данных, представляющая системный ресурс, например файл, поток или графическое изображение.
Дескриптор – это некая абстракция, которая позволяет скрыть реальный адрес памяти от Программы в пользовательском режиме.
Для более глубокого понимания Операционных систем могу посоветовать следующие материалы:
Книги:
- Таненбаум, Бос: Современные операционные системы
- Windows Internals 7th edition (Part 1)
Видео:
Настройка рабочего пространства
Для разработки драйвера, как и любого другого софта необходима подходящая среда.
Так как мы работаем в операционной системе Windows, её средствами мы и будем пользоваться.
Что нам понадобится:
1. Visual Studio 2017 и старше.
(Community Version хватает с головой) Также во вкладке „Individual components” необходимо установить
Код:
MSVC v142 - VS 2019 C++ ARM build tools (Latest)
MSVC v142 - VS 2019 C++ ARM Spectre-mitigated libs (Latest)
MSVC v142 - VS 2019 C++ ARM64 build tools (Latest)
MSVC v142 - VS 2019 C++ ARM64 Spectre-mitigated libs (Latest)
MSVC v142 - VS 2019 C++ ARM64EC build tools (Latest - experimental)
MSVC v142 - VS 2019 C++ ARM64EC Spectre-mitigated libs (Latest - experimental)
MSVC v142 - VS 2019 C++ x64/x86 build tools (Latest)
MSVC v142 - VS 2019 C++ x64/x86 Spectre-mitigated libs (Latest)
и далее по списку.
2. Windows 10/11 SDK (последней версии)
Ссылка скрыта от гостей

Тут все просто. Качаем iso файл, монтируем и запускаем установщик.
3. Windows 10/11 Driver Kit (WDK)
Ссылка скрыта от гостей

В конце установки вам будет предложено установить расширение для Visual Studio. Обязательно установите его!

После закрытия окна установки WDK появится установщик Расширения VisualStudio

4. Sysinternals Suite
Ссылка скрыта от гостей
Скачайте и распакуйте в удобное для вас место. Это набор полезных утилит, которые пригодятся для исследования Windows, дебага драйвера и прочего.

5. Виртуальная Машина с Windows для тестов.
Выбор ПО для виртуализации на ваше усмотрение. Я буду использовать «VMware Workstation 16 pro».
Написанные драйверы лучше тестировать именно в виртуальной машине, так как Ядро — ошибок не прощает, и вы будете часто улетать в синий экран смерти.
После того, как все было установлено, пора запускать Visual Studio и начинать писать драйвер.
Создание проекта
Запускаем Visual Studio и создаем новый проект. Создадим пустой проект „Empty WDM Driver“

Называем его как душе угодно.
И вот он, наш свеженький чистенький проект для нашего первого драйвера.

Теперь необходимо создать cpp файл, в котором мы будем писать сам драйвер.


Вот и все. Настройку системы и среды мы закончили.

Первый драйвер
Сначала импортируем ntddk.h эта одна из базовых библиотек для работы с ядром. Больше информации
Ссылка скрыта от гостей
. Как и у любой программы, у драйвера должна быть точка входа DriverEntry, как функция Main в обычной программе. Готовый прототип этой функции выглядит так
C++:
#include <ntddk.h>
NTSTATUS DriverEntry(_In_ PDRIVER_OBJECT DriverObject, _In_ PUNICODE_STRING RegistryPath) {
/*
    In_ это часть SAL(Source Code Ananotation Language) Аннотации не видимы для компилятора,
    но содержат метаданные которые, улучшают анализ и чтение кода.
*/
    return STATUS_SUCCESS;
}
Если мы попробуем собрать наш проект, то получим следующие ошибки и предупреждения.

В данном случае пункт 1 является следствием пунктов 2 и 3. Дело в том, что по дефолту в Visual Studio некоторые “предупреждения” расцениваются как ошибки.
Чтобы решить эту проблему есть 2 пути.
- Отключить эту фичу в Visual Studio, что делать не рекомендуется. Так как сообщения об ошибках могут быть полезны и сэкономят вам время и нервы в дальнейшем.
- Более правильный и классический метод это использовать макросы в c++. Как видно из сообщения с кодом C4100 объекты RegistryPath и DriverObject не упомянуты в теле функции. Подробнее
Ссылка скрыта от гостей
.
Для того, чтобы избавиться от предупреждений, и заставить наш код работать, стоит поместить объекты в макрос UNREFERENCED_PARAMETER(ObjectName)
C++:
include <ntddk.h>

NTSTATUS DriverEntry(_In_ PDRIVER_OBJECT DriverObject, _In_ PUNICODE_STRING RegistryPath) {
    UNREFERENCED_PARAMETER(DriverObject);
    UNREFERENCED_PARAMETER(RegistryPath);
    return STATUS_SUCCESS;
}
Теперь, если пересобрать проект, то мы увидим, что ошибка С220 и предупреждение C4100 пропали, но к ним на смену пришли LNK2019 и LNK1120. Однако это уже не ошибки компиляции — это ошибки линкера. А кто говорил что будет легко?
О том, что такое линкер можно почитать
Ссылка скрыта от гостей
.
Дело в том, что наша функция не представлена в стандартном линкере С++ и вообще она девушка капризная и хочет Си-линкер. Удовлетворим желание дамы и дадим ей то, чего она хочет.
Делается это просто. Перед функцией надо добавить extern "C" так наш линкер будет понимать, что эта функция должна линковаться С-линкером.
Собираем проект заново и вуаля — Драйвер собрался.

Что на данный момент умеет наш драйвер? Сейчас это по сути пустышка, которая после загрузки, в случае успеха, вернет нам сообщения об удачном запуске. Давайте заставим его нас поприветствовать и проверим его работоспособность. Выводить сообщения мы будем при помощи функции KdPrint(()); да именно в двойных кавычках.
Итоговый код драйвера будет выглядеть так:
C++:
#include <ntddk.h>

//Указываем линкеру, что DriverEntry должна линковаться С-линкером
extern "C"
NTSTATUS DriverEntry(_In_ PDRIVER_OBJECT DriverObject, _In_ PUNICODE_STRING RegistryPath)
{
    //Убираем варнинг C4100 и связанную с ним ошибку C220
    UNREFERENCED_PARAMETER(DriverObject);
    UNREFERENCED_PARAMETER(RegistryPath);
    //Выводим сообщение
    KdPrint(("Hi Codeby, this is our first driver! Yuhu!\n"));

    return STATUS_SUCCESS;
}
Собираем или пересобираем драйвер.

Важно! Сборка драйвера должна происходить в режиме Debug!!!

После чего в папке нашего проекта мы сможем найти результаты нашего труда. Вы только посмотрите на него, какой маленький и хорошенький.

Но что делать дальше? Как проверить его работоспособность?
Для этого нам и понадобится наша виртуальная машина с Windows, но перед запуском на ней драйвера, нам придется проделать пару манипуляций. Дело в том, что в Windows есть встроенная защита, и если драйвер не подписан «нужной» подписью ака сертификатом, то драйвер просто не загрузится.
Дальнейшие действия нужно проделать в Windows на виртуальной машине.
Чтобы отключить эту проверку подписи, а точенее перевести Windows в тестовый режим, запустите cmd.exe от имени администратора и введите следующую команду bcdedit /set testsigning on.

Перезагрузите виртуальную машину.
Если все прошло удачно, в правом нижнем углу вы увидите следующую надпись (2 нижнее строчки могут отличиться в зависимости от версии Windows)

Возвращаемся в папку с драйвером и копируем его в виртуальную машину. Теперь нам надо создать службу для запуска драйвер. Открываем консоль от имени администратора и вводим следующую команду:
sc create Name type= kernel binPaht= PATH_TO_DRIVER
в моем случае это выглядит так:

Также проверить успешность создания можно через реестр.

В той же консоли мы можем попробовать запустить нашу службу.
sc start CodebyDriver

Отлично, драйвер запустился и мы даже не улетели в синьку, а это всегда приятно. Теперь давайте проверим, выводится ли сообщение от драйвера.
Для этого нам необходимо провести подготовительные работы.
Создадим новый ключ в реестре и назовем его Debug Print Filter.

В качестве значения задаем DWORD с именем DEFAULT и определяем данные для значения как 8.

Перезагружаем виртуальную машину.
После перезапуска запускаем DebugView данный инструмент находится в архиве Sysinternals, который мы ранее скачали. Ее можно смело скопировать в виртуальную машину.
Запускаем DebugView от имени Администратора и ставим галочку “Capture Kerner”

Capture Win32 и Capture Global Win32 можно снять, если летит много сообщений.
Затем запускаем консоль от имени администратора и запускаем службу загрузки драйвера.

Все отработало отлично, и мы видим приветствие от нашего драйвера!
На этой приятной ноте первая статья из цикла заканчивается. В дальнейших статьях мы добавим функционала нашему драйверу, научим его выгружаться и получать данные.
Спасибо за чтение!
P.S: Я сам только начал изучать тему работы с драйверами. Так что если у вас есть предложения или правки по технической части статьи, прошу отписать в комментарии, чтобы я мог внести изменения в статью.
P.P.S: Как вы могли заметить, писать мы будем преимущественно на С++, посему могу посоветовать отличный канал с уроками по С++ — The Cherno.
Driver samples for Windows 11
These are the official Microsoft Windows Driver Kit (WDK) driver code samples for Windows 11. They provide a foundation for Universal Windows driver support of all hardware form factors, from phones to desktop PCs. Use these samples with Visual Studio 2022 and Windows Driver Kit (WDK) 11.
Windows Driver Kit documentation
Windows 11 driver development
Use Visual Studio 2022 and Windows Driver Kit (WDK) 11 to build, test, and deploy your drivers. With Windows 11, the driver development environment is integrated into Visual Studio. To get started, download the driver development kits and tools for Windows 11.
Download the WDK, WinDbg, and associated tools
Windows Driver Kit (WDK)
Take a look at the compilation of the new and changed driver-related content for Windows 11. Areas of improvement include camera, print, display, Near Field Communication (NFC), WLAN, Bluetooth, and more.
Find out what’s new in the WDK
Universal Windows drivers
Write one driver that runs on Windows 11 for desktop editions, as well as other Windows editions that share a common set of interfaces.
Getting Started with Universal Windows drivers
Windows Driver Frameworks
The Windows Driver Frameworks (WDF) are a set of libraries that make it simple to write high-quality device drivers.
WDF driver development guide
Samples
Use the samples in this repo to guide your Windows driver development. Whether you’re just getting started or porting an older driver to the newest version of Windows, code samples are valuable guides on how to write drivers.
For information about important changes that need to be made to the WDK sample drivers before releasing device drivers based on the sample code, see the following topic:
From Sample Code to Production Driver — What to Change in the Samples
Build your first driver
If you’re writing your first driver, use these exercises to get started. Each exercise is independent of the others, so you can do them in any order.
Write a UMDF driver based on a template
Write a KMDF Hello World driver
Write a KMDF driver based on a template
Use GitHub Actions to build a simple driver project
Microsoft Code of Conduct
This project has adopted the Microsoft Open Source Code of Conduct. For more information see the Code of Conduct FAQ or contact opencode@microsoft.com with any additional questions or comments.
While applications with user-friendly interfaces run in user mode, some protected data can only be accessed in kernel mode. To securely and efficiently work with user data, applications rely on software drivers that process user mode requests and deliver results back to the application.
In this article, we provide a practical example of writing a Windows Driver Model (WDM) driver for encrypting a virtual disk that stores user data. Most of the steps described will also work for other types of drivers. This article will be useful for development teams and project leaders who are considering developing a custom software driver.
Contents:
- What do you need to build a Windows software driver?
- Encryption disk architecture
- Building a WDM driver
- Creating a device object
- Registering callback methods
- Implementing callback methods
- Implementing read/write operations for a virtual disk
- Mounting the disk
- Unmounting the disk
- Encrypting the disk
- Running a demo
- Debugging the disk
- Conclusion
What do you need to build a Windows software driver?
In the article How to Develop a Virtual Disk Driver for Windows: A No-Nonsense Guide, we discuss in detail how to build a basic virtual disk driver for Windows. This time, even though we’re once again working with a virtual disk driver, we are building a software driver for Windows that won’t directly interact with any physical devices or hardware. The driver is part of a project written in C, so we also cover some language-related limitations.
In this guide, we show you how to develop a Windows driver for creating an encrypted virtual disk — a file that operates similarly to a physical disk. You’ll be able to see the virtual disk in File Explorer and perform operations in it such as creating, saving, and deleting data. The driver’s key task is to process requests received from the operating system and send them to the virtual disk instead of a real device.
To follow along with our driver development guide, you’ll need the following tools:
- Visual Studio (we used Visual Studio 2019)
- Windows Software Development Kit (SDK) (for versions older than Visual Studio 2017; we used SDK version 10.0.19041.0.)
- Windows Driver Kit (WDK) (we used WDK version 10.0.19041.685)
- VMWare (to create a virtual machine for driver debugging)
Note: Starting with Visual Studio 2017, Windows SDK is installed automatically when you select the Desktop development with C++ option when installing Visual Studio. WDK, however, still must be downloaded separately.
If WDK was installed properly, you’ll see driver project templates in the dialog window for creating new Visual Studio projects:
Screenshot 1: Visual Studio 2019 interface for creating driver projects
Working with WDK
Note that your approach to working with WDK depends on the version(s) of Windows you want your driver to be compatible with.
Before Visual Studio 2012 (WDK 8.0), Windows Driver Kit was a standalone solution that had its own compiler and other tools needed for developing a Windows driver. Driver assembly used to consist of two main steps:
- Call the setenv.bat script to set build options
- Call the build.exe utility from WDK
To build a basic driver for Windows, you needed two files:
1. The Makefile file, containing a directive to include the final makefile from the WDK. This directive was always standard:
Makefile
!include $(NTMAKEENV)\makefile.def2. The Sources file, containing build options and a list of driver sources.
WDK is currently integrated into Visual Studio via an extension that gets installed automatically. Therefore, you no longer need to work with Sources and Makefile, as you can select the project type, WDK version, and libraries to link to your driver in project settings.
When you use older versions of WDK to build drivers supporting Windows OS, your driver should also be able to support newer versions of Windows. However, to enable support for older Windows versions, you might need to use older versions of WDK when building your driver.
For example, to build a driver supporting Windows XP, you’ll need to use WDK version 7.1.0 (7600.16385.1) or older. This driver will also work under Windows versions 7, 8, and 10. At the same time, with WDK version 10.0.19041.685 (used in our guide), you can build a driver that supports Windows 7 or later, but it won’t work properly on Windows XP.
To learn more about writing drivers for different Windows versions, read Microsoft’s recommendations.
Overall, if you’re working on a new driver that doesn’t need to support older versions of Windows, it’s best to use the latest WDK version and create the project directly in Visual Studio.
With that in mind, let’s move to the actual process of Windows driver development.
Preparing to develop a Windows driver
Microsoft explains in detail the nature and purpose of drivers in Windows. Below, we summarize the core information you need to know to follow our guide.
First, let’s outline what a driver is and what its tasks are. A driver is a portable executable (PE) file that has a .sys extension. The format of this file is similar to the format of any .exe file, but the driver file links to the kernel (ntoskrnl.exe) and other system drivers (although this capability won’t be used in our example):
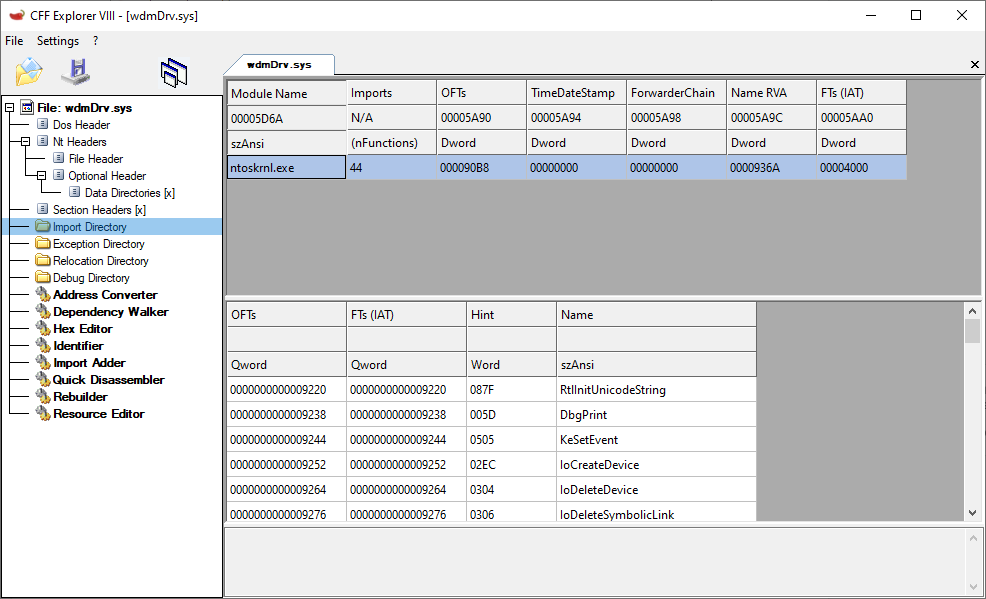
Screenshot 2: List of a driver’s linked modules with imported APIs
Drivers also have a different entry point — the GsDriverEntry function and the /SUBSYSTEM – NATIVE parameter.
Usually, drivers are written in C. However, as Microsoft doesn’t provide things like a C runtime for the kernel or a standard C++ library, you can’t use common C++ features like new/delete, C++ exceptions, or global class object initialization in the kernel. You can still write your code in a .cpp file and state a class, and the compiler will understand it; but full-scale support for C++ is absent.
Also, Microsoft recommends not using standard C++ functions like memcpy and strcpy for kernel driver development, even though they can be exported by the kernel. Instead, they recommend using safe implementations designed specifically for the kernel, such as the RtlCopyMemory and RtlCopyString functions.
To work with a project that relies on C, you can use a C++ runtime (cppLib) and an STL library (STLport) ported to the kernel. To simplify our example, we don’t use either of those and work with almost pure C.
To make it easier to write drivers, Microsoft created the Windows Driver Framework (WDF). This framework can help you significantly shorten the code for interacting with Plug and Play (PnP) devices and power management.
WDF is based on the Windows Driver Model. The choice of a driver model depends on many factors, including the type of driver under development.
With WDF being more suitable for building device drivers, in this article, we build our software driver with WDM.
Encryption disk architecture
To build a properly functioning WDM driver, we need to create two components:
- wdmDrv.sys — a driver that implements a virtual disk in Windows
- wdmDrvTest.exe — a user application that manages the driver
First, we need to mount our disk so it appears in the system and is accessible from File Explorer. To do this, we need a separate user application — wdmDrvTest.exe — that will send commands to the driver to mount and unmount the disk. We can also use the Windows registry to specify mount options for the disk (disk letter, path to the virtual disk file, disk size, etc.) and read those options when the driver is loaded into the system.
Then, for reasons of data security, we need to make sure the data is encrypted before it’s written to the disk and decrypted only after it’s read from the disk. As a result, data stored on the disk will always be encrypted.
Our driver is responsible for performing read/write operations on our virtual disk. The WdmDrvTest.exe application is responsible for encrypting and decrypting data. This application can also read and write data to and from the file where our virtual disk is stored. Therefore, our driver will delegate the processing of read/write operations to wdmDrvTest.exe.
Building a WDM driver
Any Windows driver starts with the DriverEntry function, which is called by the Windows operating system when the driver is loaded:
C
NTSTATUS DriverEntry(
IN PDRIVER_OBJECT DriverObject,
IN PUNICODE_STRING RegistryPath)
In our case, this function is responsible for:
- Creating a device object that will receive control commands.
- Registering callback methods that Windows calls for the created device objects. For example, in the case of a request to read data from the disk, the system will call a read callback in our driver.
- Registering the DriverUnload method, which Windows calls to unload the driver and free the allocated resources.
Basically, the DriverEntry function works similarly to the Main function in user applications.
However, while the Main function executes a certain algorithm and then returns control to the operating system, a driver remains loaded in memory and waits for Windows to call the appropriate handler in response to a new event even after execution of the DriverEntry function.
The following diagram shows the execution of a process in user mode and the work of a driver as part of a system process:
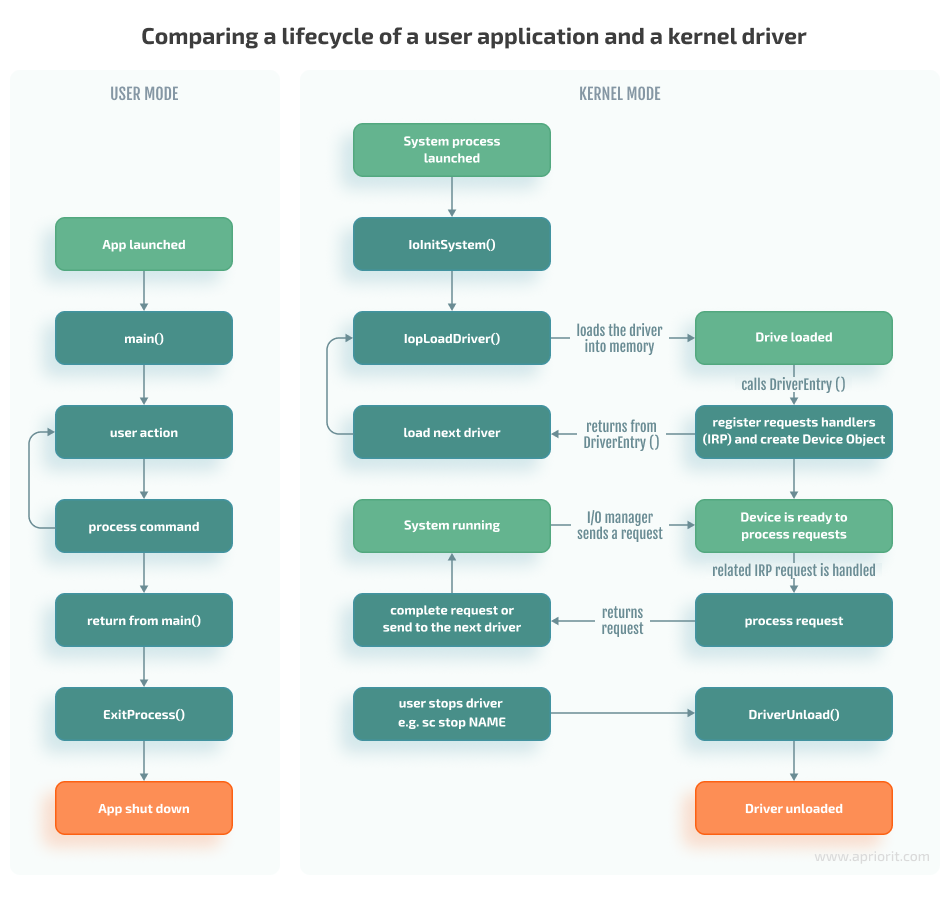
Here, the input/output (I/O) manager should be seen as a set of functions called to process I/O events rather than a separate module in the system.
Creating a device object
To create a device object, use the IoCreateDevice and IoCreateDeviceSecure functions:
NTSTATUS IoCreateDeviceSecure(
    [in]             PDRIVER_OBJECT     DriverObject,
    [in]             ULONG              DeviceExtensionSize,
    [in, optional]   PUNICODE_STRING    DeviceName,
    [in]             DEVICE_TYPE        DeviceType,
    [in]             ULONG              DeviceCharacteristics,
    [in]             BOOLEAN            Exclusive,
    [in]             PCUNICODE_STRING   DefaultSDDLString,
    [in, optional]   LPCGUID            DeviceClassGuid,
    [out]            PDEVICE_OBJECT     *DeviceObject
);
IoCreateDeviceSecure allows us to additionally specify the parameters for the DefaultSDDLString security descriptor. For example, we can specify which user groups can write to the device. Starting from Windows 7, this parameter must be used to, for instance, successfully format a disk.
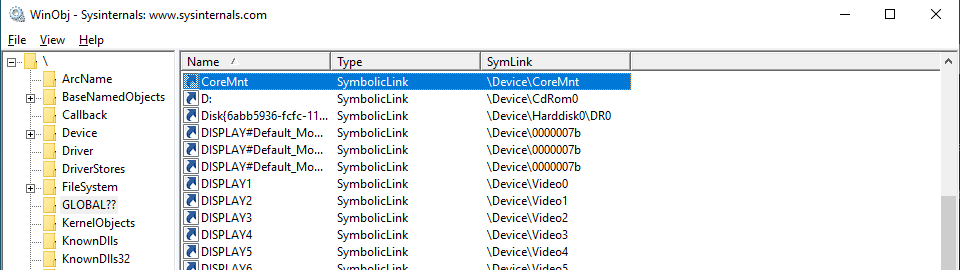
The DeviceName parameter is the name of the device, which might look like \Device\MyDevice. This parameter is created in the Device directory, which is a standard directory where all devices in the system are listed. To view this directory, we can use the winobj utility. Here is our virtual disk in the Device directory:
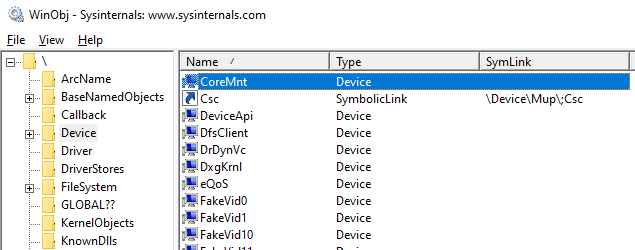
However, the devices in this directory can’t be accessed from user mode. Therefore, if we try to open a device by calling the CreateFile function, we’ll get the INVALID_HANDLE_VALUE value with the ERROR_FILE_NOT_FOUND error.
To make a device accessible from user mode, we need to create a symbolic link to it in the GLOBAL?? directory. To do that in the kernel, we call the IoCreateSymbolicLink function:
Now, using the name of our device, any user application can open the device object and send requests to it:
C++
CreateFileW(L"\\.\CoreMnt", GENERIC_READ | GENERIC_WRITE, 0, NULL, OPEN_EXISTING, 0, NULL);To learn more on the topic of naming device objects, you can read the guidelines from Microsoft or the Naming Devices section in the book Programming the Microsoft Windows Driver Model by Wolter Oney.
Continuing with our guide, we need to create two devices:
- A control device for interacting with the user application: particularly, for performing mount/unmount commands on our disk. This device is created in DriverEntry.
- A disk device for receiving and processing I/O operations. The control device creates a disk device when it receives the disk mount command.
Now, let’s look closer at the rest of the IoCreateDeviceSecure parameters:
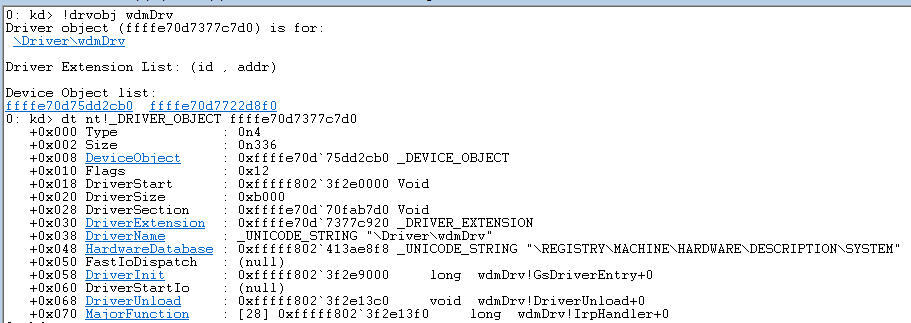
DriverObject is a structure created by Windows and passed to the DriverEntry function. This structure contains a list of all device objects created for the driver.
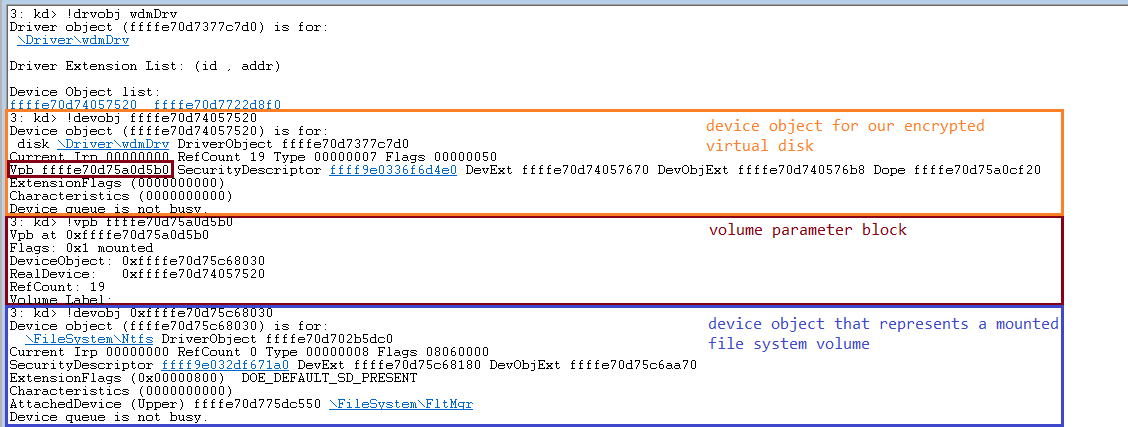
Here’s how we can find a DriverObject by the driver name and see the entire structure using WinDbg (see the Debugging the disk section below) and the !drvobj command:
DeviceExtensionSize is the parameter defining the size of the structure that we want to store in the created device object. This parameter is specified in the DeviceExtension field.
Windows will allocate memory for this structure and save the pointer to it in the created device object. This structure is where we will store everything we need to process requests: the I/O request queue, disk size, etc. In terms of C++ classes, this structure can be seen as the device object’s data members.
DeviceType is one of the numerical values defined in wdm.h, such as FILE_DEVICE_DISK, FILE_DEVICE_PRINTER, and FILE_DEVICE_UNKNOWN. Based on this parameter, the system assigns a default security descriptor to the device object of the virtual disk.
DeviceCharacteristics defines additional device characteristics such as FILE_READ_ONLY_DEVICE. In our case, we pass 0 as the value of this parameter.
Exclusive is a parameter that prohibits the opening of more than one device handler (HANDLE). In our case, we set the value of this parameter to FALSE.
DeviceObject is the address of the created device object.
The next important step in creating a WDM driver is registering its callback methods. Let’s take a look at this process.
Registering callback methods
Windows uses the I/O request packet (IRP) structure to handle various I/O events. For solutions where we have two different drivers interacting with each other, we can create and send IRPs to the second driver ourselves. But in our case, the operating system is responsible for both creating this structure and passing it to the driver.
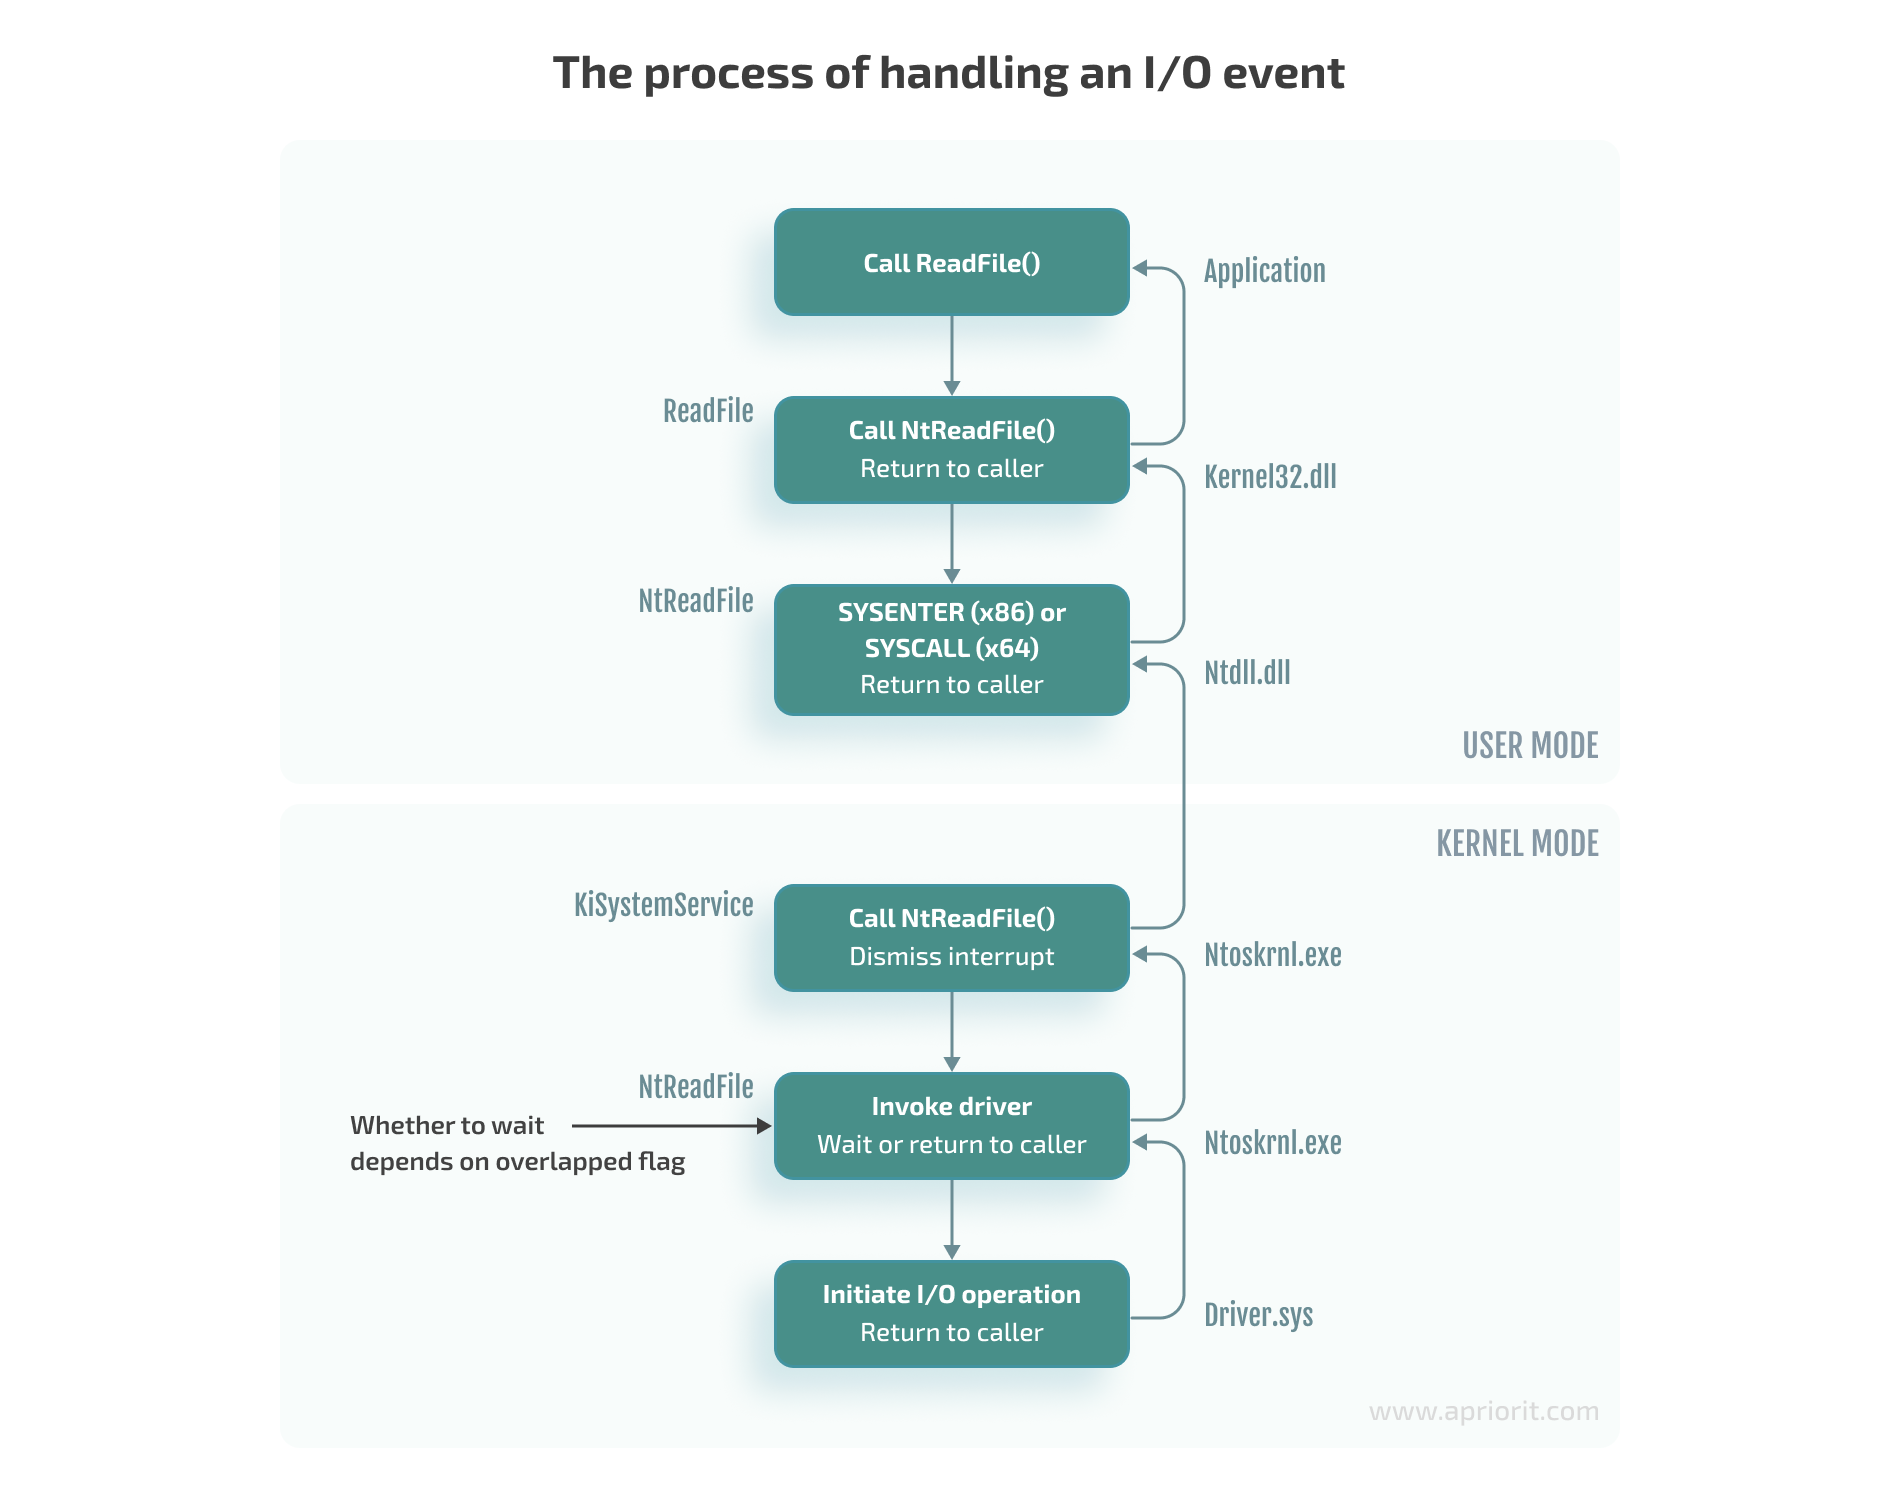
Let’s see how an I/O event is usually handled, using the ReadFile function as an example. When the ReadFile function is called, this is what happens in the user application:
1. The ReadFile function calls the ntdll!NtReadFile function, which switches to kernel mode and calls the corresponding nt!NtReadFile function in the kernel (ntoskrnl.exe).
2. Using the passed HANDLE for the nt!NtReadFile file, the nt!NtReadFile function:
- Finds the device corresponding to the file. For example, this can be done through calls to ObReferenceObjectByHandle or IoGetRelatedDeviceObject functions.
- Creates an IRP structure using, for example, a call to the IoAllocateIrp function.
- Calls the appropriate device driver by passing the created IRP structure to it. This can be done by, for example, calling the nt!IoCallDriver function.
Note that the HANDLE is stored in the table of process objects and therefore only exists within a specific process.
3. The nt!IoCallDriver function takes a pointer to the driver object from the structure describing the device and passes the received IRP structure to the appropriate handler. The pseudocode for this process looks like this:
C++
NTSTATUS IoCallDriver(PDEVICE_OBJECT device, PIRP irp)

{

// get FunctionIdx from irp

PDRIVER_OBJECT driver = device->DriverObject;

return(*driver->MajorFunction[FunctionIdx])(device, irp);

}
4. The execution flow is then transferred to the IRP_MJ_READ (0x03) handler of the corresponding driver.
Note that there’s a function similar to NtReadFile — the ZwReadFile function. ZwReadFile can be exported by both the kernel and ntdll. If we need to call a function from the user mode, we can work with either NtReadFile or ZwReadFile. But if we need to call a function from the kernel mode, then it’s best to use ZwReadFile, as it allows us to avoid errors when passing the data buffer from the user mode. You can learn more about working with these two functions in Microsoft documentation.
To process various control events or I/O events, the driver needs to register the appropriate handlers in the DriverObject->MajorFunction array. The full list of supported functions can be found in the wdm.h file.
For example, to process read/write requests, we need to provide implementations of functions with the IRP_MJ_READ and IRP_MJ_WRITE indexes:
C++
NTSTATUS IrpHandler(IN PDEVICE_OBJECT fdo, IN PIRP pIrp){...}

NTSTATUS DriverEntry(IN PDRIVER_OBJECT DriverObject, ...)

{

DriverObject->MajorFunction[IRP_MJ_READ] = IrpHandler;

DriverObject->MajorFunction[IRP_MJ_WRITE] = IrpHandler;

}
However, we don’t have to register all possible handlers. The system provides a default implementation that reports failed request processing. We can also see all handlers registered for a particular driver:
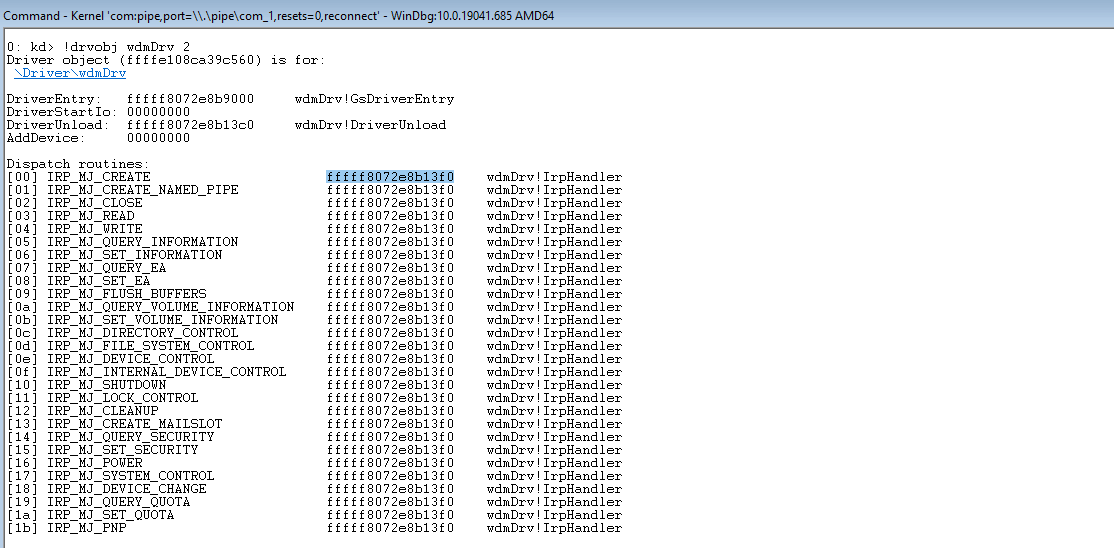
Note: It’s impossible to unload a driver without registering the DriverUnload method. Antivirus software and similar products often leverage this feature to ensure that no one can unload their drivers from the system.
Implementing callback methods
When creating the IRP structure, the I/O manager allocates an array of IO_STACK_LOCATION structures for it. This array is located at the very end of the IRP structure.
The array size is specified in the DEVICE_OBJECT structure of the device that will receive this IRP first; specifically, in the StackSize field of this structure. The MajorFunction code is also located in this structure and not in the IRP itself. As a result, the operation code may change when the IRP structure is passed from one device to another. For example, when passing a request to read to a USB device, the operation code may change from IRP_MJ_READ to something like IRP_MJ_INTERNAL_DEVICE_CONTROL.
To access the IO_STACK_LOCATION structure of the current device, we need to call the IoGetCurrentIrpStackLocation function. Then, depending on the value of MajorFunction, we need to perform the corresponding operation:
C++
PIO_STACK_LOCATION ioStack = IoGetCurrentIrpStackLocation(irp);

switch(ioStack->MajorFunction)

{

caseIRP_MJ_CREATE:

...

caseIRP_MJ_WRITE:

...

default:

returnCompleteIrp(irp, STATUS_INVALID_DEVICE_REQUEST, 0);
Overall, there are three possible scenarios for request processing:
1. Process the IRP request immediately. For example, if it’s a request for disk size (IOCTL_DISK_GET_LENGTH_INFO), we can return the result immediately, as this information is known:
C
irp->IoStatus.Status = STATUS_SUCCESS;

irp->IoStatus.Information = 0x1000000;

IoCompleteRequest(irp, IO_NO_INCREMENT);

returnSTATUS_SUCCESS;
In case of failed request processing, the Information field usually has a 0 value in it. If a request is processed successfully, this field will contain the size of the data to be sent.
The IO_NO_INCREMENT (0) value means there’s no need to boost the priority of the threads waiting for IRP completion. If we were building a sound card driver, we could pass the IO_SOUND_INCREMENT (8) value, where 8 would represent the priority level corresponding to the driver type.
2. Pass the IRP request to the next driver in the device stack. While we don’t do this in our example, it can be done with the following command:
C++
IoSkipCurrentIrpStackLocation(irp);

returnIoCallDriver(lowerDeviceObject, irp);
This scenario can be used, for instance, when we need to process requests in a minifilter driver.
3. Save the IRP request to be further processed by the driver and mark it as pending. Add this structure to the list stored in the device’s extension and return STATUS_PENDING (see the example below). This scenario is often applied for read/write operations and can be used when, for example, there’s a call to a real device that needs to be processed after processing the initial request:
C++
IoMarkIrpPending(irp);

ExInterlockedInsertTailList(list, &irp->Tail.Overlay.ListEntry, listLock);

KeSetEvent(&requestEvent, (KPRIORITY)0, FALSE);

returnSTATUS_PENDING;
Next, in the case of a synchronous call, the user mode application that called the Read/WriteFile function will call NtWaitForSingleObject for the HANDLE file to wait for the operation’s completion. Later, our driver will complete the stored IRP request by calling the IoCompleteRequest function. Calling this function will cause the event inside nt!_FILE_OBJECT to be set, which, in turn, will end the waiting for the HANDLE file.
Here’s how you can put a breakpoint in the code above to see the IRP request:
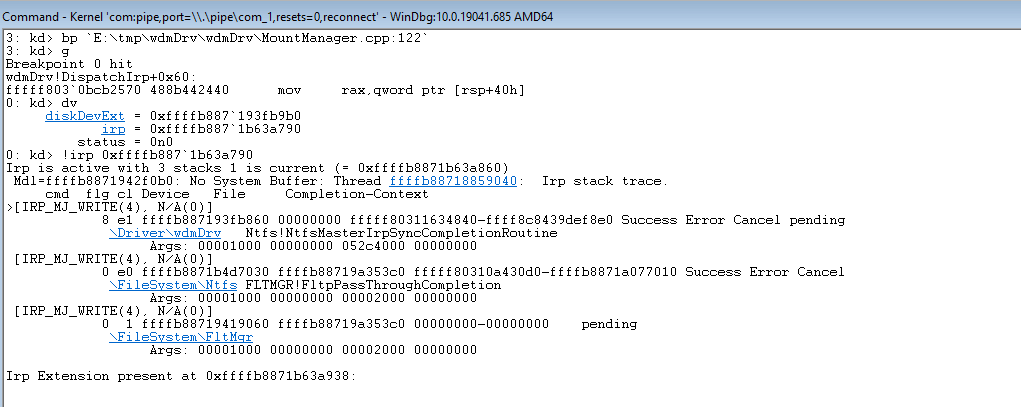
Now, let’s move to implementing read/write operations for a virtual disk.
Implementing read/write operations for a virtual disk
As we mentioned earlier, read/write requests are saved to a list stored in the device extension. Here’s a common way to process such requests:
- Create a thread in the kernel where we subtract requests from this list in a loop.
- Execute the corresponding operation of reading or writing to the file.
- For read operations, copy read data to the irp->MdlAddress buffer.
- Complete the request by calling the IoCompleteRequest function.
With this approach, requests are fully processed within the driver. However, as we need to work with the virtual disk file on the user application’s side, we need to apply a different approach where:
- The wdmDrvTest.exe application creates a thread in which it requests data on the last saved request from the driver.
- Based on the data received after Step 1, wdmDrvTest.exe reads data from and writes data to the disk file.
- The application sends the result back to the driver.
- In the case of a read operation, the driver copies the read data to IRP.
- The driver completes the request by calling the IoCompleteRequest function.
When compared to processing requests directly in the driver, this approach has several advantages. It enables us to:
- Use various libraries available in user mode
- Use programming languages other than C/C++
- Place the logic in DLLs, which we can dynamically load or replace without unloading the entire driver or rebooting the system
- Simplify code testing
- Increase overall system stability, as even if an error occurs, it doesn’t lead to a system shutdown.
However, this approach also has disadvantages — the increased complexity of and time needed for request processing.
Let’s see how this approach works in practice.
To request the saved IRP, we need to send a special control code (ioctl) from the wdmDrvTest.exe application. To do this, we call the DeviceIoControl function so the driver receives the IRP_MJ_DEVICE_CONTROL request.
First, we wait for the setting of the event, indicating that the request has been added to the list (see the previous section). Then we get the object of the saved IRP.
C++
KeWaitForSingleObject(requestEvent, Executive, KernelMode, FALSE, NULL);

PLIST_ENTRY request;

if((request = ExInterlockedRemoveHeadList(list, listLock)) == NULL)

{

// the list is empty, the event is set during unmounting

returnSTATUS_SUCCESS;

}

PIRP lastIrp = CONTAINING_RECORD(request, IRP, Tail.Overlay.ListEntry);
From the IRP, we get data such as the offset on the disk for read/write operations, the size of the data, and the data buffer for write operations. Then we copy this data to irp->AssociatedIrp.SystemBuffer and complete the IRP_MJ_DEVICE_CONTROL request. After that, we can perform steps two through five.
Working with the lpOverlapped parameter
When implementing read/write operations, it’s crucial to properly configure the lpOverlapped parameter when calling the DeviceIoControl function.
lpOverlapped is a pointer to the OVERLAPPED structure for making asynchronous calls. If you don’t pass this parameter to the DeviceIoControl function, the call to this function will be executed synchronously, which may cause wdmDrvTest to hang when sending other ioctl calls.
Here is what can happen when this disk unmounting scenario takes place:
- Thread 1 sends an ioctl call to get a saved request.
- The driver receives this ioctl call and waits for a new request to appear in the request list.
- Thread 0 (main) tries to send an ioctl call to unmount the drive.
- Thread 0 hangs because the DeviceIoControl function is waiting for the call from step 2 to be completed.
Now, we can move to the process of disk mounting.
Mounting the disk
Onсe we’ve created a disk device and implemented IRP processing for it, we need to make this device available for users so that it can be accessed from File Explorer. To do this, we need to create a symbolic link between our disk device and the drive name:
C++
UNICODE_STRING deviceName, symLink;

RtlInitUnicodeString(&deviceName, L"\\Device\\CoreMntDevDir\\disk");

RtlInitUnicodeString(&symLink, L"\\GLOBAL??\\Z:");

NTSTATUS ntStatus = IoCreateSymbolicLink(&symLink, &deviceName);
We need to create such a symbolic link in the global namespace so that the Z drive can be:
- Seen from the wdmDrvTest.exe application launched in administrator mode so we can lock the volume before unmounting (see the next section)
- Found via File Explorer and launched by a regular user
After that, the first time a file or folder is accessed on the drive, the I/O manager will mount the volume:
C++
05 nt!IopMountVolume

06 nt!IopCheckVpbMounted

07 nt!IopParseDevice

08 nt!ObpLookupObjectName

09 nt!ObOpenObjectByNameEx

0a nt!IopCreateFile

0b nt!NtCreateFile

0c nt!KiSystemServiceCopyEnd

0d ntdll!NtCreateFile

0e KERNELBASE!CreateFileInternal

0f KERNELBASE!CreateFileW
During volume mounting, the system creates a volume parameter block (VPB) and links the volume device object (also created by the system) to the device object of our drive. The VPB address will be saved to the VPB field inside our device object.
Here’s what it looks like for our disk:
Unmounting the disk
While the system automatically creates a device object for the volume and associates it with our disk through the VPB structure, unmounting this volume is still our task.
The whole process consists of the following steps:
- Unmount the volume
- Complete the thread that receives requests from the driver
- Delete our disk device object by calling the IoDeleteDevice function
- Delete the symbolic link to the Z drive
Note: Volume unmounting should always be performed first because the system can write data from the cache to the disk even during unmounting, potentially causing the system to hang.
The logic of the volume unmounting process is implemented in the wdmDrvTest.exe application. The application sends the following ioctl requests to the volume: FSCTL_LOCK_VOLUME, FSCTL_DISMOUNT_VOLUME, and FSCTL_UNLOCK_VOLUME. These commands can only be run by a user with administrator rights.
After executing these commands, the VPB in our Device Object will be updated and will no longer contain a pointer to the volume device object.
At this point, we only have one control device object left for our driver. We can resend a disk mounting request to this device object, thus causing the whole cycle to repeat itself. This control device object will be removed after calling the DriverUnload function and unloading our driver.
Now, let’s talk about the security of our disk’s data.
Encrypting the disk
To secure the disk, we can use OpenSSL to implement data encryption in our wdmDrvTest.exe application.
Here’s what the encryption algorithm would look like when our user application receives a read request from the driver:
1) The application reads the data from the file with the contents of our virtual disk (see screenshot 10 below)
2) The application deciphers the requested data
3) The application returns the deciphered results to the driver so that the driver can copy that data to the IRP request and complete it
C++
void EncryptedImage::Read(char* buf, uint64_t offset, uint32_t bytesCount)
{
    if (bytesCount % SECTOR_SIZE || offset % SECTOR_SIZE)
    {
        throw std::exception("wrong alignment");
    }
    std::vector<unsigned char=""> encData(bytesCount);
    m_image->Read(&encData[0], offset, bytesCount);

    uint64_t startSector = offset / SECTOR_SIZE;
    DecryptLongBuf(encData, bytesCount, startSector, m_key, buf);
}
In the case of a write request, the algorithm would be a bit different — we would first need to encrypt the data, then write it to the disk.
When we mount the disk in the wdmDrvTest.exe application, the system passes a password to the PKCS5_PBKDF2_HMAC function. We get the encryption key from that password.
The size of our encryption key is 256 bits, but since it’s encoded with the 128-bit Advanced Encryption Standard (AES) ciphertext stealing (XTS) cipher, the key gets split into two blocks of 128 bits each. The first block will be used for encrypting the data, and the second block will be used for encrypting the tweak.
A tweak is basically an analog of the initialization vector in Cipher Block Chaining (CBC). The only difference is that a tweak is applied for each block — not only the first one. The tweak is generated from the disk sector number, so different tweaks will be used to encrypt different sectors of our disk.
There are two key advantages of working with this cipher:
1) Each data block (disk sector) is encrypted independently from the others
2) For different data blocks, the same plaintext will return different ciphertext
As a result, even if one disk sector gets damaged, decryption of the remaining sectors won’t be affected. In the case of CBC, this would be impossible because each data block relies on the encryption results of the previous block. At the same time, the use of a tweak prevents data leaks common with electronic codebook (ECB) mode, which also encrypts all blocks independently.
It’s also possible to implement encryption directly in the driver using standard tools like Cryptography API: Next Generation and BitLocker. However, these tools support AES-XTS encryption only in Windows 10 and later versions.
With most of the technical steps of our driver development processes over, let’s try to run the driver we’ve created.
Running a demo
Once we’ve finished with all the preparations, all that’s left is to click the Build Solution button in Visual Studio to complete the process of building our driver. After that, we can configure a virtual machine running Windows 10 to launch and debug our driver. For our example, we used VMWare.
Note: When setting up a virtual machine in VMWare, it’s important to enable secure boot in the settings:
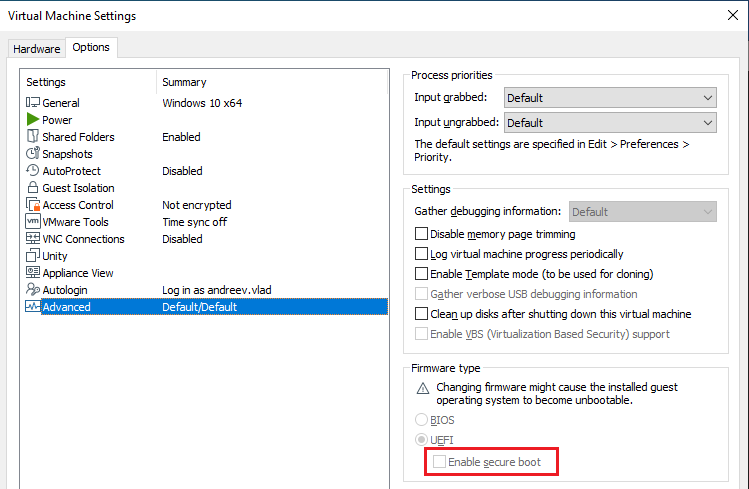
Otherwise, the following commands won’t work.
First, we need to allow the loading of test-signed drivers so that the driver will be automatically signed with the wdmDrv.cer certificate during the build. To do that, we need to run the following command as an administrator:
Bash
> bcdedit.exe -set TESTSIGNING ONThen, we need to copy the binaries and run the deploy.bat script (also as an administrator). This script copies our driver to the \system32\drivers\ directory and loads it.
After that, we can run the wdmDrvTest.exe application. The following command creates a vd.img file in the current folder and mounts the disk:
Bash
> wdmDrvTest.exe --create -p password -i vd.img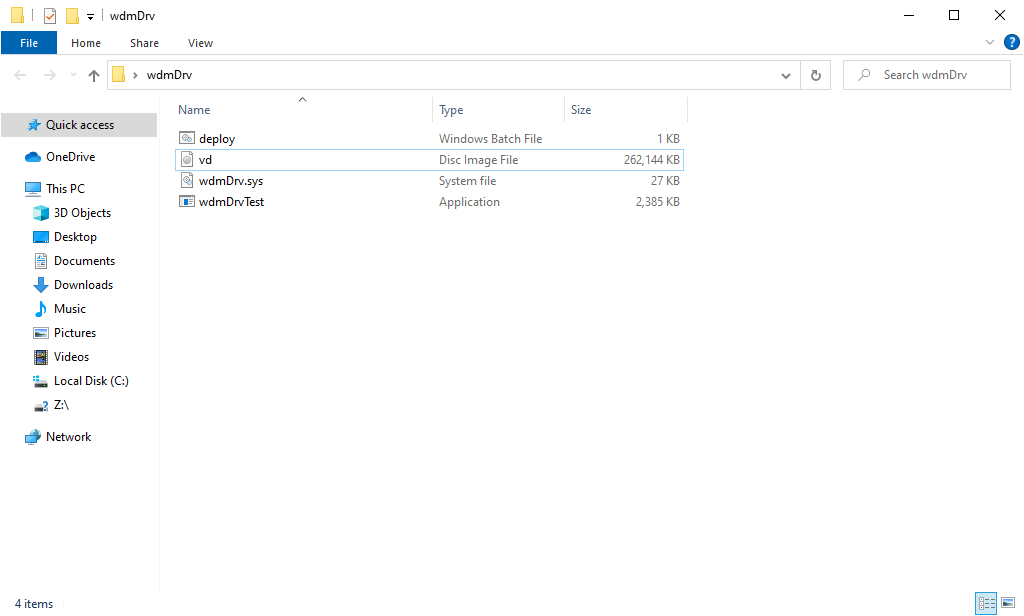
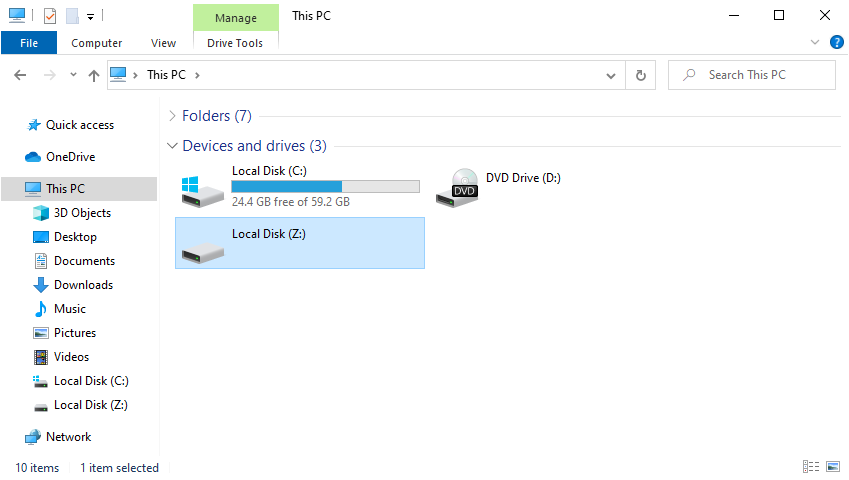
Now we can open the disk, which will cause the formatting window to appear. It allows us to format the disk with the required file system. Then we can create several files on the disk and go back to the wdmDrvTest.exe application and press any button to unmount the disk. To mount the disk from the file once more, we need to remove the –create parameter from the command above. After running the changed command as an administrator, the disk will appear in File Explorer again, but now with all the files created earlier.
To check if the data on the disk is encrypted, we can try opening the vd.img file with FTK Imager:
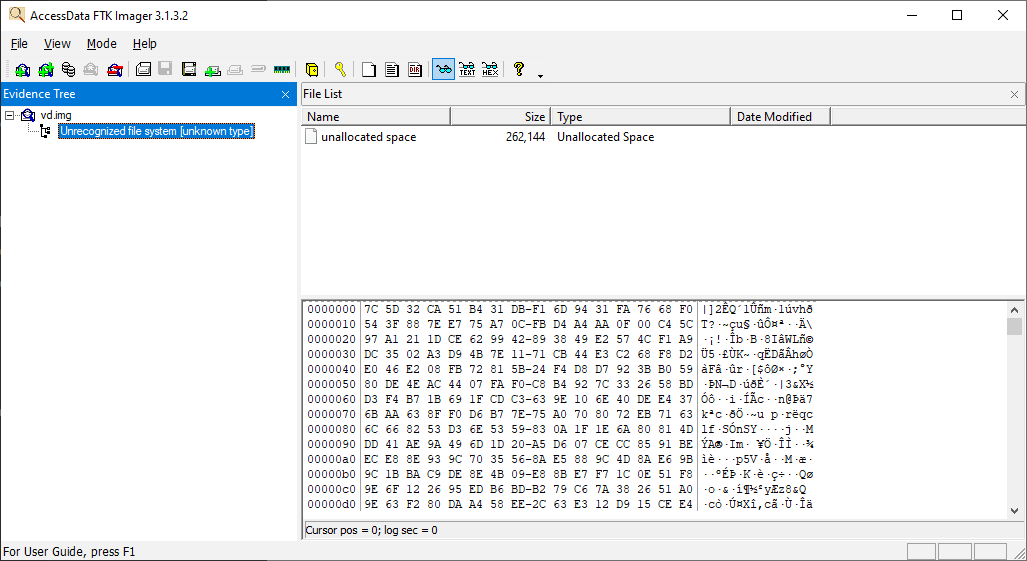
If we turn off encryption, we’ll be able to see all of the contents of our virtual disk:
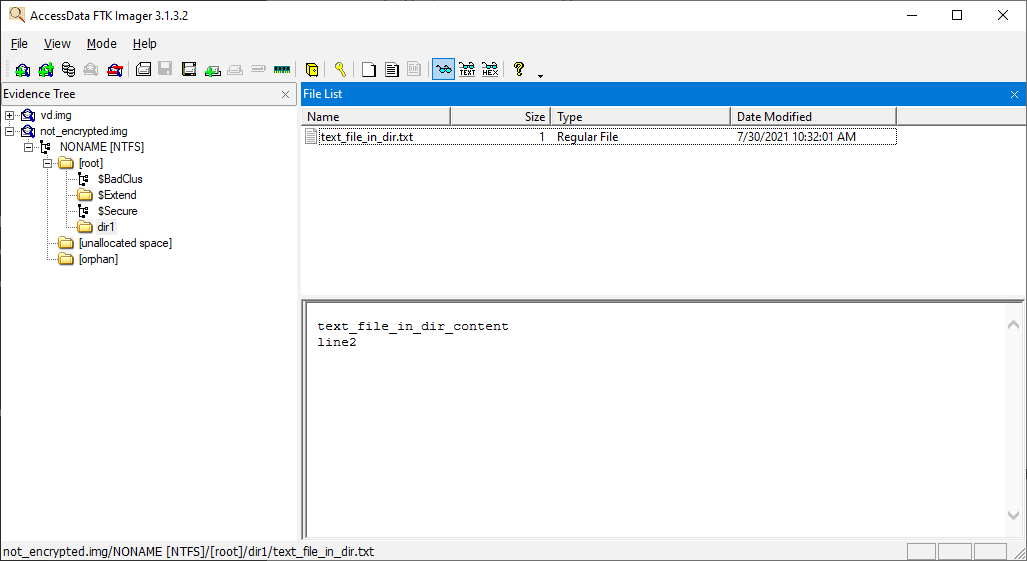
Now, we can move to the final stage of the driver development process and debug our driver.
Debugging the disk
First, we need to install the WinDbg tool. It comes as part of Windows SDK and WDK, although you can also install it separately by checking only the Debugging tools for Windows option during setup.
Microsoft recommends using the Hyper-V hypervisor for driver debugging. They also provide a detailed guide on a simplified debugging process for Windows 10, which has Hyper-V built in. Recommendations on how to enable Hyper-V and configure a virtual machine with it are also provided on the Microsoft website. Alternatively, you can debug a driver using VirtualKD.
Since we created our virtual machine using VMWare, we use a slightly different approach:
1. Choose Add -> Serial Port in the settings of the virtual machine and check the boxes as shown in the following screenshot:
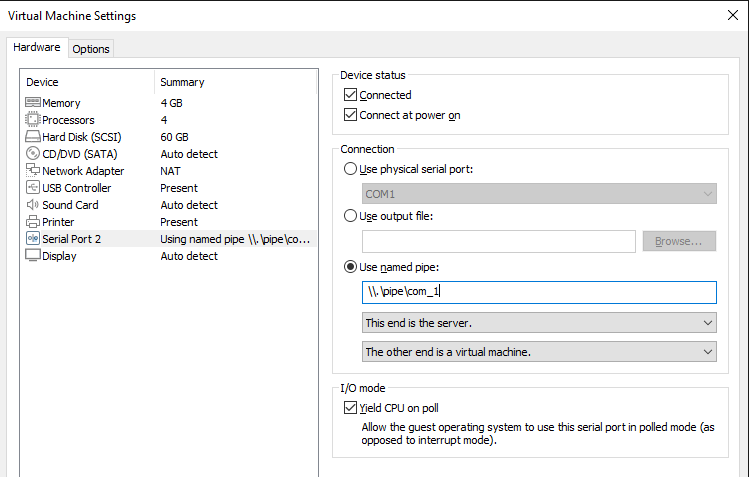
The name com_1 will be used in the WinDbg connection settings, so you can change it to a different one.
2. Start the virtual machine and run the following commands as an administrator:
Bash
> bcdedit /debug on
> bcdedit /dbgsettings serial debugport:2 baudrate:115200
3. On the machine with WinDbg installed, run the following command as an administrator:
Bash
> setx _NT_SYMBOL_PATH srv*c:\symbols*http://msdl.microsoft.com/download/symbolsThis command adds the environment variable indicating where to look for the symbols (.pdb).
4. Create a WinDbg shortcut and add Target parameters at the end to launch kernel debugging:
Bash
-k com:pipe,port=\\.\pipe\com_1,resets=0,reconnectMake sure to change the pipe name when you repeat these actions on your virtual disk.
5. Double-click on the WinDbg shortcut and restart the virtual machine.
Once the system restarts, we can:
- Open WinDbg and press Ctrl+Break
- Specify the path to the pdb driver using the .sympath+ command
- Run the commands listed in this article once again to better memorize the described approach
And that’s it. We’ve successfully created a WDM driver.
To learn details about drivers, check out our articles about Windows driver testing and USB WiFi driver development.
Conclusion
Software drivers play an essential role in building Windows applications and expanding their capabilities. This process requires Windows driver developers to have a deep understanding of driver development specifics, keen knowledge of Windows internals, and expertise in C/C++.
Apriorit driver development professionals have successfully helped many businesses tackle their driver development challenges and deliver well-performing, secure, and competitive products.
Reach out to us to discuss ways our driver development experts can help your company build a secure and well-performing driver solution for Windows or any other platform.