Windows 10 Windows 8.1 Surface Pro 4 Surface Pro 3 Surface Book More…Less
Summary
When you use a high-DPI device such as a Surface Pro 3, Surface Pro 4, or Surface Book together with external monitors, you experience the following issues:
-
Elements such as applications, the taskbar, icons, toolbars, text, and dialog boxes appear to be fuzzy.
-
Elements are too large or too small compared to the rest of the desktop.
-
Blurry text appears in applications or in the Windows interface.
Although these symptoms may be seen on a single monitor, they’re more common when you use multiple monitors that vary in display resolution. These symptoms also occur when the hardware configuration changes, such as when you dock and undock a device that uses external monitors, or you detach an external monitor from the device.
These issues commonly occur in the following scenarios:
-
Applications are moved between monitors that use different display resolutions.
-
The monitor that applications are displayed on changes between docked and undocked configurations.
-
Users mix connections during the same logon session. For example, users log on through a remote desktop connection (RDC), and later connect directly without first logging off.
Display information is determined when a user logs on to the system. A logoff-logon process resets the display information and improves behavior. However, the issue recurs if the monitor configuration changes during the same logon session, such as when you dock or undock the device or detach an external monitor.
This issue has become more prevalent since the introduction of 4k and higher resolution monitors, especially when these monitors are mixed together with older, standard monitors.
For more information about how Windows scales applications, see the following Core Team Blog articles:
Display Scaling in Windows 10
Display Scaling changes for the Windows 10 Anniversary Update
Improving your scaling experience
Improved high-DPI support for desktop apps
Resolution
To resolve this issue, use the following methods.
-
Check for software updates
Improvements are continuously being added to Windows 10 and Office 2016 applications. If you are experiencing a specific issue, first check whether it has been resolved in the latest Windows release or cumulative update. To check Windows 10 updates, see the following Microsoft Knowledge Base article:Windows 10 Update History
-
Match screen resolutions
Consider deploying monitors that have complementary screen resolutions.When you use multiple monitors (including when you dock or connect to remote screens), a greater difference in the resolution between the native device and external device is more likely to cause the issues to occur. For more information, see the following OneDrive presentation:
Surface Pro 3 and Multi-Monitor Guidance
-
Use UWP applications
Use or deploy Universal Windows Platform (UWP) applications instead of Win32 applications.Modern (UWP) apps always scale correctly. If there is a comparable modern app available, you can substitute that app to mitigate the scaling issues. For example, Edge is a modern app that does not cause the DPI Scaling issues that Internet Explorer might experience. Similarly, Remote Desktop is an alternative to mstsc.exe.
-
Check for known issues
See the following articles for more information about known issues in these specific products.Office 2016
3165808 Internet Explorer 11 Window display changes between built-in device monitor and an external monitor
Workaround
To work around scaling issues, try the following methods:
-
Log out and in
Log out and log back in to the system. This improves how applications and elements are displayed when the monitor configuration changes. -
Adjust display settings
Windows 10Select Display > Change the size of text, apps, and other items, and then adjust the slider for each monitor.
Earlier Windows systems
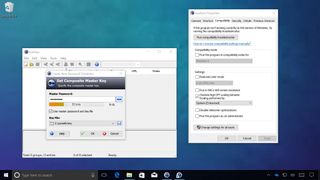
Right-click the application, select Properties, select the Compatibility tab, and then select the Disable display scaling on high DPI settings check box.
-
Change application properties
In Explorer or on the Start menu, right-click the application name, select Properties, select the Compatibility tab, and then select the Disable display scaling on high DPI settings check box.Note: In Windows 10 Version 1703 and later version of Windows, the text of the Disable display scaling on high DPI settings option is changed to Override high DPI scaling behavior, scaling performed by: Application.
-
Check whether applications are DPI-aware
To determine an application’s support of DPI Scaling, follow these steps:-
Download and run Sysinternals Process Explorer.
-
In Process Explorer, click the columns, and then add the DPI Awareness column to the view.
-
Start the application that you want to check.
-
In Process Explorer, locate the application, and then examine the DPI Awareness column.
DPI Awareness status definitions
Per-Monitor Aware: Per-monitor DPI-aware. These applications check for the DPI when they are started, and adjusts the scale factor whenever the DPI value changes. These applications are not automatically scaled by the system.
System Aware: System DPI-aware. These applications do not scale for DPI changes. They query for the DPI one time, and then use that value for the lifetime of the application. If the DPI changes, the application does not adjust to the new DPI value. It will be automatically scaled up or down by the system when the DPI changes from the system value.
Unaware: DPI-unaware. These applications do not scale for DPI changes. They are always assumed to have a scale factor of 100 percent (96 DPI). These applications are automatically scaled by the system at any other DPI settings.
For more information, see the following MSDN topic:
PROCESS_DPI_AWARENESS enumeration
-
-
Report an issue
Many UI elements have been updated because of customer feedback. Because DPI Scaling issues can involve multiple symptoms and configuration, information from users can help us identify specific scenarios and prioritize the development of updates.To provide such feedback, follow these steps:
-
Record monitor configurations. To do this, take a screenshot of Display window (Start > Settings > System > Display).
-
For each monitor, note the make and model, scaling percentage, and resolution.
-
Record the steps that you must follow to reproduce the issue.
-
Take screenshots or video of the desktop or applications before and after the scaling issues occur.
-
Run DXDiag.exe on the system.
-
Select Start > Feedback Hub. Search on “DPI” to check whether any listed issue matches your specific issue. If you find a match, you can add additional feedback, including screen shots, DXDiag results, and any other relevant information.
-
More Information
Display scaling is a deceptively complex problem. There is no magic bullet or single fix to resolve all DPI Scaling problems. DPI Scaling benefits from continuous improvements in the core operating system, in application development models, and in applications from both Microsoft and third parties.
Different versions of Windows and application development models have different display scaling capabilities and limitations.
For example, in Windows that were released earlier than Windows 8.1, desktop environment and applications understand only one scale factor, generally based on the primary display at the time that the logon session starts. When the display changes in the middle of a logon session, the system bitmaps scale content from the system scale factor to the new monitor scale factor. This makes sure that content doesn’t become excessively large or small. However, text may appear blurred. (The effect is worse when you scale up.) If the system shrinks or stretches UI elements to the correct size, this may cause some blurriness in dialog boxes and other UI elements.
In Windows 10, investments were made so that large parts of the desktop UX will scale crisply in docking-undocking scenarios. Additional scalability improvements were made to the taskbar, File Explorer, desktop icons, context menu, and other UI elements to improve the user experience.
Microsoft is continuously updating the system and first-party applications. Third-party applications may require similar investments.
References
|
MSDN: Writing DPI-aware Win32 applications |
High DPI |
|
TechNet |
High DPI Support for IT Professionals |
|
Thurrott Blog: July 13, 2015 post that discusses DPI Scaling. Article is based on the «Devices» chapter of the Windows 10 Field Guide. |
Windows 10 Feature Focus: Display Scaling |
|
Windows Blog: July 15, 2013 |
Windows 8.1 DPI Scaling Enhancements |
|
Build 2015: Display Scaling: What it is and what you need to know about it to have great visuals |
Display Scaling: What It Is and What You Need to Know About it to Have Great Visuals Display scaling: What it is and why it matters to you.pptx |
|
Build 2014: Windows Desktop Development Platform Advancements |
Windows Desktop Development Platform Advancements Windows Desktop Development Platform Advancements.pptx |
|
Build 2013: Making your desktop apps shine on high-DPI displays |
Making Your Desktop Apps Shine on High- DPI Display |
Need more help?
Want more options?
Explore subscription benefits, browse training courses, learn how to secure your device, and more.
Communities help you ask and answer questions, give feedback, and hear from experts with rich knowledge.
Windows 10 and MacOS both have their devoted fans. One side prefers the look and feel of Windows and the breadth of the Windows PC ecosystem. The other side appreciates the elegance of MacOS and the close integration between Apple’s software and hardware.
Contents
- High-DPI displays and Windows
- Pixels-per-inch problems
- Adjusting Windows 10 scaling
- Let Windows help
- Windows desktop applications
- Adjust the DPI settings manually on an app-by-app basis
- High DPI scaling override settings explained
- Tinker with the settings to see what works best
However, there is one thing that MacOS has always done better: Take advantage of high-resolution displays. Still, Windows 10 is catching up now that 4K has become the new high-resolution norm.
Here’s how to adjust high-DPI scaling in Windows 10 to get the best visuals you can squeeze out of your PC.
High-DPI displays and Windows
Though Full HD (1920 x 1080) and higher displays are much more common today, 4K UHD (3840 x 2160) displays are now the new high-resolution norm.
Some PCs, such as the HP Spectre x360 15, only offer 4K UHD screens. Other manufacturers use custom resolutions, as highlighted by Microsoft’s Surface line. These PCs have a very high pixels-per-inch (ppi) count packed into a screen with a 3:2 ratio versus the more common widescreen 16:9 ratio.
There’s no question that high resolutions are great. However, they require a higher physical pixel count, and when you cram all those pixels into a small display, on-screen items not properly scaled to support that high resolution can become very small. That makes them extremely hard to see and use.
The term dots per inch, or DPI, is typically associated with printers and how many dots they can print both horizontally and vertically within an inch. On displays, this translates to the measurement of an image on the screen. The more physical pixels installed in a screen, the more dots the GPU can “print” (or render) in both directions.
Microsoft originally defined “high-DPI” as a display with between 120 and 144 ppi, and it started supporting high-DPI displays in Windows 7. Since then, manufacturers have shipped displays with significantly higher ppi, causing a few problems along the way.

Image used with permission by copyright holder
Pixels-per-inch problems
The first major problem with Windows 10 high-DPI displays is that the vast majority of Windows applications weren’t written for such high resolutions. Newer applications are more aware of high-resolution displays, and some developers have caught up with the times and have adjusted their older applications.
However, there are still millions of Windows applications that simply don’t display well on today’s best displays when they’re running at their native resolutions. Consider the following screenshot, which shows a 4K UHD screen set at its native resolution with the Windows 10 Settings app maximized.
The Windows 10 and application user interfaces on such a display are simply too small to use. Why? Because the screen has a high pixel count and the program’s user interface wasn’t designed to natively support the larger width and height. It’s essentially telling Windows and the GPU to “print” a smaller interface. That’s where Windows 10 scaling comes in.

Mark Coppock/Digital Trends
Adjusting Windows 10 scaling
The most basic setting to look at is display scaling, which essentially means adjusting the DPI by some percentage multiplier. By increasing the display scaling, you can make on-screen items such as text and icons more substantial and more comfortable to read and use.
For example, here is the same 4K UHD display and settings app at 250% scaling (click on the image to see it clearly in full resolution). All the on-screen items such as text and icons are now much easier to view and manipulate.
In a nutshell, the application only knows to provide its interface up to a specific resolution and physical pixel count. Because your resolution and pixel count is higher, Windows and the GPU will use the additional pixels to render the interface at a larger scale without everything looking like a blurry mess. Text and lines are sharp, as if the app natively supported 4K.
To adjust the scaling, do the following:
Step 1: Click the Notification icon on the Taskbar and select the All Settings tile in the Action Center. Alternatively, click the Start button followed by the Gear icon on the Start Menu. Both open the Settings app.
Step 2: Click System.
Step 3: The Display section should load by default. Scroll down to Scale and Layout.
Here, you will see a drop-down menu for changing the size of text, apps, and other items. These are typically set to a unified “recommended” setting based on what Windows 10 knows about your display.
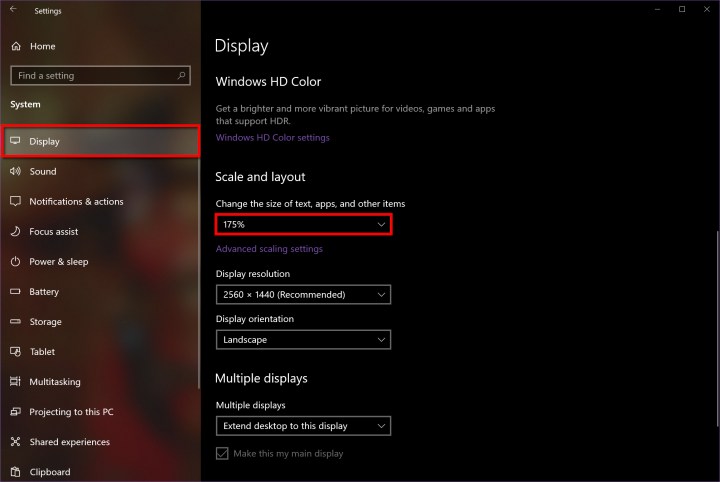
Image used with permission by copyright holder
Step 4: To change the scaling, click the Down Arrow and select a new setting on the pop-up menu. The scaling percentage ranges from 100% to 300%.

Image used with permission by copyright holder
Let Windows help
Some desktop apps will look blurry when you change scaling and display settings and adjust for DPI. If you’re running the Windows 10 April 2018 Update or newer, the system should automatically try to resolve these problems when it sees an issue. If not, here’s where you can find the setting:
Step 1: Click the Notification icon on the Taskbar and select the All Settings tile in the Action Center. Alternatively, click the Start button followed by the Gear icon on the Start Menu. Both open the Settings app.
Step 2: Click System.
Step 3: The Display section should load by default. Scroll down to Scale and Layout.
Step 4: Click the Advanced Scaling setting link under the scaling percentage box.
Step 5: Make sure the Toggle is set to On under Let Windows Try To Fix Apps So They’re Not Blurry.
Step 6: This step is optional. Enter a custom scaling size under Custom Scaling. This shouldn’t be necessary unless you are working with a unique display that needs personalized scaling to function.
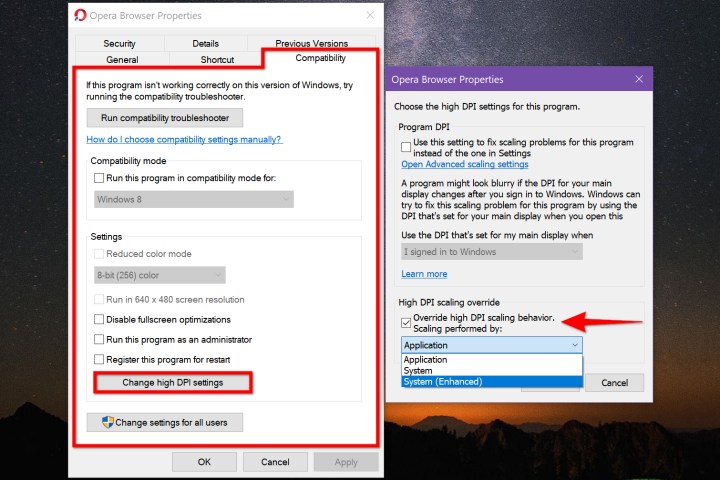
Image used with permission by copyright holder
Windows desktop applications
Problems can arise with older Windows desktop applications. When many of the 16 million or so Windows desktop applications were first written, high-DPI displays were rare. Moreover, updating applications to support all display resolutions made available today is just too costly for developers.
Problems mainly arise when you’re using Windows 10 scaling to make your high-DPI displays more manageable. Many Windows desktop applications simply don’t scale well, with symptoms like blurry text and icons. Microsoft has made some changes to Windows 10 high-DPI support, and today these older applications are handled much more effectively.
Even with all of Microsoft’s improvements, Windows desktop applications can still run into issues. Fortunately, there is a trick that you can use to make some of those applications look better on high-DPI displays.
Step 1: Click the Notification icon on the Taskbar and select the All Settings tile in the Action Center. Alternatively, click the Start button followed by the Gear icon on the Start Menu. Both open the Settings app.
Step 2: Select Ease of Access.
Step 3: The Display section should open by default. Under Make Text Bigger, move the Slider accordingly, and then click Apply.
Step 4: Under Make Everything Bigger, click the Down Arrow and select a scaling percentage.
Adjust the DPI settings manually on an app-by-app basis
You may also need to adjust the DPI settings manually on an app-by-app basis. Here’s how:
Step 1: Right-click on the program’s desktop shortcut and select Properties on the pop-up menu.
Step 2: Click the Compatibility tab.
Note: If you don’t see this tab, you may need to open File Explorer and right-click on the program’s actual EXE file buried somewhere on your drive — Program Files or Program Files (x86). Sometimes desktop shortcuts don’t allow for compatibility changes.
Step 3: Under Settings, click Change High DPI Settings.
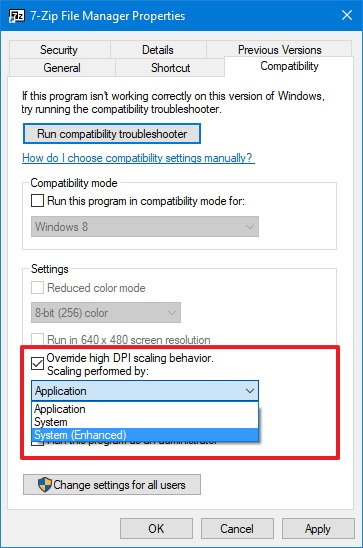
Step 4: A second pop-up window appears on the screen. Check the box next to Override High DPI Scaling Behavior.
Step 5: Select Application, System, or System (Enhanced) on the drop-down menu and then click OK. For more information about each setting, consult the next section of this guide.
Note: You may need to experiment with these three settings until you determine which one fixes your program’s scaling issue.

Mark Coppock/Digital Trends
High DPI scaling override settings explained
Consider the application shown below as it runs on a 4K UHD display set to 250% scaling. While usable, it’s incredibly blurry, which isn’t the ideal experience. Now, let’s see the same application using each of the three override settings.

Mark Coppock/Digital Trends
Application
The Application option doesn’t allow for user customizations, and instead uses the default application displays. This results in the same thing as if you have your Windows 10 system configured for 100% scaling — notice how the icons under the menu are tiny.

Mark Coppock/Digital Trends
System
The System option uses the Windows 10 system to control the settings. This is the default, so it won’t matter if you have this selection on or off.
Mark Coppock/Digital Trends
System (Enhanced)
The System (Enhanced) setting doesn’t work with all applications. If it’s compatible with an app, it will give you better graphics and clearer text, so it’s worth trying.
Tinker with the settings to see what works best
Before the Windows 10 Creators Update, there were more detailed settings that could be configured to control the size of text, icons, and other elements. Microsoft removed those options, however, so now you’re left with these more limited options. You’ll still be able to customize your PC enough to make it both appealing to look at and efficient to use.
When looking for new apps for Windows 10, try to make sure they are Universal Windows Platform (UWP) apps. UWP has built-in scaling that takes advantage of your screen size to give you the best graphics without leaving you struggling to access certain areas of the screen.
Editors’ Recommendations
-
How to use Passkeys in Windows 11
-
The best Windows apps for 2023
-
How to join the Windows Insider program
-
Windows 12: the top features we want to see in the rumored OS
-
Windows 11 vs. Windows 10: finally time to upgrade?

ОС Windows настроена на автоматическое определение размера монитора и отображение рабочего стола с соответствующим уровнем масштабирования. Однако, если вы захотите изменить стандартные настройки и изменить стандартное масштабирование DPI, некоторые окна могут отображаться нечетко, особенно на широкоформатных экранах с высоким разрешением. Вместо того чтобы экспериментировать с различными настройками и выходить и входить в систему для применения изменений, можно воспользоваться утилитой Windows 10 DPI Fix. Это небольшое приложение (твик) предназначено для приведения рабочего стола в нормальный вид независимо от разрешения дисплея. В главном окне программы есть две опции: масштабирование DPI в Windows 8.1 и переключение на стандартное масштабирование дисплея в Windows 10. Достаточно отметить нужный вариант и нажать кнопку «Применить». Для вступления изменений в силу требуется перезагрузка компьютера (для применения масштабирования DPI по умолчанию в Windows 10).
Утилита Windows 10 DPI Fix пригодится пользователям с широкоформатными экранами высокого разрешения (1920х1080 и выше).
Цель программы — предоставить простой способ перехода от стандартного метода масштабирования DPI в Windows 10 к тому, который используется в Windows Vista, 7, 8 и 8.1. С ее помощью на экране не будет размытого текста.
Скачать бесплатно:
- Windows10_DPI_FIX 1 Mb
| Версия: | 2.2 |
| Размер: | 1 Mb |
| Платформа: | Windows 10 32/64 bit |
Важно!
Если вы не видите ссылки на скачивания, то отключите Ads Block или другой блокировщик рекламы в вашем браузере.
Многие пользователи при обновлении до Windows 10 столкнулись с проблемой размытости и нечеткости отображения шрифтов в системе и некоторых приложениях, крайне мешающее при работе с компьютером. Как правило, проблема наблюдается на устройствах, с высоким разрешением, превышающем 200 DPI. Дело в том, что еще начиная с Windows 8.1, Майкрософт изменила применяемую ранее схему масштабирования DPI. Проблемы могут наблюдаться при значениях DPI, больше 120, а также у приложений, у которых отсутствует DPI-Aware флаг. Эта же схема масштабирования применяется и в Windows 10.
В том случае, если вы не удовлетворены отображением масштабированных шрифтов, возможно вернуться к «классической» схеме масштабирования как для одного конкретного приложения, так для всей системы (сброс и восстановление шрифтов при этом не поможет).
Содержание:
- Устраняем размытость шрифтов для конкретного приложения
- Уменьшение системных настроек DPI в Windows 10
- Возвращаем старый метод масштабирования в Windows 10
Устраняем размытость шрифтов для конкретного приложения
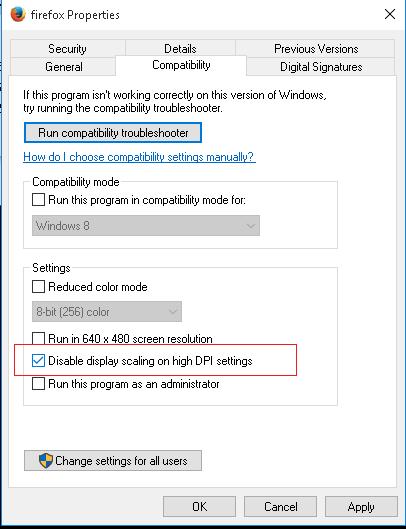
Если проблема с размытыми шрифтами наблюдается в одном конкретном приложении, например, в браузере Mozilla Firefox, можно попробовать решить проблему с размытостью шрифтов индивидуально для этого приложения.
- Откройте свойства исполняемого файла приложения (в нашем примере firefox.exe)
- Перейдите на вкладку Compatibility (Совместимость)
- Включите опцию Disable display scaling on high DPI settings (Отключить масштабирование изображения при высоком разрешении экрана)

- Сохраните изменения и запустите приложение.
Проверьте, устранена ли проблема. Если не устранена, переходите к следующему этапу – уменьшению системных настроек DPI.
Уменьшение системных настроек DPI в Windows 10
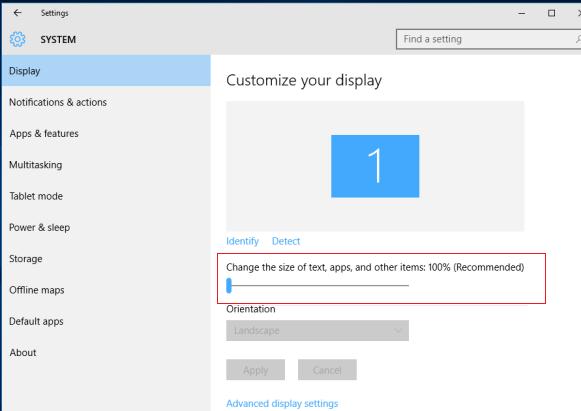
На многих устройствах проблемы размытости и плохой читаемости шрифтов наблюдаются в системе при использовании масштабирования 125% или выше. В этом случае стоит попробовать уменьшить настройки масштабирования шрифтов (DPI) до 100%.
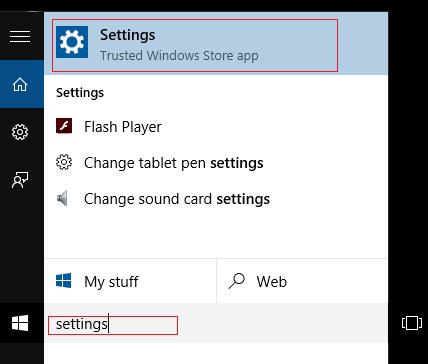
- Откройте современную панель управления настройками системы (Settings)

- Затем в разделе Display установите ползунок Change the size of text, apps and other items (Изменение размера текста, приложений и других элементов) в крайнее левое положение (должно быть значение 100%)

- Завершите сессию Windows и перезайдите в систему
Если и это не помогло – перейдите к следующему решению.
Возвращаем старый метод масштабирования в Windows 10
В Windows 10 и Windows 8.1 используется новая методика масштабирования отображаемых на дисплее шрифтов. Существует возможность вернуться к старому методу масштабирования, используемого в Windows 8 RTM и Windows 7. В большинстве случаев это поможет решить проблему размытости и некорректного отображения шрифтов.
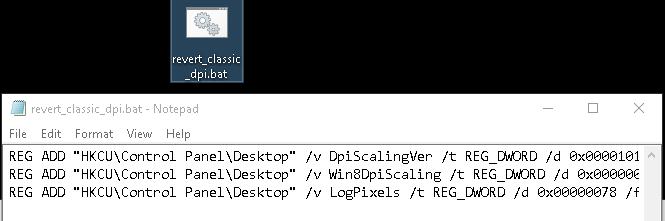
- Создайте файл revert_classic_dpi.bat со следующим текстом:
REG ADD "HKCU\Control Panel\Desktop" /v DpiScalingVer /t REG_DWORD /d 0x00001018 /f
REG ADD "HKCU\Control Panel\Desktop" /v Win8DpiScaling /t REG_DWORD /d 0x00000001 /f
REG ADD "HKCU\Control Panel\Desktop" /v LogPixels /t REG_DWORD /d 0x00000078 /f

- Запустите файл revert_classic_dpi.bat с правами администратора.
- Перезагрузите Windows 10
- Проверьте, исправилась ли проблема с отображением шрифтов
Примечание. В моем случае значение ключа DpiScalingVer при выходе из системы каждый раз возвращалось на 1000. Пришлось скопировать созданный bat файл в автозагрузку (Win+R-> shell:startup) и еще раз перезагрузить компьютер.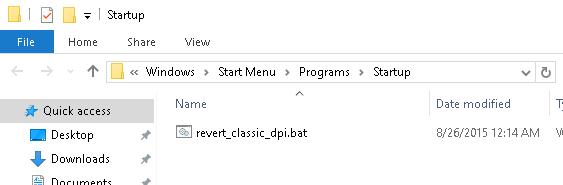
В некоторых случаях проблемы с размытыми шрифтами в Windows 10 проявляются RDP сессии из-за проблемы масштабирования на 2K и 4K мониторах высокого разрешения. Решается проблема так.
Nowadays, you’ll find high-DPI displays on almost any device, including on phones, laptops, tablets, and on desktop computers. However, there is one problem, while Windows 10 ships with DPI scaling support to improve the viewing experience, legacy applications never really benefit from it.
You can see this scaling problem when running traditional desktop (win32) apps, where text and visual elements look blurry or they’re sized incorrectly. To address this issue, Microsoft introduced some improvements with the Windows 10 Anniversary Update, but it wasn’t until the Creators Update that we’ve seen significant changes.
High-DPI scaling improvements on Windows 10
Microsoft is improving the way Windows 10 handles automatic scaling per-monitor, which reduces the amount of blur or incorrect size for legacy apps. However, there are scenarios where applications won’t render correctly, such as when a developer doesn’t update an app to support new DPI scaling changes. For this and other similar situations, Windows 10 now includes an option to force a particular app to run as a DPI-unware process.
The new option is called «System (Enhanced),» and when enabled the text and interface will look crispier and elements will be sized correctly. Though, some parts of the app may continue to look a little blurry, but it’s still a significant improvement.
In this Windows 10 guide, we’ll walk you through the easy steps to change the scaling settings for a particular legacy app to make text and interface look crisper and less blurry.
How to enable ‘System (Enhanced)’ scaling option on apps
If you’re running legacy (GDI-based) apps that don’t render properly on high pixel density displays, you can make them look better using the following steps:
- Open the app you want to enhance scaling.
- Right-click the app in the taskbar.
- Right-click the name of the app and select Properties.Quick Tip: You can also find the app’s .exe file, right-click it, and select Properties.

- Click the Compatibility tab.
- Under «Settings,» check the Override high DPI scaling behavior option.
- Under «Scaling performed by» drop-down menu, select System (Enhanced).
- Click Apply.
- Click OK.
This new option will override the way that a particular app handles the DPI scaling, which can result in interface elements and text being blurry, and allows Windows 10 to take care of the scaling.
Once you’ve completed the steps, restart the application to see the improvements. If the new scaling option works as expected, text and visual elements should look crisper. (Note that you may also need to reboot your computer to see the changes.)
Here are some of the current limitations with the new option:
- GDI+ and DX content don’t DPI scale.
- Bitmap-based content won’t look very crisp.
- You need to enable the option on each app to see if it works.
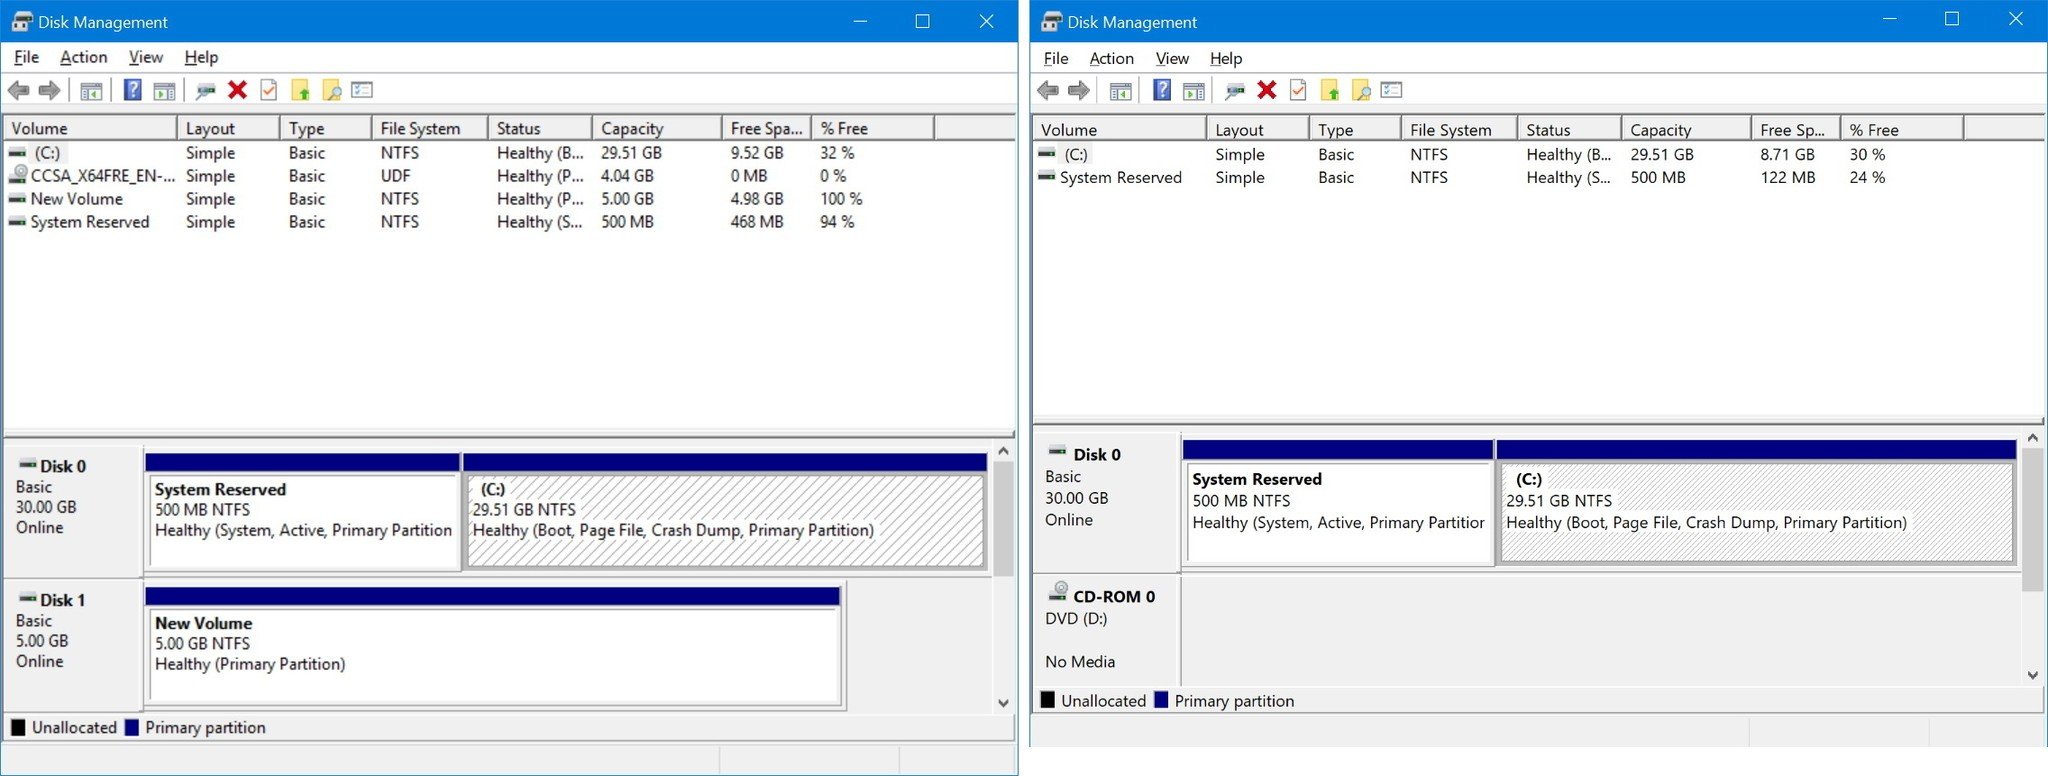
However, even with these limitations, the new high DPI scaling improvements are very noticeable to the point that Microsoft decided to enable the new option on many apps built into the OS, including the Microsoft Management Console (mmc.exe). This means that on the Creators Update and later versions built-in snap-in, such as Disk Management, Computer Management, Device Manager, and others will look significantly crispier and less blurry.

You’ll also notice two additional scaling options, if «System (Enhanced)» is not working on a particular app:
- Application: Used to be referred as «Disable display scaling on high DPI settings.» Using this option will force the app to run on a per-monitor DPI awareness.
- System: When enabled Windows 10 will stretch the interface, bitmap elements, and text will be blurry. This is the standard way Windows 10 handles scaling.
The new DPI scaling settings are only available for traditional desktop (GDI-based) apps. Windows Store apps cannot be configured with these options because they’re already optimized for high pixel density displays.
More Windows 10 resources
For more help articles, coverage, and answers to common questions about Windows 10, visit the following resources:
- Windows 10 on Windows Central – All you need to know
- Windows 10 help, tips, and tricks
- Windows 10 forums on Windows Central
All the latest news, reviews, and guides for Windows and Xbox diehards.
Mauro Huculak is technical writer for WindowsCentral.com. His primary focus is to write comprehensive how-tos to help users get the most out of Windows 10 and its many related technologies. He has an IT background with professional certifications from Microsoft, Cisco, and CompTIA, and he’s a recognized member of the Microsoft MVP community.