If PowerShell is an option, that’s the preferred route, since you (potentially) won’t have to install anything extra:
(new-object System.Net.WebClient).DownloadFile('http://www.example.com/file.txt', 'C:\tmp\file.txt')
Failing that, Wget for Windows, as others have pointed out is definitely the second best option. As posted in another answer it looks like you can download Wget all by itself, or you can grab it as a part of Cygwin or MSys.
If for some reason, you find yourself stuck in a time warp, using a machine that doesn’t have PowerShell and you have zero access to a working web browser (that is, Internet Explorer is the only browser on the system, and its settings are corrupt), and your file is on an FTP site (as opposed to HTTP):
start->run "FTP", press "OK".
If memory serves it’s been there since Windows 98, and I can confirm that it is still there in Windows 8 RTM (you might have to go into appwiz.cpl and add/remove features to get it). This utility can both download and upload files to/from FTP sites on the web. It can also be used in scripts to automate either operation.
This tool being built-in has been a real life saver for me in the past, especially in the days of ftp.cdrom.com — I downloaded Firefox that way once, on a completely broken machine that had only a dial-up Internet connection (back when sneakernet’s maximum packet size was still 1.44 MB, and Firefox was still called «Netscape» /me does trollface).
A couple of tips: it’s its own command processor, and it has its own syntax. Try typing «help». All FTP sites require a username and password; but if they allow «anonymous» users, the username is «anonymous» and the password is your email address (you can make one up if you don’t want to be tracked, but usually there is some kind of logic to make sure it’s a valid email address).
Downloading files in PURE BATCH…
Without any JScript, VBScript, Powershell, etc… Only pure Batch!
Some people are saying it’s not possible of downloading files with a batch script without using any JScript or VBScript, etc… But they are definitely wrong!
Here is a simple method that seems to work pretty well for downloading files in your batch scripts. It should be working on almost any file’s URL. It is even possible to use a proxy server if you need it.
For downloading files, we can use BITSADMIN.EXE from the Windows system. There is no need for downloading/installing anything or using any JScript or VBScript, etc. Bitsadmin.exe is present on most Windows versions, probably from XP to Windows 11.
Enjoy!
USAGE:
You can use the BITSADMIN command directly, like this:
bitsadmin /transfer mydownloadjob /download /priority FOREGROUND "http://example.com/File.zip" "C:\Downloads\File.zip"
Proxy Server:
For connecting using a proxy, use this command before downloading.
bitsadmin /setproxysettings mydownloadjob OVERRIDE "proxy-server.com:8080"
Click this LINK if you want more info about BITSadmin.exe
TROUBLESHOOTING:
If you get this error: «Unable to connect to BITS — 0x80070422»
Make sure the windows service «Background Intelligent Transfer Service (BITS)» is enabled and try again. (It should be enabled by default.)
CUSTOM FUNCTIONS
Call :DOWNLOAD_FILE "URL"
Call :DOWNLOAD_PROXY_ON "SERVER:PORT"
Call :DOWNLOAD_PROXY_OFF
I made these 3 functions for simplifying the bitsadmin commands. It’s easier to use and remember. It can be particularly useful if you are using it multiple times in your scripts.
PLEASE NOTE…
Before using these functions, you will first need to copy them from CUSTOM_FUNCTIONS.CMD to the end of your script. There is also a complete example: DOWNLOAD-EXAMPLE.CMD
:DOWNLOAD_FILE «URL»
The main function, will download files from URL.
:DOWNLOAD_PROXY_ON «SERVER:PORT»
(Optional) You can use this function if you need to use a proxy server.
Calling the :DOWNLOAD_PROXY_OFF function will disable the proxy server.
EXAMPLE:
CALL :DOWNLOAD_PROXY_ON "proxy-server.com:8080"
CALL :DOWNLOAD_FILE "http://example.com/File.zip" "C:\Downloads\File.zip"
CALL :DOWNLOAD_PROXY_OFF
CUSTOM_FUNCTIONS.CMD
:DOWNLOAD_FILE
    rem BITSADMIN COMMAND FOR DOWNLOADING FILES:
    bitsadmin /transfer mydownloadjob /download /priority FOREGROUND %1 %2
GOTO :EOF

:DOWNLOAD_PROXY_ON
    rem FUNCTION FOR USING A PROXY SERVER:
    bitsadmin /setproxysettings mydownloadjob OVERRIDE %1
GOTO :EOF

:DOWNLOAD_PROXY_OFF
    rem FUNCTION FOR STOP USING A PROXY SERVER:
    bitsadmin /setproxysettings mydownloadjob NO_PROXY
GOTO :EOF
DOWNLOAD-EXAMPLE.CMD
@ECHO OFF
SETLOCAL

rem FOR DOWNLOADING FILES, THIS SCRIPT IS USING THE "BITSADMIN.EXE" SYSTEM FILE.
rem IT IS PRESENT ON MOST WINDOWS VERSION, PROBABLY FROM WINDOWS XP TO WINDOWS 10.


:SETUP

rem URL (5MB TEST FILE):
SET "FILE_URL=http://ipv4.download.thinkbroadband.com/5MB.zip"

rem SAVE IN CUSTOM LOCATION:
rem SET "SAVING_TO=C:\Folder\5MB.zip"

rem SAVE IN THE CURRENT DIRECTORY
SET "SAVING_TO=5MB.zip"
SET "SAVING_TO=%~dp0%SAVING_TO%"

:MAIN

ECHO.
ECHO DOWNLOAD SCRIPT EXAMPLE
ECHO.
ECHO FILE URL: "%FILE_URL%"
ECHO SAVING TO:  "%SAVING_TO%"
ECHO.

rem UNCOMENT AND MODIFY THE NEXT LINE IF YOU NEED TO USE A PROXY SERVER:
rem CALL :DOWNLOAD_PROXY_ON "PROXY-SERVER.COM:8080"

rem THE MAIN DOWNLOAD COMMAND:
CALL :DOWNLOAD_FILE "%FILE_URL%" "%SAVING_TO%"

rem UNCOMMENT NEXT LINE FOR DISABLING THE PROXY (IF YOU USED IT):
rem CALL :DOWNLOAD_PROXY_OFF

:RESULT
ECHO.
IF EXIST "%SAVING_TO%" ECHO YOUR FILE HAS BEEN SUCCESSFULLY DOWNLOADED.
IF NOT EXIST "%SAVING_TO%" ECHO ERROR, YOUR FILE COULDN'T BE DOWNLOADED.
ECHO.

:EXIT_SCRIPT
PAUSE
EXIT /B


rem FUNCTIONS SECTION


:DOWNLOAD_FILE
    rem BITSADMIN COMMAND FOR DOWNLOADING FILES:
    bitsadmin /transfer mydownloadjob /download /priority FOREGROUND %1 %2
GOTO :EOF

:DOWNLOAD_PROXY_ON
    rem FUNCTION FOR USING A PROXY SERVER:
    bitsadmin /setproxysettings mydownloadjob OVERRIDE %1
GOTO :EOF

:DOWNLOAD_PROXY_OFF
    rem FUNCTION FOR STOP USING A PROXY SERVER:
    bitsadmin /setproxysettings mydownloadjob NO_PROXY
GOTO :EOF
As a Linux user, I can’t help but spend most of my time on the command line. Not that the GUI is not efficient, but there are things that are simply faster to do with the keyboard.
Think about copy and paste. Select a text you want to copy, go to the edit menu, click, precisely move down to copy, click, then go to the destination, click where you want to paste, go to edit menu, click, move down to the paste option, then paste. Every time I see someone do this, I die a little inside. Sure you can save some time by right-clicking, copy, right-click, paste. But you can save some more time by pressing, ctrl-c then ctrl-v
My hands are already on the keyboard, and I would rather do the mundane things on the keyboard and not think about them.
One thing I do frequently is download files. They can be zip file, tgz, or jpg. On linux, all I have to do is open the command line, run wget with the file I want to download and it is done.
wget http://example.org/picture.jpg
Straight to the point. But how do you do that when you are on a Windows machine? Let me introduce you to cURL, pronounced curl. (i don’t know why I wrote it the way I did)
curl is a very powerful tool with too many feature. But I just want to download the file on Windows so let’s just learn how to do that.
Open PowerShell. That’s Windows Key + R then type powershell and press enter.
Now run the curl command with the -O option to specify the file output.
curl http://example.org/picture.jpg -O picture.jpg
Easy right? Now you can download files right from the command line all by simply using your keyboard.
OK. It is time I confess. This is not the curl tool you are using. It’s only an alias. In reality, we are calling the command Invoke-WebRequest. But hey! It works, so we don’t care. You can call it in its native format if you want to.
Invoke-WebRequest http://example.org/picture.jpg -O picture.jpg
Either way, now you know how to download a file from the command line.
How to download a file using command prompt (cmd) Windows?
If you’re like most Internet users, you download various types of files now and then. You either download these files with your web browser or some download manager software. Have you ever considered downloading files using the command prompt i.e. CMD? If not, we recommend you to try it. It’s quite interesting apart from being very useful as well. In this article, we’ll show you how to download a file using command prompt aka CMD.
How to download a file using command prompt?
There are several useful commands for the Command Prompt and one of them is bitsadmin. Though bitsadmin has several uses, here we shall limit this article to its role in downloading files only. If you want to read the details about bitsadmin syntax, continue reading this section. Otherwise, you can scroll down to the next section – Downloading a file.
The syntax of bitsadmin is :
BITSADMIN [/RAWRETURN] [/WRAP | /NOWRAP] command
As you know, the parts of the syntax inside the square brackets are OPTIONAL. So, we use them only if we need them. In this case, we don’t need to bother ourselves with [/RAWRETURN], [WRAP] and [/NOWRAP]. So, we need to type bitsadmin, followed by the command whose syntax (in this case) is :
/TRANSFER <job name> [type] [/PRIORITY priority] [/ACLFLAGS flags] remote_url local_name
The various parts of this syntax have been explained below :
- /TRANSFER – We use this command for transferring files. You can use it to upload/download files. Multiple files may be uploaded/downloaded at a time.
- <job name> – We need to provide a name for the transfer job which we are going to perform.
- [type] – This part is OPTIONAL. You may use it to specify whether the transfer job is going to upload or download file(s). The default action is download.
- [/PRIORITY priority] – This part is also OPTIONAL. However, we recommend that you use it. You may use it to set the priority of the job as LOW, NORMAL or HIGH. For best performance, set it to HIGH.
- [/ACLFLAGS aclflags] – This is also OPTIONAL.
- remote_url – The URL of the file you want to download. Please note that the URL must have the file’s name at the end, otherwise the job will not start.
- local_name – The location of your computer where you want to download the file. It should end in the name of a file, and the file name should be the same as the one at the end of the remote_url.
Example –
bitsadmin /transfer wcb /priority high http://example.com/examplefile.pdf C:\downloads\examplefile.pdf
In the above example, wcb is the name we assigned to the transfer job,http://example.com/examplefile.pdf is the URL of the file to be downloaded andC:\downloads\examplefile.pdf is the location where the file would be saved after being downloaded.
Downloading a file
You can download a file using the following syntax :
bitsadmin /transfer TransferJobName /priority high UrlOfTheFile SaveFileAsName
You need to replace TransferJobName with a word (which could be anything), UrlOfTheFile with the URL of the url of the file to be downloaded and SaveFileAsName with the complete location where the file would be downloaded and saved.
For example, we downloaded a PDF file (1.04 MB) named sample.pdf from website – http://www.africau.edu/images/default/sample.pdf. We used the following command for downloading this file –
bitsadmin /transfer wcb /priority high http://www.africau.edu/images/default/sample.pdf D:\sample.pdf
The results are displayed in the following screenshots :
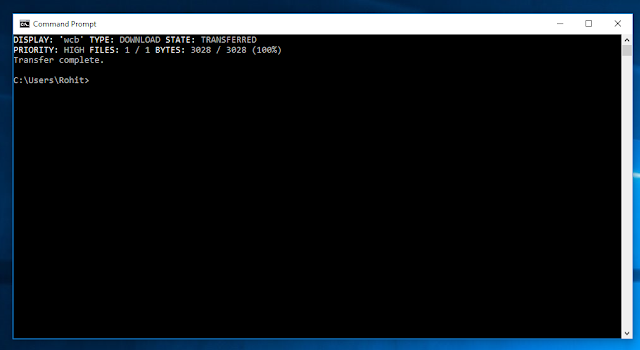
How to download a file using Command Prompt – Downloading
How to download a file using Command Prompt – Download Finished
Downloading file(s) using the Command Prompt is a great idea if you’re looking to do some COOL things. It is also useful if you don’t want to use third party programs for downloading files. You can download multiple files using this method. However, it has one drawback. Downloading files using Command Prompt is a slow process. It is slower than a typical file downloader program. So, if speed is important for you, don’t use this method.
We hope you enjoyed this article. Let your friends and colleagues know how to download a file using Command Prompt by SHARING THIS ARTICLE…
Popular posts from this blog
Angular 9 — User Registration and Login Example & Tutorial

In this tutorial we’ll go through an example of how to build a simple user registration, login and user management (CRUD) application with Angular 9. The project is available on GitHub at https://github.com/cornflourblue/angular-9-registration-login-example . The Angular CLI was used to generate the base project structure with the ng new <project name> command, the CLI is also used to build and serve the application. For more info about the Angular CLI see https://angular.io/cli . Styling of the example app is all done with Bootstrap 4.4 CSS, for more info about Bootstrap see https://getbootstrap.com/docs/4.4/getting-started/introduction/ . Here it is in action: (See on StackBlitz at https://stackblitz.com/edit/angular-9-registration-login-example ) Running the Angular 9 Login Tutorial Example Locally Install NodeJS and NPM from https://nodejs.org . Download or clone the Angular project source code from https://github.com/cornflourblue/angular-9-registra
Firebase Web Codelab

1 . Overview In this codelab, you’ll learn how to use the Firebase platform to easily create Web applications and you will implement and deploy a chat client using Firebase. What you’ll learn Sync data using the Firebase Realtime Database and Cloud Storage. Authenticate your users using Firebase Auth. Deploy your web app on Firebase static hosting. Send notifications with Firebase Cloud Messaging. What you’ll need The IDE/text editor of your choice such as WebStorm , Atom or Sublime . npm which typically comes with NodeJS . A console. A browser such as Chrome. The sample code. See next step for this. 2 . Get the sample code Clone the GitHub repository from the command line: git clone https : //github.com/firebase/friendlychat-web The friendlychat-web repository contains sample projects for multiple platforms. This codelab only uses these two repositories: 📁 web-start —The starting code that you’ll build upon in this c
CMD (Command Prompt) is a useful tool in Windows that allows users to control and automate various system processes. Among the many features it offers is the ability to download files from the internet, which can come in handy for various purposes, whether it be conducting research, backing up files, or updating software. In this article, we will explore how to download files using CMD, and provide some helpful code examples to get you started.
The first step in downloading a file from the internet using CMD is to open the Command Prompt window. This can be done by pressing the Windows key + R, typing in «cmd» and hitting Enter. Alternatively, you can navigate to the Windows search bar, type in «Command Prompt,» and click on the app when it appears.
Once the Command Prompt is open, you can use the following commands to download files:
- Using the «wget» Command
The «wget» command is a popular utility for downloading files from the web in UNIX-based systems. However, it is not included in Windows by default, so we have to download and install it manually. Here’s how:
Step 1: Visit the official GNU Wget website to download the software: https://eternallybored.org/misc/wget/
Step 2: Extract the downloaded file and move its contents to a directory on your system path. For example, you can extract it to C:\Program Files (x86)\wget.
Step 3: Add the directory to your system path. To do this, right-click the Windows Start button, select «System,» then «Advanced System Settings.» In the System Properties dialog box, click on «Environment Variables.» In the «System Variables» section, scroll down to the «Path» variable and click on «Edit.» Add the full path to wget.exe (e.g., C:\Program Files (x86)\wget) to the end of the «Path» variable value, separated by a semicolon (;).
Step 4: To confirm that you have installed wget correctly, open the Command Prompt and run the command «wget -V». This should display the version of wget that you have installed.
Now that wget is installed, you can use it to download a file by entering the following command:
wget [file URL]
For example, to download a file from the website https://example.com/file.zip, you would enter:
wget https://example.com/file.zip
- Using the «bitsadmin» Command
Another option for downloading files in Windows is the «bitsadmin» command. This is a built-in tool that uses the Background Intelligent Transfer Service (BITS) to transfer files in the background while your computer is idle. Here’s how to use it:
bitsadmin /transfer [JobName] [FileURL] [LocalFilePath]
For example, to download a file from the website https://example.com/file.zip and save it to C:\Downloads\file.zip, you would enter:
bitsadmin /transfer myjob https://example.com/file.zip C:\Downloads\file.zip
You can also use the bitsadmin command to specify additional options, such as setting priority levels, specifying authentication credentials, and controlling the number of simultaneous downloads.
- Using the «certutil» Command
The «certutil» command is a built-in tool that can be used to download files from a remote server securely. It uses cryptographic services to verify the integrity and authenticity of the downloaded files. Here’s how to use it:
certutil -urlcache -split -f [FileURL] [LocalFilePath]
For example, to download a file from the website https://example.com/file.zip and save it to C:\Downloads\file.zip, you would enter:
certutil -urlcache -split -f https://example.com/file.zip C:\Downloads\file.zip
You can also use the certutil command to specify additional options, such as setting authentication credentials and controlling caching behavior.
In all of these examples, replace [FileURL] with the URL of the file you want to download, and [LocalFilePath] with the path where you want to save the downloaded file locally.
Conclusion
Downloading files using the command prompt in Windows can be an efficient and convenient way to manage your downloads. By following the code examples provided in this article, you can download files securely and reliably from various websites on the internet. Whether you prefer the flexibility of wget or the built-in tools like bitsadmin and certutil, CMD offers several options for downloading files that can be customized to meet your specific needs.
In this article, we have explored how to download files using CMD, providing code examples for using the «wget,» «bitsadmin,» and «certutil» commands in Windows. Let’s dive a little deeper into each of these commands and their features.
«wget» Command
Wget is a popular command-line tool used for downloading files from the internet on UNIX-based systems. It comes with many useful features such as recursive downloads, resuming interrupted downloads, and downloading whole websites. In Windows, wget is not included by default, so it must be downloaded and installed manually. Once installed, it can be used to download files by entering the «wget [file URL]» command, where the file URL is the location of the file you want to download.
«bitsadmin» Command
Bitsadmin is a built-in command-line tool in Windows that uses the Background Intelligent Transfer Service (BITS) to transfer files in the background while your computer is idle. It’s a powerful tool that can be used to manage large files or perform batch downloads. You can also use the bitsadmin command to specify additional options, such as setting priority levels, specifying authentication credentials, and controlling the number of simultaneous downloads.
«certutil» Command
Certutil is another built-in command-line tool that can be used to download files from a remote server securely. It uses cryptographic services to verify the integrity and authenticity of the downloaded files. It’s an excellent option for downloading files that require more secure connections. You can also use the certutil command to specify additional options, such as setting authentication credentials and controlling caching behavior.
In conclusion, using CMD to download files in Windows can be a powerful tool for managing your downloads and automating file transfers. Whether you prefer the flexibility of wget or the built-in tools like bitsadmin and certutil, there are many options available for downloading files that can be customized to meet your specific needs. By using the code examples provided in this article, you can start downloading files using these commands today.
Popular questions
- What is CMD, and what is its purpose in Windows?
CMD (Command Prompt) is a command-line interface in Windows that provides access to a wide range of system-level functionality. It allows users to interact with their operating system directly through text-based commands, enabling a high level of customization and automation.
- How do I download files using CMD in Windows?
To download a file using CMD, you can use either the «wget,» «bitsadmin,» or «certutil» command, depending on your needs. The command syntax and options may differ slightly for each, so it’s important to consult the documentation for each command before using it.
- What is the «wget» command, and how can I use it in Windows?
Wget is a popular command-line utility used for downloading files from the internet on UNIX-based systems, and can be downloaded and installed for use in Windows. To use wget, open the Command Prompt and enter «wget [file URL],» where [file URL] is the location of the file you want to download.
- What is the «bitsadmin» command, and how can I use it in Windows?
Bitsadmin is a built-in command-line tool in Windows that uses the Background Intelligent Transfer Service (BITS) to transfer files in the background while your computer is idle. To use bitsadmin, open the Command Prompt and enter «bitsadmin /transfer [JobName] [FileURL] [LocalFilePath],» where [JobName] is the name of your download job, [FileURL] is the location of the file you want to download, and [LocalFilePath] is the path where you want to save the downloaded file locally.
- What is the «certutil» command, and how can I use it in Windows?
Certutil is another built-in command-line tool in Windows that can be used to download files from a remote server securely. To use certutil, open the Command Prompt and enter «certutil -urlcache -split -f [FileURL] [LocalFilePath],» where [FileURL] is the location of the file you want to download, and [LocalFilePath] is the path where you want to save the downloaded file locally. You can also use the certutil command to specify additional options, such as setting authentication credentials and controlling caching behavior.
Tag
Snippet