
If you stop working temporarily and you’re not ready to shut down your PC, Windows 10 sleep mode is a great option.
It turns off your computer’s monitor and hard drive, slowing down power consumption in the process.
But your PC might refuse to go to sleep sometimes. This could be due to peripheral devices and errors in power settings.
If you’re currently unable to put your computer to sleep, you’ve come to the right place.
In this article, I will show you 4 ways you make your computer go to sleep again so it consumes less power.
To make sure sleep mode is enabled, follow these steps:
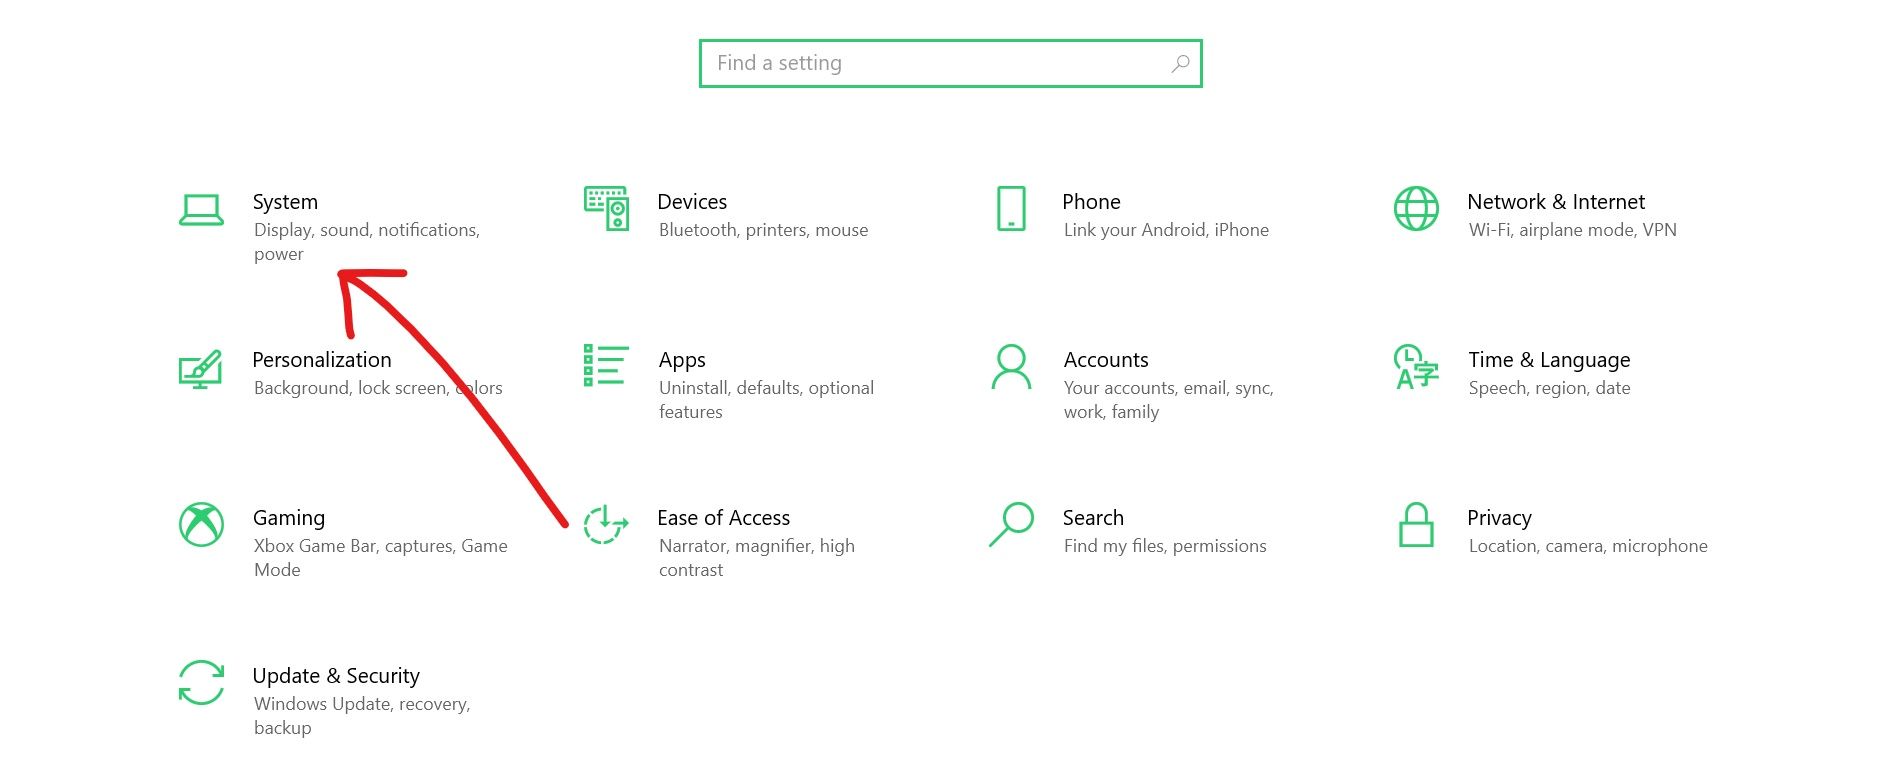
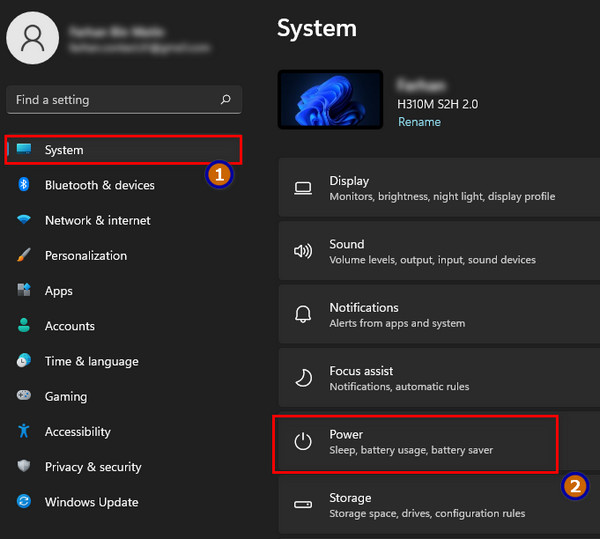
Step 1: Press WIN + I on your keyboard to launch Settings.
Step 2: Select System from the menu tiles.
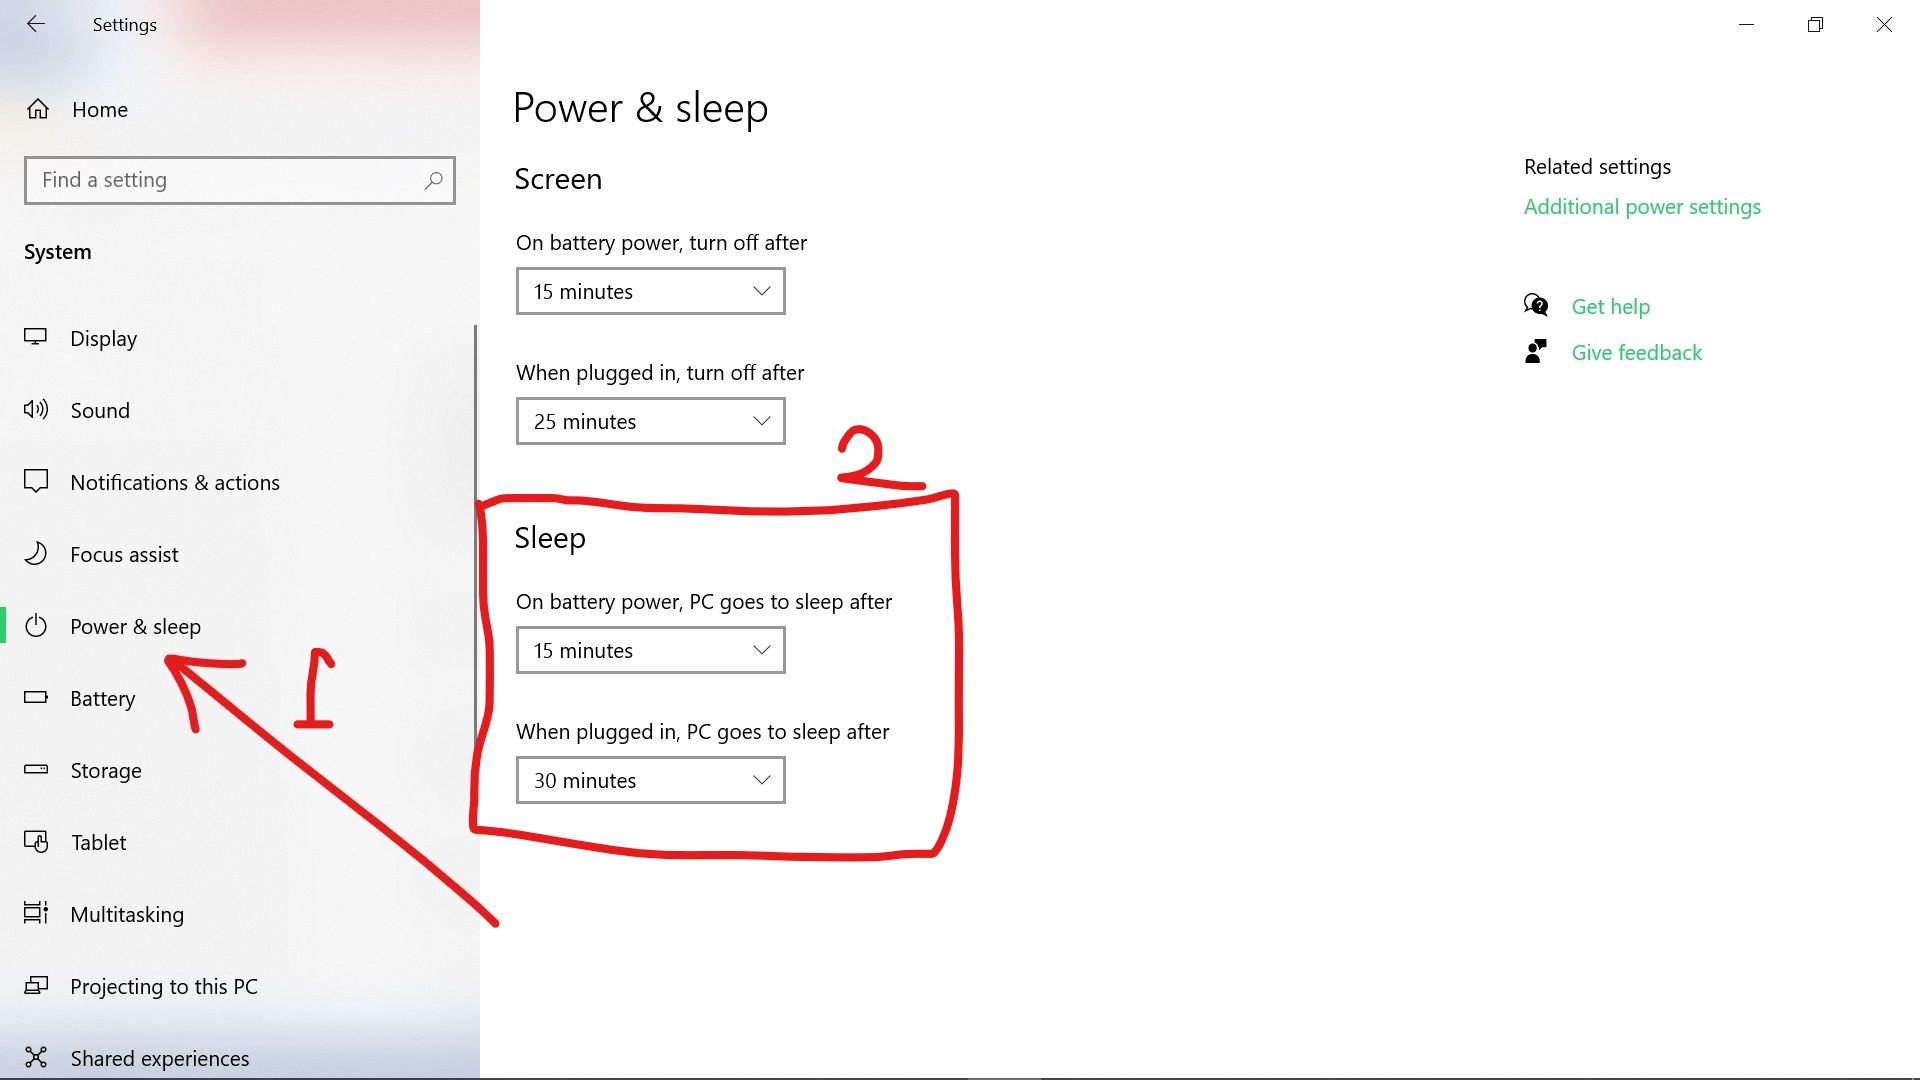
Step 3: Make sure you’re in the Power and Sleep tab. Then under the Sleep section, set the times for when your computer goes to sleep on battery and while plugged in (charging).
To confirm the times you set:
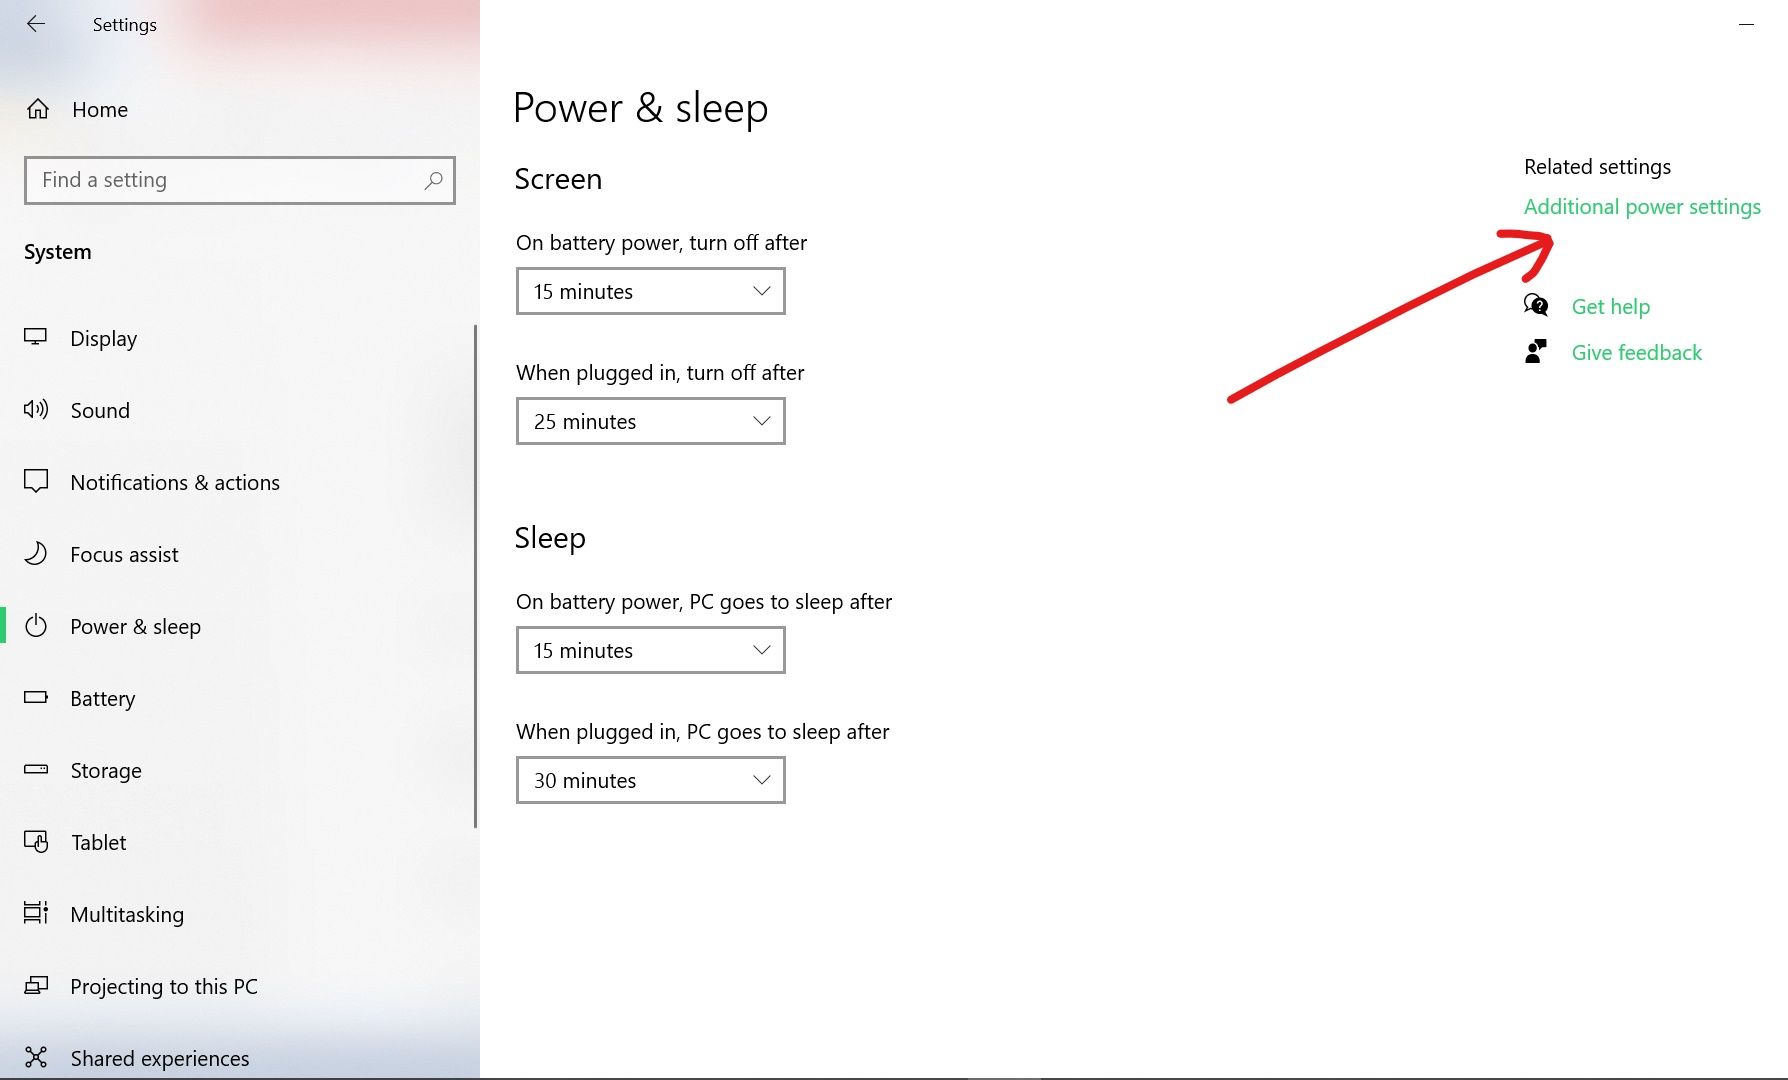
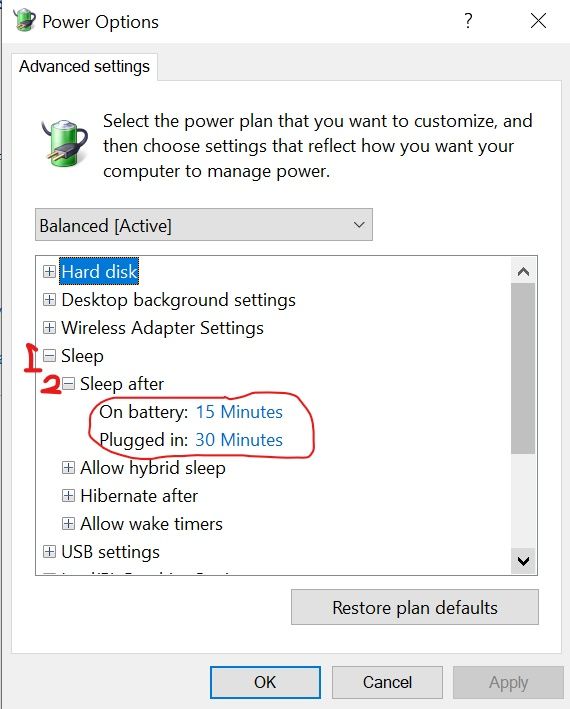
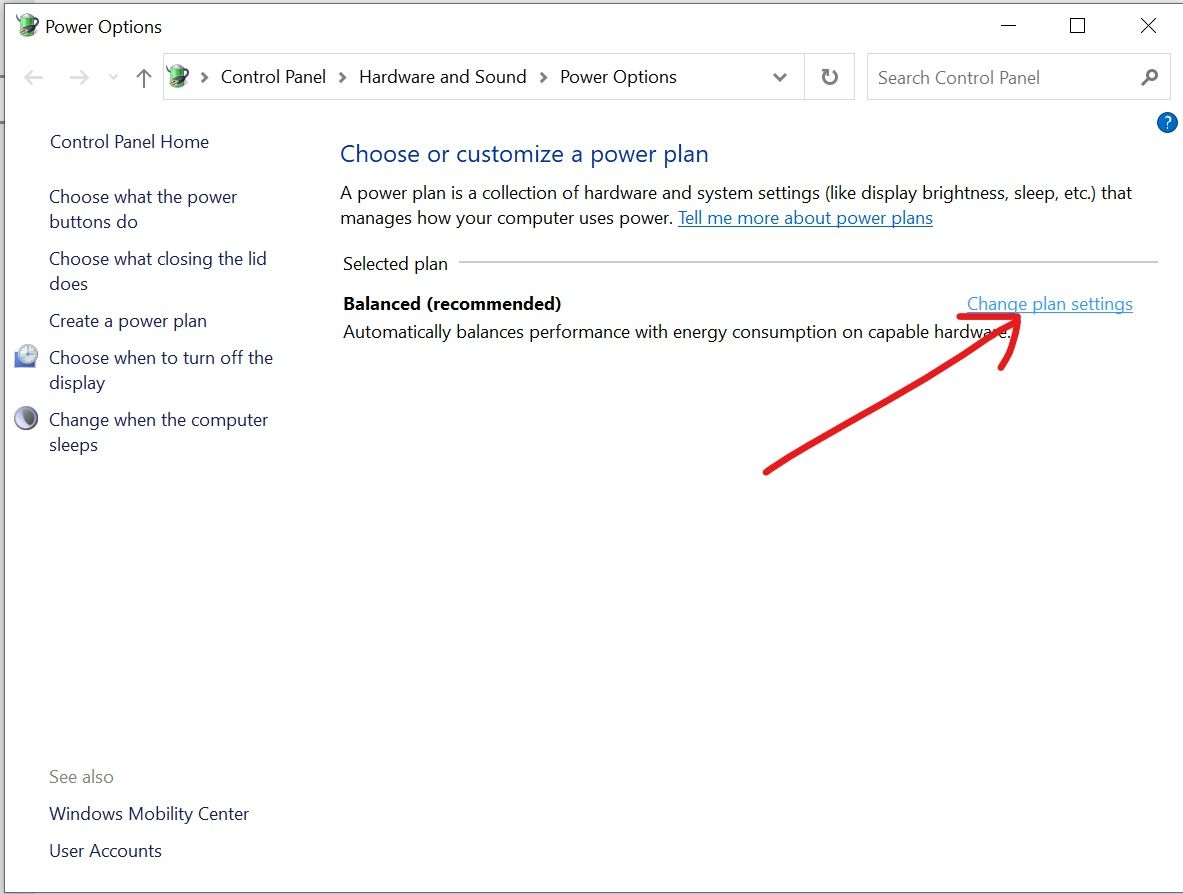
Select Additional power settings on the right.
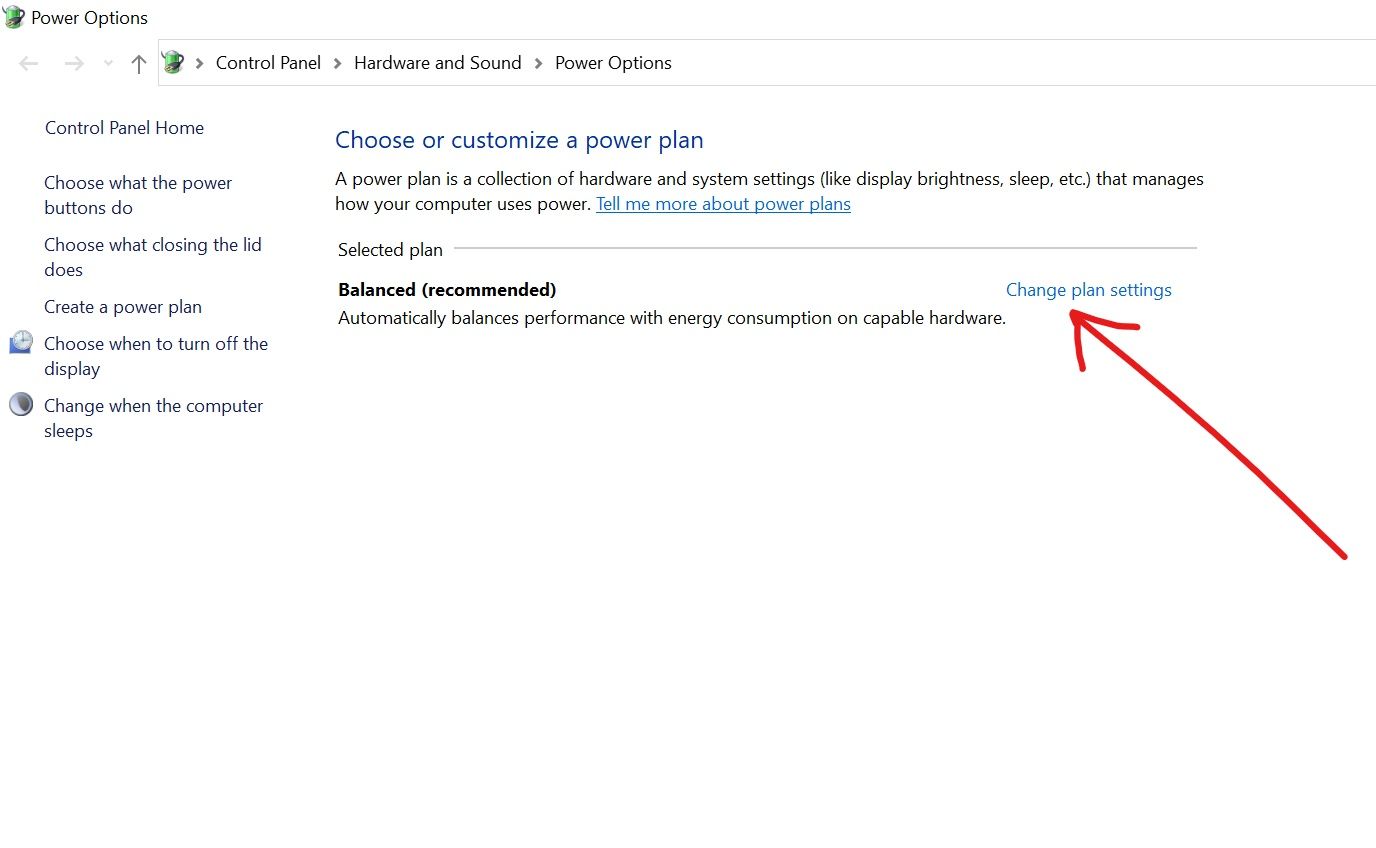
Click the Change plan settings link.
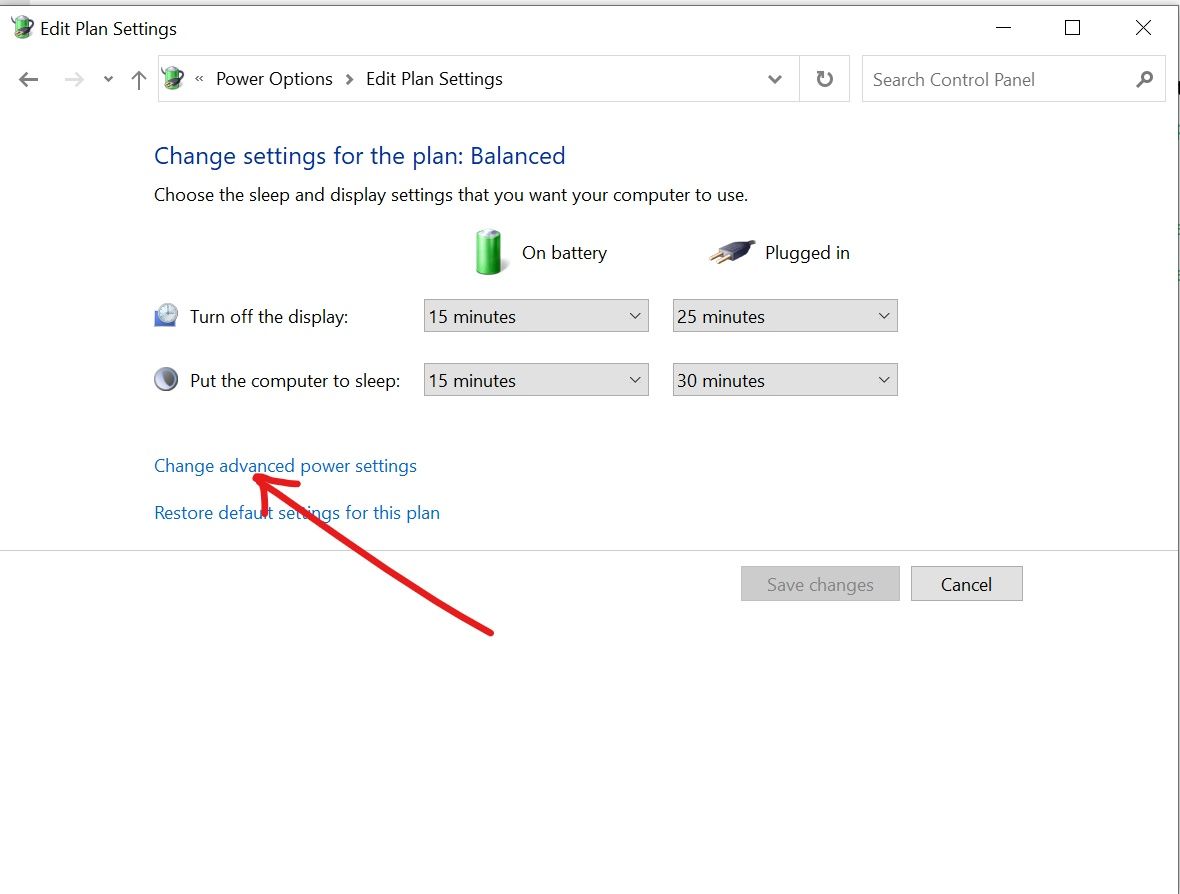
Click Change Advanced power settings.
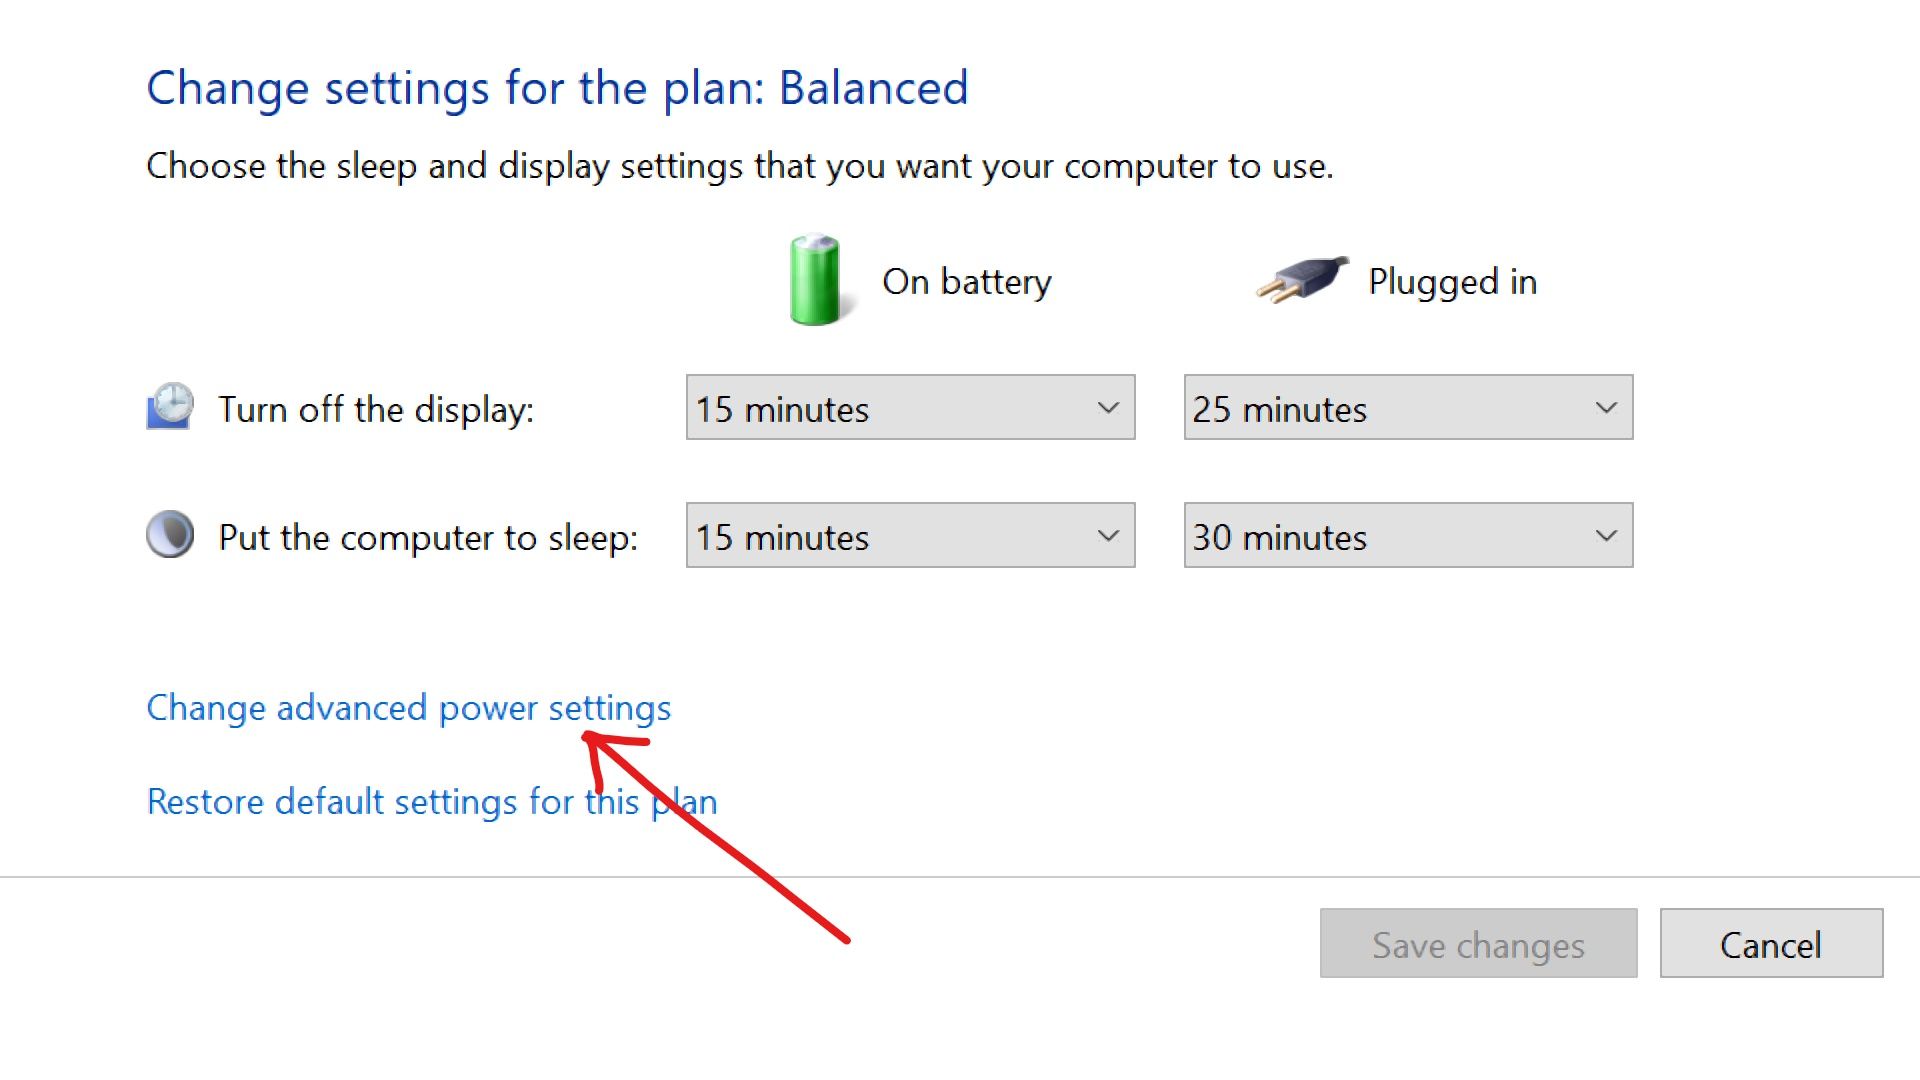
Expand “Sleep”, and then “Sleep after” in the tree menu. You should see the exact times you set.
How to Fix Windows 10 PC Not Going to Sleep By Removing Peripheral Devices
Peripheral Devices such as your mouse, keyboard, scanner, and network adapters can interfere with your PC power settings and prevent it from going to sleep.
I’ve been in this situation before, and I’ve seen people around me in the same situation. But I won’t advise you disable these devices from being able to wake up your computer.
The best thing you can do is remove these devices whenever you want to put your PC to sleep, then plug them back in when you are ready to work again.
How to Fix Windows 10 PC Not Going to Sleep By Disabling Screensaver
Screensavers can interfere with the sleep timers you set. So an active screensaver can prevent your computer from going to sleep.
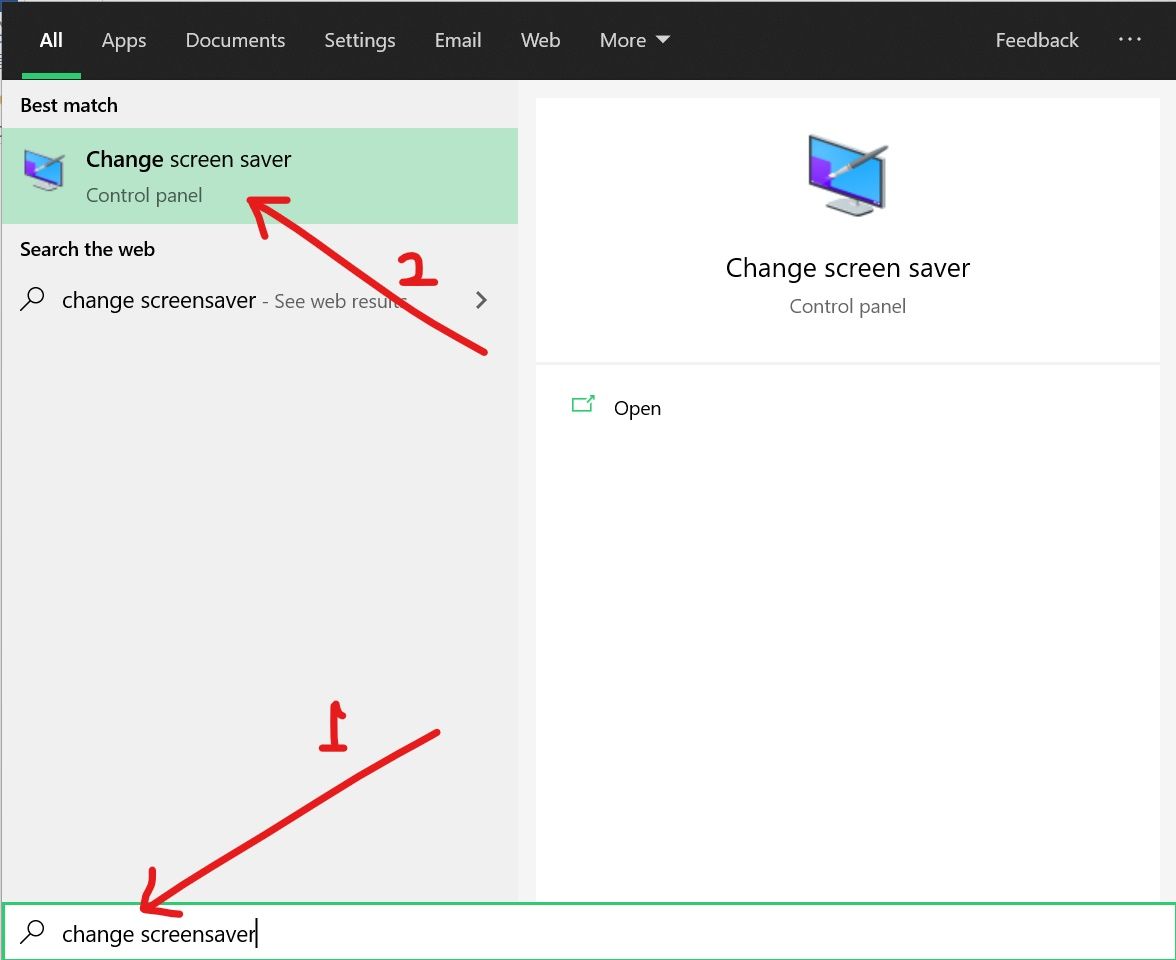
You can disable screensavers with the steps below:
Step 1: Click on Start and search for «change screensaver». Then select the «Change screensaver» search result.
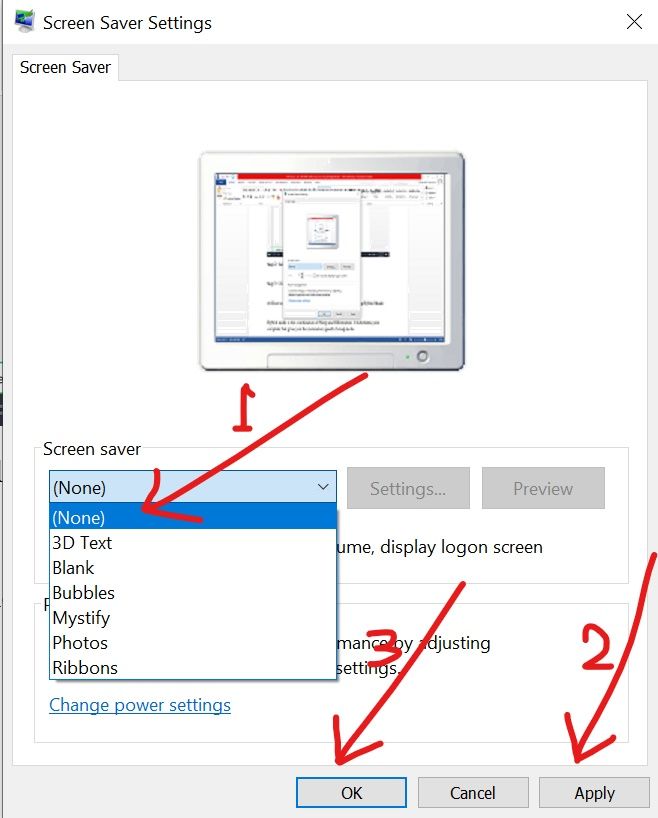
Step 2: Select None from the drop-down under “Screen saver”.
Step 3: Click Apply and then Ok.
How to Fix Windows 10 PC Not Going to Sleep By Disabling Hybrid Mode
Hybrid mode is the combination of Sleep and Hibernation. It hibernates your computer but gives you the restoration speed of sleep mode.
If hybrid mode is turned on, it could stop your PC from going to sleep.
To disable hybrid mode, follow these steps:
Step 1: Click on Start and select Settings.

Step 2: Select System from the menu tiles.
Step 3: Switch to the Power & Sleep tab, then select Additional power settings on the top right corner.
Step 4: Under the power plans you are currently on, select “Change plan settings”.
Step 5: Select “Change advanced power settings”.
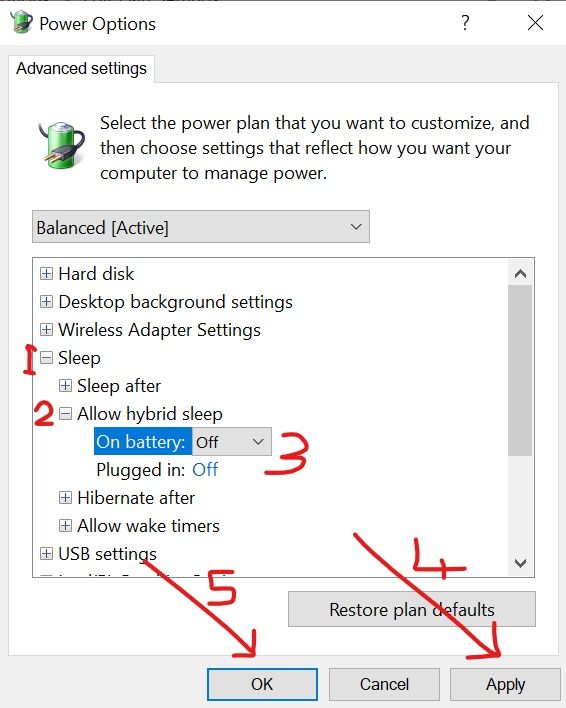
Step 6: Expand “Sleep” and «Allow hybrid sleep» in the tree menu.
Step 7: Turn off hybrid sleep on battery and plugged in.
Step 8: Click “Apply”, and then “Ok”.
If you find this article helpful, consider sharing it with your friends and family.
Thank you for reading.
Learn to code for free. freeCodeCamp’s open source curriculum has helped more than 40,000 people get jobs as developers. Get started
While we are working on our machines without moving the mouse or pressing any keys on the keyboard, like when reading eBooks, an article, or watching a show or movie, our monitor screen turns off. The system goes to sleep according to the configured power plan which causes hindrance in our activity and pulls out our attention.
You can disable the Sleep Mode in Windows 10 and 11. We can do this by configuring our power plan so that it won’t let our machine sleep even when there is inactivity.
You can do this through built-in settings in Windows, from the Control Panel, from the Command Prompt, or by using a Microsoft or a third-party tool. Continue to read through the article to find a suitable way to keep your computer from sleeping.
Learn how to disable hibernation mode.
Table of contents
- Turn Off Sleep Mode on Windows
- Disable Sleep Mode from Settings App
- Turn Off Sleep from Settings in Windows 11
- Turn Off Sleep from Settings in Windows 10
- Disable Sleep Mode from Control Panel
- Disable Sleep Mode from Screen Saver Settings
- Disable Sleep Mode from Command Line
- Disable Sleep Mode using Microsoft PowerToys
- Disable Sleep Mode using Third-Party Tools
- Don’t Sleep
- Insomnia
- Noise
- Disable Sleep Mode from Settings App
- Closing Words
Turn Off Sleep Mode on Windows
Disable Sleep Mode from Settings App
Perform the following steps to prevent your Windows computer from going into sleep mode from the built-in Settings app:
Turn Off Sleep from Settings in Windows 11
-
Navigate to the following:
Settings app >> System >> Power & battery
Alternatively, you can also open the Power & Battery settings from the Windows Key + X (Power User) menu, and then click “Power Options.”
-
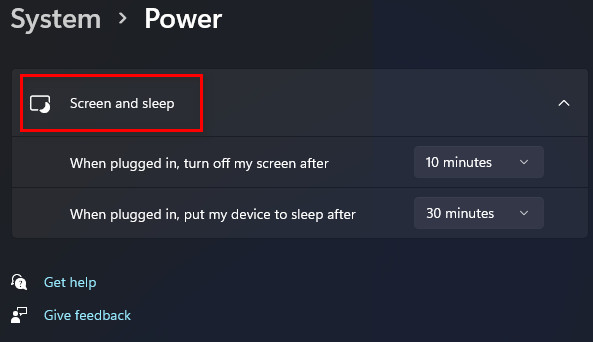
Click “Screen and sleep” to expand the options.

Expand screen and sleep settings -
Select “Never” from the drop-down menus in front of:
- On battery power, put my device to sleep after
- When plugged in, put my device to sleep after
Disable sleep from Windows 11 Settings app


Turn Off Sleep from Settings in Windows 10
-
Navigate to the following:
Settings app >> System >> Power & sleep
-
In the Sleep section, select “Never” from the drop-down menus under:
- On battery power, PC goes to sleep after
- When plugged in, PC goes to sleep after

Disable sleep from Windows 10 Settings app

Your computer will now never go into sleep mode unless the settings are changed.
Disable Sleep Mode from Control Panel
Similar to the Settings app method, you can also solve the issue of the computer entering sleep mode by performing the following steps through the Control Panel:
-
Open the Power Options applet by typing in “powercfg.cpl” in the Run Command box.

Open the Power Options applet -
Click “Change plan settings” in front of the selected power plan.

Change power plan settings -
Select “Never” from the drop-down menus in front of “Put the computer to sleep” under “On Battery” as well as “Plugged in.”
Disable sleep mode in Windows from Control Panel -
Click “Save changes.”
Save changes


You just changed the settings for only one power plan, if you have more than one plan then you need to change the settings for each plan when selected as the “Current plan.”
Disable Sleep Mode from Screen Saver Settings
If the above configurations have not worked for you, you can also perform the steps given below that will turn off sleep mode on your PC, or refer to the given third-party tools below as an alternative method.
This also involves the Settings app but gets the task done using the Screen Saver settings page.
-
Navigate to the following:
Settings app >> Personalization >> Lock Screen >> Screen saver
-
Select “None” from the drop-down menu in the Screen saver section, and uncheck the box next to “On resume, display logon screen.”
Disable sleep mode from screen saver settings -
Then click Apply and Ok.

This will prevent the screen saver from appearing when the computer goes into sleep mode, which it no longer should.
Disable Sleep Mode from Command Line
You can also disable the sleep mode directly from the Command Prompt as well as Windows PowerShell. You will need to run 2 simple and almost identical cmdlets to disable sleep mode for both battery power and also for when the laptop is plugged in. Moreover, both the cmdlets work in Command Prompt and PowerShell.
Follow these steps to disable sleep mode in Windows using the command line:
-
Launch an elevated Command Prompt or PowerShell instance.
-
Run the following cmdlets to disable sleep mode for both AC and DC power (in the case of laptops):
powercfg /x -standby-timeout-ac 0
powercfg /x -standby-timeout-dc 0
Disable sleep mode from Command Prompt

Sleep mode will now be disabled.
If you want to re-enable it later on, you can use the same cmdlets above while replacing “0” with the number of minutes you want the computer to go to sleep after inactivity.
The methods discussed till now disable the sleep mode permanently unless the settings are changed back through the Windows-native tools. However, using other tools, you can allot specific times when the sleep mode should be disabled, and when it is automatically enabled.
Disable Sleep Mode using Microsoft PowerToys
Microsoft PowerToys is a suite of powerful tools and utilities using which end-user can manage the different administrative components of the Windows OS and increase their productivity. One of the utilities inside PowerToys, named “Awake,” is a tool designed to do precisely what its name is – keep your system awake.
This is a convenient method to prevent your computer from going to sleep, on-demand, and can be used to schedule when your PC can and can’t go to sleep mode.
Use the following steps to download, install, and then use Microsoft PwoerToys to disable the sleep mode on your Windows PC:
-
Start by downloading and installing PowerToys.
You can download PowerToys from GitHub, from Microsoft Store, or by running the following command in Command Prompt:
winget install --id Microsoft.PowerToys -
Run the application and click “Awake” on the left.
Open Awake in PowerToys -
Toggle the slider in front of “Enable Awake” into the On position.
Enable Awake -
Click on the drop-down menu in front of “Mode” and select “Keep awake indefinitely.”
Keep the PC awake using PowerToys -
Now, toggle the slider in front of “Keep screen on” into the On position.
Always keep the screen on


Now, your computer won’t go into sleep mode.
You can also set the computer to not enter sleep mode for a specific time by selecting “Keep awake for a time interval,” after which the PC will return to its previous settings. You may also select “keep awake until expiration” and set a date and a time after which the previous power plan applies.
You define the time interval in the first one and a date and time in the second option; but in both options, the PC returns to its original power settings once the deadline is crossed.
Disable Sleep Mode using Third-Party Tools
Don’t Sleep
Download Don’t Sleep from here
Don’t Sleep is a small portable tool that doesn’t allow your system to restart, shut down, hibernate, or go to sleep.

The advantage of using this tool is that it can provide you with a timer, which helps you to make your settings automatically change. If you want to keep your system awake during specific hours, just add that time limit to the timer and switch it on.
Don’t Sleep saves you time by not having to reconfigure your settings over and over again for different sleep mode requirements.
Insomnia
Download Insomnia from here
Insomnia is available in both 32 Bit and 64 Bit architecture. It is a very small and simple utility.
Upon installation, a small window will appear on your screen that says “The computer can’t go to sleep while this window is open.” As long as we open the window, your machine will stay awake and will not go to sleep.
So you don’t have to set any timer or anything else regarding the settings to keep your system awake.

Noise
Download Noise from here
This is another simple tool. When you install it, a window will open that asks you to enter any key from the keyboard, and then after every 60 seconds it sends the same keystroke to the processor automatically so that it thinks that someone is using and pressing the keys.
This way, the system won’t go to sleep and the screen will remain on. Users can easily use any key by opening this little window. It won’t create any obstacles or stop the user from doing their work.

Noise is accessible through the system tray. You can easily open it by clicking its icon and entering any key, or changing it as required. You can also add combinations of numbers and characters.
Closing Words
These are all simple and easy ways to stop your system from going to sleep or turning your system’s screen off while watching a movie, reading an eBook, or downloading a large file. These tools will provide you with simple installation and ease of use.
Sleep mode helps to save the power of your computer when you’re not using it.
So, when your Windows 11 PC won’t go to sleep, you might be worried.
Don’t worry; I have done extensive research and got you all covered. I’ll provide you with a step-by-step tutorial on how to fix the problem.

So, Let’s get started.
What is Sleep Mode in Windows 11?
Sleep mode is a low-power mode feature in computers where the device saves power consumption by turning off the display, hard disk, and other components. The device loads the last session from memory when waken. Sleep mode helps to avoid the hassle of reopening the applications and tabs again.
Sleep mode is a feature built into all versions of Windows operating systems and is especially handy for those who use a laptop. Your PC goes into a state of rest without shutting the device down completely. Sleep mode brings the benefit to users to resume their work from exactly where they left off.
You may ask: What is windows hibernate mode?
Hibernate mode is a feature where the device completely shuts down, but the data are stored in the hard disk. This mode is similar to sleep mode on your Windows 11 in terms of reducing power consumption. Use Hibernate mode when you know you won’t use your device for a long time and want to resume the leftover work afterward.
Sleep mode is ideal when you are isolated from your device for short durations. It helps in conserving power and you can quickly resume or work from where you left off. Your PC won’t generate overheating issues as well. You can even schedule Windows 11 to wake from sleep automatically.
It is a major discomfort when Windows won’t go into sleep mode. Let’s proceed and see the solutions to fix the PC won’t go to sleep Windows 11.
Interestingly, there also exists a completely opposite issue: Windows 11 won’t wake from sleep.
How to Fix Windows 11 Won’t Go to Sleep Mode
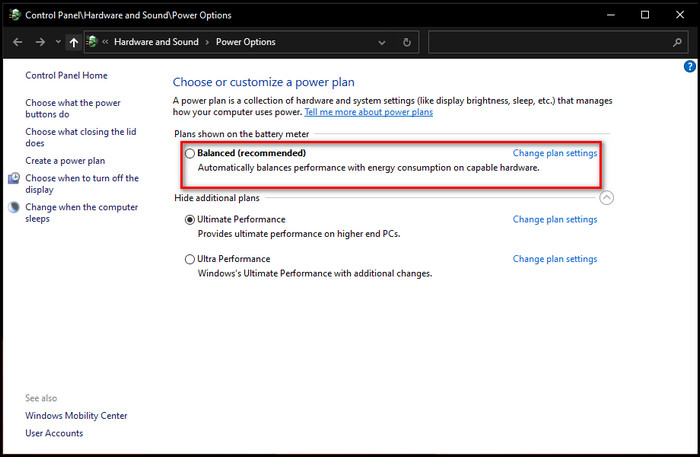
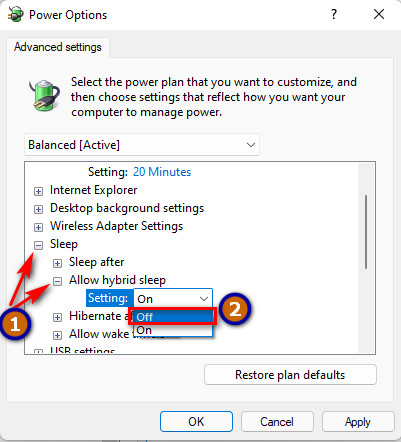
To fix Windows 11 won’t go to sleep, go to Control Panel > Hardware and Sound > Power Options and select Balanced. Then go to Change plan settings > Change advanced power settings. Here select Sleep > Allow hybrid sleep > On and set the time for Hibernate after option.
Many users reported that, after upgrading to Windows 11, their PC doesn’t enter sleep mode. This is a minor problem and can be fixed immediately. I would suggest you follow the steps carefully to fix Windows 11 sleep mode.
Here are the methods to fix the Windows 11 sleep mode not working:
1. Edit Advanced Power Settings
On Windows 11, you will get the settings for various power plans on the Control Panel. Here you can take some steps like choosing the power plan, toggle the hybrid sleep, setting the hibernation time manually, etc.
Hybrid mode is the combination of sleep mode and Hibernation mode in Windows 11. This mode puts your device to sleep and, at the same time, stores necessary data on your hard disk. So, whenever you want to resume your progress after a long idle time, you can easily continue.
But the hybrid mode can interfere with other power settings so you can toggle the hybrid sleep and other relevant options to fix the issue.
Here’s how you can edit Windows 11 advanced power settings:
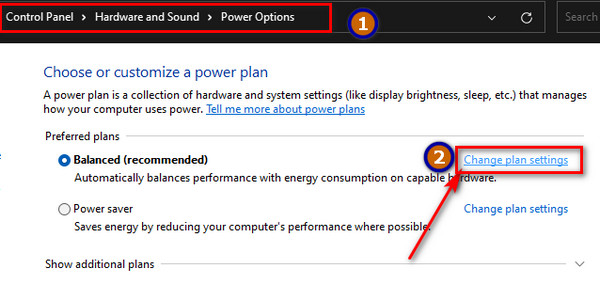
- Search for Control Panel from the Search option of the taskbar.
- Click on Hardware and Sound > Power Options.

- Select the Balanced power option.

- Click on Change plan settings next to Balanced.
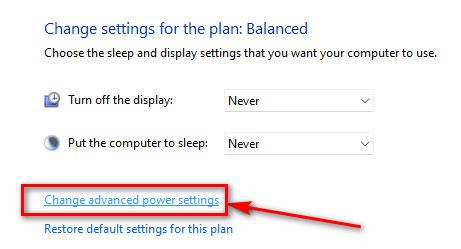
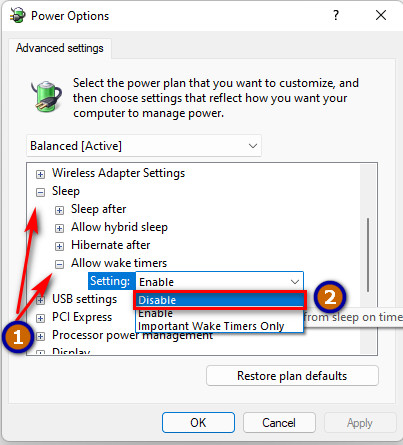
- Click on Change advanced power settings. A new window will pop up.

- Click the + sign next to Sleep to expand it.
- Expand Allow hybrid sleep and turn it on. If it’s already on, try disabling hybrid sleep.

- Expand Hibernate after and set a time for it.
- Click on Apply and then OK to save the changes.
For most users, these steps should fix the issue.
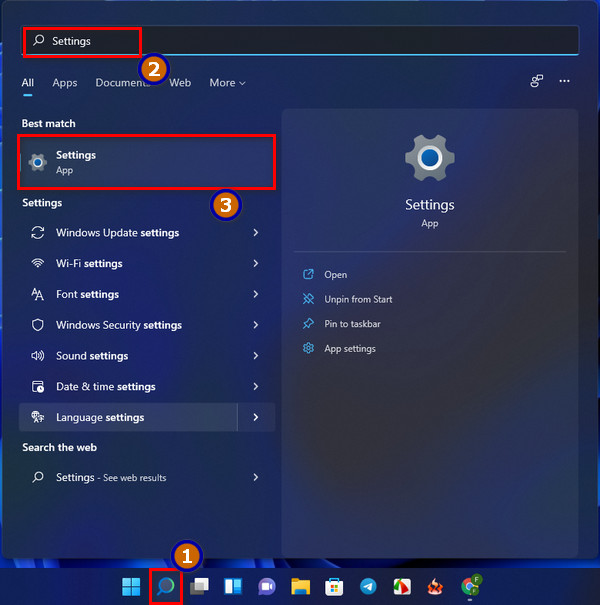
2. Enable Sleep Mode Manually
Make sure sleep mode is enabled on your device. If you don’t know the exact steps on how to enable sleep mode in Windows 11, then follow the steps below:
- Click on Windows Search from the Taskbar.
- Search for Settings and Click on it.

- Select the Power Options from the System panel.

- Press the drop-down menu of the Screen and Sleep option.

- Customize your specific time to put the screen and device to sleep.
- Exit the Settings.
If this step didn’t help you, go through the next step.
3. Disable Wake Timers
Wake timers are timed events that wake up the device. You can turn off this mode through the command prompt or through the control panel. It’s easy to turn off the wake timer through the control panel.
Here are the steps to turn off the wake timer:
- Open the Control Panel by performing a Windows Search.
- Go to Hardware and Sound > Power Options.
- Click on Change Plan settings under preferred Balanced plans.

- Select the Change advanced settings option.
- Tap on the (+) plus icon beside the Sleep option to expand the set of options.

- Click on Allow wake timers and tap on the settings to turn them off.
- Close the Control Panel.
Now, wait and see if your PC goes to sleep.
4. Disconnect Peripheral Devices
All peripherals don’t cause Windows 11 sleep mode issues. For example, a mouse, keyboard, controller, etc., usually don’t cause any problem with this feature.
However, a printer, scanner, webcam, and any other connected device is waking the system up from sleep into standby mode. So, you need to disconnect these electronic devices and see if they’re making your computer awake.
To check further, you can disconnect the mouse, keyboard, controller, or any external trackpads as well. If there are driver errors or other bugs, these devices can also create a problem such that the PC fails to enter sleep mode.
5. Deactivate Fast Startup
Fast startup is a feature where your computer boots quickly after a complete shutdown. Windows 11 allows fast startup by default. However, you can disable fast startup from the control panel.
Some older laptops and desktops don’t support fast bootup. As a result, it may cause sleep mode issues quite often.
Here are the steps to disable fast startup on Windows 11:
- Open the Control Panel.
- Go to Hardware and Sound > Power Options.
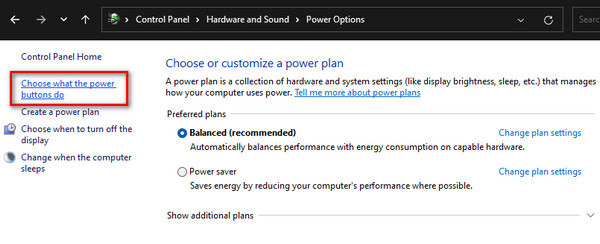
- Click on Choose what the power buttons do from the left.

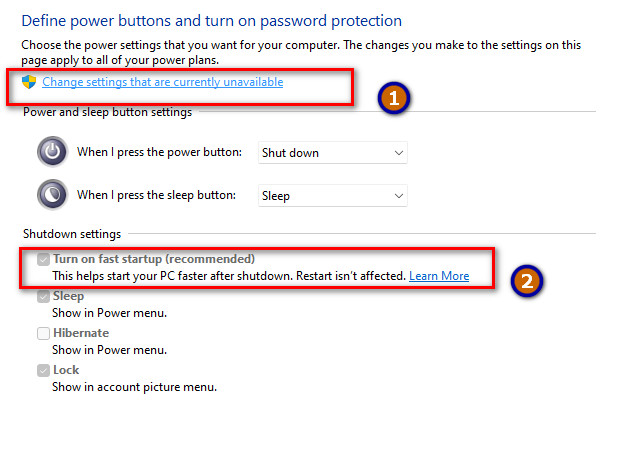
- Click the option Change settings that are currently unavailable.
- Uncheck the box beside Turn on fast startup.

- Save the changes.
6. Turn Off Screensaver Mode
Whenever the computer is inactive for a specific time, the screen saver mode activates. If the screensaver is enabled, your PC won’t enter sleep as the screen updates every moment.
So, you should disable the screensaver when you face Windows 11 won’t sleep issue.
Here are the steps to turn off windows 11 screensaver mode:
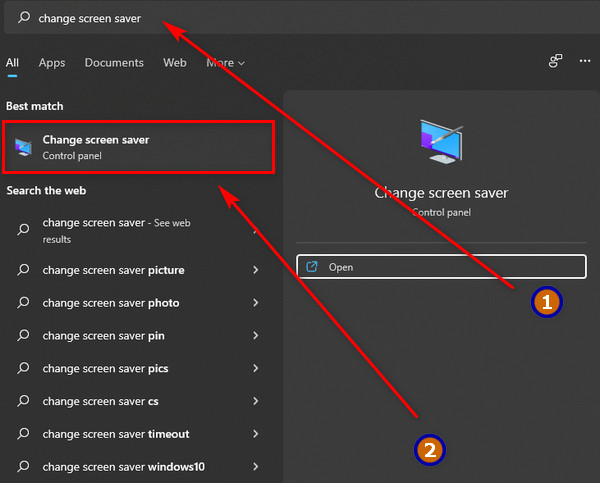
- Open Windows Search from the Taskbar.
- Search for Change Screen Saver.

- Select None under the Screen Saver Tab.

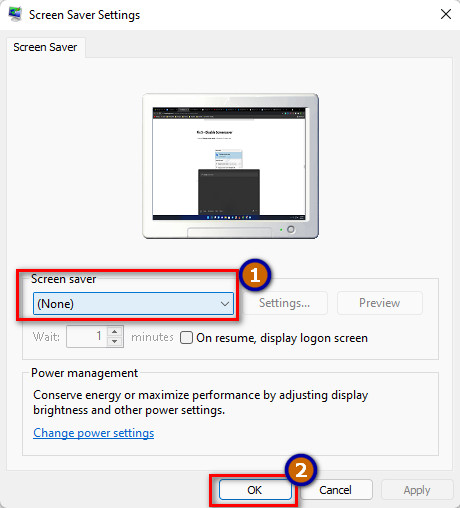
Now screensaver should not display and the PC should enter the sleep mode after a certain inactive time.
7. Remove the CMOS Battery
This step is for both laptop and desktop users. If consistently your PC won’t sleep even though all the settings are correct, then the main culprit is the battery itself.
Remove the CMOS battery for 15 minutes and then place it back in to check if the issue is resolved. Or else, Change the CMOS battery.
8. Close Microsoft Edge in the Background
Microsoft edges runs in the background preventing your computer from sleeping. This situation occurred to me once when I didn’t have the chrome browser.
You can end tasks using the task manager and also prevent Microsoft Edge from running in the background.
Follow the steps below to close the Edge browser in the background:
- Open Windows Search and type task manager.
- Go to Task Manager.
- Select the Processes Tab and find Microsoft Edge.
- Right-click on the Microsoft Edge process and select End task.
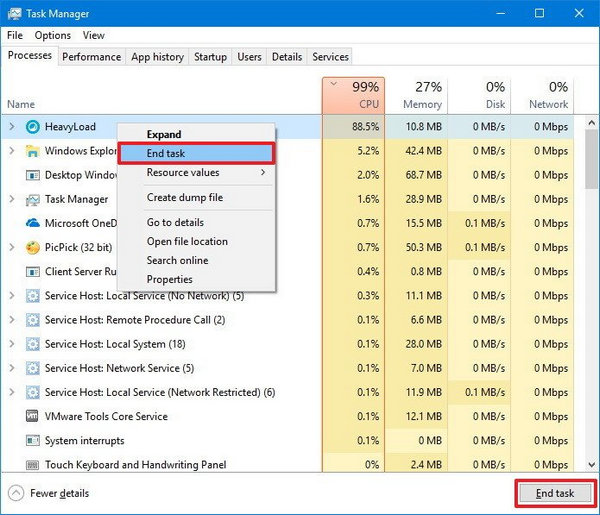
You can also go to the Startup tab and disable Microsoft Edge to launch at startup.
9. Check for Power Requests
Windows has an in-built program fixed to help you find out which app or feature is problematic.
To check that, follow the steps below:
- Open the Windows Search and type cmd. It’ll show the Command Prompt
- Click on Run as Administrator from the right.
- Type powercfg /requests and press Enter.
Note: There is a space between the word powercfg and the symbol /.
After noticing the disturbing program, go to the Task Manager and disable that process. Here’s a related guide: Stop apps running in background Windows 11.
10. Run the Power Troubleshooter
If there’s any bug or problem with the Windows core files, use Windows 11’s built-in power troubleshooter to detect and resolve your problems.
Follow the steps below to troubleshoot Windows 11 power:
- Press Win+I to open Settings.
- Click on System.
- Select Power & Sleep from the left-hand menu.
- Click on “Additional power settings.” This will open the Control Panel’s Power Options
- Click on “Troubleshoot problems with power plans” from the left-hand menu.
- Click on Advanced and select “Apply repairs automatically” to let Windows 11 automatically fix the issue.
- Click on Next and Windows will start detecting problems related to power settings. After the troubleshooter completes the detection, it will provide a list of issues found.
- Select the checkbox next to “Sleep mode” and click on Next. The troubleshooter will now attempt to fix the sleep mode problem on your Windows 11 PC.
- Restart your computer once the troubleshooter completes the repair process and see if the sleep mode issue is resolved.
That’s it. Following these steps should help you run the power troubleshooter and fix sleep mode issues in Windows 11.
You can use an antivirus or Windows Defender to check for viruses or other malware if your Windows 11 PC still doesn’t go to sleep mode.
Final Thoughts
There could be multiple reasons why Windows 11 is unable to enter sleep mode and save energy.
I have provided the most successful fixes that resolved the issue for most people.
If none of the above steps worked for you, then ensure that the Windows ISO you’re using was a stable version or not. Make sure that your PC was compatible with Windows 11.
Let us know in the comments section which solution worked.
If you have a Windows 10/11 computer and it does not go into sleep mode continue reading below to see how you can resolve the problem. When your computer goes into sleep mode, the screen turns off, keeping all the programs and applications you were using open so you can pick up where you left off when you come back to work on your computer again. In fact, suspending the computer actually helps save energy, but it also saves the users’ time because they don’t have to open all the programs from the beginning again to start working.
A major problem that some users face is that their Windows 10 device won’t go to sleep mode, and they are forced to completely shut down their computer and open applications whenever they want to take a break from their work. Other users also reported that the sleep mode stopped working after upgrading to Windows 11.
The problem of a computer not going into sleep mode can be caused by several reasons, such as processes or applications running in the background, malicious programs, incompatible or outdated drivers, or incorrect settings.
In this article we have gathered all possible solutions that will help you solve the following issue: PC/Laptop won’t turn off the screen or won’t go to sleep in Windows 10/11.
How to FIX: Computer won’t sleep on Windows 11/10.
Before proceeding with the methods listed below, there are some actions you can take that sometimes fix the problem of Windows not going into sleep mode. For example: Unplugging peripheral devices such as mouse, joysticks, gamepads and USB devices can resolve the problem. In addition, make sure your computer is clean of viruses and malware by following the instructions on this Malware Scan and Removal Guide.
- Modify Power Options.
- Prevent Devices to Wake Up your PC.
- Identify what prevents your PC from going into sleep mode.
- Get a Detailed Power Diagnostics Report.
- Run the Power Troubleshooter.
- Perform a clean boot.
Method 1. Modify Power Plan Settings.
Power settings may prevent the device from entering to sleep mode. Making changes to the power plan could fix things and allow the computer to enter sleep mode.
1. On the taskbar, search for edit power plan, then click Open.

2. Make sure that you specify after how long in idle, the computer will go into sleep mode and click Change advanced power settings.

3. In Advanced Power settings:
a. Expand Sleep and set the Allow wake timers to Disable in order to prevent Windows to wake up your PC on timed events (e.g. to install updates).

b. Expand Multimedia settings and change the When sharing media setting from Prevent idling to sleep to Allow the computer to sleep.

c. Click OK when done, and see if the sleep mode works now. However, if the issue persists, try the next method below.
Method 2. Prevent Devices to Wake Up your PC.
Network adapters, Bluetooth devices, or a sensitive mouse can cause your computer to not go into sleep mode. To avoid this:
1. In search box type device manager and click Open.

2. In Device manager, expand the Network Adapters and then double-click to open the properties of the installed network adapter.

3. In Power Management tab uncheck the Allow this device to wake the computer option and click OK to apply the change.

4. Now go ahead and make the same setting for the devices listed in these categories:
-
Bluetooth
-
Game Controllers
-
Mice and other pointing devices.
Method 3. Identify which other Device, Program or Service Prevents your PC from going into sleep mode.
If, after setting up the action options as described above, your computer still doesn’t go into sleep mode, go ahead and identify the reason why Windows 11 isn’t going into sleep. Certain processes, drivers or applications could be the culprit in this case. Once it is identified, we can uninstall it or stop the processes.
1. In search box type command prompt and then click Run as Administrator.

2a. In command prompt, copy and paste the command below, then press Enter:
- powercfg -requests
2b. After running the above command, a list of all the processes or services that are preventing your device from entering sleep mode is displayed. If any services/processes found proceed and disable them.

3a. Now, proceed to find out which other devices are currently configured to wake the system from it’s sleep state, by giving this command:
- powercfg -devicequery wake_armed
3b. Note the devices that appear in the list and go ahead and prevent them from waking your computer from sleep, by following the instructions in method-2 above. *
* Note: I suggest not preventing your keyboard device from waking up your computer.

Method 4. Get a Power Efficiency Diagnostics Report for your computer.
Windows 7, 8, 10 and 11 can help you diagnose exactly what is preventing your computer from going into sleep mode by providing you with a detailed diagnostic power performance report.
1. In search box type command prompt and then click Run as Administrator.
2. In command prompt type the following command and press Enter: *
-
powercfg -energy
* Note: The above command will trace your computer for 60 seconds for power problems.

3. When the tracing is completed, open the energy-report.html file at the following location:
-
C:\Windows\system32\energy-report.html
4. Now look at ‘Power Efficiency Diagnostics Report’ to find out which other devices, services or programs prevent the system from automatically entering sleep and then proceed to disable them.

Method 5. Run the Power Troubleshooter.
Power Troubleshooter is a built-in tool for resolving power issues on Windows PC. To fix the sleep issue on your Windows 10/11 device with the power troubleshooter:
1. In search box type troubleshoot power and Open the Find and fix problems with your computer’s power settings.

2. Click Next on the window that appears and then let Windows to fix the detected power issues.

Method 6. Perform a Clean Boot.
Certain third-party services or programs could be the reason why the PC is not going to sleep. Performing a clean boot will start your computer with only Microsoft services, and other third-party services will be disabled.
1. Simultaneously press the Windows ![]() + R keys to open the ‘Run‘ command box.
+ R keys to open the ‘Run‘ command box.
2. In run command box, type msconfig press Enter to open the System Configuration utility.

3. At Services tab, check the Hide all Microsoft services checkbox and then click Disable all to disable all non third-party services that start with Windows.

4. When done, click OK and restart your PC.

5. After restart, check if the «Sleep Mode» issue has been resolved. If yes, re-open the ‘System Configuration’ utility (msconfig) and enable one by one the disabled services and restart your system, until you find out which service cause your pc not to go to sleep.
That’s it! Which method worked for you?
Let me know if this guide has helped you by leaving your comment about your experience. Please like and share this guide to help others.
![]()
Download Article
![]()
Download Article
Sleep is a feature on your computer that allows you to save your computers state in a very low power mode. Sleep can be continent when you aren’t going to use your computer for a while and you want to save everything that is open, but it can also cause problems. Having your computer go to sleep can be annoying when it comes on too fast, or when it causes issues with your games. But don’t worry, this wikiHow will teach you how to prevent Windows 10 from going to sleep.
Things You Should Know
- While Sleep saves your laptop’s battery, it can be annoying if it activates too quickly or if it causes issues with your games.
- Prevent your Windows 10 from going to sleep using Settings or Control Panel.
- You can change the Power Mode to «Never» so your computer never goes to Sleep.
-

1
Open the Settings app. Click the Start
button in the lower-left corner of your screen and select the settings gear
.
-
2
Open the System category. It’s the first category to the very left of the app.
Advertisement
-
3
Select Power and sleep from the left pane.[1]
-
4
Disable sleep. Set both of the drop down menus under «Sleep» to «Never».


Advertisement
-
1
Open the Control Panel. You can do this by right-clicking the Start
button, and then clicking on «control panel» in the context menu that comes up.
- You can also open the control panel by pressing ⊞ Win+X at the same time.
- You can also open the control panel by pressing ⊞ Win+X at the same time.
-
2
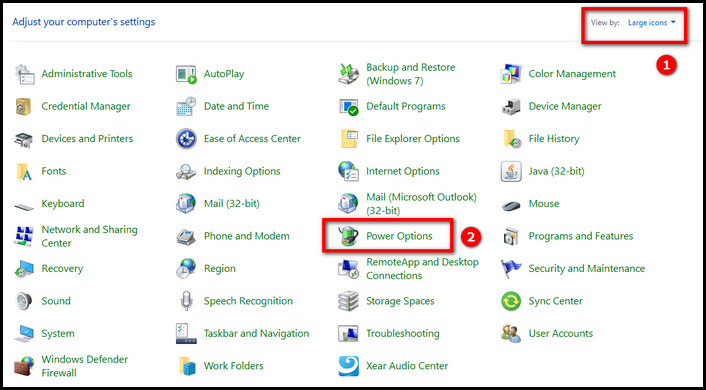
Open Power Options. It will be under the «System and Security» header.[2]
-
3
Click on the link ‘Choose when to turn off the display‘ from the left pane of the window screen.
-
4
Set both the drop down menus next to «Sleep» to Never. Make sure to save the changes before closing the window.


Advertisement
Ask a Question
200 characters left
Include your email address to get a message when this question is answered.
Submit
Advertisement
Video
-
Instead of disabling sleep, considering increasing the amount of time it takes for your computer to go to sleep after.
Thanks for submitting a tip for review!
Advertisement
-
This will not stop your laptop from going to sleep if you close the screen.
-
Disabling sleep on battery power may decrease your computer’s battery life.
Advertisement
References
About This Article
Thanks to all authors for creating a page that has been read 132,826 times.