Ознакомьтесь с нашими способами исправления ошибки на диске, если его размер стал отображаться как 0 байт. Можете сразу перейти к той части статьи, которая вас больше всего интересует.
| Рабочие Способы | Пошаговое Устранение Неполадок |
|---|---|
| Способ 1. Восстановление данных | Запустите программу восстановления данных EaseUS и выполните сканирование…Все шаги |
| Способ 2. Форматирование в NTFS | В Управлении Дисками щелкните правой кнопкой мыши по диску объёмом 0 байт…Все шаги |
| Способ 3. Преобразование Raw в NTFS | Запустите CMD, чтобы преобразовать RAW диск в NTFS…Все шаги |
| Способ 4. Проверьте диск на ошибки | В Проводнике Файлов щелкните правой кнопкой мыши по HDD/SSD объёмом 0 байт…Все шаги |
| Способ 5. Обновление драйвера | В Диспетчере Устройств обновите драйвер диска размером 0 байт…Все шаги |
На жестком диске отображается что занято 0 байт, как это исправить
‘Один из разделов жесткого диска на моём компьютере с прошлой пятницы стал показывать размер 0 байт. Я не воспринимал это всерьез до сегодняшнего утра, пока мне не стало нужно открыть очень важный файл, сохраненный на этом разделе.
Я думал, что это системная ошибка, что я могу просто перезагрузить компьютер и проблема решится. Но оказалось, что это ни к чему не привело. Я все еще не могу открыть его. Знаете ли вы, как решить эту проблему, не потеряв ценные файлы?’
Становятся ли внезапно разделы жесткого диска вашего компьютера объёмом 0 байт? Можете ли вы получить доступ к каким-либо данным из раздела жесткого диска 0 байт? Не переживайте. Воспользуйтесь способами решения проблемы из этой статьи и вы сможете вернуть правильное отображение размера жесткого диска в Windows 10/8/7.
Примечание: Основными признаками нулевого размера разделов жесткого диска в Управлении Дисками являются состояния RAW и Нет Носителя. Решения проблемы в этих двух случаях разные, поэтому ознакомьтесь с нашим руководством ниже, чтобы избавиться от этой ошибки.
- Подсказка
- Быстрое решение этой проблемы состоит в том, чтобы:
- 1. Отключите, снова подключите жесткий диск и перезагрузите компьютер.
- 2. Поменяйте линию питания жесткого диска и кабель SATA, затем перезагрузите компьютер.
- Если это не сработает, тогда читайте далее чтобы устранить проблему.
[Исправлено] Жесткий диск Размером 0 Байт Отображается RAW в Управлении Дисками
Применимо для исправления ошибки 0 байт на разделе жесткого диска/SSD, который отображается как RAW, при этом он подключён и в исправном состоянии.
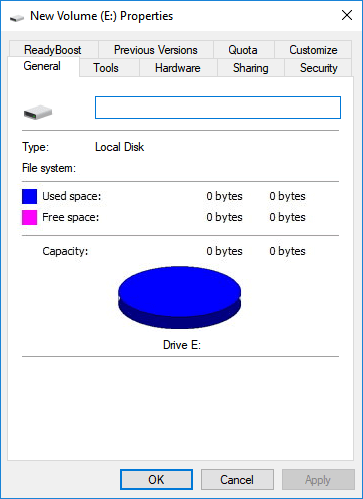
Раздел жесткого диска, HDD/SSD, который отображается как RAW, также может показывать в свойствах устройства текущий объём занятого пространства равным 0 байт. И чтобы решить эту проблему без потери данных, вам нужно выполнить некоторые действия из этого руководства.
# 1. Восстановление Данных
Если в свойствах устройства отображается 0 байт занятого места, и в Управлении Дисками стоит метка RAW, то вы не можете получить доступ к этому устройству. С помощью профессионального программного обеспечения для восстановления жесткого диска вы можете восстановить все ценные данные. EaseUS Data Recovery Wizard это инструмент, который позволяет выполнить быстрое и безопасное восстановление данных на разделах жесткого диска, USB-накопителе, SD-карте и других устройствах хранения данных с проблемой ‘0 байт’.
Далее рекомендуем посмотреть этот видеоурок, чтобы понять как восстановить данные с помощью EaseUS Data Recovery Wizard.
Шаг 1: подключите свою проблемную карту памяти к компьютеру.
Вставьте карту в картридер и подключите его к исправному ПК/ноутбуку.
Шаг 2: запустите программу восстановления данных от EaseUS и начните сканировать карту.
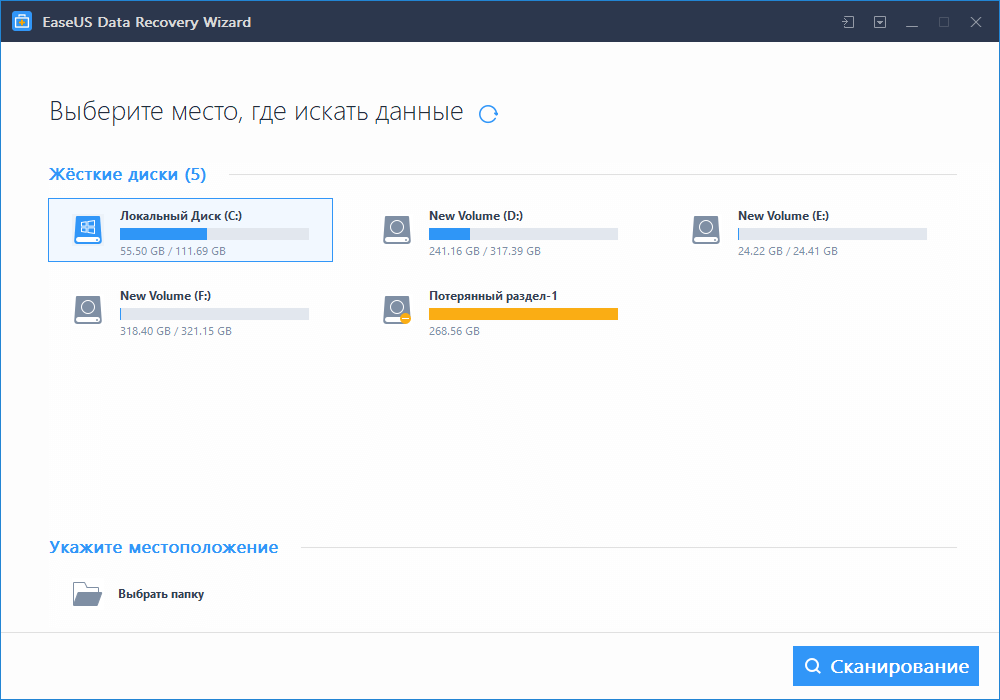
Запустите EaseUS Data Recovery Wizard на своем ПК и выберите карту памяти в столбце «Внешние устройства».
Затем нажмите «Сканировать», чтобы начать поиск потерянных (удаленных) данных на SD-карте.
Шаг 3: проверьте и восстановите потерянные данные.
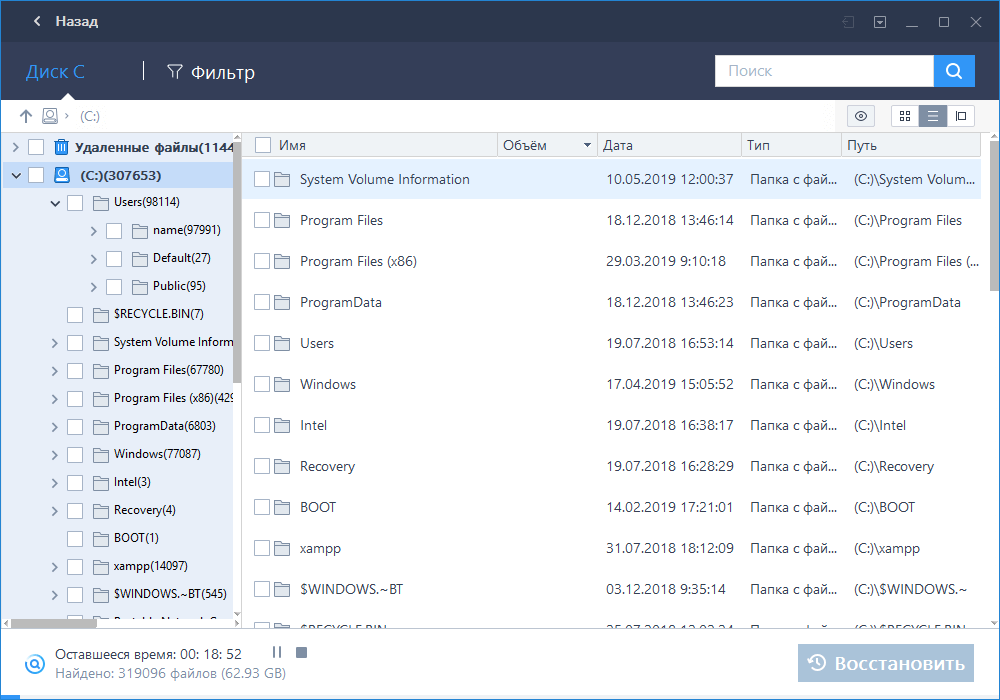
Вы можете предварительно оценить состояние найденных фото и документов (посмотреть, открываются ли они / проверить их) — для этого достаточно двойного клика мышки по нужному файлу… Затем нажмите «Восстановить», чтобы сохранить файлы в безопасном месте на вашем ПК или внешнем хранилище.
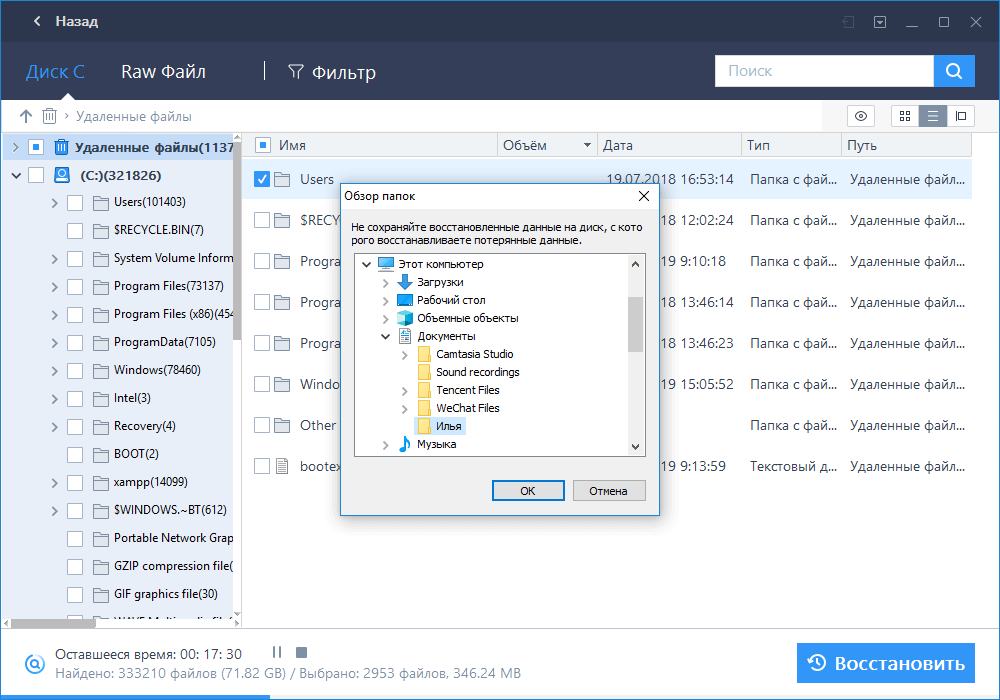
Не забудьте сохранить восстановленные данные на другом защищенном устройстве, пока ошибка не будет устранена.
# 2. Исправление Ошибки 0 Байтов На Жестком Диске RAW (3 метода)
Быстрое Исправление — Изменение Буквы Жесткого Диска
Когда жесткий диск становится объёмом 0 байтов, то это может быть связано с проблемой подключения или с определением буквы диска. Быстрое решение, которое вы можете попробовать, — это повторно подключить жесткий диск и изменить его букву:
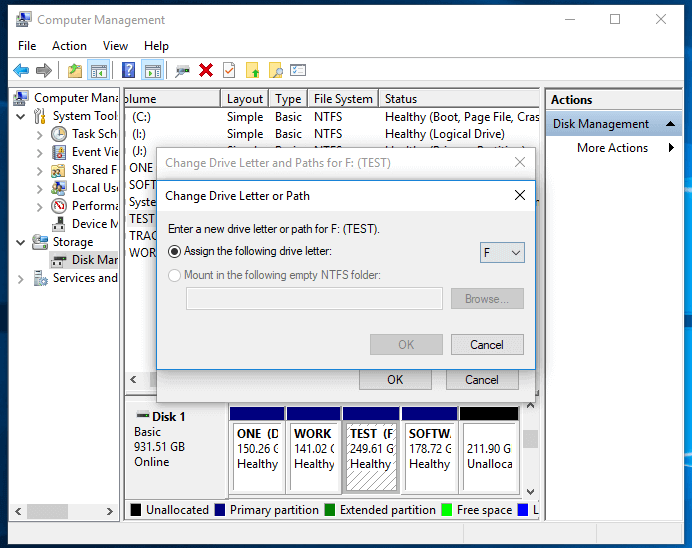
Шаг 1. Нажмите «Windows+R» и введите diskmgmt.msc и нажмите ‘Enter’. Откроется окно Управление Дисками.
Шаг 2. Щелкните правой кнопкой мыши по жесткому диску, на котором отображается 0 байт свободного места, и выберите «Изменить Букву Диска и Пути…»
Шаг 3. Нажмите кнопку «Изменить букву диска» и выберите букву диска из раскрывающегося списка.
Шаг 4. Нажмите «ОК», а затем нажмите «Да», при появлении запроса. Нажмите «ОК», чтобы подтвердить и закрыть окно.
Если изменение буквы диска не помогает решить проблему с 0-байтовым размером жесткого диска, существует 3 метода, которые можно применить для решения проблемы с RAW на 0-байтовом разделе жесткого диска.
Метод 1. Форматирование 0-байтового RAW раздела SSD/Жёсткого Диска в NTFS
После восстановления данных, воспользуйтесь Управлением Дисками для форматирования 0-байтового раздела жесткого диска RAW в NTFS:
- Шаг 1: Щелкните правой кнопкой мыши Этот компьютер/Мой компьютер и выберите «Управление».
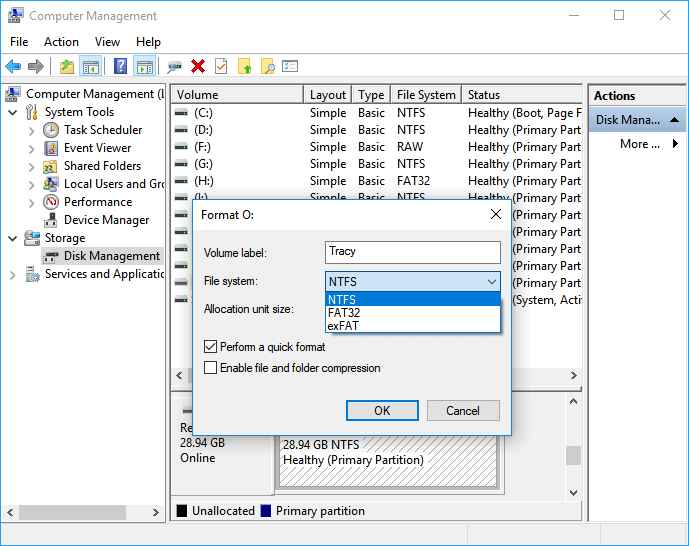
- Шаг 2: Щелкните «Управление Дисками», найдите и щелкните правой кнопкой мыши по разделу жесткого диска размером 0 байт, затем выберите «Форматировать».
- Шаг 3: Выберите NTFS в качестве файловой системы для раздела и нажмите «ОК» для подтверждения.
Метод 2. Преобразование Жесткого Диска RAW в NTFS с Помощью CMD
Существует еще один способ решить проблему RAW устройства на жестком диске с 0 использованных байтов, а именно, преобразовать файловую систему RAW в NTFS с помощью команды CMD.
Для этого вы можете перейти по ссылке конвертировать RAW внешний жесткий диск в NTFS в качестве ориентира. Весь процесс такой же.
Метод 3. Запустите Средство Проверки Диска на Ошибки
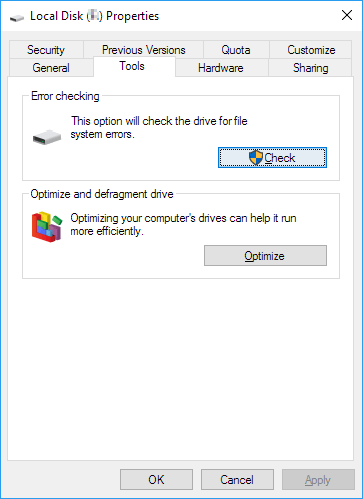
- Шаг 1: Open File Explorer and right-click on the 0 bytes HDD/SSD partition, select «Properties» and go to the Tools tab.
- Шаг 2: Нажмите кнопку «Проверить» в разделе «Проверка ошибок».
- Шаг 3: Он просканирует SD-карту и автоматически исправит найденные ошибки файловой системы.
Когда процесс завершится, вы можете перезагрузить компьютер, если нужно. После этого раздел будет доступен для сохранения новых файлов, и вы сможете снова скопировать восстановленные данные обратно на этот раздел.
[Решено] Жесткий Диск 0 Байт Пишет Нет Носителя в Управлении Дисками
Применимо для решения проблемы 0-байтового жесткого диска, который пишет, что нет носителя в Управлении Дисками.
Чтобы восстановить жесткий диск или раздел с 0 занятых байт, на котором отображается сообщение Нет Носителя в Управлении Дисками, вы можете попробовать следующие два метода.
# 1. Обновите Драйвер Жесткого Диска
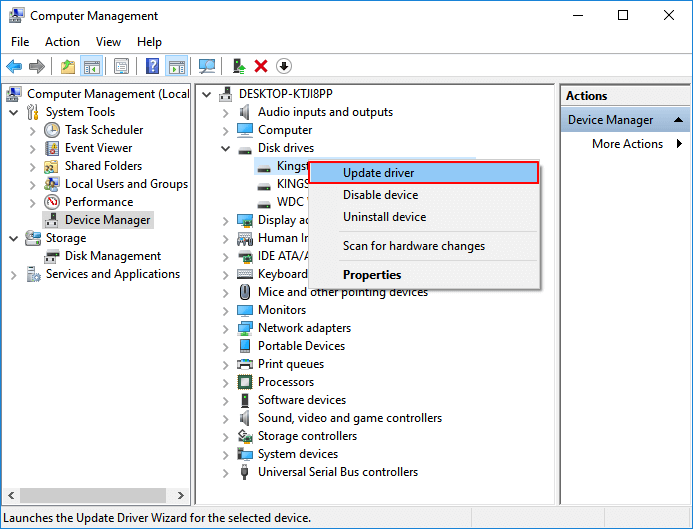
- Шаг 1: Щелкните правой кнопкой мыши значок Этот Компьютер/Мой Компьютер, выберите Управление и перейдите в Диспетчер Устройств.
- Шаг 2: Разверните Драйверы Дисковых Устройств, найдите и щелкните правой кнопкой мыши жесткий диск размером 0 байт, который отображается как без носителя, выберите «Обновить драйвер».
- Шаг 3: Выберите «Автоматический поиск обновленного программного обеспечения драйвера» и дождитесь завершения процесса.
- При необходимости перезагрузите компьютер.
Если ваш жесткий диск или SSD является специальным устройством, вы можете связаться с производителем или перейти на его веб-сайт, загрузить и установить драйвер жесткого диска.
После обновления устройства проверьте раздел жёсткого диска, появился ли у вас доступ к данным или нет. Также, проверьте состояние устройства в Управлении Дисками.
- Если отображается RAW, следуйте приведенным выше решениям чтобы исправить это.
- Если пишет Offline, то переведите устройство в Online и попробуйте снова его открыть.
- Если по-прежнему пишет, что нет носителя, то примените Метод 2 из этой статьи.
# 2. Отнесите Жёсткий Диск 0 Байт Без Носителя в Местную Ремонтную Мастерскую
Если первый метод не сработал, то у вас остался только один вариант. Отнесите жесткий диск в местный центр ремонта запоминающих устройств или в центр поддержки производителя.
Check the following solutions to fix the drive showing 0 bytes. Directly jump to the part you’re most interested in.
| Workable Solutions | Step-by-step Troubleshooting |
|---|---|
| Fix 1. Restore data | Run EaseUS recovery software, scan to find…Full steps |
| Fix 2. Format to NTFS | In Disk Management, right-click 0 bytes drive…Full steps |
| Fix 3. Convert Raw to NTFS | Run CMD to convert the RAW drive to NTFS…Full steps |
| Fix 4. Check disk errors | In File Explorer, right-click 0 bytes HDD/SSD…Full steps |
| Fix 5. Update driver | In Device Manager, update 0 byte drive driver…Full steps |
Hard drive shows 0 bytes used, how to fix it
«One of my computer hard drive partitions showed as 0 bytes since last Friday. I didn’t take it seriously until this morning when I need to use a very important file saved in that partition.
I thought it was a system error that I can reboot PC to get this issue solved. But it turned out nothing has changed. I still cannot open it. Do you know how to solve this issue without losing my valuable files?»
Does your computer hard drive partitions suddenly turn 0 bytes? Can you access any data from the 0 bytes hard drive partition? Don’t worry anymore. Follow solutions on this page to fix the hard drive displaying as 0 bytes in Windows 10/8/7.
Note: The major symptoms of 0 bytes hard drive partitions in Disk Management are RAW and No Media. The solutions towards two cases are different and you can read on to find the one to get rid of this error.
A quick fix toward this issue is to:
- 1. Unplug, replug the hard drive and reboot the computer.
- 2. Change hard drive power line and STATA cable, and reboot the computer.
- If this doesn’t work, follow on and get the issue resolved.
[Fixed] 0 Bytes Hard Drive Shows RAW in Disk Management
Applies to fix 0 bytes hard drive/SSD partition shows as RAW, online, with the healthy state.
Hard drive partition, HDD/SSD with the RAW issue may also show up 0 bytes used in device properties. And to resolve this issue without data loss, you can go through steps here for a guide.
# 1. Restore Data
When 0 bytes of the used devices show RAW in Disk Management, you are unable to access the device. With the help of professional hard drive recovery software, you can restore all precious data. EaseUS Data Recovery Wizard is a tool that enables you to perform fast and secure data recovery on hard drive partitions, USB drive, SD card or other storage devices with the «0 bytes» issue.
Step 1. Select a drive and start scanning
Launch EaseUS Data Recovery Wizard and hover over the partition where you lost data. This could be an internal hard disk, external disk, USB, or SD card. Then, click «Scan».
Step 2. Check and preview scanned files
Use the file format filter on the left or upper right corner to narrow the scan results until you find the files you need. Then, you can click the «Preview» button or double-click a file to preview its content, if you’d like.
Step 3. Recover lost data to a secure location
Click the checkbox next to the file and click «Recover» to restore the lost data to a secure place. We recommend that you do not store the recovered data on the disk where you lost it earlier.
Remember to save the restored data to another secure device until the error is resolved.
Consult with EaseUS data recovery experts for one-on-one manual recovery service. We could offer the following services after a FREE diagnosis
- Repair corrupted RAID structure, unbootable Windows OS, and corrupted virtual disk file
- Recover/repair lost partition and re-partitioned drive
- Unformat hard drive and repair RAW drive (Bitlocker encrypted drive)
- Fix disks that become GPT-protected partitions
# 2. Fix 0 Bytes Error on RAW Hard Drive (3 Methods)
Quick Fix — Change the Hard Drive Letter
When a hard drive becomes 0 bytes, it might be a connection problem or drive letter not detected. A quick fix that you can try is to reconnect the hard drive and change its drive letter.
Step 1. Press «Windows+R» and type diskmgmt.msc and hit «Enter». The Disk Management window appears.
Step 2. Right-click on the hard drive that shows 0 bytes free space and choose «Change Drive Letter and Paths…»
Step 3. Click the Change drive letter button and choose a drive letter from the drop-down list.
Step 4. Click «OK» and then click «Yes» when prompted. Click «OK» to confirm and close the box.
If changing the drive letter doesn’t help to fix the hard drive 0-byte issue, there are 3 methods that can apply to resolve the RAW issue on your 0 bytes hard drive partition.
Method 1. Format 0 Byte RAW SSD/Hard Drive Partition to NTFS
After restoring data, you can use Disk Management to format the 0 bytes RAW hard drive partition to NTFS.
Step 1. Right-click on This PC/My Computer, select «Manage».
Step 2. Click «Disk Management», locate and right-click the 0 bytes hard drive partition, then choose «Format».
Step 3. Select NTFS as the file system for the partition and click «OK» to confirm.
Method 2. Convert RAW Hard Drive to NTFS with CMD
There is another way that can resolve the device RAW issue on 0 bytes used hard drive, which is to convert RAW file system to NTFS using CMD command.
Step 1. Press Windows + R, type diskpart, and hit Enter.
Step 2. Enter the following commands hitting Enter after each line.
- list volume
- select volume X («X» means the volume number of the RAW drive)
- format fs=ntfs quick (or format fs=fat32 quick)
- exit
Then, check the drive.
Method 3. Run Disk Error Checker
Step 1. Open File Explorer and right-click on the 0 bytes HDD/SSD partition, select «Properties» and go to the Tools tab.
Step 2. Click on the Check button under the Error checking section.
Step 3. It will scan the SD card and automatically repair found file system errors.
When the process completes, you can restart the PC if necessary. Then the partition will be available for saving and storage new files and you can copy the restored data back to the partition again.
[Resolved] 0 Bytes Hard Drive Shows No Media in Disk Management
Applies to resolve 0 bytes hard drive which displays no media in Disk Management.
To repair 0 bytes used hard drive or partition which displays No Media in Disk Management, you have two methods to try here below.
# 1. Update Hard Drive Driver
- Step 1. Right-click on This PC/My Computer icon, select Manage and go to Device Manager.
- Step 2. Expand Disk drivers, find and right-click on the 0 bytes hard drive which displays as no media, choose «Update driver».
- Step 3. Select «Search automatically for updated driver software» and wait patiently till the process completes.
- Restart the PC if necessary.
If your hard drive or SSD is a customized device, you can contact or go the manufacturers’ websites, download and install the hard drive driver.
After updating the device, you can check the hard drive partition to see if you can access the data or not. And check the display state in Disk Management.
- If it shows RAW, follow the above solutions and fix it.
- If it shows Offline, activate the device to Online and try to open the device again.
- If it still shows no media, follow Method 2 below for help.
# 2. Take 0 Bytes No Media Hard Drive to Local Device Repair Center
When the first method fails to work, you’ll only have the last solution. It is to take your hard drive to be repaired at the local storage device repair center or its manufacturer support center.
SSD Showing 0 Bytes FAQs
You may have solved the internal or external hard disk showing 0 bytes of free space. If you want to learn more, read the questions and answers below.
1. Why does it say I have 0 bytes?
Reasons why HDDs may be showing 0 bytes:
- Your hard drive becomes a RAW drive
- Your hard drive is corrupted
- There is a virus on your drive
2. How do I fix my hard drive showing 0 bytes?
When your hard drive shows 0 bytes, follow the solutions below:
- Convert RAW to NTFS
- Format the hard drive to NTFS
- Check disk errors with CHKDSK
- Update hard drive drivers
3. Is 0 bytes a virus?
No, it’s not a virus. Generally, a 0-byte file is a result of file or storage drive corruption.
4. do I fix my SSD full for no reason?
You can fix the SSD full for no reason error with these solutions:
- Delete big hidden files and folders
- Clean up junk files and large files
- Delete hibernate file
- Uninstall some programs
- Temporarily disable system restore
- Add extra space to drive C
While it is great for everyone involved, these devices do show errors on a few occasions, making it difficult to access data within them.
One such error is the drive showing 0 bytes and you are not able to access any data. It is important for you to act quickly and recover all the data present on the drive.
What are 0 Bytes In the hard drive?
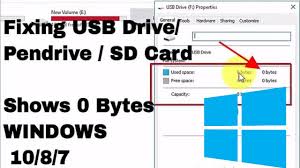
They simply refer to no space and no data left. When a hard drive shows 0 bytes, it means the drive has become RAW and has no more space for data. Right-clicking the hard drive and selecting Properties will show you that there are 0 bytes of free space, used space, and capacity. Adding and editing data on an internal or external hard drive is not possible.
How do you fix a 0 hard drive on a Windows?
- Fix the error with the help of command prompt
- Change driver letter name
- Using Disk Management
- Recover data using Remo Recover
- Formatting the hard-drive
Why My Hard drive is Showing 0 Byte Error?
A hard drive or any Storage device shows 0 bytes because of the following reasons
- If your hard drive has bad sectors
- Errors in the file system
- Usage of Outdated device driver
- Ejecting hard drive without permission
- The shutdown of the system while the data is being written on disk.
Let us look at a few solutions to Hard Drive Showing 0 Bytes Error:
Solution 1: Using Command Prompt
- Press Windows +R to open the Run window. Once the run window opens, type cmd and hit Enter.
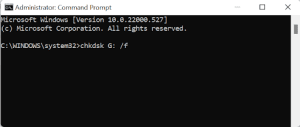
- In Command Prompt, type chkdsk F: /R and hit Enter. (where F is the drive letter of the drive showing 0 bytes)
- Just wait for some time before the chkdsk command fixes the 0 bytes hard drive problem.
Once the process completes, you can access content within your hard drive.
Solution 2: Change Drive Letter name
- Click on Start Now right-click on This PC/My Computer and click Manage.
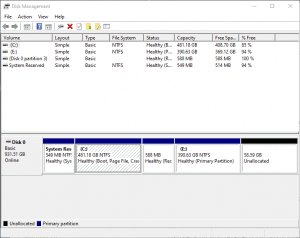
- Click Disk Management. Now right-click on the hard drive that shows 0 bytes.
- Now click Change drive letter and paths. Next, click on Change and use a new drive letter name that is not assigned to any other drive on the system.
- Click Yes and OK to confirm.
Solution 3: Using Disk Management
- Press Windows+E to open the explorer window. Right-click on This PC/My Computer and then click Manage. Type in the admin password to proceed.
- Click Disk Management. Right-click on the hard drive showing 0 bytes and select Properties.
- Click Owner and Security tab to check if the list is empty or not.
- Click Edit and Add
- Under Permissions, click Edit to change permissions.
- Now check every option there to allow complete permission.
- Click OK and Apply.
Vital Information: If you are wondering why your USB drive is not showing full capacity? Then do refer to this comprehensive guide to find out how to restore the USB drive back to full capacity.
Solution 4: Data Recovery using Remo Recover software
If you encountered the 0 bytes error, do not worry. Remo Recover software can recover all the contents of your hard drive. Once recovery is done, you can format the hard drive and use it again.
The user interface of Remo Recover is extremely simple to use. You can recover lost or deleted data from all kinds of hard drives, USB flash drives, memory sticks, FireWire drives, etc.
If your storage device has bad sectors, the data recovery software creates a disk image of the drive, bypasses these bad sectors, and later recovers data from the image. The deep scanning algorithms ensure every nook and corner of your hard drive is checked for lost or deleted data and recovered in a short time.
Data recovery is supported on FAT16, FAT32, NTFS, NTFS5, and ExFAT file systems.
- Free Download For Windows
- Free Download For Mac
If you are wondering how do I recover files from raw hard drive, Remo Recover explains the process in a few simple steps.
Step 1: Download and install the software on your system and launch the tool.
Step 2: In the main screen, select the drive from where you want to recover data and hit the Scan button.
Step 3: Once the scanning process starts, make use of the Dynamic Recovery View option that lets you have a look at the recovered files without having to wait till the scanning process completes.
Step 4: After the scanning process is complete, all recovered files will get displayed on your screen. you can view the recovered files through the Preview option.
Step 5: Select the Files that you want to retrieve. Click on the Recover option and select the Folder where you want to save the recovered files. Click on the OK button to start the data saving process.
The software also allows you to save the files to a destination folder of your choice in a ZIP file to save disk space.
Solution 5: Update Hard-drive/ Format
If the listed solutions have not worked well with you, then you will need to format your hard drive and create a new NTFS file system to eradicate the error byte 0. By formatting, you will also lose the data residing on the affecting hard drive.
In such cases, we recommend you make use of a reliable data recovery utility like Remo Recover as mentioned in the above section to effortlessly recover lost or deleted files from your hard drive with ease.
0 Пользователей и 1 Гость просматривают эту тему.
1. Производитель, наименование, объем памяти (маркировка на корпусе) флешки.
Не указано, т.к. подарочная с рекламным логотипом
2. Отчет программы Flash Drive Information Extractor о Вашей флэшке.
Volume: I:
Controller: Alcor AU6989SN/AU6998SN/SC908SN
Possible Memory Chip(s): Not available
Chip Code: 0xE50B
Chip F/W: 1EBF
Group: 98
VID: 058F
PID: 1234
Manufacturer: Alcor Micro
Product: Mass Storage Device
Query Vendor ID: Generic
Query Product ID: USB Flash Disk
Query Product Revision: 7.76
Physical Disk Capacity: 0 Bytes
Windows Disk Capacity: 0 Bytes
Internal Tags: AZWF-AAES
USB Version: 2.00
Max. Power: 100 mA
ContMeas ID: 63F1-04-00
Microsoft Windows XP SP3
————————————
…
Program Version: 7.7.0.510
3. Если флешка вскрыта. Маркировка контроллера (квадратная микросхема с ножками со всех сторон)
AU6989SNHL
D44747-2F
131110682
4. Если флешка вскрыта. Название микросхемы памяти (прямоугольная микросхема(ы) с ножками с двух сторон, иногда ножки
RMRMRMRM
C251070671
SDTNPNAHEM-004G
WSCA230351SS
5. Утилиты которыми Вы пытались восстановить работоспособность флешки.
Alcor Change PID_VID Rework 1.0.0.2 ( менял VIP/PID — WRITE_VID ERROR !! )
AlcorMP_v13.07.10.00
AlcorMP(121214.eD3)
6. Краткое описание проблемы.
Винда xp sp3 определяет подключенную флешку, присваивает букву, но не определяется объем памяти (емкость 0 ) , в свойствах флешки — состояние «Нет носителя» , при форматировании выдает «Отсутствует диск в устройстве..».
7. Операционная система компьютера, в которой Вы запускаете утилиты.
Win 7 x64 ; win xp sp3 x86
Записан
Привет!
В отчете есть строка Possible Memory Chip(s): Not available, которая наводит на размышления о возможно зацикленном контроллере. Пока контроллер зациклен, утилиты не будут работать правильно. Необходимы дополнительные отчеты ChipGenius и ChipEasy последних версий отсюда. Если в них с отображением памяти будет проблема, то надо с этим разобраться и только при полностью рабочем железе запускать сервисные утилиты.
Кстати, задайте вопрос что хотите получить от флешки, может вам данные нужны или еще чего.
Записан
На флешке нет никакой инфы, надо только ее реанимировать.
Диагностика утилит:
ChipGenius_v4_00_0028_pre7_fix
Description: [I:]Çàïîìèíàþùåå óñòðîéñòâî äëÿ USB(Generic USB Flash Disk)
Device Type: Mass Storage Device
Protocal Version: USB 2.00
Current Speed: High Speed
Max Current: 100mA
USB Device ID: VID = 058F PID = 1234
Device Vendor: Alcor Micro
Device Name: Mass Storage Device
Device Revision: 0001
Manufacturer: Generic
Product Model: USB Flash Disk
Product Revision: 7.76
Controller Vendor: Alcor Micro
Controller Part-Number: SC908SN/AU6989SN — F/W 1EBF
Tools on web: .
ChipEasy_EN_V1.5.6.6
Logical drive : I:\ Capacity: 0.0G
Device ID : VID = 058F PID = 1234
Device SN :
Device version : 7.76
Device vendor : Generic
Device model : USB Flash Disk
Protocol : USB2.0
Max power : 100mA
Partition type : Device active :
Aligned state : Misaligned
Controller : AlcorMP
Controller model: AU698X/FC8708/FC8308/FC850X Help?
Tools : http://www.upan.cc/tools/mass/Alcor/
OS Version : Microsoft Windows XP Professional Service Pack 3
Update Status : The current version is the latest version!
Записан
Если не ошибаюсь то проблема схожая с моей,исключение составляет лишь то что у меня чип показало сразу.
« Последнее редактирование: 23 Октября 2013, 17:31:42 от dezea »
Записан
Тестовые утилиты не видят память. Это, вернее всего, следствие неправильной работы контроллера. Другие варианты — плохая пайка, закоротка осколками припоя или некачественный монтаж, отсутствие питания на памяти или трещины на плате. Если не было серьезных мех.воздействий на флешку, то можно выполнить сброс контроллера по этой статье. Все действия под свою ответственность, неправильное исполнение процедуры сброса может иметь тяжелые последствия. Главное, не замыкать ничего на подключенной к питанию флешке, надо замкнуть другие контакты — отключите сначала флешку. Не держите после подключения замкнутые контакты более 1-2сек. Не замыкайте никакие другие контакты кроме тех что указаны в статье(т.е. шина данных и только!)
Записан
Вах! пару -тройку дней плотного поиска решения задачи и, благодаря замечательным людям, создавшим и поддерживающим этот полезный сайт, результат достигнут! Перевод контроллера USB флэш в тестовый режим и не без труда подобранная утилита AlcorMP(121214.eD3) сделали свое дело! Правда флешка работает нестабильно на разных компах, особенно через USB хабы и на старых системниках, но это похоже ее врожденная особенность.
Спасибо Вам за внимание, усилия и время, которое Вы уделили, помогая тем, кто не ищет простых решений!
Записан
А вот результат:
Volume: I:
Controller: Alcor AU6989SN/AU6998SN/SC908SN
Possible Memory Chip(s):
SanDisk SDTNPNAHEM-004G
Memory Type: TLC
Flash ID: 45D79892 7256
Flash CE: 1
Flash Channels: Single
Chip Code: 0xE50B
Chip F/W: D826
Group: 98
VID: 058F
PID: 6387
Manufacturer: Not available
Product: Not available
Query Vendor ID: Generic
Query Product ID: Flash Disk
Query Product Revision: 8.07
Physical Disk Capacity: 4150984704 Bytes
Windows Disk Capacity: 4142534656 Bytes
Internal Tags: AYWR-SU2A
File System: FAT32
Relative Offset: 332 KB
USB Version: 2.00
ContMeas ID: 63F1-08-00
Microsoft Windows XP SP3
————————————
…
Program Version: 7.7.0.510
Записан
Собственно, принесли 3 флешки с абсолютно одинаковой проблемой что описана выше. Вскрытие показало чип Alcor au6989snhl и вообще неидентифицируемую память (т.е вообще ничего на чипе) Перебором программ мне подошла AlcorMP(130205.MD). Только она согласилась работать. При сбросе флешки, закарчиванием контактов (в моем случае это ноги 31-32 из мануалаhttp://flashboot.ru/flash_recovery/2012/11/04/usb-test-pin.html) (а 2 сразу без сброса) показали память JS29F64G08AAMF1 на 8 гигов … 1 завелась тут же перепрошивкой. Вторая завлеась сначала на 2, через пару раз на 4 гига, 8 я так и не смог добиться. 3- на прошивке сказала 40400-load firmware cod error: bad block:138/2048 и все на этом.
Записан
Запустите утилиты ChipGenius и FDIE, ссылки есть в прикрепленной теме «Правила созданий новых тем» чтобы понять что за память по FID (Flash ID) и её возможный объем. Тогда и сервисную утилиту подобрать легче, судя по ошибке 40400-load firmware cod error: bad block:138/2048 — неподходящая версия утилиты в которой нет подходящей прошивки.
Записан
Вот забавно- ожившая флешка опять умерла.
Текущее состояние FDIE:
Volume: G:
Controller: Alcor AU6989SNHL/AU6998SNHL/SC908SN
Possible Memory Chip(s): Not available
Chip Code: 0xE50B
Chip F/W: 06CC
Group: 98
VID: 058F
PID: 1234
Manufacturer: Alcor Micro
Product: Mass Storage Device
Query Vendor ID: Generic
Query Product ID: USB Flash Disk
Query Product Revision: 7.76
Physical Disk Capacity: 0 Bytes
Windows Disk Capacity: 0 Bytes
Internal Tags: AZAF-AAH2
USB Version: 2.00
Declared Power: 100 mA
ContMeas ID: 2467-01-00
Microsoft Windows 7 SP1 x64
————————————
…
Program Version: 7.9.0.543
Буква диска присваивается,но не открывается. Опять запустил AlcorMP(130205.MD) — сразу прошилось и заработало. Интересно надолго ли…
Вот что получилось после утилиты:
Volume: G:
Controller: Alcor AU6989SNHL/AU6998SNHL/SC908SN
Possible Memory Chip(s): Not available
Chip Code: 0xE50B
Chip F/W: 840B
Group: 98
VID: 058F
PID: 6387
Manufacturer: Generic
Product: Mass Storage
Query Vendor ID: Generic
Query Product ID: Flash Disk
Query Product Revision: 8.07
Physical Disk Capacity: 8313110528 Bytes
Windows Disk Capacity: 8296353792 Bytes
Internal Tags: AYWP-S822
File System: FAT32
Relative Offset: 520 KB
USB Version: 2.00
Declared Power: 500 mA
ContMeas ID: 2467-02-00
Microsoft Windows 7 SP1 x64
————————————
…
Program Version: 7.9.0.543
Вот флешка, кот отформатировалась на 4:
Volume: G:
Controller: Alcor AU6989SNHL/AU6998SNHL/SC908SN
Possible Memory Chip(s): Not available
Chip Code: 0xE50B
Chip F/W: F310
Group: 98
VID: 058F
PID: 6387
Manufacturer: Generic
Product: Mass Storage
Query Vendor ID: Generic
Query Product ID: Flash Disk
Query Product Revision: 8.07
Physical Disk Capacity: 4331864064 Bytes
Windows Disk Capacity: 4323233792 Bytes
Internal Tags: AYWP-S822
File System: FAT32
Relative Offset: 164 KB
USB Version: 2.00
Declared Power: 500 mA
ContMeas ID: 2467-03-00
Microsoft Windows 7 SP1 x64
————————————
…
Program Version: 7.9.0.543
на ней ничего не пропало за выходные)
И вот флеш которая не прошивается:
Volume: G:
Controller: Alcor AU6989SNHL/AU6998SNHL/SC908SN
Possible Memory Chip(s): Not available
Chip Code: 0xE50B
Chip F/W: A9C3
Group: 98
VID: 058F
PID: 1234
Manufacturer: Alcor Micro
Product: Mass Storage Device
Query Vendor ID: Generic
Query Product ID: USB Flash Disk
Query Product Revision: 7.76
Physical Disk Capacity: 0 Bytes
Windows Disk Capacity: 0 Bytes
Internal Tags: AZAF-AAH2
USB Version: 2.00
Declared Power: 100 mA
ContMeas ID: 2467-04-00
Microsoft Windows 7 SP1 x64
————————————
…
Program Version: 7.9.0.543
Записан
« Последнее редактирование: 07 Апреля 2014, 10:36:12 от muncubus »
Записан
KDME56, Занятно. Почему-то раздел не выбирается.
Тогда после
select disk 3
clean (тут ОЧЕНЬ внимательно. Эта команда очищает весь выбранный диск и от всех разделов и от всей инфы. Проверьте, чтобы выбранный диск оказался именно проблемной флешкой, а не жёстким диском, например)
Затем, если диск очистится, не снимая фокуса с флешки, создать раздел с файловой системой fat32
create partition primary (если размеры создаваемого раздела не указывать, то он должен занять всю флешку)
format fs=fat32
Затем можно выйти из дискпарта (exit)
Добавлено через 1 минуту
Сообщение от KDME56
флешка определяется как дисковод
Гм-гм… А ей букву не меняли? (или дисководу)
Добавлено через 1 минуту
Нсколько я понимаю, дисковод — это диск 2 (можно проверить, той же детализацией)
