 Одна из частых проблем пользователей, особенно после чистой установки Windows — компьютер или ноутбук не видит сетевой адаптер: не важно, идет ли речь о сетевой карте Ethernet или же о сетевом адаптере Wi-Fi, причины обычно одни и те же.
В этой инструкции подробно о том, что делать, если ПК или ноутбук не видит сетевой адаптер в Windows 11 или Windows 10, чтобы решить проблему.
Включение сетевой карты или Wi-Fi адаптера в БИОС/UEFI
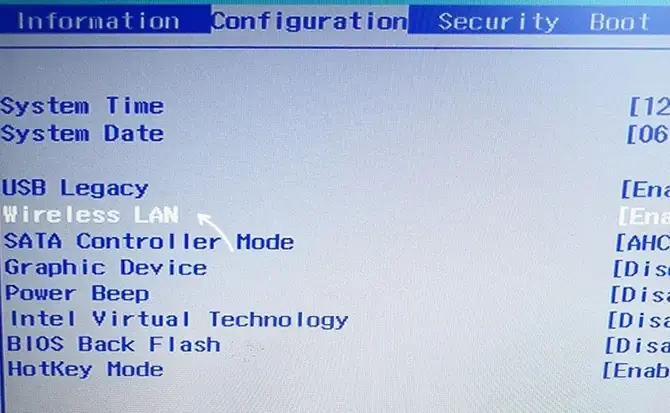
Если в диспетчере устройств отсутствуют любые признаки наличия сетевого адаптера: нет неизвестных устройств или устройств с ошибками, при этом вы уверены, что физически он присутствует, возможно, сетевая карта Ethernet или Wi-Fi адаптер отключены в БИОС.
Шаги, чтобы это проверить и включить сетевой адаптер в БИОС/UEFI:
- Зайдите в БИОС/UEFI, на ПК обычно для этого нужно нажать клавишу Del при включении, на ноутбуке — чаще F2 (но возможны и иные варианты). Подробнее: Как зайти в БИОС/UEFI на компьютере и ноутбуке.
- Найдите раздел и пункты, отвечающие за включение и отключение периферийных устройств. Варианты пути могут быть разными, например: Advanced — Onboard Device Configuration, где необходимо включить LAN/Ethernet/Network или WLAN/Wireless/Wi-Fi адаптер (установить в Enabled).

- Параметры могут находиться и в других разделах, например: Configuration, Chipset, Onboard Devices, Integrated Peripherals, Network Configuration.

- Во всех случаях ищем обозначение нужного адаптера, и, если его состояние установлено в Disabled, переключаем в Enabled, затем выходим с сохранением настроек БИОС (обычно — клавиша F10).


После включения сетевого адаптера в БИОС и повторного запуска Windows драйверы сетевого адаптера обычно устанавливаются автоматически: но иногда не те, либо по какой-то причине вообще не могут установиться: это тоже может быть причиной того, что сетевая карта или беспроводный адаптер не видны.
Драйверы сетевого адаптера
В случае, если в диспетчере устройств отображаются какие-либо сетевые адаптеры, неизвестные устройства, либо устройства с ошибками (желтый восклицательный знак), вероятнее всего причиной проблемы является отсутствие подходящих драйверов.
Наиболее надежный путь — вручную скачать и установить драйверы с официального сайта производителя материнской платы ПК либо с сайта производителя ноутбука именно для вашей модели устройства. Порядок действия будет следующим:
- С компьютера (или даже смартфона) где есть доступ в Интернет, найдите официальную страницу поддержки вашей модели материнской платы или ноутбука.
- На странице поддержки устройства найдите раздел загрузки драйверов, а в нём — соответствующие драйверы сетевого адаптера. Для сетевой карты Ethernet они могут иметь названия Network Driver, LAN Driver, Ethernet Driver, для беспроводной сети — Wi-Fi, WLAN, Wireless LAN, скачайте эти драйверы к себе на устройство, а затем скопируйте на компьютер с проблемой. Внимание: если на сайте представлены драйверы только для предыдущей версии Windows, всё равно попробуйте их скачать и установить — обычно они могут исправно работать и в современных Windows 11 и Windows 10.

- Установите скачанные драйверы и проверьте, была ли решена проблема.
- На некоторых ПК и ноутбуках возможна ситуация, когда драйверы сетевого адаптера не устанавливаются либо не работают пока не будут установлены оригинальные драйверы чипсета или управления питанием. Если вы столкнулись с этим, попробуйте также скачать и установить их. Вас будут интересовать драйверы Chipset, Power Management, ACPI, ATK, Intel ME или Management Engine, Serial I/O
- После установки драйверов рекомендую перезагрузить компьютер.
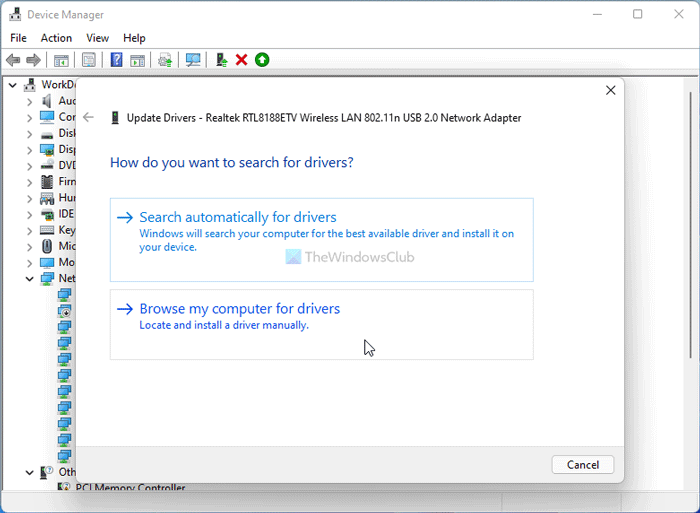
- Если сетевой адаптер отображается в диспетчере устройств, но не работает или работает с ошибками, можно попробовать следующий вариант действий: в диспетчере устройств нажмите правой кнопкой мыши по сетевому адаптеру, выберите пункт «Обновить драйвер», затем: Найдите драйверы на этом компьютере — Выбрать драйвер из списка доступных драйверов на компьютере. Проверьте, нет ли в списке совместимых драйверов каких-то иных вариантов, помимо установленного в настоящий момент: при наличии выберите его и нажмите кнопку «Далее» для установки.


Если вы не можете найти драйверы самостоятельно, можно попробовать выполнить установку с помощью специализированных программ, рекомендую Snappy Driver Installer.
В завершение — ещё некоторые варианты, которые могут оказаться полезными в некоторых сценариях возникновения проблем с наличием сетевого адаптера в Windows:
- Если сетевой адаптер пропадает после завершения работы и включения, но появляется, если использовать пункт «Перезагрузка» в меню завершения работы, попробуйте отключить быстрый запуск — это может помочь.
- Проверьте наличие сетевых адаптеров в скрытых и отключенных устройств в диспетчере устройств. Чтобы показать скрытые устройства, используйте пункт меню «Вид». Для отключенных устройств рядом со значком отображается стрелка, а если нажать по устройству правой кнопкой мыши, в контекстном меню будет доступен пункт «Включить устройство».
- Попробуйте использовать встроенное средство устранения неполадок сети и посмотреть, о чем оно сообщает. В некоторых случаях сообщение может выглядеть как «Не удалось обнаружить правильно установленный сетевой адаптер», тема рассмотрена в этой инструкции. Многие другие сообщения средства устранения неполадок также рассмотрены на этом сайте: можно использовать поиск по сайту, не исключено, что инструкция найдётся.
- Если аппаратные проблемы исключены, а проблема появилась на давно работающей Windows и не сразу, могут помочь точки восстановления системы.
- Попробуйте загрузиться с LiveCD с поддержкой сети — если в этом случае сетевой адаптер исправно работает, проблема в установленной системе, драйверах и настройках. Если нет — в настройках БИОС, подключении, либо аппаратных неисправностях сетевого адаптера.
- Дополнительно при решении проблемы могут пригодиться инструкции: Не работает интернет в Windows 10 (подойдет и для Windows 11), Что делать, если работает Wi-Fi на ноутбуке, Не работает Интернет по кабелю или Wi-Fi.
Надеюсь, один из вариантов поможет в решении проблемы. Если остаются вопросы — опишите ситуацию в деталях в комментариях ниже, не исключено, что мне удастся подсказать подходящее решение.
| Workable Solutions | Step-by-step Troubleshooting |
|---|---|
| Solution 1: Restart the PC | Please turn off the device, wait for a minute or two and turn it on…Full steps |
| Solution 2: Run Hardware and Devices Troubleshooter | Press Windows + R on your PC to open the Run app…Full steps |
| Solution 3: Reset Windows Socket (Winsock) Catalog | Search for Command Prompt and open it in administrator mode…Full steps |
| Solution 4: Update Network Drivers | Search for the Device Manager and Open it…Full steps |
| Solution 5: Reinstall the Network Drivers | Open Device Manager and locate «Network Adapters…Full steps |
Network Drivers manage all the network connections on your device. If there is any fault in them, it will trigger Windows did not detect a properly installed network adapter error. Such faulty drivers restrict you from having proper internet and Wi-Fi connections. If you meet the same issue, this passage discusses the reasons and methods to fix the Windows Did Not Detect a Properly Installed Network Adapter in simple steps. Please go through it to resolve your issue.

Drivers play a significant role in our devices, as they act as a medium of communication between software and hardware. They need to be up to date and properly installed to maintain the functions related to the particular drivers. If they are faulty or improperly installed, the device behaves abnormally.
Reasons of Windows Did Not Detect a Properly Installed Network Adapter
As discussed above, multiple reasons could cause this issue. But let us know the root cause of the problem to understand why it is the Windows unable to detect the properly installed adapter.
1. Missing Driver Updaters
The drivers cannot update themselves. They use the updaters to identify new updates and install the updates. If the Network Drivers Updaters are missing or faulty, it could cause detection issues. We can rectify this by resetting the Winsock catalog.
2. Improperly Installed Drivers
If the network drivers are not correctly installed, the windows cannot detect them. This triggers detection problems. In such cases, you can uninstall and reinstall the drivers and adapters.
We can try out multiple solutions capable of solving the detection issues. Let us take a look at the most effective ones. Try them one after the other, and see if it solves the problem.
Solution 1: Restart the PC
If you continuously run your PC without any restarts, it can be problematic, sometimes resulting in abnormal issues.
A simple restart refreshes all the programs on the PC and rectifies minor glitches in the system’s software. If the issue is due to any little hardware or software issue, the restart could help us solve the problem. Please turn off the device, wait for a minute or two and turn it on the device again.
Try checking the applications using network adapters to see if the issue is solved.
Solution 2: Run Hardware and Devices Troubleshooter
Windows uses troubleshooters to identify the internal reasons for software malfunctions and suggest or solve if any issues exist. Hardware and Device Troubleshooters can fix problems related to hardware and devices you need to run so that that system can identify the reason for detection issues.
Steps to run hardware and device troubleshooter:
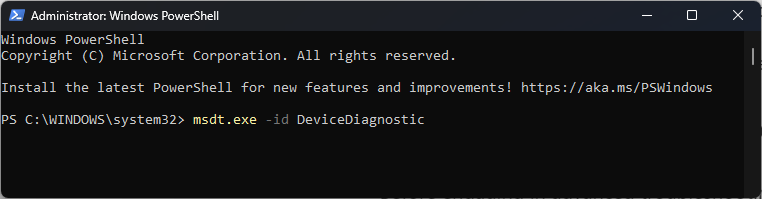
Step 1. Press Windows + R on your PC to open the Run app.
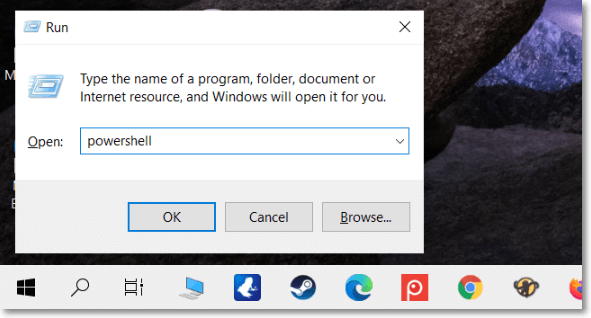
Step 2. Enter Powershell in the dialog box. Press Ctrl + Shift + Enter to open PowerShell in administrator mode.
Step 3. Enter the below command and press Enter to open the Hardware and Device Troubleshooter.
msdt.exe -id DeviceDiagnostic
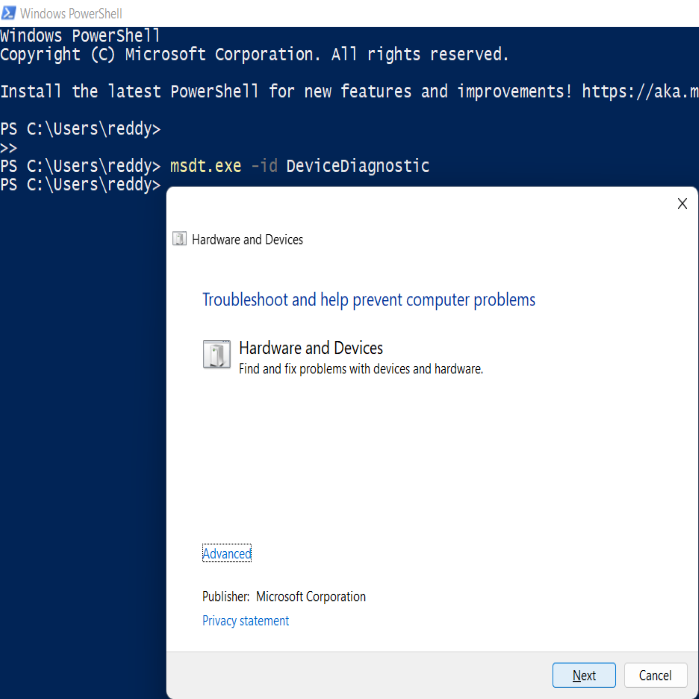
Step 4. Follow the instructions on the screen to complete the process. Check for the working again to see if the issue is rectified.
Solution 3: Reset Windows Socket (Winsock) Catalog
Winsock (Windows Sockets) maintains network communication between applications and devices. If there is a problem with any of those, resetting Winsock could help.
Steps to reset Winsock Catalog:
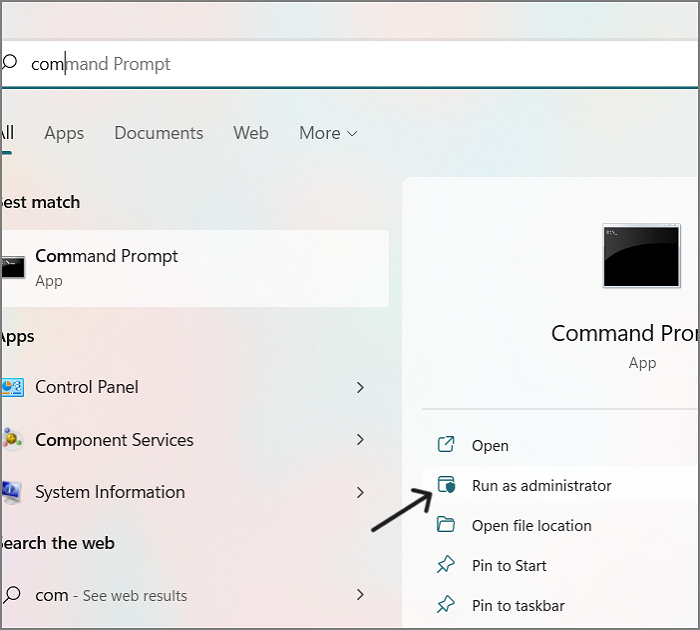
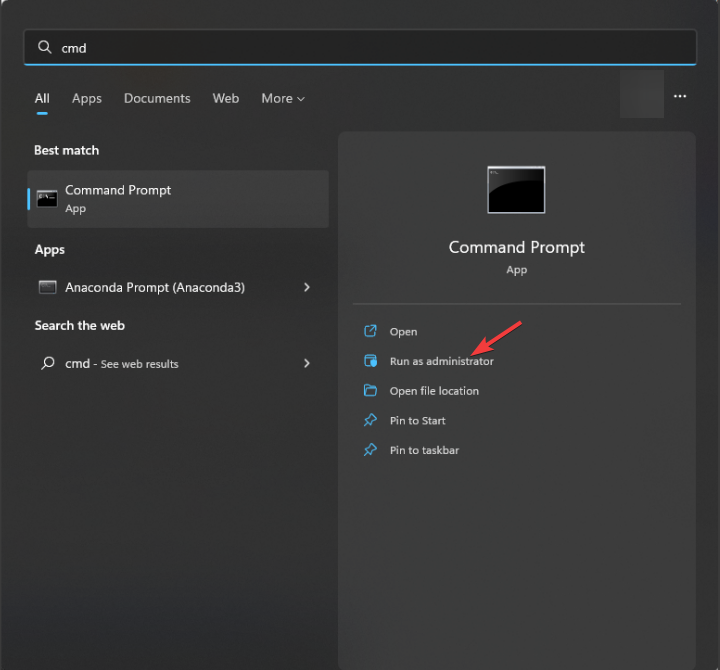
Step 1. Search for Command Prompt and open it in administrator mode.
Step 2. Enter the below command and execute it.
netsh Winsock reset
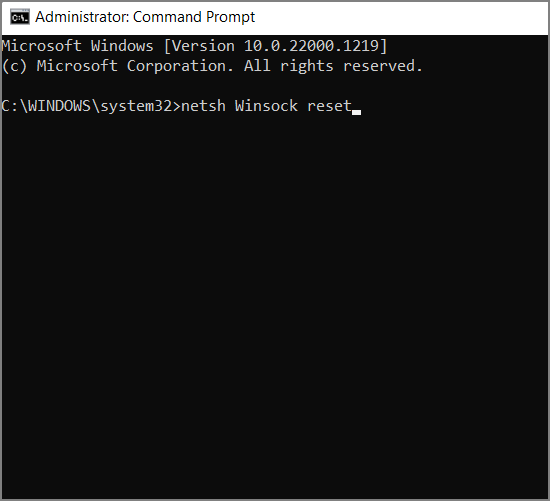
Step 3. After resetting, check for the working of the drivers.
Solution 4: Update Network Drivers
The detection issues occur not only due to faulty drivers but also due to outdated or corrupt drivers. If we keep our network drivers up to date, we can resolve issues related to them.
Steps to update network drivers manually:
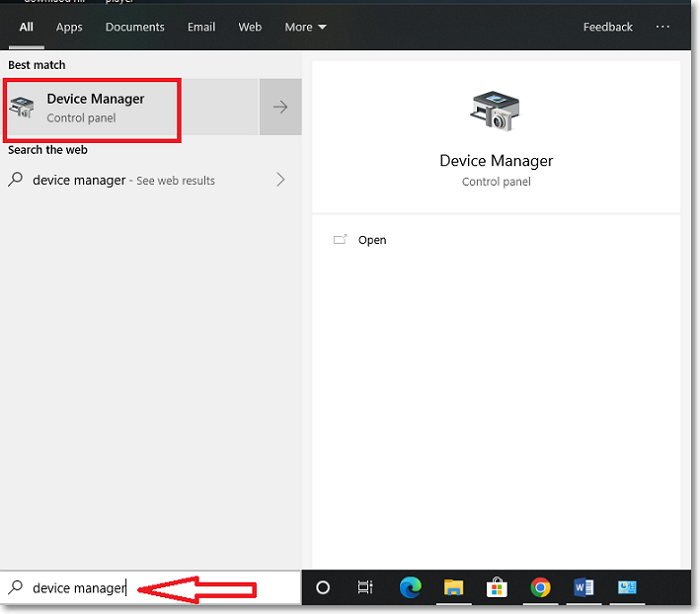
Step 1. Search for the Device Manager and Open it.
Step 2. You can see all the available drivers on your computer here, find and expand the Network Adapters.
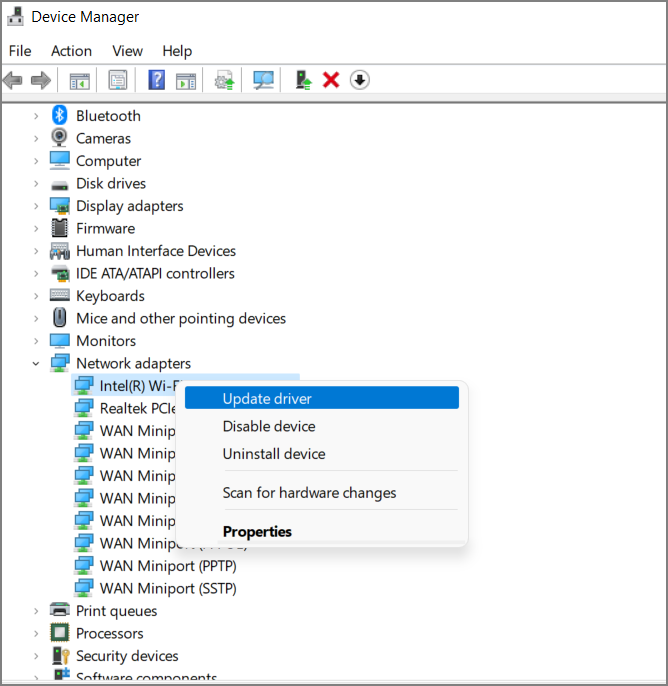
Step 3. Right-Click on the driver or required drivers and Select Update.
Solution 5: Reinstall the Network Drivers
You can reinstall the network drivers if the issue persists even after updating. If any of the drivers have faulty software, it will cause detection issues, eliminating it.
Steps to reinstall Network Drivers:
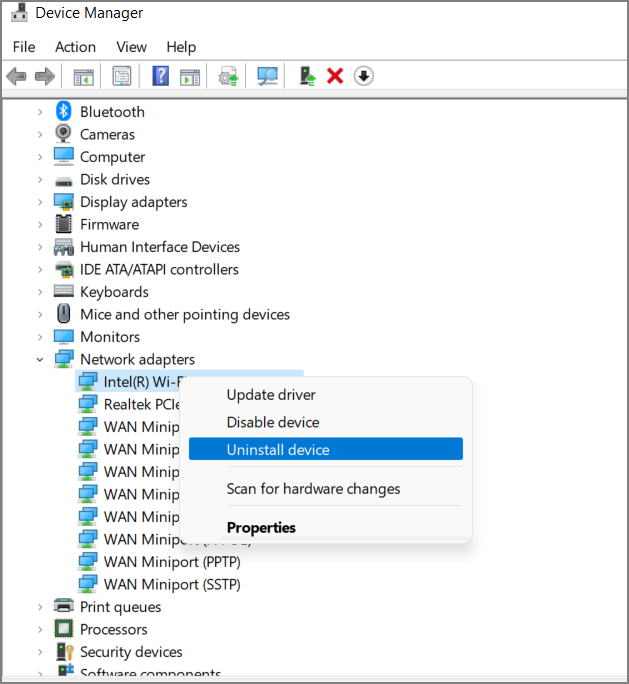
Step 1. Open Device Manager and locate «Network Adapters.»
Step 2. Expand the Network Adapters, navigate to the required drivers, and right-click on them.
Step 3. Select Uninstall. Perform a restart after this, and the device’s OS will reinstall the missing drivers automatically.
If none works, you can perform a system restore, which takes the system back to the previous state. You can also try resetting the router, which is responsible for the internet connection.
Final Verdict
The Windows did not detect a properly installed Network Adapter is a standard error due to fault or corrupt drivers. You can notice this with the pop-up message across your screen. You generally encounter this after updating the Windows OS. Try the solutions one by one to see if the error is resolved.
I hope you like the article and it answers all your questions. Feel free to leave a comment about my work or any queries regarding the article’s content. Share it with your friends.
In this post, we will show you how to fix the error message Windows did not detect a properly installed network adapter which you may see after running the Network Adapter Troubleshooter on a Windows 11/10 PC. The error occurs when Windows fails to detect a network adapter due to corrupt or missing driver files or OS incompatibility issues. Network adapter issues are the prime cause of a slow or intermittent connection, lost connection, or even no connection to a wired or wireless network.
A Network Adapter controls the interface of an operating system and connects the system to the wireless network.
Device drivers play a significant role in managing the communication between the computer and the hardware device. For network adapters, the driver is known as a network adapter driver. When you connect a network adapter to the computer, Windows checks for the available drivers and install them automatically. However, not all pre-installed drivers work as expected. Sometimes, they become corrupt or outdated, or incompatible and, throw errors. This post talks about one such error that results in a failed network adapter installation.
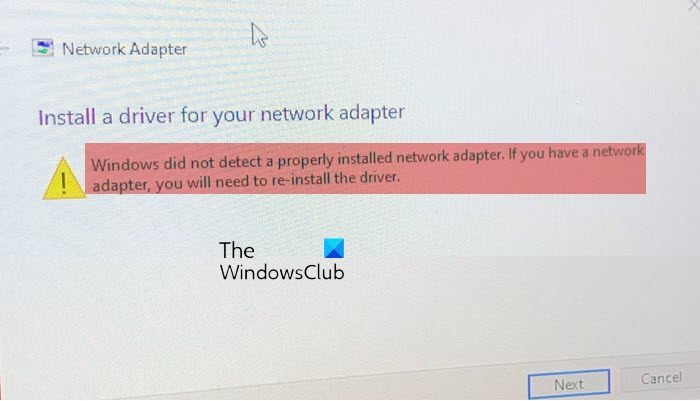
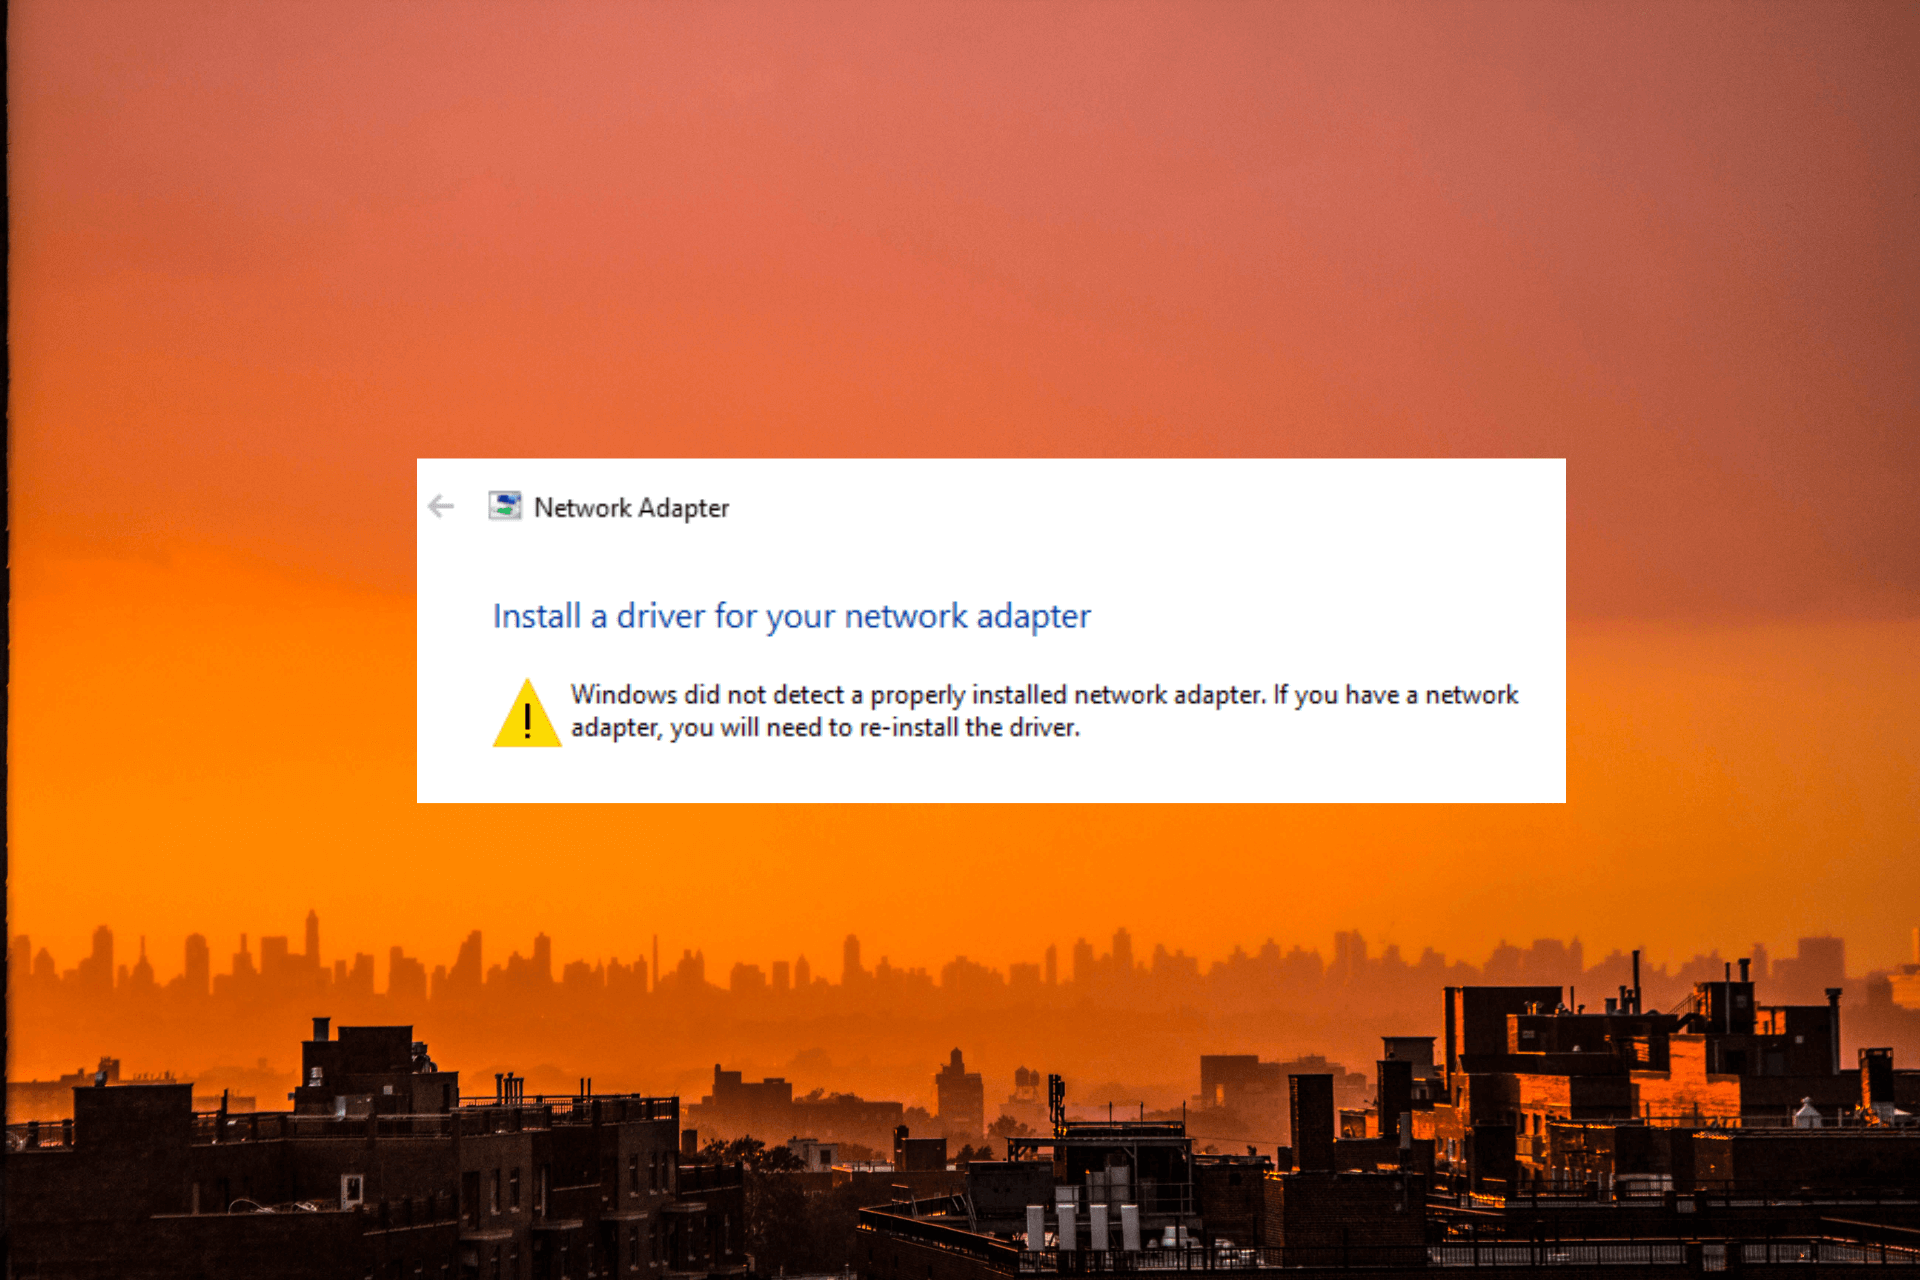
The complete error message reads:
Network Adapter
Install a driver for your network adapter
Windows did not detect a properly installed network adapter. If you have a network adapter, you will need to re-install the driver.
If you cannot use a network connection (WiFi or Ethernet) on your system due to the same error, continue reading this post to know how to fix the issue.
Use the following solutions to fix the error message Windows did not detect a properly installed network adapter which you may see after running the Network Adapter Troubleshooter on a Windows 11/10 PC:
- Update/Reinstall Network adapter drivers.
- Run the Hardware and Devices troubleshooter.
- Perform a Network Reset.
Let us see these in detail.
1] Update/Reinstall Network adapter drivers
Outdated or incompatible drivers can also cause Windows to show error messages.
While updating, it is important to install the right drivers manually. Since the internet may not be working on your system, you should download the drivers from the manufacturer’s website using another Windows system that has access to the internet. Then you can transfer the drivers to your system using a USB drive.
To update the Network drivers, right-click on the Start button icon and select Device Manager. Click on the arrow before the Network adapters section to view the list of available drivers. Right-click on a driver and select Update Driver. In the Update Drivers window, select Browse my computer for drivers. Then browse and select the downloaded driver.
Repeat this for all available network adapter drivers. Reboot Windows and see if the error is gone.
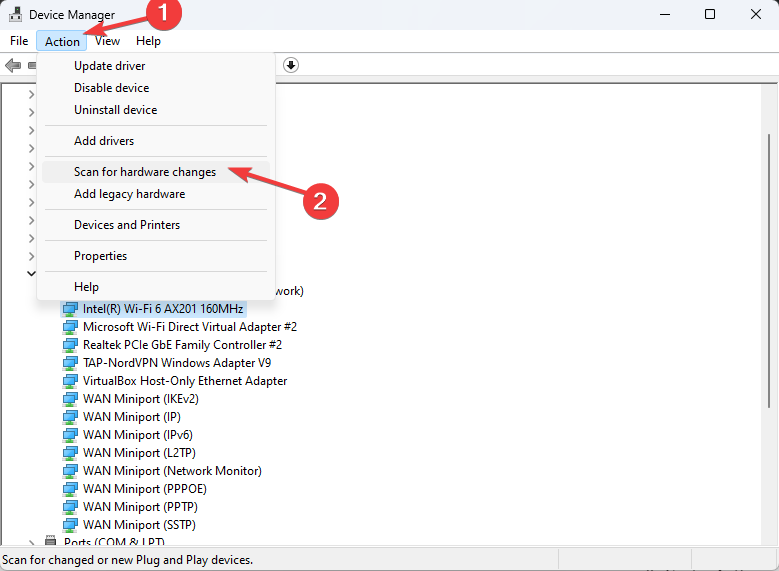
If not, you should try reinstalling the network adapter drivers. Open Device Manager, right-click on the driver and select Uninstall device.
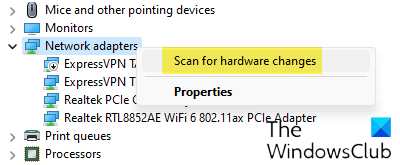
Now select Action > Scan for hardware changes. Windows will automatically detect and install the right drivers for you.
2] Run the Hardware and Devices troubleshooter

Hardware and Devices troubleshooter is a Windows troubleshooter that can detect issues with hardware devices attached to the PC. It no longer appears in the Troubleshoot section, so you must access it using Command Prompt. You can also use our freeware FixWin to open the troubleshooter with a mouse click.
Open Command Prompt using administrator privileges. Click on Yes in the UAC prompt. Type the following command in the Command Prompt window and press Enter:
msdt.exe -id DeviceDiagnostic
Hardware and Devices troubleshooter will appear. Click on the Next button and follow the on-screen instruction to troubleshoot the issue.
Read: Network Adapter missing or not showing in Windows
3] Perform a Network Reset

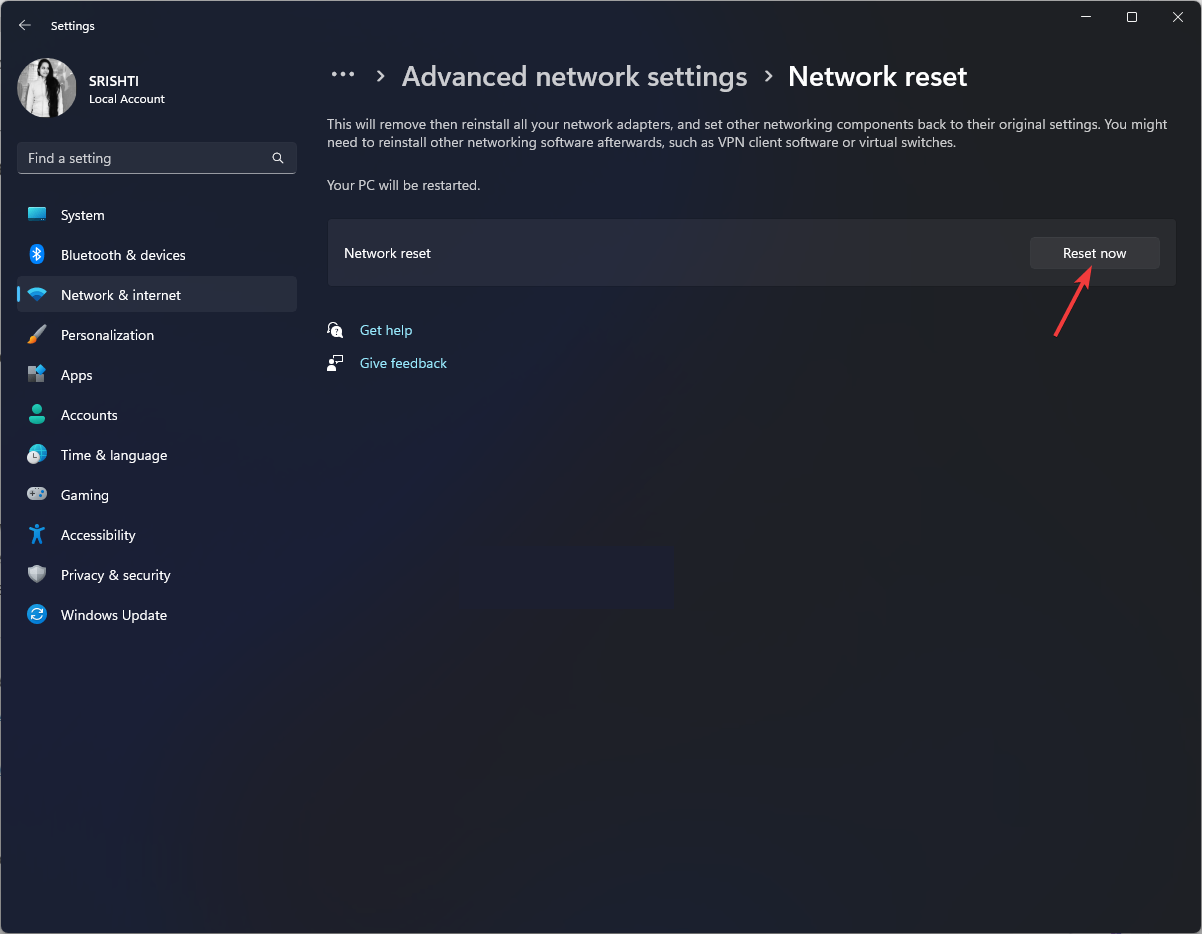
Network reset is a feature that reinstalls network adapters & set networking components to default on a Windows 11/10 PC. You may use this feature if you’re facing connectivity issues and the built-in Network troubleshooters in Windows won’t help you out.
Here’s how to use the Network reset option on a Windows 11 PC:
- Click on the Start button icon and select Settings.
- Click on Network & internet in the left panel.
- Scroll down to the bottom of the right panel and click on Advanced network settings.
- Click on Network reset under More settings.
- On the next screen, click on the Reset now button. Wait till the process uninstall and reinstalls the network drivers.
- Reboot your PC.
This will reinstall Network adapters, Reset Networking Components to default.
If none of the above solutions work, you can perform a system restore to roll back your system to a previous working state. Once the computer reboots, you may check if Windows can detect the network adapter on your PC.
I hope this helps.
Similar: Windows could not find a driver for your Network adapter.
Why is my PC not detecting my Network Adapter?
If Windows does not detect your network adapter, then the network adapter driver installed on your system might have gone corrupted or outdated. The adapter’s power management settings can also make this happen. If you can’t see the network adapter or see an ‘unknown device’ in the Device Manager, try updating the network adapter driver to fix the issue.
How do I enable Network Adapter in BIOS?
Open Windows Settings. Go to System > Recovery. Click on the Restart Now button next to the Advanced startup option. You will enter the Windows Recovery Environment. Choose Troubleshoot > Advanced options > UEFI Firmware Settings. On the next screen, click on the Restart button. Press the F10 key to enter BIOS Setup. Go to the Main tab. Go to Network Boot. Enable Network Boot. Press F10 to save changes and exit.
Reinstalling the network drivers will fix this problem quickly
by Srishti Sisodia
Srishti Sisodia is an electronics engineer and writer with a passion for technology. She has extensive experience exploring the latest technological advancements and sharing her insights through informative… read more
Updated on
- The Windows did not detect a properly installed network adapter could mainly occur due to improperly installed drivers.
- To fix it, you can run hardware and devices troubleshooter, reinstall the network driver, or modify the Wi-Fi adapter properties.
XINSTALL BY CLICKING THE DOWNLOAD
FILE
A properly functioning network adapter is crucial for establishing and maintaining a stable internet connection on a Windows computer. Encountering the Windows did not detect a properly installed network adapter error message can be frustrating and prevent you from accessing the local network resources.
This guide will explore several troubleshooting steps and solutions to address the issue right after understanding potential causes.
Why is my PC not detecting my network adapter?
There could be various reasons for this issue; some of the common ones are mentioned here:
How we test, review and rate?
We have worked for the past 6 months on building a new review system on how we produce content. Using it, we have subsequently redone most of our articles to provide actual hands-on expertise on the guides we made.
For more details you can read how we test, review, and rate at WindowsReport.
- Missing network drivers – If the network adapter drivers are missing or outdated, Windows may not be able to detect or utilize the network adapter correctly. Try updating the drivers.
- Hardware connection issues – An improperly connected network adapter can trigger this issue. Ensure it is securely seated in expansion slot & check the cables connecting it to the motherboard.
- Faulty network adapter – In some cases, the network adapter itself may be defective or malfunctioning, causing this problem.
- BIOS or UEFI settings – Incorrect BIOS or UEFI settings can prevent Windows from recognizing and utilizing the network adapter.
Identifying the error’s underlying cause is crucial to implement the appropriate solution. Now that you have done that proceed with the troubleshooting steps to fix it.
How can I fix the Windows didn’t detect any network hardware?
Before engaging in advanced troubleshooting steps, you should consider performing the following checks:
- Try restarting your computer and router.
- Ensure your internet is working fine.
- Your Windows must not have any pending updates.
- Ensure the latest BIOS or UEFI firmware is installed.
- Replug the ethernet cable if using a wired connection.
- Remove and add the Wi-Fi networks added to your device.
Once you have checked all these, let us move to the solutions.
1. Run Hardware and Devices troubleshooter
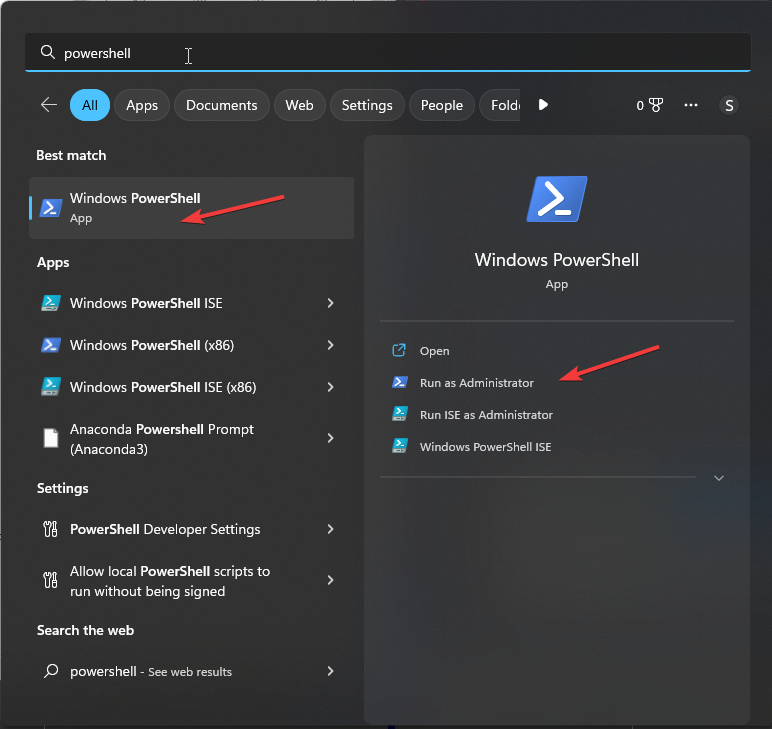
- Press the Windows key, type powershell and click Run as administrator.

- Type the following command to open the troubleshooter and hit Enter:
msdt.exe -id DeviceDiagnostic
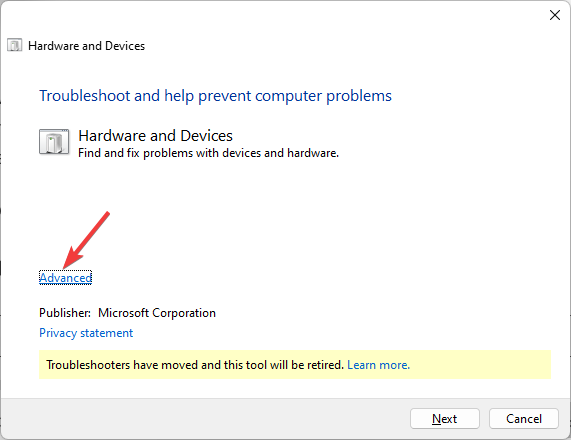
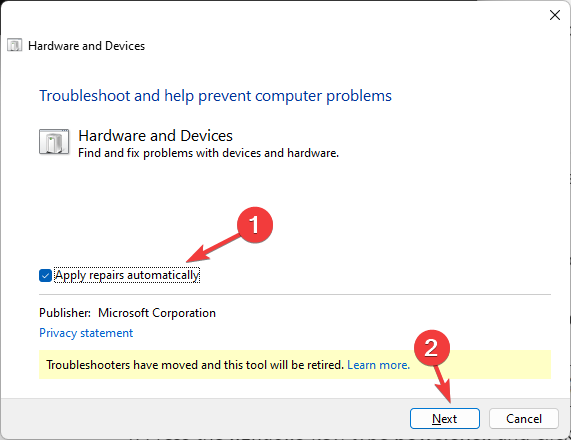
- On the Hardware and Devices window, click Advanced.

- Select Apply repairs automatically, then click Next.
- Follow the onscreen instructions to complete the process.
2. Reinstall the network driver
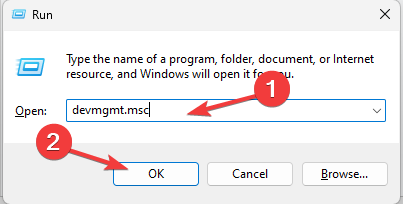
- Press Windows + R to open the Run console.

- Type devmgmt.msc and click OK to open the Device Manager.
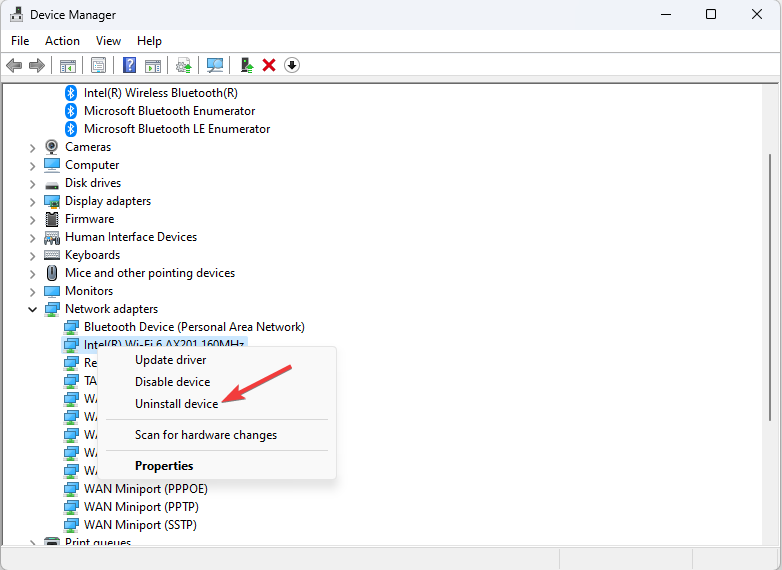
- Locate and click Network adapters to expand it.
- Right-click the Wi-Fi or other affected driver and select Uninstall driver.

- Once uninstalled, go to Action and select Scan for hardware changes.

- Reboot your PC to save the changes.
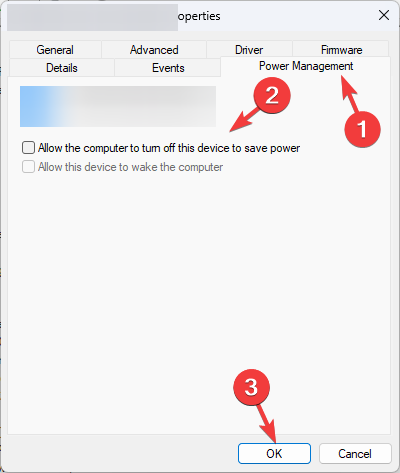
3. Modify the Wi-Fi adapter properties
- Press Windows + R to open the Run console.
- Type devmgmt.msc and click OK to open the Device Manager.
- Locate and click Network adapters.
- Right-click the Wi-Fi driver and select Properties.

- Go to the Power Management tab, and remove the checkmark next to Allow the computer to turn off this device to save power.

- Click OK.

- Microsoft Paint Cocreator: A complete guide on the new AI tool
- Windows 11 adds more apps to the share links feature
4. Uninstall the Windows update
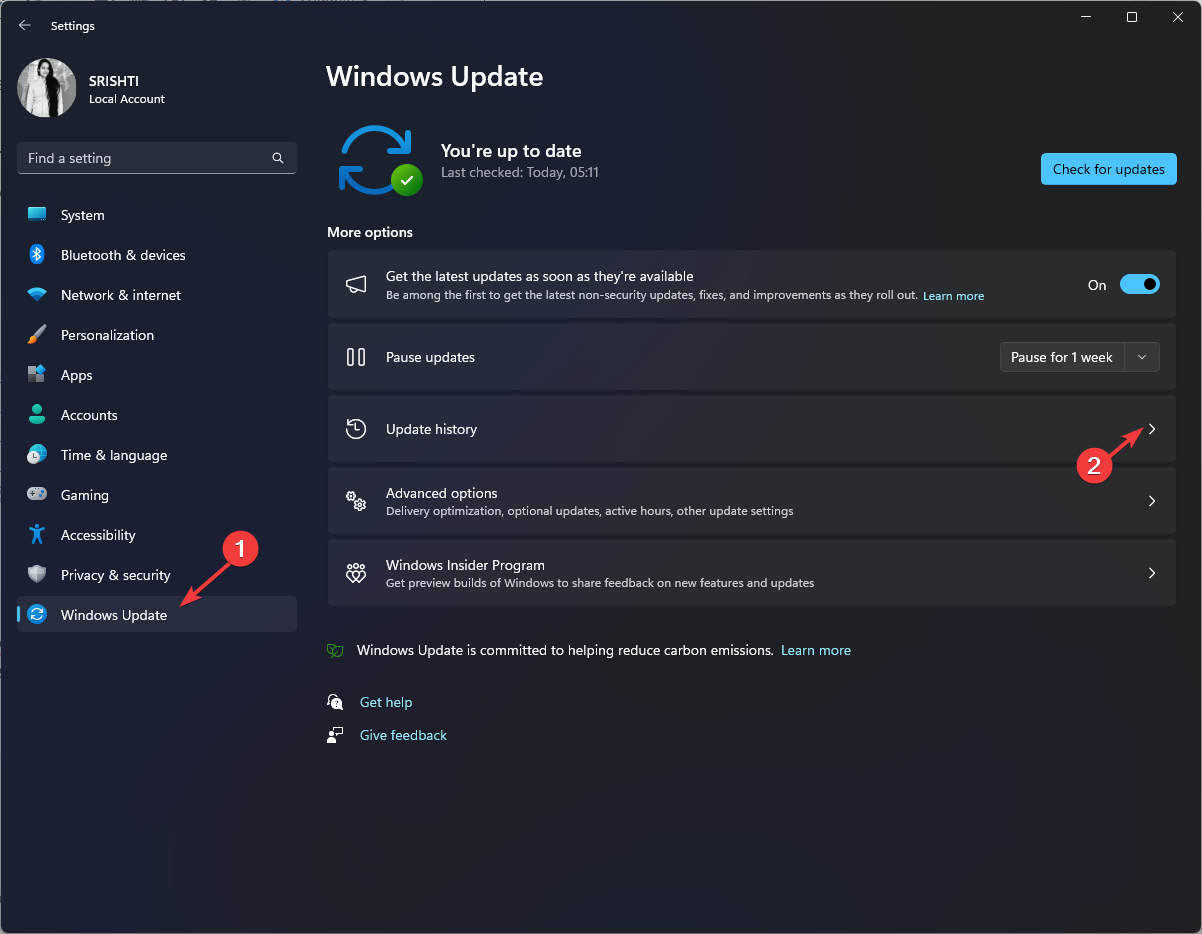
- Press Windows + I to open the Settings app.
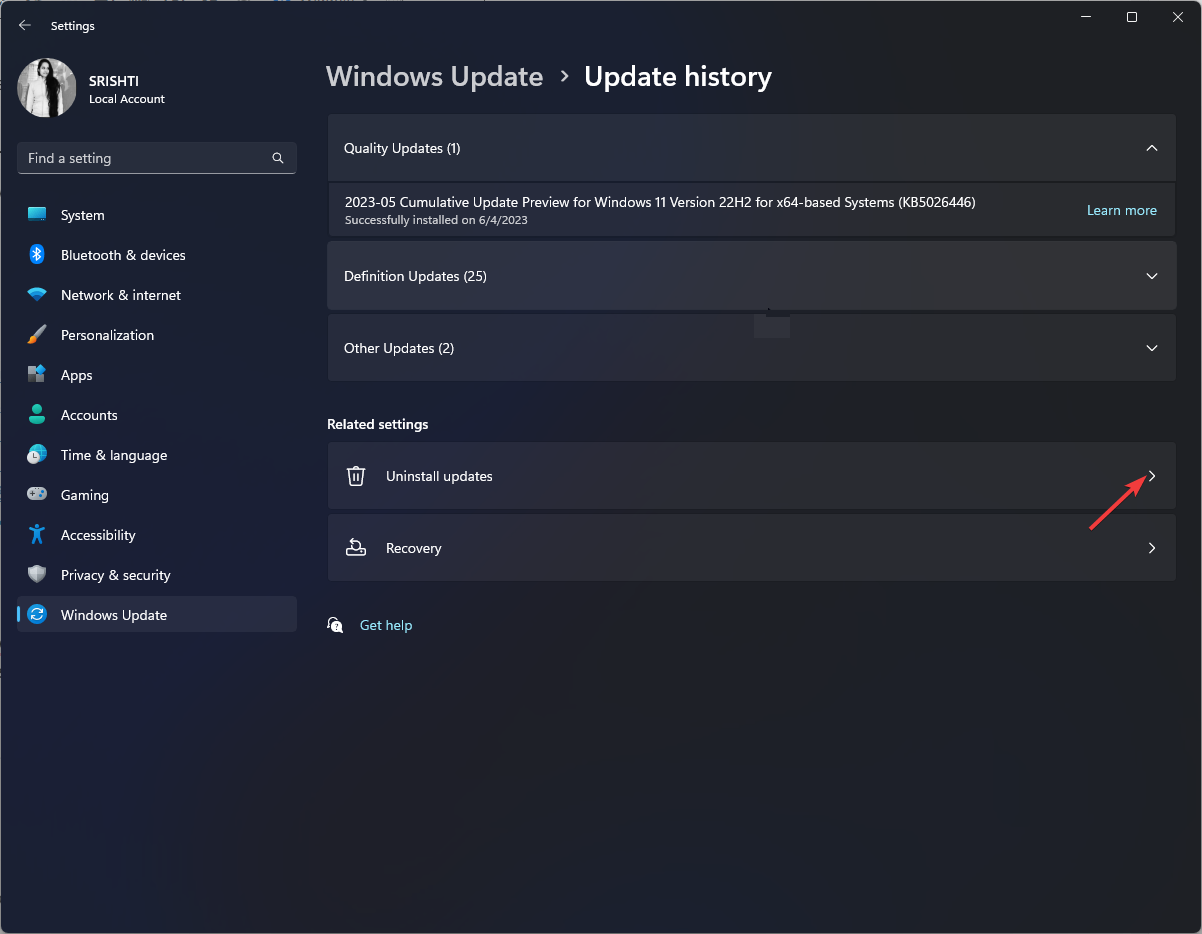
- Go to Windows Update, and click Update history.

- Under Related settings, click Uninstall updates.

- Go to the latest update and click Uninstall.

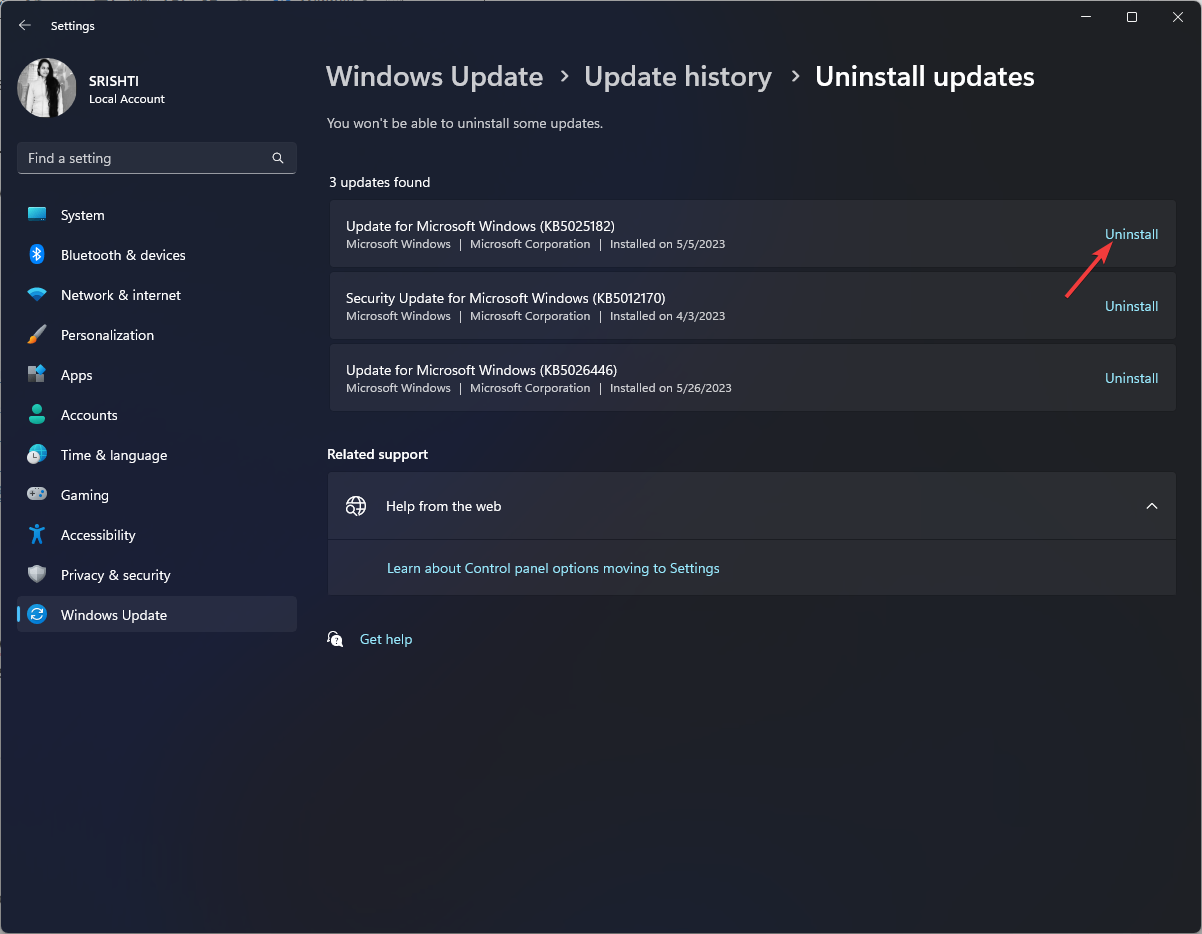
Wait for a few minutes and once it is complete, restart your computer and check if the issue persists.
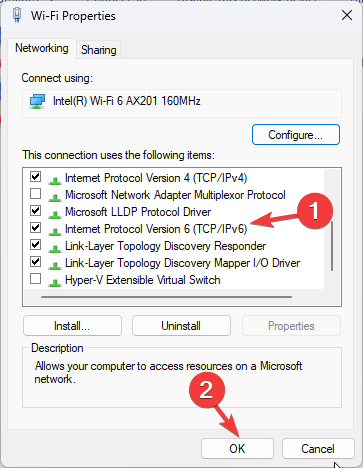
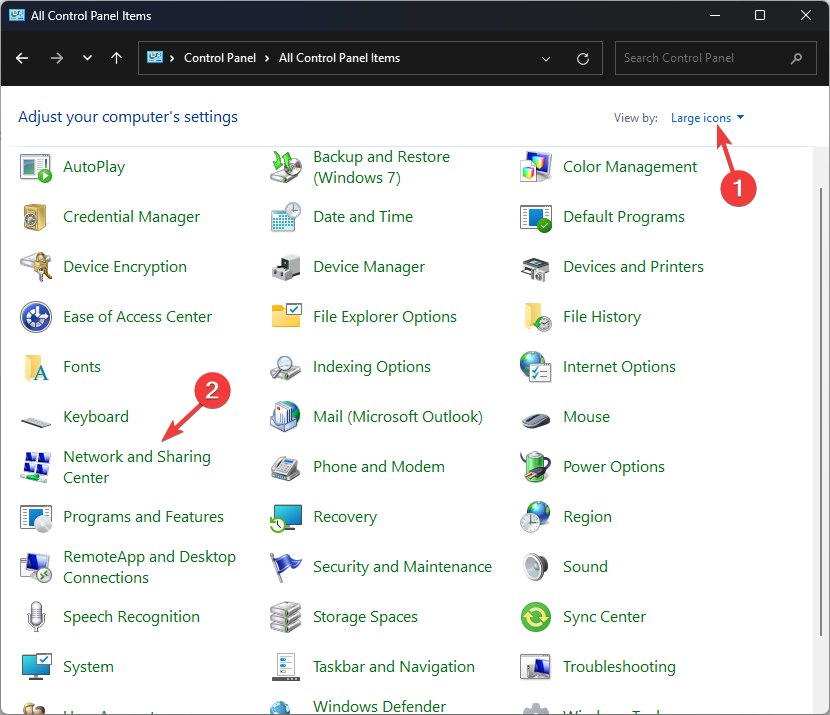
5. Enable IPv6
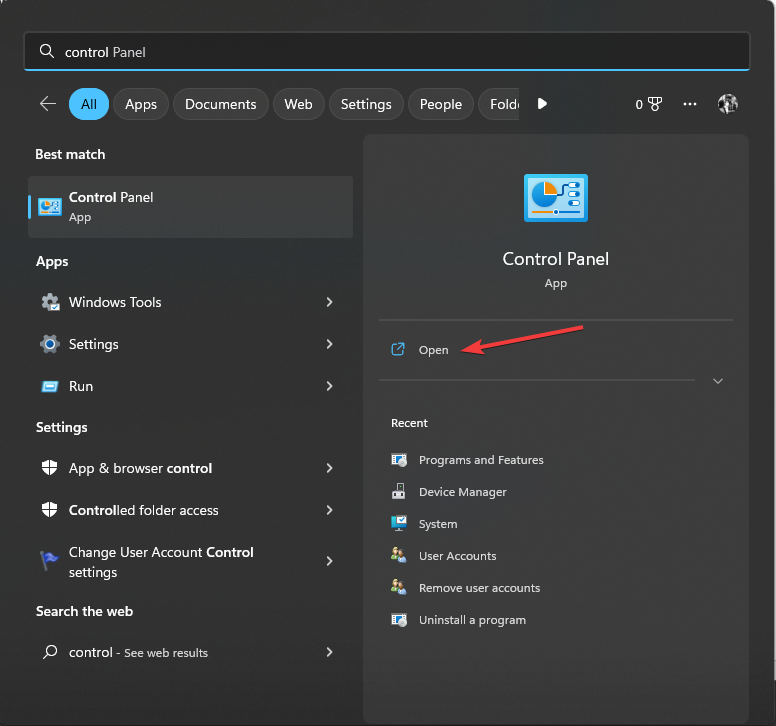
- Press Windows key, type control panel and click Open.


- Select View by as Large icons and click Network and Sharing Center.

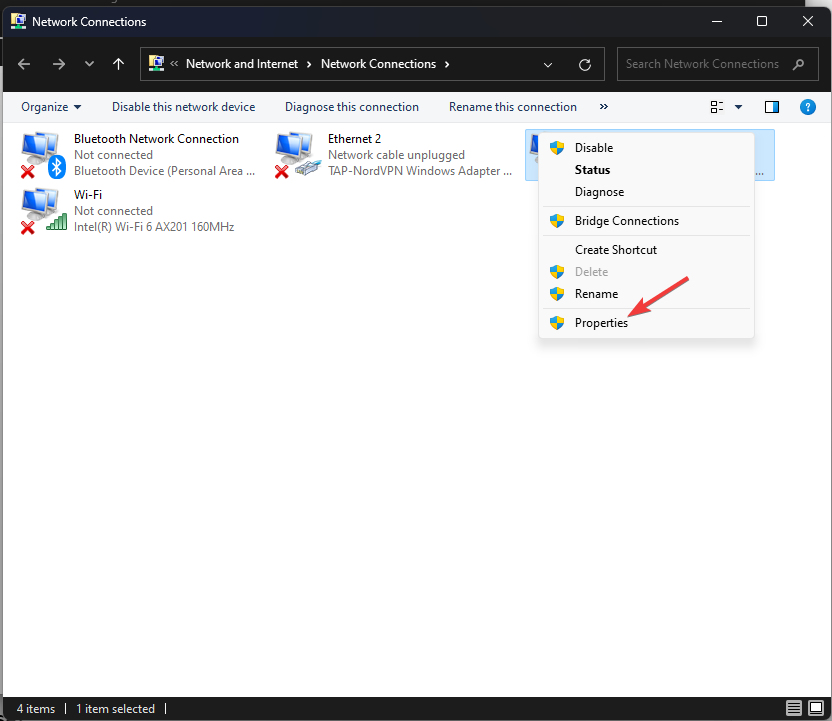
- Click Change adapter settings.

- Right-click the network adapter and select Properties.

- Locate Internet Protocol Version 6 (TCP/IPV6) and place a checkmark next to it to enable it.
- Click OK to confirm the choice.

6. Reset your network
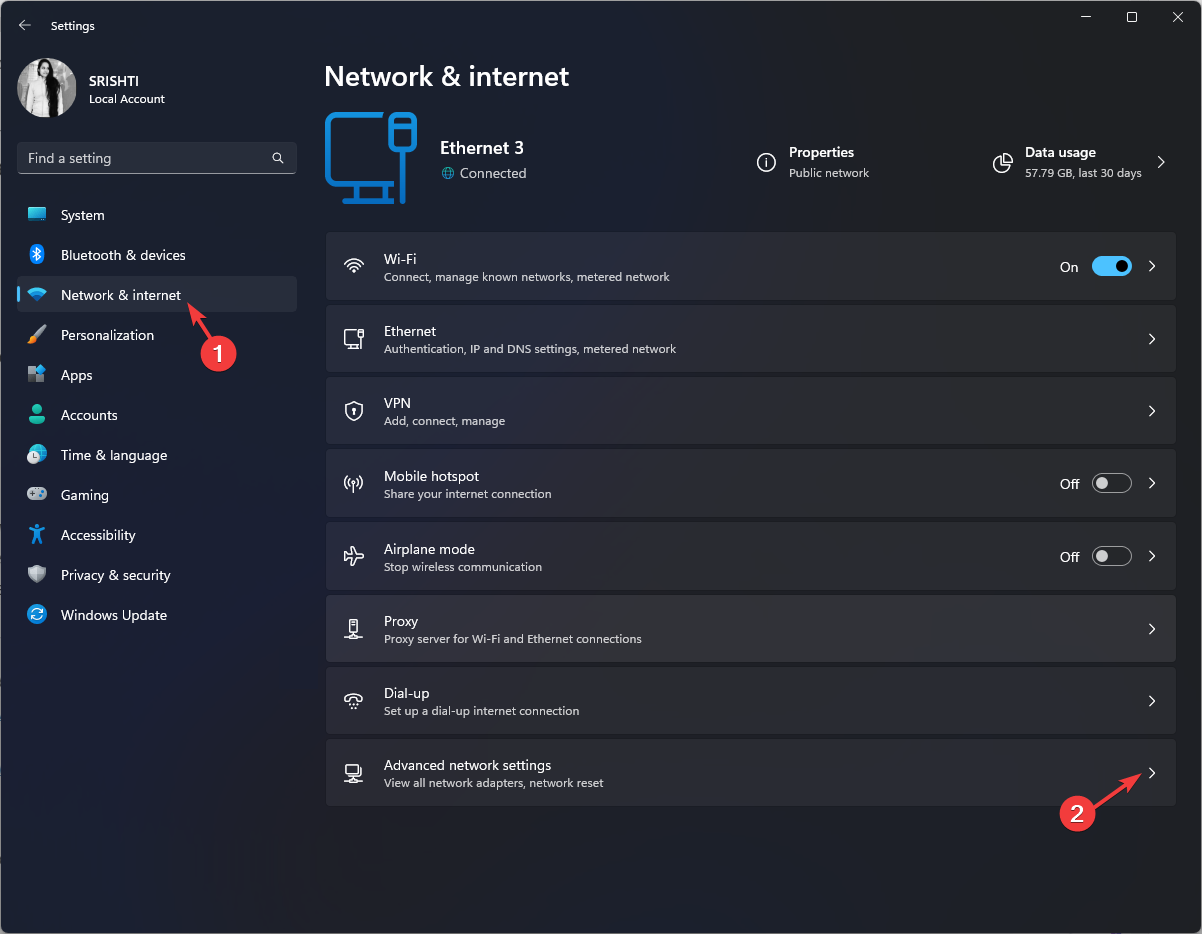
- Press Windows + I to open Settings.
- Go to Network & Internet, then click Advanced network settings.

- Under More settings, click Network reset.

- On the next page, locate Network reset and click Reset now.

7. Reset Winsock
- Press the Windows key, type cmd, and click Run as administrator.

- Copy & paste the following command to reset Winsock and press Enter:
netsh Winsock reset
- Restart your computer to check if the issue persists.

So, you can follow these methods to fix the Windows that did not detect a properly installed network adapter error and restore network connectivity to your Windows computer. If nothing worked for you, we suggest you perform a clean installation of Windows.
If you are facing issues like the Wi-Fi adapter not working on your PC, we recommend you check out this guide for quick fixes.
Please feel free to give us any information, tips, and your experience with the subject in the comments section below.
![]()
Contents
- What Does “Windows Could Not Find a Driver for Your Network Adapter” Mean?
- How to Fix Windows Did Not Detect Any Networking Hardware
- Fix 1: Perform a System Restore
- Fix 2: Run the Hardware and Devices Troubleshooter
- Fix 3: Update Your Network Adapter Driver
- Fix 4: Reinstall the Network Driver

You’ve come across a message that says no driver has been detected for your network adapter. This problem is easy to fix. We’ll show you how. Please keep reading.
What Does “Windows Could Not Find a Driver for Your Network Adapter” Mean?
Device drivers are responsible for the smooth communication of your operating system with your PC’s hardware components. Without the right drivers, you’ll run into various unexpected issues, including BSOD errors.
This particular error message indicates that the driver for your Network Adapter is either missing or not properly installed. Sometimes, users encounter the issue after upgrading Windows or performing a clean install.
How to Fix Windows Did Not Detect Any Networking Hardware
There are four fixes you can implement:
- Perform a system restore
- Run the hardware and devices troubleshooter
- Update your network driver
- Reinstall the network driver
If the first two solutions don’t work, updating the network driver or reinstalling it surely will. You may therefore want to begin with those fixes.
Let’s get started:
Fix 1: Perform a System Restore
If you recently just encountered this problem, taking your system back to a previous state can help resolve it. This is why it is important to manually create restore points once in a while, although Windows often handles it automatically.
Follow these easy steps to perform a restore:
- Press the Windows logo + X combination to invoke the WinX menu.
- Locate Control Panel from the list and click on it.
- Go to the search bar and type System restore and then click on Create a restore point.
- In the System Properties box that opens, click the button that says “System Restore.”
Alternatively, you can skip steps 1 through 4. Simply bring up the Run dialog (Press the Windows logo + R shortcut on your keyboard). Then type rstrui.exe and click Ok or press Enter. - Click the Next button and then select a restore point from the available list.
- Click Next.
- Confirm the restore point you’ve chosen and then click Finish.
- You’ll now receive a prompt that says “Once started, system restore cannot be interrupted. Do you wish to continue?” Click the Yes button and then wait for the process to complete. Your system will restart afterwards.
Check if the issue has been resolved.
Fix 2: Run the Hardware and Devices Troubleshooter
This built-in utility might help in resolving the issue. Here’s how to run it:
- Go to the Start menu (You can do this by pressing the Windows key on your keyboard).
- Open the Settings menu (click the cog-wheel icon).
- Go to Updates and Security and click Troubleshoot.
- Run the Hardware and Devices troubleshooter.
After the scan is complete, see if it was able to successfully resolve the issue.
Fix 3: Update Your Network Adapter Driver
This fix will most likely solve your problem. You can perform the update by following these steps:
- Open the Run dialog by pressing the Windows Key + R on your keyboard.
- Type devmgmt.msc into the text box and click Ok or press Enter.
- In the Device Manager window that opens, expand Network Adapters and right-click on your network adapter.
- Select Update driver from the context menu.
- Click on option that says “search automatically for updated driver software”. Once the driver has been updated, restart your computer and see if the issue has been resolved.
You could also visit the official website of your PC manufacturer and download the driver file from there. You may need to know the specifications of your computer and operating system so as to make sure you download and install the right file. Installing the wrong driver version can lead to further problems.
If you are not confident with performing these manual update procedures, we recommend you make things easier for yourself and use Auslogics Driver Updater. The tool will recognize the specs of your computer, ensuring you get the correct driver. Once it runs a full scan, it will notify you of all missing, outdated, faulty, or corrupt drivers. You can then allow it to automatically download and install the latest version recommended by the manufacturer of your PC.
After the network adapter driver has been updated, restart your computer and then check if the “Could not detect driver” problem has been resolved.
Fix 4: Reinstall the Network Driver
If the error happens to remain after you’ve updated your driver, performing a reinstallation should help eliminate it.
Follow these easy steps:
- Invoke the Run dialog (Press the Windows logo + R combo).
- Type devmgmt.msc into the box and press Enter or click OK to open Device Manager.
Alternatively, you could skip steps 1 and 2 and click on Device Manager from the WinX menu (Windows logo + X shortcut). - Locate and expand Network Adapters by clicking the arrow beside it.
- Right-click on your network adapter and then select Uninstall Device from the context menu.
- Follow the instructions displayed on the screen to complete the process.
- Restart your computer. The driver will be reinstalled by the system.
The “Did not detect a properly installed network adapter driver” error should now be resolved.
If you have any questions or suggestions, please feel free to share your thoughts by leaving us a comment in the section below.
We’ll love to hear from you.
Do you like this post? 🙂
Please rate and share it and subscribe to our newsletter!
40 votes,
average: 2.93 out of
5
Loading…