Для проверки целостности системных файлов и восстановления поврежденных файлов (библиотек) компонентов в Windows (Windows Server) можно использовать команды SFC и DISM. Эти две утилиты могут быть крайне полезными, если операционная система Windows работает нестабильно, появляются ошибки при запуске стандартных приложений или служб, после вирусного заражения и т.д.
В этой статье мы рассмотрим, как использовать команды
sfc /scannow
,
DISM /Online /Cleanup-Image /RestoreHealth
или
Repair-WindowsImage -Online -RestoreHealth
для восстановления образа и системных фалов в Windows 10/11 и Windows Server 2022/2019/2016.
Содержание:
- SFC /scannow: восстановление системных файлов Windows
- Проверка целостности хранилища компонентов Windows с помощью DISM
- Восстановление образа Windows с помощью DISM /RestoreHealth
- DISM /Source: восстановление образа Windows с установочного диска
- Восстановление образа Windows с помощью PowerShell
- DISM: восстановление поврежденного хранилища компонентов, если Windows не загружается
SFC /scannow: восстановление системных файлов Windows
Перед тем, как восстанавливать образ Windows с помощью DISM, рекомендуется сначала попробовать проверить целостность системных файлов с помощью утилиты SFC (System File Checker). Команда
sfc /scannow
позволяет проверить целостность системных файлов Windows. Если какие-то системные файлы отсутствуют или повреждены, утилита SFC попробует восстановить их оригинальные копии из хранилища системных компонентов Windows (каталог C:\Windows\WinSxS).
Утилита SFC записывает все свои действия в лог-файл
windir%\logs\cbs\cbs.log
. Для всех записей, оставленных SFC в файле CBS.log проставлен тег [SR]. Чтобы выбрать из лога только записи, относящиеся к SFC, выполните команду:
findstr /c:"[SR]" %windir%\Logs\CBS\CBS.log >"%userprofile%\Desktop\sfc.txt"
Если команда sfc /scannow возвращает ошибку “
Программа защиты ресурсов Windows обнаружила повреждённые файлы, но не может восстановить некоторые из них / Windows Resource Protection found corrupt files but was unable to fix some of them
”, скорее всего утилита не смогла получить необходимые файла из хранилища компонентов (образа) Windows.
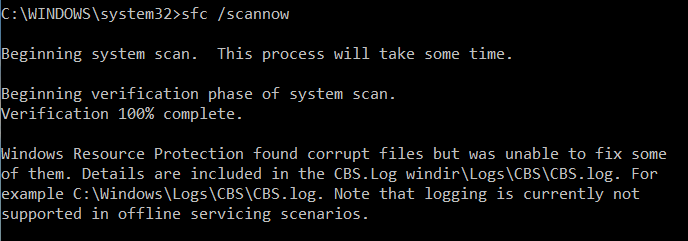
В этом случае вам нужно попробовать восстановить хранилище компонентов вашего образа Windows с помощью DISM.
После восстановления образа вы можете повторно использовать утилиту SFC для восстановления системных файлов.
Проверка целостности хранилища компонентов Windows с помощью DISM
Утилита DISM (Deployment Image Servicing and Management) доступна во всех версиях Windows, начиная с Vista.
Для сканирования образа Windows на наличие ошибок и их исправления используется параметр DISM /Cleanup-image. Команды DISM нужно запускать из командной строки, с правами администратора.
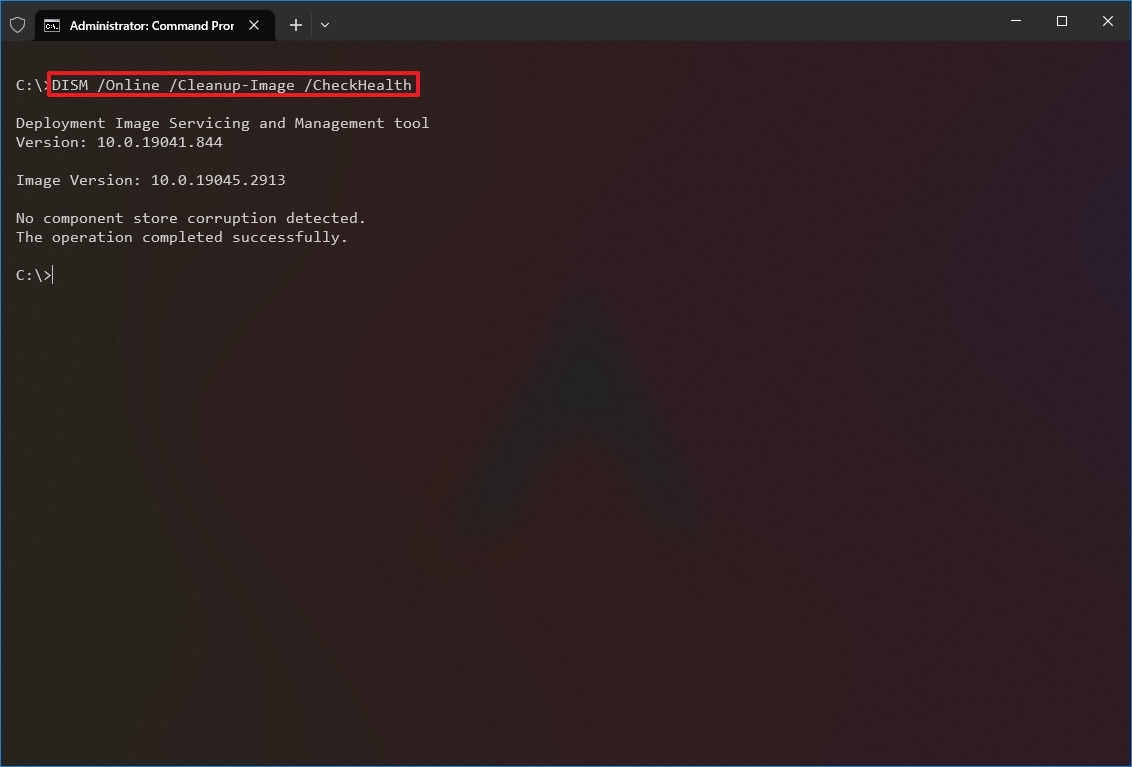
Чтобы проверить наличие признака повреждения хранилища компонентов в образе Windows (флаг CBS), выполните команду (не применимо к Windows 7/Server 2008R2):
DISM /Online /Cleanup-Image /CheckHealth
Эта команда не выполняет полное сканирование хранилища компонентов. Проверяются лишь записанные ранее маркеры повреждений и события в журнале Windows. Изменения в образ не вносятся. Команда проверит, не помечен ли ваш образ Windows как поврежденный и возможно ли исправить его.
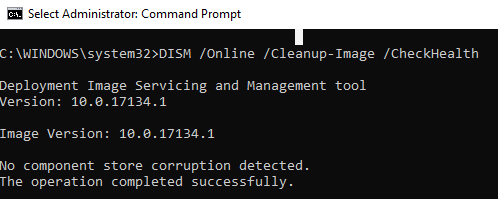
В этом примере команда вернула, что с образом все хорошо:
No component store corruption detected.
The operation completed successfully.
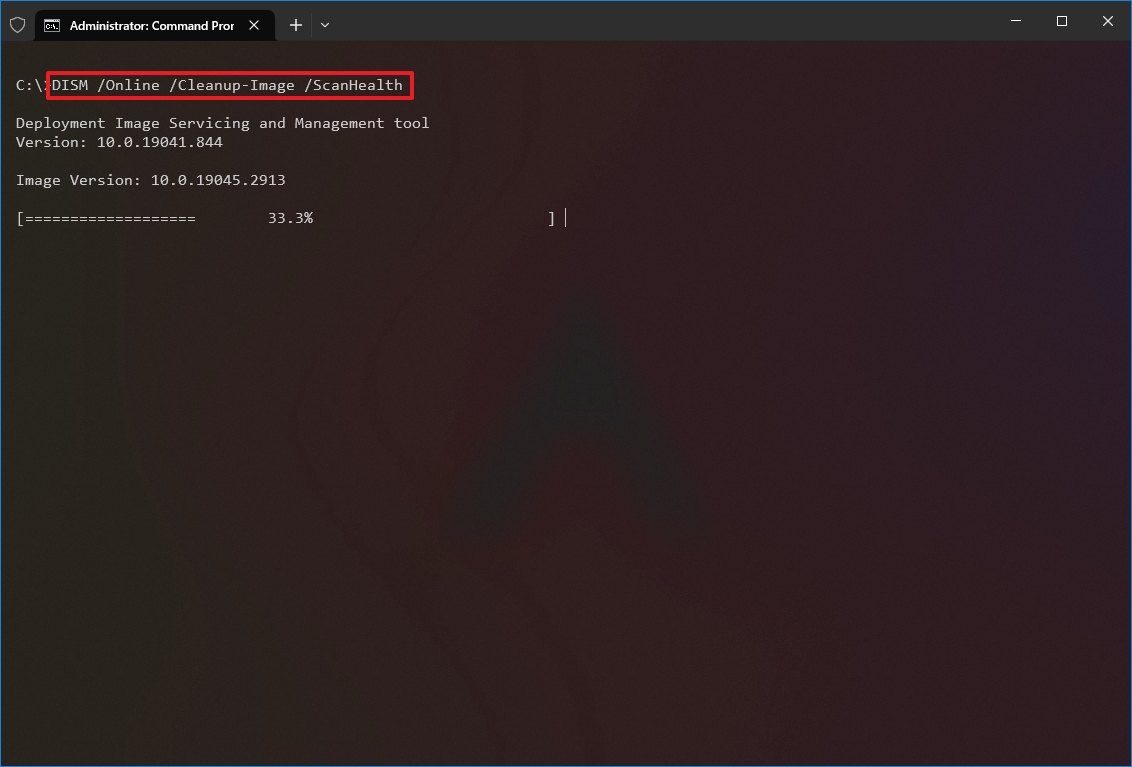
Чтобы выполнить полное сканирование хранилища компонентов на наличие повреждений в хранилище компонентов Windows, запустите команду:
DISM /Online /Cleanup-Image /ScanHealth
Команда проверки образа Windows может выполняться довольно долго (от 10 до 30 минут). И вернет один из трех результатов:
- No component store corruption detected – DISM не обнаружил повреждения в хранилище компонентов;
- The component store is repairable – DISM обнаружил ошибки в хранилище компонентов и может исправить их;
- The component store is not repairable – DISM не может исправить хранилище компонентов Windows (попробуйте использовать более новую версию DISM или вам придется восстанавливать образ Windows из резервной копии, сбрасывать или полностью переустанавливать вашу копию Windows.

В Windows 7 и Windows Server 2008 R2 для использования параметра DISM /ScanHealth нужно установить отдельное обновление KB2966583. Иначе при запуске DISM будет появляться “
Ошибка 87. Параметр ScanHealth не распознан в этом контексте
”.
Команда DISM /ScanHealth может вернуть ошибки:
- Ошибка: 1726. Сбой при удалённом вызове процедуры;
- Ошибка: 1910. Не найден указанный источник экспорта объекта.
Это однозначно говорит о том, что ваш образ Windows поврежден и его нужно восстановить.
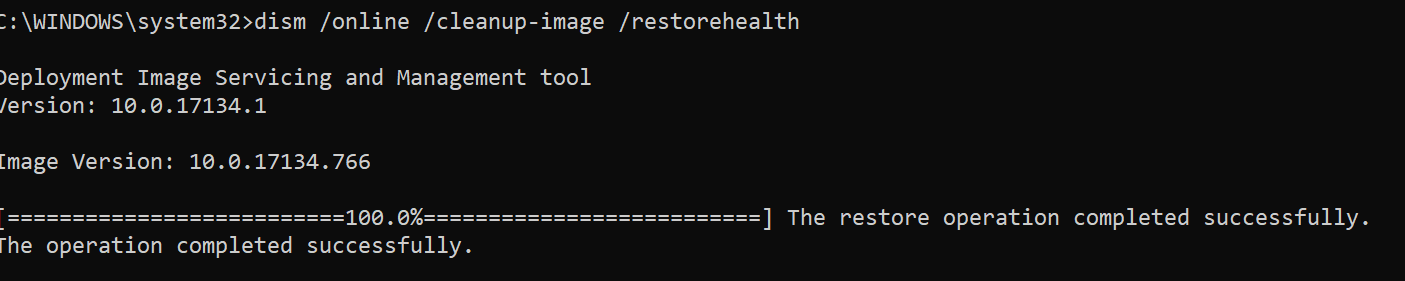
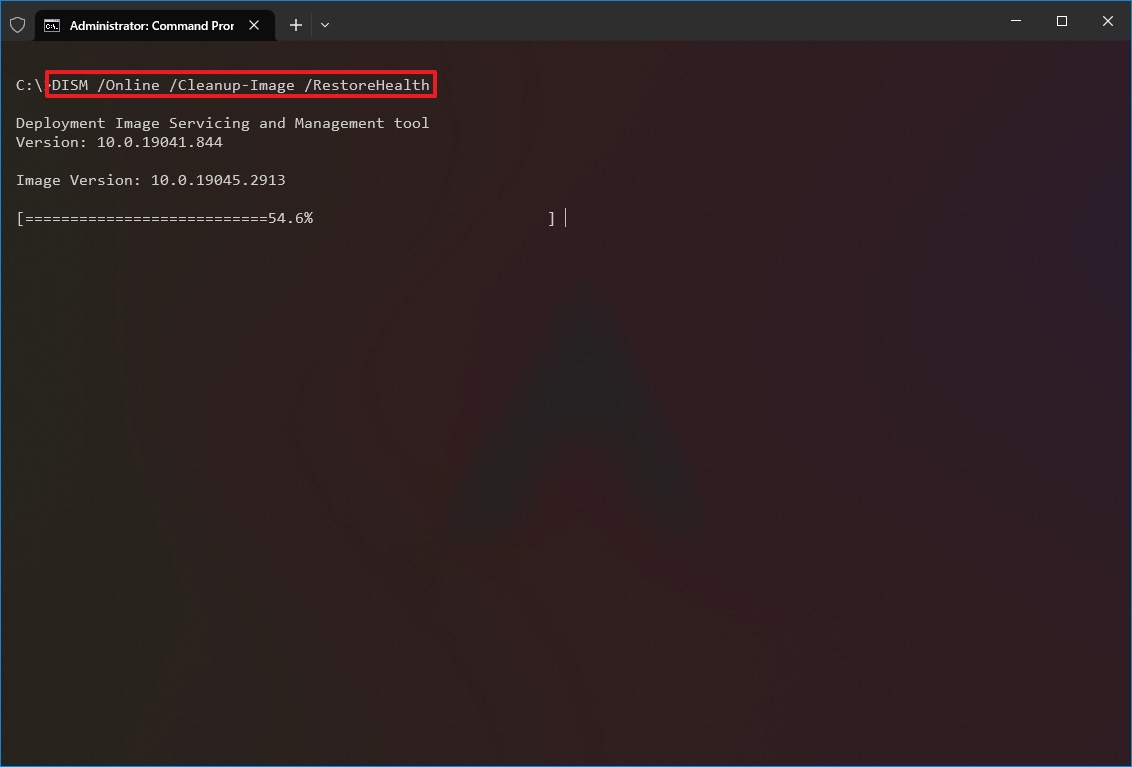
Восстановление образа Windows с помощью DISM /RestoreHealth
Чтобы исправить повреждения в хранилище компонентов образа Windows нужно использовать опцию RestoreHealth команды DISM. Эта опция позволит исправить найденные в образе ошибки, автоматически скачать и заменить файлы повреждённых или отсутствующих компонентов эталонными версиями файлов из центра обновлений Windows (на компьютере должен быть доступ в Интернет). Выполните команду:
DISM /Online /Cleanup-Image /RestoreHealth
В Windows 7/2008 R2 эта команда выглядит по другому:
DISM.exe /Online /Cleanup-Image /ScanHealth
Процесс сканирования и восстановления компонентов может быть довольно длительным (30 минут или более). DISM автоматически загрузит недостающие или поврежденные файлы образа с серверов Windows Update.
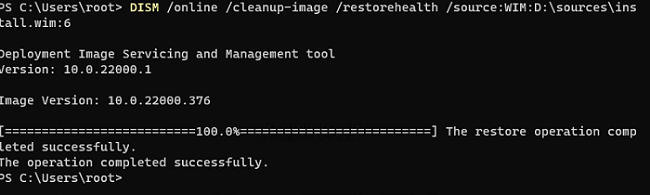
Восстановление выполнено успешно. Операция успешно завершена.
The restore operation completed successfully.
DISM /Source: восстановление образа Windows с установочного диска
Если на компьютере (сервере) отсутствует доступ в Интернет или отключена/повреждена служба Windows Update (как восстановить клиент Windows Update), то при восстановлении хранилища компонентов появятся ошибки:
- 0x800f0906 — Не удалось скачать исходные файлы. Укажите расположение файлов, необходимых для восстановления компонента, с помощью параметра Источник (0x800f0906 — The source files could not be downloaded. Use the source option to specify the location of the files that are required to restore the feature);
- Ошибка: 0x800f0950 — Сбой DISM. Операция не выполнена (0x800f0950 — DISM failed. No operation was performed);
- Ошибка:0x800F081F. Не удалось найти исходные файлы. Укажите расположение файлов, необходимых для восстановления компонента, с помощью параметра Источник (Error 0x800f081f, The source files could not be found. Use the «Source» option to specify the location of the files that are required to restore the feature).
 <
<
Во всех этих случаях вы можете использовать альтернативные средства получения оригинальных файлов хранилища компонентов. Это может быть:
- Установочный диск/флешка/iso образ Windows
- Смонтированный файл wim
- Папка \sources\SxS с установочного диска
- Файл install.wim с установочным образом Windows
Вы можете указать WIM или ESD файл с оригинальным установочным образом Windows, который нужно использовать в качестве источника для восстановления файлов системы. Предположим, вы смонтировали установочный ISO образ Windows 11 в виртуальный привод D:.
Примечание. Для восстановления поврежденных файлов в хранилище компонентов из локального источника версия и редакция Windows в образе должна полностью совпадать с вашей.
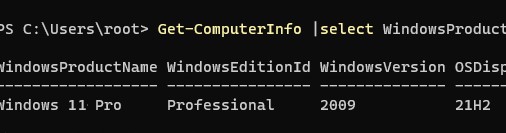
С помощью следующей PowerShell команды проверьте, какая версия Windows установлена на вашем компьютере:
Get-ComputerInfo |select WindowsProductName,WindowsEditionId,WindowsVersion, OSDisplayVersion
Выведите список доступных версий Windows в установочном образе:
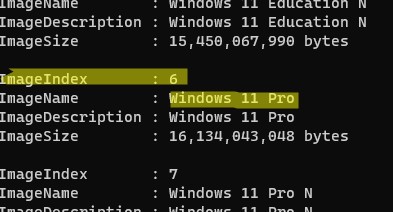
Get-WindowsImage -ImagePath "D:\sources\install.wim"
В нашем случае образ Windows 11 Pro в образе install.wim имеет
ImageIndex = 6
.
Для восстановления хранилища компонентов из локального WIM/ESD файла с блокированием доступа в интернет, выполните следующую команду (не забудьте указать ваш индекс версии Windows в файле):
DISM /online /cleanup-image /restorehealth /source:WIM:D:\sources\install.wim:6 /limitaccess
Или:
DISM /online /cleanup-image /restorehealth /source:ESD:D:\sources\install.esd:6 /limitaccess
Если при запуске появляется
- Ошибка Error: 50: DISM does not support servicing Windows PE with the /Online option, значит ваша DISM считает, что вы используете WinPE образWindows. Чтобы исправить это, удалите ветку реестра HKEY_LOCAL_MACHINE\SYSTEM\CurrentControlSet\Control\MiniNT.
Ошибка DISM Error 87: проверьте правильно написания команды, убедитесь что вы используете версию DISM для вашей версии Windows (обычно бывает при загрузке через WinPE/WinRE).
Утилита DISM пишет подробный журнал сканирования и восстановления системных файлов в файл
C:\Windows\Logs\DISM\dism.log
.
После восстановления хранилища компонентов вы можете запустить утилиту проверки системных файлов
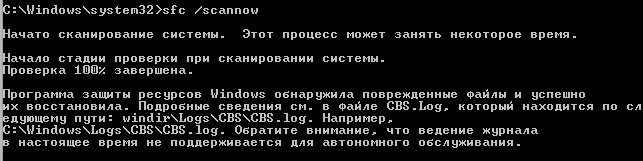
sfc /scannow
. Скорее всего она успешно восстановит поврежденные файлы:
Программа защиты ресурсов Windows обнаружила поврежденные файлы и успешно их восстановила.
Windows Resource Protection found corrupt files and successfully repaired them.
Если все системные файлы целы, появится сообщение:
Windows Resource Protection did not find any integrity violations
Восстановление образа Windows с помощью PowerShell
В версии PowerShell в Windows 10/11 и Windows Server 2022/2019 есть аналоги рассмотренных выше команд DISM. Для сканирования хранилища компонентов и поиска повреждений в образе выполните:
Repair-WindowsImage -Online –ScanHealth
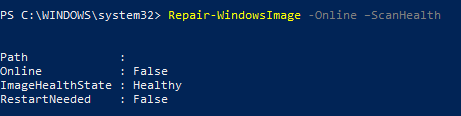
Если ошибок в хранилище компонентов не обнаружено, появится сообщение:
ImageHealth State: Healthy
Для запуска восстановления системных компонентов и файлов наберите:
Repair-WindowsImage -Online -RestoreHealth
При отсутствии доступа к интернету эта команда может зависнуть в процессе восстановления образа. Вы можете восстановить системные компоненты из локальной копии образа Windows в виде WIM/ESD файла, скопированного с установочного ISO образа Windows 10 (здесь также нужно указать индекс версии Windows в wim файле в качестве источника восстановления):
Repair-WindowsImage -Online -RestoreHealth -Source D:\sources\install.wim:5 –LimitAccess
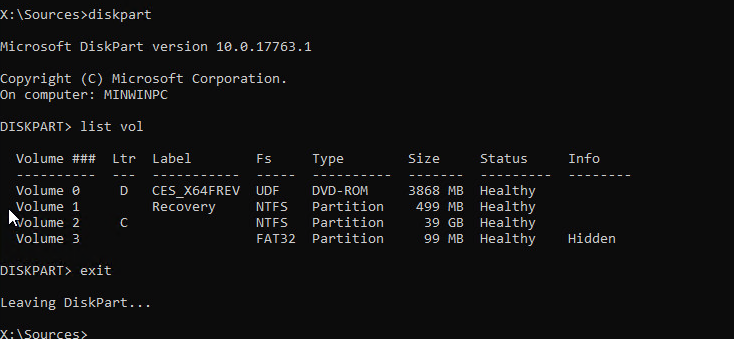
DISM: восстановление поврежденного хранилища компонентов, если Windows не загружается
Если Windows не загружается корректно, вы можете выполнить проверку и исправление системных файлов в оффлайн режиме.
- Для этого загрузите компьютер с установочного образа Windows (проще всего создать загрузочную USB флешку с Windows 10/11 с помощью Media Creation Tool) и на экране начала установки нажмите
Shift + F10 - Чтобы разобраться с буквами дисков, назначенных в среде WinPE, выполните команду
diskpart
->
list vol
(в моем примере диску, на котором установлена Windows присвоена буква C:\, эту букву я буду использовать в следующих командах);
- Проверим системные файлы и исправим поврежденные файлы командой:
sfc /scannow /offbootdir=C:\ /offwindir=C:\Windows
- Для исправления хранилища компонентов используйте следующую команду (в качестве источника для восстановления компонентов мы используем WIM файл с установочным образом Windows 10, с которого мы загрузили компьютер):
Dism /image:C:\ /Cleanup-Image /RestoreHealth /Source:WIM:D:\sources\install.wim:6
- Если на целевом диске недостаточно места, то для извлечения временных файлов нам понадобится отдельный диск достаточного размера, например F:\, на котором нужно создать пустой каталог:
mkdir f:\scratch
и запустить восстановление хранилища компонентов командой:
Dism /image:C:\ /Cleanup-Image /RestoreHealth /Source:D:\sources\install.wim /ScratchDir:F:\scratch


Совет. Другие полезные команды DISM, которые должен знать администратор:
-
DISM /Add-Package
– установка MSU/CAB файлов обновлений, интеграция обновлений в образ Windows; -
DISM /Get-Drivers
– получение списка установленных драйверов; -
DISM /Add-Driver
– добавление драйверов в образ; -
DISM /Export-Driver
– экспорт установленных драйверов Windows; -
DISM /Add-Capability
– установка дополнительных компонентов Windows через Features on Demand (например, RSAT, сервер OpenSSH или ssh клиент Windows; -
DISM /Enable-Features
и
/Disable-Features
– включение и отключение компонентов Windows (например, протокола SMBv1), -
DISM /online /Cleanup-Image /StartComponentCleanup
– очистка хранилища компонентов и удаление старых версий компонентов (папки WinSxS); -
DISM /set-edition
– конвертирование ознакомительной редакции Windows на полную без переустановки.
Updated: 01/31/2023 by

Short for Deployment Image Servicing and Management, DISM is a command available in Microsoft Windows used to install and configure Windows binary images.
Availability
The DISM command is available in the following Microsoft operating systems:
- Windows 10
- Windows 11
Description
DISM lists, installs, uninstalls, configures, and updates features and packages in Windows images. The commands available depend on the image being serviced, and whether the image is currently loaded and running.
DISM command syntax
The following is the command syntax for the Deployment Image Servicing and Management tool (DISM version 10.0.22000.653):
DISM.exe [dism_options] Imaging_command [Imaging_arguments]
DISM.exe {/Image:path_to_offline_image | /Online} [dism_options]
         servicing_command [servicing_arguments]
FFU commands
| /Capture-Ffu | Captures a physical disk image to a new FFU file. |
| /Apply-Ffu | Applies an .ffu image. |
| /Split-Ffu | Splits an existing .ffu file into multiple read-only split FFU files. |
| /Optimize-Ffu | Optimizes an FFU file so that it can be applied to storage of a different size. |
WIM commands
| /Apply-CustomDataImage | Dehydrates files contained in the custom data image. |
| /Capture-CustomImage | Captures customizations into a delta WIM file on a WIMBoot system. Captured directories include all subfolders and data. |
| /Get-WIMBootEntry | Displays WIMBoot configuration entries for the specified disk volume. |
| /Update-WIMBootEntry | Updates WIMBoot configuration entry for the specified disk volume. |
| /List-Image | Displays a list of the files and folders in a specified image. |
| /Delete-Image | Deletes the specified volume image from a WIM file with multiple volume images. |
| /Export-Image | Exports a copy of the specified image to another file. |
| /Append-Image | Adds another image to a WIM file. |
| /Capture-Image | Captures an image of a drive into a new WIM file. Captured directories include all subfolders and data. |
| /Get-MountedWimInfo | Displays information about mounted WIM images. |
| /Get-WimInfo | Displays information about images in a WIM file. |
| /Commit-Wim | Saves changes to a mounted WIM image. |
| /Unmount-Wim | Unmounts a mounted WIM image. |
| /Mount-Wim | Mounts an image from a WIM file. |
| /Remount-Wim | Recovers an orphaned WIM mount directory. |
| /Cleanup-Wim | Deletes resources associated with mounted WIM images that are corrupted. |
Generic imaging commands
| /Split-Image | Splits an existing .wim file into multiple read-only SWM (split WIM) files. |
| /Apply-Image | Applies an image. |
| /Get-MountedImageInfo | Displays information about mounted WIM and VHD images. |
| /Get-ImageInfo | Displays information about images in a WIM, a VHD or an FFU file. |
| /Commit-Image | Saves changes to a mounted WIM or VHD image. |
| /Unmount-Image | Unmounts a mounted WIM or VHD image. |
| /Mount-Image | Mounts an image from a WIM or VHD file. |
| /Remount-Image | Recovers an orphaned image mount directory. |
| /Cleanup-Mountpoints | Deletes resources associated with corrupted mounted images. |
Image specifications
| /Online | Targets the running operating system. |
| /Image | Specifies the path to the root directory of an offline Windows image. |
DISM options
| /English | Displays command line output in English. |
| /Format | Specifies the report output format. |
| /WinDir | Specifies the path to the Windows directory. |
| /SysDriveDir | Specifies the path to the system-loader file named bootmgr. |
| /LogPath | Specifies the logfile path. |
| /LogLevel | Specifies the output level shown in the log (1-4). |
| /NoRestart | Suppresses automatic reboots and reboot prompts. |
| /Quiet | Suppresses all output except for error messages. |
| /ScratchDir | Specifies the path to a scratch directory. |
For more information about these DISM options and their arguments, specify an option immediately before /?.
For example, to get help about the following commands, append «/?»:
DISM.exe /Mount-Wim /?
DISM.exe /ScratchDir /?
DISM.exe /Image:C:\test\offline /?
DISM.exe /Online /?
DISM examples
dism /online /cleanup-image /checkhealth
The command above runs the DISM command to check for any corruption.
dism /online /cleanup-image /restorehealth
The command above restores any found corruption.
dism /online /cleanup-image /analyzecomponentstore
The command above reports the Windows Update component store and report its usage as shown below. If the command reclaims packages, you are asked to restart the computer.
Deployment Image Servicing and Management tool
Version: 10.0.19041.844
Image Version: 10.0.19044.2486
[==========================100.0%==========================]
Component Store (WinSxS) information:
Windows Explorer Reported Size of Component Store : 8.18 GB
Actual Size of Component Store : 7.98 GB
    Shared with Windows : 5.64 GB
    Backups and Disabled Features : 2.33 GB
    Cache and Temporary Data :  0 bytes
Date of Last Cleanup : 2023-01-15 17:12:13
Number of Reclaimable Packages : 0
Component Store Cleanup Recommended : No
The operation completed successfully.
Tip
If corruption is found when running the DISM command, it’s also a good idea to run SFC /scannow to repair the Windows install.
(Image credit: Future)
The Deployment Image Servicing and Management (DISM) on Windows 10 is a tool that administrators use to prepare, modify, and repair system images, including Windows Recovery Environment, Windows Setup, and Windows PE (WinPE). However, you can also use it with the local recovery image to fix system issues.
Technically, when troubleshooting a specific error, figuring out why the device no longer boots correctly, or resolving performance problems, you can use the System File Checker (SFC) tool to replace missing or corrupted system files using the recovery image. The only caveat with this approach is that if one or more Windows 10 files in the local image are damaged, the SFC command won’t work. In this scenario, you can use the «install.wim» image file with DISM to repair the image and then use the SFC tool to fix the setup without having to reinstall Windows.
This how-to guide will walk you through the steps to use the DISM and SFC tools to bring a computer back from the dead to a healthy working state without reinstallation.
Warning: The commands outlined in this guide are non-destructive, but since you will be making system changes, it is still recommended to create a temporary full backup before proceeding.
How to use DISM to repair image of Windows 10
The DISM command tool includes multiple options to repair an image, including «CheckHealth,» «ScanHealth,» and «RestoreHealth,» which you’ll want to use in that order. Also, depending on the problem, you can use the «RestoreHealth» option to fix the locally available image using different source files.
DISM command with CheckHealth option
The «CheckHealth» option with the DISM tool lets you determine any corruptions inside the local Windows 10 image. However, the option does not perform any repairs.
To check the image of Windows 10 for issues with DISM, use these steps:
- Open Start.
- Search for Command Prompt, right-click the top result, and select the Run as administrator option.
- Type the following command to perform a quick check and press Enter: DISM /Online /Cleanup-Image /CheckHealth
Once you complete the steps, the Deployment Image Servicing and Management tool will run and verify any data corruption that may require fixing.
DISM command with ScanHealth option
The «ScanHealth» option performs a more advanced scan to determine whether the image has any problems.
To check image problems with the ScanHealth option on Windows 10, use these steps:
- Open Start.
- Search for Command Prompt, right-click the top result, and select the Run as administrator option.
- Type the following command to perform an advanced DISM scan and press Enter: DISM /Online /Cleanup-Image /ScanHealth
After you complete the steps, the scan may take some time to check whether the Windows 10 image needs any fixing.
DISM command with RestoreHealth option
If there are problems with the system image, use DISM with the «RestoreHealth» option to automatically scan and repair common issues.
To repair Windows 10 image problems with the DISM command tool, use these steps:
- Open Start.
- Search for Command Prompt, right-click the top result, and select the Run as administrator option.
- Type the following command to repair the Windows 10 image and press Enter: DISM /Online /Cleanup-Image /RestoreHealth
- Quick note: If the command appears stuck, this is normal behavior. After a few moments, the process will complete successfully.
Once you complete the steps, DISM will connect to Windows Update online to download and replace damaged files (as necessary).
Fix problems with DISM using install.wim image
The Deployment Image Servicing and Management commands typically don’t cause issues. However, if the tool finds problems replacing the damaged files or the computer isn’t connected to the internet, you’ll have to provide another image using the «Source» option. Usually, you can use an «install.wim» or «install.esd» file from another computer, install media, or ISO file. You only need to ensure that the files match the version, edition, and language of the version of Windows 10 you are trying to fix.
Download Windows 10 ISO file
If you need to use another file source, use the Media Creation Tool to download a fresh copy of Windows 10.
To download the ISO file of Windows 10, use these steps:
- Open this Microsoft support website.
- Click the Download Now button.
- Double-click the MediaCreationToolxxxx.exe file to launch the setup.
- Click the Accept button to agree to the terms.
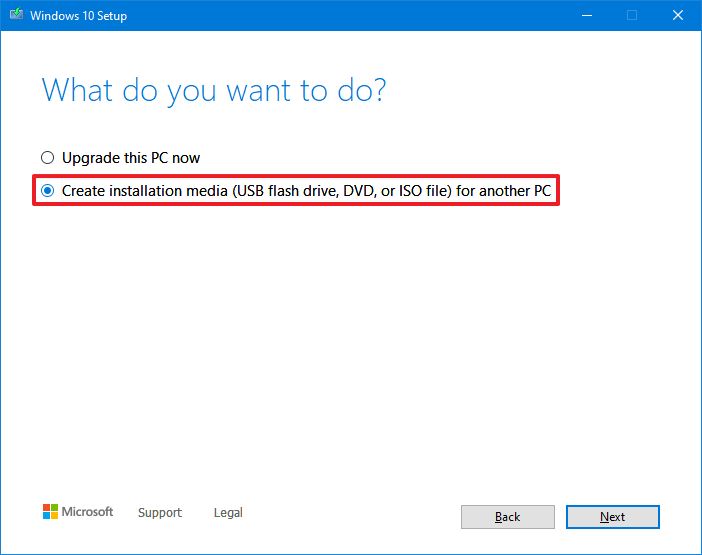
- Select the «Create installation media (USB flash drive, DVD, or ISO file) for another PC» option.
- Click the Next button.
- Click the Next button again.
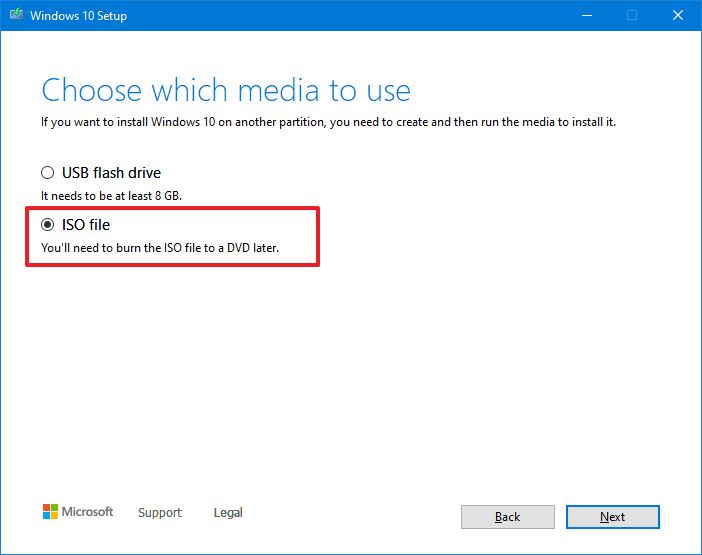
- Select the ISO file option.
- Click the Next button.
- Select the destination to store the Windows 10 ISO file.
- Click the Save button.
- Click the link to open the file location with File Explorer.
- Click the Finish button.
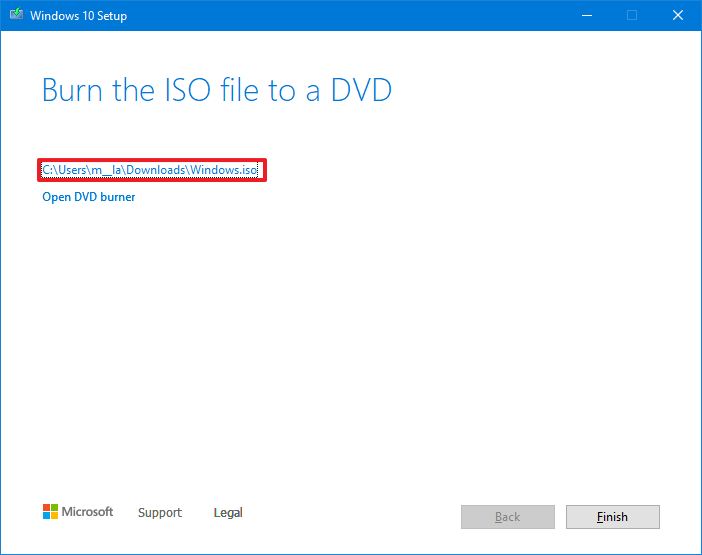
- Double-click the Windows.iso file to mount the image.
- Under the «This PC» section, confirm the drive letter for the mount point of the ISO file.
After you complete the steps, you can continue with the DISM tool using the «Source» option to repair the local image.
Fix Windows 10 recovery image
To run Deployment Image Servicing and Management tool with an alternate source (install.wim) image, use these steps:
- Open Start.
- Search for Command Prompt, right-click the top result, and select the Run as administrator option.
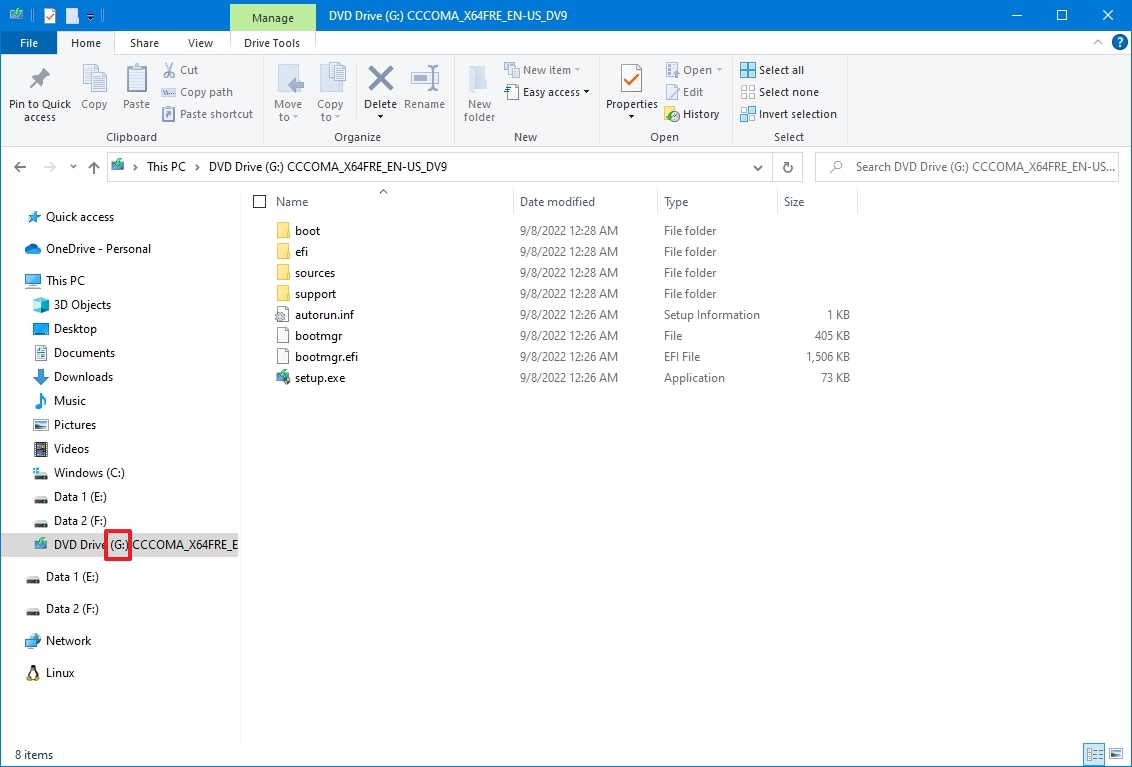
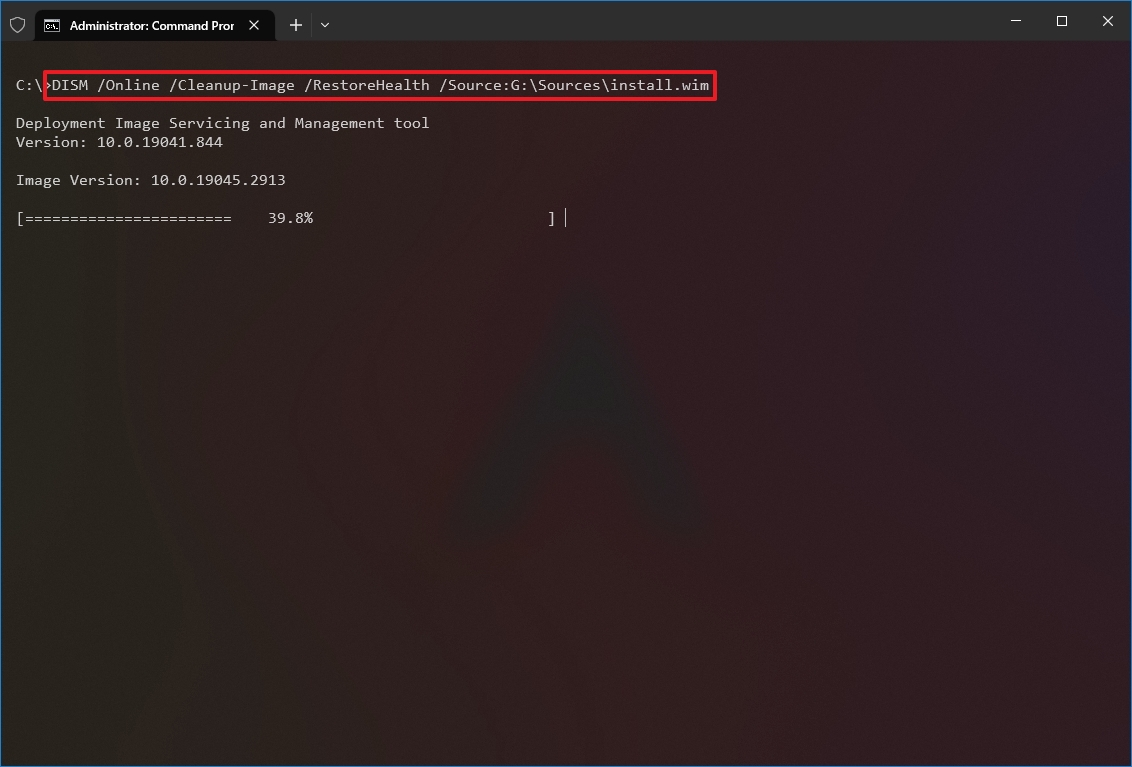
- Type the following command to repair the Windows 10 image and press Enter: DISM /Online /Cleanup-Image /RestoreHealth /Source:G:\Sources\install.wim
In the command, replace «G» with the ISO mount point drive letter in File Explorer.
- (Optional) Type the following command to limit the use of Windows Update and press Enter: DISM /Online /Cleanup-Image /RestoreHealth /Source:G\Sources\install.wim /LimitAccess
- (Optional) Type the following variant of the previous command to accomplish the same task and press Enter: DISM /Online /Cleanup-Image /RestoreHealth /Source:wim:G:\Sources\install.wim:1 /LimitAccess
In the command, change «G:\Sources,» for the path to the «install.wim» file.
Once you complete the steps, the command will scan and repair the problems using the «install.wim» file you specified as the alternative source.
Fix problems with DISM using ESD image
If you have an encrypted «install.esd» image, it’s possible to use it to repair the damaged files on Windows 10.
To use DISM with an «install.esd» image file as the source to repair Windows 10, use these steps:
- Open Start.
- Search for Command Prompt, right-click the top result, and select the Run as administrator option.
- Type the following command to repair the image with an «install.esd» file and press Enter: DISM /Online /Cleanup-Image /RestoreHealth /Source:C:\ESD\Windows\sources\install.esd
In the command, change «C:\ESD\Windows\sources» with the path to the location of the «.esd» file (if different).

- (Optional) Type the following command to limit the use of Windows Update and press Enter: DISM /Online /Cleanup-Image /RestoreHealth /Source:C:\ESD\Windows\sources\install.esd /LimitAccess
- (Optional) Type the following variant of the previous command to accomplish the same task and press Enter: DISM /Online /Cleanup-Image /RestoreHealth /Source:esd:C:\ESD\Windows\sources\install.esd:1 /LimitAccess
- (Optional) Type the following command to use an install.esd file located in another drive and press Enter: DISM /Online /Cleanup-Image /RestoreHealth /Source:E:\Sources\install.esd
In the command, replace «E:\Sources» with the path to the location of the «install.esd» file.
After you complete the steps, the tool will repair the damaged files using the files included in the «install.esd» image.
How to run SFC to repair problems on Windows 10
The above instructions will repair issues with the system image, not the problems with the system installation. After restoring the image to a healthy state, use the System File Checker command tool to repair the current setup.
To use the SFC command tool to repair Windows 10 problems, use these steps:
- Open Start.
- Search for Command Prompt, right-click the top result, and select the Run as administrator option.
- Type the following command to repair the installation and press Enter: SFC /scannow
- Quick tip: If errors are found, you may want to run the command around three times to ensure that everything was fixed correctly.
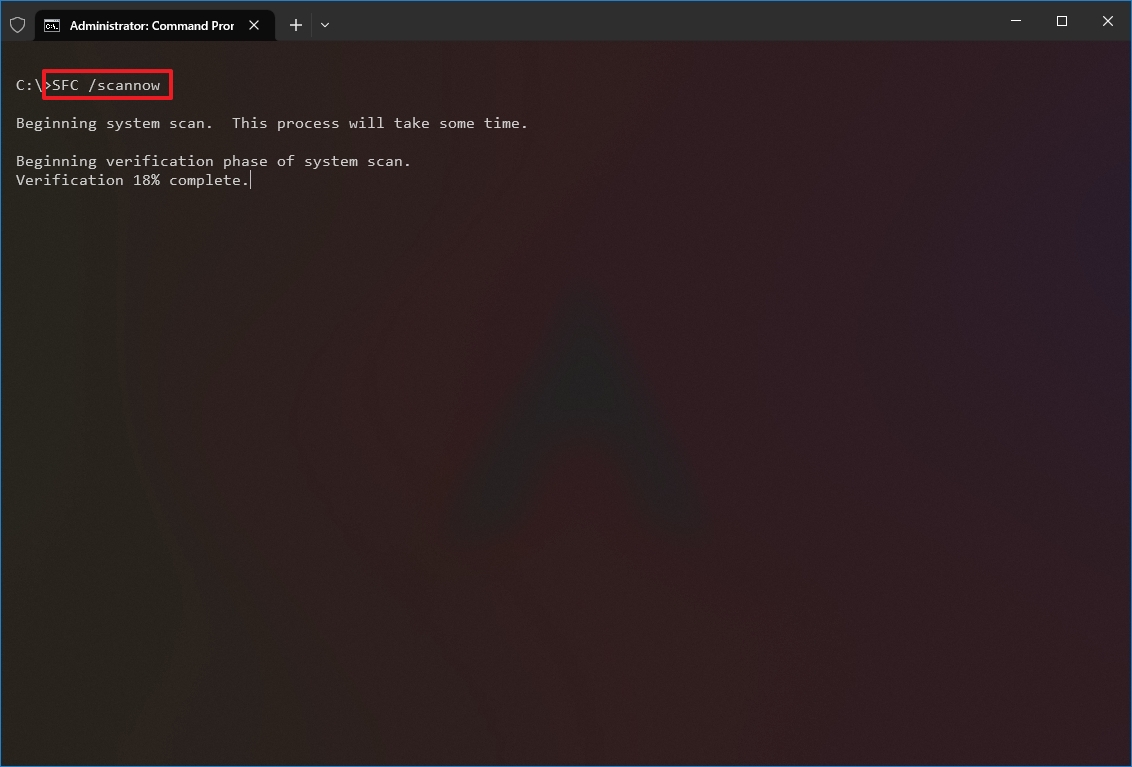
Once you complete the steps, the System File Checker tool will repair the system files using the local image files, and the log files will be saved on «%windir%/Logs/CBS/CBS.log» and «%windir%\Logs\DISM\dism.log,» which you can view to get more details about the process.
You can use this guide to learn more ways to use the SFC tool to fix problems on Windows 10.
More resources
For more helpful articles, coverage, and answers to common questions about Windows 10 and Windows 11, visit the following resources:
- Windows 11 on Windows Central — All you need to know
- Windows 10 on Windows Central — All you need to know
All the latest news, reviews, and guides for Windows and Xbox diehards.
Mauro Huculak is technical writer for WindowsCentral.com. His primary focus is to write comprehensive how-tos to help users get the most out of Windows 10 and its many related technologies. He has an IT background with professional certifications from Microsoft, Cisco, and CompTIA, and he’s a recognized member of the Microsoft MVP community.
Microsoft Windows Deployment Image Servicing and Management (DISM) is a command-line tool that allows IT administrators to service Windows desktop images and virtual hard disks prior to deployment to users.
DISM is an administrator-level tool to repair Windows images and make changes to Windows installation media. It replaces many other Windows deployment tools, such as PEimg, Intlcfg, ImageX, and Package Manager.
Administrators can access the DISM tool through the command line (DISM.exe) or from Windows PowerShell. DISM is built into the Windows operating system (OS). It is also distributed in the Windows Assessment and Deployment Kit (Windows ADK). ADK contains numerous tools to customize Windows images for large-scale deployment. DISM is one of them.
Uses of Microsoft DISM
The primary use of DISM is to help admins service Windows images. These images are frequently used for Windows PE (WinPE), Windows Recovery Environment (Windows RE) and Windows Setup. By using DISM’s image management commands, admins can mount and get required information about three file types:
- Windows image (WIM) files.
- Full-flash utility (FFU) files.
- Virtual hard disks (VHD or VHDX).
DISM can also be used to capture, split and manage WIM files.
Here are some uses of DISM image management commands:
- List the image index numbers.
- Verify the architecture for the image being mounted.
- Append or apply an image.
- Capture an image.
- Delete an image.
- Export an image to another file.
- Apply siloed provisioning packages to a specified image.
- Scan and repair the WIM store and corrupted system files (ideally in conjunction with a system file check).

Once an image is updated, admins must unmount it and then commit or discard the changes.
In addition to image management commands, DISM also includes servicing commands. These commands can be used to install/uninstall, configure and update WIM files, FFU files VHD, and VHDX files, and the following:
- Windows features.
- Packages.
- Drivers.
- International settings.
Both image management and servicing commands and options can be used on offline Windows images. Some commands and options are also available to admins on a running OS, meaning DISM can be used to update a running OS. The availability of these commands and options depends on the Windows OS being serviced by the admin.
Supported Windows platforms
When using DISM to service Windows images, admins must check the compatibility of those images with both the DISM version and Windows OS version. The OS where DISM runs is known as the host deployment environment.
DISM supports these newer editions of Windows OS host deployment environments:
- Windows 11.
- Windows 10 (x86 and x64).
- Windows 8.1 (x86 or x64).
- Windows Server 2012 R2 (x86 or x64).
- Windows 8 (x86 or x64).
- Windows 7 (x86 or x64).
In Windows 10 and Windows 11, DISM resides in the c:\windows\system32 folder. That said, the tool can be accessed in the command prompt from any location (as administrator). In older versions of Windows, Windows ADK must be downloaded and installed to use DISM. In Windows ADK installations, DISM resides in the C:\Program Files (x86)\Windows Kits\<version>\Assessment and Deployment Kit\Deployment Tools\10\DISM folder.

DISM also supports these versions of Windows Server and WinPE:
- Windows Server 2016 (x86 or x64).
- Windows Server 2012 (x86 or x64).
- Windows Server 2008 R2 (x86 or x64).
- Windows Server 2008 SP2 (x86 or x64).
- WinPE for Windows 11 x64.
- WinPE for Windows 10 (x86 or x64).
- WinPE 5.0 (x86 or x64).
- WinPE 4.0 (x86 or x64).
- WinPE 3.0 (x86 or x64).
DISM can be used with the target images of older Windows OSes. The only exception is if those OSes are more recent than the installed version of DISM. For example, DISM from Windows 10, version 1511 cannot service Windows 10, version 1607. However, it can service Windows 10, version 1511 and version 1507.
Also, there are certain Windows host deployment environments where the target image (the image being serviced) is not supported. For instance, target images of Windows 8, Windows Server 2012 or WinPE 4.0 (x86 or x64) are not supported in a Windows 11 host deployment environment. Similarly, target images of Windows 11 or WinPE for Windows 11 are not supported in Windows 7, Windows 8, Windows Server 2008, WinPE 4.0 (x86 and x64) and WinPE 3.0 (x86 and x64) host deployment environments.

DISM limitations
When using DISM to service Windows images, admins must be aware of its built-in limitations. One is that it does not support Resilient File System. ReFS is a new file system for Windows Server 2022, Windows Server 2019, Windows Server 2016, Windows Server 2012 R2 and Windows Server 2012 OS. It can efficiently scale to large data sets and provides better data availability and performance than older file systems.
Another limitation of DISM is that it doesn’t allow for the installation of packages to a remote computer over a network. Also, the packages are always installed in the order in which they are listed in the command line. Multiple servicing commands cannot be specified on the same command line (even though multiple drivers or packages can be specified).
Admins must remember that there is a dependency requirement in DISM, meaning certain packages must be installed first before other packages can be installed. To account for this limitation and to ensure that packages are installed in the correct order, admins must use an answer file when installing multiple packages.
The final limitation of DISM is that DISM command lines do not support wildcards.
See when to use the Windows command prompt vs. PowerShell and how to build a vulnerability scanner with PowerShell. Learn how Windows 11 Print Management can fix printer issues and how to fix Windows 11 when it keeps restarting. Try these PowerShell Start-Job examples for more efficiency and these 7 steps to fix a black screen in Windows 11.
This was last updated in October 2023
Continue Reading About Microsoft Windows Deployment Image Servicing and Management (DISM)
- How to create a custom ISO for Windows 10
- 5 steps to identify and fix Windows 11 performance issues
- 16 PowerShell commands for network troubleshooting
- Windows 11 vs. Windows 10: What are the differences?
- PowerShell vs. Bash: Key differences explained
Dig Deeper on Desktop management
-
Microsoft Windows Assessment and Deployment Kit (Windows ADK)
By: Eddie Lockhart
-
Microsoft Windows PowerShell DSC (Desired State Configuration)
By: Brien Posey
-
Full GitHub Actions environment variables list for YAML build workflow scripts example
By: Cameron McKenzie
-
Image-level methods for Windows application deployment
By: Brien Posey


Deployment Image Servicing and Management (DISM) is a command-line utility in Windows 10 that lets administrators build, alter, and repair system images such as Windows Recovery Environment, Windows Setup, and Windows PE. Run the DISM command to fix any error on Windows OS.

The SFC and DISM utilities are incorporated into Windows systems to assist users in scanning system files and images for corruption or other changes. Then they’ll automatically fix the issues it discovered, such as replacing the corrupted file with the proper one, fixing the underlying Windows system image, etc.
What Is The DISM Tool? How Do I Run DISM Command?
When you start obtaining errors such as Blue Screen of Death (BSoD), it is a sign that some of the Windows files might be corrupt and need fixing. The same goes for when applications start crashing or specific Windows 10 features stop working.
There are built-in tools in Windows OS that can be used for this, and one of them is SFC (System File Checker Tool). This command scans your Windows and checks for corrupt files.
If any corrupt files are found, the SFC tool will try to replace them. However, sometimes corrupt files can even affect the SFC tool. Whenever you cannot conduct an SFC scan, it’s time to use DISM to fix any errors.
When do I need To Run DISM Command?
You begin to receive problems such as the Blue Screen of Death (BSOD), or your programs begin to crash. Certain Windows 10 capabilities stop operating, which indicates missing, damaged, or corrupted system files.
To Scan And Restore Missing Corrupted System Files, I Recommend Using The System File Checker Tool (SFC /scannow). If any system files are missing or corrupted, the SFC software will repair them from a specific location on %WinDir%System32/dllcache.

However, you may see that the system file checker discovered some faulty files but could not repair them. Windows Resource Protection located faulty files but was unable to repair some of them, and so on.
To solve a problem like this, We use the DISM command line to repair the system image and allow the System File Checker Utility to complete its task.
Methods To Use DISM To Repair Image Of Windows 10
- DISM Command With CheckHealth Option
- DISM Command With Restorehealth Option
- DISM Command With Scanhealth Option
- Repair Windows With DISM Using Install.Wim Image
- Run DISM With Source Options
- Run System File Checker Utility
1. DISM Command With CheckHealth Option
The DISM tool’s CheckHealth option allows you to identify any corruptions in the local Windows 10 image. The choice, however, does not do any repairs.
Follow these methods to examine the Windows 10 image for DISM issues:
- Go to the Start Menu.
- Right-click the top result in the search for Command Prompt and choose Run as administrator.
- To do a quick check, type the following command and hit Enter:
DISM /Online /Cleanup-Image /CheckHealth

- The Deployment Image Servicing and Management program will run after you finish the procedures and review for any data corruption that needs to be fixed.
- To Run DISM Command in a different mode keep reading the next methods.
2. DISM Command With Restorehealth Option
Use DISM with RestoreHealth to automatically check and repair common issues if there are issues with the system image.
Follow these methods to utilize the DISM command tool to fix Windows image problems:
- Go to the Start Menu.
- Right-click the top result in the search for Command Prompt and choose Run as administrator.
- To restore the Windows 10 image, use the following command and press Enter.
DISM /Online /Cleanup-Image /RestoreHealth

- This is standard behavior if the command appears to be stuck. The process will be completed successfully after a few minutes.
- After you’ve finished the steps, the utility will connect to Windows Update and download and replace any damaged files (as necessary).
- To Run DISM Command in a different mode keep reading the next methods.
3. DISM Command With Scanhealth Option
The DISM tool’s CheckHealth option allows you to identify any corruptions in the local Windows 10 image. The choice, however, does not do any repairs.
Follow these methods to examine the Windows 10 image for DISM issues:
- Go to the Start Menu.
- Right-click the top result in the search for Command Prompt and choose Run as administrator.
- To do a quick check, type the following command and hit Enter:
DISM /Online /Cleanup-Image /ScanHealth

- The Deployment Image Servicing and Management program will run after you finish the procedures and check for any file corruption that needs to be fixed.
- To Run DISM Command in a different mode keep reading the next methods.
4. Repair Windows With DISM Using Install.Wim Image
You can utilize an “install.wim” or “install.esd” file, bootable install media, or a Windows 10 ISO file from another device. All you need to do now is double-check that the files match the version, edition, and language of the Windows 10 version you’re trying to repair.
Download the ISO image of Windows OS
- If you need to use a different file source, you should obtain a fresh copy of Windows 11 using the Media Creation Tool.
- Follow these methods to get the Windows 11 ISO file:
- Go to the Microsoft support page.
- To get the utility, click the Download Now button.

- To run the setup, double-click the MediaCreationToolxxxx.exe file.
- To accept the terms, click the Accept button.
- Create installation media for another PC or device (USB flash drive, DVD, or ISO file).
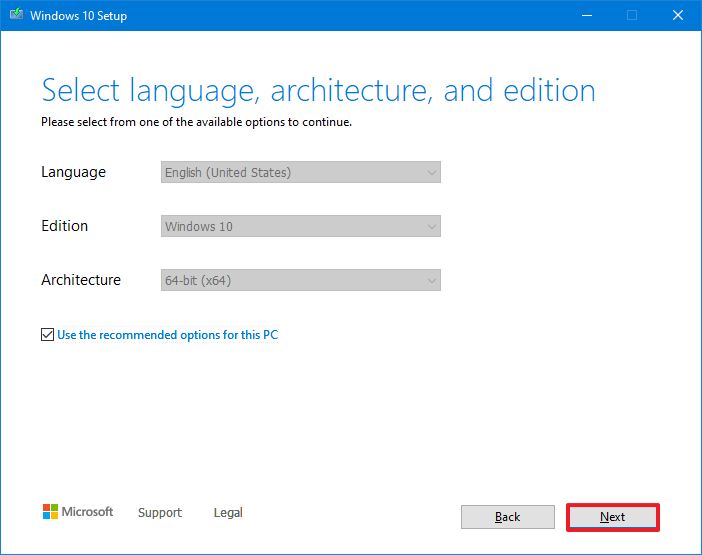
- Select the ISO file option after selecting the language, architecture, and edition.
- Choose a location to save the Windows 10 ISO file.
- Select the Save option.
- To open the file location in File Explorer, click the link.
- Finish by pressing the Finish button.
Fix the recovery image in Windows 10
Follow these steps to run the Deployment Image Servicing and Management tool using an alternate source (install.wim) image:
- Use the Run as administrator option in Command Prompt.
- To restore the Windows 10 image, use the following command and press Enter.
DISM /Online /Cleanup-Image /RestoreHealth /Source:G:\Sources\install.wim
- Replace “G” with the ISO mount point drive letter in File Explorer in the command.
- The command will scan and correct the faults using the “install.wim” file you supplied as an alternate source once you’ve completed the instructions.
- To mount the image, double-click the Windows.iso file.
- Confirm the drive for the mount point in the “This PC” section.
- After completing the procedures, use the DISM tool to repair the local image using the “Source” option.
Using an ESD image to fix DISM issues
It’s feasible to utilize an encrypted “install.esd” image to fix the damaged data on Windows 10.
Follow these procedures to fix Windows 10 using DISM and an “install.esd” image file as the source:
- Use the Run as administrator option in Command Prompt.
- Type the following command and press Enter to fix the image with an “install.esd” file.
DISM /Online /Cleanup-Image /RestoreHealth /Source: C:\ESD\Windows\sources\install.esdIn- . Replace C:ESDWindowssources with the path to the “.esd” file’s location.
- To Run DISM Command in a different mode keep reading the next methods.
5. Run DISM With Source Options
To run DISM with source options, first download Windows 10 ISO, 32 Bit Or 64 Bit, with the same version and edition as your present Windows 10 installation. After the download is complete, right-click the ISO file, select Mount, and make a note of the drive path.
- Open the Command prompt once more. Then type the command as an administrator.
DISM /Online /Cleanup-Image /RestoreHealth
- Replace D with the letter drive that contains your Windows 10 ISO.
- This will repair the Windows image using the known-good files contained in the install.wim file.
- It uses the Windows 10 installation disc instead of trying to download the essential files for repair through Windows Update.
- Wait till the Scanning Process is finished. DISM will create a log file in %windir%/Logs/CBS/CBS.log after completing the process.
- It records any issues that the tool discovers or resolves. Then, to get a fresh start, restart your computer.
- To Run DISM Command in a different mode keep reading the next methods.
6. Run System File Checker Utility
After you run the DISM (Deployment Imaging and Servicing Management) Tool will repair any corrupted files that the sfc/scannow command couldn’t fix.
- Open the Command prompt once more. Log in as an administrator to launch System File Checker Utility and type the command
SFC /scannow.

- This will scan for missing or corrupted system files and repair them.
- This System File Checker Utility will successfully scan and restore missing, damaged, and corrupted system files using a good copy from a specific Cache folder located in %WinDir%/System32/dllcache.
- Wait until the scanning and repair process is finished. Restart the Windows machine after that.
- You’ve successfully repaired missing or corrupted system files with the SFC software or the DISM command-line tool.
- To Run DISM Command in a different mode keep reading the next methods.
Conclusion
The DISM is a command-line utility included with Windows that allows users to scan for system damage and restore images or system files as needed. What can you do with the DISM tool? How can you fix your image or system files using the DISM command? All of these topics in detail are discussed above. Use this extraordinary tool to fix any issue with the Windows Operating System.
FAQS
How Do I Run DISM Commands?
Start the program. Right-click the top result in the search for Command Prompt and choose Run as administrator. To run an advanced DISM scan, type the following command and press Enter: DISM /Online /Cleanup-Image /ScanHealth.
What Is The DISM Command For?
The command-line utility Deployment Image Servicing and Management (DISM.exe) can be used to service and prepare Windows images, such as those used for Windows PE, Windows Recovery Environment (Windows RE), and Windows Setup. A Windows image (. wim) file or a virtual hard disc can be serviced with DISM (. vhd )
Which Is Better, SFC Or DISM?
While CHKDSK examines your hard drive and SFC analyses your system files, DISM finds and resolves faulty files in the Windows system image’s component store, allowing SFC to function properly. After the scan and repairs are finished, restart your computer and run SFC to replace any corrupt or missing system files.
Can DISM Fix Windows Update?
If there are corruption or BSOD errors, Windows updates and service packs may fail to install. For example, if a system file is damaged, an update may fail to install. The DISM (System Update Readiness) utility may be able to assist you in resolving various Windows corruption issues.