Содержание
- Не открывается Журнал Защиты Виндовс
- Ответы (6)
- Центр безопасности Защитника Windows — стартует и сразу закрывается
- Как принудительно очистить журнал Windows Defender и избавиться от предупреждающих значков на иконке Защитника
- Изменение срока хранения Журнала Защитника
- Принудительная очистка Журнала Защитника
- Почему защитник Windows 10 не включается?
- Основные причины невозможности запуска защитника Windows 10
- Исправляем проблему запуска и включения защитника Windows 10
- Решение 1: софт для удаления антивирусных программ
- Решение 2: проверяем системные файлы
- Решение 3: загрузка компьютера в «чистом» состоянии
- Решение 4: перегрузить Центр обеспечения безопасности
- Решение 5: измените настройки групповой политики
- Решение 6: внесите изменения в системный реестр
Не открывается Журнал Защиты Виндовс
Доброе время Суток. Проблема проста, Не открывается Журнал Защиты, при Запуски Журнала он Сам закрывается.
по мима Этого Была Стычка с Сервера Для игры CSS.. Защита ругалась на многи файлы Сервера, Пришлось удалить но он все равно Отображает Проблему Бута эти файлы есть
Что нужно сделать чтоб Журнал открылся
Ответы (6)
2 польз. нашли этот ответ полезным
Был ли этот ответ полезным?
К сожалению, это не помогло.
Отлично! Благодарим за отзыв.
Насколько Вы удовлетворены этим ответом?
Благодарим за отзыв, он поможет улучшить наш сайт.
Насколько Вы удовлетворены этим ответом?
Благодарим за отзыв.
![]()
Был ли этот ответ полезным?
К сожалению, это не помогло.
Отлично! Благодарим за отзыв.
Насколько Вы удовлетворены этим ответом?
Благодарим за отзыв, он поможет улучшить наш сайт.
Насколько Вы удовлетворены этим ответом?
Благодарим за отзыв.
Нужно очистить журнал защиты, сделать это можно вот так:
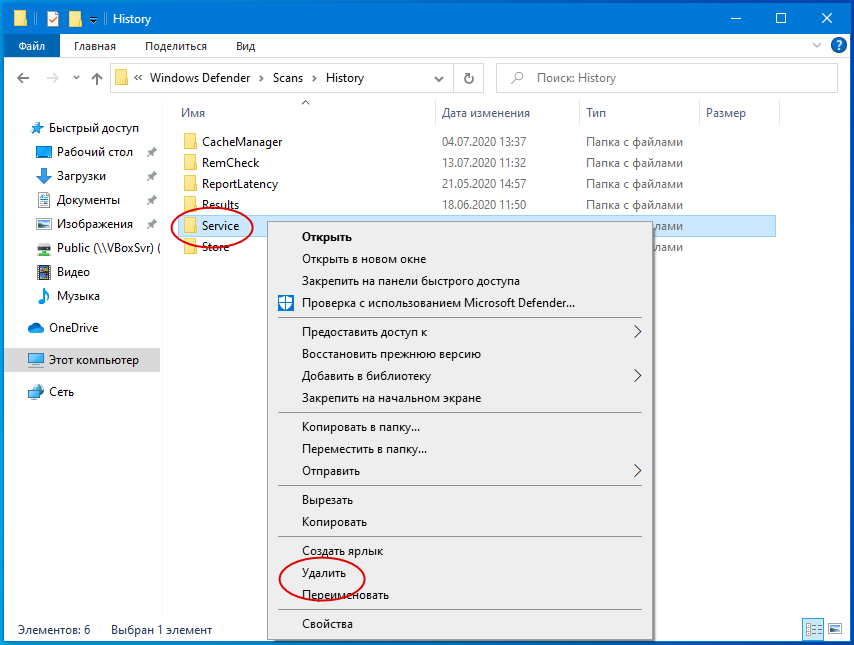
- C:ProgramDataMicrosoftWindows DefenderScansHistory
- Удалите папку Service.
Чтобы в будущем, хоть как-то избежать проблемы (не могу сказать сработает ли это, но лишним не будет):
Запустите PowerShell от имени администратора и введите команду ниже:
- Set-MpPreference -ScanPurgeItemsAfterDelay 5
- Где 5 на конце это количество дней хранения истории в журнале защиты.
2 польз. нашли этот ответ полезным
Был ли этот ответ полезным?
К сожалению, это не помогло.
Отлично! Благодарим за отзыв.
Насколько Вы удовлетворены этим ответом?
Благодарим за отзыв, он поможет улучшить наш сайт.
Насколько Вы удовлетворены этим ответом?
Благодарим за отзыв.
Был ли этот ответ полезным?
К сожалению, это не помогло.
Отлично! Благодарим за отзыв.
Насколько Вы удовлетворены этим ответом?
Благодарим за отзыв, он поможет улучшить наш сайт.
Насколько Вы удовлетворены этим ответом?
Благодарим за отзыв.
![]()
Точно такая же проблема Журнал защиты закрывается.
Это не помогает:
«Нужно очистить журнал защиты, сделать это можно вот так:
- C:ProgramDataMicrosoftWindows DefenderScansHistory
- Удалите папку Service .
- »
Это не помогает, хот 5, хоть 1, 0 толку нет:
«Запустите PowerShell от имени администратора и введите команду ниже:
- Set-MpPreference -ScanPurgeItemsAfterDelay 5»
Это тоже проделал, ошибок нет:
« 3. Проверьте систему на ошибки и восстановите их:
Проблема следующая — в трее иконка Windows Defender отображается с красным крестиком, при наведении на нее пишет: требуются действия. Правый клик -> Открыть, появляется окно Центра безопасности Защитника Windows и через 2-3 секунды закрывается.
При просмотре событий: появляются 2 события с кодом 1000 и 5973.
«Имя сбойного приложения: SecHealthUI.exe, версия: 10.0.15063.0, метка времени: 0x58ccbce5
Имя сбойного модуля: SecHealthUIDataModel.dll, версия: 0.0.0.0, метка времени: 0x58ccbc8d
Код исключения: 0xc0000409
Смещение ошибки: 0x000000000002f700
Идентификатор сбойного процесса: 0x2dfc
Время запуска сбойного приложения: 0x01d2d405c0af781d
Путь сбойного приложения: C:WindowsSystemAppsMicrosoft.Windows.SecHealthUI_cw5n1h2txyewySecHealthUI.exe
Путь сбойного модуля: C:WindowsSystemAppsMicrosoft.Windows.SecHealthUI_cw5n1h2txyewySecHealthUIDataModel.dll
Идентификатор отчета: b33b666c-1e8e-4bce-a17c-c8d82e72e2f6
Полное имя сбойного пакета: Microsoft.Windows.SecHealthUI_10.0.15063.0_neutral__cw5n1h2txyewy
Код приложения, связанного со сбойным пакетом: SecHealthUI»
«Сбой активации приложения Microsoft.Windows.SecHealthUI_cw5n1h2txyewy!SecHealthUI. Ошибка: Сбой при удаленном вызове процедуры.. Дополнительные сведения см. в журнале Microsoft-Windows-TWinUI/Operational.»
Указанный журнал: Microsoft-Windows-TWinUI/Operational — отсутствует.
Как принудительно очистить журнал Windows Defender и избавиться от предупреждающих значков на иконке Защитника

Подобно другим антивирусам, встроенный Защитник Windows ведет историю обнаруженных угроз, просмотреть которую можно в журнале защиты. Эти записи будут отображаться в журнале, даже если опасный файл обезврежен и помещен в карантин, что может вызвать своеобразный побочный эффект, проявляющийся наличием красного или желтого значка на иконке Защитника в системном лотке. в Windows 10 2004 разработчики вроде бы должны были решить эту проблему.
Но, судя по отзывам пользователей, сталкиваться с ней приходится и в последней стабильной версии системы.
Чтобы избавиться от этих предупреждающих о несуществующей уже угрозе значков, нужно очистить журнал Windows Defender. В сборках до релиза 1903 сделать это можно было через интерфейс управления безопасностью Windows, в более поздних сборках системы кнопка очистки журнала отсутствует. Данные журнала удаляются автоматически по истечении 30-и дней, но вы можете сократить этот период или просто удалить их принудительно.
Изменение срока хранения Журнала Защитника
Для изменения срока хранения записей в журнале Защитника Windows 10 мы предлагаем использовать консоль PowerShell .
Запустив ее от имени администратора, выполните в ней команду Get-MpPreference и найдите в полученном списке параметр ScanPurgeItemsAfterDelay.
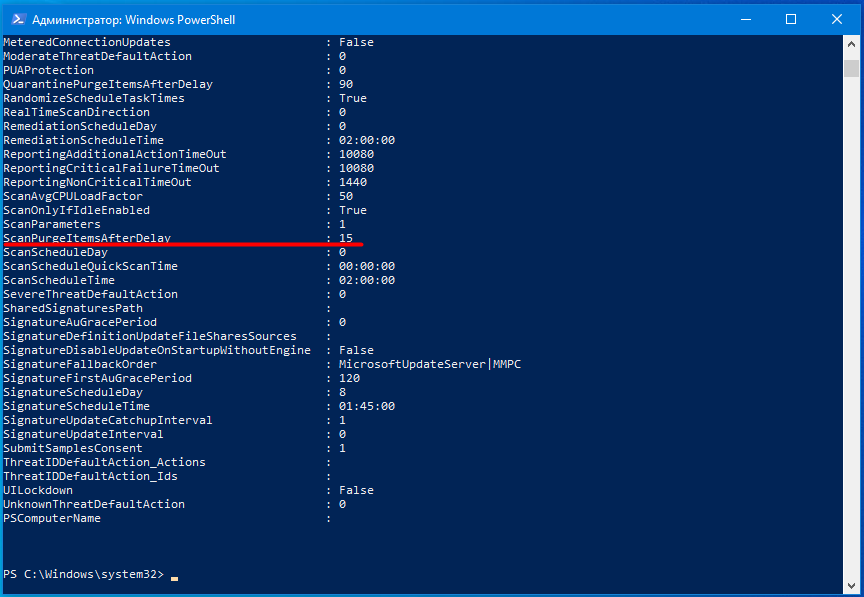
В Windows 10 2004 его значение равняется 15, то есть данные журнала хранятся 15 дней. Чтобы сократить этот срок, скажем, до двух дней, выполните в PowerShell такую команду:
Set-MpPreference -ScanPurgeItemsAfterDelay 2

Принудительная очистка Журнала Защитника
Если вы хотите очистить журнал прямо сейчас, выполните следующие действия.
Перейдите в Проводнике в папку C:ProgramDataMicrosoftWindows DefenderScans , а затем зайдите в расположенную в ней папку History , подтвердив вход с правами администратора.
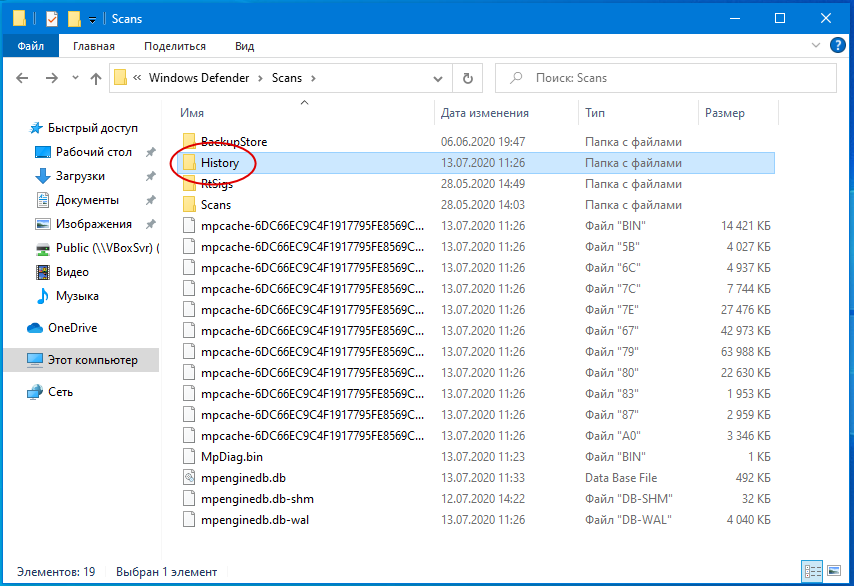
В свою очередь, в ней найдите папку Service и удалите ее.
Вместе с ней будет удалена и история действий Windows Defender.
Должен исчезнуть и значок предупреждения на иконке Защитника. Однако, если у вас не настроены базовые функции безопасности, желтый значок предупреждения будет отображаться независимо от того, имеются в журнале записи или нет.
Почему защитник Windows 10 не включается?

Многие пользователи Windows 10 по тем или иным причинам не могут включить Windows Defender. Обычно это происходит, когда утилита Microsoft Antimalware обнаруживает, что в системе установлено антивирусное программное обеспечение сторонних разработчиков. При этом пользователи часто утверждают, что на самом деле уже удалили «левый» софт.
Ранее уже встречались подобные проблемы, но только с выходом обновления «Anniversary Update» жалобы пользователей на то, что защитник Windows 10 не включается, приобрели глобальный характер.
Основные причины невозможности запуска защитника Windows 10
Как известно, Windows Defender является встроенным в Windows 10 антивирусным ПО, которое очень неплохо справляется с большинством задач. Тем не менее, Defender демонстрирует некоторые «глюки» при своем запуске. Ниже я перечислю наиболее частые жалобы на то, что защитник Windows 10 не включается:
- Окно Windows Defender не хочет открываться
- Windows Defender отключен групповой политикой
- Windows Defender вылетает при запуске с ошибкой
- Windows Defender не включается после удаления антивирусных программ Avast, Bitdefender, McAfee, AVG
- Windows Defender конфликтует с антишпионской утилитой Windows 10 Spybot
- Windows Defender не открывается, не запускается, не работает и не стартует
Теперь мы можем остановиться на самых значительных ошибках запуска защитника Windows 10
Исправляем проблему запуска и включения защитника Windows 10
Решение 1: софт для удаления антивирусных программ
Когда вы удаляете сторонний антивирусный софт с помощью стандартной опции в разделе «Программы и компоненты» Панели управления, существует риск неполного удаления файлов. Они-то как раз и могут помешать включению защитника Windows Defender. В этом списке вы можете найти один из подходящих способов удаления установленного антивируса перед восстановлением работы Windows Defender.

В дополнение к этим инструментам вы можете попробовать специализированный софт — деинсталляторы, которые качественно удаляют программы. «Анинсталлер» не только удалит указанное программное обеспечение, но и уничтожит все созданные сторонним антивирусом файлы, а также записи о нем в системном реестре. В результате вы получите чистую операционную систему без следов стороннего антивирусного ПО. Среди хороших деинсталляторов я могу вам порекомендовать два — IOBit Uninstaller и Revo Uninstaller. Они очень просты в использовании, и вы легко с их помощью удалите все «следы» софта. Отмечу также, что после удаления антивирусного ПО Windows 10 следует перегрузить.
Решение 2: проверяем системные файлы
Системная утилита System File Checker (средство проверки системных файлов) поможет вам восстановить поврежденные или удаленные системные файлы. Используйте эту консольную программу для проверки Defender – повреждены ли его файловые компоненты или нет?
- Для того, чтобы запустить инструмент «Проверка системных файлов (SFC)» откройте командную строку с правами администратора и наберите в ней следующее:
DISM /Online /Cleanup-Image /RestoreHealth
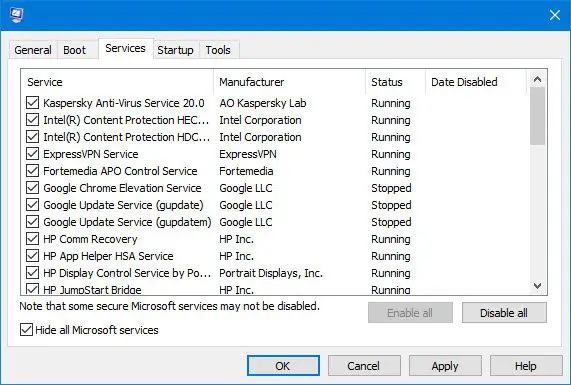
Решение 3: загрузка компьютера в «чистом» состоянии
Иногда программы сторонних разработчиков могут активно взаимодействовать с компонентами Windows, что может приводить к проблемам. Тем не менее вы можете самостоятельно найти проблемное приложение, применив «чистую» загрузку компьютера. Это простая операция, если будете четко следовать следующим шагам.
- Найдите через меню «Пуск» и запустите утилиту msconfig (Конфигурация системы)
- В окне конфигурации системы выберите вкладку «Службы». Отметьте галочкой пункт под списком сервисов «Не отображать службы Майкрософт». После чего нажмите кнопку «Отключить все».

- Перейдите на вкладку «Автозагрузка» и кликните по ссылке «Открыть диспетчер задач».
- Перед вами откроется список автозагрузки – программы, которые автоматически загружаются в память при запуске системы. Кликните правой кнопкой мышки по первому приложению в списке. В контекстном меню выберите отключить. Аналогичным образом отключите все последующие приложения.
- Как только вы закончите с отключением сервисов и программ из автозагрузки, вернитесь в первоначальное окно «Конфигурация системы», кликните «Применить» и «ОК». Перегрузите компьютер.


После перезагрузки компьютера, проверьте, исчезла ли проблема включения защитника Windows 10. Если это так, значит какое-то из отключенных приложений или сервисов является помехой для запуска Defender. Для того, чтобы вычислить какое именно приложение вам мешает, нужно включать их один за одним через «Конфигурацию системы». Вычислив конфликтующее приложение, оставьте его отключенным или полностью удалите.
Решение 4: перегрузить Центр обеспечения безопасности
Для того, чтобы Windows Defender включался и правильно работал, необходимо, чтобы определенные сервисы были запущены. Тем не менее вы всегда можете запустить их, выполнив следующее:
- Запустите через команду «Выполнить» в меню «Пуск», системную оснастку «Службы». Для этого наберите services.msc и нажмите Enter.
- Далее найдите в списке служб «Центр обеспечения безопасности», кликните по нему правой клавишей мышке и выберите пункт «Перезапустить».

После того, как сервис будет перезагружен, проверьте, включатся ли защитник Windows 10.
Решение 5: измените настройки групповой политики
Иногда защитник Windows Defender не хочет включаться из-за того, что отключен групповой политикой. Для кого-то это может показаться сложным, но поверьте, небольшие изменения в групповой политике помогут ее решить. Сделайте следующее:
- Запустите через команду «Выполнить» оснастку gpedit.msc, также, как это делали в предыдущих пунктах.
- Когда откроется «Редактор локальной групповой политики», откройте в левой панели редактора раздел «Конфигурация компьютера». Далее найдите подраздел «Антивирусная программа «Защитник Windows» по следующему пути:
«Конфигурация компьютера» —> «Административные шаблоны» —> «Компоненты Windows» —> «Антивирусная программа «Защитник Windows»
После данных изменений в групповой политике защитник Windows 10 будет включен и запустится в вашей операционной системе без каких-либо проблем.
Решение 6: внесите изменения в системный реестр
Если Windows Defender не хочет включаться, одной из причин может являться ошибочный ключ в редакторе реестра. Вы можете исправить ошибку с помощью редактора реестра.
- Запустите «Редактор реестра» через меню «Пуск» и команду «Выполнить». Наберите «regedit» и нажмите «ОК».
- Когда откроется редактор реестра, найдите в его левой панели следующую ветку:
После таких действий Windows Defender будет включен и возобновит свою работу в Windows 10. Отмечу, что некоторые пользователи рекомендуют вообще удалить параметр «DisableAntiSpyware». Если хотите, можете тоже попробовать этот вариант.
Ну вот и все. Кажется, я рассмотрел все самые важные и действенные способы восстановления работы защитника Windows 10. Если вы столкнулись с проблемой включения антивирусного защитника Windows Defender, попробуйте один из предложенных вариантов. Надеюсь, что-то вам поможет!
Get Windows Defender working again using these solutions
by Ivan Jenic
Passionate about all elements related to Windows and combined with his innate curiosity, Ivan has delved deep into understanding this operating system, with a specialization in drivers and… read more
Updated on February 12, 2023
Reviewed by
Vlad Turiceanu

Passionate about technology, Windows, and everything that has a power button, he spent most of his time developing new skills and learning more about the tech world. Coming… read more
- There are instances when a computer is not protected because Windows Defender won’t turn on Windows.
- If Windows Defender real-time protection won’t turn on Windows 10, then you should check its settings.
- Sometimes, the date and time settings are the reason why Windows Defender won’t turn on.
- Using dedicated software solves the failure of the Windows Defender antivirus to turn on in Windows 10.

Often we hear people complaining that they cannot turn on Windows Defender in Windows 10, so today we’ve decided to share with you a few tips on how to fix this issue.
It’s the main anti-malware component of Windows. It provides a great defense against threats and you are pretty much safe from most online risks.
Windows Defender must work 24/7 especially when you don’t use any other antivirus. Leaving your PC vulnerable even for a few moments might pose a big risk.
If you’re happy with basic antivirus protection, Windows Security is perfect for protecting your PC. Other antivirus software comes with additional security features.
Windows Defender won’t start
Here are some examples of how this issue may manifest itself:
- Can’t turn on Windows Defender Windows 10 Group Policy
- If you get this error, check out our article about Group Policy Editor and Windows Defender.
- Can’t turn off Windows Defender Windows 10
- If you want to switch to another antivirus program, this problem might prevent you from turning off Windows Defender.
- Windows Defender real-time protection handled by another av program
- Windows Defender and another antivirus program don’t go along (see below).
There are a few possible scenarios for this problem, and we’ll cover most of them in this article.
What to do if Windows Defender is not working in Windows 10
- Enable real-time protection
- Change date and time
- Use professional software for protection
- Update Windows
- Change Proxy Server
- Disable third-party antivirus
- Run the SFC scan
- Run DISM
- Reset the Security Center service
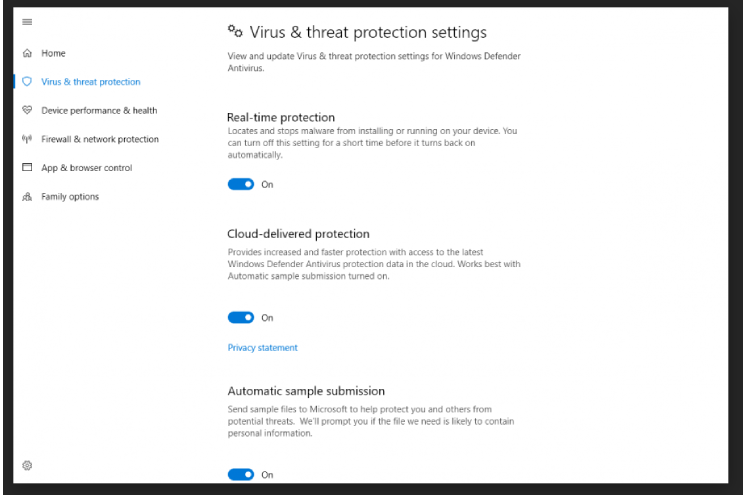
1. Enable real-time protection
- Press the Windows key + Q key on the keyboard to bring up the charms search.
- Type Windows Defender in the search box and then press Enter.
- Head over to the Settings and check Turn on real-time protection.

Windows Defender is designed to turn itself off if it detects any other third-party antivirus software. Windows is designed to detect any installed antivirus software, and certain issues can occur if you have two or more antivirus software installed.
These issues include conflicts between antivirus software that can manifest as frequent freezing, crashing of applications, etc.
Since this is a common problem, in order to avoid any conflicts, Windows Defender will turn itself off if Windows detects any other security program.
In addition, if this security software has a Firewall, Windows Firewall will also turn itself off.
This means that if you want Windows Defender to work, you’ll have to choose between it and the third-party antivirus software.
Often users are not aware of whether security software is installed or not because when you buy a new laptop in most cases it comes with a trial version of antivirus software such as Norton, McAfee, etc.
When you install applications like Flash or Java it might prompt you to uninstall the free security scanner, and that can cause some problems.
Therefore it’s best to search your PC if you’re not sure whether security software is installed or not. Once you remove it, you might need to manually turn it back on using these steps:
2. Change date and time
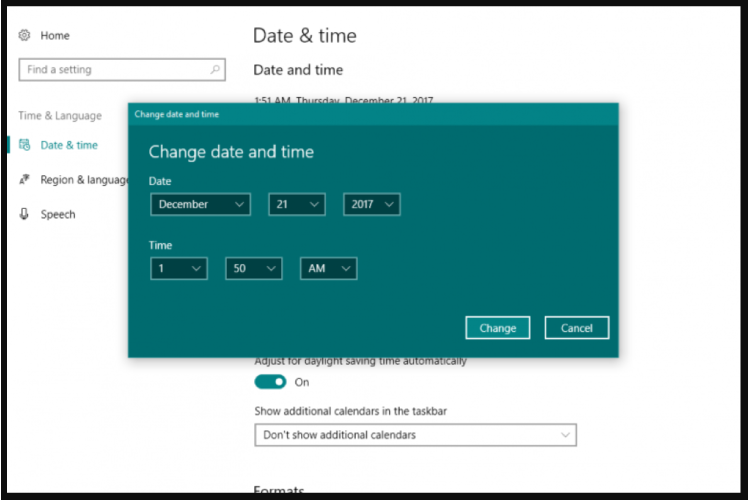
Another cause for Windows Defender not working properly is the incorrect time and date on Windows 10.
In order to fix this, you need to check your time and date and set it to the correct value before trying to turn Windows Defender back on.
We know that this might sound strange, but most of the Windows system functions are dependent on time and date, therefore an incorrect date or time could trigger abnormal behavior in your Windows OS.
3. Use professional software for protection
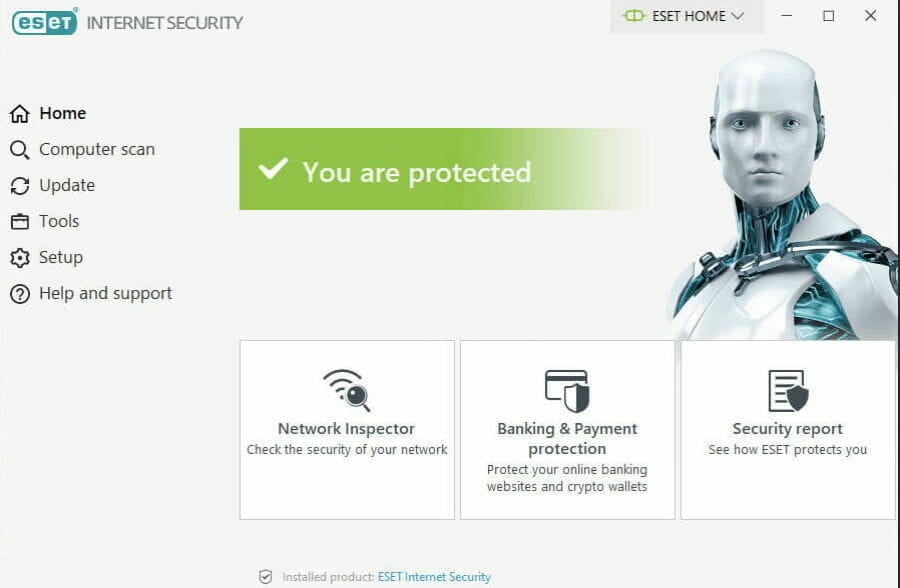
Some PC issues are hard to tackle, especially when it comes to corrupted repositories or missing Windows files. If you are having troubles fixing an error, your system may be partially broken.
We recommend installing Restoro, a tool that will scan your machine and identify what the fault is.
Click here to download and start repairing.
Windows Defender is a useful feature for your operating system, but if it doesn’t function properly, you can try professional software. Eset Smart Security is constantly improved through updates by its developer so that it will detect and repair the latest malware that will appear.
Try out the ultimate cybersecurity package that will provide you with online safety. This software was created for users that want full protection against online threats.
This means you will also benefit from extra theft protection and a user-friendly password management feature. Feel free to install and use it on any Windows, Android, Mac or Linux device, as it is compatible with all four operating systems.
Keep your digital identity under protection from unauthorized third-parties with Eset Smart Security’s advanced antivirus technology. This application will also offer efficient protection of your confidential data from phishing and ransomware.
If you desire more privacy for your files, then you can choose to encrypt them and removable media too. This is professional software that keeps you organized with good password management, by storing and organizing them.

Eset Smart Security Premium
Eset Smart Security Premium keeps your computer safe from viruses, malware, and protects your private data.
4. Update Windows
- Go to Start, select Settings, and choose Update & Security.
- Navigate to Windows Update, and then select Check for updates.

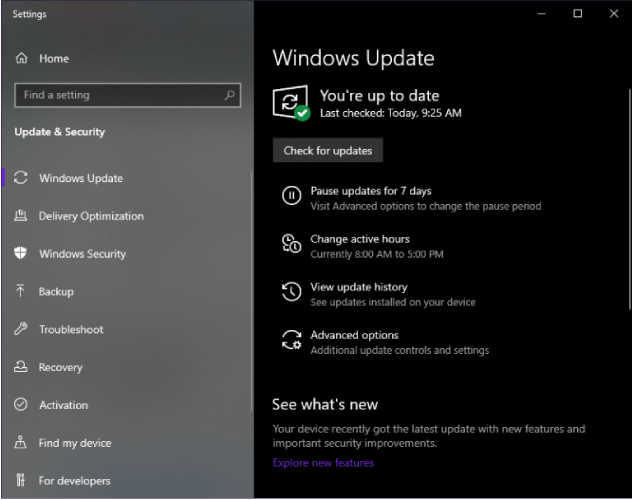
Make sure that you keep your Windows up to date using Windows Update since this can cause some problems with Windows Defender. When it comes to any security software, make sure that you update it frequently.
We suggest that you perform a full Windows Update, then open Windows Defender and run an update from there as well.
If you can’t open the Setting app, we have a special article on how to solve the issue.
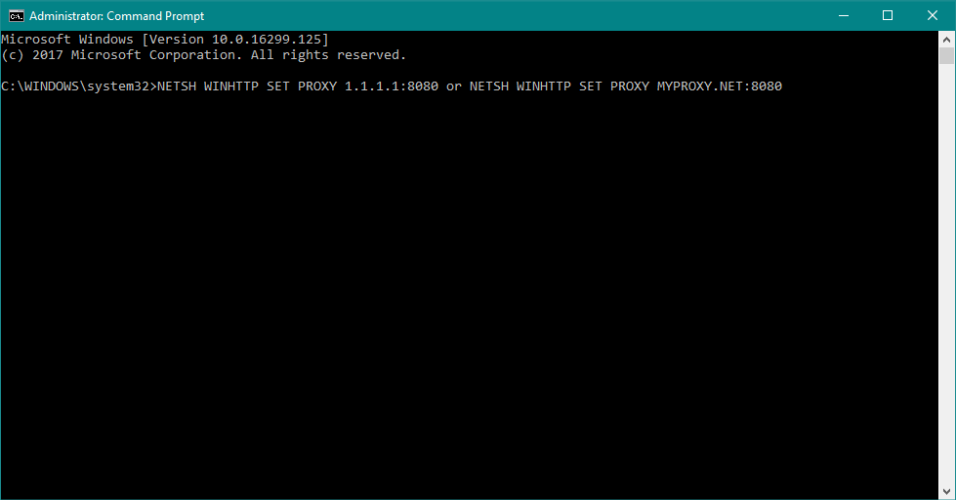
5. Change Proxy Server
- Press Windows key + X and select Command Prompt (Admin).

- Type in one of the following:
NETSH WINHTTP SET PROXY 1.1.1.1:8080orNETSH WINHTTP SET PROXY MYPROXY.NET:8080 - Reboot the system and see if it works.
These three are the most common scenarios that can cause problems with Windows Defender, but there are some other not-so-common scenarios that can cause problems as well.
For example, incorrect Zone settings in Internet Explorer can cause problems, but you can easily fix this by resetting Internet Explorer to factory settings.
Bear in mind that if you are using a Proxy server, Windows Defender will not be able to update. If that’s the case, you’ll need to make some minor tweaks to your Proxy server.
If you’re having trouble accessing Command Prompt as an admin, then you can read one of our guides.
6. Disable third-party antivirus

Windows Defender doesn’t get along with third-party antivirus programs. Just like any two antivirus programs don’t work well with each other.
So, if you want Windows Defender to be your primary security option, make sure to disable any third-party antivirus programs you have installed on your computer.
7. Run the SFC scan
- Go to Search, type cmd, and open Command Prompt as Administrator.
- Enter the following line and press Enter:
sfc/scannow - Wait for the process to finish.
- Restart your computer.

This simple solution shows how to run the SFC scan in Windows 10.
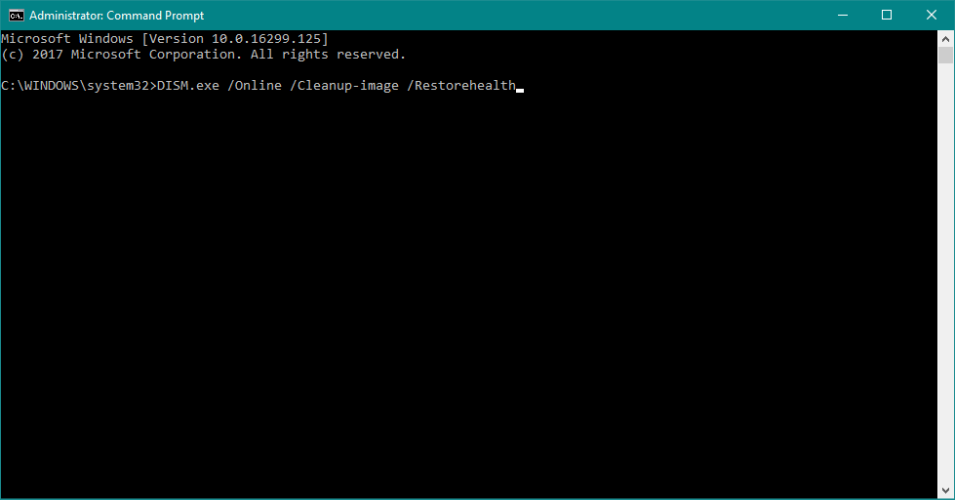
8. Run DISM
- Go to Search, type cmd, and open Command Prompt as Administrator.

- Enter the following command on the command line:
DISM.exe /Online /Cleanup-image /Restorehealth
- In case the DISM can’t obtain files online, try using your installation USB or DVD. Insert media and type following command:
DISM.exe /Online /Cleanup-Image /RestoreHealth /Source:C:RepairSourceWindows /LimitAccess
- Make sure to replace the following path of your DVD or USB:
C:/Repair/Source/Windows
9. Reset the Security Center service
- Go to Search, type
services.msc, and open Services. - Find the Security Center service.

- Right-click the Security Center service, and go to Reset.
- Restart your computer.
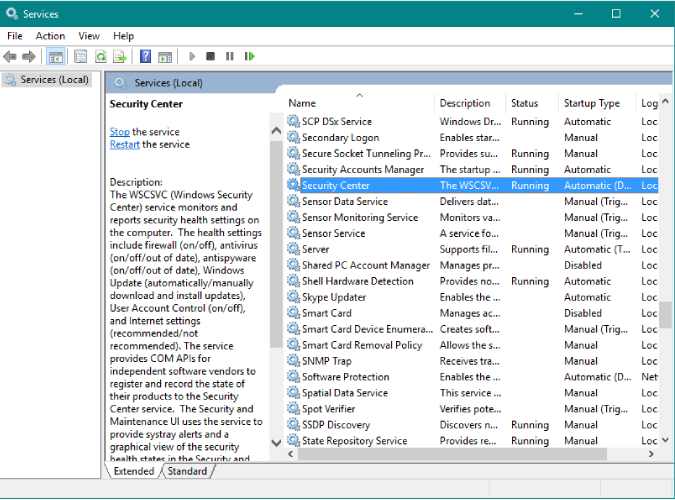
And finally, if none of the solutions from above worked, we’ll try resetting the Security Center service. Hopefully, Windows Defender will start working after that.
That’s about it, we hope at least one of these solutions helped you resolve your problems with Windows Defender. If you have any comments, questions or suggestions, just let us know in the comments down below.
![]()
Newsletter
Get Windows Defender working again using these solutions
by Ivan Jenic
Passionate about all elements related to Windows and combined with his innate curiosity, Ivan has delved deep into understanding this operating system, with a specialization in drivers and… read more
Updated on February 12, 2023
Reviewed by
Vlad Turiceanu
Passionate about technology, Windows, and everything that has a power button, he spent most of his time developing new skills and learning more about the tech world. Coming… read more
- There are instances when a computer is not protected because Windows Defender won’t turn on Windows.
- If Windows Defender real-time protection won’t turn on Windows 10, then you should check its settings.
- Sometimes, the date and time settings are the reason why Windows Defender won’t turn on.
- Using dedicated software solves the failure of the Windows Defender antivirus to turn on in Windows 10.
Often we hear people complaining that they cannot turn on Windows Defender in Windows 10, so today we’ve decided to share with you a few tips on how to fix this issue.
It’s the main anti-malware component of Windows. It provides a great defense against threats and you are pretty much safe from most online risks.
Windows Defender must work 24/7 especially when you don’t use any other antivirus. Leaving your PC vulnerable even for a few moments might pose a big risk.
If you’re happy with basic antivirus protection, Windows Security is perfect for protecting your PC. Other antivirus software comes with additional security features.
Windows Defender won’t start
Here are some examples of how this issue may manifest itself:
- Can’t turn on Windows Defender Windows 10 Group Policy
- If you get this error, check out our article about Group Policy Editor and Windows Defender.
- Can’t turn off Windows Defender Windows 10
- If you want to switch to another antivirus program, this problem might prevent you from turning off Windows Defender.
- Windows Defender real-time protection handled by another av program
- Windows Defender and another antivirus program don’t go along (see below).
There are a few possible scenarios for this problem, and we’ll cover most of them in this article.
What to do if Windows Defender is not working in Windows 10
- Enable real-time protection
- Change date and time
- Use professional software for protection
- Update Windows
- Change Proxy Server
- Disable third-party antivirus
- Run the SFC scan
- Run DISM
- Reset the Security Center service
1. Enable real-time protection
- Press the Windows key + Q key on the keyboard to bring up the charms search.
- Type Windows Defender in the search box and then press Enter.
- Head over to the Settings and check Turn on real-time protection.
Windows Defender is designed to turn itself off if it detects any other third-party antivirus software. Windows is designed to detect any installed antivirus software, and certain issues can occur if you have two or more antivirus software installed.
These issues include conflicts between antivirus software that can manifest as frequent freezing, crashing of applications, etc.
Since this is a common problem, in order to avoid any conflicts, Windows Defender will turn itself off if Windows detects any other security program.
In addition, if this security software has a Firewall, Windows Firewall will also turn itself off.
This means that if you want Windows Defender to work, you’ll have to choose between it and the third-party antivirus software.
Often users are not aware of whether security software is installed or not because when you buy a new laptop in most cases it comes with a trial version of antivirus software such as Norton, McAfee, etc.
When you install applications like Flash or Java it might prompt you to uninstall the free security scanner, and that can cause some problems.
Therefore it’s best to search your PC if you’re not sure whether security software is installed or not. Once you remove it, you might need to manually turn it back on using these steps:
2. Change date and time
Another cause for Windows Defender not working properly is the incorrect time and date on Windows 10.
In order to fix this, you need to check your time and date and set it to the correct value before trying to turn Windows Defender back on.
We know that this might sound strange, but most of the Windows system functions are dependent on time and date, therefore an incorrect date or time could trigger abnormal behavior in your Windows OS.
3. Use professional software for protection
Some PC issues are hard to tackle, especially when it comes to corrupted repositories or missing Windows files. If you are having troubles fixing an error, your system may be partially broken.
We recommend installing Restoro, a tool that will scan your machine and identify what the fault is.
Click here to download and start repairing.
Windows Defender is a useful feature for your operating system, but if it doesn’t function properly, you can try professional software. Eset Smart Security is constantly improved through updates by its developer so that it will detect and repair the latest malware that will appear.
Try out the ultimate cybersecurity package that will provide you with online safety. This software was created for users that want full protection against online threats.
This means you will also benefit from extra theft protection and a user-friendly password management feature. Feel free to install and use it on any Windows, Android, Mac or Linux device, as it is compatible with all four operating systems.
Keep your digital identity under protection from unauthorized third-parties with Eset Smart Security’s advanced antivirus technology. This application will also offer efficient protection of your confidential data from phishing and ransomware.
If you desire more privacy for your files, then you can choose to encrypt them and removable media too. This is professional software that keeps you organized with good password management, by storing and organizing them.
Eset Smart Security Premium
Eset Smart Security Premium keeps your computer safe from viruses, malware, and protects your private data.
4. Update Windows
- Go to Start, select Settings, and choose Update & Security.
- Navigate to Windows Update, and then select Check for updates.
Make sure that you keep your Windows up to date using Windows Update since this can cause some problems with Windows Defender. When it comes to any security software, make sure that you update it frequently.
We suggest that you perform a full Windows Update, then open Windows Defender and run an update from there as well.
If you can’t open the Setting app, we have a special article on how to solve the issue.
5. Change Proxy Server
- Press Windows key + X and select Command Prompt (Admin).
- Type in one of the following:
NETSH WINHTTP SET PROXY 1.1.1.1:8080orNETSH WINHTTP SET PROXY MYPROXY.NET:8080 - Reboot the system and see if it works.
These three are the most common scenarios that can cause problems with Windows Defender, but there are some other not-so-common scenarios that can cause problems as well.
For example, incorrect Zone settings in Internet Explorer can cause problems, but you can easily fix this by resetting Internet Explorer to factory settings.
Bear in mind that if you are using a Proxy server, Windows Defender will not be able to update. If that’s the case, you’ll need to make some minor tweaks to your Proxy server.
If you’re having trouble accessing Command Prompt as an admin, then you can read one of our guides.
6. Disable third-party antivirus
Windows Defender doesn’t get along with third-party antivirus programs. Just like any two antivirus programs don’t work well with each other.
So, if you want Windows Defender to be your primary security option, make sure to disable any third-party antivirus programs you have installed on your computer.
7. Run the SFC scan
- Go to Search, type cmd, and open Command Prompt as Administrator.
- Enter the following line and press Enter:
sfc/scannow - Wait for the process to finish.
- Restart your computer.
This simple solution shows how to run the SFC scan in Windows 10.
8. Run DISM
- Go to Search, type cmd, and open Command Prompt as Administrator.
- Enter the following command on the command line:
DISM.exe /Online /Cleanup-image /Restorehealth
- In case the DISM can’t obtain files online, try using your installation USB or DVD. Insert media and type following command:
DISM.exe /Online /Cleanup-Image /RestoreHealth /Source:C:RepairSourceWindows /LimitAccess
- Make sure to replace the following path of your DVD or USB:
C:/Repair/Source/Windows
9. Reset the Security Center service
- Go to Search, type
services.msc, and open Services. - Find the Security Center service.
- Right-click the Security Center service, and go to Reset.
- Restart your computer.
And finally, if none of the solutions from above worked, we’ll try resetting the Security Center service. Hopefully, Windows Defender will start working after that.
That’s about it, we hope at least one of these solutions helped you resolve your problems with Windows Defender. If you have any comments, questions or suggestions, just let us know in the comments down below.
![]()
Newsletter
 Александр Криницин
07.11.2020
Что делать если вылетает журнал защиты виндовс. Он заблокировал один файл, а я не могу разрешить его!
Дополнено (1). 
Дополнено (2). После нажатия на «Журнал защиты» Он просто закрывается
 Кулхацкир
24.10.2020
Поставить нормальную ОС
 Треть Земли
24.10.2020
То есть Ты не можешь добавить файл в исключения антивируса?
 Гость
Гость
05.01.2021
таже проблема, не знаю как решить
- Безопасность Windows — Журнал защиты — Исправление не завершено проблема Показывает троян и информацию о нём. Кнопки ДЕЙСТВИЯ нет и удалить его не могу. Показывает что находится он в папке Загрузки но там тоже ничего нет.
- Журнал событий виндовс Смотря журнал событий винды заметил ошибки и предупреждения с разными кодами события. Какие коды событий негативно влияют на систему, а какие можно не фиксить так как Они не предоставляют угрозы для системы?
- Не открывается журнал Защиты Windows Defender Короче, ситуация такова. При открытии журнала Защиты стандартного анти-вируса от Майков, окошко с антивирусом зависает и через пару секунд вылетает. Поддержка Microsoft беспомощна, все толдычат одно и тоже, и всё равно не помогает.
- Прошу помощи (журнал защиты виндовс) Как очистить запись: доступ к папкам заблокирован. Из журнала защиты в виндовс 10? Именно очистить эту запись, я могу очистить другие записи, удалив папку сервис, а эту нет, прошу помощи
Добавить комментарий
Download Windows Speedup Tool to fix errors and make PC run faster
If Windows Security or Defender closes immediately after opening or crashes in Windows 11/10, here are some fixes to eliminate the issue. There could be times when you might not be able to use Windows Security on your Windows 11/10 computer due to various reasons. It may close immediately after opening or start freezing or crashing on your computer. You could follow the following guides to mitigate the problem.

If your Windows Security closes immediately after opening – or crashes on your Windows 11/10 computer, follow these troubleshooting steps to fix the issue:
- Run antivirus scan at Boot time
- Use SFC
- Run DISM
- Repair or Reset Windows Security
- Disable or Uninstall Third-party antivirus
- Troubleshoot in Clean Boot State
- Cloud Reset or Reset this PC
To learn more about solutions in detail, continue reading.
1] Run antivirus scan at Boot time
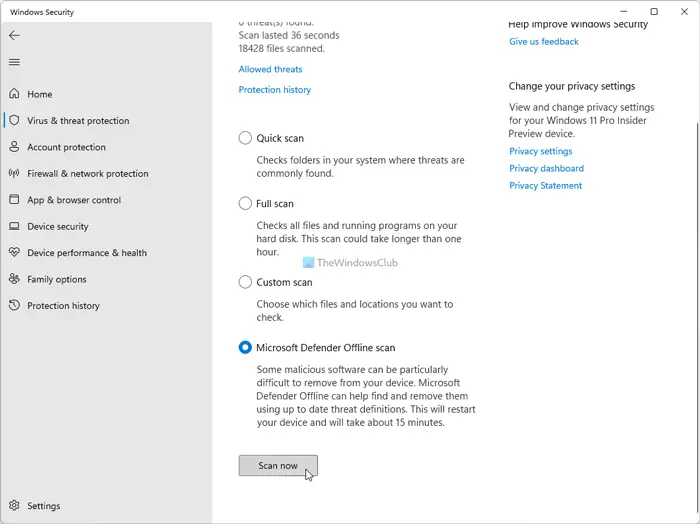
Windows Security allows users to scan the computer in Safe Mode or at Boot time. The option is called Microsoft Defender Offline scan, which you can find in the Virus & threat protection > Scan options in Windows Security. After choosing the option, you need to click the Scan now button.
You can scan your computer in Safe Mode or Boot time using any antivirus. There are some antivirus software that allow users to scan their PC at Boot-Time – they offer such an option. If your installed antivirus supports that option, you could use it.
2] Use SFC or System File Checker
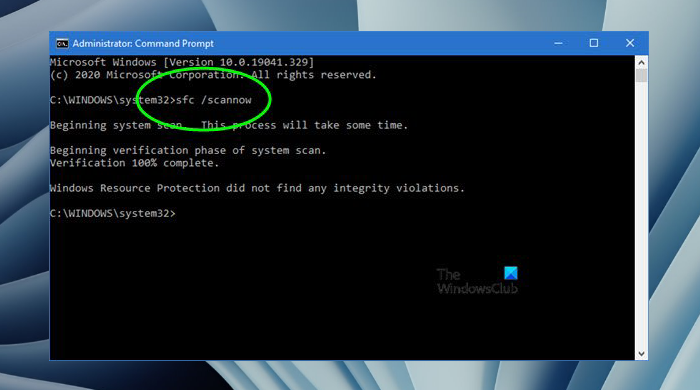
System File Checker is a command-line utility build into Windows 11/10 computer to identify and fix corrupt system files. You need to use the sfc /scannow command in an elevated Command Prompt window to run it on your PC. However, if you do not know about the SFC scan, it is recommended to follow this tutorial.
3] Run DISM
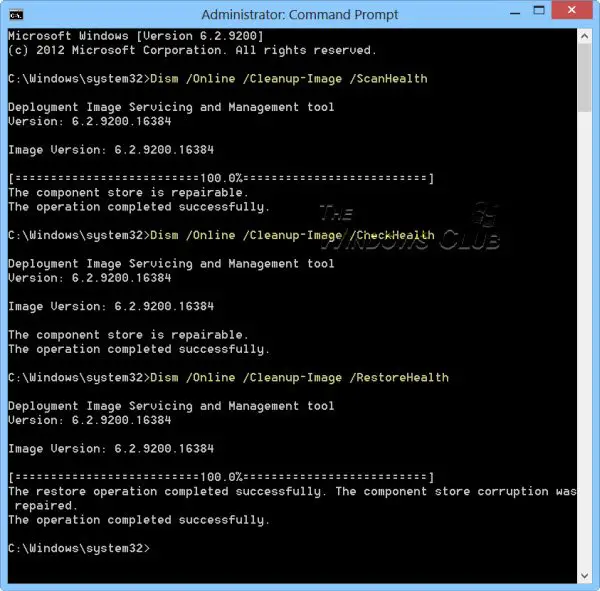
DISM or Deployment Image Servicing and Management is another command-line tool that you can find on your Windows 11/10 computer. It fixes common issues with system apps like Windows Security. Follow this guide to learn how to run DISM tool to fix Windows Security issues.
4] Repair or Reset Windows Security
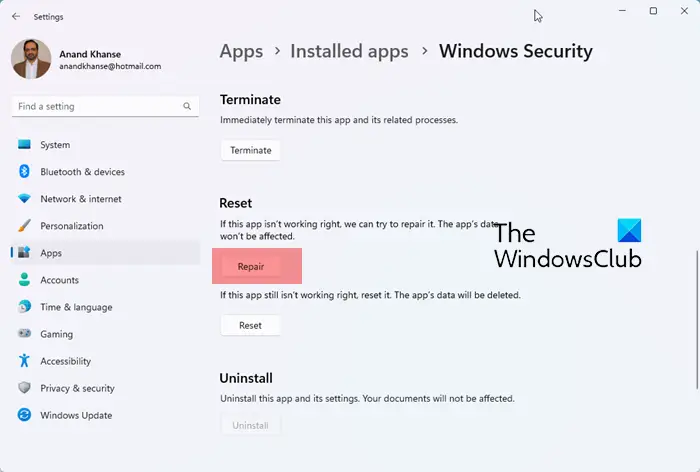
To repair Windows Security, do the following:
- Press the Win+I key on the keyboard to open Settings.
- Click on App settings on the left side
- Under Installed apps, search for Windows Security
- Click on the 3 dots and select Advanced option
- On the next page, click on the Repair button in Settings.
- Click on Repair to confirm.
5] Disable Third-party antivirus
If you installed a third-party antivirus, you might get the same problem on your computer. Windows 11/10 disables Windows Security when you install a third-party antivirus. In the meantime, if you try to open the in-built security tool, you may come across the issue as stated here. Therefore, disable the third-party antivirus and check if it solves the issue or not.
6] Troubleshoot in Clean Boot State
Clean Boot is such a state that allows users to boot their computers without additional services. In other words, it lets users determine whether the source of the problem is a third-party app or something else. For that, you need to follow this tutorial to learn how you can troubleshoot in the Clean Boot state in Windows 11/10 PC.
7] Cloud reset or Reset this PC
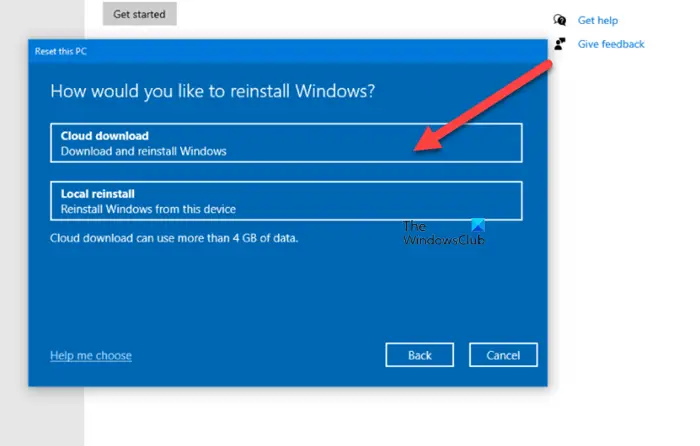
If nothing is working to fix the issue, you need to reset your computer to the factory defaults. When you reset your PC, it goes into the default settings and fixes the issue immediately. You might need to consider resetting your computer to eliminate the problem. You could also use the Cloud Reset option.
Why does my Windows Security keep closing?
There could be various reasons why Windows Security keeps closing on your Windows 11/10 computer. From a third-party antivirus to a corrupted system file, anything can be accountable for this problem. However, if you get this issue, you can follow the solutions mentioned above in this article.
How do I fix Windows Defender from closing?
To fix Windows Defender from closing immediately after opening, you need to use the System File Checker, run the DISM tool, disable third-party antivirus, or troubleshoot in the Clean Boot state. However, if nothing is working, you can reset the PC to get it fixed.
That’s all! Hope this guide helped.
Read: List of Microsoft Defender error codes and solutions.
Anand Khanse is the Admin of TheWindowsClub.com, a 10-year Microsoft MVP (2006-16) & a Windows Insider MVP (2016-2022). Please read the entire post & the comments first, create a System Restore Point before making any changes to your system & be careful about any 3rd-party offers while installing freeware.
Hi
Still having issues with Windows Defender Security Center program closes when you click on the home button, or try to open from settings, update and security, windows defender, open windows defender
security center button.
What happens
1 Right click WD notification tab/open. The WD security center window opens. Thumb tabs to the left all work except the home tab and the settings tab. When first open the window is blank except
the tabs. If I click the home or settings tabs it crashes «program stops»
2 Go to settings/update and security/windows defender/open windows defender security center button «program stops»
If I get it running using the first method ie right click the notifications button. The home page is blank. I click on the other tab the window will populate with the correct tab. If I then click
the home or the settings tabs it closes.
Up to date as of 01/23/2018
windows 10 v 1709 Build 16299.192
virus definitions
Antimalware client v 4.12.17007.18011
Engine v 1.1.14500.5
Antivirus definition v 1.261.151.0
Antispyware definition v 1.261.151.0
NIS engine v 2.1.14202.0
NIS definition v 118.2.0.0
Running programs
WD notification icon
Windows security health service
No other Antivirus software installed….ever
Here is the post that was cosed with no answer.
https://answers.microsoft.com/en-us/protect/forum/protect_defender-protect_start-windows_10/windows-defender-security-centre-crashes-on/369012bd-c2d3-4672-9602-647a40e71727
Doing several weeks of Google searching there are several that are having this issue.
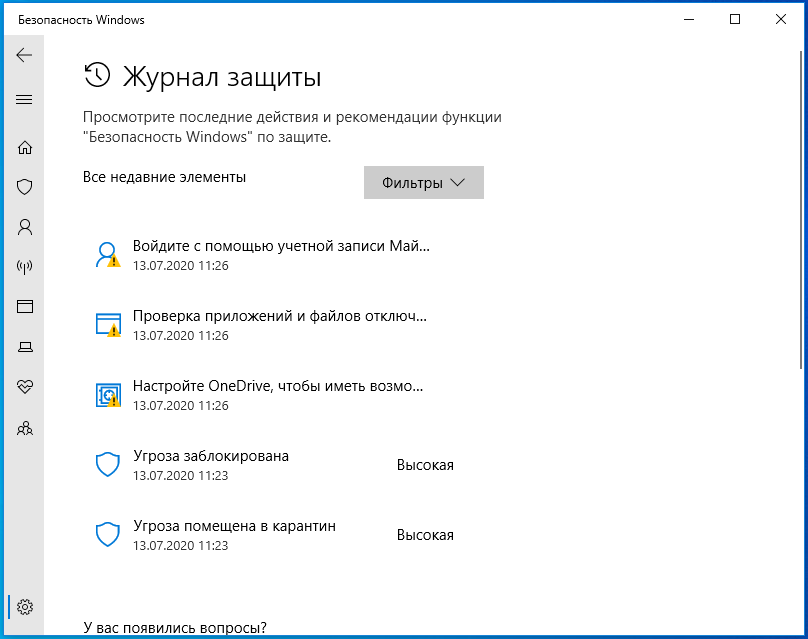
Журнал защиты — это часть приложения «Безопасность Windows», в котором отображаются действия и рекомендации по угрозам в Windows 11 и 10. На странице представлены элементы, помещенные в карантин, элементы, удаленные, удаленные элементы, разрешенные элементы, удаленные элементы, заблокированные действия и серьезность угрозы. Параметр «Заблокированные действия» имеет 3 подменю: «Блокировать доступ к папке», «Заблокированные элементы» и «Блокировать на основе правил». Точно так же параметр «Серьезность» имеет 4 элемента: «Тяжелая высокая», «Умеренная» и «Низкая». Но иногда люди жалуются на отсутствие истории защиты.
История защиты Защитника Windows пуста или пуста, и на странице ничего не видно, когда возникает проблема. Сразу после запуска «Быстрого сканирования», «Полного сканирования», «Выборочного сканирования» или «Автономного сканирования Microsoft Defender» пользователь обычно переходит к истории защиты. Но он разочаровывается и обнаруживает себя из ниоткуда, когда оказывается незанятым, потому что он не может узнать статус угроз или устранить их на своем компьютере с Windows 11. К счастью, есть решения этой проблемы. См. — Исправление: пустые, пустые или отсутствующие параметры программы предварительной оценки в Windows 10.
Вот как исправить историю защиты, отсутствующую в Windows 11 или 10 —
Способ 1: отключить Защитник Windows и перезагрузить компьютер
Чтобы нормально получить доступ к соответствующим настройкам, вы можете пройти — Как просмотреть историю защиты в Windows 10, но в этом случае содержимое этой страницы отсутствует. Отключение Защитника Windows и удаление файлов mpcache работает как чудо, чтобы решить проблему —
- Ударил – Окна и р.
- Тип – cmd.exe.
- Нажимать Ctrl + Сдвиг + Входить.
- Выбирать Да когда откроется всплывающее окно настройки контроля учетной записи пользователя.
- Введите последовательно следующие команды и нажмите Enter.
del “C:\ProgramData\Microsoft\Windows Defender\Scans\History\Service\DetectionHistory\*” del “C:\ProgramData\Microsoft\Windows Defender\Scans\mpenginedb.db”
- Нажмите на Поиск.
- Тип Безопасность Windows.
- Нажимать Входить.
- Выбирать – Защита от вирусов и угроз.
- Теперь нажмите на Управление настройками связь.
- На следующей странице отключите Защита в режиме реального времени и Облачная защита.
- Теперь откройте Проводник (Win+E).
- Перейдите на диск (C:).
- Дважды щелкните по Данные программы.
- Открыть Майкрософт папка.
- Входить Защитник Windows и запуск Сканы папка.
- Путь будет следующим –
C:\ProgramData\Microsoft\Защитник Windows\Сканирование
- Найти все файлы с префиксом mpcache и удалите их.
- На моем компьютере Сканы папка имеет следующие файлы, которые я удаляю –
mpcache-8B71EC38EE6CA744C8B3D9719F943BEFDB9392A9.bin mpcache-8B71EC38EE6CA744C8B3D9719F943BEFDB9392A9.bin.01 mpcache-8B71EC38EE6CA744C8B3D9719F943BEFDB9392A9.bin.6C mpcache-8B71EC38EE6CA744C8B3D9719F943BEFDB9392A9.bin.7C mpcache-8B71EC38EE6CA744C8B3D9719F943BEFDB9392A9.bin.7E mpcache-8B71EC38EE6CA744C8B3D9719F943BEFDB9392A9.bin.67 mpcache-8B71EC38EE6CA744C8B3D9719F943BEFDB9392A9.bin.79 mpcache-8B71EC38EE6CA744C8B3D9719F943BEFDB9392A9 .bin.80 mpcache-8B71EC38EE6CA744C8B3D9719F943BEFDB9392A9.bin.83 mpcache-8B71EC38EE6CA744C8B3D9719F943BEFDB9392A9.bin.87 mpcache-8B71EC38EE6CA744C8B3D9719F943BEFDB9392A9.bin.A0 mpcache-8B71EC38EE6CA744C8B3D9719F943BEFDB9392A9.bin.DB mpcache-8B71EC38EE6CA744C8B3D9719F943BEFDB9392A9.bin.E6
- Иногда вы не сможете удалить файлы mpcache и получите сообщение «Действие не может быть выполнено, так как файл открыт в антивирусной службе Microsoft Defender».
- В этом случае нажмите Ctrl+Shift+Esc.
- В диспетчере задач найдите процессы, связанные с Widows Security и Защитником Windows.
- Щелкните правой кнопкой мыши на каждом из них и выберите Завершить задачу.
- Теперь попробуйте удалить файлы mpcache.
- Перезагрузите компьютер, если вы можете восстановить отсутствующую историю защиты в Защитнике Windows.
Способ 2: удалить файлы mpcache с помощью команды cmd, чтобы исправить отсутствующую историю угроз безопасности Windows.
II вы не можете удалить файлы mpcache даже после отключения защиты в реальном времени и использования «Завершить задачу» в диспетчере задач, тогда может помочь команда cmd.
- Запустите командную строку от имени администратора (шаги указаны в первом способе)
- Введите следующую команду –
del “C:\ProgramData\Microsoft\Windows Defender\Scans\mpcache*” /s > NUL 2>&1
- Наконец, перезагрузите компьютер, чтобы увидеть отсутствующую историю защиты в Windows 11 или 10.
Методы:
Способ 1: отключить Защитник Windows и перезагрузить компьютер
Способ 2: удалить файлы mpcache с помощью команды cmd
Вот и все!!