Windows 10 часто преподносит «сюрпризы», которые сильно влияют на производительность слабых компьютеров. Одним из таких сюрпризов может быть процесс Antimalware Service Executable, способный полностью загрузить процессор, оперативную память или жесткий диск.
Почему так происходит и как это исправить – поговорим в сегодняшней статье.
Зачем нужен процесс Antimalware Service Executable
Antimalware Service Executable – задача, предназначенная для защиты операционной системы в реальном времени. Иными словами – это и есть Защитник Windows 10, который был разработан для устранения вирусов и вредоносного ПО. По умолчанию он встроен в систему и использует службу «Антивирусная программа Microsoft Defender». Если вы откроете «Диспетчер задач» (сделать это можно с помощью комбинации клавиш «CTRL+SHIFT+ESC»), то увидите данный процесс.
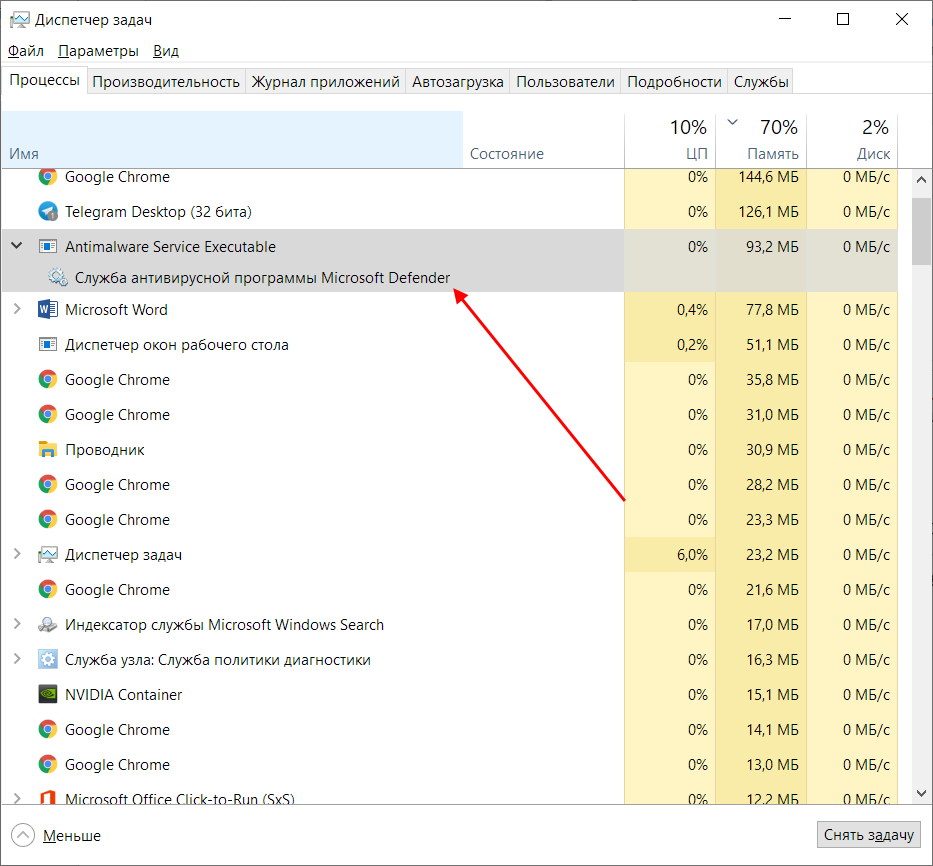
Когда Защитник проверяет компьютер на наличие угроз, он проводит полную проверку и анализирует все файлы. Такой процесс требует много ресурсов, поэтому многие процессоры часто не справляются с ним, вследствие чего начинают сильно тормозить: компьютер зависает, долго думает и будто отключается.
Почему так происходит, если любое другое антивирусное средство делает все то же самое, что и Защитник Windows? Ответ прост – разработчики не оптимизировали работу утилиты. На мощных компьютерах она никак не повлияет на производительность системы, а на слабых и даже средних машинах процесс может сильно грузить систему.
Если вы заметили высокую нагрузку на процессор или жесткий диск, то не стоит беспокоиться, ведь проблему еще можно исправить. Для начала рекомендую воспользоваться следующими инструкциями.
Комьюнити теперь в Телеграм
Подпишитесь и будьте в курсе последних IT-новостей
Подписаться
Исправляем проблему с Antimalware Service Executable
Существует несколько способов устранения проблемы с Antimalware Service Executable, однако ни один из них не гарантирует, что процесс перестанет грузить систему. Давайте рассмотрим каждый из них и попытаемся сделать все возможное.
Способ 1: Через планировщик заданий
Суть в следующем: по умолчанию Защитник Windows анализирует систему рандомно: нет какого-то определенного времени, когда он начнет сканирование. Вы можете играть, смотреть фильм, заниматься важными делами, но процессу нет до этого никакого дела – он будет работать тогда, когда захочет. Мы же можем задать точное время сканирования, тем самым минимизировав нагрузку на систему в рабочее время. Например, если вы находитесь за компьютером с 9 утра до 6 вечера, то работу Защитника стоит перенести на вечер или раннее утро.
Меняем расписание проверок:
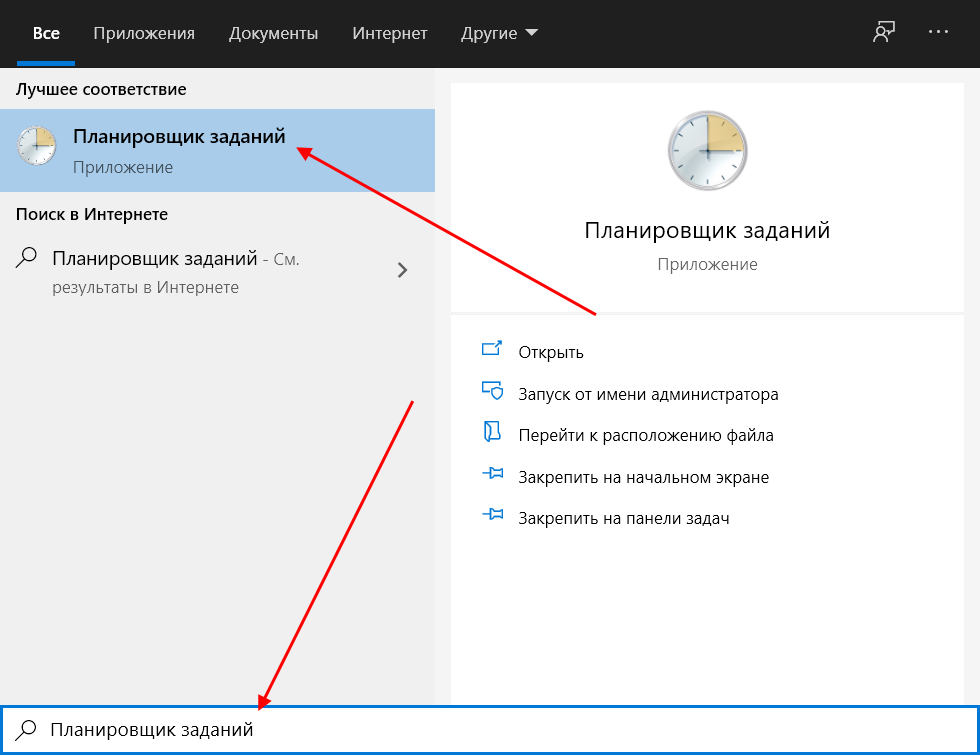
- Открываем меню «Пуск», вводим запрос «Планировщик заданий» и открываем соответствующую утилиту.

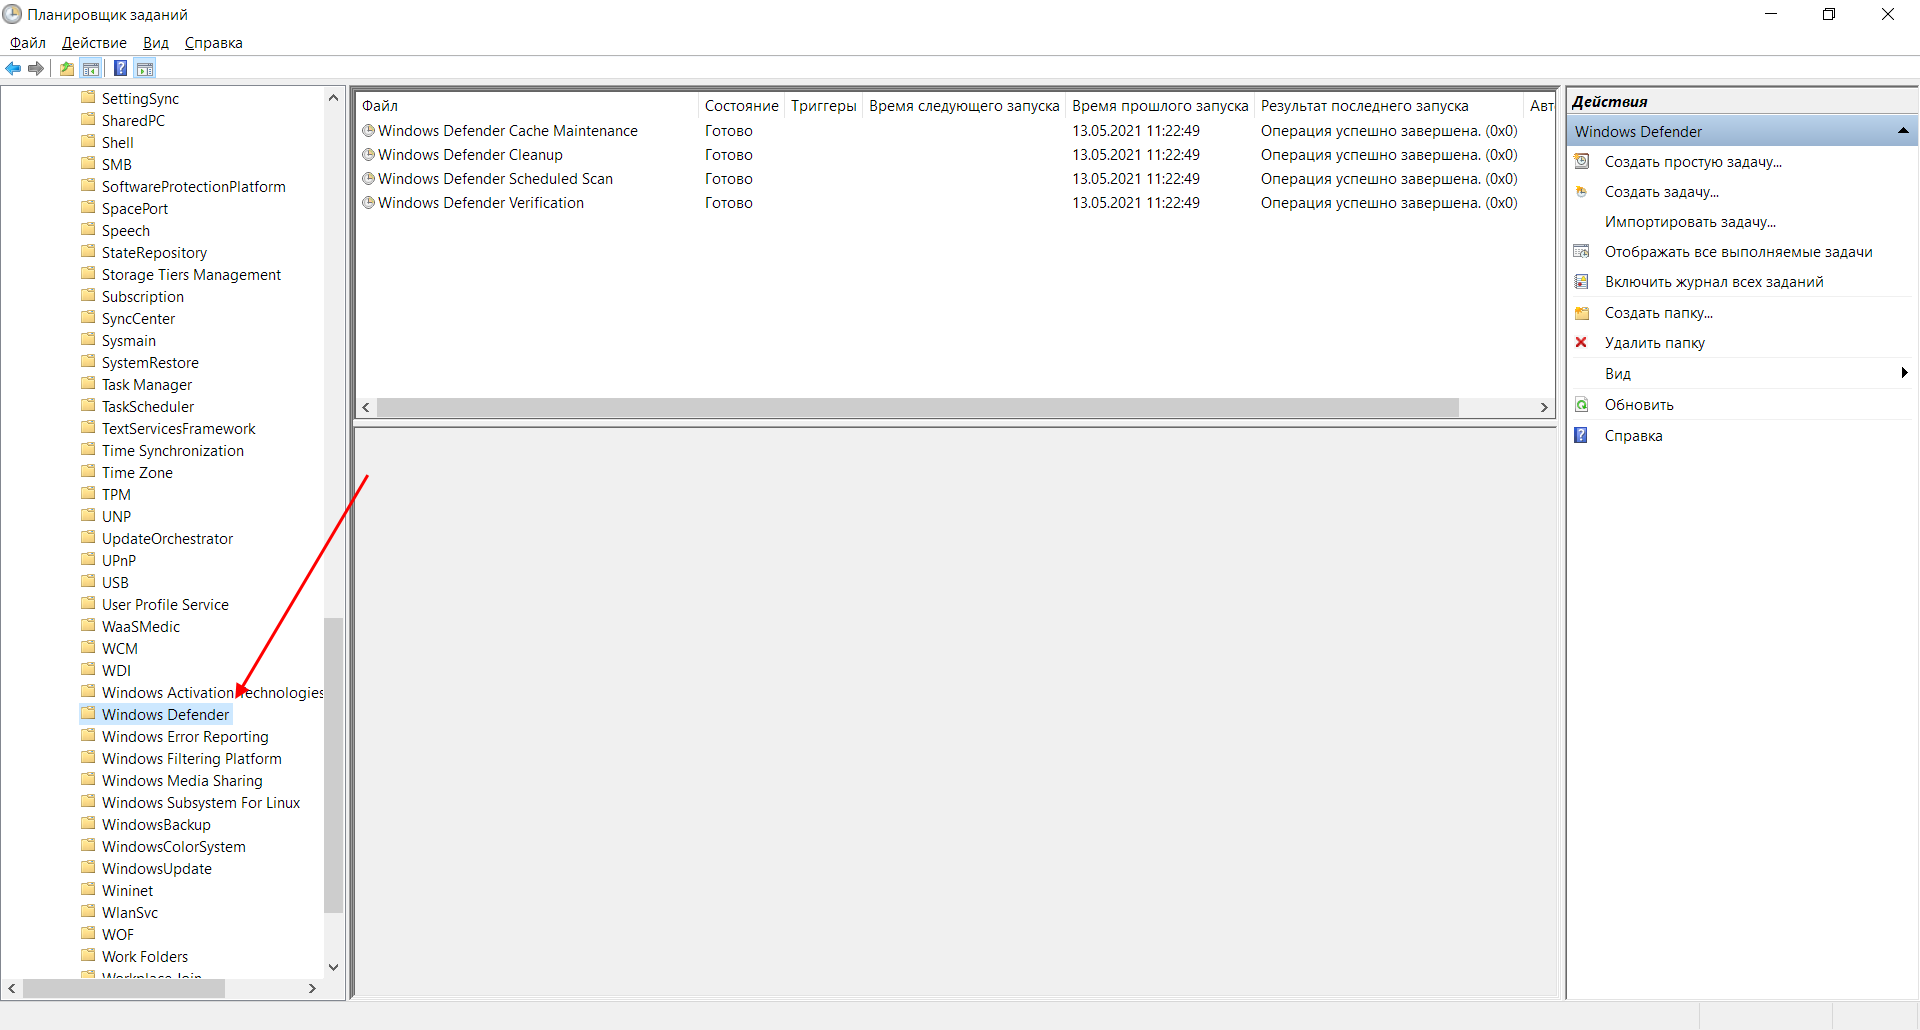
- В отобразившемся окне обращаем внимание на левую часть – там расположены папки различных программ. Нас интересует следующий путь: «Библиотека планировщика заданий» -> «Microsoft» -> «Windows» -> «Windows Defender».
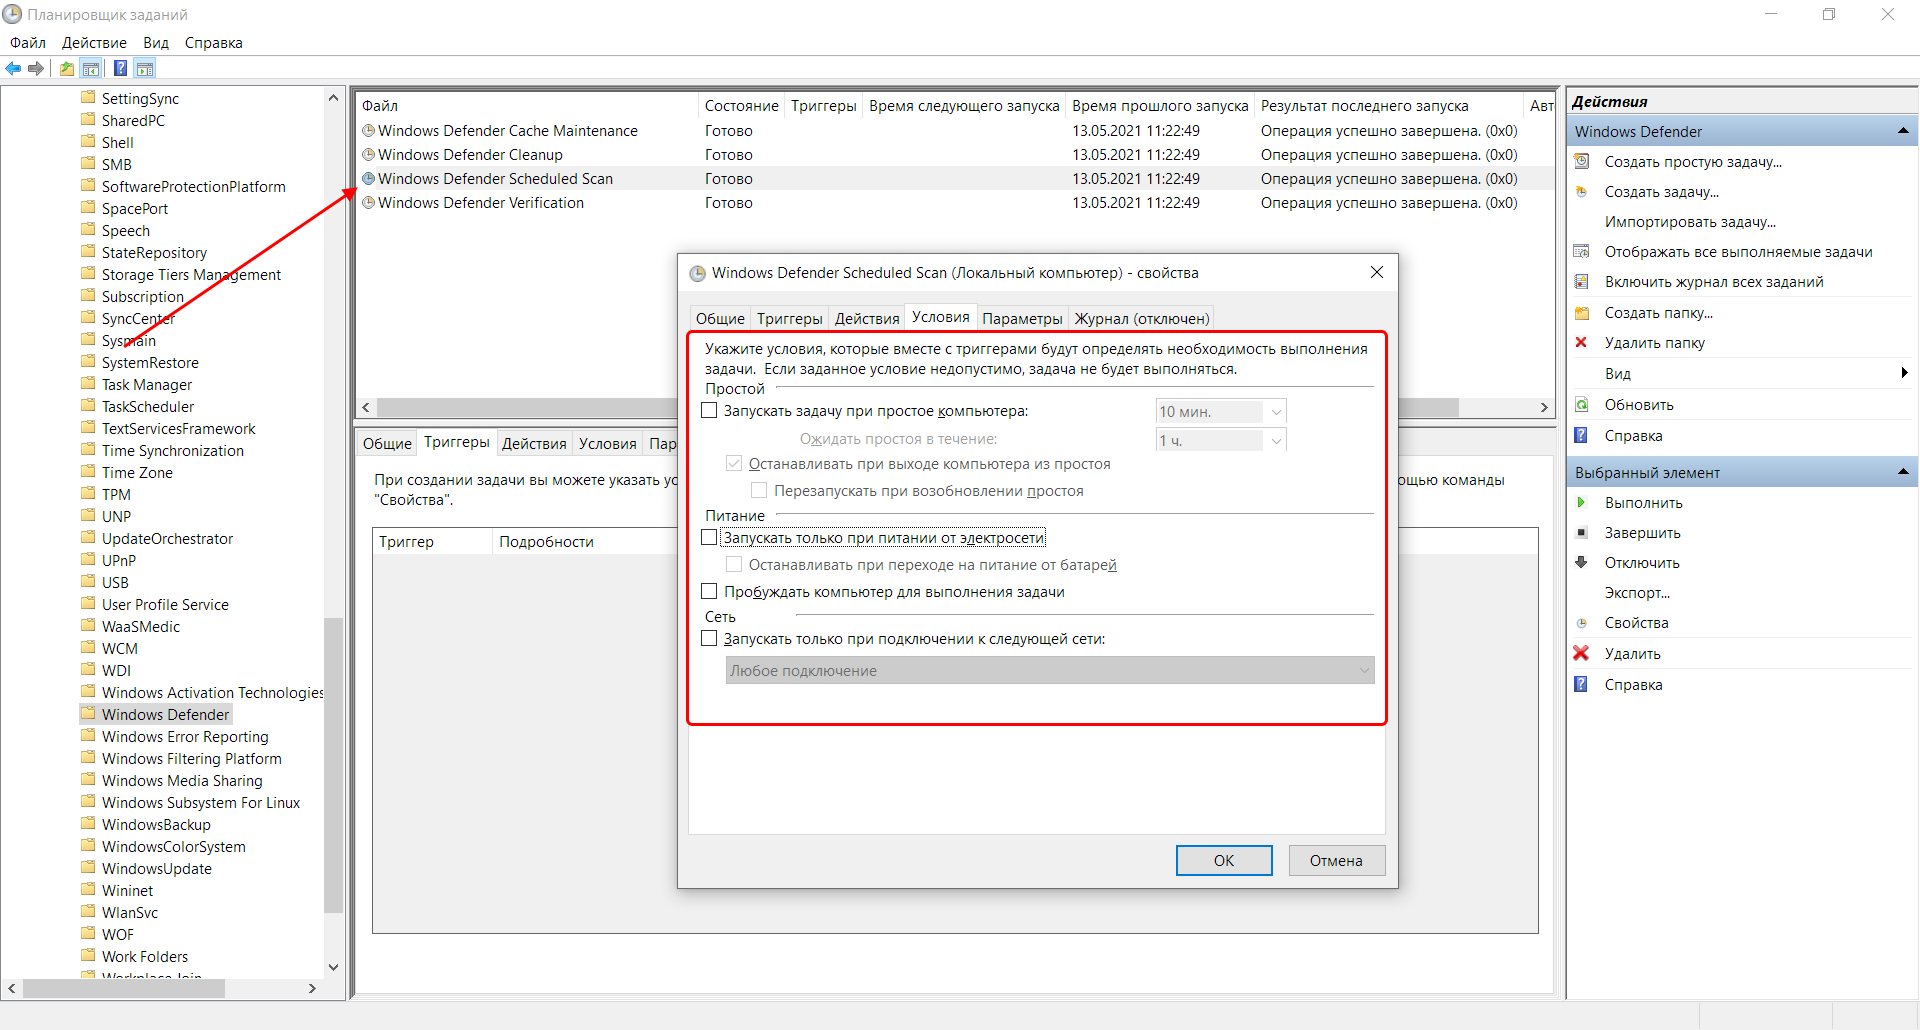
- Здесь находятся различные задачи, исполняемые Защитником. В первую очередь нас интересует Windows Defender Scheduled Scan – кликаем по нему двойным щелчком мыши и переходим в раздел «Условия», отключаем там все доступные опции.
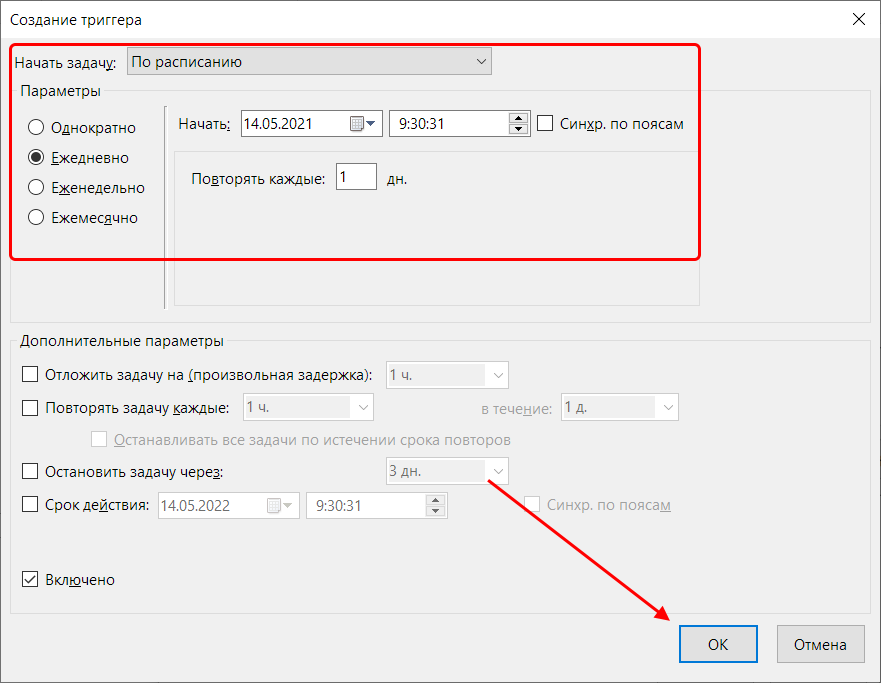
- Теперь нам нужно создать триггер, который будет вызывать задачу в определенное время суток. Для этого переходим в раздел «Триггеры» и нажимаем «Создать…».
- Осталось указать необходимое время запуска и сохранить внесенные изменения.

Подождите закрывать Планировщик Заданий – нужно провести аналогичные настройки и для других задач. Все, что мы сделали, выполните также для Windows Defender Cache Maintenance, Windows Defender Cleanup, Windows Defender Verification.
Способ 2: С помощью списка исключений
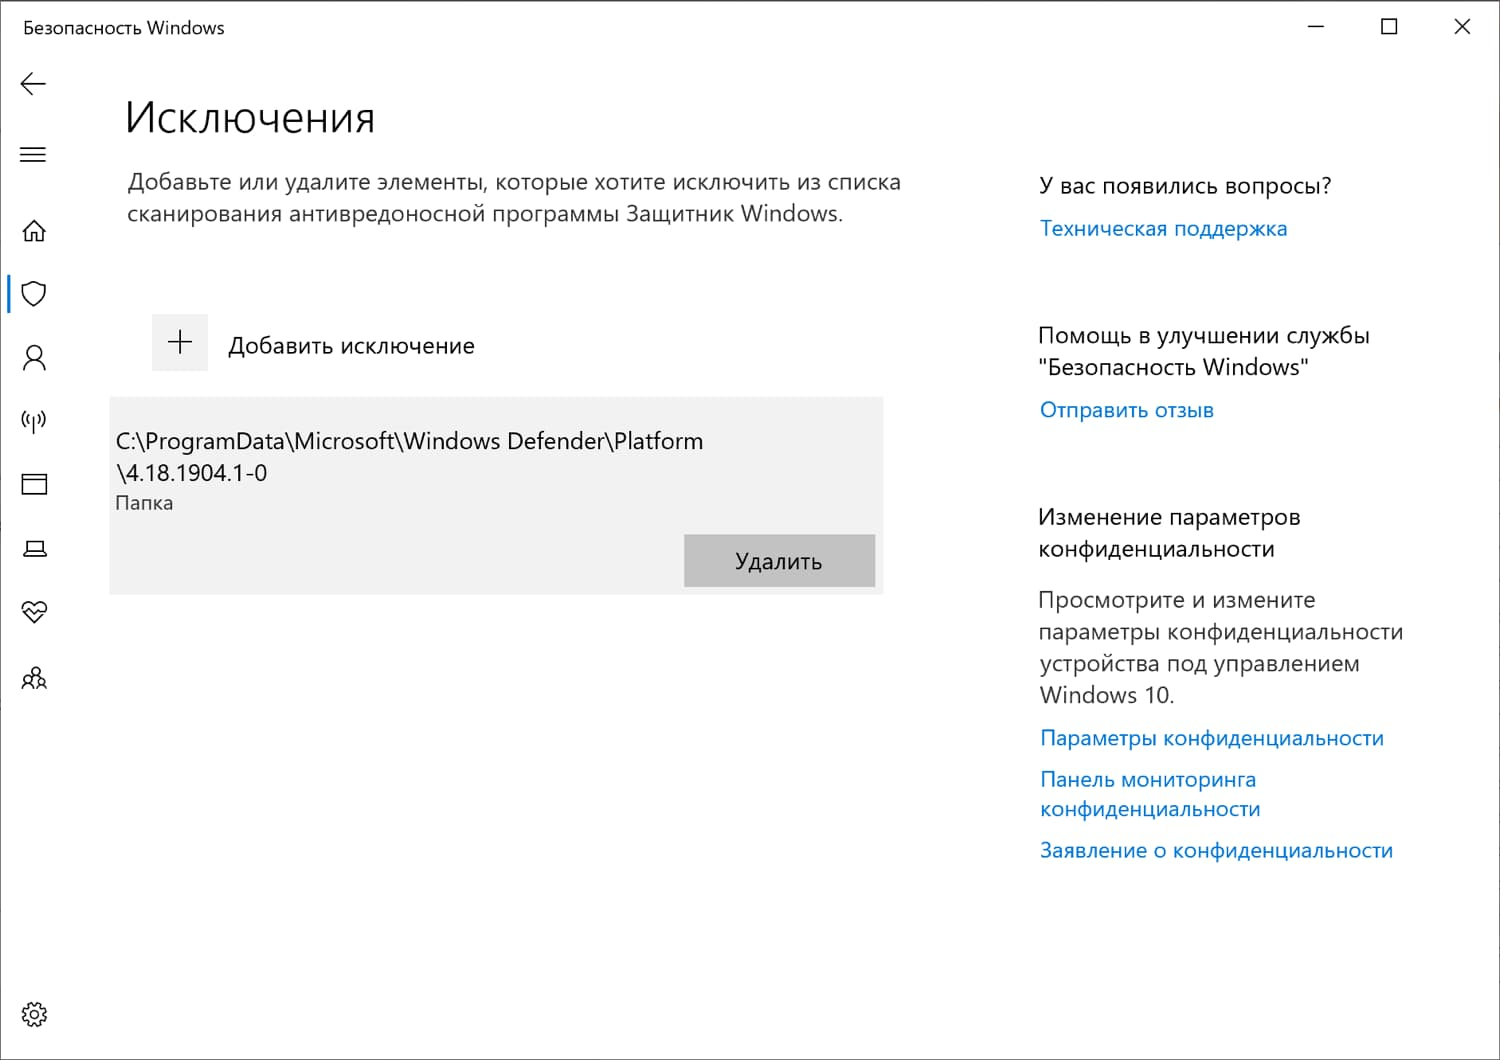
Сканирование подразумевает анализ всех файлов, которые есть в системе. В их список входят файлы самого Защитника Windows – именно в этом и кроется проблема. Когда антивирусник сканирует собственные данные, компьютер начинает подтормаживать. Чтобы это исправить, мы можем просто исключить папку Защитника из списка сканируемых файлов. Сделать это можно следующим образом:
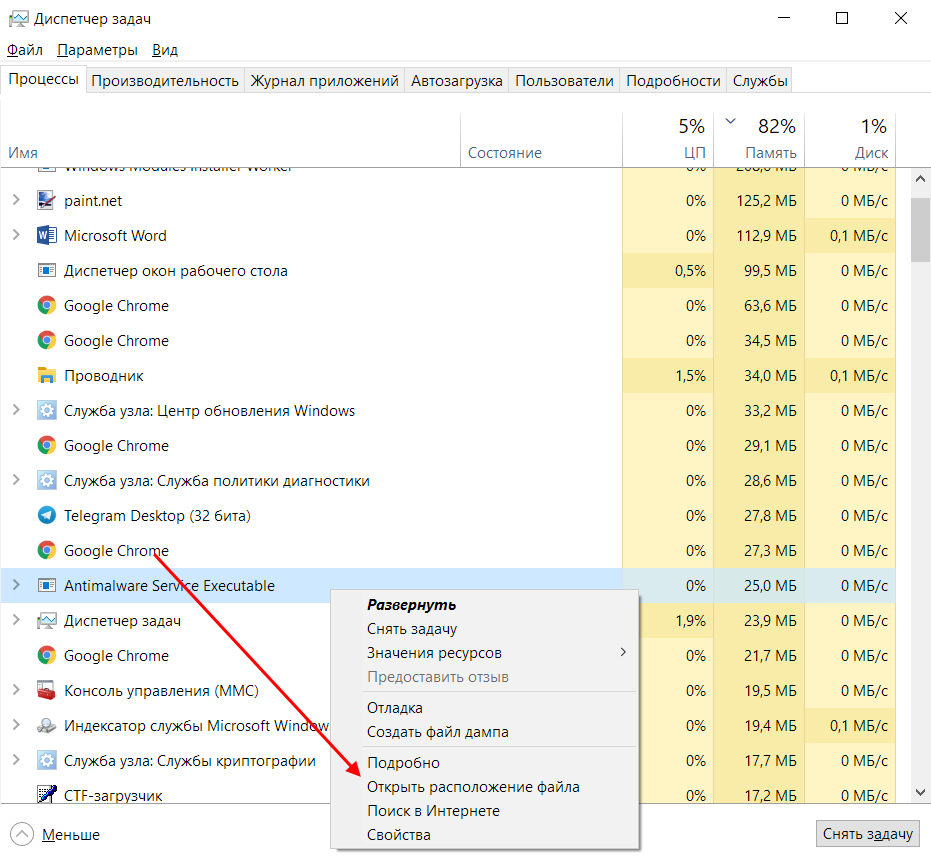
- Для начала узнаем, где хранятся файлы Windows Defender. Для этого кликаем правой кнопкой мыши по панели задач и переходим в «Диспетчер задач» либо используем комбинацию клавиш «CTRL+SHIFT+ESC». Затем находим процесс Antimalware Service Executable, кликаем по нему правой кнопкой и выбираем «Открыть расположение файла».
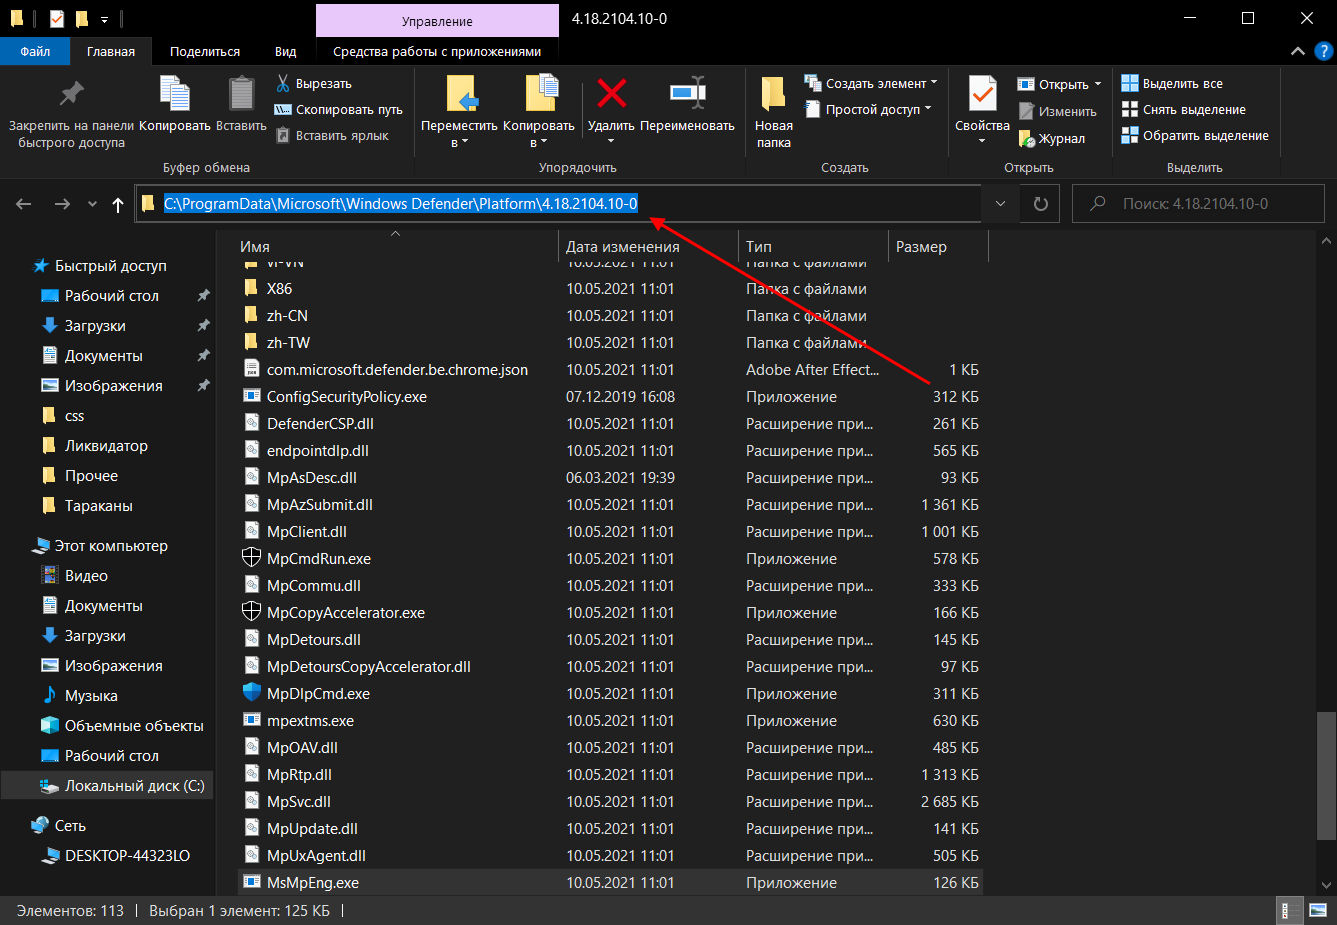
- В результате перед нами отобразится папка с файлом MsMpEng.exe, отвечающим за процесс. Копируем адрес папки через верхнюю строку запроса.
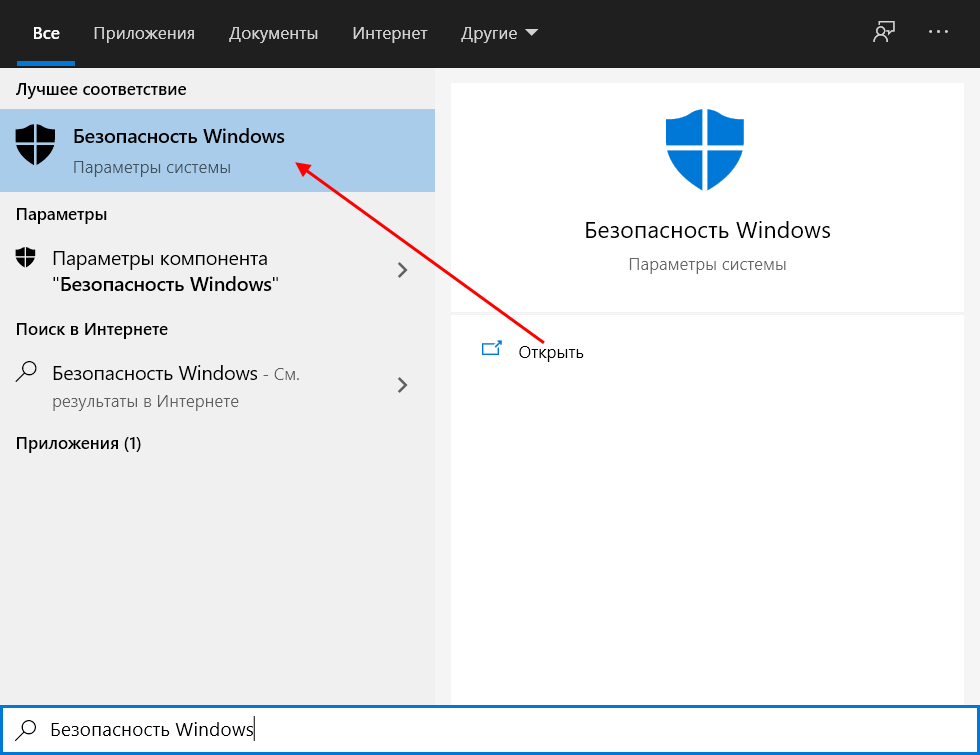
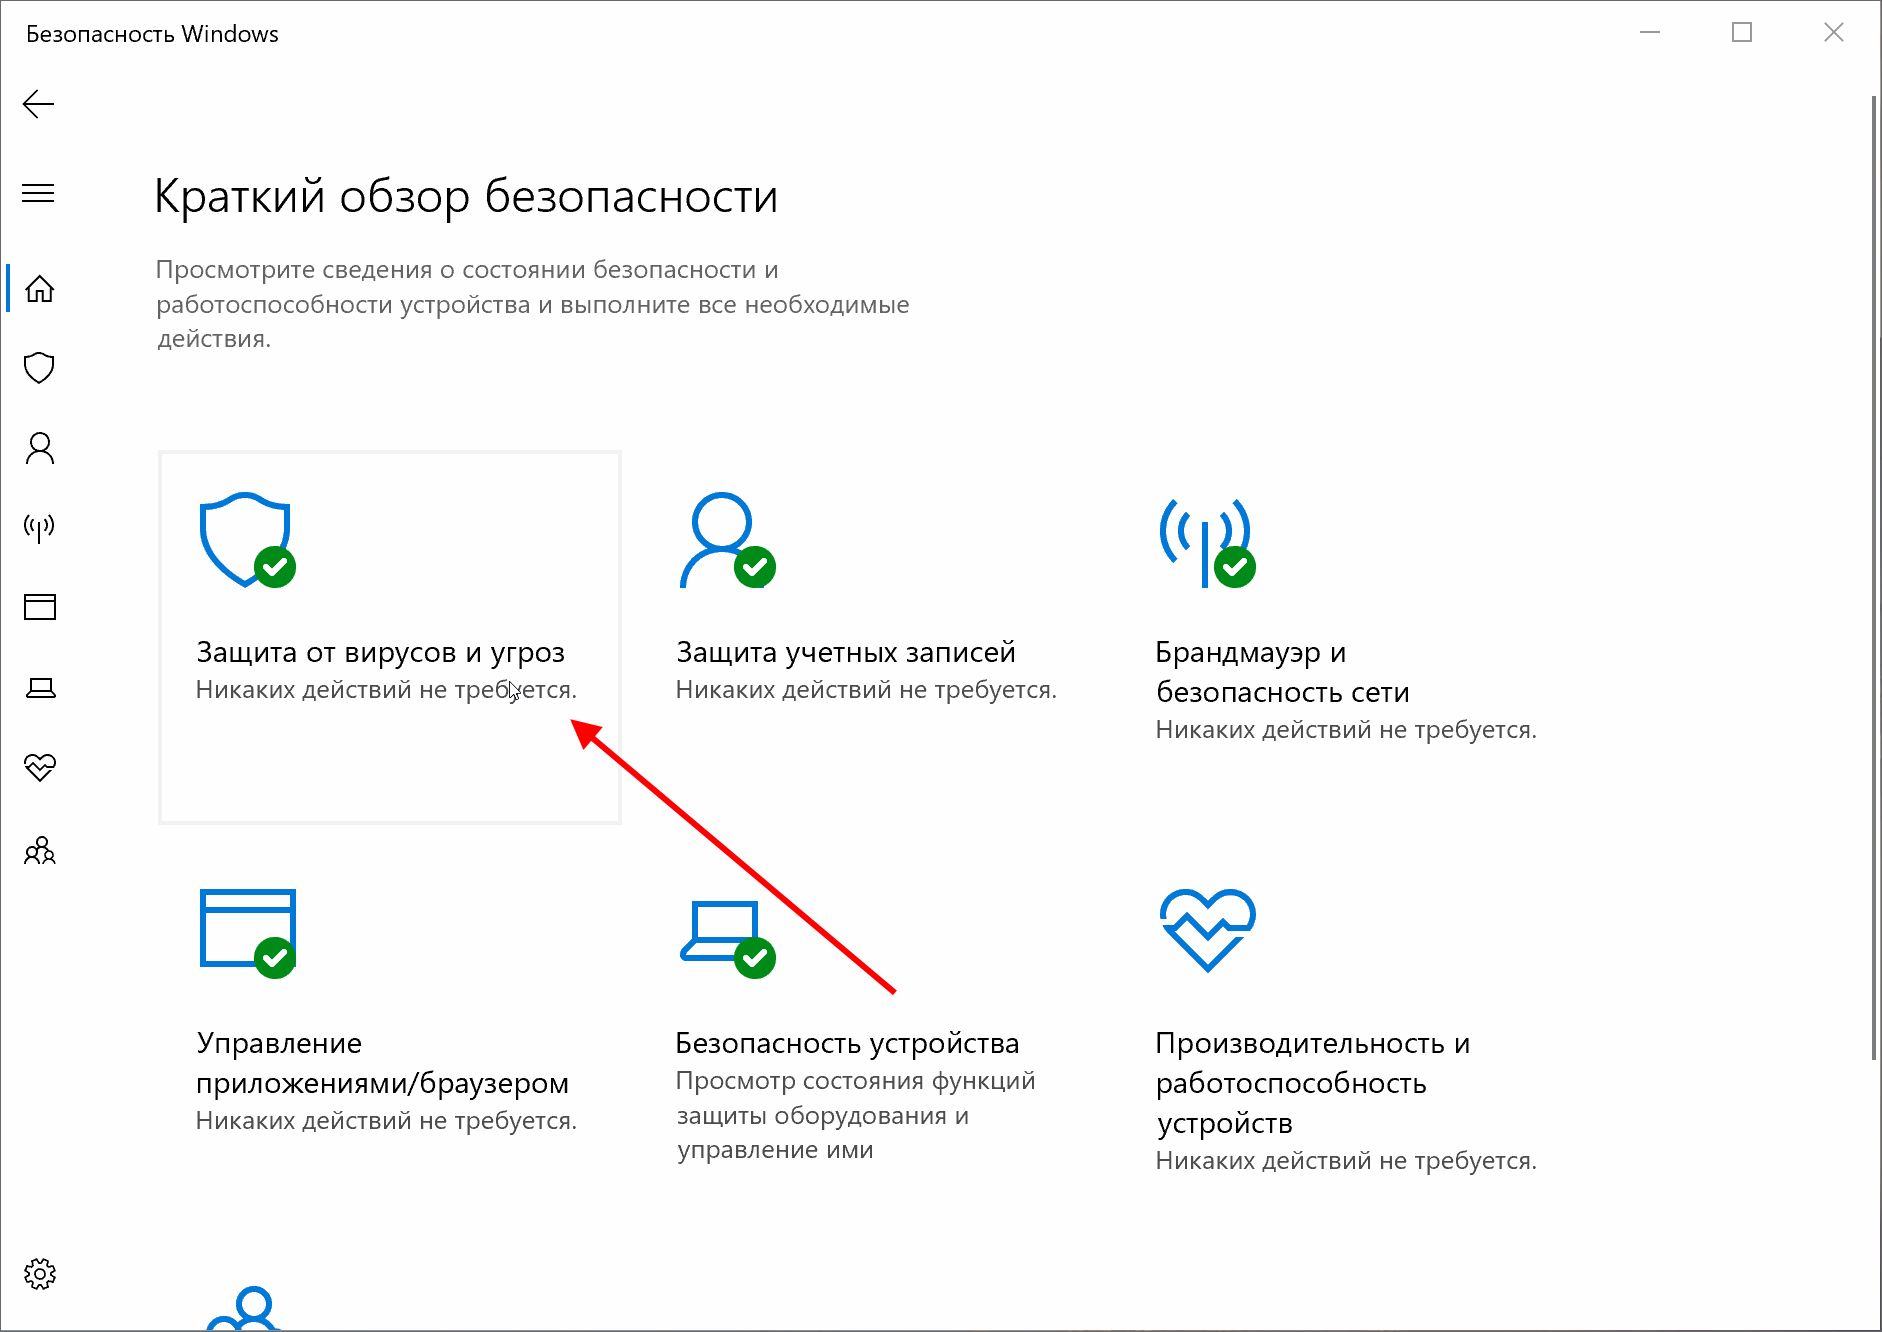
- Переходим в меню «Пуск», вводим запрос «Безопасность Windows» и открываем его.
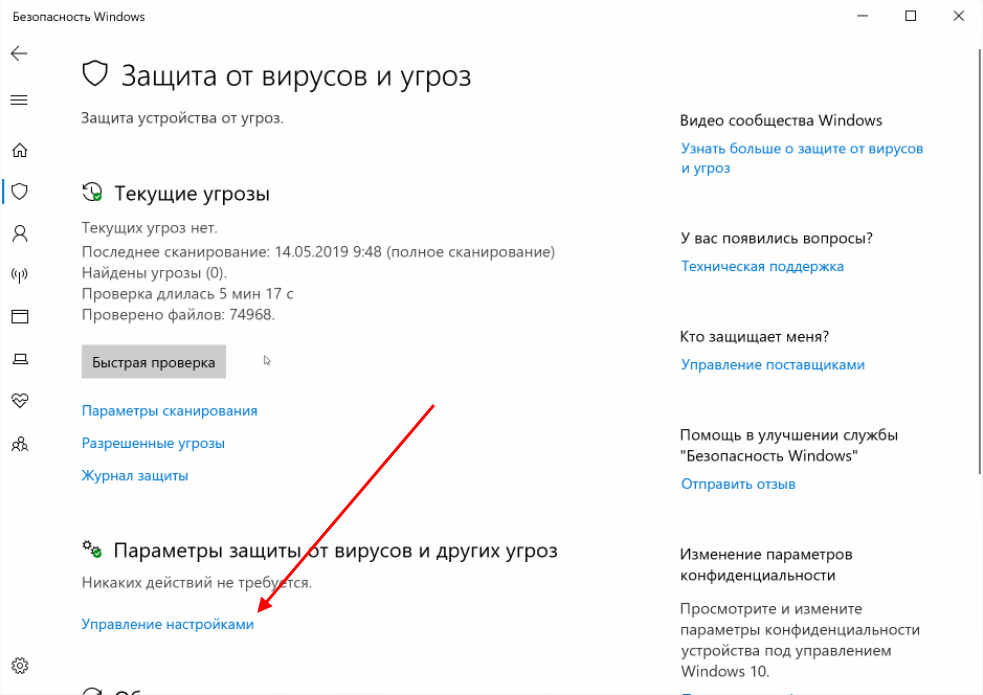
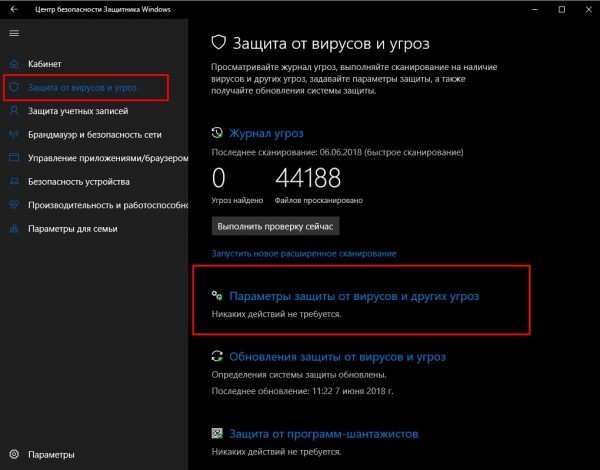
- Следующим шагом выбираем «Защита от вирусов и угроз».
- Пролистываем немного вниз и переходим в «Управление настройками».
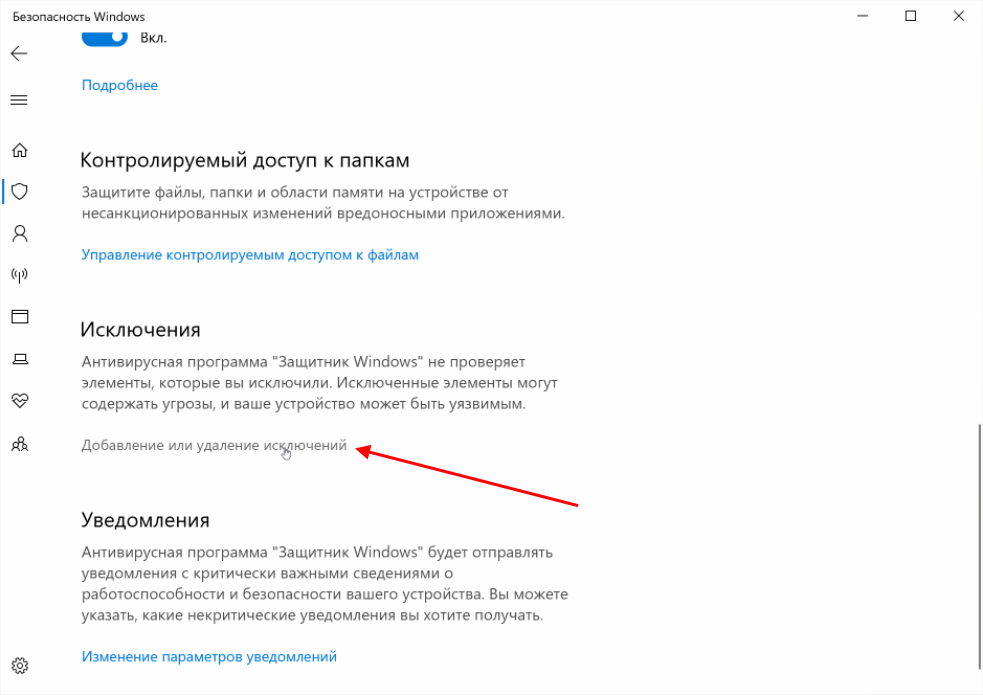
- Находим раздел «Исключения» и прямо под ним нажимаем на кнопку «Добавление или удаление исключений».
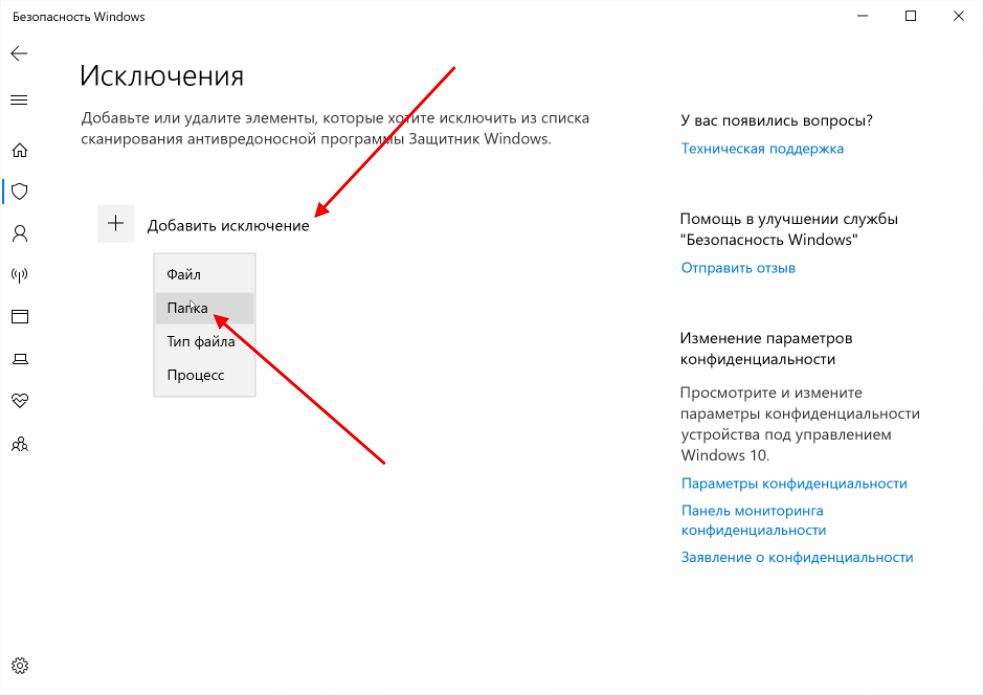
- Выбираем «Добавить исключение» -> «Папка».
- Вставляем скопированный путь и жмем «Выбор папки». Таким образом мы исключаем проверку всех файлов Windows Defender.
Аналогичным образом мы можем исключить любые другие файлы системы.
Способ 3: Проверка на вирусы
Частая причина высокой нагруженности Защитника Windows – вирусная активность. Хоть программа и предназначена для защиты от вирусов, ей не всегда удается их устранить. В таких случаях процессор или оперативная память начинает сильно загружаться. Исправить это можно сторонними антивирусными средствами, например Dr.Web CureIt! или Malwarebytes Free.
Как отключить Защитник Windows 10
Если ни один из вышеперечисленных способов не подошел, рекомендуется переходить к радикальным мерам – полному отключению антивирусника Windows. Данный способ стоит использовать только тогда, когда есть альтернативное решение Защитнику. Когда вы его отключите, ваша система станет уязвима к различным видам атак, поэтому важно иметь под рукой сторонний антивирусник.
Вариант 1: Временное отключение Защитника
Данный способ подойдет для тех, кто все же решился оставить Защитник Windows, но хочет избавиться от торможения системы на время. Сделать это можно следующим образом:
- Переходим в параметры антивирусника через панель задач.
- В отобразившемся окне переходим в раздел «Защита от вирусов и угроз». Затем открываем «Параметры защиты от вирусов и других угроз».
- Переводим все ползунки в значение «Откл.».
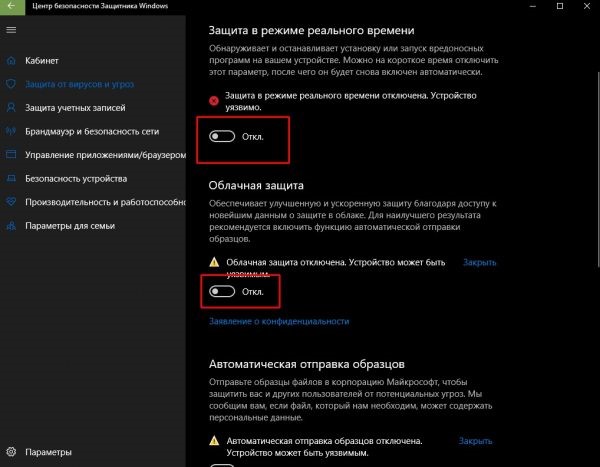
Антивирусник будет отключен, и процесс перестанет потреблять ресурсы компьютера. После того как система перезагрузится, Defender снова станет активным.
Вариант 2: Полное отключение
Для полного отключения нам потребуется зайти в редактор реестра и настроить некоторые параметры. Строго следуйте инструкции, потому как изменение различных данных реестра может привести к серьезным системным проблемам.
Отключаем Защитник:
- Используем комбинацию клавиш «WIN+R», вводим запрос regedit и жмем «ОК».
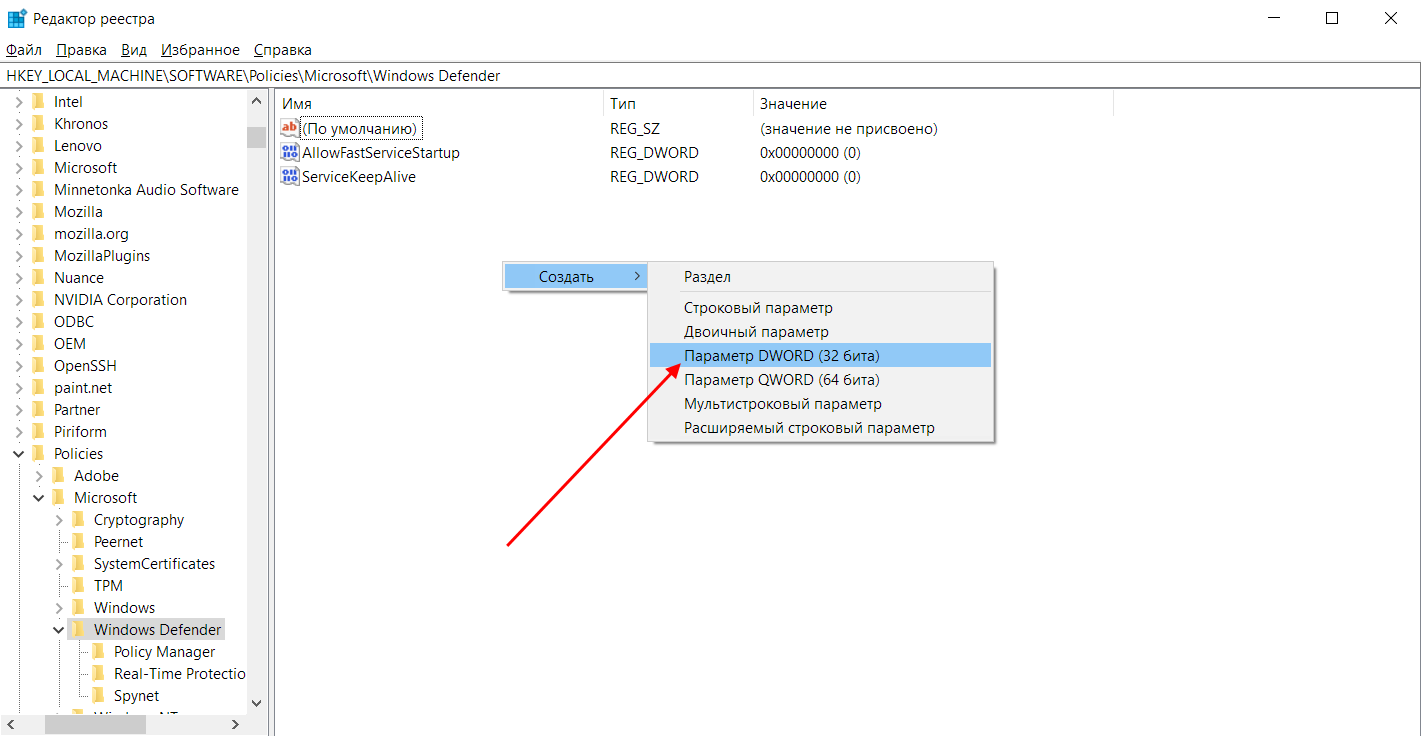
- Далее переходим по пути HKEY_LOCAL_MACHINE\SOFTWARE\Policies\Microsoft\Windows Defender.
- Кликаем правой кнопкой мыши по пустому полю и выбираем «Создать» -> «Параметр DWORD (32 бита)».
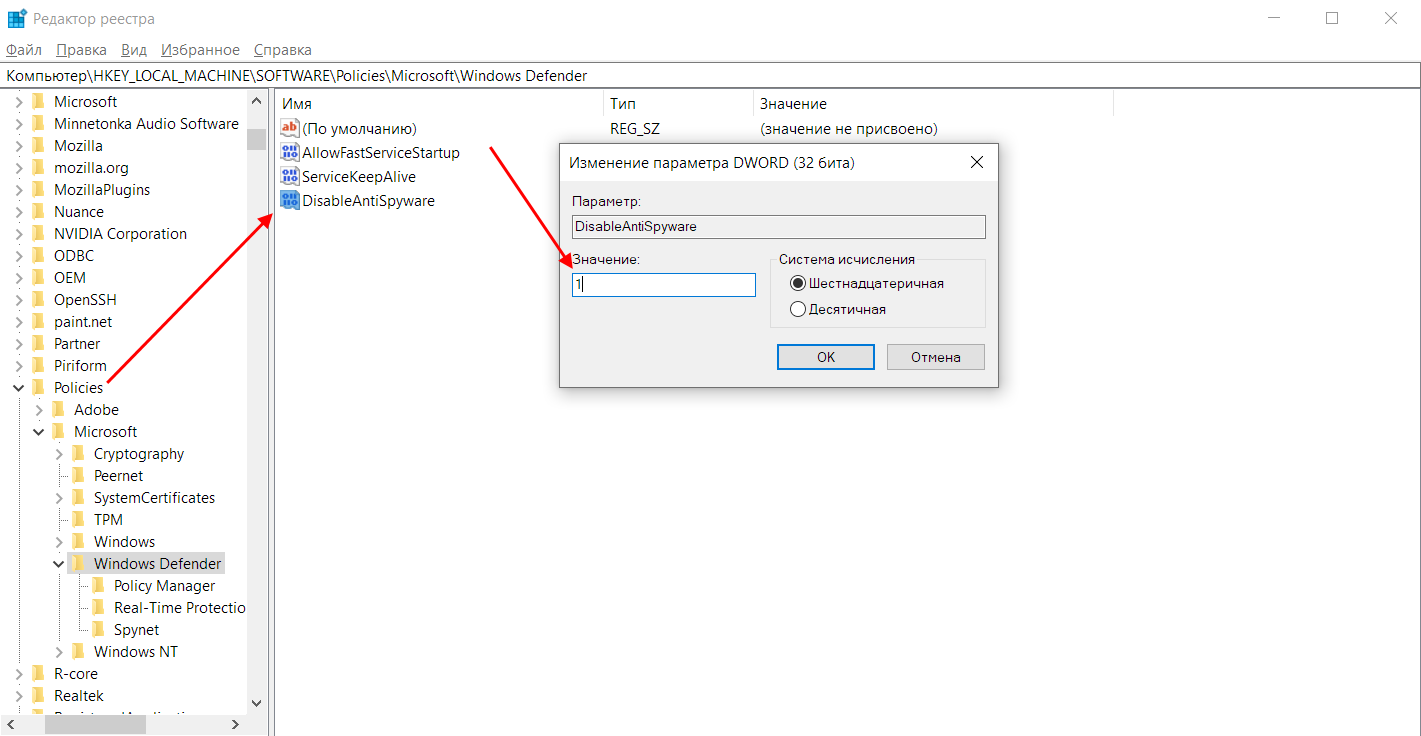
- Задаем новому параметру имя DisableAntiSpyware и открываем его. В отобразившемся окне указываем значение «1» и выбираем шестнадцатеричную систему исчисления.
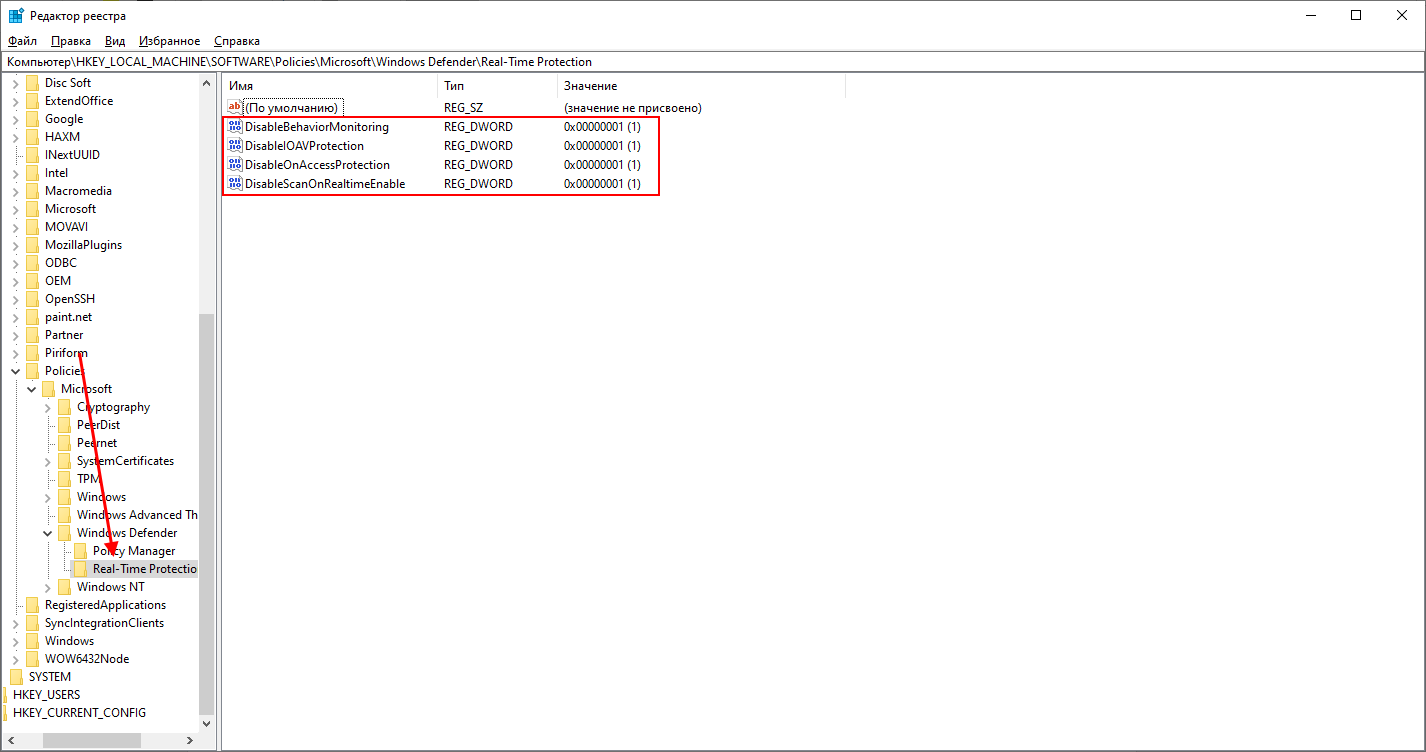
- Теперь переходим в папку «Real-Time Protection». В ней создаем 4 параметра DWORD (32 бита): DisableBehaviorMonitoring, DisableOnAccessProtection, DisableScanOnRealtimeEnable, DisableIOAVProtection. Всем параметрам выставляем значение «1».


Перезагружаем компьютер и проверяем работоспособность Windows Defender.
Защитник Windows 10 – это отличное решение для тех, у кого нет средств на приобретение платного антивирусника. Несмотря на то, что у многих пользователей возникают проблемы с ним, основную работу он все же выполняет. Да, у Защитника есть ряд проблем, но, потратив немного времени на рассмотренные выше инструкции, можно добиться хорошего результата.
- Что такое Antimalware Service Executable?
- Почему Antimalware Service Executable грузит процессор?
- Что сделать, чтобы Antimalware Service Executable перестал грузить систему?
Пользователи операционных систем Windows могут сталкиваться с временным снижением производительности своего компьютера из-за того, что процесс Antimalware Service Executable грузит центральный процессор (ЦП). Разберемся, что это за процесс и почему он время от времени оказывает сильную нагрузку на ЦП.
Что такое Antimalware Service Executable?
Ответ на вопрос можно найти в самом Диспетчере задач, развернув блок с названием процесса Antimalware Service Executable. Здесь будет указано, что данный процесс принадлежит Службе антивирусной программы Microsoft Defender (она же — Защитник Windows).

Таким образом, Antimalware Service Executable — это одна из системных служб, обеспечивающая безопасность компьютера. Работает она в фоновом режиме, в ее обязанности входит своевременное выявление и блокирование функционирования вирусов и вредоносных программ.
Важность службы Antimalware Service Executable в обеспечении безопасности ПК косвенно подтверждается запретом со стороны системы на принудительное завершение работы процесса. Если попробовать в Диспетчере задач завершить работу службы нажатием кнопки Снять задачу или клавиши Del, пользователь увидит сообщение об отказе доступа:
![]()
Почему Antimalware Service Executable грузит процессор?
Одна из основных задач службы Antimalware Service Executable — сканирование компьютера на предмет наличия вредоносного ПО. В зависимости от того, что конкретно антивирусом сканируется в данный момент, нагрузка может оказываться не только на процессор, но и на оперативную память и диски. Например, если Antimalware Service Executable сканирует большое количество мелких файлов, основная нагрузка, скорее всего, придется на диск и процессор. Иногда антивирусу требуется загружать объемные данные сканируемых объектов в оперативную память. В этом случае может наблюдаться нехватка ОЗУ для нормальной работы других запущенных приложений, что, как следствие, приведет к снижению общей производительности компьютера.
Как и все прочие антивирусы, когда Antimalware Service Executable сканирует ПК на наличие угроз, он не только и анализирует файлы на диске, но и отслеживает действия запущенных приложений. Все эти процессы требуют много вычислительных ресурсов, особенно со стороны центрального процессора.
Пользователи, имеющие опыт в работе с антивирусными программами, могут задаваться логичным вопросом — если любое другое антивирусное средство делает все то же самое, что и Microsoft Defender, почему последний оказывает более высокую нагрузку на компьютер? Вероятный ответ на этот вопрос — разработчики плохо оптимизировали работу встроенного в Windows антивируса. Т.е. на одних компьютерах Защитник Windows не оказывает сильное влияние на производительность системы, а на других — да. И это может быть связано не только с техническими характеристиками ПК, но с рядом других причин, например:
- Проблемы с реестром. Если в нем скопилось большое количество мусорных записей, Microsoft Defender придется потратить больше времени и ресурсов на полное сканирование реестра и файлов, на которые ссылаются те или иные записи.
- В систему проник вирус, который не способен обнаружить Защитник Windows. При этом встроенный в систему антивирус реагирует (хоть и тщетно) на действия этого вируса, оказывая тем самым нагрузку на процессор, память, диск или на все сразу.
Далее мы рассмотрим несколько способов исправления проблем с производительностью системы, возникающих вследствие работы службы Antimalware Service Executable.
Что сделать, чтобы Antimalware Service Executable перестал грузить систему?
Существует несколько способов решения проблемы с высоким потреблением службой Antimalware Service Executable ресурсов компьютера.
Способ 1: изменение расписания сканирования компьютера
Данный способ, конечно, никак не сказывается на функционировании встроенного в Windows антивируса. Он как грузил, так и будет грузить компьютер, однако это дело можно перенести на определенное время, когда пользователю не требуется задействовать все вычислительные мощности ПК. Вообще, Microsoft Defender сканирует систему, «когда ему вздумается». Пользователь может играть за компьютером, смотреть фильм, выполнять какую-либо важную работу — антивирусу все равно — он будет работать тогда, когда захочет.
К счастью, существует возможность задать расписание сканирования. Это позволит минимизировать нагрузку на компьютер во время его активного использования. Например, если пользователь работает за компьютером с 9-10 утра до 6-7 вечера, то задачу по полному сканированию антивирусом логично перенести на раннее утро или поздний вечер.
Для перенастройки расписания работы Microsoft Defender нужно сделать следующее:
- Запустить Планировщик заданий. Для этого можно открыть окно Выполнить клавишами Win + R, вписать/скопировать в него команду msc и нажать кнопку ОК.
- В левой части отобразившегося окна Планировщик заданий поочередно переходим в разделы: Библиотека планировщика заданий > Microsoft > Windows > Windows Defender.
- В центральной части окна Планировщика находятся различные задачи, выполняющиеся Защитником Windows. Для начала разберемся с наиболее важной для нас задачей Windows Defender Scheduled Scan (Периодическая задача сканирования). Кликаем по ней два раза мышкой. Это приведет к открытию окна свойств выбранной задачи:
- Переходим в окне свойств во вкладку Условия и снимает галочки со всех пунктов, что там есть:
- Далее нам нужно создать триггер, который будет автоматически запускать сканирование компьютера антивирусом Защитник Windows в подходящее время. Для этого следует открыть вкладку Триггеры, затем нажать кнопку Создать…
- Откроется окно Создание триггера. В левой его части в блоке Параметры переводим переключатель в положение Ежедневно. Напротив метки Начать выставляем дату начала работы триггера (можно не менять) и время его срабатывания. Для примера мы запланировали запуск сканирования компьютера антивирусом на 9 часов вечера. Нажимаем ОК по завершению настройки.
- Во вкладке Триггеры отобразится только что созданный триггер.
Не спешите закрывать окно Планировщика заданий. Проделайте все то же самое с остальными задачами: Windows Defender Cache Maintenance (периодическая задача обслуживания), Windows Defender Cleanup (периодическая задача очистки) и Windows Defender Verification (периодическая задача проверки).
Способ 2: исключение из сканирования папки с программой Microsoft Defender
Во время сканирования Microsoft Defender анализирует вообще все файлы, которые есть в системе. В список проверки также относятся файлы самого антивируса. Как заметили внимательные пользователи, когда Защитник Windows начинает сканировать собственные файлы, компьютер начинает сильно тормозить. Чтобы антивирус перестал анализировать свои же данные, нужно исключить из сканирования папку, в которую установлена программа Microsoft Defender:
- Для начала нужно определить, в какой папке хранятся файлы антивируса Windows Defender. Открываем Диспетчер задач комбинацией клавиш Ctrl + Shift + Esc, находим в списке запущенных процессов Antimalware Service Executable, кликаем по нему правой кнопкой и выбираем в контекстном меню пункт Открыть расположение файла.
- В Проводнике будет открыта папка, в которой хранится файл, ответственный за запуск процесса Antimalware Service Executable (exe). Как можно заметить, он хранится в папке 4.18.23050.9-0 (в нашем случае), а та, в свою очередь, в папке Platform, которая находится в папке Windows Defender. Путь до последней нам и нужен (т.е. C:\ProgramData\Microsoft\Windows Defender). Сразу копируем его в буфер обмена:
- Теперь добавим папку в список исключений антивируса. Для начала откроем окно с его настройками. Можно воспользоваться поиском в меню Пуск, в который следует вписать запрос Безопасность Windows, а затем кликнуть по отобразившемуся одноименному значку.
- В левой части окна Безопасность Windows откройте раздел Защита от вирусов и угроз, затем — правее — кликните по элементу Управление настройками.
- Прокрутите окно до самого низа, затем кликните по элементу Добавление или удаление исключений:
- Нажмите кнопку Добавить исключение и выберите из выпадающего меню пункт Папка:
- Откроется окно выбора папки. Вставьте в его адресную строку скопированный ранее путь до папки Windows Defender (C:\ProgramData\Microsoft\Windows Defender) и нажмите кнопку Выбор папки:
- После того, как папка Windows Defender была добавлена в список исключений, путь до нее отобразится в этом же окне:
С этого момента антивирус Защитник Windows перестанет сканировать собственные файлы. Кстати, в список исключений можно добавить и любые другие объекты — конкретные файлы, папки или даже целиком локальные диски.
Способ 3: временное отключение Защитника Windows
В настройках антивируса Microsoft Defender можно деактивировать две его ресурсоемкие функции — Защита в режиме реального времени и Защита от подделки. Они отслеживают действия всех запускаемых программ, сканируют скачиваемые через браузер файлы и т.д. — словом, постоянно грузят компьютер. Настройки антивируса позволяет отключить данные функции, но только временно. Они автоматически активируются по истечению некоторого времени, а также после перезагрузки компьютера.
Все действия выполняются в окне Безопасность Windows:
- В левой части окна перейдите в раздел Защита от вирусов и угроз, затем кликните по элементу Управление настройками в блоке Параметры защиты от вирусов и других угроз:
- Переведите переключатель в положение Откл. под опцией Защита в режиме реального времени:
- Прокрутите страницу вниз и сделайте то же самое с переключателем под опцией Защита от подделки.
Способ 4: полное отключение Защитника Windows
Существует несколько способов отключения штатного антивируса Windows. Один из них заключается в редактировании реестра. Его и будем рассматривать:
- Запускаем Редактор реестра путем выполнения команды regedit через окно Выполнить (Win + R для запуска):
- Скопируйте в адресную строку Редактора реестра нижеследующий адрес, после чего нажмите Enter:
Компьютер\HKEY_LOCAL_MACHINE\SOFTWARE\Microsoft\Windows Defender
Первым делом требуется разблокировать возможность редактирования раздела Windows Defender. Для этого:
- Кликните правой кнопкой мыши по разделу Windows Defender и выберите из меню пункт Разрешения…:
![]()
- Откроется окно Разрешения для группы «Windows Defender». Кликните в нем по кнопке Дополнительно под списком пользователей:
- Откроется еще одно окно Дополнительные параметры безопасности для «Windows Defender». Кликните в верхней его части по элементу Изменить рядом с надписью СИСТЕМА:
- В следующем окне Выбор: «Пользователь» или «Группа» нажмите кнопку Дополнительно, после чего откроется еще одно окно, в котором нужно кликнуть Поиск, а затем дважды — по имени учетной записи администратора компьютера:
![]()
- Нажимаем ОК в окне Выбор: «Пользователь» или «Группа»:
![]()
- Теперь в окне Дополнительные параметры безопасности для «Windows Defender» напротив Владелец будет указано имя выбранной только что учетной записи. Поставьте галочки напротив опций Заменить владельца подконтейнеров и объектов и Заменить все записи разрешений…, после чего нажмите ОК (согласитесь с изменениями в диалоговом окне):
- Теперь нужно добавить в самое первое открытое окно Разрешения для группы «Windows Defender» нового пользователя и предоставить ему необходимые права. Для этого последовательно выполните: клик по кнопке Добавить, затем по кнопке Дополнительно…, нажмите Поиск и выберите имя учетной записи:
![]()
- Добавив пользователя в окне Разрешения для группы «Windows Defender» выберите его в списке Группы или пользователи, а ниже — установите галочки напротив опций Полный доступ и Чтение, после чего нажмите ОК:
![]()
Теперь мы можем редактировать раздел реестра Windows Defender:
- Проверьте, существуют ли в открытом разделе Windows Defender ключи/параметры с именами ServiceStartStates, DisableAntiSpyware и DisableAntiVirus. Если все они есть, пропустите следующие два шага. Если отсутствуют все или некоторые из них, выполните следующее:
- Кликните правой кнопкой мыши по разделу Windows Defender, выберите — Создать и затем — Параметр DWORD (32 бита). Повторите действие 3 раза (если не было ни одного параметра):
- В итоге будут созданы три параметра с именами Новый параметр #1/2/3. Переименуйте их (выделите и нажмите клавишу F2) в ServiceStartStates, DisableAntiSpyware и DisableAntiVirus:
- Кликните два раза по любому из созданных параметров, введите в небольшое окно 1 и нажмите ОК.
- Сделайте то же самое со всеми созданными параметрами.
![]()
- Далее в разделе Windows Defender перейдите в подраздел Real-Time Protection. Как и в предыдущем случае, проверьте существуют ли здесь 4 параметра DWORD (32 бита) с именами: DisableBehaviorMonitoring, DisableOnAccessProtection, DisableScanOnRealtimeEnable и DisableIOAVProtection. Если нет — создайте их и пропишите 1 в значениях каждого:
Перезагрузите компьютер. Защитник Windows более не должен будет запускаться. Не забудьте установить другой антивирус для обеспечения безопасности компьютера.
При установке стороннего Антивируса на новую Windows 11, вы можете столкнутся с проблемой отключения стандартного Защитника Microsoft. Как этого избежать, и принудительно отключить стандартный антивирус Windows 11 мы расскажем в этой статье. Не забудьте поставить лайк и напишите комментарий.
Антивирус Защитник Microsoft (ранее известный как Защитник Windows) — это встроенная бесплатная программа защиты от вредоносных программ, включенная в новую ОС. Помимо защиты от вирусов и вредоносных программ, Microsoft Defender также предлагает защиту учетной записи, онлайн-безопасность, мониторинг производительности и работоспособности устройства, родительский контроль, а также брандмауэр и сетевую безопасность.
Если вы используете сторонний антивирус, то, вероятно, захотите отключить встроенный защитник. При этом при установке стороннего антивируса, можно столкнуться с затруднениями.
Первый способ. Отключение через настройки групповой политики
Для начала нужно отключить защиту, а затем запустить редактор групповой политики. Откройте Пуск – Параметры – Конфиденциальность и безопасность – Безопасность Windows.
Далее перейдите в Защита от вирусов и угроз – Управление настройками, здесь отключите Защиту от подделки.
Для запуска Редактора локальной групповой политики, в строке поиска ищем «Изменение групповой политики» и запустите его.
В окне программы перейдите в раздел, Конфигурация компьютера – Административные шаблоны – Компоненты Windows – Антивирусная программа Microsoft Defender. Справа найдите настройку «Выключить антивирусную программу Microsoft Defender».
Кликните по ней правой кнопкой мыши и выберите Изменить. В открывшемся окне отметьте значение Включено, а затем нажмите – Применить и Ок.
Затем меняем настройку «Разрешить постоянную работу службы защиты от вредоносных программ», здесь ставим отметку напротив Отключено – Применить – Ок.
Далее откройте папку «Защита в режиме реального времени» и откройте параметр «Выключить защиту в реальном времени». Здесь установите отметку Включено – Применить – Ок.
Настройка групповой политики завершена, далее, чтобы предотвратить запуск определенных служб и появление ошибок после отключение антивируса Windows 11, нужно настроить планировщик заданий. В поиске ищем «Планировщик заданий» и открываем его.
Переходим в раздел «Библиотека планировщика заданий» – Microsoft – Windows – Windows Defender. Здесь по очереди отключаем все четыре задания:
— Windows Defender Cache Maintenance
— Windows Defender Cleanup
— Windows Defender Scheduled Scan
— Windows Defender Scheduled Scan
Правой кнопкой мыши по значению – Отключить.
Затем нужно обновить политики компьютера и пользователя. Для этого откройте командную строку от имени администратора и выполните такую команду:
gpupdate /force
После данной настройки Защитник не будет запускаться с системой после следующей загрузке.
Второй способ. Отключение через исправление реестра
Следующий метод отключить защиту через настройку реестра.
Кликните правой кнопкой мыши по меню пуск – Выполнить, в строке пишем — regedit – Ок.
В открывшемся окне реестра переходим по пути:
HKEY_LOCAL_MACHINE\SOFTWARE\Microsoft\Windows Defender
Чтобы изменить или добавить значение в данной папке, сперва нужно изменить ее владельца, по умолчанию здесь установлено «Система». Чтобы изменить его, жмем правой кнопкой по папке – Разрешения.
В открывшемся окне — Разрешения для группы Windows Defender откройте вкладку – Дополнительно, и в поле – Владелец, жмем по кнопке — Изменить.
В следующем окне жмем — Дополнительно – Поиск – здесь выбираем учетную запись администратора или группу Администраторы, затем Ок и еще раз Ок для подтверждения.
Затем установите отметки напротив «Заменить владельца подконтейнеров и объекта» и «Заменить все записи разрешений дочернего объекта наследуемыми от этого объекта» и во всплывающем окне «Безопасности» подтверждаем изменения — Да.
Далее в окне — Разрешения для группы, предоставляем пользователю полный доступ — ок.
Теперь можно приступать к правке реестра, для этого в разделе Windows Defender создаем Параметры DWORD (32 бита) с такими именами: DisableAntiVirus, DisableAntiSpyware, ServiceStartStates, и присваиваем им значение единицу.
После закрываем редактор реестра и перезагружаем компьютер. После перезагрузки Защитник будет отключен. Если понадобится снова его запустить в окне — Защита от вирусов и угроз, нажмите — «Перезапустить сейчас».
Третий способ. Отключение с помощью утилиты Autoruns для Windows
Еще один из методов отключить Microsoft Defender с помощью утилиты Autoruns для Windows. Загрузите данную утилиту с официального сайта Microsoft и распакуйте ее из архива.
Далее нам нужно отключить постоянную защиту и загрузится в безопасном режиме. Откройте Параметры – Конфиденциальность и безопасность – Безопасность Windows – Защита от вирусов и угроз – Управление настройками и отключите защиту в режиме реального времени.
Затем, чтобы загрузится в безопасном режиме в поиске, ищем «Конфигурация системы», открываем вкладку загрузка, устанавливаем отметку напротив Безопасный режим, Минимальная – Ок и нажмите Перезагрузка. После загрузки в безопасном режиме откройте Безопасность и проверьте не запустился ли Defender.
Затем перейдите в папку с утилитой Autoruns для Windows и запустите Autoruns64.exe. В окне программы откройте вкладку Services, с настройками по умолчанию службы Windows скрыты. Для того чтобы они отображались откройте Options и снимите отметку напротив скрыть записи Windows (Hide Windows Entries).
Далее ищем в списке службу Windows Defender и снимите отметку, это отключит автоматическую загрузку Защитника Windows после каждой перезагрузки системы.
После закрываем утилиту и загружаемся в обычном режиме. Открываем Конфигурацию системы, отмечаем здесь Обычный запуск – Ок — Перезагрузка. После перезагрузки откройте диспетчер задач и проверьте запуск Службы Защитника Windows.
Откройте Параметры – Конфиденциальность и безопасность – Безопасность Windows – Защита от вирусов и угроз – Кабинет. Здесь вы увидите вращающийся значок или статус защиты – Неизвестный. В это время защитник проверяет настройку.
Важный момент. Не нажимайте по плитке Защитника, пока он получает информацию или отображается неизвестный статус. Если кликнуть по плитке Защитник Windows снова станет активным, подождите пока не появится статус — Отключен.
Заключение
Теперь вы знаете, как отключить Защитник Windows в операционной системе Windows 11. Для того чтобы он оставался неактивным после перезагрузки, точно следуйте представленной инструкции. Если представленные способы не помогли отключить Microsoft Defender, можете попробовать сторонние программы их легко найти в интернете.
Полную версию статьи со всеми дополнительными видео уроками смотрите в источнике. А также зайдите на наш Youtube канал, там собраны более 400 обучающих видео.
The Antimalware Service Executable is a legit process that runs in the background of your Windows 10 and 11 computer. It is part of Windows Security, more specifically Defender, and helps protect your PC against malware threats. Problems occur when the Antimalware Service Executable process begins to consume too much RAM and CPU, resulting in a slow, laggy user experience.
What Is Antimalware Service Executable
As noted in the introduction, Antimalware Service Executable is a valid process that is run and maintained by Windows Security. Microsoft Defender uses it to fight malware on your PC. As such, it is supposed to be running constantly in the background. However, it usually consumes little to no resources.
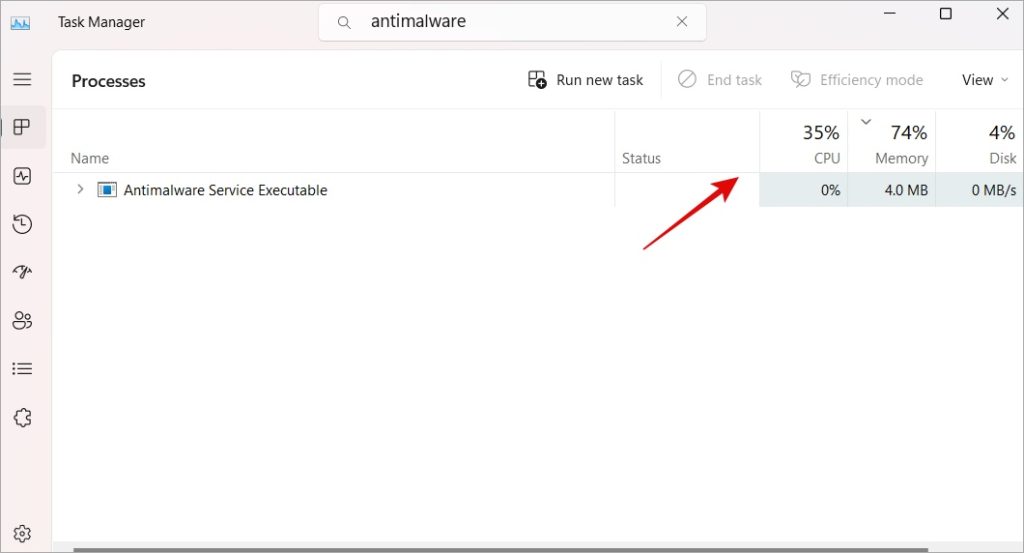
You will notice in the above screenshot that on my Windows 11 computer, the CPU and Memory usage is close to zero. However, several users find Antimalware Service Executable process to be consuming too much PC resources, ultimately slowing down their Windows 10 or 11 computer. Note that the file name of the process is MsMpEng.exe instead which can add to the confusion.
Pro Tip: Top 8 Ways to Maximize CPU Performance on Windows 11
Should You Disable Antimalware Service Executable
You should never close this process. It is supposed to be running at all times in the background. Closing this process puts your Windows computer at malware risk. Ideally, if Antimalware Service Executable process is consuming more resources, it should mean that Defender is running a scan in the background, looking for malware threats, updating libraries, or whatever else it needs to do to neutralize the threat if any is detected.
Also, even if you do disable Antimalware Service Executable process, Defender will restart it automatically. You can only stop it from running by disabling Windows Security completely which is also not recommended. Now there is some misleading information about this process online. One is that installing another antivirus app will stop this process. I have Malwarebytes Premium installed and Antimalware Service Executable still runs in the background just fine.
Once the scan is complete and any threat, if detected, has been dealt with, Antimalware Service Executable should go back to its previous state. If Antimalware Service Executable process continues to consume high CPU and RAM usage, here are some troubleshooting steps.
1. Scan Manually
There are two reasons to scan your computer using both Defender and Malwarebytes. One is to figure out if the PC is infected with malware and two is to reduce CPU and RAM usage by Antimalware Service Executable process.
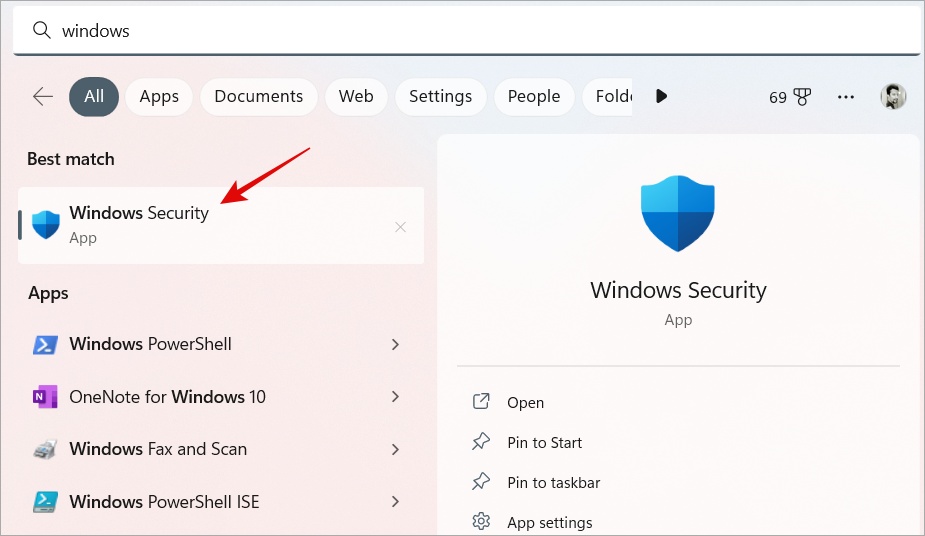
1. Press Windows+S to open Windows Search. Type Windows Security and open it.
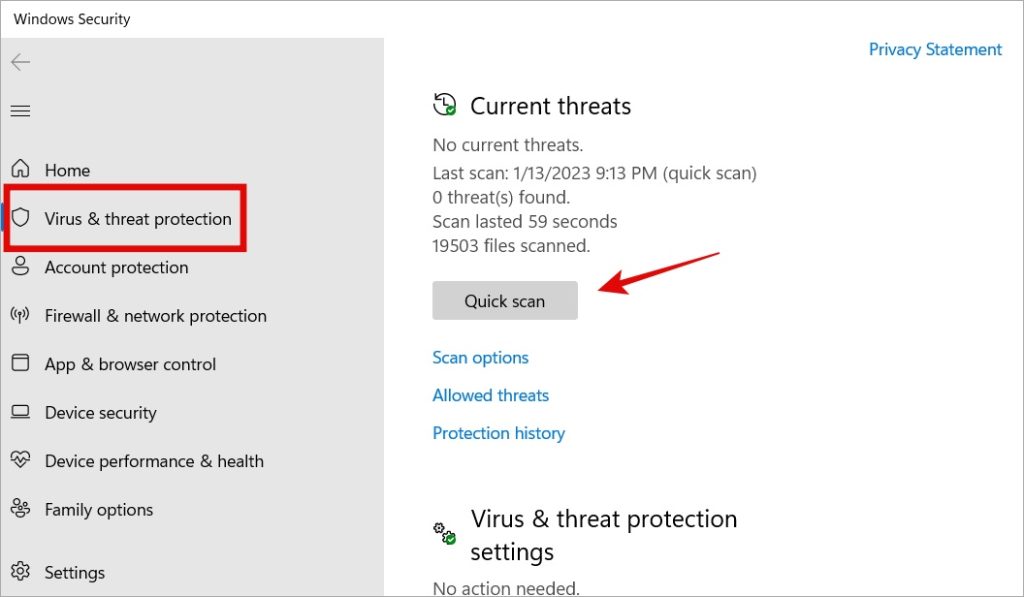
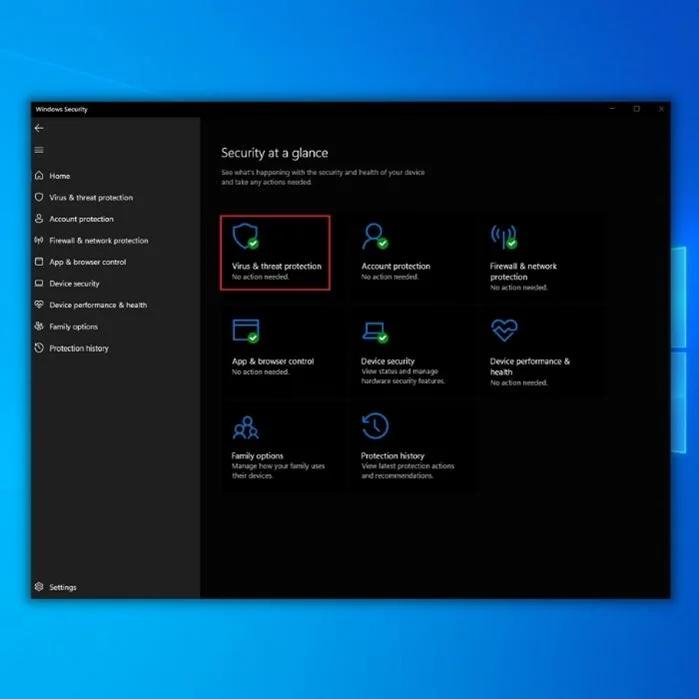
2. Select Virus & threat protection tab in the left sidebar, and then perform a full scan from the right window pane. Here you can perform a full or a Quick scan.
3. Once the scan is complete, download Malwarebytes. The free version is good enough but I would recommend the paid version if you can afford it. Run a scan using Malwarebytes too as it was designed to detect malware specifically.
Note 1: You cannot and should not use two antivirus programs on the same machine at the same time. Installing Malwarebytes will disable Defender automatically.
Note 2: You can use any third-party antivirus of your choice and still use Defender by enabling periodic scanning in Windows Security > Virus & threat protection.
Finally, most Windows users don’t know this but Microsoft has a separate, regularly updated tool called Microsoft Safety Scanner. You will have to download a fresh copy every time you want to run it. The tool is not updated automatically and doesn’t have to be installed. Simply download and run. It will scan for viruses on your Windows PC.
2. Turn Off/On Real-Time Protection
Several Windows users found this simple tip to work and help resolve Antimalware Service Executable process consuming too much RAM and CPU.
Windows Security has a number of components that help protect your computer. One of them is the real-time protection. You will find it under Windows Security > Virus & threat protection > Manage settings.
Now scroll a little and turn off Real-time protection, wait a few moments, and then turn it back on.
3. Change Defender’s Schedule
Since Windows Security runs periodic scans in the background, rescheduling the scan can help fix Antimalware Service Executable process taking too much CPU and RAM.
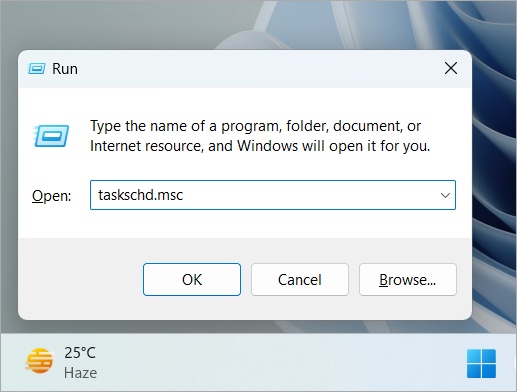
1. Press Windows+R to open the Run prompt. Type taskschd.msc and press Enter button on your keyboard. It will open the Task Scheduler.
2. In Task Scheduler, in the left window-pane, navigate to the below folder structure.
Task Scheduler Library > Microsoft > Windows > Windows Defender
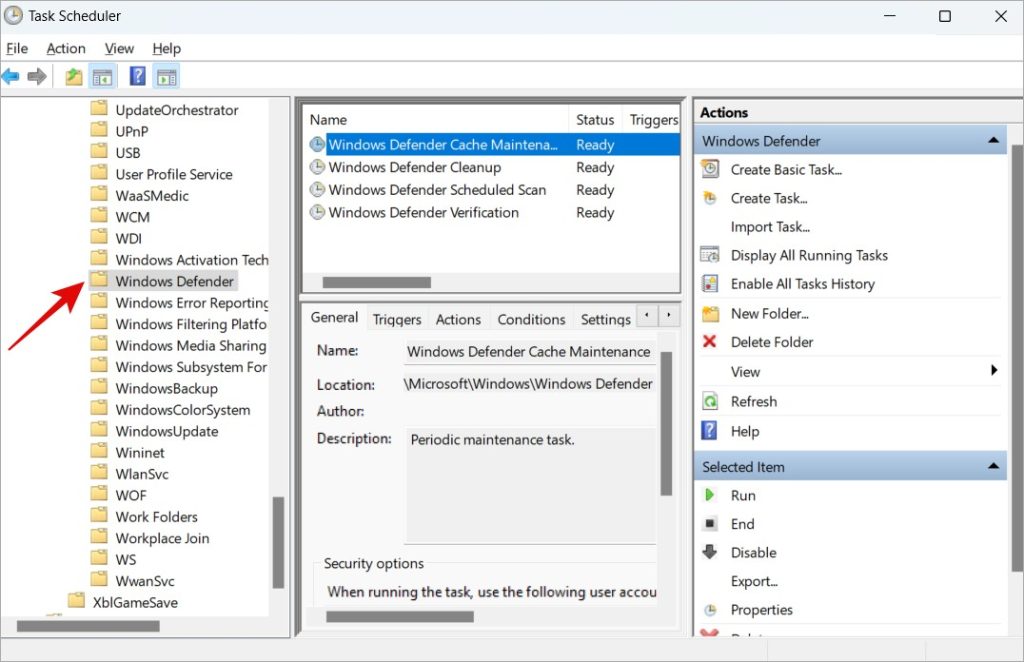
3. Now double-click on Windows Defender Scheduled Scan option in the middle window pane under the Name column.
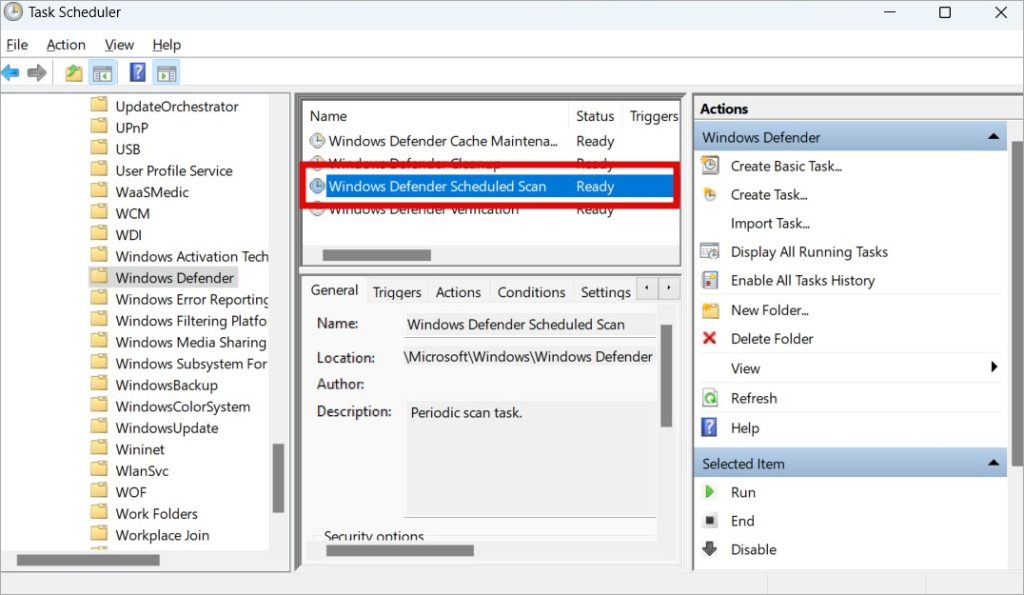
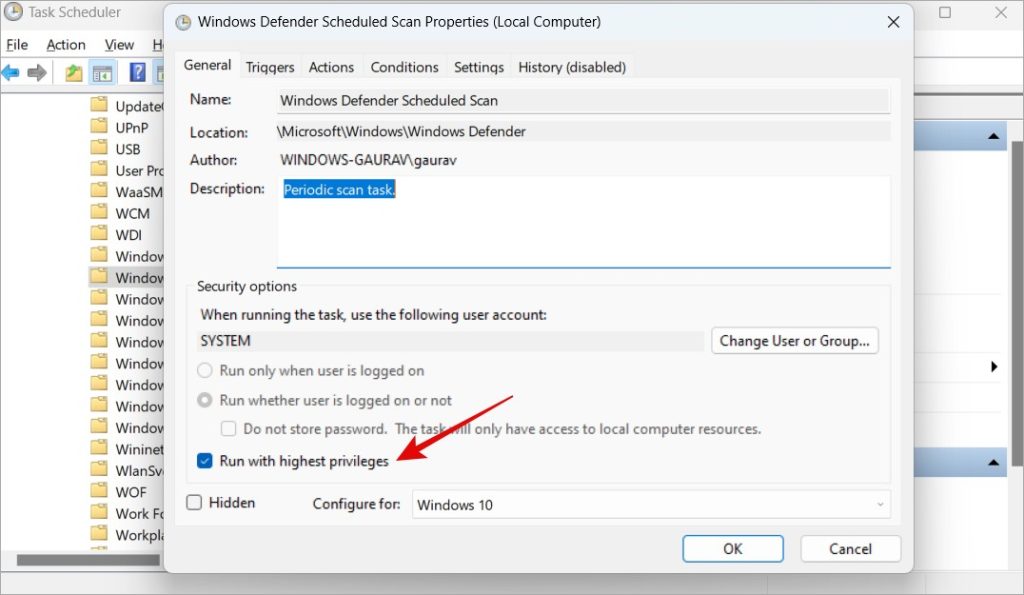
4. In the pop-up that follows, uncheck Run with highest privileges option under General tab.
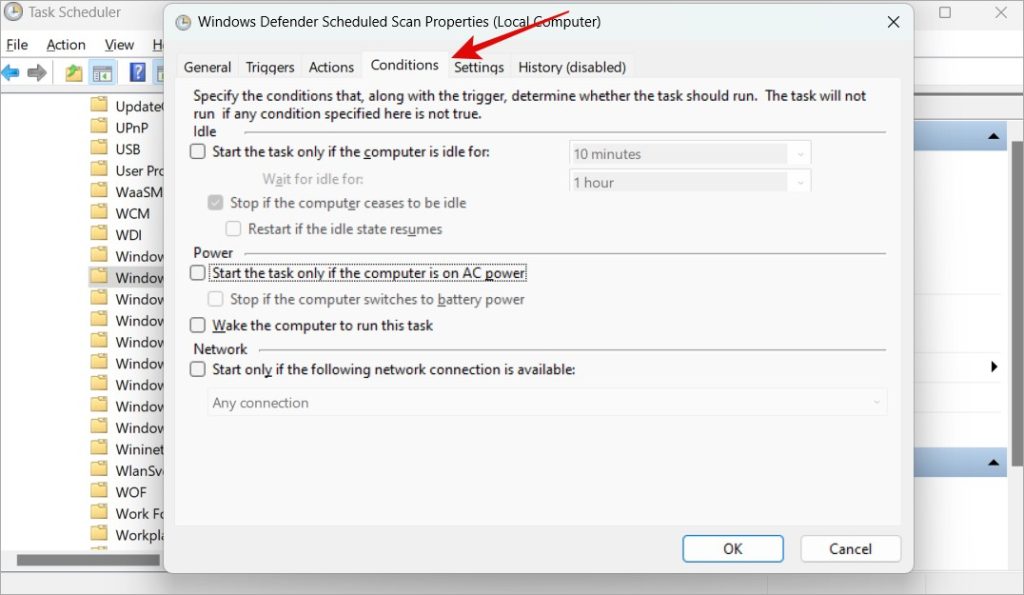
5. Uncheck everything under the Conditions tab.
5. Click on OK to save all settings in all open windows and check again if Antimalware Service Executable is consuming too many resources in the Task Manager (press Ctrl+Shift+Esc to open Task Manager directly).
6. To set a new schedule, go to the Triggers tab, and click on New. Then in the pop-up that follows, select Weekly and check Enabled.
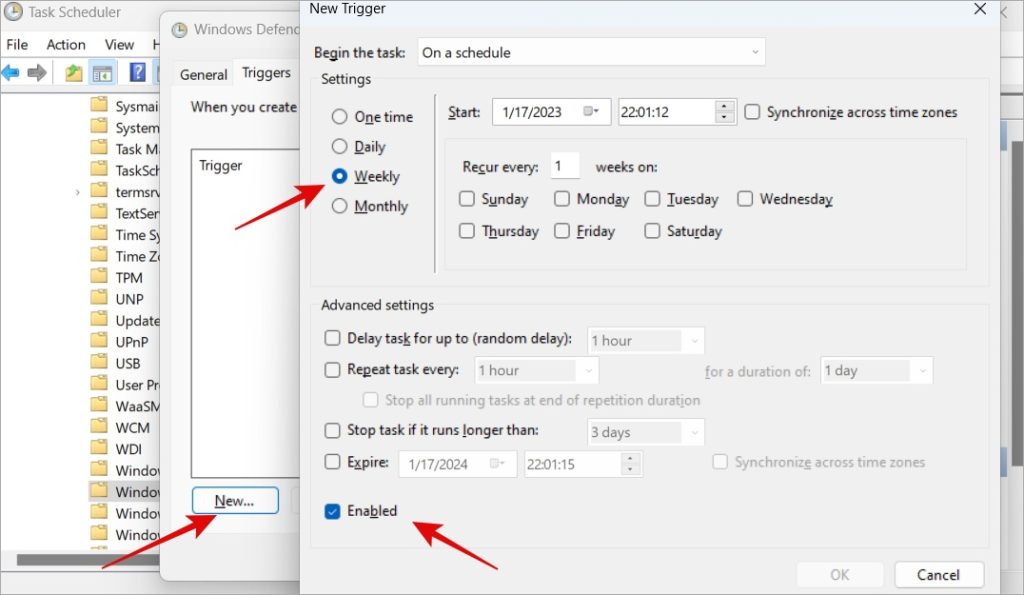
7. Repeat the same steps for Windows Defender Cache Maintenance, Windows Defender Cleanup, Windows Defender Verification in the middle window-pane. Go back to step 3 above.
Doing so will reschedule the Antimalware Service Executable component to run weekly instead of daily. Now allow the current scan to finish and see if system resources are freed up.
4. Add to Exclusion List
Add the Antimalware Service Executable process to the exclusion list will prevent Windows from running it automatically once it is closed.
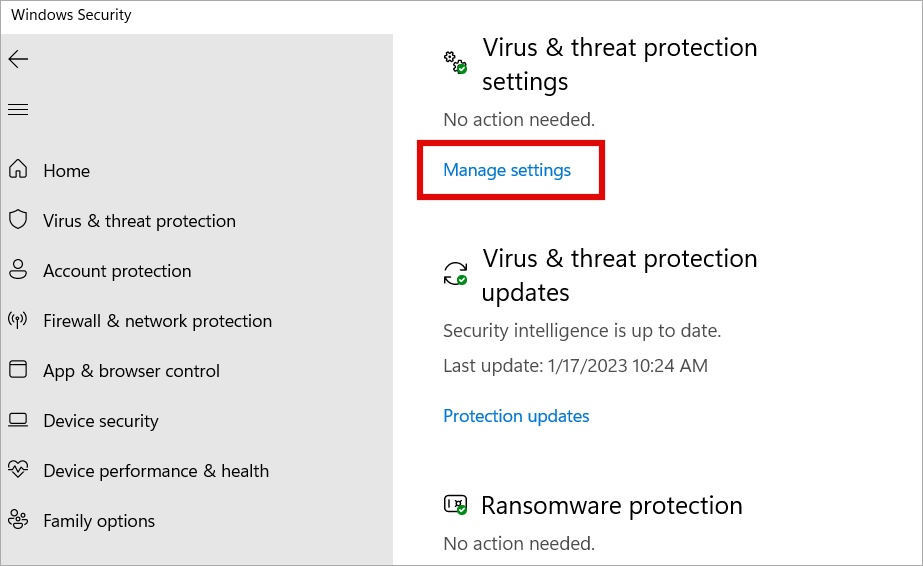
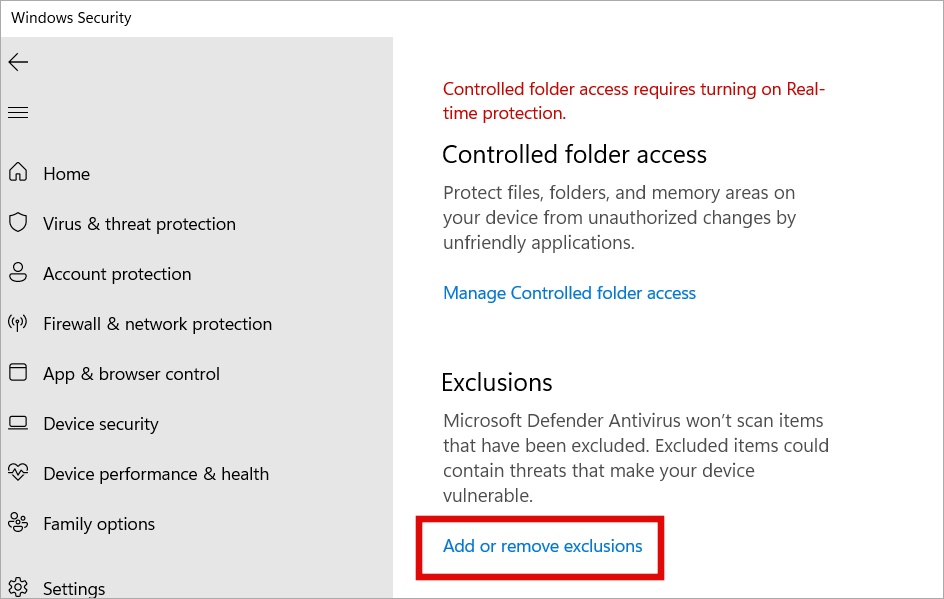
1. Open Windows Security again and select Virus & threat protection in the left sidebar. Now click on Manage settings under the Virus & threat protection settings section.
2. Scroll to the bottom and click on Add or remove exclusions.
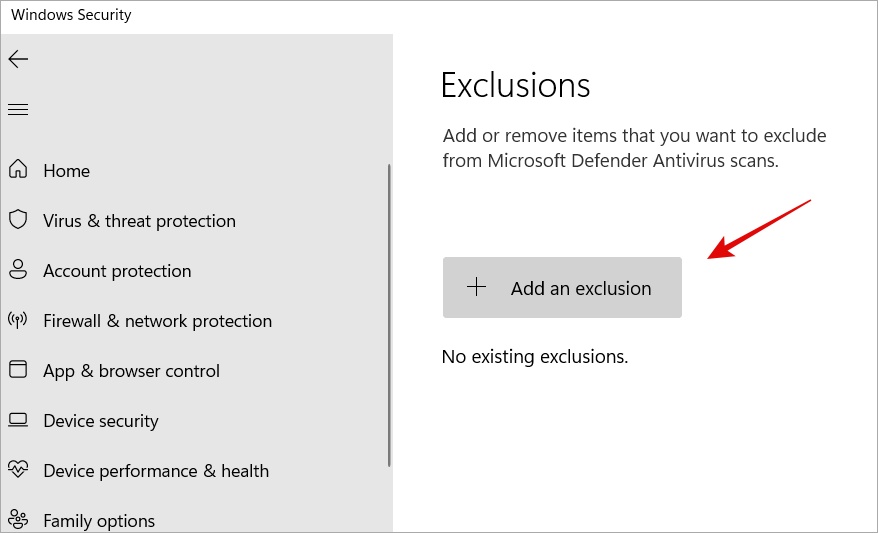
3. Click on Add an exclusion button. You may be asked to give permission. If yes, do it.
4. In the drop-down menu, select Process because that’s what Antimalware Service Executable is. In the Task Manager, it is listed under Processes.
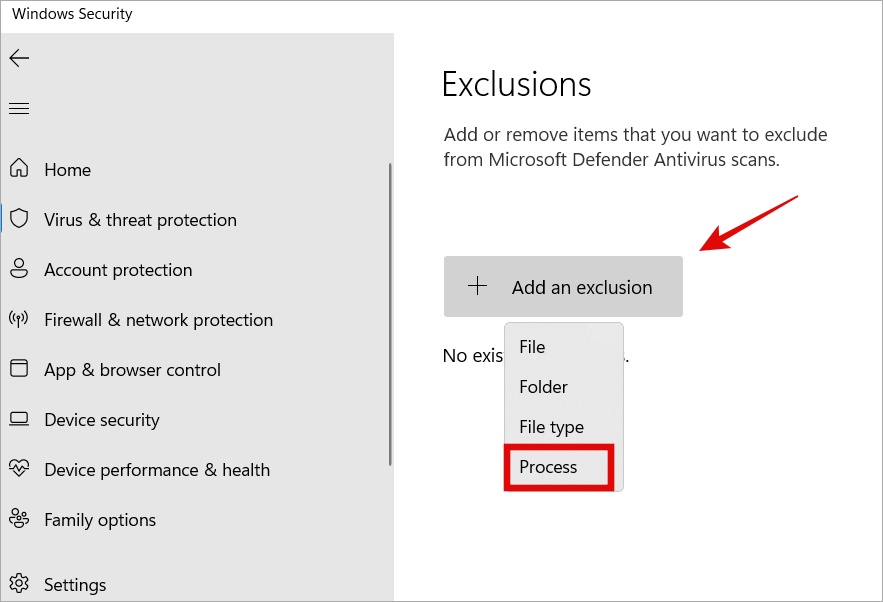
5. Now enter the name of executable file that runs the process. We mentioned at the beginning that Antimalware Service Executable file name is MsMpEng.exe so that’s what you will enter here.
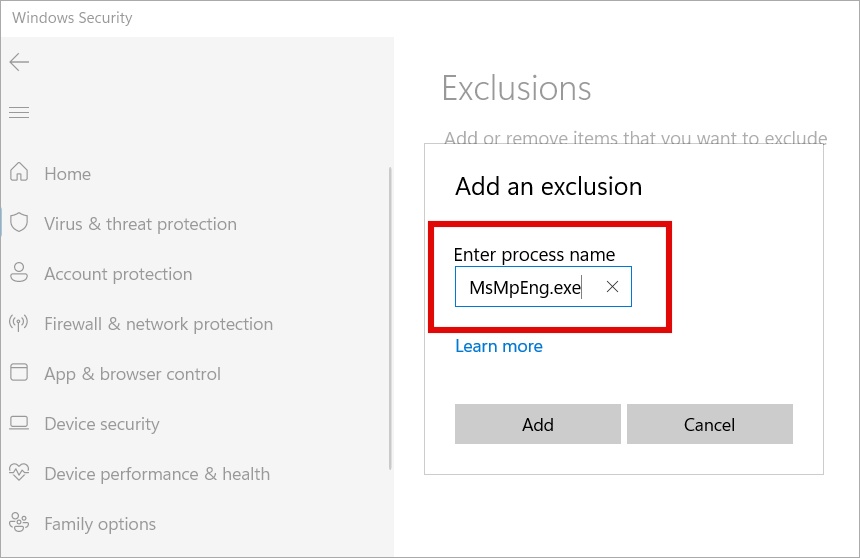
6. Click on Add and then OK to save changes. Then restart your computer and check if the PC continues to consume high CPU and RAM resources.
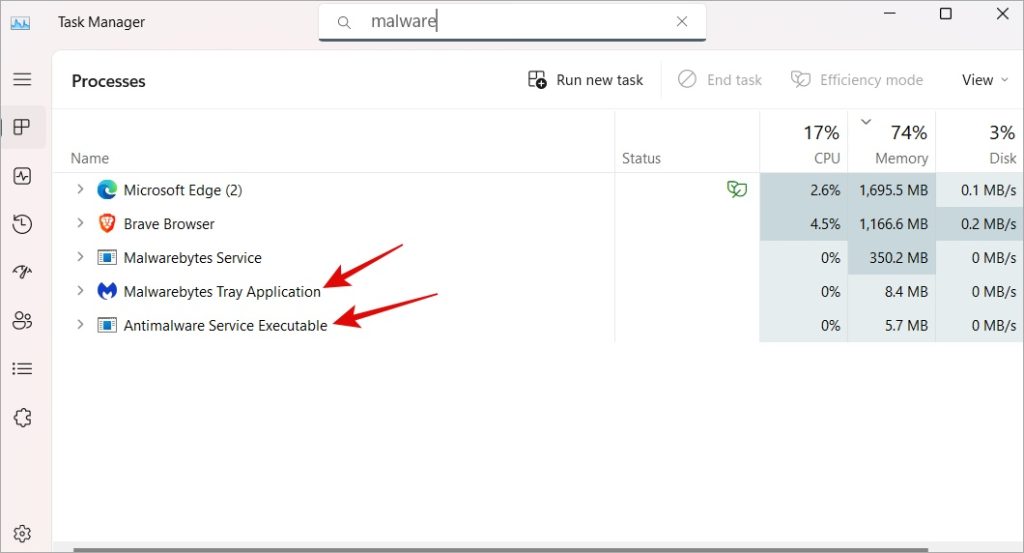
5. Use 3rd-Party Antivirus
The Antimalware Service Executable is primarily associated with Defender component of Windows Security. Using a third-party antivirus should resolve the issue. I am using and recommend Malwarebytes (not affiliated in any way) but you can go with another. Note that the above process is still running on my computer even though I have Defender disabled. But it may help reduce high CPU and RAM usage as it will alter how and when malware scans are performed on your Windows computer.
6. Disable AntiSpyware
This particular issue was discovered by Windows 10 Insiders community members. It traces back to a Registry Editor key that is easy enough to fix.
1. Search Registry Editor in Windows Search and open it with Admin rights.
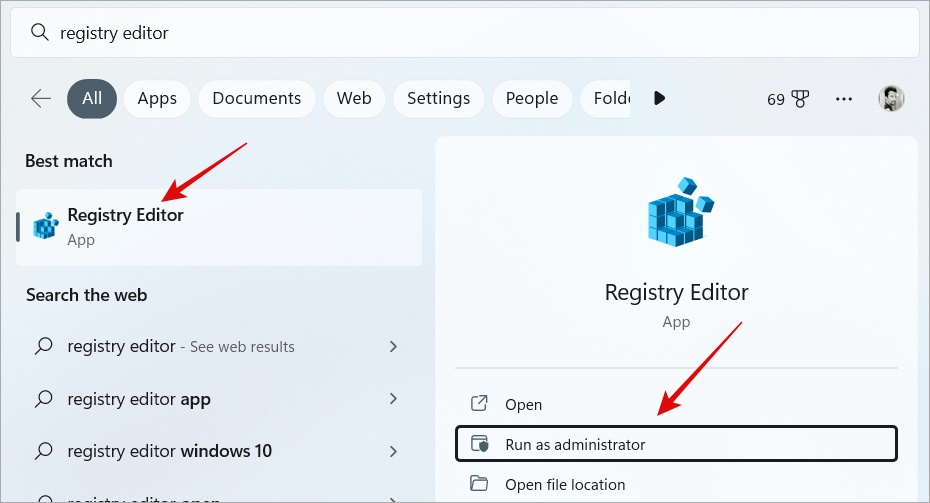
2. Navigate to the folder structure below from the left window pane.
HKEY_LOCAL_MACHINE\SOFTWARE\Policies\Microsoft\Windows Defender
3. You should find DisableAntiSpyware file in the right window pane. If not, right-click anywhere and select New > DWORD (32-bit) Value.
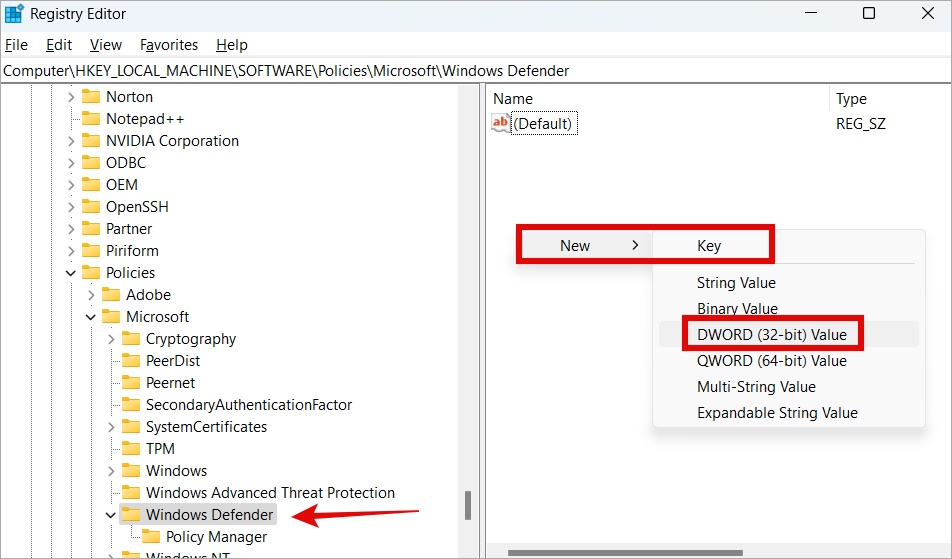
4. Now rename the file as DisableAntiSpyware. You can select the file and press F2 to rename any file on Windows.
5. Now double-click to open the newly created file and enter the Value data as 1.
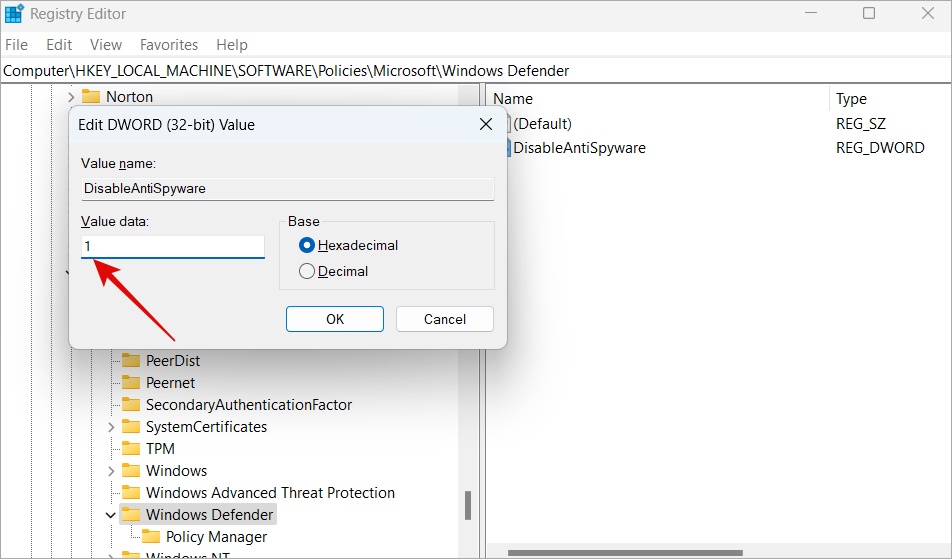
6. Save all changes. Reboot your computer once and check again.
7. Disable Exploit Protection Service
A false positive scenario where Defender cannot close an activity or disable a service for some reason. While not a big deal, now the service is running in a loop causing the Antimalware Service Executable process to run in a continuous loop. This then results in the process to take high CPU and RAM resources.
1. From Windows menu, search for PowerShell and open it with admin rights.
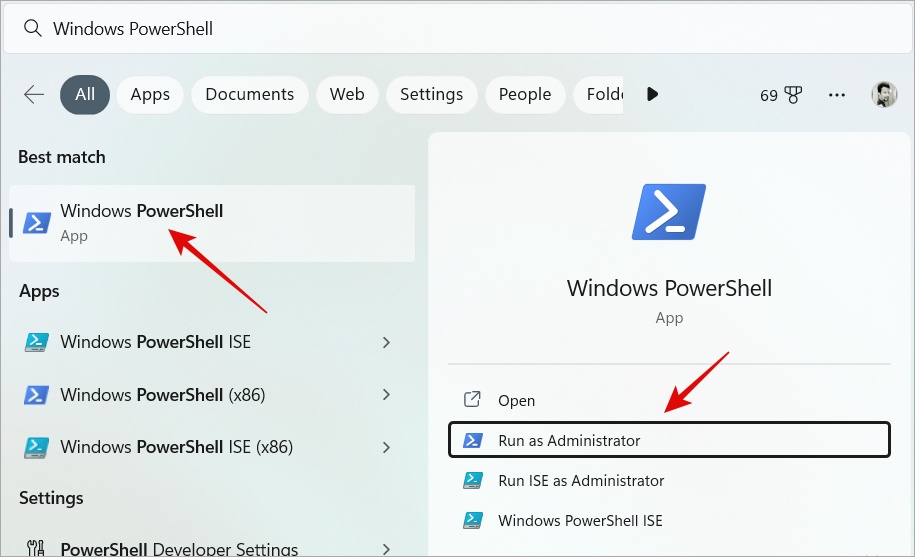
2. Copy-paste the command below and hit Enter to execute it.
powershell “ForEach($v in (Get-Command -Name \”Set-ProcessMitigation\”).Parameters[\”Disable\”].Attributes.ValidValues){Set-ProcessMitigation -System -Disable $v.ToString().Replace(\” \”, \”\”).Replace(\”`n\”, \”\”) -ErrorAction SilentlyContinue}”
Note: You may see a warning of some kind but that is okay. Allow the command to run its course. When done, reboot the computer.
Also Read: Command Prompt vs PowerShell vs Windows Terminal: How They Differ
Antimalware Service Executable Process
The process itself is legit. The only problem is when it begins to consume more resources than it should. That’s when you experience a slow PC. We don’t recommend disabling Defender without enabling another antivirus app. We also don’t recommend disabling critical services using Group Policy Editor. Instead, there are some workarounds that you can use to fix Antimalware Service Executable process running in loops.
Gaurav Bidasaria
Gaurav is an editor here at TechWiser but also contributes as a writer. He has more than 10 years of experience as a writer and has written how-to guides, comparisons, listicles, and in-depth explainers on Windows, Android, web, and cloud apps, and the Apple ecosystem. He loves tinkering with new gadgets and learning about new happenings in the tech world. He has previously worked on Guiding Tech, Make Tech Easier, and other prominent tech blogs and has over 1000+ articles that have been read over 50 million times.
- Microsoft Defender Antivirus, previously known as Windows Defender, is included with Windows 10 and Windows 11.
- Microsoft Defender’s background process is called “Antimalware Service Executable.” Known as MsMpEng.exe, it is a component of the Windows operating system.
- Windows Defender analyzes your computer in the background while idle and not in use. It may utilize CPU resources to execute updates or scan files when you access them.
- We recommend downloading the Fortect Repair Tool to repair High CPU Usage issues.
Automatically Repair High CPU Usage Errors
Recommended: To easily install drivers automatically, use the tool below.
Microsoft Defender Antivirus, previously known as Windows Defender, is included with Windows 10. Microsoft Defender’s background process is called “Antimalware Service Executable.” Known as MsMpEng.exe, it is a component of Microsoft’s Windows operating system.
Most of the time, Antimalware Service Executable in Windows Defender is a reliable tool that provides extra protection and system efficiency for your PC. Unfortunately, there will be moments when your Windows Defender will have high CPU usage, causing your system to run slowly. In this article, we look at solutions on how to fix this anomaly.
About Antimalware Service Executable
Microsoft Defender, previously known as Windows Defender, is included with Windows 10 and replaces Microsoft Security Essentials with Windows 7 for free. Microsoft Defender assures that all users of Windows 10, regardless of whether they have chosen to install one, will always have antivirus software installed and running on their computer.
Windows 10 will automatically disable and replace it with Microsoft Defender if you have an out-of-date antivirus program installed. Microsoft Defender is also included with Windows 11. Not on Windows 11 yet? Check out our post on how to move from Windows 10 to Windows 11.
Microsoft Defender’s background service, the Antimalware Service Executable process, always runs in the background. It is responsible for scanning files for malware upon access, running background system scans for malicious software, updating antivirus definitions, installing antivirus definition updates, and executing any other tasks required of a security tool like Defender.

The process is called Antimalware Service Executable in the Windows Task Manager’s Processes tab, but its file name is MsMpEng.exe, which you can see in the Details tab in the Windows Task Manager.

The Windows Security program bundled with Windows 10 and 11 allows you to configure Microsoft Defender, run scans, and view scan history. This program was previously known as the “Windows Defender Security Center.”
Use the “Windows Security” shortcut by clicking the Start menu and searching for it. You can alternatively click on the Windows button > Settings > Update & Security > Windows Security > Open Windows Security by right-clicking the shield symbol in the notification area on your taskbar and selecting “View Security Dashboard.”

Why Does Antimalware Service Executable Cause High CPU Usage?
The Antimalware Service Executable is likely doing a system scan for malware if it’s using a lot of CPU or disk resources. Like other antivirus programs, this built-in utility regularly scans your computer’s files in the background. Unfortunately, Windows Defender scheduled scan also uses lots of CPU power and makes your system slow.
It also regularly checks files as you view them and installs patches with information on new threats. It could also be a sign that Microsoft Defender is installing an update or that you recently opened a large file that requires additional processing time.
Microsoft Defender analyzes your computer in the background while idle and not in use. Even if you’re not using your computer, it may utilize CPU resources to execute updates or scan files when you access them. The background scans, on the other hand, should not run while you are using your computer.
This is typical behavior for any antivirus tool, as they all require specific system resources to examine your computer and keep you secure.
Windows Automatic Repair Tool

System Information
-
Your machine is currently running Windows 10 -
Fortect is compatible with your operating system.
Recommended: To repair Windows Errors, use this software package; Fortect System Repair. This repair tool has been proven to identify and fix these errors and other Windows problems with very high efficiency.

-
100% safe as confirmed by Norton. -
Only your system and hardware are evaluated.
Should You Disable Windows Defender Altogether?
We do not recommend deactivating or disabling Windows Defender if you have no alternative antivirus app installed and you won’t be able to turn it off permanently.
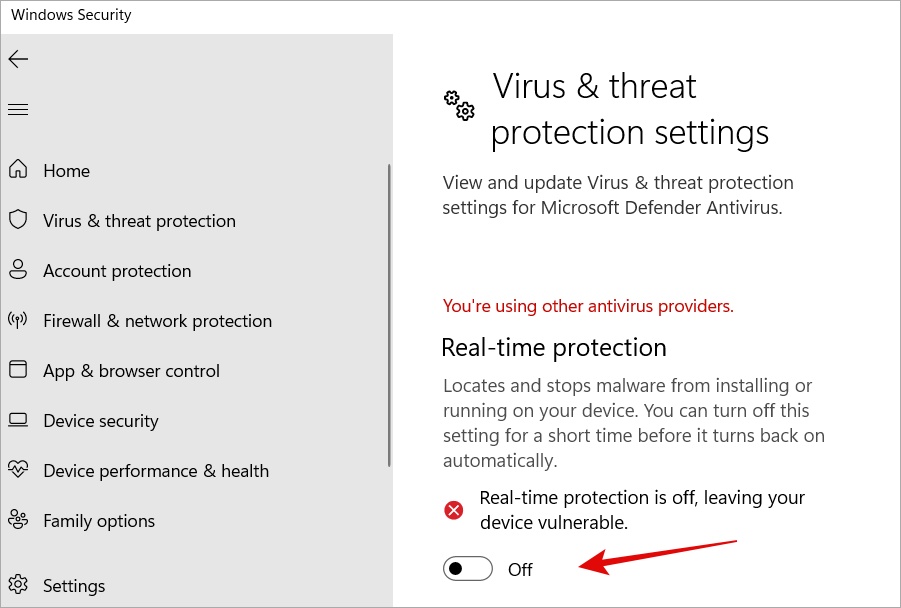
You can disable “Real-Time Protection” by opening the Windows Security process application from the Start menu, selecting “Virus & Threat Protection,” and then clicking “Manage Settings” under the Virus & Threat Protection setting. But Microsoft Defender will reactivate itself shortly if it does not find alternative antivirus programs installed.
Defender scans are a system maintenance operation you can’t turn off, despite some incorrect advice you’ll find online. It won’t help if you disable the scan schedule and its duties in Task Scheduler, and it will only be permanently disabled if you replace it with another antivirus product.
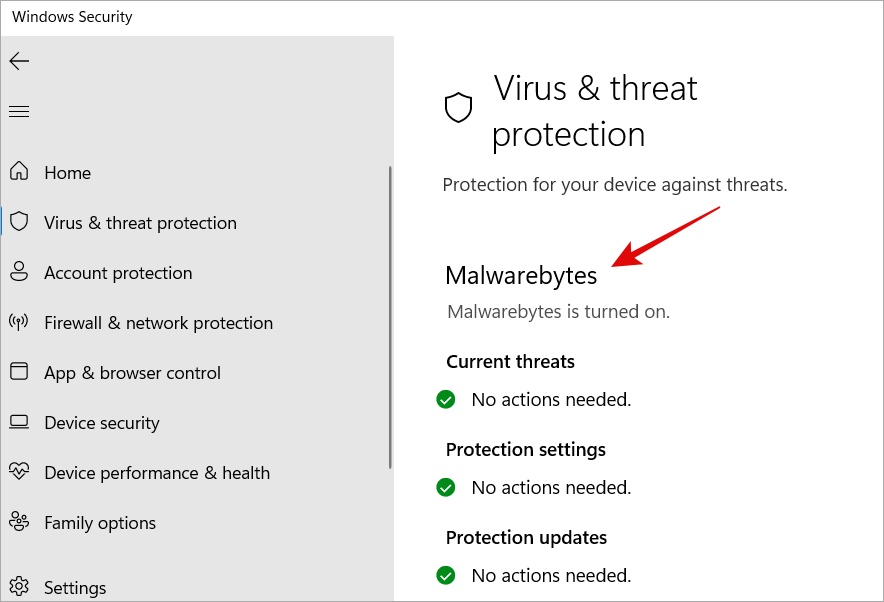
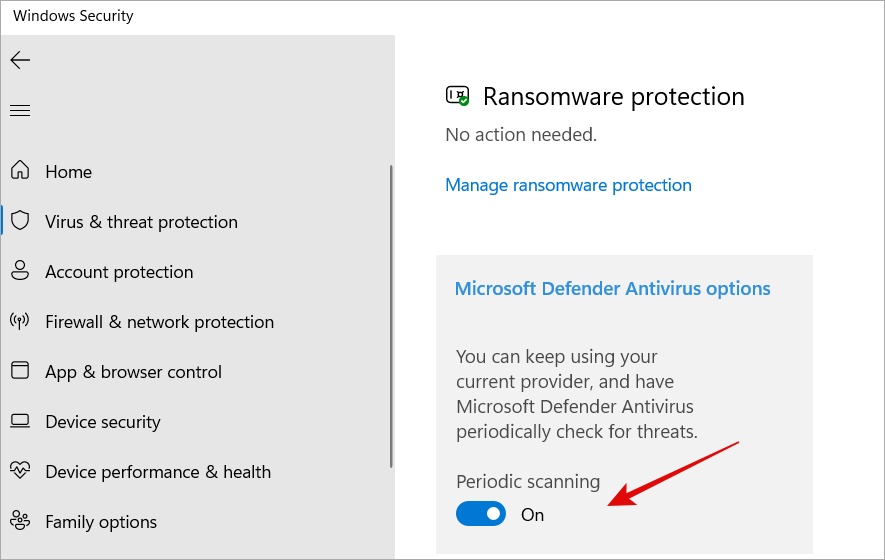
If you have another antivirus product installed on your computer, Microsoft Defender will turn itself off and leave you alone. If you go to Windows Security > Virus & Threat Protection and have another antivirus application installed and operational, you’ll receive a notice that says, “You’re using other antivirus providers.”
This indicates that Windows Defender is turned off. Although the process may be running in the background, it should not consume too much CPU power or disk resources while Windows Defender attempts to run a scan on your computer.
However, you can utilize your preferred antivirus product and Microsoft Defender. Expand “Microsoft Defender Antivirus settings” and enable “Periodic scanning” on the same screen. Suppose you’re already using an antivirus product. In that case, Defender will continue to do regular background scans, giving you a second opinion and maybe catching items that your primary antivirus program might not have noticed.
If you want to block Microsoft Defender to avoid the antimalware service executable from using too many system resources, even if you have alternative antivirus software installed, go here and ensure the Periodic scanning option is turned off. If it doesn’t concern you, you can enable Periodic scanning, as it adds another degree of security and protection. This feature, however, is disabled by default.
Should You Worry About Antimalware Service Executable Process Being a Threat?
The Antimalware Service Executable has not been imitated by any viruses we have encountered. Because Microsoft Defender is an antivirus, any malware that tries to do this should be stopped in its tracks. It’s typical for Microsoft Defender to be operating as long as you’re using Windows 10 and have Microsoft Defender turned on.
If you’re seriously worried, you can always scan using a different antivirus tool to ensure your PC is not infected with malware.
Here are some steps you can perform to fix Antimalware Service Executable when it uses too many system resources.
How to Fix Antimalware Service Executable High CPU Usage Issues
Method 1: Add Antimalware Service Executable to Windows Defender’s Whitelist
Windows Defender checks every file on your computer, including itself, throughout its scans. This can lead to fascinating interactions on rare occasions and is a typical cause of system latency. You may instruct Windows Defender to ignore itself while doing a system scan to avoid this by adding Antimalware Service Executable to the Windows Defender’s exclusion list.
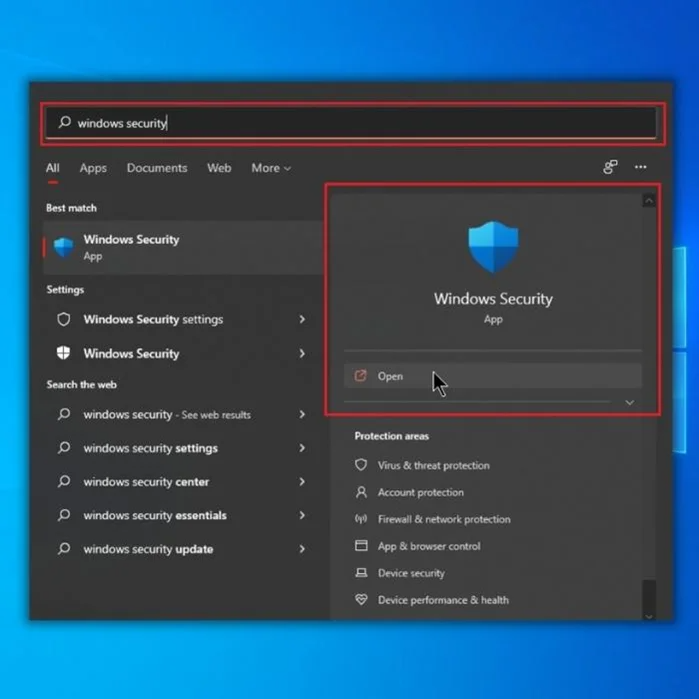
1. Open Windows Defender by clicking on the Windows button, typing in “Windows Security,” and pressing “enter.”
- Under the “Virus & Threat Protection Settings,” click on “Manage Settings.”
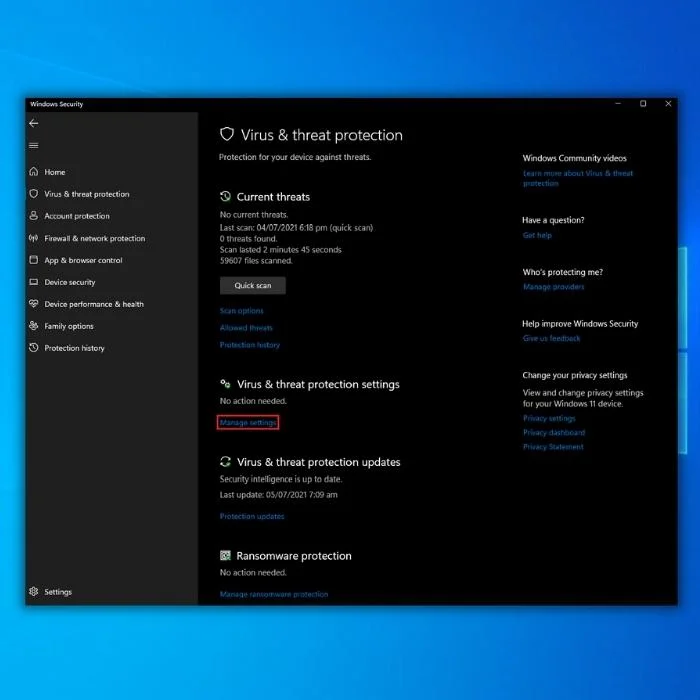
- Click on “Add or Remove Exclusions” under Exclusions

- Click on “Add an exclusion” and select “Folder.“. Choose the Windows Defender folder with the Antimalware Service Executable MsMpEng.exe. In most cases, it is found under this path: C:\ProgramData\Microsoft\Windows Defender\Platform.
Once you have completed these steps, the folder mentioned above with the Antimalware Service Executable MsMpEng.exe will now be excluded from any scans performed by Windows Defender. Open your Task Manager to see if the antimalware service process still utilizes too many system resources.
Method 2 – Temporarily Disable Windows Defender
You can turn off Microsoft Defender temporarily if you don’t want to use it. The antimalware service executable will no longer run as a result of this. Microsoft Defender will not be uninstalled; instead, it will be disabled. It may remain disabled after restarting the computer for some users, but it usually turns back on.
1. Open Windows Defender by clicking on the Windows button, typing in “Windows Security,” and pressing “enter.”
- Click on “Virus & Threat Protection” on the Windows Security homepage.
- Under Virus & Threat Protection Settings, click “Manage Settings” and disable the following options:
- Real-time Protection
- Cloud-delivered Protection
- Automatic Sample Submission
- Tamper Protection
The situation is temporary, as previously stated. The Group Policy Editor allows Windows users to permanently disabled it, but this feature isn’t built into Windows 10 Home.
Even the Group Policy option is absent in some recent versions of Windows 10 Pro, so it is better and easier to disable Windows Defender through the application itself. This should fix the antimalware service executable’s high CPU usage. If not, then move on to the following method.
Method 3 – Disable Windows Defender Through the Registry Editor
If the problem continues after attempting the first two methods, you may be tempted to turn off Windows Defender in the Registry Editor as a last option. Before you remove Windows Defender, you should install an excellent anti-malware program on your computer because doing so exposes you to various cyberattacks.
1. Press the “Windows” and “R” keys to bring a command prompt window and up the run command line. Type in “regedit” and click “OK,” or press enter on your keyboard to open the Registry Editor.

- Navigate to the following path: HKEY_LOCAL_MACHINE\SOFTWARE\Policies\Microsoft\Windows Defender.
- If you can see the registry entry named DisableAntiSpyware in the main registry editor pane, right-click on it, click “Modify,” change the Value Data to “1,” and click on “OK.
- If you do not see the “DisableAntiSpyware” registry entry, right-click on the space in the Registry Editor and click on “New,” click “DWORD (32-bit) Value” and name it “DisableAntiSpyware.”

- Once the entry has been created, right-click on it and change the Value Data to “1,” following the steps listed above.
- Restart your computer and open the Task Manager to see if the antimalware service executable high CPU usage issue has already been fixed.
Method 4: Modify the Scheduling Options of Windows Defender
Since the real-time protection function is the leading cause of the issue, changing Windows Defender’s schedule is a perfect remedy. Fix the Antimalware Service Executable High CPU usage issue by following the steps for modifying the real-time protection settings.
1. Hold the “Windows” and “R” keys to bring up the run dialog box. Type in “taskschd.msc” and click “OK” or press enter on your keyboard to open the Windows Task Scheduler.

- On the left pane, double-click on “Task Scheduler Library,” click “Microsoft,” “Windows,” and then select “Windows Defender.”
- In the middle pane, double-click “Windows Defender Scheduled Scan.”

- On the next window, uncheck “Run with highest privileges.”

- Next, click on the “Conditions” tab, uncheck all the options under the tab, and click “OK.”

After modifying Windows Defender’s schedule, your error should be repaired if you follow the steps above. Try the next one below if the above method fails to fix the antimalware service executable high usage.
Method 5: Check For New Windows Updates
Antimalware Service Executable can experience high CPU usage due to out-of-date Windows drivers and files. Use Windows Update to see if there are any available updates to keep your system current.
- Press “Windows” on your keyboard and press “R” to bring up the run dialog box; type in “control update,” and press enter.

- Click on “Check for Updates” in the Windows Update window. If no updates are available, you should get a message saying, “You’re Up to Date.”

- If the Windows Update Tool finds a new update, let it install and wait for it to complete. You may be required to restart your computer for it to install.

- Restart your computer and open Windows Task Manager to see if the antimalware service’s high usage remains.
Method 6: Managing Windows Defender Cache Maintenance and Cleanup Tasks
Performing regular cache maintenance and cleanup for Windows Defender is crucial for maintaining optimal performance and ensuring that your system resources are used efficiently. These tasks can help free up valuable disk space and reduce the likelihood of high CPU usage caused by Antimalware Service Executable.
Windows Defender Cache Maintenance
To manage Windows Defender cache maintenance, follow these steps:
- Open Task Scheduler by pressing the Windows key and typing “Task Scheduler” in the search bar. Then, press Enter.
- In the left pane, navigate to Task Scheduler Library > Microsoft > Windows > Windows Defender.
- Locate the Windows Defender Cache Maintenance task in the middle pane and double-click it.
- In the new window, click the Triggers tab. Here, you can modify the schedule for cache maintenance to suit your needs. Adjust the settings and click OK to save your changes.
Windows Defender Cleanup
To perform a Windows Defender cleanup, follow these steps:
- Open the Windows Security app by clicking on the Windows button, typing “Windows Security,” and pressing “Enter.”
- Click on “Virus & Threat Protection” on the Windows Security homepage.
- Scroll down and find the “Current Threats” section. Click on “Quick Scan” to perform a basic scan of your system.
- Once the scan is complete, click “Clean Threats” to remove any detected malware or potentially unwanted software.
- If Windows Defender identifies any issues, it will perform an automatic cleanup. You can also click “Start Actions” to manually initiate the cleanup process.
By managing cache maintenance and performing cleanup tasks regularly, you can ensure that Windows Defender runs efficiently, reducing the chances of high CPU usage caused by the Antimalware Service.
Method Seven: Verifying Windows Defender’s Functionality
To perform a Windows Defender verification, open the Windows Security app from the Start menu, and click on “Virus & Threat Protection.” From there, you can initiate a quick or full scan to verify that Windows Defender is functioning correctly and detecting potential threats.
During the scan, if you want to open file location of a detected threat, you can do so by clicking on the threat details within the Windows Security app. This will provide you with more information about the detected item, including its location on your computer.
To verify Windows Defender’s functionality, follow these steps:
- Open the Windows Security app by clicking on the Windows button, typing “Windows Security,” and pressing “Enter.”
- On the Windows Security homepage, click “Virus & Threat Protection.”
- You should see a message indicating that Windows Defender is protecting your device. If there are any issues with Windows Defender, you will see a warning message with a prompt to take action.
- To test the real-time protection feature, you can download the EICAR test file from the EICAR website. This file is a harmless text file designed to test antivirus software. Once downloaded, Windows Defender should immediately detect it as a potential threat and remove it.
- Verify that Windows Defender is receiving updates by checking the “Virus & Threat Protection Updates” section. Click on “Check for Updates” to ensure you have installed the latest definitions.
- Perform a quick scan by clicking “Quick Scan” in the “Current Threats” section. Windows Defender should start scanning your system for potential threats. If any issues are detected, follow the prompts to resolve them.
- To ensure that scheduled scans are enabled, open Task Scheduler by pressing the Windows key and typing “Task Scheduler” in the search bar. Then, press Enter. In the left pane, navigate to Task Scheduler Library > Microsoft > Windows > Windows Defender. Locate the Windows Defender Scheduled Scan task in the middle pane and double-click it. In the new window, click the Triggers tab and make sure that the task is enabled and scheduled to run at regular intervals.
By following these steps, you can verify that Windows Defender is functioning correctly and that the Antimalware Service Executable process is actively protecting your system from potential threats.
Wrap Up
Although Windows Defender is a valuable utility, especially since it comes pre-installed with Windows 10, the application does consume a significant amount of your computer’s processing power. By following the methods we provided in this article, you will regain control of Antimalware Service Executable and maintain maximum system performance while on your computer.