(Image credit: Windows Central)
On Windows 10, you can change the default system font, but you now have to make changes to the Registry to complete this task.
In older versions like Windows 7, the Control Panel included personalization settings to change the system font for many visual elements on the desktop, such as File Explorer, icons, title bars, menus, message boxes, and more. However, for some reason, Windows 10 removed these settings, and you are now stuck with the default system font.
However, it is possible to change the «Segoe UI» default font on Windows 10, if that is something you want to do. Now, it just takes a few more steps using the Registry.
In this Windows 10 guide, we will walk you through the steps to change the default system font for most desktop elements.
- How to change default font on Windows 10
- How to restore default system font on Windows 10
How to change default font on Windows 10
To change the system font on Windows 10, use these steps:
Warning: This is a friendly reminder that editing the Registry is risky and can cause irreversible damage to your installation if you don’t do it correctly. It’s recommended to make a full backup of your PC before proceeding. Alternatively, you can create a system restore point, which will also help you revert the changes.
- Open Start.
- Search for Notepad and click the top result to open the text editor.
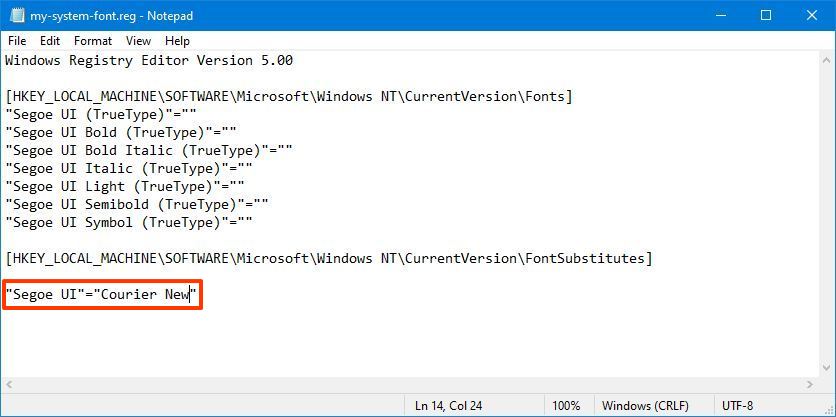
- Copy and paste the following Registry code onto the file:Windows Registry Editor Version 5.00[HKEY_LOCAL_MACHINE\SOFTWARE\Microsoft\Windows NT\CurrentVersion\Fonts]»Segoe UI (TrueType)»=»»»Segoe UI Bold (TrueType)»=»»»Segoe UI Bold Italic (TrueType)»=»»»Segoe UI Italic (TrueType)»=»»»Segoe UI Light (TrueType)»=»»»Segoe UI Semibold (TrueType)»=»»»Segoe UI Symbol (TrueType)»=»»[HKEY_LOCAL_MACHINE\SOFTWARE\Microsoft\Windows NT\CurrentVersion\FontSubstitutes]»Segoe UI»=»NEW-FONT-NAME»
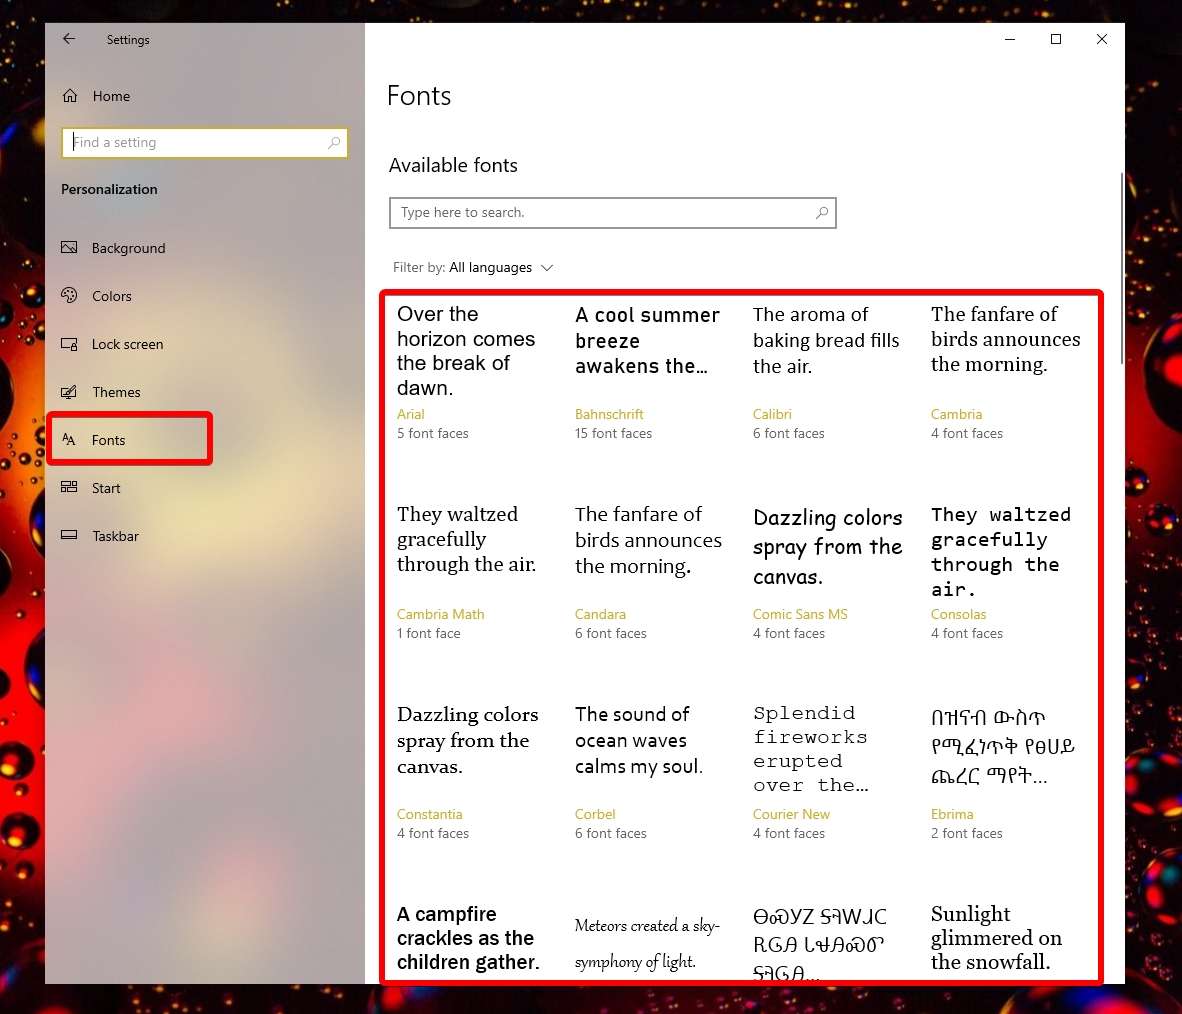
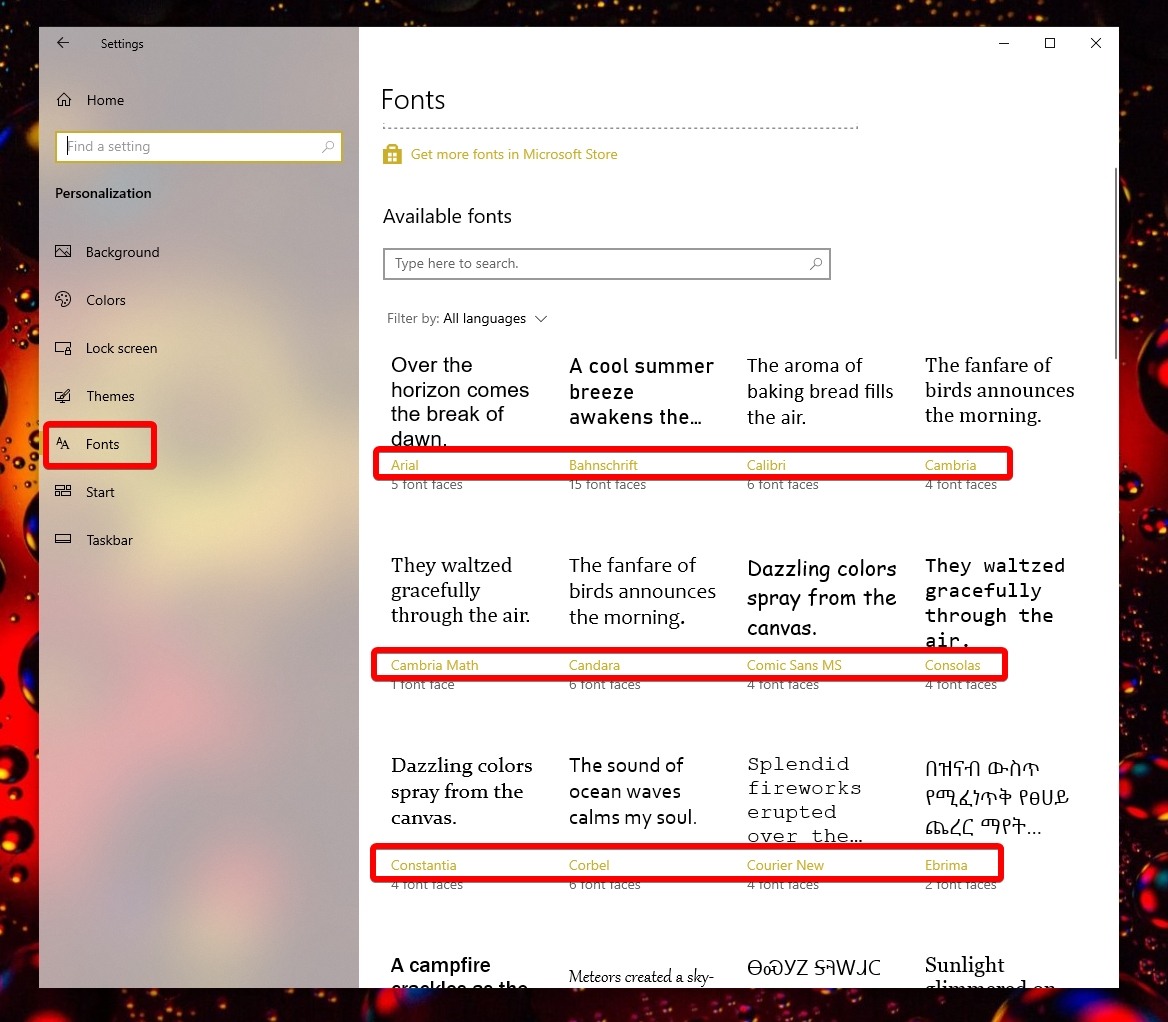
- Open Settings.
- Click on Personalization.
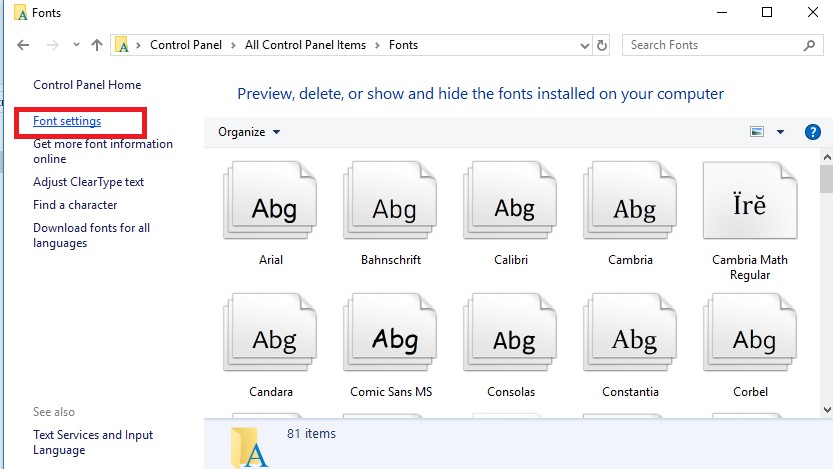
- Click on Fonts.
- Select the font family you want to use.
- Note the official name of the font family – for example, Courier New.
- In the Notepad text with the Registry code, replace «NEW-FONT-NAME» with the name of the font you want to use in the entire system – for example, Courier New.
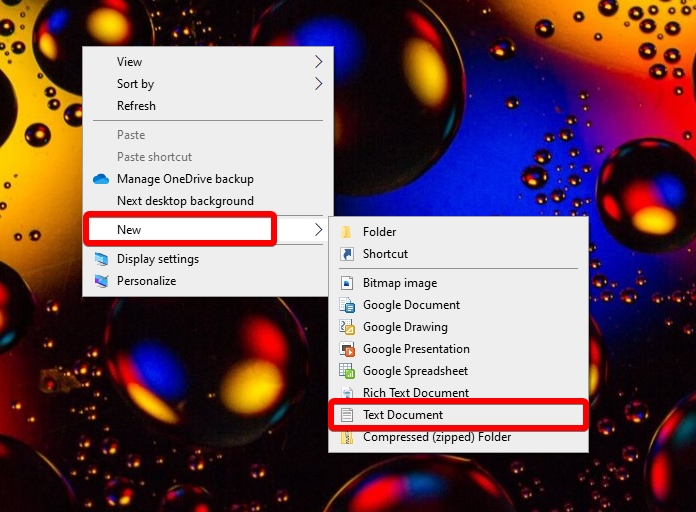
- Click the File menu.
- Select the Save as option.
- Use the «Save as type» drop-down menu and select the All Files option.
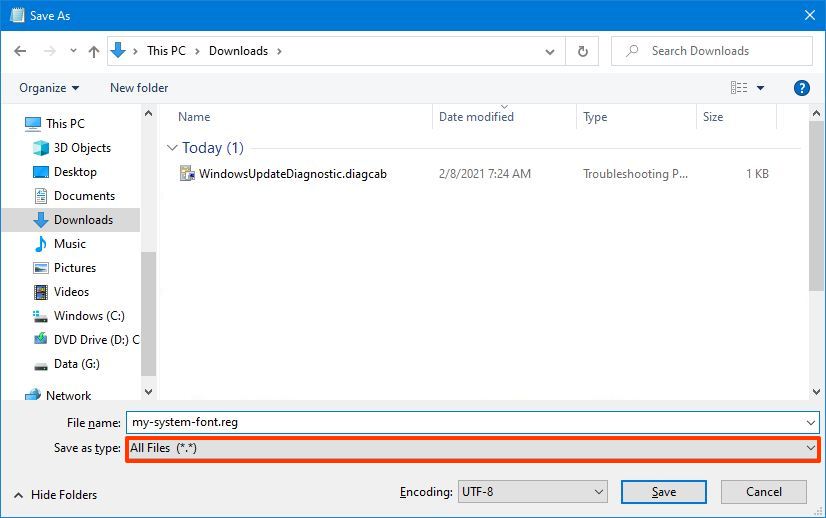
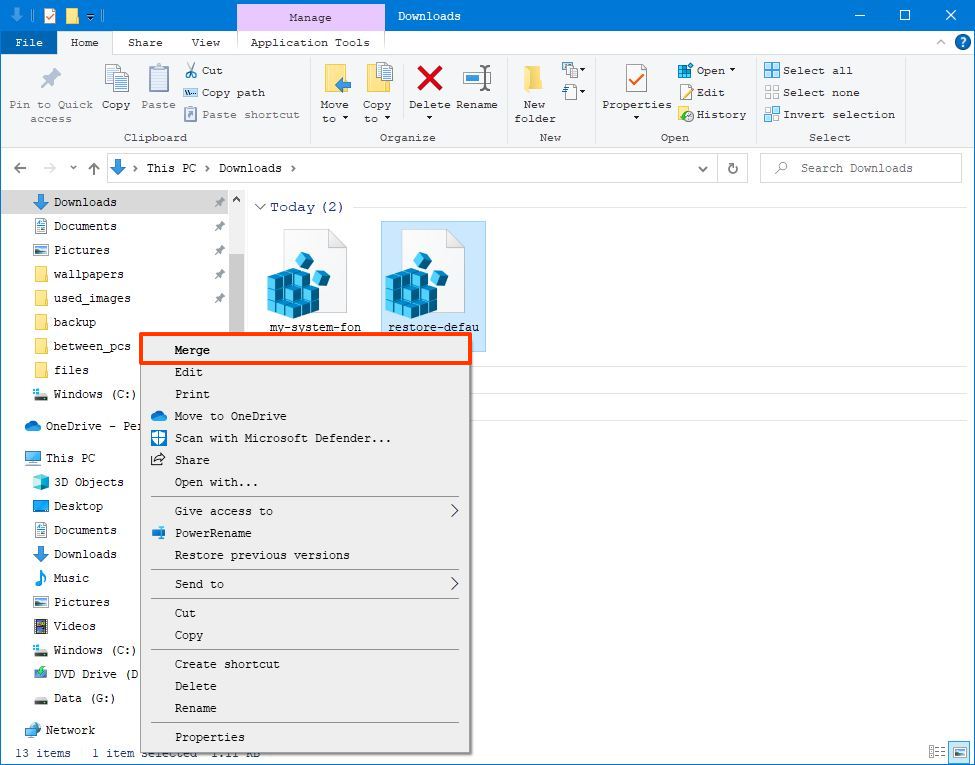
- Confirm a descriptive name for the file, such as «my-system-font,» and use the «.reg» as the extension – for example, my-system-font.reg.
- Click the Save button.
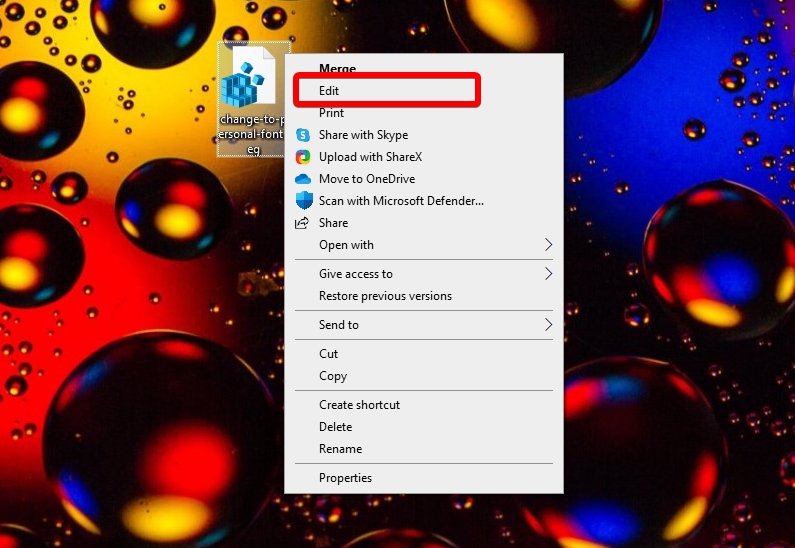
- Right-click the newly created «.reg» file and select the Merge option.
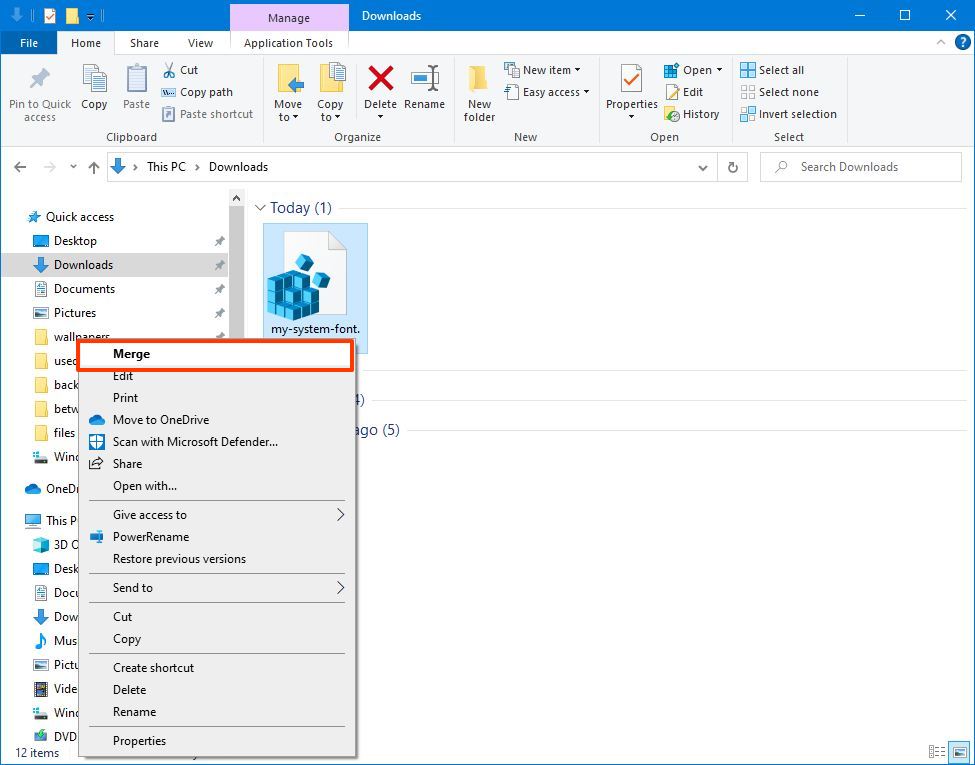
- Click the Yes button.
- Click the OK button.
- Restart the computer.
Once you complete the steps, the new font should be available throughout the desktop visual elements, including File Explorer, message box, taskbar, and apps that use the system default font settings.
Although you can select from a lot of different fonts, it is recommended to choose a style that is easy to understand since fonts like Webdings or Wingdings use symbols, and they can cause issues to the installation.
How to restore default system font on Windows 10
If you change your mind, you can always restore the previous settings using the Registry or using a restore point.
Undo settings with Registry
To restore the default font settings on Windows 10, use these steps:
- Open Start.
- Search for Notepad and click the top result to open the text editor.
- Copy and paste the following Registry code onto the file:Windows Registry Editor Version 5.00[HKEY_LOCAL_MACHINE\SOFTWARE\Microsoft\Windows NT\CurrentVersion\Fonts]»Segoe UI (TrueType)»=»segoeui.ttf»»Segoe UI Black (TrueType)»=»seguibl.ttf»»Segoe UI Black Italic (TrueType)»=»seguibli.ttf»»Segoe UI Bold (TrueType)»=»segoeuib.ttf»»Segoe UI Bold Italic (TrueType)»=»segoeuiz.ttf»»Segoe UI Emoji (TrueType)»=»seguiemj.ttf»»Segoe UI Historic (TrueType)»=»seguihis.ttf»»Segoe UI Italic (TrueType)»=»segoeuii.ttf»»Segoe UI Light (TrueType)»=»segoeuil.ttf»»Segoe UI Light Italic (TrueType)»=»seguili.ttf»»Segoe UI Semibold (TrueType)»=»seguisb.ttf»»Segoe UI Semibold Italic (TrueType)»=»seguisbi.ttf»»Segoe UI Semilight (TrueType)»=»segoeuisl.ttf»»Segoe UI Semilight Italic (TrueType)»=»seguisli.ttf»»Segoe UI Symbol (TrueType)»=»seguisym.ttf»»Segoe MDL2 Assets (TrueType)»=»segmdl2.ttf»»Segoe Print (TrueType)»=»segoepr.ttf»»Segoe Print Bold (TrueType)»=»segoeprb.ttf»»Segoe Script (TrueType)»=»segoesc.ttf»»Segoe Script Bold (TrueType)»=»segoescb.ttf»[HKEY_LOCAL_MACHINE\SOFTWARE\Microsoft\Windows NT\CurrentVersion\FontSubstitutes]»Segoe UI»=-
- Click the File menu.
- Select the Save as option.
- Use the «Save as type» drop-down menu and select the All Files option.
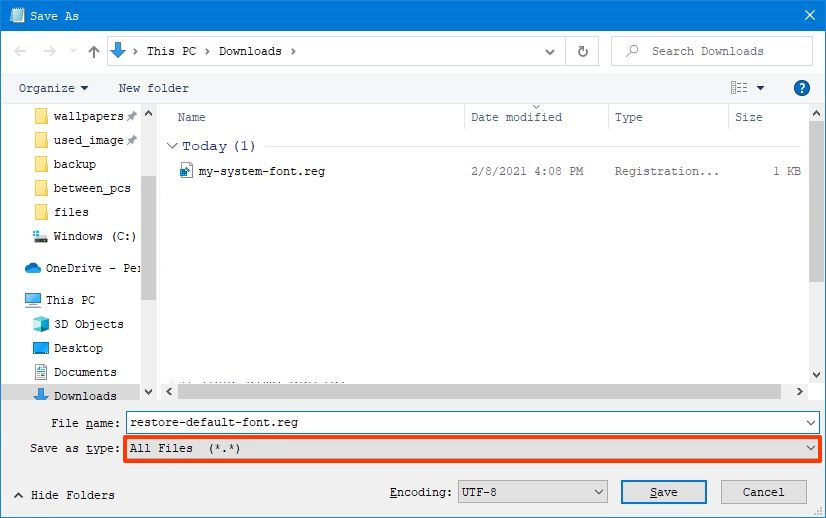
- Confirm a descriptive name for the file, such as «restore-default-font,» and use the «.reg» as the extension – for example, restore-default-font.reg.
- Click the Save button.
- Right-click the newly created «.reg» file and select the Merge option.
- Click the Yes button.
- Click the OK button.
After you complete the steps, the Windows 10 default font should rollback to the previous configuration.
Undo settings with Restore point
Alternatively, you could also use a previous restore point created before modifying the font settings to undo the changes. However, use this option as a last resort, since depending on when you are restoring the system, the feature may also undo other system changes you may have configured after the restore point was created.
To undo system changes, use these steps:
- Open Start.
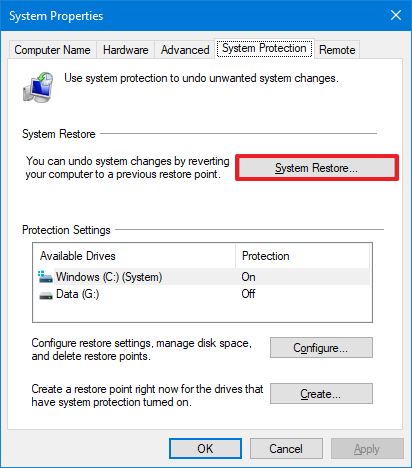
- Search for Create a restore point and select the top result to open the app.
- Click the System Protection tab.
- Click the System Restore button.
- Click the Next button.
- Select the restore point you created before applying the settings.
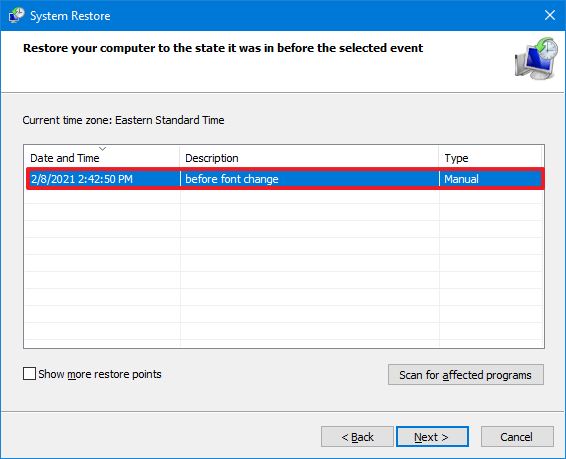
- Click the Next button.
- Click the Finish button.
Once you complete the steps, the system will need to be restarted to finish the process.
All the latest news, reviews, and guides for Windows and Xbox diehards.
Mauro Huculak is technical writer for WindowsCentral.com. His primary focus is to write comprehensive how-tos to help users get the most out of Windows 10 and its many related technologies. He has an IT background with professional certifications from Microsoft, Cisco, and CompTIA, and he’s a recognized member of the Microsoft MVP community.
If you’re tired of using the default system font on Windows 11/10, you can change it to your desired font with a simple registry tinkering. This will change the default system fonts of the desktop icons like Recycle bin, including title bar, message box, and others.
In the older version (Windows 7 or lower version) changing the default system font was not a big deal. It was quite easy and straightforward through personalization settings in the Control Panel. But for some reason, these settings were removed and users remained stuck with the default system font. You had to do just this:
- Right-click the mouse on a blank area of the screen and choose Customize.
- Click Color and appearance of windows.
- Then, click Open classic appearance properties for additional color options.
- Next click the Advanced button.
- Pull down the list item and choose the element you want to change the font, icon, for example.
- Then pull down the Font list and choose the font to use. Then define its size and horns (bold or italic).
- Then repeat the operation for the other elements to customize. Finally, click on the OK button and then click Apply. The change is immediate and you don’t have to restart your computer.
In this article, we will show how to change the default system font on Windows 11/10, including the way to restore the default system font using the Registry Editor. Before you proceed, one thing you must know is that without having proper skills, editing a registry is dangerous. It can damage your system permanently which might be irreversible. So, if you have a little knowledge of what you’re doing then you can skip it and ask a skilled person to complete the adjustment.
Before you go ahead and use the steps, do remember to create a system restore point first.
To get started, open Notepad first. You can open it using the Run command. Simply press Windows+R keys to launch the Run dialog box, type Notepad in the text field, then hit Enter to open the Notepad app.
In the Notepad app, copy and paste the following text code:
Windows Registry Editor Version 5.00

[HKEY_LOCAL_MACHINE\SOFTWARE\Microsoft\Windows NT\CurrentVersion\Fonts]
"Segoe UI (TrueType)"=""
"Segoe UI Bold (TrueType)"=""
"Segoe UI Bold Italic (TrueType)"=""
"Segoe UI Italic (TrueType)"=""
"Segoe UI Light (TrueType)"=""
"Segoe UI Semibold (TrueType)"=""
"Segoe UI Symbol (TrueType)"=""

[HKEY_LOCAL_MACHINE\SOFTWARE\Microsoft\Windows NT\CurrentVersion\FontSubstitutes]

"Segoe UI"="NEW_FONT"
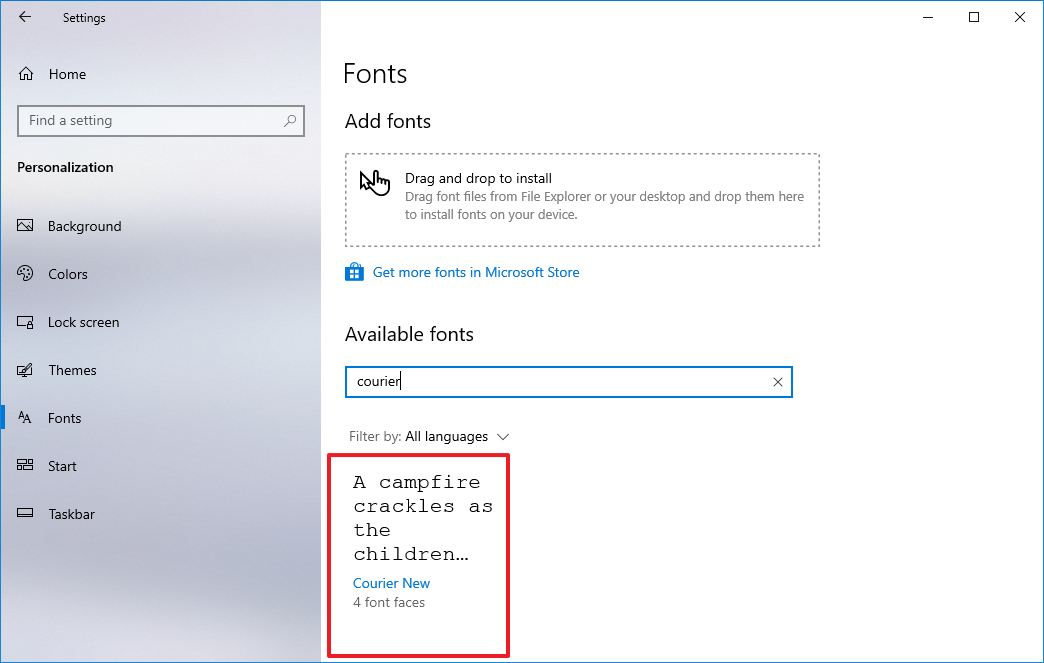
Now, open the Settings app and click on the Personalization category.

In the left pane, select the Fonts tab. You will see a large collection of the font family on the right.
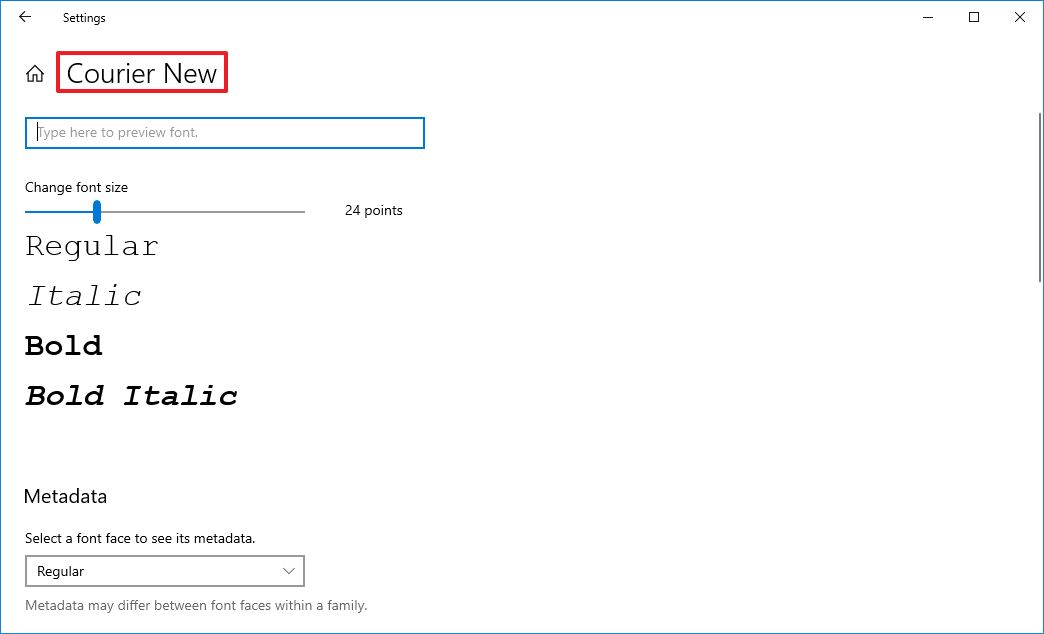
Select the font you want to use from the list and also note its Official name. For example – Book Antiqua.

Now replace “NEW_FONT” with the font name you have selected from the Settings page. Because I prefer the font name “Book Antiqua” to be used in the entire system so, you can see the above image, I have replaced the “NEW_FONT” with the Book Antiqua in the registry code.
After replacing the font name in the Notepad, click on the File menu and then select the “Save as” option. On the Save as page, switch “Save as type” to All Files.
Name the file, choose the preferred location of your file, and then click the Save button. The file name must have the .reg extension. For instance – I have named my file my_font. So, the name of my file with the .reg extension should be “my_font.reg”.

Now go to the location where the .reg file has been saved. Then right-click on it and select the Merge option from the context menu.
Click Yes and then hit the OK button to save the changes.
After performing the above steps, restart your computer and the new font will substitute in the entire system.
Read: How to change default font in Word, Excel, PowerPoint.
Restore default system font on Windows 11/10
If you want the previous configuration on your Windows device, you can revert the changes using the following instructions:
Open the Start menu, type Notepad, then select the top of the result to open the Notepad text editor.
In the Notepad app area, copy and paste the following text code:
Windows Registry Editor Version 5.00

[HKEY_LOCAL_MACHINE\SOFTWARE\Microsoft\Windows NT\CurrentVersion\Fonts]
"Segoe UI (TrueType)"="segoeui.ttf"
"Segoe UI Black (TrueType)"="seguibl.ttf"
"Segoe UI Black Italic (TrueType)"="seguibli.ttf"
"Segoe UI Bold (TrueType)"="segoeuib.ttf"
"Segoe UI Bold Italic (TrueType)"="segoeuiz.ttf"
"Segoe UI Emoji (TrueType)"="seguiemj.ttf"
"Segoe UI Historic (TrueType)"="seguihis.ttf"
"Segoe UI Italic (TrueType)"="segoeuii.ttf"
"Segoe UI Light (TrueType)"="segoeuil.ttf"
"Segoe UI Light Italic (TrueType)"="seguili.ttf"
"Segoe UI Semibold (TrueType)"="seguisb.ttf"
"Segoe UI Semibold Italic (TrueType)"="seguisbi.ttf"
"Segoe UI Semilight (TrueType)"="segoeuisl.ttf"
"Segoe UI Semilight Italic (TrueType)"="seguisli.ttf"
"Segoe UI Symbol (TrueType)"="seguisym.ttf"
"Segoe MDL2 Assets (TrueType)"="segmdl2.ttf"
"Segoe Print (TrueType)"="segoepr.ttf"
"Segoe Print Bold (TrueType)"="segoeprb.ttf"
"Segoe Script (TrueType)"="segoesc.ttf"
"Segoe Script Bold (TrueType)"="segoescb.ttf"

[HKEY_LOCAL_MACHINE\SOFTWARE\Microsoft\Windows NT\CurrentVersion\FontSubstitutes]

"Segoe UI"=-
Now click on the File menu and then select the “Save as” option. On the Save as page, use the drop-down menu to switch “Save as type” to All Files.
Thereafter you have to name the file, choose the preferred location to save the file, and then click the Save button. Save the file with the .reg extension. For example – I have named my file restore_my_font. So, the name of my file with the .reg extension should be “restore_my_font.reg”.
Now go to the location where you have saved the restore_my_font.reg file. Then do a right-click on it and select the Merge option from the context menu.
Click Yes then hit the OK button to save the changes.
Once you have done, restart your computer and it will revert your system configuration to the default font.
TIP: Advanced System Font Changer lets you change System Font in Windows.
What is the default font in Windows 11 or Windows 10?

Segoe UI is the default font in Windows 11 and Windows 10 families of operating systems. Segoe UI (User Interface) is a member of the Segoe family and it is used in most Microsoft products for user interface text, as well as for many of its online services.
If you accidentally deleted or replaced one or more system fonts in Windows, you can try to restore the default fonts. The issue of missing fonts can appear as follows: in system dialog boxes (and some other windows) instead of normal characters, you can see strange or unreadable symbols. In our example, these are hieroglyphs and squares. This problem can occur after a third-party app is uninstalled, which also deleted several system default font files (up to complete cleaning the font files folder C:\Windows\Fonts). Also, the problem with fonts can occur when a certain program replaces one of the default fonts with its own one during installation.
In this article, we’ll discuss ways to restore corrupted system fonts in Windows 10 and Windows 11 to a clean system state.
Contents:
- How to Restore Default System Font Settings in Windows?
- Extract Default Font Files from a Windows 10 or 11 Installation Image
- Clear Font Cache in Windows
- Download and Restore Default Fonts on Windows 10 and 11
How to Restore Default System Font Settings in Windows?
Firstly, you should try to restore the default fonts in Windows 10 or 11 using the built-in feature. To do it:
- Go to the Control Panel -> Appearance and Personalization -> Fonts. This Control Panel item can be opened by running the command:
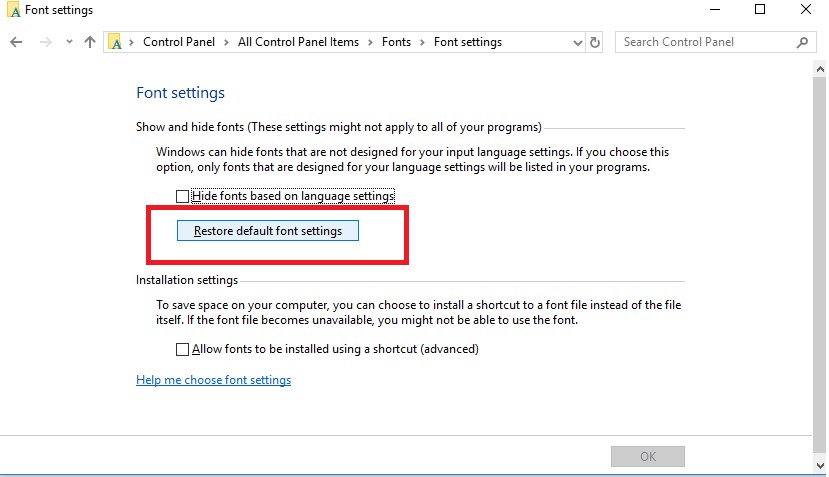
control fonts - Select Font settings in the left pane;

- In the next window click the Restore default font settings button.

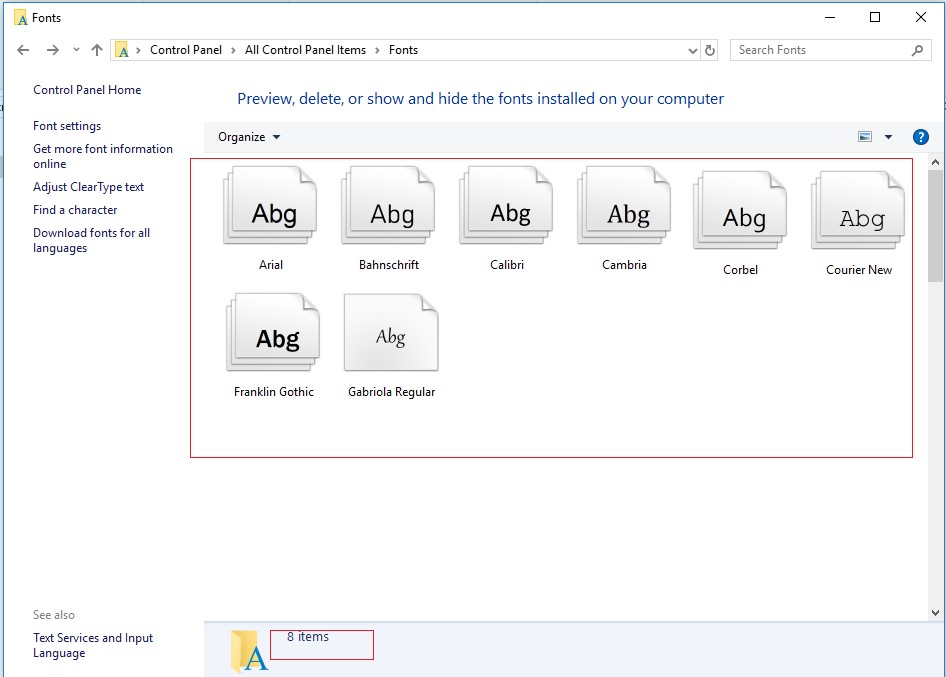
This option allows you to remove all third-party fonts, leaving only the standard Windows fonts. However, if the desired font file (*.fon or *.ttf) was deleted or replaced, the reset feature won’t help.
The Segoe UI font family is used by default in Windows to display the system interface. Make sure it is in the font list in Control Panel.
To restore the needed font, you can copy the specific font file from the Windows distribution (or from another computer), or download and install the font file manually or through the GPO (note that Windows 10 has a feature that blocks the installation of third-party fonts, which may prevent new fonts from being installed).
Tip. The installation of a large number of fonts in Windows can lead to problems with system performance and some apps, usually related to graphics and layouts.
Extract Default Font Files from a Windows 10 or 11 Installation Image
The font files in Windows are stored in the C:\Windows\Fonts directory. Try to open this folder in File Explorer. If you see only a few font files with the *.FON and *.TTF extensions in this directory, then the default font files have been deleted and reset by the built-in tools (as described above) won’t help.
The missing font files can be copied from any computer running the same OS version or extracted from the installation disk or an ISO/WIM image of Windows 10 (11 or 8.1).
Let’s consider the second case. To do this, we need a Windows 10/11 installation media. The easiest way to create a Windows installation ISO image using the Media Creation Tool. Mount the ISO image into a virtual drive (suppose letter H: is assigned to it).
Open the PowerShell command prompt as an administrator and copy the H:\sources\install.wim or H:\sources\install.esd file into the C:\Distr\ directory:
Copy-Item H:\sources\install.wim C:\Distr\
Tip. If your Windows image contains only the install.esd file, you can convert the ESD file to WIM format using the command:
dism /export-image /SourceImageFile:c:\distr\install.esd /SourceIndex:1 /DestinationImageFile: c:\distr\install.wim /Compress:max /CheckIntegrity
Mount the Windows 10 installation image file (install.wim) to the C:\Distr\wim directory:
dism /mount-wim /wimfile:c:\Distr\install.wim /index:1 /mountdir:C:\Distr\wim
Tip. In our example, the installation wim image contains only one Windows edition with the index 1 (/index:1), other editions are removed from the image. Your installation ISO image or WIM file can contain multiple versions and editions of Windows. The list of available editions can be displayed with the command:
Dism /Get-WimInfo /WimFile:C:\Distr\install.wim

Tip. If the DISM command returns the following error: Error: 0xc1510111 You do not have permissions to mount and modify this image, make sure that the Read-Only attribute is not checked in the properties of the install.wim file. 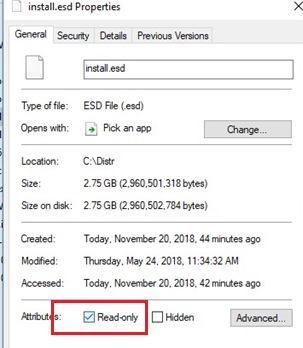
Copy the original fonts files from the C:\Distr\wim\Windows\Fonts to the C:\Windows\Fonts directory with the replacement of files in the target directory. Use this PowerShell command:
Copy-Item -path C:\Distr\wim\Windows\Fonts -Destination C:\Windows -recurse –container -force
The font files will be replaced with the original ones. Some system fonts that are currently used won’t be replaced; a number of errors in the console window will indicate this.
Now you can unmount the source Windows image:
dism /unmount-wim /mountdir:C:\Distr\wim /discard
Restart your computer and check if the font problem persists.
Clear Font Cache in Windows
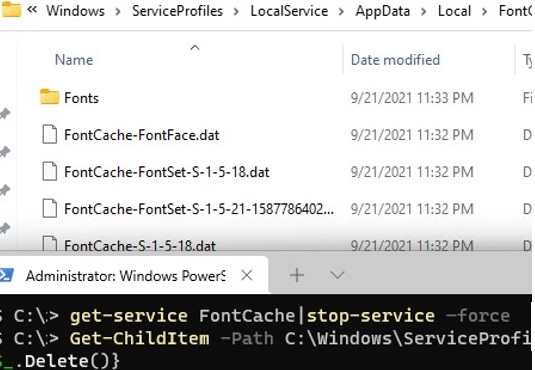
Windows font caching is enabled by default (similar to icon caching). This allows loading fonts faster in Windows apps and dialogs. The font cache is located in the %WinDir%\ServiceProfiles\LocalService\AppData\Local\FontCache folder. If the font cache is corrupted, it can also cause font display issues in Windows. We recommend that you manually reset the current Windows font cache. For this you need:
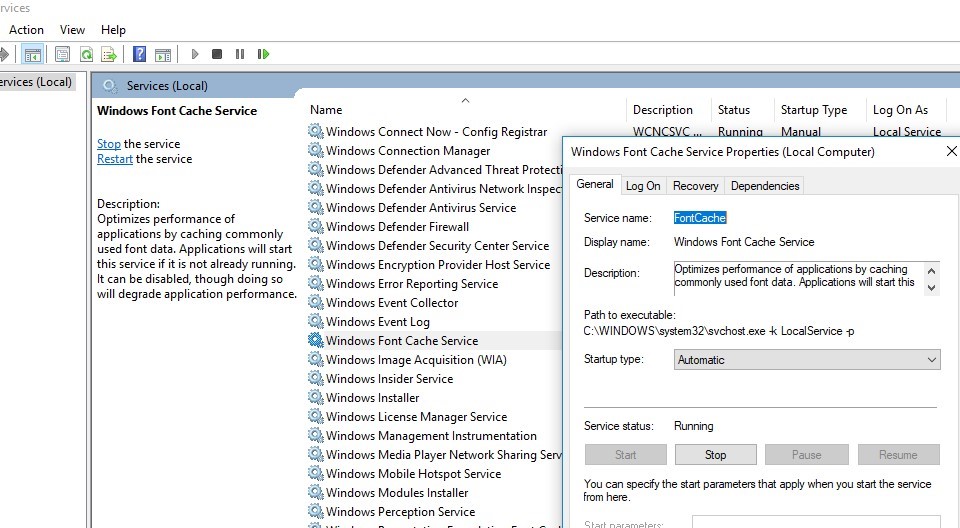
- Open the service management console (
services.msc); - Stop the Windows Font Cache Service in the console or using a PowerShell command:
Get-Service FontCache|Stop-Service –force
- Clean up the font cache folder:
Get-ChildItem -Path C:\Windows\ServiceProfiles\LocalService\AppData\Local\FontCache -File | foreach { $_.Delete()} - Delete the file FNTCACHE.DAT:
Remove-Item c:\Windows\System32\FNTCACHE.DAT
- Run the FontCache service and reboot your device.
Download and Restore Default Fonts on Windows 10 and 11
If you don’t have a Windows 10 (Windows 11 or Windows 8.1) installation image, you can copy the directory with the original font files from another computer running the same OS version, or use ready font archives that can be downloaded from the links below:
- Default fonts for Windows 8 – DefaultFontsWin8.zip (197 MB);
- Default fonts for Windows 8.1 – DefaultFontsWin8-1.zip (258 MB);
- Original fonts for Windows 10 21H1 (suitable for other Windows 10 builds) — DefaultFonts-Win10-21H1.zip (189 MB);
- Original fonts for Windows 11 – DefaultFonts-Win11.zip (190 MB).
Download and unzip the archive for your Windows version. Copy the archive contents to the C:\Windows\Fonts folder with the replacement.
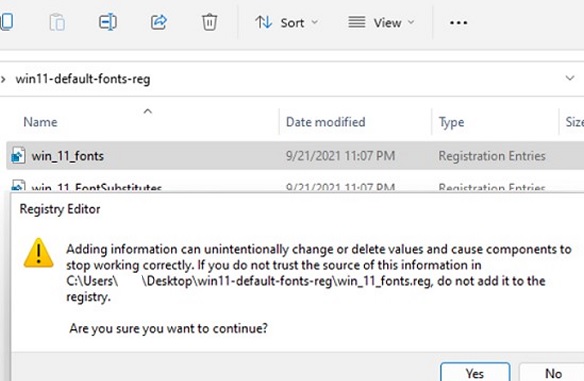
Then download and apply registry files with default font settings for your version of Windows:
- Windows 10 — win10-default-fonts-reg.zip
- Windows 11 — win11-default-fonts-reg.zip
Each archive contains three REG files:
- win_10_fonts.reg – contains a list of default fonts registered in the system registry (
HKLM\SOFTWARE\Microsoft\Windows NT\CurrentVersion\Fonts); - win_10_FontSubstitutes.reg – contains font association settings (
HKLM\SOFTWARE\Microsoft\Windows NT\CurrentVersion\FontSubstitutes); - win_restore_default_user_font_settings.reg – restores default font settings in user registry hive (
HKCU\Software\Microsoft\Windows NT\CurrentVersion\Font Management).
Unzip the archive and apply (double click) each reg file.
Restart your computer. The problem with the fonts should be gone!
Tip. If the problem with fonts is caused by the installation of a new font file, you can reset the contents of C:\Windows\Fonts before replacement (the fonts you are currently using won’t be replaced). This operation can be performed using the Restore button in the Control Panel we talked about above.
If all else fails and the fonts are displayed incorrectly, try to check and repair your Windows image using the commands:
sfc /scannow
 DISM /Online /Cleanup-Image /RestoreHealth
Contents
- What is the default font for Windows?
- To check what font you are currently using as the default, do the following:
- Here’s how to change the default fonts on Windows 10:
- How to change your Windows font back to default
- To restore the default font settings in Windows 10, do the following:
- How to change your Windows font back to default via the Registry
- If you are an experienced Registry user, you can go ahead with the following steps:

If you’ve been using your Windows 10 PC for a while, you have probably made some changes to the way things work. For instance, one of the most common adjustments people make to their PCs is changing the font settings. While this may be a good idea for personalizing your Windows experience, at some point, you may want to restore your Windows font settings back to their defaults.
If you are wondering how to fix Windows 10 font problems, you are in the right place. Today, we will be looking into how to fix font issues on Windows 10.
First, we will check what the default font on Windows is. Second, we will show you how to change the default font on your system and what the consequences of that may be. Finally, we will give you two methods for restoring your Windows font settings to their defaults.
Let’s get started.
What is the default font for Windows?
The default font on Windows 10 is Segoe. It’s a pretty nice-looking font —but, of course, aesthetics are in the eye of the beholder. If you are not a fan of the Segoe font, you can easily change it. If you do, however, keep in mind that this will change the font on your whole system: it will affect your system’s icons, menus, title bar text, File Explorer, and more.
To check what font you are currently using as the default, do the following:
- On your keyboard, use the Win + I shortcut.
- This will launch the Settings window.
- Here, go to Personalization and select Fonts.
- At the top of the screen, you should see the official name of the font currently set as default.
Before making changes to your font settings in Windows, it is strongly advised that you back up your Windows Registry. This way, if anything goes wrong, you will be able to restore your Registry settings easily.
Here’s how to change the default fonts on Windows 10:
- Launch Run by pressing the Win and R buttons at the same time.
- Type “regedit” and press the Enter key on your keyboard.
Make sure you are using Windows Registry Editor Version 5.00 for this.
- Navigate to File > Export…
- You will need to save the new Registry file somewhere on your hard drive.
- Launch Notepad.
- Copy the commands below and paste them into the new Notepad file:
[HKEY_LOCAL_MACHINE\SOFTWARE\Microsoft\Windows NT\CurrentVersion\Fonts]
“Segoe UI (TrueType)”=””
“Segoe UI (TrueType)”=””
“Segoe UI Black (TrueType)”=””
“Segoe UI Black Italic (TrueType)”=””
“Segoe UI Bold (TrueType)”=””
“Segoe UI Bold Italic (TrueType)”=””
“Segoe UI Historic (TrueType)”=””
“Segoe UI Italic (TrueType)”=””
“Segoe UI Light (TrueType)”=””
“Segoe UI Light Italic (TrueType)”=””
“Segoe UI Semibold (TrueType)”=””
“Segoe UI Semibold Italic (TrueType)”=””
“Segoe UI Semilight (TrueType)”=””
“Segoe UI Semilight Italic (TrueType)”=””
[HKEY_LOCAL_MACHINE\SOFTWARE\Microsoft\Windows NT\CurrentVersion\FontSubstitutes]
“Segoe UI”=”Verdana”
In the last line, you will need to replace “Verdana” with the name of the font that you want to switch to. If you are not sure how the font is called, go to the Fonts folder (you can access it by searching for “fonts” in your Windows taskbar). Locate the font you want to use and note down its exact name. While experimenting with different fonts is definitely fun and can help you fully customize your experience, make sure you are not using fonts that can make your system unreadable (like Wingdings, which is too small) or hard to manage. Otherwise, you may have trouble navigating the interface and changing fonts again.
After you’ve changed the font name in the last line, go to File and click Save. Make sure that the file has the .reg extension. Other than that, you can give this file any name you want.
Next, double-click the Registry file that you have just created. You will be asked to allow the file to make changes to your system — agree and continue. Hold on for the confirmation that the changes have been made.
The final step will be to restart your PC to make sure all the new changes take effect.
Just don’t change the default font to something that can render your system completely unreadable.
How to change your Windows font back to default
Windows 10 features TrueType fonts and OpenType fonts installed out of the box. These files will have the TTF or OTF file extension. They also support scaling and look really good on modern displays.
OpenType is more flexible font software as it supports any writing script and comes with an advanced typographic “layout” feature that allows for the positioning and replacement of rendered glyphs.
There is a special section in the Settings app called Fonts — head to Personalization to find it. Here you can get access to all the new feature releases, like color fonts or variable fonts. This section has replaced the earlier Fonts Control Panel applet.
When you head to the dedicated Fonts page in Settings, you will be able to see a mini preview of each font family. These previews will give you a good idea of what each font will look like on your system and with the language you are using. If the said font comes with multi-color capabilities built into it, you will also see it in the preview.
Now, if you’ve explored new font customization features in Windows 10 and now want to go back to your default Windows font settings, here’s what you should do.
To restore the default font settings in Windows 10, do the following:
- First, head to the classic Control Panel app.
- Navigate to Control Panel\Appearance.
- Here, locate Personalization\Fonts.
- A folder will open, with all available fonts listed in alphabetical order.
- On the left, find the link that says “Font settings”.
- On the next page, press the button that says “Restore default font settings”.
- This will take your font settings to their originals — no matter how many changes you’ve made.
There is another way to restore your font settings to their defaults on a Windows 10 PC — you can do it via a simple Registry tweak.
How to change your Windows font back to default via the Registry
You can restore your font settings to their defaults using the method we’ve described above. However, you can also do it using the Registry. To make the changes, you will need Windows Registry Editor Version 5.00.
Note that while this is a rather simple tweak to make, it is still only recommended for users who are familiar with how the Registry works and have made similar changes before. Making a mistake while editing the Registry can lead to serious issues with your system — and it’s best to leave this method to more experienced users.
If you are an experienced Registry user, you can go ahead with the following steps:
- Open Windows Registry Editor Version 5.00.
- Create a REG file with the following contents:
[HKEY_CURRENT_USER\Software\Microsoft\Windows NT\CurrentVersion\Font Management]
“Auto Activation Mode”=dword:00000001
“InstallAsLink”=dword:00000000
“Inactive Fonts”=-
“Active Languages”=-
[-HKEY_CURRENT_USER\Software\Microsoft\Windows NT\CurrentVersion\Font Management\Auto Activation Languages]
- Save the file and double-click it to apply the changes.
If you don’t feel comfortable making Registry changes, you can find ready-made REG files for restoring your fonts on some Windows forums. In this case, you can simply download the file you need and double-click it to make the changes.
And there you have it. Above, we have covered how you can change fonts on Windows 10 and what you can do to restore the font settings back to their defaults. We hope this information has been helpful and you now have a better understanding of how fonts work on Windows.
Before you go, there is just one more thing we’d like to recommend. As you download files from the internet (for instance, the REG file we’ve suggested above), it is absolutely essential that you have proper security on board — this means you need anti-malware software that can detect even the newest and rarest threats. We recommend using Auslogics Anti-Malware. This program has been designed specifically for Windows and is able to timely detect almost any threat that could be affecting your system. Auslogics Anti-Malware is very easy to use and can be installed in just a few steps. Once on board, the software will run automatic checks of your system, focusing on malicious programs running in the background, cookies that could be trying to gather your personal data, suspicious startup items, Registry entries, and browser extensions, and more. You can also personalize the way the program works. You can choose to run a quick scan (which will look into the main folders on your PC), a deep scan (which will look into the deepest corners of your system) and a custom scam (in this case, you define what areas of your system should be inspected).
Using Auslogics Anti-Malware can keep your PC safe and make your overall experience smooth and efficient — especially when downloading data from the web.

Contents
- 1 How to Change the Font in Windows 10 with a Registry Key
- 2 How to Restore Default Fonts in Windows 10
The Windows default font these days is Segoe UI, a fairly simple and no-nonsense typeface that’s used across many of Microsoft’s products. However, though some like this subdued style, others look to change Windows font to something with a bit more personality.
Thankfully, Microsoft does let you change Windows fonts, but it doesn’t make it particularly easy. This is likely because doing so can have unintended consequences, such as causing issues with your system clock.
We’re going to show you safely change the font in Windows 10 while fixing issues with the clock. We’ll also be walking you through how to restore default fonts in Windows 10 if you don’t like the changes.
How to Change the Font in Windows 10 with a Registry Key
As mentioned earlier, a change of Windows font isn’t as easy as a settings switch, but it’s still not too technical. All it requires is a text editor such as notepad and a font you like. First, though, you need to discover the full name for its font family.
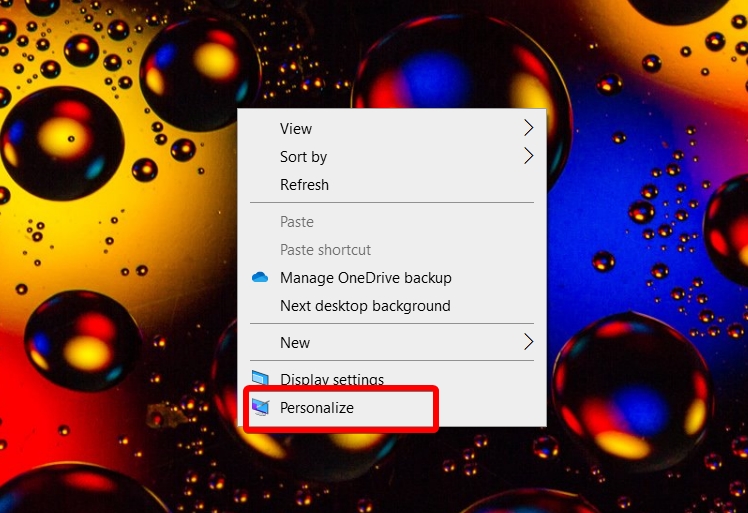
- Open personalization settings
Right-click on your desktop and choose “Personalize”.

- Click “Fonts” and check the list

- Note your font family name
Find the font you want to use in the settings interface and note its name in Windows, which will be indicated as below.

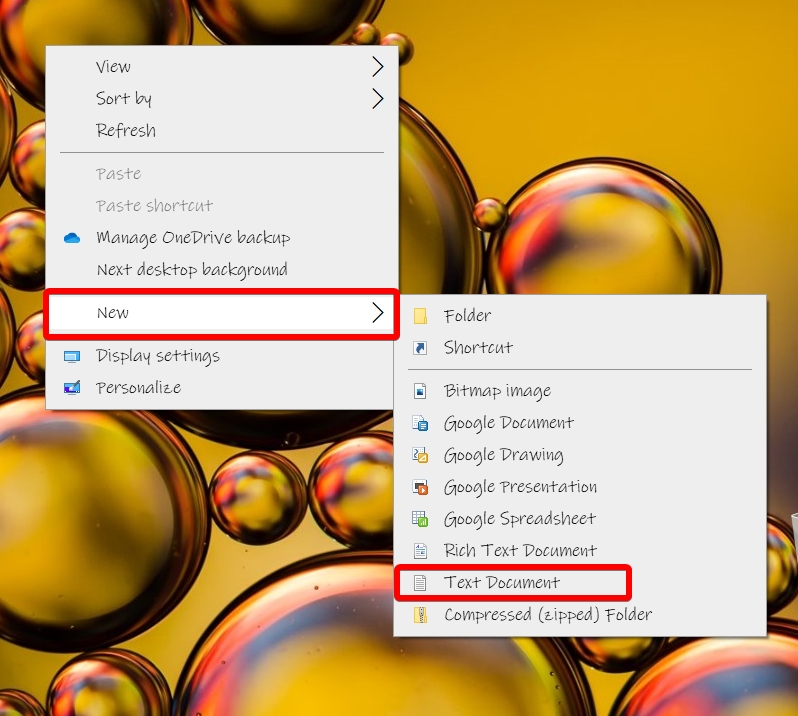
- Create a new text document
On your desktop, right-click and select “New > Text Document”.

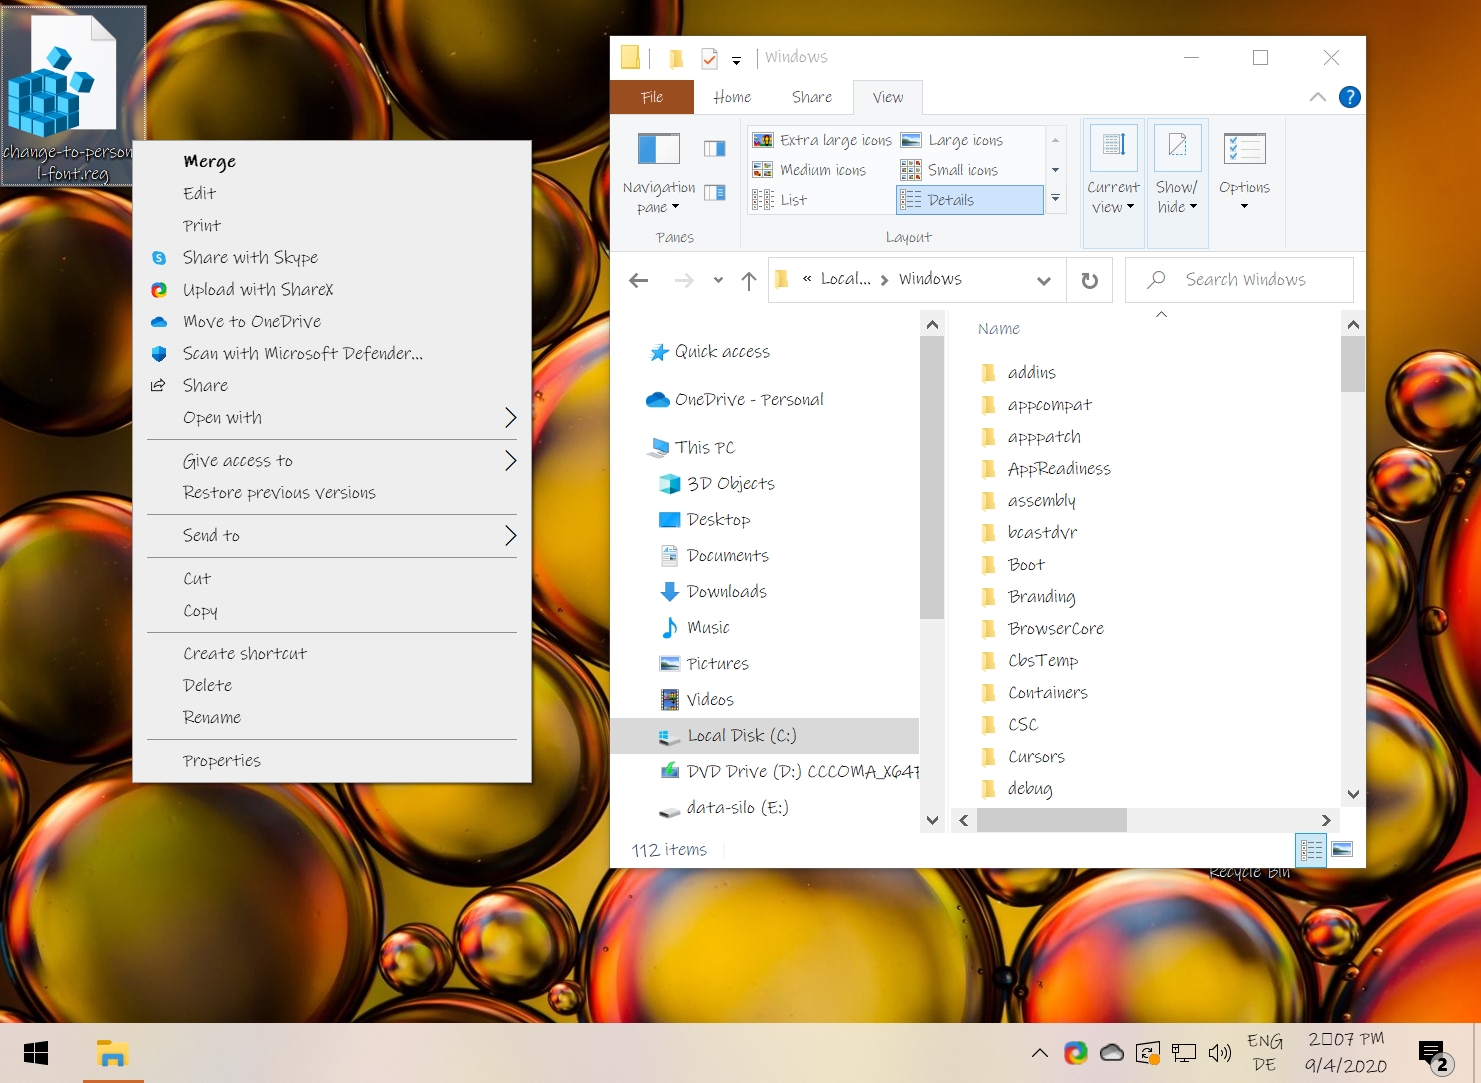
- Rename it to “change-to-personal-font.reg”
Click away or press “Enter” to save the changes.

- Accept the file extension change
Windows will warn you that changing the file extension (from .txt to .reg) may cause it to become unusable. We know this isn’t the case, so you can safely click “Yes”.

- Edit the .reg file
Right-click the .reg file and select “Edit”.

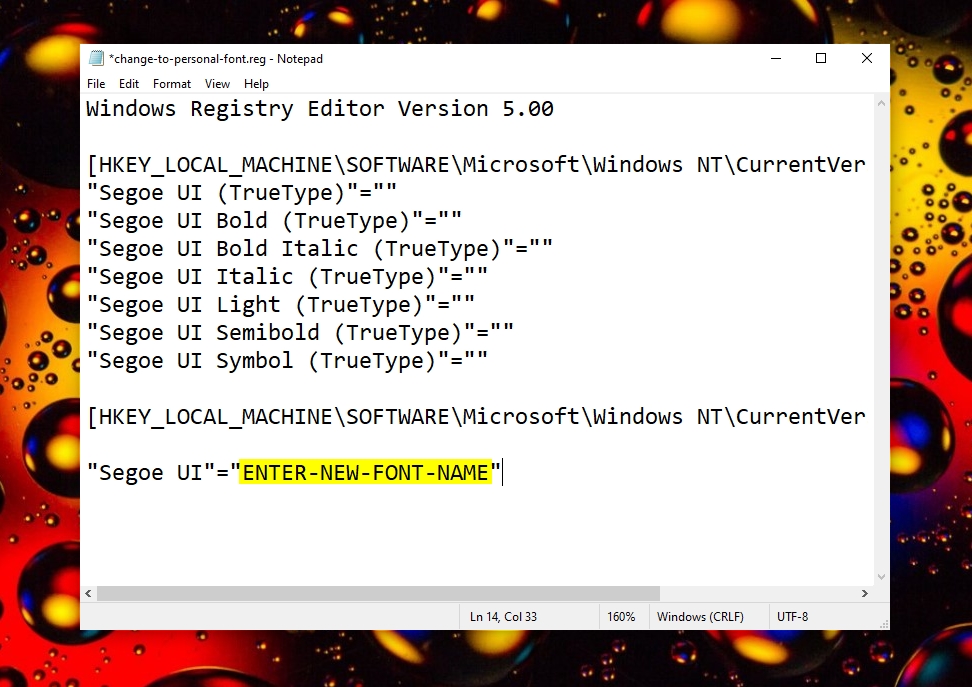
- Add the change Windows font registry code
In your text document, paste the following:
Windows Registry Editor Version 5.00
[HKEY_LOCAL_MACHINE\SOFTWARE\Microsoft\Windows NT\CurrentVersion\Fonts]
"Segoe UI (TrueType)"=""
"Segoe UI Bold (TrueType)"=""
"Segoe UI Bold Italic (TrueType)"=""
"Segoe UI Italic (TrueType)"=""
"Segoe UI Light (TrueType)"=""
"Segoe UI Semibold (TrueType)"=""
"Segoe UI Symbol (TrueType)"=""
[HKEY_LOCAL_MACHINE\SOFTWARE\Microsoft\Windows NT\CurrentVersion\FontSubstitutes]
"Segoe UI"="ENTER-NEW-FONT-NAME"
Replace
ENTER-NEW-FONT-NAMEwith the font family you identified earlier.
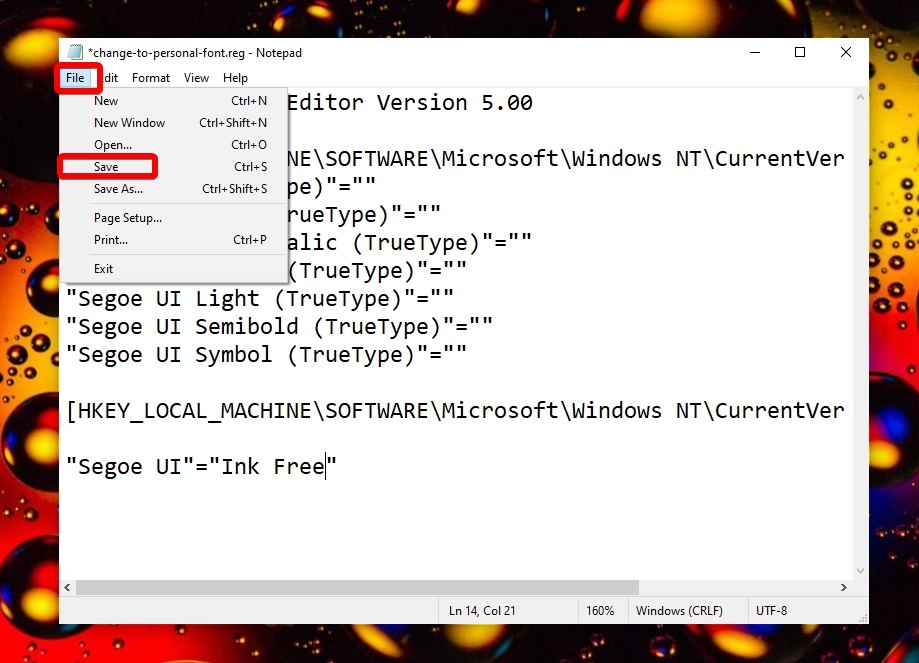
- Add your new Windows font name

- Save the document
Click “File” from the top bar, then “Save”. You can close the document.

- Change Windows font
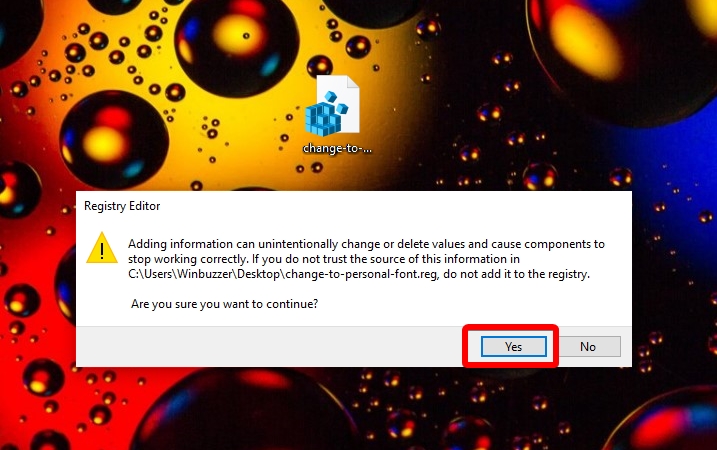
Make a registry backup, then Right-click the .reg file on your desktop and choose “Merge”.

- Accept the Windows font change
When the UAC Account Control prompt surfaces, click “Yes”.

- Agree to the registry change
In the registry editor pop-up, click “Yes”. Restart your PC.

- Check for your new Windows default font
If the changes were successful, you’ll notice a change to your font after restarting your PC. If you notice a square where your clock’s separator should be, edit your ssShortTime registry entry in
HKEY_Current_User\ControlPanel\Internationalto use?instead of the default colon symbol. Save the changes and restart.


As mentioned earlier, a change of Windows font isn’t as easy as a settings switch, but it’s still not too technical. All it requires is a text editor such as notepad and a font you like. First, though, you need to discover the full name for its font family.
- Create a text document
Right-click your desktop and then click “New > Text Document”.

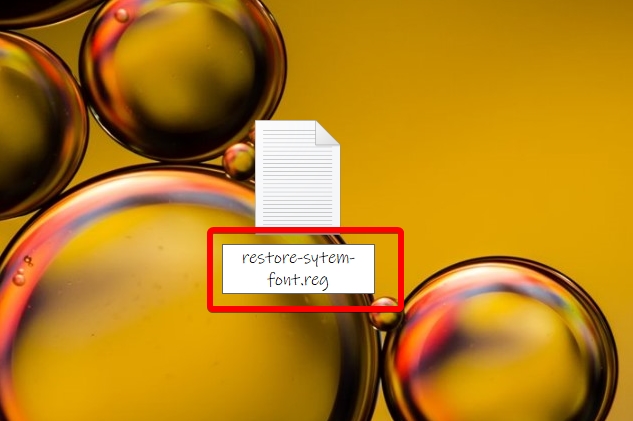
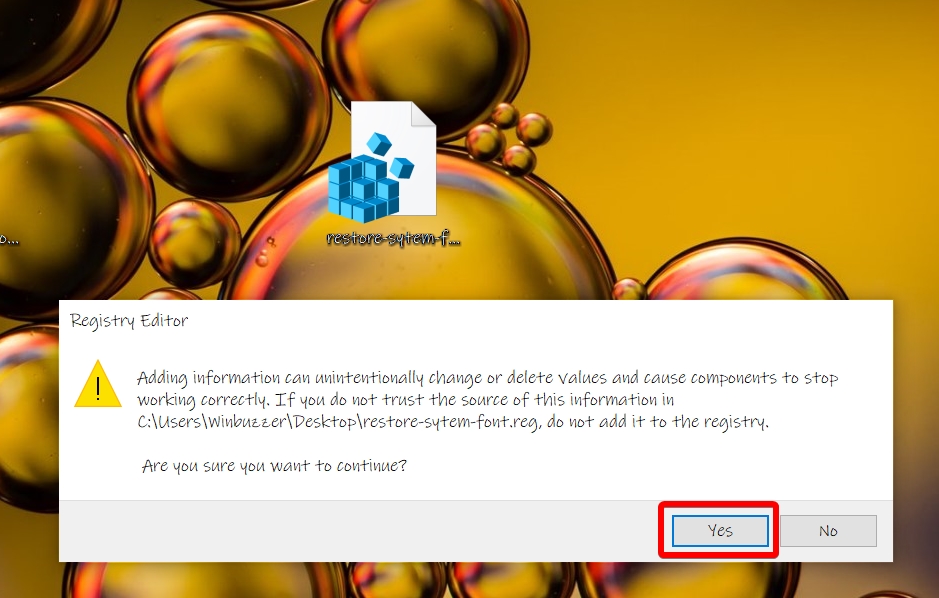
- Rename it to “restore-system-font.reg”
Click away to save the changes.

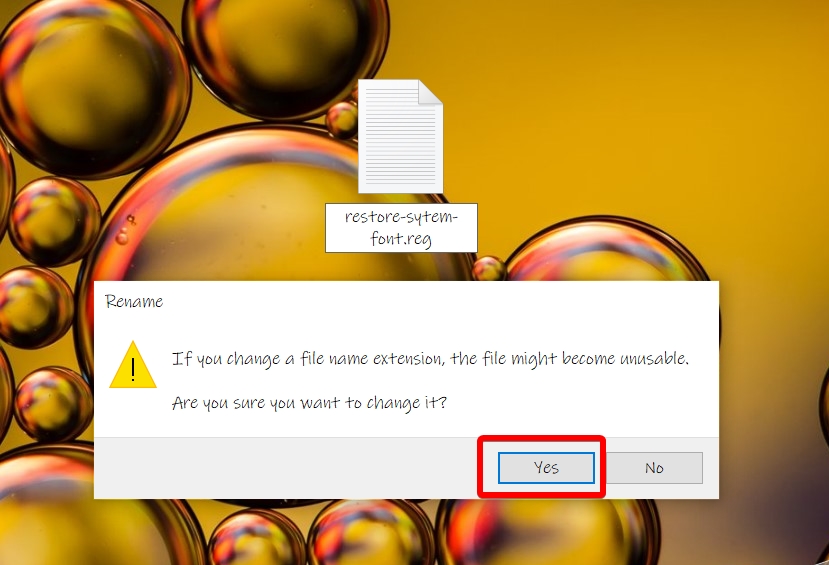
- Accept the extension change
Click “Yes” to save the extension change, as we can be sure we’ll be able to edit the file still.

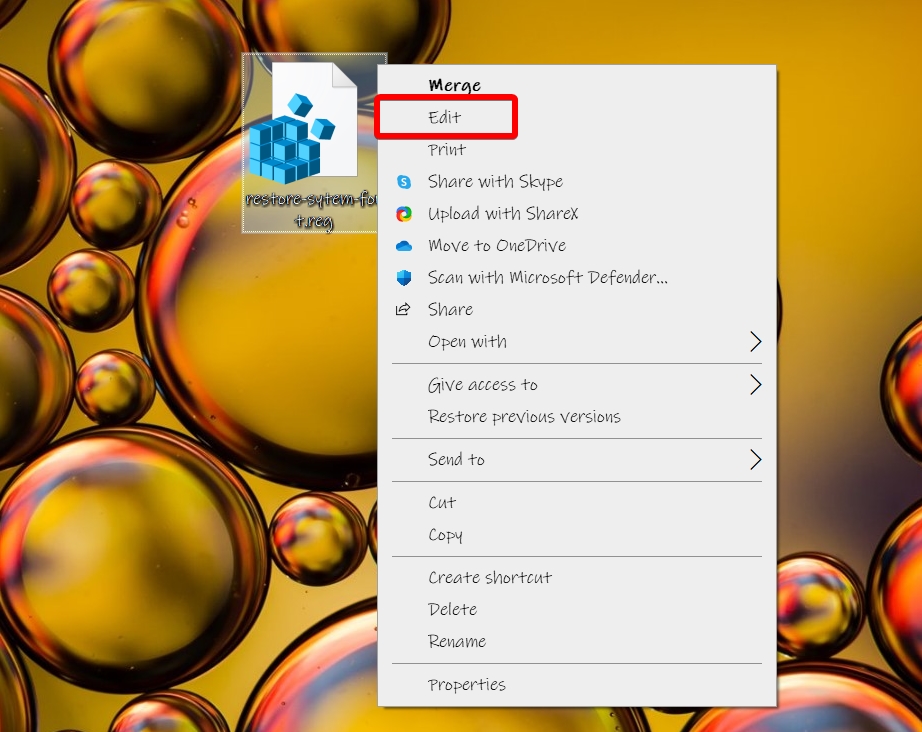
- Edit the .reg file
Right-click the .reg file and select “Edit”.

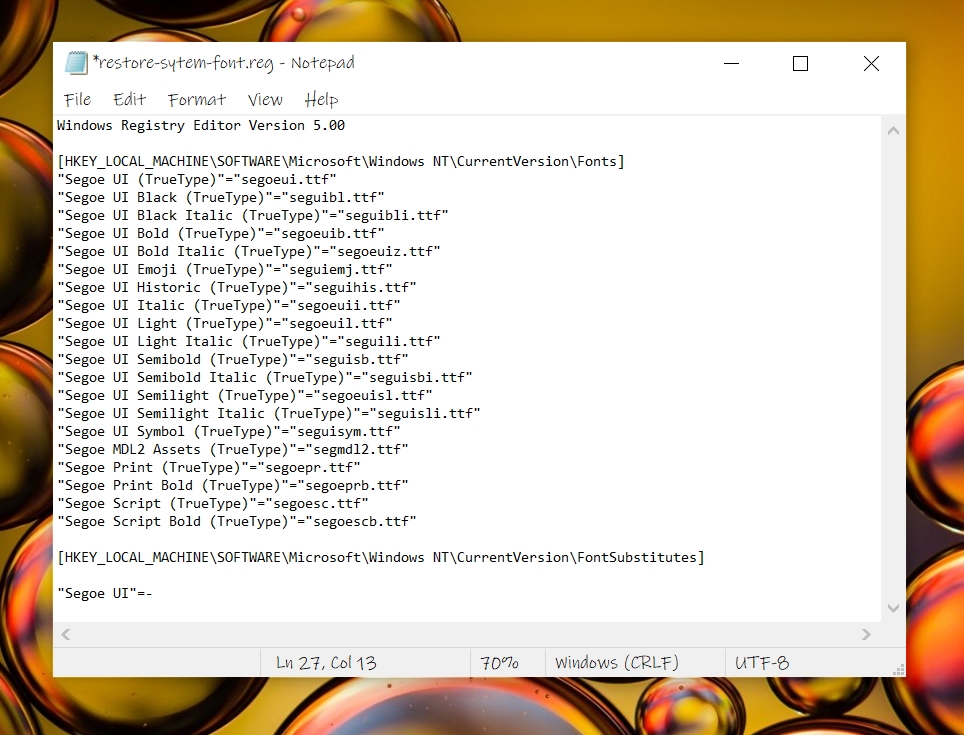
- Add the restore default fonts in Windows 10 registry instructions
In your text document, paste the following:
Windows Registry Editor Version 5.00
[HKEY_LOCAL_MACHINE\SOFTWARE\Microsoft\Windows NT\CurrentVersion\Fonts]
"Segoe UI (TrueType)"="segoeui.ttf"
"Segoe UI Black (TrueType)"="seguibl.ttf"
"Segoe UI Black Italic (TrueType)"="seguibli.ttf"
"Segoe UI Bold (TrueType)"="segoeuib.ttf"
"Segoe UI Bold Italic (TrueType)"="segoeuiz.ttf"
"Segoe UI Emoji (TrueType)"="seguiemj.ttf"
"Segoe UI Historic (TrueType)"="seguihis.ttf"
"Segoe UI Italic (TrueType)"="segoeuii.ttf"
"Segoe UI Light (TrueType)"="segoeuil.ttf"
"Segoe UI Light Italic (TrueType)"="seguili.ttf"
"Segoe UI Semibold (TrueType)"="seguisb.ttf"
"Segoe UI Semibold Italic (TrueType)"="seguisbi.ttf"
"Segoe UI Semilight (TrueType)"="segoeuisl.ttf"
"Segoe UI Semilight Italic (TrueType)"="seguisli.ttf"
"Segoe UI Symbol (TrueType)"="seguisym.ttf"
"Segoe MDL2 Assets (TrueType)"="segmdl2.ttf"
"Segoe Print (TrueType)"="segoepr.ttf"
"Segoe Print Bold (TrueType)"="segoeprb.ttf"
"Segoe Script (TrueType)"="segoesc.ttf"
"Segoe Script Bold (TrueType)"="segoescb.ttf"

[HKEY_LOCAL_MACHINE\SOFTWARE\Microsoft\Windows NT\CurrentVersion\FontSubstitutes] "Segoe UI"=-

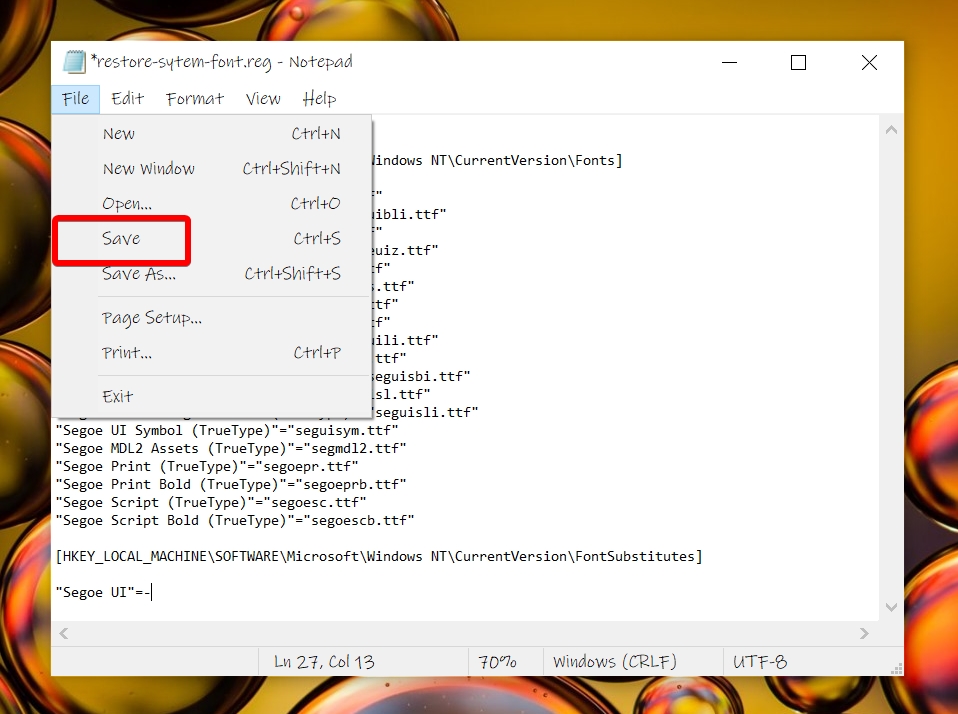
- Save the file
Click “File” from the top bar, then “Save”. Close the document.

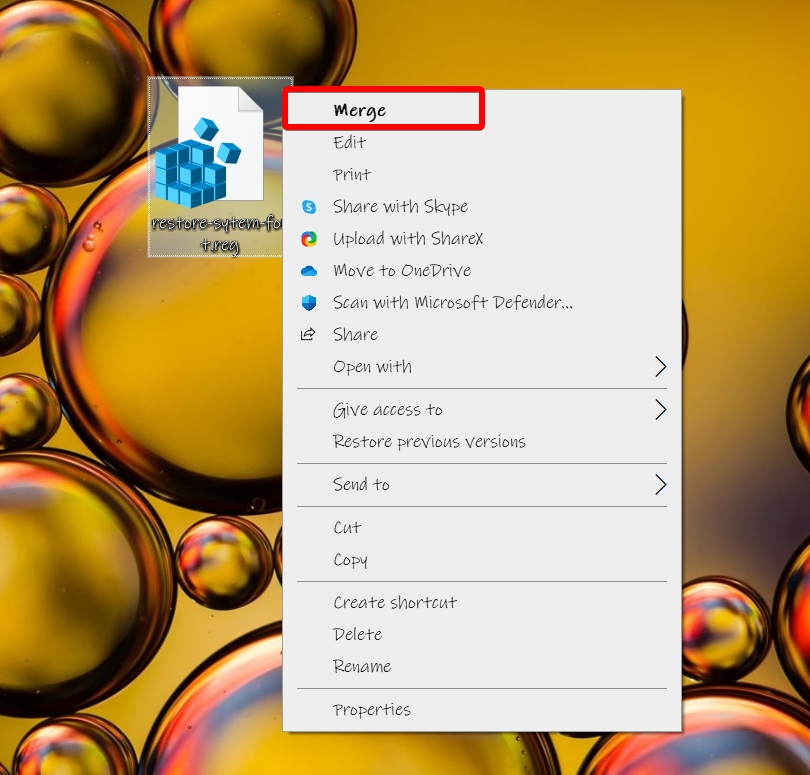
- Restore the default fonts in Windows 10
Right-click the .reg and choose “Merge”.

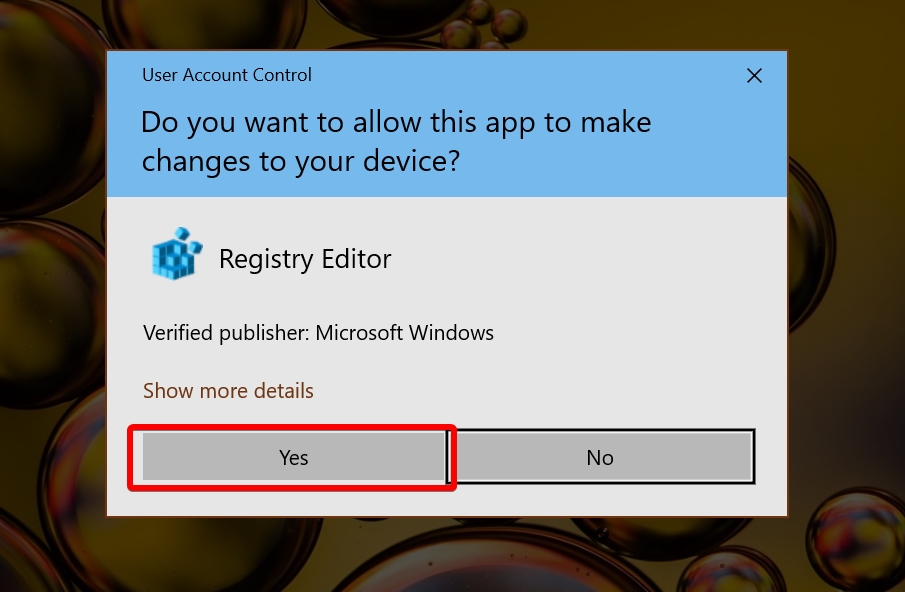
- Accept the Windows font change
Click “Yes” to the UAC prompt.

- Agree to the registry change
In the registry editor pop-up, click “Yes”. Restart your PC.