If you don’t already know, an ISO file is a container that can hold a number of files in it. It’s usually used to create backups of your CD and DVD discs. However, you can create an ISO from the folders on your Windows PC as well. There are actually multiple apps that help you do it on your machine.
There are many reasons why you may want to create an ISO on your Windows 10 PC. Maybe you want to keep all of your folders in a single place. Or maybe you want to keep some of your folders handy ready to burn to your discs.
Regardless of the reasoning, it’s pretty easy to create an ISO from folders on a Windows computer. Also, check out the video from our sister site where we walk you through the steps in a short video.
CREATING AN ISO FILE FROM A FOLDER In Windows
Use AnyBurn To Create ISO From The Folders On Your PC
One of the free apps you can use to create an ISO from your folders is AnyBurn. It’s actually an app that helps you burn your data to your discs but you can use it to create ISO files as well. It has an option on the main interface that helps add your chosen folders to an ISO which you can then save anywhere on your computer.
- Download, install, and launch AnyBurn on your computer.
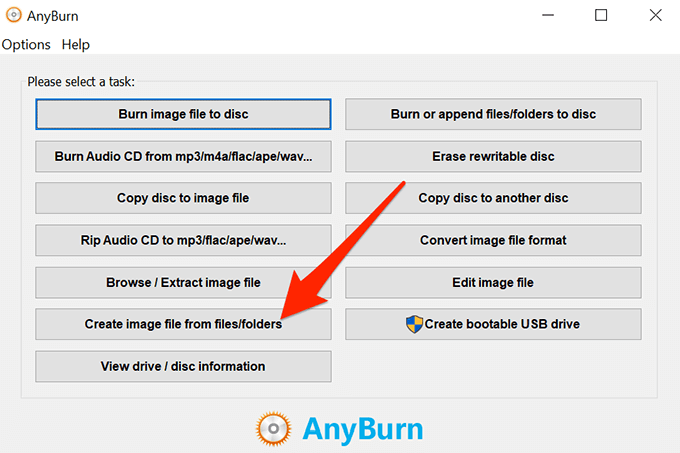
- You’ll find several options regarding creating ISOs on the main interface. Find the one that says Create image file from files/folders and click on it.
- The following screen will let you choose the folders that you want to add to your ISO. Click on the Add button at the top to add your folders.

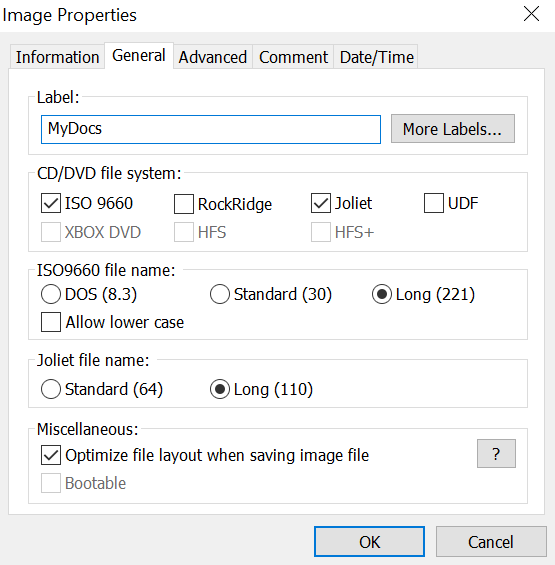
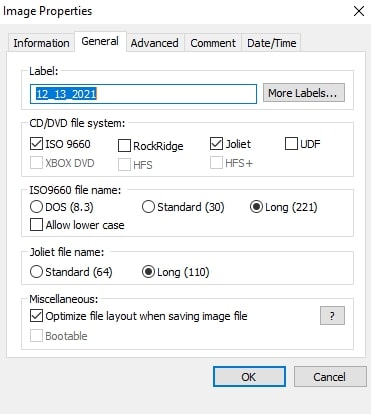
- If you want to specify any custom settings for your file, click on the Properties button at the top. It’ll then let you modify options like the file system for your ISO, file naming standard, compression level, and so on. Click on OK when you’ve configured them.
- Click on the Next button to go to the next screen of the ISO creation process.
- On the following screen, click on the folder icon to choose the folder where you want to save your ISO. You can also enter a name for your file on the same screen.
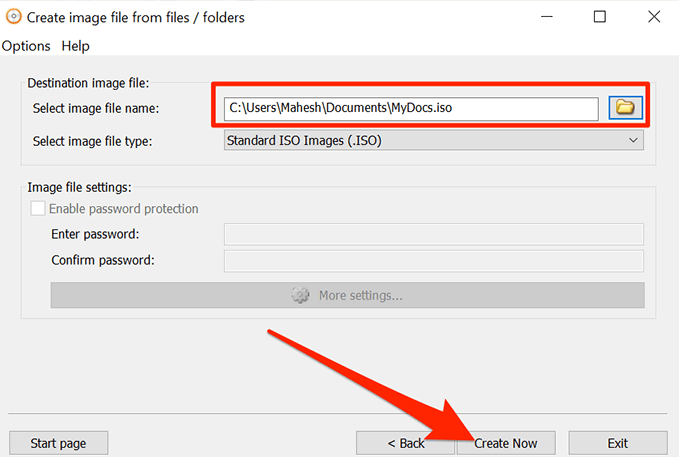
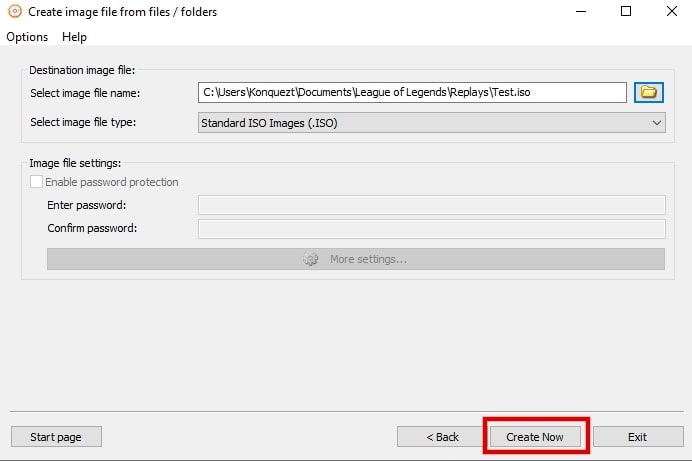
- Finally, click on Create Now to start creating an ISO out of your chosen folders.
Create An ISO In Windows 10 Using WinCDEmu
WinCDEmu is an open-source tool that lets you create virtual drives out of various image file formats on your computer. If you have downloaded an ISO file and you want to view its contents, this app can help you mount that as a drive on your machine.
You can use the app to create ISO files from folders in Windows as well, and it actually provides you with the easiest way to make an ISO from your folders. All you basically need to do is install the app and it’ll add an option to your context menu. You can then use that option to generate an ISO from your folders.
- Download and install the WinCDEmu app on your PC.
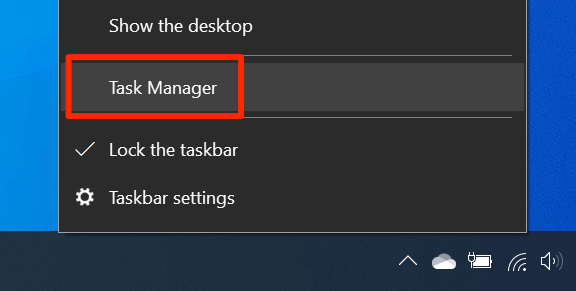
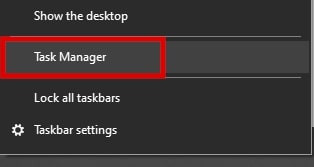
- Right-click on your taskbar and select Task Manager.
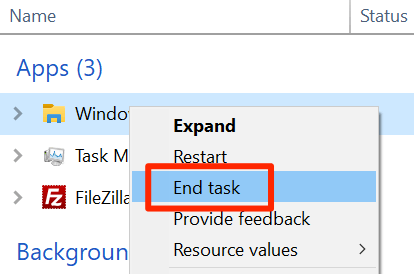
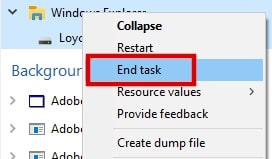
- Right-click on the process that says Windows Explorer and select End task. You need to close the Explorer before you can see the newly added item in the context menu.
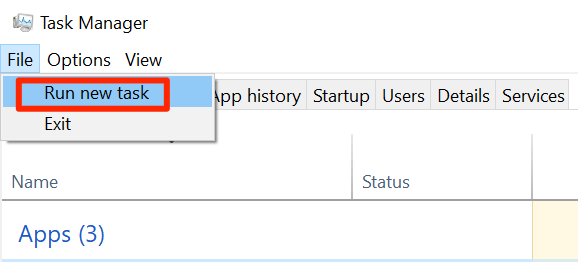
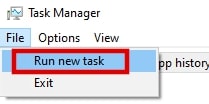
- Click on the File menu in Task Manager and select Run new task.
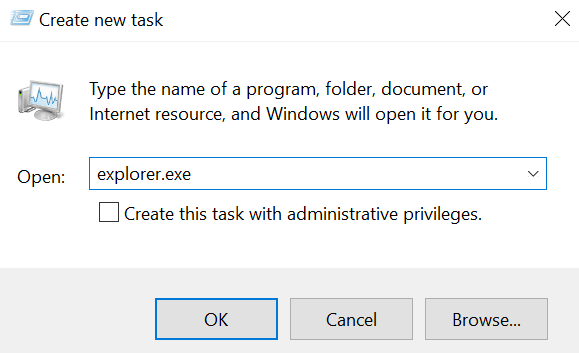
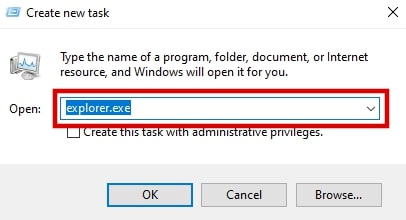
- Type in explorer.exe and hit Enter. It’ll relaunch the Windows File Explorer.
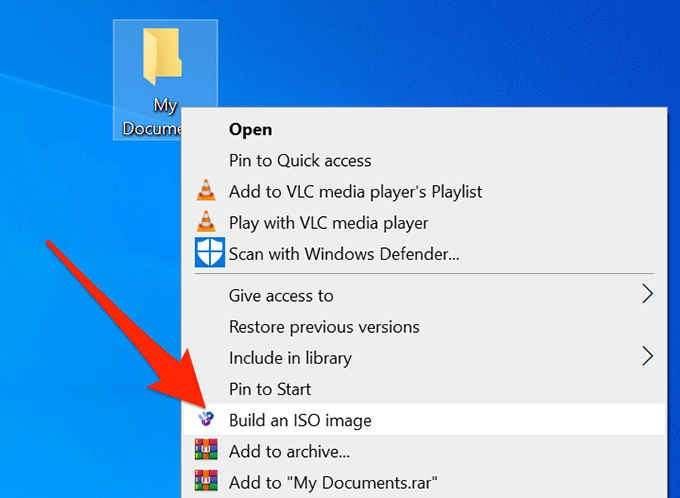
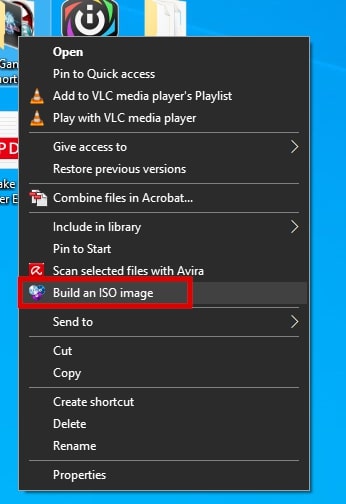
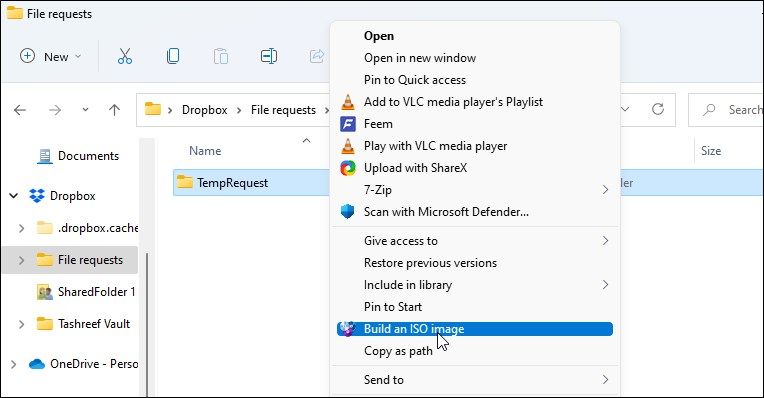
- Find the folder that you want to create an ISO for, right-click on it, and select Build an ISO image.
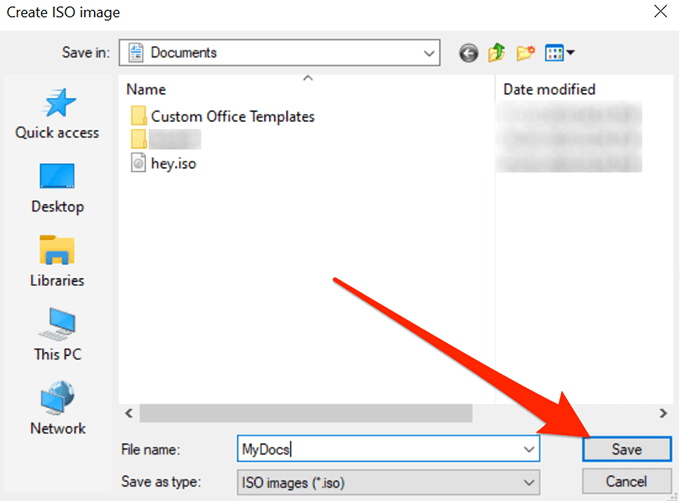
- It’ll ask you to enter a name for your ISO and the location where you want to save it. Enter these details and click on Save.
- It’ll quickly create the ISO for you and let you know when it’s fully built.
Use ImgBurn To Create ISO Files From Folders On Windows
ImgBurn has been a popular app to create and burn image files for a long time. If you’ve ever created a backup of your discs or you’ve burned a disc, you’ll likely recognize the app.
The app can be used to create ISO files from your folders as well.
- Download, install, and open the ImgBurn app on your computer.
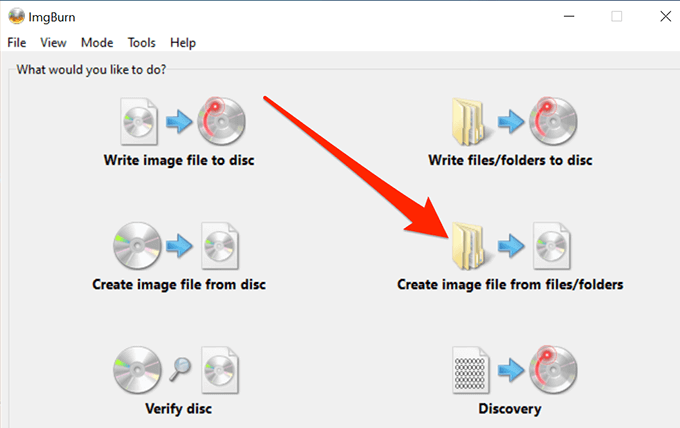
- On the main interface, find and click on the option that says Create image file from files/folders.
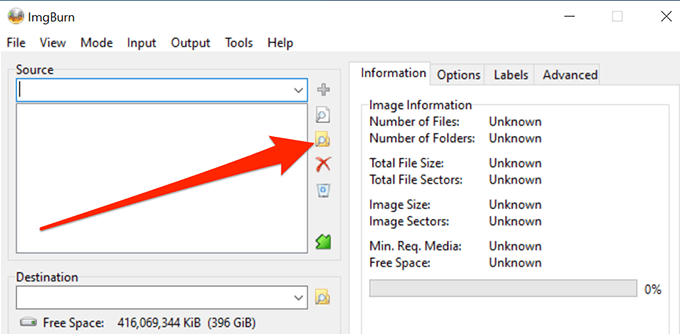
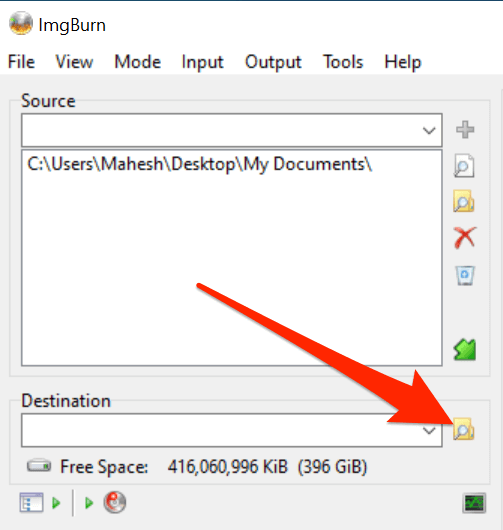
- You’ll see a screen that lets you add the folders you want to include in your ISO. Click on the little folder icon and add the folders for your ISO file.
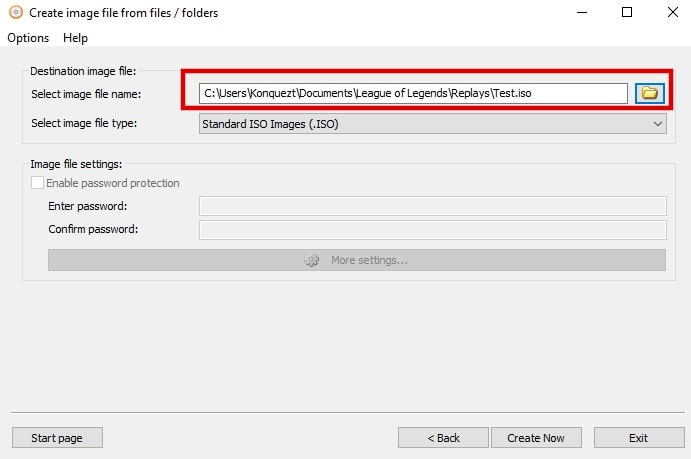
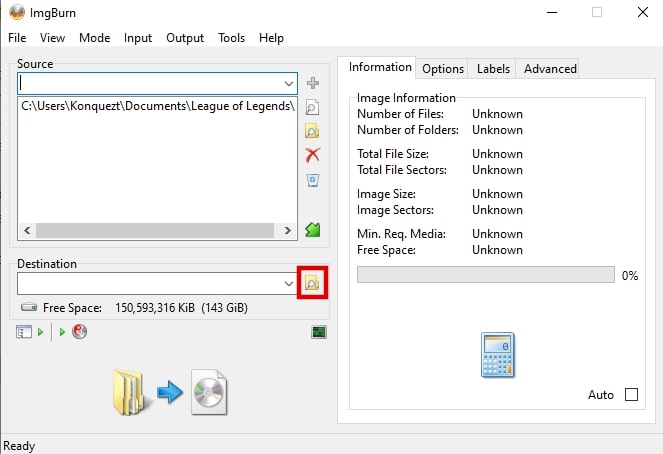
- Click on the tiny folder icon next to where it says Destination and select a name and target folder for your ISO file.
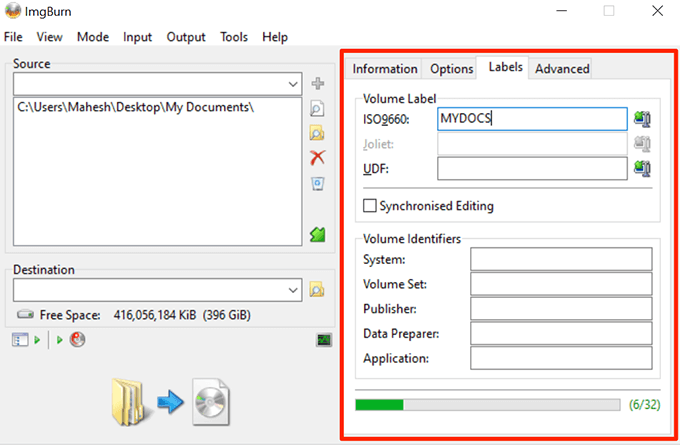
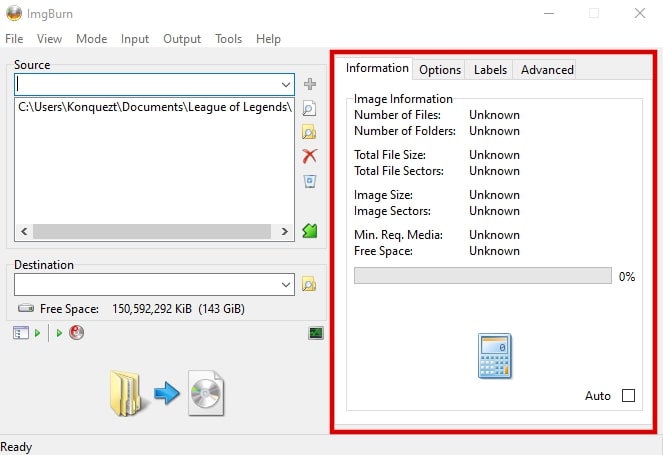
- On the right-hand side pane, you’ll find various options to configure for your ISO. With these options, you can change your image type, enter a label for your image, specify restrictions, and do a few other things.
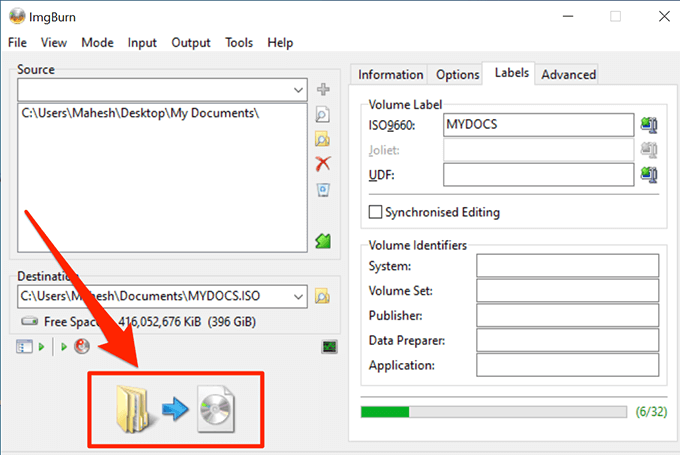
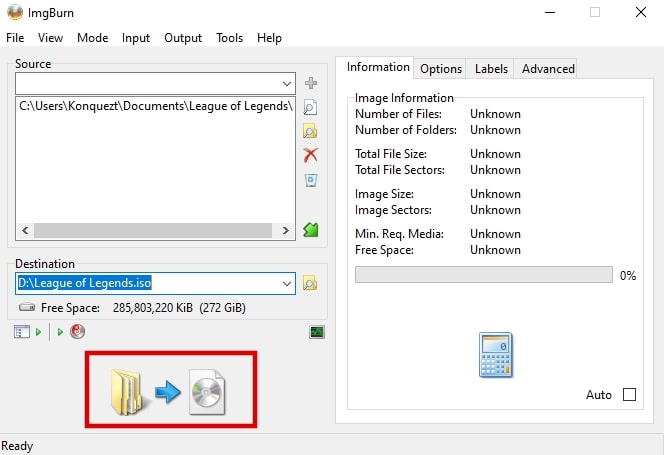
- Finally, click on the large Build button on your screen to start building an ISO file out of your selected folders.
Use a Portable Tool To Create An ISO From Folders
If it’s just a single ISO that you’ll be making and you don’t think you’ll be doing it again anytime soon, you might prefer something that doesn’t require an installation. Folder2Iso can actually help you out as it’s a free and portable tool that helps quickly create ISOs without any hassle.
It works on many versions of Windows including Windows 7, 8, 10, and Linux.
- Download the Folder2Iso app and double-click on it to extract the actual app contents.
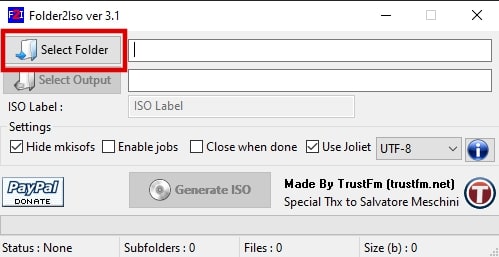
- Run the executable file that you extracted from the archive.
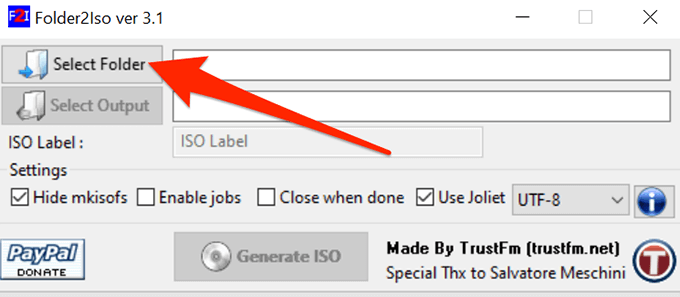
- You’ll see a simple interface with only a few options on it. Click on the Select Folder option and select the folder you want to add to your ISO.
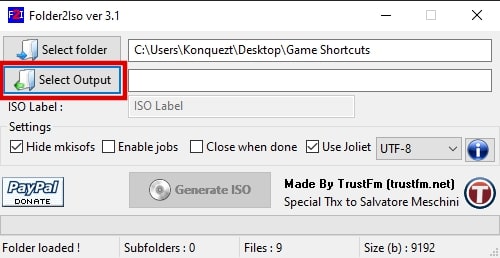
- Click on the Select Output button and choose the folder where you’d like to save your ISO file. Remember you can’t choose the folder that you’ve chosen to include in your ISO.
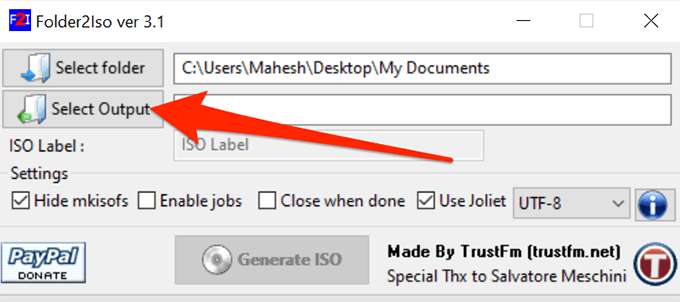
- You can then specify the extra options available on your screen, if you want.
- Click on the Generate ISO button to make an ISO out of your chosen folders.

- The progress bar will go all green when the ISO has been generated.
It’s a good idea to create an ISO from your folders in Windows so you can mount them all as a single drive on your PC. If you have done it on your computer already, let us know what app you chose to do it and why. We await your response in the comments below!
Optical Disk Image (ISO) files are very commonly used amongst Windows users since the Windows operating system natively supports this file format. You can open and mount an ISO file on a Windows PC without using third-party software. However, you can have difficulty creating an ISO file from a folder or a WIM file.
This post shows you how to create a bootable ISO image from a folder using just the Windows Command Line Interface (CLI). The method discussed in this post eliminates the use of third-party software, which is why no paid software is needed, nor do you have to watch any advertisements that accompany a free tool.
You can apply this method to create a .ISO file on the Windows command line if:
- You have made changes to an existing ISO file after extracting it and want to recreate a modified ISO image.
- You want to share multiple files after converting them into a single, compressed file.
- You want to create a bootable ISO image.
Let us move on to see how to create an ISO image from a simple folder on a Windows PC.
Although third-party software is not needed for the process, you must still install Microsoft Windows Assessment and Deployment Kit (ADK), formerly known as Windows Automated Installation Kit (Windows AIK). Windows ADK is a collection of tools that you can combine to prepare, assess and launch image-based large-scale Windows deployments.
One of the Windows ADK components is the “Deployment tools,” which contains the OSCDIMG tool. The OSCDIMG is a command-line tool that you can use to create a custom ISO image of any folder using the Command Prompt.
That said, we have divided this guide into 2 steps:
- Installing Windows ADK’s Deployment Tools component.
- Creating an ISO file from a folder.
These steps need to be performed in the chronological order mentioned since we will be using the OSCDIMG tool to create an ISO.
Install Windows ADK
Perform the following steps to install Windows ADK Deployment Tools:
-
Start by downloading the Windows ADK installation package suited for your operating system from our Windows ADK guidepost.
-
Execute the downloaded package and the installation wizard should then run. We suggest that you leave the default location and click Next.

Select installation path -
Click Next on the next screen again.
Click Next -
Accept the license agreement.
Accept license agreement -
On the next screen, select “Deployment Tools” whilst unchecking all other boxes, and then click Install.
Select and install -
Windows ADK will now install. Once it is finished, click Close.
Close wizard


Windows ADK Deployment tools should now be available on your PC. Continue to learn how to use OSCDIMG to create an ISO image from a folder.
Create ISO File From Windows Command Line
Now follow these steps to create an ISO image using Window Command Prompt:
-
Before you begin, create a standard folder using File Explorer containing the contents you want in the ISO image.
-
Now open Command Prompt with elevated privileges.
-
Now use the following cmdlet to change the directory to the folder where the OSCDIMG file has been installed. Replace Path with the complete path to the OSCDIMG file.
cd /d PathThe default installation path for the OSCDIMG file is the following:
C:\Program Files (x86)\Windows Kits\<version>\Assessment and Deployment Kit\Deployment Tools\amd64\Oscdimg
Using this cmdlet and information, we changed the directory with the cmdlet in the following image:

Change directory -
Once you are inside the directory with the OSCDIMG file, use the following cmdlet to create an ISO image of a folder:
Replace PathToSource with the complete path to the folder you want to convert to an ISO image and DestinationPath to the location where you want to save the generated ISO file.
OSCDIMG -n -d -m PathToSource DestinationPath.ISO
ISO image created


You can now find the newly created ISO file at the designated location provided in step 4 above. If the contents inside the source folder were bootable, you can now use this ISO image to create a bootable drive and then use it.
Closing Words
The internet is filled with other command-line tools and GUI-based tools that can be used to create an ISO image file. However, we used the OSCDIMG tool because it has been created by Microsoft, therefore it is reliable and free to use.
We hope that this post enabled you to create ISO images quickly and efficiently without using third-party software.
An ISO file is a container, usually derived from a CD or DVD’s contents, that can hold a decent number of files. Though creating CD and DVD backups is its typical function, an ISO can also be created from files and folders already on your Windows computer.
Converting a file or folder to an ISO in Windows can be a painless procedure. So long as you utilize the correct app, of course. Thankfully, multiple apps are at your disposal that can convert a file or folder to an ISO for Windows 10 and 11 computers.
Best File/Folder to ISO Converter
Reasons for creating an ISO on your Windows 10 PC will vary. Keeping specific files and folders readily burnable tends to be a more common one. Regardless, your reasons are your own. We’ve figured out which ISO conversion app is the best available so that you can use it for whatever reason. We have five different File to ISO converter apps that we consider the best on the market today.
1. AnyBurn
Starting with a free app, we have AnyBurn. The app was intended to create an ISO using a CD, DVD, or BluRay player. However, it also has the option to create ISO files that can be placed anywhere on your computer.
Step 1. Navigate to the AnyBurn official website to download and install the application.
Step 2. Once installed, launch the app and locate the option to “Create image file from files/folders”, then click on it.
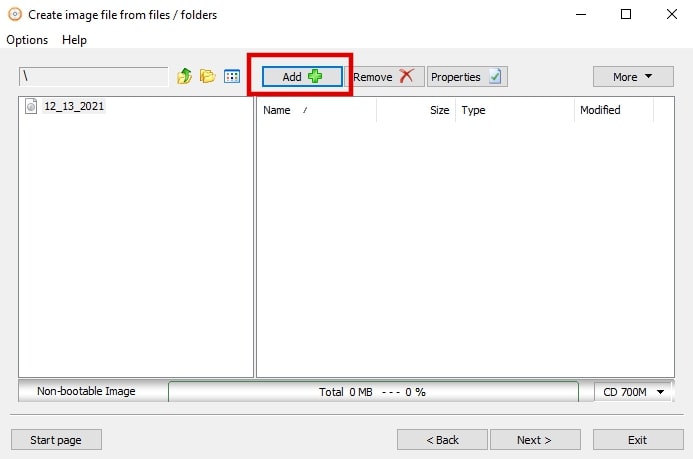
Step 3. In the next window, you’ll be able to select which folders you want to add to your ISO. Click the Add button at the top of the window and add all folders you want to convert.
Step 4. Once files have been added, you can click Next to proceed. If you wish to customize the settings for your ISO file, you can modify them through the Properties button located toward the top-right of the window.
Step 5. The following window is for imaging your ISO. Click the folder icon and choose which folder location you wish to save your ISO.
Step 6. Ensure that the file type is Standard ISO IMages (.ISO), and click Create Now.
Step 7. Your ISO folder will now be created and saved in your selected location.
2. ImgBurn
One of the more popular and long-running ISO converter apps is ImgBurn. The chances are good that if you’ve ever burned an ISO to a CD or DVD in the past, the name will be recognizable. It’s incredibly lightweight and supports a wide range of file formats.
To create an ISO file or folder:
Step 1. Download, install, and launch the ImgBurn app.
Step 2. From the main window, select Create image file from files/folders.

Step 3. In the new window, click the icon of a folder with a magnifying glass to the right of the “Source” box to add the files and folders you want to your ISO.

Step 4. Then, click the same icon to the right of “Destination” to select the folder where you’ll place your ISO on your computer.
Step 5. On the pane to the right, there are various ISO configuration options should you need them.
Step 6. Once all changes are complete and information entered, you can click on the Folder to CD icon toward the bottom. This will create the ISO from the files and folders you’ve selected.
3. Folder2ISO
If you’re looking to avoid the need to install any software, then Folder2ISO may be the folder for the ISO application you’ve been looking for. Folder2ISO is a free-to-use, portable ISO file creator that is great for single-use cases.
Step 1. Users need to download the Folder2Iso app and extract its contents by double-clicking on it.
Step 2. Follow this up by running the extracted executable file (.exe).
Step 3. Next, click “Select Folder” and choose the folder you want to be added to your ISO.
Step 4. Afterward, click “Select Output” and choose where the ISO will be saved on your PC.
Step 5. Finally, click the Generate ISO button to create your ISO and have it saved to the chosen destination.

From this point, you need only wait until the progress bar has been filled with a green color. This will indicate that the ISO generation process has concluded.
4. WinCDEmu
The open-source option on this list belongs to WinCDEmu. With it, you can create virtual drives from various image file formats on your computer. WinCDEmu will also allow you to mount already created ISO files located on your computer so that you may view their contents.
WinCDEmu is one of the easier options for converting files and folders to ISO. Upon installation, you’ll have the option to generate ISO from folders directly from the context menu.
Step 1. Download and install the WinCDEmu app on your computer.
Step 2. Navigate to Task Manager by right-clicking your taskbar and selecting the Task Manager option from the list.
Step 3. Next, right-click the Windows Explorer process and select End Task. This is essential to ensure all newly added items appear within the context menu.
Step 4. Now, click the File tab in Task Manager and select Run new task.
Step 5. Relaunch File Explorer by typing explorer.exe into the field and click OK.
Step 6. With Windows Explorer up and running again, locate the folder you want to convert into an ISO. Right-click the folder (or file), and you’ll notice that Build an ISO image is now an option.
Step 7. Click Build an ISO image, enter a name for the ISO, and select a location where it will be stored.
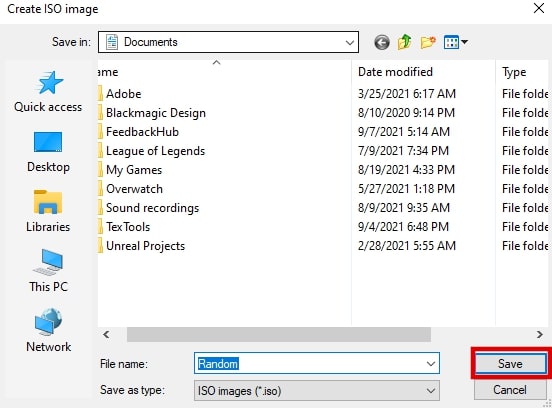
Complete this task by clicking Save. The ISO image will be created fairly quickly and prompt you once complete.
5. AnyToISO
Another simplistic file to ISO converter for both Windows and Mac is AnyToISO. AnyToISO supports a lengthy list of formats making extraction and conversion an easy task. The file or folder is not only convertible to CD, DVD, and Blu-ray, but can also be extracted and converted from your desktop.
Step 1. Download and install AnyToISO from the official website.
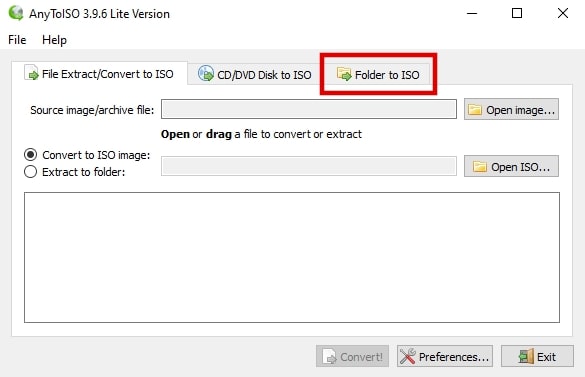
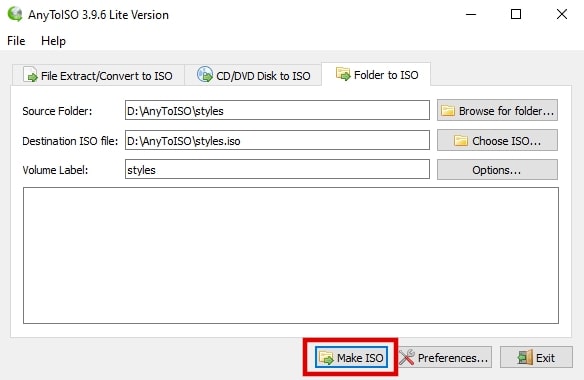
Step 2. Once installed, at the main screen, tab over Folder to ISO.
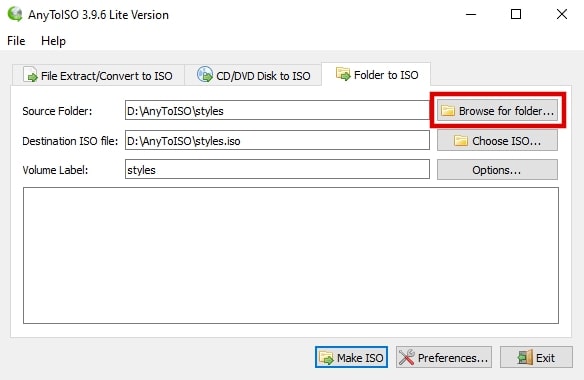
Step 3. Next, type the folder with the images you wish to convert into an ISO in the Source Folder area, or click the Browse for folder… button and select it.
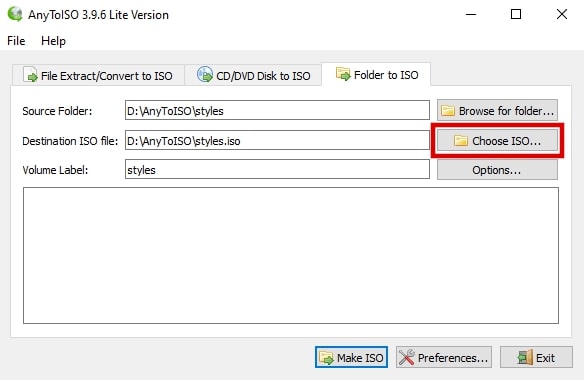
Step 4. Then, choose the destination folder for the converted ISO.
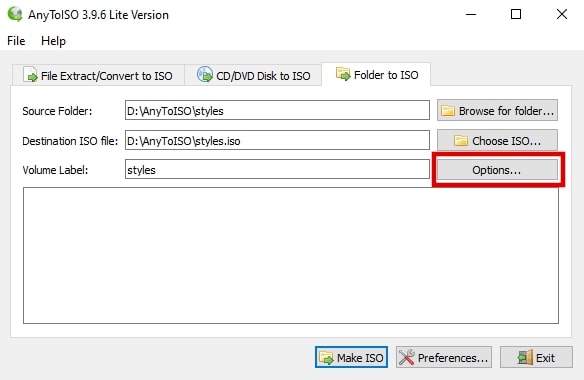
Step 5. It’s also recommended that you select the Volume Label, which can be accessed by clicking the Options… button.
Step 6. Finally, you can click Make ISO. If Make ISO is still grayed out, it means that the above steps were not completed or done correctly.
FAQs
What is an ISO?
An ISO is a copy of a file, folder, or optical disk archived into a single file or folder. Ultimately, it is a compressed form of a larger set of data combined and saved in a singular space.
Why should I convert my file or folder to an ISO image?
Converting files or folders into an ISO image is great as it allows you to mount all combined files onto a single PC drive.
Are ISO converters for Windows 10/11 free?
Not all file and folder to ISO image converters are free; however, most will offer a free trial. All of those in the above list happen to be free for use.
The best app from the above list will depend on your needs. All of them are free and simple to use. Regardless of your choice, all will convert files or folders to ISO in Windows 10/11.
Want an easy way to convert your files and folders into an ISO? These Windows tools have you covered.
You can convert files and folders to an ISO image using third-party ISO management utilities. These come in handy when you want to create a backup of files and folders in ISO format. You can also use it to add new files to an existing ISO image and repack it.
Windows, by default, does not offer an option to convert files and folders to an ISO image. But there are third-party Windows programs that can help you achieve this task. Here we show you the best apps to make an ISO file from files and folders.
1. AnyToISO
If you are looking for a free utility to create an ISO image not bigger than a regular CD, the AnyToISO Lite version is an excellent utility. It is easy to use and doesn’t come with tons of options.
It also supports the Windows Explorer shell extension. When enabled, it will add a create ISO option in the Windows Explorer context menu.
To convert a folder to an ISO image using AnyToISO:
-
Launch AnyToISO and open the
Folder to ISO
tab
. -
Next, click on
Browse
for Folder
and select the folder you want to convert to an ISO image. -
Next, click on
Choose ISO
and select the save location for the ISO file. - You can change the volume label name or leave it as default.
-
Click on
Options
to customize the
File System
and
ISO Settings
. -
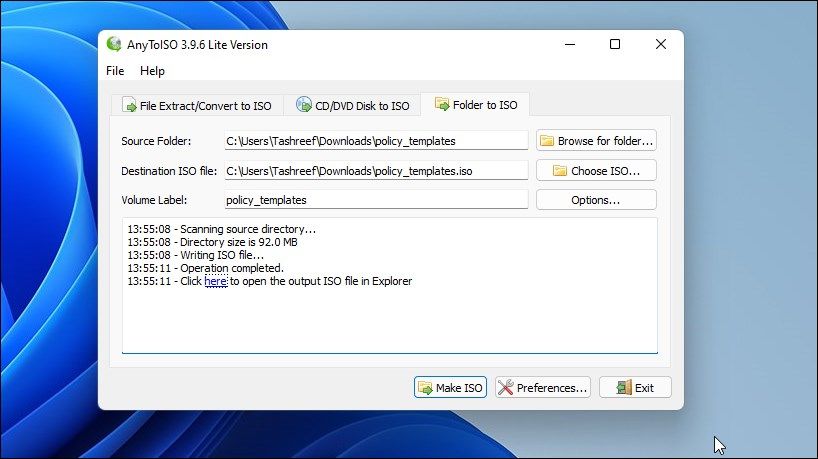
Next, click the
Make ISO
button to initiate the process. Depending on the size of the folder, the ISO writing process may take some time. - Once completed, you will have a new ISO file created out of the selected folder.
You can also right-click on any folder in File Explorer and select the Create ISO option to launch the app and convert the folder into an ISO image. However, if you are using Windows 11, you will first need to access the classic context menu to view the AnyToISO option.
If you want to create an ISO image with large folders (above 870 MB), you need to upgrade to the Pro version and shell $22.95 for the license.
Download: AnyToISO for Windows, Mac (Free Lite version, Premium $22.95)
2. AnyBurn
AnyBurn is a full-fledged CD-burning utility that is free to use for both home and commercial purposes. Apart from creating image files from files and folders, you can use it to create a bootable USB drive, perform disc surface tests, edit image files, and burn image files to disc.
Follow these steps to create an image file from files and folders using AnyBurn:
-
Launch AnyBurn and click on
Create image file from files/folders
. -
In the new dialog, click the
Add +
button on the toolbar.
-
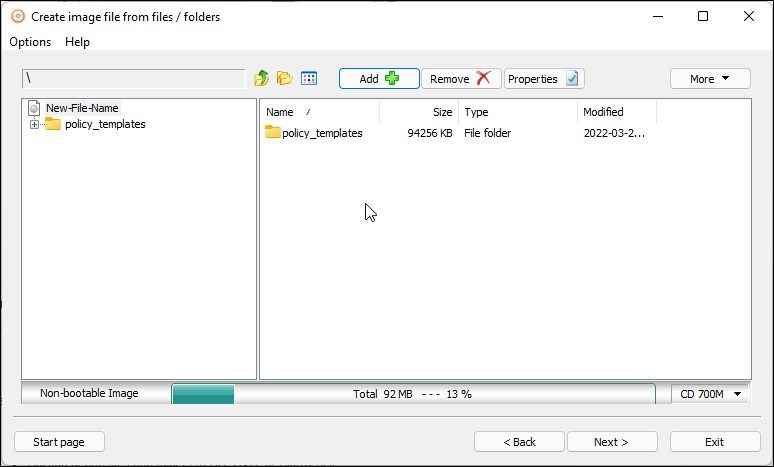
Navigate to the location, select the files or folder to convert, and click
Add. -
Next, click the
Properties
button. Here, you can change the label name, file system, choose compression level, add comments, and modify time and date. Click
OK
to save the changes. -
Click
Next
. - Type a name for the new ISO image and select image file type.
-
Click on
Create Now
to begin the process. - AnyBurn will optimize the file layout and then promptly write the image file. The green progress bar indicates the process is completed successfully.

Download: AnyBurn (Free)
3. WinCDEmuI
WinCDEmu is a simple yet effective disc utility for Windows. You can use it to mount an optical disc image or create an ISO image from folders.
WinCDEmu is also available in a special portable version. However, with the portable version, you don’t get the right-click to create an ISO image option.
To convert a folder to an ISO image using WinCDEmu:
- Download the app and complete the installation.
-
Once installed, open
File Explorer
and navigate to the folder you want to convert to an image. -
Right-click on the folder and select
Build an ISO Image
. On Windows 11, you need to click on
Show more options
to view the classic context menu. -
Type a name for your ISO image and click
Save
.
That’s it. WinCDEmu will start the image writing process. Depending on the folder size, this may take anywhere from a few seconds to a few minutes.
Download: WinCDEmu (Free)
4. ImgBurn
ImgBurn is another popular Windows utility to create ISO images from files and folders. It is a feature-rich disc burner utility with options to write image files to disc, create image files from disc, and disc verification.
Unlike WinCDEmu and AnyBurn, ImgBurn supports creating ISO images from both files and folders. Here’s how you can use it to create an ISO image from files.
- Download and install the app on your PC.
-
Next, launch
ImgBurn
. If you can’t find the desktop icon, or it doesn’t appear in Windows search, then navigate to the following location to launch the tool:C:\Program Files (x86)\ImgBurn -
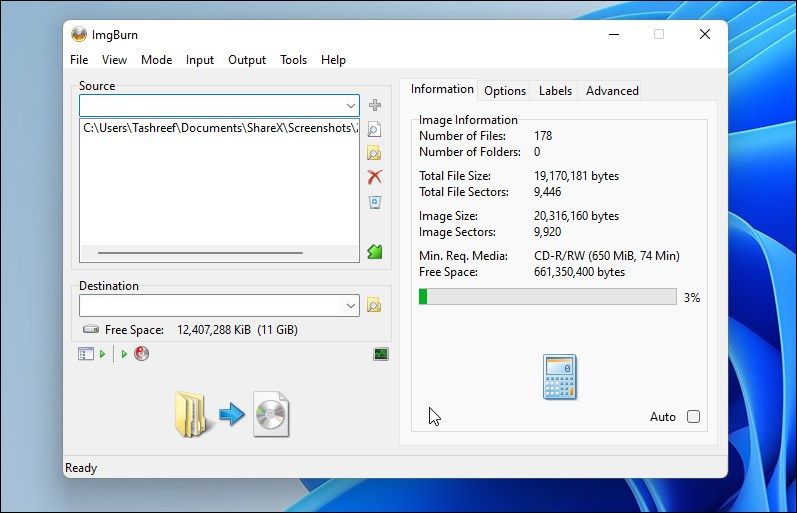
On the main screen, click on
Create image file from files/folders
.
-
Next, you can browse for the files and folder or drag and drop the content onto
ImgBurn
to add the files. -
Next, click the
Calculator
icon on the right side to calculate the file size and view other information. -
Next, open the
Options
tab to customize image options, add hidden system files and other attributes.
-
Next, open the
Labels
tab and provide a volume label for the file. If you skip this step, ImgBurn will automatically add a label during the image writing process. -
Click the
Folder to Disc
icon, enter the ISO image’s name, and select the destination folder. -
Click
Save
to begin the process. Follow any on-screen instructions, if necessary, to complete the process.

Download: ImgBurn (Free)
5. ISO Workshop
ISO Workshop is a premium ISO image management app. It features a modern look and offers multiple disc management options. You can use it to make ISO, burn ISO, convert ISO, and extract files from disc images.
Here’s how to use ISO Workshop to make an ISO image from files and folders.
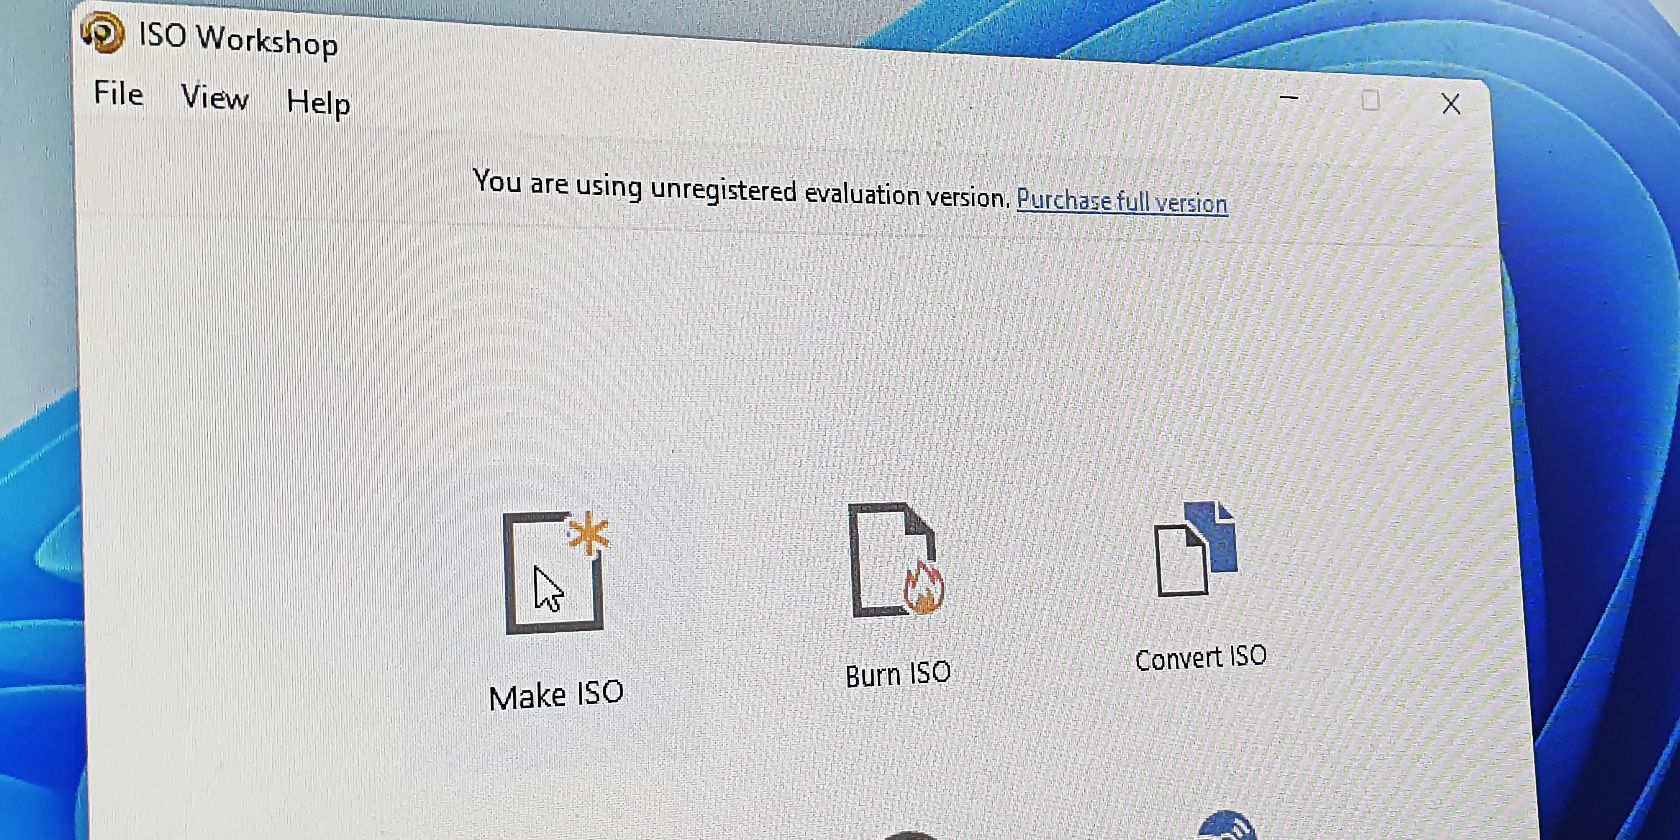
- Download and complete the installation. Once installed launch ISO Workshop.
-
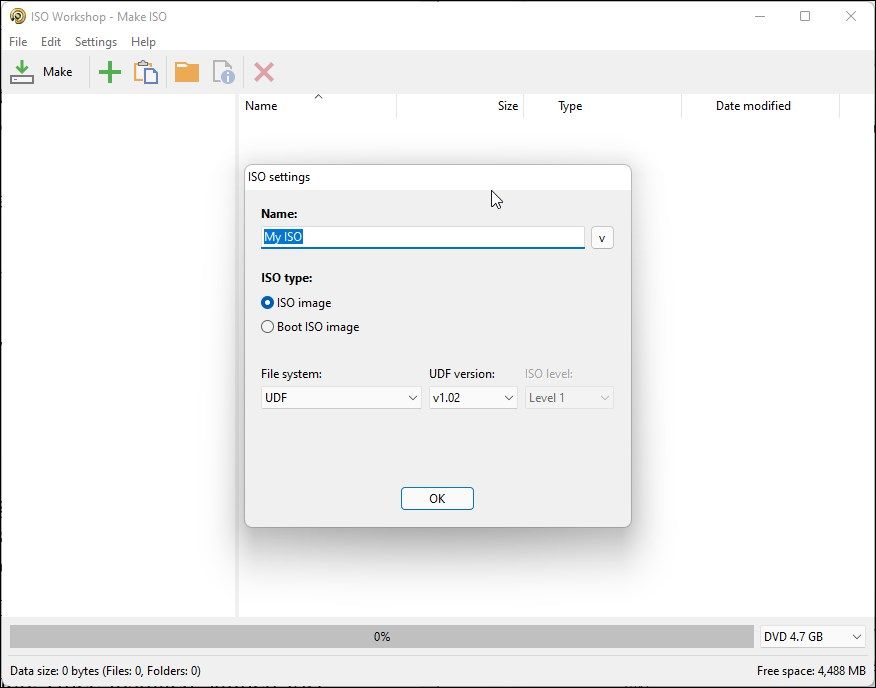
In the main interface, click on
Make ISO.
-
Next, type a name for the new ISO image and click
OK
. -
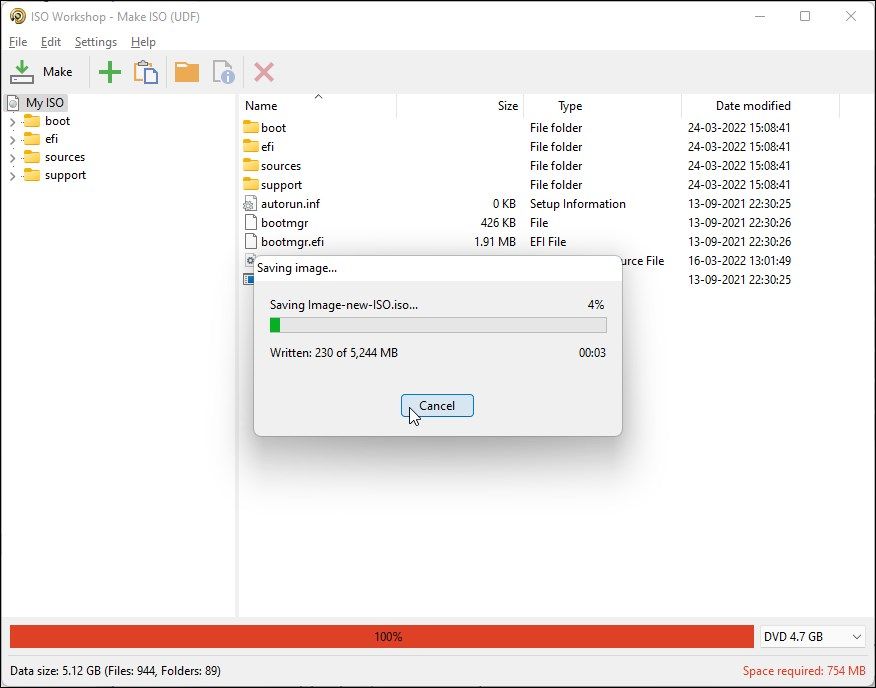
Click the
+
icon and select the files and folders to add. You can also drag and drop all the files and folders onto the app to add them. -
Click on
Make
, type a name for the file, and click
Save
. - ISO Workshop will start writing image files. Once complete, you can burn the ISO image to a disc or mount it on your PC.
ISO Workshop is a premium utility and comes with a 10-day free trial. After the trial ends, you will need to purchase one of the user licenses for continued use.
Download: ISO Workshop (Free trial, Premium $29.95)
If you frequently convert files and folders to an ISO Image, a tool like AnyToISO and WinCDemu are more beneficial due to the shell application support for the File Explorer context menu. If you need advanced ISO image options, opt for AnyBurn or ImgBurn. However, for occasional use, any of these utilities can help you convert your files and folders to an ISO image in no time.
An ISO file, also known as an ISO image, is an archive file that contains an exact copy of the data found on an optical disc, such as a CD or DVD. ISO files are commonly used for backing up optical discs or distributing large file sets intended for burning to an optical disc.
Previously, third-party software was required to mount an ISO image to a virtual drive on Windows Vista and XP. However, starting with Windows 7, Microsoft added a built-in feature that allows users to mount an ISO image to a virtual CD-ROM drive. This feature is also available on Windows 10 and 8, meaning that users can mount ISO images to virtual drives without the need for third-party tools. However, if you prefer to use a third-party emulator, you can download WinCDEmu, which is compatible with Windows 11 and has a size of only 1.50MB.
Folder2iso for Windows 11 & 10
In this tutorial, we will introduce a free tool called Folder2ISO. Unlike other software, which comes with several features, Folder2ISO only converts a folder to an ISO file.
This portable software does not require installation on your Windows PC. You can even carry it in a USB drive and start converting the folder to ISO. Using Folder2ISO is quite simple, and even a novice can get addicted to this gem.
How to use Folder2iso?
Step 1. To use Folder2ISO, download it from the official website and extract it to a folder using any archive tool.
Step 2. Double-click on the Folder2ISO executable file to open it.
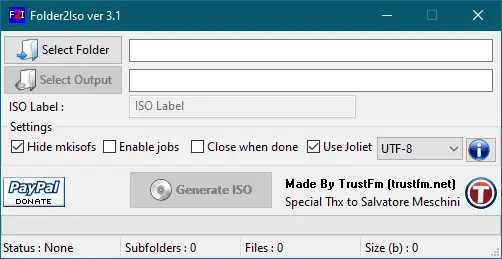
Step 3. Click on the “Select Folder” icon to select a folder from your PC or drag a folder to the interface of the Folder2ISO software.
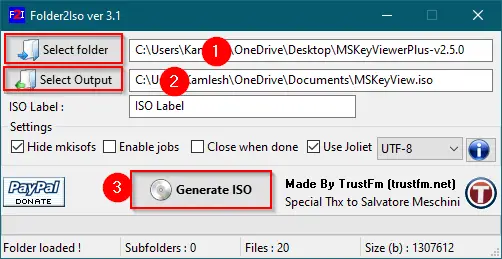
Step 4. Select the output folder by clicking on the “Select Output” button and finally, click on the “Generate ISO” button.
Once you complete the above steps, you will have an ISO file of the selected folder on your Windows PC within a minute (depending on the size of the folder).
Download Folder2iso
Folder2ISO is compatible with Windows and Linux operating systems. You can download and use it on all versions of Windows, including Windows 11, 10, 8, 7, Vista, and XP. The latest version of this free and tiny utility (less than 3MB) can be downloaded from the official website.
If you’re interested in similar software, you might also want to check out IsoCreator and WinBurner, which are also tiny in size and offer similar functionality.
Conclusion
In conclusion, Folder2ISO is a simple and efficient tool for converting a folder to an ISO file. Its portable nature and easy-to-use interface make it a great option for anyone who needs to create ISO files on their Windows 11 or 10 computer. Additionally, with the built-in ISO mounting feature in Windows, users can easily access and use their newly created ISO files without the need for third-party software. Overall, Folder2ISO is a handy utility to have in your toolkit when working with ISO files.