Based on my experience, this error usually can occur because the VDS service is set to disabled. To resolve it, we need to enable the “Virtual Disk” service. Please refer to the following steps:
1) Click Start / Run and type SERVICES.MSC
2) Look for the Virtual Disk Service
3) Right click it and choose «Properties«
4) Change the Startup Type to Manual, then click the Start button.
5) Reboot and try the upgrade again.
If there isn’t Virtual Disk Service listed, you can take the following steps to populate the disk information:
1) Click Start / Run and type devmgmt.msc
2) Expand the Disk drives and double click the disk.
3) Click Volumes on the disk Properties.
4) If the volumes information are blank, click Populate.
5) Insert the Windows 7 installation disc and launch Setup.exe
Best Regards
Dale
-
Marked as answer by
Wednesday, April 7, 2010 1:43 AM

Contents
- 1 Solve Windows Could Not Retrieve Information About The Disks On This Computer
- 2 Windows Could Not Retrieve Information About The Disk On This Computer | Fixed
- 2.1 Conclusion
- 2.1.1 Related image with solve windows could not retrieve information about the disks on this computer
- 2.1.2 Related image with solve windows could not retrieve information about the disks on this computer
- 2.1 Conclusion
Delight Your Taste Buds with Exquisite Culinary Adventures: Explore the culinary world through our Solve Windows Could Not Retrieve Information About The Disks On This Computer section. From delectable recipes to culinary secrets, we’ll inspire your inner chef and take your cooking skills to new heights. And legacy enabled it latest save secure if uefi set sata exit- or or making to bios to install necessary is Update csm set fast firmware boot changes if you to uefi after first bios and ahci windows disabled have sure boot or boot manager defaults reset to controller the until disable
Solve Windows Could Not Retrieve Information About The Disks On This
Solve Windows Could Not Retrieve Information About The Disks On This
Update the bios or uefi firmware to latest, or reset to defaults, making sure (if you have it) uefi is enabled, csm or legacy bios disabled, windows boot manager set first to boot, if necessary disable secure and fast boot until after install, set sata controller to ahci, save changes and exit. Check your hard disk for any errors: type: cmd, from the results, right click cmd click ‘run as administrator’ at the command prompt, type: chkdsk r f when you restart your system, your computer will be scanned for errors and attempts will be made to correct them. 1. click start, type msconfig in the start search box, and then press enter.

Windows Could Not Retrieve Information About The Disks On This Compute
Windows Could Not Retrieve Information About The Disks On This Compute
«windows could not retrieve information about the disks on this computer» i am booting from a usb image of windows 7 x64 pro made using the official usb dvd download tool. the image is verified to be working because i can launch it from the usb drive from windows, and the same errors don’t occur. Method 1: you need to enable the virtual disk service before performing the upgrade if you hit this error. a. click start run and type services.msc. b. check for the virtual disk service c. right click it and choose «properties» d. make sure the startup type is automatic, then click the start button. e. reboot and try the upgrade again. method 2:. Ice ice superfamily 6.34k subscribers subscribe 160 32k views 8 years ago many people who was trying to formatting their windows or trying to install the new windows probably will facing this. Under the «create windows 11 installation media» section, click the download now button to save the file on the device. source: windows central (image credit: source: windows central) double click.

Windows Could Not Retrieve Information About The Disk On This Computer
Windows Could Not Retrieve Information About The Disk On This Computer
Ice ice superfamily 6.34k subscribers subscribe 160 32k views 8 years ago many people who was trying to formatting their windows or trying to install the new windows probably will facing this. Under the «create windows 11 installation media» section, click the download now button to save the file on the device. source: windows central (image credit: source: windows central) double click. After upgraded, rebuild new kbe for a scripted install , during deployment gotten this windows e 4217798, following these workarounds, it should resolve the windows errors:during deployment, open command prompt and try to use diskpart to list the drives availablex:\windows\system32>diskpartdiskpart > list diskif diskpart utility is able to display the correct hdd, then proceed with another. This article provides a troubleshooting guide on how to solve the issue of not being able to find a disk drive during the installation of windows 11 10 on a notebook or all in one (aio) computer. the solution is to load the corresponding driver during the installation process.

Fix Disk Management Errors On Windows 10
Fix Disk Management Errors On Windows 10
After upgraded, rebuild new kbe for a scripted install , during deployment gotten this windows e 4217798, following these workarounds, it should resolve the windows errors:during deployment, open command prompt and try to use diskpart to list the drives availablex:\windows\system32>diskpartdiskpart > list diskif diskpart utility is able to display the correct hdd, then proceed with another. This article provides a troubleshooting guide on how to solve the issue of not being able to find a disk drive during the installation of windows 11 10 on a notebook or all in one (aio) computer. the solution is to load the corresponding driver during the installation process.

Could Not Retrieve Information About Disks On Computer Windows 10 Forums
Could Not Retrieve Information About Disks On Computer Windows 10 Forums
Windows Could Not Retrieve Information About The Disk On This Computer | Fixed
Windows Could Not Retrieve Information About The Disk On This Computer | Fixed
i was trying to install operating system and getting this error «windows could not retrieve information about the disk on this many people who was trying to formatting their windows or trying to install the new windows probably will facing this issue. hey guys sourav dutta here and today i am going to show you how to fix ‘windows could not complete the installation’ error how to fix windows 10 installation has failed: bit.ly 2zazxtr a good article about this problem: fix windows cannot be installed to this disk in 60 seconds today we will fix «windows cannot be installed to this disk. the disk check could not be performed because windows cannot access the disk in windows 10 fix chkdsk c: f. setup did not find any disk drives in your computer when installing windows error fix. fix: windows cannot be installed to this disk the selected disk is of the gpt partition. issues addressed in this tutorial: windows feel free to donate to my wallet addresses which would be greatly appreciated bitcoin wallet p2sh address this video has been updated here: youtu.be ymcwoaocs k use this video to troubleshoot and repair why your dell hey guys sourav dutta here and today i am going to show you how to windows cannot be installed to this disk this how to fix software installation error in windows 10 8.1 7 fail can’t install. registry entry: msiexec i «%1» like any complex
Conclusion
Taking everything into consideration, it is evident that article offers useful information about Solve Windows Could Not Retrieve Information About The Disks On This Computer. From start to finish, the author demonstrates an impressive level of expertise on the topic. Notably, the discussion of Y stands out as a key takeaway. Thank you for this post. If you have any questions, please do not hesitate to reach out through the comments. I am excited about your feedback. Additionally, here are some similar posts that might be interesting:
While I have received no help or advice from Microsoft whatsoever regarding this serious installation deficiency, I have managed to get past it and successfully install Windows 7 on my laptop. If you recall, the original problem was:
When I put in the Windows 7 installation disk into the DVD drive and click «Install Now», it goes to a full-screen setup page, which reads:
— Setup is copying temporary files…
— Setup is starting…
— Then an error window opens stating, «Windows could not retrieve information about the disks on this computer.»
That’s it. No help, suggestions, no nothing! Just an «OK» button…
The first thing I noticed when I started poking around with my security settings was that even though I am the only user on this machine and I had given myself Administrator privileges, I still didn’t have FULL and complete admin rights to everything! 99% of the rights were there, but 1% was still being denied. So, I logged off as a user and logged back in as The Administrator.
Then I started playing around with the Vista Device Manager. I went to
Start | Control Panel | Hardware and Sound | Device Manager.
Then I selected Disk drive and double-clicked on my hard drive, which brought up the Properties window for the drive.
I clicked on the Volumes tab and noticed there was no information displayed there whatsoever. So I clicked the
Populate button, and poof… like magic all the volume information correctly appeared.
But I noticed that when I clicked the OK button, then went back into the hard drive to recheck the volume information, it was blank again! Go figure.
So I did this one more time, populating the volume information tab, but this time I did
NOT
click the OK button; I simply left it open with the volume information displayed. I then ran the Windows 7 setup program, and wow… it worked — no problem.
I don’t know if this is the the answer to everyone’s installation problems, but it worked for me, and I hope this information can help someone else too.
Ed Newbold
Columbus, OH
-
#1
So… as the title implies I am Trying to Install Win 7 Pro (32bit) over Win XP on a
Toshiba Satellite P200-RT1 Laptop
.
When I begin the install it eventually pops up »
Windows could not retrieve information about disks on this computer
» .
Most people suggest …»This error usually can occur because the VDS is set to disabled. To resolve it, you need to enable the “Virtual Disk” service.»
The problem is when I run
SERVICES.MSC
Virtual Disk Service isn’t listed anywhere, so then people suggest to run
devmgmt.msc
, expand the drives, go to Properties, Volumes Tab & click «Populate» then Insert the Windows 7 installation disc and launch Setup.exe.
Still I get the same error (Even when I dont click ok in the volumes Tab and leave it up)… Is there something I’m Missing or is there another possibility for this issue?
Thanks in advance to anyone who can help shed some light here!
-
#2
First of all. What are you doing.? A full install of 7 . If so you will need to wipe the hard drive first.
-
#3
Yes a full install of Win 7, sorry if that wasn’t clear. So I can’t just install Windows 7 if XP is on the drive? Hmmm, so how do I wipe the drive?
-
#4
You could use a program such as killdisk. Which wipes the hard drive as to the day it was bought. The install your win7 disk and format the drive. Windows should install then. Most retail computers can be a pain. When it comes to not using their OS. But first of all before you do this. Do you have the Bios setup to boot from the cd drive. If not this may also be what stopping you.
-
#5
Yep it’s set to boot from CD but now for some reason it’s bypassing that and not giving me the «Hit any key to boot from disc» option.. instead it just loads to XP.
But it’s set to boot first in the bios still and the CD/DVD drive works once I’m in XP
-
#6
Can you do a clean install from inside XP?
-
#7
Naw… «from inside» is where I run into «Windows could not retrieve information about disks on this computer»… but I just went back and changed the boot order to H/D first, then switched it back to CD/Dvd player and it gave me the boot from CD option… So I’m waiting to see what happens now.
Last time I made it this far Win 7 went through the install process but then when it restarted instead of finishing the install I kept getting a «Black Screen».
I read…
Installing Windows 7 it fails to play nice with machines that have an AMD/ATI Radeon graphics processing unit (GPU)
Something to do with embedded DisplayPort (eDP) technology.
People that attempted to install Windows 7 found a black screen is displayed during the installation process.
I thought that was my issue but I checked once I got back to XP and this has an intel GPU of some sort.
I’m 80% through the Win 7 install now but fear that I will «hang» on a Black Screen in the end again. If that happens should I just make a new thread for that issue ya think?
-
#8
Not really. Lets see what happens now. It could have been fluke. Or it could be the hardware is to old..
-
#9
Okay so it got to the final stage of the install of Win 7 Pro (32-bit) and went to a black screen after the win 7 logo… I tried hooking up an external VGA monitor but it doesn’t present an image either… I think the VGA «drivers» were missing in the win XP install
-
#10
Ok your best bet would be to wipe the drive. Or try to format it with Xp Like you did your other laptop. Then try installing 7. Or as stated before the hardware is to old.
-
#11
I did try the format with XP first route… So I guess wipe the drive and try a Win 7 install then. But won’t that delete any drivers etc. I may need? like the CD/DVD drive drivers in order to boot from the CD?
-
#12
It should not. The cd/dvd rom should not need a driver to read the disk. It would be like you were installing a new hard drive. So if you think about it. When you install a new drive. Then install your OS from the dvd. Dose the cd/dvd have drivers then no. The bios will let the cd/dvd rom read the disk. How old is this laptop?
-
#13
Makes sense… So I have gone in through the Win7 install and Formatted the drive from there before attempting the install… but you suggest using killdisk instead (the name freaks me out) and then trying? I’ll give it a go now as I really have nothing to lose at this point… If you are around by then I’ll let you know how it goes, If not I look forward to your feedback when you are… and thanks for all your help thus far!
-
#14
Your welcome all killdisk dose is write 0’s to the drive. Which in turns clears all data of the drive. Puts the drive back to a state were nothing has never been install on it. In turn lets you reformat it and install your OS on it. I will check back and see how things went. Hopefully great.
-
#15
Okay so I tried everything, but I finally figured this out! Here’s what I did…
I Installed Win 7 to the point where it restarts after the copying process has finished…Now
1) Before bootup, press F8 to enter the boot menu
2) Select ‘Safe Mode’ and the boot process will begin
3) Once booted you will be presented with the following warning: «Windows cannot complete the installation in safe mode, to continue installing windows restart computer» NOTE: Do not click ‘OK’ or press Space/Enter
4) Press SHIFT+F10 to open the Command Prompt
5) Type compmgmtlauncher into Command Prompt and press ‘Enter’ (It may take a few seconds to display)
6) Now Click on ‘Device Manager’
7) You can now disable (not uninstall) any device that you believe is causing the failure to boot.
* I disabled the VGA driver that had the «Yellow Triangle with the Exclamation Point» and BAM! once I exited out and the Laptop restarted Win 7 Finished the Install!
Thanks for your help and I hope this Helps someone else… Is there a way to mark this «Solved»?
-
#16
Very good. Glad to hear this. Just wandering how old is this laptop.? I have not ran across this in ages. They do not mark them solved here, But do leave them posted for other. people to read.
-
#17
Don’t know if anyone is still following this post but, I solved this exact problem by transferring the new Win 7 Home Premium disk to a USB thumb drive. Stuck it in the old xp machine, then went to Windows Explorer and found the start exe. file. It loaded and installed without any problems.
Its taking longer to update the program than it did to install it.
Ошибка при установке Windows 7. Windows не удалось получить сведения о дисках на данном компьютере
Проверьте диск на ошибки:
Откройте проводник, нажмите правой кнопкой мыши на диске (C:), выберите Свойства, перейдите на вкладку Сервис, нажмите кнопку Выполнить проверку. отметьте оба пункта флажками:
Автоматически исправлять системные ошибки
Проверять и восстанавливать поврежденные сектора
Нажмите кнопки Запуск, Расписание проверки диска, OK, закройте проводник. Перезагрузите ПК, после чего не нажимайте клавиши на клавиатуре, дождитесь отсчета времени и начала проверки диска.
Выполните следующие действия в BIOS:
Сбросьте настройки BOS на умолчание.
Измените режим работы жесткого диска настройках BIOS с AHCI на IDE (Legacy).
Выберите приоритет загрузки с жесткого диска по очерёдности — системный диск первым.
Если сообщение «Windows не удалось получить сведения о дисках на данном компьютере»сохраняется, это может означать что, в составе дистрибутива Windows не содержится драйвер для контроллера жесткого диска материнской платы, такое к сожалению встречается.
В таком случаи необходимо сперва посмотреть в диспетчере устройств, какой контроллер жесткого диска используется, затем зайти на сайт производителя и загрузить его, распаковать в папку на съёмный USB накопитель, затем во время установки системы в режиме обновления на стадии выбора дисков указать явное расположение драйвера контроллера жесткого диска материнской платы находящийся в папке на съемном USB накопители.
Вариантов много:
1. Не подключён диск
2. Мёртвый диск.
3. (наиболее вероятный) В установщике системы нет драйверов для контроллера жёсткого диска на вашей материнской плате. Система старая и не обязана знать новые контроллеры.
По 3-ему варианту: Скачать драйвера для контроллера (именно для загрузки, обычно есть на сайте производителя материнской платы или конкретного контроллера) и в начале установки системы указать подгрузить их с флешки/CD-DVD диска. Либо установить 10-ку, в ней, скорее всего, нужный драйвер уже будет.
Источник
Диагностика с помощью оснастки «Управление дисками» Troubleshooting Disk Management
Относится к: Windows 10, Windows 8.1, Windows 7, Windows Server (Semi-Annual Channel), Windows Server 2019, Windows Server 2016, Windows Server 2012 R2, Windows Server 2012 Applies To: Windows 10, Windows 8.1, Windows 7, Windows Server (Semi-Annual Channel), Windows Server 2019, Windows Server 2016, Windows Server 2012 R2, Windows Server 2012
В этом разделе перечислено несколько распространенных проблем, которые могут возникнуть при использовании компонента управления дисками, и шаги по их устранению. This topic lists a few common issues you may encounter when using Disk Management and troubleshooting steps to try.
Если при их выполнении отобразится сообщение об ошибке или что-то не работает, сохраняйте спокойствие! If you get an error or something doesn’t work when following these procedures — don’t panic! Эта статья является вводной. На сайте сообщества корпорации Майкрософт в разделе Файлы, папки и хранилища вы найдете больше информации о разных конфигурациях оборудования и программного обеспечения, с которыми вы можете столкнуться. This topic is just the first thing to try; there’s also a ton of info on the Microsoft community site in the Files, folders, and storage section about the wide variety of hardware and software configurations you might be dealing with. Если вам по-прежнему будет нужна помощь, опубликуйте вопрос здесь или обратитесь в службу поддержки корпорации Майкрософт или к изготовителю оборудования. If you still need help, post a question there, or Contact Microsoft Support or the manufacturer of your hardware.
Открытие компонента управления дисками How to open Disk Management
Прежде чем перейти к сложным вещам, давайте вспомним, как проще всего перейти к компоненту управления дисками, если вы еще не сделали этого: Before we launch into the tricky stuff, here’s an easy way to get to Disk Management in case you’re not there already:
- Введите Управление дисками в поле поиска на панели задач, выберите и удерживайте (или щелкните правой кнопкой мыши) Управление дисками, а затем выберите действие Запуск от имени администратора >Да. Type Computer Management in the search box on the taskbar, select and hold (or right-click) Computer Management, and then select Run as administrator >Yes.
- Когда откроется компонент управления компьютером, перейдите в раздел Хранилище >Управление дисками. After Computer Management opens, go to Storage >Disk Management.
Что делать, если диски отсутствуют или не инициализированы, а также общие действия по устранению неполадок Disks that are missing or not initialized, plus general troubleshooting steps
Причина. При наличии диска, который не отображается в проводнике и указан в оснастке управления дисками как Не инициализирован, причина может быть в том, что диск не имеет допустимой подписи. Cause: If you have a disk that doesn’t appear in File Explorer and is listed in Disk Management as Not Initialized, it could be because the disk doesn’t have a valid disk signature. По сути это означает, что диск не инициализирован и не отформатирован или что форматирование диска каким-либо образом повреждено. Basically this means that the disk has never been initialized and formatted, or the drive formatting has become corrupted somehow.
Также возможно, что на диске есть проблемы с оборудованием или проблемы подключения, но мы опишем их в следующих абзацах. It’s also possible that the disk is having hardware problems or issues plugging in, but we’ll get to that in a few paragraphs.
Решение: если диск совершенно новый и его просто необходимо инициализировать, удалив все данные на нем, решить проблему очень легко — см. раздел Инициализация новых дисков. Solution: If the drive is brand new and just needs to be initialized, erasing any data on it, the solution is easy — see Initialize New Disks. Однако высока вероятность того, что вы уже безуспешно пытались сделать это. However, there’s a good chance you’ve already tried this, and it didn’t work. Возможно, ваш диск заполнен важными файлами и вы не хотите стирать их при инициализации. Or maybe you have a disk full of important files, and you don’t want to erase the disk by initializing it.
Существует множество причин, по которым диск может отсутствовать или быть недоступными для инициализации, среди которых самая распространенная — это сбой диска. There are a bunch of reasons a disk or memory card might be missing or fail to initialize, with a common reason being because the disk is failing. Для исправления сбойного диска можно принять лишь ограниченный набор мер; тем не менее мы приводим ряд шагов, которые могут помочь восстановить его работоспособность. There’s only so much you can do to fix a failing disk, but here are some steps to try to see if we can get it working again. Если диск заработает после выполнения части этих шагов, можете пропустить дальнейшие действия, расслабиться и, может быть, провести обновление резервных копий. If the disk works after one of these steps, don’t bother with the next steps, just kick back, celebrate, and maybe update your backups.
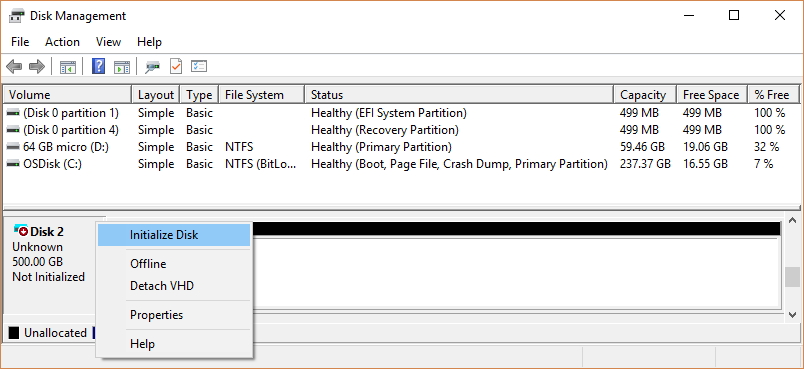
Взгляните на диск в оснастке управления дисками. Look at the disk in Disk Management. Если он Отключен, как показано ниже, щелкните его правой кнопкой мыши и выберите пункт Подключен. If it appears Offline as shown here, try right-clicking it and selecting Online.

Если диск отображается в оснастке управления дисками как Подключен и указано, что основной раздел Исправен, как показано здесь, это хороший знак. If the disk appears in Disk Management as Online, and has a primary partition that’s listed as Healthy, as shown here, that’s a good sign.

- Если на разделе есть файловая система, но у диска нет буквы (например, E), добавьте букву диска вручную согласно инструкциям по изменению буквы диска. If a partition has a file system, but no drive letter (for example, E:), see Change a drive letter to add a drive letter manually.
- Если на разделе нет файловой системы (он обозначен как RAW вместо NTFS, ReFS, FAT32 или exFAT) и вы уверены, что диск пустой, щелкните раздел правой кнопкой мыши и выберите Форматировать. If a partition doesn’t have a file system (it’s listed as RAW instead of NTFS, ReFS, FAT32, or exFAT) and you know that the disk is empty, select and hold (or right-click) the partition and select Format. Форматирование диска удаляет все данные на нем, поэтому не делайте этого, если вы пытаетесь восстановить файлы с диска — вместо этого сразу переходите к следующему шагу. Formatting a disk erases all data on it, so don’t do this if you’re trying to recover files from the disk — instead, skip ahead to the next step.
- Если раздел указан как Нераспределенный и вы уверены, что он пустой, выберите и удерживайте (или щелкните правой кнопкой мыши) этот нераспределенный раздел и выберите Создать простой том, а затем следуйте инструкциям по созданию тома в свободном пространстве. If the partition is listed as Unallocated and you know that the partition is empty, select and hold (or right-click) the unallocated partition and then select New Simple Volume and follow the instructions to create a volume in the free space. Не делайте этого, если вы пытаетесь восстановить файлы с диска. Вместо этого сразу переходите к следующему шагу. Don’t do this if you’re trying to recover files from this partition — instead, skip ahead to the next step.
Игнорируйте все разделы, которые указаны как Системный раздел EFI или Раздел восстановления. Ignore any partitions that are listed as EFI System Partition or Recovery Partition. Эти разделы содержат много очень важных файлов, от которых зависит правильная работа компьютера. These partitions are full of really important files your PC needs to operate properly. Лучше всего оставить их в покое, чтобы вы могли запускать ПК и восстановить его в случае проблем. It’s best to just leave them alone to do their jobs starting your PC and helping you recover from problems.
Если у вас есть внешний диск, который здесь не отображается, отключите его, подключите еще раз и щелкните Действие > Повторно сканировать диски. If you have an external disk that’s not showing up, unplug the disk, plug it back in, and then select Action > Rescan Disks.
Завершите работу компьютера, отключите внешний жесткий диск (если это внешний диск с проводом питания) и снова включите компьютер и диск. Shut down your PC, turn off your external hard disk (if it’s an external disk with a power cord), and then turn your PC and the disk back on. Чтобы отключить ПК с Windows 10, нажмите кнопку «Пуск», затем кнопку управления питанием и выберите Завершение работы. To turn off your PC in Windows 10, select the Start button, select the Power button, and then select Shut down.
Подключите диск к другому USB-порту непосредственно на компьютере (не на концентраторе). Plug the disk into a different USB port that’s directly on your PC (not on a hub). Иногда USB-диски не получают достаточную мощность питания или испытывают другие проблемы с определенными портами. Sometimes USB disks don’t get enough power from some ports, or have other issues with particular ports. Это особенно часто происходит с USB-концентраторами, но иногда существуют различия между портами на ПК, поэтому необходимо проверить несколько разных портов при их наличии. This is especially common with USB hubs, but sometimes there are differences between ports on a PC, so try a few different ports if you have them.
Попробуйте другой кабель. Try a different cable. Это может выглядеть странно, но кабели часто не работают, поэтому следует попробовать другой кабель для подключения диска. It might sound crazy, but cables fail a lot, so try using a different cable to plug the disk in. При наличии внутреннего диска в настольном компьютере, возможно, необходимо выключить компьютер перед переключением кабеля; дополнительные сведения см. в руководстве по компьютеру. If you have an internal disk in a desktop PC, you’ll probably need to shut your PC down before switching cables — see your PC’s manual for details.
Проверьте диспетчер устройств на наличие ошибок. Check Device Manager for issues. Выберите и удерживайте (или щелкните правой кнопкой мыши) кнопку «Пуск», а затем выберите диспетчер устройств в контекстном меню. Select and hold (or right-click) the Start button, then select Device Manager from the context menu. Найдите устройства с восклицательным знаком или другими проблемами, дважды щелкните такое устройство, а затем проверьте его состояние. Look for any devices with an exclamation point next to it or other issues, double-click the device and then read its status.
Ниже приведен список кодов ошибок в диспетчере устройств. Иногда проблему можно решить, выбрав и удерживая (или щелкнув правой кнопкой мыши) проблемное устройство, выбрав команду Удалить устройство, а затем щелкнув Действие > Обновить конфигурацию оборудования. Here’s a list of Error codes in Device Manager, but one approach that sometimes works is to select and hold (or right-click) the problematic device, select Uninstall device, and then Action > Scan for hardware changes.

Подключите диск к другому ПК. Plug the disk into a different PC.
Если диск не работает на другом компьютере, это достоверный признак того, что проблема происходит с диском, а не с компьютером. If the disk doesn’t work on another PC, it’s a good sign that there’s something bad going on with the disk, and not your PC. Понятно, что приятного в этом мало. No fun, we know. Вы можете обратиться за помощью на сайт сообщества Майкрософт либо связаться с производителем диска или службой поддержки Майкрософт. Search for and ask for help at the Microsoft community site, or contact your disk manufacturer or Microsoft Support.
Если заставить диск работать все же не удается, существуют приложения, которые позволяют восстановить данные даже с неисправных дисков; если файлы очень важны, вы можете обратиться в лабораторию восстановления данных, чтобы попытаться восстановить их. If you just can’t get it working, there are also apps that can try to recover data from a failing disk, or if the files are really important, you can pay a data recovery lab to try to recover them. Если вы нашли новый работающий способ, сообщите об этом в разделе «Комментарии» ниже. If you find something that works for you, let us know in the comments section below.
Диски сбоят довольно часто, поэтому очень важно регулярно проводить резервное копирование всех файлов, которые для вас важны. Disks fail pretty often, so it’s important to regularly backup any files you care about. Если диск иногда не отображается или сообщает об ошибках, стоит перепроверить свои методы резервного копирования. If you have a disk that sometimes doesn’t appear or gives errors, consider this a reminder to double-check your backup methods. Ничего страшного, если вы немного запаздываете, это нормально. It’s OK if you’re a little behind — we’ve all been there. Лучшее решение для резервного копирования — это то, которое действительно используется, поэтому мы рекомендуем найти решение, которые работает для вас, и придерживаться его. The best backup solution is one you use, so we encourage you to find one that works for you and stick with it.
Сведения о том, как использовать приложения, встроенные в Windows, для резервного копирования файлов на внешний диск, например USB-диск, см. в разделе Резервное копирование и восстановление файлов. For info on how to use apps built into Windows to backup files to an external drive such as a USB drive, see Back up and restore your files. Также можно сохранять файлы в службе Microsoft OneDrive, которая синхронизирует файлы с вашего компьютера в облаке. You can also save files in Microsoft OneDrive, which syncs files from your PC to the cloud. При сбое жесткого диска вы по-прежнему сможете получить все файлы, которые хранятся в OneDrive, с сайта OneDrive.com. If your hard disk fails, you’ll still be able to get any files you store in OneDrive from OneDrive.com. Дополнительные сведения см. в разделе OneDrive на вашем компьютере. For more info, see OneDrive on your PC.
Состояние базового или динамического диска — «Нечитаемый». A basic or dynamic disk’s status is Unreadable
Причина. Данный базовый или динамический диск недоступен и мог подвергнуться сбою оборудования, повреждению или ошибкам ввода-вывода. Cause: The basic or dynamic disk is not accessible and might have experienced hardware failure, corruption, or I/O errors. Копия системной базы данных конфигураций дисков на этом диске может быть повреждена. The disk’s copy of the system’s disk configuration database might be corrupted. На дисках с состоянием Нечитаемый отображается значок ошибки. An error icon appears on disks that display the Unreadable status.
Также диски могут иметь состояние Нечитаемый во время набора оборотов или когда средство управления дисками повторно сканирует все диски в системе. Disks might also display the Unreadable status while they are spinning up or when Disk Management is rescanning all of the disks on the system. В некоторых случаях нечитаемый диск претерпел сбой и не может быть восстановлен. In some cases, an unreadable disk has failed and is not recoverable. В случае с динамическими дисками состояние Нечитаемый обычно возникает в результате повреждения или ошибок ввода-вывода определенной части диска, а не из-за сбоя всего диска. For dynamic disks, the Unreadable status usually results from corruption or I/O errors on part of the disk, rather than failure of the entire disk.
Решение. Выполните повторное сканирование дисков или перезапустите компьютер и проверьте, изменилось ли состояние дисков. Solution: Rescan the disks or restart the computer to see if the disk status changes. Кроме того, повторите действия по устранению неполадок, описанные в разделе Состояние диска — «Не инициализирован», или диск отсутствует. Also try the troubleshooting steps described in A disk’s status is Not Initialized or the disk is missing entirely.
Состояние динамического диска — «Инородный» A dynamic disk’s status is Foreign
Причина. Состояние Инородный возникает при перемещении динамического диска на локальный компьютер с другого ПК. Cause: The Foreign status occurs when you move a dynamic disk to the local computer from another computer PC. На дисках с состоянием Инородный отображается значок предупреждения. A warning icon appears on disks that display the Foreign status.
В некоторых случаях ранее подключенный к системе диск может иметь состояние Инородный. In some cases, a disk that was previously connected to the system can display the Foreign status. Данные конфигурации динамических дисков хранятся на всех динамических дисках, поэтому при выходе из строя всех динамических дисков сведения о том, какие диски принадлежат системе, будут утеряны. Configuration data for dynamic disks is stored on all dynamic disks, so the information about which disks are owned by the system is lost when all dynamic disks fail.
Решение. Добавьте диск в конфигурацию системы компьютера, чтобы получить доступ к данным на этом диске. Solution: Add the disk to your computer’s system configuration so that you can access data on the disk. Чтобы добавить диск в конфигурацию системы компьютера, импортируйте добавляемый диск (выберите и удерживайте его или щелкните правой кнопкой мыши, а затем выберите пункт Импорт чужих дисков). To add a disk to your computer’s system configuration, import the foreign disk (select and hold (or right-click) the disk and then click Import Foreign Disks). Все существующие тома на инородном диске станут видимыми и доступными после импорта диска. Any existing volumes on the foreign disk become visible and accessible when you import the disk.
Состояние динамического диска — «Подключен (ошибки)». A dynamic disk’s status is Online (Errors)
Причина. В определенной области динамического диска есть ошибки ввода-вывода. Cause: The dynamic disk has I/O errors on a region of the disk. На динамическом диске с ошибками отображается значок предупреждения. A warning icon appears on the dynamic disk with errors.
Решение. Если ошибки ввода-вывода носят временный характер, повторно активируйте диск, чтобы вернуть ему состояние Подключен. Solution: If the I/O errors are temporary, reactivate the disk to return it to Online status.
Состояние динамического диска — «Отключен» или «Отсутствует». A dynamic disk’s status is Offline or Missing
Причина. Динамический диск с состоянием Отключен может быть поврежден или периодически недоступен. Cause: An Offline dynamic disk might be corrupted or intermittently unavailable. На отключенном динамическом диске отображается значок ошибки. An error icon appears on the offline dynamic disk.
Если диск имеет состояние Отключен, а его имя изменяется на Отсутствует, то диск был недавно доступен в системе, но теперь не может быть обнаружен или определен. If the disk status is Offline and the disk’s name changes to Missing, the disk was recently available on the system but can no longer be located or identified. Отсутствующий диск может быть поврежден, выключен или отсоединен. The missing disk may be corrupted, powered down, or disconnected.
Решение. Чтобы вернуть диску с состоянием «Отключен» и «Отсутствует» состояние «Подключен», сделайте следующее. Solution: To bring a disk that is Offline and Missing back online:
- Устраните все проблемы с диском, контроллером или кабелем. Repair any disk, controller, or cable problems.
- Убедитесь, что физический диск включен и подключен к электросети и компьютеру. Make sure that the physical disk is turned on, plugged in, and attached to the computer.
- Затем воспользуйтесь командой Повторно активировать диск, чтобы вернуть диск в состояние Подключен. Next, use the Reactivate Disk command to bring the disk back online.
- Используйте действия по устранению неполадок, описанные в разделе Состояние диска — «Не инициализирован», или диск отсутствует. Try the troubleshooting steps described in A disk’s status is Not Initialized or the disk is missing entirely.
- Если диск остается в состоянии Отключен и у него отсутствует имя, а вы определили, что связанную с этим диском проблему невозможно устранить, удалите диск из системы. Для этого выберите и удерживайте (или щелкните правой кнопкой мыши) диск и выберите Удалить диск. If the disk status remains Offline and the disk name remains Missing, and you determine that the disk has a problem that cannot be repaired, you can remove the disk from the system by selecting and holding (or right-clicking) the disk and then clicking Remove Disk). Однако перед удалением диска необходимо удалить все тома (или зеркала) на нем. However, before you can remove the disk, you must delete all volumes (or mirrors) on the disk. Чтобы сохранить зеркальные тома на диске, удалите зеркало вместо всего тома. You can save any mirrored volumes on the disk by removing the mirror instead of the entire volume. Удаление тома приводит к потере данных на нем, поэтому удалять диск следует лишь в том случае, если вы твердо уверены, что диск безвозвратно поврежден и не может использоваться. Deleting a volume destroys the data in the volume, so you should remove a disk only if you are absolutely certain that the disk is permanently damaged and unusable.
Чтобы вернуть диску с состоянием «Отключен» и именем «Диск #» (не «Отсутствует») состояние «Подключен», выполните одну или нескольких указанных далее процедур. To bring a disk that is Offline and is still named Disk # (not Missing) back online, try one or more of the following procedures:
В средстве управления дисками выберите и удерживайте (или щелкните правой кнопкой мыши) диск и выберите Повторно активировать диск, чтобы вернуть диску состояние Подключен. In Disk Management, select and hold (or right-click) the disk and then click Reactivate Disk to bring the disk back online. Если диск остается в состоянии Отключен, проверьте кабели и контроллер диска и убедитесь, что физический диск исправен. If the disk status remains Offline, check the cables and disk controller, and make sure that the physical disk is healthy. Устраните все проблемы и снова попробуйте активировать диск. Correct any problems and try to reactivate the disk again. Если повторная активация диска прошла успешно, все тома на нем должна автоматически вернуться к состоянию Работоспособен. If the disk reactivation succeeds, any volumes on the disk should automatically return to the Healthy status.
В компоненте «Просмотр событий» проверьте журналы событий на наличие связанных с диском ошибок, таких как «Нет пригодных копий конфигурации». In Event Viewer, check the event logs for any disk-related errors such as «No good config copies». Если эта ошибка есть в журналах событий, обратитесь в службу технической поддержки Майкрософт. If the event logs contain this error, contact Microsoft Product Support Services.
Попробуйте переместить диск на другой компьютер. Try moving the disk to another computer. Если на другом компьютере вам удается перевести диск в состояние Подключен, проблема, скорее всего, связана с конфигурацией компьютера, на котором диск не удается перевести в состояние Подключен. If you can get the disk to go Online on another computer, the problem is most likely due to the configuration of the computer on which the disk does not go Online.
Попробуйте переместить диск на другой компьютер, на котором есть динамические диски. Try moving the disk to another computer that has dynamic disks. Импортируйте диск на этом компьютере, а затем переместите диск обратно в компьютер, на котором его не удавалось перевести в состояние Подключен. Import the disk on that computer and then move the disk back to the computer on which it would not go Online.
Состояние базового или динамического тома — «Сбой». A basic or dynamic volume’s status is Failed
Причина. Базовый или динамический том не удается запустить автоматически, поврежден диск или файловая система. Cause: The basic or dynamic volume cannot be started automatically, the disk is damaged, or the file system is corrupt. Если диск или файловую систему невозможно восстановить, состояние Сбой указывает на потерю данных. Unless the disk or file system can be repaired, the Failed status indicates data loss.
Решение. Solution:
Если том является базовым томом с состоянием Сбой, сделайте следующее. If the volume is a basic volume with Failed status:
- Убедитесь, что базовый физический диск включен и подключен к электросети и компьютеру. Make sure that the underlying physical disk is turned on, plugged in, and attached to the computer.
- Используйте действия по устранению неполадок, описанные в разделе Состояние диска — «Не инициализирован», или диск отсутствует. Try the troubleshooting steps described in A disk’s status is Not Initialized or the disk is missing entirely.
Если том является динамическим томом с состоянием Сбой, сделайте следующее. If the volume is a dynamic volume with Failed status:
- Убедитесь, что используемые диски имеют состояние Подключен. Make sure the underlying disks are online. Если это не так, верните диски в состояние Подключен. If not, return the disks to the Online status. Если это удалось сделать, том автоматически перезапустится и вернется в состояние Работоспособен. If this succeeds, the volume automatically restarts and returns to the Healthy status. Если динамический диск возвращается в состояние Подключен, но динамический том не возвращается в состояние Работоспособен, можно повторно активировать том вручную. If the dynamic disk returns to the Online status, but the dynamic volume does not return to the Healthy status, you can reactivate the volume manually.
- Если динамический том является зеркальным томом или томом RAID-5 со старыми данными, перевод базового диска в состояние Подключен не приведет к автоматическому перезапуску тома. If the dynamic volume is a mirrored or RAID-5 volume with old data, bringing the underlying disk online will not automatically restart the volume. Если диски, содержащие актуальные данные, отключены, сначала необходимо подключить эти диски (чтобы данные могли синхронизироваться). If the disks that contain current data are disconnected, bring those disks online first (to allow the data to become synchronized). В противном случае перезапустите зеркальный том или том RAID-5 вручную, а затем запустите средство проверки на наличие ошибок или Chkdsk.exe. Otherwise, restart the mirrored or RAID-5 volume manually, and then run the Error-checking tool or Chkdsk.exe.
- Используйте действия по устранению неполадок, описанные в разделе Состояние диска — «Не инициализирован», или диск отсутствует. Try the troubleshooting steps described in A disk’s status is Not Initialized or the disk is missing entirely.
Состояние базового или динамического тома — «Неизвестно». A basic or dynamic volume’s status is Unknown
Причина. Состояние Неизвестно возникает, если загрузочный сектор тома поврежден (возможно, из-за вируса) либо если у вас больше нет доступа к данным в томе. Cause: The Unknown status occurs when the boot sector for the volume is corrupted (possibly due to a virus) and you can no longer access data on the volume. Также состояние Неизвестно возникает, если при установке нового диска мастер не смог создать подпись диска. The Unknown status also occurs when you install a new disk but do not successfully complete the wizard to create a disk signature.
Решение. Инициализируйте диск. Solution Initialize the disk. Инструкции см. в разделе Инициализация новых дисков. For instructions, see Initialize New Disks.
Состояние динамического тома — «Неполные данные». A dynamic volume’s status is Data Incomplete
Причина. Вы переместили некоторые диски в томе, состоящем из нескольких дисков, но не все. Cause: You moved some, but not all of the disks in a multi-disk volume. Данные на этом томе будут утеряны, если не переместить и не импортировать оставшиеся диски, на которых располагается этот том. Data on this volume will be destroyed unless you move and import the remaining disks that contain this volume.
Решение. Solution:
- Переместите в компьютер все диски, из которых состоит том. Move all the disks that comprise the multi-disk volume to the computer.
- Импортируйте диски. Import the disks. Инструкции по перемещению и импорту дисков см. в разделе Перемещение дисков на другой компьютер. For instructions describing how to move and import disks, see Move Disks to Another Computer.
Если том из нескольких дисков больше не нужен, можно импортировать диск и создать на нем новые тома. If you no longer require the multi-disk volume, you can import the disk and create new volumes on it. Для этого выполните следующие действия. To do so:
- Выберите и удерживайте (или щелкните правой кнопкой мыши) том с состоянием Сбой или Отказавшая избыточность и выберите Удалить том. Select and hold (or right-click) the volume with Failed or Failed Redundancy status and then click Delete Volume.
- Выберите и удерживайте (или щелкните правой кнопкой мыши) диск и выберите Создать том. Select and hold (or right-click) the disk and then click New Volume.
Состояние динамического тома — «Исправен (под угрозой)». A dynamic volume’s status is Healthy (At Risk)
Причина. Указывает, что динамический том на данный момент доступен, но на базовом динамическом диске обнаружены ошибки ввода-вывода. Cause: Indicates that the dynamic volume is currently accessible, but I/O errors have been detected on the underlying dynamic disk. Если в какой-либо части динамического диска обнаружена ошибка ввода-вывода, все тома на диске переходят в состояние Исправен (под угрозой) , а на томе появляется значок предупреждения. If an I/O error is detected on any part of a dynamic disk, all volumes on the disk display the Healthy (At Risk) status and a warning icon appears on the volume.
Если том находится в состоянии Работоспособен (под угрозой) , используемый им диск, как правило, находится в состоянии Подключен (ошибки) . When the volume status is Healthy (At Risk), an underlying disk’s status is usually Online (Errors).
Решение. Solution:
Верните используемый диск в состояние Подключен. Return the underlying disk to the Online status. Как только диск вернется в состояние Подключен, том должен вернуться в состояние Работоспособен. Once the disk is returned to Online status, the volume should return to the Healthy status. Если состояние Работоспособен (под угрозой) сохранится, диску, возможно, угрожает сбой. If the Healthy (At Risk) status persists, the disk might be failing.
Создайте резервную копию данных и замените диск как можно скорее. Back up the data and replace the disk as soon as possible.
Используя средство управления дисками или приложение DiskPart, нельзя управлять чередующимися томами. Cannot manage striped volumes using Disk Management or DiskPart
Причина. Некоторые решения по управлению дисками сторонних поставщиков выполняют функцию расширенного управления дисками вместо диспетчера логических дисков (LDM) Майкрософт, в результате чего LDM может отключиться. Cause: Some non-Microsoft disk management products replace Microsoft Logical Disk Manager (LDM) for advanced disk management, which can disable the LDM.
Решение. Если вы используете программное обеспечение по управлению дисками стороннего поставщика, которое отключило LDM, обратитесь к поставщику этого ПО за поддержкой в устранении проблем с конфигурацией дисков. Solution: If you are using non-Microsoft disk management software that has disabled LDM, you must contact the vendor on the non-Microsoft disk management software for support or assistance in troubleshooting problems with the disk configuration.
Средство управления дисками не может запустить службу виртуальных дисков. Disk Management cannot start the Virtual Disk Service
Причина. Эта ошибка может возникнуть, если удаленный компьютер не поддерживает службу виртуальных дисков (VDS) или вам не удается установить подключение к удаленному компьютеру, так как он заблокирован брандмауэром Windows. Cause: If a remote computer does not support the Virtual Disk Service (VDS) or if you cannot establish a connection to the remote computer because it is blocked by Windows Firewall, you may receive this error.
Решение. Solution:
- Если удаленный компьютер поддерживает VDS, можно настроить брандмауэр Защитника Windows таким образом, чтобы он разрешал подключаться через VDS. If the remote computer supports VDS, you can configure Windows Defender Firewall to allow VDS connections. Если удаленный компьютер не поддерживает VDS, можно использовать подключение к удаленному рабочему столу, чтобы подключиться к нему, а затем запустить средство управления дисками непосредственно на удаленном компьютере. If the remote computer does not support VDS, you can use Remote Desktop Connection to connect to it and then run Disk Management directly on the remote computer.
- Для управления дисками на удаленных компьютерах с поддержкой VDS необходимо настроить брандмауэр Защитника Windows как на локальном компьютере (на котором запущено средство управления дисками), так и на удаленном. To manage disks on remote computers that do support VDS, you must configure the Windows Defender Firewall on both the local computer (on which you are running Disk Management) and the remote computer.
- На локальном компьютере настройте брандмауэр Защитника Windows, чтобы включить исключение удаленного управления томами. On the local computer, configure Windows Defender Firewall to enable the Remote Volume Management Exception.
Исключение удаленного управления томами включает в себя исключения для Vds.exe, Vdsldr.exe порта TCP 135. The Remote Volume Management Exception includes exceptions for Vds.exe, Vdsldr.exe, and TCP port 135.
Удаленные подключения в рабочих группах не поддерживаются. Remote connections in workgroups are not supported. Локальный и удаленный компьютеры должны входить в состав домена. Both the local computer and the remote computer must be members of a domain.
Источник