Владельцы компьютеров с операционной системой Windows 10 иногда сталкиваются с проблемой, при которой появляется сообщение об ошибке «Windows could not configure one or more system components». Эта ошибка может возникнуть по разным причинам и требует быстрого решения для нормальной работы компьютера.
Одной из возможных причин этой ошибки может быть повреждение системных файлов или ошибки обновления. В таких случаях рекомендуется выполнить проверку целостности файлов системы с использованием командной строки или специальных программ. В случае обнаружения ошибок, необходимо выполнить восстановление поврежденных файлов.
Кроме того, проблема может быть связана с установленным программным обеспечением или драйверами. В таких случаях рекомендуется удалить недавно установленные программы или обновления и перезагрузить компьютер. Если проблема не устраняется, то необходимо обновить драйверы устройств до последней версии или откатить их к предыдущей версии.
Если вы все еще сталкиваетесь с ошибкой «Windows could not configure one or more system components», можно попробовать выполнить проверку системного диска с использованием утилиты chkdsk и запустить системный файловый сканер SFC, чтобы исправить возможные ошибки. Если все остальные методы не помогают, то остается попробовать выполнить чистую установку операционной системы Windows 10 с использованием загрузочного USB-накопителя.
Содержание
- Возможные причины появления ошибки «Windows 10 windows could not configure one or more system components»
- Несовместимое оборудование или драйверы
- Поврежденные системные файлы
- Недостаточное пространство на жестком диске
Возможные причины появления ошибки «Windows 10 windows could not configure one or more system components»
Ошибка «Windows 10 windows could not configure one or more system components» может возникнуть по различным причинам, которые могут включать следующее:
-
Неполадки в системных компонентах: Возможно, в системе Windows 10 произошли неполадки с одним или несколькими системными компонентами, которые не позволяют провести успешную конфигурацию. Это может быть связано с поврежденными или отсутствующими файлами, некорректными настройками или проблемами с обновлениями операционной системы.
-
Проблемы с обновлениями операционной системы: В случае использования функции обновления Windows 10, возможно, обновление не было установлено полностью или не удалось сконфигурировать все системные компоненты после обновления. Это может произойти из-за ошибок в процессе обновления, неправильных настроек или конфликта с другими программами.
-
Недостаточное пространство на жестком диске: Если на жестком диске не хватает свободного места, то операционная система может не иметь достаточно ресурсов для корректной конфигурации системных компонентов. Необходимо освободить дополнительное место или перенести данные на другой диск.
-
Проблемы с установкой программного обеспечения: Иногда, при установке или обновлении программного обеспечения, возникают конфликты с системными компонентами. Это может вызвать ошибку в процессе конфигурации компонентов системы Windows 10.
-
Неполадки в аппаратном обеспечении: В редких случаях, неполадки в аппаратном обеспечении, такие как неисправности в жестком диске или оперативной памяти, могут быть причиной ошибки при конфигурации системных компонентов. Необходимо проверить аппаратное обеспечение компьютера на наличие проблем.
Чтобы решить проблему с ошибкой «Windows 10 windows could not configure one or more system components», можно попробовать такие действия, как проверка целостности системных файлов, удаление и повторная установка обновлений операционной системы, освобождение места на жестком диске и проверка аппаратного обеспечения на работоспособность.
Несовместимое оборудование или драйверы
Еще одной причиной ошибки «Windows 10 windows could not configure one or more system components» может быть наличие несовместимого оборудования или установленных драйверов. Это может быть связано с несоответствием аппаратных требований операционной системы или устаревшими драйверами, которые не совместимы с Windows 10.
Чтобы решить эту проблему, рекомендуется следующие действия:
1. Проверьте аппаратные требования. Убедитесь, что ваше оборудование соответствует минимальным требованиям операционной системы Windows 10. Это может включать процессор, объем оперативной памяти, свободное место на жестком диске и другие компоненты.
2. Удалите несовместимые драйверы. Если у вас есть установленные драйверы, которые не совместимы с Windows 10, рекомендуется удалить их. Для этого можно воспользоваться инструментом Установка и удаление программы, который находится в разделе «Настройки» вашей операционной системы.
3. Обновите драйверы. Если вы установили все совместимые драйверы и оборудование все еще не работает, рекомендуется обновить драйверы до последней версии, совместимой с Windows 10. Для этого можно посетить официальный сайт производителя вашего оборудования или поискать обновления через меню «Устройства и принтеры» вашей операционной системы.
Примечание: перед установкой новых драйверов рекомендуется создать точку восстановления системы, чтобы иметь возможность откатиться к предыдущей версии драйверов в случае проблем.
Если после выполнения указанных действий проблема не решается, может потребоваться обратиться к специалисту по вопросам компьютерной техники или обратиться в службу поддержки производителя оборудования.
Поврежденные системные файлы
Одной из причин проблемы «Windows 10 windows could not configure one or more system components» может быть наличие поврежденных системных файлов. Системные файлы играют важную роль в работе операционной системы Windows 10, и их повреждение может привести к различным ошибкам и проблемам.
Повреждение системных файлов обычно происходит вследствие ошибок в процессе установки или обновления системы, воздействия вредоносного программного обеспечения или неправильного завершения работы компьютера.
Для исправления проблемы с поврежденными системными файлами можно воспользоваться инструментом «Сканер файлов системы» (System File Checker — SFC), встроенным в операционную систему Windows 10.
Чтобы воспользоваться инструментом SFC, нужно открыть командную строку с правами администратора. Для этого щелкните правой кнопкой мыши по кнопке «Пуск» и выберите «Командная строка (администратор)» из контекстного меню.
В открывшемся окне командной строки введите команду sfc /scannow и нажмите клавишу «Enter», чтобы запустить сканирование системных файлов.
Сканирование может занять некоторое время, поэтому дождитесь завершения процесса. Инструмент SFC проверит целостность всех системных файлов и автоматически восстановит поврежденные файлы, если это возможно.
После завершения сканирования перезагрузите компьютер и проверьте, исправилась ли проблема «Windows 10 windows could not configure one or more system components». Если проблема остается, возможно, требуется выполнить более сложные действия, такие как выполнение обновления системы или переустановка операционной системы.
Недостаточное пространство на жестком диске
Одна из распространенных причин возникновения ошибки «Windows 10 windows could not configure one or more system components» может быть недостаточное пространство на жестком диске компьютера. Ваша операционная система может требовать определенное количество свободного места для установки и функционирования системных компонентов.
Если на вашем жестком диске слишком мало свободного места, это может привести к некорректной установке или настройке системных компонентов, что вызовет ошибку «Windows 10 windows could not configure one or more system components». Чтобы решить эту проблему, вам необходимо освободить дополнительное пространство на вашем жестком диске. Вот несколько способов, которые могут помочь вам увеличить свободное место на диске:
- Удалите ненужные или неиспользуемые программы и файлы. Просканируйте ваш компьютер и удалите все ненужные программы, приложения и файлы, чтобы освободить место на диске.
- Очистите временные файлы и корзину. Временные файлы и элементы из корзины могут занимать большое пространство на диске. Очистите временные файлы и опустошите корзину, чтобы освободить дополнительное место.
- Перенесите файлы на внешний накопитель или облачное хранилище. Если у вас есть большое количество файлов, которые вы редко используете, вы можете переместить их на внешний накопитель или загрузить их в облачное хранилище, чтобы освободить место на вашем жестком диске.
- Используйте программу для очистки диска. Существуют специальные программы, которые помогают очистить ваш жесткий диск от ненужных файлов и освободить место.
После освобождения дополнительного пространства на вашем жестком диске, попробуйте снова установить или настроить компоненты операционной системы Windows 10. Если проблема остается, обратитесь к специалисту или поддержке Microsoft для получения дополнительной помощи.
Contents:
- Windows Could Not Configure One or More System Components Overview
- Why Couldn’t Windows Configure One or More System Components?
- 3 Ways to Fix Windows Could Not Configure One or More System Components?
- Bonus Tip
Windows Could Not Configure One or More System Components Overview
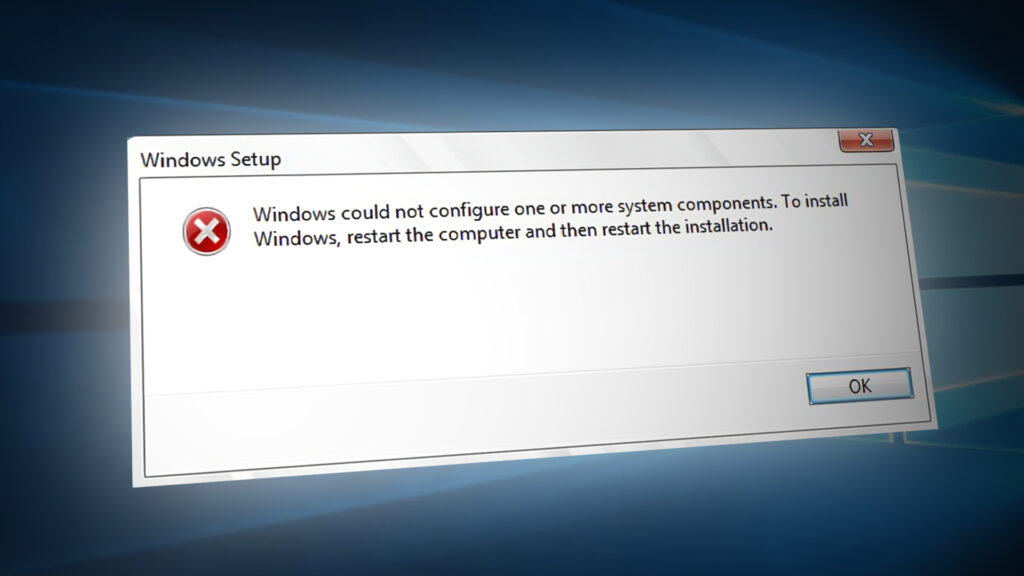
It is common that when you are upgrading Windows 10 to 1607 or 1709 version or any other, Windows 10 suddenly prompted you an error with a message indicating Windows could not configure one or more system components. To install Windows, restart the computer and then restart the installation.
Some people might find their upgrade failed at 45%, 49% with no progress.
How can this problem happen when you would like to update Windows system, the Creators update or anniversary update? This thread would fix your doubt.
Why Couldn’t Windows Configure One or More System Components?
This Windows system install error is rather complex as it is hard to figure out the exact reason for it. While the main causes can be identified, there are several major culprits are to blame.
1. The incongruence between the system to be upgraded to and the installed Windows system, such as Windows 10 1703 and 1709.
2. The external device interruption.
3. The setup log files corruption.
4. The driver incompatibility.
What you are supposed to do is following up this article and tackling this upgrading problem effectively.
How to Fix Windows Could Not Configure One or More System Components?
Regarding the principal reasons for the setup error, you can try to fix it in the following ways.
Solutions:
1: Run Windows Update Troubleshooter
2: Disconnect External Devices
3: Use SFC and DISM to Fix Windows Cannot Configure One or More System Components
Solution 1: Run Windows Update Troubleshooter
To simplify this Windows updating issue, it is advisable that you use the inbuilt troubleshooting tool to find out the installing problem.
For users of Windows 10 1603 or later, to troubleshoot the Windows update problem, you can directly go to Start > Settings > Update & Security > Troubleshoot > Windows Update > Run the troubleshooter.
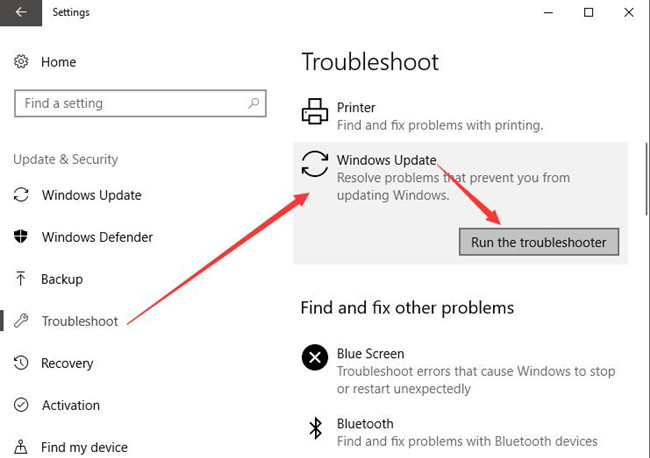
If possible, this troubleshooter would automatically repair Windows Could not configure your system components for you as you can see from the troubleshooting results.
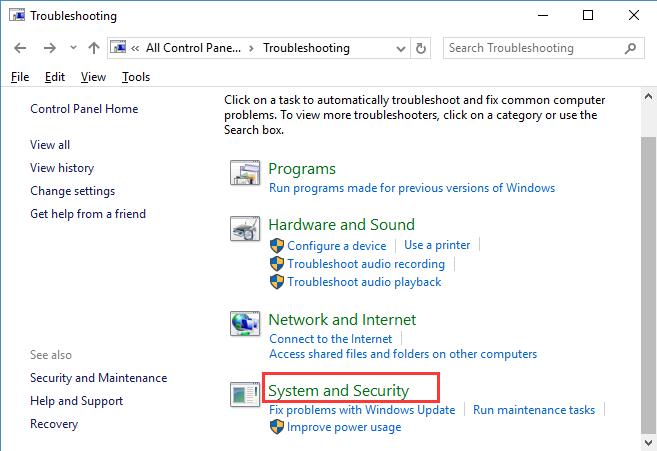
Tips: Before Windows 10 1603 users, follow these steps.
1. Open Control Panel.
2. Type in Troubleshooting in Control Panel search box and choose Troubleshooting from the result.
3. In Troubleshooting window, scroll down to locate System and security.
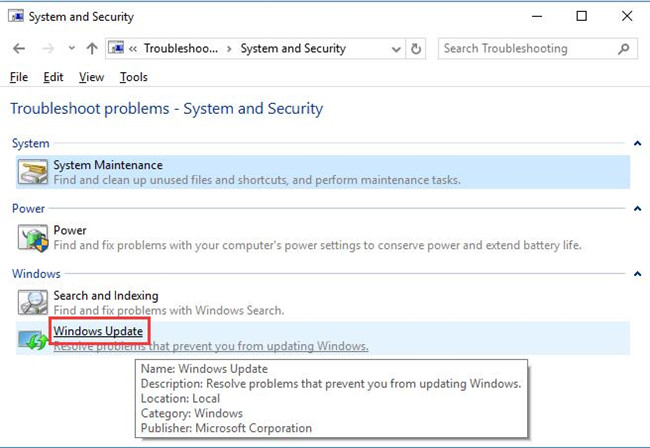
4. Select Windows Update from the list.
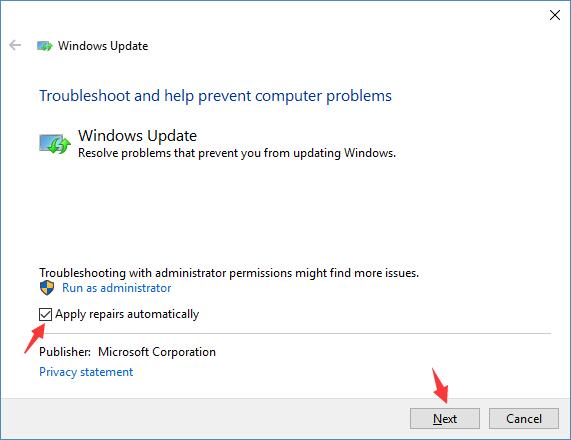
5. In Windows Update troubleshooting interface, click Advanced.
6. Tick the box of Apply repairs automatically and the hit Next to go further.
7. Windows Update Troubleshooter is Detecting problems, which would cost you several minutes.
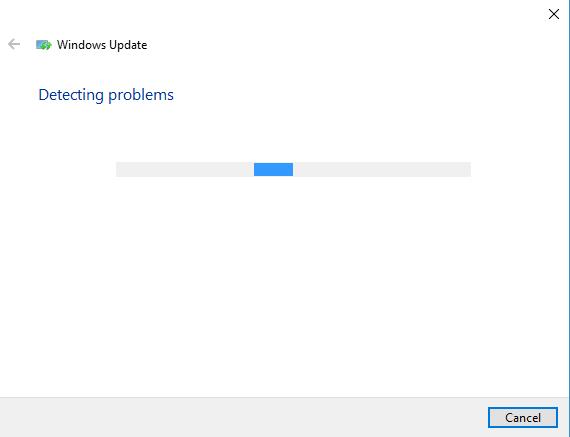
Here in the process of detecting Windows update errors, you are required to sign in with the administrator If not, Windows 10 would ask you to change to the administrator.
8. When the troubleshooting is finished, you can decide to View detailed information to check why your Windows could not configure one or more system components.
Solution 2: Disconnect External Devices
In a large sense, when the upgrading process failed at 50% or even 99%, it will also show you that Windows could not configure one or more system component.
In that case, whatever movable devices you have plugged in on Windows 10, such as USB, CD or DVD, you should plug out them to see if the set up can continue.
Solution 3: Use SFC and DISM
When you upgrade Windows 10 to 1603, 1703 or 1709 or other versions, there will be some setupact.logs along with some log files on the computer. In some way, these files may be corrupted so as to make Windows could not configure one or more system components on Windows 10.
Thus, you would better make use of the System Files Checker to scan for and correct the corruption in system files in updating.
1. Input Command Prompt in the search box and hit Enter to navigate to it.
2. Type in sfc/scannow in the Command Prompt and press Enter to run this command.
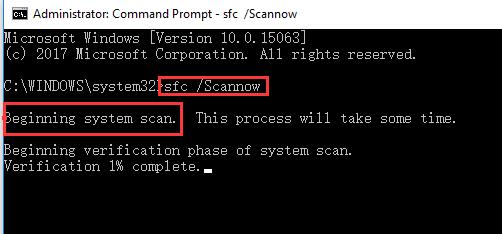
From the screenshot, you can see the SFC is running to check and correct the problematic files on your computer. As per the reports from some users, it can make the Windows update error disappear.
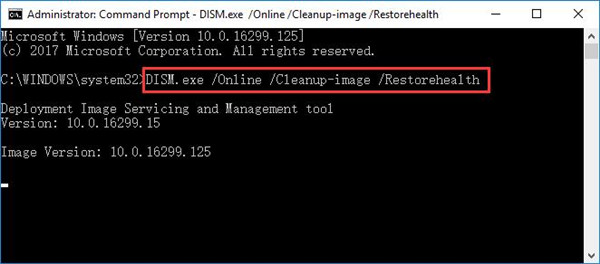
If not, you are able to try another system tool — DISM (Development Image Servicing and Management), which is capable of repairing the erroneous image that can lead to Windows could not configure one or more system components on Windows 10.
In Command Prompt, copy the command DISM /Online /Cleanup-Image /RestoreHealth and then execute it.
Now the install issue will have been removed from your PC with the help of these two tools sweeping the corrupted files and images.
Bonus Tip – Fix all the Conflicting Components Automatically
Possibly, even if you fixed the driver, file and program incompatibility, in some cases, Windows could not configure one or more system components warning message will also pop up before your sight.
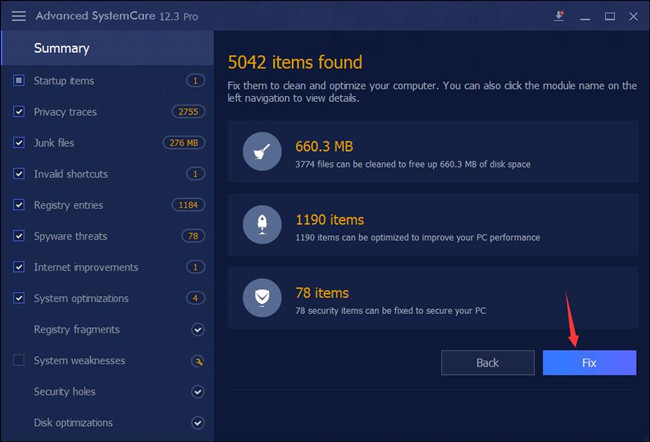
Under this circumstance, much as you tried, it can be a good choice to utilize Advanced SystemCare to scan all the items on Windows 10, including the files, registry, startup programs, disk, and so on.
Advanced SystemCare will detect the problematic items on your PC and then fix them automatically, which is an effective solution towards Windows could not configure one or more system components on Windows 10.
1. Download, install and run Advanced SystemCare.
2. Under Clean & Optimize, check the box of Select All and then Scan.
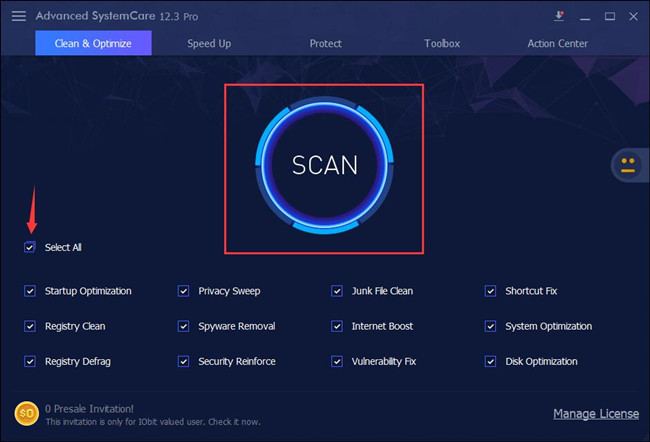
3. Hit Fix to fix all the erroneous items, including startup programs, files, and registries.
In this way, you can check whether Windows could not configure one or more system components, to reinstall Windows, restart the computer and then restart the installation.
In a nutshell, to cope with the Windows could not configure one or more system components. To install Windows, restart the computer and then restart the installation, you can select way from above or try them all, if not useless, maybe you have to clean install Windows 10 or reset Windows 10 to factory or restore your PC.
More Articles:
Some Settings are Managed by Your Organization
Fix Windows 10 Update Downloading Stuck
5 Ways to Stop Windows 10 Auto-Updates
This error code ‘Windows could not Configure One or More System Components‘ appears to users running Windows on their computers and it appears when trying to update their PCs to the latest available build of Windows. The full error message goes like:
"Windows could not configure one or more system components. To install windows, restart the computer and then restart the installation."
Despite the need for a restart, it has barely helped anyone and people are desperate for a real solution. We have decided to gather the most successful solutions which have actually helped people online and present them in a detailed manner. Good luck with solving your problem!
What Causes the “Windows could not configure one or more system components” Error?
There are several things to look out for if you want to stay away from this annoying error code. Here is the full list:
- Faulty or missing keys used to encrypt the configuration store for the AES Provider
- Old and outdated wireless drivers (or drivers in general)
- Misconfigured or faulty Internet Information Services tool which needs to be uninstalled
Solution 1: Remove Certain Files From Your Computer
If your computer’s keys that IIS (Internet Information Server) uses to encrypt the configuration store using the AES Provider are somehow missing or corrupted, then the provider instantiation will fail.
Because of the fact that the Window 10 installer will also try to install IIS (Internet Information Server), and this fails, the upgrade fails and is rolled back. The correct way to solve this problem is to remove certain files from your computer. They will be recreated once you run the Windows 10 installer.
- Navigate to the following location on your computer by opening the Windows Explorer and clicking on This PC:
C:\ProgramData\Microsoft\Crypto\RSA\MachineKeys
- If you are unable to see the ProgramData folder, you may need to turn on the option which enables you to view hidden files and folders. Click on the “View” tab on File Explorer’s menu and click on the “Hidden items” checkbox in the Show/hide section.
- Here are the files you should look for. The name of the file will begin with the first sequence of numbers and letters and end with the GUID of your machine (different for each user:
6de9cb26d2b98c01ec4e9e8b34824aa2_GUID      iisConfigurationKey

d6d986f09a1ee04e24c949879fdb506c_GUID      NetFrameworkConfigurationKey

76944fb33636aeddb9590521c2e8815a_GUID      iisWasKey
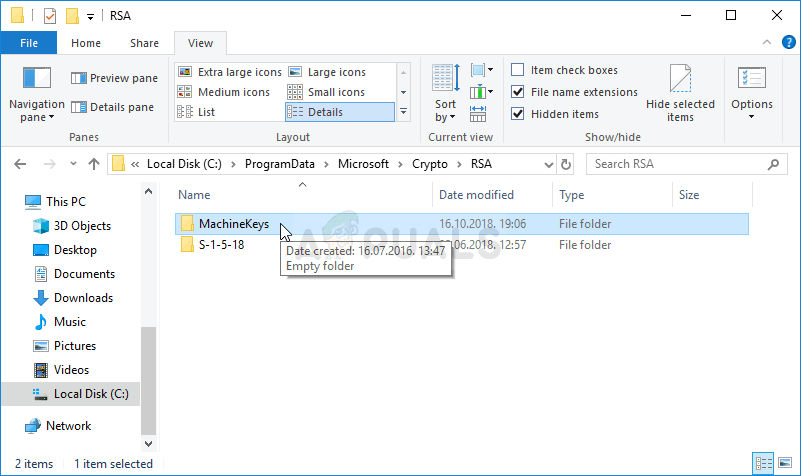
- Select these files, right-click on them, and choose the Delete option which will appear from the context menu. The files will be recreated when you run the Windows updater or Windows installation and the problem should be gone.
Solution 2: Try Using the Media Creation Tool
If an update was released for Windows 10 and you tried to install it the conventional way before you received the error code, you might want to try an alternative which consists of using the Windows Media Creation Tool. This is a file you download from Microsoft’s official website. You will be given the option to update Windows to the latest build after you download it.
- Download the Media Creation Tool executable from Microsoft’s website and wait for the download to complete. Double-click on the downloaded file in your Downloads folder called MediaCreationTool.exe in order to open the setup. Tap Accept at the first screen.
- Select the “Upgrade this PC now” option by enabling its radio button and click on the Next button to continue. The tool will download certain files, check for updates, and scan your PC to see if it is ready so please stay patient.
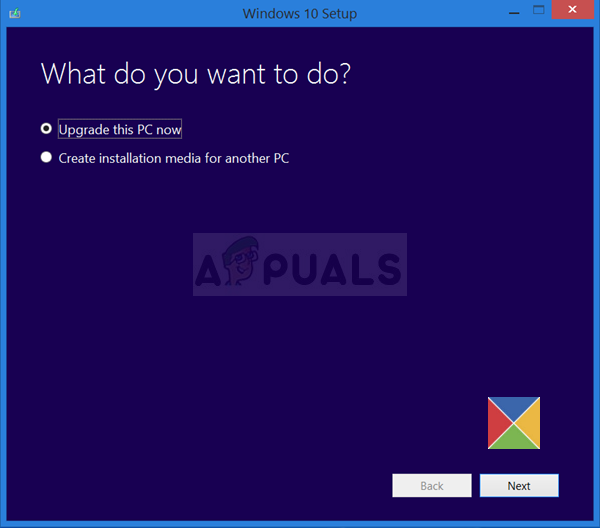
- Accept the license terms from the next window if you want to continue with the installation and wait again to communicate with Microsoft for updates (again).
- After that, you should already see the Ready to install screen with Install Windows and Keep personal files and apps options being listed. This has been chosen automatically since you are already running Windows 10 and you want to keep everything. The install should now proceed so your computer should be updated after the tool finishes with its process and the error should no longer appear.
Solution 3: Uninstall Your Old Wi-Fi Drivers and Update Others
Old and outdated drivers are also a known cause for this issue. There are several different ways in which the drivers are to blame. Some users claim that their old Wi-Fi driver was to blame and they were able to solve the problem by uninstalling it.
Others claim that they needed to update all of their drivers before proceeding. Try out both of these methods and see which one works the best for you!
- Click the Start menu button at the lower left part of your screen, type in Device Manager, and click its entry from the list of results at the top.
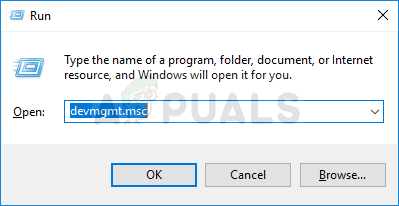
- You can also use the Windows Key + R combination by clicking both of these keys simultaneously in order to bring up the Run dialog box. Type in “devmgmt.msc” in the box and click OK.
- Locate the wireless adapter driver under Network adapters, right click on it, and select Uninstall device from the drop-down menu which will appear. Confirm any prompting dialogs.
- Right-click on other devices on your computer where the driver needs to be updated and choose Update driver from the drop-down menu. There are tools which can automate the process for you if you want.
- After you have updated your drivers and gotten rid of the wireless driver, try running the installation and check to see if the “Windows could not configure one or more system components” error still appears!
https://social.technet.microsoft.com/Forums/en-US/1b5b24b7-a0f0-4955-9f44-32a977643aef/windows-10-fall-creator-upgrade-1709-stops-at-45-with-quotwindows-could-not-configure-one-or-more?forum=win10itprosetup
Solution 4: Uninstall IIS
Internet Information Services (IIS, formerly Internet Information Server) is an extensible web server created by Microsoft for use with the Windows NT family. IIS supports HTTP, HTTP/2, HTTPS, FTP, FTPS, SMTP and NNTP.
If you are not using it, you should know that it could be the culprit behind your frustrations regarding this error and you should consider uninstalling it immediately!
- On your keyboard, use the Windows Key + R key combination to open the Run dialog box. Also, you can search these directly in the Start menu if your Windows OS supports it.
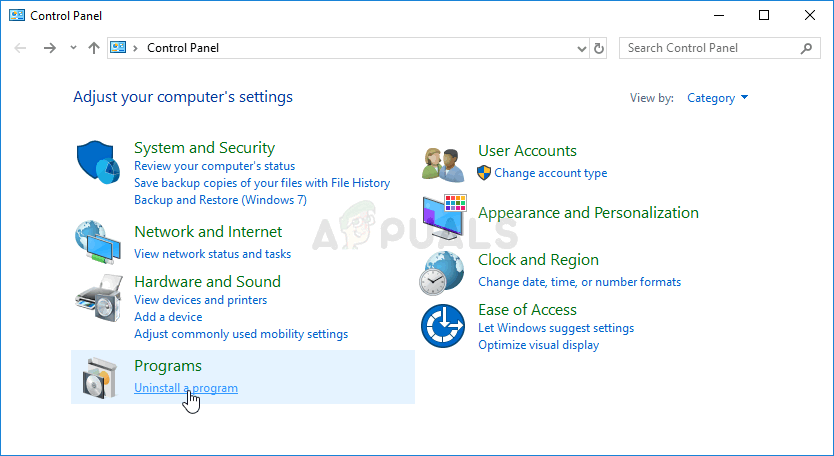
- Type in Control Panel and click OK in order to open it. Make sure you change the view in Control Panel to View by: Category and click on Uninstall a program under the Programs section.
- At the right side of the screen which opens, click on Turn Windows features on or off and locate the Internet Information Services entry on the list. Uncheck the box next to it and click the OK button in order to apply the changes. Check to see if the error is gone!
Solution 5: Unplug your SD Card Reader
This might be an odd way to solve the problem but plenty of users suggested that the problem has automatically fixed itself after users have disconnected the SD card from their respective computers. You can reconnect if after the update finishes or after you install Windows successfully!

Kevin Arrows
Kevin Arrows is a highly experienced and knowledgeable technology specialist with over a decade of industry experience. He holds a Microsoft Certified Technology Specialist (MCTS) certification and has a deep passion for staying up-to-date on the latest tech developments. Kevin has written extensively on a wide range of tech-related topics, showcasing his expertise and knowledge in areas such as software development, cybersecurity, and cloud computing. His contributions to the tech field have been widely recognized and respected by his peers, and he is highly regarded for his ability to explain complex technical concepts in a clear and concise manner.
If you are trying to install or upgrade your Windows 10 computer but suddenly encountered an error message saying, “Windows could not configure one or more system components”, read on as this post will show you how you can fix the problem.
You are not alone in experiencing this problem as other users also reported having the same scenario. Some of them reported getting the following error message:
“Windows could not configure one or more system components. To install Windows restart the computer with error code 0xc1900101-0x30018.”
When you check on the Windows 10 rollback log, you will see a part with the “iisetup.exe” that’s related to the abort. Usually, the upgrade process completes over 50% and gets stuck and then rolls back later on and generates the error logs. This kind of error, in most cases, appears during the upgrade of Windows 10 and is related with the Internet Information Services or IIS in Windows 10. For some unknown reason, it restricts the installation or the upgrade which causes the error to appear. To fix the “Windows could not configure one or more system components” error, you can try to remove the IIS from the Windows Features or rename the “inetsrv” folder. You could also move all the folders related to IIS to another drive. For more details, refer to the options provided below.
Option 1 – Try to remove the IIS from Windows Features
The IIS is installed from the Windows Features and you can find it at Control Panel > Programs. From there, uncheck the checkbox for the Internet Information Services. Once done, click on the OK button to save the changes. Note that this process will get rid of all the related programs, services, and folders from Windows 10. So if you want to, you can just install them later on or use an offline installer from the official site of Microsoft.
Option 2 – Try renaming the inetsrv folder
The next option you can check out to resolve the problem is to rename the “inetsrv” folder. If you have uninstalled IIS from the Windows Features, this should remove the folders as well, however, it didn’t remove the folder then you have to delete the folders that are related to the IIS by following these steps:
- First, you have to boot into the Advanced Recovery Mode and from there, open Command Prompt.
- Next, execute this command to rename the folder from this location, C:Windowssystem32inetsrv: rename C:/Windows/system32/inetsrv/inetsrv.old
- Once done, boot into your computer normally and try to upgrade Windows 10 again, and check if the problem is fixed or not.
Option 3 – Try to move the folders related to IIS to a different drive
- Tap the Win + R keys to launch the Run utility and type “services.msc” in the field and hit Enter to open the Windows Services Manager.
- Next, look for the Application Host Helper Service from the list of services and stop it.
- Once done, take ownership of the “WinSxS” folder and then move the *windows-iis*.*” folders to another drive. You can just search using the “*windows-iis*.*” keyword in the Start Search.
- Next, tap the Ctrl + X keys and paste the folders to another drive.
- After that, start the update process for Windows 10 again.
Do You Need Help with Your Device?
Our Team of Experts May Help

Troubleshoot.Tech Experts are There for You!
GET HELP
Troubleshoot.Tech experts work with all versions of Microsoft Windows including Windows 11, with Android, Mac, and more.
Share this article:
You might also like
In their search for making Windows, a better operating system Microsoft has come up with an insider program that will collect telemetry and send it to Microsoft in order to provide enough information to make a better OS. Being in an insider program is per choice basis and it is not forced to anyone.
This guide will cover how to turn off the insider program since its constant updates and telemetry can slow down the internet. So if you decided that you no longer want to be part of this program here is how to turn it off.
- Press ⊞ WINDOWS + R to open the run dialog

- Type in dialog gpedit.msc and press ENTER
- You will find yourself in the Local Group Policy Editor Window. Inside windows find:
Computer Configuration > Administrative Templates > Windows Component > Windows Update > Windows Update for Business - Move to the right pane and double-click on the Manage Preview Builds option
- Inside the Manage Preview Builds window, check the Enabled radio button
- Go to the Options section, and using the drop-down menu, set the preferred release channel
- Select Apply and then OK

Read More
Hello and welcome to our software series review. Weel this time we could say this is more of a service review since the application we are going through today is online and you can use it freely without ever needing to install it.
When we choose software that we are going to review and recommend we really try to recommend something that is worth your time and money, Cartoonize fits in both categories in my opinion.
First of all basic plan of this graphic software is completely free and as mentioned it is working online, also as one more feature basic plan does not even require you to have an account of any kind, all you need to do is go to the website of the application and you can start using it right away. There is also paid plan for extra features if you need them billed monthly or annually.

Features
First things first, this is not Photoshop or GIMP and it does not aim nor want to be. This is something else, directed and pointed at the different types of users. This application is aimed at people that want to make some quick graphics and post them on social media and it does that very well. Even without knowledge to use graphic software this one is so well designed and straightforward that even a complete newcomer can do something right away.
So as the application that wants to be used by people that want to place some cool pictures or ads on their social media what it offers. For starters simplicity and ease of use, every option that you can use is on the left side of the screen nicely packed into the vertical toolbox. Inside the toolbox, you have access to various tools, effects, and filters that you can apply to your image.
Tools explained
Image manager
The first section on the tool panel is the image manager, here you can upload your images, delete them, search stock images, and so forth. nothing more to say about this one as it is only a basic file manager.
Edit
In this tool panel, there are a lot of basic settings for your image manipulations divided into 3 sections: Basics, Enhance, and Creative. In the basic section, you can crop, resize and rotate your image. Enhance panel will let you set exposure, color, vibrance, tint, and details (sharpen). Finally, the Creative part will let you remove the background with AI in a single click, replace colors in the image, and add a vignette and round image.
Effects
In the effects panel, you will be given 4 options to choose from Cartoonizer, Digital art, Sketcher, and painting. Each option once clicked will open another set of options tied to chosen preset where you will be able to choose a different style from chosen template. Once you click on the desired template it will be applied to your image and in the upright corner, you will have edit options to tweak it to your liking. You can play around as much as you want because only once you click on the apply button, the effect will be applied to your image.
Filters
Same as in the effects tool panel here you will also get a series of different filters that you can apply to your image. As in the previous tool once clicked on the chosen filter, you will be given options for its variations and details edits. How there is really plenty of filters options and combined with its own presets I will not focus on explaining what each one is doing since picture thumbnails are pretty accurate and just one look at them will explain to you everything you need to know.
Overlays
In the overlays panel, you can as the name says overlay different kinds of effects on your image. You can add snow, fog, sun flares rain, and many more. Presets work identically to previous effects and filters.
Masks
If you want to place your image in a certain shape or in-text this is the section for you. You will be presented with sections as custom text, shapes, brushes, floral, animals, and patterns. Each section will once again lead to plenty of variations on the chosen subject where you can pick one that you like the most and tweak its options.
Text
As the name suggests, this section is to add text to your picture or design. If you are making some cool ad for Facebook, Instagram, or other social media I believe that you will spend most of your time in this section adding text and tweaking it so it looks best. You have all the tools that you will need to make a catchy title or smaller block of text and you can add multiple texts to your picture tweaking their own visual appearance, the font used, color, and some effects like a drop shadow.
Draw
In the draw section, you will be able to freely draw whatever you like with your mouse or pen if you have one. you have basic options for a brush and eraser so you can erase stuff. Pretty basic tool but it gives a nice touch to underline something, circle it, etc.
Graphics
This panel will let you place various already made graphic assets into a picture. You have hearts, hats, glasses, etc. There really are tons of premade graphics along with thematic ones like new year, st. Patric day and more.
Frames
As the name suggests this section will place a frame of your choice around your picture. You can choose the style of frame, position, color, and many more. There are various styles and each style has its own options.
Conclusion
Cartoonize is a great online application that will let you quickly and easily do cool and nice image edits. As mentioned you can also add various effects, text, and graphics and use this app to make some quick and nice ads for social media. You have the option to publish to your social media right from the app in the save dialog but you can also of course download your image or design to your local computer.
Please note that for this review we used the pro, paid version so all of the features were unlocked. We wanted to give you a full overview of the full potential of the app. In my opinion, the small monthly fee that they charge is well worth it when you see all things that you can do with it.
Go to the cartoonize website and check it out, basic option is completely free and it does not even require making an account. Have fun, be creative and take care, I hope to see you again tomorrow.
Read More
Dune, arguably one of the best science fiction novels ever written was brought to a big screen first time by David Linch. Sadly movie itself went through development hell and a lot of troubles and the end result was somewhat strange. The audience was divided on it, some hated it, some loved it but for sure it left a mark in cinema history. Years have passed and just when people forgot about ever receiving another try on a book adaptation Denis Villeneuve has brought his vision of Frank Herbert’s novel into its full glory on a big screen.
The interesting thing about this new Dune movie was that from the start Denis envisioned it as a two-movie part openly saying that book itself is too complex to be done in a single movie. But, the issue arises when information about Dune part two was hanging on a thread on how well Dune part one will be received and performed in the box office. This naturally brought all kinds of speculation and worry among fans of the franchise, especially because the movie itself was really good and well made.
Well for all of you fans and people who wanted to see a continuation of the story can rest at peace now since the Legendary picture has officially announced and green-lighted Dune part two. The budget was given and we can expect part two at the beginning of 2023.

Read More
What is the Error Code 652?
Error code 652 is a runtime error. It hampers you from accessing and running your program on your system. If not resolved, it can also lead to program corruption.
Solution
 Error Causes
 Error Causes
Runtime Error 652 can occur due to several causes. These include:
- Conflict of color depth within icons, the desktop, or a particular application in the Visual Basic environment. This happens when the Image
- List control consists of more colors than the depth of what Windows can support.
Other causes include:
- Malicious software and malware attack
- Conflict with Terminate
- Invalid or corrupt registry
Further Information and Manual Repair
If you are not a computer programmer and don’t have any sound technical expertise, then you might think of hiring a professional to resolve the error on your PC. But this can be costly as you may have to pay hundreds of dollars to the technician.
However, an alternative way to resolve the error code 652 is to download the Total System Care. This PC repair tool is integrated with an intuitive registry cleaner and a powerful anti-virus. It is safe, efficient, user-friendly, and available for free.
Restoro is a multi-functional error tool and a one-stop solution to resolve practically all kinds of PC-related problems. By running this repair tool, you can fix runtime error code 652 on your system in seconds.
Restoro
What makes Restoro a hot favorite among PC users is that it is simple and easy to use.
To operate this PC fixer, you don’t need to have the sound technical knowledge or be adept at computer programming. It can be used by all levels of PC users including beginners and intermediates.
It has a neat and clean layout with simple instructions and navigation making it easy for users to resolve even the mightiest errors in just a few clicks.
Restoro features
Whether the underlying reason for the error code 652 is malicious software or registry corruption, Restoro takes care of all. Registry corruption occurs due to unnecessary files and data overload in the hard disk. This includes junk files, internet history, invalid registry entries, and bad registry keys.
The registry cleaner embedded in Restoro intuitively detects and scans all registry issues.
It wipes and clears the hard disk from all the unnecessary and obsolete files and thus cleans up your disk space. It repairs the corrupt registry and also boosts your PC’s performance.
Thus it not only repairs the error code 652 but also resolves system slowdown issues by optimizing your system’s speed.
With the help of its in-built anti-virus, it removes all the malicious software on your system that could be triggering the error code 652.
Data security threats such as malicious software are detected and scanned and listed under the privacy error utility.
It is compatible with all Windows versions including both the latest and old versions. You can run it to scan error code 652 on any Windows version you have installed on your computer.
Restoro for error Code 652
Furthermore, as mentioned above Error Code 652 is safe to use. It is bug-free and besides, it offers users outstanding data safety. It has a backup file feature that helps you save and create backup copies of all the data you have on your system. This is carried for safety purposes.
It enables users to retrieve and recover data in case the data and files are lost during the repair thus sparing you from a big loss.
The error code 652 may be critical but it can be resolved in seconds with Restoro. Here’s how:
- To get started click here to download and install Restoro on your system
- Once installed, run it to scan for errors. It will take only a few seconds to scan your entire PC.
- Then simply create a backup and click on repair to resolve and resume your desired program.
For best results, it is advised to run Restoro on the computer often. This will help you detect PC errors and repair them timely. It will help you ensure proper PC maintenance, health, and performance.
Read More
This post will guide you in fixing high CPU, Memory, and Disk usage problems caused by NTOSKRNL.exe. NTOSKRNL stands for “NT Operating System Kernel. This file is a kernel image that is responsible for a lot of systems-based processes such as Hardware Virtualization, Process, and Memory. Aside from that, it is also the one that compresses the old pages of memory that reduces the overall amount of memory being used. If you notice that your computer is running slowly and you find that the NTOSKRNL.exe file is hogging your resources such as disk usage, CPU usage as well as memory usage, then read on as this post will guide you in fixing the problem caused by NTOSKRNL.exe.
Make use of the options given below to resolve the issues caused by NTOSKRNL.exe.
1] Scan your computer for potential malware
There might be a good chance that your computer might be infected with malware. And this malware might be associated with the NTOSKRNL.exe file and hence making it consume a lot of system resources. So, I would really recommend you to make sure that your Antivirus is up to date and then scan your computer with it specifically the C:/Windows/System32 folder because this is the location where the NTOSKRNL.exe file is located.
Option 1 – Put your computer in a Clean Boot State
The first thing you have to do is to put your computer in a Clean Boot State as this can help you in finding any incompatible programs that are causing the problem.
- Log onto your PC as an administrator.
- Type in MSConfig in the Start Search to open the System Configuration utility.
- From there, go to the General tab and click “Selective startup”.
- Clear the “Load Startup items” check box and make sure that the “Load System Services” and “Use Original boot configuration” options are checked.
- Next, click the Services tab and select the “Hide All Microsoft Services” check box.
- Click Disable all.
- Click on Apply/OK and restart your PC. (This will put your PC into a Clean Boot State. And configure Windows to use the usual startup, just simply undo the changes.)
- From there, start to isolate the problem by checking which one of the programs you installed recently is the root cause of the problem.
Once you’ve found any incompatible programs, you need to uninstall them. Refer to the steps below to do so.
- In the search box, type in “control” and then click on Control Panel (desktop app) among the search results.
- After that, select Programs and Features from the list which will give you a list of all the programs installed on your computer.
- From there, look for the concerned program and select it and then uninstall it.
Note: If you have downloaded the app from the Windows Store, you can simply right-click on it from the application list and then uninstall it.
Option 2 – Update or rollback drivers
If the first option didn’t work for you, then it’s time to either update or roll back the device drivers. It is most likely that after you updated your Windows computer that your driver also needs a refresh. On the other hand, if you have just updated your device drivers then you need to roll back the drivers to their previous versions. Whichever applies to you, refer to the steps below.
- Open the Devices Manager from the Win X Menu.
- Then locate the device drivers and right-click on them to open the Properties.
- After that, switch to the Driver tab and click on the Uninstall Device button.
- Follow the screen option to completely uninstall it.
- Finally, restart your computer. It will just reinstall the device drivers automatically.
Note: You can install a dedicated driver on your computer in case you have it or you could also look for it directly from the website of the manufacturer.
Option 3 – Try to run the DISM tool
If the first two options didn’t work, then running the Deployment Imaging and Servicing Management might. Using this built-in tool, you have various options such as the “/ScanHealth”, “/CheckHealth”, and “/RestoreHealth”.
- Open the Command Prompt with admin privileges.
- Then type in the following commands and make sure to hit Enter right after you type each one of them:
- Dism /Online /Cleanup-Image /CheckHealth
- Dism /Online /Cleanup-Image /ScanHealth
- exe /Online /Cleanup-image /Restorehealth
- Do not close the window if the process takes a while as it will probably take a few minutes to finish.
Option 4 – Try to stop the Runtime Broker process
The RuntimeBroker.exe or the Runtime Broker process is the one that monitors access to Windows APIs to make sure that the apps do not violate the core security of Windows. This process usually leaves a very small footprint. However, there are times when it consumes more resources than it’s supposed to and does not release memory after the work is done that results in a memory leak. As a result, it affects NTOSKRNL.exe which is why you have to stop the Runtime Broker process. To do so, refer to these steps:
- Tap the Ctrl + Shift + Esc to open the Task Manager.
- After opening Task Manager, go to the Processes tab and look for the Runtime Broker process.
- Once you find it, check if it is using more than 15% of your memory. If it is, then you most likely have an issue with an app installed on your computer.
- Select the Runtime Broker process and right-click on it and then click on the End Task option to end its process.
Option 5 – Try to run the Performance Troubleshooter
- Tap the Win + R keys to open the Run dialog box.
- Type “msdt.exe /id PerformanceDiagnostic” in the field and hit Enter to open the Performance troubleshooter.
- Then click on Next to get started. Wait until the process is completed.
Option 6 – Try using the Windows Performance Toolkit
You can also use the Windows Performance Toolkit in finding the root cause of the problem. Just refer to the following steps to use this toolkit.
- Search for “cmd” in the Cortana Search box and click on Command Prompt from the search results to open it.
- Next, type in the command given below or copy and paste it and then hit Enter:
xperf -on latency -stackwalk profile -buffersize 1024 -MaxFile 256 -FileMode Circular && timeout -1 && xperf -d cpuusage.etl
- After executing the command, wait for at least 60 seconds and then check the logs of the Windows Performance toolkit which is stored in a file named cpuusage.etl in the folder located at C:/Windows/System32. From there, you should see a list of all the causes of the System Resources being hogged.
Read More
It seems that Microsoft is going to offer subscription and sales of individual office applications in the Windows Store. The office package will still be available as a package but for the first time, we will get single applications as standalone ones available for purchase.
 This is a very interesting decision by Microsoft and I fully support it, this time users will be able to pay less and to choose only applications that they need instead of paying for the whole package and not using it.
Read More
There are times when after you upgrade your Windows operating system, the System Logs under the Event Viewer will display an error message saying, “Event ID 10010 error – The server did not register with DCOM within the required timeout”.
What is DCOM? DCOM stands for “Distributed Component Object Model”. It is a proprietary Microsoft technology that allows the Component Object Model or COM software to communicate across a network. You can consider it as an extension of COM which is equipped with the capability of solving a couple of inherent problems related to the COM model to the better use over a network. COM is a tool that’s used for advanced configuration and troubleshooting in Windows 10. Developers usually use it to configure routine components and application behavior like participation in transactions and object pooling and so on.
The Component Services needs the DCOM wire protocol in order to communicate with the Component Object Model components on other computers. By default, in a Windows-based system, the network computers are configured initially to enable DCOM.
There are also some components in Windows that might require registering themselves with DCOM. However, if they fail to do so, you will encounter the “The server did not register with DCOM within the required timeout” error. To fix this, here are some suggestions you can check out.
Option 1 – Try to use the Component Services
- Tap the Win + R keys to open the Run dialog box.
- Then type “dcomcnfg” in the field and tap Enter to pull up Component Services.
- Next, double click on the Computers folder located in the right pane and right-click on My Computer, and select the Properties option.
- After that, switch to the COM Security tab under My Computer Properties and then go to the Access Permissions section.
- From there, click the Edit Default button and in the new window that appears, apply the correct permission to objects under the Group or user names section.
- Once you’re done, click OK and exit. This should fix the error.
Option 2 – Make sure that Function Discovery Resource Publication Properties Services is running
- In the Cortana search box, type “services” and click on the Services icon to open the Services Manager. Alternatively, you can also tap the Win + R keys to launch the Run prompt and then type “services.msc” in the field and hit Enter to open the Services Manager.
- Next, scroll down and look for the “Function Discovery Resource Publication” entry and double click on it.
- Then switch to the General tab and from there, make sure that the Startup Type is set to “Manual (Triggered).
- You also have to make sure that the service is running so if it’s not, just click on the Start button to start the service.
- Now click on Apply to save the changes made.
Option 3 – Try resetting the default DCOM permissions
- Tap the Win + R keys to open the Run dialog box.
- Then type “dcomcnfg” in the field and tap Enter to pull up Component Services.
- After that, expand Component Services > Computers and right-click on My Computer, and then select Properties.
- Next, go to the Default Properties tab, and in the Default Distributed COM Communication Properties section, make sure that:
- Default Authentication Level is set to Connect
- Default Impersonation Level is set to Identify.
Read More
If you are trying to save a file in a PDF format on your Windows 10 computer but then the PDF text content in an Adobe file suddenly disappears, then read on. This post will give you more insight into this issue. This kind of issue is rare and mostly occurs in forms that you can fill upon. In such a case, the text you enter in the form vanishes right after you click the Save button.
One of the benefits of working with PDF files is that it has the ability to compress high-quality files to relatively small file sizes. This is really useful especially when you are saving hard drive space and you’re working with limited storage resources. However, these files can contain layered content if they are created from layered documents using applications like Adobe InDesign. Consequently, a single page of the PDF file can contain different layers with different content. So if you try to save or print a PDF file that contains layered content, the elements will disappear from the PDF. To resolve this issue, you can try to merge or flatten the file since it will help keep the changes in the PDF file. On the other hand, you can no longer make any alterations or form data once you flatten the file. Another thing to keep in mind is that merging or flattening the file can’t be undone so you might want to save another copy of the file before you proceed.
Option 1 – Print to PDF
- First, you have to open the desired PDF file and tap the Ctrl + P keys to open the Print dialog box.
- After that, select the “Microsoft Print to PDF” option as the printer.
- Once the action is confirmed, it will regenerate another version of the PDF file with the default settings and merge all the existing layers into a single layer.
- On the other hand, you can also click on the “File” menu of the PDF file and select Print.
- From there, click on the Print button and select “PostScript (*.ps)” as the “Save as” type to save a PostScript copy of the original PDF file.
- Once you’re done, double click on the .ps file to open the file in the Adobe Distiller which will flatten the file automatically and convert it to a PDF file with only one visible layer.
Option 2 – Save the PDF file as an Optimized PDF file
If you are using the Acrobat Reader Pro version such as the Acrobat Pro, Foxit, and so on, you can try to flatten the layers by saving the PDF file as an Optimized PDF file. Refer to these steps to do so:
- Select File > Save as > Optimized PDF.
- Next, select the Transparency checkbox from the Settings window that opens.
- Then click on the Save button to apply and save the changes made. After that, the PDF text content should not disappear when you try to save a file on your Windows 10 computer.
Read More
Error 0x800CCC90 — What is it?
Error 0x800CCC90 is a typical Outlook error. This error indicates that Outlook has failed to connect to the mail server that handles and manages the incoming and outgoing emails. The error message is displayed in the following format:
“There was a problem logging onto your mail server. Your User Name was rejected.”
This error limits your ability to send and receive emails on Outlook. If you largely communicate at the workplace using your Outlook account, this error may slow down your work productivity and performance dramatically. Therefore it is advisable to fix it immediately.
Solution
Error Causes
The error 0x800CCC90 is triggered several reasons including but not limited to:
- Authentication issues
- Failure of POP 3 Server
- PST File Corruption
- Registry issues- Invalid Entries
- Viral infection
Further Information and Manual Repair
To resolve error 0x800CCC90, try the methods given below:
Method 1 — Adjust the Authentication Settings
To resolve the error 0x800CCC90, adjust the authentication settings. Here’s what you need to do:
- First, go to the ‘Tools’ tab and select the ‘Accounts’ option.
- Once you select the account option, an internet accounts box will appear on the computer screen.
- Simply double click on the account property box after that go to the server tab and click on it.
- Check the box that says ‘My Server Requires Authentication’.
- Click on apply to accept changes tab to save changes and close the window.
- To activate changes made, restart Outlook and then try sending emails again.
Method 2 — Download a PST Repair Tool
If the error is triggered by PST file corruption, then the best way to resolve it is to download the PST repair tool. Download the PST repair tool from a trusted website. Run it on your system to fix PST file issues and resolve error 0x800CCC90.
Method 3 — Scan for Viruses
Another way to resolve this error is to scan for viruses. Viruses usually enter computer systems through phishing emails or while downloading attachments.
You may not know this but viruses may be affecting your PC. Due to viruses, errors like error 0x800CCC90 can also be triggered. Therefore install an antivirus to scan and remove errors on your PC.
Method 4 — Clean the Registry and Remove Invalid Entries
Due to poor PC maintenance, misconfigured and invalid registry entries may be stored in the registry. Such entries may lead to Outlook errors too. Thus to resolve you must clean the registry and remove these entries right away. Download a registry cleaner to fix the error.
Whether the error is triggered by viral infection or registry issues, it is recommended you download only Restoro. This is the one-stop solution to resolve all PC related errors. This software is deployed with 6 scanners including a registry cleaner, an antivirus, and a system optimizer.
It is user-friendly and has simple navigation. It is compatible with all Windows versions. In just a few clicks this software resolves practically all types of PC-related errors including error 0x800CCC90.
Click here to download Restoro today!
Read More
One of the most common brands of GPUs that comes in a large number of computers is AMD’s Radeon Graphics processing units. AMD included the Radeon Settings panel so that users can control how the hardware functions. However, as of late, a lot of users reported that the Radeon Settings panel throws an error that says, “Radeon Settings are currently not available. Please try again after connecting AMD graphics” when they try to use it.
This kind of error in the Radeon Settings panel is most likely caused by either corrupted drivers or incompatible drivers. If you are one of the users who are facing this problem, worry not for this post will guide you in fixing this error. You can either use the Device Driver Uninstaller or change the driver version. For more details, make use of the options provided below.
Option 1 – Try to use the Device Driver Uninstaller
The first thing you can do to fix the problem is to uninstall the AMD Radeon drivers by using the Device Driver Uninstaller software. After you’ve uninstalled the AMD Radeon drivers using this software, go to the official website of AMD to download the AMD Radeon drivers. Once you’ve downloaded them, you can install them by simply running the executable file. Once the installation of the new AMD Radeon drivers is done, try to open the Radeon Settings panel and see if the error is now fixed or not. If not, refer to the next given option below.
Option 2 – Try changing the Driver version
If you have followed the instructions in the first option then you can proceed to the next given steps below.
- Now that you’ve completely uninstalled the AMD Radeon drivers and reinstalled their latest working versions, check if the drivers are still updating. If they are, you need to stop them.
- To disable the drivers being automatically updated, you need to go to the Group Policy Editor by tapping the Win + R keys to open the Run utility and then type “gpedit.msc” in the field and tap Enter or click OK.
- After opening the Group Policy Editor, navigate to this policy setting: Computer Configuration > Administrative Templates > System > Device Installation > Device Installation Restrictions
- From there, double click on the “Prevent installation of devices that match any of these device IDs” policy setting to open a new window, and from this window, you will see the following description of the setting:
“This policy setting allows you to specify a list of Plug and Play hardware IDs and compatible IDs for devices that Windows is prevented from installing. This policy setting takes precedence over any other policy setting that allows Windows to install a device. If you enable this policy setting Windows is prevented from installing a device whose hardware ID or compatible ID appears in the list you create. If you enable this policy setting on a remote desktop server the policy setting affects the redirection of the specified devices from a remote desktop client to the remote desktop server. If you disable or do not configure this policy setting devices can be installed and updated as allowed or prevented by other policy settings.”
- Now set the radio button of the policy setting to “Enabled”. This will turn off the delete confirmation prompt. Note that setting the radio button to either Not Configured or Disabled will turn off the driver being automatically updated.
- Next, click on the Show button under the Options section. And in the field that pops up, type in the Hardware ID of your GPU and click OK. You can find the GPU’s Hardware ID under this location: Device Manager > <DEVICE NAME> Properties > Details > Hardware IDs
- Once you’re done, click the Apply and OK buttons to save the changes made.
- Close the Group Policy Editor and restart your PC and see if the “Radeon Settings are currently not available. Please try again after connecting AMD graphics” error is now fixed.
Read More
![]()
Copyright © 2023, ErrorTools. All Rights Reserved
Trademark: Microsoft Windows logos are registered trademarks of Microsoft. Disclaimer: ErrorTools.com is not affiliated with Microsoft, nor claims direct affiliation.
The information on this page is provided for information purposes only.
![]()
The “Windows Could Not Configure One or More System Components” error is a common issue that can occur in Windows 10. This error can prevent users from accessing certain features or programs, and can be difficult to troubleshoot. Fortunately, there are a few steps that can be taken to resolve this issue.
The first step is to check for any pending Windows updates. To do this, open the Start menu and select “Settings”. Then, select “Update & Security” and click “Check for Updates”. If any updates are available, install them and then restart your computer.
If there are no updates available, the next step is to run the System File Checker (SFC) tool. This tool scans your system for any corrupted or missing files and attempts to repair them. To run the SFC tool, open the Start menu and type “cmd”. Right-click on the “Command Prompt” icon and select “Run as Administrator”. Then, type “sfc /scannow” and press Enter. The SFC tool will then scan your system and attempt to repair any corrupted or missing files.
If the SFC tool does not resolve the issue, the next step is to run the DISM tool. This tool is used to repair any corrupted system files that the SFC tool may have missed. To run the DISM tool, open the Start menu and type “cmd”. Right-click on the “Command Prompt” icon and select “Run as Administrator”. Then, type “DISM /Online /Cleanup-Image /RestoreHealth” and press Enter. The DISM tool will then scan your system and attempt to repair any corrupted system files.
If the issue persists after running both the SFC and DISM tools, the next step is to perform a system restore. System restore will restore your system to a previous state, before the issue occurred. To perform a system restore, open the Start menu and type “System Restore”. Select “Create a Restore Point” and follow the on-screen instructions to create a restore point. Then, select “System Restore” and follow the on-screen instructions to restore your system to a previous state.
If none of the above steps resolve the issue, the last step is to perform a clean installation of Windows 10. This will completely erase your system and reinstall Windows 10 from scratch. Before performing a clean installation, make sure to back up any important files or data.
By following these steps, you should be able to resolve the “Windows Could Not Configure One or More System Components” error in Windows 10. If the issue persists, contact Microsoft Support for further assistance.
Exploring the Causes of the “Windows Could Not Configure One or More System Components” Error in Windows 10
The “Windows Could Not Configure One or More System Components” error is a common issue encountered by Windows 10 users. This error can prevent users from accessing certain features or programs, and can be a source of frustration. In order to resolve this issue, it is important to understand the causes of the error.
One of the most common causes of the “Windows Could Not Configure One or More System Components” error is a corrupted or outdated Windows registry. The Windows registry is a database that stores important information about the operating system and its settings. If the registry is corrupted or outdated, it can cause the error to appear.
Another potential cause of the error is a corrupted or outdated driver. Drivers are pieces of software that allow the operating system to communicate with hardware devices. If a driver is corrupted or outdated, it can cause the error to appear.
In some cases, the error can be caused by a virus or malware infection. Viruses and malware can corrupt or delete important system files, which can cause the error to appear. It is important to scan your computer for viruses and malware regularly to prevent this from happening.
Finally, the error can be caused by a conflict between two or more programs. If two programs are trying to access the same system resource, it can cause the error to appear. To resolve this issue, it is important to identify the conflicting programs and uninstall them.
In conclusion, the “Windows Could Not Configure One or More System Components” error can be caused by a variety of issues, including a corrupted or outdated Windows registry, a corrupted or outdated driver, a virus or malware infection, and a conflict between two or more programs. It is important to identify the cause of the error in order to resolve it.
How to Fix the “Windows Could Not Configure One or More System Components” Error in Windows 10
The “Windows Could Not Configure One or More System Components” error is a common issue that can occur in Windows 10. This error can prevent users from accessing certain features or programs, and can be a source of frustration. Fortunately, there are several steps that can be taken to fix this issue.
The first step is to check for any pending Windows updates. To do this, open the Start menu and select “Settings”. Then, select “Update & Security” and click “Check for Updates”. If any updates are available, install them and then restart your computer.
If the issue persists, the next step is to run the System File Checker (SFC) tool. This tool scans your system for any corrupted or missing files and attempts to repair them. To run the SFC tool, open the Start menu and type “cmd”. Right-click on the “Command Prompt” icon and select “Run as Administrator”. Then, type “sfc /scannow” and press Enter. The scan may take several minutes to complete.
If the issue still persists, the next step is to run the DISM tool. This tool can be used to repair corrupted system files. To run the DISM tool, open the Start menu and type “cmd”. Right-click on the “Command Prompt” icon and select “Run as Administrator”. Then, type “DISM /Online /Cleanup-Image /RestoreHealth” and press Enter. The scan may take several minutes to complete.
Finally, if the issue still persists, the last step is to perform a system restore. This will restore your system to a previous state, before the issue occurred. To perform a system restore, open the Start menu and type “System Restore”. Select “Create a Restore Point” and follow the on-screen instructions.
By following these steps, you should be able to fix the “Windows Could Not Configure One or More System Components” error in Windows 10.
Understanding the Impact of the “Windows Could Not Configure One or More System Components” Error in Windows 10
The “Windows Could Not Configure One or More System Components” error is a common issue encountered by Windows 10 users. This error can occur when attempting to install a new program, update Windows, or even when attempting to start the computer. It is important to understand the cause of this error and the steps that can be taken to resolve it.
The “Windows Could Not Configure One or More System Components” error is caused by a conflict between the Windows operating system and the program or update that is being installed. This conflict can be caused by a variety of factors, including outdated drivers, corrupted system files, or incompatible software. In some cases, the error may also be caused by a virus or malware infection.
In order to resolve the “Windows Could Not Configure One or More System Components” error, it is important to first identify the cause of the issue. If the error is caused by outdated drivers, then the drivers should be updated. If the error is caused by corrupted system files, then the system should be scanned for viruses and malware. If the error is caused by incompatible software, then the software should be uninstalled and reinstalled.
Once the cause of the error has been identified, the next step is to take the necessary steps to resolve the issue. If the error is caused by outdated drivers, then the drivers should be updated. If the error is caused by corrupted system files, then the system should be scanned for viruses and malware. If the error is caused by incompatible software, then the software should be uninstalled and reinstalled.
It is important to understand the cause of the “Windows Could Not Configure One or More System Components” error in order to take the necessary steps to resolve the issue. By identifying the cause of the error and taking the appropriate steps to resolve it, users can ensure that their computer is running smoothly and efficiently.
What to Do When You Encounter the “Windows Could Not Configure One or More System Components” Error in Windows 10
If you encounter the “Windows Could Not Configure One or More System Components” error in Windows 10, there are several steps you can take to try and resolve the issue.
First, try restarting your computer. This can often resolve the issue, as it will allow Windows to reload the system components that are causing the error.
If restarting your computer does not resolve the issue, you can try running the System File Checker (SFC) tool. This tool will scan your system for any corrupted or missing files and attempt to repair them. To run the SFC tool, open the Command Prompt as an administrator and type “sfc /scannow”.
If the SFC tool does not resolve the issue, you can try running the DISM tool. This tool will scan your system for any corrupted or missing components and attempt to repair them. To run the DISM tool, open the Command Prompt as an administrator and type “DISM /Online /Cleanup-Image /RestoreHealth”.
If none of these steps resolve the issue, you may need to perform a repair install of Windows 10. This will reinstall Windows 10 while preserving your personal files, settings, and installed applications. To perform a repair install, you will need to create a bootable Windows 10 installation media and then boot from it.
If you are still unable to resolve the issue, you may need to contact Microsoft Support for further assistance.
Tips for Avoiding the “Windows Could Not Configure One or More System Components” Error in Windows 10
1. Check for Updates: The first step to take when trying to avoid the “Windows Could Not Configure One or More System Components” error is to check for any available updates. Windows 10 is constantly releasing updates to fix bugs and improve system performance, so it is important to make sure that your system is up to date.
2. Run the System File Checker: The System File Checker (SFC) is a built-in tool that can be used to scan and repair corrupted system files. To run the SFC, open the Command Prompt as an administrator and type “sfc /scannow”.
3. Run the DISM Tool: The Deployment Image Servicing and Management (DISM) tool is another built-in tool that can be used to repair corrupted system files. To run the DISM tool, open the Command Prompt as an administrator and type “DISM /Online /Cleanup-Image /RestoreHealth”.
4. Perform a Clean Boot: A clean boot is a process of starting Windows with a minimal set of drivers and startup programs. This can help to identify any third-party software that may be causing the error. To perform a clean boot, open the System Configuration window and select the “Selective startup” option.
5. Uninstall Recently Installed Programs: If the error started occurring after installing a new program, it is possible that the program is causing the issue. Uninstalling the program may help to resolve the issue.
6. Reset Windows: If all else fails, you can try resetting Windows. This will restore Windows to its default settings and may help to resolve the issue. To reset Windows, open the Settings app and select the “Update & Security” option. Then select the “Reset this PC” option and follow the on-screen instructions.
Extra Resources:
How to Fix “Windows Could Not Configure One Or More System Components” Error
Easy Fixes: Windows could not Configure System Components
FIX: Windows could not configure one or more system components in Windows 10 Update (Solved).