Contents
-
Client Access — Browsing SMB shares
- Ubuntu Clients
- Windows Clients (XP,Server,Vista, Win7)
-
Samba Client — Manual Configuration
- Connecting using CIFS
- Connecting using SMBFS (deprecated)
The samba package is a meta-package intended to be installed on file and printer sharing servers. Clients do not need this meta-package (you are acting as a client if you need to access files on another computer). For example, installing samba is not necessary if you only need your Ubuntu system to do any of the following:
-
Access shared folders, drives and printers on a Windows computer (that is, act as a client with Windows servers). To do this, you only need the smbfs plugin. See MountWindowsSharesPermanently for more information.
- Have your Windows computer use (via a network) a printer that is attached to a Linux computer. CUPS can be configured to make the printer accessible to the network.
-
Share directories between two Linux computers. You can use NFS or setup an SSH server on one computer and access it from other computers using an scp or sftp client, or Places -> Connect to Server… and choose «SSH» as the service type.
Ubuntu Clients
Ubuntu and Gnome make it easy to access files on a Windows network share. Open the Places Menu, then click on Network. You will see a Windows network icon. Double-click to open it. The next window shows all the domains/workgroups found on your network. Inside each domain/workgroup you will see all the computers on the domain/workgroup with sharing enabled. Double-click on a computer icon to access its shares and files.
-
If you want to be able to share folders with nautilus (the file browser), install the nautilus-share package (installed by default in Ubuntu 9.10 Desktop edition):
sudo apt-get install nautilus-share
Alternate: From the menu at the top select «Location» -> «Connect to a server». In the «Service type» pull down select «Windows share». Enter the server ip address in the «Server:» box and the share name in the «Share:» box. Click «Connect» and then «Connect» again on the second dialog box
Alternate 12.04: Double clicking on ‘Windows network’ did not work for me. So I went to ‘Go’ menu in the nautilus file browser and clicked ‘Location’. I got an address bar at the top of the window. I entered «smb://192.168.2.148» (substitute the IP address of your Samba server) — I was presented with user/password window — After typing in user/passwd I was able to see the samba shares on the server and browse the files/folders.
Note: The default installation of Samba does not synchronize passwords. You may have to run «smbpasswd» for each user that needs to have access to his Ubuntu home directory from Microsoft Windows.
Windows Clients (XP,Server,Vista, Win7)
Microsoft Windows clients connect and browse through their corresponding network interface.
Example: XP clients can open Windows Network Neighborhood or My Network Places to browse available SMB shares.
Samba Client — Manual Configuration
This section covers how to manually configure and connect to a SMB file server from an Ubuntu client. smbclient is a command line tool similar to a ftp connection while smbfs allows you to mount a SMB file share. Once a SMB share is mounted it acts similar to a local hard drive (you can access the SMB share with your file browser (nautilus, konqueror, thunar, other).
Connecting to a Samba File Server from the command line
Connecting from the command line is similar to a ftp connection.
List public SMB shares with
smbclient -L //server -U user
Connect to a SMB share with
smbclient //server/share -U user
Enter you user password.
You can connect directly with
smbclient //server/share -U user%password
but your password will show on the screen (less secure).
Once connected you will get a prompt that looks like this :
smb: \>
Type «help» , without quotes, at the prompt for a list of available commands.
Connecting using CIFS
CIFS is included in the smbfs package and is a replacement for smbfs (I know, the terminology here is a little confusing).
Reference : http://linux-cifs.samba.org/
As above, install by any method, smbfs, on Ubuntu 12.10, smbfs has been replaced by cifs-utils.
Allow non-root users to mount SMB shares
By default only root may mount SMB shares on the command line. To allow non-root users to mount SMB shares you could set the SUID, but I advise you configure sudo. You should configure sudo with visudo
You may either allow the group «users» to mount SMB shares, or add a group, samba, and add users you wish to allow to mount SMB shares to the samba group.
sudo groupadd samba
sudo adduser user samba
Change «user» to the username you wish to add to the samba group.
sudo visudo
In the «group» section add your group you wish to allow to mount SMB shares
Add a line  in the "group" section :
## Members of the admin group may gain root privileges
%admin ALL=(ALL) ALL
%samba   ALL=(ALL) /bin/mount,/bin/umount,/sbin/mount.cifs,/sbin/umount.cifs
Change «%samba» to «%users» if you wish to allow members of the users group to mount SMB shares.
The following will mount the myshare folder on myserver to ~/mnt (it will be in your home directory):
mkdir ~/mnt
sudo mount -t cifs //myserver_ip_address/myshare ~/mnt -o username=samb_user,noexec
Note: «samba_user» = the user name on the samba server (may be different from your log-in name on the client).
The «noexec» option prevents executable scripts running from the SMB share.
You will be asked for BOTH your sudo and then your samba_user password.
To umount,
sudo umount ~/mnt
Automagically mount SMB shares
In order to have a share mounted automatically every time you reboot, you need to do the following:
With any editor, create a file containing your Windows/Samba user account details:
gksu gedit /etc/samba/user
KDE users must use kdesu rather than gksu and instead of Gedit they can use Kwrite as editor.
… it should contain two lines as follows:
username=samba_user
password=samba_user_password
Note: «samba_user» = the user name on the samba server (may be different from your log-in name on the client). «samba_user_password» is the password you assigned to the samba_user on the samba server.
Save the file and exit gedit.
Change the permissions on the file for security:
sudo chmod 0400 /etc/samba/user # permissions of 0400 = read only
Now create a directory where you want to mount your share (e.g. /media/samba_share):
sudo mkdir /media/samba_share
Now, using any editor, and add a line to /etc/fstab for your SMB share as follows:
sudo cp /etc/fstab /etc/fstab.bak
gksu gedit /etc/fstab
Add a line for your SMB share:
//myserver_ip_address/myshare /media/samba_share cifs credentials=/etc/samba/user,noexec 0 0
The share will mount automatically when you boot. The «noexec» option prevents executable scripts running from the SMB share.
To mount the share now, without rebooting,
sudo mount /media/samba_share
You can unmount the share with :
sudo umount /media/samba_share
If you wish to increase security at the expense of convenience, use this line in /etc/fstab
//myserver_ip_address/myshare /media/samba_share cifs noauto,credentials=/etc/samba/user,noexec 0 0
The noexec» option prevents executable scripts running from the SMB share.
Edit /etc/samba/user, remove the password (leave just the samba user).
Now the share will NOT automatically mount when you boot and you will be asked for your samba password.
Mount the share with :
sudo mount /media/samba_share
CIFS may cause a shutdown error.
CIFS VFS: Server not responding.
There is a fix in the troubleshooting section of this forum post.
Back to top
Connecting using SMBFS (deprecated)
Note: This method still works, but as outlined under the «CIFS» section above is «deprecated» (no longer maintained and pending removal from the kernel).
Mounting a share on the local filesystem allows you to work around programs that do not yet use GnomeVFS to browse remote shares transparently. To mount a SMB share, first install smbfs:
sudo apt-get update
sudo apt-get install smbfs
To allow non root accounts to mount shares, change the permissions on the smbmnt program thus:
sudo chmod u+s /usr/bin/smbmnt /usr/bin/smbumount
Note: This may be a security risk as after setting the SUID bit anyone can mount a SMB share. I advise you configure sudo, as above.
The working line in /etc/sudoers is as follows (see CIFS section above):
%samba ALL=(ALL) /bin/mount,/bin/umount,/sbin/mount.cifs,/sbin/umount.cifs,/usr/bin/smbmount,/usr/bin/smbumount
This allows any user in the samba group to mount SMB shares (you will need to create a samba group and add users).
The following will mount the myshare folder on myserver to ~/mnt (it will be in your home directory):
mkdir ~/mnt
smbmount //myserver/myshare ~/mnt
To umount,
smbumount ~/mnt
In order to have a share mounted automatically every time you reboot, you need to do the following:
Open a shell as root
sudo -s
Create a file containing your Windows/Samba user account details:
vi /etc/samba/user
…it should contain two lines as follows:
username=george
password=secret
Change the permissions on the file for security:
chmod 0600 /etc/samba/user
Now create a directory where you want to mount your share (e.g. /mnt/data):
mkdir /mnt/data
Now edit the file system table (/etc/fstab) and add a line as follows:
//server/share /mnt/data smbfs credentials=/etc/samba/user,rw,uid=bob 0 0
…where ‘bob’ is the non-root user you log into ubuntu with, ‘server’ is the name or address of the Windows machine and ‘share’ is the name of the share.
To mount the share now, just use the following command as root. It will mount automatically on subsequent reboots.
mount /mnt/data
to be continued…
Ubuntu Client
On the Ubuntu client using the menu at the top, go to «Places» -> «Network». You will see an icon «Windows network» and should be able to browse to your shared folder. You will be asked for a password, leave it blank. Click the «Connect button.
(no need for a password).
If you would like to mount your SMB share using your (server) hostname rather than the IP Address, edit /etc/hosts and add your samba server (syntax IP Address hostname).
192.168.1.100 hostname
Where «hostname» = the name of your samba server.
Windows Client
On Windows open «My Computer» and navigate to «My Network Places». Navigate to your Ubuntu server and your share will be available without a password.
Alternate : From the menu at the top select «Tools» -> «Map Network Drive». Select an available letter for your SMB share (Default is z: ). In the «Folder:» box enter \\samba_server_ipaddress\share. Tic (Select with the mouse) the option «Reconnect at login» if you want the share to be automatically mounted when you boot Windows. Click the «Finish» box. A dialog box will appear, enter your samba user name and password. Click «OK».
If you would like to mount your SMB share using your (server) hostname rather than the IP Address, edit C:\WINDOWS\system32\drivers\etc\hosts and add your samba server (syntax IP Address hostname).
192.168.1.100 hostname
Where «hostname» = the name of your samba server.

on
How to connect to Linux Samba shares from Windows
If you’re having trouble figuring out how to connect Windows 10 or 11 to your data center Samba shares, Jack Wallen eases your concern with the simple steps to make this work.
When Windows 10 was released, it seemingly broke the ability to easily connect to Linux Samba shares. It appeared one could not write to Linux share from Windows 10. Considering how many businesses rely on Samba for the sharing of folders, this was a bad move on the part of Microsoft. Fortunately, the ability to connect to Samba shares wasn’t actually removed from the Windows platform, it was merely tucked a bit out of sight.
I want to walk you through the process of making that connection between Windows 10/11 and your Linux shares.
For this tutorial, I will assume you have both Windows 10 or 11 installed on a machine (or multiple machines) and a Samba share at the ready from your data center. With that said: Let’s connect.
Connecting to your server
Open up File Explorer and then right-click on This PC (in the left pane). From the resulting context menu, select Add A Network Location (Figure A).
Figure A

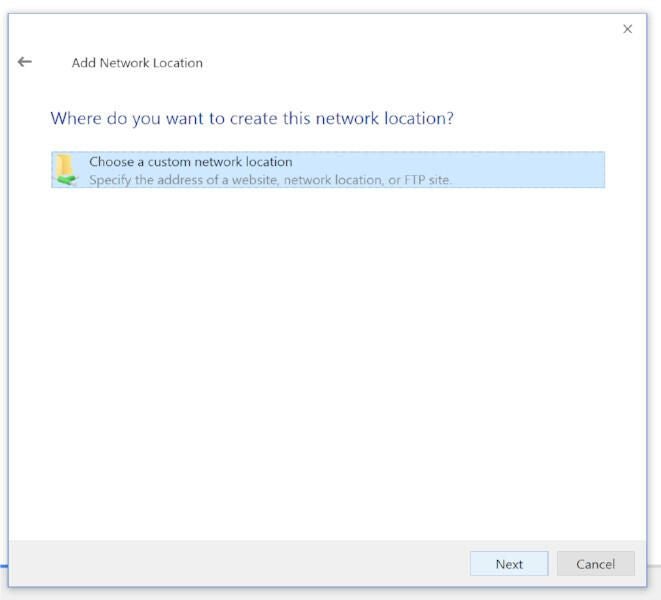
A new wizard will open, one that will walk you through the process of creating a shortcut for a new network location within File Explorer. Click Next in the Welcome window. In the resulting screen (Figure B), click Choose A Custom Network Location (the only option) and then click Next.
Figure B
Next you must enter the IP address of your Samba server (Figure C) in the form of //SERVER_IP/SHARE, where SERVER_IP is the IP address of your Samba server and SHARE is the name of the share you want to add.
Figure C

Click Next to continue on. In the next window (Figure D), type a name for the network location. A default name will be picked up by the Samba server, you can either use that or enter a custom name that makes it easier for you to remember either where the share is or what is housed within the share.
Figure D

Click Next to reach the final screen of the wizard. Here (Figure E) click Finish and the share is now ready for you to use.
Figure E

And that is all there is to connecting a Windows 10 machine to a Samba share in your data center. It’s not quite as easy as it once was, but the feature is, in fact, still there.
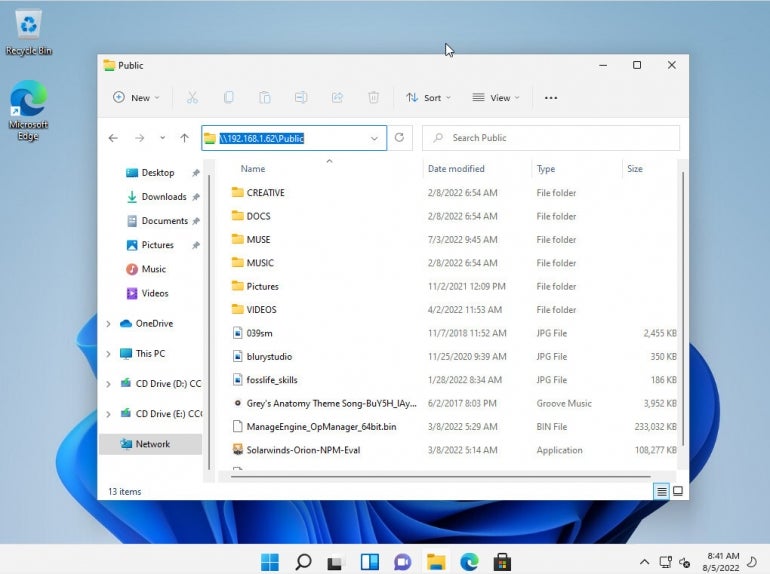
How to connect from Windows 11
With Windows 11, it is much easier to make the connection. Simply open the file manager and in the address bar (Figure F) and type \\SERVER\SHARE, where SERVER is the IP address of the machine hosting the Samba share and SHARE is the name of the actual share.
Figure F
After hearing a number of people coming to me asking why they can not write to Linux share from Windows 10, I’m happy to tell you that it is not, in fact, broken. Although it’s a bit hidden away, you can still make that much needed desktop to data center connection.
Also See
-
How to protect Samba from the SambaCry exploit
(TechRepublic) -
How to set up Samba shares for groups
(TechRepublic) -
How to configure Ubuntu Linux server as a Domain Controller with samba-tool
(TechRepublic) -
Ethical Hacking Using Kali Linux From A to Z
(TechRepublic Academy)
-
Data Centers
-
Microsoft
-
Open source
Although Linux has made some inroads into the desktop market, its origins and future are very much server based. It is unsurprising, therefore, that Ubuntu can act as a file server. It is also common for Ubuntu and Windows systems to be used side by side in networked environments. Therefore, it is a common requirement that files on an Ubuntu system be accessible to Linux, UNIX, and Windows-based systems over network connections. Similarly, shared folders and printers residing on Windows systems may also need to be accessible from Ubuntu-based systems. Windows systems share resources such as file systems and printers using the Server Message Block (SMB) protocol. For an Ubuntu system to serve such resources over a network to a Windows system and vice versa, it must support SMB. This is achieved using a technology called Samba. In addition to providing integration between Linux and Windows systems, Samba may also provide folder sharing between Linux systems (as an alternative to NFS covered in the previous chapter).
In this chapter, we will look at the steps necessary to share file system resources and printers on an Ubuntu system with remote Windows and Linux systems and to access Windows resources from Ubuntu.
Accessing Windows Resources from the GNOME Desktop
Before getting into more details of Samba sharing, it is worth noting that if all you want to do is access Windows shared folders from within the GNOME desktop, then support is already provided within the GNOME Files application. The Files application is located in the dash as highlighted in Figure 21-1:
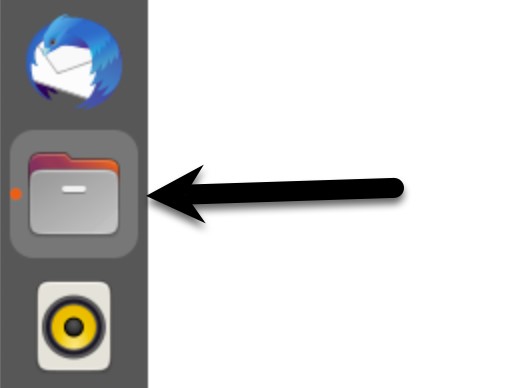
Once launched, select the Other Locations option in the left-hand navigation panel, followed by the Windows Network icon in the main panel to browse available Windows resources:
Samba and Samba Client
Samba allows both Ubuntu resources to be shared with Windows systems and Windows resources to be shared with Ubuntu systems. Ubuntu accesses Windows resources using the Samba client. On the other hand, Ubuntu resources are shared with Windows systems by installing and configuring the Samba service.
 |
You are reading a sample chapter from Ubuntu 22.04 Essentials. Buy the full book now in eBook ($24.99) format. Includes 36 chapters. Learn more.
Preview Buy eBook |
Installing Samba on Ubuntu
The default settings used during the Ubuntu installation do not typically install the necessary Samba packages. Unless you specifically requested that Samba be installed, it is unlikely that you have Samba installed on your system. To check whether Samba is installed, open a terminal window and run the following command and check for the [installed] indicator for each package:
# apt -qq list samba-common samba smbclientCode language: plaintext (plaintext)Any missing packages can be installed using the apt command-line tool:
# apt install samba-common samba smbclientCode language: plaintext (plaintext)Configuring the Ubuntu Firewall to Enable Samba
Next, the firewall protecting the Ubuntu system must be configured to allow Samba traffic. If you are using the Uncomplicated Firewall (ufw) run the following command:
# ufw allow sambaCode language: plaintext (plaintext)Alternatively, if you are using firewalld, run the firewall-cmd command as follows:
# firewall-cmd --permanent --add-port={139/tcp,445/tcp}
# firewall-cmd --reloadCode language: plaintext (plaintext)
Before starting the Samba service, some configuration steps are necessary to define how the Ubuntu system will appear to Windows systems and the resources to be shared with remote clients. Most configuration tasks occur within the /etc/samba/smb.conf file.
|
You are reading a sample chapter from Ubuntu 22.04 Essentials. Buy the full book now in eBook ($24.99) format. Includes 36 chapters. Learn more.
Preview Buy eBook |
Configuring the smb.conf File
Samba is a highly flexible and configurable system that provides many options for controlling how resources are shared on Windows networks. Unfortunately, this flexibility can lead to the sense that Samba is overly complex. In reality, however, the typical installation does not need many configuration options, and the learning curve to set up a basic configuration is relatively short.
For this chapter, we will look at joining an Ubuntu system to a Windows workgroup and setting up a directory as a shared resource that a specific user can access. This is a configuration known as a standalone Samba server. More advanced configurations, such as integrating Samba within an Active Directory environment, are also available, though these are outside the scope of this book.
The first step in configuring Samba is to edit the /etc/samba/smb.conf file.
Configuring the [global] Section
The smb.conf file is divided into sections. The first section is the [global] section, where settings that apply to the entire Samba configuration can be specified. While these settings are global, each option may be overridden within other configuration file sections.
The first task is defining the Windows workgroup name on which the Ubuntu resources will be shared. This is controlled via the workgroup = directive of the [global] section, which by default is configured as follows:
|
You are reading a sample chapter from Ubuntu 22.04 Essentials. Buy the full book now in eBook ($24.99) format. Includes 36 chapters. Learn more.
Preview Buy eBook |
workgroup = WORKGROUPCode language: plaintext (plaintext)Begin by changing this to the actual name of the workgroup if necessary.
In addition to the workgroup setting, the other settings indicate that this is a standalone server on which user passwords will protect the shared resources. Before moving on to configuring the resources to be shared, other parameters also need to be added to the [global] section as follows:
[global]
.
.
        netbios name = LinuxServerCode language: plaintext (plaintext)
The “netbios name” property specifies the name by which the server will be visible to other systems on the network.
Configuring a Shared Resource
The next step is configuring the shared resources (in other words, the resources that will be accessible from other systems on the Windows network). To achieve this, the section is given a name by which it will be referred when shared. For example, if we plan to share the /sampleshare directory of our Ubuntu system, we might entitle the section [sampleshare]. In this section, a variety of configuration options are possible. For this example, however, we will define the directory that is to be shared, indicate that the directory is both browsable and writable, and declare the resource public so that guest users can gain access:
[sampleshare]
        comment = Example Samba share
        path = /sampleshare
        browseable = Yes
        public = yes
        writable = yesCode language: plaintext (plaintext)
To restrict access to specific users, the “valid users” property may be used, for example:
|
You are reading a sample chapter from Ubuntu 22.04 Essentials. Buy the full book now in eBook ($24.99) format. Includes 36 chapters. Learn more.
Preview Buy eBook |
valid users = demo, bobyoung, marcewingCode language: plaintext (plaintext)Removing Unnecessary Shares
The smb.conf file is pre-configured with sections for sharing printers and the home folders of the users on the system. If these resources do not need to be shared, the corresponding sections can be commented out so that Samba ignores them. In the following example, the [homes] section has been commented out:
.
.
#[homes]
#       comment = Home Directories
#       valid users = %S, %D%w%S
#       browseable = No
#       read only = No
#       inherit acls = Yes
.
.Code language: plaintext (plaintext)
Creating a Samba User
Any user that requires access to a Samba shared resource must be configured as a Samba User and assigned a password. This task is achieved using the smbpasswd command-line tool. Consider, for example, that a user named demo is required to be able to access the /sampleshare directory of our Ubuntu system from a Windows system. To fulfill this requirement, we must add demo as a Samba user as follows:
# smbpasswd -a demo
New SMB password:
Retype new SMB password:
Added user demo.Code language: plaintext (plaintext)
Now that we have completed the configuration of an elementary Samba server, it is time to test our configuration file and then start the Samba services.
Testing the smb.conf File
The settings in the smb.conf file may be checked for errors using the testparm command-line tool as follows:
# testparm
Load smb config files from /etc/samba/smb.conf
Loaded services file OK.
Weak crypto is allowed

Server role: ROLE_STANDALONE
Press enter to see a dump of your service definitions

# Global parameters
[global]
	log file = /var/log/samba/%m.log
	netbios name = LINUXSERVER
	printcap name = cups
	security = USER
	wins support = Yes
	idmap config * : backend = tdb
	cups options = raw

[sampleshare]
	comment = Example Samba share
	guest ok = Yes
	path = /sampleshare
	read only = No

[homes]
	browseable = No
	comment = Home Directories
	inherit acls = Yes
	read only = No
	valid users = %S %D%w%S

[printers]
	browseable = No
	comment = All Printers
	create mask = 0600
	path = /var/tmp
	printable = Yes
.
.Code language: plaintext (plaintext)
Starting the Samba and NetBIOS Name Services
For an Ubuntu server to operate within a Windows network, the Samba (SMB) and NetBIOS nameservice (NMB) services must be started. Optionally, also enable the services so that they start each time the system boots:
|
You are reading a sample chapter from Ubuntu 22.04 Essentials. Buy the full book now in eBook ($24.99) format. Includes 36 chapters. Learn more.
Preview Buy eBook |
# systemctl enable smbd nmbd
# systemctl start smbd nmbdCode language: plaintext (plaintext)
Before attempting to connect from a Windows system, use the smbclient utility to verify that the share is configured:
# smbclient -U demo -L localhost
Password for [WORKGROUP\demo]:

	Sharename       Type      Comment
	---------       ----      -------
	sampleshare     Disk      Example Samba share
	print$          Disk      Printer Drivers
	IPC$            IPC       IPC Service (demoserver server (Samba, Ubuntu))
	demo            Disk      Home Directories
	HP_OfficeJet_Pro_9020_series_9F6907 Printer   HP_OfficeJet_Pro_9020_serieCode language: plaintext (plaintext)
Accessing Samba Shares
Now that the Samba resources are configured and the services are running, it is time to access the shared resource from a Windows system. On a suitable Windows system on the same workgroup as the Ubuntu system, open Windows Explorer and right-click on the Network entry in the side panel to display the menu shown in Figure 21-3:
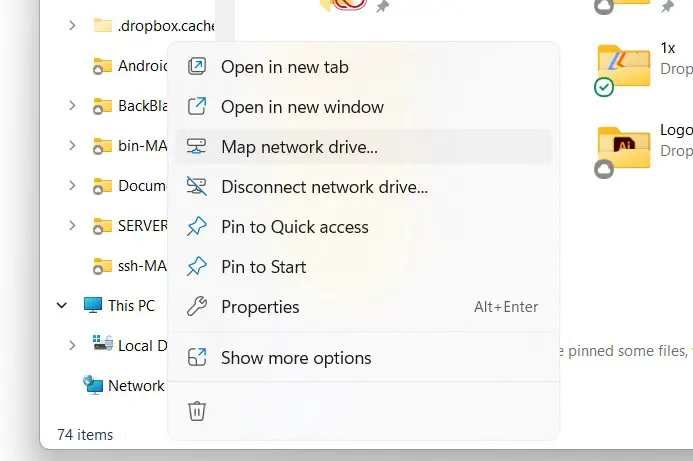
Select the Map network drive… menu option to display the dialog illustrated in Figure 21-4:
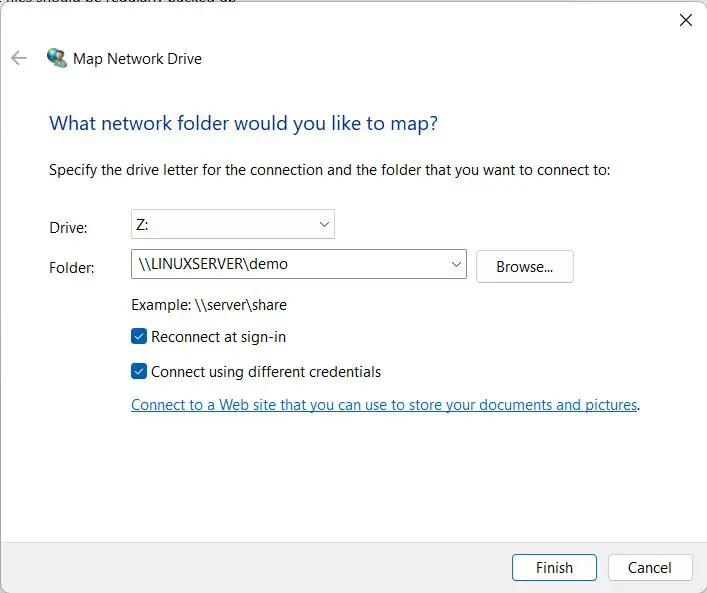
Select a drive letter and enter the path to a samba share. For example, assuming that the server name is LinuxServer and the samba user name is demo, the path to the user’s home folder would be as follows:
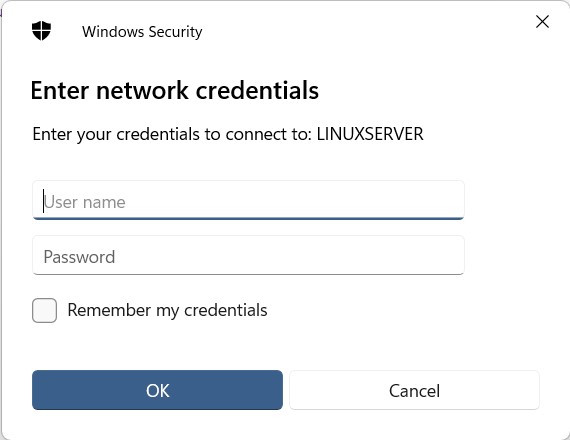
\\LINUXSERVER\demoCode language: plaintext (plaintext)Enable the Connect using different credentials checkbox and click finish. When the network credentials dialog appears, enter the Samba user name and the password that was assigned earlier using the smbpasswd command:
|
You are reading a sample chapter from Ubuntu 22.04 Essentials. Buy the full book now in eBook ($24.99) format. Includes 36 chapters. Learn more.
Preview Buy eBook |
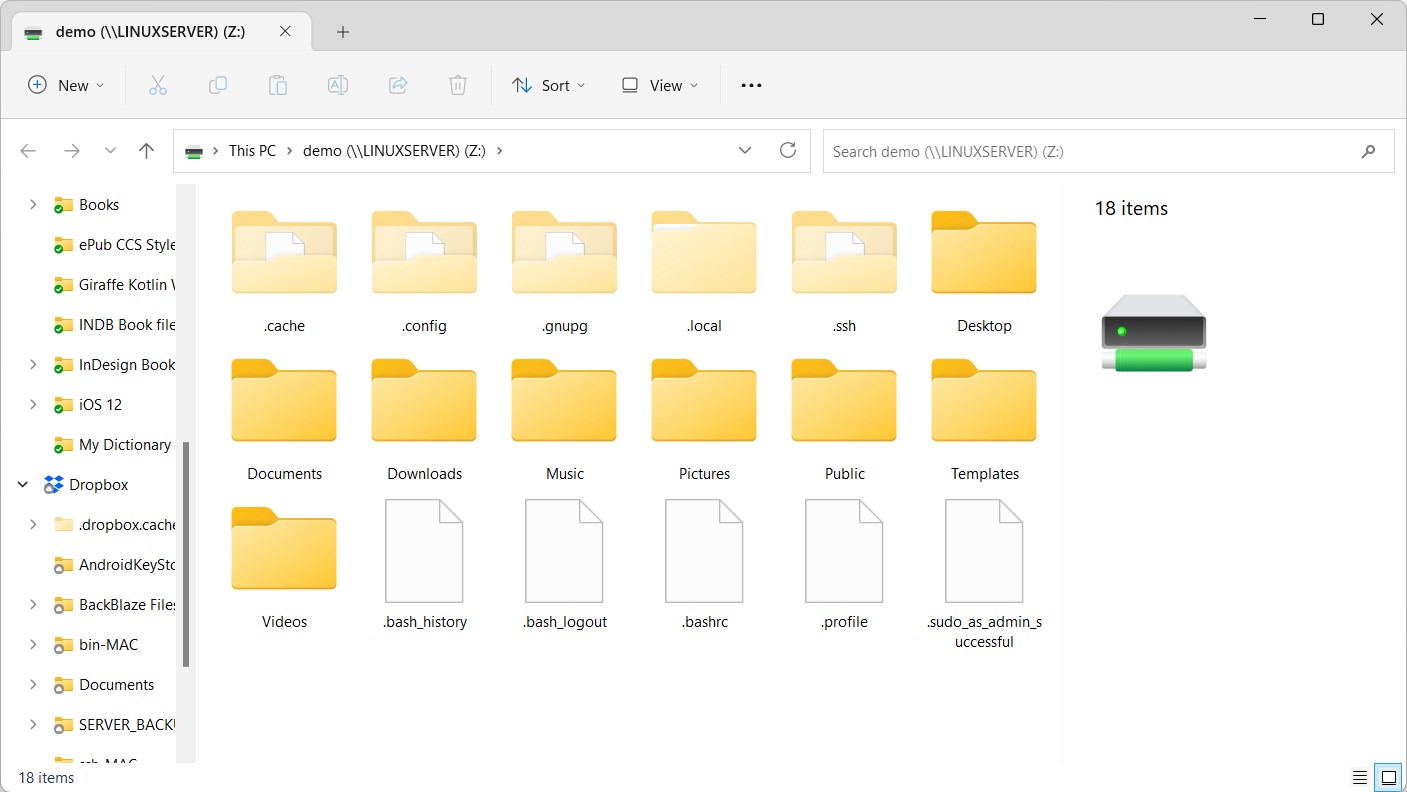
After the connection is established, a new Windows Explorer dialog will appear containing the contents of the shared Ubuntu folder:
Accessing Windows Shares from Ubuntu
As previously mentioned, Samba is a two-way street, allowing not only Windows systems to access files and printers hosted on an Ubuntu system but also allowing the Ubuntu system to access shared resources on Windows systems. This is achieved using the samba-client package, installed at this chapter’s start. If it is not currently installed, install it from a terminal window as follows:
# dnf install samba-clientCode language: plaintext (plaintext)Shared resources on a Windows system can be accessed from the Ubuntu desktop using the Files application or the command-line prompt using the smbclient and mount tools. The steps in this section assume that the Windows system has enabled appropriate network-sharing settings.
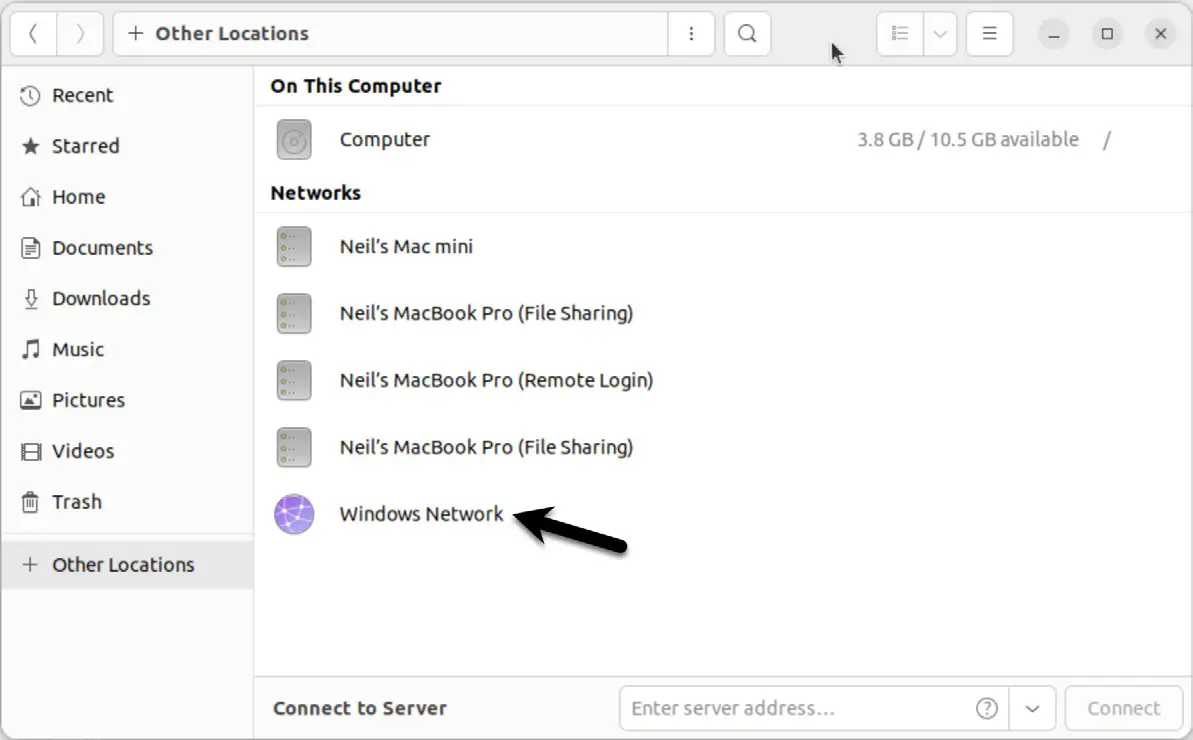
To access any shared resources on a Windows system using the GNOME desktop, launch the Files application and select the Other Locations option. This will display the screen shown in Figure 21-7 below, including an icon for the Windows Network (if one is detected):
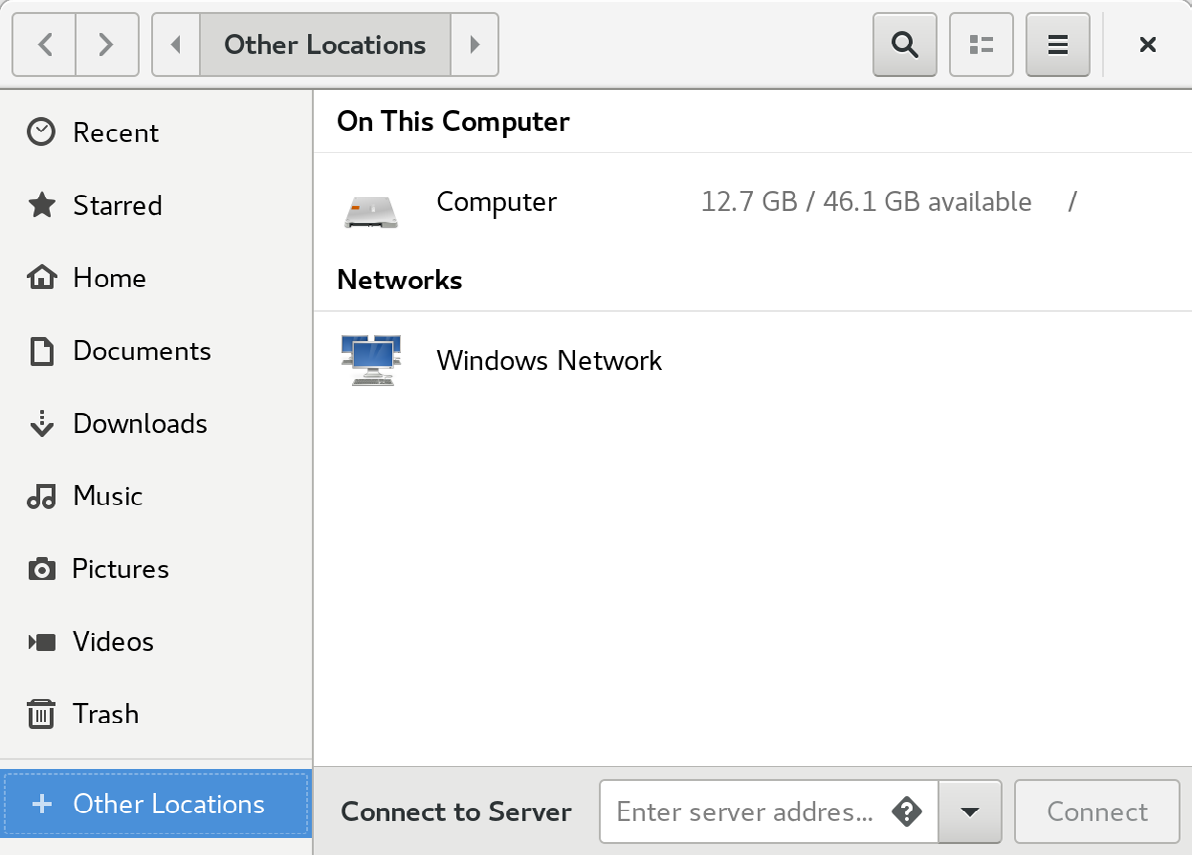
Selecting the Windows Network option will display the Windows systems detected on the network and allow access to any shared resources.
|
You are reading a sample chapter from Ubuntu 22.04 Essentials. Buy the full book now in eBook ($24.99) format. Includes 36 chapters. Learn more.
Preview Buy eBook |
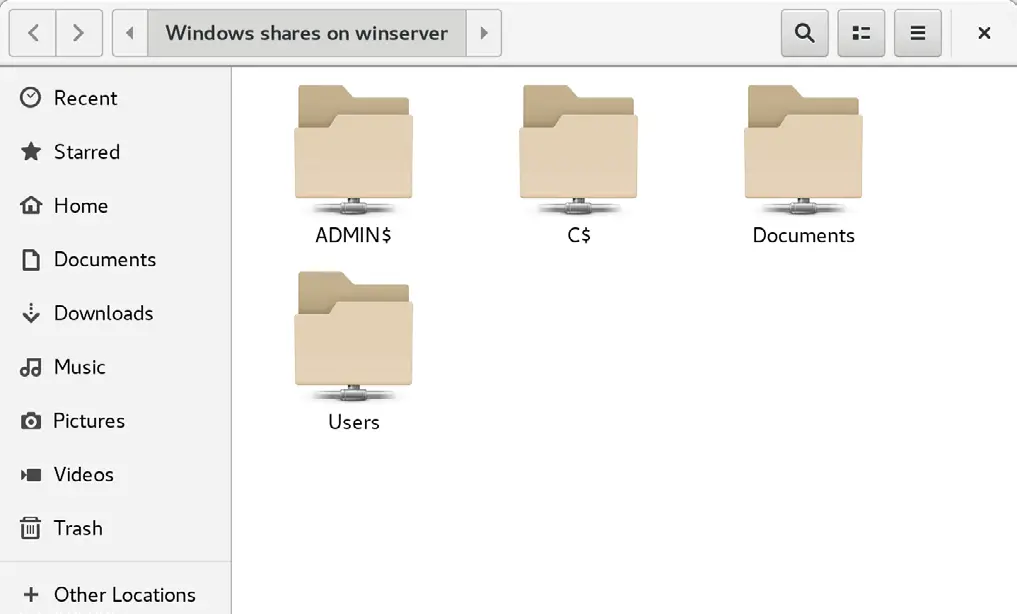
Alternatively, the Connect to Server option may be used to connect to a specific system. Note that the name or IP address of the remote system must be prefixed by smb:// and may be followed by the path to a specific shared resource, for example:
smb://WinServer/DocumentsCode language: plaintext (plaintext)Without a desktop environment, a remote Windows share may be mounted from the command line using the mount command and specifying the cifs filesystem type. The following command, for example, mounts a share named Documents located on a Windows system named WinServer at a local mount point named /winfiles:
# mount -t cifs //WinServer/Documents /winfiles -o user=demoCode language: plaintext (plaintext)Summary
In this chapter, we have looked at how to configure an Ubuntu system to act as both a Samba client and server, allowing the sharing of resources with Windows systems. Topics covered included the installation of Samba client and server packages and configuring Samba as a standalone server. In addition, the basic concepts of SELinux were introduced together with the steps to provide Samba access to a shared resource.
In my previous article, Interoperability: Getting started with Samba, I covered installing and configuring Samba shares on a Linux server. The real power of Samba comes when Windows clients can communicate with Linux file servers. In this article, I will cover how you can access Samba shares from both Linux and Windows clients.
Install the Samba client packages
To access Samba share from Linux clients we need to install a few Samba client packages.
On the client machine, install the samba-common and samba-client packages.
# yum install samba-client samba-common -yCheck for available shares
Let’s check if we can access our shares from the server. We can use either the hostname or ip address of the server. If you use the hostname, make sure DNS is working.
# smbclient -U user -L 192.168.1.122

Enter SAMBA\user's password:

        Sharename       Type      Comment
        ---------       ----      -------
        print$          Disk      Printer Drivers
        myshare         Disk      my share
        IPC$            IPC       IPC Service (Samba 4.9.1)
        user      Disk      Home Directories

Reconnecting with SMB1 for workgroup listing.

        Server               Comment
        ---------            -------

        Workgroup            Master
        ---------            -------
        SAMBA                SAMBA-SERVER
Create a directory that we can use as our mount point. I’m going to create a directory under /mnt, but you can use any directory you would like to. You may need to configure SELinux on that directory.
# mkdir /mnt/myshareNow, mount the share.
# mount -t cifs -o username=user //192.168.1.122/myshare /mnt/share

Password for user@//192.168.1.122/myshare:  ********
Now that we’ve mounted our share, we can check the mounts with the following command:
# df -hPersistent mount
Let’s make that directory mount persistently so it can withstand a reboot. Using the text editor of your choice, edit the /etc/fstab file. You can do this in multiple ways, but I’m going to demonstrate two ways to mount the Samba share at boot in /etc/fstab.
# vim /etc/fstabThe first option provides a username and password for the Samba user in the fstab.
//192.168.1.122/myshare /mnt/share cifs username=user,password=password,_netdev 0 0The other option is to create a credential file. You can call this file anything, but I would like to call it cred. I would like to place credentials files in the home directory of the user. In our demonstration it will be /home/user/.cred.
//192.168.1.122/myshare /mnt/share cifs credentials=/home/user/.cred,_netdev 0 0The _netdev option is important since we are mounting a network device. Clients may hang during the boot process if the system encounters any difficulties with the network.
Now create that .cred file inside the user’s home directory.
# vim /home/user/.credNext, add the Samba user’s username and password.
username=user
password=password
Finally, mount all filesystems.
# mount -aAccess a share from a Windows client
I will be using Windows 10 as my client machine with a workgroup called SAMBA. We need to create a local user account on the Windows machine that matches the username and password of the Samba user account we created in my previous article. Although account creation is not necessary, this will make things simpler when accessing the share.
Like I mentioned above, this step is optional and you can skip it completely. Although there are multiple approaches to adding a new local user on a Windows machine, for the simplicity of this article I will be using PowerShell. Launch PowerShell as an administrator and issue following commands:
PS > $password = Read-Host -AsSecureString
PS > New-LocalUser -Name “user” -Password $password
Now that we have created a new local user account matching the Samba user account, we can log in to Windows with our newly created user account.
Access a share from Windows Explorer
To access the Samba share from Windows Explorer, start typing the IP address to our share in the search area. I am using the hostname of the Samba server. In my case, it is centos. You can also access the share by using the IP address of the Samba server.
You might be prompted to enter the username and password to access the share if you skipped the local user creation process. If you get prompted for credentials, enter the Samba username and password we created in the previous article.
You will need to enter the Samba share path every time you want to access the share. There is a better way to access the share by mapping a drive to Samba share in Windows.
Mapping a drive to a Samba share
To map a drive to the Samba share, open PowerShell and issue following command:
PS > NET USE M: \\centos\myshareWrap up
Accessing a Samba share on Linux and Windows is easy. With this basic setup, you will be able to access file shares from client machines in your network. With somewhat more configuration, you can deploy Samba shares in a domain environment. Samba can do more than file share. If you would like to learn more about Samba, read this article about Windows and Linux interoperability. This is a basic set up, but you can do so much more with Samba.
[ Want to test your sysadmin skills? Take a skills assessment today. ]
Here is a step guideline to install Samba in Ubuntu 20.04, Focal Fossa, to enable sharing with Windows 10 as the client. I write this article to help people solving problem around:
1. Windows 10 not connecting properly with Samba 4.7.6 on Ubuntu 18.04
2. Ubuntu 16 Samba server with Windows 10 client – Tutorial/Howto
3. I can’t get Win10 PC to Access Ubuntu 18.10 Samba Shares
4. Cannot access smb share from Windows 10
5. Fixing broken Samba File Share access for Linux hosts after installing the latest version of Windows 10
In this case, I didn’t change Windows features for Samba v1 or change regedit configuration. This is works on pure Windows 10 and Ubuntu 20.04 without additional changes

Here are the steps on “How to install Samba on Ubuntu 20.04 and Fix Sharing with Windows 10”
1. Install Samba server
First, we need to install Samba by running this command
sudo apt-get install samba -y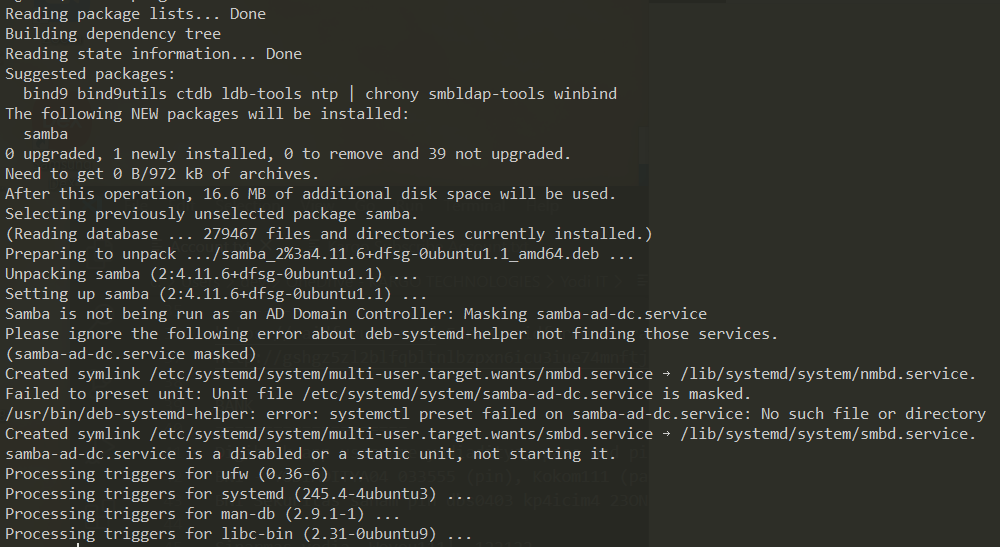
2. Adding user to samba group
Now our Samba is running under smbd service. Next step, we need to add users to samba group
sudo smbpasswd -a username3. Change samba configuration to works with Windows 10
Go edit file “/etc/samba/smb.conf” and edit this part to enable succesfull sharing with Windows 10 Network.
Add this in Global part
   passdb backend = tdbsam
   security = user
Enable interfaces by binding it with device IP address or eth0 or wlan0 (check with sudo ifconfig)
#### Networking ####

# The specific set of interfaces / networks to bind to
# This can be either the interface name or an IP address/netmask;
# interface names are normally preferred
interfaces = 192.168.100.63 wlp1s0

bind interfaces only = yes
For user part, we need to disable bad_user map and force user with our added user previously
#map to guest = bad user
force user = username
The last part, we can add folder to shared
[Users]
  path = put your path here
  browseable = yes
  read only = no
  force create mode = 0660
  force directory mode = 2770
  valid users = @username_here
Just in case you have messy samba configuration, as long as your are using the latest Ubuntu 20.04, this configuration will work like a charm.
This configuration will help to avoid problem to connect to Windows 10 SMB share or Samba file sharing not working
#
# Sample configuration file for the Samba suite for Debian GNU/Linux.
#
#
# This is the main Samba configuration file. You should read the
# smb.conf(5) manual page in order to understand the options listed
# here. Samba has a huge number of configurable options most of which
# are not shown in this example
#
# Some options that are often worth tuning have been included as
# commented-out examples in this file.
#  - When such options are commented with ";", the proposed setting
#    differs from the default Samba behaviour
#  - When commented with "#", the proposed setting is the default
#    behaviour of Samba but the option is considered important
#    enough to be mentioned here
#
# NOTE: Whenever you modify this file you should run the command
# "testparm" to check that you have not made any basic syntactic
# errors.

#======================= Global Settings =======================

[global]

## Browsing/Identification ###

# Change this to the workgroup/NT-domain name your Samba server will part of
   workgroup = WORKGROUP
   passdb backend = tdbsam
   security = user

# server string is the equivalent of the NT Description field
   server string = %h server (Samba, Ubuntu)

#### Networking ####

# The specific set of interfaces / networks to bind to
# This can be either the interface name or an IP address/netmask;
# interface names are normally preferred
interfaces = 192.168.100.63 wlp1s0

# Only bind to the named interfaces and/or networks; you must use the
# 'interfaces' option above to use this.
# It is recommended that you enable this feature if your Samba machine is
# not protected by a firewall or is a firewall itself.  However, this
# option cannot handle dynamic or non-broadcast interfaces correctly.
bind interfaces only = yes

#### Debugging/Accounting ####

# This tells Samba to use a separate log file for each machine
# that connects
   log file = /var/log/samba/log.%m

# Cap the size of the individual log files (in KiB).
   max log size = 1000

# We want Samba to only log to /var/log/samba/log.{smbd,nmbd}.
# Append syslog@1 if you want important messages to be sent to syslog too.
   logging = file

# Do something sensible when Samba crashes: mail the admin a backtrace
   panic action = /usr/share/samba/panic-action %d

####### Authentication #######

# Server role. Defines in which mode Samba will operate. Possible
# values are "standalone server", "member server", "classic primary
# domain controller", "classic backup domain controller", "active
# directory domain controller".
#
# Most people will want "standalone server" or "member server".
# Running as "active directory domain controller" will require first
# running "samba-tool domain provision" to wipe databases and create a
# new domain.
   server role = standalone server

   obey pam restrictions = yes

# This boolean parameter controls whether Samba attempts to sync the Unix
# password with the SMB password when the encrypted SMB password in the
# passdb is changed.
   unix password sync = yes

# For Unix password sync to work on a Debian GNU/Linux system, the following
# parameters must be set (thanks to Ian Kahan <<kahan@informatik.tu-muenchen.de> for
# sending the correct chat script for the passwd program in Debian Sarge).
   passwd program = /usr/bin/passwd %u
   passwd chat = *Enter\snew\s*\spassword:* %n\n *Retype\snew\s*\spassword:* %n\n *password\supdated\ssuccessfully* .

# This boolean controls whether PAM will be used for password changes
# when requested by an SMB client instead of the program listed in
# 'passwd program'. The default is 'no'.
   pam password change = yes

# This option controls how unsuccessful authentication attempts are mapped
# to anonymous connections
#   map to guest = bad user
force user = dev

# It specifies the location of the user's
# profile directory from the client point of view) The following
# required a [profiles] share to be setup on the samba server (see
# below)
;   logon path = \\%N\profiles\%U
# Another common choice is storing the profile in the user's home directory
# (this is Samba's default)
#   logon path = \\%N\%U\profile

# The following setting only takes effect if 'domain logons' is set
# It specifies the location of a user's home directory (from the client
# point of view)
;   logon drive = H:
#   logon home = \\%N\%U

# The following setting only takes effect if 'domain logons' is set
# It specifies the script to run during logon. The script must be stored
# in the [netlogon] share
# NOTE: Must be store in 'DOS' file format convention
;   logon script = logon.cmd

# This allows Unix users to be created on the domain controller via the SAMR
# RPC pipe.  The example command creates a user account with a disabled Unix
# password; please adapt to your needs
; add user script = /usr/sbin/adduser --quiet --disabled-password --gecos "" %u

# This allows machine accounts to be created on the domain controller via the
# SAMR RPC pipe.
# The following assumes a "machines" group exists on the system
; add machine script  = /usr/sbin/useradd -g machines -c "%u machine account" -d /var/lib/samba -s /bin/false %u

# This allows Unix groups to be created on the domain controller via the SAMR
# RPC pipe.
; add group script = /usr/sbin/addgroup --force-badname %g

############ Misc ############

# Using the following line enables you to customise your configuration
# on a per machine basis. The %m gets replaced with the netbios name
# of the machine that is connecting
;   include = /home/samba/etc/smb.conf.%m

# Some defaults for winbind (make sure you're not using the ranges
# for something else.)
;   idmap config * :              backend = tdb
;   idmap config * :              range   = 3000-7999
;   idmap config YOURDOMAINHERE : backend = tdb
;   idmap config YOURDOMAINHERE : range   = 100000-999999
;   template shell = /bin/bash

# Setup usershare options to enable non-root users to share folders
# with the net usershare command.

# Maximum number of usershare. 0 means that usershare is disabled.
#   usershare max shares = 100

# Allow users who've been granted usershare privileges to create
# public shares, not just authenticated ones
   usershare allow guests = yes

#======================= Share Definitions =======================

# Un-comment the following (and tweak the other settings below to suit)
# to enable the default home directory shares. This will share each
# user's home directory as \\server\username
;[homes]
;   comment = Home Directories
;   browseable = no

# By default, the home directories are exported read-only. Change the
# next parameter to 'no' if you want to be able to write to them.
;   read only = yes

# File creation mask is set to 0700 for security reasons. If you want to
# create files with group=rw permissions, set next parameter to 0775.
;   create mask = 0700

# Directory creation mask is set to 0700 for security reasons. If you want to
# create dirs. with group=rw permissions, set next parameter to 0775.
;   directory mask = 0700

# By default, \\server\username shares can be connected to by anyone
# with access to the samba server.
# Un-comment the following parameter to make sure that only "username"
# can connect to \\server\username
# This might need tweaking when using external authentication schemes
;   valid users = %S

# Un-comment the following and create the netlogon directory for Domain Logons
# (you need to configure Samba to act as a domain controller too.)
;[netlogon]
;   comment = Network Logon Service
;   path = /home/samba/netlogon
;   guest ok = yes
;   read only = yes

# Un-comment the following and create the profiles directory to store
# users profiles (see the "logon path" option above)
# (you need to configure Samba to act as a domain controller too.)
# The path below should be writable by all users so that their
# profile directory may be created the first time they log on
;[profiles]
;   comment = Users profiles
;   path = /home/samba/profiles
;   guest ok = no
;   browseable = no
;   create mask = 0600
;   directory mask = 0700

[printers]
   comment = All Printers
   browseable = no
   path = /var/spool/samba
   printable = yes
   guest ok = no
   read only = yes
   create mask = 0700

# Windows clients look for this share name as a source of downloadable
# printer drivers
[print$]
   comment = Printer Drivers
   path = /var/lib/samba/printers
   browseable = yes
   read only = yes
   guest ok = no
# Uncomment to allow remote administration of Windows print drivers.
# You may need to replace 'lpadmin' with the name of the group your
# admin users are members of.
# Please note that you also need to set appropriate Unix permissions
# to the drivers directory for these users to have write rights in it
;   write list = root, @lpadmin

[Users]
  path = put your path here
  browseable = yes
  read only = no
  force create mode = 0660
  force directory mode = 2770
  valid users = @username_here
4. Restart samba service
sudo service smbd restart
sudo service nmbd restart
5. Open Ubuntu Samba folder from Windows 10
Go to your network and access to your IP from path \

6. BONUS: Enable follow symlinks in samba folder
To enable symbolic link path or shortcut in Samba, you can add these configuration
[global]
allow insecure wide links = yes

[YouShareFolder]
follow symlinks = yes
wide links = yes