В Windows 10 и Windows Server 2019 появился встроенный SSH клиент, который вы можете использовать для подключения к *Nix серверам, ESXi хостам и другим устройствам по защищенному протоколу, вместо Putty, MTPuTTY или других сторонних SSH клиентов. Встроенный SSH клиент Windows основан на порте OpenSSH и предустановлен в ОС, начиная с Windows 10 1809.
Содержание:
- Установка клиента OpenSSH в Windows 10
- Как использовать SSH клиенте в Windows 10?
- SCP: копирование файлов из/в Windows через SSH
Установка клиента OpenSSH в Windows 10
Клиент OpenSSH входит в состав Features on Demand Windows 10 (как и RSAT). Клиент SSH установлен по умолчанию в Windows Server 2019 и Windows 10 1809 и более новых билдах.
Проверьте, что SSH клиент установлен:
Get-WindowsCapability -Online | ? Name -like 'OpenSSH.Client*'

В нашем примере клиент OpenSSH установлен (статус: State: Installed).
Если SSH клиент отсутствует (State: Not Present), его можно установить:
- С помощью команды PowerShell:
Add-WindowsCapability -Online -Name OpenSSH.Client* - С помощью DISM:
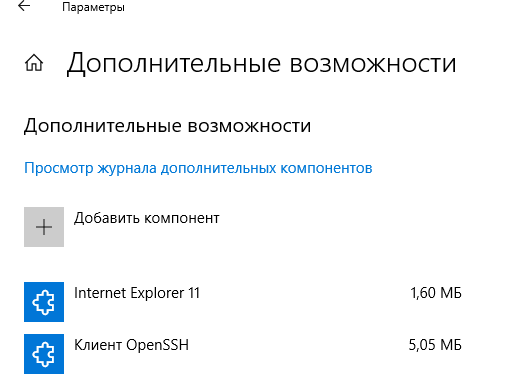
dism /Online /Add-Capability /CapabilityName:OpenSSH.Client~~~~0.0.1.0 - Через Параметры -> Приложения -> Дополнительные возможности -> Добавить компонент. Найдите в списке Клиент OpenSSH и нажмите кнопку Установить.
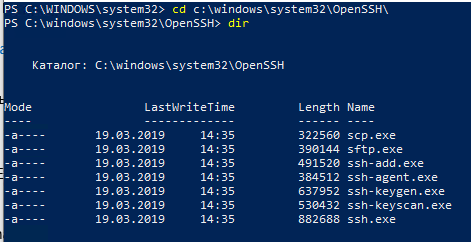
]Бинарные файлы OpenSSH находятся в каталоге c:\windows\system32\OpenSSH\.
- ssh.exe – это исполняемый файл клиента SSH;
- scp.exe – утилита для копирования файлов в SSH сессии;
- ssh-keygen.exe – утилита для генерации ключей аутентификации;
- ssh-agent.exe – используется для управления ключами;
- ssh-add.exe – добавление ключа в базу ssh-агента.
Вы можете установить OpenSSH и в предыдущих версиях Windows – просто скачайте и установите Win32-OpenSSH с GitHub (есть пример в статье “Настройка SSH FTP в Windows”).
Как использовать SSH клиенте в Windows 10?
Чтобы запустить SSH клиент, запустите командную строку
PowerShell
или
cmd.exe
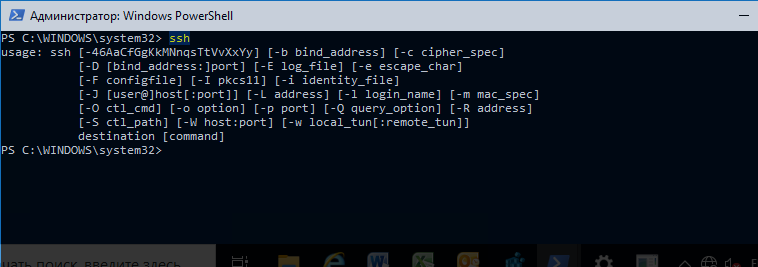
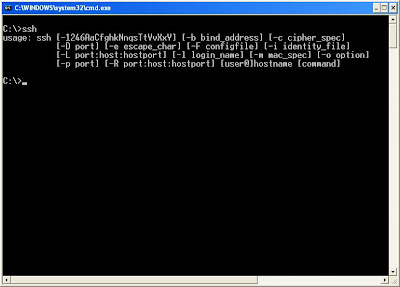
. Выведите доступные параметры и синтаксис утилиты ssh.exe, набрав команду:
ssh
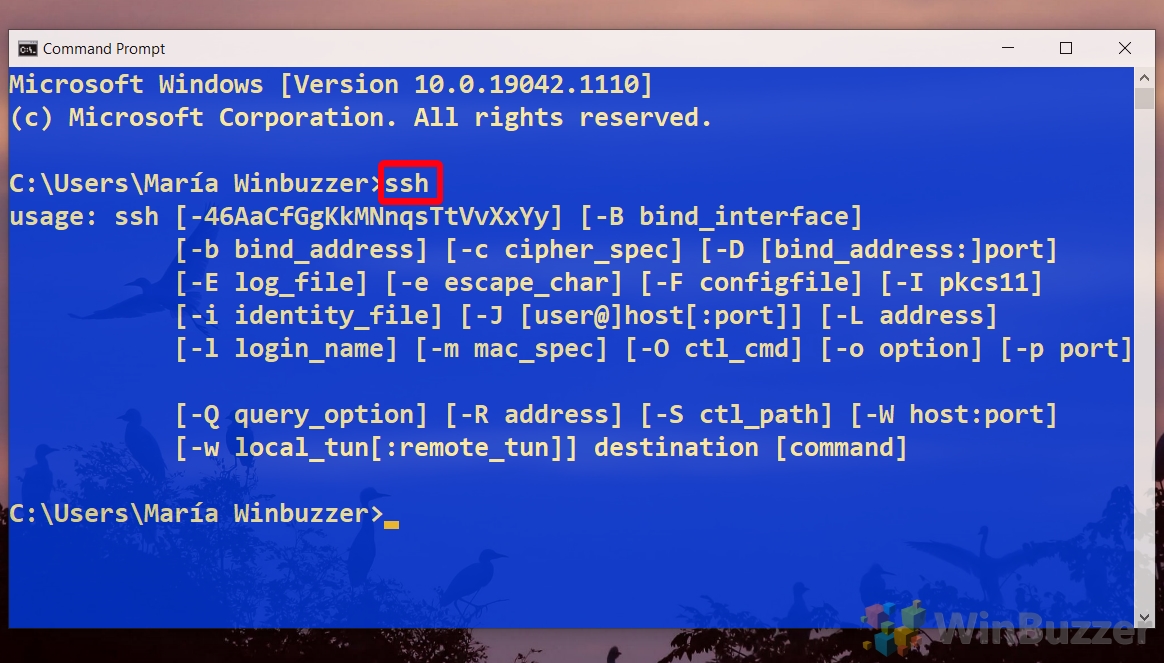
usage: ssh [-46AaCfGgKkMNnqsTtVvXxYy] [-b bind_address] [-c cipher_spec]
[-D [bind_address:]port] [-E log_file] [-e escape_char]
[-F configfile] [-I pkcs11] [-i identity_file]
[-J [user@]host[:port]] [-L address] [-l login_name] [-m mac_spec]
[-O ctl_cmd] [-o option] [-p port] [-Q query_option] [-R address]
[-S ctl_path] [-W host:port] [-w local_tun[:remote_tun]]
destination [command]
Для подключения к удаленному серверу по SSH используется команда:
ssh username@host
Если SSH сервер запущен на нестандартном порту, отличном от TCP/22, можно указать номер порта:
ssh username@host -p port
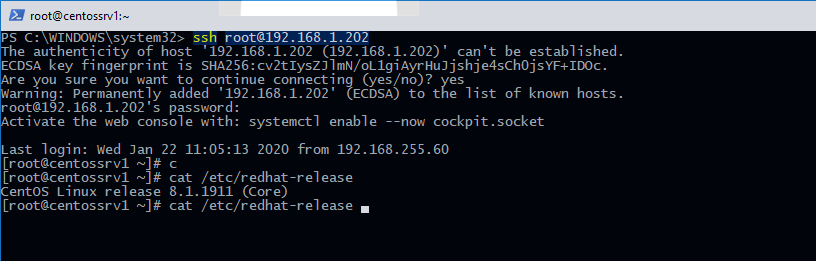
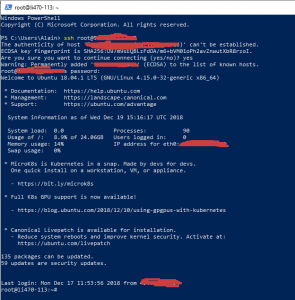
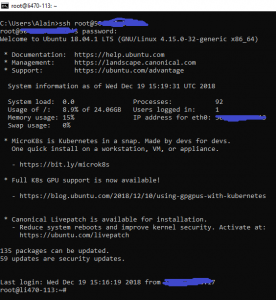
Например, чтобы подключиться к Linux хосту с IP адресом 192.168.1.202 под root, выполните:
ssh [email protected]
При первом подключении появится запрос на добавление ключа хоста в доверенные, наберите yes -> Enter (при этом отпечаток ключа хоста добавляется в файл C:\Users\username\.ssh\known_hosts).
Затем появится запрос пароля указанной учетной записи, укажите пароль root, после чего должна открытся консоль удаленного Linux сервера (в моем примере на удаленном сервере установлен CentOS 8).
С помощью SSH вы можете подключаться не только к *Nix подобным ОС, но и к Windows. В одной из предыдущих статей мы показали, как настроить OpenSSH сервер на Windows 10 и подключиться к нему с другого компьютера Windows с помощью SSH клиента.
Если вы используете SSH аутентификацию по RSA ключам (см. пример с настройкой SSH аутентификации по ключам в Windows), вы можете указать путь к файлу с закрытым ключом в клиенте SSH так:
ssh [email protected] -i "C:\Users\username\.ssh\id_rsa"
Также вы можете добавить ваш закрытый ключ в SSH-Agent. Сначала нужно включить службу ssh-agent и настроить ее автозапуск:
set-service ssh-agent StartupType ‘Automatic’
Start-Service ssh-agent
Добавим ваш закрытый ключ в базу ssh-agent:
ssh-add "C:\Users\username\.ssh\id_rsa"
Теперь вы можете подключиться к серверу по SSH без указания пути к RSA ключу, он будет использоваться автоматически. Пароль для подключения не запрашивается (если только вы не защитили ваш RSA ключ отдельным паролем):
ssh [email protected]
Еще несколько полезных аргументов SSH:
-
-C
– сжимать трафик между клиентом и сервером (полезно на медленных и нестабильных подключениях); -
-v
– вывод подробной информации обо всех действия клиента ssh; -
-R
/
-L
– можно использовать для проброса портов через SSH туннель.
SCP: копирование файлов из/в Windows через SSH
С помощью утилиты scp.exe, которая входит в состав пакета клиента SSH, вы можете скопировать файл с вашего компьютера на SSH сервер:
scp.exe "E:\ISO\CentOS-8.1.1911-x86_64.iso" [email protected]:/home

Можно рекурсивно скопировать все содержимое каталога:
scp -r E:\ISO\ [email protected]:/home
И наоборот, вы можете скопировать файл с удаленного сервера на ваш компьютер:
scp.exe [email protected]:/home/CentOS-8.1.1911-x86_64.iso e:\tmp
Если вы настроите аутентификацию по RSA ключам, то при копировании файлов не будет появляться запрос на ввод пароля для подключения к SSH серверу. Это удобно, когда вам нужно настроить автоматическое копирование файлов по расписанию.
Итак, теперь вы можете прямо из Windows 10 подключаться к SSH серверам, копировать файлы с помощью scp без установки сторонних приложений и утилит.
Перейти к содержанию
На чтение 3 мин Опубликовано
Системы Windows претерпели много улучшений, поэтому вам не нужно устанавливать инструмент, но вы можете использовать доступные средства.
В этом уроке мы узнаем, как подключить Linux-машину из Windows с помощью встроенных инструментов.
Содержание
- Что нужно знать о SSH
- 2) Соединение SSh с Windows Powershell и командной строкой
- а) SSh из Windows Powershell
- б) SSH из командной строкой
Что нужно знать о SSH
Secure Shell – это защищенный и зашифрованный протокол соединения, позволяющий осуществлять удаленный и безопасный вход по незащищенным соединениям.
Соединение работает в режиме клиент-сервер, поэтому соединение устанавливается клиентом SSH, подключающимся к серверу SSH.
SSH предлагает несколько вариантов аутентификации пользователя, и наиболее распространенными являются пароли и методы аутентификации с открытым ключом:
- Пароль: SSH работает как обычный процесс для локального компьютера, что означает, что вам нужно иметь имя пользователя и пароль существующей учетной записи на сервере.
- Открытый ключ: принцип состоит в том, чтобы иметь пару открытый ключ криптографического ключа и закрытый ключ, где открытый ключ сконфигурирован на сервере, чтобы разрешить доступ и предоставить любому, у кого есть копия закрытого ключа, доступ к серверу.
1) Установить функцию OpenSSH в Windows 10 клиенте
Компьютеры с Windows теперь позволяют вам использовать собственные инструменты для установки SSH-соединения, но сначала вам нужно убедиться, что установлена функция Openssh Windows Client.
Обычно он не устанавливается по умолчанию, поэтому сначала вам нужно будет это сделать
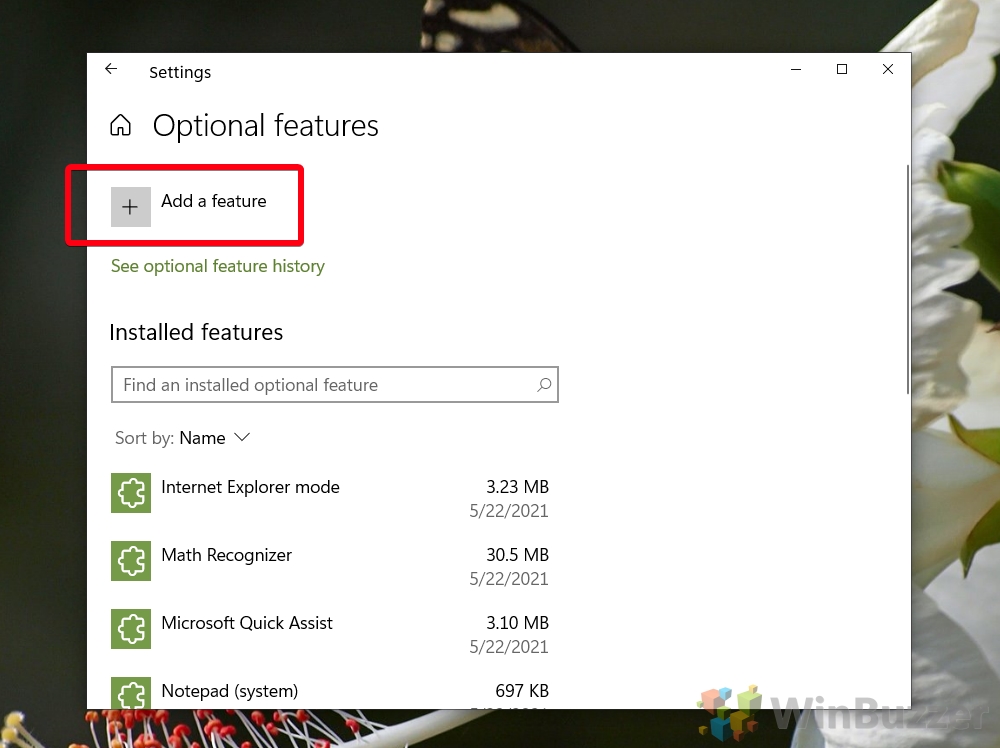
Зайдите в Windows -> Settings -> Apps -> Manage optional feature
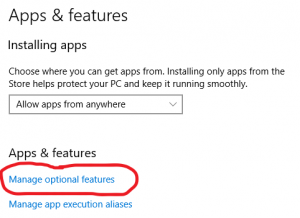
Нажмите Add a feature

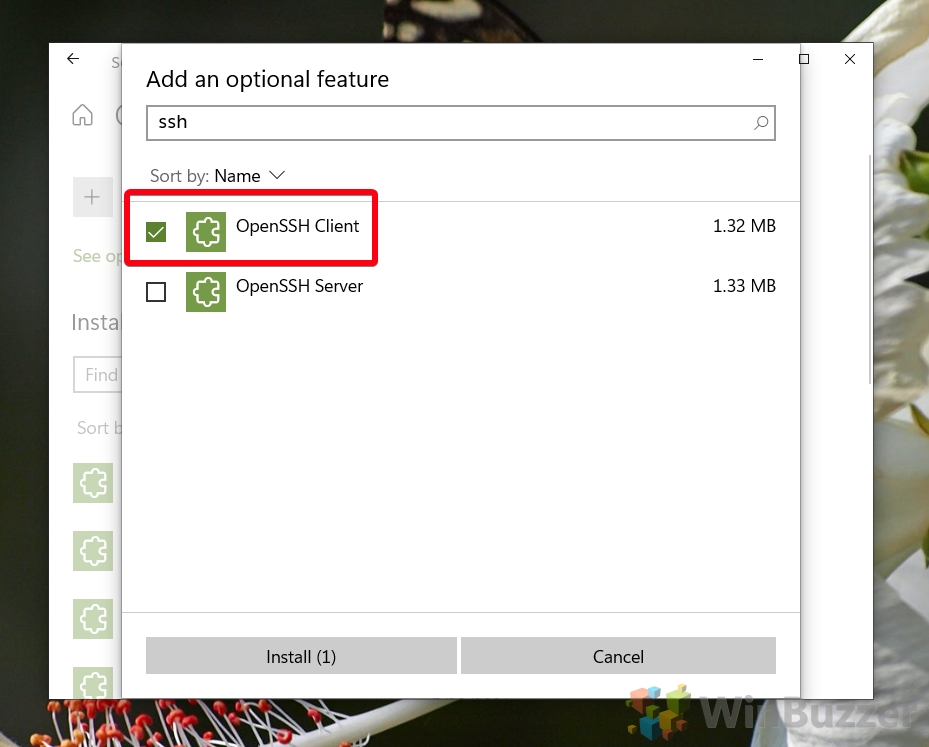
Выберите OpenSSH Client и установите
2) Соединение SSh с Windows Powershell и командной строкой
Теперь вы можете использовать командную строку или Windows PowerShell для доступа к вашему Linux-серверу через ssh.
а) SSh из Windows Powershell
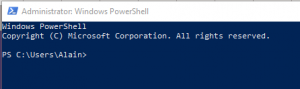
Собственный инструмент Windows Powershell позволяет удаленно подключаться к серверу через ssh.
Вы просто должны открыть его с Windows + R, а затем нажмите клавишу A
Теперь введите команду ssh для подключения к удаленному серверу Linux: ssh root@hostname-or-ip-address
б) SSH из командной строкой
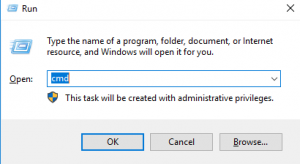
Чтобы удаленно получить доступ к вашему серверу с помощью команды, вам просто нужно запустить его с помощью комбинации клавиш Windows + r и затем ввести cmd
Теперь в командной строке вы можете использовать команду ssh, как в случае с powershell
Теперь вы знаете, как можно подключиться к удаленному серверу Linux с помощью SSH с помощью встроенных в Windows инструментов.
Вы также можете использовать инструмент putty, но теперь проще и удобнее использовать инструменты, предлагаемые по умолчанию.
Пожалуйста, не спамьте и никого не оскорбляйте.
Это поле для комментариев, а не спамбокс.
Рекламные ссылки не индексируются!
on January 26, 2009
Openssh for windows is a freely downloadable command line ssh client for windows operating system. This can be downloaded from http://sshwindows.sourceforge.net/
A snapshot with the options is given below. (Click on the image to see the options more clearly).
Installation instructions:
- Open the above download link and click on Binary Installer Releases
- Download the zip file
- Unzip the file and run the setupssh.exe file
- Select the options based on your requirement. Unselect server component if you just need the client version.
- After completing installation, open command window and then run ssh
If you want a GUI ssh client you can use Putty.exe. Use Putty connection manager in combination with Putty to have tabbed ssh sessions like the Terminal on Linux.
Related Posts:
How to enable auto login in Putty for ssh connections
One of the biggest and most welcome changes to the Windows 10 1809 update and in Windows Server 2019 was the addition of the OpenSSH Client and OpenSSH Server features. It is now incredibly easy to SSH into a Windows Workstation/Server using native tools that are now builtin to the Operating System. In the past this was only possible by using complicated tools and odd workarounds in order to get an SSH-like implementation to work correctly. You can also use the SSH commands right from the Windows command line (CMD, PowerShell), without needing third-party tools or odd commands. This is a very nice change that Microsoft has added, since it is much easier to remotely manage a Windows through the Command Line instead of the GUI, and having the ability to use the same tools on both Windows and Linux is a big advantage.
Note: I have only tested this on Windows 10 Pro for Workstations (Version 1809 Build 17763.253) and on Windows Server 2019 Standard.
Table Of Contents
Installation
Installing the OpenSSH Client and OpenSSH Server options can be done through either the Settings app or through the Command Line.
GUI Installation
To install through the GUI, go to Settings -> Apps -> Apps & Features -> Manage optional features -> Add a feature. You should see the two options in the list of available features that can be installed:
- OpenSSH Client
- OpenSSH Server

Highlight each option and click the Install button to install the feature. If the options are missing, then you are not on the latest version/patch level of Windows 10 or Windows Server 2019. A restart should not be necessary after adding these features, but the newly installed services will need to be started and configured to automatically start at boot.
Command Line Installation
To install through the Command Line, open an elevated PowerShell console in order to proceed. To confirm that you are able to install the OpenSSH Client and OpenSSH Server features, run the following command:
Get-WindowsCapability -Online | findstr OpenSSH

Name  : OpenSSH.Client~~0.0.1.0
Name  : OpenSSH.Server~~0.0.1.0
If those two options are present, run the following two commands to install the features:
Add-WindowsCapability -Online -Name OpenSSH.Client~~~~0.0.1.0
Add-WindowsCapability -Online -Name OpenSSH.Server~~~~0.0.1.0

Like installing through the Settings app, a restart should not be necessary after adding these features. The newly installed services will need to be started and configured to automatically start at boot.
Services Start
In order to start using OpenSSH Server, the associated services will need to be started first. This can be done through either the Services MMC console or through the Command Line.
Services MMC Console
Open the Services MMC Console (Win + R, and type in services.mmc) and find the two Services that are related to OpenSSH Server:
- OpenSSH Authentication Agent
- OpenSSH Server
Right-click on each service and select Properties. Under Service Status, click the Start button to start the service. To configure the service to start automatically at boot, change the Startup Type drop-down menu to Automatic and click Apply.

Command Line Services
To start the OpenSSH Server services and enable them to run automatically, there are a few command that you will need to run. To do this, open an elevated PowerShell console and run the following commands to start the OpenSSH Server:
Start-Service sshd
Start-Service ssh-agent
To have these services start automatically at boot, there are two additional commands to run as well:
Set-Service sshd -StartupType Automatic
Set-Service ssh-agent -StartupType Automatic
After this has been completed, you should be able to connect to your Windows installation over SSH.
Using OpenSSH Client
The OpenSSH Client can be used exactly the same way as you would on any Linux/Unix host. It will work through the regular Command Line and in PowerShell:
PS C:\> ssh.exe
usage: ssh [-46AaCfGgKkMNnqsTtVvXxYy] [-B bind_interface]
           [-b bind_address] [-c cipher_spec] [-D [bind_address:]port]
           [-E log_file] [-e escape_char] [-F configfile] [-I pkcs11]
           [-i identity_file] [-J [user@]host[:port]] [-L address]
           [-l login_name] [-m mac_spec] [-O ctl_cmd] [-o option] [-p port]
           [-Q query_option] [-R address] [-S ctl_path] [-W host:port]
           [-w local_tun[:remote_tun]] destination [command]
Here is the same output from a Linux environment:
matthew@thinkpad / $ ssh
usage: ssh [-46AaCfGgKkMNnqsTtVvXxYy] [-b bind_address] [-c cipher_spec]
           [-D [bind_address:]port] [-E log_file] [-e escape_char]
           [-F configfile] [-I pkcs11] [-i identity_file]
           [-J [user@]host[:port]] [-L address] [-l login_name] [-m mac_spec]
           [-O ctl_cmd] [-o option] [-p port] [-Q query_option] [-R address]
           [-S ctl_path] [-W host:port] [-w local_tun[:remote_tun]]
           [user@]hostname [command]
I won’t go into the details on how to use any of these advanced options, there are very good tutorials on how to use the OpenSSH Client on other sites. The behaviour of OpenSSH Client on Windows should be almost exactly the same as on a Linux environment. So far I haven’t run into any issues with connectivity.
Connecting to OpenSSH Server
There is nothing special required to connect to a Windows host, it behaves exactly the same way as any other SSH host. There are a few different username formats that you can use:
user@windows-host (Local User Account)
user@domain.local@windows-host (Domain UPN)
domain\user@windows-host (Netbios)
One of the benefits is the ability to login with a Microsoft account if you are using that as your username. It is a bit unusual to see an e-mail address used this way, but I am glad that Microsoft made sure that this functionality worked correctly:
user@outlook.com@windows-host
There is nothing more to OpenSSH Server, you can manage your Windows host from the command line once you are logged in. If you want to do any further customization or need some basic troubleshooting, there is additional information below.
Change the Default Shell
By default when you login to a Windows installation with SSH, it defaults to the regular Command Prompt (cmd.exe). I prefer PowerShell for everyday usage, and it is easy to switch to PowerShell once you login, but you can change the default shell to save yourself some time if you are going to be using this feature often.
This is done through the Registry Editor, which will run with Administrator privileges. You need to navigate to the following key:
Computer\HKEY_LOCAL_MACHINE\SOFTWARE\OpenSSH
Create a new string called DefaultShell and give it the following value:
C:\Windows\System32\WindowsPowerShell\v1.0\powershell.exe
Restart the OpenSSH Server Service and the next time that you login with SSH, you should automatically go to PowerShell. I have tried making this work with Bash, but it doesn’t seem to be supported yet.

If you do want to use Bash, just type in bash.exe to switch to it.
Additional Settings
There are a few customizations that you can do to the OpenSSH Server service if needed. Since this is a port of the OpenSSH Server, the customization is done in a very similar way. To begin, the directory where all of the associated executable files are found is in the C:\Windows\System32\OpenSSH directory:

The other important directory for OpenSSH Server is the C:\ProgramData\ssh folder, which contains the configuration files and log files.

OpenSSH Server options, such as changing the login banner and locking down security options are done in the C:\ProgramData\ssh\sshd_config file.
Not all options can be used on a Windows host. For more information, you can refer to the official Wiki article on what options are supported:
https://github.com/PowerShell/Win32-OpenSSH/wiki/sshd_config
Troubleshooting
If you need to view the log file for OpenSSH Server, you need to make a quick change to the configuration file (C:\ProgramData\ssh\sshd_config) to enable logging:
# Logging
#SyslogFacility AUTH
#LogLevel INFO
Make the following change:
# Logging
SyslogFacility LOCAL0
LogLevel INFO
You will need to restart the OpenSSH Server service in order to apply the change. Once the change has been made, the log file (sshd.log) can be found in the C:\ProgramData\ssh\logs directory. When you are finished troubleshooting, you should revert this change to prevent unnecessary logging for the OpenSSH service.
Links
- SSH on Windows Server 2019
- Win32-OpenSSH

Contents
- 1 How to Install the SSH Client on Windows 10
- 2 How to Use SSH Commands in Windows 10
- 3 How to Open a Port in Firewall or Enable the Telnet Client
Using SSH on Windows 10 used to be a pain that required third-party software such as PuTTy. In 2018, though, Microsoft enabled native SSH commands via an OpenSSH Windows integration.
If you’re unfamiliar with SSH, it stands for Secure Shell, a protocol typically used for connecting to Linux servers. The command-line SSH tool lets you log into your server and run commands remotely to perform any required task.
The Integrated OpenSSH for Windows Client
The OpenSSH client for Windows is installed by default on Windows Server 2019 and Windows 10 build 1809 and later. However, if SSH commands aren’t working for you, it’s because you need to enable them in your Windows features. We’re going to walk you through enabling SSH on Windows 10 via this method, then show you how to use it. Let’s get started:
How to Install the SSH Client on Windows 10
Though Windows 10 OpenSSH is installed by default on most versions, it may not be for everyone. Thankfully, enabling SSH only takes a few seconds. Here’s how:
- Press the Search button and type “Optional feature”
Click the top result, which should read, “Add an optional feature”.

- Click “Add a feature” in Settings

- Install the Windows OpenSSH Client
Type “SSH” in the optional features search bar, then tick the entry that reads “OpenSSH Client”. Finally, click the “Install” button at the bottom of your Window. The process will take a few seconds to complete and shouldn’t require a restart.


Once you have the Windows 10 SSH client installed, using it is a simple matter. You can use Command Prompt for this, or PowerShell SSH, whichever you prefer. The SSH commands are the same across both applications, so you can still follow along.
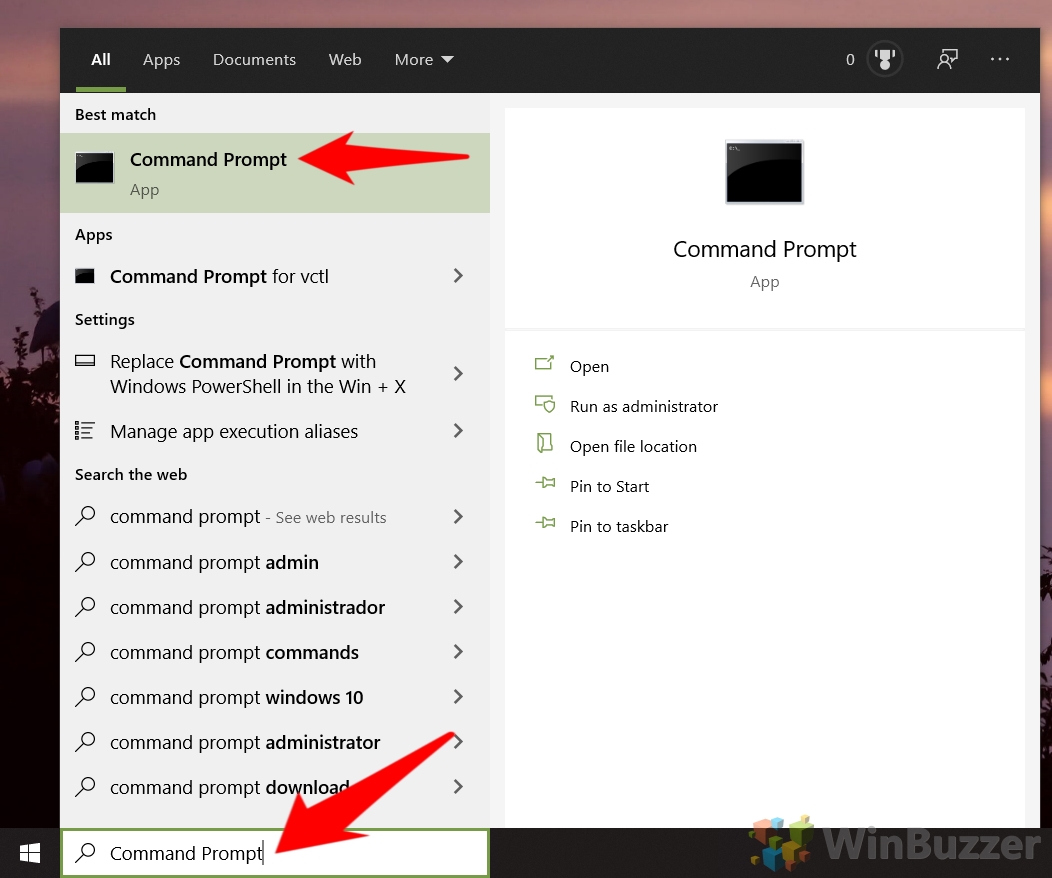
- Open Command Prompt (or PowerShell)
Press Start and then type “Command Prompt”. Click the top result.

- Run the SSH command to view its usage guide
Command Prompt will return a full list of options and syntax for you to use as you require.

- Connect to your server via your Windows Open SSH client
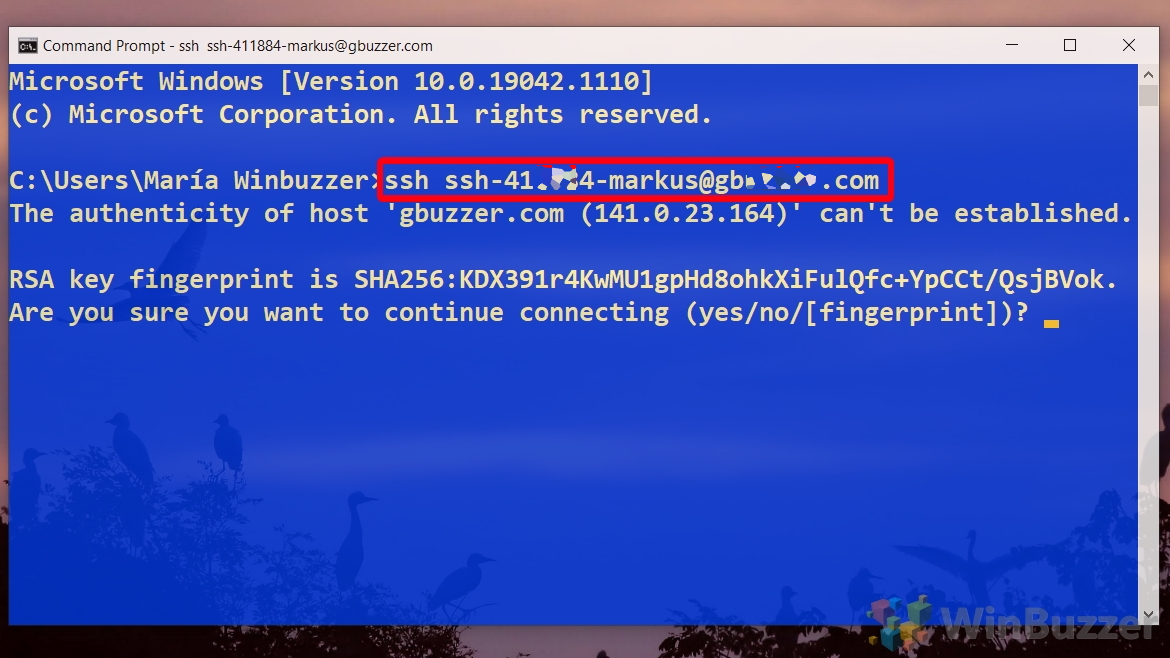
In most cases, you won’t need the above options to connect to your SSH server. Instead, you can simply run:
ssh username@host
You’ll be prompted for your server’s root password, which you can type and press Enter to log in.
If your server uses a different port to the standard for SSH, you can specify it by adding
-p portnumberto the end of your command.The first time you connect to a server, you’ll receive a warning asking if you’re sure you want to connect. Type
yesand press Enter to connect.
How to Open a Port in Firewall or Enable the Telnet Client
Now you know how to install SSH on Windows. However, if you’re still having issues, you may need to follow our tutorial on how to open or close a port in Windows 10 Firewall to add an exception for your SSH port.
Finally, if your server uses the older Telnet protocol, you may want to follow our tutorial on how to enable the Telnet client in Windows 10 instead.