I need to make a script that can write one line of text to a text file in the same directory as the batch file.
![]()
Mark Amery
144k81 gold badges407 silver badges459 bronze badges
asked Nov 9, 2013 at 16:15
![]()
1
You can use echo, and redirect the output to a text file (see notes below):
rem Saved in D:\Temp\WriteText.bat
@echo off
echo This is a test> test.txt
echo 123>> test.txt
echo 245.67>> test.txt
Output:
D:\Temp>WriteText

D:\Temp>type test.txt
This is a test
123
245.67

D:\Temp>
Notes:
@echo offturns off printing of each command to the console- Unless you give it a specific path name, redirection with
>or>>will write to the current directory (the directory the code is being run in). - The
echo This is a test > test.txtuses one>to overwrite any file that already exists with new content. - The remaining
echostatements use two>>characters to append to the text file (add to), instead of overwriting it. - The
type test.txtsimply types the file output to the command window.
![]()
Marco
7,1042 gold badges19 silver badges49 bronze badges
answered Nov 9, 2013 at 17:05
![]()
Ken WhiteKen White
123k14 gold badges225 silver badges445 bronze badges
0
It’s easier to use only one code block, then you only need one redirection.
(
  echo Line1
  echo Line2
  ...
  echo Last Line
) > filename.txt
answered Apr 14, 2015 at 19:24
![]()
jebjeb
78.9k17 gold badges172 silver badges226 bronze badges
7
echo "blahblah"> txt.txt will erase the txt and put blahblah in it’s place
echo "blahblah">> txt.txt will write blahblah on a new line in the txt
I think that both will create a new txt if none exists (I know that the first one does)
Where «txt.txt» is written above, a file path can be inserted if wanted. e.g. C:\Users\<username>\desktop, which will put it on their desktop.
answered Jul 15, 2015 at 6:06
![]()
Darth TaterDarth Tater
4574 silver badges7 bronze badges
3
    @echo off

    (echo this is in the first line) > xy.txt
    (echo this is in the second line) >> xy.txt

    exit
The two >> means that the second line will be appended to the file (i.e. second line will start after the last line of xy.txt).
this is how the xy.txt looks like:
this is in the first line
this is in the second line
![]()
Jay Godse
15.2k16 gold badges84 silver badges132 bronze badges
answered Nov 9, 2013 at 19:10
![]()
OrganOrgan
1633 bronze badges
@echo off
Title Writing using Batch Files
color 0a
echo Example Text > Filename.txt
echo Additional Text >> Filename.txt
@ECHO OFF
Title Writing Using Batch Files
color 0a

echo Example Text > Filename.txt
echo Additional Text >> Filename.txt
answered Apr 13, 2015 at 6:09
![]()
AceAce
491 silver badge1 bronze badge
- You can use
copy conto write a long text -
Example:
C:\COPY CON [drive:][path][File name]
…. Content
F6
1 file(s) is copied
answered May 9, 2015 at 9:05
![]()
pc43pc43
4391 gold badge7 silver badges19 bronze badges
2
@echo off

echo Type your text here.

:top

set /p boompanes=

pause

echo %boompanes%> practice.txt
hope this helps. you should change the string names(IDK what its called) and the file name
![]()
answered Feb 8, 2016 at 14:13
![]()
 Если вы оказались без доступа к чему-либо кроме командной строки или Windows PowerShell и по какой-то причине вам требуется возможность создания или чтения текстовых файлов, это вполне реализуемо, причем более чем одним методом.
В этой инструкции подробно о работе с текстовыми файлами в командной строки или PowerShell (разумеется, можно и в Терминале Windows) — создание и сохранение текстовых файлов, их вывод и чтение в консоли.
Создание текстовых файлов в командной строке
Возможность создания текстовых файлов доступна как в командной строке (cmd.exe), так и в PowerShell. Начнем с первого варианта.
Во всех случаях учитывайте, что при использовании кириллицы потенциально возможны проблемы с кодировкой, а в некоторых случаях кодировка может отличаться при использовании разных команд.
Команда ECHO
Команда командной строки echo предназначена для вывода текстовых сообщений в окне консоли, например, при выполнении сценария в bat-файле, но может быть использована и для вывода текста в файл, благодаря возможности использования оператора «>» для перенаправления вывода из консоли в файл.
Пример команды:
echo Содержимое текстового файла > file.txt
В результате её выполнения в текущей рабочей папке командной строки будет создан файл с именем file.txt и содержимым «Содержимое текстового файла».

COPY CON
Команда copy с параметром con позволяет скопировать содержимое консоли в файл. Использование возможности будет состоять из следующих шагов:
- Введите команду
copy con имя_файла.txt
файл не будет создан, но после выполнения указанной команды у вас появится возможность набрать содержимое этого файла, которое по завершении процесса будет в него сохранено.
- Курсор переместится на строчку ниже, и вы сможете набирать текст так, как делаете это обычно, включая перенос строки.

- Для завершения набора и сохранения текстового файла нажмите сочетание клавиш Ctrl+Z, а затем — Enter. Это добавит отметку конца файла и сохранит его в текущей папке с указанным на 1-м шаге именем.


Создание текстового файла в PowerShell
PowerShell также имеет набор встроенных командлетов для сохранения текстовых данных в файл.
Out-File
Использование Out-File в PowerShell по своей функциональности сходно с оператором перенаправления вывода в командной строке. Вывод консоли перенаправляется в заданный файл.
Пример использования:
"Текстовая строка" | Out-File -FilePath .\file.txt
В этом примере в текущей папке PowerShell будет создан файл с именем file.txt и содержимым «Текстовая строка».
New-Item
Создание нового текстового файла в PowerShell возможно с помощью командлета New-Item. Пример команды, в которой создается текстовый файл file.txt, содержащий «Текстовая строка» в текущем расположении:
New-Item -Path . -Name "file.txt" -ItemType "file" -Value "Текстовая строка"

Set-Content и Add-Content
Ещё два командлета PowerShell для работы с текстовыми файлами:
- Set-Content — перезаписывает содержимое файла
- Add-Content — добавляет содержимое в конце выбранного файла
Их использование можно увидеть на примере следующей команды:
Add-Content -Path .\file.txt -Value "Ещё одна текстовая строка"

Вывод (чтение) текстового файла в командной строке и PowerShell
Теперь перейдем к способам просмотреть текстовые файлы в командной строке или PowerShell. Как и в предыдущем случае, учитывайте, что для файлов, содержащих кириллицу, возможны проблемы с отображением символов в правильной кодировке.
TYPE
Самый простой вариант — использование команды TYPE с указанием пути к файлу, который нужно отобразить в консоли, например:
type file.txt

MORE
Если файл объемный и содержит большое количество строк, используйте команду more, например:
more file.txt
Выполнив команду, вы увидите часть содержимого текста, которая помещается в окне консоли, далее вы можете использовать следующие клавиши:

- Enter — для отображения следующей строки файла.
- Пробел — для отображения следующих строк документа, которые поместятся в активное окно консоли.
- P — Показать следующие N строк. После нажатия этой клавиши с последующим указанием количества строк, будет выведено соответствующее количество строк текстового документа.
- S — пропустить следующие N строк, работает аналогично предыдущему варианту.
- Клавиша «=» — для отображения текущего номера строки.
- Q — для прекращения выполнения команды more.
Get-Content
Вывести содержимое текстового файла в PowerShell можно с помощью Get-Content с указанием пути к файлу, например:
Get-Content file.txt

Также вы можете выводить определенные строки файла, с помощью команд вида (вывод первых или последних 10 строк соответственно):
Get-Content file.txt | Select-Object -First 10
Get-Content file.txt | Select-Object -Last 10
Или присвоить содержимое файла переменной и вывести конкретную строку:
$file_text = Get-Content file.txt
$file_text[2]

Помимо использования ручного ввода команд, вы можете использовать консольные текстовые редакторы — сторонние в версиях для Windows, такие как Vim, Nano, Kinesics Text Editor или даже старый встроенный edit.com (может отсутствовать в вашей версии системы и требовать патча NTVDMx64).
One of the most useful ways to log and troubleshoot the behavior of commands or batch jobs that you run on Windows is to redirect output to a file.
However, there are a few different ways you can redirect command line writes to a file. The option you choose depends on how you want to view your command output.

How Windows Command Prompt Output Works
When you type a command in the Windows console (command prompt), the output from that command goes to two separate streams.
- STDOUT: Standard Out is where any standard responses from commands go. For example the standard response for the DIR command is a list of files inside a directory.
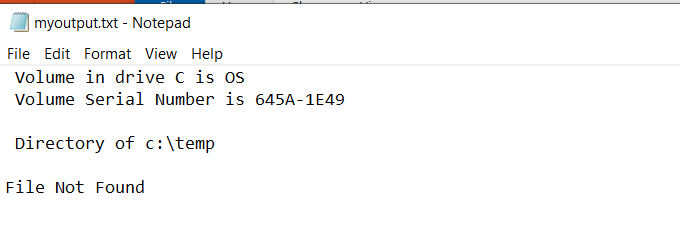
- STDERR: Standard Error is where any error messages go if there’s a problem with the command. For example if there aren’t any files in the directory, the DIR command will output “File Not Found” to the Standard Error stream.
You can redirect output to a file in Windows for both of these output streams.
Redirect Standard Output Write to New File
There are two ways you can redirect standard output of a command to a file. The first is to send the command output write to a new file every time you run the command.
To do this, open the command prompt and type:
dir test.exe > myoutput.txt
The > character tells the console to output STDOUT to the file with the name you’ve provided.
When you run this command, you’ll notice that there isn’t any response in the command window except the error that the file doesn’t exist.
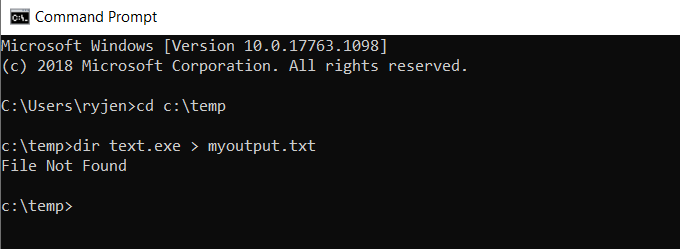
This is because the standard output for the command was redirected to a file called myoutput.txt. The file now exists in the same directory where you ran the command. The standard error output still displays as it normally does.
Note: Be careful to change the active directory for the command prompt before running the command. This way you’ll know where the output files are stored.
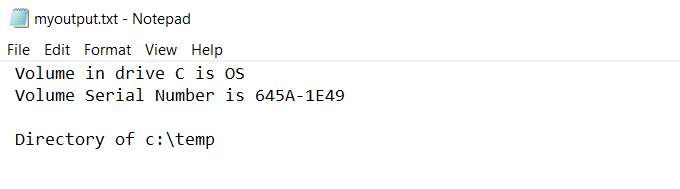
You can view the standard output that went to the file by typing “myoutput.txt” in the command window. This will open the text file in your default text file viewer. For most people, this is usually Notepad.exe.
The next time you run the same command, the previous output file will be deleted. A new output file will be recreated with the latest command’s output.
Redirect Standard Output Writes to the Same File
What if you don’t want to overwrite the same file? Another option is to use >> rather than > to redirect to an output file. In the case of this example, you would type:
dir test.exe >> myoutput.txt
You’ll see the same output (the error only).

But in this case, instead of overwriting the output file, this command appends the new output to the existing output file.
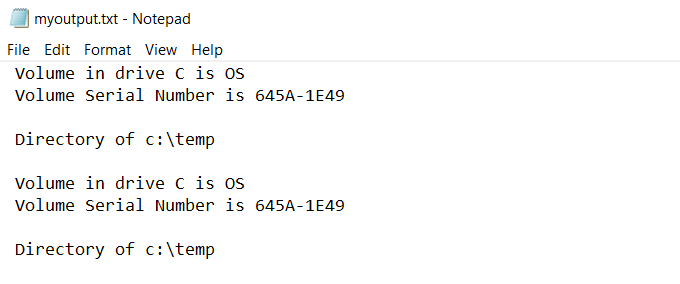
Every time you run a command and append the output to a file, it’ll write the new standard output to the end of the existing file.
Redirect Standard Error To a File
The same way you can redirect standard output writes to a file, you can also output the standard error stream to a file.
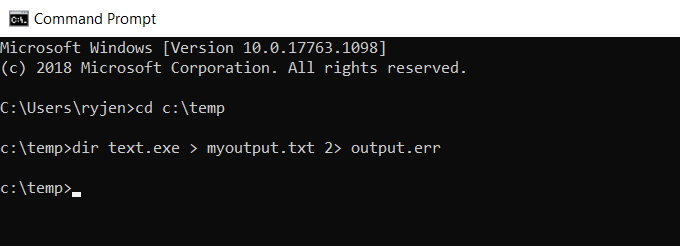
To do this, you’ll need to add 2> to the end of the command, followed by the output error file you want to create.
In this example, you’ll type the command:
dir test.exe > myoutput.txt 2> output.err
This sends the standard output stream to myoutput.txt, and the standard error stream to output.err. The result is that no output stream at all gets displayed in the console window.
However, you can see the error messages by typing output.err. This will open the file in your default text file viewer.

As you can see, any error messages from the command are output to the error file. Just as with the standard output, you can use >> instead to append the error to errors from previously run commands.
Redirect All Output Writes to a Same File
All of the approaches above result in multiple files. One file is for the standard output stream and the other is for the standard error stream.
If you want to include both of these outputs to the same file, you can do that too. To do this, you just need to redirect all output to the same file using the following command.
dir test.exe 1> myoutput.txt 2>&1
Here’s how this command works:
- The standard output is directed to the output file identified by output number 1.
- The standard error output identified by the number 2 is redirected to the output file identified by number 1.
This will append the error output to the end of the standard output.
This is a useful way to see all output for any command in one file.
Silencing Standard or Error Output Streams
You can also turn off either Standard Output or Standard Error by redirecting the output to a NUL instead of a file.
Using the example above, if you only want Standard Output and no Standard Error at all, you can use the following command:
dir test.exe 1> myoutput.txt 2>nul
This will result in the same output file as the first example above where you only redirected the Standard Output, but with this command the error won’t echo inside the console. It won’t create an error log file either.
This is useful if you don’t care about any errors and don’t want them to become a nuisance.
You can perform any of the same output commands above from inside a BAT file and the output from that line will go to the output file you specify. This is a useful way to see whether any commands within a BAT file had any errors when they tried to run.
The Write command is a Windows CMD command used to write text to a file. It is a powerful tool that allows users to quickly and easily create new files or edit existing ones. This article will provide an overview of the Write command, its syntax, options, and user examples.
What is the Write Command?
The Write command is a Windows CMD command used to write text to a file. It is a powerful tool that allows users to quickly and easily create new files or edit existing ones. The Write command can be used to create text files, HTML documents, batch files, and more. It is an essential tool for any Windows user who needs to create or edit text files.
Syntax of the Write Command
The syntax of the Write command is as follows:
- WRITE [filename] [text]
The filename is the name of the file you want to create or edit. The text is the text you want to write to the file. You can also use the following options with the Write command:
- /A – Append text to an existing file.
- /P – Prompt for input before writing to the file.
- /F – Force the file to be created or overwritten.
User Examples of the Write Command
The following are some examples of how to use the Write command:
- To create a new text file called “example.txt” with the text “This is an example text file”, use the following command: WRITE example.txt “This is an example text file”
- To append the text “This is an example of appended text” to an existing file called “example.txt”, use the following command: WRITE /A example.txt “This is an example of appended text”
- To prompt the user for input before writing to the file “example.txt”, use the following command: WRITE /P example.txt
- To force the file “example.txt” to be created or overwritten, use the following command: WRITE /F example.txt
Conclusion
The Write command is a powerful Windows CMD command that can be used to quickly and easily create or edit text files. This article has provided an overview of the Write command, its syntax, options, and user examples. With the Write command, users can create text files, HTML documents, batch files, and more.
(Image credit: Future)
On Windows 11 and 10, the ability to save the Command Prompt or PowerShell command output to a text file can be helpful in many situations. For instance, exporting the command output for analysis is convenient for troubleshooting a problem. You can also print the return of a command to a text file to save a configuration for documentation purposes and more.
You can always select and right-click the content to copy the output to the clipboard and paste it to a text file. However, the approach requires additional steps, which you can avoid with a single command using the redirected output to the file function.
This guide will walk you through the steps to save the command output to a text file on Command Prompt or PowerShell on Windows 11. (The instructions will also work on Windows 10.)
How to save command output to file using Command Prompt
To save the command output to a text file with Command Prompt, use these steps:
- Open Start.
- Search for Command Prompt.
- Right-click the top result and select the Run as administrator option.
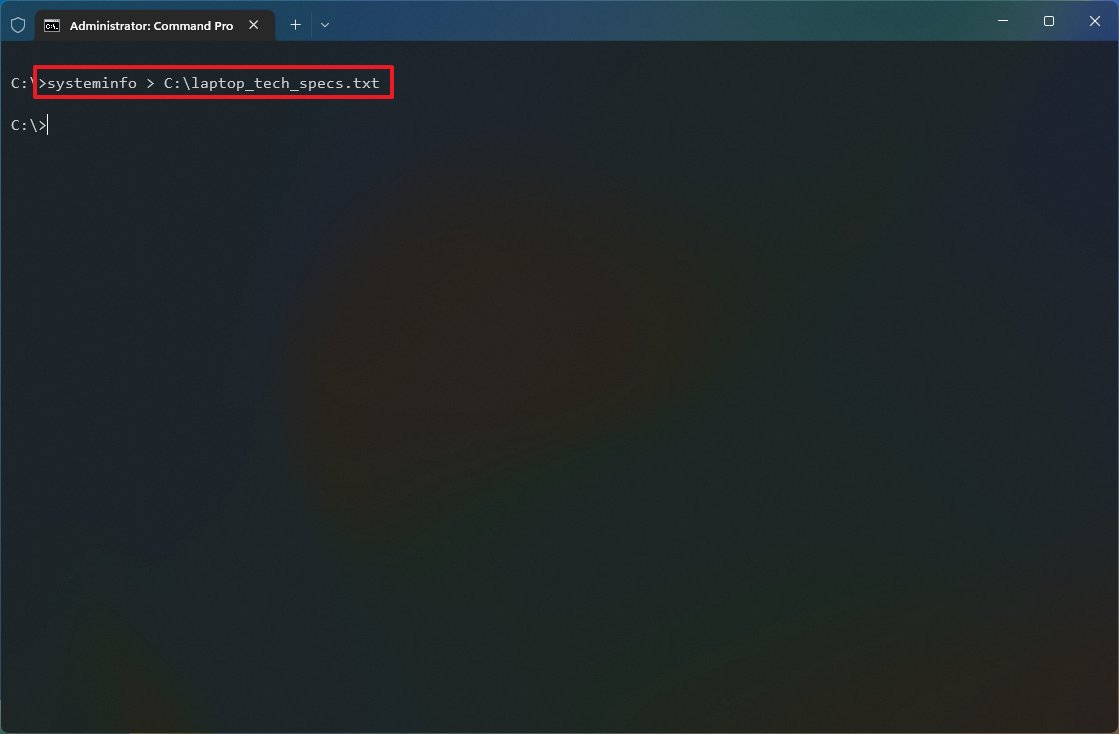
- Type the following command to save the output to a text file and press Enter: YOUR-COMMAND > C:\PATH\TO\FOLDER\OUTPUT.txt
In the command, change «YOUR-COMMAND» with your command and «c:\PATH\TO\FOLDER\OUTPUT.txt» with the path and file name to store the output.
This example exports the system technical specifications to the «laptop_tech_specs.txt» file: systeminfo > C:\laptop_tech_specs.txt
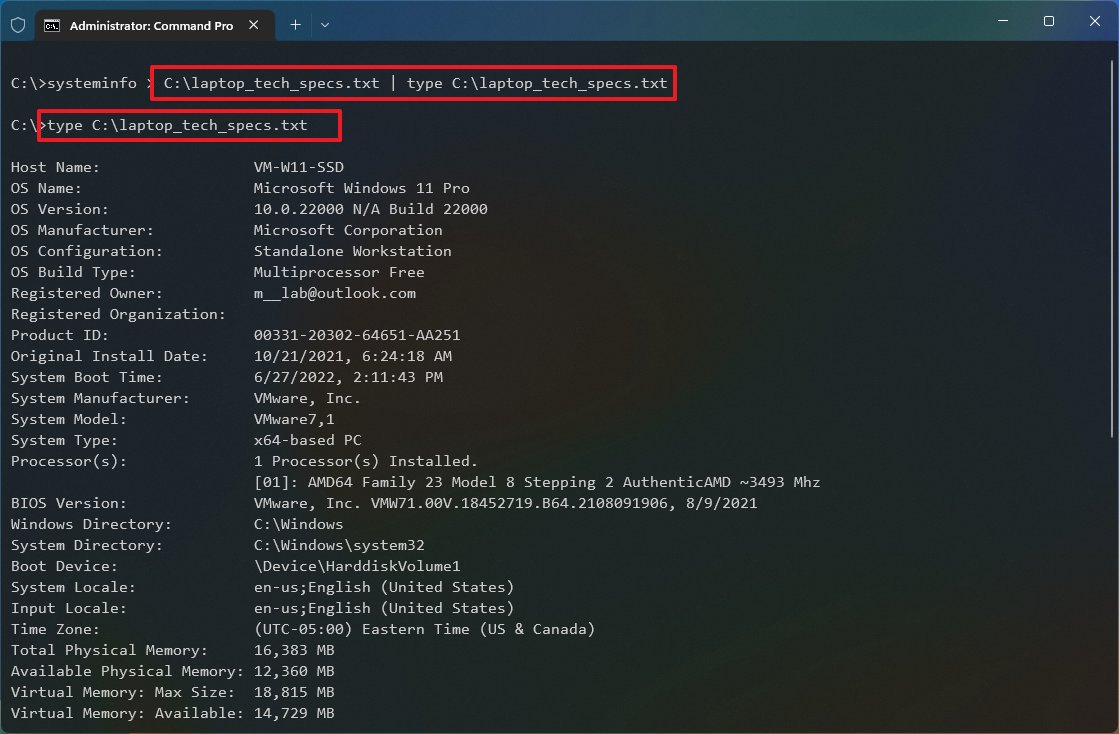
- (Optional) Type the following command to save the output and view results on the screen and press Enter: YOUR-COMMAND > C:\PATH\TO\FOLDER\OUTPUT.txt | type C:\PATH\TO\FOLDER\OUTPUT.txt
In the command, change «YOUR-COMMAND» with your command and «c:\PATH\TO\FOLDER\OUTPUT.txt» with the path and filename to store and view the output.
This example exports the system technical specifications to the «laptop_tech_specs.txt» file and prints the information on the screen: systeminfo > C:\laptop_tech_specs.txt | type C:\laptop_tech_specs.txt
- Quick tip: If you have problems viewing the file, you can use the type c:\PATH\TO\FOLDER\OUTPUT.txt command after step No. 3.
Once you complete the steps, the command output will be saved into the text file, which you can review or share with tech support.
How to save command output to file using PowerShell
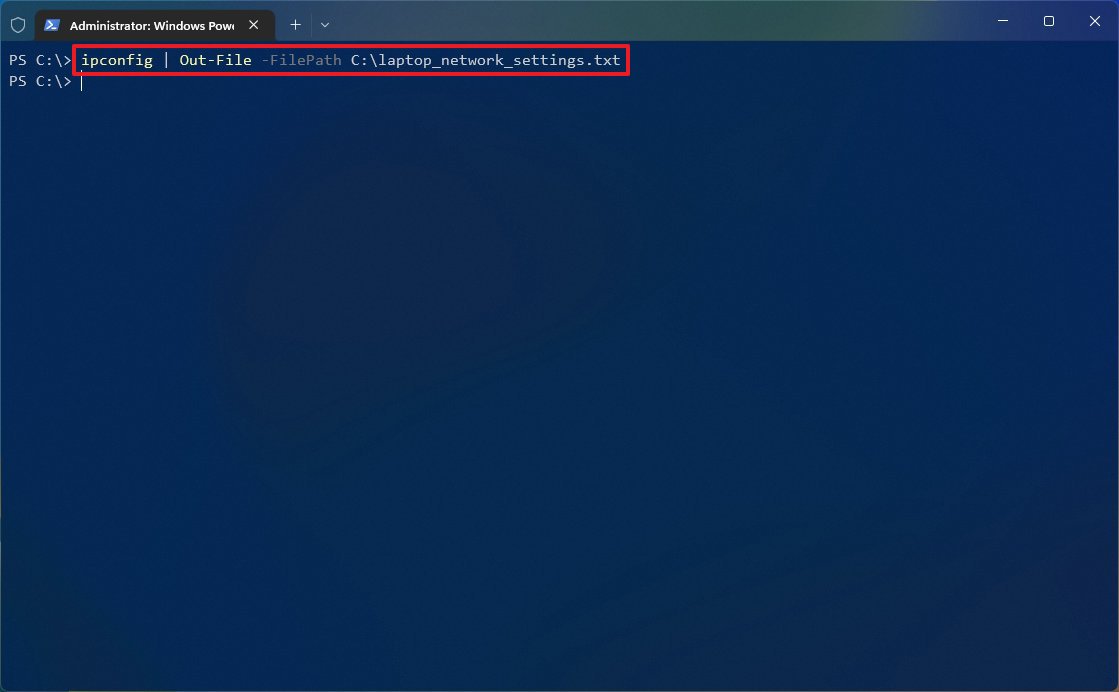
To save the command output to a text file with PowerShell on Windows 11 or Windows 10, use these steps:
- Open Start.
- Search for PowerShell.
- Right-click the top result and select the Run as administrator option.
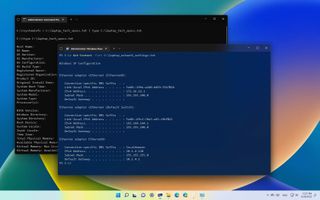
- Type the following command to save the output to a text file and press Enter: YOUR-COMMAND | Out-File -FilePath C:\PATH\TO\FOLDER\OUTPUT.txt
In the command, change «YOUR-COMMAND» with your command and «c:\PATH\TO\FOLDER\OUTPUT.txt» with the path and file name to store the output.
This example exports the IP address configuration to the «laptop_network_settings.txt» file: ipconfig | Out-File -FilePath C:\laptop_network_settings.txt
- (Optional) Type the following command to view the saved output on the screen and press Enter: Get-Content -Path C:\PATH\TO\FOLDER\OUTPUT.txt
In the command, change «c:\PATH\TO\FOLDER\OUTPUT.txt» with the path and file name with the output content.
This example shows the contents of the «laptop_network_settings.txt» file: Get-Content -Path C:\laptop_network_settings.txt

After you complete the steps, PowerShell will save the result into a text file on your specified location.
More Windows resources
For more helpful articles, coverage, and answers to common questions about Windows 10 and Windows 11, visit the following resources:
- Windows 11 on Windows Central — All you need to know
- Windows 10 on Windows Central — All you need to know
All the latest news, reviews, and guides for Windows and Xbox diehards.
Mauro Huculak is technical writer for WindowsCentral.com. His primary focus is to write comprehensive how-tos to help users get the most out of Windows 10 and its many related technologies. He has an IT background with professional certifications from Microsoft, Cisco, and CompTIA, and he’s a recognized member of the Microsoft MVP community.