This post introduces 4 ways to allow you to run CHKDSK on startup in Windows 10 to check and fix computer hard drive errors. It also explains how to stop CHKDSK from running at startup if you find that CHKDSK runs at every startup in Windows 10. Best free CHKDSK alternative and hard drive data recovery services from MiniTool are also offered.
If you’d like to run CHKDSK on startup in Windows 10 to scan and repair hard disk errors, you can check the solutions below. This post also includes ways to run Windows 10 disk check on startup when your PC or laptop won’t turn on.
Besides, if you feel troublesome that CHKDSK runs at every startup in Windows 10, you can also easily stop CHKDSK on startup in Windows 10 by following the operation below.
Hard disk errors often cause some data loss. So, MiniTool Software will also introduce professional data recovery software to help you recover your lost and deleted files in all versions of Windows.
Also read: Discover the essential steps for successful hard drive recovery in this informative article.
How to Run CHKDSK on Startup Windows 10 – 4 Ways
- Run CHKDSK on Startup from Command Prompt
- Run CHKDSK on Startup from Advanced Options Screen
- Run CHKDSK on Startup with Recovery Disk/USB
- Run CHKDSK on Startup with Installation Media
How to Run CHKDSK on Startup Windows 10 – 4 Ways
If your computer can boot and you want to scan the Windows system C drive (where the OS is installed) or other system related drives, you need to run CHKDSK in Windows 10 before boot since CHKDSK can’t run if the drive is in use. Check how to run CHKDSK before booting into Windows below.
1. How to Run CHKDSK on Startup from Command Prompt
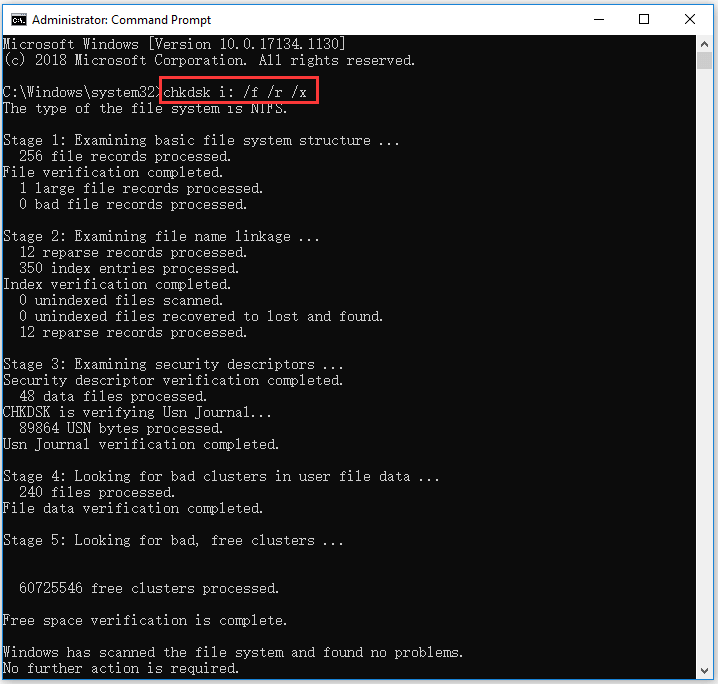
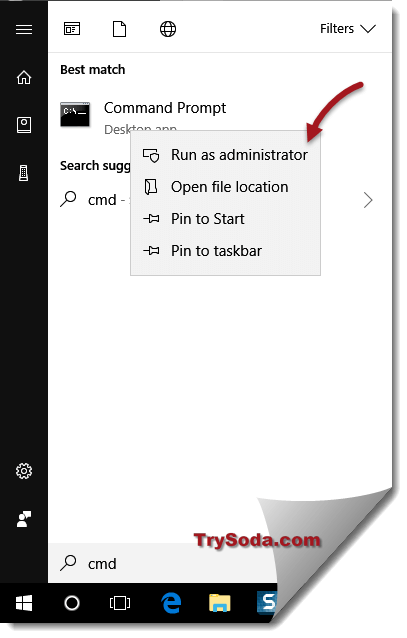
- Press Windows + R, type cmd, press Ctrl + Shift + Enter to open elevated Command Prompt in Windows 10.
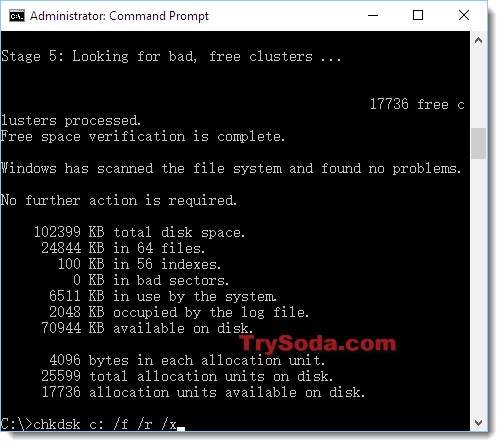
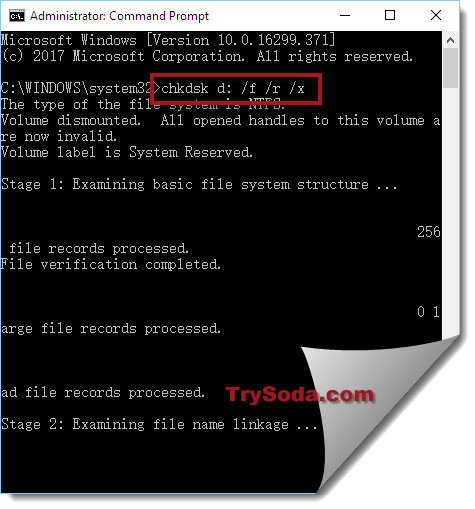
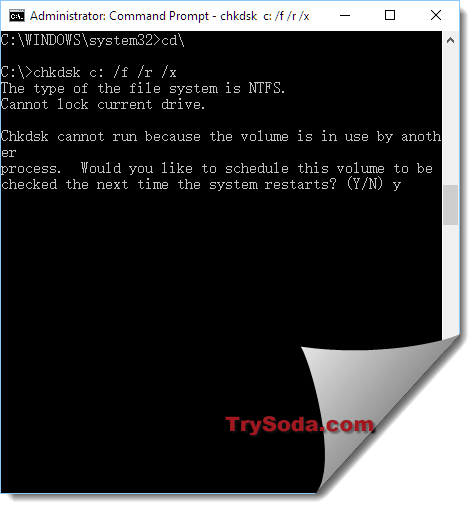
- In command Prompt, type this command: chkdsk C: /f /r /x, and press Enter. Replace “C” with the drive letter of the target drive. Please do not miss the spaces in this command.
- If you are trying to scan the system C drive, CHKDSK will pop up a message saying that cannot lock current drive, the volume is in use by another process, and asking you if you want to schedule this volume to be checked the next time the system restarts. You can type Y and press Enter.
- Restart your computer and Windows will automatically run CHKDSK on reboot to scan and fix hard drive errors.
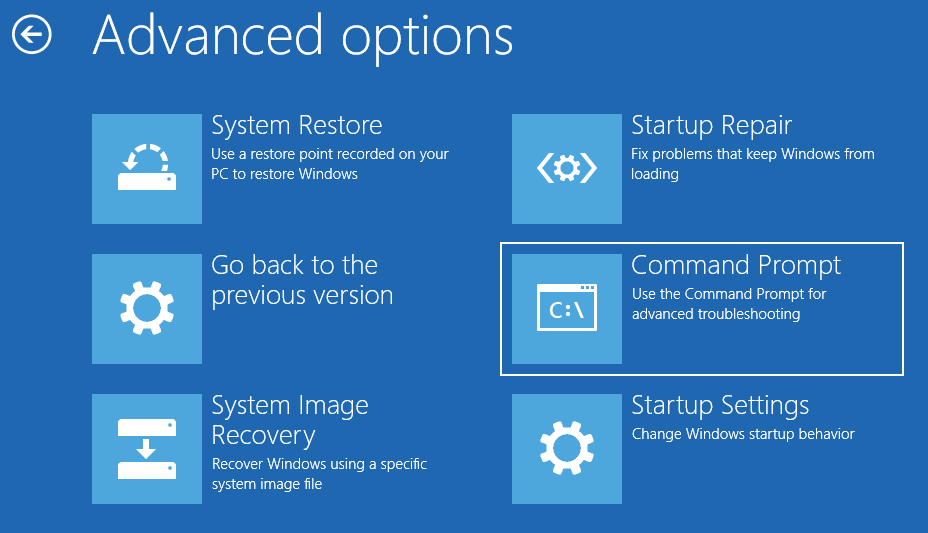
2. How to Run Windows 10 Disk Check on Startup from Advanced Options Screen
If you know how to access advanced startup options in Windows 10, you can select Command Prompt in Advanced options screen to boot your computer into Command Prompt window. And then you can run CHKDSK command in Command Prompt window to check and fix computer hard drive errors before booting into Windows.
3. How to Run CHKDSK on Startup with Recovery Disk/USB
If your Windows 10 computer can’t boot, but if you know how to create a Windows 10 recovery USB drive or disk, you can then use the recovery USB or disk drive to boot your Windows 10 computer into Windows Recovery Environment (Windows RE). Then you can click Troubleshoot -> Advanced options, click Command Prompt in the blue Advanced options screen and use it to run chkdsk /f /r command.
4. How to Run CHKDSK on Startup with Installation Media
If you don’t have a Windows 10 installation media at hand, you can check how to create an installation media with Windows 10 media creation tool. After you get the installation USB or disc, you can use it to boot your computer into WinRE and get into Advanced options screen to choose Command Prompt option. Then you can run CHKDSK command in Command Prompt to scan and fix disk errors.
Instead of struggling to run CHKDSK on startup, you can use third-party free disk check tool like MiniTool Partition Wizard to easily check and fix disk errors.
MiniTool Partition Wizard is an all-in-one disk partition manager for Windows. Aside from scanning and fixing disk errors and checking disk bad sectors, you can also use it to easily create/resize/format/delete/wipe partitions, copy disk, migrate OS, convert partition format, analyze disk space usage, test hard drive speed, etc.
Free download and install MiniTool Partition Wizard on your Windows computer, and check the guide below for how to use it to check and fix disk errors as well as how to detect bad sectors on hard drive.
MiniTool Partition Wizard FreeClick to Download100%Clean & Safe
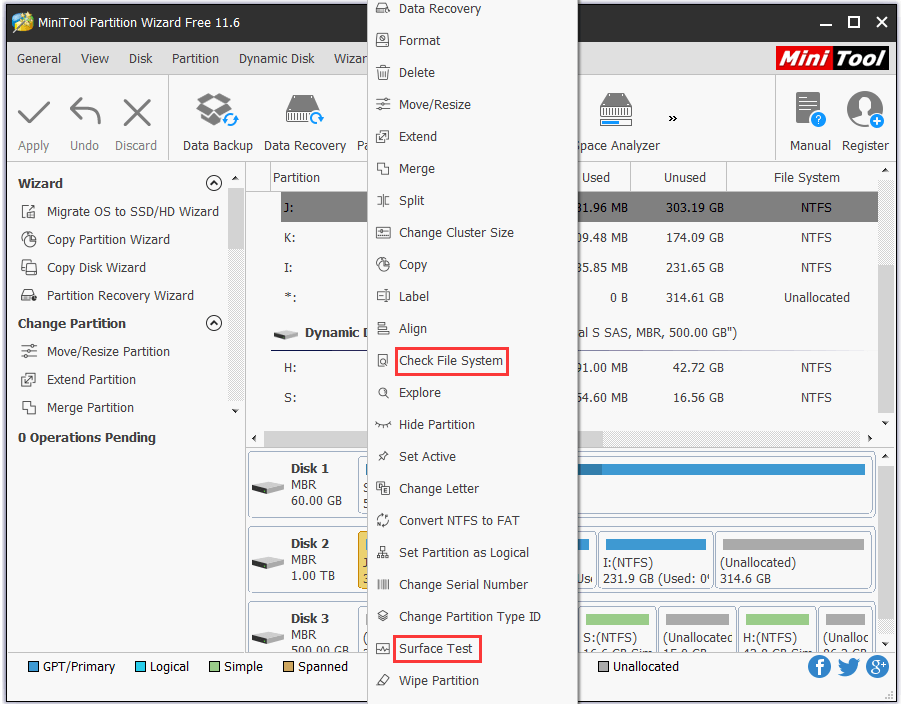
Step 1. Launch MiniTool Partition Wizard and click Yes if it pops up the User Account Control window to enter into the main interface of the software. Locate the target hard drive and the target partition which you want to check disk errors.
Step 2. Right-click the target partition and select Check File System option. In the new window, you can click check & fix file system error option, and click Start button. MiniTool Partition Wizard will automatically scan and fix detected file system errors on the disk.
Step 3. To diagnose if the hard drive has bad sectors, you can go back to the main interface, and right-click the target partition to choose Surface Test option. Click Start Now button to begin checking bad sectors on the disk.
Click to Tweet
How to Stop CHKDSK on Startup Windows 10 – 3 Ways
- Press Any Key to Cancel the Disk Check
- Stop CHKDSK on Startup via Command Prompt
- Disable CHKDSK on Startup with Registry Editor
How to Stop CHKDSK on Startup Windows 10 – 3 Solutions
Some users have the problem that CHKDSK always runs at startup. CHKDSK scanning can be very time-consuming. If you want, you can stop CHKDSK from running at startup in Windows 10. Check the solutions below.
Solution 1. Press Any Key to Cancel the Disk Check
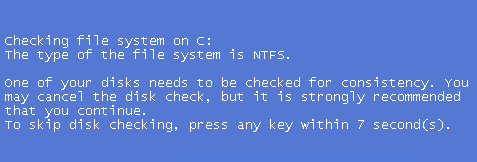
If your computer didn’t shut down properly, Window CHKDSK may automatically run when you start your computer next time. It will appear a message on booting saying that one of your disks needs to be checked for consistency. It advises you to conduct the disk check, but also gives an option to cancel the disk check by pressing any key within several seconds. You can press any key to stop CHKDSK on startup in Windows 10.
Solution 2. Stop CHKDSK on Startup via Command Prompt
By using solution 1, you can skip the CHKDSK scanning for once. But if you restart your computer next time, CHKDSK may automatically run again since it thinks one of your computer hard drive still needs to be checked. If CHKDSK runs at startup in every restart, you can use Command Prompt to disable it if you want.
- Press Windows + R, type cmd, and press Ctrl + Shift + Enter to open elevated Command Prompt.
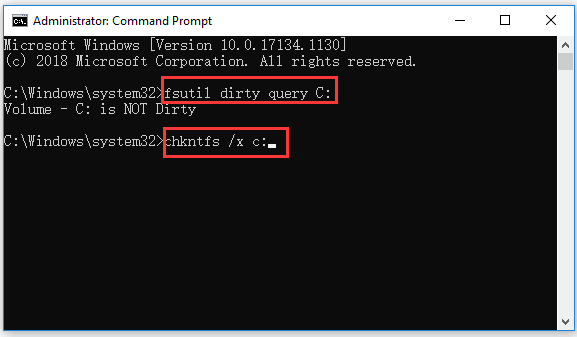
- Optional action: Type the command fsutil dirty query C: in Command Prompt, and press Enter to execute the command. This can help check if the drive has been marked with a dirty bit value, since CHKDSK will automatically check the disk that is marked as dirty.
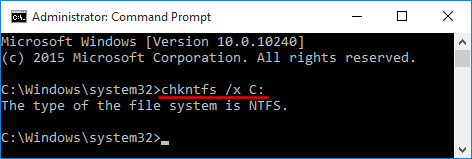
- Next you can type chkntfs /x c: command, and press Enter to disable CHKDSK from scanning C drive on startup.
- If you want to stop CHKDSK on startup for several drives, you can add the drive letters in the command, e.g. chkntfs /x c: d: e:. Please do not forget the spaces in the command line.
Solution 3. Disable CHKDSK on Startup with Registry Editor
You can also stop check disk on startup by using Registry Editor.
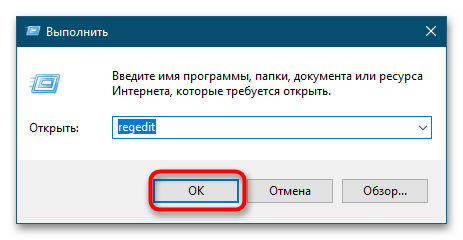
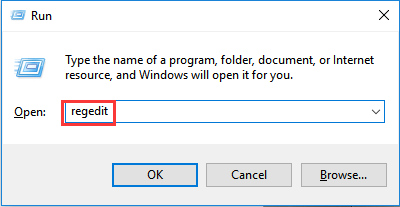
- Press Windows + R, type regedit in Run box, and press Enter to open Registry Editor in Windows 10.
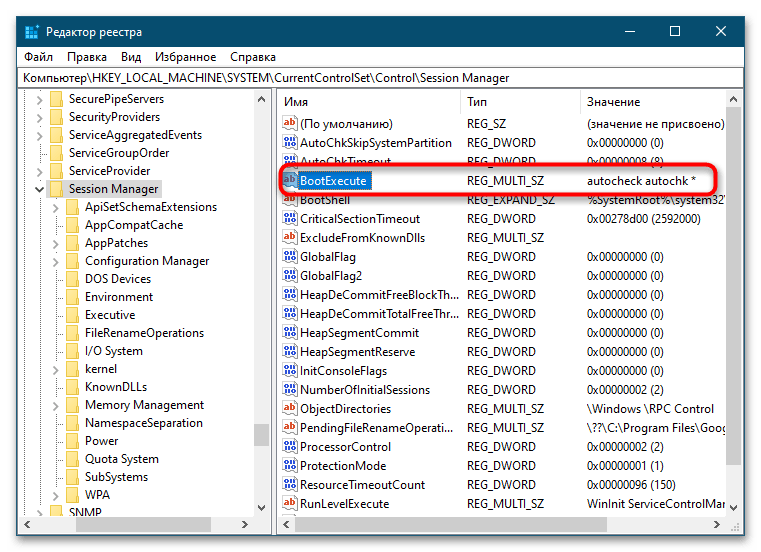
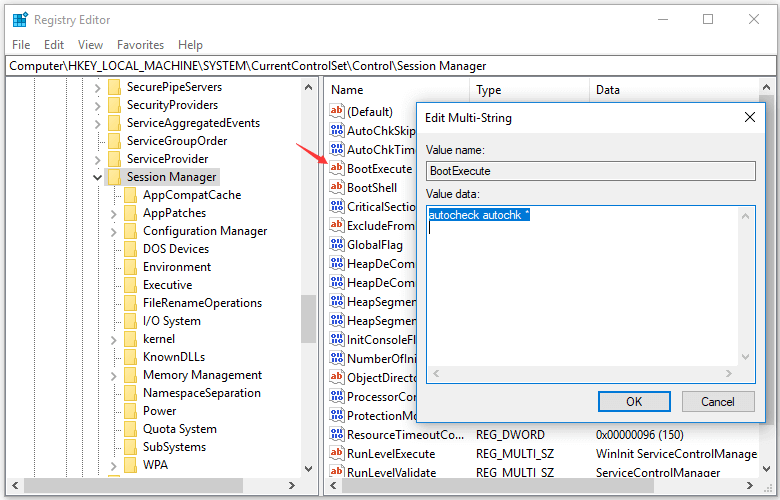
- Navigate the following path in Registry Editor: HKEY_LOCAL_MACHINE\SYSTEM\CurrentControlSet\Control\Session Manager.
- Double-click BootExecute key in the right window. And delete all lines under Value data except autocheck autochk *.
- Close Registry Editor and restart your computer to check if CHKDSK runs at startup.

How to Recover Lost/Deleted Files from Windows 10 PC or Laptop
In case you lost some important data after CHKDSK scan or lost some important files due to hard drive failures or other reasons, here we introduce an easy and fast way to help you recover any lost or deleted files from Windows 10 computer and other storage devices.
MiniTool Power Data Recovery is best free data recovery software for Windows. You can use this tool to easily recover lost/deleted files from Windows PC or laptop, external hard drive, SSD, USB flash drive, SD memory card, etc. in simple steps. Various data loss situations are covered.
It delivers fast scan speed, high recovery result, and keeps original file. Extremely easy-to-use and 100% safe. Download and install MiniTool Power Data Recovery in your Windows 10 computer, and check how to recover data from Windows 10 computer below.
MiniTool Power Data Recovery TrialClick to Download100%Clean & Safe
Step 1. Launch MiniTool Power Data Recovery, choose the target partition that contains your lost/deleted files and click Scan button. If you want to select the whole disk to scan, you can click Devices tab and choose the disk.
This software will start scanning the chosen drive automatically. Before you click Scan, you can also click Scan Settings button in the left menu bar to select specific file types to scan.
Step 2. Wait until the scan finishes. Then you can check the scan result to find needed files, tick them and click Save button to choose a new destination path to store the recovered files.

Conclusion
This tutorial explains how to run or stop CHKDSK on startup in Windows 10. If you have other questions about how to use MiniTool Partition Wizard or MiniTool Power Data Recovery, please contact [email protected].
Click to Tweet
Run or Stop CHKDSK on Startup FAQ
Why does CHKDSK run on startup?
If your computer runs CHKDSK on startup, it might because of improper computer shutdown, hard drive failures, disk file system errors caused by malware/virus infection, etc. You can let CHKDSK perform the disk check and it may cost some time. You can also use one of the 3 solutions in this post to stop CHKDSK on startup in Windows 10 if you want.
How do I stop CHKDSK from running at startup Windows 10?
This tutorial explains 3 solutions to let you stop CHKDSK on startup in Windows 10. You can try one of them.
Is it safe to stop CHKDSK?
Generally you can’t stop CHKDSK process once it starts. It’s not safe to stop CHKDSK while it’s still scanning. It may cause file system corruption and data loss if you shut down the computer during the disk check process.
How to stop CHKDSK in progress Windows 10?
- Press Ctrl + Shift + Esc to open Task Manager.
- Find CHKDSK in Task Manager window, right-click it and click Details to find out PID of the CHKDSK task.
- Next you can press Windows + R, type cmd, and press Ctrl + Shift + Enter to open elevated Command Prompt.
- Then type the command taskkill /F PID PID number in Command Prompt window, and press Enter. Replace “PID number” with the PID of CHKDSK.
You may use this way to force stop CHKDSK if the scanning and repairing drive gets stuck in Windows 10. However, it’s not a good idea to force stop CHKDSK in progress after you manually run chkdsk /f /r command in Windows 10. It may cause damage to the hard disk and cause data loss. So it’s not recommended.
Способ 1: Утилита «chkntfs»
Для управления режимом проверки дисков при загрузке в Windows 10 имеется встроенная утилита «chkntfs» — используйте ее, чтобы отключить автопроверку дисковых накопителей. Утилита не имеет графического интерфейса, поэтому работать с ней придется через консоль.
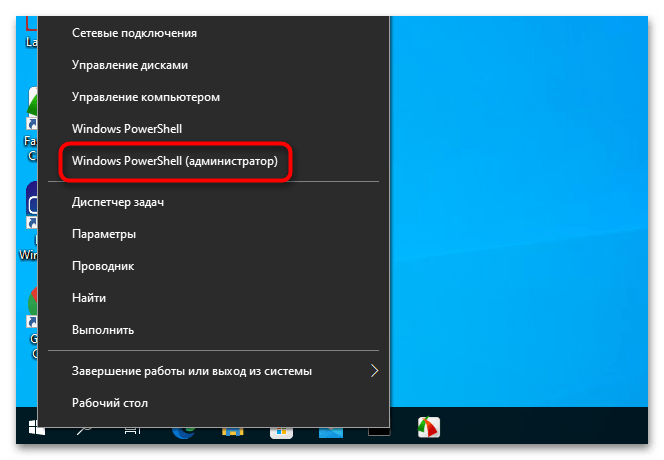
- Запустите от имени администратора «PowerShell» из контекстного меню кнопки «Пуск» или другим известным вам способом. Для этих же целей вы можете использовать классическую «Командную строку».
- Введите команду
chkntfs /x C:и нажмите клавишу ввода. Если нужно отключить автопроверку на диске D, укажите в команде его букву. Также буквы дисков можно указать через пробел.

В результате автоматическая проверка диска средствами «chkdsk» при загрузке операционной системы будет отключена.
Способ 2: Твик реестра
Для отключения автопроверки разделов накопителя можно использовать системный реестр, изменив значение одного из параметров.
- Запустите «Редактор реестра», для чего вызовите нажатием клавиш Win + R диалоговое окошко быстрого запуска и выполните в нем команду
regedit. - Разверните
HKLM\SYSTEM\CurrentControlSet\Control\Session Manager, найдите справа параметр «BootExecute» и кликните по нему дважды, чтобы открыть его свойства. - Чтобы отключить автопроверку системного диска, отредактируйте значение параметра по умолчанию, добавив перед знаком звездочки
/k:C, вот так:autocheck autochk /k:C *. - Соответственно, если нужно проверить другой том, вместо C укажите его букву. Также литеры дисков, для которых производится отключение, можно указать через пробел, например
autocheck autochk /k:C /k:D *.

После применения твика нужно будет перезагрузить компьютер. Между прочим, стоит отметить, что отключать автопроверку диска при загрузке без особой нужды не рекомендуется, так как при этом вы утратите контроль за целостностью файловой системы. Более правильным решением будет установить причины активации автопроверки, которая может указывать на серьезные проблемы с жестким диском.
Еще статьи по данной теме:
Помогла ли Вам статья?
CHKDSK is a command used in Command Prompt to scan, check, and repair hard drives in our computers. In Windows 11 or Windows 10, using chkdsk is no different from using it in any previous version of Windows. However, you will need to give the Command Prompt (CMD) administrative privileges to use the chkdsk command.
Run CHKDSK in Windows 11/10 from Command Prompt
If your target hard drive is not a boot drive, meaning that the drive isn’t where your Windows is located, using CHKDSK in Command Prompt will scan and repair the target drive immediately.
- Go to Start Menu. Type CMD.
- From the search result, right click Command Prompt, then click Run as administrator.

- If “User Account Control” ask for permission, click Yes to proceed.
- In the command prompt, type:
chkdsk [driveletter] /f /r /x
- For example:
chkdsk C: /f /r /x

- Chkdsk will then run to scan the selected disk for errors and repair them automatically. It may take hours if you have a huge and messy drive.
Why do we need the parameters “/f /r /x” when doing chkdsk?
- If you enter CHKDSK without the parameters, the command itself will only scan the disk and show you the disk’s status. It won’t repair anything. To allow it to fix errors it finds, “/f” is needed.
- If you want it to also locate bad sectors on the drive and recover readable information, “/r” is needed.
- To force it to dismount the drive before checking the disk, “/x” is needed. This is recommended to make sure there is no running application in that particular drive that may interfere with the CHKDSK process.
- If you need more info on other parameters you can use, go to this chkdsk docs from microsoft.
Run CHKDSK in Windows 10/11 Before Boot
If you want to CHKDSK your primary drive where you store and boot your Windows, usually C: drive, CHKDSK will need to run before booting into Windows. This is because CHKDSK cannot be run if the drive is in use, especially if there are any system core files on the drive that Windows relies on to work.
Note: If you cannot even boot into Windows, skip this method and go to the next one.
Here’s how you can set CHKDSK to run before boot in Windows 11/10:
- Follow step 1-4 in the instruction above.
- In the command prompt, enter chkdsk commands with the parameters. For example:
chkdsk C: /f /r /x
- If chkdsk detects that the drive you want to scan is a boot drive, it will shows “Cannot lock current drive. Chkdsk cannot run because the volume is in used by another process“, and ask if you would like to schedule the drive to be checked the next time you reboot/restart your computer.
- Type and enter Y.
- Restart your computer.
- Chkdsk will run automatically during your next boot before booting into Windows.
If you cannot even boot into Windows
If you are facing a serious issue where you can’t even boot into Windows, you can force your PC to boot into recovery mode and open Command Prompt from the recovery mode.
For more info about how to launch CMD on boot, read: How to Startup Repair Windows 11/10 using Command Prompt.
When do you need to run chkdsk for your drives?
You can run CHKDSK gradually and as frequently as you like. Unlike defragmenting, CHKDSK won’t harm your drive in any way no matter how frequently you run it. If you have not run it for a while, it’s recommended that you run CHKDSK for each of your hard drives once a month.
If you encounter freezes, hangs, drives, or CPU running at 100% all the time in Windows, run CHKDSK. There may be errors on the disk that cause all the problems.
Why is chkdsk stuck at a certain percentage for a long time?
CHKDSK may take some time to finish. We are talking about several hours here depending on the size of the disk and how much space it was used. Try to wait it out. We usually let our system run CHKDSK overnight.
If CHKDSK is still stuck at a certain percentage even after 10 hours of running, try to restart the run. It may indicate that your drive is starting to fail. Backup immediately and replace the drive as soon as possible before it completely breaks down.
Q: Why does my computer run to a disk check every time I start it up?
«Every time I turn on my laptop it does a disk check. It never used to do this before, but now it’s showing up all the time, taking me a long time to boot into Windows. How do I disable the disk check progress at the start in Windows 10? Can someone help me?»
The disk check utility (CHKDSK or chkdsk.exe) is helpful for scanning and repairing hard drive problems, but it can be annoying to see disk check running on every startup when you do not need it. This post is going to teach you how to stop disk check on startup in Windows 10 so you can skip this meaningless checking progress and directly enter the system.
| Workable Solutions | Step-by-step Troubleshooting |
|---|---|
| #1. Using Windows 10 Command Prompt | Press Windows + X keys to bring up the context menu, select Command Prompt (Admin) …Full steps |
| #2. Using Windows 10 Registry Editor | Press Windows + R keys to bring up the Run box, type regedit…Full steps |
***Common issues related to Check Disk you might encounter:
Should You Stop Auto Disk Check During Windows Startup?
When you turn on a computer and it starts going into a session of «scanning and repairing drive (C:) xx% complete», it can be an alarm of a boot drive issue. And if it’s checking the drive like D: or E:, the problem can be from the data drive. If you’re recently experiencing a slow computer performance, let Windows run through the checking disk from 0% to 100% complete.
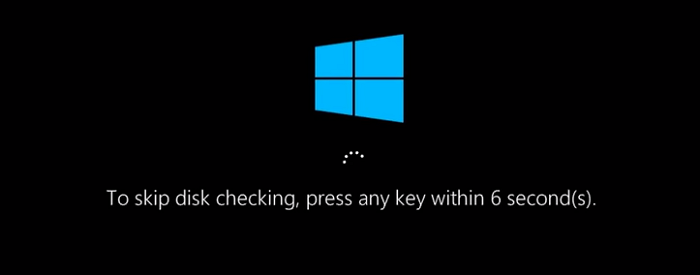
If you’re reluctant to execute the disk check, you can avoid it by following the message «to skip disk checking, press any key within xx second(s).» However, when you restart your computer the next time, the same message will appear on the screen again because Windows still thinks the drive needs repairing and will keep reminding you until it is checked.
The fact is, to be frank, the disk check is not always triggered to find issues, as what we’re going to mainly discuss here. Some system events and insignificant problems can evoke the utility, which usually sets to take effect at the next system reboot and the next, and the next… For example:
- Improper system shutdown
- Suspicious malware or virus infection
- Unplug any external device from the computer without safely ejecting
At this moment, an unwanted disk check that constantly comes up can be irritated. All you need to do is cancel the automatic schedule.
You can follow the two ways below to check on the startup. And if you think this passage is useful, you can share with someone in need!
Except for the cases that Windows force you to run a disk check because it has detected issues waiting for repair, you can decide by yourself to stop it from working on each startup in Windows 10/8/7. There are two common ways for you to follow. We’ll display the guide based on Windows 10 operating system.
#1. Using Windows 10 Command Prompt
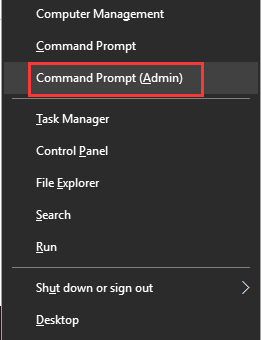
- Press Windows + X keys to bring up the context menu, select Command Prompt (Admin) and click in.
- On the Command Prompt window, type the command <chkntfs /x C:> if your target is to disable a disk check task on the C: drive.
#2. Using Windows 10 Registry Editor
- Press Windows + R keys to bring up the Run box, type regedit and click OK. This will help open Windows Registry Editor.
- You’ll navigate to the Session Manager folder by following the path: HKEY_LOCAL_MACHINE\SYSTEM\CurrentControlSet\Control\Session Manager. Double-click on the BootExecute on the right pane. In the new «Edit Multi-String» window, delete all linds under Value data except autocheck autochk *.
Simple & Free Windows 10 Disk Check Alternative
To run the disk check through Windows Command Prompt, you must be very familiar with the various CHKDSK parameters and know each parameter’s function as well. Are you interested in a simple yet free CHKDSK alternative that will never bother you on every startup?
EaseUS Partition Master is primarily an all-around disk and partition manager program for Windows, which allows users to take full charge of their computer hard disks and any external ones by adjusting the partition size, file system conversion, disk cloning, OS migration, etc. Its «Check partition» feature works exactly like the Windows inbuilt CHKDSK utility with regard to scanning and repairing disk errors and bad sectors it finds, and this feature is available to its free version.
Step 1. Right-click the target partition that has a problem.
Step 2. Choose «Advanced» > «Check File System».
Step 3. Confirm if you want to hide the partition or not.
Step 4. In the Check File System window, check the «Try to fix errors if found» option.
Step 5. Click «Start» to check errors on your partition.
In conclusion, the disk check running on startup usually does no harm to your computer, it can be a sign of a hard disk failure or file system corruption. It’s usually necessary to execute a disk check at least once if it’s first launched on a Windows startup screen. Otherwise, if every time check disk has found nothing to repair and it constantly starts scanning and repairing a drive before you can enter the Windows OS, use the two ways to stop it from the startup: [1] apply the chkntfs /x C: command; [2] retain only the autocheck autochk * value data in Windows Registry Editor.
For average computer users who have trouble in dealing with the CHKDSK command things, it’s worth downloading a free and user-friendly CHKDSK alternative software like EaseUS Partition Master for better management of disk and partitions in Windows 10/8/7.
Download Windows Speedup Tool to fix errors and make PC run faster
The Check Disk Utility or Chkdsk.exe in Windows 11/10/8/7 is used to check for errors in the disk media and in the file system. If you face problems ranging from blue screens to inability to open, save files, or folders, you should run chkdsk.exe.
Check Disk can run automatically, in the case of an abrupt shutdown or if it finds the file system to be ‘dirty’. There may be times, when you may find that this Check Disk Utility runs automatically every time your Windows starts. You may have scheduled its run, or your Windows may have decided to schedule its run. But instead of running just once, it continues to run every time your Windows computer boots.
If your Check Disk or chkdsk tool in Windows runs on every boot, here are a few things you may want to try to cancel the ChkDsk operation:
- Let it runs once completely
- Edit the Windows Registry
- Cancel ChkDsk using Command Prompt.
Let us see these steps in detail.
1] Let it runs once completely
Running this process denotes that you have some problem in your hard disk and your computer is trying to fix it. Therefore, you should let it run once completely instead of interrupting.
2] Edit the Windows Registry
There is a Registry file that you need to edit to fix this problem. For that, do the following:
- Press Win+R to open the Run prompt.
- Type regedit and press the Enter button.
- Click the Yes option to open Registry Editor.
- Navigate to this path:
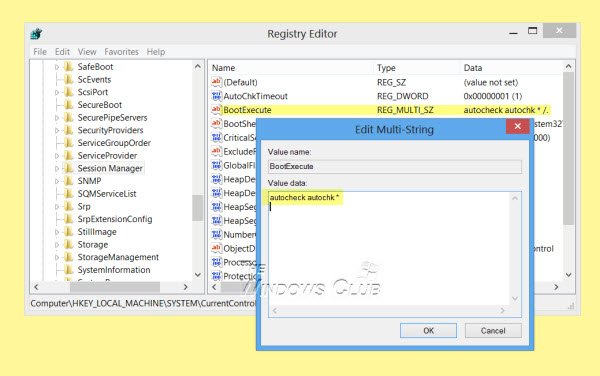
HKEY_LOCAL_MACHINE\SYSTEM\CurrentControlSet\Control\Session Manager - Double-click on the BootExecute String Value.
- Change the Value data from autocheck autochk * /. to autocheck autochk *.
- Click the OK button.
If this works for you great, else try the next step.
3] Cancel ChkDsk using Command Prompt
Open a command prompt window, type the following and hit Enter:
fsutil dirty query g:
This command will query the drive, and more than likely it will tell you that it is dirty.
Next, execute the following command:
CHKNTFS /X G:
The X tells Windows to NOT check that particular drive (G) on the next reboot.
At this time, manually reboot your computer, it should not run Chkdsk now, but take you directly to Windows.
Once Windows has fully loaded, bring up another command prompt and execute the following command:
Chkdsk /f /r g:
This should take you through five stages of the scan and will unset that dirty bit. Finally, type the following and hit Enter:
fsutil dirty query g:
Windows will confirm that the dirty bit is not set on that drive.
You can run the chkdsk /r command or the chkdsk /f command to check a hard disk for errors.
Hope this helps.
If you need more inputs you can always take a look at the ChkDsk log files.
Why does my computer do a disk check every time I start it up?
If your computer is running disk check every time you start it up, that implies some issues in your hard disk. When your computer detects some internal problems, it automatically runs the disk check process to eliminate the issue.
How do I stop chkdsk from running at startup Windows 11/10?
There are several things you can do to stop chkdsk from running at startup in Windows 11/10. For example, you can finish the scan, edit a registry file named BootExecute, etc. On the other hand, you can cancel ChkDsk using Command Prompt as well.
Related reads:
- How to reduce ChkDsk countdown time
- Check Disk will not run at startup in Windows
- ChkDsk is stuck or hangs.
Anand Khanse is the Admin of TheWindowsClub.com, a 10-year Microsoft MVP (2006-16) & a Windows Insider MVP (2016-2022). Please read the entire post & the comments first, create a System Restore Point before making any changes to your system & be careful about any 3rd-party offers while installing freeware.