In an earlier article, I showed you how to build a fully-functional two-tier PKI environment. At the end of that piece, I left you with the most basic deployment. In a second article, I showed you how to set up certificate templates. I will use this article to show you how to perform the most common day-to-day operations: requesting certificates from a Windows Certification Authority.
I used “SSL” in the title because most people associate that label with certificates. For the rest of the article, I will use the more apt “PKI” label.
The PKI Certificate Request and Issuance Process
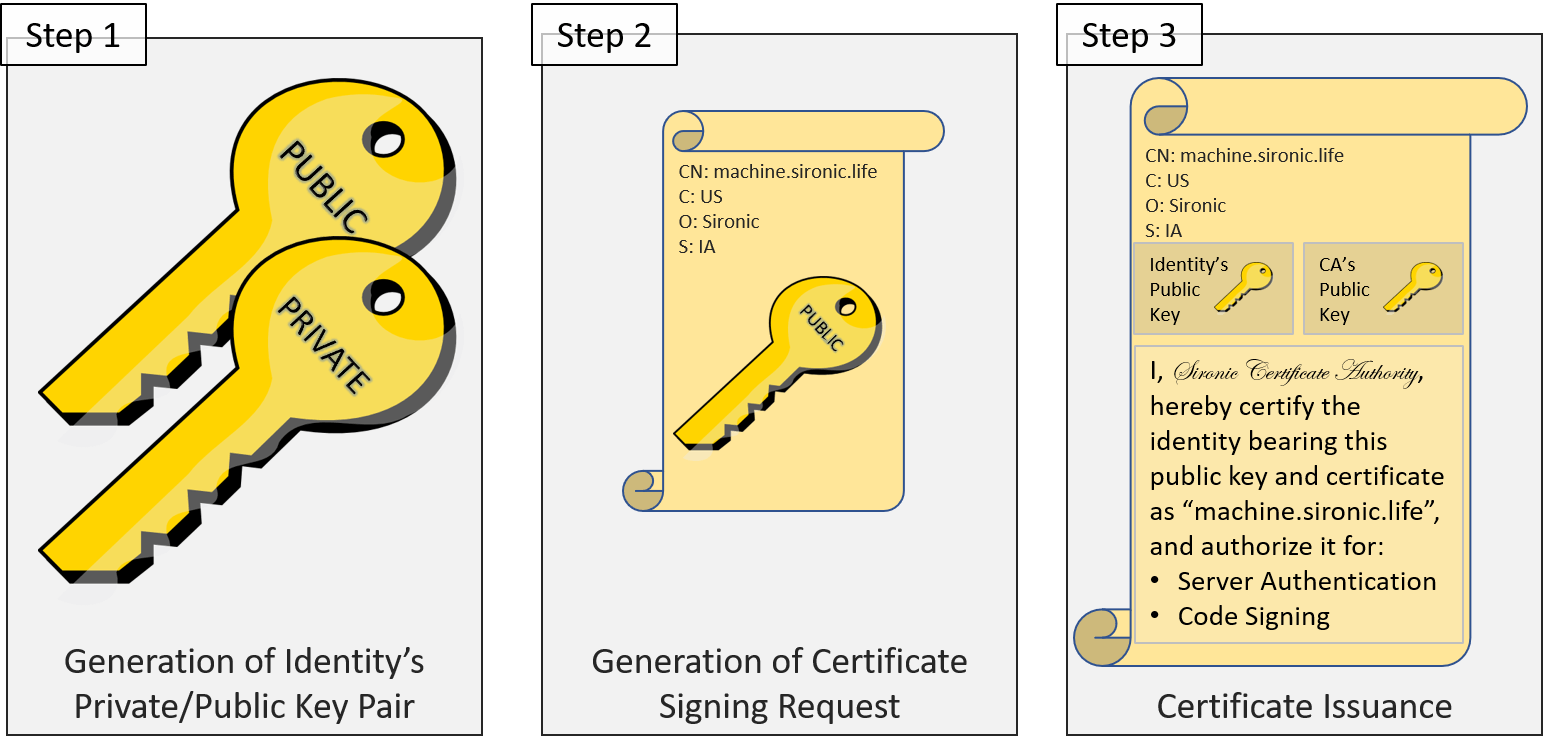
Fundamentally, the process of requesting and issuing PKI certificates does not depend on any particular vendor technology. It follows this pattern:
- A public and private key is generated to represent the identity.
- A “Certificate Signing Request” (CSR) is generated using the public key and some information about the identity.
- The certification authority uses information from the CSR, its own public key, authorization information, and a “signature” generated by its private key to issue a certificate.
The particulars of these steps vary among implementations. You might have some experience generating CSRs to send to third-party signers. You might also have some experience using web or MMC interfaces. All the real magic happens during the signing process, though. Implementations also vary on that, but they all create essentially the same final product.
I want you to focus on the issuance portion. You do not need to know in-depth details unless you intend to become a security expert. However, you do need to understand that certificate issuance follows a process. Sometimes, an issuer might automate that process. You may have encountered one while signing up for a commercial web certificate. Let’s Encrypt provides a high degree of automation. At the other end, “Extended Validation” certificates require a higher level of interaction. At the most extreme, one commercial issuer used to require face-to-face contact before issuing a certificate. Regardless of the degree, every authority defines and follows a process that determines whether or not it will issue.
In your own environment, you can utilize varying levels of automation. More automation means more convenience, but also greater chances for abuse. Less automation requires greater user and administrative effort but might increase security. I lean toward more automation, myself, but will help you to find your own suitable solutions.
Auto-Enroll Method
I am a devoted fan of auto-enrollment for certificates. You only need to set up a basic group policy object, tie it to the right places, and everything takes care of itself.
If you recall from the previous article on certificate templates, you control who has the ability to auto-enroll a certificate by setting security on the template. You use group policy to set the scope of who will attempt to enroll a certificate.
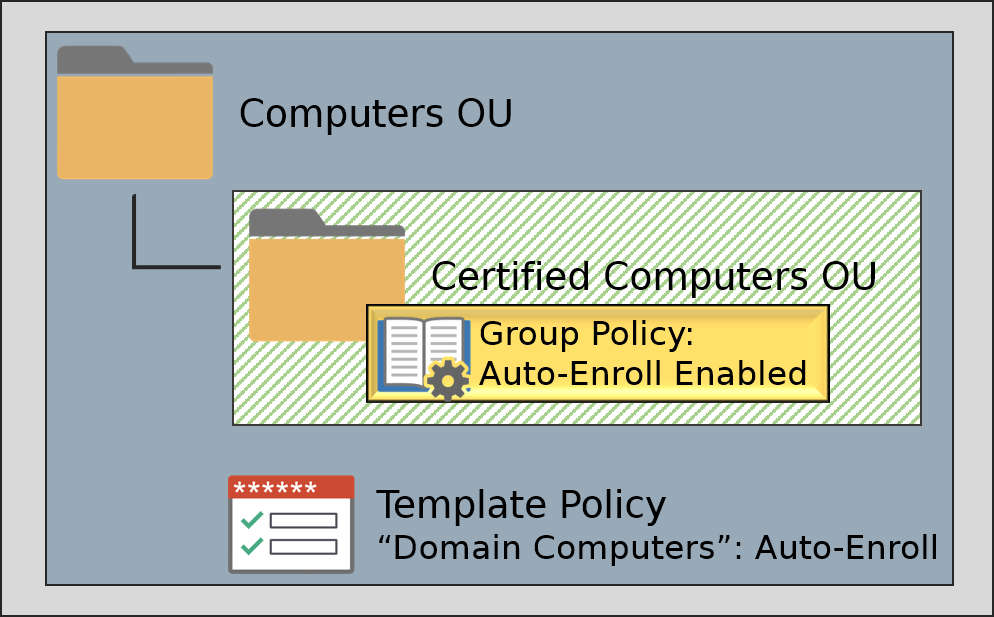
In the above graphic, the template’s policy allows all members of the default security group named “Domain Computers” to auto-enroll. Only the example “Certified Computers” OU links a group policy that allows auto-enrollment. Therefore, only members of the Certified Computers OU will receive the certificate. However, if Auto-Enroll is ever enabled for any other OU that contains members of the “Domain Computers” group, those members will receive certificates as well.
In summary, in order for auto-enroll to work, an object must:
- Have the Autoenroll security permission on the certificate template
- Fall within the scope of a group policy that enables it to auto-enroll certificates
You saw how to set certificate template security permissions in the previous article. We’ll go to the auto-enrollment policies next.
Auto-Enrollment Group Policies
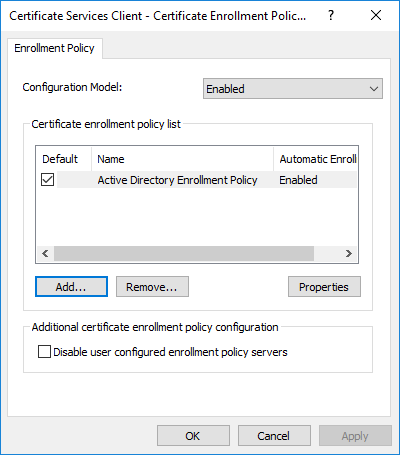
The necessary policies exist at Computer or User ConfigurationPoliciesWindows SettingsSecurity SettingsPublic Key Policies. I am concerned with two policies: Certificate Services Client – Auto-Enrollment Settings and Certificate Services Client – Certificate Enrollment Policy.
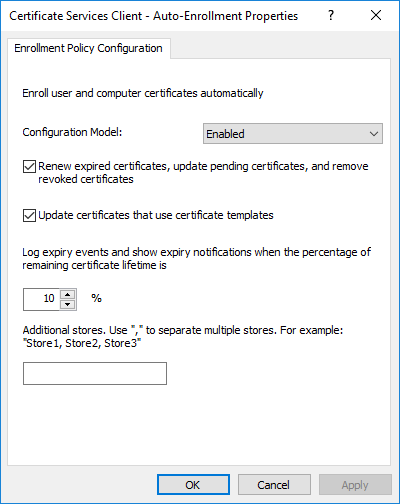
First, Certificate Services Client – Auto-Enrollment Settings. To get going, you only need to set Configuration Model to Enabled. The default enrollment policy uses Windows Authentication to pull certificate information from Active Directory. If you’ve followed my directions, then you have an Active-Directory-integrated certification authority and this will all simply work. You will need to perform additional configuration if you need other enrollment options (such as requesting certificates from non-domain accounts).
Second, Certificate Services Client – Certificate Enrollment Policy. You only need to set Configuration Model to Enabled. Choose other options as desired.
I think the first option explains itself. The second, Update certificates that use certificate templates, allow the certificate bearer to automatically request a replacement certificate when the certificate has updates. I showed you how to do that in the previous article.
Auto-Enrollment Security Implications
In general, you should not have many concerns with automatic certificate issuance. As followed so far, my directions keep everything under Active Directory’s control. However, you can enable auto-enrollment using other techniques, such as simple user/password verification via a URI. Anyone with local administrative powers can set local policies. Certificate templates can allow the requester to specify certificate subject names. Furthermore, some systems, like network access controls, sometimes simply require a particular certificate.
Think through who can request a certificate and who will accept them when configuring auto-enrollment scopes.
MMC Enrollment Procedure
MMC enrollment provides a great deal of flexibility. You can request certificates for you, your computer, or another entity entirely. It works on every single version of Windows and Windows Server in support, as long as they have a GUI. Since you can connect the console to another computer, you can overcome the need for a GUI. The procedure takes some effort to explain, but don’t let that deter. Once you have the hang of it, you can get through the process quickly.
First, you need to access the necessary console.
Accessing Certificate MMCs on Recent Windows Versions
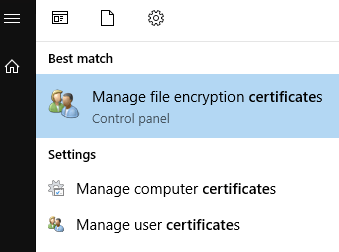
On Windows 10 or Windows Server 2016+, just open up the Start menu and start typing “certificate”. At some point, Cortana will figure out what you want and show you these options:
These options will work only for the local computer and the current user. If you want to target another computer, you can follow the upcoming steps.
Note: If you will use the console to request a certificate on behalf of another entity, it does not matter which console you start. The certificate template must allow exporting the private key for this mode to have any real use.
Accessing Specific Certificate MMCs Directly
On any version of Windows, you can quickly access the local computer and user certificates by calling their console snap-ins. You can begin from the Start menu, a Run dialog, or a command prompt. For the local computer, you must run the console using elevated credentials. Just enter the desired snap-in name and press Enter:
- certlm.msc: Local machine certificates
- certmgr.msc: Current user certificates
Note: If you will use the console to request a certificate on behalf of another entity, it does not matter which console you start. The certificate template must allow exporting the private key for this mode to have any real use.
Manually Add Specific Certificate Targets in MMC
You can manually add the necessary snap-in(s) from an empty MMC console.
- From the Start menu, any Run dialog, or a command prompt (elevated, if you need to use a different account to access the desired target), run mmc.exe.
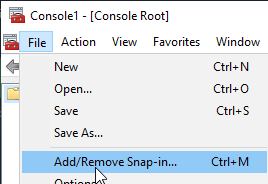
- From the File menu, select Add/Remove Snap-in…
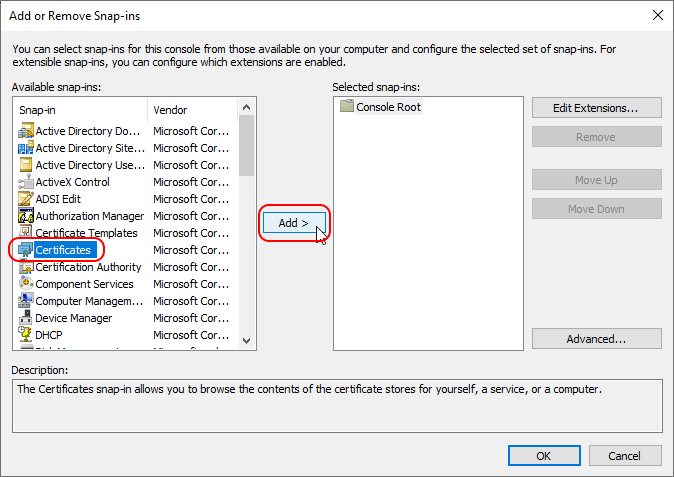
- Highlight Certificates and click Add:
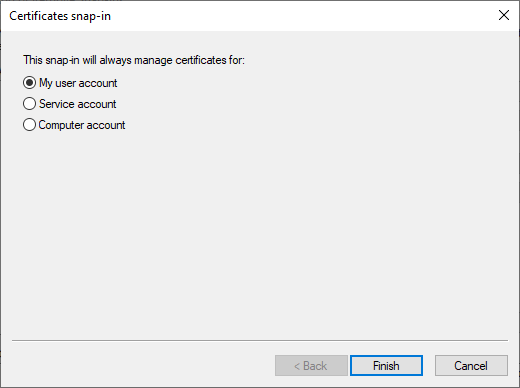
- Choose the object type to certify. In this context, My user account means the account currently running MMC. If you pick My user account, the wizard finishes here.
- If you picked Service account or Computer account in step 4, the wizard switches to the computer selection screen. If you choose any computer other than local, you will view that computer’s certificate stores and changes will save to those stores. If you choose Computer account, the wizard finishes here.
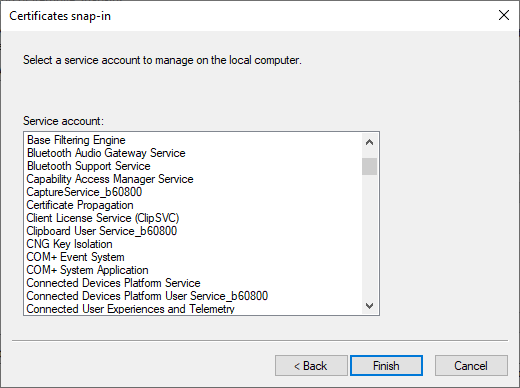
- If you selected Service account in step 4, you will now have a list of service accounts to choose from.
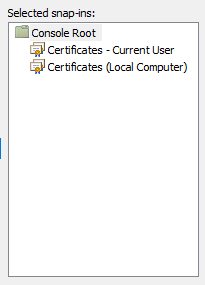
- If you want, you can repeat the above steps to connect one console to multiple targets:
- Once you have the target(s) that you like, click OK on the Add or Remove Snap-ins window. You will return to the console and your target(s) will appear in the left pane’s tree view.
Using the Certificates MMC Snap-In to Request Certificates
Regardless of how you got here, certificate requests all work the same way. We operate in the Personal branch, which translates to the My store in other tools.
Requesting a Certificate Using Template Defaults
You can quickly enroll a certificate template with template defaults. This is essentially the manual corollary to auto-enroll. You could use this method to perform enrollment on behalf of another entity, provided that you the template allows you to override the subject name. For that, you must have selected a console that matches the basic certificate type (a user console can only request user certificates and a computer console can only request computer certificates). You must also use an account with Enroll permissions on the desired template. I recommend that you only use this method to request certificates for the local computer or your current user. Skip to the next section for a better way to request certificates for another entity.
To request a certificate using a template’s defaults:
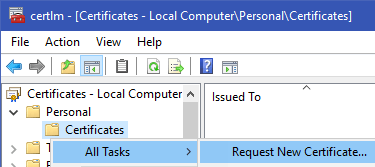
- Right-click Certificates and click Request New Certificate.
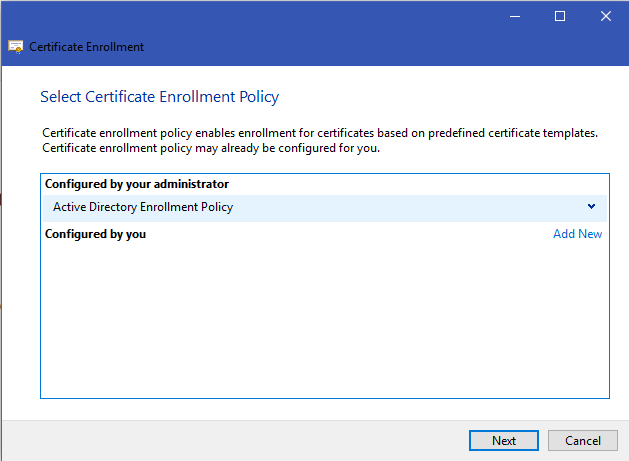
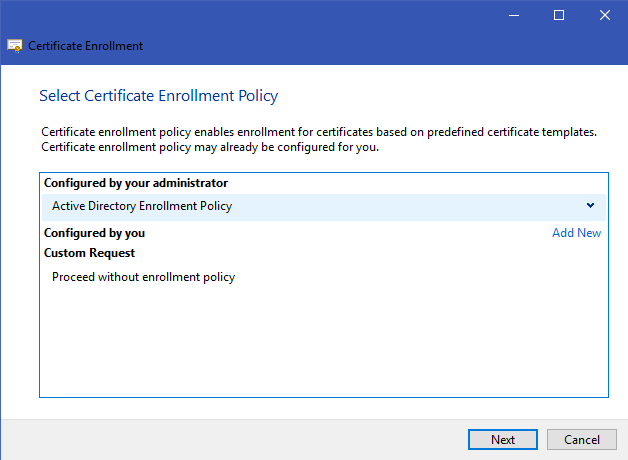
- The first screen is informational. The next screen asks you for a certificate enrollment policy. Thus far, we only have the default policy. You would use the Configured by you policy if you needed to connect without Active Directory. Click Next.
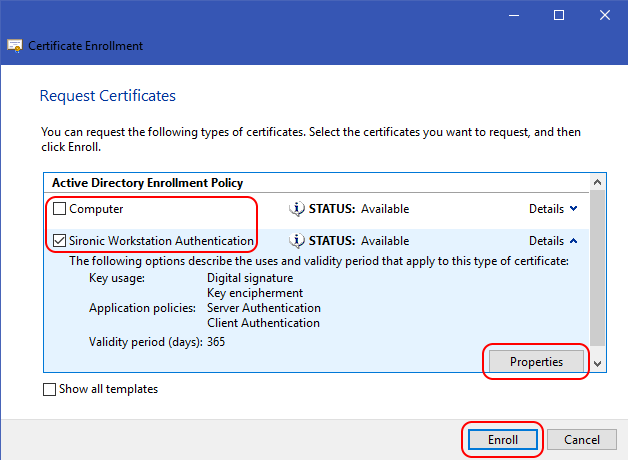
- You will see certificate templates that you have Enroll permissions for and that match the scope of the console. In this screenshot, I used a computer selection, so it has computer certificates. If you expand Details, it will show some of the current options set in the certificate. If you click Properties, you can access property sheets to control various aspects of the certificate. I will go over some of those options in the next section. Remember that the certificate template to manually supply subject name information or it will ignore any such settings in your requests. Click Enroll when you are ready. The certificate will appear in the list.
Once you have a certificate in your list, double-click it or right-click it and click Open. Verify that the certificate looks as expected. If you requested the certificate for another entity, you will find the Export wizard on the certificate’s All Tasks context menu.
Creating an Advanced Certificate Request
You can use MMC to create an advanced certificate request. Most importantly, this process works offline by creating a standard certificate signing request file (CSR). Since it does not check your permissions in real time, you have much greater flexibility. I recommend that you use this method when requesting certificates on behalf of another entity. Follow these steps:
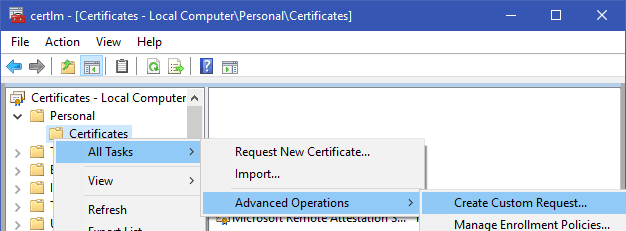
- Right-click Certificates, go to All Tasks, then Advanced Operations, and click Create Custom Request.
- The first screen is informational only. Click Next. On the next screen, choose your enrollment policy. If you’ve followed my guide, you only have two (real) choices: the default Active Directory policy or a completely custom policy. You could also choose to create a new local policy, which I will not cover. If you pick the Active Directory policy, it will allow you to pick from all of its known templates, which you can customize if needed. If you choose to Proceed without enrollment policy, you will start with an empty template and need to provide almost every detail. Make your selection and click Next.
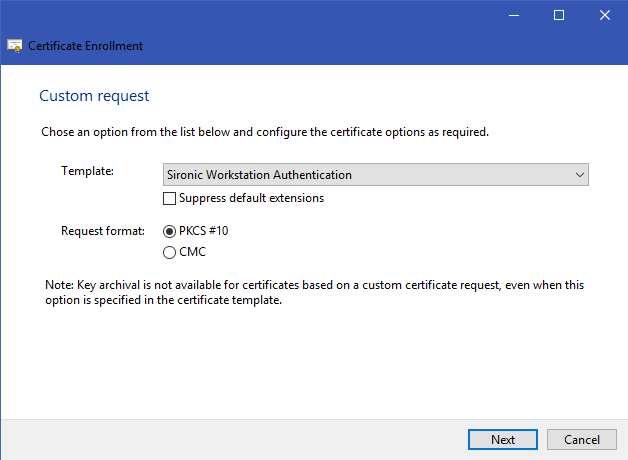
- I took this screenshot after choosing the Active Directory enrollment policy. I then selected one base template. You can see that you also have options for the CSR format to use. If you chose to proceed without a policy, your Template options are No template (CNG key) or No template (Legacy key). CNG (Certificate Next Generation) creates v3 certificates while the Legacy option generates v2 certificates. Practically, they mostly deal with how the private key is stored and accessed. Common Microsoft apps (like IIS) work with CNG. Legacy works with almost everything, so choose that if you need to guess.
- On the Certificate Information screen, you will either see the template name that you chose or Custom request if you did not select an enrollment policy. To the right of that, near the edge of the dialog, click the down-pointing triangle next to Details. If you selected a policy, that will show the defaults. If you did not, it will show empty information. Click the Properties button to access property sheets where you can specify certificate options. Look at the screenshot in step 3 in the previous section. I will show the details dialog in the next section. Click Next when you have completed this screen.
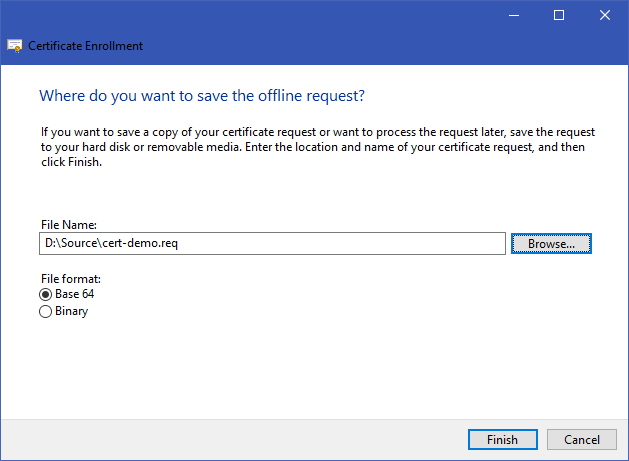
- Choose the output file name and format. Most CAs will work with either type. Most prefer the default of Base64.
- You can now process the request on your Certification Authority.
Configuring Advanced Certificate Options in a Request
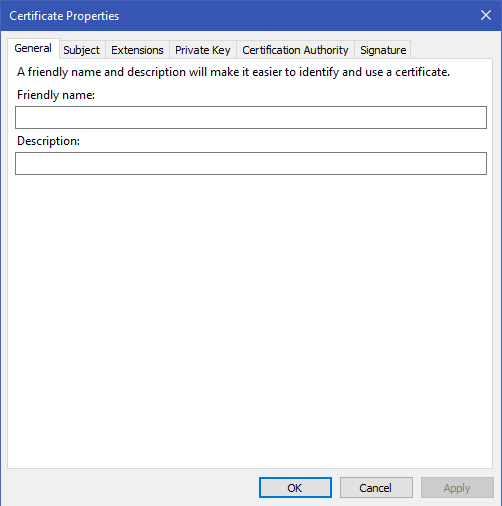
As mentioned step 3 in the above directions on using MMC to request a default template and in step 4 of the advanced request, you can use the Properties button on the Details section to modify parts of the certificate request prior to submitting it to the CA. If you selected a template that requires you to supply information, you will see an additional link that opens this dialog. You should always take care to inspect such a certificate after issuance to ensure that the CA honored the changes.
I will not cover every single detail. We will look at a few common items.
- General: These fields are cosmetic. They appear when you see the certificate in the list.
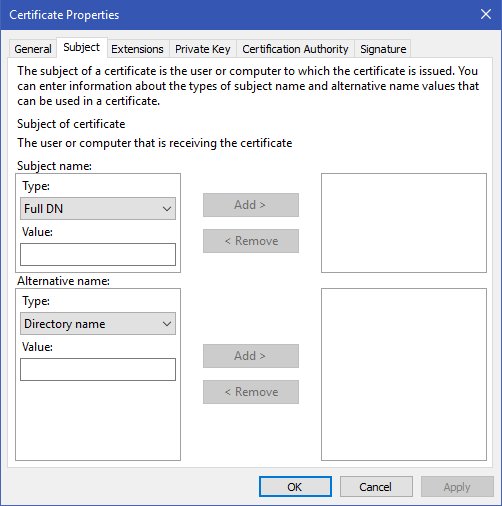
- Subject: This busy tab contains identity information about the certificate holder. If the template only allows Active Directory information, then the CA will not accept anything that you enter here. For each type on the left, you can add multiple values. Make certain that you Add items so that they move to the right panes! Some of the more important parts:
- Subject Name group: The fields in this group appear all combine to describe the certificate holder.
- Common name: The primary identity of the certificate. Use a fully-qualified domain name for a computer or a full name for a user. Modern browsers no longer accept the value in the common name for authentication. Other tools still expect it. Always provide a value for this field to ensure the completeness of the subject group.
- Country, Locality, Organization, etc.: Public CAs often require several of these other identity fields.
- Alternative Name group: The fields in this group appear in the “Subject Alternate Name” (SAN) section of a certification. Browsers and some other tools will match entries in the SAN fields with the URL or other access points
- DNS: Use this field to designate fully-qualified and short names that clients might use to access the certificate holder. Since web browsers no longer use the common name, enter all names that the owner might present during communications, including what you entered as the common name. Only use short names with LAN-scoped certificates. For instance, I might have a certificate with a common name of “internalweb.sironic.life” and give it an alternative DNS entry of “internalweb”. For load-balanced servers in a farm, I might have multiple DNS entries like “webserver1.sironic.life”, “webserver2.sironic.life”, etc.
- IP Address (v4 and v6): If clients will access the certified system by IP address, you might want to add those IPs in these fields.
- Subject Name group: The fields in this group appear all combine to describe the certificate holder.
The wizard will contain your options in the certificate request. The CA may choose to issue the certificate without accepting all of them.
Handling Certificate Signing Requests from a Linux System on a Microsoft Certification Authority
You can use a utility on a non-Windows system to create certificate requests. Linux systems frequently employ OpenSSL. These non-Microsoft tools generally do not know anything about templates, which the Windows Certification Authority requires. You could use the MMC tool on a Windows system to request a certificate on behalf of another. But, if you have a certificate signing request file, you can use the certreq.exe tool on a Windows system to specify a template during the request.
You can use OpenSSL to create CSRs fairly easily. Most of the one-line instructions that you will find today still generate basic requests that identify the system with the Common Name field. Modern browsers will reject such a certificate. So, generating a usable CSR takes a bit more work.
- Locate openssl.cnf on your Linux system (some potential locations: /etc/pki/tls, /etc/ssl). I recommend creating a backup copy. Open it in the text editor of your choice.
- Locate the [ req ] section. Find the following line, and remove the # that comments it out (or add it if it is not present):
req_extensions = v3_req
- Locate the section named [ v3_req ]. Create one if you cannot find it. Add the following line:
subjectAltName = @alt_names
- Create a section named [ alt_names ]. Use it to add at least the system’s Common Name. You can use it to add as many names as you like. It will also accept IP addresses. If you will host the system on an internal network, you can use short names as well. Remember that most public CAs will reject CSRs with single-level alternative names because it looks like you are trying to make a certificate for a top-level domain.
[ alt_names ]
DNS.1 = pkidemo.sironic.life
DNS.2 = pkidemo   # only works internally
DNS.3 = load-balanced-pkidemo.sironic.life
IP.1 = 192.168.20.47
IP.2 = 10.10.60.3
- Make any other changes that you like. Remember that if the CA has a preset value for a setting, it will override. Save the file and exit your editor.
- Make sure that you’re in a directory that your current user account can write in and that you can transfer files out of. You could:
mkdir ~/csr
cd ~/csr
- Execute the following (feel free to research these options and change any to fit your needs):
openssl req -new -newkey rsa:2048 -keyout demo.key -out demo.csr -nodes
- You will receive prompts for multiple identifier fields. If you explicitly set them in openssl.cnf, then it will present them as defaults and you can press Enter to accept them. I recommend skipping the option to create a challenge password. That does not passphrase-protect the key. To do that, you first need to run openssl with the genpkey command, then pass the generated key file to the openssl req command using the key parameter instead of newkey/keyout. A ServerFault respondent explains the challenge password and key passphrase well, and includes an example.
- Move the key file to a properly secured location and set permissions accordingly. Remember that if anyone ever accesses this file, then your key, and therefore any certificate generated for it, is considered compromised. Do not transfer it off of its originating system! Example location: /etc/pki/tls/private.
- Transfer the CSR file to a Windows system using the tool of your choice.
- On the Windows system, ensure that you have logged on with an account that has Enroll permissions for the template that you wish to use.
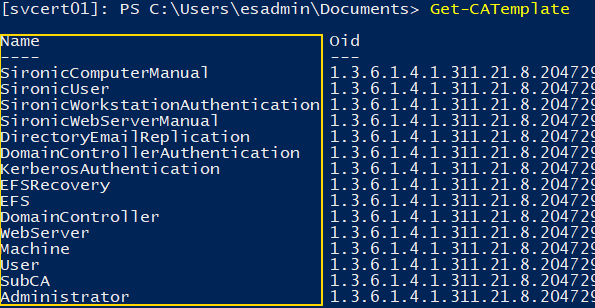
- Discover the Name of the template. Do not use the Display Name (which is usually the Name, with spaces). You can uncover the name with PowerShell if you have the ADCSAdministration module loaded. Use Get-CATemplate:
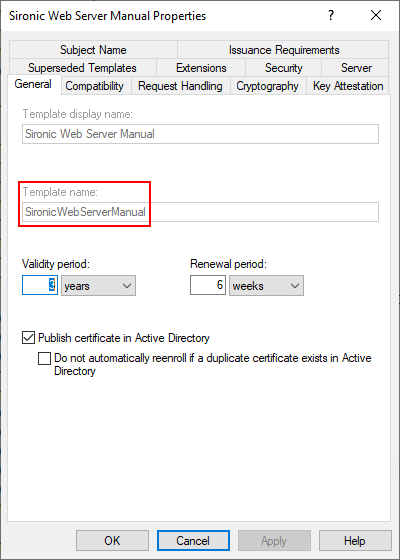
Alternatively, open up the Certification Authority snap-in and access template management. Find the template you want to use and open its properties sheet. Check the Template name field.
- On the Windows system where you transferred the file, run the following, substituting your file name and template name:
certreq -submit -attrib "CertificateTemplate:SironicWebServerManual"
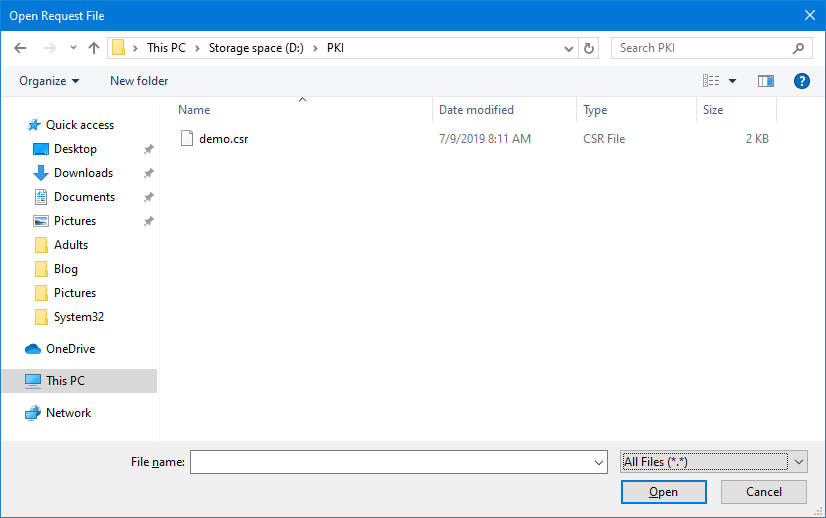
- The utility will ask you to browse to the request file. You may need to change the filter to select all files.
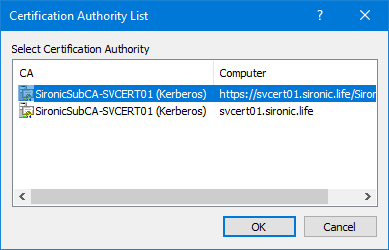
- You will next need to select the certification authority.
- The utility will show the CA’s response to your request. If it issues a certificate, it will prompt you to save it. Be aware that even though you can choose any extension you like, it will always create an x509 encoded certificate file.
At this point, you have your certificate and the request/signing process is complete. However, in the interest of convenience, follow these steps to convert the x509 certificate into PEM format (which most tools in Linux will prefer):
- Transfer the certificate file back to the Linux system.
- Run the following:
openssl x509 -in pkidemo.crt -outform PEM -out pkidemo.pem
- Move the created file to its final location (such as /etc/pki/tls/certs).
This procedure has multiple variants. Check the documentation or help output for the commands.
Deprecated Web Enrollment Method
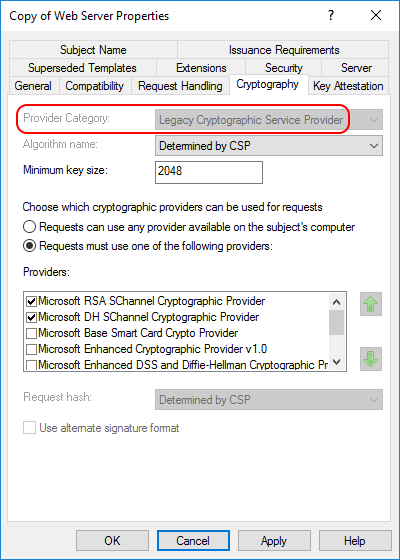
Once upon a time, Microsoft built an ASP page to facilitate certificate requests. They have not updated it for quite some time, and as I understand it, have no plans to update it in the future. It does still work, though, with some effort. One thing to be aware of: it can only provide v2 (legacy) certificates. It was not updated to work with v3 (CNG). If a certificate template specifies the newer cryptography provider, web enrollment will not present it as an enrollable option. Certificates must use the Legacy Cryptographic Service Provider.
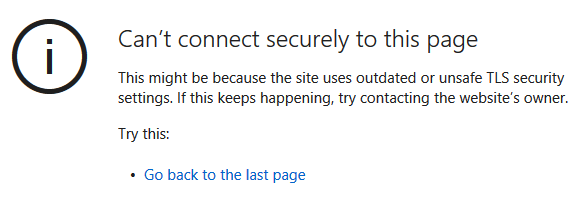
First, you must issue it a certificate. It responds on 80 and 443, but some features behave oddly on a port 80 connection. Installation of the Web Enrollment role creates the web site and enables it for 443, but leaves it without a certificate.
Follow the steps in the previous article to set up a web server certificate (requires Server Authentication extended key usage). Once you finish that, use one of the MMC methods above to request a certificate for the site. Remember to use its FQDN and optionally its NetBIOS names as DNS fields on the Subject tab. Then, follow these steps to assign it to the certificate server’s web site:
- Open Internet Information Services (IIS) Manager on the system running the Web Enrollment service or on any system that can connect to it.
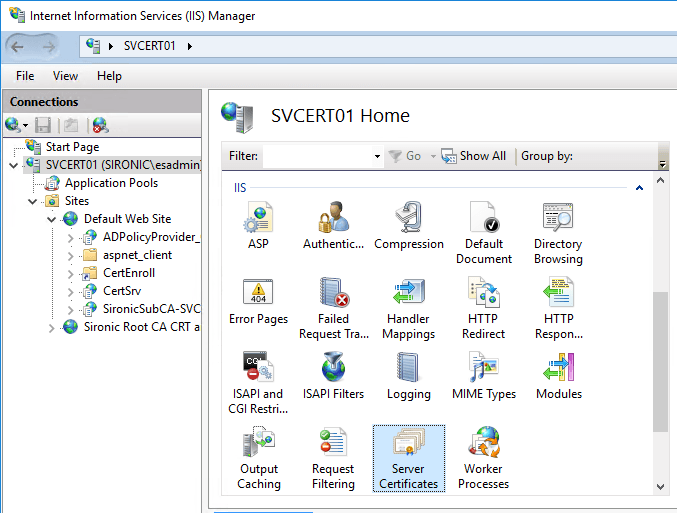
- Highlight the server in the left pane. In the right pane, under IIS, double-click Server Certificates.
- The newly-issued certificate should appear here. Highlight it and click Enable automatic rebind of renewed certificate in the right pane. If it does not appear here, verify that it appears in MMC and reload this page. If it still does not appear, then you made a mistake during the certificate request or issuance process.
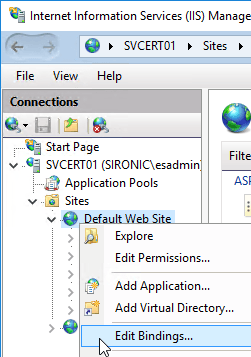
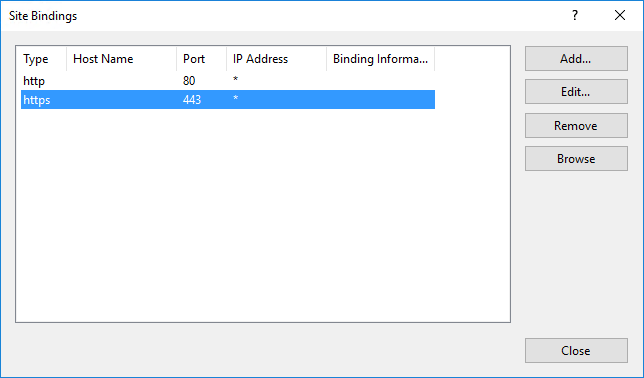
- In the left pane, drill down from the server name to Sites, then Default Web Site. Right-click Default web site and click Edit Bindings. You can also find a Bindings link in the far right pane.
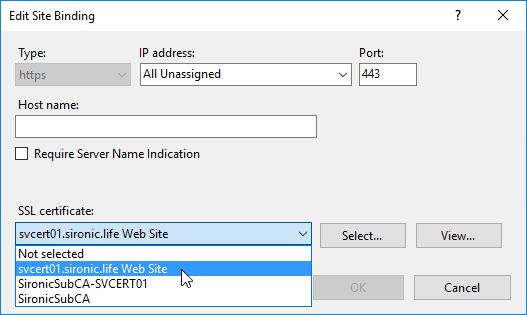
- Double-click the https line or highlight it and click Edit… at the right.
- Under SSL certificate, choose the newly-issued certificate. Click OK, then Close to return to IIS Manager.
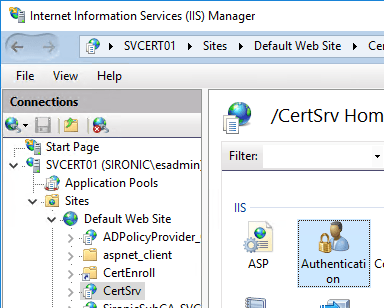
- Drill down under Default web site and click on CertSrv. In the center pane, double-click Authentication.
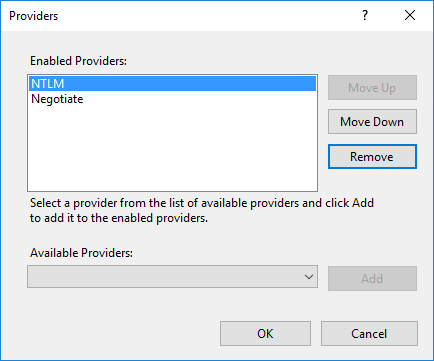
- In the center pane, highlight Windows Authentication. It should already be Enabled. In the right pane, click Providers.
- NTLM should appear in the provider list. If it does not, use the drop-down to select it, then Add to put it in the list. Use the Up button to move NTLM to the top of the list. Ensure that your dialog looks like the following screenshot, then click OK.
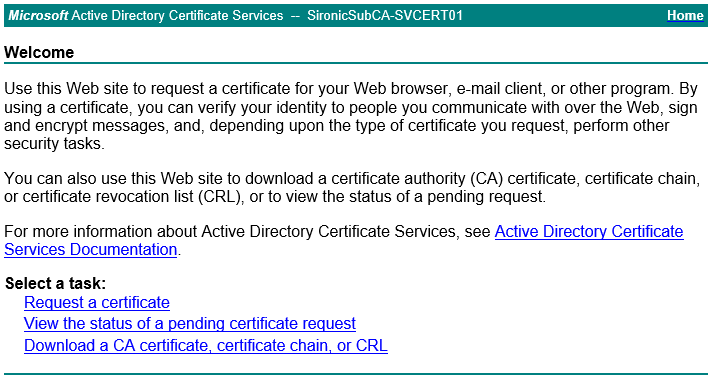
You can now access the site via https://yourcertserver.domain.tld/certsrv. You will need to supply valid credentials. It will display the start screen, where you can begin your journey.
Because of the v2 certificate limitation, I neither use nor recommend this site for certificate requests. However, it does provide a convenient access point for your domain’s certificate chain and CRL.
Alternative Request Methods
The methods that I displayed above are the easiest and most universally-applicable ways to request certificates. However, anything that generates a CSR may suffice. Some tools have interfaces that can communicate directly with your certificate server. Some examples:
- certreq.exe: Microsoft provides a built-in command-line based tool for requesting certificates. You can use it to automate bulk requests without involving auto-enroll. Read up on its usage on docs.microsoft.com.
- IIS Manager
- Exchange Management Console
Other tools exist.
What’s Next
At this point, you can create PKI certificate templates and request them. With an Active Directory-integrated certificate system, all should work easily for you. However, if you were following the directions for the custom request, you ended up with a CSR. Passing a CSR to the certification authority requires different tools. In the next article, I will show how to perform routine operations from the Certification Authority side, such as accepting CSRs and revoking certificates.
Table of Contents
- Overview
- Connection Manager Certificate
- Request Certificate
- Generate the Certificate
- Import Certificate
Overview
In this article, we will show how to produce a Certificate Request using the management console with the Certificates snap-in. After importing the certificate in the computer container. In this case we are generating a digital certificate that will be installed
at 2010 TMG that it is configured as Reverse Proxy Server Lync pool. The enterprise certification service is installed along with the domain controller with the service and this Web Enrrolement active.
The certificate will be generated with multiple Destinguish Name and Subject Alternative Names.
Connection Manager Certificate
Start running on the machine and run the mmc to start the management console, click
File and Add / Remove Snap-in
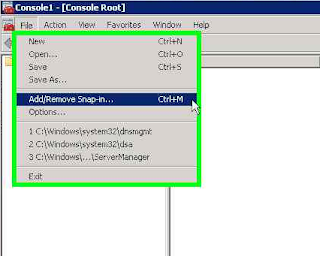
Select the Certificate Snap-in and add to the console

Select Computer Account to manage the certificates installed on computed
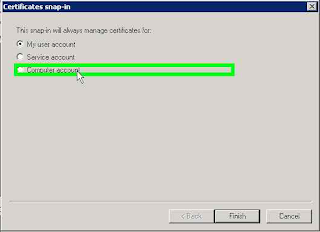
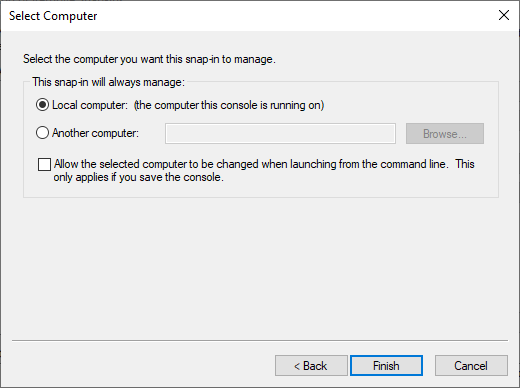
Select Local Computer and finish the wizard

Request Certificate
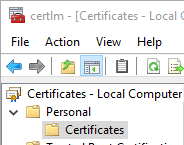
Expand the Personal folder in the Certificates. Right-click
All Tasks, select Advanced Operations and Create Custom Request ….
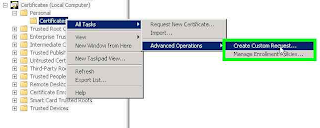
Go to start the certificate request
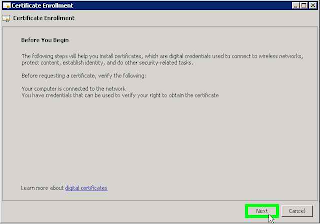
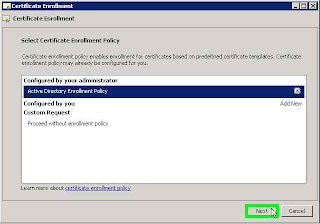
Select the Enrollment Policy
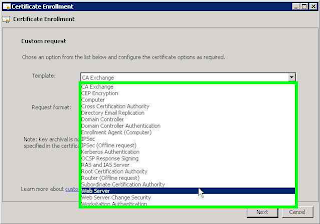
Select the template of the certificate to the Reverse Proxy must select
Web Server template
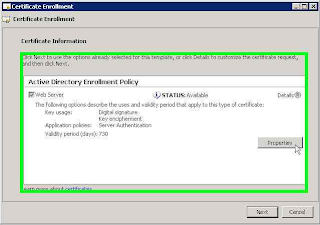
In the Certificate Information tab expand the Details and click
Properties to configure the options of the Certificate
Tab Certificeta Properties in select Subject Name option
Type: Common Name and Value set the FQDN of the primary service that uses the certificate. In part of
Alternative Name select Typer: DNS and add all the FQDN’s that bear the certificate
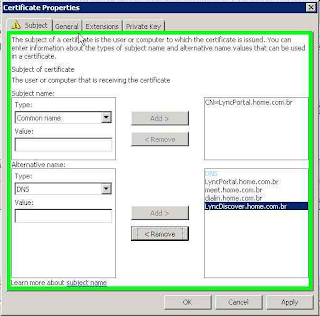
In the tab General set the Friendly Name of the certificate, this option does not affect any functionality of the certificate may take any value. Usually we set up a brief description of the functionality of the certificate

Tab Private Key option expand the Key Options check the
Make Private key exportable. Apply the changes and finish the wizard
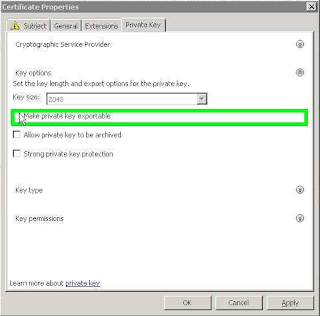
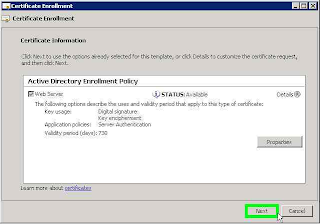
In Certificate Enrollment advance
Select the folder where the request is saved and finish the assistant
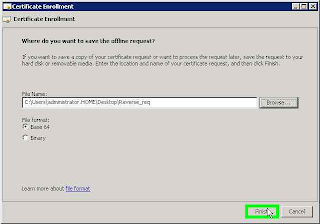
Generate the Certificate
Access the address of the Web Enrollment of digital certification in the URL https:// <FQDN server certificado> / CertSrv and click
Request Certificate
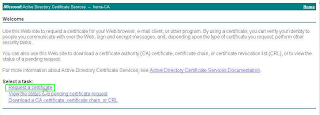
Click the Advanced Certificate Request

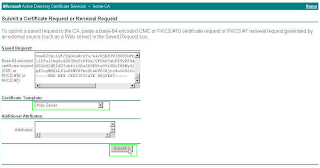
Select Submit a certificate request by using the base 64-encoded CMC or PKCS # 10 file, or submit a renewal request by using the base 64-encoded PKCS # 7 file

Open the request file in Notepad, select and copy the entire contents
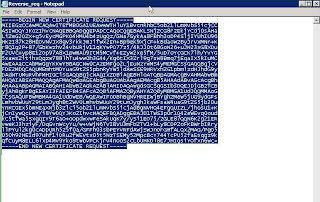
Paste the contents of the file request in the space Saved Request and select the
Certificate Template: Web Server and click Submit
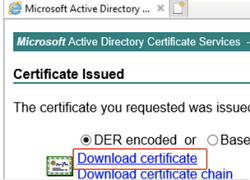
The certificate will be generated, click Download Certificate and save the certificate in a folder
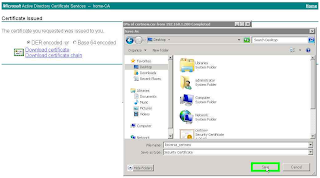
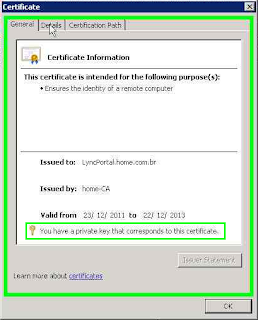
Check the settings of the certificate are correct and that the option of private key is present in the certificate
Import Certificate
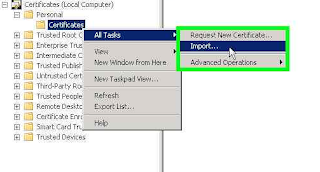
Return to the management console expand the Personal Right click
Certificates select All Tasks and click Import …
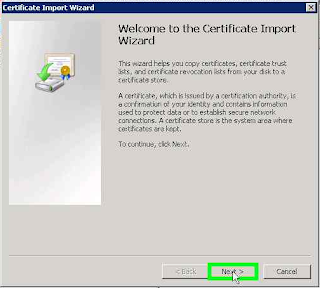
Go to start the certificate import
Select the certificate that was saved

Go to the configuration of the Certificate Store

And finalize the wizard
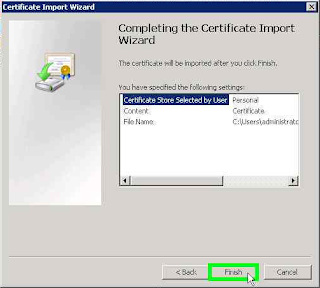
The certificate must be imported and ready to be linked to services
Чтобы начать использовать SSL-сертификат на веб-сервере, его необходимо сначала получить из центра сертификации (ЦС), но чтобы получить сертификат, предварительно необходимо сгенерировать запрос на получение сертификата — CSR (Certificate Signing Request). CSR — это файл, в котором хранится информация о компании и домене, а также открытый ключ будущего сертификата. При формировании CSR обычно (но не обязательно) создается пара ключей — открытый ключ (public key) и закрытый ключ (private key). При этом, открытый ключ передается в ЦС (CA, Certification authority) и включается в сертификат SSL. Закрытый ключ хранится на сервере и никуда не передается. Генерацию запроса на сертификат (открытый ключ и закрытый ключ) могут выполнить и внешние сервисы, в том числе ЦС, но в этом случае, высока вероятность компрометации закрытого ключа. Далее этот файл передается в центр сертификации (ЦС). Центр сертификации, проверяет полученную заявку, выпускает на ее основе сертификат и публикует текущий статус проверки сертификата, чтобы каждый, кто пользуется сертификатом мог проверить его действительность.
Выполнить запрос на сертификат, можно на любой операционной системе, поддерживающей IIS для Windows или OpenSSL для Linux-based. В рамках данной статьи рассмотрим пример для IIS на Windows Server 2019. Ранее, в статье: Как установить IIS на Windows Server 2019? был описан процесс установки IIS на Windows Server 2019.
1. Выполнить вход на сервер с правами администратора
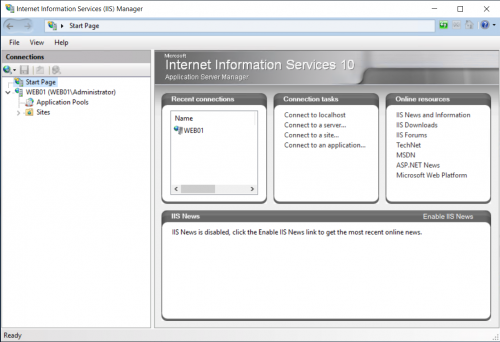
2. Если автоматически не запустилась консоль Server Manager, то необходимо запустить ее вручную, либо испоьзуя пункт меню перейти в Windows Administrative Tools и запустить Internet Information Services (IIS) Manager
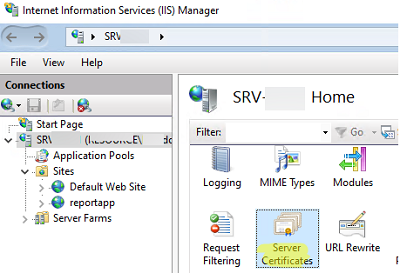
3. В левой колонке выбрать уровень сервера, и в правой ачасти окна перейти в Server Certificates 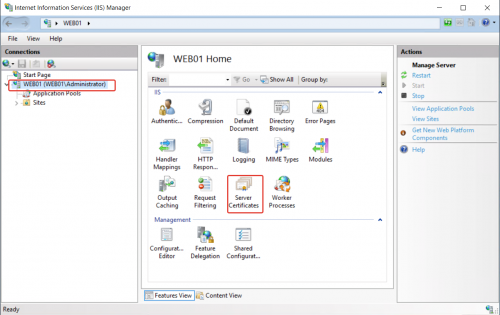
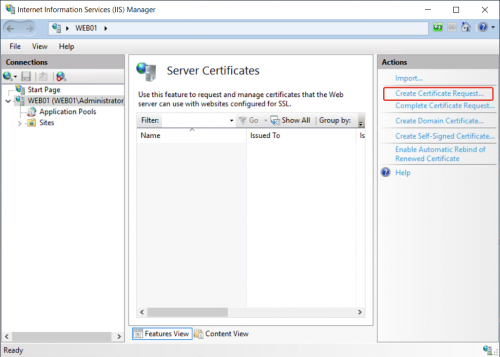
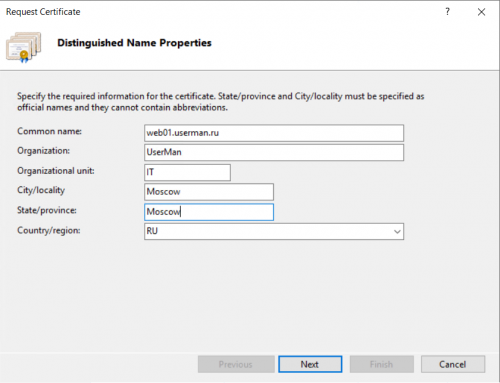
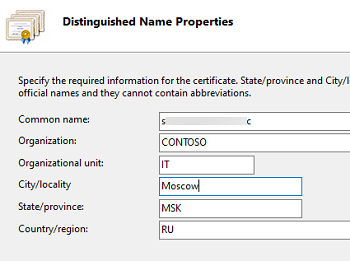
- Common Name — доменное имя для сертификата.
- Organization — организация (имя компании).
- Organizational unit — подразделение (чаще всего IT).
- City/locality — город .
- State/province — регион.
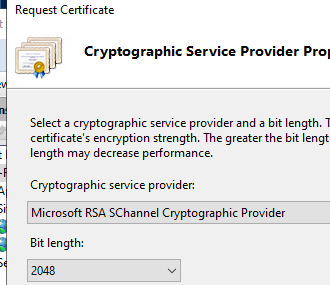
6. В окне Cryptographic Service Provider Properties, в качестве провайдера криптографии выбираем Microsoft RSA SChannel с длиной ключа 2048 бит.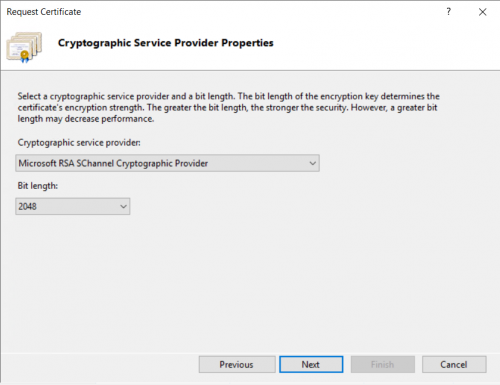
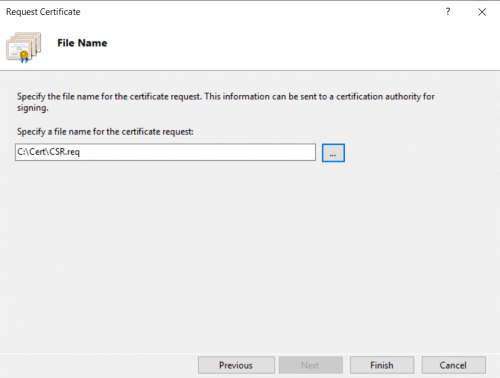
-----BEGIN NEW CERTIFICATE REQUEST-----
MIID2DCCA5cCAQAwaTELMAkGA1UEBhMCUlUxDzANBgNVBAgMBk1vc2NvdzEPMA0G
A1UEBwwGTW9zY293MRAwDgYDVQQKDAdVc2VyTWFuMQswCQYDVQQLDAJJVDEZMBcG
A1UEAwwQd2ViMDEudXNlcm1hbi5ydTCCAbYwggErBgcqhkjOOAQBMIIBHgKBgQCy
T7RKvU9c6LlfsaknNuds6T6um8rMQ0KmFXtTxZ246lcpOlNCMryESqm1o19vkF93
idPY8yf2cquDr8x1xTlMfASC/EfCrJ7udnyV747p293aVeaghE3pptfgSwXMqEVR
1HltnFHgA2BNoa1PpsUgGzUyOyrZn+naar4+E4bx0QIVAJtF2ivrP3zhG+5tzijO
GtBTAj2XAoGAP+KyicxC1dR75tqq34Qb/HL+cCwYtklfArQYV0col+hisYCufwHE
/j0CwqNkuoJjhRlQOz+bdGEe4spJL+htpWFEUke4dL7siaNbokp/LWUOINJPHSoe
NBBM7W+MQiz/lVBEWlrVL7dwAESy9GZ+YGdiAqceYM4WdvXBYq87GgYDgYQAAoGA
OmXi/26VBWGUt870nivKHgcTJV8aaJkjsw3iv1wXuUVI2EUa63/o8WWRAQR0DvQJ
DtVakTAtM15DICL7t4Ycj97a+PQCBZAYT765mxc6SzVrlUipokNH+FGx8vpYU9Vj
XwO1MXUkK1abOn+qOxEk1UEsZY/Q80/E1WJK5EPwQO+gggFrMBwGCisGAQQBgjcN
AgMxDhYMMTAuMC4xNzc2My4yMDsGCSsGAQQBgjcVFDEuMCwCAQUMBXdlYjAxDBNX
RUIwMVxBZG1pbmlzdHJhdG9yDAtJbmV0TWdyLmV4ZTBwBgorBgEEAYI3DQICMWIw
YAIBAh5YAE9AaQBjAHIAbwBzAG8AZgB0ACAARABIACAAUwBDAGgAYQBuAG4AZQBs
ACAAQwByAHkAcAB0AG8AZwByAGEAcABoAGkAYwAgAFAAcgBvAHYAaQBkAGUAcgMB
ADCBmwYJKoZIhvcNAQkOMYGNMIGKMA4GA1UdDwEB/wQEAwIE8DATBgNVHSUEDDAK
BggrBgEFBQcDATBEBgkqhkiG9w0BCQ8ENzA1MA4GCCqGSIb3DQMCAgIAgDAOBggq
hkiG9w0DBAICAIAwBwYFKw4DAgcwCgYIKoZIhvcNAwcwHQYDVR0OBBYEFMjzWx/r
ormqQP+5iULozoioya+oMAkGByqGSM44BAMDMAAwLQIVAIxd9pf1qCgUiZwHdw6B
lLYjTBxwAhRXcCaaQGA5gZVkNdTU8mXGVKCvJw==
-----END NEW CERTIFICATE REQUEST-----
Данная инструкция описывает процедуру выпуска и установки SSL сертификатов на веб сервере IIS (Internet Information Services) в Windows Server.
Содержание:
- Генерация CSR запроса в IIS
- Установка SSL сертификата в ISS
- Привязать SSL сертификат к сайту IIS
Генерация CSR запроса в IIS
Для генерации SSL/TLS сертификата у внешнего Certificate Authority (CA) вам нужно сгенерировать запрос для выпуска сертификата (CSR, Certificate Signing Request). Вы можете сформировать CSR в ISS:
- Откройте консоль Internet Information Services Manager (
InetMgr.exe
); - Выберите ваш хост Windows Server и откройте раздел Server Certificates;
- В правом меню Actions выберите Создать запрос сертификата (Create Certificate Request);
- Заполните следующие поля в информацию о сертификате:
-
- Common Name – укажите имя сайта (веб-сервера), по которому будут обращаться ваши клиенты. Укажите FQDN имя, например:
reports.winitpro.ru
. Вы можете использоватьWildcard-сертфикат, в этом случае укажите здесь
*.winitpro.ru - Organization – укажите название организации. Для сертификатов с валидацией организации (OV-Organization Validation) и сертификатов с расширенной проверкой (EV-Extended Validation) нужно указать официальное название организации. Для физических лиц можно использовать SSL-сертификатов c домена (DV-Domain Validation). В этом случае указывается полное имя владельца сертификата;
- Organizational unit – yкажите внутреннее название подразделения вашей организации, которое является ответственным за сертификат;
- City/locality
- State/province
- Country/region – двухбуквенный код страны.
- Common Name – укажите имя сайта (веб-сервера), по которому будут обращаться ваши клиенты. Укажите FQDN имя, например:
-
- Выберите крипто провайдер и длину ключу. Рекомендуется использовать Microsoft RSA SChannel Cryptographic Provider с длиной ключа 2048 бит и более;
- Укажите имя файла, в который нужно сохранить CSR запрос.
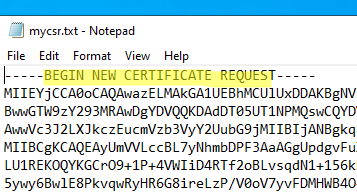
- Должен сгенерироваться текстовый файл, который начинается с
BEGIN NEW CERTIFICATE REQUEST
и заканчивается
END NEW CERTIFICATE REQUEST
.
Передайте ваш CSR-файл организации, уполномоченной выпускать SSL сертификаты. Если вы используете внутренний CA на базе Microsoft, загрузите CSR файл и подпишите сертификат и скачайте файл.
Установка SSL сертификата в ISS
После того, как вы получили ваш файл (*.CER) с сертификатом SST/TLS от вашего CA, вы можете установить его в IIS.
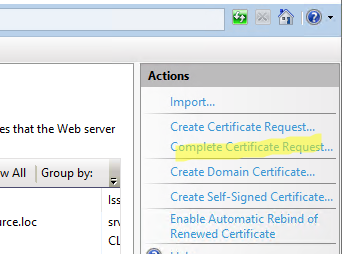
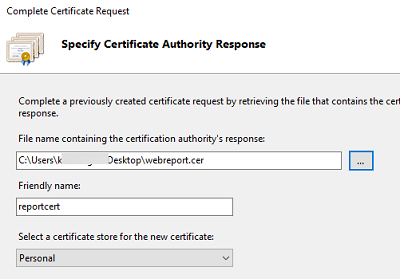
Для этого запустите консоль IIS Manager, перейдите в раздел Certificates и выберите Complete Certificate Request.
В статье описывается установка *.CER сертификатов в формате DER/base64 сертификаты X.509 от Microsoft. Если вы получили от своего CA сертификат в формате *.CRT, его не получится импортировать и установить в IIS. Вам нужно сконвертировать CRT сертификат в формат PFX. Проще всего это сделать с помощью утилиты openssl в любом дистрибутиве Linux. Вам понадобится файл сертификата (*.crt) и закрытый ключ (*.key). Для их конвертации, выполните команду:
$ openssl pkcs12 -export -out target.pfx -inkey source.key -in source.crt
Такой PFX сертификат можно импортировать через меню Import.
Также вы можете конвертировать CRT сертификат прямо из Windows:
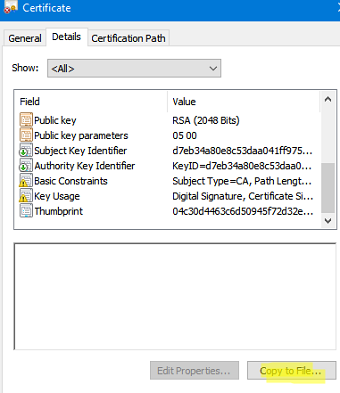
- Дважды щелкните по вашем CRT файлу;
- Перелижите на вкладку Details и нажмите Copy to File;
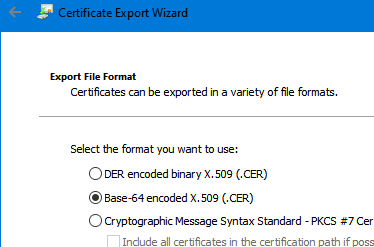
- Выберите формат Base-64 encoded X.509(.CER);
- Укажите путь, куда нужно поместить CER файл сертификата.
Выберите *,crt файл с SSL сертификатом, полученным от центра сертификации. Укажите имя SSL сертификата и хранилище, в которое поместить сертификат (Personal или Web Hosting).
Новый SSL сертификат должен появится в списке доступных сертификатов в IIS.
Привязать SSL сертификат к сайту IIS
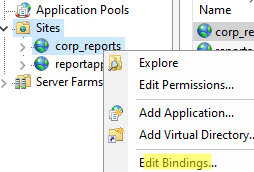
Теперь нужно привязать ваш сертификат к сайту IIS, порту и/или IP адресу. Найдите ваш сайт в консоли IIS и выберите Edit Bindings.
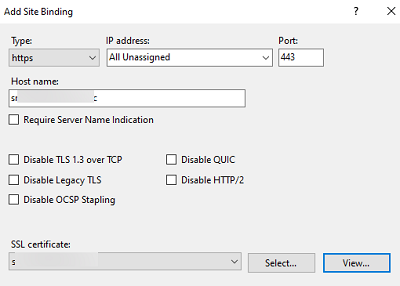
Нажмите Add и заполните следующую информацию:
- Type:
https - IP Address: выберите
All Unassigned
, или выберите конкретный IP адрес, которому нужно привязать SSL сертификат (на одном порту и IP адресе веб сервера IIS можно запустить несколько сайтов) - Port:
443 - Hostname: укажите имя узла, для которого выпущен сертификат
- SSL Certificate: выберите из списка SSL сертификат, который вы установили
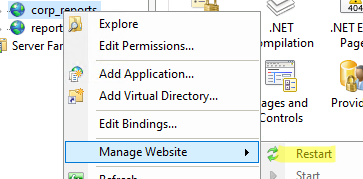
Перезапустите сайт IIS (Manage Website -> Restart или командой
iisreset
).
Откройте ваш веб сайт IIS в браузере используя префикс
https://
. Если сертификат установлен правильно в адресной строке браузера появится зеленый замок. Это значит что подключение защищено. Нажмите на замок чтобы просмотреть информацию о вашем SSL сертификате.
Далее нужно настроить правила, которое будет перенаправлять все HTTP запросы к сайту IIS на HTTPS.
SSL certificates are what enable websites to move from HTTP to HTTPS, which is more secure. An SSL certificate is a data file hosted in a website’s origin server. SSL certificates make SSL/TLS encryption possible, and they contain the website’s public key and the website’s identity, along with related information. Since certificates play a vital role in securing communications between federation servers, claim-aware applications, web clients, etc. Therefore, AD FS requires a certificate for Secure Socket Layer (SSL) server authentication on each federation server in your federation server farm. See the following interesting guides on how to import a certificate into the Trusted Root and Personal file certificate store, how to request a certificate signing request in Windows using Microsoft Management Console, and how to export a certificate in PFX format in Windows.
If you are not going to perform the certificate request yourself and you are requested to provide the components needed to create a certificate for you, Please provide the following information as described here
This will need to replicate to other domain controllers and for safety precautions, DC will have to wait 10 hours from when the key is created to ensure that you are able to answer password-related queries that relate to this key. See this link for more information.
Note: To avoid AD FS from failing to start, you can run this PowerShell command in advance to ensure you meet the 10 hours requirements. The image below shows the service account being used
Step 1 – Request for a certificate to work with AD FS: See the following link for more information.
How to Open Certificate Manager
I use this step in the image below to manage certificates. But I prefer using the alternative method described below in creating certificates. Here I can specify the right snap-in type of users and computers to be managed.
- Click the Start button,
- Type certmgr.msc in the search field, and
- Click the Enter key
Search for run, type certmgr.msc in the open field and press enter. This step will open the local computer certificate management console.
Alternatively, this can be accessed using the MMC
– Click the Start button,
– Type mmc in the search field, and
– Click the Enter key
Or search for run, type mmc in the open field and press enter.
Note: In using the MMC Console, you will have to add the certificate snap-in as shown below.
– Click on file, select add/remove Snap-in
– Select Certificate and click on add
– Select local computer and click on finish
Note: You can also run this on another computer.
– Finally, click on okay.
This will certificate management console. Expand the certificates, you will have access to all folders in the local computer as shown below.
Step 2: In order to create a certificate signing request, follow the steps below.
– Click on Personal, select all tasks, advanced options and Create Custom Request
Click on Next
Select proceed without enrolment.
On the Custom request, leave everything as default.
On the Certificate Information page, expand the details tab as shown below and click on properties.
Enter your desired friendly name and description and click on apply
On the Subject menu, enter the relevant details and click on Apply.
Here: I selected the CN and entered the field
– Under Alternative Name, I entered the same values as the CN as required by ADFS.
– I also entered under DNS the Subject alternate name
– Also entered certauth.domain.de to support authentication on port 443.
– And lastly, I ensured the SAN contained “enterpriseregistration.<upn suffix> for more information, see here
On the Private Key Menu, expand the key option in order to select your desired key size.
When you are done, click on ok and this will display the Certificate Information Window once more
Click on next
– Finally, enter your desired path to store the certificate.
Remember to add the .req to the filename
Click on finish.
– See this guide on how to import the certificate to the Trusted Root and Personal File Certificate Store.
Note: Self-signed certificates are not trusted by default and they can be difficult to maintain. Also, they may use outdated hash and cipher suites that may not be strong. For better security, purchase a certificate signed by a well-known certificate authority.
I hope you found this blog post helpful. If you have any questions, please let me know in the comment session.
