

Remember the Active Directory Administrative Center? If you are like me, you didn’t really see many across the enterprise make use of the “next-generation” of Active Directory management. However, there is a new Active Directory Administrative Center that I would like to predict will be the next-generation of managing Active Directory domain resources and that is the Windows Admin Center New Active Directory Extension that is available for Preview in Windows Admin Center. Additionally, if you are looking for Active Directory Administrative Center Windows 10, this is the tool that most likely, will fill this need. Let’s take a look at the Windows Admin Center New Active Directory Extension and see how this new Active Directory extension is installed and used.
As you know, Windows Admin Center can be installed and used on Windows 10 as well as Windows Server operating systems. In fact, you can connect to and have access to many powerful tools in Windows Admin Center on your Windows 10 administrative workstation.
How do you access the Windows Admin Center Active Directory module?
Installing Windows Admin Center New Active Directory Extension
Be sure you are running the latest and greatest Windows Admin Center (1910 at the time of this writing). You can download it here: https://www.microsoft.com/en-us/cloud-platform/windows-admin-center

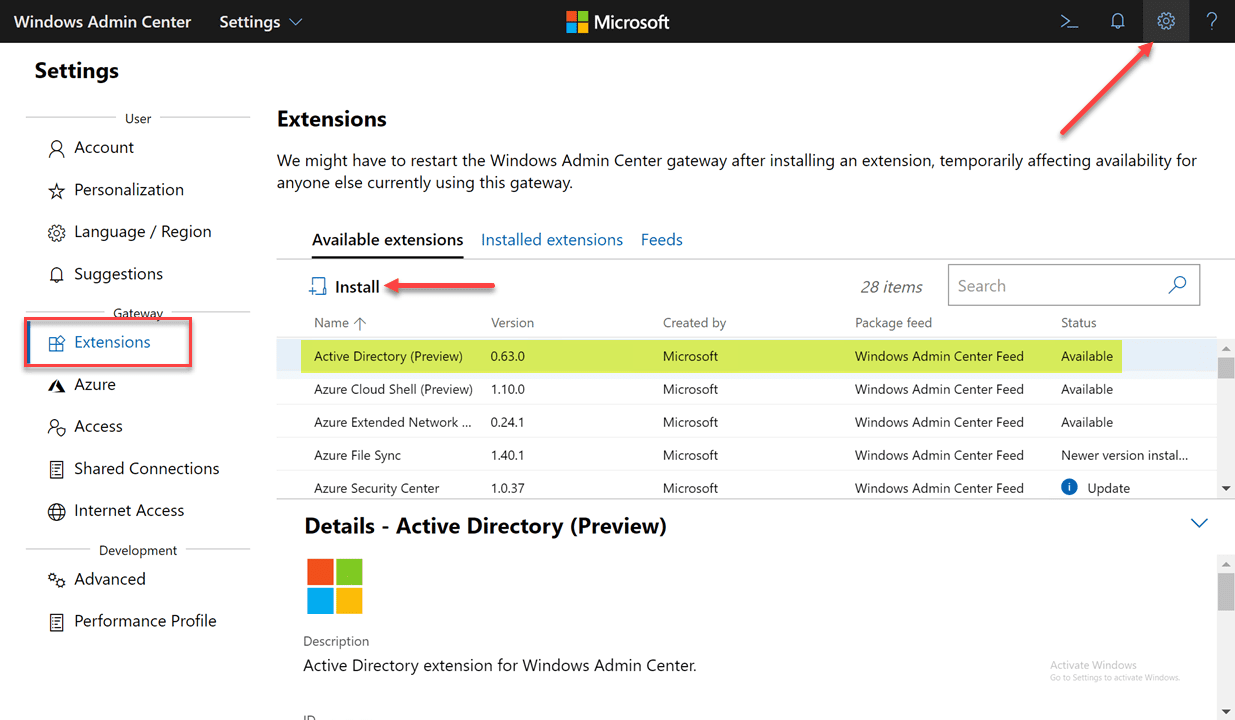
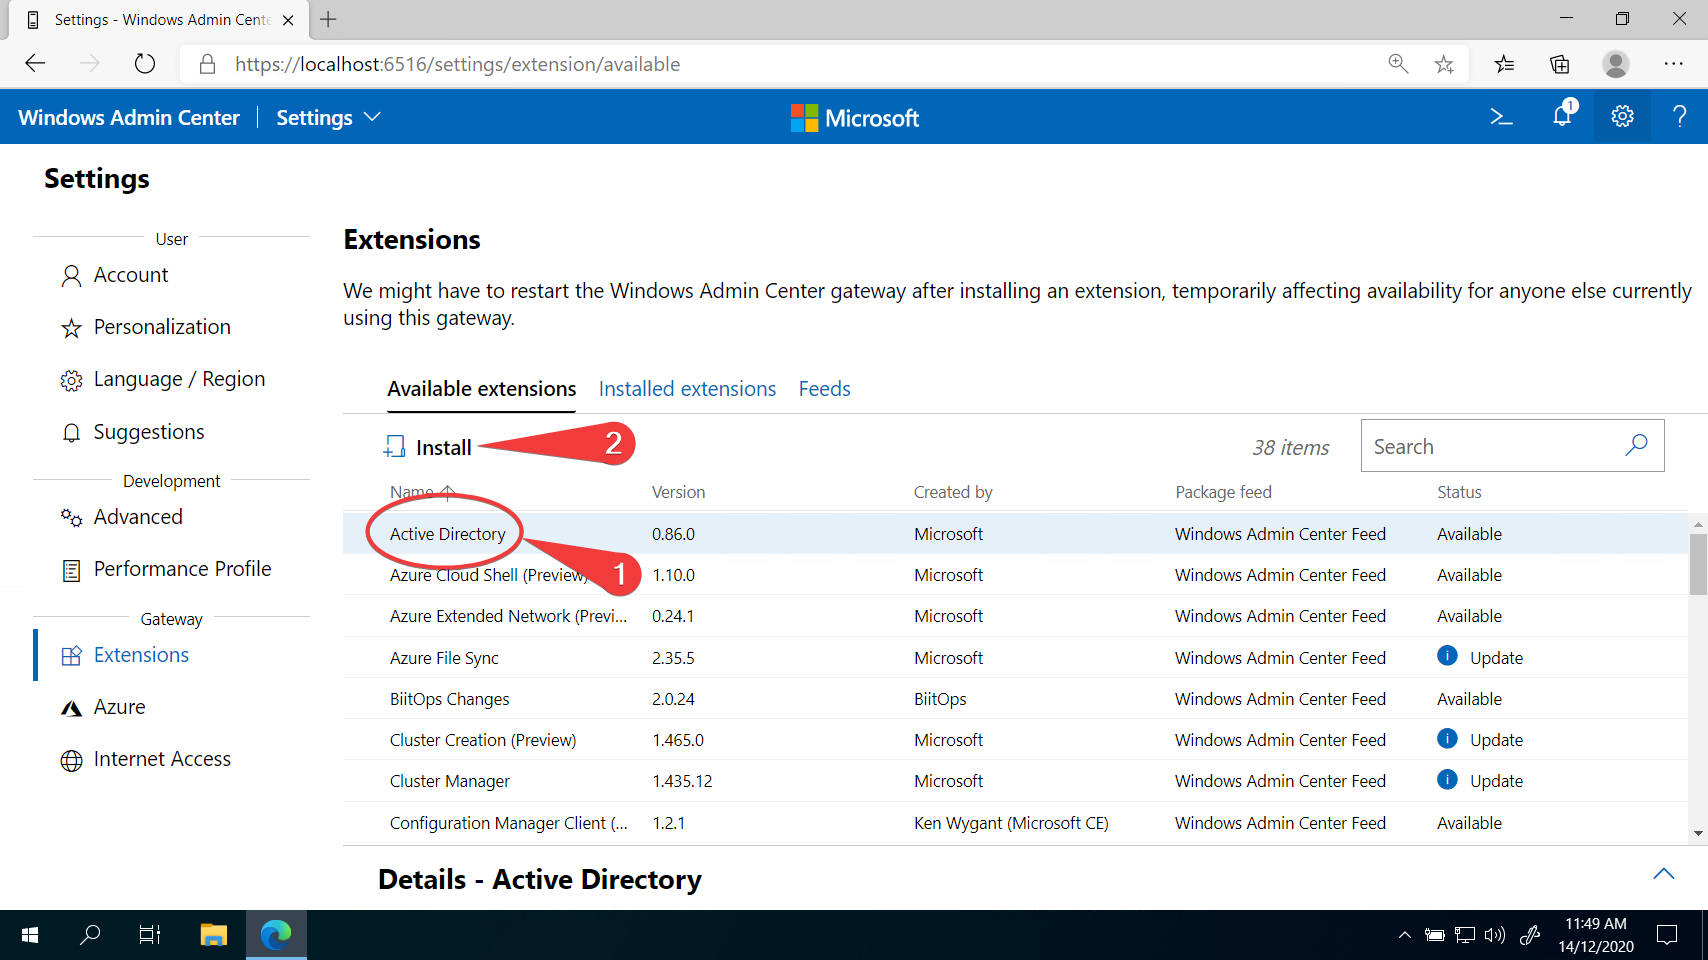
Once you have the latest Windows Admin Center, navigate to the Settings > Extensions screen. Under the Available extensions, you will see the Active Directory (Preview) listed. Highlight it, and then click the Install button.
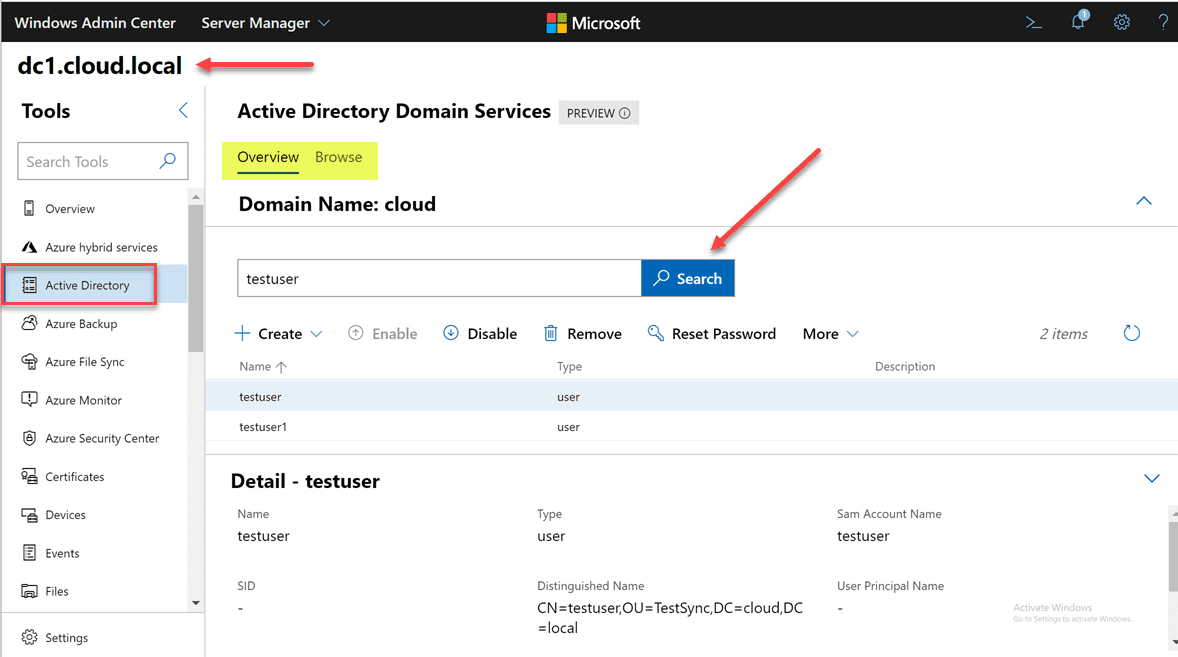
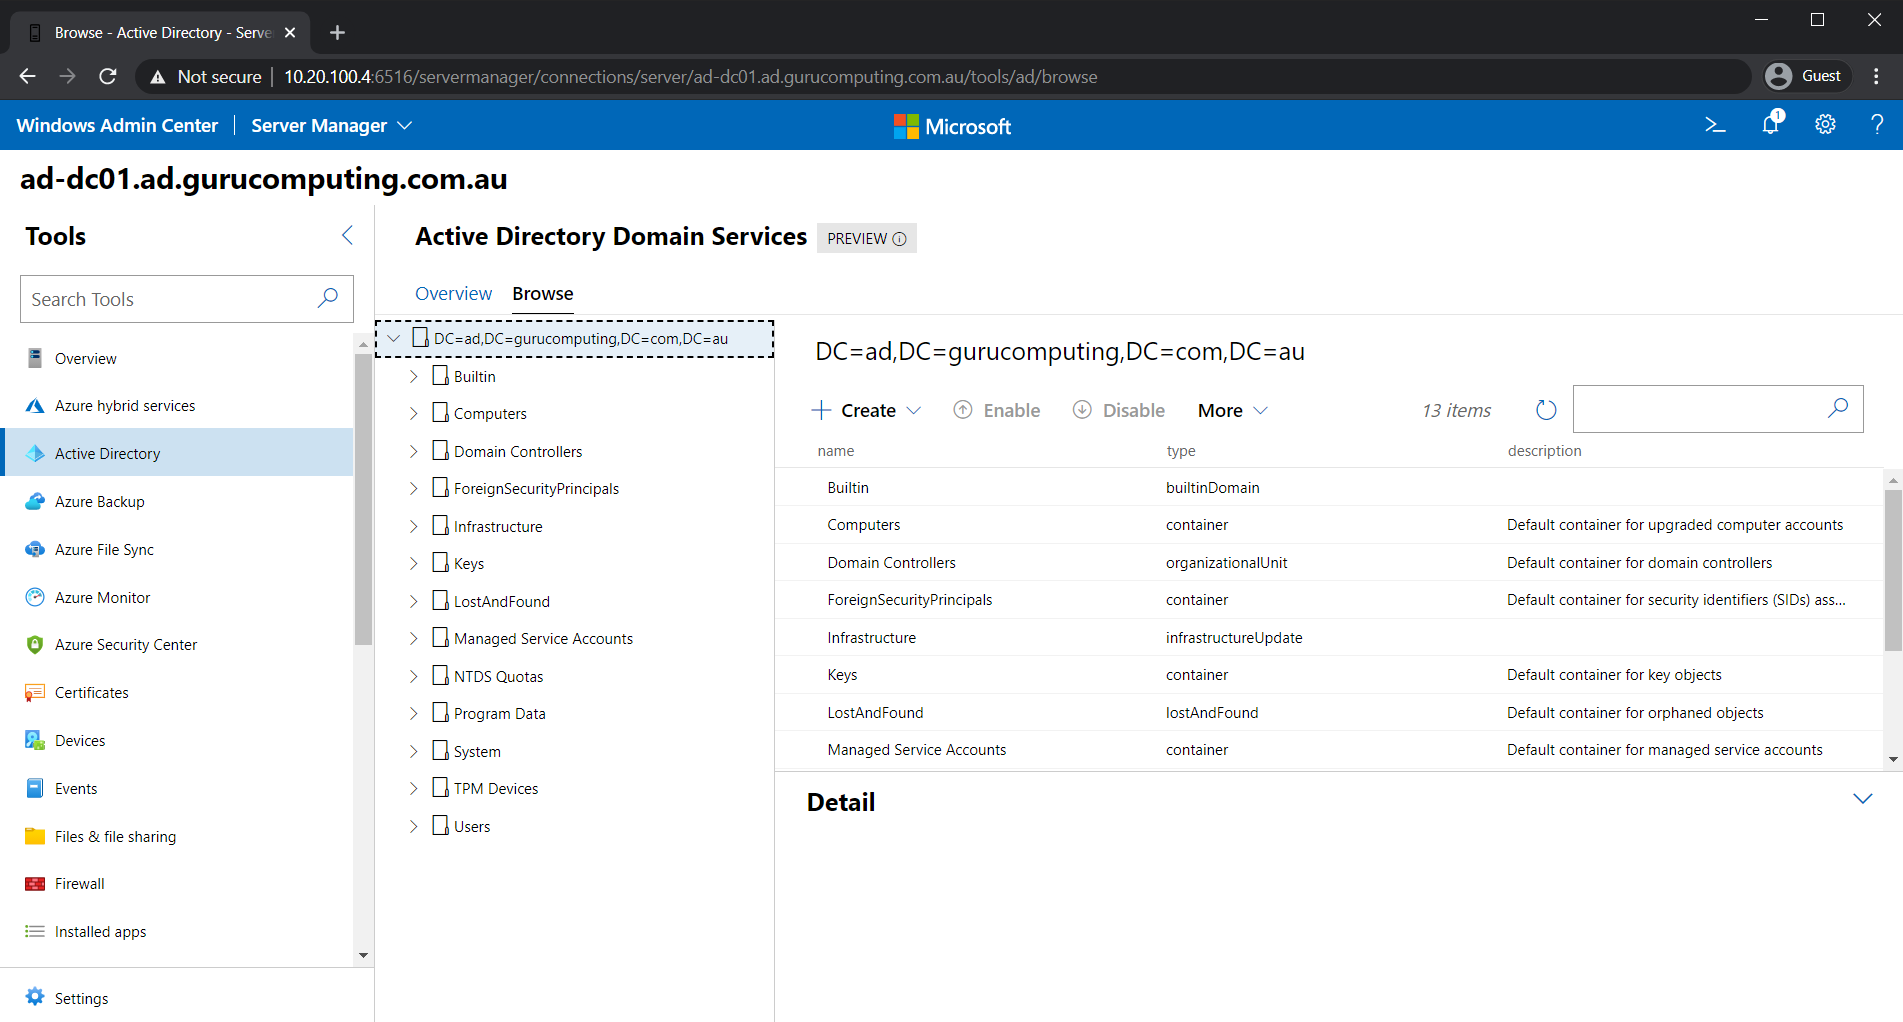
Once installed, Windows Admin Center will quickly reload the browser session. Then you will need to connect to a domain controller in your environment to manage. The Active Directory Domain Services only shows up in the context of managing a domain controller with Windows Admin Center. After connecting to a DC, you will see the Active Directory menu listed underneath Tools.
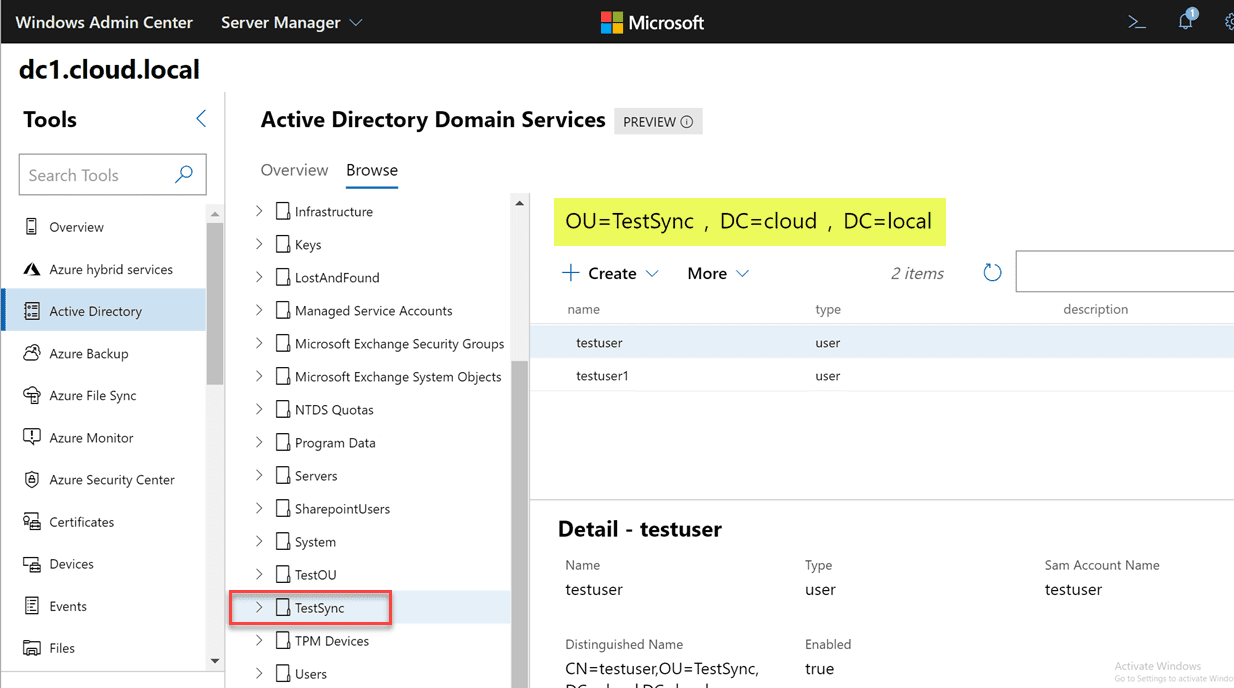
There are several things that stand out here. For one, the large search field allows easily finding objects.
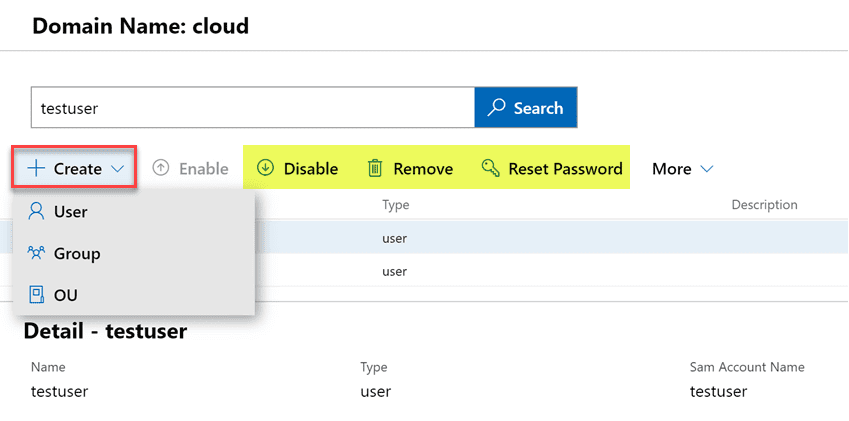
Zooming in a bit further, when we look at the various actions that can be performed, you will see under the Create menu, you can create users, groups, and OUs. Additionally, you have the ability to Disable, Remove, and Reset Password.
Under the More menu, you will notice two options – Properties and Locate.
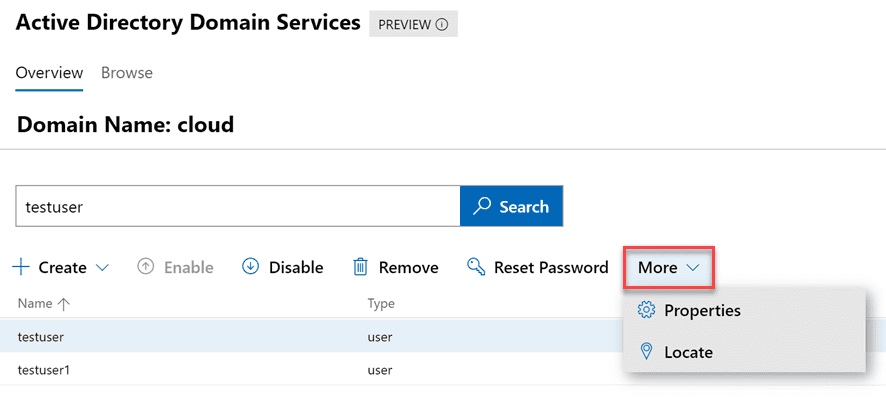
For one, I love the locate option. How many times have you performed a search in Active Directory Users and Computers and even though the search in ADUC returns the object you are looking for, you may need to see it where it is located. This is not achievable in the default ADUC tools. It is great to see an easy locate feature for any object so you can quickly be taken to the location where the object is housed.
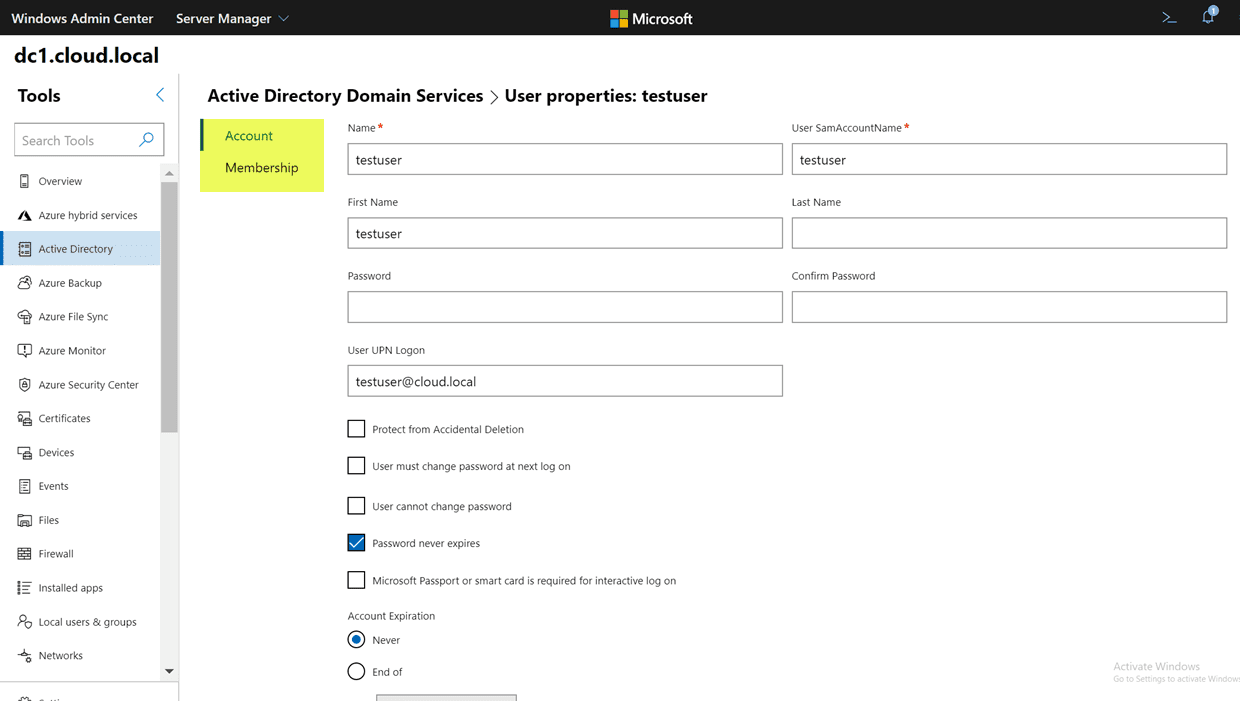
Additionally, if you look at the Properties screen, you will see a good bit of functionality here. You get the basic properties of the user that can be modified such as the typical name, SAMaccountname, UPN suffix, password options, account expiration and others.
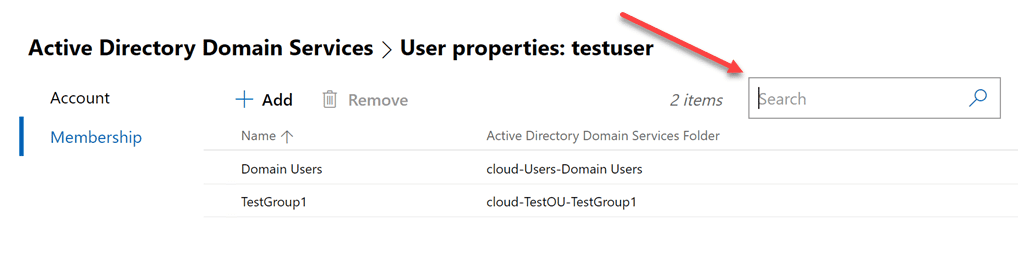
Also, if you look at the Membership menu, you will quickly get to see which groups the user object is a member of. Additionally, I really like the search menu that is found on these pages that allows quickly filtering down to see the exact object you are looking forward. Instead of having to scroll through a list of groups in the user properties like ADUC, you can quickly use the search menu and determine if the user is a member of a particular group or not.
Still in Preview
The Windows Admin Center New Active Directory Extension is a great new extension to be found for use with Windows Admin Center. Keep in mind this extension is still in Preview form as are many other Windows Admin Center extensions. Why should you still get excited about this new extension if you are an Active Directory administrator?
As you have no doubt noticed, Microsoft is going “all in” on Windows Admin Center and I can say that it has kept me pleasantly surprised. I think it is turning out to be great platform that has been introduced at the right time. It will certainly be the one tool that Microsoft settles on for day-to-day management of Windows Server environments, including Active Directory.
The seeming lack of features at this stage should not be alarming. It is not close to ADUC or other tools in its current form, however, you can expect to see this new Active Directory extension rapidly gain new features. I suspect Microsoft will also bring in the functionality of other consoles like Active Directory Domains and Trusts as well as Sites and Services eventually.
Concluding Thoughts
The Windows Admin Center New Active Directory Extension is certainly the new active directory administrative center with great new features no doubt to come. It is most definitely worth downloading and getting familiar with.
Expect it to rapidly gain features and functionality as Microsoft ramps up all of the Windows Admin Center tools to become viable replacements for all the legacy management consoles we have used for the past decade.
To date, one of the biggest restrictions of Microsoft’s Web-based management tools has been that the company did not provide any functions for Active Directory, DNS, and DHCP servers. Microsoft began to close this gap in Preview 1903. However, the AD module is mostly limited to basic functions.
Contents
- Implementation as extensions
- Information about extension updates
- Adding extensions for AD, DNS, and DHCP
- Managing the Active Directory
- DNS Management
- DHCP Extension
- Availability
- Author
- Recent Posts

Wolfgang Sommergut has over 20 years of experience in IT journalism. He has also worked as a system administrator and as a tech consultant. Today he runs the German publication WindowsPro.de.
Currently, Windows Admin Center (WAC) only supplements the RSAT; it does not replace them. So far, it is almost impossible to avoid using the two toolboxes side-by-side because the WAC exclusively covers some new features of Windows Server, such as System Insights, while many common tasks are still left to MMC-based tools.
Implementation as extensions
The Windows Server roles that the Admin Center has completely ignored to date include AD Domain Services, DNS and DHCP servers. Since their administration is one of the core tasks of many admins, the modules for these roles were at the top of users’ wish lists for WAC.
These wishes are fulfilled by Microsoft’s three new modules in Preview 1903. However, they are not an integral part of the WAC yet; they must be installed as extensions. Consequently, the development of the new modules is decoupled from the overall system, which allows Microsoft to publish updates at shorter intervals.
Information about extension updates
To inform users in general about new versions of extensions, the WAC Preview 1903 introduces a notification function. A corresponding message appears when an extension is opened and an update is available.

WAC displaying a notification about an update for an extension
For extensions that originate from hardware manufacturers, it is sufficient if the user in WAC connects to a server offered by the hardware provider. However, the extension must explicitly support notifications.
Adding extensions for AD, DNS, and DHCP
The list of extensions can be displayed using the gear symbol in the top right-hand corner of the menu bar. You can install the previews for Active Directory, DNS, and DHCP individually from there. However, afterwards they only appear in the navigation of Admin Center when you connect to a domain controller, a DHCP, or a DNS server.

The modules for AD, DNS, and DHCP must be installed via the list of extensions
Managing the Active Directory
When called, the AD module provides several information about the domain, such as name, functional level, or the standard containers for users and computers. The actual administration is essentially limited to adding, deleting, and editing user accounts as well as creating groups and managing their members.
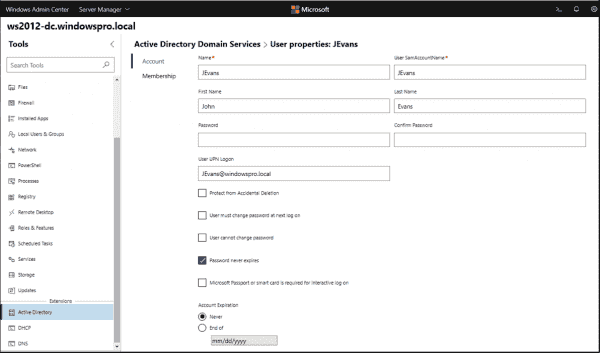
When editing user accounts, only some of the attributes are available
Password reset is one of the features that is especially useful for web-based tools. This task can be delegated to employees without having to install any software on their computer.

Password reset in WAC Preview 1903
The AD extension also supports this function. However, WAC’s rough role model does not allow users to be limited to this task. Rather, they can use all the AD module features within the scope of their permissions.

Objects in the Active Directory can only be accessed via the search function
Unlike Active Directory Users and Computers or the Active Directory Administrative Center, the new WAC extension does not allow you to navigate through the AD’s tree structure; instead, all activities start with the integrated search function.
It also allows the entry of substrings and returns all objects (users, computers, groups) that match the pattern. Depending on the type you choose, specific operations are available. The password reset, for example, only works for users.
There is no access to OUs. Therefore, these cannot be displayed, edited, moved, or newly created. Currently, it is also not possible to manage group policies via the WAC.

When adding a server, you can look up its name in Active Directory
The integration with the AD is also noticeable elsewhere. If you want to add a new computer to the list of managed systems, you can now trigger a search in the AD.
DNS Management
The new extension handles most of the core features needed for this service. Thus, the DNS module can display details of forward and reverse lookup zones, create them, and edit their properties (such as master server or dynamic updates).
Displaying DNS zones and their entries with the new DNS extension from WAC.
Moreover, admins can use it to create records of host type (A or AAAA), CNAME, or MX. Existing DNS entries and their properties, such as FQDN, IP address, or TTL, can be edited. The tool also allows you to create PTR type entries under a Reverse Lookup Zone.
To use the DNS extension, the PowerShell DNS module must be installed on the target server. If necessary, this can be done directly from the error message or with:
Install-WindowsFeature -ComputerName <DNS-Server> -Name RSAT-DNS-Server
DHCP Extension
The module for DHCP provides the essential status information for the IPv4 and IPv6 scopes (use of addresses, reservations). Scopes can also be created and configured (IP addresses for the start and end of a range, expiration of leases, exclusion of ranges, reservations).
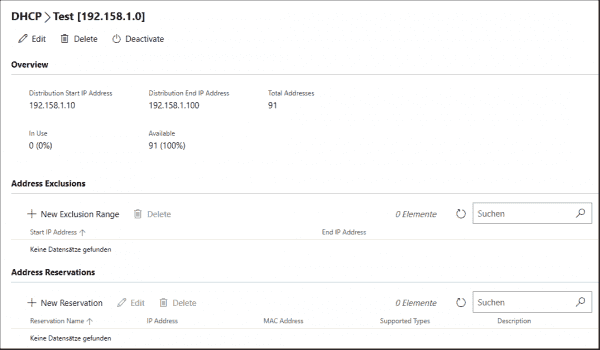
Editing DHCP scope in the Windows Admin Center
Advanced functions, such as configuring DHCP failover or filtering clients via policies, are not supported. It is also not possible to authorize DHCP servers in Active Directory.
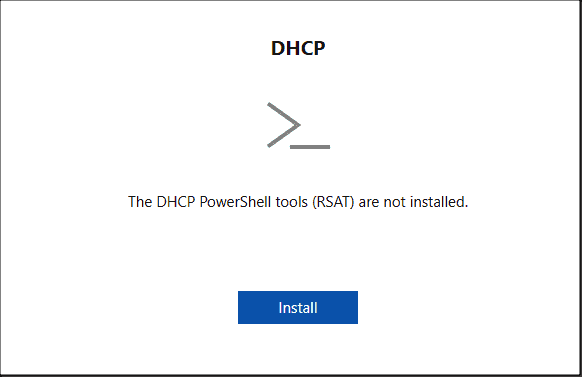
The DNS and DHCP extensions need their respective PowerShell modules on the target system
The DHCP extension also requires the respective PowerShell module (RSAT-DHCP) on the target systems. You can add it following the same pattern used for DNS.
Availability
WAC Preview 1903 can be downloaded from the Windows Server Preview website once you are registered as an Insider. As mentioned above, you have to add the extensions for AD, DNS, and DHCP separately.
![]()
![]()
Время на прочтение
4 мин
Количество просмотров 26K

Недавно я шерстил Хабр и встретил комментарий от Inskin:

Я впервые познакомился в Windows Admin Center, когда в нем был только счетчик управления файлами и больше ничего. Сейчас все инструменты из RSAT потихоньку переезжают в Windows Admin Center.
Пока я не видел ни одного толковой русской статьи про настройку Windows Admin Center и решил написать ее сам. Под катом подробный обзор, две скрытые кайфовые фишки WAC, а также инструкции по установке и настройке.
Какие фичи реализованы на текущий момент?
Чуть больше года назад WAС был практически неюзабельным, в превью версии был только красивый дашборд и управление процессами.
Теперь, можно делать полноценный деплой новых серверов прямо из браузера.
- Диспетчер задач
- Управление сертификатами
- Управление устройствами
- Просмотр событий
- Проводник
- Брандмауэр
- Установка и удаление программ и служб и ролей
- Regedit
- Планировщик задач
А еще WAC может служить шлюзом для WinRM и RDP.
Кстати, для подключения, Windows Admin Center использует WinRM и общий runspace вместе с WSMan’ом, поэтому, если у вас подключены сетевые диски, то подключаться к серверам что хостят эти диски можно будет без ввода логина и пароля.
Попробуйте сделать Enter-PSSession без указания Credentials, если команда не попросит логин или пароль, то значит можно будет войти и через WAC без ввода логина и пароля.
Что вы могли упустить:
Часть функционала все еще скрыта за плагинами, поэтому, вы могли упустить две очень крутые фишки и одну не очень крутую.
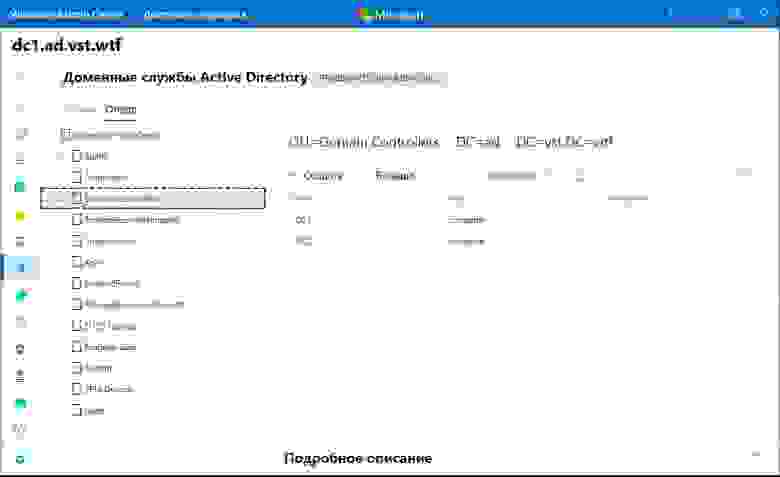
Управление AD (превью):
Органы управления Active Directory тут похожи на что-то между ADAC и ADDC. Хорошо, что они переосмыслили интерфейс, в целом это выглядит даже удобнее, чем через RSAT. В еще одном вопросе можно целиком перейти на WAC.
Управление DNS (превью):
В WAC переехал полностью функционал управления DNS. Создание новых зон, PTR записей, теперь все это доступно через Windows Admin Center.

Управление Windows Defender (превью):
Пока что можно только управлять сканированием и отключать защиту в реальном времени. Отсутствуют все пункты защитника, плюс нельзя управлять защитой от программ-шантажистов.

Установка на Windows Server / Windows 10
По моему мнению, самая правильная установка это – установка на локальный компьютер. Сначала нужно скачать установочный файл по ссылке:
http://aka.ms/WACDownload
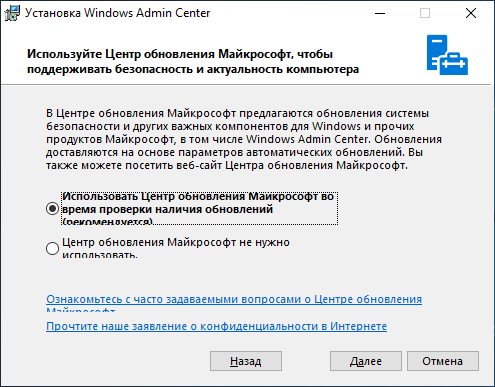
Установка очень проста, «далее, далее, готово», но пару рекомендаций дать нужно. Обязательно выберите пункт об автоматическом обновлении WAC, гарантирую, вам это пригодится, но по непонятным причинам, этот пункт по умолчанию снят.
WinRM работает по HTTP протоколу, поэтому, чтобы Windows Admin Center не подключался к удаленным серверам по HTTP обязательно включите этот пункт. Он тоже снят по умолчанию.

Если вы используете WAC на домашней системе, рекомендую оставить самоподписанный сертификат. Он автоматически добавляется в доверенные и не доставляет неудобств, но если у вас есть свой собственный сертификат и вы хотите использовать его, то впишите его отпечаток в графу, как показано ниже:
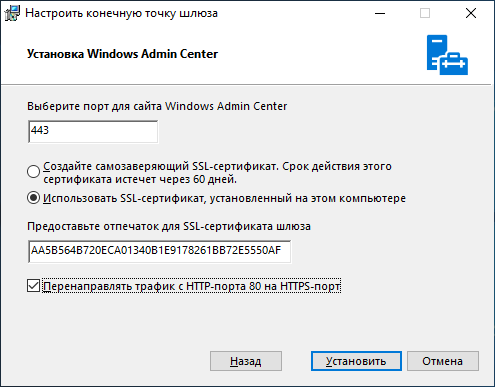
Можно перейти в certmgr → Личное → Сертификаты, перейти в свойства сертификата и найти его отпечаток.
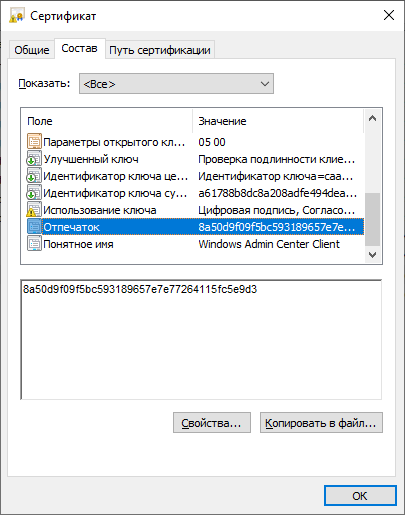
Тоже самое с помощью PowerShell:
Get-ChildItem -Path Cert:LocalMachine\MY | Select-Object FriendlyName, ThumbprintУстановка на Server Core

VPS с Windows Server Core можно взять прямо из маркетплейса
Чтобы использовать Windows Admin Center в качестве управляющего узла, обязательно нужна Active Directory. Войти в Windows Admin Center развернутую на Server Core можно только под административной ролью в AD.
Скачиваем WAC:
Start-BitsTransfer -Source http://aka.ms/WACDownload
-Destination C:\Users\Administrator\Downloads\wac.msi
Устанавливаем с самоподписанным сертификатом:
Start-Process -FilePath "C:\Users\Administrator\Downloads\wac.msi" -ArgumentList " /qn SSL_CERTIFICATE_OPTION=generate"Если у вас есть купленный сертификат или серитфикат от Let’s Encrypt, установленный в системной хранилище сертификатов, то впишите его Thumbprint в аргументы установщика.
Получить отпечаток сертификата можно вот так:
Get-ChildItem -Path Cert:LocalMachine\MY | Select-Object FriendlyName, Thumbprint
Вписать отпечаток нужно после SME_THUMBPRINT, как в примере:
Start-Process -FilePath "C:\Users\Administrator\Downloads\wac.msi" -ArgumentList " /qn SME_THUMBPRINT=AA5B564B720ECA01340B1E9178261BB72E5550AF SSL_CERTIFICATE_OPTION=installed"
Чтобы изменить сертификат, нужно будет еще раз запустить установщик, вписав в отпечаток нового сертификата.
Выводы
С каждой новой версией Windows Admin Center становится все функциональнее и функциональнее.
До полного счастья нужно разве что доделать все диспетчеры связанные с AD, добавить поддержку RRAS, IIS, перенести целиком проводник вместе с нормальным управлением SMB и Bitlocker, управление групповыми политиками и нормальный Windows Defender, и чтобы все диспетчеры, которые работают с файлами умели открывать и выбирать пути с диска машины, к которой ты подключен. А еще чтобы когда ты закрываешь WAC, нужно чтобы он закрывал PSSession и освобождал память на сервере, еще неплохо было бы, чтобы можно было ставить на Server Core без обязательного наличия AD, а когда закончат, можно перейти к MS SQL Server.
А в целом очень даже неплохо, очень рекомендую ознакомиться.

Всем привет! Сегодня мы поговорим с вами об оснастке и консоли управления доменами Active Directory – пользователи и компьютеры (ADUC). Данную оснастку используют для управления доменом Active Directory. Сама оснастка по умолчанию не установлена в системе Windows, но её можно инсталлировать несколькими способами. В статье я расскажу где скачать и как установить оснастку Active Directory для Windows 10, 11 и 8.1. Также я очень коротко расскажу, как работать с ней и как подключить компьютер к домену Active Directory из-под рабочей группы.
Содержание
- Установка в Windows
- Способ 1: Через параметры системы
- Способ 2: PowerShell
- Способ 3: Для Windows 10 1803/1709 (Более старых сборок) и Для Windows 8.1
- Как её пользоваться?
- Подключение к домену из рабочей группы
- Видео
- Задать вопрос автору статьи

Итак, в первую очередь нам нужно установить центр администрирования Active Directory. По умолчанию в Windows 10 и Windows 11 они не установлены в системе и являются дополнительными компонентами ОС. Есть несколько способов выполнить установку. Можете выбрать любой из представленных.
Способ 1: Через параметры системы
Вы можете скачать Active Directory для Windows 10 (сборка 1809 старше) и Windows 11 через меню системы.
ВНИМАНИЕ! Если у вас Windows 10 со сборкой до 1809 – смотрите 4 способ.
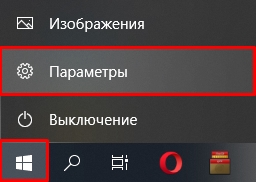
- Откройте меню «Пуск» и нажмите по шестеренке, чтобы открыть основные параметры ОС.
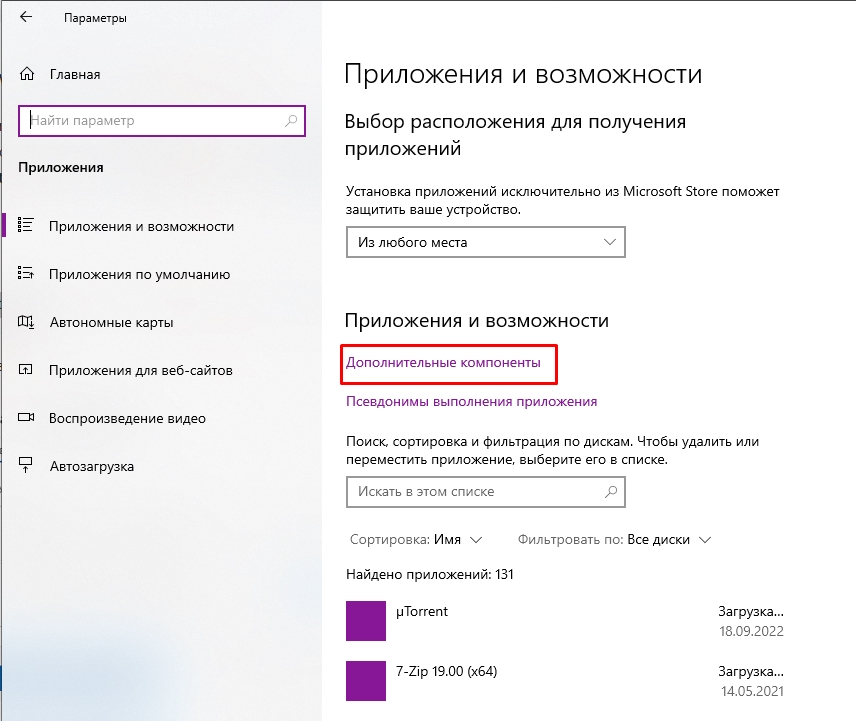
- Переходим в раздел «Приложения» (Apps).

- Вас сразу же перебросит во вкладку «Приложения и возможности». Далее в левом блоке найдите ссылку «Дополнительные компоненты» (Optional Features).
- Жмем по кнопке с плюсиком «Добавить компонент» (Add an optional feature (View features)).

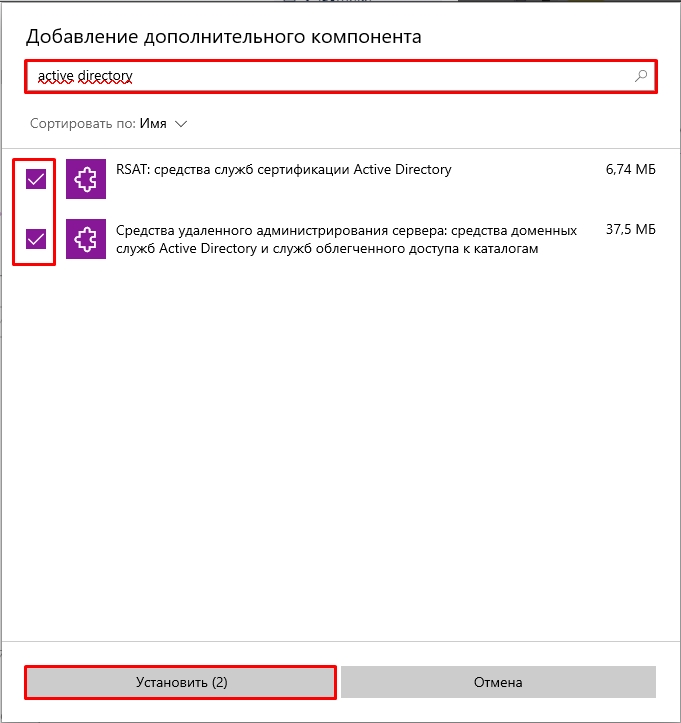
- Дабы не искать их вручную вводим в поисковую строку запрос:
Active Directory
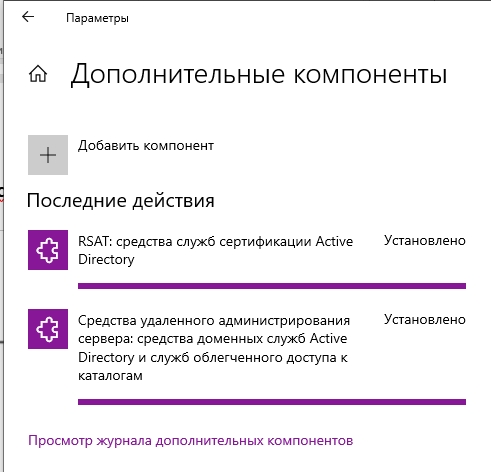
- Вы увидите два компонента. Первый – это RSAT или средства службы сертификации. Второй – инструменты для работы с удаленными администрированием и дополнительные службы. Устанавливаем обе галочки и жмем по кнопке «Установить».
- Они будут скачены с интернета с серверов Microsoft, поэтому в данный момент нужно быть подключенным к глобальной сети. Подождите пока оба компонента установятся.
Способ 2: PowerShell
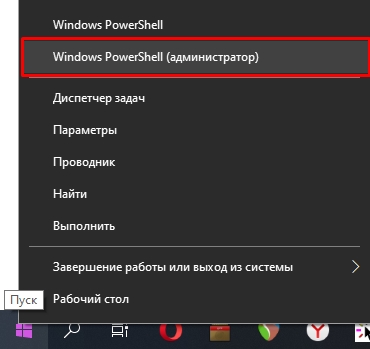
Запустите дополнительную консоль, нажав правой кнопкой мыши по меню «Пуск» и выбрав из контекстного меню нужную команду. Запускаем PowerShell с правами администратора.
Используем команду:
Add-WindowsCapability –online –Name Rsat.ActiveDirectory.DS-LDS.Tools~~~~0.0.1.0

Способ 3: Для Windows 10 1803/1709 (Более старых сборок) и Для Windows 8.1
Если у вас более старая версия Windows 10 или установлена Windows 8.1 – вам нужно скачать пакеты по ссылкам ниже. Скачиваем компоненты для своей разрядности (32 или 64 бита).
- Windows 10.
- Windows 8.1.
После этого просто устанавливаем пакет, дважды щелкнув левой кнопкой мыши. После установки компоненты нужно будет активировать.
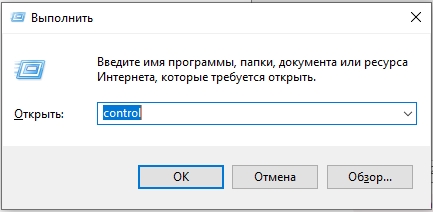
- Используем клавиши, нажав одновременно:
+ R
- Вводим команду, чтобы зайти в «Панель управления»:
control
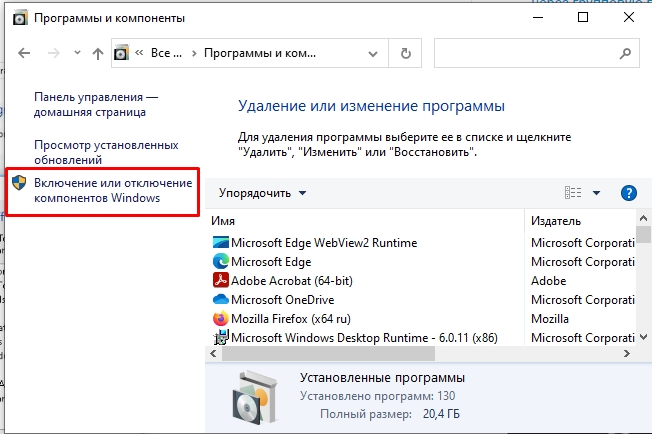
- «Программы и компоненты».
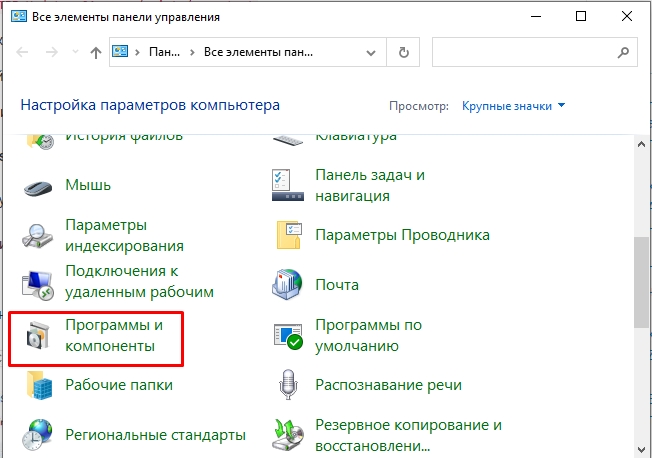
- «Включение и отключение компонентов Windows».
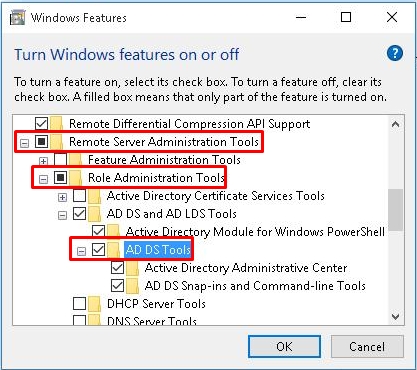
- Откройте основную папку «Remote Server Administration Tools», в ней раскрываем ветку «Role Administration Tools» и находим «AD DS and AD LDS Tools» – «AD LDS Tools» – ставим обе галочки и жмем «ОК».
Дополнительно нужно установить оснастку ADUC через командную строку – запускаем её с правами администратора. Используем команды:
dism /online /enable-feature /featurename:RSATClient-Roles-AD
dism /online /enable-feature /featurename:RSATClient-Roles-AD-DS
dism /online /enable-feature /featurename:RSATClient-Roles-AD-DS-SnapIns
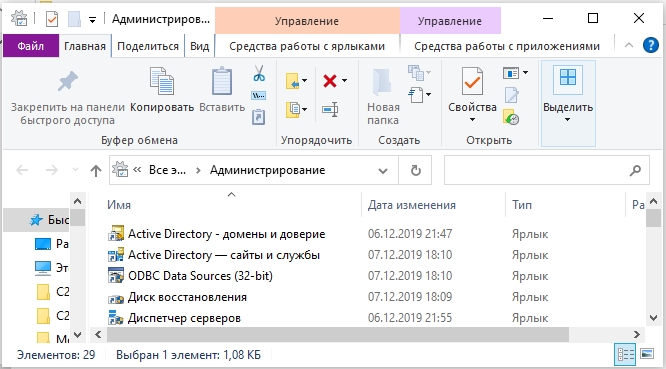
В разделе администрирования в панели управления (control) можно будет увидеть две ссылки на консоли.
Как её пользоваться?
Чтобы запустить саму оснастку консоли, можно использовать команду:
dsa.msc
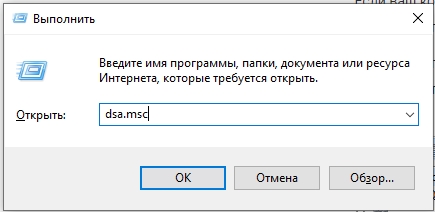
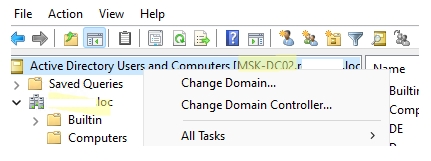
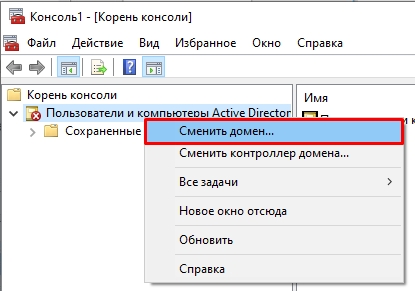
Второй вариант – это зайти в «Панель управления» – «Администрирования» – далее находим консоль там. Если ваш компьютер уже находится в домене Active Directory, то он автоматически подключится к серверу, который в свою очередь и будет являться контроллером домена. Имя сервера находится в самом верху в квадратных скобках. Если вы хотите изменить домен, кликните по нему правой кнопкой мыши и выберите соответствующую команду.
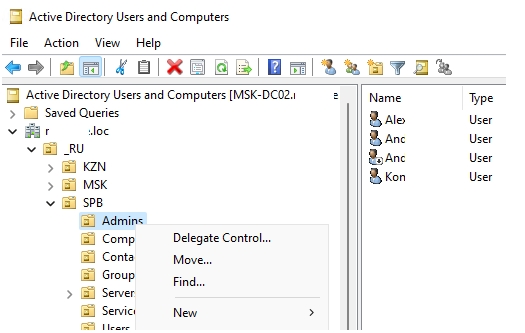
В качестве корня является сам домен организации. В каждом домене можно создать основные группы или подгруппы какой-то компании. Например, можно создать основную группу, которая будет филиалом в городе. Вы можете создавать новые объекты. Каждый объект может быть как целой группой, так и пользователем с определенными контактами.
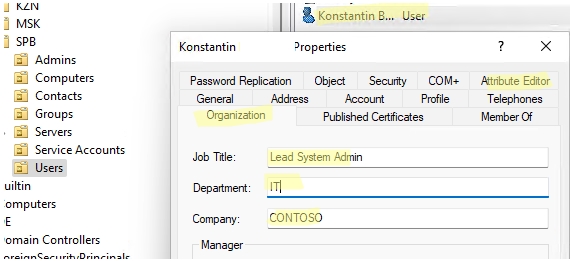
Каждый объект можно создавать, перемещать и изменять его характеристики или свойства. Например, конечного пользователя можно добавить в определенную группу, выключить его аккаунт или сбросить пароль. После сброса пароля ему на рабочем месте придется придумывать новый ключ, который он будет использовать при аутентификации в системе (при входе на начальном экране).
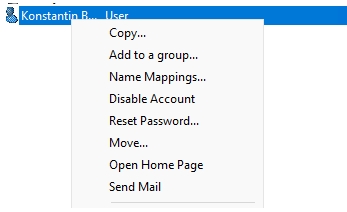
Можно зайти в свойства пользователя и изменить некоторые атрибуты. Даже есть возможность добавить фото юзера. Я советую внимательно ознакомиться со всеми вкладками и возможностями.
Представим себе ситуацию, что ваш компьютер находится в рабочей группе, которая никаким образом не связана и не подключена к основному серверу управления домена ADUC.
- Запускаем стандартную командную строку винды с правами админа.
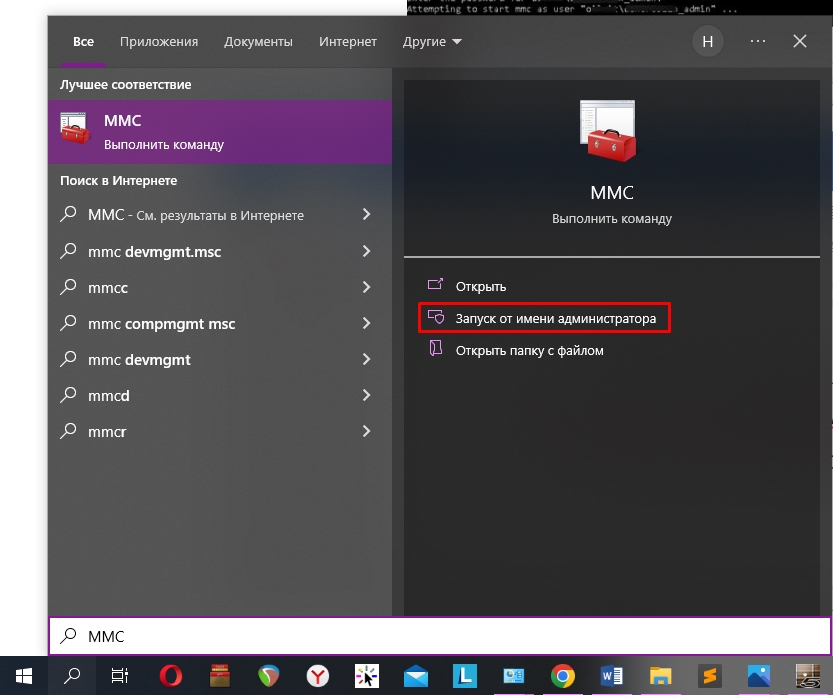
- Используем команду для запуска оснастки другого пользователя:
runas /netonly /user:wifigid\aaivanov mmc
- Теперь открываем MMC консоль – проще всего воспользоваться поиском системы.
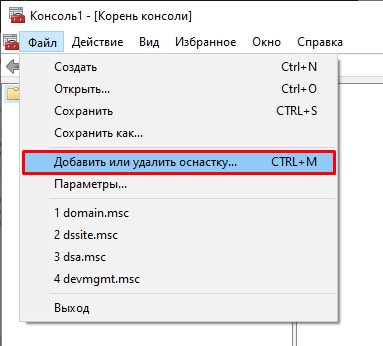
- На панели жмем «Файл» – «Добавить или удалить оснастку». Или используем клавиши:
Ctrl + M
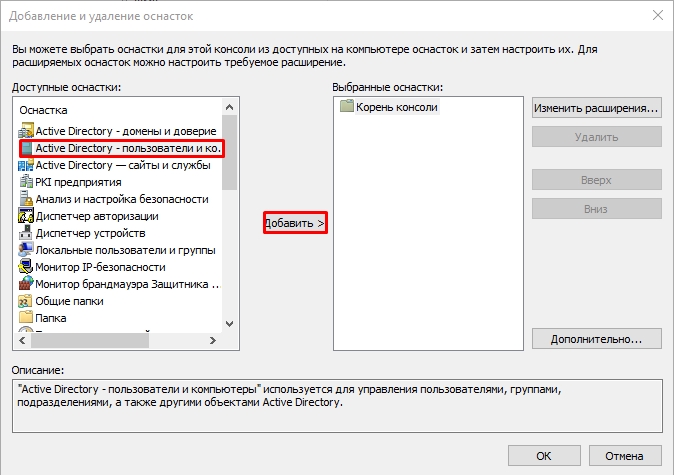
- В левом блоке выбираем «Active Directory – пользователи и компьютеры» и кликаем по кнопке добавления. После этого жмем «ОК».
- Кликаем правой кнопкой по созданному пункту, выбираем «Сменить домен». Далее останется ввести наименование домена и компьютер к нему подключится.
Видео
If you want to learn how to download Windows Admin Center, set it up including tweaking the Windows Admin Center port, you’ve come to the right place.
Not a reader? Watch this related video tutorial!
Not seeing the video? Make sure your ad blocker is disabled.
In this tutorial, you’re going to learn how to set up Windows Admin Center from scratch from download all the way to installing new extensions!
Prerequisites
To fully examine the capabilities of Windows Admin Center, you need to have more than just a desktop in place. To follow along, you will need the following:
- A test Windows domain with a domain controller. This guide is a good place to start if you do not have one in place.
- A fresh install of Windows Server 2016 or Windows Server 2019 (This article will be using Windows Server Core 2019). You can find the installation media on Microsoft’s Website.
Windows Admin Center works on Windows 10, but will not allow remote access. It will launch like an application instead of service and can only be used from the computer it launches from. Windows Server allows for Windows Admin Center to be used from any computer with a web browser.
Downloading Windows Admin Center (with Installation)
Windows Admin Center is freely available as an MSI on Microsoft’s Website. Windows Admin Center has no licensing costs and is available to install on Windows 10 (1709 or later), or Window Server 2016 and up.
Downloading and installing Windows Admin Center is typically a seamless process. You can find it via the Windows Server Evaluation Portal, or just using a direct download link.
To save you some time downloading Windows Admin Center below is a PowerShell snippet that will both download and install on your Windows Server.
Note the SME_PORT=6516 option below. By default, the Windows Admin Center port is 6516. If you’d like to change the port upon installation, you can do that here. The SSL_CERTIFICATE_OPTION option is creating a self-signed certificate for Windows Admin Center to use.
## Download the msi file
Invoke-WebRequest 'https://aka.ms/WACDownload' -OutFile "$pwd\WAC.msi"

## install windows admin center
$msiArgs = @("/i", "$pwd\WAC.msi", "/qn", "/L*v", "log.txt", "SME_PORT=6516", "SSL_CERTIFICATE_OPTION=generate")
Start-Process msiexec.exe -Wait -ArgumentList $msiArgs
Adding Firewall Rules
The MSI installer will automatically allow remote access to the Windows Admin Center port, however, that only applies to your network’s current state. but if your network profile changes (for example, from private to domain), that access will become invalid.
A network profile is a set of firewall rules that can change depending on the state of your server. You can think of it is as a security group for firewall settings. Typically there are four profiles: Public, Private, Work, and Domain.
If your server is currently in a workgroup (for this tutorial we’ll assume so), ensure you create inbound Windows firewall exceptions for the Windows Admin Center port of 6516 (or whatever port you set of the SME_PORT option above.
When the Winodws server is added to a domain, the network profile will change to Domain and, if not defined for the Domain network profile, you might not be able to access Windows Admin Center.
Below you will find a few PowerShell commands to run to open up the Windows Admin Center port.
> New-NetFirewallRule -DisplayName "Allow Windows Admin Center" -Direction Outbound -profile Domain -LocalPort 6516 -Protocol TCP -Action Allow

> New-NetFirewallRule -DisplayName "Allow Windows Admin Center" -Direction Inbound -profile Domain -LocalPort 6516 -Protocol TCP -Action Allow
Logging into Windows Admin Center
Now that you have initially installed Windows Admin Center, you can now start managing your server using a web browser, like Chrome or the new Microsoft Edge.
To access Windows Admin Center:
- Open up a web browser on any computer on the same LAN as the Windows server and go to https://<server ip>:6516. This guide is using https://10.20.100.4:6516.
If you do not know the IP of your server, you can retrieve it by running ipconfig in the PowerShell console on the server.
Related: The ipconfig Commands You Need to Know
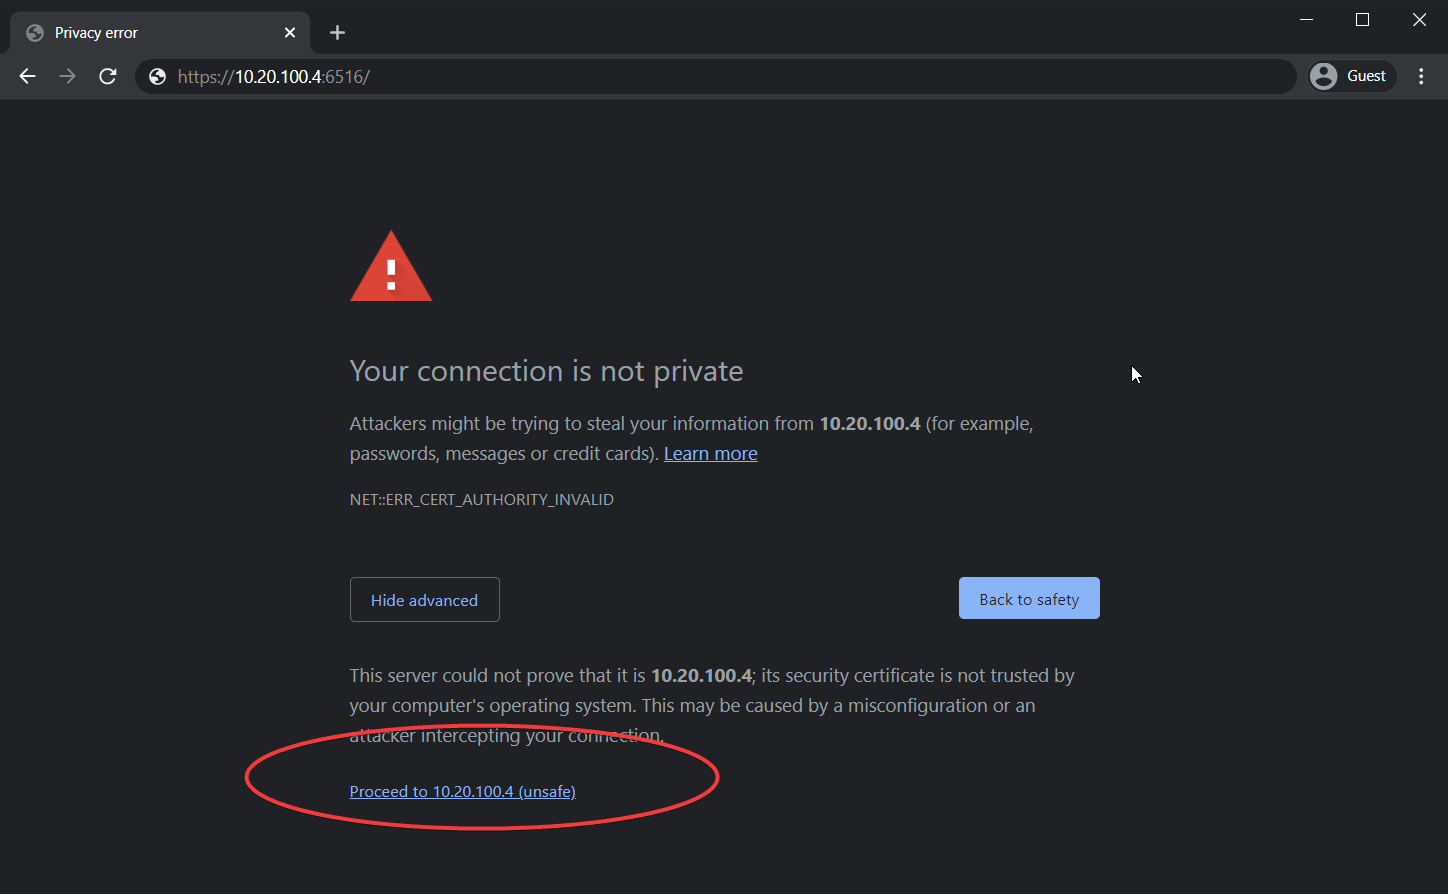
2. You will likely be greeted with a big warning saying Your Connection is not private. Select “show advanced” and then “Proceed to <IP> (unsafe). Click on Proceed to <server IP> (unsafe).
You are seeing this warning because Windows Admin Center is using a self-signed certificate and your local browser does not trust it.
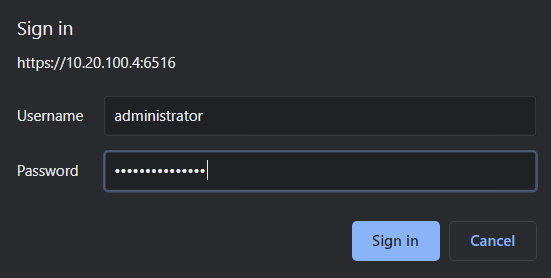
3. Provide the local administrator username and password at the Sign in prompt.
This tutorial is using the local administrator account for convenience. But you can get much more advanced in this area by checking out the User Access Options documentation.
Joining a Domain with Windows Admin Center
Windows Admin Center has a slew of features and ways to manage Windows Server. To provide a demonstration of what Windows Admin Center can do, let’s briefly cover how to add the Windows Server to a domain.
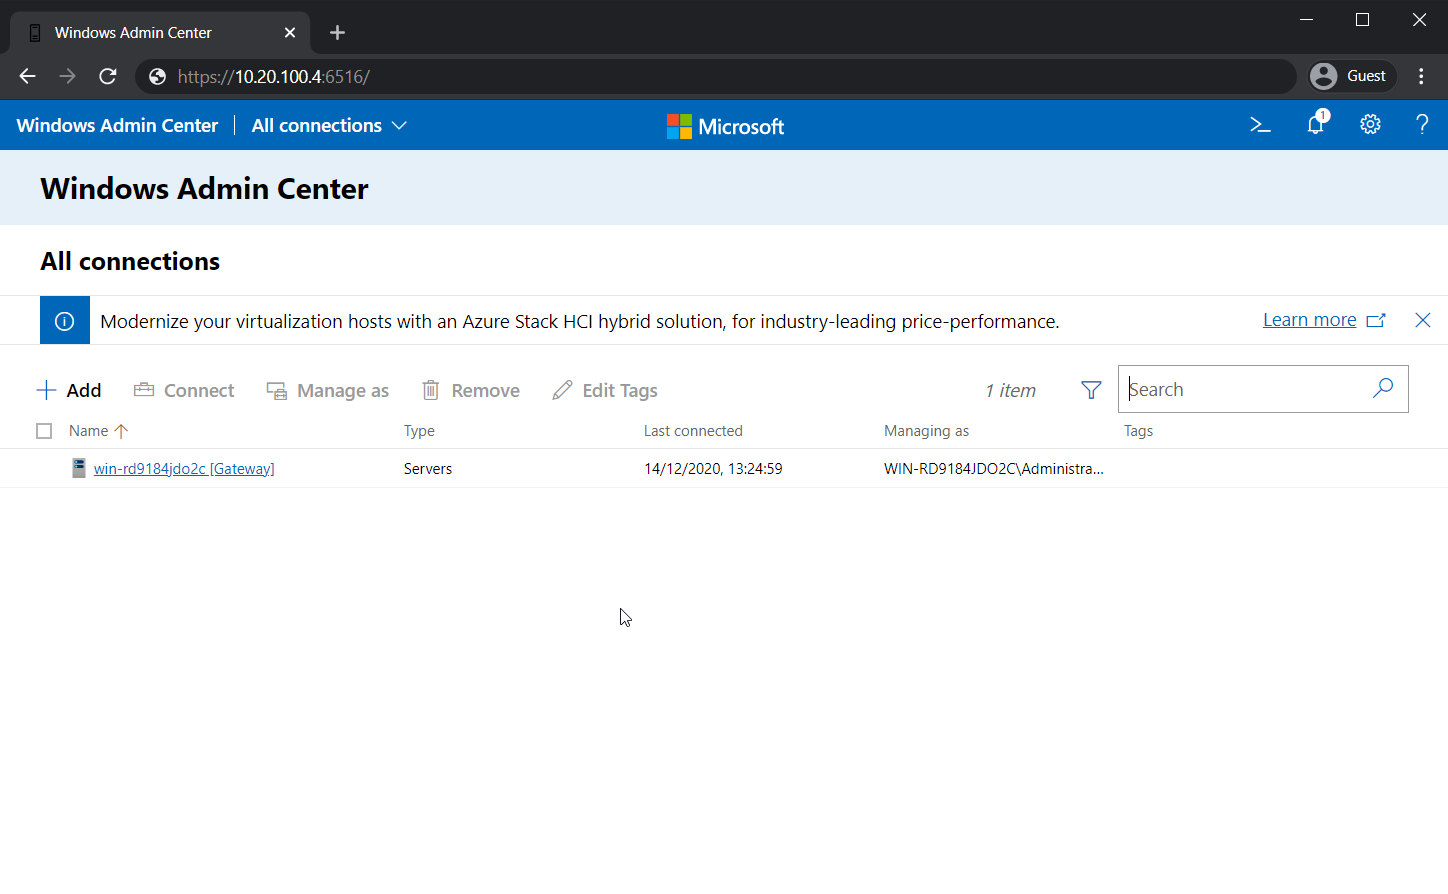
Whenever you first log in, you will be greeted by a list of computers, of which, there’s actually only a single computer: the one you installed Windows Admin Center on. You can see an example of what this screen looks like below.
- To select a server to work with, click on the (probably only) Windows server in the list.

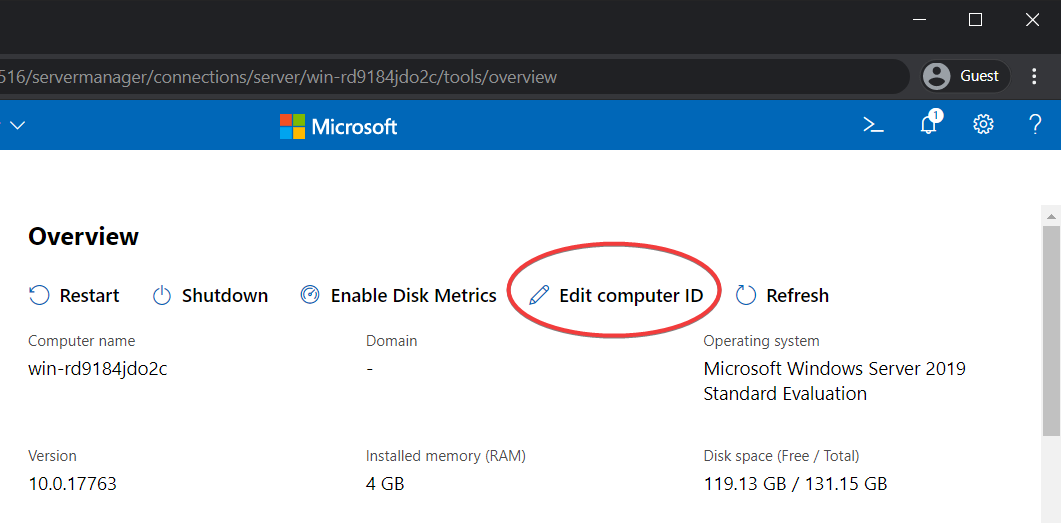
2. Once selected, Windows Admin Center will present you with a dashboard of your Windows Admin Center server (as seen below). You will also notice that the computer name (1) is randomly generated (if you used the Windows installer), and the Domain (2) doesn’t exist.
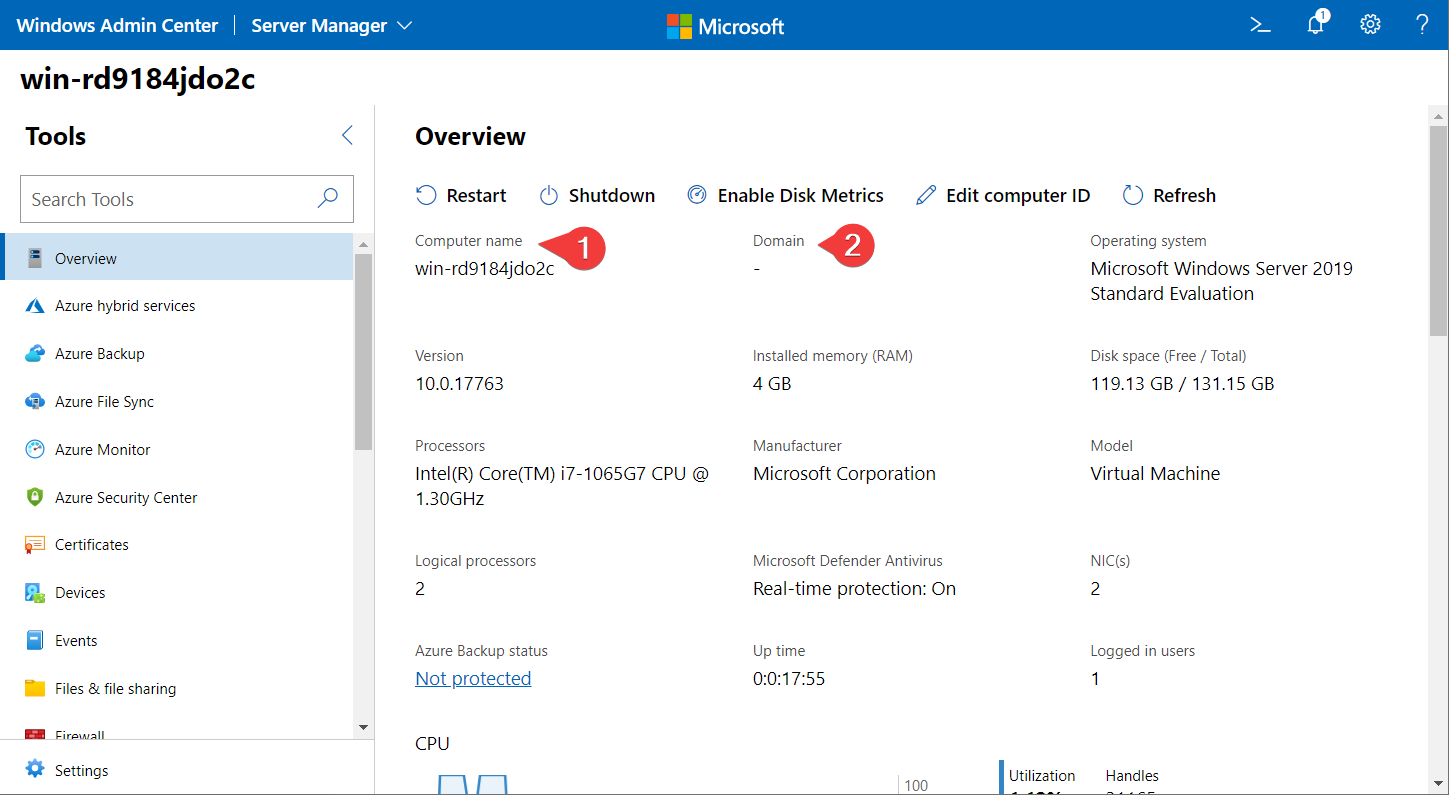
3. Select Edit Computer ID on the dashboard. The Computer ID is how Windows Admin Center defines common properties like hostname and domain membership.
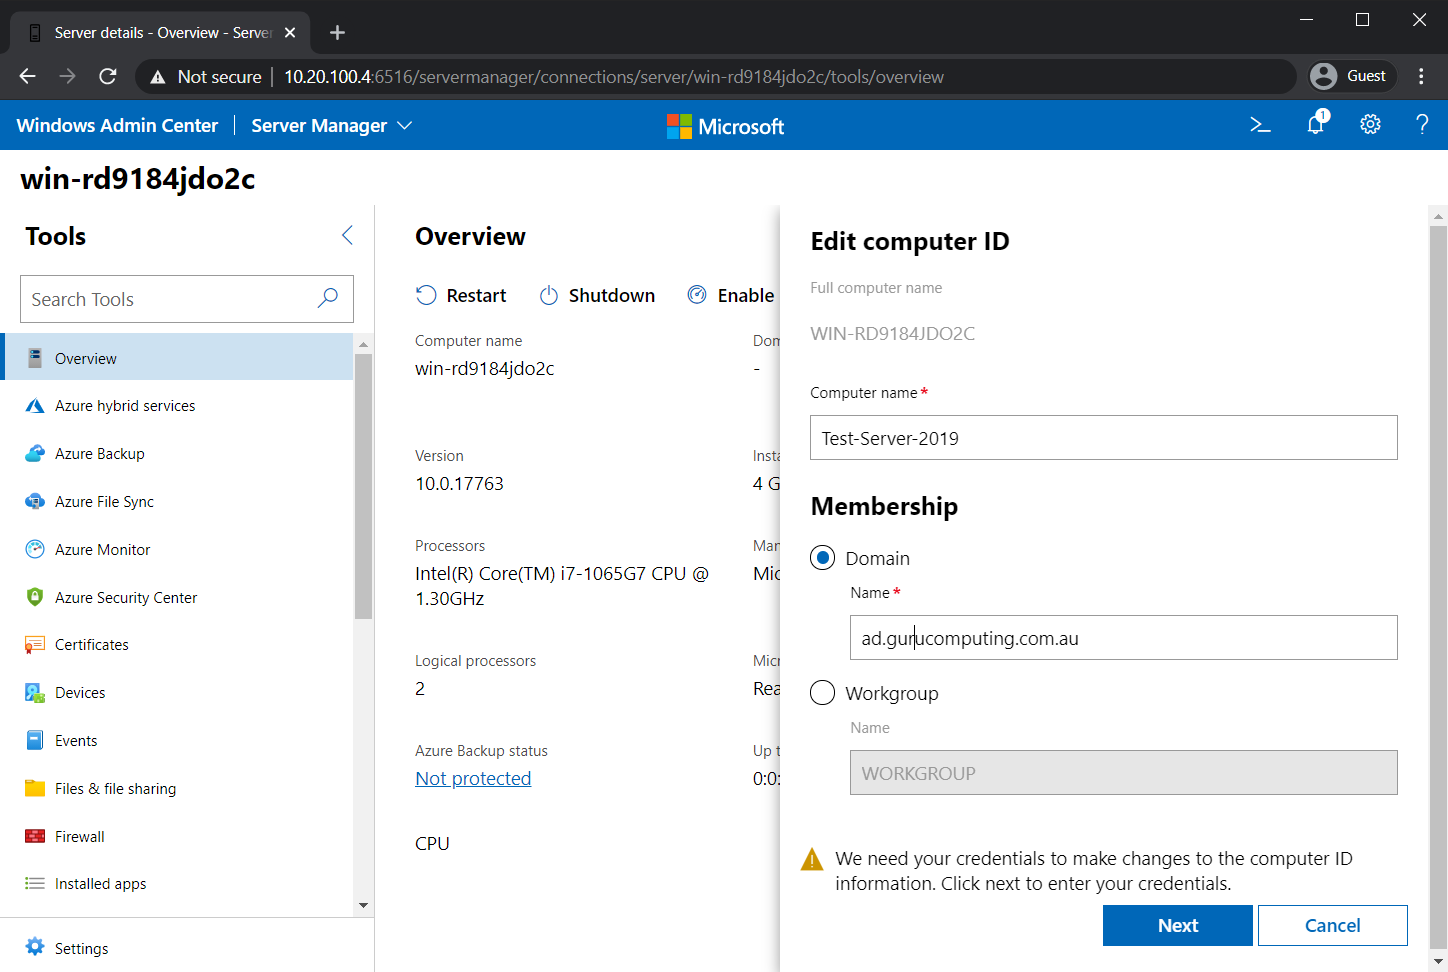
4. Enter your desired computer name and domain. This tutorial is using a domain called ad.gurucomputing.com.au and Test-Server-2019 as the computer name.
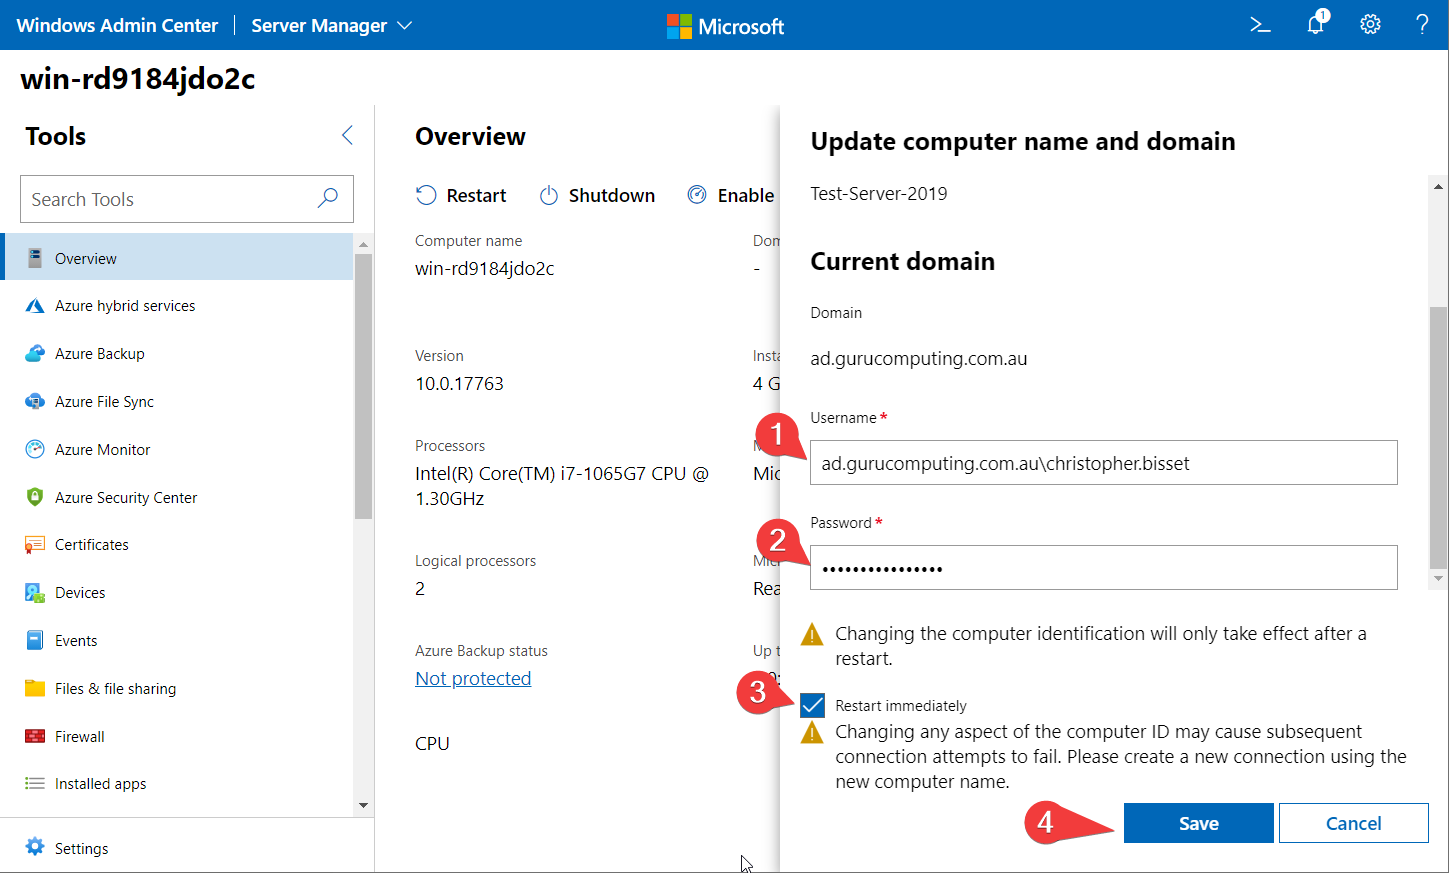
5. Supply the Domain User and Password with rights to join the domain (this article us using ad.gurucomputing.com.au/christopher.bisset), enable the Restart immediately checkbox, and click on Save. You will then be prompted to reboot and choose to do so.
6. Upon reboot, log back into Windows Admin Center (https://10.20.100.4:6516 in the example) with your domain admin credentials (not the local administrator user account) and click on the test Winodws server again.
You should now see a view of the updated dashboard. You will now notice in the below screenshot that the computer name is updated as well as the domain.
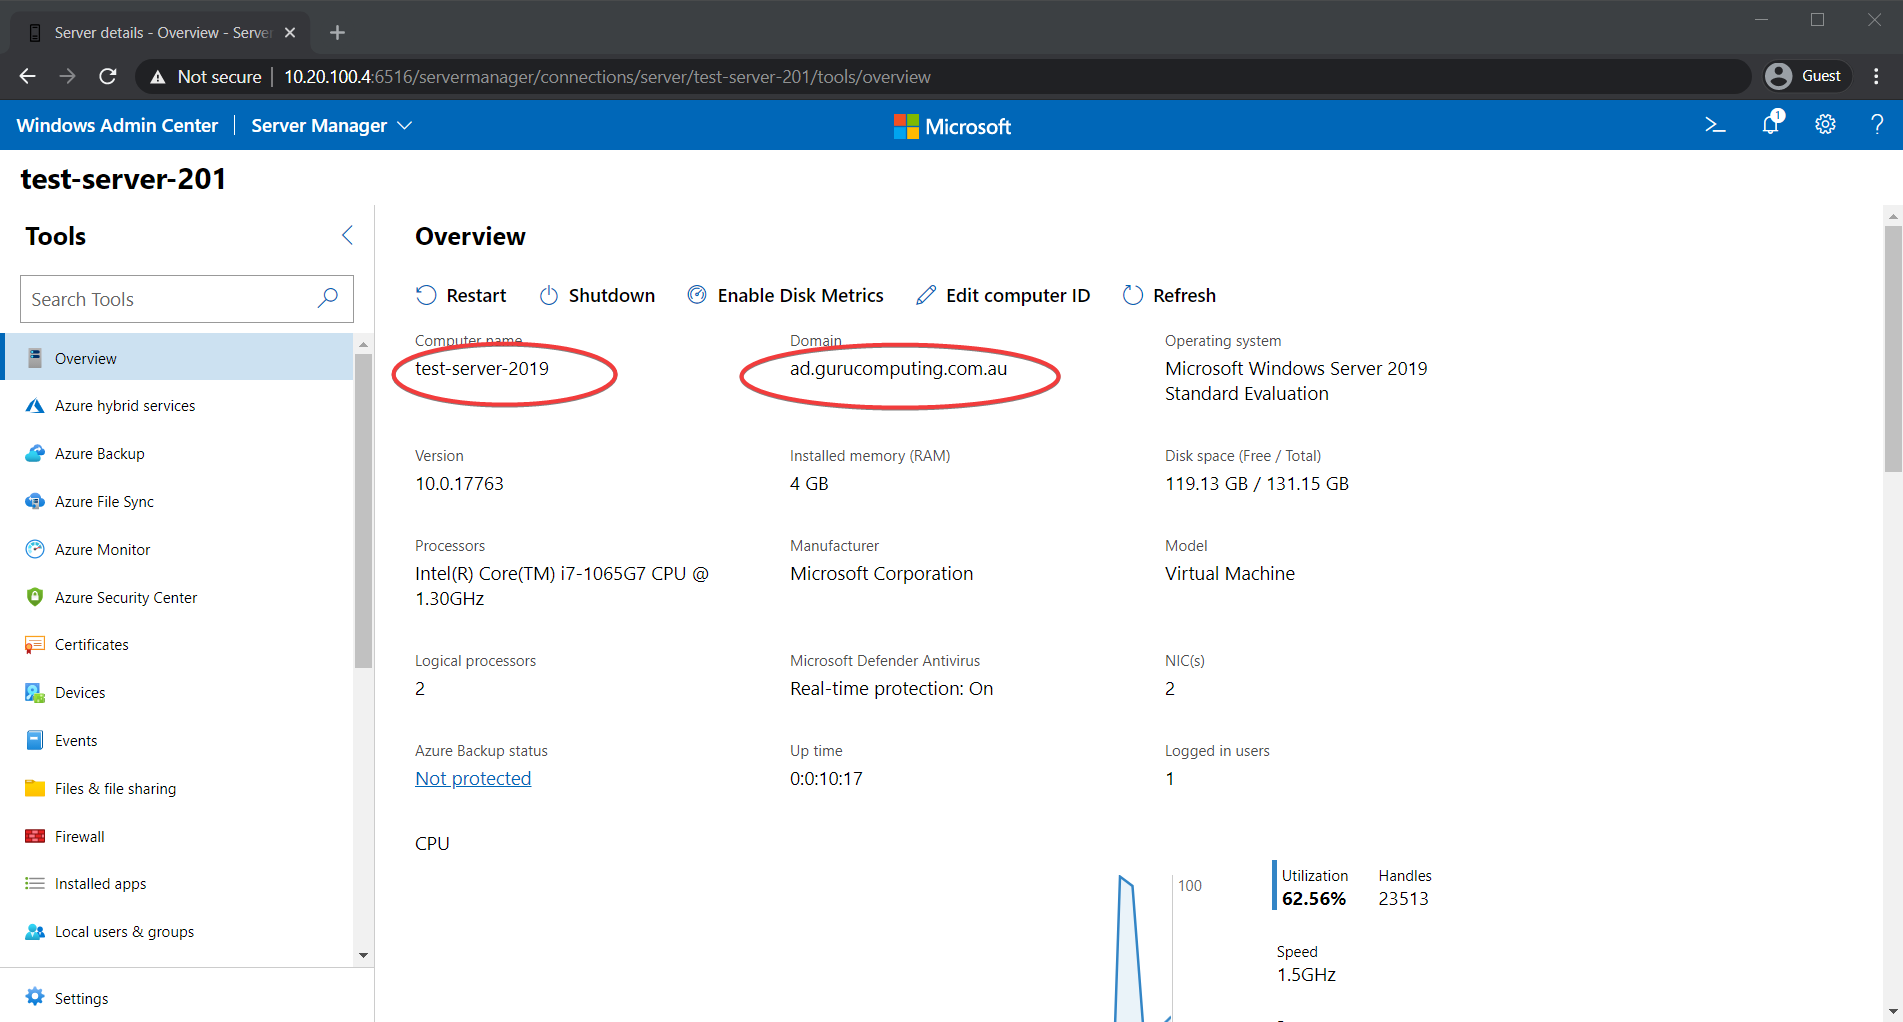
Note that the Name in the Top Left has been cut off, as older systems expect a max of 15 characters.
Now that you have successfully joined the domain, you can start exploring the options that Windows Admin Center provides. You will immediately notice that most of the sidebar categories (the left side menu in the screenshot below) look suspiciously like control panel categories, and in fact, most of them are.
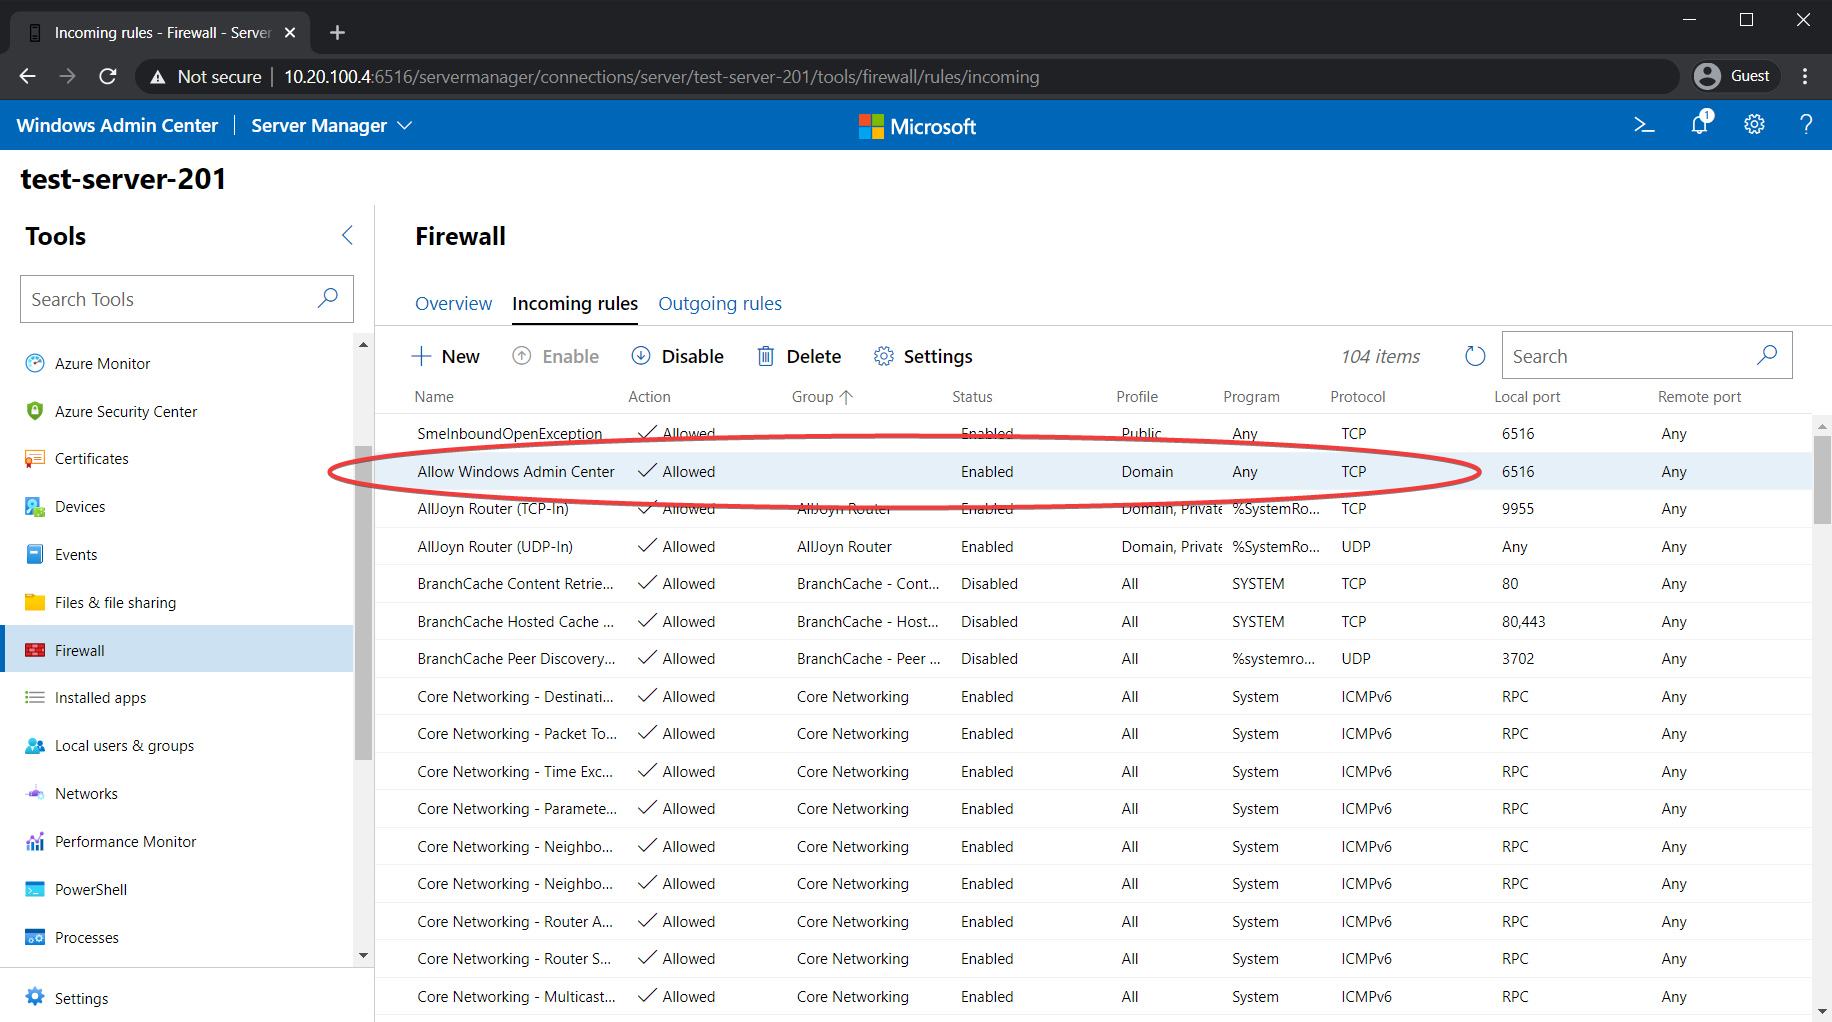
Windows Admin Center is designed to be a web replacement for server management. Most of the categories (such as Firewall, Installed apps, etc.) are a direct replacement for the control panel.
For example, when viewing a Windows server, select the Firewall category. You’ll see that firewall exception you made using PowerShell earlier.
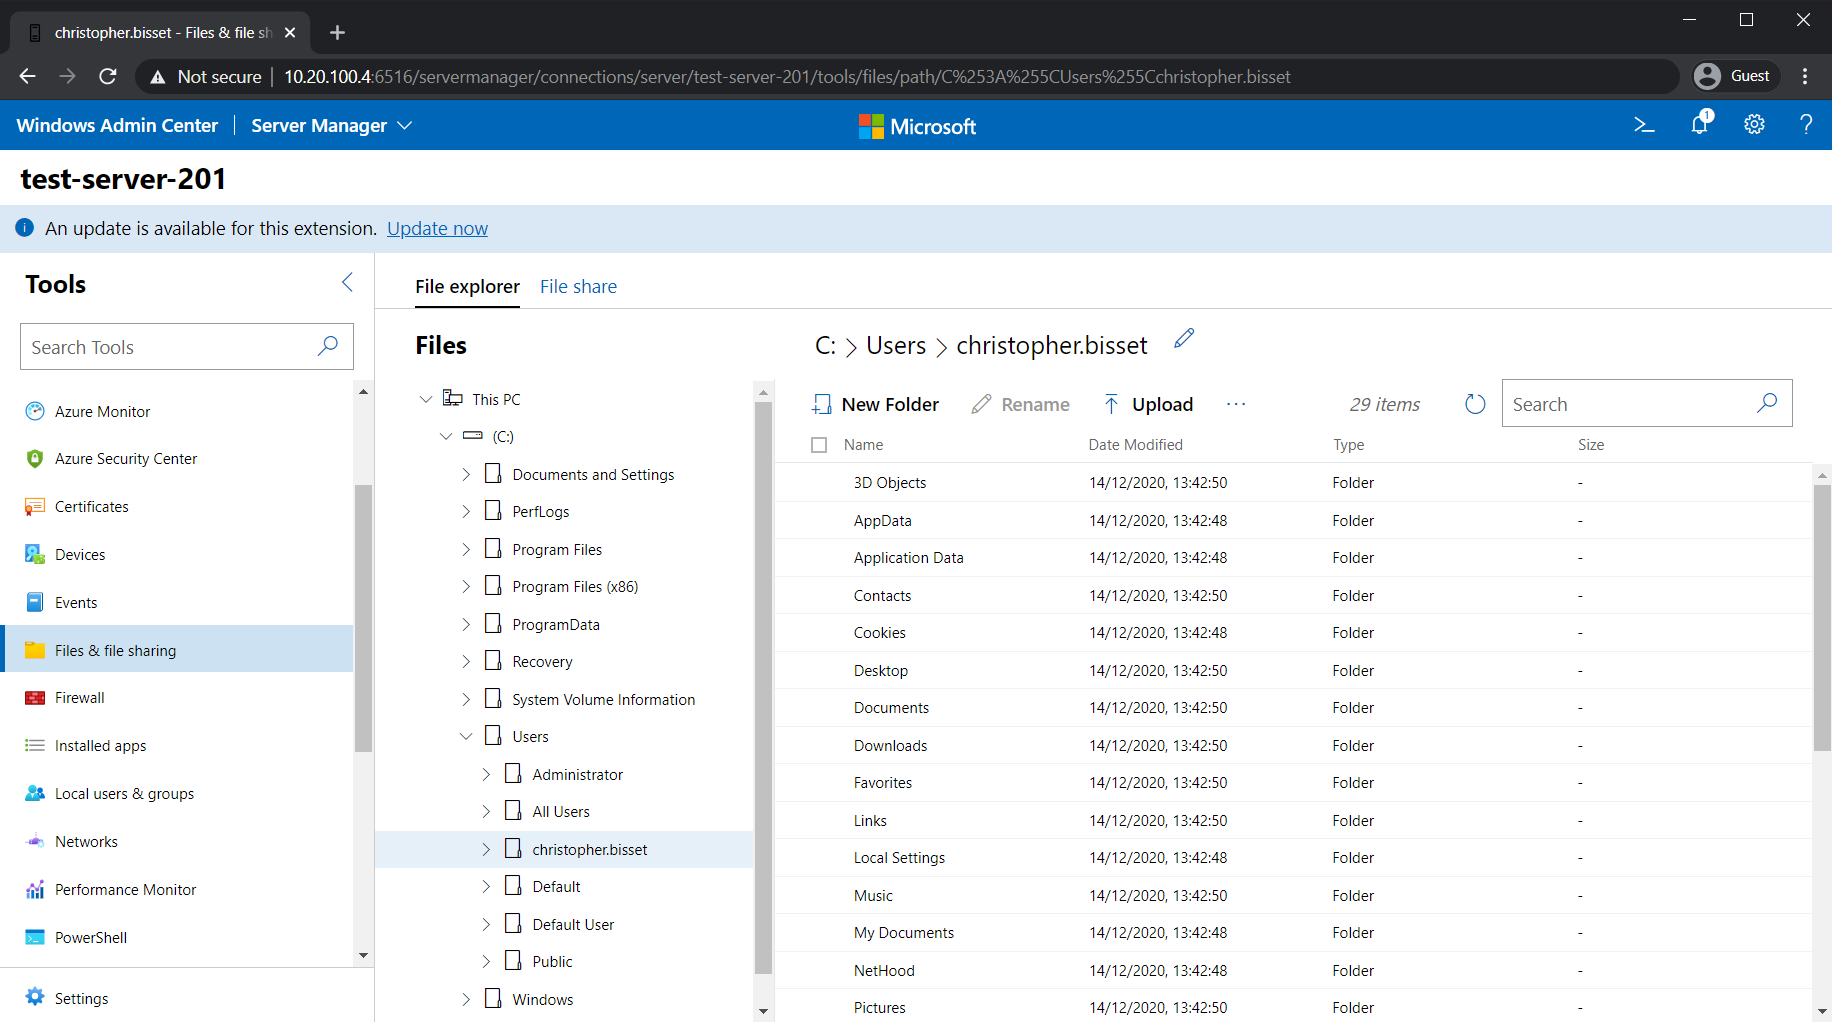
There are also several categories designed for remote management of the server. Files & File Sharing allows you to directly upload, download, or modify files on your server as shown in the following screenshot.
The PowerShell and Remote Desktop categories, in particular, are extremely interesting. PowerShell allows you to open a remote terminal directly on the machine as if you were using remote PowerShell natively!
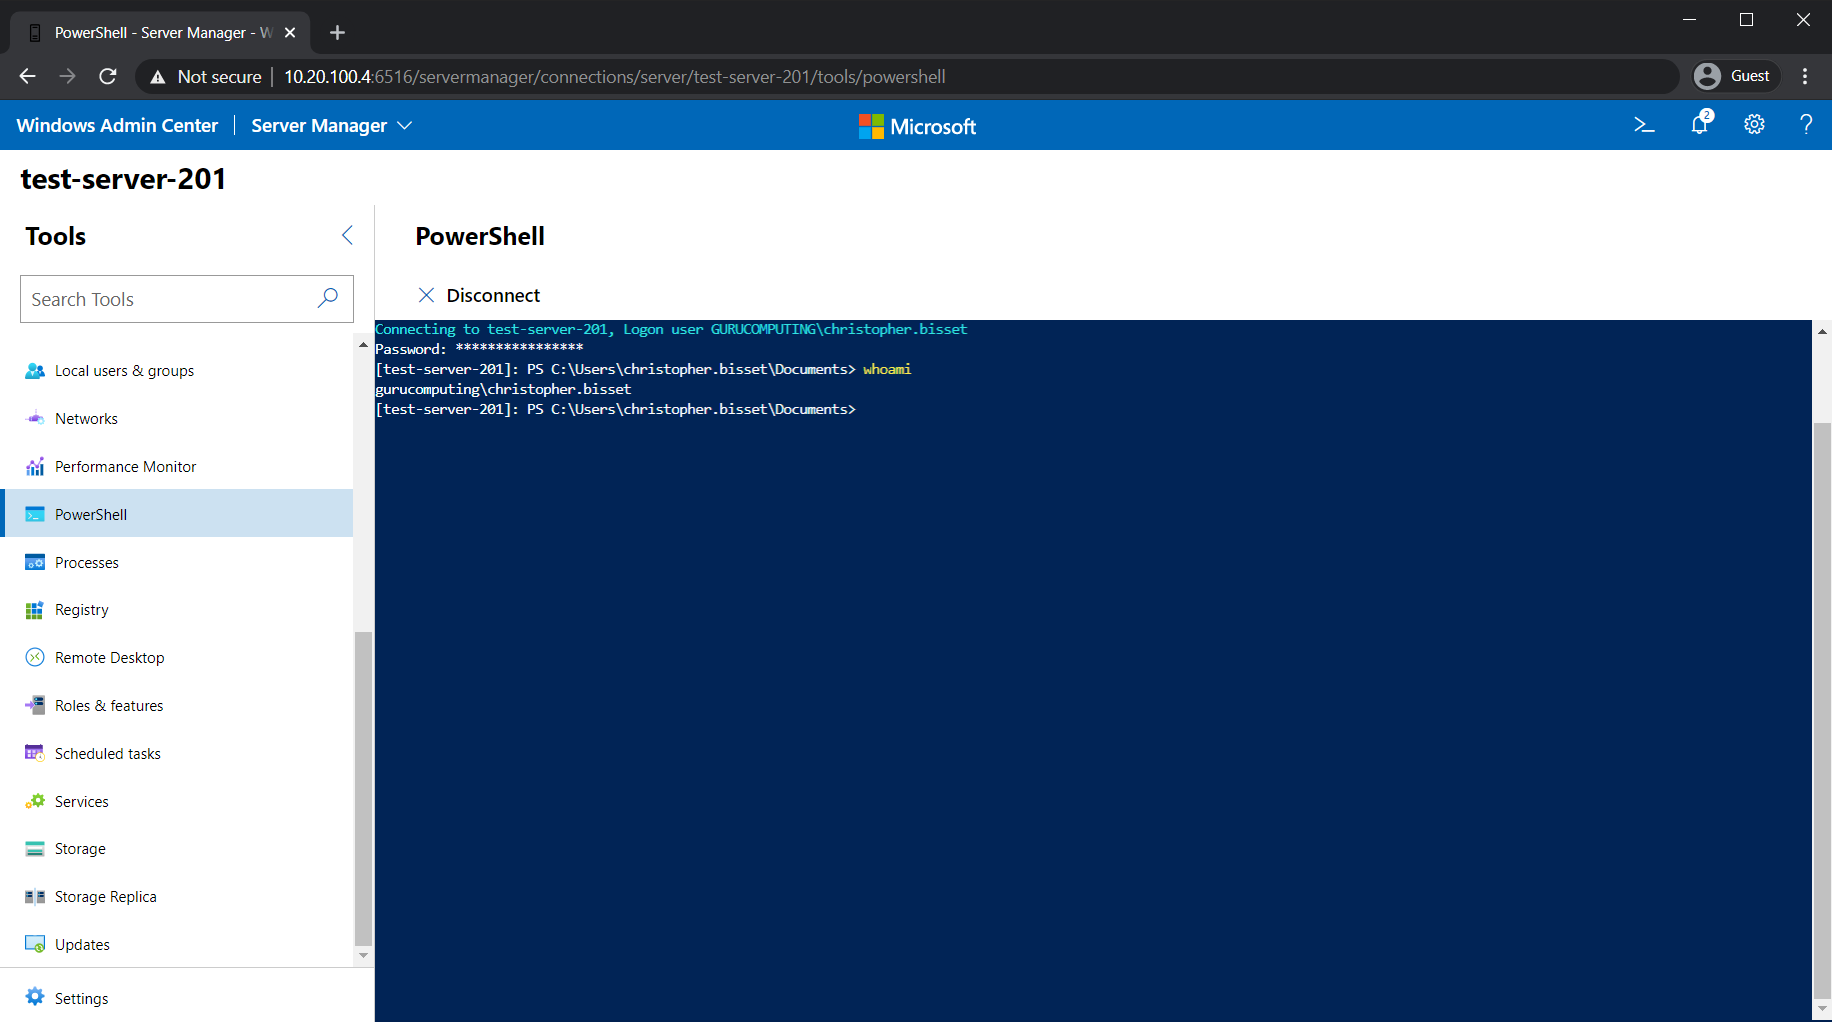
This remote PowerShell console is especially helpful for workgroup servers, remotely managing a workgroup server can be extremely tricky without a Domain.
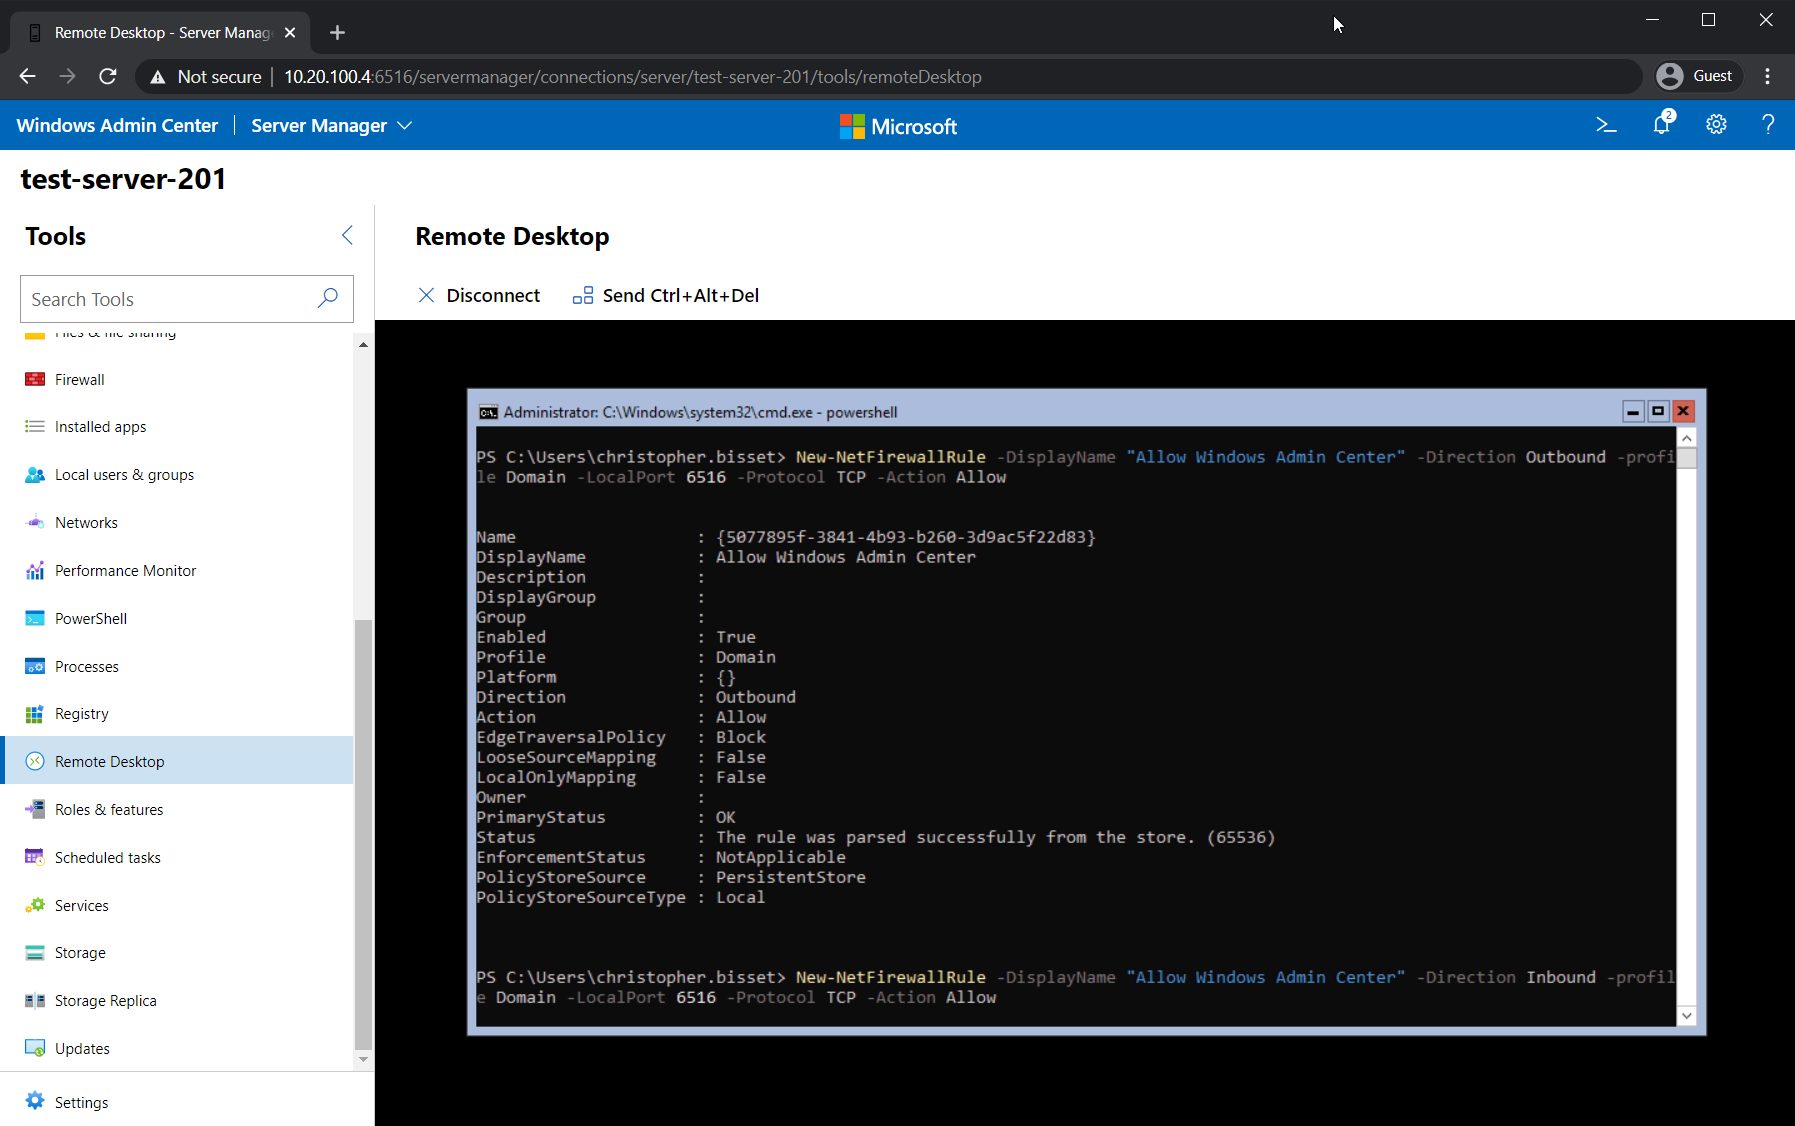
The Remote Desktop option allows you to open up RDP directly in your browser. RDP in a browser means you can have a full-blown remote desktop session inside Windows Admin Center!
There are over a dozen other categories, which this article will gloss over for the time being. Most of them are analogous to the control panel and are fairly self-explanatory. Instead, let’s explore managing Active Directory with a Windows Admin Center extension.
Managing Active Directory with Windows Admin Center Extensions
Windows Admin Center has an extensible system with support for adding on more functionality in the form of extensions. It supports a large swathe of extensions for various administrative tasks (in fact, some of the sidebar categories are Microsoft bundled extensions).
A Windows Admin Center Extension is an optional extra that adds additional functionality. This could include cluster management, virtual machine management, or active directory management (as seen below)
To demonstrate extensions, let’s install the Active Directory extension.
For a full demonstration of the Active Directory extension, this website did a great job.
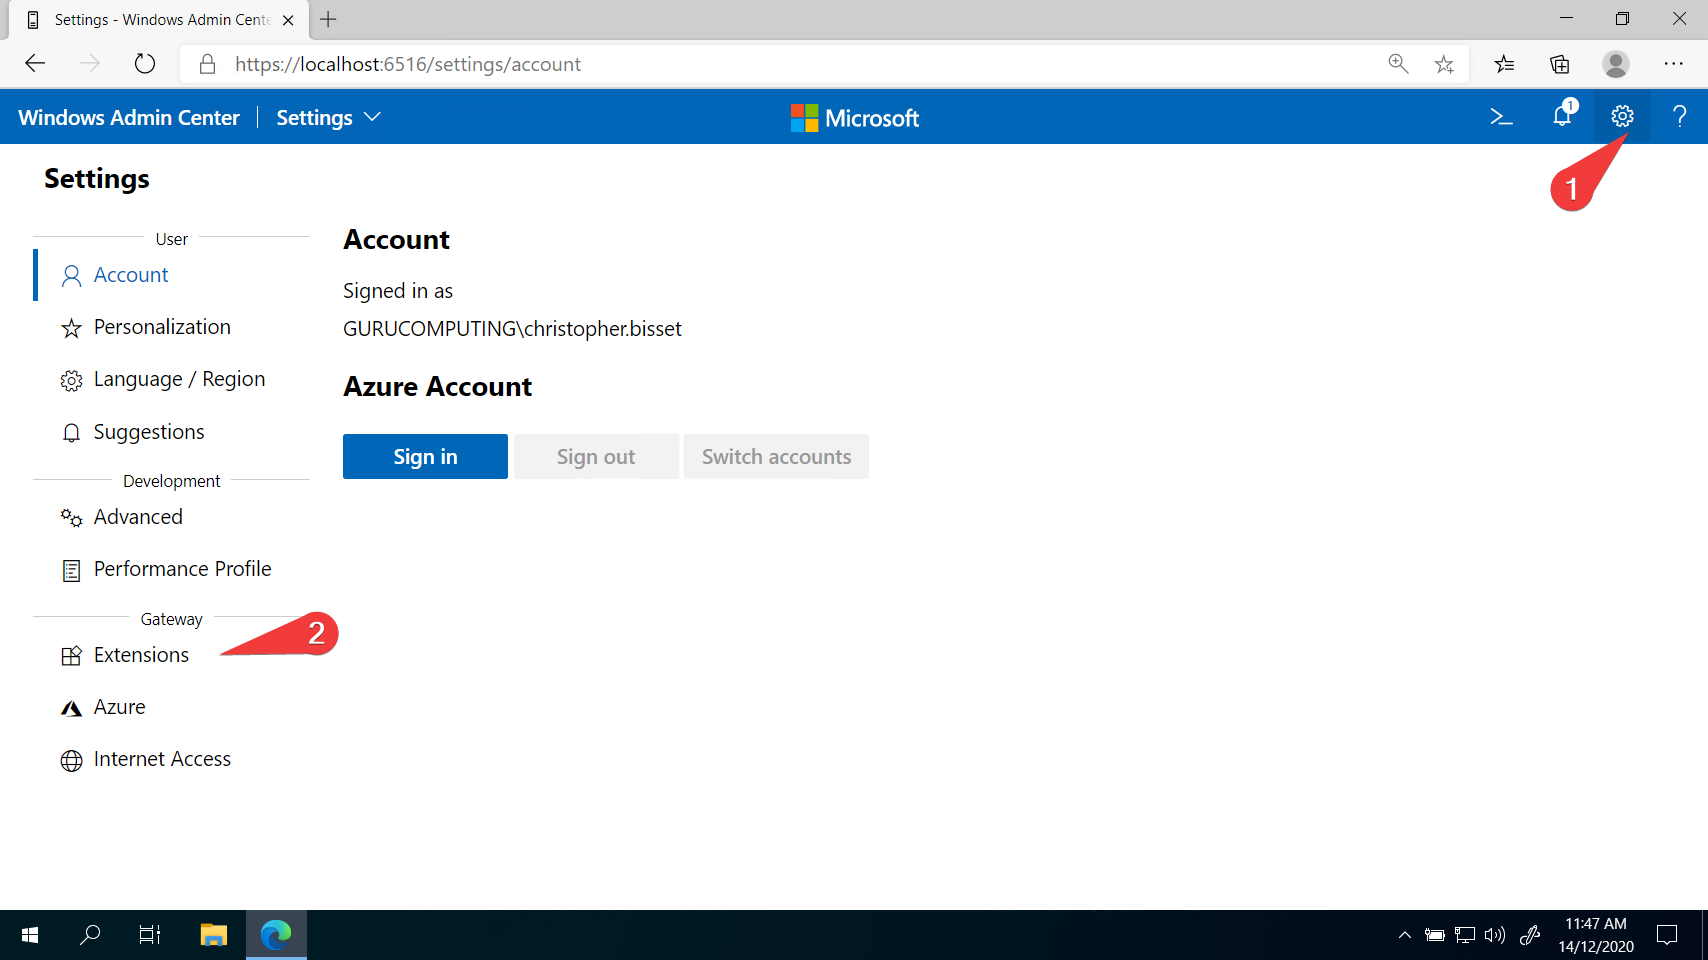
- While on the main Windows Admin Center page, select the Settings cog (1) in the top right
2. Click on Extensions (2) on the left-hand side as shown below. You should be presented with a list of installed and available extensions:
3. Click on the Active Directory extension and click on Install.
It is worth browsing through the list of extensions to see what is available. Many Microsoft related services have a Windows Admin Center extension available.
Once installed, the Active Directory option will move from Available Extensions to Installed Extensions.
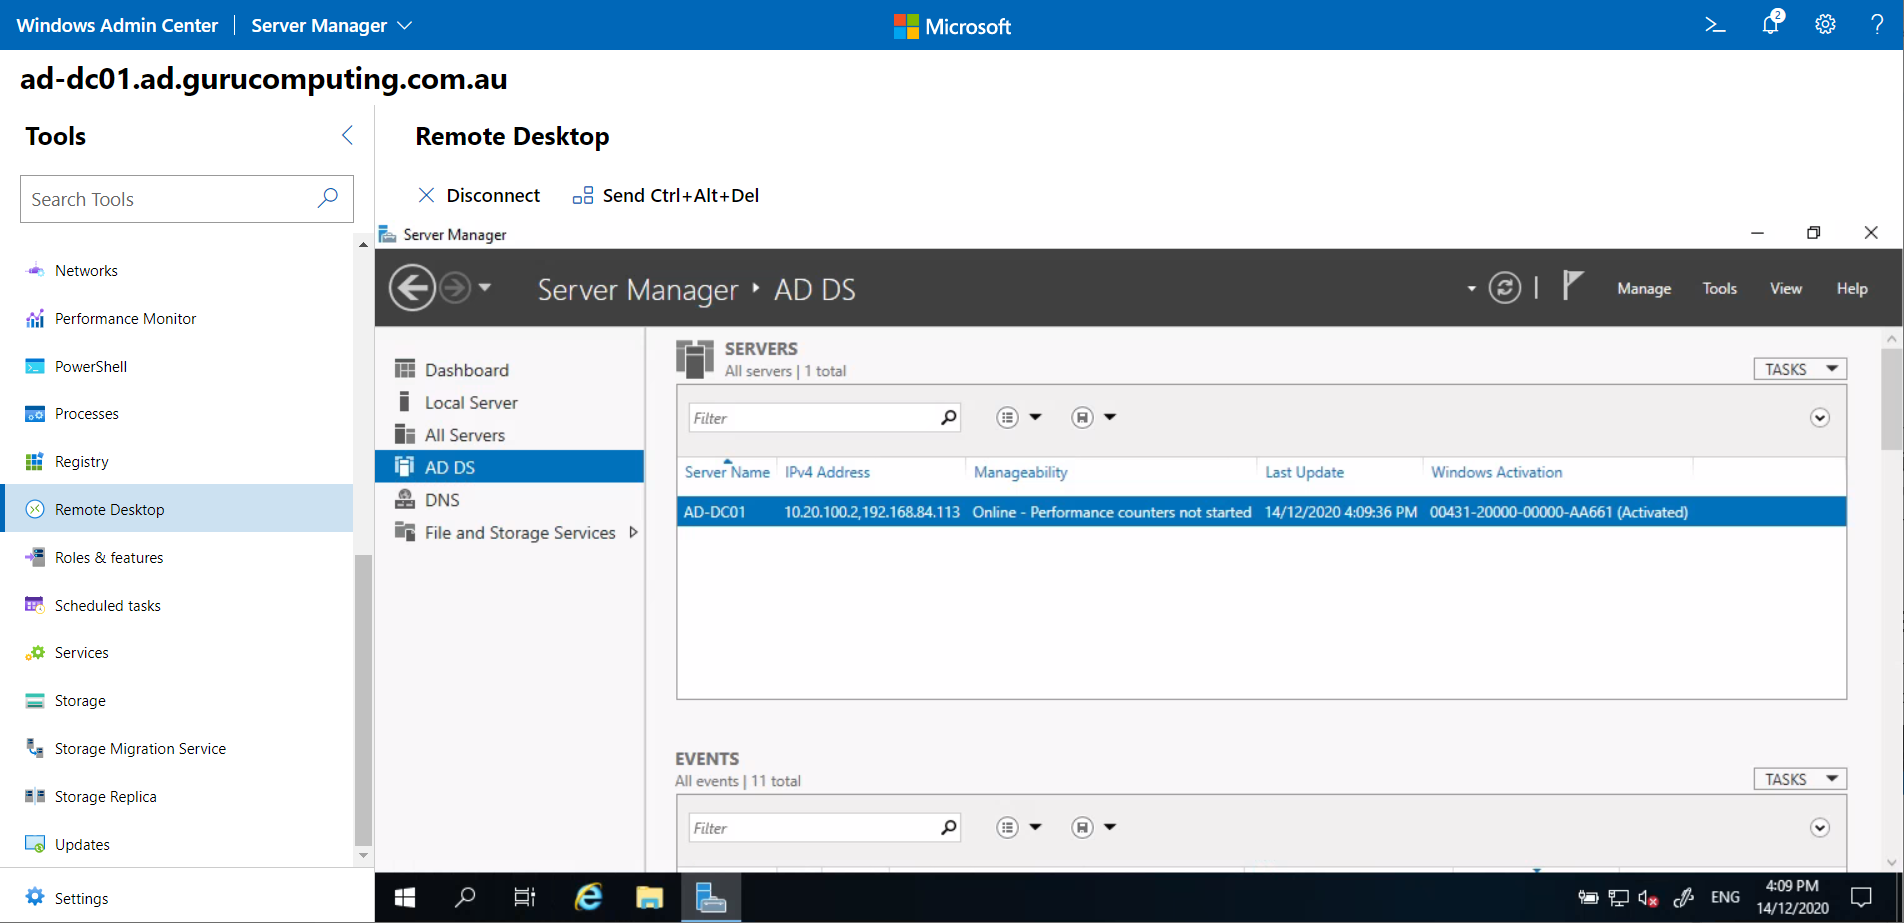
4. If you are remotely managing your Domain Controller (addressed later in the article), you can see in the sidebar that you now have an Active Directory option. Click on it and begin managing Active Directory.
As you are most likely not using Windows Admin Center on a domain controller, the Active Directory section will not appear in the sidebar as in the above screenshot. This problem will be addressed shortly.
For those familiar with the Active Directory Administrative Tools (not to be confused with Windows Admin Center), this will be a very similar experience. The main difference is you are not using Microsoft’s Remote Server snap-ins: You’re using a web interface with no locally installed tools at all.
It’s all PowerShell Under the Hood
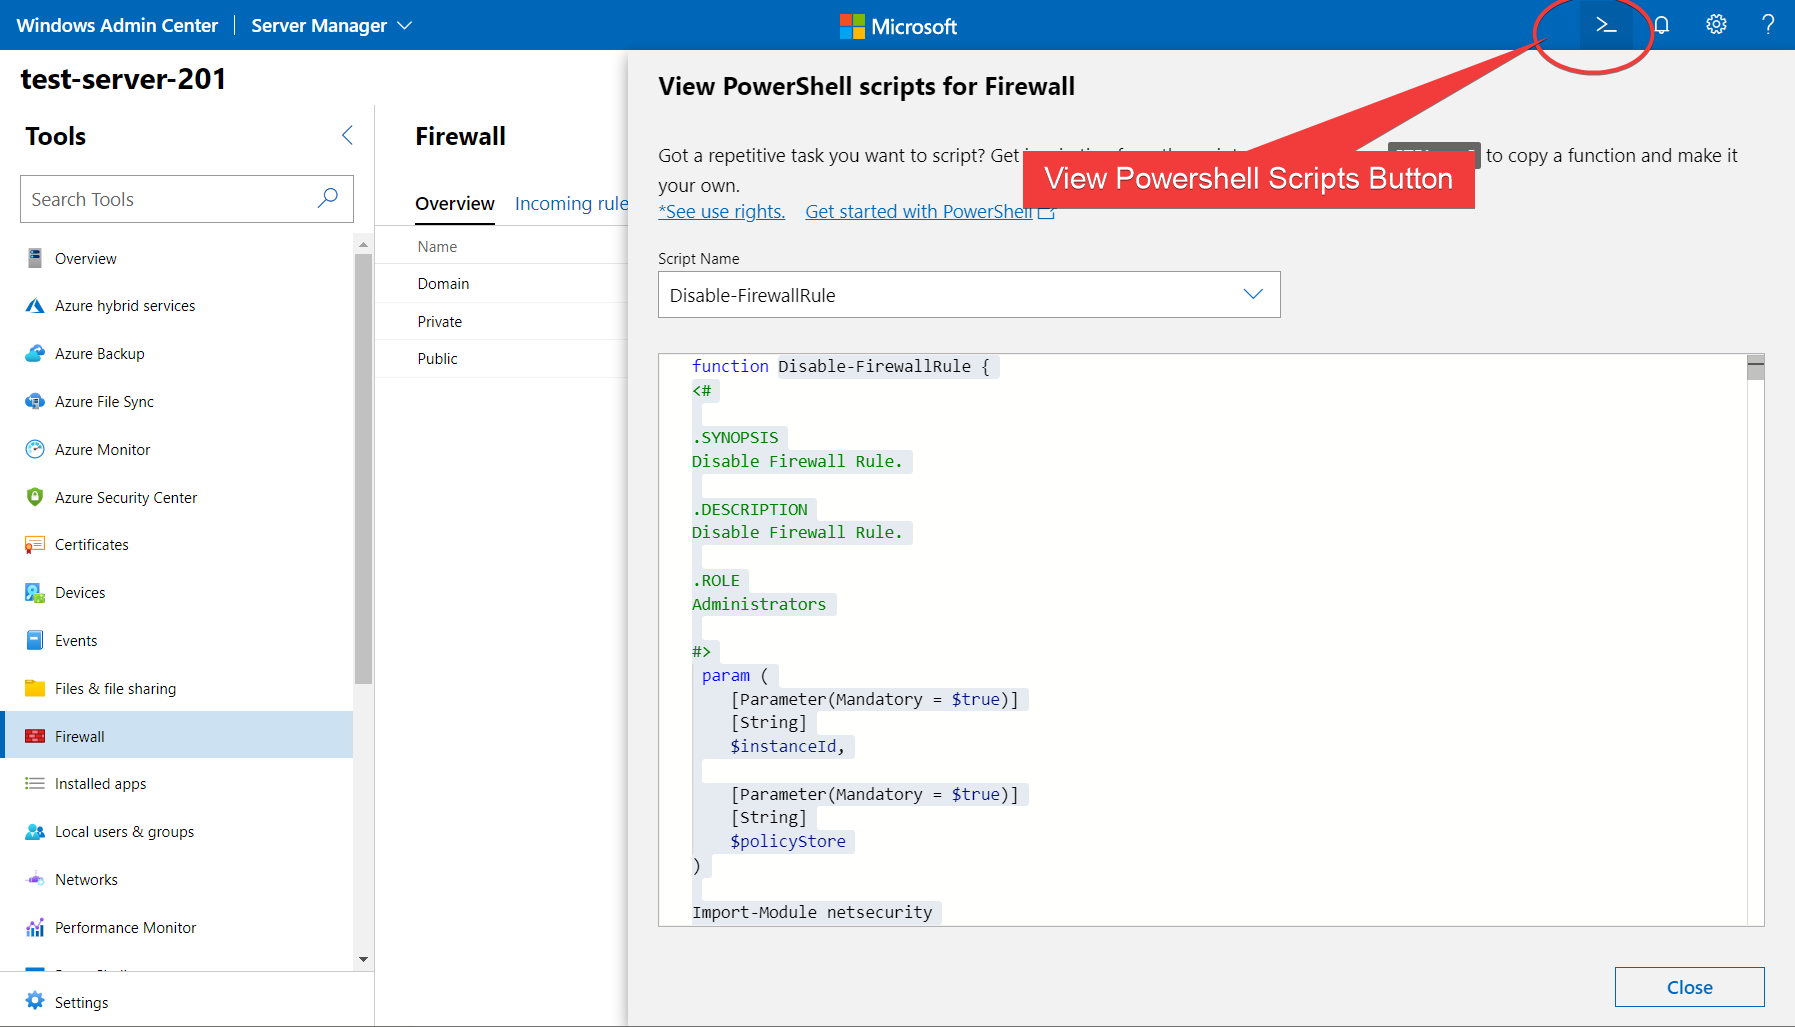
Something you might not be aware of is that PowerShell drives the entire backend of Windows Admin Center. Every time you change a setting or view a dashboard, a corresponding PowerShell script runs in the background to enact that change. In fact, you can peek behind the curtain in Windows Admin Center and directly extract the PowerShell it runs!
Inspecting Firewall PowerShell Functions
Navigate back to the Firewall Category again and click the View Powershell Scripts icon as seen below. Doing so brings up a new panel, showing a dropdown list of PowerShell functions. Choosing an option (as seen with the Disable-FirewallRule option below) displays the corresponding function that Windows Admin Center uses to perform its tasks.
This type of inspection can be done for every category in the sidebar.
This is a handy tool because it lets you directly view exactly how Microsoft structures all of their PowerShell and gives you tons of best practice examples when writing your own PowerShell!
Remote Management of Other Servers
If you thought you had to install Windows Admin Center on every server in your environment, think again. Windows Admin Center actually only needs to exist on a single server. Because Windows Admin Center does all of its work under the hood with PowerShell, all you need to do is have PowerShell Remoting enabled on your servers!
Let’s show that in this article by remoting into the domain controller.
If you are following in a production domain, you may not have permission to manage your domain controller remotely. Do not test any features on sensitive equipment before checking your IT policies!
- Navigate back to the server list by clicking on the Windows Admin Center title in the top left
2. Click the Add button.
3. Click Servers.
4. Either manually enter the computer name of the domain controller, or search for it in the Search Active Directory box.
5. Add the server to the list.
6. Select the server, and enter your domain credentials.
You can see these steps in the animation below:
You’ve now added a web interface to your domain controller, and you don’t even need to install anything!
Your browser is just using the Windows Admin Center server as a host and is running all the backend commands on the domain controller!
If you have remote desktop enabled for the controller, you can even use the Windows Admin Center server as a jump box to manage the domain controller! See the fully functional RDP session below:
In the above example, the PC running the browser cannot directly access the Domain Controller. Instead, the browser is interacting with the Windows Admin Center server, and the Windows Admin Center server is talking to the Domain Controller. You can use this method to remotely access restricted or sensitive devices.
Where to go From Here
Windows Admin Center, if you so choose, can be used to manage your entire fleet of servers. You can find extensive documentation on Microsoft’s website. To a certain extent, Windows Admin Center can even manage your entire fleet of endpoints (albeit, an RMM tool like Meshcentral or TeamViewer would be more appropriate for endpoints).
Windows Admin Center is another tool to add to your arsenal and is incredibly useful for managing GUI-less environments.