In Windows 8 (& 8.1), 7 & Vista Operating Systems, you cannot load a driver or execute a program that hasn’t a Driver Signature. Driver Signing is a method to verify the identity of the software publisher or the hardware (driver) vendor in order to protect your system from been infected with malware rootkits, that are able to run on the lowest level of Operating System. This means that all drivers and programs must be digitally signed (verified) in order to be installed and run on latest Windows Operating Systems.
Digital Signatures ensure that the software publisher or hardware vendor is trusted and verified by Microsoft. But in real life, publishers and vendors cannot always pay Microsoft to verify all their products or Microsoft cannot verify all the drivers or programs that are published every day. But this becomes a problem in the case that you own an old unsigned legitimate software or driver and you want to install or load it to your computer, because the OS doesn’t allow it to work or load.
Problems-Symptoms that are solved with this guide:
– Windows cannot verify the digital signature for this file. (0xc0000428)
– Windows requires digitally signed driver OR Digitally signed driver is required.
– Digital Signature Not Found.
– Cannot load or install an unsigned driver.
– Cannot run (execute) an unsigned software (program).
– Windows did not find a Microsoft signature associated with the software package you want to install.
In order to resolve digitally signed driver installation errors, follow the steps below:

How to Disable Driver Signature Enforcement in Windows 8.1, Windows 8, Windows 7, Windows Server 2008, or Windows Vista.
Attention: Keep in mind that disabling the Driver Signature Enforcement is a security risk, and you must disable it only if you are sure that the driver or program that you want to install and run is trusted and legitimate.
Solution 1: Disable Driver Signature once.
Solution 2: Disable Driver Signature completely.
Solution 1: Disable Driver Signature once.*
* Note: Use this solution to disable driver Signature Enforcement just once in order to install a unsigned driver (e.g. your old printer driver).
Step 1. Enter in Advanced Options menu.
Windows 7 & Vista
To enter in Advanced Options menu in Windows 7 and Vista OS:
- Close all programs and reboot your computer.
- Press the «F8» key as your computer is booting up, before the appearance of the Windows logo.
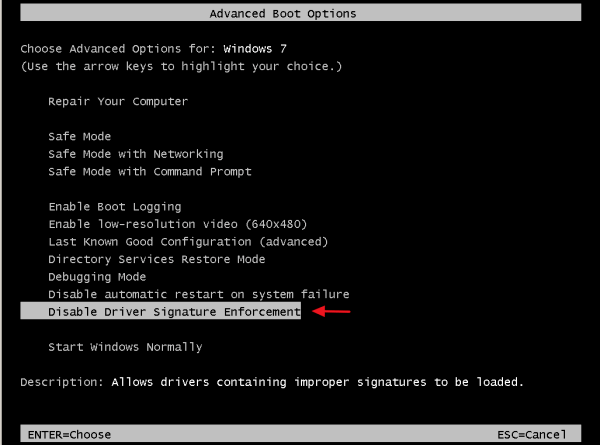
- When the «Windows Advanced Options Menu» appears on your screen, use your keyboard arrow keys to highlight the “Disable Driver Signature Enforcement” option and then press «ENTER«.
Windows 10, 8 & 8.1
To enter in Advanced Options menu in Windows 10, 8.1 & 8 OS:
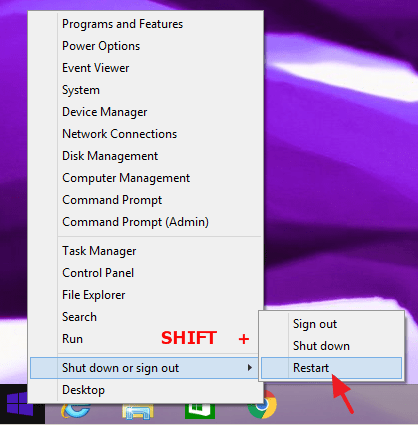
1. Right click at the Windows Start button ![]() and select Shut Down or sign out.
and select Shut Down or sign out.
2. Press and HOLD down the SHIFT key and then click Restart.
3. When Windows restarts, press “Troubleshoot” .

4. In the “Troubleshoot options” screen, choose “Advanced options”.

5. In the “Advanced Options” window, choose “Startup Settings”.

6. In “Startup Settings” screen, click “Restart”.

7. After restart, select the «Disable driver signature enforcement» option and press Enter. *
* Note: If you see the below screen (Startup Settings), press the “F7” (or the “7”) key on your keyboard to select the“Disable driver signature enforcement” option.

8. Then, proceed to install your unsigned driver. During the installation procedure, Windows will inform you that can’t verify the publisher of this driver software. At this point, ignore the warning message and choose “Install this driver software anyway” to complete the installation.

Normally installation should be done without errors now. Keep in mind that after the restart, the driver signature enforcement will be enabled again to avoid security risks. If you want to keep driver signature enforcement always disabled, then you must apply solution 2.
Solution 2: Disable Driver Signature completely.*
*Note: Use this solution only if you want to keep driver signature enforcement always disabled. (e.g. if you always want to run an old legitimate software).
In this solution, we are going to modify Windows Boot loader options with the BCDEDIT tool.
Step 1. Disable Secure Boot in BIOS.
1. Power On your computer and launch BIOS SETUP settings.
2. In BIOS, disable the Secure Boot option. (the setting is commonly found at Security section or at Boot Options section)
Step 2. Modify Windows Boot Loader.
– In order to modify boot loader, open “Command Prompt” in administrative mode:
1. Right click at the Windows Start button ![]() and choose “Command Prompt (Admin)”.
and choose “Command Prompt (Admin)”.

2. Choose “Yes” at User Account Control” warning message:

3. Inside the command prompt window, type the following command and press “Enter”:
- bcdedit /set testsigning on

You should receive “The operation completed successfully” message.

4. Close command prompt window and restart your computer.
From now on, you will be able to install or run any unsigned driver or program without problems.
How to enable Driver Signature Enforcement.
1. In case that you want to enable driver signature enforcement in the future and avoid security risks, then open “Command Prompt” with elevate rights again.
2. Type type the following command and press “Enter”
- bcdedit /set testsigning off

You should receive “The operation completed successfully” message.

3. Close command prompt window and restart your computer.
4. Install the unsigned driver. *
* Note: If you still cannot install unsigned drivers then:
1. Open a command prompt with Administrative privileges and type this command:
- bcdedit /set nointegritychecks ON
2. Restart your computer
3. Install the unsigned driver.
To re-enable device driver signing, again type: bcdedit /set nointegritychecks OFF
That’s it!
В этой статье постараюсь описать методику диагностики проблем с неподписанными файлами драйверов в x64 битной версии Windows систем, из-за которых компьютер перестает загружаться и при загрузке падает в BSOD. Но систему все-таки можно загрузить, отключив проверку цифровой подписи при загрузке (F8 -> Disable Driver Signature Enforcement). В качестве примера в этой статье я буду работать с Windows Server 2008 R2 (которая, напомню, бывает только в 64-разрядной редакции), но данная методика подойдет так и для Windows 7 x64 и Vista x64.
Если вернуться к предыстории вопроса, то вспомним, что Microsoft приняла решение о том, что в 64-битных системах, начиная с Windows Vista, Windows загружает драйвера в режим ядра только в том случае, если драйвер имеет цифровую подпись. Если же цифровая подпись драйвера отсутствует, то при загрузке системы случается критическая ошибка (зависит от типа драйвера, загрузка которого заблокирована) и появляется экран BSOD. Конкретная ошибка и ее код зависят от конкретного драйвера, который заблокирован в процессе загрузки. Некоторые ошибок прямо на экране BSOD могут указывать на файл неподписанного драйвера.
В моем случае после обновления драйверов на сервере Windows 2008 r2 при обычной загрузки машины появился синий экран смерти с текстом:
STOP: c000021a (fatal System Error)
The initial session process or system process terminated unexpectedly with a status of 0x00000000 (0xc000428 0x00100448). The system has been shut down
")
Попробуем выяснить что это за ошибка, какой драйвер ее вызывает т определим по драйверу конкретное устройство.
Для декодирования ошибки нам нужен второй параметр (он выделен жирным) — 0xc000428.
Преобразуем hex код ошибки в более удобочитаемую форму. Для этого можно воспользоваться встроенной в Windows утилитой SLUI.EXE или же сопоставить код этой ошибки в файле ntstatus.h, найти который можно в Windows SDK. Воспользуемся первым способом, для чего в командной строке выполним:
slui.exe 0x2a 0xC0000428

Как вы видите на скриншоте, мы убедились в том, что BSOD вызвана невозможностью проверить цифровую подпись драйвера (“Windows cannot verify digital signature for this file”)
Перезагружаем наш компьютер и при загрузке жмем клавишу F8. В расширенном загрузочном меню (Advanced Boot Options) отключаем проверку цифровой подписи, выбрав Disable Driver Signature Enforcement .

В том случае, если в таком режиме сервер загрузиться, мы точно уверены в том, что некий неподписанный модуль или драйвер не позволяет системе нормально загрузиться.
Следующий шаг – определение файла проблемного модуля или драйвера. Откроем консоль журнал событий (Event Viewer) и перейдем в раздел Applications and Services Logs -> Microsoft -> Windows -> CodeIntegrity -> Operational.
Примечание: если при доступе к логам в этой ветке появляется ошибка “access denied”, создайте на диске c: каталог, предоставив группе Everyone полный доступ. Затем измените путь к файлу ETL на новый каталог, и отключите и заново включите логирование.

В моем случае, в журнале есть событие EventID 3001 с текстом «Code Integrity determined an unsigned kernel module \Device\HarddiskVolume1\Windows\System32\win32k.sys is loaded into the system. Check with the publisher to see if a signed version of the kernel module is available». Вот мы и нашли проблемный драйвер!
Данный драйвер может быть как родным драйвером Microsoft, так и драйвером стороннего разработчика. Удостоверимся, что данный драйвер действительно не имеет цифровой подписи. Для этого нам понадобится утилита от Sysinternals под названием SIGCHECK.EXE (взять ее можно тут http://technet.microsoft.com/en-us/sysinternals/bb897441).
Проверку наличия цифровой подписи выполним командой:
c:\TOOLS>sigcheck.exe -i c:\Windows\System32\win32k.sys

Если подпись отсутствует, то в поле Verified будет указано Unsigned (в противном случае, соответственно Signed).
Перед нами есть два варианта решения проблемы невозможности нормальной загруки системы с неподписанным драйвером:
- Найти подписанную версию драйвера
- Отказаться от использования данного драйвера (и устройства)
- отключить проверку цифровой подписи драйвера в Windows
Третий вариант может не подойти по тем или иным причинам. В первых двух случаях нам нужно определить к какому конкретному устройству относится данный файл драйвера .sys.
Как же определить устройство, зная лишь имя sys-файла? Я использую следующую методику (пусть нам нужно определить устройство, драйвер которого имеет имя HpCISSs2.sys):
1) Открываем редактор реестра и поиском по ветке HKEY_LOAL_MACHINE\SYSTEM\ControlSet001 ищем ключ со значением HpCISSs2.sys
2) В моем случае он нашелся в ветке HKEY_LOAL_MACHINE\SYSTEM\ControlSet001\services\HpCISSs2
3) Разворачиваем вложенную ветку с названием ENUM, нас интересует значение ключа 0, в моем случае это PCI\VEN_103C&DEV_3230&SUBSYS_3235103C&REV_01\4&3b416f2c&0&0018
4) Определяем, что производитель устройства имеет ID 103C, а код устройства 3230
5) Далее на сайте указываем в полях Vendor Search и Device Search найденные нами коды.
6) Получаем что искомое нами устройство контроллер жестких дисков HP Smart Array P400 Controller.
Нам осталось лишь найти новую версию драйвера на сайте производителя оборудования (внимательно смотрите для каких версий ОС подходит нужный вам драйвер) и обновить драйвер на компьютере.
Sometimes, you might encounter the USB driver error code 52: Windows cannot verify the digital signature for the drivers required for this device. Luckily, you can fix it by yourself. In this article, MiniTool Partition Wizard puts together some solutions to this issue and hope you can benefit from them.
Windows Digital Signatures
Based on Microsoft public key infrastructure technology, the Windows digital signatures are implemented to verify the identity of the software publisher or the driver vendor. The digital signature can protect your Windows from potential threats and infections of some malicious programs.
According to the explanation from Microsoft, Windows uses a valid digital signature to verify some information, including:
- The file, or the collection of files (such as a driver package), is signed.
- The signer is trusted.
- The certification authority that authenticated the signer is trusted.
- The collection of files was not altered after it was published.
In order to be installed and run on the latest Windows operating system, the drivers and programs must be digitally signed. However, there are still some legitimate programs or drivers that are not signed, and you may encounter certain problems while installing them.
About Windows Cannot Verify the Digital Signature Code 52
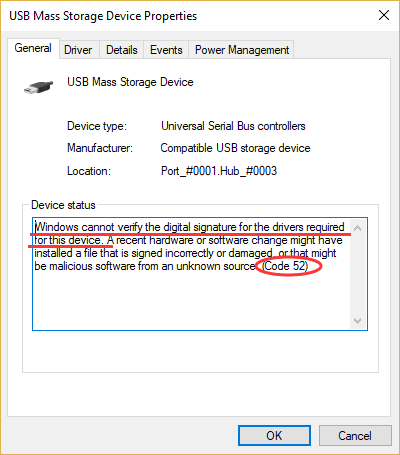
Sometimes, your USB ports might fail to recognize any hardware connected to your device, and you will see the error code 52 in the properties of the USB driver. The USB driver code 52 is a typical error related to the digital signature. It commonly occurs after updating or upgrading Windows and comes up with the following error message:
Windows cannot verify the digital signature for the drivers required for this device. A recent hardware or software change might have installed a file that is signed incorrectly or damaged, or that might be malicious software from an unknown source. (Code 52)
Besides, you might receive some other different error messages related to Windows digital signature, such as “Windows cannot verify the digital signature for this file. (0xc0000428)”, “Digital Signature not found”, and so on.
If you receive the digital signature error unluckily, take it easy. Some feasible solutions reported by the users are listed in the following contents, and you can work your way down the list until you fix the issue effectively.
7 Solutions to Windows Cannot Verify the Digital Signature
- Modify windows registry
- Update or uninstall the problematic driver
- Use System File Checker utility
- Scan for file system errors
- Disable integrity checks
- Disable driver signature enforcement
- Perform system restore
Fix 1: Modify Windows Registry
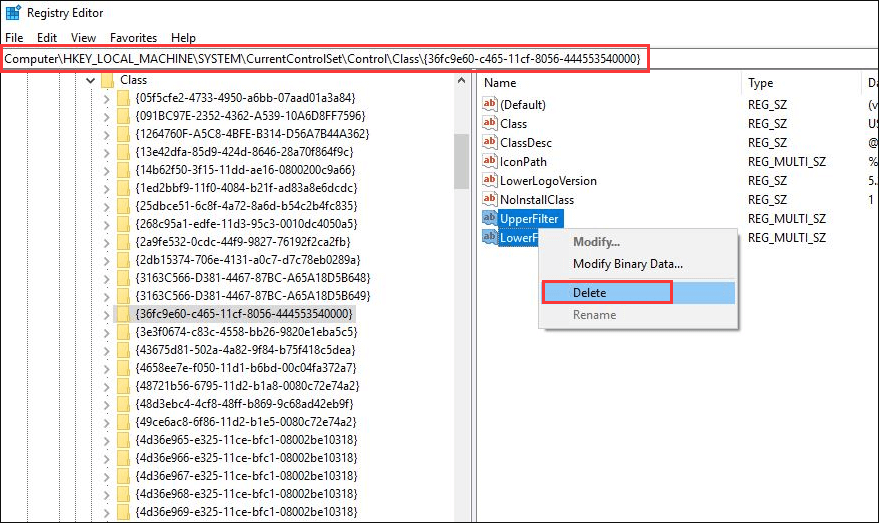
In most cases, this issue is caused by 2 registry entries named UpperFilters and LowerFilters, and some users have fixed the problem simply by deleting them. So, if you receive the “Windows cannot verify the digital signature for the drivers required for this device” error message, try deleting these registries at first. The steps are listed below.
Note: This is a risky solution as any improper operations for registries might bring unrecoverable damage for your system. Therefore, you had better back up your Windows registry in advance, so that you can restore the registry to the original status if this solution doesn’t work.
Step 1: Press Windows + R to invoke Run window. Type regedit and click OK to open Registry Editor.
Step 2: Navigate to the following path: ComputerHKEY_LOCAL_MACHINESYSTEMCurrentControlSetControlClass{36fc9e60-c465-11cf-8056-444553540000}.
Step 3: Keep the {36fc9e60-c465-11cf-8056-444553540000} key selected, and find the UpperFilters and LowerFilters entries in the right pane. Right-click them and choose Delete.
Step 4: Click OK to confirm the operation. Restart your computer and check if the error code 52 disppears.
Fix 2: Update or Uninstall the Problematic Driver
If this is just related to a specific device driver, perhaps the problem lies on the driver itself. In this case, it should be helpful to update or uninstall the problematic driver. You can follow the instructions below:
Step 1: Right-click the Start button and choose Device Manager to open it.
Step 2: Double-click Universal Serial Bus controllers to expand the category.
Step 3: Locate the problematic USB driver. Commonly, the device driver which runs into the error code 52 will be displayed with a yellow exclamation mark in Device Manger, and it may be named as Unknown USB Device.
Step 4: Right-click the problematic driver and choose Update driver.
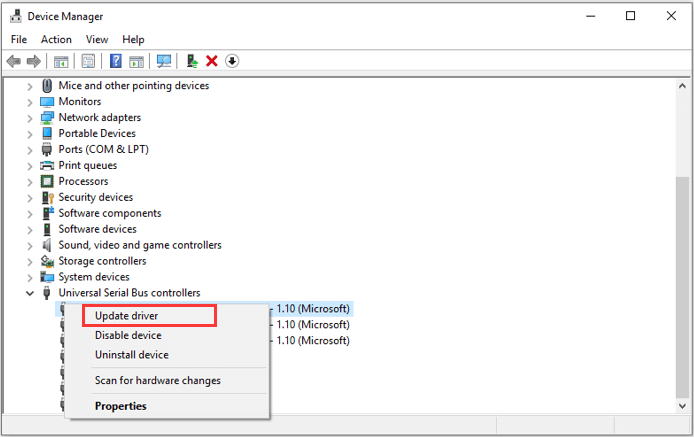
Step 5: Choose the Search automatically for updated driver software option to proceed. If there are any updates detected, install them according to the onscreen instructions and then reboot your computer.
Note: If there are more than one problematic driver, perform the operation for the left drivers to make sure all of them are of the latest version.
Alternatively, you can also choose to uninstall the driver, which has effectively removed the USB error code 52 for some users. Just right-click the driver, choose Uninstall device, and click Uninstall to confirm the operation. Then, restart your system, and the default driver will be reinstalled automatically.
Fix 3: Use System File Checker Utility
The corrupted or missing system files could also trigger the “Windows cannot verify the digital signature for this file/driver” error message. To resolve the problem, you can use the built-in System File Checker utility referring to the tutorial below.
Step 1: Open Run window.
Step 2: Input cmd and press Ctrl + Shift + Enter to run Command Prompt as administrator.
Step 3: Type the command sfc /scannow in the console and press Enter to execute it.
Then, this tool will start scanning your system files and automatically replace the problematic files with a fresh cached copy. All you need to do is to wait patiently until the process is 100% completed. After that, restart your device and check if the USB error code 52 is resolved.
Fix 4: Scan for File System Errors
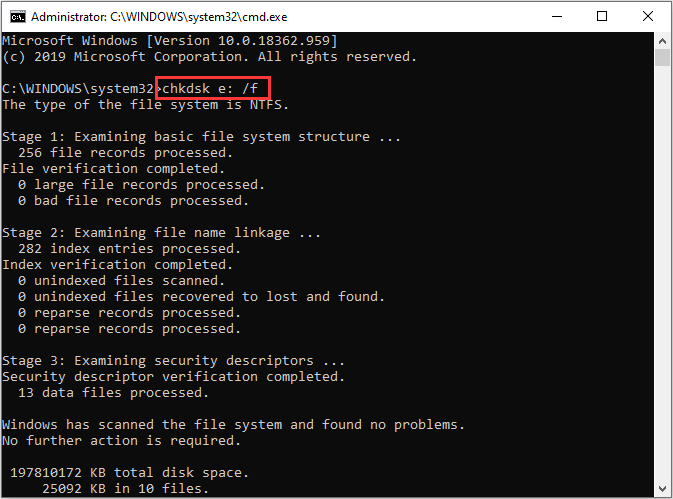
It’s said that this issue might have something to do with the file system error. So, you can try scanning your drives for file system errors and fixing them.
To do that, you can use the CHKDSK tool. Just launch Command Prompt with administrative privileges, input the command chkdsk e: /f, and press Enter. Restart your computer after the process is completed.
Tip: You need to replace e: with the drive letter of the partition you want to scan for. If you execute the command chkdsk /f without a drive letter, this tool will automatically check and fix the current drive (the system drive in almost all cases), which will require a reboot.
Besides, you can also use a professional program to check and fix file system errors for your hard drive. Here, MiniTool Partition Wizard is recommended for you. It can help you recover lost data, back up Windows, and of course, deal with the file system issues within a few clicks. Just click the following button to download it to have a try.
MiniTool Partition Wizard FreeClick to Download100%Clean & Safe
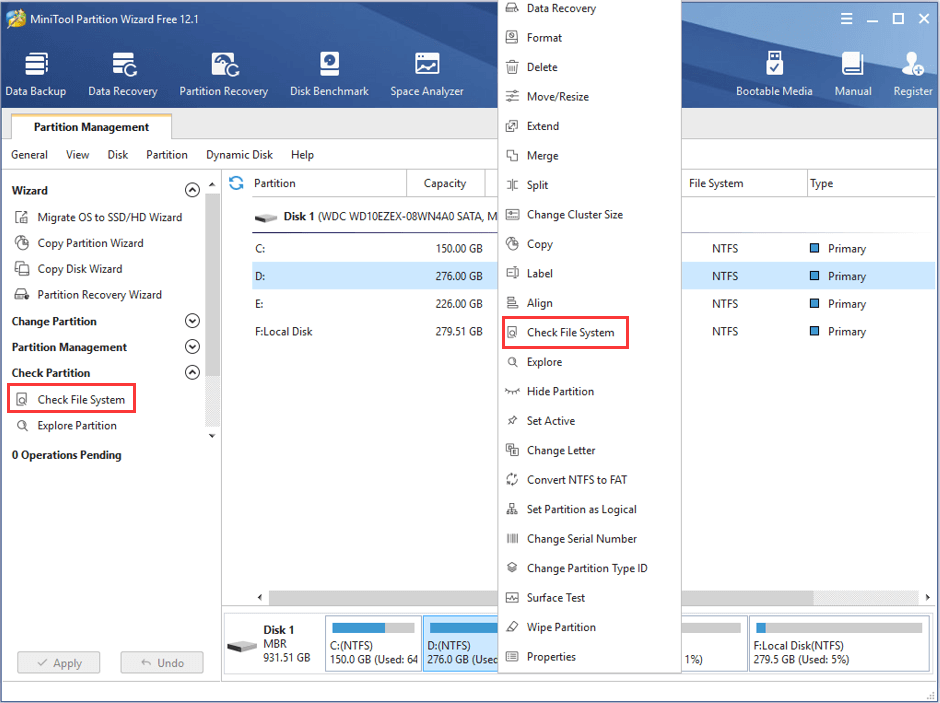
Step 1: Download and install MiniTool Partition Wizard Free on your computer. Launch it to get the main interface.
Step 2: Select the drive you want to scan for and choose Check File System feature from the left action panel. You can also activate this feature by selecting Check File System from the context menu after right-clicking the drive.
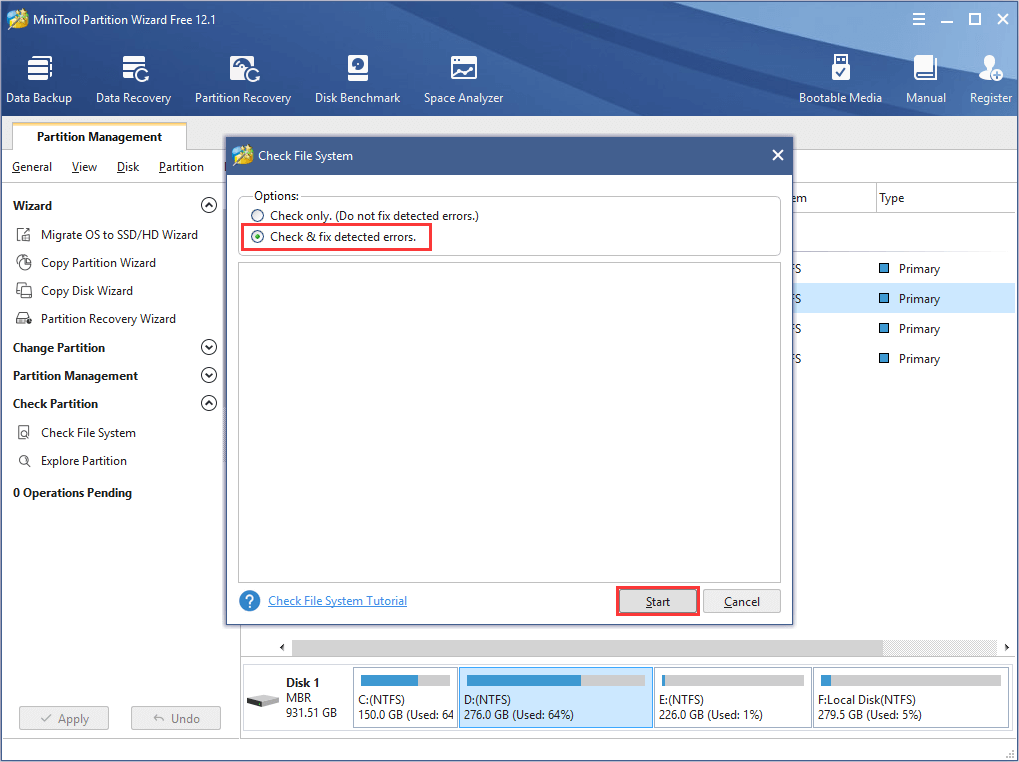
Step 3: In the pop-up window, choose Check & fix detected errors option and click Start button.
Fix 5: Disable Integrity Checks
As mentioned before, the “Windows cannot verify the digital signature for the drivers required for this device” error message appears when your Windows is trying to verify the digital signature and integrity of the device. In theory, disabling this option may resolve the problem and enable you to install the driver of the device again.
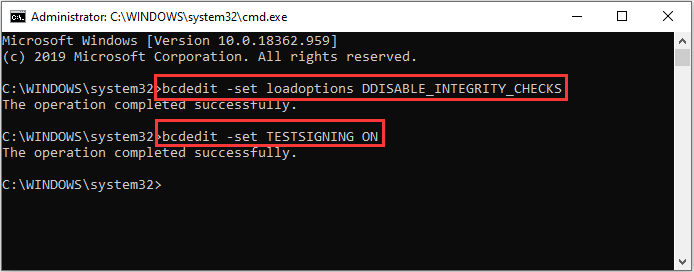
To disable integrity checks, you need to:
Step 1: Run Command Prompt as administrator.
Step 2: Input the following command lines and press Enter key after each to execute them:
- bcdedit -set loadoptions DDISABLE_INTEGRITY_CHECKS
- bcdedit -set TESTSIGNING ON
Step 3: Go to check if the USB error code 52 is fixed or not. If this doesn’t work, open the command console again and execute the following command lines this time:
- bcdedit /deletevalue loadoptions
- bcdedit -set TESTSIGNING OFF
Fix 6: Disable Driver Signature Enforcement
If the above methods fail to resolve the issue for you, perhaps you can disable driver signature enforcement. In this way, you will be able to install drivers for the problematic devices bypassing Windows checking for the signatures.
Here’s a simple guide.
Step 1: Press Windows + I to open Settings.
Step 2: Go to Update & Security > Recovery and click Restart now button under Advanced startup section in the right pane.
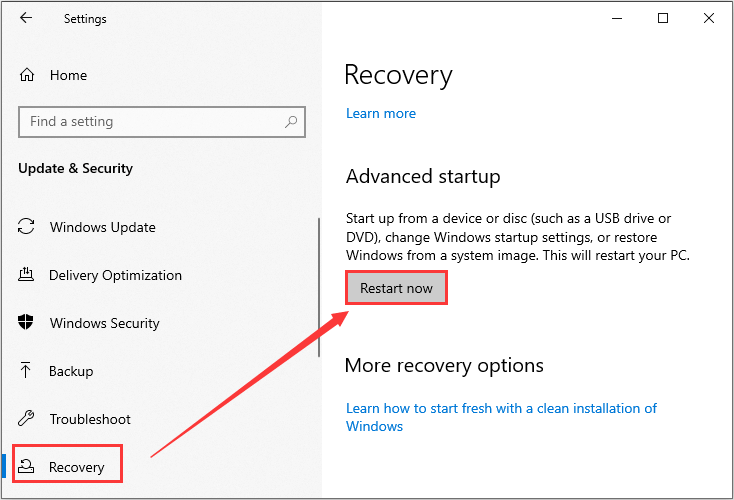
Step 3: When you enter Windows Recovery Environment, navigate to Troubleshoot > Advanced options > Startup Settings and then click Restart button.
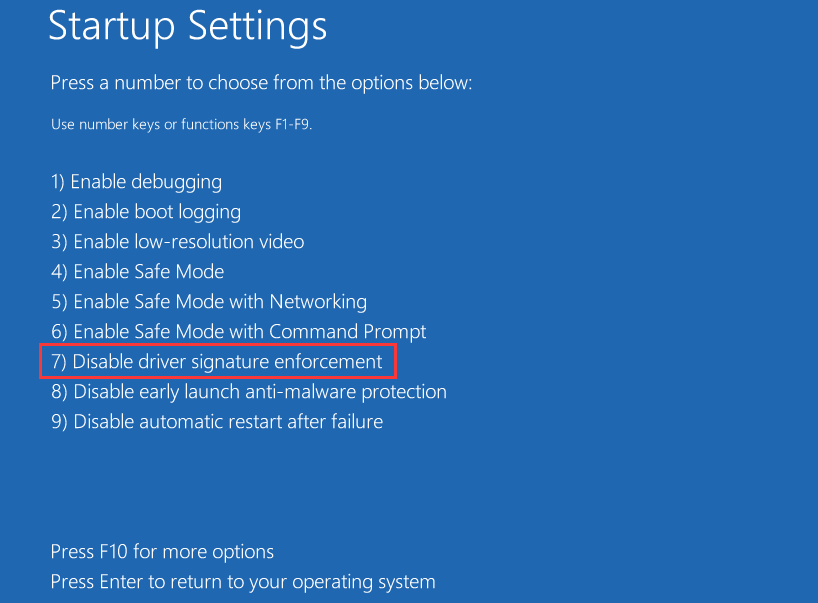
Step 4: When you get the following interface, press 7 or F7 to choose the Disable driver signature enforcement option.
Then, your Windows will boot up automatically. You need to open Device Manager and try updating the problematic drivers referring to the steps mentioned above. Now, the USB error code 52 should be resolved.
For more information about driver signature enforcement and how to disable it, you can read this article: How to Disable Driver Signature Enforcement? Try These Methods.
Fix 7: Perform System Restore
Finally, you can perform system restore to bring your Windows back to a previous status, which may help you get rid of the “Windows cannot verify the digital signature for the drivers required for this device” issue.
Step 1: Open Run dialog, input sysdm.cpl and click OK to access System Properties.
Step 2: Switch to the System Protection tab and click System Restore.
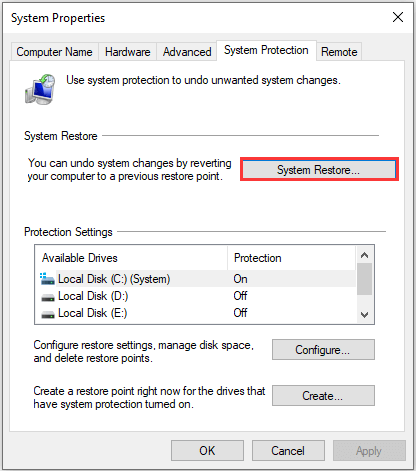
Step 3: Click Next to skip the welcome page. Then, choose a restore point and click Next button.
Tip: You can click Scan for affected programs to check the applications or services to be removed during the process.
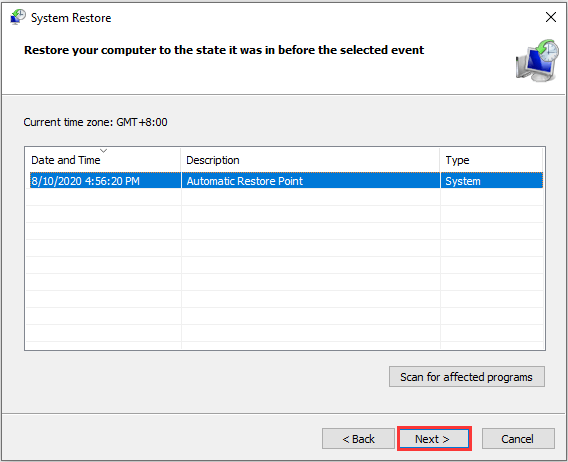
Step 4: Click Finish button to confirm the operation, and a restart will be required to apply the changes.
Hopefully, the Windows digital signature issue will be removed successfully.
Here are 7 feasible methods to get rid of the “Windows cannot verify the digital signature for the drivers required for this device” error.Click to Tweet
Bottom Line
Have you resolved the “Windows cannot verify the digital signature for this file/driver” issue with the solutions introduced in this article? All we know about how to fix the issue is in this post. If you have better solutions, please leave a message in the comment zone below. We are desired to improve this article with your valuable suggestions.
If you want to explore more features of MiniTool Partition Wizard, you can check the user manual. For any questions, you can contact us via [email protected].
Windows Cannot Verify the Digital Signature FAQ
Can I install a driver without a digital signature?
To install a driver and make it work properly on your computer, the driver should be officially signed. But sometimes, you may want to install a drier without a digital signature. Yes, you can force an unsigned driver to install, but it may take some time. For the detailed information, you can check this guide.
How do I fix an invalid digital signature?
If you encounter the invalid digital signature installation error, you can try the following solutions:
- Make sure the downloaded executable is unblocked.
- Install the certificates manually through the properties of the executable file.
- Consult your group policy admin to temporarily disable restriction for the authentication of certificates.
What is the difference between signed and unsigned drivers?
The signed driver with a correct digital signature indicates that it is not damaged, corrupted, manipulated, or changed, and it is safe to use. It can be installed and work properly on Windows. The unsigned driver will be considered as a potentially malicious item by the system and it cannot be installed properly.
A signed driver might also turn to unsigned if its signature becomes invalid due to any tampering or changing.
- Remove From My Forums
-
Question
-
Hello,
I use a device driver for my application. This driver file has to be renamed because of which its signature becomes invalid. And hence the driver file and the catalog file need to be digitally-signed again in order to install in a 64 bit OS. I went through
the whole process of creating a catalog file using inf2cat then signing the catalog file and driver file using signtool and a digital certificate obtained from Verisign.The signatures have also been verified.
I then created a driver package with all the required files for installation including the signed files.
Enabled the test-signing option and rebooted my machine.
Running the installation for the driver (using .inf files) worked without any error but there are errors in the device manager that «Windows cannot verify the digital signatures for the drivers……»
Please let me know what I need to do in order to resolve this issue.
Do I have to sign both .cat and .sys files?
Thanks,
Saritha.
Answers
-
Based on your information you are asking your questions in the wrong place.
http://search.microsoft.com/results.aspx?form=MSHOME&mkt=en-US&setlang=en-US&q=signed+drivers has links about signed drivers, but
you may need to go to MSDN for more assistance. You’re not really asking a simple Windows 7 compatibility question. You’re asking how to get your modified driver accepted and that would be a question better addressed in a programming and/or development
forum.
Please remember to click “Mark as Answer” on the post that helps you, and to click “Unmark as Answer” if a marked post does not actually answer your question. This can be beneficial to other community members reading the thread. ”
-
Proposed as answer by
Thursday, September 9, 2010 6:58 AM
-
Marked as answer by
Linda Yan
Monday, September 13, 2010 2:53 AM
-
Proposed as answer by
When attempting to sign in to Windows 10/11, you may encounter the error 0xc0000428, indicating that the operating system couldn’t load due to a verification failure of a file’s digital signature. This commonly refers to the winload.exe file.
Without a doubt, if Windows 10/11 is unable to authenticate the digital signature for this file, you will be unable to boot your computer normally.
What Is a Digital Signature in Windows 10/11?
Before you can fix the Windows system 32 winload.exe error, you must first understand why Windows is unable to verify the digital signature for this file.
The digital signature essentially acts as a security lock. If Microsoft does not recognize the file’s permissions, a blue screen error will appear, stating that the digital signature for the file could not be verified and displaying the error code 0xc0000428.
Digital signatures are used to ensure the security of your files. Once you’ve digitally signed your machine, you’ll need to receive this signature every time you power it up, which is why it’s referred to as one of the boot managers.
A digital signature is used to safeguard software and prevent forgeries. In other words, if a document, a message, or an application is digitally signed, the user or recipient can be confident that it is secure and belongs to a legitimate organization or individual. As a result, the digital signature aids in the prevention of forgery, tampering, and abdication of responsibility.
This tutorial will lead you through the steps to successfully solve the 0xc0000428 “The digital signature for this file couldn’t be verified” error in Windows 10/11.
What Is the “The Digital Signature for This File Couldn’t Be Verified” Error on Windows 10/11?
The BOOTMGR bootloader, first introduced in Windows Vista and later also used in Windows 7, Windows 8(.1), and Windows 10/11, reads boot configuration data and displays the operating system selection menu as part of the system startup routine. When a user installs a newer version of Windows on top of an older one, or when a service pack is installed, the BOOTMGR entries may fail to be updated properly, and the following notice may appear:
“A recent hardware or software change might have installed a file that is signed incorrectly or damaged, or that might be malicious software from an unknown source.
If you have a Windows installation disk, insert the disk and restart your computer. Click “Repair your computer”, and then choose a recovery tool.
Otherwise, to start Windows so you can investigate further, press the Enter key to display the boot menu, press F8 for Advanced Boot Options, and select Last Known Good. If you understand why the digital signature cannot be verified and want to start Windows without this file, temporarily disable driver signature enforcement.
File: \Windows\System32\winload.exe
Status: 0xc0000428
Info: Windows cannot verify the digital signature for this file.”
Another version of the error message says:
“Your PC/Device needs to be repaired.
The operating system couldn’t be loaded because the digital signature of a file couldn’t be verified.
File:\Windows\System32\Drivers\AppleMNT.sys
Error code: 0xc0000428”
The fact that this file’s digital signature could not be verified is a security flaw created by the installation of certain programs. Because Microsoft does not recognize authorization for the new apps, it displays the message “This digital signature could not be verified.”
What Causes the “The Digital Signature for This File Couldn’t Be Verified” Issue?
Several scenarios have been linked to this error:
- After a system update, BOOTMGR has become obsolete. If something went wrong during the Windows installation procedure, this error may appear, and the boot process may stop if the user has installed a newer version of Windows on top of an older one and the BOOTMGR file has not been updated properly.
- BOOTMGR has become outdated following a service pack update. This issue can also occur if a user fails to update the existing BOOTMGR file after installing a new service pack. If this is the case, an updated version of Windows will be stuck with an old version of BOOTMGR, which will prevent it from loading properly.
- The installation disk was detached before installing Windows. Many customers are recommended to detach their primary boot disk prior to installing a new version of Windows to avoid corruption of the existing working installation or data loss during a system upgrade. However, following this advice may cause the system bootloader on the primary boot disk to become obsolete, resulting in the error in question after the drive is reinstalled.
- Users with dual boot enabled are also likely to see this problem, as the older BOOTMGR may still be in use, or the new operating system may not have a boot record.
- Due to a recent hardware or software upgrade, Windows may be unable to verify digital signatures, resulting in this error. Before they can be used on your device, all drivers must be digitally signed and certified by Microsoft.
How to Fix the “The Digital Signature for This File Couldn’t Be Verified” Boot Manager Error
In this section, we’ll show you how to fix the “The digital signature for this file couldn’t be verified” error in Windows. But before that, make sure that you remove any malware that might be interfering with your processes. You can use a third-party antivirus tool or the built-in Windows Defender to do so. Scanning for system issues and deleting junk files using a reputable PC repair tool, foor example, Outbyte PC Repair, can make the troubleshooting process a lot easier and less complicated.
We recommend going through the solutions in the order suggested below.
Fix 1: Fix the Boot Manager and BCD
You can use the Command Prompt to run a tool called bootrec.exe, which is used to fix boot-related problems on your computer.
However, if you are stuck at the boot screen, you must open the Command Prompt from the boot screen without turning on your machine. On Windows 10/11, you’ll need recovery media to do so. Here are the steps to follow:
- If your device has an optical disk reader, download and burn the Windows file from the Microsoft website to a flash drive or CD.
- Select “Repair your computer” from the drop-down menu. You’ll be taken to Advanced Options once you do this.
- Choose Command Prompt from the drop-down menu.
- After you’ve successfully opened the Command Prompt, type the commands below one by one, pressing Enter after each one:
- bcdboot C:\windows /s C:
- bootrec /fixMBR
- bootrec /fixBoot
- bootrec /rebuildBCD
Note: there should be a space before /.
- Restart your computer and try booting into your computer now.
The bootrec.exe tool will repair your device’s boot files once you execute these commands, and you will be able to boot into your computer normally.
Fix #2: Restart the Boot Manager
If you can’t boot Windows 10/11 because of the 0xc0000428 issue, the first thing you should do is restart the boot manager.
Here is how to do so:
- On the sign-in screen, click Restart while holding down the Shift key until the context menu appears. If you still can’t find the sign-in window, you may need to boot from a USB device to get to this screen.
- In Troubleshoot, select Advanced options.
- Select Command Prompt from the Advanced Options screen. It’s also a good idea to run a Startup Repair for Windows 10/11 to resolve the “The digital signature for this file couldn’t be verified” error on your computer.
- Then, one by one, in the Command Prompt, type the following three commands to restart Windows 10/11’s boot manager:
- C:
- cd boot
- attrib bcd -s -h –r
- bootrec /rebuildbcd
Note: Generally, the root drive on Windows 10/11 is C:; if yours is D:, F:, or another hard drive, you need to use its letter.
Now that your PC’s boot manager has been correctly rebooted, you can check if the “The digital signature for this file couldn’t be verified” error 0xc0000428 has been resolved.
Fix 3: Run Startup Repair
If the above solutions don’t work, try this one:
- Press the Power button and then any key while a USB containing Windows 10/11 installation media is inserted into your PC.
- If the system fails to recognize the hard disk automatically, interrupt the restart process by pressing any of these keys: F2, F10, ESC, or DEL. This should load the boot menu, where you can choose to boot from the installation disk.
- Then, using the arrow keys, navigate to the appropriate option, such as Boot, Boot Options, Boot Order, or something similar, and press Enter.
- After that, use the arrow keys to move the CD, USB flash drive, or DVD from the bottom to the top of the Boot list. When you’re done, press Enter.
- Use the F10 key to save your changes.
- Click Yes when the confirmation window appears and wait for the system to restart.
- Select your preferred language, time, currency, keyboard, and other options, then select Next.
- Then choose “Repair your computer” and wait for the System Recovery Options window to appear.
- Select the Windows installation drive and press Next after the window has opened.
- Then, select the Startup Repair option and wait for the process to finish.
Fix 4: Turn Off Driver Signature Enforcement
If the message “The digital signature for this file couldn’t be verified” appears frequently, you may need to switch off Driver Signature Enforcement from the boot menu.
Using repair media is the simplest way to do this. Simply follow these instructions:
- If your device has an optical disk reader, download and burn the Windows file from the official website to a flash drive or CD.
- Select “Repair your computer” from the drop-down menu. You’ll be taken to Advanced Options if you do this.
If you can boot into Windows, you can use the Windows 10/11 Settings app to access Advanced Options. Simply follow these instructions:
- Open the Windows Settings application. You can use the Win + I keyboard shortcut.
- Click Update & Security.
- Select Recovery from the left pane menu.
- Select Advanced Startup from the right pane.
- To access Advanced Startup Options, click Restart Now.
- Select the Troubleshoot option after the PC has rebooted.
- Click Startup Settings after selecting “Advanced options”.
- Toggle on the “Disable driver signature enforcement” option by pressing F7.
Try booting into Windows now. This time, the boot functionality should work normally.
Fix 5: Run System Restore in Safe Mode
If the problem persists, you can use Windows 10/11’s System Restore feature to resolve it:
- Restart your computer, and while the Windows logo is loading, press and hold the Power button until the computer shuts off.
- Shut down or restart your computer numerous times until you see the Advanced Startup mode.
- Next, go to Troubleshoot > Advanced Options > Startup Settings > Restart.
- Press 5 or F5 to enter Safe Mode with Networking after restarting.
- In Windows Safe Mode, hit the Win + R shortcut on your computer, type ‘stru’ into the Run box, and then click the OK button to run System Restore.
- Click on Next in the System Restore window, select a restore point based on the day and time when everything was operating fine and there were no problems, and then click Next > Finish to begin restoring the system.
- Restart your computer to see if the error has been resolved.
Final Thoughts
If you’re having trouble booting up your Windows 10/11 computer because of the “The digital signature for this file couldn’t be verified” issue, you’ve come to the perfect spot for help. The solutions above should be able to help you in dealing with this boot manager error. If nothing works, then you might have a hardware problem that needs to be checked by a professional computer technician. In most cases, the solutions outlined above may help resolve the issue.
Give us some love and rate our post!