The error ‘Windows cannot Run Disk Checking on this Volume Because it is Write Protected’ is caused when your volume/drive is damaged or attributed to Read Only. CHKDSK is a command-line utility in Windows that lets you search for bad sectors in your volume and verify the integrity of system files stored on your drive.
Depending on the reason why you receive «Windows cannot run disk checking on this volume because it is write protected», the solutions to the problem vary. Five Fixes for Chkdsk Write Protected:
| Workable Solutions | Step-by-step Troubleshooting |
|---|---|
| Case 1. Chkdsk Write Protected Because Hard Drive Is Write Protected |
Fix 1. Remove Write Protection with Software…Full steps Fix 2. Remove Write Protection via CMD…Full steps |
| Case 2. Chkdsk Write Protected Because File System Corrupted |
Fix 5. Recover Files from Corrupted Hard Drive…Full steps |
«Tried to boot up my computer this morning and was given the message: ‘Startup Repair cannot repair this computer automatically.’ And it wouldn’t let me boot into the Safe Mode. Having no system restore points, then I ran the chkdsk command. But it gave me the ‘Windows cannot run disk checking on this volume because it is write protected’ error message. Is there any way to fix the issue? I’m running Windows 10 Professional.»
Chkdsk is a built-in Check Disk utility for Windows PC to help you fix disk errors or startup issues. But usually, when you run ‘chkdsk /r’ via a Command Prompt after getting the message: ‘Startup Repair cannot repair this computer automatically’, it will not work and at most times will give you the error message reads:
‘The type of the file system is NTFS.
Cannot lock current drive.
Windows cannot run disk checking on this volume because it is write protected’.

Why did you receive this error message? Generally, there are two common causes:
- The disk volume attribute is set to read-only
- The file system of the partition is corrupted or damaged.
If you were caught in one of the two situations where you could not run CHKDSK to check and repair your disk, don’t get frustrated. We will show you effective ways to cope with it.
To enable chkdsk running again, you need to remove write protection from your hard drive so to get rid of the «Windows cannot run disk checking on this volume because it is write protected» error.
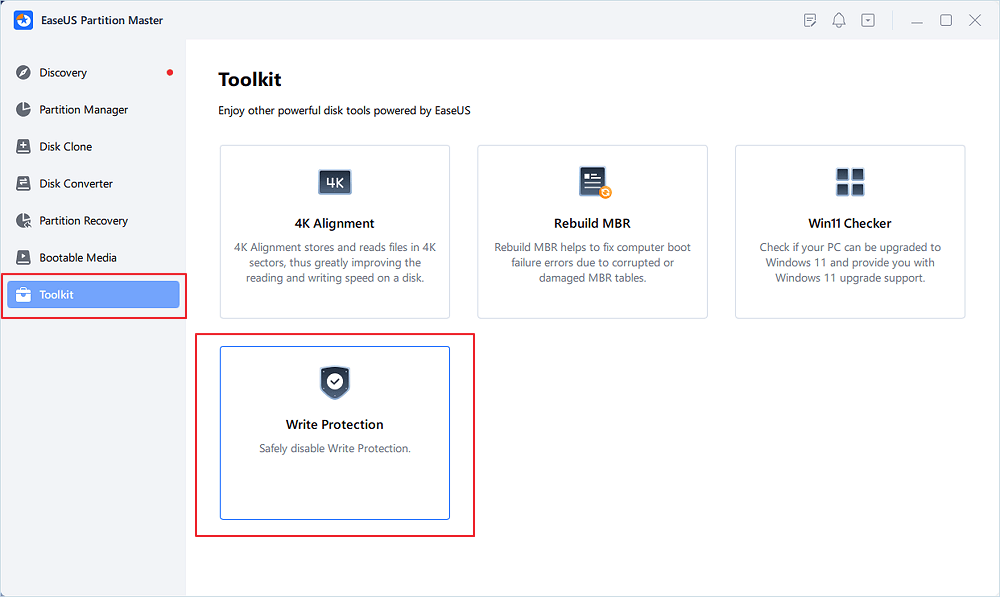
Fix 1. Remove Write Protection with 1-Click Write Protection Removal Software
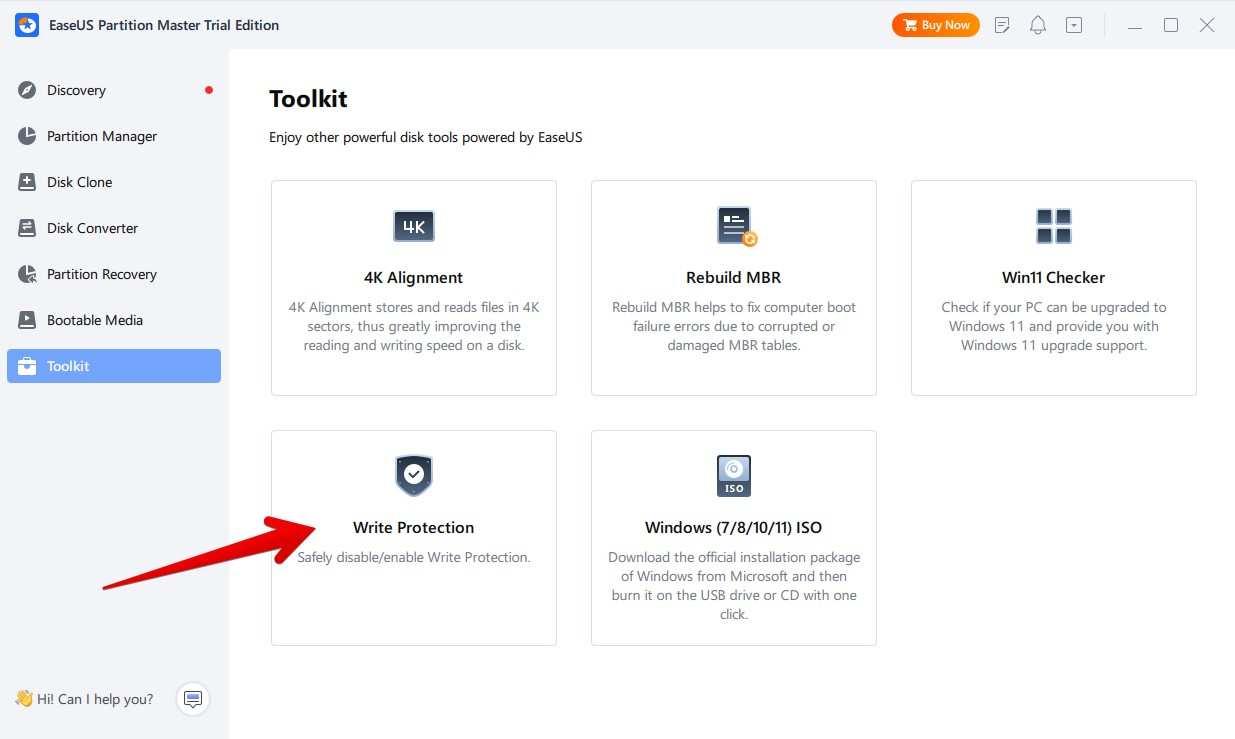
EaseUS Partition Master provides a free feature that users can efficiently apply to remove the write protection state and make their devices work normally again. This software gives you a direct solution to remove write protection from your write-protected USB, USB external disk or SD card in simple clicks. Here is how to do so:
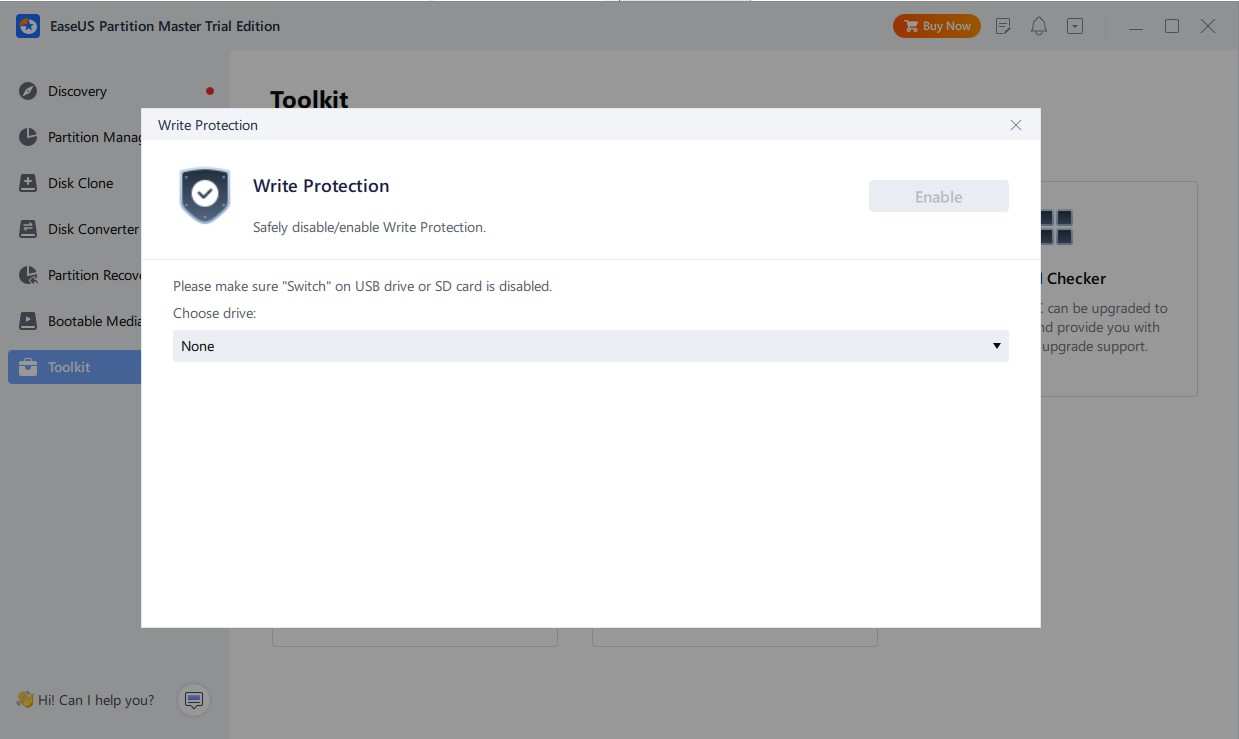
Step 1. Download and install EaseUS Partition Master, go to the Toolkit section, and click «Write Protection».
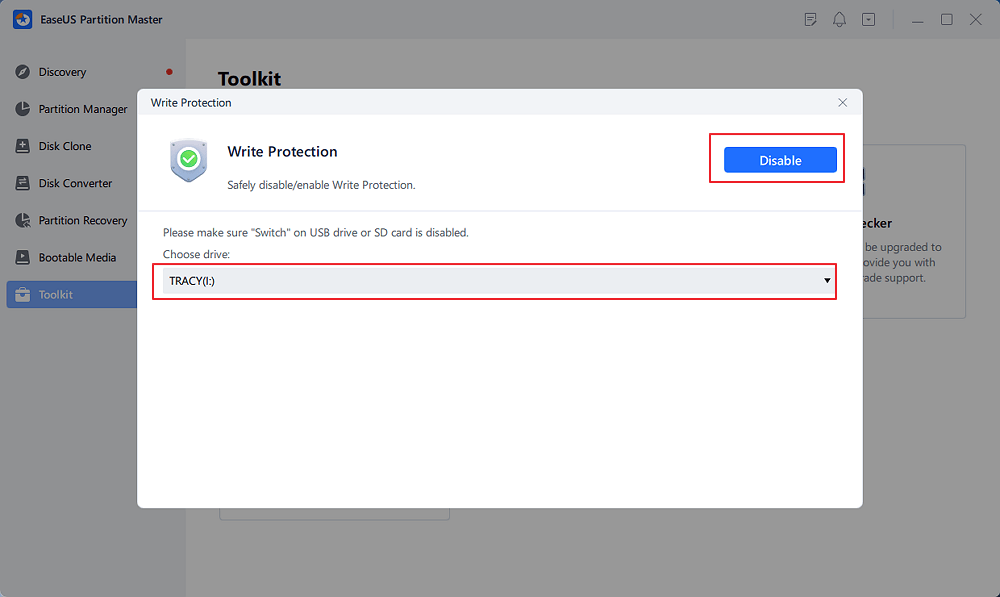
Step 2. Select your write protected USB, USB external disk or SD card, and click «Disable».
Fix 2. Remove Write Protection via CMD
Step 1. Press «Windows + X» buttons to bring up the power users menu.
Step 2. In the power users menu, select the «Command Prompt (Admin)» option.
Step 3. Click «Yes» when you are presented with a UAC window requesting permission to launch the Command Prompt as Administrator.
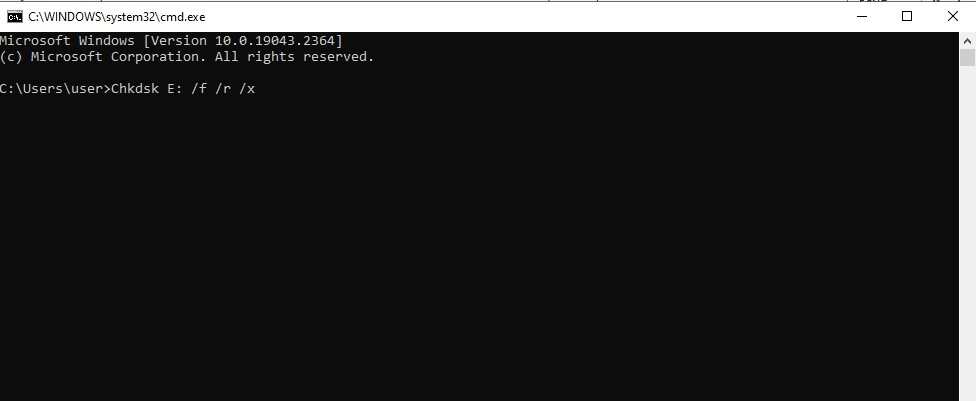
Step 4. In the new Command Prompt window, type chkdsk E: /f /r /x and press «Enter». Here you should replace «E» with the drive letter of your PC hard drive, SD card or USB drive.
This command will unmount the disk, SD card or USB drive and remove any write protection status on the device. In this case, you can get CHKDSK working again and will no longer see ‘Windows cannot run disk checking on this volume because it is write protected’ error message.
If this tip won’t work, no worry. There are other ways to remove write protection.
Fix 3. Remove Write Protection via Diskpart
Via diskpart, you can clean the read-only attribute on your hard drive.
Step 1. Run «Command Prompt» as an administrator.
Step 2. Enter diskpart and click «Yes» in the prompt asking for notification.
Step 3. Enter the following command in order:
list disk
select disk X (Replace «X» with the number of your write-protected hard drive.)
attributes disk clear readonly
Step 4. If you get the message «Disk attributes cleared successfully», enter exit and then go back to CMD to run the chkdsk command. This time, you will be able to check and fix your disk error easily.
If you are not a computing management professional and are unfamiliar with command lines, don’t worry. EaseUS R&D team has promoted a fresh kit for helping you resolve the write-protection issue on your hard drive, external hard drive, USB or SD card, etc., devices. You can directly revert to Fix 1 and apply EaseUS Partition Master for help.
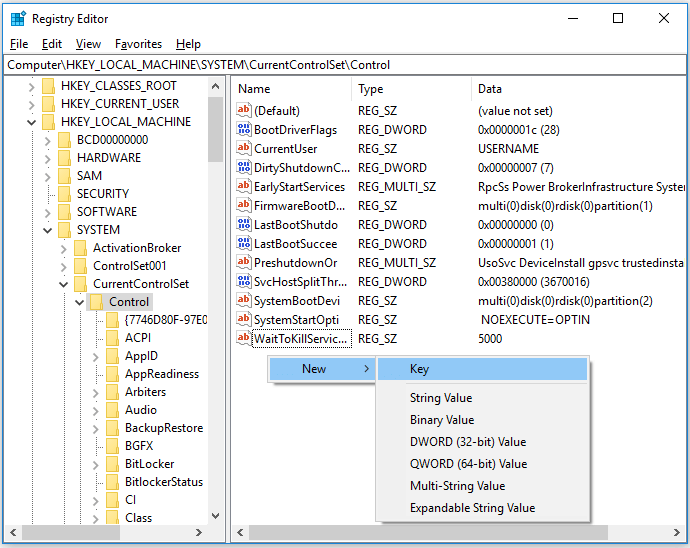
Fix 4. Clear Read-Only in Registry Editor
Method 2 still won’t work? Don’t get upset, here is another way worth trying.
Step 1. Press «Windows + R» simultaneously and enter regedit. In the window asking for permission, click «Yes».
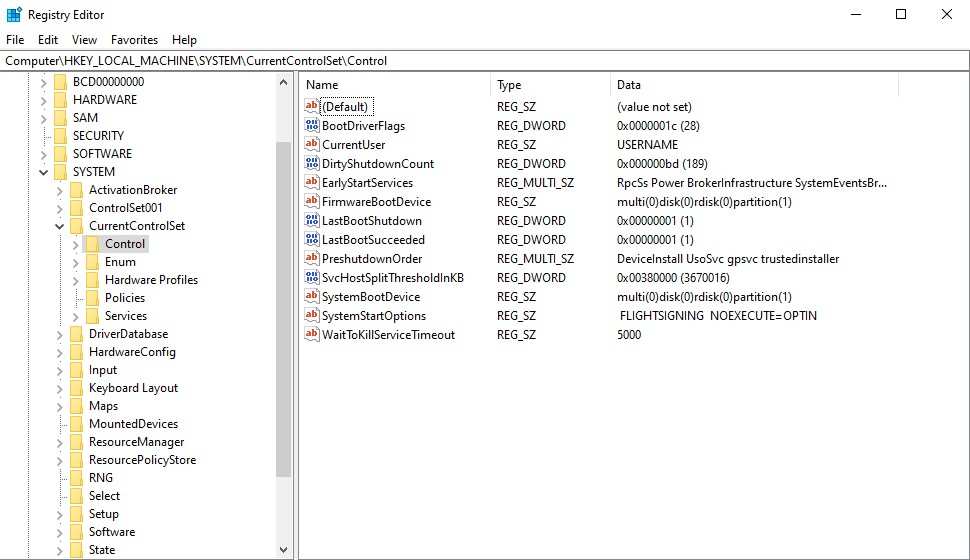
Step 2. Go to HKEY_LOCAL_MACHINE\SYSTEM\CurrentControlSet\Control\StorageDevicePolicies.
Step 3. Find and right-click the «WriteProtect» key and set the value as «0».
Don’t see «StorageDevicePolicies» in the specific path? No worry, follow the steps below to achieve the same goal.
Step 1. In Registry Editor, go to HKEY_LOCAL_MACHINE\SYSTEM\CurrentControlSet\Control.
Step 2. On the right pane, right-click in the space and choose «New» > «Key». Name it as «StorageDevicePolicies».
Step 3. Make sure «StorageDevicePolicies» is selected. Go to the right pane, right-click and choose «DWORD (32-bit) Value».
Step 4. Input the name as «WriteProtect» and set its value as «0».
These are all the possible ways to remove write protection on a hard drive. In most of the cases, using one of the methods above could help to solve the issue «Windows cannot run disk checking on this volume because it is write protected». If the issue remains after trying the fixes, you should consider whether the chkdsk reports write protected due to file system errors or hard drive corruption.
Since the ways to repair corrupted hard drive have been provided, here you can only find the fixes for a hard drive with file system errors. When the file system of your hard drive is corrupted or damaged, you have no access to the data on it. It’s likely that you will receive the message «Windows cannot run disk checking on this volume because it is write protected» in such a case. To make your hard drive work normally again, you need to assign a file system to the hard drive by formatting. However, since the formatting will erase all the existing files on your disk, you are recommended to recover files first.
Fix 5. Recover Files from Hard Drive
With the EaseUS Data Recovery Wizard — EaseUS Data Recovery Wizard, you are able to retrieve files from disk with file system errors like disk becoming RAW, file system missing, and more. This professional software can rescue almost all existing file types from a computer, external hard drive, USB, memory card, and more after deletion, formatting, file system becoming RAW, etc.
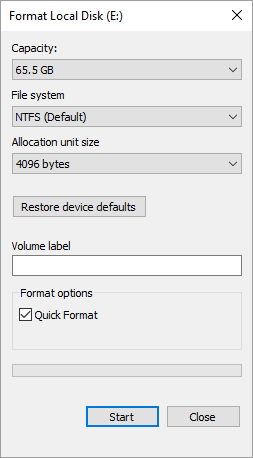
Fix 6. Format the Volume
As you may know, there are many ways to format a hard drive. The easiest one is:
Step 1. Go to «This PC».
Step 2. Find and right-click your problematic hard drive partition.
Step 3. Choose «Format».
Step 4. Set the new file system and other options, then click «Start».
Conclusion
The causes leading to «Windows cannot run disk checking on this volume because it is write protected» are relatively specific. Thus, the ways to fix the error are clear, either by removing write protection or fixing file system errors. Hope one of the methods above can help you fix your problematic hard drive perfectly.
FAQs About Windows Cannot Run Disk Checking On This Volume
If you have more questions about Windows Disk Checking or CHKDSK on a locked drive, check the following questions and you may find the answers to listed questions may interest you somehow.
1. How do you fix Windows Cannot run checking on this volume because it is write protected?
The basic cause of this error is that the Windows disk checking command is disallowed for executing as the target device is write-protected. So the best way to resolve this issue is to remove write protection from your device.
There are 5 ways that can help to unlock a write-protected drive or device. For a detailed guide, you may revert back to the detailed operations of 5 Fixes on this page for help.
2. How do I remove write protection from a hard drive from command prompt?
To remove the write protection of a hard drive from Command Prompt, you should be careful while executing the following steps:
Step 1. Open Command Prompt as Administrator.
Step 2. Type diskpart in Command Prompt and hit Enter.
Step 3. Click «Yes» to open DiskPart.
Step 4. Type list volume, select volume X, attributes disk clear readonly and hit Enter each time. (Replace X with the volume drive of your hard drive.)
3. How do I run chkdsk on a locked drive?
To run CHKDSK on a locked drive, you should first unlock the drive by using CMD command or a third-part write-protection removal tool. You may refer to Remove Write Protection on Windows 10/8/7 for a guide.
After this, you can follow the next steps to run CHKDSK:
Step 1. Open Command Prompt as Administrator.
Step 2. Type: chkdsk E: /f /r /x and press «Enter». (Replace «E» with the drive letter of your hard drive.)
When your volume/drive is damaged or credited to Read Only, the error ‘Windows cannot run disk checking on this volume because it is write protected‘ occurs. CHKDSK is a command-line service in Windows that allows you to search for poor sectors and check the authenticity of system files saved on your drive. Running the utility may occasionally prompt you with an error stating that the drive is distorted or write-protected. If one of your drives is write shielded, this implies you won’t be able to modify or delete the files of that drive. Simply stated, write-protected demonstrates that the volume is set to read-only. In this guide, you’ll get the detailed fixes to resolve the issue of windows cannot Run Disk Checking on this Volume Because it is Write Protected.

Part 1. Why Windows Cannot Run Disk Checking On This Volume Because It is Write Protected?
A good illustration would be the write protection of USB sticks and SD cards, which happens to everyone sometimes and prevents you from copying the contents of the drive to the desktop or vice versa.
It is safe to say that everybody confronts this error from time to time, which is generally caused by:
- Enabled Write protection on the drive: If your drive is set to read-only, the error cannot run disk checking because it is write protected will appear because of the limited permissions.
- A faulty drive: If your drive is broken or corrupted as a result of a bad system file contained in it, the error may appear.
Part 2: How to Fix Windows That Cannot Run Disk Checking?
Fix 1. Remove Write Protection via CMD
PRAM stands for Parameter Random Access Memory and it stores details like system configuration, display settings, hard disk configuration, etc. Likewise, NVRAM (Non-Volatile Random Access Memory) device, display, and other permanent system component details. You can reset the PRAM and NVRAM in 3 simple steps.
To begin with, there have been indications that the mistake was resolved using a distinct chkdsk instruction. This was recommended by Microsoft Support, so it is certainly worth a shot. What you must do is:
- Launch an elevated command prompt by pushing Winkey + X and then selecting Command Prompt (Admin) from the menu.
-
When it opens, enter the following: Chkdsk D: /f /r /x

- Press the Shutdown button to turn your Mac off.
Where D: is the defective drive, replace it as necessary.
The parameters mean the following:
- The /f parameter scans your drive for errors and attempts to repair them.
- The /r parameter will inspect your drive for and repair bad sectors.
- The /x parameter unmounts your drive, which means that if your drive is currently in use, it will no longer be so until the search is finished.
It’s worth noting that some users have reported that their issue persevered even after attempting this, in which case you’ll need to try the other solutions listed below.
Fix 2. Remove Write Protection via Diskpart
DiskPart is a command-line utility for creating partitions on your hard drive. It can be used to modify the properties of a drive, which is what we’ll do here. This is how to put it to use:
- Go to the Start Menu and type in ‘diskpart’ to access it.
- Once the utility has loaded, enter: List volume
- Look at the listed volumes on your hard disk and type as: Select volume #
- All you need to do is replace # with another drive’s alphabet.
-
After that, type in : Attributes disk clear read-only

- Wait until it completes.
Fix 3: Clear Read-Only in Registry Editor
If the Microsoft remedy does not work for you, you can try removing the write protection through the Windows Registry. Windows Registry can cause serious problems, so make sure you cautiously follow the steps. Here’s what you should do:
- Open Run by pressing the Winkey + R combination.
- Enter Regedit.
-
Once the Windows Registry is accessible, copy and paste the following into the address/location bar:
HKEY_LOCAL_MACHINE\SYSTEM\CurrentControlSet\Control\StorageDevicePolicies - Change the value of the ‘WriteProtect’ key from 1 to 0 by double-clicking it.
If you can’t locate the StorageDevicePolicies folder in your Windows Registry, here’s another option:
-
Copy and paste the following path into the address bar:
HKEY_LOCAL_MACHINE\SYSTEM\CurrentControlSet\Control -
Right-click in the mid pane and choose New > Key.

- A new folder called ‘StorageDevicePolicies’will be formed. Make sure you don’t misspell the name.
- Next, select the freshly formed folder, right-click in the middle pane, and choose DWORD (32-bit) Value.
- Give it the name WriteProtect and change the value to 0.
Fix 4: Scan Drive for Corruption
One final thing you can do to resolve this cannot run disk checking write protected error is to inspect your hard drive for corrupted files that is one of its causes. Here’s how to go about it:
- Launch ‘This PC.’
- Select Properties from the context menu when you right-click the faulty drive.
- Navigate to the Tools tab.
- When you’re there, select the ‘Check’ option.
- If prompted by a UAC dialogue box, select “Yes.”
-
Wait for the scan to finish.

Fix 5. Recover Files from Hard Drive and Format It
In the digital environment, data loss is unavoidable. It is very simple to inadvertently delete sensitive information, causing you to worry about how to recover these files. Tenorshare 4DDiG data recovery is your best option for recovering all lost data on Windows/Mac computers from different failure scenarios such as deletion, formatting; Windows cannot run disk checking write protected errors, and so on, with satisfactory results.
- 4DDiG endorses over 1000 file formats, including NTFS, FAT, APFS, HFS+, HFS X, and others.
- 4DDiG can retrieve data from any medium, including Flash Drives, Hard Drives, Memory Cards, and so on.
- Data will be recovered fully using patented technology, keeping the original format and size.
- Quick scans provide a free preview then you can quickly locate your deleted files.
- 4DDiG claims 100% protection of files from being overwritten.
-
Choose a Local Disk
Once the installation of Tenorshare 4DDiG Windows Data Recovery is done, you’ll see the default home display. To format a drive to retrieve data from a write-protected disk, choose the drive and click start to proceed.
-
Scan Hard Disk Drive
4DDiG instantly scans your chosen hard drive all over for lost data. As 4DDiG continues to find deleted files on the drive, it records the digitized items in Tree View and File View. An advancement bar shows how far you’ve come. You can also wait or stop the scanning at any time especially as you’ve discovered the files you want to retrieve.
Following that, you can see the monitoring result, which demonstrates how many files were found. If you are unable to locate the desired lost data, you can perform a Deep Scan at the underside of the interaction to recover deleted files, which may take some time.
-
Preview and Select Files to Recover
Tenorshare 4DDiG allows you to preview and recover various file types. You can choose specific file categories, preview them for verification, and then recover them by clicking «Recover.» When you click «Recover,» a dialog box will prompt you to select a destination for the recovered files. After selecting your preferred location, click «OK.» Your files will be successfully recovered. To avoid data loss from disk overwriting, never save the recovered files to the same partition where they were deleted.
FAQs
1. How do I run chkdsk on write-protected?
When you see the CHKDSK /f volume is write-protected problem, as per Microsoft support, you can try some other command in CMD: chkdsk/ f / r / x. Try it by typing others like Chkdsk F: /f /r /x and hit Enter. You can change F to another drive letter.
2. How do you fix Windows that can’t check the disk while it’s in use?
If you get the message»Windows didn’t verify the disk while it’s in use,» you can either click «Schedule disk check» or Cancel the scan. We recommend scheduling a disk check and restarting your Windows 7 computer. When it reboots, you only have 10 seconds to withdraw the operation by pressing any key.
3. How do I unprotect my hard drive?
- Perform a disk check. Install the boot disk or USB drive and turn on the desktop.
- Check the system files. As in stage one, boot the computer from the disk or USB.
- Carry out a startup repair.
- Perform a system restore.
- Restart your computer.
4. Why can I not run Chkdsk?
Start a cmd as Administrator in Windows. Run Chkdsk with the «/f» (fix filesystem data errors) or «/r» (repair disk physical errors) options. As you’ll see, the result is «Chkdsk cannot run because the volume is used by some other process.» Running windows is also considered a specific task.
Chkdsk must be the only program that has access to a disk in terms of fixing or repairing it. In the error message, volume is merely another word for the disk, or more precisely, partition; the process is another word for the program. If another program has a file accessible on the disk, it’s regarded as «in use,» and Chkdsk won’t be able to get the entirely separate access it requires.
Conclusion:
The solutions vary based on why you are facing «Windows cannot run disk checking on this volume because it is write protected.» we have discussed various Solutions to Chkdsk Write Protected. The cause for the error Windows cannot run disk checking on this volume because it is write protected windows 10 are quite explicit. As a result, the solutions to the error are obvious: remove write protection or repair file system errors. We hope one of the outlined fixes can assist you in completely repairing your faulty hard drive. However, Tenorshare 4DDiG is a highly recommended and professional tool to assist you with a crashed drive to recover your precious data with very easy steps.
William Bollson (senior editor)
William Bollson, the editor-in-chief of 4DDiG, devotes to providing the best solutions for Windows and Mac related issues, including data recovery, repair, error fixes.

Добрый день. Помогите, пожалуйста, как решить проблему.
Вчера при работе вылезло уведомление про какую-то проблему, кажется в жд и что надо комп перезапустить, я трогать не стала,вечером пока меня не было, ноут выключили и с того момента включить я его не могу. При загрузке у меня выходит синий экран смерти с кодом NTFS file system, иногда бывает FAT file system и тупо идет по кругу перезагрузка ноута.
Итог. В обычном режиме комп не включается, в среду восстановления могу зайти, в биос тоже, через безопасный режим не включается, тоже выходит синий экран и перезагрузка. Лазила в HP ассистенте, точки восстановления на ноуте нет, при попытки восстановления без потери данных написал, что возникла проблема, при попытке восстановления при загрузке выдало, что не удалось восстановить, при попытке создания резервной копии выдало недостаточно памяти.
Есть ли возможность восстановить ноут или уже только замена ЖД поможет?
Просто облазила форумы, что только не пишут, одни говорят, что просто винду переустановить, другие, что ЖД только менять, третьи, что может это в системе, надо всякие проверки сделать и норм будет. Что делать, с чего начать?
Нашла, что надо через ком.строку запустить Chkdsk/f/r, на это у меня выдало
«The type of the file system is NTFS.
Cannot lock current drive.
Windows cannot run disk checking on this volume because it is write protected»
В итоге запустила проверку командой chkdsk c: /f /r /x
но на форуме писали «Вы должны перезапустить систему прежде, чем дисковое сканирование начнется на системном разделе» Что это значит и как и когда перезапустить?
Пока проверка идет, уже выходят строки типа:
Deleting corrupt file record segment ….
File record segment … is unreadable
Deleted corrupt attribute list entry with type code 40(128,192) in file ….
Trying to run a command chkdsk allows users to verify errors in their local drive. However, there could be an occurrence when this command does not work. Instead, an error about unable to check the disks shows up. So here are three solutions if you are facing this problem on your Windows PC

Contents
- The Reason That Shows Windows Cannot Run Disk Checking Due to Write Protection
- Solution
- Method 1: Use CMD
- Method 2: Use Registry Editor
- Method 3: Use EaseUS Partition Master
- Conclusion
The Reason That Shows Windows Cannot Run Disk Checking Due to Write Protection
All Windows PCs have some built-in utility tools that help improve the quality of your system. Among all these utility tools, there is Chkdsk which is a disk checking feature users can access via command prompt. Chkdsk prompt attempt a quick check of your local drive which comes in handy at times. However, it is not 100% reliable as it may not work when things get complicated. One of the more common scenarios where this error occurs is when a start-up error happens on your computer.
You can tell the disk checking tool is not working when there is a message “The type of the file system is NTFS”. Below that, the main error is displayed on the screen.
The reason why your Windows PC is showing this error is because of the following statement:
1. Read-only mode is enabled to provoke Write Protection.
2. The local disk hardware is corrupted or has physical damage.
Solution
Method 1: Use CMD
Resetting NVRAM and PRAM can remove write protection as they store various configurations of your Windows computer.
- Press the shortcut keys for Run: Windows + R. Type “Cmd” and press enter.
- After you enter the cmd prompt Write or paste the prompt: Chkdsk F: /f /r /x. Keep in mind that the letter “F” is the drive that will get affected, change it accordingly.
- After properly pasting the command, press enter.
If the problem is still occurring then look for other methods below.
Method 2: Use Registry Editor
Registry Editor has so many benefits for resolving Windows-related issues. The error we are dealing with here can also be resolved using the registry editor.
- In your Windows computer, hit the shortcut keys for opening Run prompt i.e. Win + R.
- Type Regedit and click OK.
- Copy and paste the following in the address bar of the registry editor: HKEY_LOCAL_MACHINE\SYSTEM\CurrentControlSet\Control\StorageDevicePolicies.
- Go to “WriteProtect” by double-clicking on it.
- Shift the value to 0.
If StorageDevicePolicies is not discoverable in your registry follow this alternative:
- Open the registry and paste the following: HKEY_LOCAL_MACHINE\SYSTEM\CurrentControlSet\Control. \
- Now in the blank area of the window, do a right click > New > Key.
- Now set the name of the key as “StorageDevicePolicies”.
- Right-click on the blank area and choose the DWORD (32-bit) value.
- Change the DWORD name to WriteProtect and alter its value to 0.
Method 3: Use EaseUS Partition Master
If all the Windows in-built methods did not work to solve the issue “Cannot Run Disk Checking on This Volume Because It is Write Protected” then your third-party software is the next trick. EaseUS Partition Master is a tool for extracting Write Protection and tons of other stuffs. As a result, your local drive will not restrict itself with Write Protection and will work normally. Here is the trick to solve your problem with EaseUS Partition Master
- Download the installer from the given link https://www.easeus[.]com/partition-manager/epm-pro.html
- Now click on “Free Trial” as we do not require the premium version here.
- Open the installer and install the program.
- Open EaseUS Partition Master and see the section on the left side. Select the “toolkit” option at the bottom.
- Click on “Write Protection” and then select the drive in the “Choose Drive” section.
- After that, a new option will be available on the same page. That option is to choose to enable or disable Write Protection. You have to click on “disable” as want to remove Write Protection.
Conclusion
The problem related to disk checking is often fortunately very specific. As a result, removing Write Protection or fixing system file usually resolve chkdsk issue on your computer. One of the methods mentioned in this guide should resolve your problem.
CHKDSK — это утилита командной строки, которая позволяет находить поврежденные сектора на томе и проверять целостность системных файлов, хранящихся на диске. Многие пользователи Windows регулярно используют его для получения необходимой информации. Некоторые пользователи видятWindows не может запустить проверку диска на этом томе, поскольку он защищен от записи.ошибкапри запуске CHKDSK на диске. В этом руководстве мы предлагаем несколько решений, которые помогут вам легко решить проблему.
Основной причиной проблемы является поврежденный диск или диск, защищенный от записи. Вы ничего не можете сделать с диском, защищенным от записи или доступным только для чтения. Перед запуском функций CHKDSK необходимо убедиться, что они не повреждены и не защищены от записи.
Если вы видите, что Windows не может запустить проверку диска на этом томе из-за ошибки защиты от записи при запуске функции CHKDSK на диске, следуйте приведенным ниже методам, чтобы устранить проблему.
- Снимите защиту от записи на диске
- Запустите CHKDSK из командной строки, чтобы найти и устранить проблемы на диске.
- Восстановить файлы и отформатировать диск
Давайте углубимся в детали каждого метода и исправим проблему.
1] Снимите защиту от записи на диске.
Ошибка также может возникнуть, если диск защищен от записи или доступен только для чтения. Чтобы исправить ошибку, необходимо снять защиту от записи.
Чтобы снять защиту от записи с помощьюКомандная строка,
- Нажмите кнопку «Пуск» и найдите «Командная строка». Затем нажмите «Запуск от имени администратора» в командной строке в результате.
- Тип
diskpartи нажмитеEnter. Затем введитеlist diskи нажмитеВходить. - Тип
select disk D. Замените D на диск, с которым у вас возникли проблемы, и нажмите Enter. - Затем введите
attribute disk clear readonlyи нажмите Enter, чтобы отключить защиту от записи для выбранного диска.
Другой способ снять защиту от записи — использоватьРедактор реестра. Для этого
- Для этого введите regedit в поле поиска Windows и нажмите Enter, чтобы открыть редактор реестра.
- Перейдите по следующему пути в редакторе реестра.
ComputerHKEY_LOCAL_MACHINESYSTEMCurrentControlSetControlStorageDevicePolicies
- Выберите и дважды щелкните DWORD с именемЗащита от записии установите его данные значения как0.
Перезагрузите компьютер и проверьте, устранило ли это ваши проблемы.
Как снять защиту от записи на диске
2] Запустите CHKDSK из командной строки, чтобы найти и устранить проблемы на диске.
Хотя вы видите ошибку при запуске функции CHKDSK, существуют другие команды, которые могут помочь вам найти и устранить проблемы с диском или томом. Вам необходимо запустить параметры CHKDSK командной строки и устранить проблемы с повреждением и т. д.
Чтобы проверить и исправить ошибки на диске, нажмите кнопку «Пуск» и найдите командную строку. Затем нажмите «Запуск от имени администратора» в командной строке в результате.
Затем введитеchkdsk C: /r /xи нажмите Enter.
Замените D на диск, с которым у вас возникли проблемы.
- /рИдентифицирует поврежденные сектора и пытается восстановить информацию.
- /ИксПринудительно отключает том. Также делает недействительными все дескрипторы открытых файлов. Это следует использовать осторожно или избегать в настольных выпусках Windows из-за возможности потери/повреждения данных.
Команда запустится и устранит любые проблемы с диском или томом. Посмотрите, сохраняется ли проблема после выполнения этой команды.
Ошибка «Диск защищен от записи» для съемных дисков
3] Восстановить файлы и отформатировать диск.
Если ни один из вышеперечисленных методов не помог вам решить проблему, вам необходимо восстановить файлы с помощью программного обеспечения для восстановления данных и отформатировать диск. Это единственное решение, которое можно исправить, если все методы не сработают. Если диск не подлежит восстановлению, возможно, вам придется обратиться в сервисный центр этой конкретной марки, чтобы починить его.
Читайте: Лучшее профессиональное программное обеспечение для резервного копирования и восстановления данных для Windows.
Это различные способы, с помощью которых вы можете исправить, что Windows не может запустить проверку диска на этом томе, поскольку это ошибка, защищенная от записи.
Как решить проблему: Windows не может запустить проверку диска на этом томе, поскольку он защищен от записи?
Эта ошибка возникает, когда диск поврежден или защищен от записи. Вам необходимо снять защиту от записи, проверить диск на наличие проблем и исправить их, чтобы продолжить процесс проверки диска. Исправления, которые вы можете реализовать, включают сканирование диска на наличие повреждений, запуск параметров chkdsk для восстановления диска или снятие защиты от записи.
Читать: Альтернативное программное обеспечение CHKDSK для проверки ошибок диска для восстановления и исправления поврежденных секторов на жестком диске.
Как запустить CHKDSK на диске, защищенном от записи?
Вам необходимо снять защиту от записи на этом диске с помощью diskpart или редактора реестра. Это единственный способ запустить CHKDSK на диске, защищенном от записи. Иногда поврежденный диск может также отображать ошибку защиты от записи во время проверки диска.
Связанное чтение:ChkDsk завис на определенном % или зависает на каком-то этапе.