On this page, we collected six fixes for you to get rid of the «Startup repair cannot repair this computer automatically» error on Windows 10/8/7 with step-by-step tutorial guides.
| Workable Solutions | Step-by-step Troubleshooting |
|---|---|
| Fix 1. Remove Peripheral Devices | If you have recently attached a device to your computer, remove the device…Full steps |
| Fix 2. Run Bootrec.exe | Restart your computer and press «F8», then choose «Repair Your Computer»…Full steps |
| Fix 3. Run CHKDSK | Restart your computer, choose «Repair Your Computer» > «Command Prompt»…Full steps |
| More Fixes | Restart your computer. Once it starts, press «F8», choose «Safe Mode with Command Prompt»…Full steps |
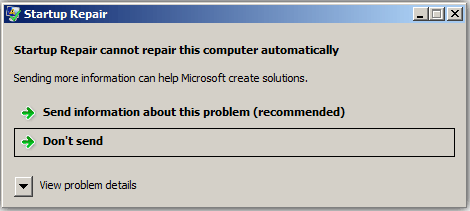
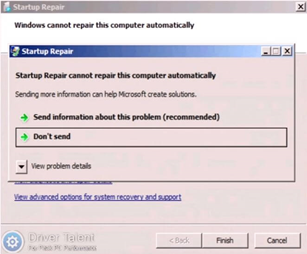
Startup Repair is a built-in Windows tool that can check and replace your computer’s missing or damaged system files. Generally, this tool is applied when your computer cannot boot properly. However, many users have encountered an issue while using this utility: «Startup Repair cannot repair this computer automatically». This is the error message in Windows 7 or Windows Vista. Windows 10’s equivalent is «Automatic Repair couldn’t repair your PC».
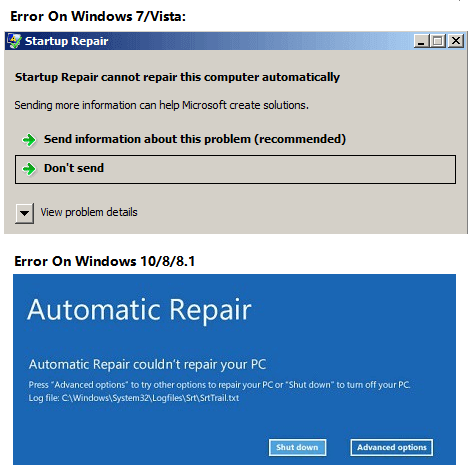
You will see the information below if you click «View problem details» in Windows 7/Vista. (The problem signature might be shown different variables from the ones above on other OS.)
Problem Event Name: StartupRepairOffline
Problem Signature 01: 6.1.7600.16385
Problem Signature 02: 6.1.7600.16385
Problem Signature 03: unknown
Problem Signature 04: 21200442
Problem Signature 05: AutoFailover
Problem Signature 06: 65
Problem Signature 07: CorruptFile
OS Version: 6.1.7600.2.0.0.256.1
Locale ID: 1033
Then why did Startup Repair fail to work? Generally, when you receive the error message, it may indicate:
- There is a problematic device attached to your computer
- The file system of your system disk is damaged
- The MBR (Master Boot Record) of the hard drive is corrupted
- There may be virus attacks, disk write errors or power outages on your disk
6 Fixes for «Startup Repair cannot repair this computer automatically» in Windows 10/8/7
If you cannot specify the cause of why Windows Startup Repair failed, never mind trying the simple fixes first and then, use some Windows 10 boot repair tools.
Method 1. Remove Peripheral Devices
Based on the information given by Microsoft, if you have recently attached a device to your computer, like a camera or portable music player, you can remove the device and restart your computer. Sometimes, Windows cannot repair the computer automatically due to the device being connected.
If this tip doesn’t work, don’t get upset. There are many other ways for you to try.
Method 2. Run Bootrec.exe
Bootrec, also called bootrec.exe utility, is a tool Microsoft provides in the Windows Recovery Environment. Bootrec.exe can fix the Master Boot Record (MBR), Boot Sector, Boot Configuration (BCD), and boot.ini. If the corrupt MBR or BCD caused the problem, the solution is to correct the MBR or BCD record with the help of bootrec. By the way, this method requires a Windows recovery disk. Since you are using it when you perform a startup repair, you can run bootrec.exe following the steps below.
In Windows 7:
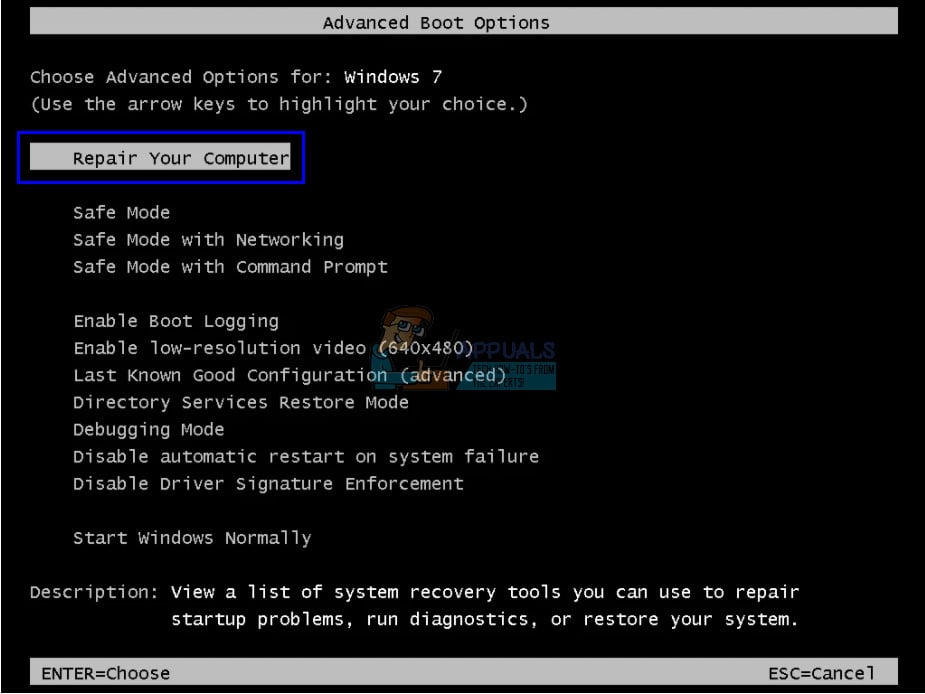
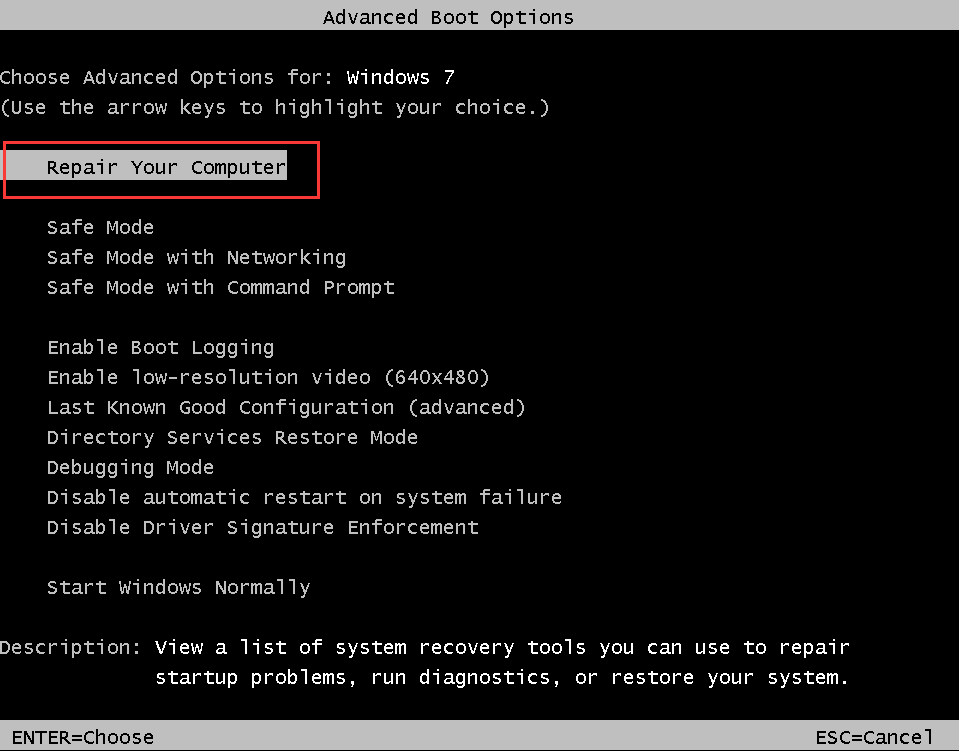
Step 1. Restart your computer and press «F8» once you see the Windows logo.
Step 2. Among the advanced boot options, choose «Repair Your Computer».
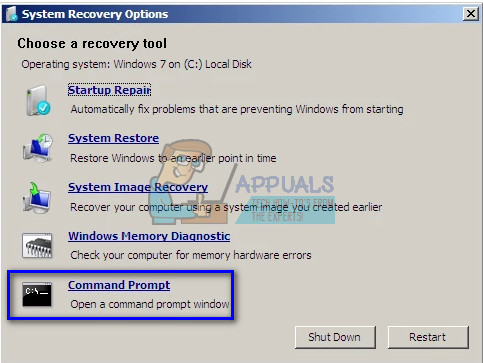
Step 3. In the system recovery options, choose «Command Prompt».
Step 4. Enter the commands below in order:
bootrec /fixmbr
bootrec /fixboot
Method 3. Run CHKDSK
As mentioned, bad sectors and file system errors on your hard drive may be why you receive the error message «Startup Repair cannot repair the computer automatically». Running CHKDSK can check and repair your disk errors, including bad sectors and file system errors.
Step 1. Restart your computer and press «F8» once you see the Windows logo.
Step 2. Among the advanced boot options, choose «Repair Your Computer».
Step 3. In the system recovery options, choose «Command Prompt».
Step 4. Enter the command below: chkdsk C: /f /r
«C» is the drive letter of your Windows installation drive.
Method 4. Run Windows System File Checker Tool
Windows System File Checker Tool can check and repair your computer’s missing or corrupted Windows system files. Besides, using this tool doesn’t need the Windows installation CD. All you need is to boot into the Safe Mode with Command Prompt.
Step 1. Restart your computer. Once it starts, press «F8» in 1-second intervals until you see the Windows logo.
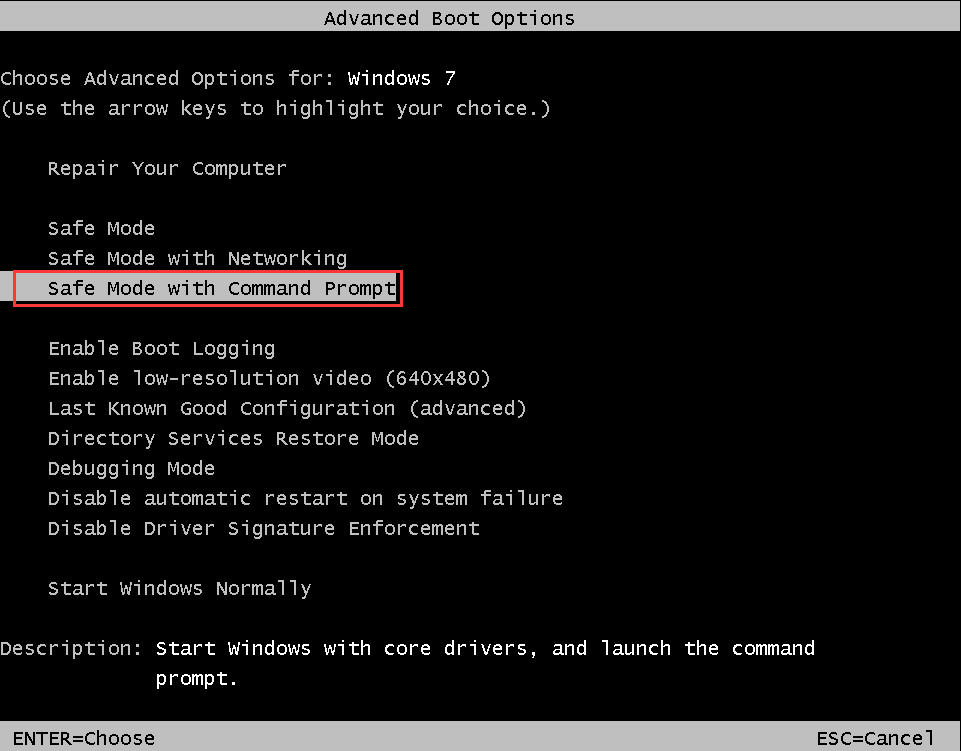
Step 2. Then you will see the menu of «Advanced Boot Options». Under it, choose «Safe Mode with Command Prompt».
Step 3. In Command Prompt, enter the following command: sfc /scannow /offbootdir=d:\ /offwindir=d:\windows
Step 4. Restart your computer.
Method 5. Perform System Restore
If you’ve created a Windows system restore point as a system backup on your Windows 10/8/7 PC, you can fully restore it to its original state, at least to its previous state. System Restore is a feature in Microsoft Windows that allows users to revert their computer’s state (including system files, installed applications, Windows Registry, and system settings) to a previous point. Thus, it can be used to recover from system malfunctions or other problems.
Procedure 1. Restore Important Data from the Dead PC
When you are stuck with the «Startup Repair cannot repair this computer automatically» or ‘»Automatic Repair couldn’t repair your PC» error message on Windows PC, don’t rush to perform System Restore. Performing a system restore will take your PC back to an earlier point, called a system restore point. Restore points are generated when you install a new app, driver, or Windows update and manually create a restore point. Restoring won’t affect your personal files but will remove apps, drivers, and updates installed after the restore point was made. Therefore, we highly recommend you to try powerful data recovery software — EaseUS Data Recovery Wizard with Bootable Media to get your data out of the current ‘dead’ PC:
Notice: This will require a second healthy computer for help.
Procedure 2. Perform a System Restore
Suppose you have enabled the System Restore on your computer and created a system restore point. In that case, you can fix «Startup repair cannot repair this computer automatically» in Windows 10/8/7/Vista by performing a system restore:
For Windows 10/8/8.1 users:
Step 1. Reboot your Windows 10/8 PC into Advanced Startup, and click «Troubleshoot».

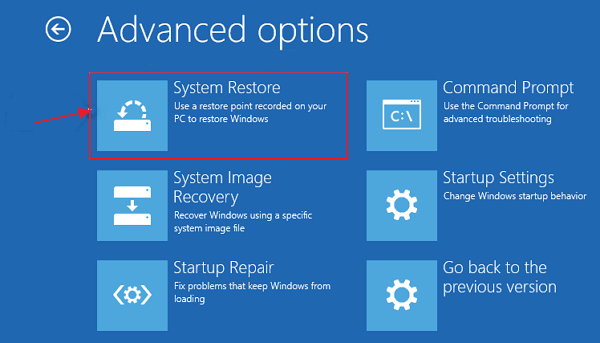
Step 2. Select «Advanced options», and choose «System Restore».
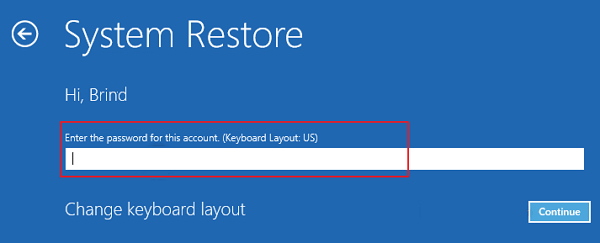
Step 3. Click on the Administrator Account, enter your password, and click «Continue» to move on.
Step 4. Choose your system restore point created previously and follow the on-screen guidelines to complete the process.
For Windows 7/Vista Users:
Step 1. Insert your Windows installation CD or disc.
Step 2. Press any key when the «Press any key to boot from CD or DVD» message appears.
Step 3. Select a language, time, currency, and keyboard or input method, and then click «Next».
Step 4. Click «Repair your computer».
Step 5. Select your Windows installation drive, usually C:\, and click «Next».
Step 6. In the System Recovery Options Dialog Box, click on «System Restore».
Step 7. Follow the System Restore Wizard instruction and choose the appropriate restore point.
Step 8. Click «Finish» to restore the system.
Finally, restart your computer and copy your restored data to your PC. You should be able to use your computer and data again.
Method 6. Repair Startup Error Without System Backup
If you don’t have a system backup, fixing the «Startup Repair couldn’t repair your PC» error will be more complex. You can:
Procedure 1. Restore the Problem PC
You can follow the detailed guidelines above to rescue your data with the help of EaseUS Data Recovery Wizard with Bootable Media. It fully lets you recover data when the PC doesn’t boot or start in Windows 10/8/7/Vista.
Procedure 2. Clean Install/Reinstall Windows OS
When you don’t have a system restore point on your PC, the best way to remove the ‘Startup Repair’ error on Windows 10/8/7, etc., is to install Windows OS cleanly. You can directly turn to Microsoft for online assistance (and Windows 7/Vista users are recommended to try this way). Or you can refer to the article about clean installing Windows 10.
How to Prevent «Startup Repair cannot repair this computer automatically» Error
Restoring your PC to life and rescuing all precious data doesn’t mean that your PC and data are safe now. Virus attack, system failure, system crash, data loss, and other unknown issues may occur anytime. How to prevent these issues from happening? That isn’t easy! Is it possible to protect your System and data securely from these disasters? Sure!
Powerful Windows system backup software — EaseUS Todo Backup can help. It provides System Backup, File Backup, Disk/Partition Backup, System Clone, and other more advanced features to help you fully protect your PC from these issues. It will help you prevent and protect your computer from ‘Startup Repair failure’ errors or similar problems. Making a backup is always the best way to avoid complete data loss.
The Bottom Line
«Startup Repair cannot repair this computer automatically» is a relatively complex issue related to Windows. Although there are solutions to the problem, they may not be easy to apply since these operations are seldom taken during your daily use. If you don’t want to try it, you can send your computer to professionals for manual repair.
Одна из самых распространенных ошибок, с которой многие пользователи сталкиваются при запуске своего компьютера, — это ошибка «Startup repair cannot repair this computer automatically». Эта ошибка может возникнуть по разным причинам, от неполадок в системных файлов до проблем с жестким диском. Хорошая новость в том, что вы можете попробовать исправить эту ошибку самостоятельно, прежде чем обращаться за помощью специалистов. В этой статье мы рассмотрим 6 простых шагов, которые помогут вам решить эту проблему.
Шаг 1: Перезагрузите компьютер
Прежде чем предпринимать какие-либо действия, попробуйте перезагрузить компьютер. В некоторых случаях простое перезапуск может решить проблему. Если после перезагрузки ошибка все еще возникает, переходите к следующему шагу.
Шаг 2: Запустите автоматическое восстановление (Startup Repair)
Windows имеет встроенную функцию автоматического восстановления, которая может попытаться исправить ошибку «Startup repair cannot repair this computer automatically». Чтобы запустить автоматическое восстановление, вам нужно загрузить компьютер с помощью установочного диска Windows и выбрать опцию «Ремонт компьютера». Далее следуйте инструкциям на экране.
Шаг 3: Проверьте жесткий диск на наличие ошибок
Ошибка «Startup repair cannot repair this computer automatically» может быть вызвана поврежденными файлами на жестком диске. Чтобы проверить жесткий диск на наличие ошибок, вы можете воспользоваться встроенной утилитой Windows — CHKDSK. Откройте командную строку от имени администратора и введите команду «chkdsk C: /f». Замените «C» на литеру вашего диска, на котором установлена операционная система. Эта команда проверит диск на наличие ошибок и попытается исправить их.
Шаг 4: Восстановите систему до предыдущей версии
Если у вас была создана точка восстановления системы, вы можете восстановить компьютер до предыдущей версии, когда все работало без проблем. Чтобы сделать это, перейдите в меню «Система и безопасность» в настройках компьютера и выберите опцию «Восстановление системы». Далее следуйте инструкциям на экране.
Шаг 5: Проверьте компьютер на наличие вирусов
Некоторые вирусы или вредоносные программы могут вызывать ошибку «Startup repair cannot repair this computer automatically». Чтобы проверить компьютер на наличие вирусов, воспользуйтесь антивирусной программой, установленной на вашем компьютере. Запустите полное сканирование системы и удалите все обнаруженные угрозы.
Шаг 6: Переустановите операционную систему
Если все предыдущие шаги не помогли решить проблему, последним решением может быть переустановка операционной системы. Обратитесь к руководству по установке Windows, чтобы переустановить операционную систему без потери важных данных.
Надеемся, что эти 6 простых шагов помогут вам исправить ошибку «Startup repair cannot repair this computer automatically» и вернуть ваш компьютер к нормальной работе. Если проблема все еще остается, лучше обратиться за помощью к специалистам.
Содержание
- Перезагрузите компьютер в безопасном режиме
- Проверьте жесткий диск на наличие ошибок
- Восстановите системные файлы с помощью инструмента SFC
- Проверьте и восстановите загрузочные записи
- Переустановите или обновите драйвера
- Воспользуйтесь системным восстановлением или создайте резервную копию и переустановите операционную систему
Перезагрузите компьютер в безопасном режиме
Если ваш компьютер не может быть запущен нормально и вы видите сообщение об ошибке «Startup repair cannot repair this computer automatically» при попытке восстановления системы, попробуйте перезагрузить компьютер в безопасном режиме. Этот режим позволяет загрузить компьютер с основными драйверами и службами, минимизируя возможность конфликта программного обеспечения.
Для перезагрузки в безопасном режиме в Windows 10 вы можете выполнить следующие шаги:
- Нажмите и удерживайте кнопку питания на компьютере до тех пор, пока он не выключится полностью.
- Нажмите на кнопку питания, чтобы включить компьютер снова.
- Как только компьютер начнет загружаться, нажмите и удерживайте клавишу F8 или Shift+F8, пока не появится экран выбора опций загрузки.
- Выберите «Безопасный режим» в списке опций загрузки.
- Дождитесь, пока компьютер полностью загрузится в безопасном режиме.
- После того, как компьютер будет загружен в безопасном режиме, вы можете попытаться исправить ошибку «Startup repair cannot repair this computer automatically», выполнив другие шаги, описанные в статье.
Перезагрузка компьютера в безопасном режиме может помочь вам решить проблему, которая мешает нормальной загрузке операционной системы. Однако, если проблема не решается, возможно, потребуется более глубокое решение или профессиональная помощь. В этом случае рекомендуется обратиться к специалисту компьютерного сервиса или технической поддержке производителя вашего компьютера.
Проверьте жесткий диск на наличие ошибок
Если внезапно возникла ошибка «Startup repair cannot repair this computer automatically», возможно, причина кроется в проблемах с вашим жестким диском. Для проверки наличия ошибок выполните следующие действия:
- Перезагрузите компьютер и нажмите клавишу F8 перед загрузкой Windows.
- В появившемся меню выберите пункт «Безопасный режим с командной строкой».
- Когда откроется командная строка, введите команду chkdsk C: /f и нажмите Enter.
- Дождитесь, пока процесс проверки жесткого диска завершится.
- Если на вашем компьютере есть другие разделы, на которых установлена операционная система, повторите те же самые действия для каждого раздела, заменяя C на соответствующую букву диска.
- После завершения проверки перезагрузите компьютер и проверьте, исправилась ли ошибка «Startup repair cannot repair this computer automatically».
Если после выполнения этих шагов ошибка все еще присутствует, возможно, причина заключается в других проблемах системы, и вам следует обратиться за помощью к специалисту.
Восстановите системные файлы с помощью инструмента SFC
Инструмент SFC (System File Checker) поможет восстановить поврежденные и отсутствующие системные файлы на вашем компьютере. Чтобы воспользоваться этим инструментом, выполните следующие шаги:
- Откройте командную строку от имени администратора. Щелкните правой кнопкой мыши по значку «Пуск» и выберите пункт «Командная строка (администратор)».
- Введите команду «sfc /scannow» и нажмите клавишу Enter. Это запустит процесс сканирования системных файлов и автоматического восстановления.
- Дождитесь завершения сканирования и восстановления файлов. Процесс может занять несколько минут, поэтому будьте терпеливыми.
- Перезагрузите компьютер. После восстановления системных файлов может потребоваться перезапуск компьютера для полного применения изменений.
- Проверьте, решена ли проблема. После перезагрузки компьютера проверьте, исправилась ли ошибка «Startup repair cannot repair this computer automatically».
- Если проблема не решена, повторите процесс. Если ошибка все еще возникает, повторите шаги снова или обратитесь за помощью к специалисту.
Использование инструмента SFC может помочь восстановить поврежденные или отсутствующие системные файлы и устранить ошибку «Startup repair cannot repair this computer automatically». Помните, что данный инструмент является одним из множества доступных методов восстановления системы, и если он не помогает, то может потребоваться более глубокое вмешательство или обращение к специалисту.
Проверьте и восстановите загрузочные записи
Если компьютер не может самостоятельно исправить ошибку «Startup repair cannot repair this computer automatically», проблема может быть связана с поврежденными или неправильно настроенными загрузочными записями на жестком диске. В этом случае следующие шаги могут помочь вам проверить и восстановить загрузочные записи:
1. Запустите компьютер с помощью установочного диска или флеш-накопителя операционной системы.
2. На первом экране выберите язык и настройки, а затем нажмите кнопку «Далее».
3. В следующем окне нажмите на ссылку «Восстановление системы».
4. В разделе «Действия» выберите «Командная строка».
5. В командной строке введите команду «bootrec /fixboot» и нажмите клавишу Enter. Данная команда восстанавливает загрузочную запись на системном разделе.
6. После завершения выполнения команды, введите команду «bootrec /fixmbr» и нажмите клавишу Enter. Эта команда восстанавливает мастер загрузки в основную загрузочную запись.
После завершения этих шагов перезагрузите компьютер и проверьте, исправилась ли ошибка. Если проблема все еще не решена, возможно, вам потребуется обратиться за помощью к специалисту или обратиться к производителю компьютера.
Переустановите или обновите драйвера
Если проблема с запуском компьютера не решается при помощи автоматического восстановления системы, вам может потребоваться переустановить или обновить драйвера вашего устройства.
1. Перезагрузите компьютер и зайдите в режим безопасного режима. Для этого нажмите и удерживайте кнопку «Shift» при загрузке компьютера, затем выберите «Отладка в безопасном режиме» или «Безопасный режим».
2. Перейдите в «Диспетчер устройств». Чтобы это сделать, нажмите правой кнопкой мыши по кнопке «Пуск» и выберите «Диспетчер устройств».
3. В диспетчере устройств найдите устройство, вызывающее проблемы. Оно может быть отмечено значком восклицательного знака или быть помеченным как «Неизвестное устройство».
4. Щелкните правой кнопкой мыши по устройству и выберите «Обновить драйвер».
5. Выберите «Автоматический поиск обновленного ПО драйвера». Windows попытается найти и установить последнюю версию драйвера для вашего устройства. Если Windows не может найти новый драйвер, вы можете попробовать найти его на официальном веб-сайте производителя устройства и установить его вручную.
6. После установки нового драйвера перезагрузите компьютер и проверьте, исправилась ли проблема с запуском.
Обновление или переустановка драйверов может помочь решить проблему с неработающим компьютером и вернуть его в рабочее состояние.
Воспользуйтесь системным восстановлением или создайте резервную копию и переустановите операционную систему
Если ошибка «Startup repair cannot repair this computer automatically» не удается исправить автоматически, вам может потребоваться воспользоваться системным восстановлением или создать резервную копию и переустановить операционную систему. Эти методы помогут вам восстановить работоспособность компьютера и исправить любые повреждения файлов системы.
Системное восстановление:
1. Нажмите кнопку «Пуск» и выберите «Панель управления».
2. В разделе «Система и безопасность» выберите «Восстановление системы».
3. Нажмите «Открыть системное восстановление» и следуйте инструкциям мастера восстановления.
4. Выберите точку восстановления, которая была создана ранее и может помочь исправить ошибку.
5. Подтвердите выбор точки восстановления и дождитесь завершения процесса восстановления.
6. После завершения компьютер будет перезагружен и, возможно, ошибка «Startup repair cannot repair this computer automatically» исчезнет.
Создание резервной копии и переустановка операционной системы:
1. Создайте резервную копию всех важных файлов и данных. Вы можете использовать внешний жесткий диск или облачное хранилище.
2. Загрузите установочный диск или флеш-накопитель с операционной системой.
3. Перезагрузите компьютер и выберите загрузку с установочного носителя.
4. Следуйте инструкциям мастера установки операционной системы.
5. Выберите опцию установки «Чистая установка», чтобы удалить старую версию операционной системы и установить новую.
6. Дождитесь завершения процесса установки и восстановления файлов.
7. После завершения компьютер будет перезагружен и, вероятно, ошибка «Startup repair cannot repair this computer automatically» больше не будет.
Выберите подходящий метод восстановления в зависимости от ваших потребностей и возможностей. Если вы не уверены в своих навыках, рекомендуется обратиться за помощью к профессионалам или специалистам технической поддержки.
The error ‘Startup repair cannot repair this computer automatically’ occurs when Windows is unable to fix the computer for misconfigurations present and fails to boot it in a normal state. There are several reasons this error might pop up; your hard drive might be damaged, there may be some bad sectors, you may have two hard drives with an operating system present in both of them etc.
There are several solutions to address this problem. Sometimes they work and sometimes they don’t. In the worst case scenario, you have to reset your Windows to factory settings which ‘may’ cause loss of your files and folders. We have listed the solutions in the order of increasing technicality. Start with the first one and work your way down accordingly.
Note: Before you move on to carrying out all the solutions listed below, make sure that you have not attached two hard drives onto the same computer where both contain their version of operating systems. If you have, try prioritizing the boot to the correct drive. If this doesn’t work, remove on the drive physically from the computer and try booting from the other one.
Solution 1: Using Bootrec (bootrec.exe)
Bootrec is tool provided by Microsoft in Windows recovery environment (also called Windows RE). When your computer fails to boot successfully, Windows automatically starts in RE. This environment has several tools that can potentially fix your computer such as Command Prompt, Startup Repair etc. There is also a utility ‘bootrec.exe’ which is used in connection with:
- Boot Sector
- Boot Configuration Data (BCD)
- Master Boot Record (MBR)
You are already using the RE when you try to repair your startup. We will try using Bootrec using the command prompt and see if this fixes the problem for us.
- Restart your computer. When your computer loads up (when Windows 7 logo appears), press F8.
- Now select ‘Repair your computer’ from the list of options available.
- A new small window will pop up. Select ‘command prompt’ from the list of options available.
- Now execute the following commands in the window and wait for each one to complete:
bootrec /fixmbr
bootrec /fixboot
Each command should give you a confirmation that the operation completed successfully. Now reboot your system and hopefully, the problem will be solved.
Note: You can also use the command ‘bootrec /RebuildBcd’.
Solution 2: Using CHKDSK
As explained earlier, this error usually occurs when your hard drive is not working properly or has bad sectors present. We can use the CHKDSK utility using the command prompt and see if there are any present. CHKDSK is a system tool present in Windows which verifies the integrity of a volume and tries to fix logical system errors. It also identifies bad sectors present on the hard drive and marks them so there will be no error when the computer uses the drive.
- Restart your computer. When your computer loads up (when Windows 7 logo appears), press F8.
- Now select ‘Repair your computer’ from the list of options available.
- A new small window will pop up. Select ‘command prompt’ from the list of options available.
- Now execute the following command in the command prompt window:
chkdsk /r
- Restart your system. Upon the restart, the check disk utility will scan your hard drive for any discrepancies and fix them accordingly.
If you are having a problem when running CHKDSK, you can execute the following commands at the command prompt prior to running the CHKDSK command:
diskpart
select disk X (X=0,1,2)
attrib disk
attrib disk clear
readonly
diskpart
list vol
sel vol X (X=0,1,2)
attrib vol
attrib vol clear readonly
After executing these commands, run CHKDSK and see if this solves the problem at hand.
navigate your way down accordingly.
Solution 3: Clean Booting your Computer
If both the above solutions don’t work out, you can load your computer in Safe Mode and try clean booting.
This boot allows your PC to turn on with a minimal set of drivers and programs. Only the essential ones are enabled while all the other services are disabled. If your computer starts in this mode, you should backup all your important data immediately. After backing up your important data, you can either install a new version of Windows or try turning the processes back on and see what the problem was.
- Press Windows + R to launch the Run application. Type “msconfig” in the dialogue box and press Enter.
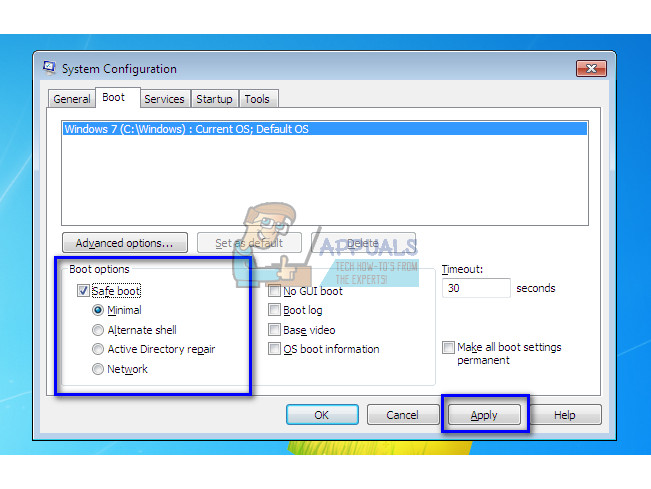
- Select the tab ‘Boot’, check the option ‘Safe boot’, and set the option as ‘Minimal’. Press Apply to save changes.
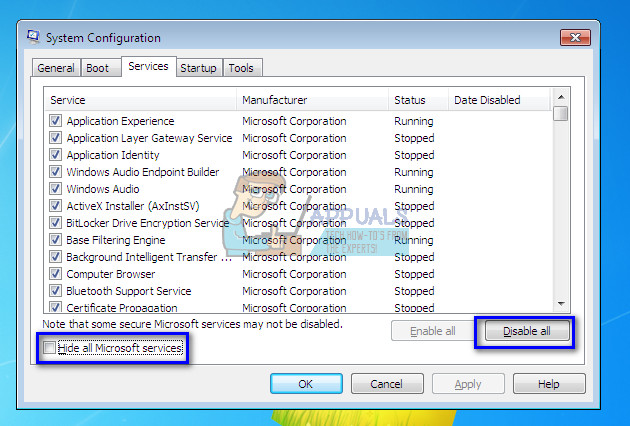
- Navigate to the Services tab present at the top of the screen. Check the line which says “Hide all Microsoft services”. Once you click this, all Microsoft related services will be disabled leaving behind all the third-party services (you can also disable all Microsoft related processes too and check more extensively if there are no third-party services causing the problem).
- Now click the “Disable all” button present at the near bottom at the left side of the window. All the third-party services will now be disabled.
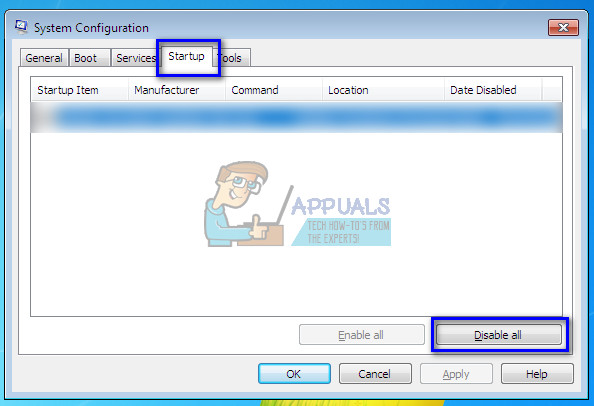
- Click Apply to save changes. Now select the ‘Startup’ tab. Select each service one by one and click “Disable” at the bottom right side of the window.
- After saving all changes, try booting the computer in normal mode and see if this does the trick. You can easily select ‘Start Windows Normally’ using the boot options preset when the operating system boots up.
Solution 4: Changing SATA Mode
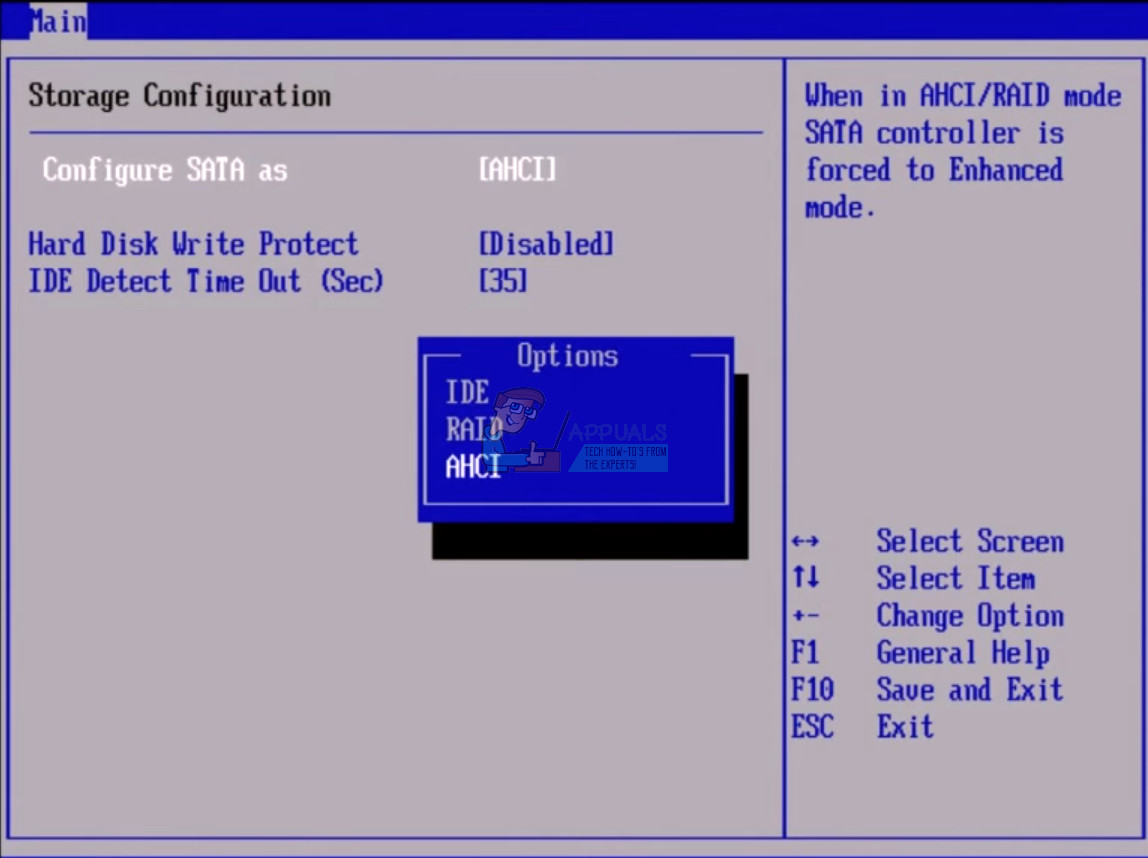
SATA modes determine how your hard drive communicates with your computer. You can set your SATA hard drive to function in one of the three modes (AHCI, IDE, and RAID). The IDE mode is the simplest mode available and in it, the hard drive is set to run as an IDE or Parallel ATA. Advanced Host Controller Interface (AHCI) mode enables the use of advanced features on SATA drives such as Native Command Queuing (NCQ), or hot swapping.
We can try changing the SATA mode of your hard drive and see if this makes any difference.
- Enter the BIOS of your computer by restarting it and immediately pressing DEL or F2. Once in BIOS, search for the option of ‘Storage Configuration’. It will most probably on the Main
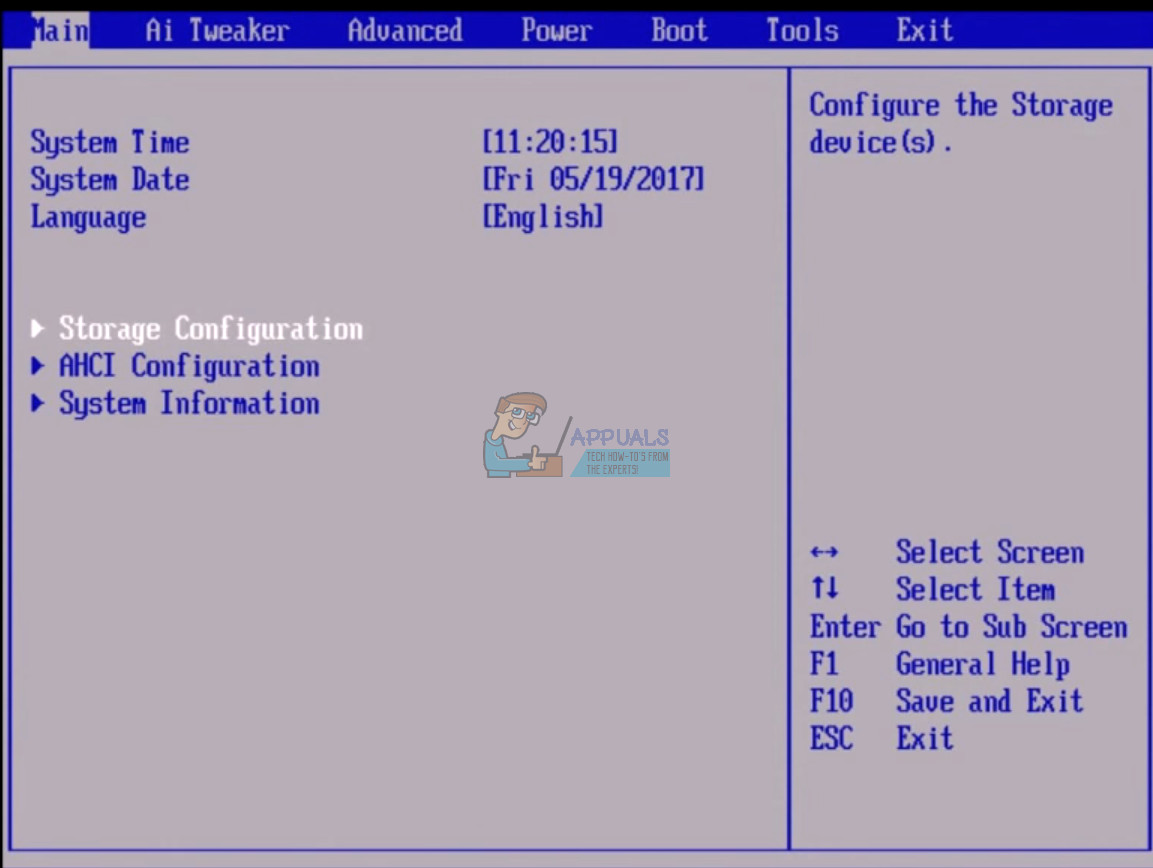
- If the mode is set to AHCI, then change it to IDE. If it is set to IDE, then change it to AHCI.
- You can also change the setting of the controller by navigating to ‘Advanced’ and then ‘Onboard Devices Configuration’.
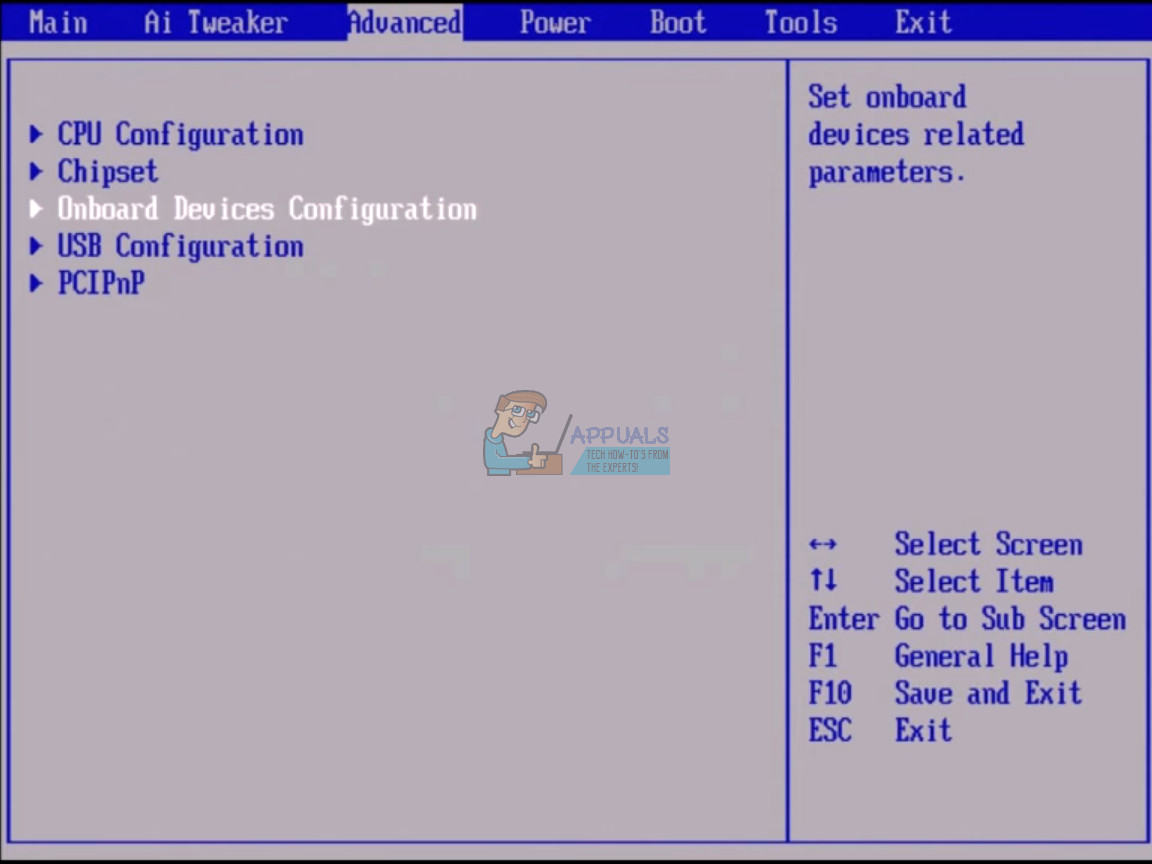
- Now look for the mode under your controller. If the mode is set to AHCI, then change it to IDE. If it is set to IDE, then change it to AHCI.

If Windows still doesn’t boot as required, you can perform solution 1 and 2 again. Make sure that you perform the CHKDSK operation either on all the drives or on the drive where your boot files are stored.
Solution 5: Backing up your Data
Before we go on to test the hard drive, you should retrieve and backup your data by following the steps mentioned below. For this, you might need a working USB port and a USB or an External Storage device. We will use the command prompt which we opened earlier on in the RE.
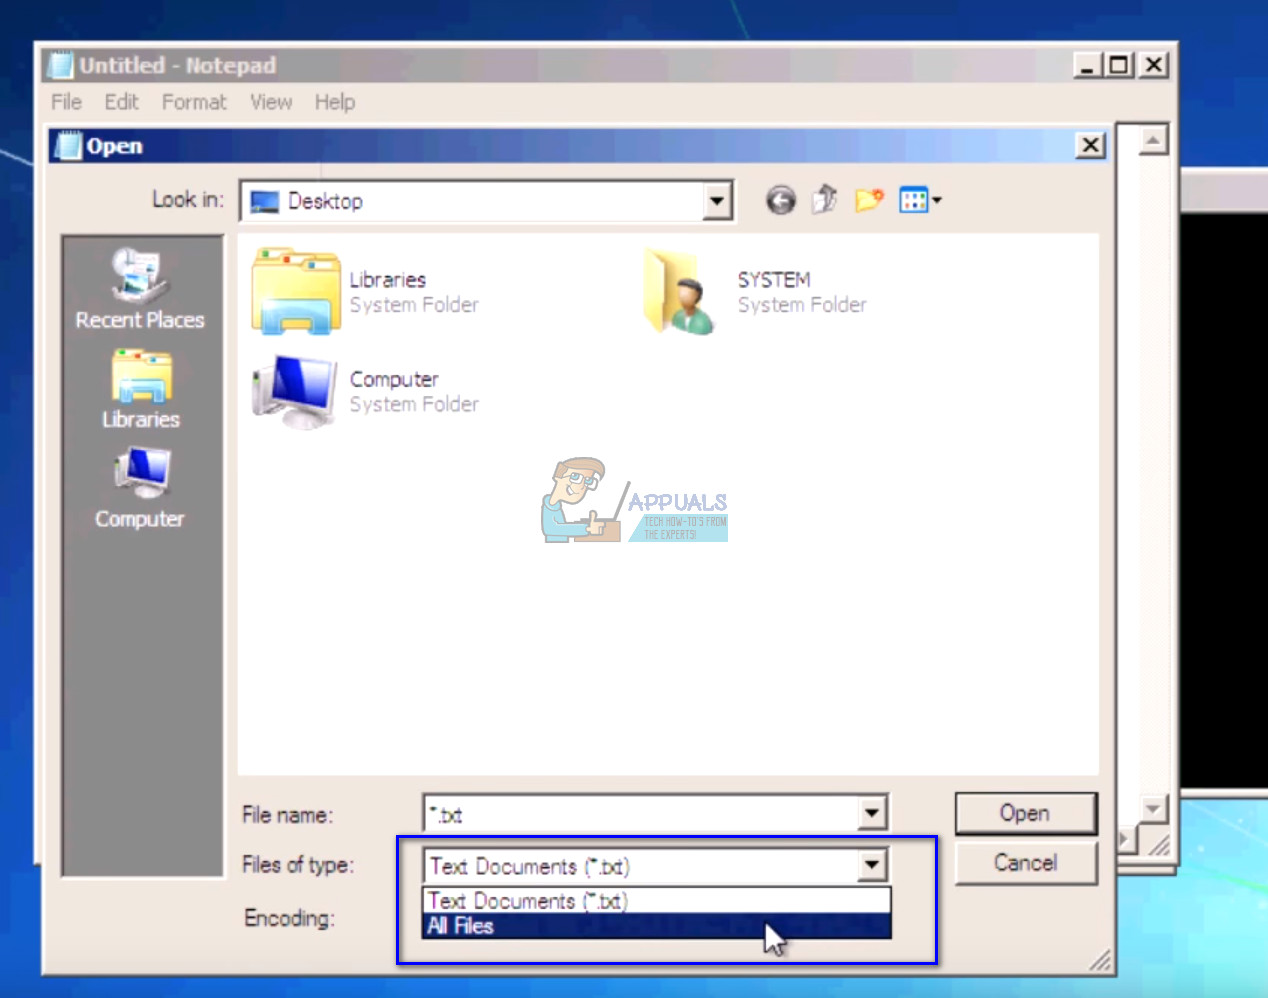
- Open the command prompt in RE as mentioned in the article earlier. Once at the command prompt, execute the instruction ‘notepad’. This will launch the normal notepad application on your computer in RE environment.
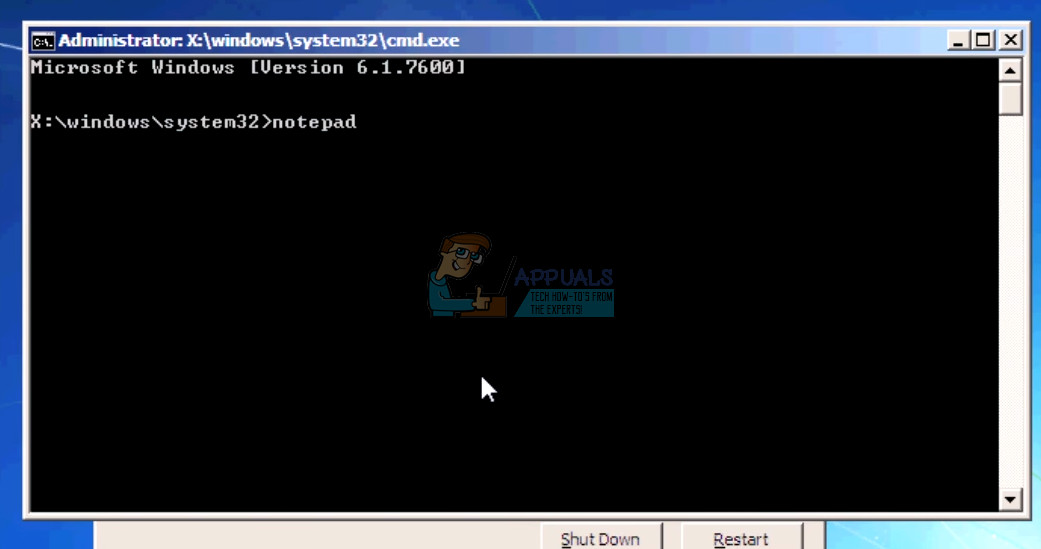
- Press File > Open in the notepad. Now select ‘All Files’ from the option “Files of type”. You will now be able to see all the files on your computer using this explorer.
- Navigate to the data you want to back up. Right-click on it and select ‘Copy’.
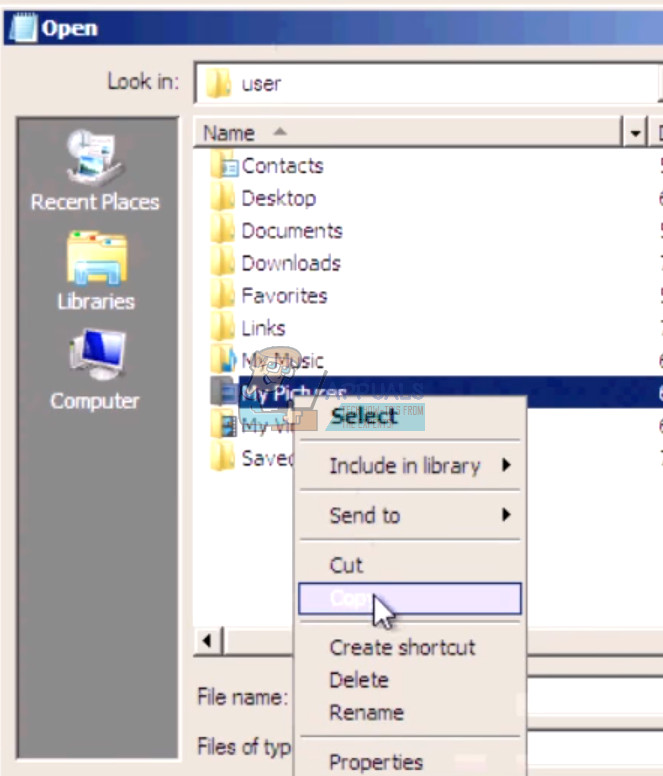
- Now navigate to My Computer again, locate the removable hard drive and paste all the contents in it. Repeat the steps until you have successfully backed up all your important data in the external hard drive.
Solution 6: Checking your Hard Drive Physically
If all the above methods fail, you should check your hard drive for any physical errors by plugging it into another computer. Carefully remove the hard drive, plug it into another computer and try running CHKDSK in it. You can also back up your data using this method.
Note: When you plug the hard drive in the new computer, make sure that the boot priority is set to that computer’s hard drive. Otherwise, you will be experiencing the same problem on that computer too.
If after following all the solutions, the computer still doesn’t fix the hard drive, there is no choice but to plug it back to your computer and install a new version of Windows from scratch. Make sure that you back up your data before proceeding.

Kevin Arrows
Kevin Arrows is a highly experienced and knowledgeable technology specialist with over a decade of industry experience. He holds a Microsoft Certified Technology Specialist (MCTS) certification and has a deep passion for staying up-to-date on the latest tech developments. Kevin has written extensively on a wide range of tech-related topics, showcasing his expertise and knowledge in areas such as software development, cybersecurity, and cloud computing. His contributions to the tech field have been widely recognized and respected by his peers, and he is highly regarded for his ability to explain complex technical concepts in a clear and concise manner.
Startup Repair is used to fix the issue when your computer won’t boot properly. However, you may encounter the error «Startup Repair cannot repair this computer automatically» while using it. Given that situation, you can refer to this post offered by MiniTool Solution. It will show you multiple methods to fix this error. Hope this post can be helpful.
“Startup Repair Cannot Repair This Computer Automatically”
If Windows can’t help you fix a misconfigured computer and it cannot start the computer in the normal state, an error “Startup Repair cannot repair this computer automatically” will occur. Windows 7 Startup Repair cannot repair this computer automatically is the same as the error – Automatic Repair couldn’t repair your PC in Windows 10/8/8.1.
If you click View problem details, it will show more details but there is no solution suggested. Only computer specific variables will be displayed:
Problem Event Name: StartupRepairOffline
Problem Signature 01: 6.1.7600.16385
Problem Signature 02: 6.1.7600.16385
Problem Signature 03: unknown
Problem Signature 04: 21200442
Problem Signature 05: AutoFailover
Problem Signature 06: 65
Problem Signature 07: CorruptFile
OS Version: 6.1.7600.2.0.0.256.1
Locale ID: 1033
On different operating systems, the problem signature may display variables that are different from the variables above.
Then why does Startup Repair fail to work? You need to know that there are some reasons for this error: there might be a problematic device attached to your computer, you have the damaged file system of your system disk, the MBR of the hard drive is corrupted, etc.
Luckily, you can fix it.
Fixes for “Startup Repair Cannot Repair This Computer Automatically”
The following part will show you how to fix “Startup Repair Cannot Repair This Computer Automatically” in detail. If you are interested in this topic, please read on.
Method 1: Remove Peripheral Devices
Sometimes, Startup Repair fails because of the connected device. According to Microsoft, you can try to remove the device and restart the computer to fix this issue, if you recently attached a device to your computer, such as a camera or portable music player.
If this method doesn’t work, there are many other ways given below for you to try.
Method 2: Run Bootrec.exe
Bootrec is also known as the bootrec.exe utility. It is a tool offered by Microsoft in the Windows Recovery Environment. Bootrec.exe can help you to repair errors of MBR, BCD, Boot Sector, and boot.ini.
If a corrupted MBR or BCD is causing the problem, you can try correcting the MBR or BCD record with the help of bootrec to fix the problem. Here, you can follow the instructions given below to run bootrec.exe.
Step 1: Restart your computer and hold F8 until the Advanced Boot Options window appears.
Step 2: Select Repair Your Computer among the available boot options.
Step 3: A new small window will pop up. Now, select Command Prompt to continue.
Step 4: Enter the following commands in order and press Enter after each to run these commands:
bootrec /fixmbr
bootrec /fixboot
Step 5: After the operation is completed successfully, reboot your system.
Right now, you can check if “Startup Repair cannot repair this computer automatically” is solved at the startup.
Method 3: Run CHKDSK
Bad sectors and file system errors can also be reasons why Startup Repair cannot repair. Thus, you can try to run CHKDSK to fix this error.
CHKDSK is a system tool in Windows that can verify the integrity of a volume and fix logical system errors. It can also identify bad sectors that exist on the hard disk and mark them so that the computer uses the drive without the errors.
How to run CHKDSK in Windows? Here are the steps on how to do that.
Step 1: Open Command Prompt following the instructions mentioned above.
Step 2: Type this command: chkdsk C: /f /r in the command prompt window and press Enter to run it.
Tip: “C” stands for the drive letter of your Windows installation drive.
Step 3: Restart your system. CHKDSK will scan your hard drive for any issues and fix them accordingly.
After that, “Startup Repair cannot repair this computer automatically” should be solved.
Method 4: Run Windows SFC Tool in Safe Mode
SFC (System File Checker) is a built-in tool provided by Windows. It can help check and repair the corrupted or missing system files. In addition, you don’t need the Windows installation CD while using this tool. What you need to do is to boot your computer into the Safe Mode with Command Prompt. Here is how to do that.
Step 1: Restart your computer and hold F8 until the Advanced Boot Options window appears.
Step 2: Choose Safe Mode with Command Prompt among the available advanced boot options.
Step 3: In the Command Prompt window, type this command: sfc /scannow and press Enter to execute it.
Step 4: After successfully running the command, restart your computer.
After that, “Startup Repair cannot repair this computer automatically” should be solved.
Method 5: Clean Boot Your Computer
If the solutions mentioned above don’t work out, you can load your computer in Safe Mode and try to clean boot your computer. In this way, you can open your PC with a minimal set of drivers and programs, enabling only essential services and disabling all others.
Here are the steps on how to clean boot your computer.
Step 1: Press the Win key + R key at the same time to open the Run dialog box. Then, type msconfig in the dialogue box and press Enter to open System Configuration.
Step 2: When the new window pops up, switch to the Boot tab. Navigate to Boot options, check the Safe boot option and set the option as Minimal. After that, click Apply to save changes.

Step 3: Then, switch to the Services tab. To hide all Microsoft related services leaving behind all the third-party services, check Hide all Microsoft services in the lowerleft corner. To disable all the third-party services, click the Disable all button. Click Apply to save changes.

Step 4: Now, switch to the Startup tab. Select all of the present services and click the Disable all button present in the lower right corner of the window. Click Apply to save changes.

Step 5: After saving all changes, try booting the computer in the normal mode.
After that, “Startup Repair cannot repair this computer automatically” should be solved.
Tip: If you want to clean boot Windows 10, you can refer to this related article: How to Clean Boot Windows 10 and Why You Need to Do So?
Method 6: Perform a System Restore
If you’ve created a Windows system restore point before this problem happens on your computer, you have the chance to revert your PC to its original normal state by performing a system restore. Here is how to do that.
Step 1: Click here to download and create Windows 7 installation disc.
Step 2: Connect it to your computer and boot from it.
Step 3: Select the proper language, time and keyboard input.
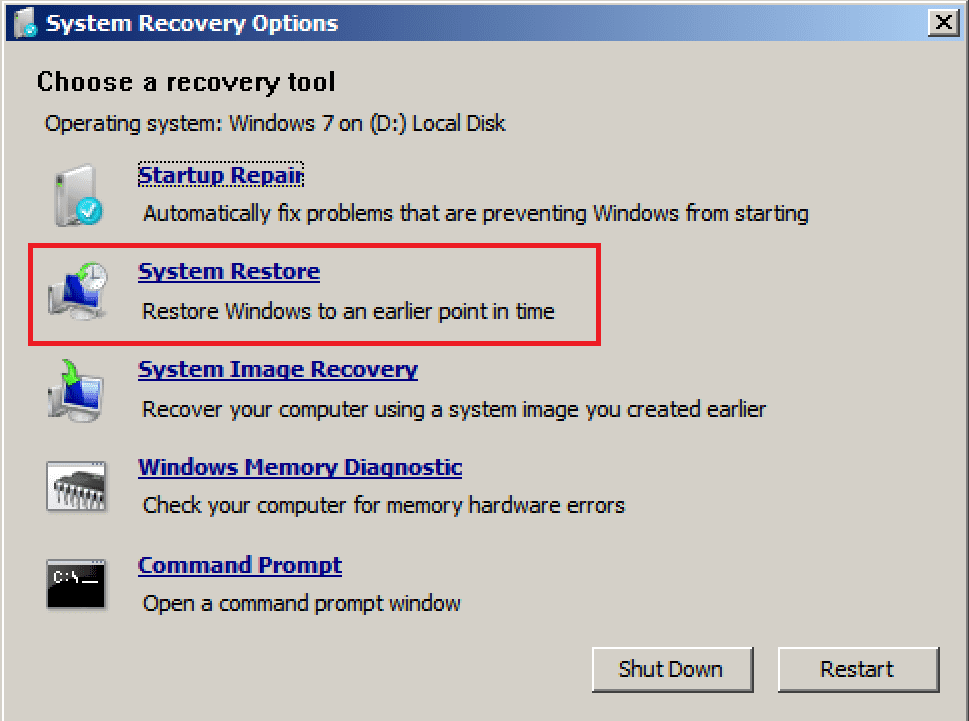
Step 4: Choose Repair your computer.
Step 5: Now, all of the available system recovery options in Windows 7 will be listed. Choose System Restore, follow the System Restore Wizard instructions shown on the screen and choose an appropriate restore point.
Step 6: Click Finish to restore the system.
After the operation is complete, you should be able to use your computer normally and “Startup Repair cannot repair this computer automatically” should not appear again.
I recently received an error message saying “Startup Repair cannot repair this computer automatically”. After reading this post, I have successfully fixed this error.Click to Tweet
Top Recommendation: Create the System Image to Safeguard Your PC
After trying the methods mentioned above, you should manage to fix the “Startup Repair cannot repair this computer automatically” issue on your computer.
However, some system issues will still occur on your computer in the future, which could make you frustrated. System image recovery could be a great solution provided that a system image was created ahead of time.
With the system image, you can restore your PC to the previous normal state after the problem happens on your computer. Therefore, how do you create a system image? A piece of the professional backup software – MiniTool ShadowMaker is your best assistant.
It is compatible with Windows 7/8/10. With its various powerful features, you are allowed to back up the operating system, files and folders, disks, partitions and so on.
To create a system image, just get MiniTool ShadowMaker Trial by clicking on the following button to have a try or purchase its Pro Edition to use it permanently.
MiniTool ShadowMaker TrialClick to Download100%Clean & Safe
Follow the instructions below to learn how to back up your system with MiniTool ShadowMaker.
Step 1: Select the Backup Mode
1.Install MiniTool ShadowMaker and launch it.
2.Then, click Keep Trial to keep using the Trial Edition.
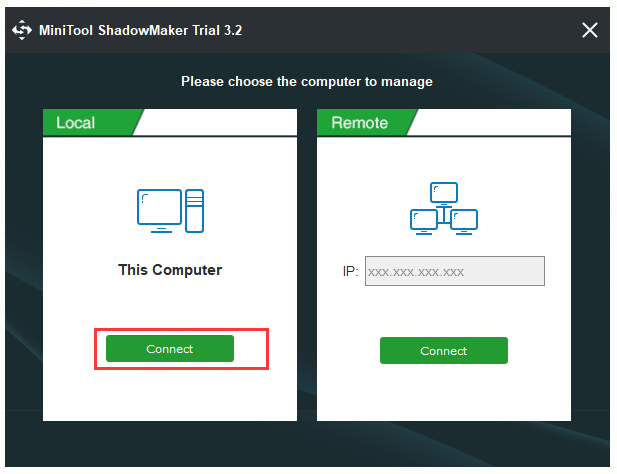
3.To manage your local computer, click the Connect button in This Computer.
Step 2: Choose Your Backup Source
MiniTool ShadowMaker is designed to back up the operating system by default. The system reserved partition and C drive are already selected, so just move to choose a destination path to save your system image.
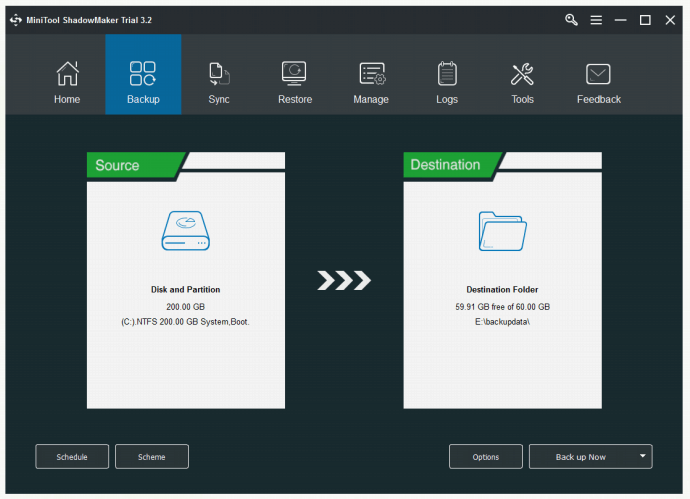
Step 3: Choose a Destination Path
1.Click the Destination tab in the Backup page.
2.Choose a suitable destination path and then click OK to continue.

Step 4: Start to Perform the Backup Operation
1.Right now, you can choose to click Back up Now to create a backup image right now or click Back up Later to delay this process.
2.Just click Yes to confirm your operation when a confirmation window pops up.
After you finish all the steps given above, you should have created your system image successfully now.
In addition to the fact that some system issues can appear on your computer, there is also the possibility that you will lose data when you perform some troubleshooting fixes or because of other errors. To protect your data, you can also use MiniTool ShadowMaker to back up your data in advance.
MiniTool ShadowMaker TrialClick to Download100%Clean & Safe
This post introduces how to make a backup of the system with MiniTool ShadowMaker. I successfully create a system image with it. It is a really powerful backup program.Click to Tweet
Conclusion
“Startup Repair cannot repair this computer automatically” is a relatively complex issue related to Windows. After reading this post, you should have solved this error and now you can use your computer normally. In addition, this post also shows you a great backup program – MiniTool ShadowMaker. To safeguard your computer and data, you will need it to create a backup.
If you encounter any problems when you are using MiniTool ShadowMaker, feel free to contact us by sending an email to [email protected].
Startup Repair Cannot Repair This Computer Automatically FAQ
What is Startup Repair on my computer?
Startup Repair is a recovery tool in the System Recovery Options menu. You can use it to fix certain system problems that might prevent a successful Windows 7 boot. It is designed to fix only certain problems such as missing or damaged system files that are used to load the operating system.
What causes a computer not to boot up?
- Bad electrical connection.
- Power supply failure.
- Operating system failure.
- Hardware failure.
How do you troubleshoot a computer?
- Run a thorough virus scan.
- Update your software.
- Cut down on the bloat.
- Test your Wi-Fi connection.
- Reinstall the operating system.
What is error recovery?
- Error recovery is a process of taking action on an error in order to reduce its negative impact.
- This phase conducts the system to an error-free state. An incorrect state can cause a new system failure unless the error is removed.
- The ability to salvage the remaining data after a read error in the decoding process.
Stellar Data Recovery Software for Windows
Powerful Windows Data Recovery Software — Rated 4.5 stars by TechRadar
Contents
- Method 1: Run chkdsk
- Method 2: Run Bootrec.exe
- Method 3: Use Windows Systems File Checker Tool
- Method 4: Recover and Restore
- Concluding Thoughts
Summary: This blog explores the different methods you can use to resolve the error “Startup Repair cannot repair this computer automatically.” You can also try an efficient data recovery software like Stellar Data Recovery Professional to restore any data lost due to this issue.

Windows users generally use the “Startup Repair” functionality of Windows when their computer fails to boot properly. However, while using the functionality, users might encounter an error message “Startup Repair cannot repair this computer automatically.” The error is displayed on Windows 7 and other old generation of Windows OS. In Windows 10 systems, the error is shown as “Automatic Repair couldn’t repair your PC.”
Your hard drive might get damaged due to disk write errors, virus attacks, power outages, etc. As a result, the drive may not start up at one go, and you may need to use the Startup Repair functionality. However, the system might return the error “Automatic Repair couldn’t repair your PC/Startup Repair cannot repair this computer automatically.”
Let us look at various methods to resolve this error.
Method 1: Run chkdsk
The error might occur due to bad sectors on your hard drive. Running chkdsk might repair the disk error. The steps are listed below:
1. Restart your PC and press F8 when the Windows logo appears.
2. The Advanced Boot Options window will appear. Here, select Repair your Computer.
3. Click Command prompt from the available options.
4. Next, enter the below command:
chkdsk C: /f /r
Method 2: Run Bootrec.exe
Bootrec is a tool provided by Microsoft, designed to fix boot issues on your Windows system. Follow the below steps to use bootrec.exe utility:
1. Restart your PC and press F8 when the Windows logo appears.
2. The Advanced Boot Options window will appear. Here, select Repair your Computer.
3. Click Command prompt from the available options.
4. Next, enter the below command:
bootrec /fixmbr
bootrec /fixboot
Method 3: Use Windows Systems File Checker Tool
This tool is designed to repair corrupted/damaged Windows system files. Please find the steps to use File checker tool below:
1. Restart your PC and press F8 when the Windows logo appears.
2. The Advanced Boot Options windows will appear. Here, select Safe Mode with Command Prompt.
3. In the command prompt, enter:
sfc /scannow /offbootdir=d:\ /offwindir=d:\windows
4. Restart your PC.
Method 4: Recover and Restore
If the above-listed steps don’t work, then it is recommended to restore your PC to an earlier time. This is known as System Restore where your PC reverts to a previous time period. This means that you would lose all data and applications created and downloaded after that period.
This is why we recommend to recover your data first with an efficient data recovery software such as Stellar Data Recovery Professional, which can recover data from any loss scenario.
As your PC is unable to boot, for restoring data, you would need to use a bootable data recovery media such as a USB stick. Please note that the USB storage must be at least 1GB.
Read this article for a step-by-step method to recover data from an unbootable PC or watch the video tutorial below
Concluding Thoughts
To fix the error message “Startup Repair cannot repair this computer automatically”, you can apply the fixes as described in the above post. If the fixes don’t work, then it’s better to restore the computer to an earlier time. Before that, you must restore your valuable data with a professional data recovery software like Stellar Data Recovery Professional. This way, your data remains intact. Data recovery software is an indispensable tool as it safeguards your data against system errors (like the one described above), virus attacks, hardware crashes, etc.
About The Author

Subhjeet Vimal
Subhjeet Vimal is a Senior Content Writer at Stellar® and a Hubspot Certified Content Marketer. He likes to keep himself curious and updated with the developments in the Tech world. He writes about Data Erasure, Data Recovery and other DIY Technologies.