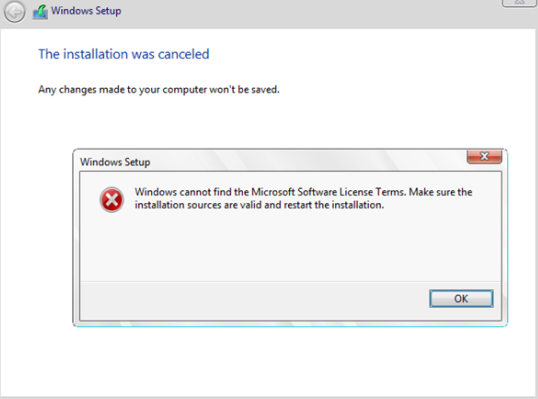
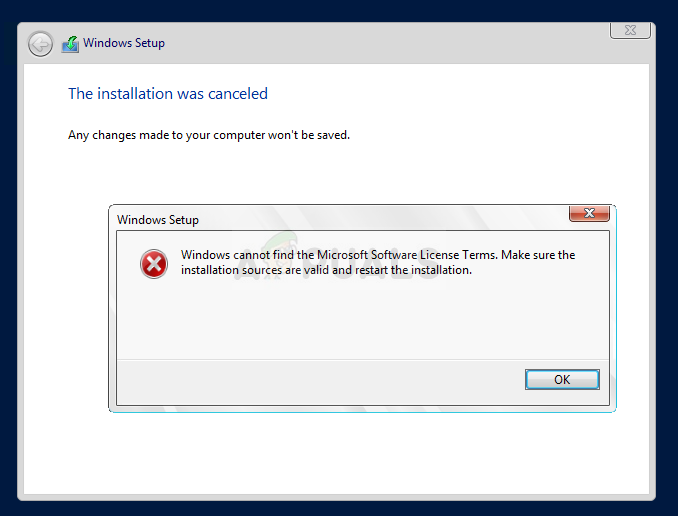
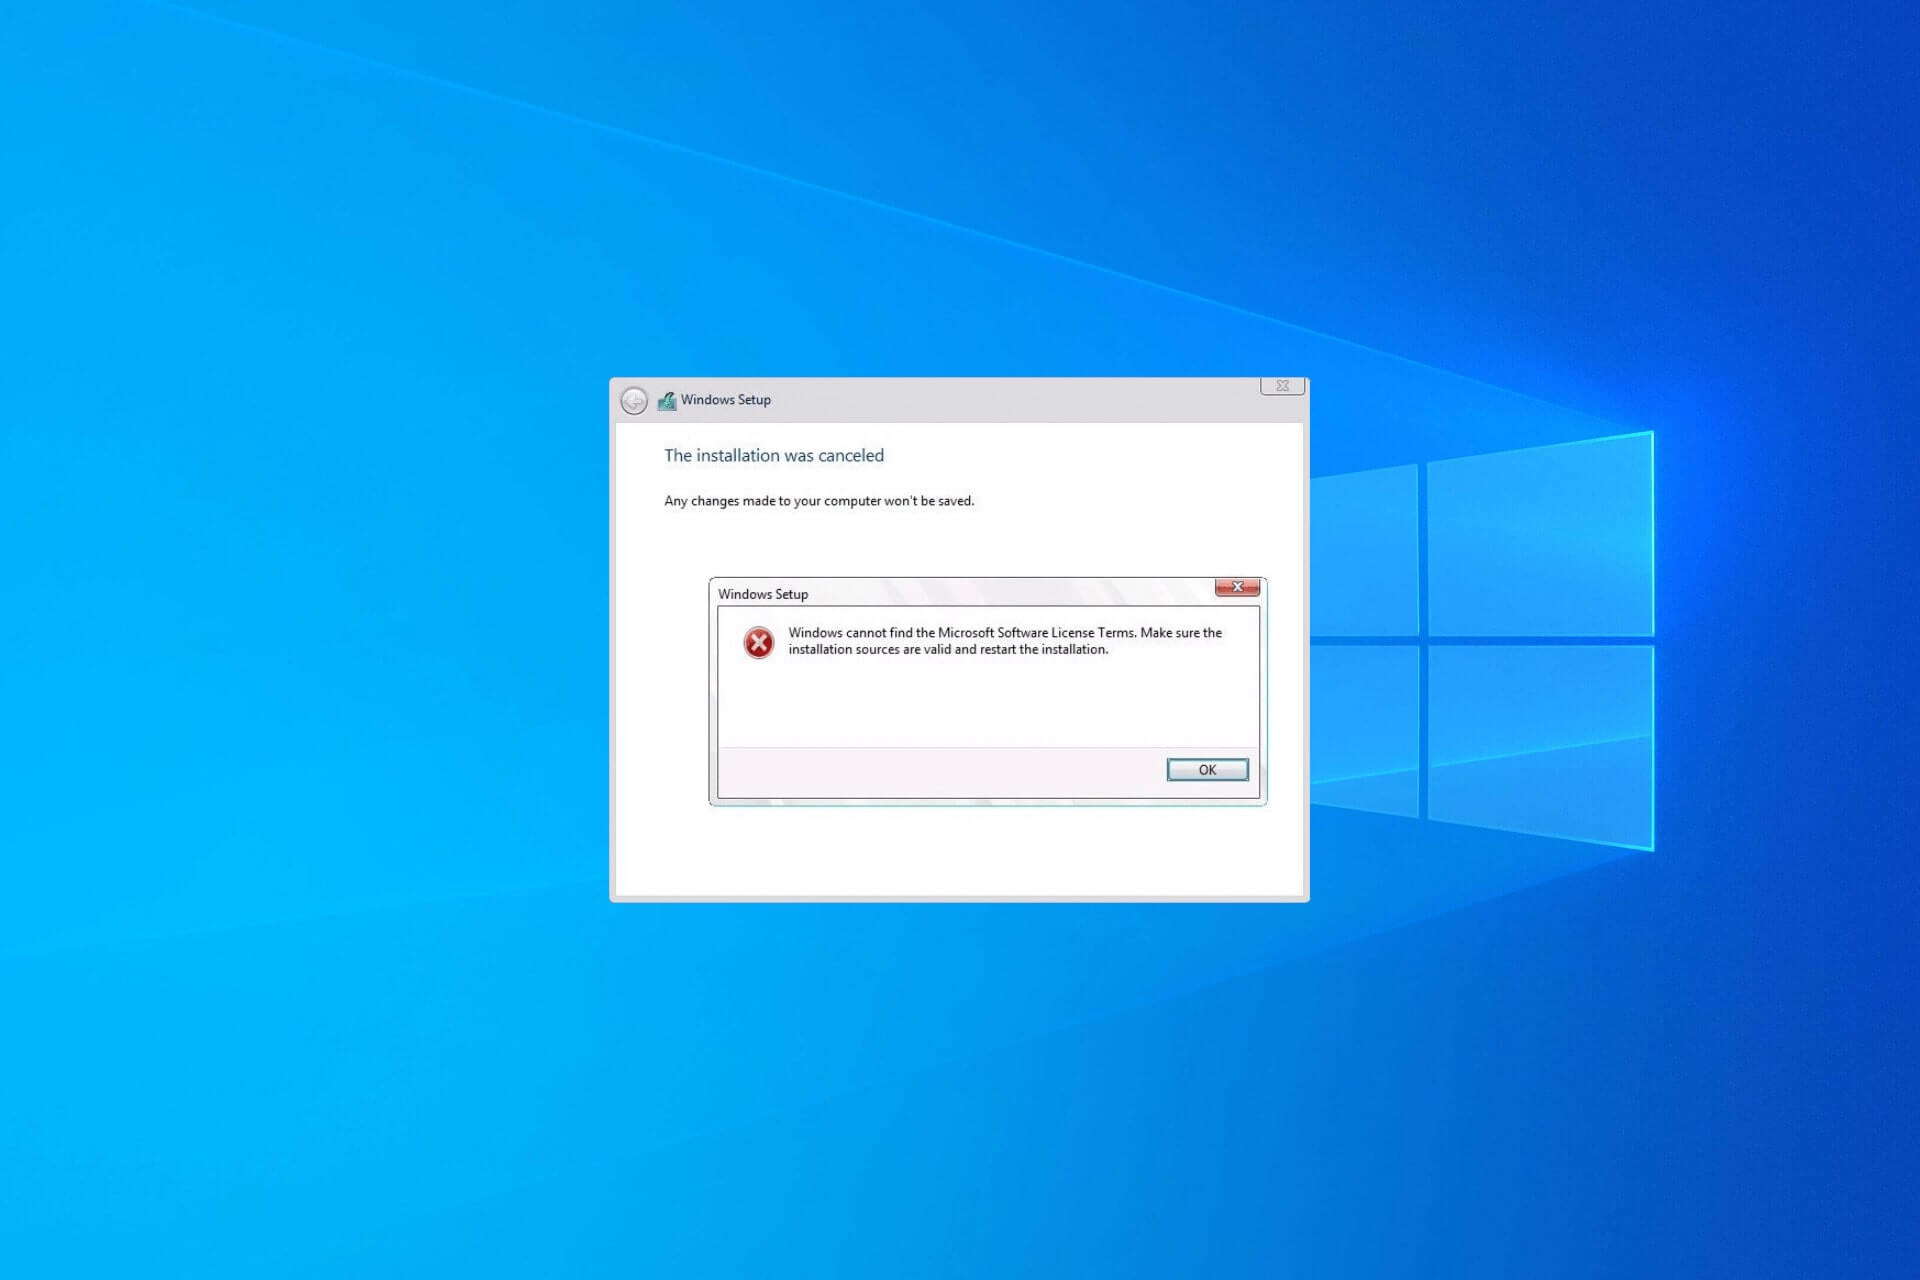
При установке операционной системы Windows 10/11 или Windows Server 2022/2019/2016 на физический хост (компьюте) или в виртуальную машину Hyper-V или VMware вы можете столкнуться с ситуацией, когда установка Windows с установочного образа прерывается после выбора редакции Windows с ошибкой:
The installation was canceled.
Windows cannot find the Microsoft Software License Terms. Make sure the installation sources are valid and restart the installation.
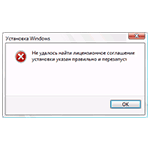
В русской версии Windows ошибка выглядит так:
Установка Windows отменена.
Не удалось найти лицензионное соглашение. Проверьте, что источник установки указан правильно и перезапустите установку.
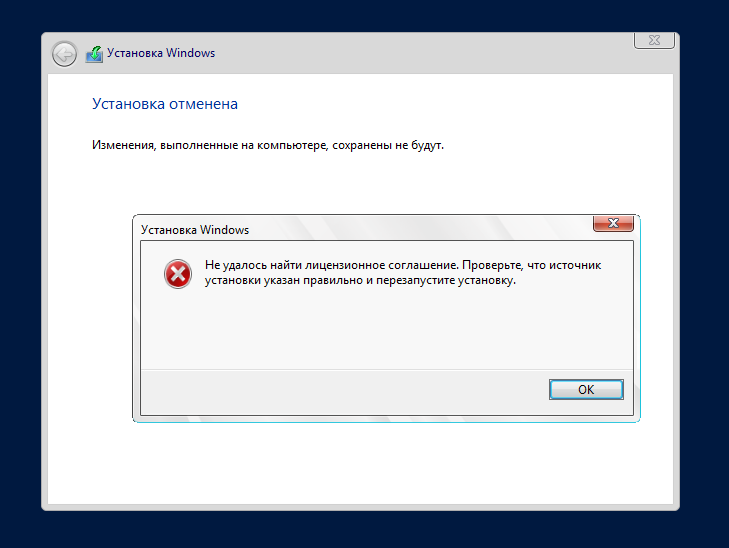
После нажатия ОК, выполняется перезагрузка компьютера и повторный запуск установки Windows, ошибка «Не удалось найти лицензионное соглашение» при этом повторяется. И так по кругу.
Данная ошибка, как оказалась, может быть связана с несколькими совершенно различными причинами. Рассмотрим их все по отдельности
Ошибка при установке Windows в виртуальную машину Hyper-V:
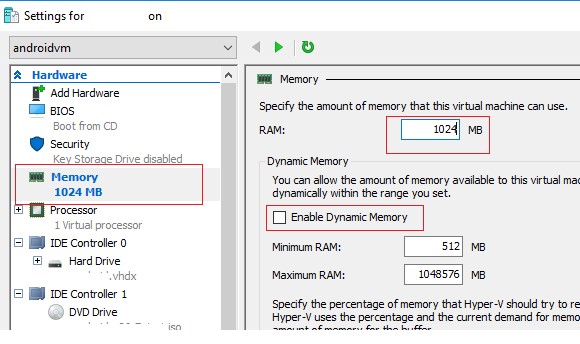
Если вы устаналиваете Windows 10/11 или Windows Server 2016/2019 (и более старых версий ОС) в виртуальную машину, убедитесь, что вы выделили данной ВМ достаточно оперативной памяти. В моем случае, на сервере Hyper-V для ВМ было выделено всего 512 Мб памяти и включена опция использования динамической памяти (Enable Dynamic memory) с возможной ситуацией Memory overcommitment. Увеличьте размер выделенной ВМ памяти хотя бы до 1024 Мб, отключите Dynamic Memory и перезапустите процесс установки Windows.
Также в комментариях несколько человек написало, что им помогло уменьшение размер оперативной памяти для ВМ с 4096 до 2048 ГБ.
Также попробуйте отключить вашу Windows ВМ от виртуального коммутатора Hyper-V, на котором разрешено подключение к Интернету.
Примечание. В качестве небольшого обходного решения, можно воспользоваться таким трюком. Перед началом установки Windows нажмите сочетание клавиш Shift+F10 и в окне командной строки выполнить команду, создающую файл подкачки:
wpeutil createpagefile /path=C:\pf.sys
. После этого переключитесь в окно установки и начните установку Windows. Установка должна продолжится без ошибок даже при маленьком объеме памяти.
Ошибка при установке Windows на физический компьютер или сервер:
Если ошибка возникает при установке Windows непосредственно на железо (на компьютер, ноутбук), а не в виртуальную машину, убедитесь, что на физическом хосте установлено достаточное количество оперативной памяти. Если памяти достаточно, скорее всего проблема с самим установочным образом (дистрибутивом) Windows (возможно он поврежден, и стоит попробовать воспользоваться другим диском или образом), либо проблема в несоответствии редакции продукта в файле ei.cfg и ключа продукта в файле pid.txt. В этом случае можно на установочном диске (ISO образе) Windows в каталоге \sources\ создать текстовый файл с именем ei.cfg и следующим содержимым:
[Channel]
OEM
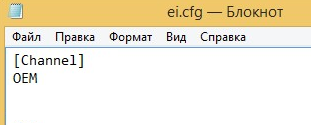
Если в этой папке уже есть файл ei.cfg, нужно смените значение Channel с Retail на OEM (т.к. похоже, что вы пытаетесь установить Enterprise редакцию с розничного дистрибутива Windows). Список редакций в ISO образе Windows можно получить так (где D: путь к приводу, в который смонтирован ISO образ Windows или установочная USB флешка):
DISM /Get-WimInfo /WimFile:"D:\sources\install.esd"
Необходимо вручную отредактировать ISO файл установочного образа Windows с помощью любого ISO редактора (WinISO), добавив указанный файл и перезаписать образ на установочный DVD / USB диск.
Либо можно указать ключ установки Windows так:
setup.exe /pkey XXXXX-XXXXX-XXXXX-XXXXX-XXXXX
Ошибка при установке Windows в виртуальную машину VMware:
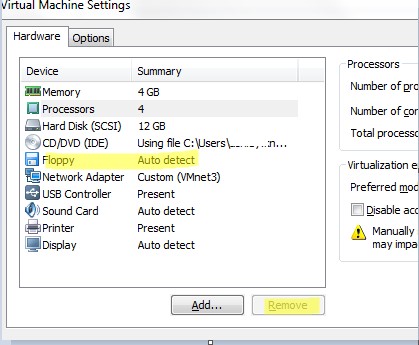
При установке Windows в качестве гостевой ОС в виртуальную машину VMware Workstation/Player/Fusion также может появится ошибка “Не удалось найти лицензионное соглашение”. Десктопные гипервизоры VMware при создании ВМ по умолчанию добавляют в оборудование виртуальный флоппи-дисовод (Virtual Floppy Drive) драйв. Установщик Windows может пытаться искать лицензионный файл на этом устройстве.
Чтобы избавиться от проблемы, просто удалите Virtual Floppy Drive из оборудования виртуальной машины или отключите опцию Connect at power on.
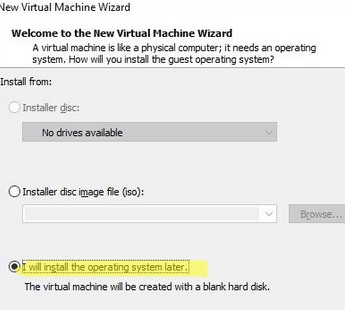
Другие возможные решения проблемы в VMware Workstation:
- При создании ВМ не указывайте пусть к установочному ISO образу Windows, а выберите опцию “
I will install the operating system later
”;
- Подключите установочный iso образ Windows в виртуальный CD/DVD привод после создания ВМ;
- Загрузите ВМ с установочного диска и начните установку Windows.
Отключите вашу виртуальную ВМ от интернета. Для этого в натсройках сетевой карты ВМ измените режим подключения к сети с NAT на Bridged или Host Only.
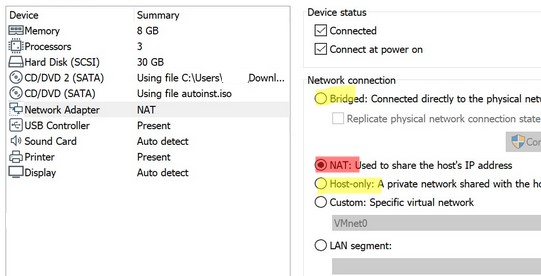
В резульате при установке Windows не будет подключатьтся в сеть для проверки лицензии (была такая проблема при установке ознакомительной Evaluation редакции Windows Server).
 Иногда при установке Windows 11 или Windows 10 можно столкнуться с нестандартной проблемой: после выбора устанавливаемой редакции или ввода ключа продукта появляется сообщение «Не удалось найти лицензионное соглашение. Проверьте, что источник установки указан правильно и перезапустите установку».
В этой инструкции подробно о том, что делать и как решить проблему, если установка отменена из-за невозможности найти лицензионное соглашение при установке Windows на компьютер, ноутбук или в виртуальной машине.
Способы исправить ошибку «Не удалось найти лицензионное соглашение»

Рассматриваемая ошибка говорит о том, что по какой-то причине программе установки не удалось прочитать и загрузить текстовый файл лицензионного соглашения для его отображения. Причины могут быть разными, но обычно устраняются сравнительно легко.
Быстрые варианты решения проблемы
Иногда ошибка «Не удалось найти лицензионное соглашение» возникает как случайный сбой и каких-то особенных действий для её исправления выполнять не требуется. Прежде чем переходить к более затратным по времени способам, попробуйте следующие варианты решения:
- Нажать «Ок» в окне с сообщением об ошибке — вы окажетесь на первом экране программы установки Windows. Повторите первые шаги установки — иногда при второй попытке ошибка исчезает и нужное лицензионное соглашение отображается:

- Попробуйте перезапустить установку, подключив загрузочную флешку к другому USB-разъему, без использования каких-либо USB-разветвителей (в случае ПК — лучше на задней панели).
- Попробуйте использовать другой тип разъема USB — 2.0 вместо 3.0 или наоборот.
- Отключите все необязательные USB-устройства.

В некоторых случаях одно из указанных действий может помочь и Windows установится без ошибок.
Проблемы с накопителем или образом
Одна из распространенных причин ошибки «Не удалось найти лицензионное соглашение» — те или иные проблемы с загрузочной флешкой, её совместимостью с текущей системой (при использовании сторонних программ создания установочного накопителя), либо самим образом системы.
- Используйте другой накопитель (флешку). К этому шагу рекомендую отнестись серьезно и найти возможность использовать другую флешку — очень часто причиной является именно нестабильная работа накопителя.
- Если для создания установочного накопителя использовалась программа Ventoy или аналогичные, используйте более «стандартные», такие как Rufus или Media Creation Tool
- Попробуйте создать установочный накопитель с использованием другого образа ISO из другого источника.
- Иногда может помочь запись установочной флешки на другом компьютере: этот сценарий достаточно редкий, но случается, что из-за ошибок оперативной памяти, либо работы вредоносного ПО, записываемые данные повреждаются, что приводит к сбоям установки.
Если предыдущие варианты не помогли, несколько дополнительных решений, которые оказываются работоспособными у некоторых пользователей:
- Попробуйте сбросить настройки БИОС, если включен разгон оперативной памяти, отключите его.
- Если ошибка появляется при установке Windows на ноутбуке, учитывайте, что иногда такое может происходить в случае выполнения установки при питании от батареи и, если это совпадает с вашей ситуацией, подключите зарядное устройство.
- Используйте режим UEFI при включенном Secure Boot во время установки.
- При наличии подозрений на ошибки оперативной памяти и наличии нескольких модулей RAM, попробуйте оставить подключенным только один. Если ошибка появилась снова — замените его одним из ранее отключенных.
- Если проблема возникает в виртуальной машине Hyper-V, попробуйте выделить больший объем оперативной памяти (и отключить динамическое выделение памяти), включить безопасную загрузку — всё это можно сделать в параметрах выбранной виртуальной машины. Также может помочь использование другого поколения виртуальной машины (потребуется создать ВМ заново).
- Динамически определяемый объем RAM может быть причиной рассматриваемой ошибки в других виртуальных машинах, например, VMware.
- Некоторые виртуальные машины могут автоматически создавать виртуальный Floppy-накопитель, а его наличие — вызывать ошибку (достаточно удалить такой накопитель из виртуальной машины для того, чтобы исправить её).
Надеюсь, один из предложенных вариантов помог разобраться, а установка Windows была успешно продолжена. Буду благодарен, если ниже в комментариях вы сможете поделиться информацией о том, какой именно из способов сработал в вашей ситуации.
The “Windows cannot find the Microsoft Software License Terms” error usually appears when trying to install Windows or Windows Server on your computer. It appears during the installation process and it prevents the installation of Windows completely.
The error is sometimes difficult to deal with because the targeted computer often doesn’t have an operating system installed and you have to resolve the problem in other ways. Luckily, many users found great methods of resolving the problem on their own and we decided to gather these methods in a single article. Check it out below!
What Causes the “Windows Cannot Find the Microsoft Software License Terms” Error on Windows?
There are several possible causes to this issue and troubleshooting them can be more difficult because the computer probably can’t boot into Windows as it hasn’t been installed yet. Still, these causes can be crucial and we recommend you check them out below!
- Broken or missing files in the installation – If the ISO file hasn’t been created properly, some crucial files might be missing or corrupt which causes the installation to stop. Recreating the ISO file using Media Creation Tool or Rufus can resolve this problem.
- The drive hasn’t been prepared properly – Any drive where you want to install Windows needs to be prepared properly. The preparation includes creating a primary partition, cleaning the drive, and formatting it in the NTFS file system. Make sure you perform these steps.
- Dynamic memory – If dynamic memory is enabled when installing Windows on a Virtual Machine, it can cause this error and the recommendation is to disable it and simply provide enough memory from the start.
Solution 1: Recreate the Windows 10 Image
In most cases, the problem can be blamed on the image file you used to install Windows. Some files might not have been copied properly and some of them may be missing or corrupt. Either way, recreating the image using the Media Creation Tool is an easy and efficient way of resolving the problem.
- Download the Media Creation Tool software from Microsoft’s website. Open the downloaded file called exe to open the start the installation. Tap Accept to agree on terms and conditions set by Microsoft.
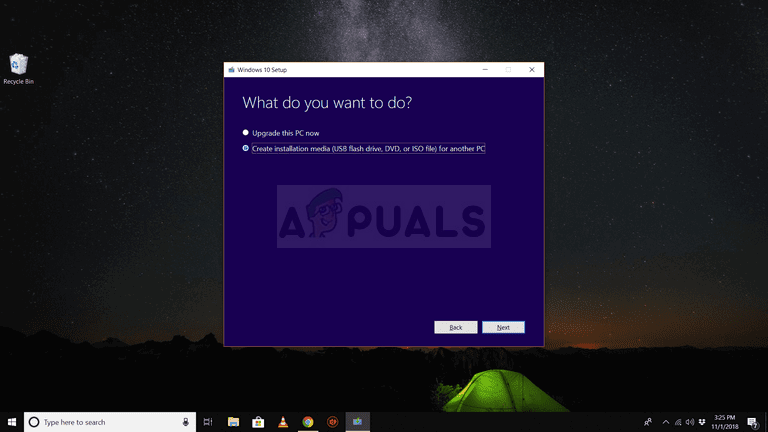
- Select the Create installation media (USB flash drive, DVD, or ISO file) for another PC option from the initial screen.
- The language, architecture, and edition of the bootable drive will be chosen based on your computer’s settings, but you should uncheck the Use the recommended options for this PC in order to select the correct settings for your PC which is encountering the error (if you are creating this on a different PC, of course).
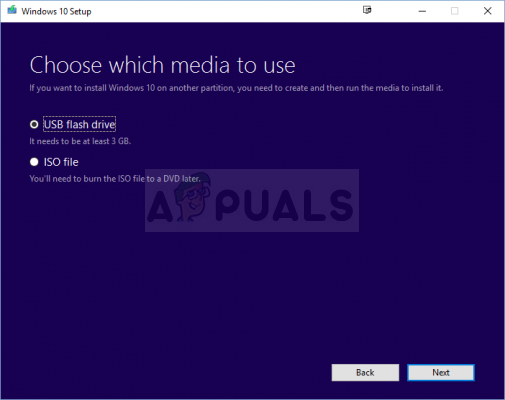
- Click Next and click on the USB drive or DVD option when prompted to choose between USB or DVD, depending on which device you want to use to store this image on.
- Click Next and choose the required drivers from the list which will show the storage devices connected to your computer at the moment.
- Click Next and the Media Creation Tool will proceed to download the files necessary to install create the installation device. Wait for the process to finish. Insert the drive in the target computer and check to see if the installation finishes without problems!
Solution 2: Use Rufus to Create a Bootable Drive
Users have reported that, after failing to create a USB bootable device using any other method, they have tried using a simple tool called Rufus. It can perform the same process easily and you won’t have to prolong the process. The only thing it lacks is a beautiful design but that is probably not the point while troubleshooting this problem.
- You can download Rufus from this website. Scroll down towards the Download button and download the latest version. Open the file you downloaded and you can simply open it without installation.
- Under the Device section, click on the drop-down menu and choose your USB device from the list. This time, you shouldn’t have problems regarding the USB device.
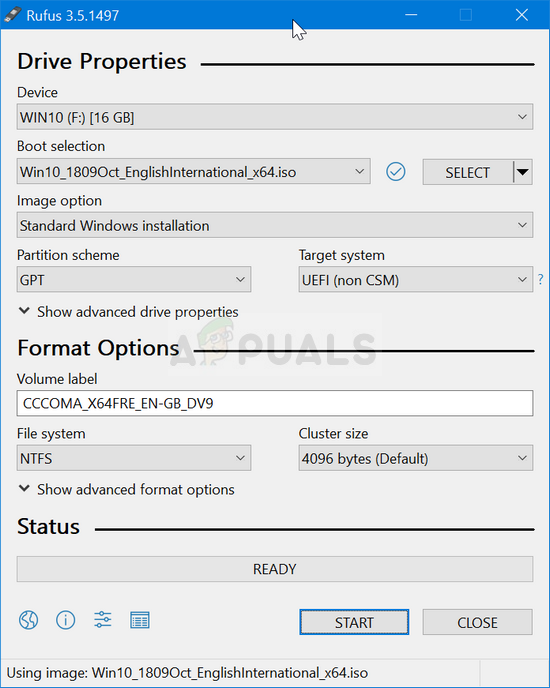
- Under Partition scheme and target system type, make sure you choose the GPT partition scheme for UEFI and leave the File system option as FAT32. Leave the Cluster size to default.
- Check the Create a bootable disk option and leave the radio button next to Standard Windows installation. At the right part of this option, click on the disk icon and choose your .iso file containing the Windows 10 installation.
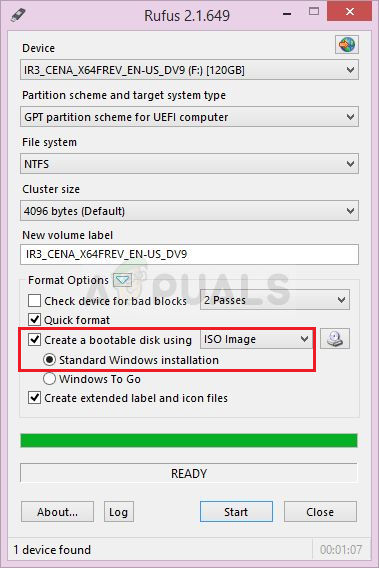
- After that, click on Start, and wait for the process to finish. After it’s done, you will now have your USB device ready for use with Windows 10 on it! Try inserting it and see whether the “Windows cannot find the Microsoft Software License Terms” error appears again!
Solution 3: Prepare Your Drive Properly
It’s quite possible that the drive where you want to install Windows hasn’t been prepared properly. It’s something you can usually do in the Disk Management utility but you will have to use Command Prompt since you are probably unable to boot into anything. Follow the steps below to fully prepare your drive for the Windows installation.
- If your computer’s system is not installed, you will have to use the installation media used to install windows for this process (the same one causing the problem). Insert the installation drive and boot your computer.
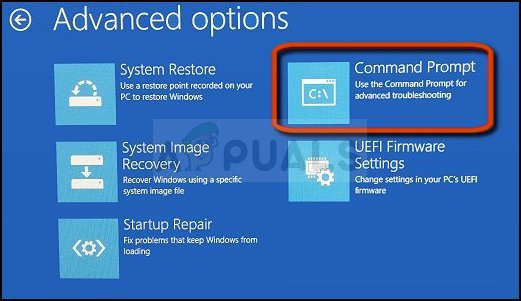
- You will see a Choose your keyboard layout screen so choose the one you want to use. After that, make sure you navigate to Troubleshoot >> Advanced Options >> Command Prompt.
- At the command prompt window, type in simply “diskpart” in a new line and click the Enter key to run this command.
- This will change the Command Prompt window to enable you to run various Diskpart The first one you will run is the one which will enable you to see the complete list of all available drives. Type this in and make sure you click Enter afterward:
DISKPART> list disk
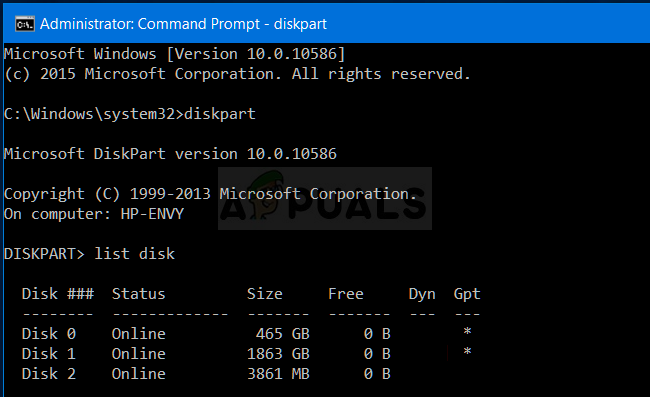
- Make sure you choose your drive carefully, depending on which number is assigned to it in the list of volumes. This is the drive where you want to install Windows. Let’s say that its number is 1. Now run the following command to select your required drive:
DISKPART> select disk 1
- A message should appear saying something like “Disk 1 is the selected disk”.
Note: If you are unsure about which drive number belongs to your drive, the easiest way to do so is to check its size at the right pane.
- To clean this volume, all you need to do is to type in the command displayed below, click the Enter key afterward, and stay patient for the process to complete. The process should now be successful for a change. This set of commands will also create a Primary Partition and make it active so that you can format it without problems.
Clean
Create Partition Primary
Active
![]()
- Finally, this last command will format the drive in the file system you choose. When considering the file system, you need to choose NTFS for the Windows installation. Type in the following command and tap Enter afterward:
format fs=ntfs quick
- Exit Command Prompt and check to see if you are now able to run the installation without problems!
Solution 4: Disable Dynamic RAM (VM users only)
If you are trying to install Windows or Windows Server on a Virtual Machine using Hyper-V, it’s recommended you disable dynamic memory from the Hyper-V Manager. Many users were able to resolve the problem this way so make sure you follow the steps below carefully.
- Open up the Hyper-V manager by double-clicking its icon on the Desktop or by searching for it in the Start Menu and clicking the first option which appears.
- From the left-side navigation menu, choose your node and the list of virtual machines should appear to the right. Right-click the one where the problem occurs and choose Settings from the context menu which will appear.
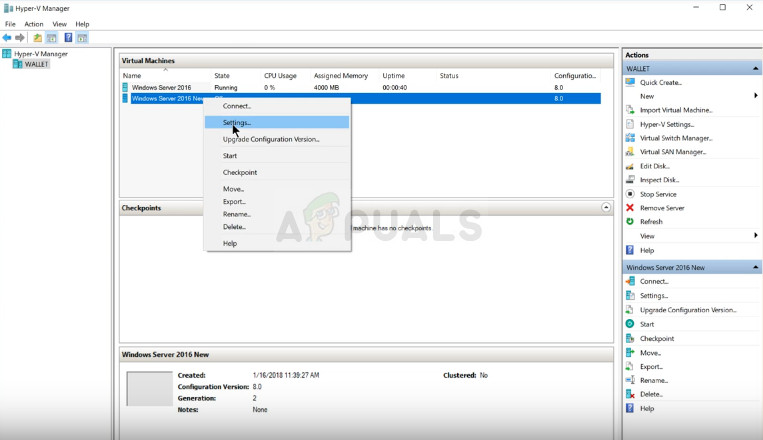
- Navigate to the Memory tab from the right-side navigation menu. From the right side, uncheck the box next to the Enable Dynamic Memory option. Make sure you assign enough static RAM for the Virtual Machine.
- Apply the changes you have made and try installing Windows to the Virtual Machine once again. Check to see if the problem still appears.

Kevin Arrows
Kevin Arrows is a highly experienced and knowledgeable technology specialist with over a decade of industry experience. He holds a Microsoft Certified Technology Specialist (MCTS) certification and has a deep passion for staying up-to-date on the latest tech developments. Kevin has written extensively on a wide range of tech-related topics, showcasing his expertise and knowledge in areas such as software development, cybersecurity, and cloud computing. His contributions to the tech field have been widely recognized and respected by his peers, and he is highly regarded for his ability to explain complex technical concepts in a clear and concise manner.
Try disconnecting the installation media during the installation process
by Milan Stanojevic
Milan has been enthusiastic about technology ever since his childhood days, and this led him to take interest in all PC-related technologies. He’s a PC enthusiast and he… read more
Updated on
Reviewed by
Alex Serban

After moving away from the corporate work-style, Alex has found rewards in a lifestyle of constant analysis, team coordination and pestering his colleagues. Holding an MCSA Windows Server… read more
- Windows cannot find the Microsoft license software terms is a common error you receive when trying to install Windows.
- This error means that the system fails to validate the installation sources and requires you to restart the installation.
- The Windows cannot find license terms error can be solved by resetting your BIOS.
- A different solution for this problem is to use a third-party tool to create a bootable media.
XINSTALL BY CLICKING THE DOWNLOAD
FILE
Windows cannot find the Microsoft license software terms error can sometimes appear while trying to install Windows.
This error message prevents you from setting up Windows 10 on your PC, but there’s a workaround.
Various problems can stop you from installing Windows on your PC. Here are some examples reported by users:
- Windows cannot find the Microsoft software license terms clean install, Hyper-V, VMware, Parallels, USB boot, VirtualBox – This issue usually occurs when trying to install Windows on a virtual machine. To fix it, change the configuration settings of the virtual machine (see how).
- Windows cannot find the Microsoft license terms to make sure the installation sources are valid – Sometimes this error can occur when there’s a problem with the installation media. To fix it, create a new installation media (see how).
- How do I fix the Microsoft license software terms issue?
- 1. Reset your BIOS
- 2. Disconnect the installation media during the installation
- 3. Use a third-party tool to create an installation media
- 4. Try using a different flash drive
- 5. Check your hardware
- 6. Use Diskpart to clean your drive
- 7. Change the virtual machine settings
- 8. Enable Secure Boot in Hyper-V
- 9. Increase the amount of RAM and remove the floppy drive in the virtual machine
- 10. Create your own ei.cfg file
How do I fix the Microsoft license software terms issue?
1. Reset your BIOS
A common cause for Windows cannot find the Microsoft license software terms can be your BIOS. Sometimes certain BIOS settings can interfere with your system and prevent Windows from installing.
To fix the issue, users are suggesting entering BIOS and restoring the default settings.
This is fairly simple to do, but if you don’t know how to do it properly, we advise you to check your motherboard manual for detailed instructions. After restoring the default settings, try to install Windows again.
2. Disconnect the installation media during the installation
- Follow the installation steps until you reach the Install Now screen.
- Disconnect your installation media and click the Install Now button.
- Continue the installation as you would do normally.
- Once the setup is ready to start copying files, it will ask you to reconnect your installation media, so be sure to do so.
- After you connect the installation media, follow the instructions on the screen to complete the installation.
This solution might sound a bit counter-intuitive, but some users claim that you can fix the Windows cannot find the Microsoft license software terms message simply by removing your installation media.
3. Use a third-party tool to create an installation media
Many users prefer using the Media Creation Tool for creating installation media.
The Media Creation Tool lets you download a Windows 10 installation file to a flash drive for use in reinstalling Windows 10.
This backup option is essential in the event that something goes wrong with your computer. Furthermore, having a physical copy of the operating system is helpful.
After you download the ISO file, add it to the dedicated software and create the installation media.
How we test, review and rate?
We have worked for the past 6 months on building a new review system on how we produce content. Using it, we have subsequently redone most of our articles to provide actual hands-on expertise on the guides we made.
For more details you can read how we test, review, and rate at WindowsReport.
4. Try using a different flash drive
If you keep getting Windows cannot find the Microsoft license software terms message, perhaps there’s an issue with your flash drive.
Your flash drive can sometimes be a problem, and in order to fix this issue, you might want to try replacing it.
If you have an extra USB flash drive, use it to create an installation media and boot Windows from USB. This isn’t the most reliable solution, but it might work for you, so feel free to try it.
5. Check your hardware
According to users, sometimes Windows cannot find the Microsoft license software terms message can appear due to hardware issues on your PC.
Several users reported that their hard drive was the issue, but after replacing it, they were able to install Windows 10 without issues.
Another cause can be your CPU, and few users reported that the problem was resolved after replacing their CPU, so you might want to check your processor as well.
Finding out which hardware component is the problem can be a bit complicated, but you can resort to hardware diagnostic tools for Windows.
If your PC is under warranty or you don’t know how to do fix hardware errors properly, perhaps you should contact a professional.
6. Use Diskpart to clean your drive
- Boot your PC using the installation media.
- Once you get to the Install Now screen, click Repair your computer.
- Navigate to Advanced Options, select Troubleshoot and then Command Prompt.
- When Command Prompt starts, run the following commands:
DISKPARTlist volume
- You’ll now see a list of all drives on your PC. Now you need to locate the correct drive. This step is crucial and if you select the wrong hard drive you’ll erase all files from it. Simply replace the # symbol with the number of your hard drive. Once again, double-check everything and make sure that you’re selecting the correct drive in order to avoid permanent file loss. After you find your drive, run the following commands:
select disk #
clean
convert mbr
partition primary
active
format quick fs=ntfs
exit
exit
If you’re encountering Windows cannot find the Microsoft license software terms message, perhaps the problem is related to your hard drive.
Sometimes there might be certain issues with your hard drive, and in order to fix them, it’s advised that you clean your hard drive with the Diskpart tool from Windows 10.
Note: By using this solution you’ll remove all files from your hard drive, so be sure to back up important files.
Alternatively, you can use this solution on a new hard drive that doesn’t have any files without any worries. After doing that, close Command Prompt and restart your PC. Now try to install Windows again.
Once again, be extra cautious while using Diskpart, and keep in mind that this method will remove all files from the selected hard drive, so be sure to back up important files beforehand.
7. Change the virtual machine settings
- Download and install virtual machine software.
- Create a new virtual machine on your PC.
- Make sure that you select I will install operating system later option in the virtual machine wizard.
- Now select the version of Windows that you want to install and click Next.
- Now click the Customize Hardware button.
- Select the DVD drive and in the Connection section select Use ISO image file. Now select the Windows ISO file.
After doing that, you can start your virtual machine and the Windows installation should work without any problems.
If you’re getting Windows cannot find the Microsoft license software terms message while installing Windows on a virtual machine, then your settings might be an issue.
To fix the problem, you just need to create a new virtual machine and make a few changes. To do that, follow the steps above.
If you need reliable virtual machine software we recommend getting the one below. It’s the most popular among coders and it’s great for running under Windows 10.
⇒ Get vmware
8. Enable Secure Boot in Hyper-V
- Open Hyper-V‘s Settings.
- Click on Security under the Hardware settings from the left pane and click on Enable Secure Boot from the right (make sure that the virtual machine is not running because otherwise, the option will be greyed out, like in our example).

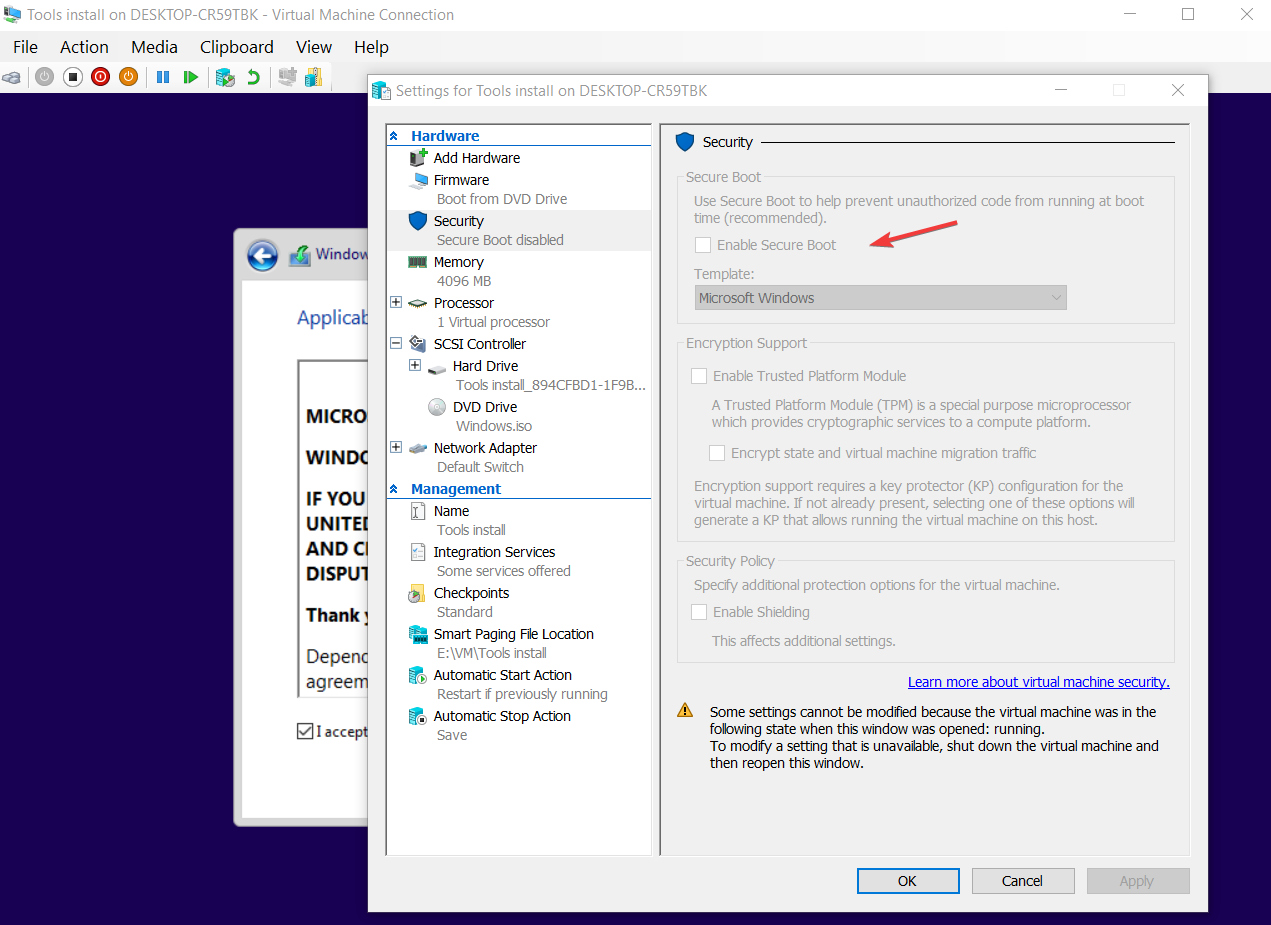
Some users claim that this error is caused by the fac that the Secure Boot option is disabled in Hyper-V. Therefore, you can enable it by using the simple steps above to fix the problem.
9. Increase the amount of RAM and remove the floppy drive in the virtual machine
Sometimes Windows cannot find the Microsoft license software terms error can occur on a virtual machine due to your settings.
To fix the problem, many users are suggesting that you remove the floppy drive from your virtual machine, so be sure to open the hardware settings and remove it.
In addition, some users are suggesting disabling Dynamic RAM feature and instead setting the fixed amount of RAM that the virtual machine will use, so be sure to try that as well.
Some users are suggesting increasing the amount of RAM that the virtual machine is using, so feel free to try that as well.
If all those solutions fail, use RAM optimizers for Windows to speed up your PC.
- Windows cannot find: Fix this error for good [Full Guide]
- Fix: Background Apps are Grayed Out on Windows 10
10. Create your own ei.cfg file
If you’re unable to install Windows due to this error message, perhaps the problem is your ei.cfg file. To fix the problem, create a new ei.cfg file with the following values:
- [Channel]
- OEM
Now open the installation media and navigate to the sources folder. Paste the ei.cfg file to it. If asked to replace a ei.cfg file, be sure to choose Yes.
Alternatively, you can open ei.cfg file on the installation media and make sure that it has the same values as above.
Once you overwrite or modify the ei.cfg file, try to install Windows again and the error message shouldn’t appear anymore.
One of our readers managed to fix this problem by disabling the floppy drive in the virtual machine so make sure you try that too.
Windows cannot find the Microsoft license software terms message can be quite problematic, but we hope that you managed to fix the problem using one of our solutions.
If you have other solutions, we haven’t already covered, don’t hesitate to leave us your suggestions in the comment section below.
![]()

VMware Workstation Pro is a hosted hypervisor that runs on x64 versions of Windows and Linux operating systems; it enables users to set up virtual machines on a single physical machine and use them simultaneously along with the host machine. When you use Easy Install, you usually do not need to provide information during guest operating system installation. If you did not provide all of the Easy Install information in the New Virtual Machine wizard, you might be prompted for a product key, user name, or password. Kindly refer to the following VMware Workstation-related errors and fixes. How to solve VMware workstation .lck error, the VM appears to be in use, how to create a VM (virtual machine) on VMware, and how to create and add a new virtual hard-disk to a Virtual Machine. In this guide, you will learn how to fix Windows cannot find the Microsoft software license terms.
I am sure you must have been very frustrated just like me on this issue as shown in the figure below. I had to download Windows Server 2019 ISO file multiple times and yet did not work. I assigned the License key and yet the issue persisted. To resolve this issue. you will have to Bypass the “VMware Workstation easy install”.

We will have to bypass the “Easy Install” on VMware Workstation. In doing this, you should be able to run your Windows Server or client installation. To do this, follow the steps below.
Instead of selecting the “Installer disc image file”, please select “I will install the operating system later” as shown below. Click on Next to proceed.

Select your guest operating system. In my case, it is Microsoft Windows and the version is “Windows Server 2019”.

Enter the Virtual Machine name and set the VM location as shown below.

Enter your desired disk size and select how you would like to have your virtual disks stored. You can choose to have it stored as single files or multiple files.

Click on finish to complete the VMware VM creation.

Now, you will have to click on Edit to edit the VM settings as shown below.

Click on the CD/DVD (SATA) device and navigate to use the ISO image file as shown below. Click on browse and select your ISO file. Click on Ok to complete this step.


Note: This should work by default. But if it does not work, and you are prompted with the error "EFI network VMware timeout boot on Windows", please refer to this additional link for a quick fix.If you are not prompted with this error, please proceed with the steps below to complete your VM installation.
– Select the Language to install, keyboard etc and
– Click on Next.

Click on Install as shown below.

Select your desired OS you wish to install. I will be selecting the Windows Server 2019 Datacenter (Desktop Experience).

Accept the license terms and click on Next to proceed

I have nothing o do on the following page, therefore, I will click on Next.

As you can see, Windows has started installing unto the VM

As you can see the process has completed and a bit faster than installing Windows on a VirtualBox. See how to install Windows Server 2019. Next, click on “Finish” to complete the steps. How to set up a VM via PXE boot on a Generation 1 VM, and How to set up a Hyper-V Virtual Machine through PXE boot.

I hope you found this blog post helpful. If you have any questions, please let me know in the comment session.