 В этой инструкции о том, что делать, если при чистой установке Windows 10 или 8 (8.1) с флешки или диска на компьютере или ноутбуке, программа сообщает, что установка на данный диск невозможна, так как на выбранном диске находится таблица MBR-разделов. В системах EFI Windows можно установить только на GPT-диск. В теории, такое может произойти и при установке Windows 7 при EFI-загрузке, но сам не сталкивался. В конце руководства также есть видео, где все способы исправления проблемы показаны наглядно.
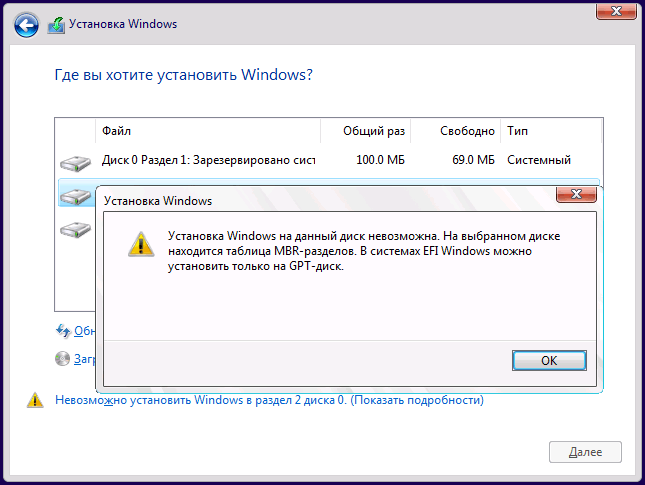
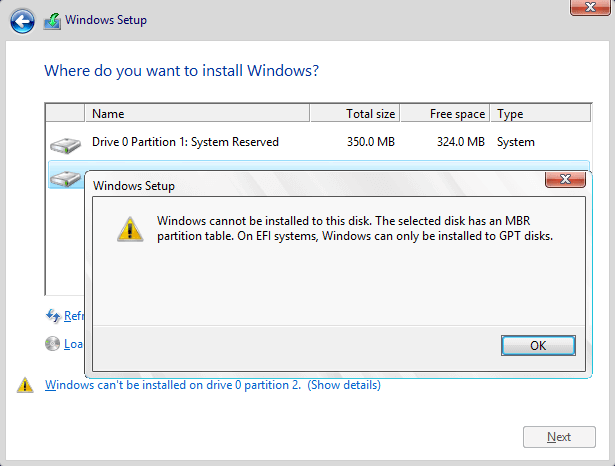
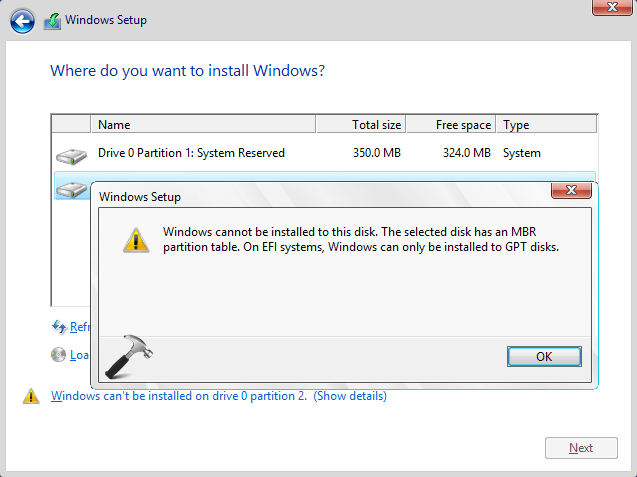
Текст ошибки говорит нам о том (если что-то в объяснении непонятно, ничего страшного, дальше разберем), что вы загрузились с установочной флешки или диска в режиме EFI (а не Legacy), однако на текущем жестком диске, на который вы хотите установить систему, находится не соответствующая этому типу загрузки таблица разделов — MBR, а не GPT (это может быть по той причине, что раньше на этом компьютере была установлена Windows 7 или XP, а также при замене жесткого диска). Отсюда и ошибка в программе установки «Невозможно установить Windows в раздел на диске». См. также: Установка Windows 10 с флешки. Также вы можете столкнуться со следующей ошибкой (по ссылке — ее решение): Нам не удалось создать новый или найти существующий раздел при установке Windows 10
Есть два способа исправить проблему и произвести установку Windows 10, 8 или Windows 7 на компьютер или ноутбук:
- Конвертировать диск из MBR в GPT, после чего установить систему.
- Изменить тип загрузки с EFI на Legacy в БИОС (UEFI) или выбрав его в Boot Menu, в результате чего ошибка о том, что на диске находится таблица MBR-разделов не появится.
В этой инструкции будут рассмотрены оба варианта, однако в современных реалиях я бы рекомендовал воспользоваться первым из них (хотя споры о том, что лучше — GPT или MBR или, вернее, о бесполезности GPT можно услышать, тем не менее, уже сейчас это становится стандартной структурой разделов для жестких дисков и SSD).
Исправление ошибки «В системах EFI Windows можно установить только на GPT-диск» путем конвертации HDD или SSD в GPT
Первый способ предполагает использование EFI-загрузки (а у нее есть преимущества и лучше оставить ее) и простую конвертацию диска в GPT (точнее конвертацию его структуры разделов) и последующую установку Windows 10 или Windows 8. Именно этот способ я рекомендую, а реализовать его можно двумя способами.
- В первом случае все данные с жесткого диска или SSD будут удалены (со всего диска, даже если он разбит на несколько разделов). Зато этот способ быстр и не требует от вас никаких дополнительных средств — это можно сделать прямо в программе установки Windows.
- Второй способ сохраняет данные на диске и в разделах на нем, но потребует использования сторонней бесплатной программы и записи загрузочного диска или флешки с этой программой.
Конвертация диска в GPT с потерей данных
Если этот способ вам подходит, то просто нажмите клавиши Shift + F10 в программе установки Windows 10 или 8, в результате откроется командная строка. Для ноутбуков может потребоваться нажать комбинацию Shift + Fn + F10.
В командной строке по порядку введите команды, нажимая Enter после каждой (ниже также есть скриншот с демонстрацией выполнения всех команд, но часть команд в нём не обязательны):
- diskpart
- list disk (после выполнения этой команды в списке дисков отметьте для себя номер системного диска, на который нужно установить Windows, далее — N).
- select disk N
- clean
- convert gpt
- exit

После выполнения этих команд, закройте командную строку, в окне выбора разделов нажмите «Обновить», а затем выберите незанятое пространство и продолжите установку (а можете предварительно использовать пункт «Создать», чтобы разбить диск на разделы), она должна пройти успешно (в некоторых случаях, если диск не отображается в списке, следует перезагрузить компьютер с загрузочной флешки или диска с Windows снова и повторить процесс установки).
Обновление 2018: а можно и просто в программе установки удалить все без исключения разделы с диска, выбрать незанятое пространство и нажать «Далее» — диск будет автоматически конвертирован в GPT и установка продолжится.
Как преобразовать диск из MBR в GPT без потери данных
Примечание: если вы устанавливаете Windows 10, а диск, на который происходит установка уже является системным (т.е. содержит предыдущую ОС Windows), вы можете использовать встроенную утилиту mbr2gpt.exe для конвертации в GPT без потери данных, подробнее о том, как именно это сделать: Конвертация диска из MBR в GPT с помощью встроенной утилиты Windows 10 MBR2GPT.EXE.
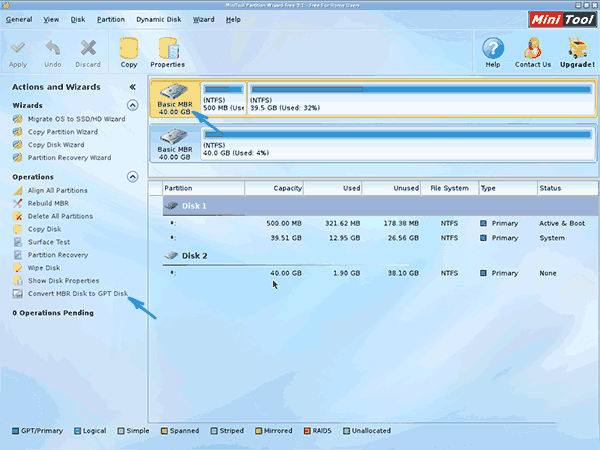
Второй способ — на тот случай, если на жестком диске находятся данные, которые вы ни в коем случае не хотите терять при установке системы. В этом случае вы можете использовать сторонние программы, из которых для данной конкретной ситуации я рекомендую Minitool Partition Wizard Bootable, представляющую из себя загрузочный ISO с бесплатной программой для работы с дисками и разделами, которая, в том числе, может конвертировать диск в GPT без потери данных.
Скачать ISO образ Minitool Partition Wizard Bootable можно бесплатно с официальной страницы http://www.partitionwizard.com/partition-wizard-bootable-cd.html (обновление: они убрали с этой страницы образ, но скачать его всё равно можно, как именно показано в видео ниже в текущей инструкции) после чего его потребуется записать либо на CD либо сделать загрузочную флешку (для данного образа ISO при использовании EFI загрузки достаточно просто переписать содержимое образа на флешку, предварительно отформатированную в FAT32, чтобы она стала загрузочной. Функция Secure Boot должна быть отключена в БИОС).
После загрузки с накопителя, выберите запуск программы, а после ее запуска проделайте следующие действия:
- Выберите диск, который нужно конвертировать (не раздел на нем).
- В меню слева выберите «Convert MBR Disk to GPT Disk».

- Нажмите Apply, ответьте утвердительно на предупреждение и дождитесь завершения операции конвертирования (в зависимости от объема и занятого пространства на диске, может занять продолжительное время).
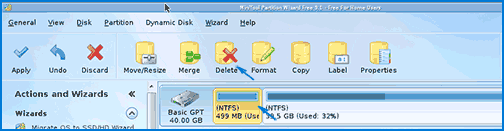
Если во втором действии вы получите сообщение об ошибке, что диск является системным и его конвертация невозможна, то можно поступить следующим образом, чтобы обойти это:
- Выделите раздел с загрузчиком Windows, обычно занимающий 300-500 Мб и находящийся в начале диска.
- В верхней строке меню нажмите «Delete», а затем примените действие с помощью кнопки Apply (можно также сразу создать на его месте новый раздел под загрузчик, но уже в файловой системе FAT32).

- Снова выделите действия 1-3 для конвертирования диска в GPT, которые ранее вызывали ошибку.
Вот и все. Теперь вы можете закрыть программу, загрузиться с установочного накопителя Windows и произвести установку, ошибка «установка на данный диск невозможна, так как на выбранном диске находится таблица MBR-разделов. В системах EFI Windows можно установить только на GPT-диск» не появится, а данные будут в сохранности.
Видео инструкция
Исправление ошибки при установке без конвертации диска
Второй способ избавиться от ошибки В системах EFI Windows можно установить только на GPT-диск в программе установки Windows 10 или 8 — не превращать диск в GPT, а превратить систему не в EFI.
Как это сделать:
- Если вы запускаете компьютер с загрузочной флешки, то используйте Boot Menu для этого и выберите при загрузке пункт с вашим USB накопителем без пометки UEFI, тогда загрузка произойдет в режиме Legacy.
- Можно точно так же в настройках БИОС (UEFI) поставить на первое место флешку без пометки EFI или UEFI на первое место.
- Можно в настройках UEFI отключить режим EFI-загрузки, а установить Legacy или CSM (Compatibility Support Mode), в частности, если вы загружаетесь с компакт-диска.
Если в данном случае компьютер отказывается загружаться, убедитесь, что у вас в БИОС отключена функция Secure Boot. Также она может выглядеть в настройках как выбор ОС — Windows или «Не-Windows», вам нужен второй вариант. Подробнее: как отключить Secure Boot.
По-моему, учел все возможные варианты исправления описываемой ошибки, но если что-то продолжает не работать, спрашивайте — постараюсь помочь с установкой.
Position: How Tos — Disk Utilities — Fixed: The Selected Disk Has an MBR Partition Table
Table of Contents:
Error overview
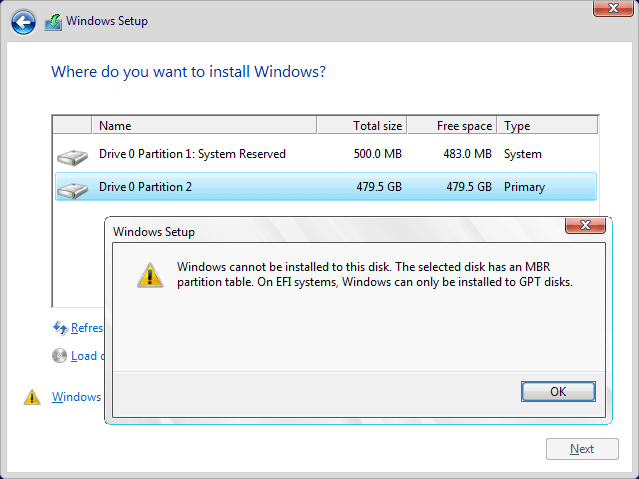
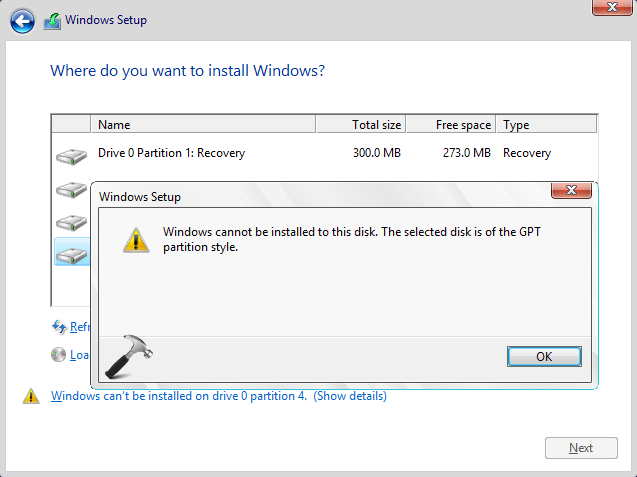
When you install Windows operating system on your computer, you may often run into an annoying error that prevents you from successfully installing system on your PC. The error message might be «Windows cannot be installed to this disk. The selected disk has an MBR partition table. On EFI system, Windows can only be installed to GPT disks». This computer’s hardware may not support booting to this disk. Ensure that the disk’s controller is enabled in the computer’s BIOS menu; or «Windows cannot be installed to this disk. The selected disk is of the GPT partition table» The error «the selected disk has an MBR partition table» is very common which appears on many Windows versions such as Windows 7, windows 8, Windows server 2008, etc. Here is a real case found on forum:
«I have a Dell laptop running Windows home on an SSD hard drive. I want to format hard drive and reinstall Windows 7, for current system is very slow. I went to BIOS to change boot option to legacy (There are no other options besides Legacy and UEFI). Both hard drive and SSD can be recognized in BIOS. The Windows setup couldn’t work as expected and constantly gave «the selected disk has an MBR partition table» error when I select the partition that I want to format.»
MBR VS GPT
MBR VS GPT, which one is better for your computer? MBR stands for Master Boot Record which is a special boot sector located at the very beginning of storage device. It contains boot loader for operating system. The shortcoming lies in that MBR disk can manage up to 2TB disk space and it can hold four primary partitions at most.
GPT is the short form of GUID (Global Unique Identifier) Partition Table and it is another way to storing partition information. GPT disk eliminates limitations on MBR, thus it doesn’t have limit on disk capacity or partition numbers. When you set up new disk on Windows 8 or 10, you will be recommended to use GPT.
It mainly depends on your BIOS configuration whether you can use MBR or GPT. Old computers usually employ Legacy BIOS + MBR boot mode, while recent computers use UEFI + GPT. If you do not follow these rules, you are likely to encounter error messages talked about in this post. For information about GPT and MBR, please refer to Windows and GPT FAQs
Therefore, if you want to use the GPT partition scheme, you need to enter BIOS, so that you can change boot option from Legacy to UEFI. Then you also need to make sure the hard drive where you want to install Windows is partitioned with GUID partition table. If not, you need to convert MBR disk to GPT or repartition hard drive.
This article provides three solutions to fix «Windows cannot be installed to this disk. The selected disk has an MBR partition table. On EFI system, Windows can only be installed to GPT disks.» so that you can complete Windows installation process smoothly. You can choose any solution based on your own preference and actual situation on your computer.
The first solution helps to change BIOS boot settings, by which you can install operating system on an MBR disk. If you want to keep UEFI and GPT, you can just convert current hard drive to GPT disk. Then you won’t be blocked by the issue. Both solution 2 and solution 3 explain methods to convert MBR to GPT: DiskGenius and Command Prompt.
DiskGenius is third-party and free partition manager software, and it is able to convert disk between MBR and GPT without losing data. The converting process is quite easy and simple. The third method presents how to convert MBR to GPT using DiskPart commands, which is complicated in operation and clears all data on the disk.
Solution #1: Change BIOS boot settings
Step 1. You can go through BIOS setting and change the UEFI boot configuration. What you need to do is temporarily switching EFI boot to SATA or legacy mode so that Windows can be installed to Legacy + MBR booted computer.
Step 2. Restart computer and enter BIOS by pressing Del or F10 before system boots. The specific key varies from Motherboard brand to another, but you can see it on screen soon after computer is powered on.
Step 3. In BIOS, go to Boot Devices and find Boot order where you can disable EFI sources or change DVD drive from UEFI to SATA or Legacy Mode.
Step 4. Save changes and exit.
Step 5. Boot computer with system installing CD or disk and try install again.
Solution #2: Convert MBR disk to GPT without data loss
For the moment, your hard drive is of MBR style while BIOS is set to UEFI boot mode. Thus, another way to solve this error is converting MBR partition table to GPT. When the disk is converted to GPT, you will no longer face the issue.
Many guides on the Internet suggest converting MBR to GPT using command line, but that will erase all partition and data on the disk. You should make sure all important files are backed up. The most convenient and easy method to convert MBR to GPT is using third party software which is able to do the converting without disturbing existing files, saving time and effort to backup data. Let’s see how to convert MBR disk to GPT using free partition manager DiskGenius Free.
Step 1. Install and launch DiskGenius Free. You can download this free partition manger free of charge from download center.
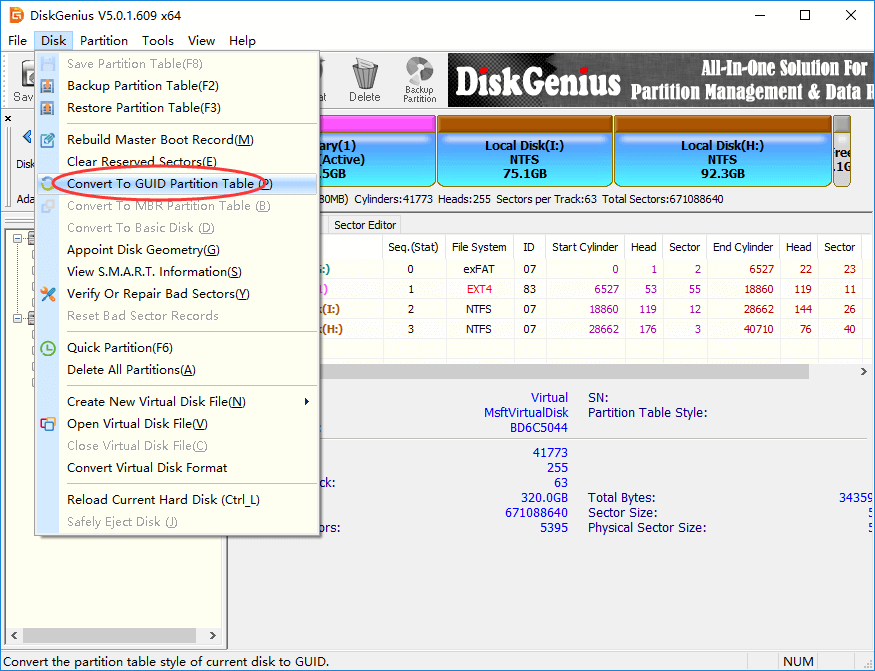
Step 2. Locate and select the MBR disk to be converted to GPT in DiskGenius Free and click Disk menu to choose Convert To GUID Partition Table.
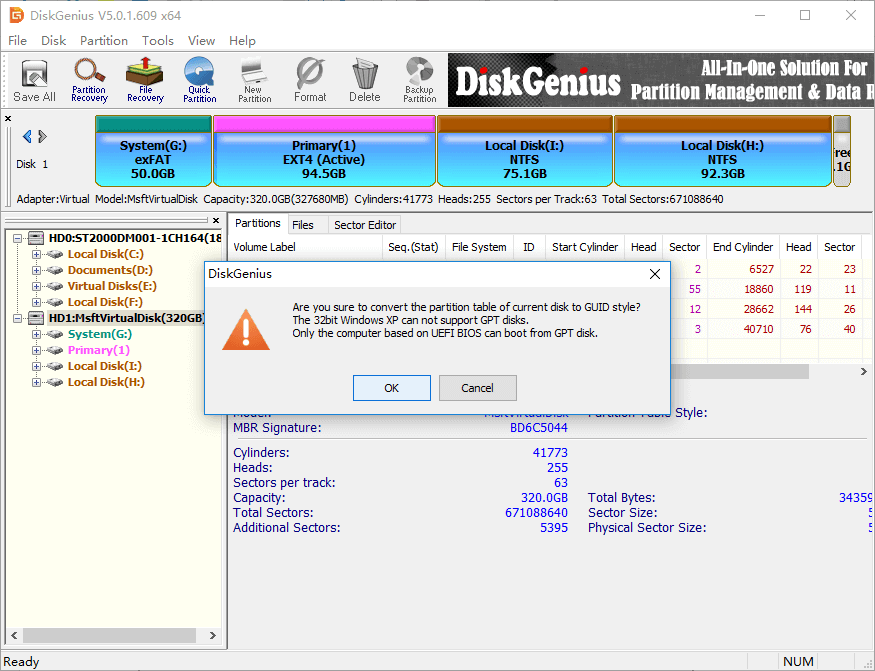
Step 3. Click OK button on the message box.
Step 4. Click Save All button to save changes to partition table and the conversion takes effect.
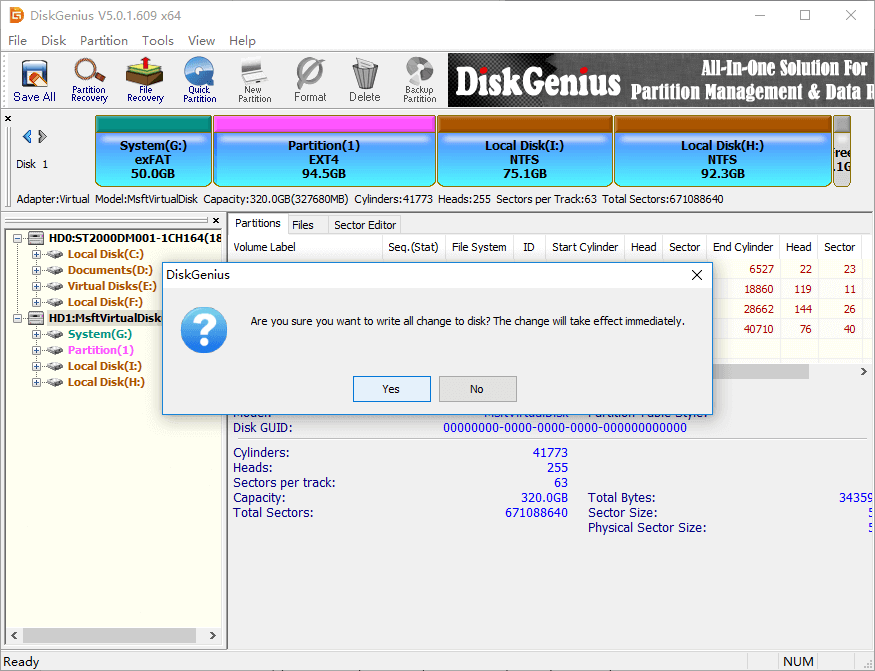
Note: The converting process does not affect data on the disk. When the disk is converted to GPT, you can retry installing Windows again. If your computer is not able to boot to system, you can do the converting under Windows PE. DiskGenius is able to boot to WinPE version directly, or create a WinPE bootable USB disk.
Solution #3: Convert MBR disk to GPT disk using Command Prompt
This method is capable of converting MBR disk to GPT, as well, but it is data destructive, which means you will certainly lose data and partition on the disk. Thus, you need to backup all crucial files to a different hard drive in advance. Try this method your own risk.
Step 1. At the Windows installation screen, go to command prompt by pressing Shift and F10 key.
Step 2. Type following commands in Command Prompt and press Enter key after each command.
diskpart
list disk (remember the disk number for which you want to convert to GPT)
select disk # (replace # with the number of the disk to be converted partition table type)
clean (this command removes all partition and data off the disk)
convert gpt
Step 3. Once the disk is converted to GPT, you can create partitions on the disk and install Windows without errors.
Conclusion
This article presents three methods to fix «The selected disk has an MBR partition table», and hope you can fix it easily and get Windows installed successfully. If you have any questions regarding this issue, please feel free to contact us vis email.
Solutions on this page work to fix Windows cannot be installed to this disk MBR in Windows 11/10/8/7. Go and see how to fix this error on your own
| Workable Solutions | Step-by-step Troubleshooting |
|---|---|
| Method 1. Convert MBR to GPT without Data Loss | Step 1: Prepare a disc or drive, like a USB drive, flash drive, or a CD/DVD disc. Correctly connect the drive…Full steps |
| Method 2. Convert MBR to GPT with Disk Management | Step 1: Enter Computer Management; Step 2: Delete the Target MBR Volume…Full steps |
| Method 3. Convert MBR to GPT with Diskpart | Step 1: Turn off the PC and connect the Windows installation DVD or USB; Step 2: Boot the PC…Full steps |
The issue ‘Windows cannot be installed to this disk MBR’ indicates the error message ‘Windows cannot be installed to this disk. The selected disk has an MBR partition style.’ It may appear during the Windows installation process and you cannot install Windows successfully unless you solve it. Another similar error is ‘Windows cannot be installed to this disk. The selected disk is of the GPT partition table.’ This article will tell you how to fix them accordingly and why these errors occur.
How to Fix ‘Windows Cannot Be Installed to This Disk MBR’
How do you fix ‘Windows cannot be installed to this disk’? The error message itself has given the answer: change MBR to GPT. Then how can you convert MBR to GPT? There are three methods.
- Method 1. Convert MBR to GPT without Data Loss
- Method 2. Convert MBR to GPT with Disk Management
- Method 3. Convert MBR to GPT with Diskpart
- Tip
- Both Method 2 and Method 3 will erase all your data on the target volume. If you want to try these two methods, please make a full backup on an external hard drive.
Method 1. Convert MBR to GPT without Data Loss
First, we’d like to recommend an easy and handy tool — EaseUS Partition Master. It will help you to create a bootable USB/CD packaged with the utility, with which you can boot your computer and then use it to change the disk from MBR to GPT. Most important, you can convert the disk without deleting any existing partition and erasing any data.
Key features of EaseUS Partition Master:
- Convert between MBR and GPT easily and freely.
- No data erasing or partition deleting during the converting process.
- Not a throw-away tool. Also supports users to resize/move, merge, or clone partitions.
- 100% secure. Approved by authorized agencies like SOFTPEDIA, PCWorld, Techradar, etc.
Follow the steps here and learn how to convert MBR to GPT and get rid of ‘Windows Cannot Be Installed to This Disk MBR’ error from your PC on your won:
Step 1. Connect an empty USB flash drive, or a CD/DVD disc to a healthy computer, launch EaseUS Partition Master, click «Bootable Media» and select «Create bootable media». Click «Next» to continue.

Step 2. Choose the USB or CD/DVD and click «Create» to start create the bootable media.

Step 3. Connect the USB with bootable media to your PC and restart the computer from EaseUS bootable media.
Press F2/Del to enter BIOS and set the computer to boot the PC from «Removable Devices» (bootable USB disk) or «CD-ROM Drive» (bootable CD/DVD). Press «F10» to save and exit to restart PC into EaseUS bootable media.
Step 4. Once your PC enter EaseUS Partition Master, go to Disk Converter and select «Convert MBR to GPT». Click «Next» to continue.

Step 5. Select the target MBR disk you tend to convert to GPT and click «Convert» to start the conversion.

There is a video tutorial about how to interconvert between MBR and GPT disk with EaseUS Partition Manager. Take a look and try to convert MBR to GPT without data loss.
Method 2. Convert MBR to GPT with Disk Management
You can also convert the disk type in Disk Management on your computer. Besides, to delete a volume, and to extend and shrink a volume are also available with Disk Management. Please follow the steps below to see how to convert the disk from MBR to GPT. This method involves a volume deletion. Please make sure you have made a full backup.
Step 1. Enter Computer Management.
Go to Control Panel, head to Administrative Tool, and choose «Computer Management». You can also right-click «This PC», and choose «Manage» to enter the Computer Management.

Step 2. Delete the Target MBR Volume.
Click «Disk Management», you can see all your disk volumes here. Right-click one volume and choose «Delete Volume». Repeat the process to delete all the volumes.

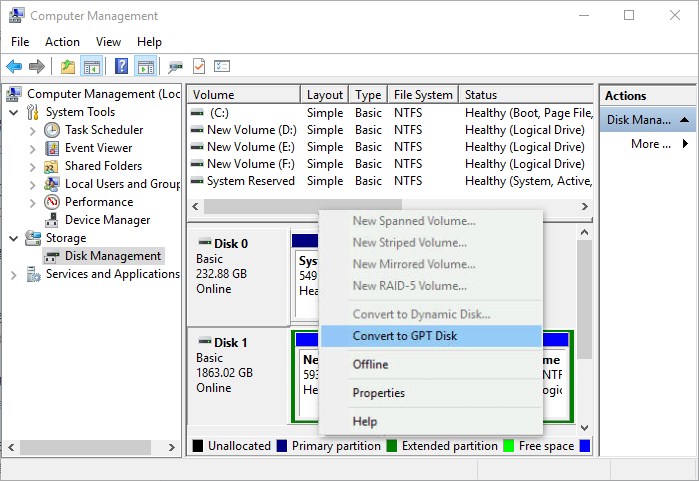
Step 3. Choose Convert to GPT Disk.
Now right-click the MBR disk and choose the option of «Convert to GPT Disk».
Method 3. Convert MBR to GPT with Diskpart
If you attempt to install Windows via the Windows installation DVD or USB, you can also apply it to convert MBR to GPT. However, this method will erase all the existing files on the disk. If you prefer to avoid data loss, you need to use Method 1 or back up your files on the disk with the file backup software — EaseUS Todo Backup. To make a backup of the MBR disk, you also need to create a bootable device via the software.
Step 1. Turn off the PC and put in the Windows installation DVD or USB.
Step 2. Boot the PC from the DVD or USB.
Step 3. In Windows Setup, press «Shift + F10» to start Command Prompt.
Step 4. Enter the following command in order to convert the MBR disk to GPT:
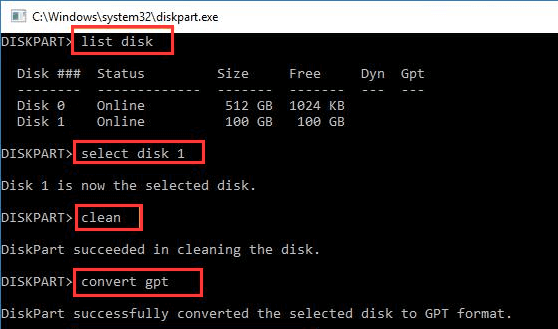
- diskpart
- list disk
- select disk 1 (choose the disk you want to install Windows on)
- clean
- convert gpt
- exit
After entering the above command, close the Command Prompt and continue the Windows installation.
- Notice:
- Most of the computers running Windows 10 support the UEFI firmware with BIOS-compatibility. On computers like that, you can also change UEFI to BIOS mode to fit the MBR disk.
- However, on Windows 11, or with the error message that contains ‘On EFI systems, Windows can only be installed to GPT disks’ which suggests that it’s UEFI-based firmware, you can only convert MBR to GPT to fix the issue.
Which way do you like to solve «the selected disk has an MBR partition table»? Click the button below to share with more people!
Cause of ‘The Selected Disk Has an MBR Partition Table’
The error message itself has already given you the reason why Windows cannot be installed on the MBR disk. That’s because your computer has an EFI system, which is not compatible with an MBR disk. It means your computer’s hardware doesn’t allow you to boot from a disk with the MBR partition table. However, many users have confused about what the MBR partition table is, what an EFI system is, and why can’t Windows installed on an MBR disk on an EFI system. Here are the answers.
What is an MBR Partition Table
The partition table decides the layout of the hard drives like an HDD or SSD and tells Windows how to access the data on it. MBR partition table is a traditional partitioning method that supports disks with a maximum size of 2TB. Besides, MBR has a limit that you can create at most four primary partitions on the MBR disk.
Contrary to MBR, the GPT partition table is a newer standard for disk partitioning. GPT supports disks larger than 2TB and has theoretically no limit on how many partitions you can create on the disk.
Both MBR and GPT are the frequently used partition styles on computers. For more introduction, refer to the article about MBR vs GPT.
What is EFI
Most of the computers use either of the boot mode: BIOS or UEFI (Unified Extensible Firmware Interface). The EFI, Extensible Firmware Interface, is the name of the partition that stores the UEFI boot files.
Why Cannot Windows Be Installed to the MBR Disk
MBR disks use the standard BIOS partition table and GPT disks apply UEFI. That means if your computer has the traditional BIOS firmware, you should install Windows on an MBR disk. Similarly, if the computer is UEFI-based, you can only install Windows on a GPT disk.
You are now clear about why the prompt saying ‘Windows cannot be installed to this disk. The selected disk has an MBR partition table.’ appears. That’s because you are trying to install Windows on an MBR disk on the computer which has UEFI firmware, which is incompatible.
The Bottom Line
The only solution to ‘Windows cannot be installed to this disk MBR’ is to change MBR to GPT. To get it done, you can either use the partition tool — EaseUS Partition Master or Windows installation DVD/USB, depending on whether you want to keep the files on the MBR disk. Hope this article can help you solve the problem successfully.
Related Questions
There are some hot issues related to MBR disk you may be interested in.
«How do I change MBR to GPT?»
If the computer can boot properly, you can change MBR to GPT via Disk Management. If your computer cannot boot, you can use EaseUS Partition Master or Windows installation media to convert MBR to GPT.
«How do I get rid of the MBR partition table?»
The partition table is necessary to use a disk. Thus, you cannot simply get rid of the MBR partition style. Instead, you should convert it to GPT if you don’t want it.
«Can Windows 10 installed on MBR partition?»
Whether you can install Windows on MBR or not depends on the firmware of the computer. You can Windows 10 install on MBR partition if the computer is BIOS-based or UEFI-based with BIOS-compatibility.
«Can Windows 11 be installed on MBR disk?»
No! Actually, Windows 11 requires secure boot mode which only works on UEFI boot mode, and as UEFI boot requires GPT disk type, you’ll need to convert the OS drive into GPT before installing or upgrading to Windows 11.
 Доброго времени!
При установке Windows нередко возникают разного рода проблемы (хотя, конечно, 10-ка в этом плане сильно прибавила и с ней гораздо легче справится…). Однако, «и на старуху бывает проруха»… 👀
В сегодняшней заметке хотел представить решение одной ошибки, связанной с таблицей MBR-разделов (см. скриншот ниже 👇). Появляется она на этапе выбора диска под установку ОС.
Что характерно: это ошибка, в общем-то, мало о чем говорит начинающему пользователю, и ее нельзя пропустить (закрыть, отменить и т.д.).
Также отмечу, что многие из-за нее форматируют жесткий диск (и теряют данные), но это не всегда помогает. Поэтому, если вы столкнулись с подобной проблемой — прежде чем удалять разделы на HDD, ознакомьтесь с материалом статьи…
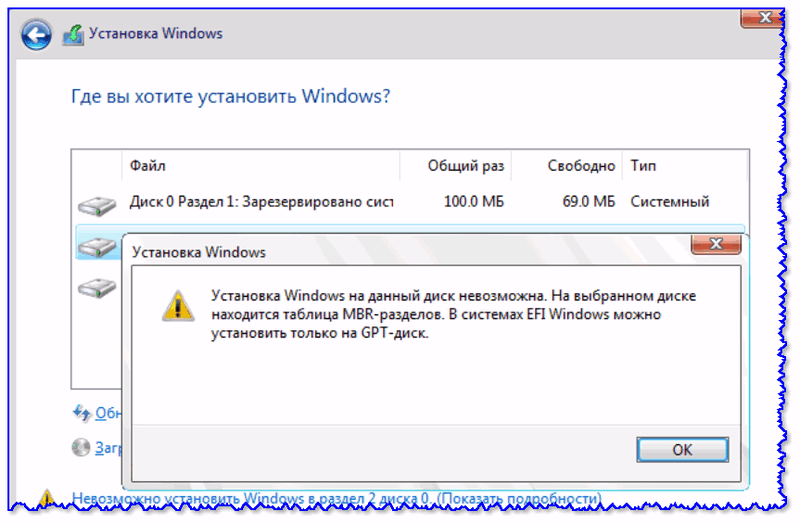
Пример ошибки: «Установка Windows на данный диск невозможна (на диске таблица MBR-разделов)»
*
Варианты решений
📌 1) Через загрузочное меню
В ряде случаев эту проблему можно решить в 2-клика!
После подключения к USB-порту установочной флешки и включения ноутбука — зайдите в Boot Menu (на моем ноутбуке ASUS для этого используется клавиша ESC — нажимать ее лучше несколько раз сразу после кнопки включения!).
*
👉 В помощь!
Горячие клавиши для входа в меню BIOS, Boot Menu — см. инструкцию
*
Зайдя в Boot Menu, — вы увидите все накопители, с которых можно произвести загрузку. В некоторых случаях, ваша загрузочная флешка будет отображаться сразу 2 раза. Обратите внимание на фото ниже: моя флешка «Kingston Data Traveler». 👇
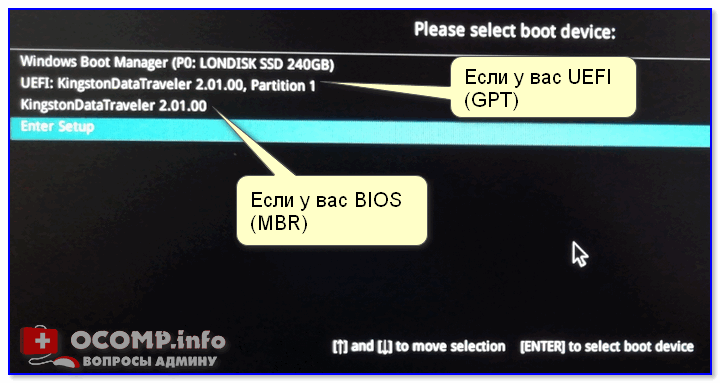
Загрузочное меню (ноутбук ASUS, ESC)
Так вот, выбирая строку без UEFI — я неоднократно избегал подобной ошибки и устанавливал ОС Windows 10. Способ весьма удобный, но, к сожалению, работает не на всех устройствах. Но попробовать его, разумеется, стоит…
*
📌 2) Запись DVD-диска и запуск установки с него
Если у вас на компьютере/ноутбуке есть привод DVD-дисков — то можно порекомендовать попробовать запустить установку ОС с него. Как бы это не показалось странно, но установка с компакт диска проходит без ошибки, связанной с MBR-разделами…
Подготовить установочный DVD можно с помощью спец. средства с сайта Microsoft (см. 👉 тут подробнее об этом).
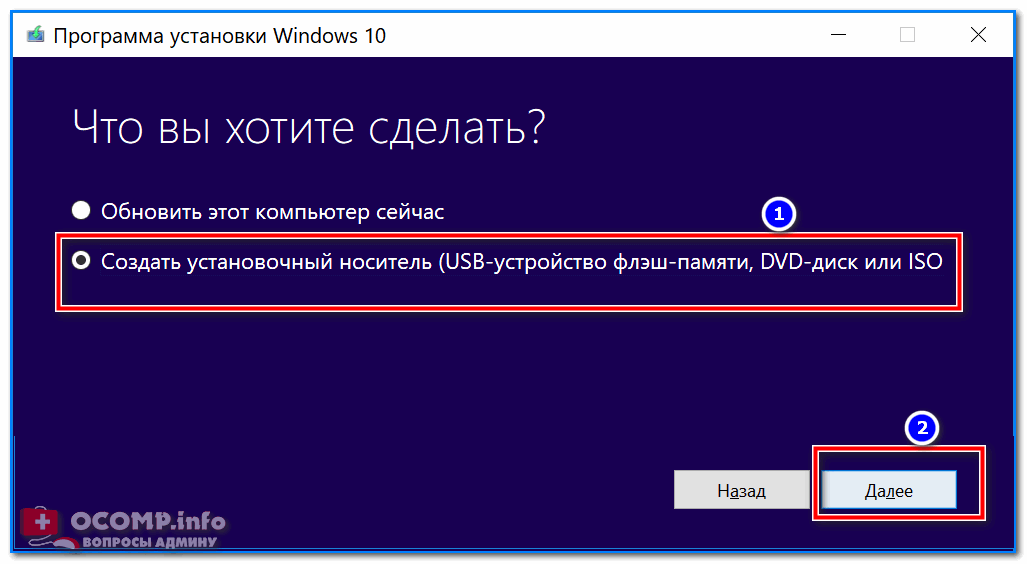
Что вы хотите сделать — программа установки Windows 10
*
👉 Примечание
Для загрузки с компакт диска необходимо установить в BIOS спец. режим загрузки Legacy или CSM (Compatibility Support Mode). Более подробно тут
*
📌 3) Удаление всех разделов
Важно! Все данные на диске при этой операции будут удалены!
Если у вас на диске нет нужных данных — то можно просто удалить ВСЕ разделы на нем (см. скрин ниже 👇), затем выбрать под установку ОС Windows 10/11 «Незанятое место на диске 0» и нажать «Далее».
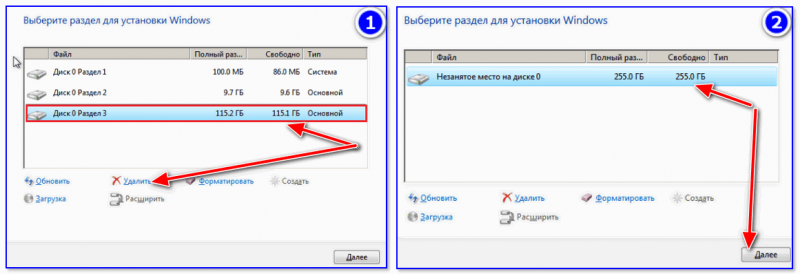
Удаление всех разделов / Кликабельно
После чего, Windows автоматически преобразует диск в GPT, и установщик продолжит свою работу…
*
📌 4) Конвертация диска в GPT с помощью командной строки
Важно! Все данные на диске при этом способе будут удалены!
При появлении окна ошибки — нажмите OK, а после используйте сочетание клавиш Shift + F10 (для ноутбуков возможно потребуется Fn+ Shift + F10). После этого должно появиться окно командной строки.
Далее необходимо по порядку выполнить следующие команды (после каждой нажимать Enter):
- diskpart (запускаем утилиту для работы с дисками);
- list disk (смотрим все подключенные диски к системе);
- select disk 1 (выбираем диск, на который хотим установить Windows. В моем случае этот диск «1», см. скрин ниже);
- clean (очищаем диск от всех данных и разделов);
- convert gpt (конвертация диска в GPT);
- exit (выход).
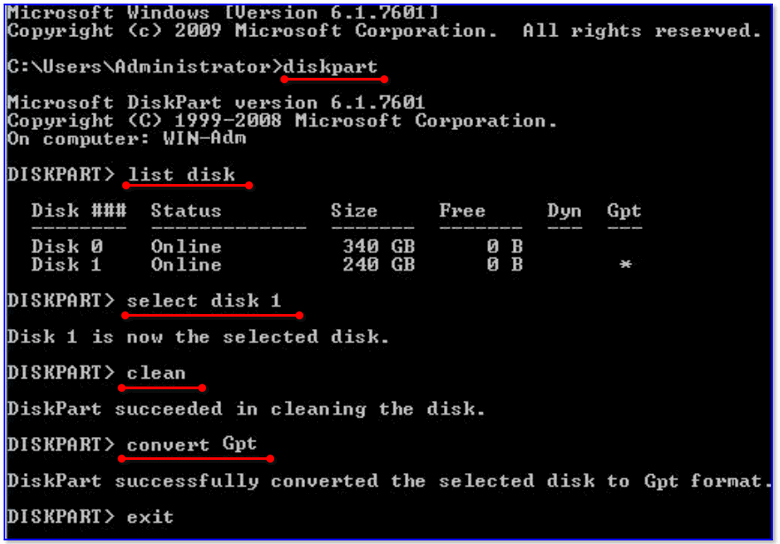
Действия в командной строке
После этого закройте командную строку, нажмите по кнопке «Обновить» — среди списка накопителей вы увидите «Незанятое дисковое пространство», на которое и можно продолжить установку ОС…
*
📌 5) Преобразование диска в GPT с помощью спец. утилит
Примечание! Способ без потери данных!
Если у вас есть второй ноутбук, ПК (либо подготовлена LiveCD-флешка) — то конвертировать диск можно и без потери данных, используя спец. утилиты. Как это будет выглядеть:
- сначала необходимо вынуть диск (на который нужно установить ОС) из ПК (ноутбука) и подключить его к другому устройству (подключение к SATA, подключение M2 накопителя к USB);
- далее установить программу MiniTool Partition Wizard;
- после открыть ее, найти в списке диск и кликнуть по нему правой кнопкой мышки — в появившемся меню указать, что требуется конвертация в GPT (пример на скрине ниже);
- после конвертации, диск необходимо подключить к исходному ПК и начать установку ОС…
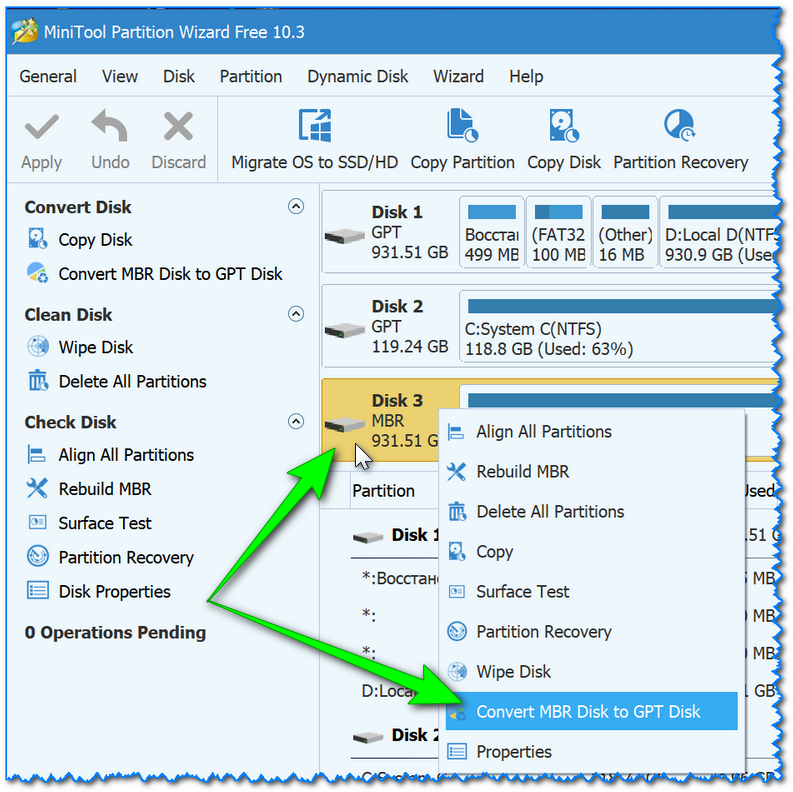
MiniTool Partition Wizard
Примечание: чтобы не вынимать диск и не подключать его к другому ПК в MiniTool Partition Wizard можно создать загрузочную флешку и с нее преобразовать диск в GPT. Однако, подобная функция стала платной (причем, не только в этой программе…).
*
👉 В помощь!
Несколько способов преобразования MBR к GPT и наоборот без потери данных — см. пошаговую инструкцию
*
На этом пока все, удачи!
👋
Первая публикация: 12.08.2019
Корректировка: 10.10.2021


Generally, there are two schemes under which we install Windows on our systems. These are – BIOS Boot Mode and UEFI Boot Mode. Most of the systems having Windows 8 or later came pre-installed have Unified Extensible Firmware Interface (UEFI) boot mode. While the systems we’re using since older days of Windows XP have Basic Input Output System (BIOS) boot mode. Because of two boot modes, there are two type of partitions. For BIOS, we’ve Master Boot Record (MBR) partition table and on UEFI, we’ve GUID Partition Table (GPT) partition style.
Recommended: How to fix corrupted Master Boot Record in Windows 10
So it is obvious that if partition style of one scheme/boot mode comes in the way of another scheme, installation of Windows is blocked. In that case, you may came around either of following two warnings:
a. If you’re installing Windows on UEFI system, and MBR partition table comes in your pathway, this is the message you’ll receive:
Page Contents
Windows cannot be installed to this disk. The selected disk has an MBR partition table. On EFI systems, Windows can only be installed to GPT disks.
This case can be resolved by converting the disk to GPT style.
b. If you’re installing Windows on BIOS system, and GPT partition table comes in your pathway, this warning will prevent you from going ahead:
Windows cannot be installed to this disk. The selected disk is of the GPT partition style.
Here, you’ve to convert the disk to MBR partition table.
In this article, we’ll tell you the process to suppress the error mentioned above by manually wiping the drive and convert it to match MBR or GPT style.
FIX : Windows Cannot Be Installed To This Disk. The Selected Disk Has An MBR Partition Table. On EFI Systems, Windows Can Only Be Installed To GPT Disks.
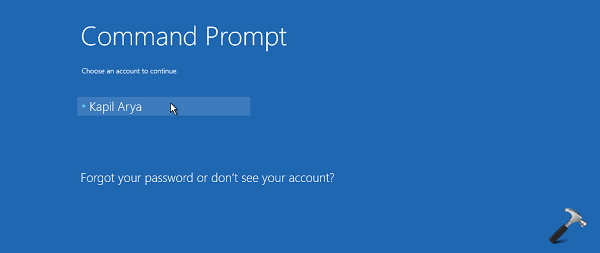
1. Boot into System Recovery Options. Hit the Command prompt entry at following screen:
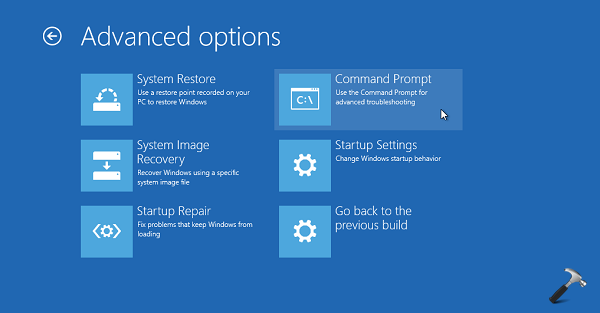
2. Last step will result in opening of Command Prompt at boot.

3. Next, select your admin account and enter its password to continue.
4. Moving on, type following commands (in bold) one-by-one in the Command Prompt window and press Enter key after each:
diskpart
list disk
select disk number Replace number with exact disk number in your case.
clean
convert gpt (for error mentioned in point a) or convert mbr (for error mentioned in point b)
exit

Finally, close the Command Prompt window and reboot with Windows installation media. So now you would not receive any warning and installation can be initiated – as expected.
Hope this helps!
Related: Windows cannot be installed to this disk. This computer’s hardware may not support booting to this disk.
READ THESE ARTICLES NEXT
- How to repair disk errors on Windows 11
- Fix: 100% Disk Usage in Windows 11
- What Is a Dynamic Disk in Windows 10 and How to Use It
- Fix: Windows 11 high disk usage
- [FIX] The Operation Failed To Complete Because The Disk Management Console View Is Not Up-To-Date
- Fix: SSD Not Showing Up in Windows 11/10
- Fix: Windows cannot run disk checking on this volume because it is write protected
- Fix: The disk check could not be performed because Windows can’t access the disk
- Recover permanently deleted files with Windows File Recovery
- How to remove drive letter in Windows 10