Quick Fixes to Windows Cannot Be Installed to This Disk:
- 1. Convert GPT to MBR Without Losing Data
- 2. Reformatting drive to MBR
- 3. Boot into UEFI mode
- Video Guide to Fix «Windows Cannot be Installed to This Disk»
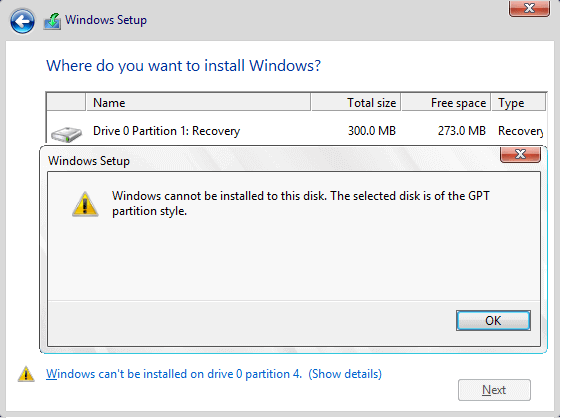
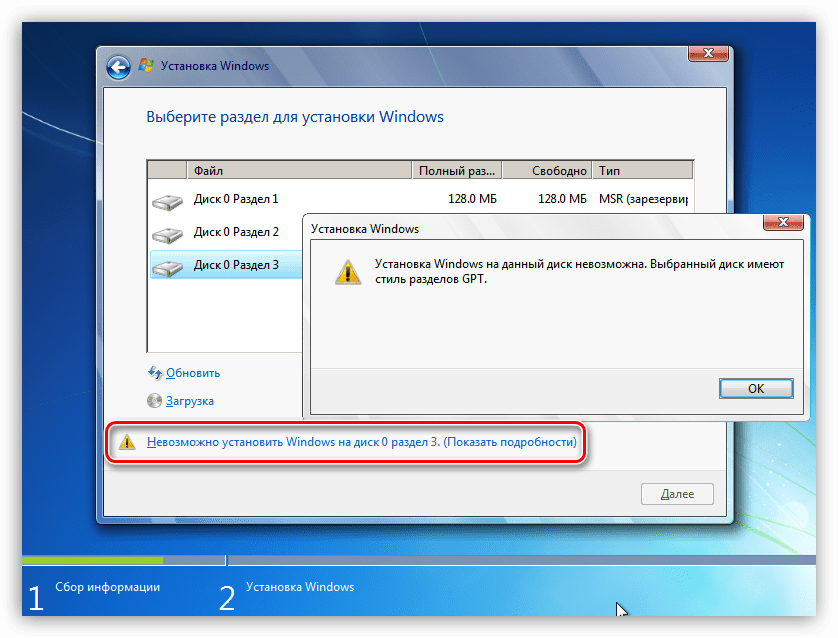
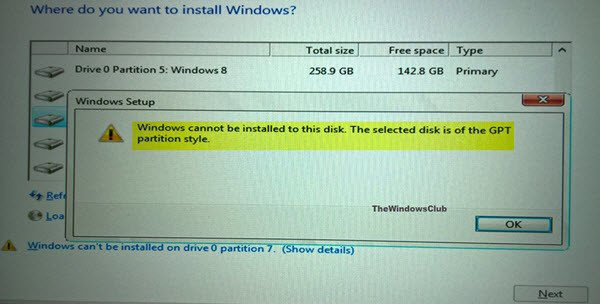
«Windows cannot be installed to this disk GPT» indicates the error message »Windows cannot be installed to this disk. The selected disk is of the GPT partition style.» This is one of the common errors that might occur during Windows installation. When you try to install Windows 10/8/7 on your computer, be it a desktop or Dell/HP laptop, Windows Setup might report the error «Windows cannot be installed to this disk. The selected disk is of the GPT partition style.» If that happens, you cannot continue installing Windows until fixing it.
Cause of ‘The selected disk is of the GPT partition style’
During Windows setup, you must choose to install using the MBR or GPT partition style. When installing Windows on UEFI-based PCs using Windows Setup, your hard drive partition style must be set up to support either UEFI mode or legacy BIOS-compatibility mode. In simple words, when you decide to choose an MBR or GPT partition to install Windows, you must know clearly what motherboard firmware you’re using and keep the two terms matched.
- UEFI → GPT
- Legacy BIOS → MBR
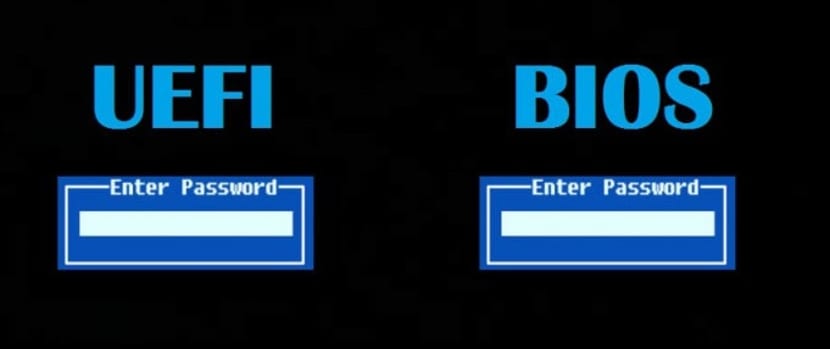
Read further: UEFI vs. BIOS
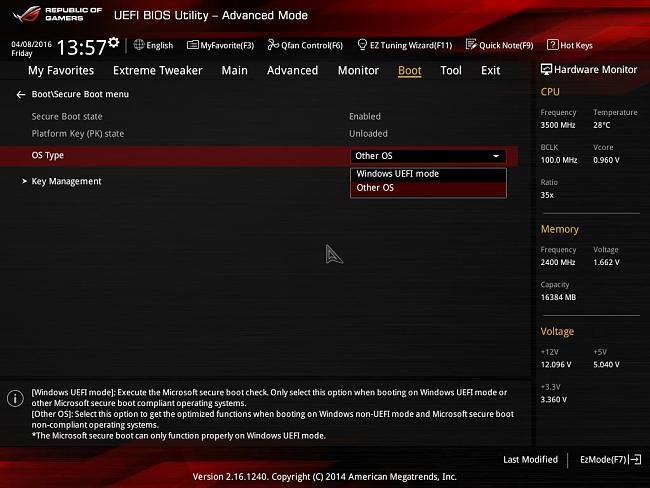
If you see the prompt saying «Windows Cannot be installed to this disk. The selected disk is of the GPT partition style», that’s because your PC is booted in UEFI mode, but your hard drive is not configured for UEFI mode.
How to take care of this GPT partition style issue? Technically, you got two options:
- #1. Convert MBR to GPT partition style to fit the PC’s UEFI firmware features.
- #2. Keep the existing MBR partition style, but reboot the PC in legacy BIOS mode.
3 Solutions to GPT Partition Style Error ‘Windows Cannot Be Installed to This Disk’
As the error causes addressed, all computers will boot to one of the two modes: UEFI or BIOS. If your computer is UEFI-based, you will need to install Windows on a GPT disk. Similarly, if your computer is BIOS-based, you will need to install Windows on an MBR disk. Therefore, GPT is incompatible with legacy BIOS and that’s why you receive the error message «Windows Cannot be installed to this disk. The selected disk is of the GPT partition style.» After figuring out the reasons, the troubleshooting becomes much easier now.
Method 1. Convert GPT to MBR Without Losing Data
As mentioned, the error message indicates that Windows is booted in Legacy mode but the target disk you selected to install Windows is with GPT partition style. That’s how this error occurs. The direct solution to «The selected disk is of the GPT partition style» is to change the target GPT disk to MBR.
We strongly advise you choose a non-data-destroying method to do the GPT to MBR conversion with EaseUS Partition Master, a third-party powerful partition tool that converts GPT to MBR easily without losing data.
Step 1. Install and launch EaseUS Partition Master on your computer, go to the Disk Converter section.
Step 2. Select «Convert GPT to MBR» and click «Next» to continue.
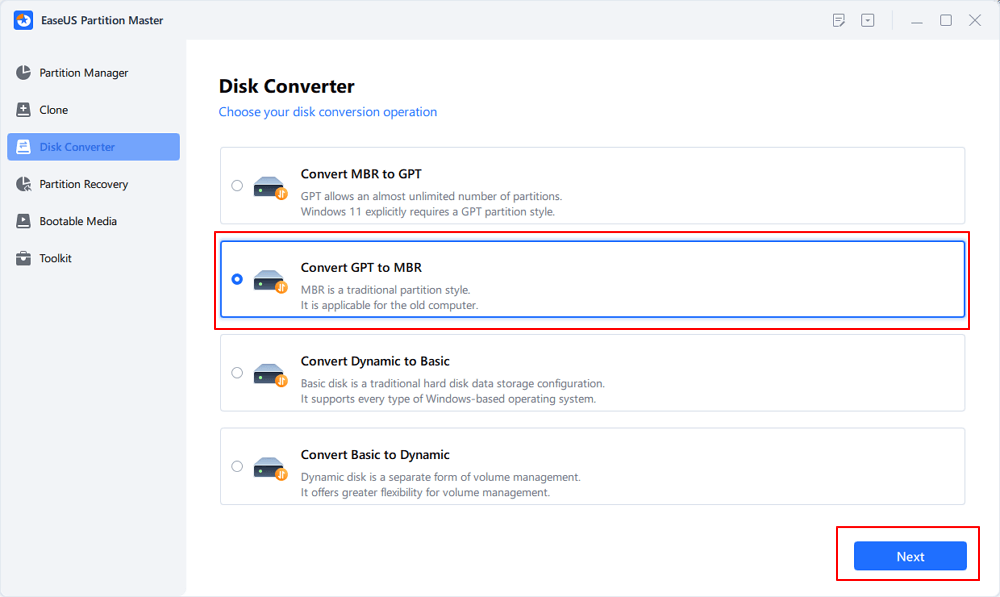
Step 3. Select the target GPT disk that you want to convert to MBR, and click «Convert» to start the conversion.

Having trouble booting your computer system? No problem. With EaseUS partition manager, you are able to create a WinPE bootable media packaged with EaseUS Partition Master on a USB, CD, or DVD. Then you can boot the computer from the device and convert the GPT disk to MBR disk with simple clicks using the tool. (You need another working computer to create the WinPE bootable USB/CD/DVD.)
Method 2. Convert GPT to MBR by Reformatting the Drive
Since you are attempting to install Windows on the disk, you must have a Windows installation DVD or USB, with which you can also convert to MBR. However, this method needs you to manually wipe a drive and convert it to MBR. Reformatting will erase all the data on the drive. Hence, if the data matters, feel no hesitate to preserve your data and convert it to MBR using EaseUS Partition Master. Or, at least create a full backup before reformating the drive.
Step 1. Turn off the PC and put in the Windows installation DVD or USB.
Step 2. Boot the PC from the DVD or USB.
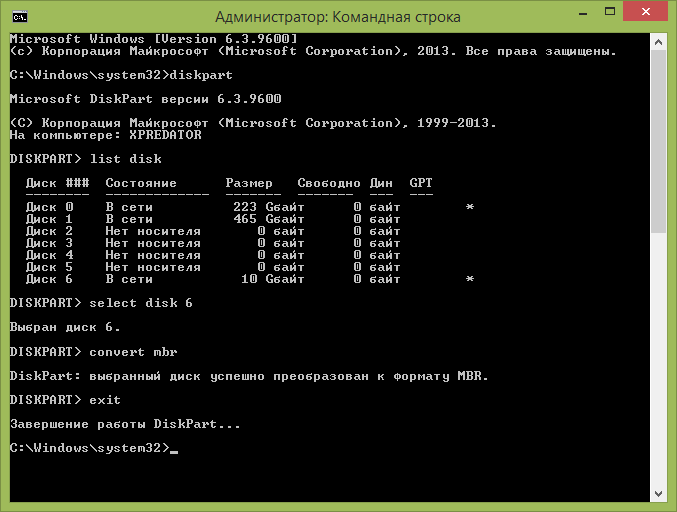
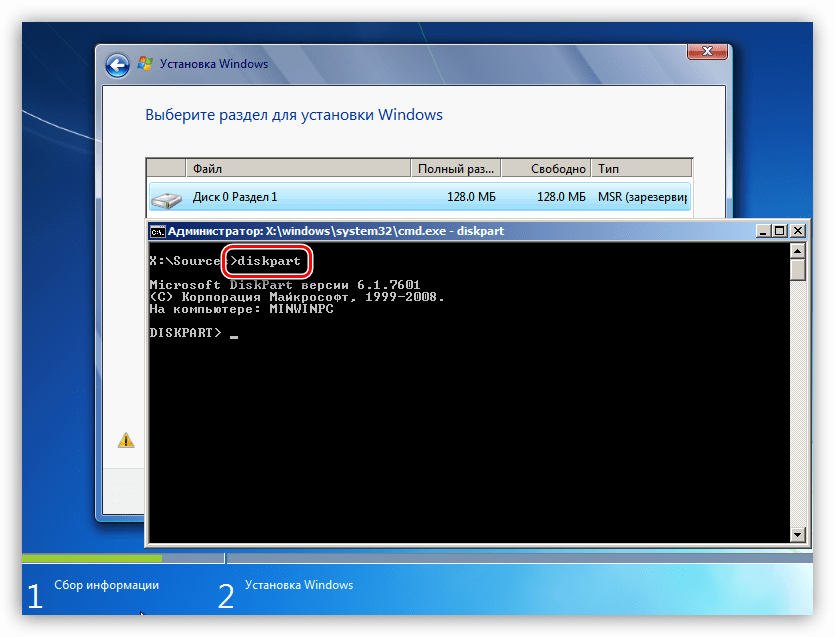
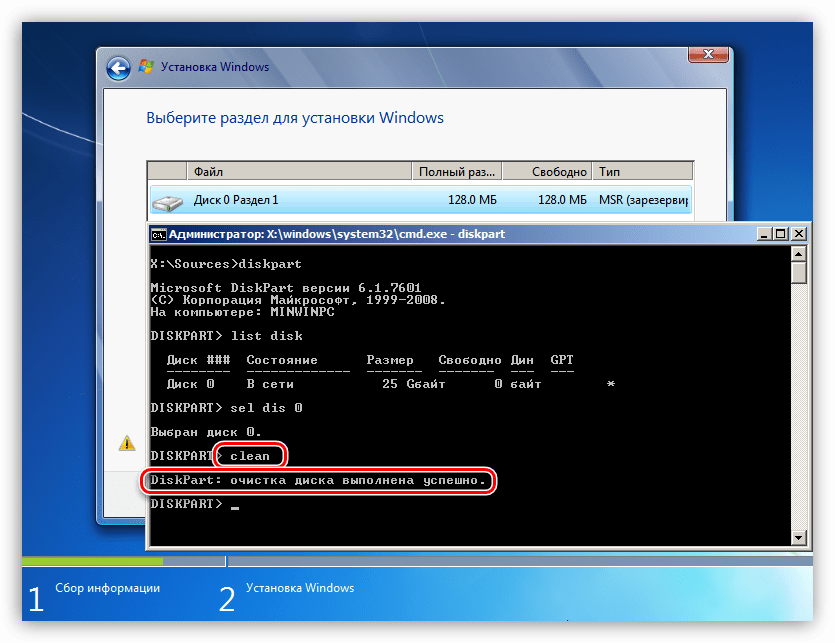
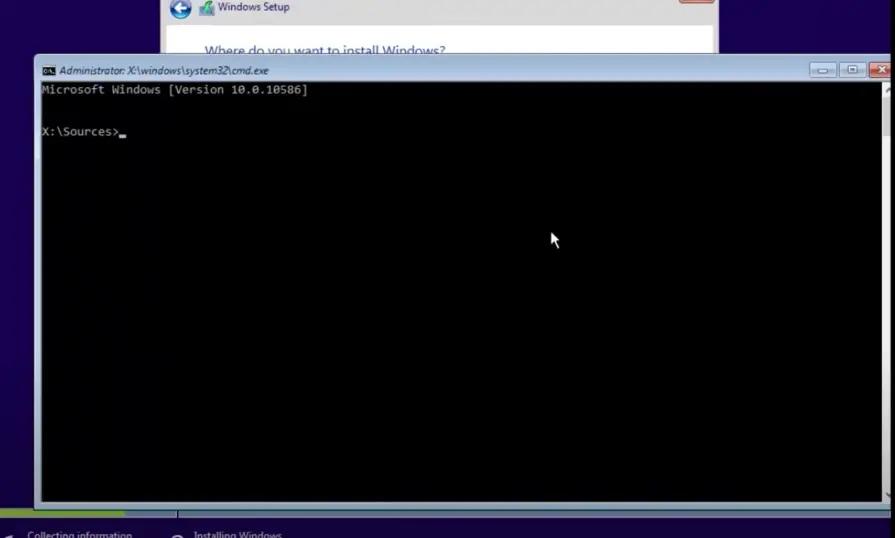
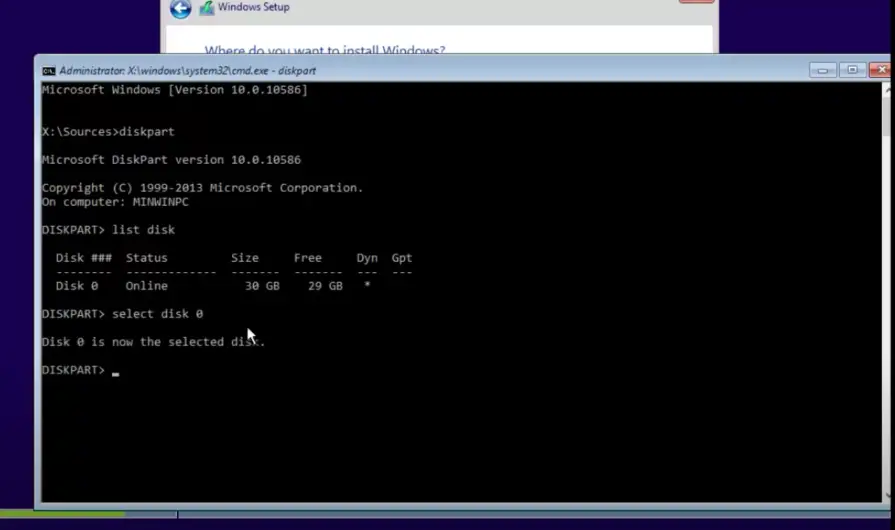
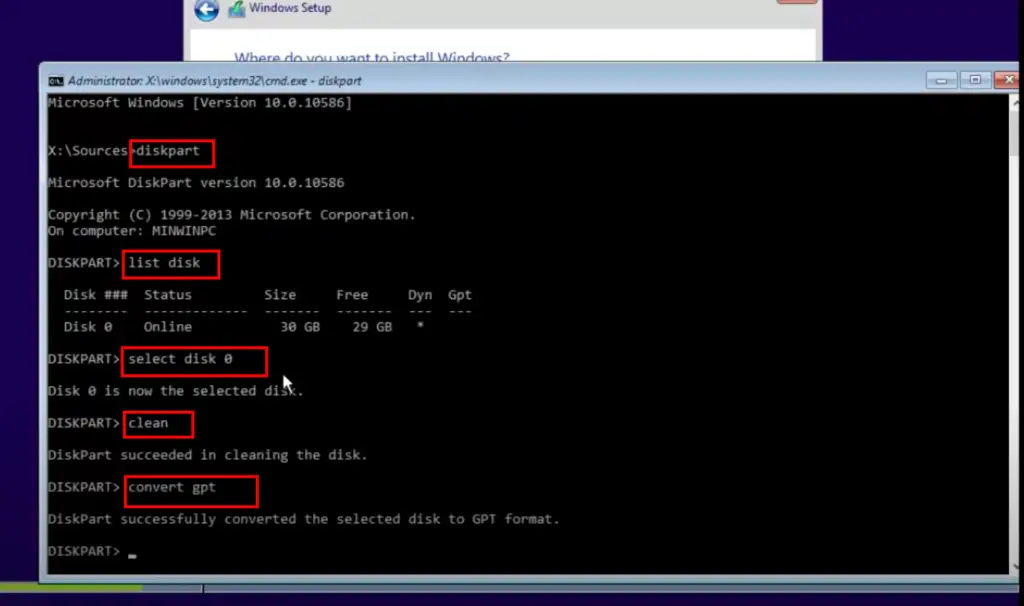
Step 3. In Windows Setup, press «Shift + F10» to start Command Prompt.
Step 4. Enter the following command in order:
- diskpart
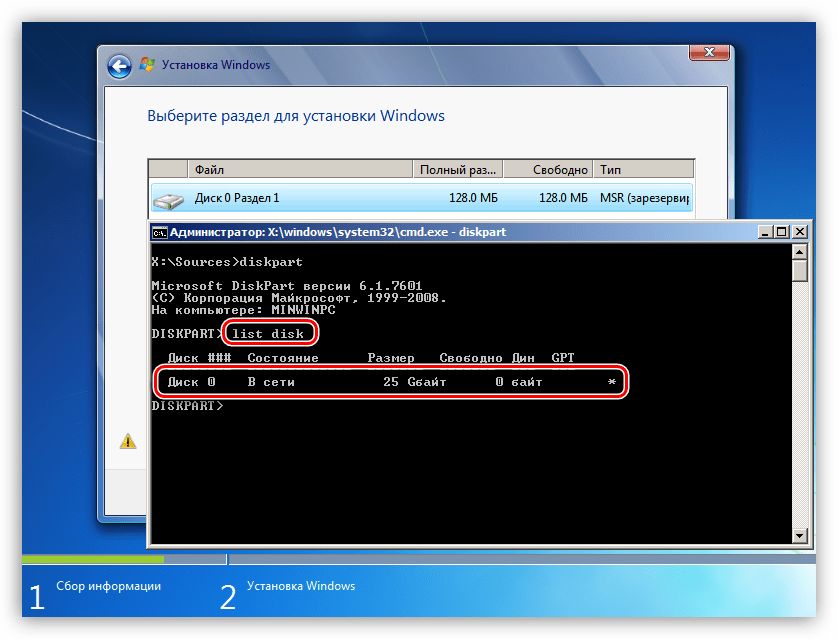
- list disk
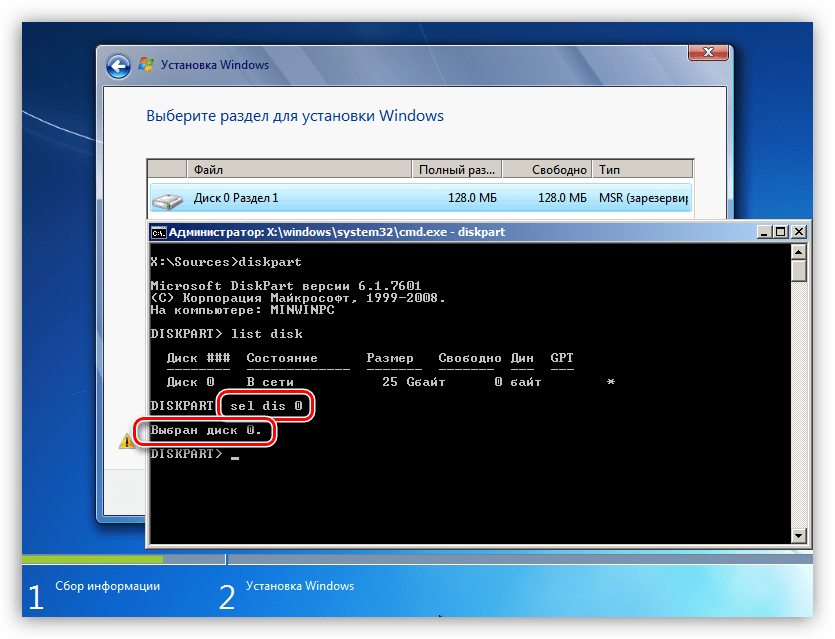
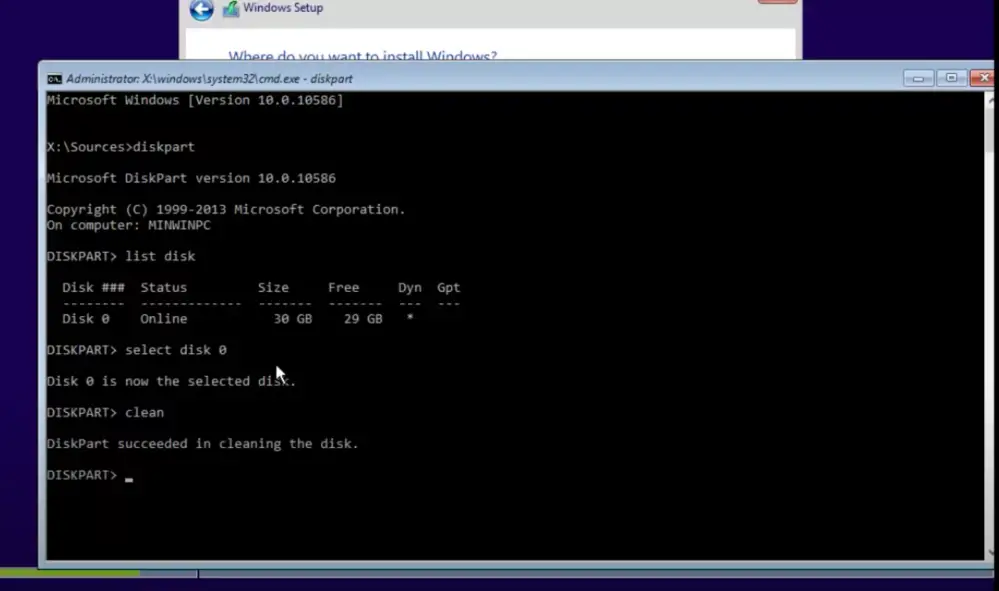
- select disk
- clean
- convert mbr
- exit
Step 5. Close Command Prompt.
Step 6. Continue the Windows installation.
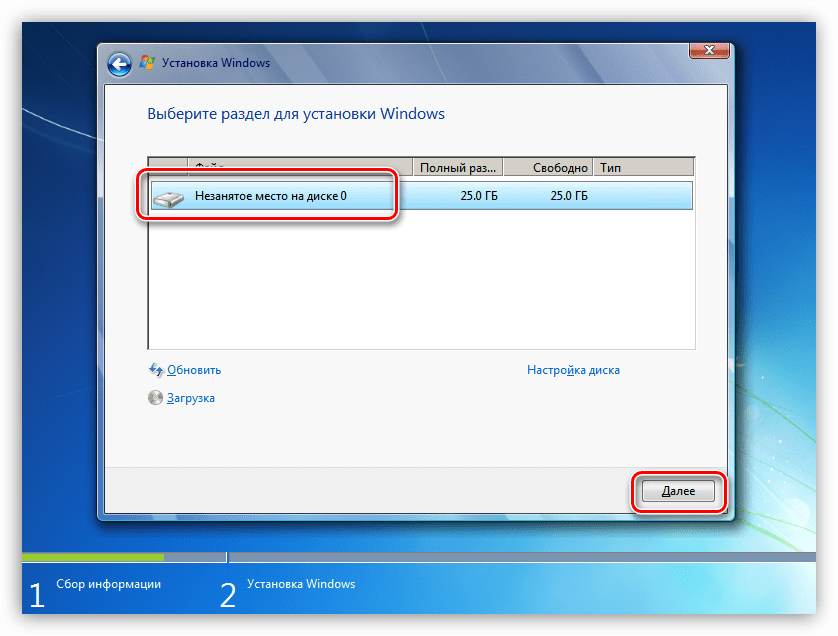
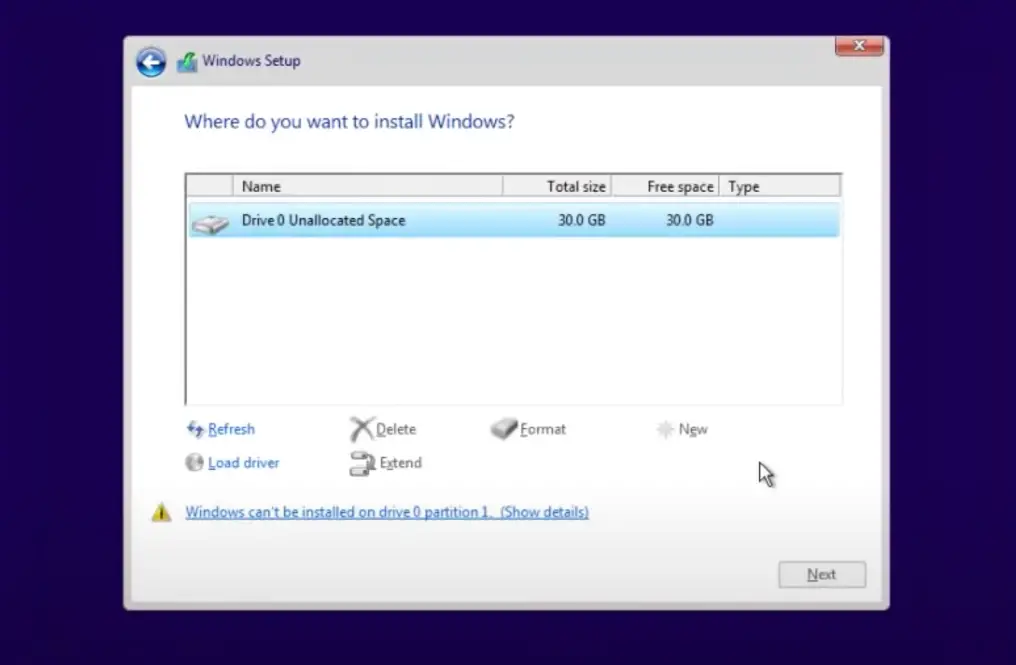
After the conversion, the drive will appear as a single area of unallocated space. Choose the unallocated space and click Next. Windows will begin the installation without sending the same error.
Diskpart commands might be troublesome for users without computing experience, so share this detailed guide to help them.
Video Tutorial: Fix «Windows cannot be installed to this disk. The selected disk is of the GPT partition style»
This video shows how to fix this error via Command Prompt. Follow the step-by-step guide:
Method 3. Boot to UEFI Mode
This solution is not universally applicable. Why? That’s because not all computers have the firmware with both UEFI and BIOS-compatible. Although most of the desktops and laptops running Windows 10 have UEFI-based motherboard with legacy BIOS-compatibility mode, there are some expectations. Older computers running Windows 7 only support legacy BIOS mode and the latest Surface Pro allows only UEFI mode.
When you receive «Windows Cannot be installed to this disk. The selected disk is of the GPT partition style», it suggests that your computer is currently booted in legacy BIOS. To boot to UEFI, you need to check whether the firmware supports UEFI in BIOS and then change to it if the mode is available.
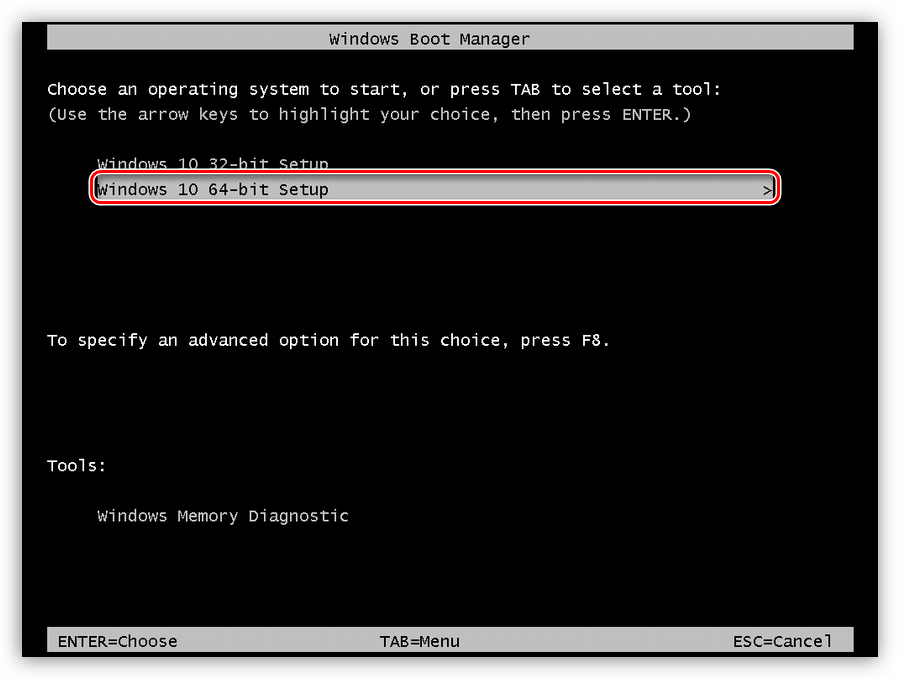
Step 1. Completely shut down your computer.
Step 2. Power on the system. Once you see the logo appears, press the BIOS key, be it Esc, Delete, F1, F2, F10, F11, or F12, to enter BIOS. (Generally, the computer screen will show you what the BIOS key is.)
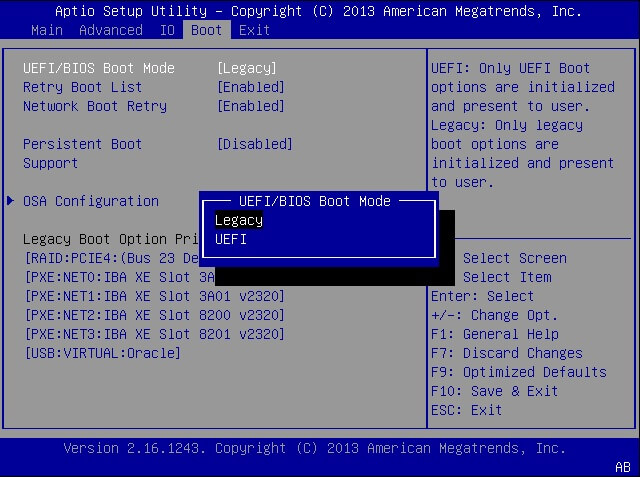
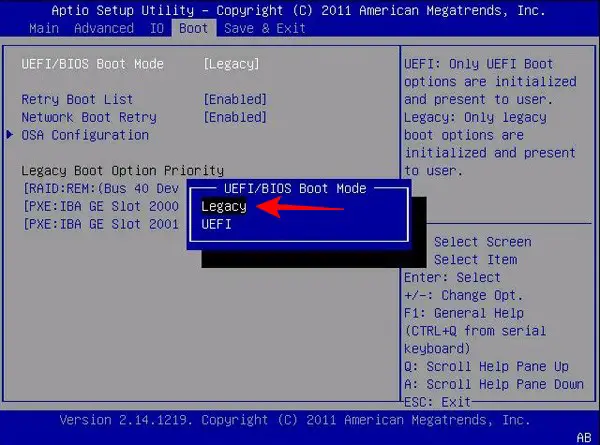
Step 3. Use the arrow key to select and enter the «Boot» tab.
Step 4. Use the down arrow to select UEFI.
Step 5. Save the changes and exit BIOS.
Step 6. Continue Windows installation.
If there is no UEFI mode available, it means that your computer only allows for BIOS mode. In such a situation, you can only change GPT to MBR to fix the «Windows cannot be installed to this disk» error.
The above are the solutions for «Windows cannot be installed to this disk. the selected disk is of the GPT partition style» error. If you find it helpful, you can share the article to help your friends with the same situation.
GPT Partition Style Related Questions
There are other issues related to the GPT partition style that many users are concerned about:
«What Is GPT Partition Style?»
GPT is part of the UEFI standard, which means a UEFI-based system should be installed on a GPT disk. Theoretically, GPT partition style allows you to create unlimited partitions and enables you to fully use disks that are larger than 2TB. Besides, compare GPT and MBR, GPT is safer and has better compatibility with modern hardware.
«Why Windows Cannot Install GPT?»
[Windows Cannot be installed to this disk. The selected disk is of the GPT partition style] means that your PC is booted in UEFI mode, but your hard drive is not configured for UEFI mode.
«How do I get rid of GPT partition style?»
You cannot ‘get rid of’ a GPT partition style. A partition style is necessary for Windows to access the data on the device. But you can change the GPT partition style to MBR by conversion.?
«How do I create a GPT partition?»
The partition style of the disk is decided when you first initialize it. When you initialize a disk, you need to choose GPT or MBR as the partitioning method. If you need to, you can change an MBR disk to GPT disk or vice versa.
«Can Windows 10 be installed on GPT?»
As long as your computer is UEFI-based, you can install Windows 10 on a GPT disk. In addition to Windows 10, earlier versions like Windows 8 and Windows 8.1 can also be installed on a GPT disk.
Related Error: «Windows cannot be installed to this disk. The selected disk has an MBR partition table.»
Similar to «Windows cannot be installed to this disk GPT», if your computer is booted in UEFI mode but the hard drive is MBR, which is not configured for UEFI, you will receive the error message «Windows cannot be installed to this disk. The selected disk has an MBR partition table. On EFI systems, Windows can only be installed to GPT disks.»
With the knowledge introduced above, you know that you can change the boot mode to convert the disk to solve the problem. However, since it’s clear that the computer firmware is UEFI-based, you can only convert MBR to GPT to cope with the issue since legacy BIOS is not supported by the computer.
The Bottom Line — Fix Windows Cannot Be Installed on This Disk/Drive
A PC uses either of the boot methods: UEFI-GPT or BIOS-MBR. Whether installing using the MBR or GPT depends on your computer firmware. If you get a BIOS-based computer, you can only install Windows on an MBR disk, If you get a UEFI-based PC, choose GPT instead, while if your computer firmware supports both UEFI and BIOS, choose GPT or MBR according to your needs.?
With that in mind, you will be clear about how to fix «Windows Cannot be installed to this disk. The selected disk is of the GPT partition style.»
 Если при установке Windows 7, 8 или Windows 10 на компьютер вы видите сообщение о том, что установка Windows на данный диск невозможна, так как выбранный диск имеет стиль разделов GPT, ниже вы найдете подробную информацию о том, почему так происходит и что делать, чтобы установить систему на данный диск. Также в конце инструкции присутствует видео по конвертации стиля разделов GPT в MBR.
В инструкции будет рассмотрено два варианта решения проблемы с невозможностью установки Windows на диск GPT — в первом случае мы все-таки установим систему на такой диск, а во втором — конвертируем его в MBR (в данном случае ошибка не появится). Ну и заодно в заключительной части статьи постараюсь рассказать, что лучше из этих двух вариантов и о чем вообще идет речь. Схожие ошибки: Нам не удалось создать новый или найти существующий раздел при установке Windows 10, Установка Windows на данный диск невозможна.
Какой способ использовать
Как я написал выше, есть два варианта исправить ошибку «Выбранный диск имеет стиль разделов GPT» — установка на GPT диск, вне зависимости от версии ОС или конвертация диска в MBR.
Я рекомендую выбрать один из них в зависимости от следующих параметров
- Если у вас относительно новый компьютер с UEFI (при входе в БИОС вы видите графический интерфейс, с мышкой и оформлением, а не просто синий экран с белыми буквами) и вы устанавливаете 64-разрядную систему — лучше установить Windows на GPT диск, то есть использовать первый способ. К тому же, скорее всего, на нем уже была установлена Windows 10, 8 или 7 на GPT, а вы в данный момент переустанавливаете систему (хотя не факт).
- Если компьютер старый, с обычным БИОС или вы устанавливаете 32-разрядную Windows 7, то лучше (а возможно и единственный вариант) конвертировать GPT в MBR, о чем я напишу во втором способе. Однако учитывайте пару ограничений: MBR диски не могут быть больше 2 Тб, создание более 4-х разделов на них затруднено.
Более подробно о разнице между GPT и MBR напишу ниже.
Установка Windows 10, Windows 7 и 8 на GPT диск

С проблемами при установке на диск со стилем разделов GPT чаще сталкиваются пользователи, устанавливающие Windows 7, но и в 8-й версии можно получить ту же самую ошибку с текстом о том, что установка на данный диск невозможна.
Для того, чтобы установить Windows на диск GPT нам потребуется выполнить следующие условия (какое-то из них на данный момент не выполняется, раз появляется ошибка):
- Устанавливать 64-разрядную систему
- Загружаться в EFI режиме.
Наиболее вероятно, что не выполняется второе условие, а потому сразу о том, как это решить. Возможно, для этого будет достаточно одного шага (изменение параметров БИОС), возможно — двух (добавляется подготовка загрузочного UEFI накопителя).
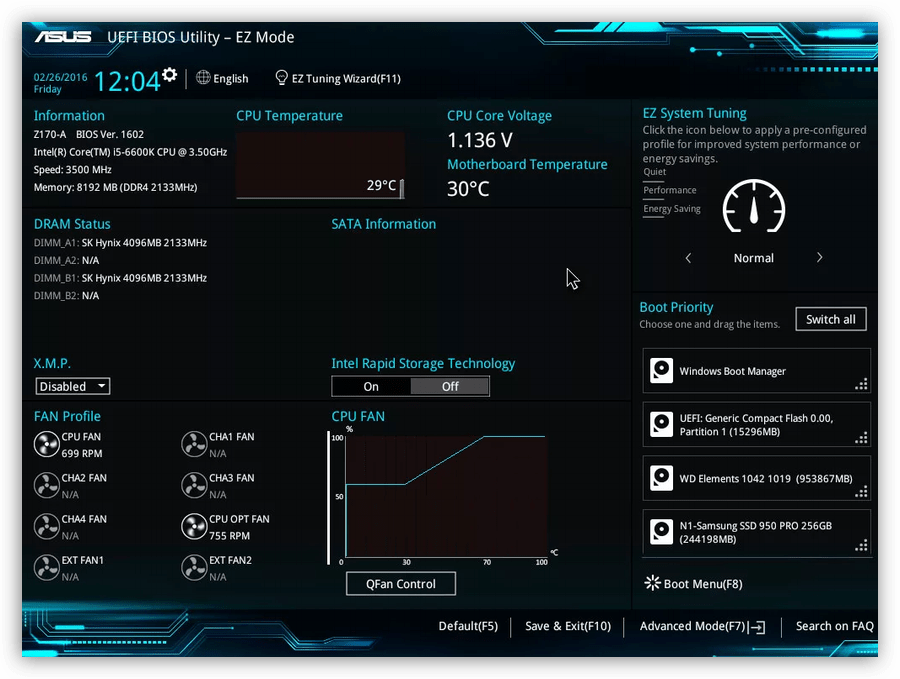
Для начала следует заглянуть в БИОС (ПО UEFI) вашего компьютера. Как правило, для того, чтобы зайти в БИОС нужно нажать определенную клавишу сразу после включения компьютера (при появлении информации о производителе материнской платы, ноутбука и т.д.) — обычно Del для стационарных ПК и F2 для ноутбуков (но может отличаться, обычно на нужном экране написано Press название_клавиши to enter setup или что-то подобное).
Если на компьютере в текущий момент установлена работоспособная Windows 8 и 8.1 вы можете войти в интерфейс UEFI еще проще — через панель Charms (та, что справа) зайдите в изменение параметров компьютера — обновление и восстановление — восстановление — особые варианты загрузки и нажать кнопку «Перезагрузить сейчас». Затем потребуется выбрать Диагностика — Дополнительные параметры — Встроенное ПО UEFI. Также подробно о том, Как зайти в БИОС и UEFI Windows 10.
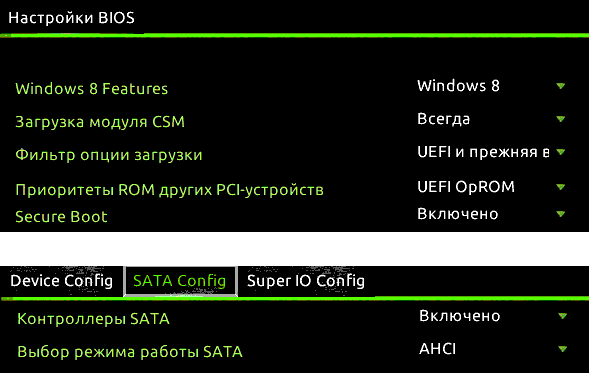
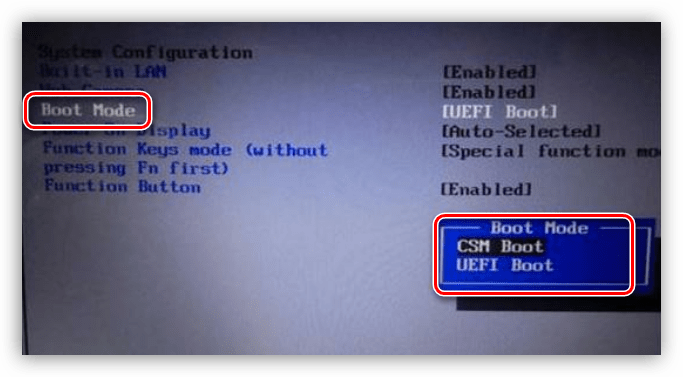
В БИОС требуется включить следующие две важные опции:
- Включить загрузку UEFI вместо CSM (Compatibility Support Mode), обычно находится в BIOS Features или BIOS Setup.
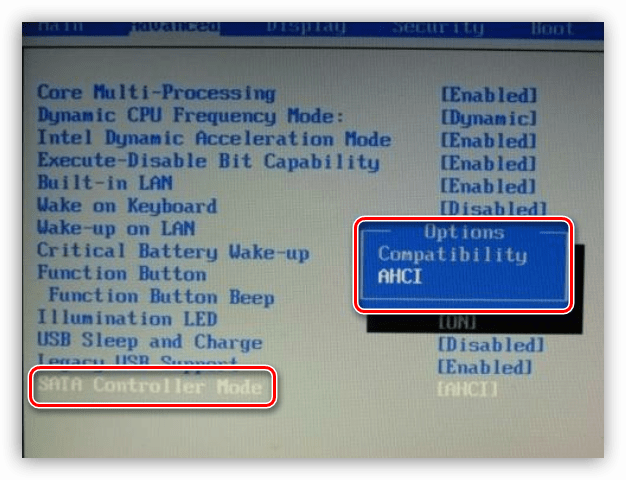
- Режим работы SATA установить в AHCI вместо IDE (обычно настраивается в разделе Peripherals)
- Только для Windows 7 и более ранних — Отключить Secure Boot
В разных вариантах интерфейса и языка пункты могут располагаться по-разному и иметь несколько отличающиеся обозначения, но обычно их не сложно выявить. На скриншоте изображен мой вариант.
После сохранения настроек ваш компьютер, в целом, готов к установке Windows на GPT диск. Если вы устанавливаете систему с диска, то вероятнее всего, в этот раз вам не сообщат о том, что установка Windows на этот диск невозможна.
Если же вы используете загрузочную флешку и ошибка вновь появляется, то рекомендую вам записать заново установочный USB с тем, чтобы он поддерживал загрузку UEFI. Для этого существуют различные способы, но я бы посоветовал способ создания загрузочной флешки UEFI с помощью командной строки, который будет работать практически в любой ситуации (при отсутствии ошибок в настройке БИОС).
Дополнительная информация для опытных пользователей: если дистрибутив поддерживает оба варианта загрузки, то предотвратить загрузку в режиме BIOS можно удалив файл bootmgr в корне накопителя (аналогично, удалив папку efi вы можете исключить загрузку в режиме UEFI).
На этом все, так как полагаю, что с тем, как поставить загрузку с флешки в БИОС и установить Windows на компьютер вы уже знаете (если вдруг нет, то на моем сайте есть эта информация в соответствующем разделе).
Конвертация GPT в MBR во время установки ОС
В случае если вы предпочитаете конвертировать диск GPT в MBR, на компьютере «обычный» БИОС (или UEFI с режимом загрузки CSM), а устанавливать, по всей видимости, планируется Windows 7, то оптимальная возможность сделать это имеется на этапе установки ОС.
Примечание: во время выполнения описанных ниже действий все данные с диска будут удалены (со всех разделов диска).
Для того, чтобы конвертировать GPT в MBR, в программе установки Windows нажмите клавиши Shift + F10 (или Shift + Fn + F10 для некоторых ноутбуков), после чего откроется командная строка. После чего по порядку введите следующие команды:
- diskpart
- list disk (после выполнения этой команды вам нужно будет отметить для себя номер диска, который нужно конвертировать)
- select disk N (где N — номер диска из предыдущей команды)
- clean (очистка диска)
- convert mbr
- create partition primary
- active
- format fs=ntfs quick
- assign
- exit
Также может пригодиться: Другие способы конвертировать диск GPT в MBR. Дополнительно, еще из одной инструкции с описанием подобной ошибки, вы можете использовать второй способ для конвертации в MBR без потери данных: На выбранном диске находится таблица MBR-разделов при установке Windows (только конвертировать нужно будет не в GPT, как в инструкции, а в MBR).
Если при выполнении данных команд вы находились на этапе настройки дисков во время установки, то нажмите «Обновить» для обновления конфигурации дисков. Дальнейшая установка происходит в обычном режиме, сообщение о том, что диск имеет стиль разделов GPT не появляется.
Что делать, если диск имеет стиль разделов GPT — видео
В видео ниже показан лишь один из вариантов решения проблемы, а именно — конвертация диска из GPT в MBR, как с потерей, так и без потери данных.
В случае, если при конвертации продемонстрированным способом без потери данных, программа сообщает, что не может конвертировать системный диск, вы можете удалить с ее же помощью первый скрытый раздел с загрузчиком, после чего конвертация станет возможной.
UEFI, GPT, BIOS и MBR — что это такое
На «старых» (в действительности, пока не такие уж и старые) компьютерах в материнской плате было установлено программное обеспечение BIOS, которое проводило первичную диагностику и анализ компьютера, после чего загружало операционную систему, ориентируясь на загрузочную запись жесткого диска MBR.
Программное обеспечение UEFI приходит на замену BIOS на производящихся в настоящее время компьютерах (точнее — материнских платах) и большинство производителей перешли к данному варианту.
Среди преимуществ UEFI — более высокие скорости загрузки, функции безопасности, такие как безопасная загрузка и поддержка аппаратно зашифрованных жестких дисков, драйверов UEFI. А также, о чем и шла речь в руководстве — работа со стилем разделов GPT, что облегчает поддержку накопителей больших размеров и с большим количеством разделов. (Помимо перечисленного, на большинстве систем ПО UEFI имеет функции совместимости с БИОС и MBR).
Что лучше? Как пользователь, на настоящий момент времени я не ощущаю преимуществ одного варианта перед другим. С другой стороны, уверен, в скором времени альтернативы не будет — только UEFI и GPT, а жесткие диски более 4 Тб.
Содержание
- Решаем проблему дисков GPT
- Способ 1: Настройка параметров BIOS
- Способ 2: Флешка UEFI
- Способ 3: Конвертирование GPT в MBR
- Способ 4: Удаление разделов
- Заключение
- Вопросы и ответы
В настоящее время, когда в сети доступна практически любая информация, каждый пользователь способен установить на свой компьютер операционную систему. Вместе с тем даже такая простая, на первый взгляд, процедура может вызвать затруднения, выражающиеся в виде различных ошибок программы установки. Сегодня поговорим о том, как решить проблему с невозможностью инсталлировать Windows на диск формата GPT.
На сегодняшний день в природе существует два типа форматов дисков — MBR и GPT. Первым пользуется BIOS для определения и запуска активного раздела. Второй применяется с более современными версиями микропрограммного обеспечения – UEFI, которые имеют графический интерфейс для управления параметрами.
Ошибка, о которой мы сегодня говорим, возникает из-за несовместимости BIOS и GPT. Чаще всего это происходит из-за неправильных настроек. Также ее можно получить при попытке установки Windows х86 или несоответствии загрузочного носителя (флешки) требованиям системы.
Проблему с разрядностью решить довольно просто: перед началом установки убедитесь, что на носитель записан образ х64 операционной системы. Если образ универсальный, то на первом этапе нужно выбрать соответствующий вариант.
Далее разберем способы решения остальных проблем.
Способ 1: Настройка параметров BIOS
К возникновению данной ошибки могут привести измененные настройки БИОС, в котором отключена функция загрузки UEFI, а также включен режим «Secure Boot». Последний препятствует нормальному определению загрузочных носителей. Также стоит обратить внимание на режим работы SATA – он должен быть переключен в режим AHCI.
- UEFI включается в разделе «Features» либо «Setup». Обычно параметром по умолчанию является «CSM», его необходимо переключить на нужное значение.

- Режим защищенной загрузки можно отключить, выполнив в обратном порядке действия, описанные в статье ниже.
Подробнее: Отключаем UEFI в BIOS
- Режим AHCI можно включить в разделах «Main», «Advanced» или «Peripherals».
Подробнее: Включаем AHCI режим в BIOS

Если в вашем БИОС отсутствуют все или некоторые параметры, то придется поработать непосредственно с самим диском. Об этом поговорим ниже.
Способ 2: Флешка UEFI
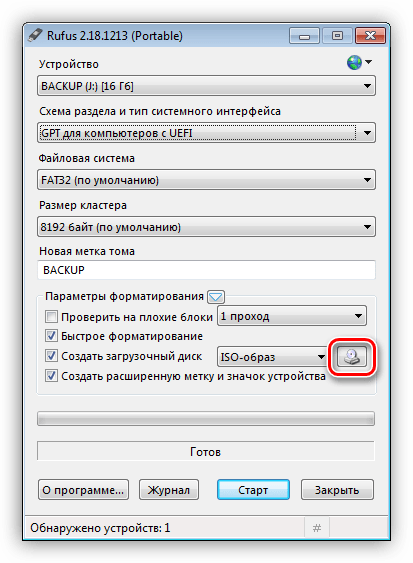
Такая флешка представляет собой носитель с записанным на него образом ОС, поддерживающий загрузку в UEFI. Если планируется установка Windows на GPT-диск, то желательно озаботиться ее созданием заранее. Делается это с помощью программы Rufus.
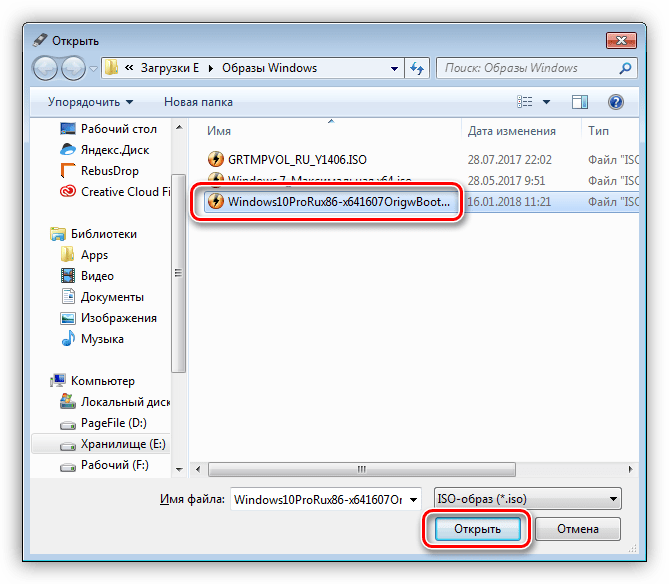
- В окне софта выбираем носитель, на который необходимо записать образ. Затем в списке выбора схемы раздела выставляем значение «GPT для компьютеров с UEFI».

- Нажимаем кнопку поиска образа.
- Находим соответствующий файл на диске и нажимаем «Открыть».

- Метка тома должна поменяться на название образа, после чего жмем «Старт» и ждем окончания процесса записи.

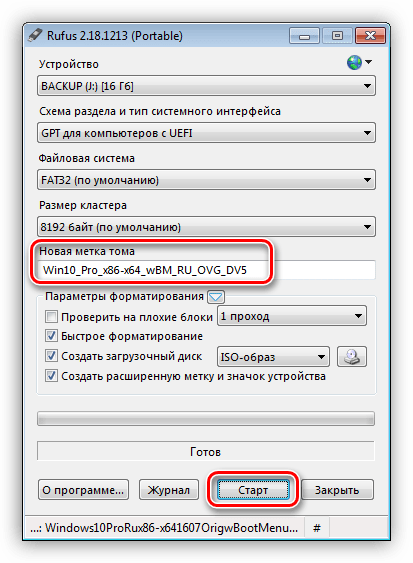
Если возможности создать UEFI-флешку нет, переходим к следующим вариантам решения.
Способ 3: Конвертирование GPT в MBR
Данный вариант подразумевает преобразование одного формата в другой. Сделать это можно как из загруженной операционной системы, так и непосредственно при установке Windows. Обратите внимание, что все данные на диске будут безвозвратно утрачены.
Вариант 1: Системные средства и программы
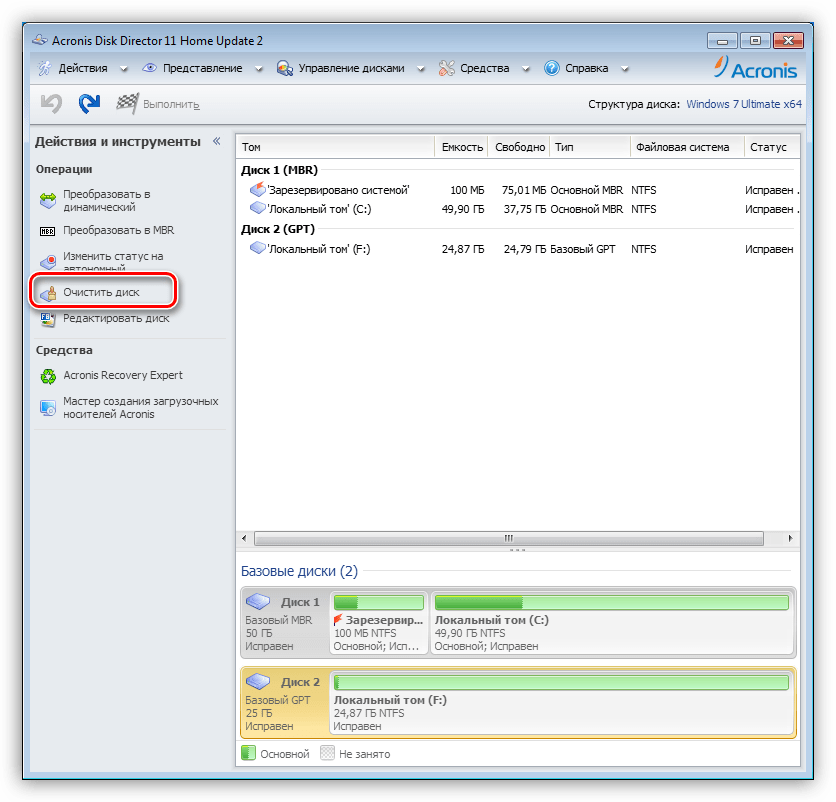
Для конвертирования форматов можно воспользоваться такими программами для обслуживания дисков, как Acronis Disk Director или MiniTool Partition Wizard. Рассмотрим метод с применением Акрониса.
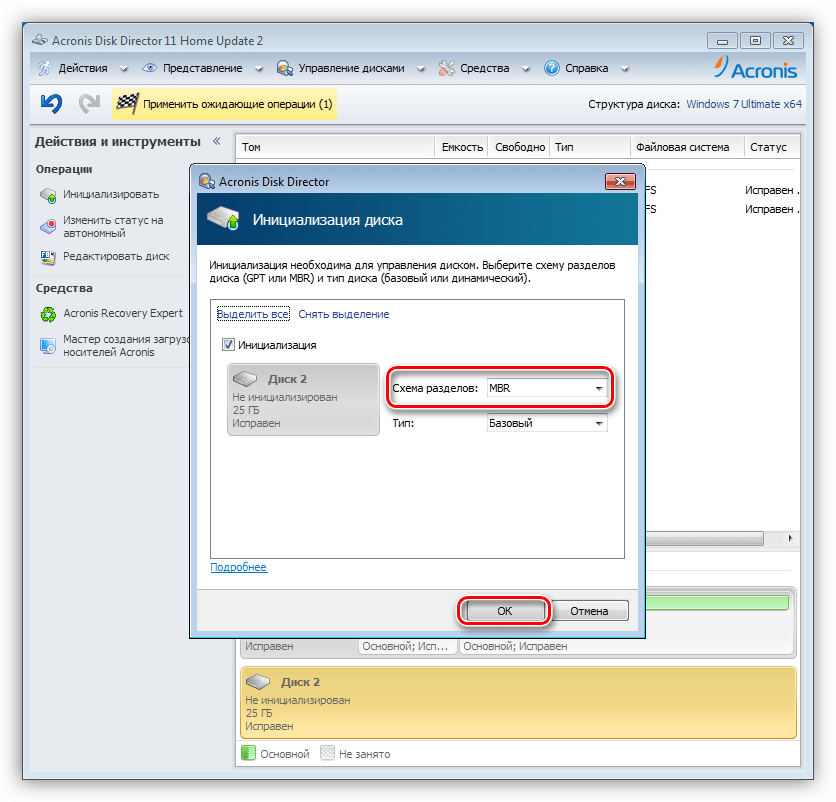
- Запускаем программу и выбираем наш диск GPT. Внимание: не раздел на нем, а именно весь диск (см. скриншот).

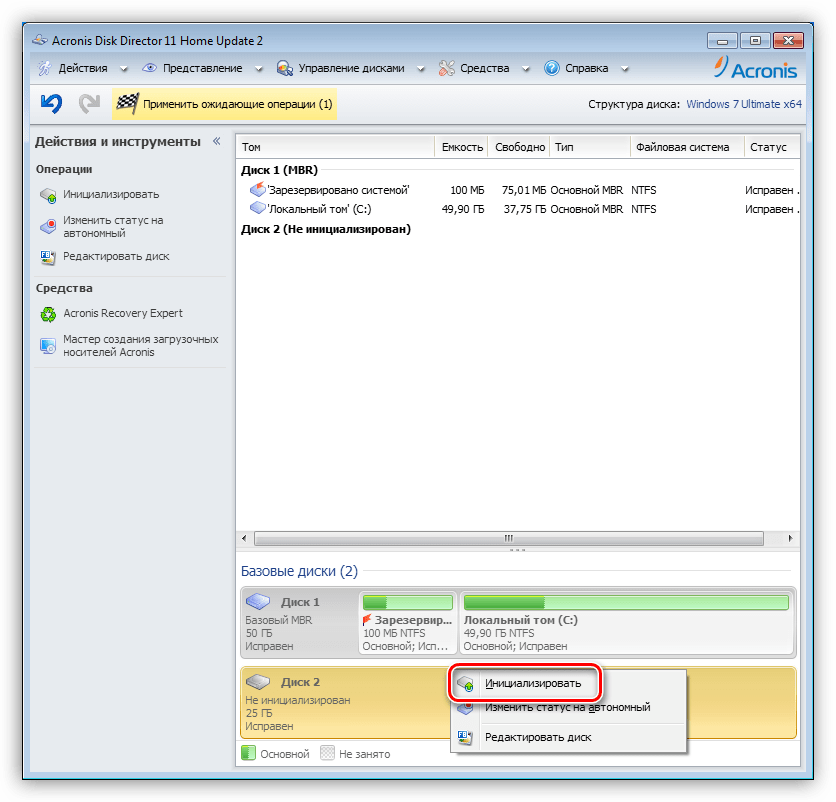
- Далее находим в списке настроек слева «Очистить диск».
- Кликаем по диску ПКМ и выбираем пункт «Инициализировать».
- В открывшемся окне настроек выбираем схему разделов MBR и жмем ОК.
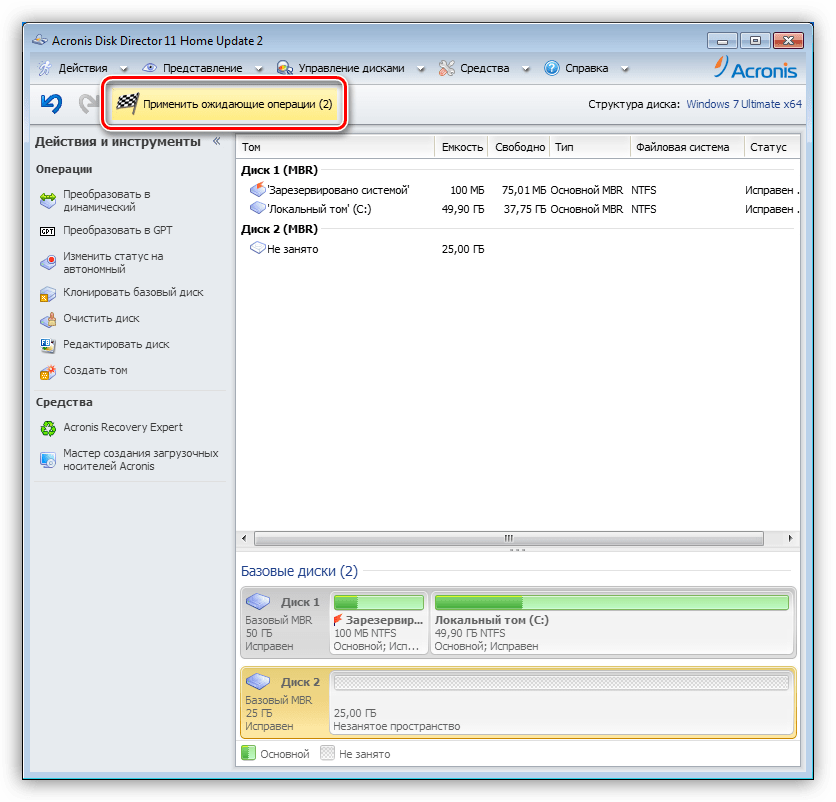
- Применяем ожидающие операции.

Средствами Windows это делается так:
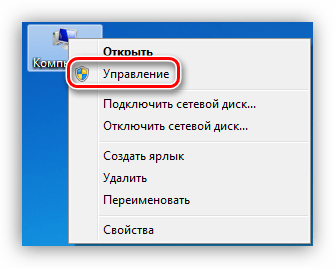
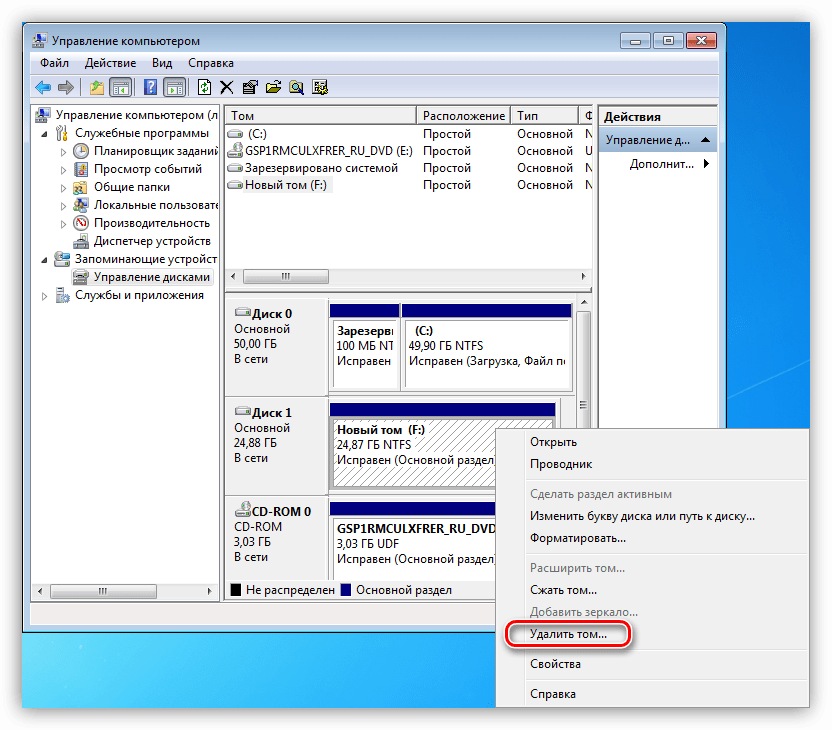
- Нажимаем ПКМ по значку компьютера на рабочем столе и переходим к пункту «Управление».

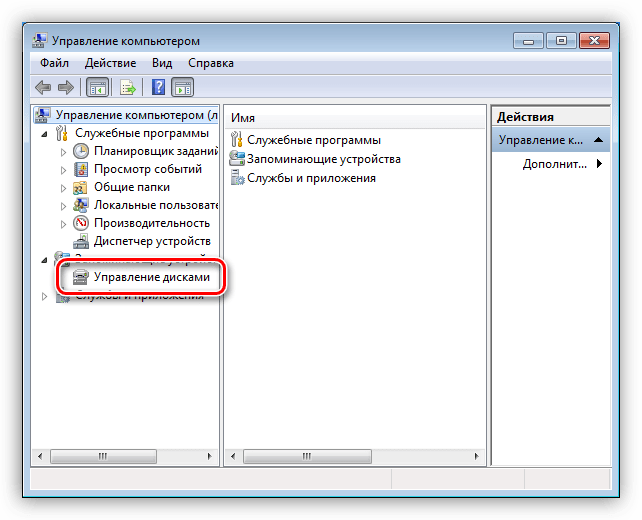
- Затем идем в раздел «Управление дисками».

- Выбираем в списке наш диск, жмем ПКМ на этот раз по разделу и выбираем пункт «Удалить том».

- Далее кликаем правой кнопкой по основанию диска (квадрату слева) и находим функцию «Преобразовать в MBR-диск».


В таком режиме можно работать только с теми дисками, которые не являются системными (загрузочными). Если требуется подготовить к установке рабочий носитель, то это можно сделать следующим способом.
Вариант 2: Конвертирование при загрузке
Данный вариант хорош тем, что работает независимо от того, доступны ли в данный момент системные средства и софт или нет.
- На этапе выбора диска запускаем «Командную строку» с помощью комбинации клавиш SHIFT+F10. Далее активируем утилиту управления дисками командой
diskpart
- Выводим на экран список всех установленных в систему жестких дисков. Делается это путем ввода следующей команды:
list disk

- Если дисков несколько, то необходимо выбрать тот, на который мы собираемся установить систему. Отличить его можно по размеру и структуре GPT. Пишем команду
sel dis 0

- Следующий шаг – очистка носителя от разделов.
clean

- Заключительный этап – конвертирование. В этом нам поможет команда
convert mbr

- Осталось только завершить работу утилиты и закрыть «Командную строку». Для этого дважды вводим
exitс последующим нажатием ENTER.

- После закрытия консоли жмем «Обновить».

- Готово, можно продолжать установку.


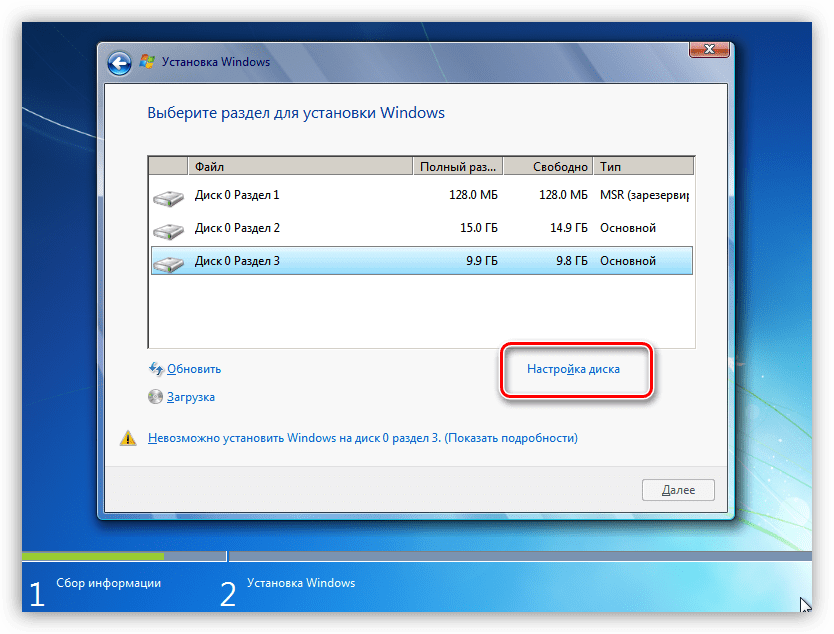
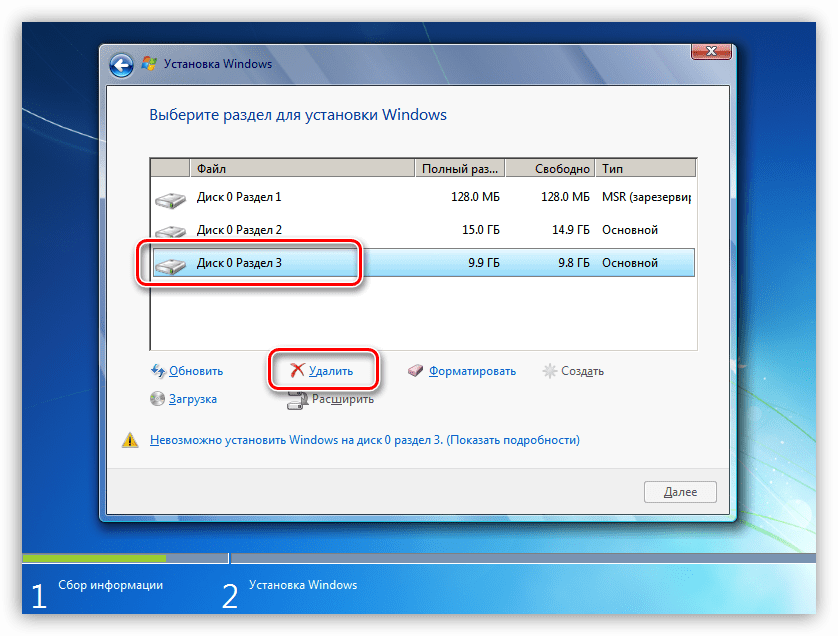
Способ 4: Удаление разделов
Этот способ поможет в тех случаях, когда по какой-то причине невозможно воспользоваться другими инструментами. Мы просто вручную удалим все разделы на целевом жестком диске.
- Нажимаем «Настройка диска».

- Выбираем каждый раздел по очереди, если их несколько, и жмем «Удалить».
- Теперь на носителе осталось только чистое пространство, на которое можно без проблем инсталлировать систему.


Заключение
Как становится ясно из всего написанного выше, проблема с невозможностью установки Windows на диски со структурой GPT решается довольно просто. Все приведенные способы могут выручить вас в разных ситуациях – от устаревшего БИОС до отсутствия под рукой необходимых программ для создания загрузочных флешек или работы с жесткими дисками.
Еще статьи по данной теме:
Помогла ли Вам статья?
Download Windows Speedup Tool to fix errors and make PC run faster
If while installing Windows 11/10 on your computer, you receive Windows cannot be installed to this disk, The selected disk is of the GPT partition style message, maybe something here will be able to help you. When you receive this message, you are unable to select any drive and proceed further with the setup, by clicking Next.
How do I fix Windows cannot be installed to this disk?
The Windows cannot be installed to this disk error can be seen during Windows 11 or Windows 10 installation, if the following issues occur, and the fixes for each will vary depending on the sub-error:
- The selected disk is of the GPT partition style
- The disk may fail soon
- Windows must be installed to a partition formatted as NTFS
- The selected disk has an MBR partition table
- Setup does not support configuration of or installation to disks connected through a USB or IEEE 1394 port
- Ensure disk controller is enabled in BIOS
- This computer’s hardware may not support booting to this disk.
In this post we will see how to fix The selected disk is of the GPT partition style error.
MBR and GPT are two formats of the hard disk. MBR is the abbreviation of master bootable record, whereas GPT is an abbreviation of GUID partition table. In order to boot Windows from GPT, the motherboard of the device should support UEFI, else, it is better to use MBR to boot from.
The selected disk is of the GPT partition style
When installing Windows on UEFI-based PCs using Windows Setup, your hard drive partition style must be set up to support either UEFI mode or legacy BIOS-compatibility mode. You receive such an error because your PC is booted in UEFI mode, but your hard drive is not configured for UEFI mode. You’ve got a few options:
- Reboot the PC in legacy BIOS-compatibility mode. This option lets you keep the existing partition style. For more information on this, read this TechNet article titled Boot to UEFI Mode or Legacy BIOS mode.
- Wipe the drive and reformat the drive to be able to use the PC’s firmware features.
Wipe a drive and convert to MBR
Open an elevated command prompt window and type diskpart and hit Enter.
Next, type list disk and hit Enter.
The list of disks will be displayed. Select the disk and type the following command and hit Enter, replacing x with the number of your disk you want to clean. The disk will have GPT marked against it.
select disk x
The disk will be selected
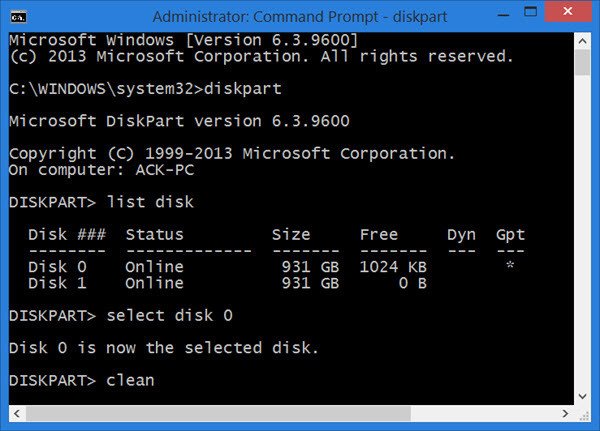
Next, type clean and hit Enter. Do NOTE that, once you enter this command, all data on the disk will be lost, so if you need to, take backups of your data.
You will now have to convert GPT to MBR using Diskpart. Moreover, if you cannot afford to clean the entire disk or wipe your data, you may want to make use of the following third-party software that lets you convert GPT to MBR easily.
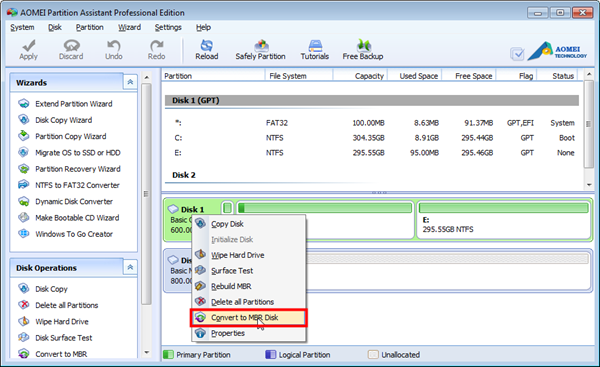
How to change MBR to GPT?
Aomei Partition Assistant will let you convert GPT to MBR for a particular drive only. You can use it to process the drive on which you plan to install Windows, and which is giving you the trouble.
This post shows how to convert MBR to GPT using Diskpart as well Partition Assistant. The process to convert GPT to MBR is the same as given in this post, except that you have to make the necessary changes, like use convert mbr command for diskpart, or select the Convert to MBR/GPT option in Partition Assistant.
If you receive the message, Windows cannot be installed to this disk. The selected disk is not of the GPT partition style, then this TechNet post titled Windows Setup Installing using the MBR or GPT partition style will help you. You will have to convert MBR to GPT.
PS: Please also read the comment by DJ Coderson below.
This post will help you if you receive Windows cannot format this drive, Quit any disk utilities or other programs that are using this drive message.
Anand Khanse is the Admin of TheWindowsClub.com, a 10-year Microsoft MVP (2006-16) & a Windows Insider MVP (2016-2022). Please read the entire post & the comments first, create a System Restore Point before making any changes to your system & be careful about any 3rd-party offers while installing freeware.
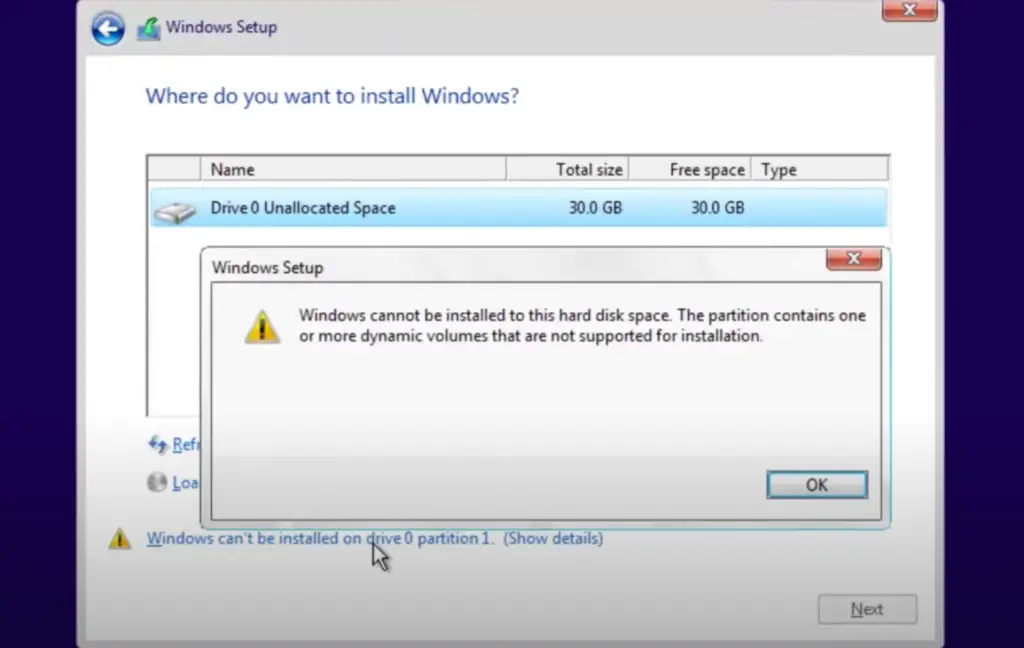
Are you trying to install Windows 8.1 or Windows 10 on your computer and getting an error “Windows cannot be installed to this disk. The selected disk is of GPT style”? There may be a different variation of this error as “Windows cannot be installed to this hard disk space. The partition contains one or more dynamic volumes that are not supported for installation”? These errors are related to the disk partition style.
It is not necessary that you will get the exact same error, but the error may vary, which will cause the disk partition to be greyed out. The error also may be ” The selected disk has an MBR partition table. On EFI system, Windows can only be installed to GPT disks.”
In this article, you will find the reason behind all these disk errors and foolproof solutions with detailed explanations.
Why Error “Windows cannot be installed to this disk. The selected disk is of GPT style” Occurs
This error occurs when you try to install Windows on a system having mismatching boot mode and partition style of your hard disk or SSD. Windows installation depends on the boot process of the motherboard and the partition style of the hard disk.
There are two different types of motherboard firmware, BIOS and UEFI.
And the boot processes used by this firmware are –
- Legacy boot (Legacy BIOS)- The boot process used by the “BIOS” firmware of the motherboard.
- UEFI – The boot process used by “UEFI” firmware.
Before we dig into the error and fix it, you need to understand some basics about BIOS, UEFI, MBR, and GPT. Once you have an idea of how the system works then, you can easily fix any error related to the boot process and hard disk partition style.
What Is BIOS
BIOS – Stands for Basic Input/Output System; it is firmware embedded in the motherboard’s chip. BIOS is a pre-installed firmware on the computer’s motherboard.
You can not change this firmware, and it is a non-volatile memory that does not disappear when your computer turns off. When you turn it ON, your computer BIOS loads the first and initializes the computer hardware to ensure they are working correctly.
After that, it loads the bootloader to initialize the Windows or other operating systems.
BIOS is older firmware running for decades which employs only 1 MB of space and must run in 16-bit processor mode. If you have more hardware connected to your computer, it will take time to initialize them.
Hence, the BIOS-based system tends to be slower while booting up or when shutting off.
What Is UEFI
UEFI – Stands for Unified Extensible Firmware Interface. It is a newer firmware that has many new features and advantages over BIOS. The UEFI has the same job of initializing the hardware components and loading the operating system.
But UEFI stores all the information about hardware initialization and startup in a .efi file. This file is stored on a partition called EFI System Partition (ESP). ESP also contains the bootloader program for the operating system.
Due to this, UEFI can directly boot the operating system, unlike self-test by BIOS. Hence it makes the boot process faster, resulting in a faster computer.
Both are firmware, but there are some major differences between BIOS and UEFI.
1. UEFI supports more than 2 TB of hard disk while BIOS supports up to 2 TB.
2. BIOS supports a maximum of 4 hard disk partitions, while UEFI supports more than 4 disk partitions.
3. Computers with UEFI firmware have faster booting than BIOS.
4. UEFI offers a secure boot that validates the operating system to ensure there is no tampering with the boot process by any malware.
5. UEFI supports the network functioning in the firmware, which helps in remote troubleshooting.
6. Unlike BIOS, UEFI offers a simple graphical user interface where you can navigate using the mouse.
UEFI is the successor of BIOS, which inherited the properties of BIOS. Modern computers use UEFI firmware, and if you try to use an old hard drive with UEFI, it won’t work.
To use UEFI firmware, the hardware in the disk drive must support UEFI. And your system disk needs to be GPT style.
GPT & MBR Disk Structures
Microsoft Windows uses two partition structures to read data from your hard disk.
- MBR – Master Boot Record
- GPT – GUID Partition Table
MBR Partition Style
The MBR is an old partition style on Windows-based systems. It was introduced in 1983 with IBM PC DOS 2.0. MBR is known as Master Boot Record since MBR is a special boot sector located at the beginning of the disk.
This sector contains a bootloader for the installed operating system.
MBR partition structure is traditional and supports hard disks up to 2 TB in size. And you can create only 4 logical partitions of the hard disk.
GPT Partition Style
The GPT is the newer standard for disk partitioning. GPT replaces the old MBR partitioning system with modern tech. This tech is called GUID or “Globally Unique Identifier.”
Every partition on the disk has a globally unique identifier. GUID is a random string that is so long that every GPT partition on the planet is likely to have its own unique identifier.
GPT supports larger than 2 TB hard drives with an unlimited number of partitions. The size and partition limits depend on the operating system and its file system.
Reason Behind GPT MBR Disk Errors
Now you have a fair idea about BIOS, UEFI, GPT, and MBR; it will be easy to understand such disk errors.
Your computer will boot in one of these two modes BIOS or UEFI.
If your computer firmware is BIOS-based, then you need to install Windows on an MBR disk. In the same way, if your computer is UEFI-based, then you have to install Windows on a GPT disk.
Hence, BIOS is incompatible with the GPT disk, and if you are trying to install Windows on a computer having BIOS firmware, you will get the error “Windows cannot be installed to this disk. The selected disk is of GPT style”
Similarly, if you try to install Windows on an MBR disk on a UEFI-based computer, you will get an error ” Windows cannot be installed to this disk. The selected disk has an MBR partition table. On EFI systems, Windows can only be installed to GPT disks.”
How To Fix ” Windows cannot be installed to this disk. The selected disk is of GPT style”
You have some options to fix this error. If you want to install Windows, then you need to convert GPT to MBR disk to fit on BIOS-based computers. OR boot into UEFI to fit the GPT disk. But it is not necessary that your computer would have UEFI if it is an older computer.
Option 1 – Change Hard Disk From GPT to MBR
If you are getting the error “Selected disk is of GPT style,” that means your computer has booted into Legacy BIOS mode that needs an MBR disk. Now you need to convert GPT to MBR disk to match the compatibility.
Since you are already trying to install Windows, that means you have the bootable media available, which can be a flash drive or DVD.
1. Turn off your computer.
2. Boot your computer using installation media.
3. At the Windows Setup Screen, press the “Shift+F10” keys together to open the command prompt.
The command prompt would look like the below image.
4. Type “diskpart” into the command prompt and hit enter. It will go into disk partition mode.
5. Type in “list disk” and hit enter, and it will show you the hard disks connected to your computer.
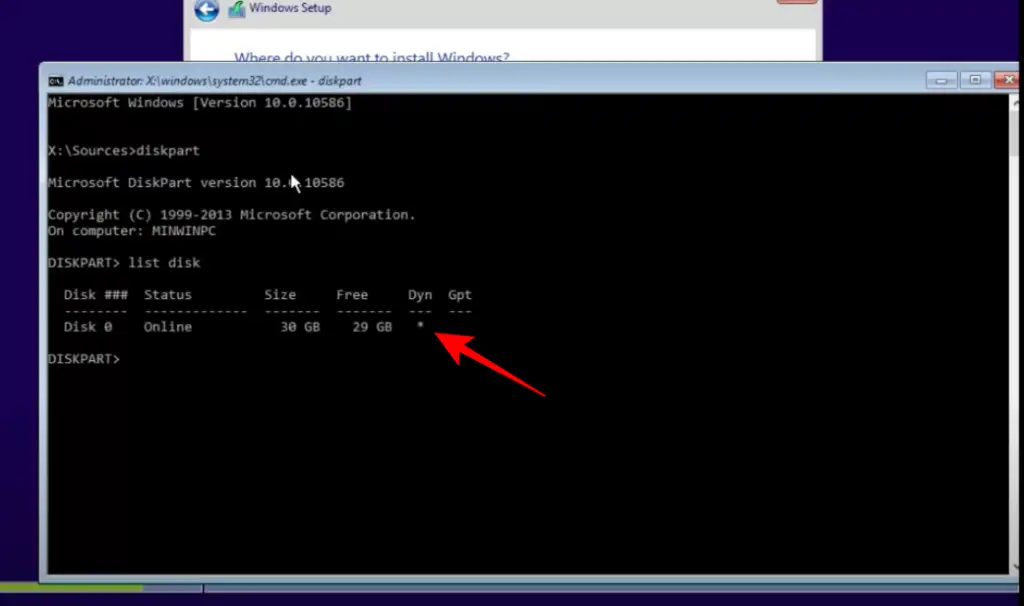
In the above image, the computer has only 1 disk, which is shown as “Disk 0.” You will get the same if there is only one hard disk on your computer.
(Do you see the * under “Dyn” which means the selected disk is dynamic. If the * is under “Gpt,” then the disk is GPT, and if there is no *, then the selected disk is an MBR disk)
6. Now type “select disk <disk_number>” in this case.
It would be “select disk 0” then hit enter on the keyboard. (If you have more than 1 hard disk, then choose the disk where you want to install Windows.)
7. This will select the desired disk. At this point, you need to clean the disk completely. Cleaning the disk will delete everything from the hard disk. If you have existing data on the disk, then create a backup first.
Type “Clean” and press the enter key.
Now you can re-formatted the cleaned disk. You need to change the partition style to MBR.
8. Type “convert MBR” and hit enter.
After a successful conversion, exit the command prompt and continue Windows installation on the MBR disk.
Option 2 – Change to UEFI Mode
This option is not applicable to every computer since you need to have UEFI firmware on your motherboard. On BIOS-based systems, you won’t be able to run a GPT disk.
Most of the computers running these days come with UEFI firmware with Legacy BIOS support. You have to check if your computer has UEFI firmware.
If you are getting UEFI options, then this method won’t delete any existing data on your computer.
Follow these steps to change to UEFI Mode-
1. Turn off your computer completely.
2. Turn ON and press the boot key to enter the boot (BIOS) options. The boot key varies from the computer manufacturer. Generally, it is F1, F2, F10, F12, Del, or Esc keys. If you are not sure, then search for the boot key for your computer on Google.
3. Once you are in the BIOS menu, navigate to the “Boot” option.
4. Now select the “UEFI” option and save the changes. Use up-down arrow keys to navigate.
Now, try to install Windows, and you will be able to install it on a GPT disk without any error.
On modern computers, you will get a feature-rich UEFI interface where you can select the options using your mouse.
However, the basics are the same; you just need to change the boot from Legacy to UEFI.
How To Fix ” The selected disk has an MBR partition table. On EFI system, Windows can only be installed to GPT disks.”
This error means you have a computer running the UEFI firmware, but the disk you are using has the MBR partition style. In this case, you have 2 options as well.
- The first option is to convert the MBR disk to GPT (This will erase all the data from the hard disk)
- Select the “Legacy” BIOS and run the existing MBR disk. ( It won’t delete data)
Option 1 – Convert MBR disk to GPT
Follow the mentioned steps to open the command prompt on the installation screen. Enter “diskpart“, list the disks, and then choose the desired disk.
After selecting the disk, type “convert GPT” and hit enter on your keyboard.
The above command will clean your disk completely and convert it to the GPT partition style.
Option 2 – Change to Legacy BIOS mode
Since you already have UEFI firmware on the computer, it does inherit the Legacy BIOS as well. To fix “The selected disk has an MBR partition table. On EFI system, Windows can only be installed to GPT disks” error, you can simply select the legacy BIOS and run the existing MBR disk.
1. To choose the Legacy BIOS mode, shut down your computer and turn it ON again.
2. Press the boot key to enter to UEFI/BIOS menu.
3. Go to the boot tab and select “Legacy,” and save the changes.
4. Restart your computer and proceed further.
You would be able to run the MBR disk using Legacy BIOS mode.
Remember, you already have UEFI, but if you have selected Legacy BIOS, then it will slow down your computer.
What is the best option, BIOS or UEFI? GPT or MBR?
The best option is UEFI firmware with the GPT disk.
If you have UEFI firmware, then convert your disk to GPT. If your disk is too old, then you won’t be able to convert it to GPT. In this case, you have to buy a new hard disk with the latest technologies.
UEFI and GPT combination will provide you with a secure boot and faster speed. on the other hand, MBR and BIOS are old, slow, and prone to boot sector malware.
Now you have an idea about BIOS, UEFI firmware, and MBR, GPT partition styles. You can easily fix any such disk-related errors by making them compatible.
Also Read –
- Fix Slow Running Windows 10 – 200% Faster PC
- How to Install Windows 10 From USB Flash Drive & DVD
- Make Flash Drive Bootable Using Command Prompt (cmd) and install Windows
Why am I getting the “Windows cannot be installed to this disk GPT/MBR partition error” message?
This error occurs when you are installing Windows on a disk that is incompatible with firmware. If you have BIOS firmware, then install Windows on an MBR disk. For UEFI, use GPT disks.
Will converting my partition from GPT to MBR cause any data loss?
Whenever you convert the disk from MBR to GPT or vice versa, then it is necessary to format the disk in the required partition style. Once you format the disk, you will lose all the data. It is advised to create a backup before converting the partition style.
What are the advantages of using a GPT partition over an MBR partition?
GPT has the following advantages over MBR.
GPT supports more than 2 TB of hard disks.
MBR disk support only 4 partitions, while GPT supports 128 partitions.
GPT boots faster than MBR disk.
GPT is a newer standard, while MBR is old.
MBR works with older firmware BIOS, while GPT works with advanced firmware UEFI.