The Windows key not working issue often occurs when the Windows key is locked. If you are wondering, it might be possible that your Windows key might be blocked due to accidentally pressing the lock key on the keyboard, which the manufacturers integrated to avoid minimizing while playing games.
Even though the locked Window key might not be available on your keyboard, it is possible that some other causes, such as filter keys, corrupted driver, and enabled game mode prevent you from using the Windows key.

Now after understanding the leading cause, let’s have a look at some other contributors:
- Disabled Windows key- If your Windows key is locked, you won’t be able to use it until you unlock the Windows key. To do that, you should carefully look for the lock key on your keyboard.
- Corrupted Keyboard Driver- It might be possible that your keyboard driver is corrupted, which is why the issue is occurring. However, if your driver is corrupted, you can easily fix this by updating or reinstalling the keyboard driver.
- Hardware Issue- On the other hand, the issue can also be caused by the defective Windows key. To ensure that your Windows key is working, try plugging another keyboard into your computer to check if this is your keyboard issue. As a result, your Windows key should not work on your other keyboard if it’s locked or if some other reason is causing this issue. Otherwise, it will be your keyboard issue.
- Enabled Game Mode- Even though Game Mode is designed to increase performance for low-end and high-end computers, it sometimes stops the Windows key from functioning. Hence, try disabling Game Mode to fix this issue.
- Interference Of Filter keys- As per the affected users, the filter keys often prevent the users from using the Windows key. You can try disabling the filter key from settings to fix this issue.
Before determining and fixing this issue, you must confirm that your Windows key is not broken. Go to this website from Microsoft and press the Windows key repeatedly to test your key. If the website detects the Windows key, that means your Windows key is working fine. If that’s the case, just follow the below methods to troubleshoot your issue.
You can also try pressing the other Windows key to check if it’s working. If it’s not working, it might be disabled from your keyboard. If one Windows key is working and another is not, it might be broken.
However, you can use the PowerToys application to divert your keys. To do that, scroll down to the 8th method.
1. Unlock Your Windows Key
Some modern gaming keyboards have a “Game Mode” that disables the Windows key. There is a high chance that you accidentally pressed the lock key, which is why the Windows key is not working. To fix this, you will need to unlock the key by pressing the lock key again. You can find the lock key in the functions keys on the top of the keyboard, it should have a lock icon, which you can use to recognize the key.
HyperX has Fn + F12, which you can press to enable and disable the Windows key. If your keyboard does not have a lock key, you can try pressing FN + F6, FN + F12, or FN + Win simultaneously to unlock the Windows key. If that does not fix this issue, follow the next method.
2. Use Registry Editor
Another method to fix this issue is to delete the Scancode Map entry from the registry editor. This entry allows the user to disable the Windows key, so the game will not minimize when you accidentally press the Windows key. You can fix this issue by deleting the Scancode Map entry via the registry editor.
Before making changes to the registry editor, make a full backup. Below are the steps:
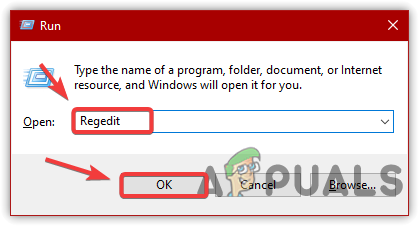
- Press the Win + R to launch Run Window
- Type Regedit and click OK to navigate

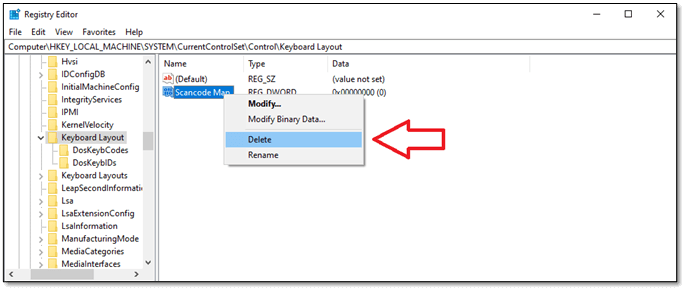
Opening Registry Editor - Go to the following directory
Computer\HKEY_LOCAL_MACHINE\SYSTEM\CurrentControlSet\Control\Keyboard Layout
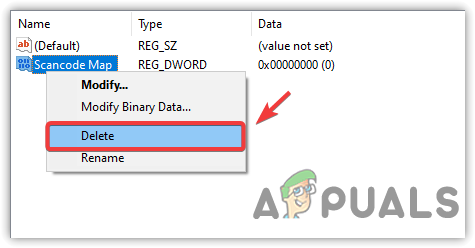
- In the right pane, locate the entry named Scancode Map
Note: If you did not find the scancode map entry, move on to the next method. - Right-click the scancode map entry, and click Delete

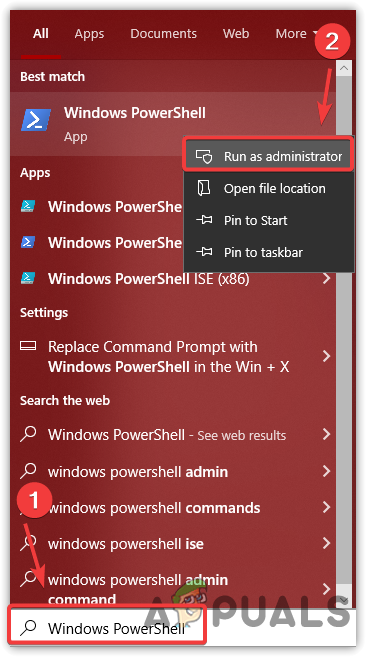
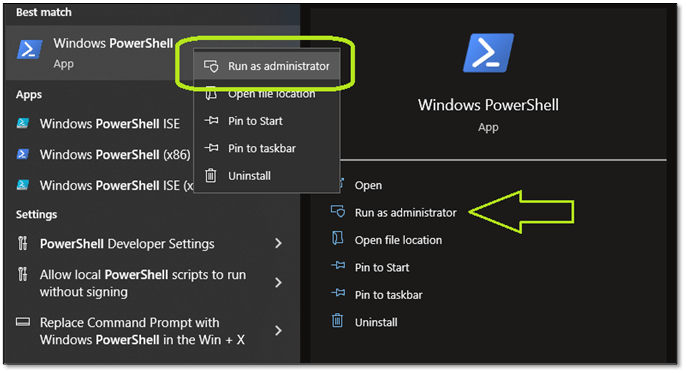
Deleting Scancode Map - After removing the entry, click Start Menu and type Windows PowerShell
- Right-click the powershell and click Run As Administrator

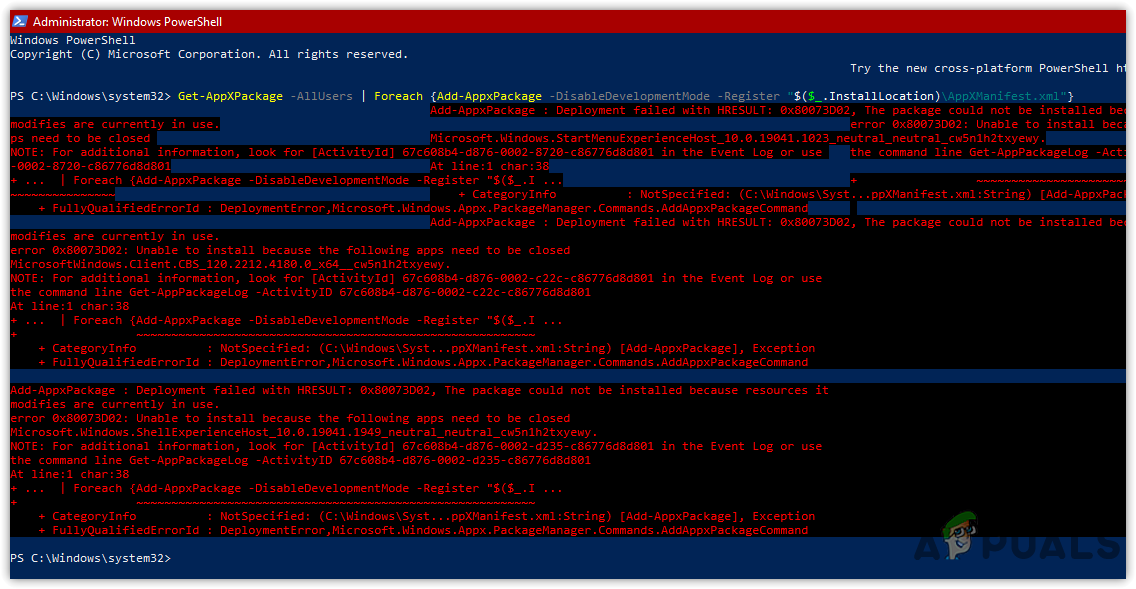
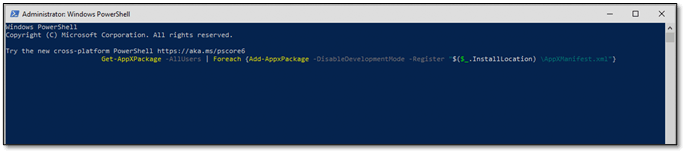
Launching Windows PowerShell - Now paste the following command to reset all apps
Get-AppXPackage -AllUsers | Foreach {Add-AppxPackage -DisableDevelopmentMode -Register “$($_.InstallLocation)\AppXManifest.xml”}
Resetting Apps - Ignore the errors and close the terminal
- Once done, restart your computer and check if the issue is fixed.
3. Run Keyboard Troubleshooter
Usually, troubleshooting tools fix various issues automatically. Microsoft developed troubleshooting tools to resolve common issues. Therefore, running the keyboard troubleshooter might fix your issue if this issue occurs due to some common reason. Here are the steps:
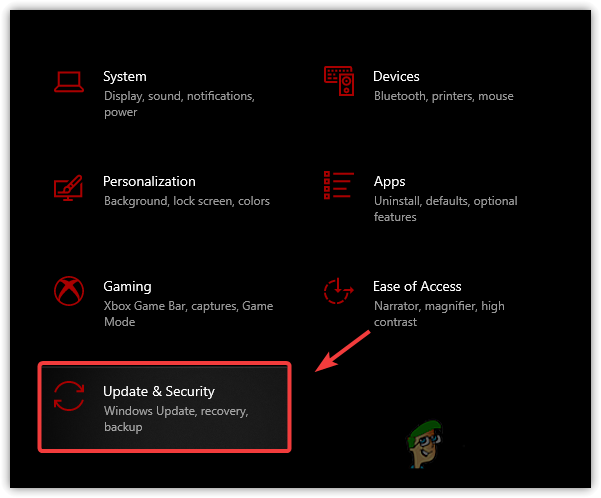
- Go to Settings by pressing the Win + I on the keyboard
- Then, head to the Update & Security

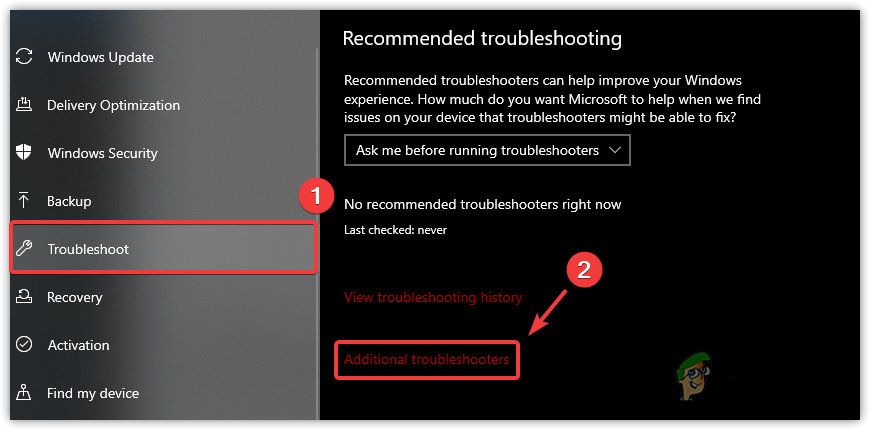
Go to Windows Update Security Settings - Click Troubleshoot from the left sidebar
- For Windows 11 users, open the Settings and scroll down to the bottom to navigate to Troubleshoots
- Now click View Additional Troubleshooter

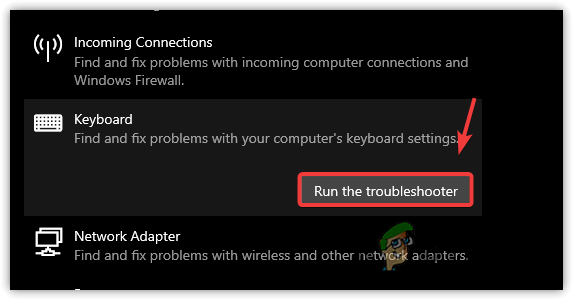
Navigating to Additional Troubleshooters - Select Keyboard under Find & Fix Other Problems
- Then click Run The Troubleshooter

Running Keyboard Troubleshooter - Once done, check if the Windows key is working.
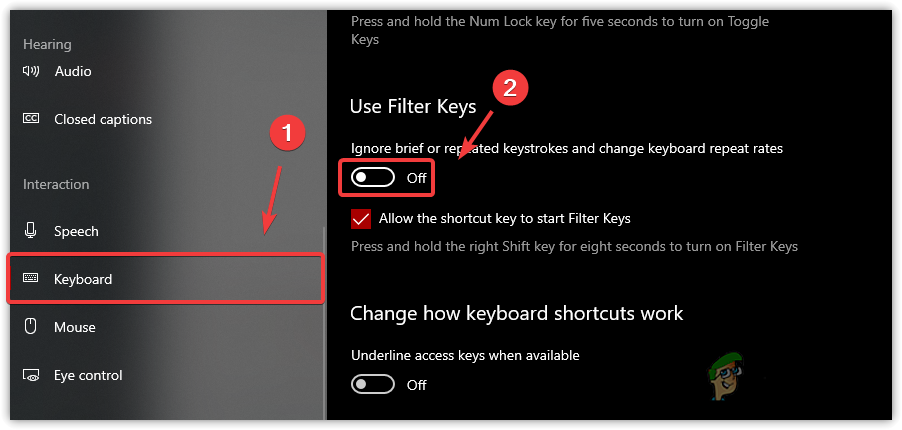
4. Turn Off Filter Keys
Filter keys are the special keys that allow the users to write without repeated keys. Microsoft introduced filter keys to ignore brief or repeated keystrokes for users with hand tremors. However, the affected users have claimed on forums that disabling the filter keys is one of the ways to fix the Windows key not working issue. To disable the filter keys, follow the steps:
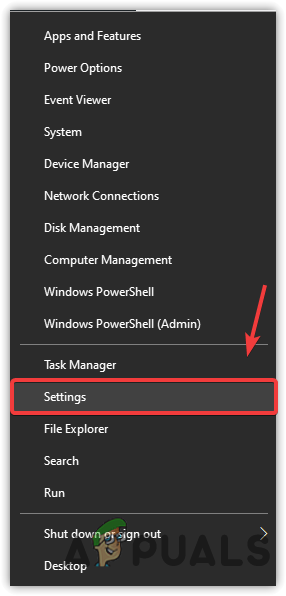
- Right-click the Start Menu icon and click Settings

Opening Settings - Navigate to the Ease Of Access, click on the keyboard from the left pane
- Scroll down a little bit and disable the Filter Keys by toggling off the Use Filter Keys option

Disabling Filter Keys - Once done, check if the Windows key start working.
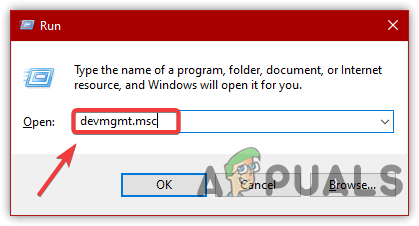
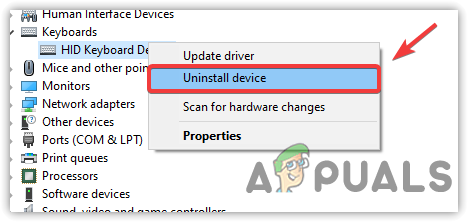
5. Update or Re-Install Keyboard Driver
The issue can also be caused by the corrupted keyboard driver, if that’s the case, you will need to reinstall the driver. Reinstalling the keyboard driver is very simple, but before that, try updating the keyboard driver. If the device manager does not find the latest driver, then go for the reinstalling option. Follow the steps:
- Press Windows + R keys at the same time to launch the Run Window
- Type devmgmt.msc and click OK
Opening Device Manager - Right-click the keyboard driver and click Update Driver

Selecting Update Driver - Choose Search Automatically For Drivers

Selecting Search Automatically For Drivers - If the device manager did not find the latest driver for your keyboard
- Right-click the keyboard driver and click Uninstall Device

Uninstalling Keyboard Device - Restart your computer for complete installation
- Once done, check if the Win key is now working. If it’s not, follow the below method.


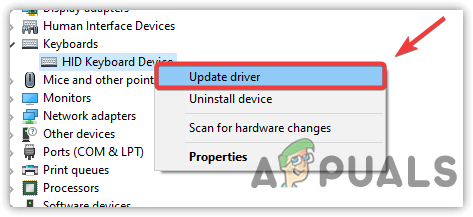
6. Switch to Generic Keyboard Driver
You can try using the generic keyboard driver if reinstalling or updating the driver does not fix your Windows key. Below are steps on how you can switch to a generic keyboard driver.
- Right-click the Start Menu and click Device Manager
- Expand the Keyboards menu
- Right-click on your keyboard driver and click Update Driver
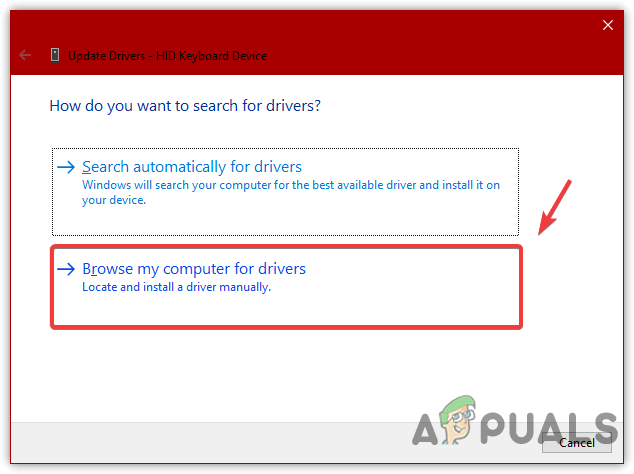
Selecting Update Driver - Select Browse My Computer For Drivers
Choosing Browse My Computer For Drivers - Then, select Let Me Pick From A List Of Available Drivers
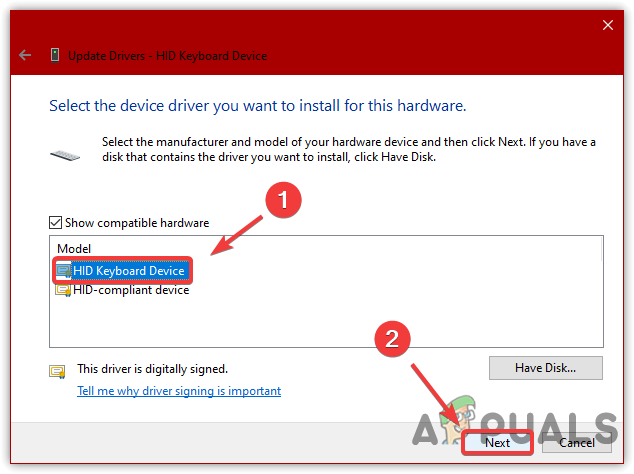
- Select HID Keyboard Device
- Then, click Next to install the driver
Selecting Keyboard Driver - Once done, check if the issue is resolved.
7. Use PowerToys to Divert Windows Key
If your Windows key is not working due to hardware damage and you need the Windows key to work temporarily, you can download the PowerToys application. PowerToys is an application that customizes Windows features and remap keys to other keys. You can simply divert the Windows key function to another key on the keyboard to use the start menu. Below are the steps you can follow to remap your Windows key:
- Open the Microsoft Store and search for PowerToys
- Install the PowerToys application from the Microsoft store
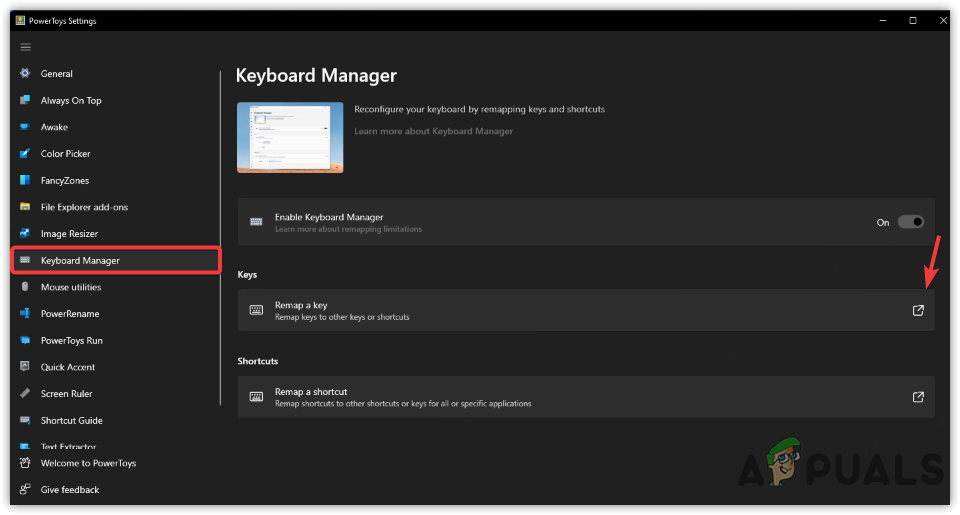
- Once it’s installed, launch the application
- Click on Keyboard Manager from the left pane

Opening Remap Keys Settings - Click Remap A Key and then click the Plus Icon

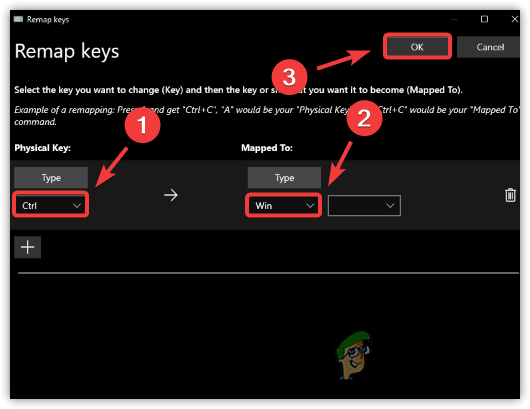
Adding Key Remap - Now under the Physical Key, select the key you want to use instead of the Win key
- After that, select the Win key under Mapped To

Remapping Key - Once done, click OK, then click Yes when the warning notification appears
- Once done, you can use the start menu function by pressing the key you selected under the physical key.

8. Enable Start Menu
It is possible that your Windows keys are working, but the start menu is not working. We have a detailed article on it that turns the start menu into a working condition if it’s not working. Here is the link to How to Fix Start Menu Not Working in Windows 10/11?
In case none of the solutions have worked, it is also possible that your taskbar is not working. To fix this issue, you can visit this article on How to Fix Taskbar Not Working on Windows 10. Despite this, if you use any start menu third-party application, uninstall it and check if the issue is resolved.
9. Replace Your Keyboard
We have described all the scenarios above that are possible in this case. However, if none of the methods have worked for you, try changing your keyboard. At the beginning of this article, we have given a link that will take you to a keyboard test, you can try pressing the Win key to check if it’s damaged or not. If it is, changing the keyboard will fix your issue.
 Многие действия Windows 11 и 10 удобнее и быстрее выполнять с помощью сочетаний клавиш, многие из которых задействуют клавишу Win (Windows) — обычно находящуюся в нижнем ряду клавиатуры слева. Однако, некоторые пользователи могут столкнуться с тем, что нужная клавиша не работает.
В этой инструкции подробно о том, почему может не работать клавиша Win на клавиатуре компьютера или ноутбука и способах это исправить.
Функции включения и отключения клавиши Win на игровых клавиатурах и ноутбуках

Некоторые игровые клавиатуры и ноутбуки предлагают функцию отключения клавиши Win для исключения случайных нажатий во время игры. В зависимости от конкретной модели игрового устройства, реализовано это может быть по-разному, например:
- Для игровых устройств ASUS настройку включения и отключения клавиши Win можно найти в приложении Armoury Crate, для Corsair — в iCUE в настройках профиля клавиатуры, для других игровых компьютеров/клавиатур также можно поискать настройку в фирменном приложении.

- Некоторые игровые клавиатуры поддерживают блокировку клавиши Win сочетанием клавиш. Сами сочетания могут отличаться, например: Fn+Win, Fn+Win+L (отдельные клавиатуры Red Square), Fn+F1 (клавиатуры XPG), Fn+F8 (на некоторых клавиатурах Logitech), возможны и другие комбинации, например, Fn+f6
- Отдельные клавиатуры могут иметь переключатель игрового режима: при наличии такого, попробуйте отключить игровой режим.


Подводя итог по этой части: если у вас игровое устройство, изучите настройки фирменного ПО, функциональные клавиши и их назначение (открыв инструкцию к вашей клавиатуре) — вероятнее всего, отключение клавиши Win было выполнено с их помощью.
В дополнение к указанным пунктам можно попробовать отключить игровой режим в Параметрах Windows 11 или Windows 10 — по некоторым сообщениям, для части устройств он может также отключать и клавишу Win.
Найти настройки игрового режима можно в разделе Параметров «Игры».
Устранение неполадок клавиатуры
Если речь идёт о простой, не игровой клавиатуре, на которой перестала работать клавиша Win, вы можете попробовать следующие методы решения проблемы:
- Попробуйте удалить клавиатуру в диспетчере устройств (правый клик — удалить), а затем выбрать в меню диспетчера устройств «Действие» — «Обновить конфигурацию оборудования».
- Попробуйте подключить клавиатуру (или приёмник) к другому USB-разъему.
- Запустите средство устранения неполадок клавиатуры: нажмите правой кнопкой мыши по кнопке «Пуск», выберите пункт «Выполнить» и используйте команду
msdt.exe -id KeyboardDiagnostic
Внимание: классические инструменты устранения неполадок, возможно, прекратят работу в будущих версиях Windows.

- Попробуйте отключить фильтрацию ввода, для этого в Windows 11 и Windows 10 можно зайти в Параметры — Специальные возможности — Клавиатура и отключить опцию «Фильтрация ввода».

- Проверьте, нет ли других совместимых драйверов для вашей клавиатуры: в диспетчере устройств нажмите правой кнопкой мыши по клавиатуре, выберите «Обновить драйвер» — «Поиск драйверов на этом компьютере» — «Выбрать из списка установленных драйверов» и, при наличии другого совместимого драйвера, попробуйте выбрать его.


В заключение несколько дополнительных возможных причин не работающей клавиши Win на клавиатуре и подходов к решению проблемы:
- Если до появления проблемы вы устанавливали какие-либо твикеры или иные программы для настройки системы, некоторые из них могут содержать функции отключения или переназначения клавиш, которые, в том числе могли повлиять на работу клавиши Win: можно проверить наличие соответствующих настроек в таких программах.
- В Windows есть возможность настройки системной политики, отключающей комбинации клавиш с клавишей Win. Откройте редактор реестра и проверьте, нет ли параметра с именем NoWinKeys в разделе
HKEY_CURRENT_USER\Software\Microsoft\Windows\CurrentVersion\Policies\Explorer
и аналогичном подразделе в HKEY_LOCAL_MACHINE, при наличии — удалите его, а затем выйдите из системы и вновь зайдите, либо перезагрузите компьютер.
- Если проблема возникла недавно и предполагается, что причина — в системе, а не самой клавиатуре, можно попробовать использовать точки восстановления системы.
Учитывайте, что проблема может быть и аппаратной: неисправность клавиатуры вследствие износа или пролитых жидкостей: причем во втором случае проблемы часто проявляются не сразу, а через некоторое время после самого события.
Если вам необходима клавиша Win, при этом она не работает физически, а замена клавиатуры по какой-либо причине невозможна, вы можете использовать инструменты переназначения клавиш, такие как AutoHotkey, соответствующие настройки в Microsoft PowerToys и другие варианты.
Содержание
- Способ 1: Поиск аппаратной неисправности
- Способ 2: Перезапуск «Проводника»
- Способ 3: Отключение игрового режима
- Способ 4: Редактирование реестра
- Способ 5: Сброс настроек в стороннем ПО
- Способ 6: Настройки игровой клавиатуры
- Способ 7: Служба «Удостоверение приложения»
- Вопросы и ответы
Способ 1: Поиск аппаратной неисправности
Если до возникновения проблемы на компьютере не было сбоев, не выполнялась установка стороннего ПО и не вносились изменения в конфигурацию, убедитесь в исправности клавиатуры и в частности самой клавиши Win.
- Проверьте, не попал ли в зазор между Win и корпусом клавиатуры мусор.
- Если клавиатура внешняя, подключите ее к другому устройству – компьютеру или планшету (через OTG-переходник).
- Если клавиатура встроенная — например, на ноутбуке, подключите к портативному компьютеру внешнюю клавиатуру. Нормальное функционирование Win на внешней клавиатуре с большей долей вероятности укажет на наличие аппаратных проблем, для решений которых скорее всего придется обратиться в сервисный центр.
Способ 2: Перезапуск «Проводника»
Бывает, что какая-то функция или клавиша перестает работать из-за сбоя оболочки Windows. В этом случае может помочь простой перезапуск «Проводника».
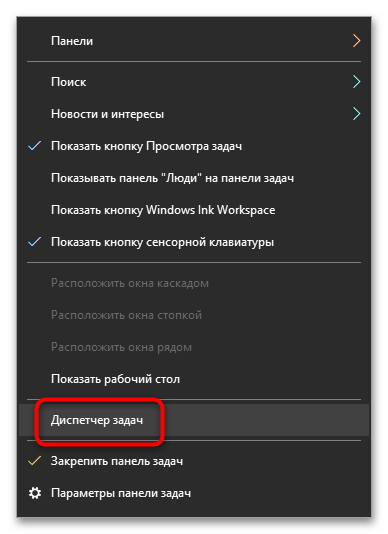
- Запустите «Диспетчер задач» из контекстного меню панели задач или нажатием комбинации клавиш Ctrl + Shift + Esc.
- Отыщите в списке процессов «Проводник», кликните по нему правой кнопкой мыши и выберите из контекстного меню опцию «Перезапустить».
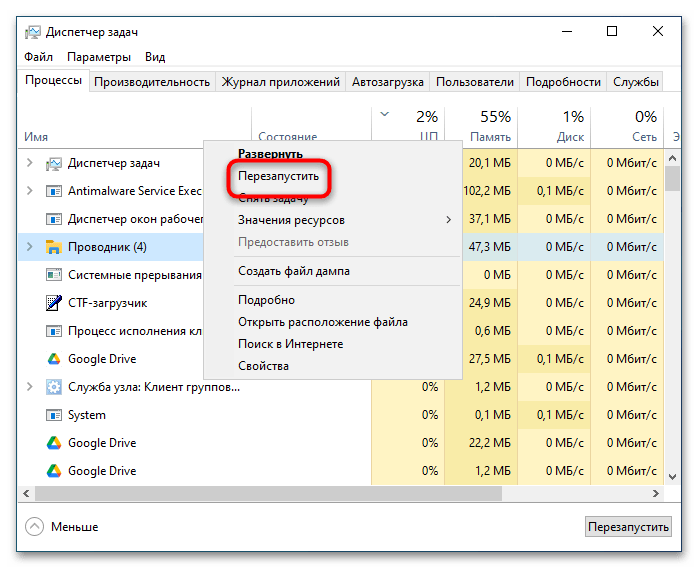
Как вариант, можно выйти и заново войти в учетную запись.
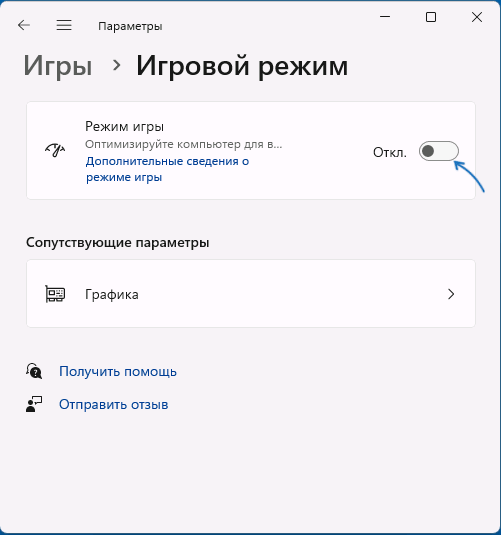
Способ 3: Отключение игрового режима
В Windows 10 имеется такая функция, как «Игровой режим», активация которой отключает ряд функциональных клавиш, чтобы их случайное нажатие во время игры не привело к нежелательным последствиям. Если она включена, отключите ее.
Для этого откройте приложение «Параметры», перейдите в раздел «Игры» → «Игровой режим» и убедитесь, что опция «Режим игры» отключена. В противном случае установите отвечающий за ее активацию переключатель в положение «Откл.».
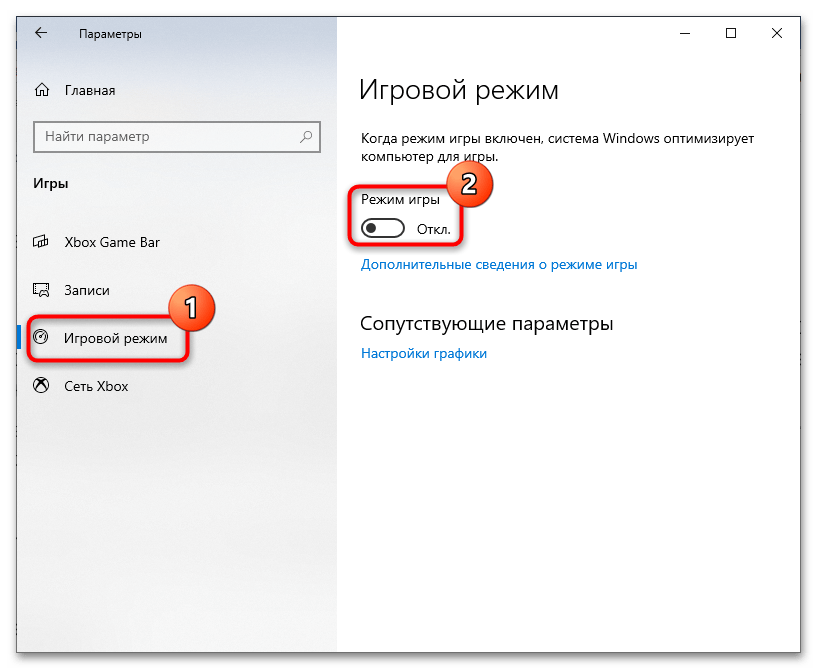
Настройки должны вступить в силу немедленно.
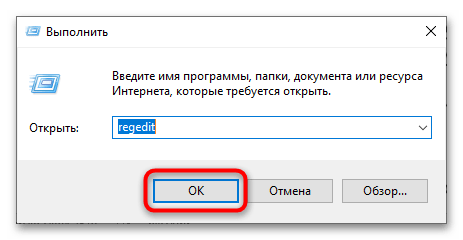
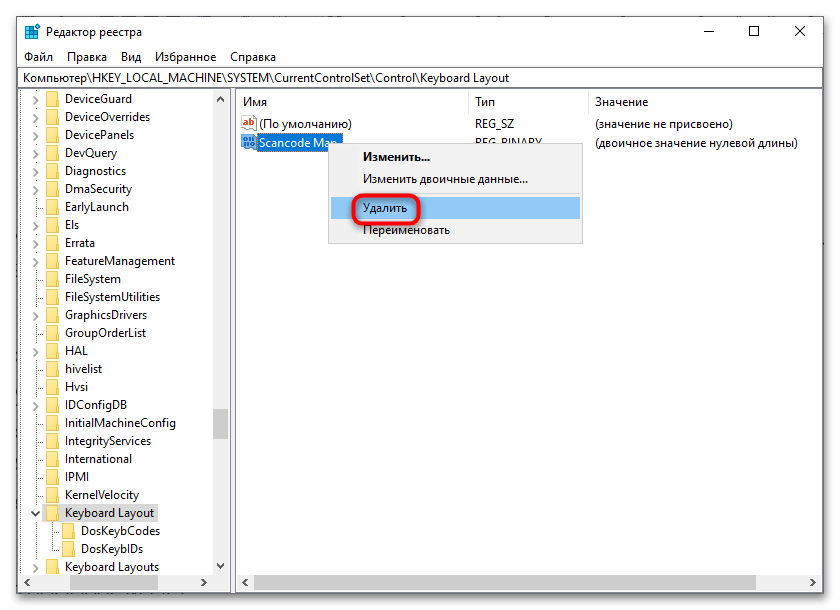
Способ 4: Редактирование реестра
Если перед появлением проблемы имело место использование твикеров либо других сторонних настройщиков системы, проверьте, не отключена ли Win в реестре.
- Откройте «Редактор реестра», выполнив в диалоговом окошке «Выполнить» (Win + R) команду
regedit. - Разверните ключ
HKEY_LOCAL_MACHINE\SYSTEM\CurrentControlSet\Control\Keyboard Layoutи посмотрите, имеется ли в последнем подразделе параметр с именем «Scancode Map». Если да, удалите его. - Чтобы настройки применились, перезагрузите компьютер.
Способ 5: Сброс настроек в стороннем ПО
В случае возникновения проблемы после внесения изменений в настройки Windows средствами сторонних программ-твикеров изучите внимательно список поддерживаемых ими настроек. Возможно, при применении твика по ошибке была задействована настройка, отключающая клавишу Win. Если программой-твикером поддерживается сброс к настройкам по умолчанию, задействуйте эту опцию. То же самое касается приложений для переназначения клавиш.
Способ 6: Настройки игровой клавиатуры
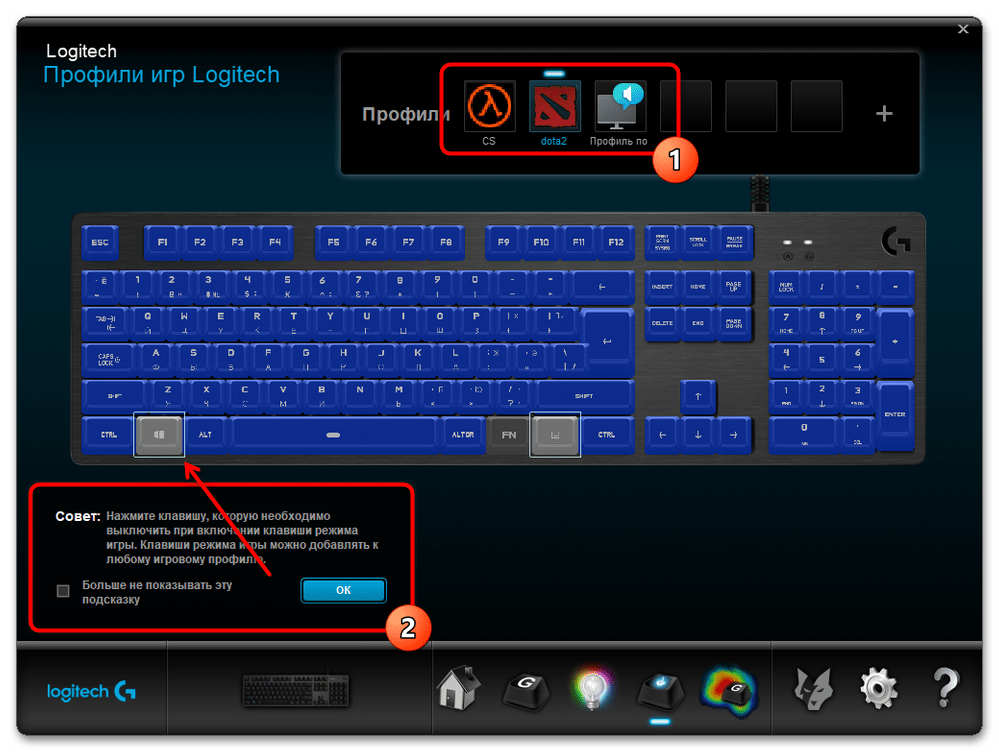
В случае использования геймерской клавиатуры не будет лишним проверить ее настройки. Такие клавиатуры могут иметь специальные аппаратные клавиши для отключения функциональных клавиш Windows, также, помимо собственного драйвера, для них почти всегда выпускается специальное программное обеспечение, которое поддерживает отключение этих самых клавиш. Посмотрите, имеется ли в верхнем ряду игровой клавиатуры клавиша с изображением Win или надписью G. Если да, нажмите ее отдельно либо в комбинации с клавишей Fn.
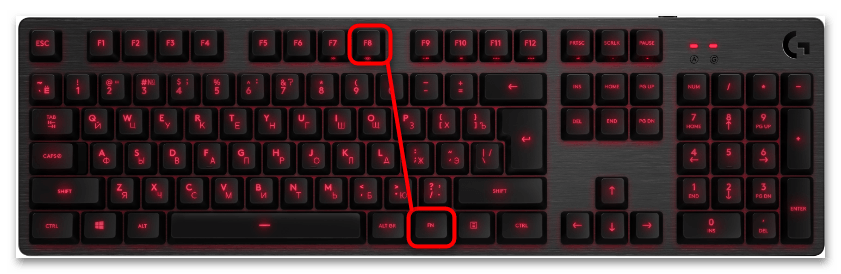
Например, на клавиатурах Logitech для отключения/включения клавиши Win используется сочетание клавиш Fn + F8. Проверьте также настройки приложения для клавиатуры, если такое фирменное программное обеспечение установлено.
Способ 7: Служба «Удостоверение приложения»
Причиной отключения функциональных клавиш может также стать остановка службы «Удостоверение приложения». Проверьте ее статус и включите, если она отключена.
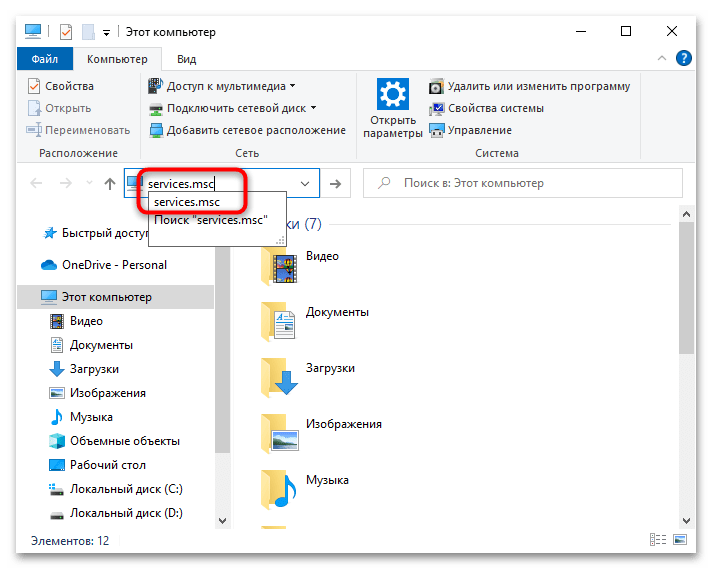
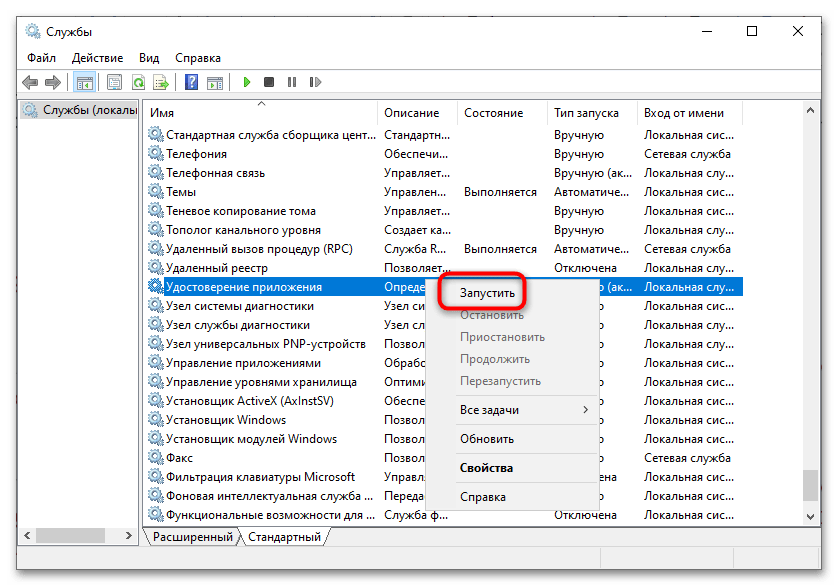
- Откройте оснастку управления службами, введя в адресную строку «Проводника» команду
services.mscи нажав клавишу ввода. Также открыть оснастку можно из «Диспетчера задач», нажав одноименную кнопку на вкладке «Службы». - Отыщите в списке служб «Удостоверение приложения» и посмотрите ее статус. Если она остановлена, запустите ее из контекстного меню.
- Также, если служба отключена, откройте ее «Свойства» двойным по ней кликом и выставьте для нее тип запуска «Автоматически». Это избавит от необходимости каждый раз включать ее принудительно.

Если кроме клавиши Win на клавиатуре не работают некоторые другие клавиши или их группы, например цифровой блок или определенный ряд, это, как правило, свидетельствует об аппаратных неполадках.
Еще статьи по данной теме:
Помогла ли Вам статья?
The Windows Start button is integral to the Windows interface. It’s also regarded as the operating system’s central hub. This button is typically located in the lower-left corner of your screen. From the Windows Start menu, you can access the following features easily:
- search bar
- recently used programs
- apps you have pinned
- other system settings
Sometimes, the Windows Start button becomes unclickable or does not work at all. This can happen for various reasons, and troubleshooting is essential to resolving the problem.
In this article, you will learn different methods to fix a Windows Start button that’s not working.
🔑 Key Takeaways:
- The Windows Start button is a crucial element of the Windows operating system, providing access to apps, settings, and other functions.
- A simple restart can help resolve the unresponsive Windows button.
- Outdated Windows systems can cause computer issues, including a Windows button not working. Manually checking for updates can help resolve the problem.
- Booting into Safe Mode can troubleshoot the problem with the Window button.
- If all other methods fail to address the problem of Windows buttons not working, factory resetting Windows can be a last option.
Methods to Fix Unresponsive Window Buttons
It could be frustrating when your Windows Start button freezes or becomes unresponsive. It may interfere with some of your computer tasks. Fortunately, you have several options for diagnosing and resolving the problem.
The methods listed below will help you restore the functionality of the Windows Start button on your computer:
1. Restart Your Windows PC
Before trying more complex ways to fix your Windows Start button, consider restarting your PC as the first step. Typically, a quick restart can resolve temporary glitches that cause your Windows Start button to be unresponsive.
Since you cannot access the Windows button, here’s an alternative way to restart your PC:
- Press Ctrl + Alt + Delete.
- Click the Power button.
- Select Restart.
📝 Note:
Press and hold the power button to shut down your PC manually. Save and close everything you work on before shutting down to avoid losing data. To restart your device, press the power button again.
2. Update Windows System
Updating Windows is one of the easiest ways to resolve most issues on your PC, including an unresponsive Windows Start button. Windows updates often include new features and bug fixes that can address issues with the Start button.
To check and update your Windows system, do the following:
1. Go to Settings by pressing the Windows key + I.
2. Enter Updates in the search bar.
3. Click on the Check for Updates option.

4. If an update is available, click on Install Now.

5. Restart your computer once the update is complete.
Another method for resolving an unresponsive Windows Start button is to update drivers. Learn more about it in the next section.
3. Update Drivers
🔖 Definition:
Drivers are software components facilitating communication between your hardware devices and the operating system.
Windows drivers are automatically updated during the Windows update cycle, but you can also check these updates manually. Incompatible, outdated, or malfunctioning drivers can affect the Start button and the overall system functions.
Here are the steps to update drivers manually and resolve a non-functional Windows button on Windows 10 or 11:
1. Press the Windows key + X
2. Select Device Manager to open the Device Manager window.

3. Look for the driver you wish to update. Right-click, then select Update driver.

4. Decide which option to take:

Choosing the Search automatically for drivers instructs Windows to search the system for the best driver available and install it automatically.
The following entries can also be examined to see if a driver can be updated:
- Display Adapters
- Sound
- Video
- Game Controllers
4. Perform a Malware Scan
Different types of malware can cause the Windows Start button to fail to work properly. This malicious software can manipulate system processes, files, and computer settings.
Run a virus scan to find and remove malware to fix an unresponsive Windows button. One reputable antivirus solution is Surfshark Antivirus. With its advanced features and proactive approach, Surfshark can help keep your system safe and secure sensitive data.
5. Unhide the Taskbar
There are cases when you can’t use the Windows Start button simply because it is hidden in the taskbar. Windows provides an option to hide the taskbar to maximize screen space automatically. You can hide the Windows Start button and other taskbar icons if this feature is enabled.
To unhide the Windows Start button in Windows 11, move your mouse to the bottom of the screen, and it will appear on its own.
If, for some reason, you still can’t unhide your Windows Start menu, you can do these steps:
1. Press Windows key + I.
2. Select Personalization and hover over the taskbar.

3. Click Taskbar Behaviors.
4. Uncheck Automatically hide the taskbar.

The taskbar will automatically appear at the bottom of your computer’s screen.
6. Restart Windows File Explorer
File Explorer, previously known as Windows Explorer, is a file management application found in every version of Windows. It ensures that all the programs on your computer are running smoothly.
An issue with an unresponsive Windows Start button can be resolved by restarting Windows Explorer. Follow the steps below to restart Windows File Explorer:
1. Right-click the taskbar at the bottom of your screen.
2. Click Task Manager.

3. Select Details.
4. You will find Windows Explorer in the Processes tab under Apps.
5. Right-click on Windows Explorer and select Restart.

6. Wait for Explorer to restart and check whether the Windows button has regained function.
7. Remove Corrupt Files
Corrupt files are files that have become damaged, altered, or distorted. These are typically the root of many Windows issues, including an unresponsive Windows Star button.
The good thing is that Windows’ built-in System File Checker (SFC) can fix broken files via the command line. To run an SFC scan, follow these steps:
1. Press the Windows key + R to open Command Prompt.
2. Enter cmd and press Ctrl + Shift + Enter to run as an Administrator.

3. In the Command Prompt, type SFC/scannow and hit Enter.

Once the scan is complete, a pop-up message determines the problem with the system files.
📝 Note:
If you have any corrupt files on your computer, you will most likely receive a message like this: Windows Resource Protection found corrupt files and successfully repaired them.
You may get a message stating that the SFC tool cannot repair some corrupt files. In this case, you will have to replace them manually.
8. Re-Register Built-in Windows Apps with PowerShell Tool
Another solution to the unresponsive Windows Start button is to re-register all the built-in apps using the PowerShell tool.
🔖 Definition:
PowerShell is a cross-platform task automation solution comprising a command-line shell, a scripting language, and a configuration management framework. Users can use this to automate processes that need repetitions, making work easier and minimizing the chances of errors.
Below are the steps to re-register built-in Windows apps using PowerShell:
1. Press the Windows key + R to open the Run dialog.
2. Type PowerShell, hold down Ctrl + Shift, and click OK. This will open the PowerShell terminal with administrative privileges.

3. In PowerShell, copy and paste this command: Get-AppXPackage -AllUsers | Foreach {Add-AppxPackage -DisableDevelopmentMode -Register «$($_.InstallLhit ocation)\AppXManifest.xml»}

4. Hit Enter.
Give it five to ten minutes, and do not close the PowerShell window until it is done. When the process is complete, restart your computer and see if this solves your problem with the Windows button.
📝 Note:
While the Get-AppXPackage command is running, you may see scary errors. Don’t be anxious about them. Most are just warnings about why you cannot reinstall a program.
9. Rebuild Indexing Options
Indexing is a built-in Windows 10 function that inspects your PC’s files, emails, and other content. Rebuilding indexing can refresh the search index, potentially resolving issues and improving the overall functionality of the Windows Start menu.
Here’s a quick guide on rebuilding the Windows 10 index:
1. Press the Windows key + S and type Indexing in the search box.
2. Click on Indexing Options.
3. In the Indexing Options window, click Modify.

4. From here, click the Show All Locations button.
5. Then, uncheck all the ticked boxes and select OK.

6. Click on Advanced, and then in the Troubleshooting section, click Rebuild.

7. You will see a message that says the rebuild could take a while. Click OK and wait until the process is finished.
8. Once it is done, restart your computer and try clicking the Search button again.
Cortana files could sometimes be why your Windows button is not working. To learn how to disable it, read the next section.
10. Disable Temporary Cortana Files
Cortana is Microsoft’s visual assistant integrated into Windows, providing voice and text-based interaction to assist users with various tasks. However, many Windows users have disabled Cortana due to its poor system integration.
On top of this, Cortana’s high CPU usage causes many Windows issues, including the malfunctioning Windows 10 Start button.
Check the following steps to disable Cortana:
1. Press the Windows key + R to open the Run dialog box.
2. Type Regedit and press Enter.
3. Right-click on the Windows Search folder in the left pane and select New > DWORD (32-bit) Value.

4. Name the new value AllowCortana. Then, double-click it and set the value to zero.

5. Click OK and close the Registry Editor.
Restart your computer and check if the Start button has regained function.
11. Create a New Registry
Another fix for the malfunctioning Windows button is to create a new registry. The Windows Registry is a hierarchical database that stores configuration settings and options for the operating system and installed applications.
If registry entries create problems with the Windows Start button, creating a new registry might help resolve the issue.
⚠️ Warning:
Modifying the Windows registry can have serious consequences if done incorrectly. It is recommended to back up your registry before making any changes.
To start a new registry, follow this procedure:
1. Press the Windows key + R to open the Run dialog box.
2. Tap Enter to open the Registry Editor.
3. Right-click anywhere on the screen and click New>DWORD (32-bit) Value.

4. Name the new file EnableXamlStartMenu.

5. Restart your PC, and the Start button should be fixed.
If this does not work, you might need to start your computer in Safe Mode. Learn more about this method in the next section.
12. Boot into Safe Mode
🔖 Definition:
Safe mode is a diagnostic mode that loads a basic set of drivers and files, excluding unnecessary components. It disables most third-party software-related issues.
If the problem causing the Windows Start menu doesn’t happen in Safe Mode, the default settings and drivers aren’t causing the issue.
Here’s how you start Windows 11 in Safe Mode and resolve a faulty Windows Start button:
1. Press the Windows key + S.
2. Click System in the left pane and click Recovery to open.

3. Click Advanced Startup.

4. A reminder reads: We will restart your device, so save your work. Make sure to save your work before clicking Restart Now.

1. When your PC reboots, select Troubleshoot > Advanced Options > Startup Settings.
2. Click the Restart button and allow the restart process to complete.
3. Select how you want to use Safe Mode on your PC.
You can also choose to do a factory reset to address the problem. Continue reading to find out how it can solve the problem.
13. Restore/Factory Reset Windows
If all of the previous techniques fail to fix the unresponsive Windows Start button, a Windows core function may be to blame. The last option here is to restore or factory reset Windows.
⚠️ Warning:
When you perform a factory reset, Windows will return to its default settings. To avoid losing your data, it is best to do a backup before a factory reset.
Below is an easy step for factory reset on Windows 11:
1. Press the Windows key + I to open Settings.
2. In Settings, click Update and Security.
3. Select Recovery from the side panel and click on Reset PC.

4. Choose ‘Keep my files’ in the dialogue box that pops up.

5. Click on Local Reinstall.

6. Change your settings and set Restore preinstalled apps? to No.
📝 Note:
If you do not see the option to Restore preinstalled apps, your PC doesn’t have preinstalled apps configured.
Wrap-Up
An unresponsive Windows Start button can be frustrating, affecting how you navigate your computer. However, the good thing is that various effective troubleshooting methods exist.
From restarting Windows to booting your PC into Safe Mode, you can choose various means. By following any methods you are comfortable with, your Windows Start button can function seamlessly.
Are you facing trouble using your Windows key? Let’s help you fix that.
One of the many reasons people love using Windows is user-friendliness. That’s why it occupies 70% of the operating system market, including Desktop, Laptops, and some tablets. There are plenty of reasons behind the Windows keyboard issues, like the Windows 10 activation key not working problem, and a recurring basis is keyboard shortcuts.
What Is the Windows Key Not Working Issue
A computer keyboard has many intriguing keys on it. One is the Windows button, allowing you to open the start menu with a simple key press. However, it can also perform other options with combination keys, such as CTRL, ALT, or Shift, to switch between files, folders, and applications.
But, when the Windows key stops, users cannot perform any of those operations. Not only are you unable to open the start menu quickly, but you are also unable to switch between Windows, desktops, etc.
Thus, users will want to try various fixes to resolve the Windows key not working issue. So, let’s keep digging to find out how.
What Causes the Windows Key Not Working Issue
There are plenty of reasons that a Windows key might stop working. Some experts say that it could be caused by malware or a simple setting disabled within your computer. Other times, manufacturers make keyboards that disable the Windows key when in gaming mode.
So, to sum it up, your Windows key might not be working because:
- Windows has disabled it
- It’s been locked by your keyboard (usual occurrence in Corsair, Razer, and other gaming keyboards)
- Malware or virus attack might have stopped it
- An app or service has blocked it
- Windows 10/11 Game Mode/Xbox Game bar disabling it
- Your keyboard is broken
These are the primary that causes the Windows key to not work. Other cases might include a bug within your Windows. So, let’s keep going to figure out how to fix it.
How to Fix the Windows Key Not Working On Windows 10/11
The shortcuts on your keyboard allow users to conduct many tasks quickly. The Windows button is one of the most convenient keyboard shortcuts or a singular key. However, users run into trouble when that stops working. How and why does that happen? Besides, how can you fix the Windows key not working? Let’s find out.
- Method 1. Turn Off Filter Keys
- Method 2. Registry Editor Fix
- Method 3. Disable Game Mode
- Method 4. PowerShell Command
- Method 5. Perform An SFC Scan
- Method 6. Create another User Account
- More Methods…
Method 1. Turn Off Filter Keys
The first method is to turn off the filter keys. To do this, you’ll head into the control panel to disable it. Here’s how:
Step 1. Head into «Control Panel».
Step 2. Search «Ease Of Access» in the search bar.

Step 3. Head into «Ease of Access» and find the «Make the keyboard easier to use the option».
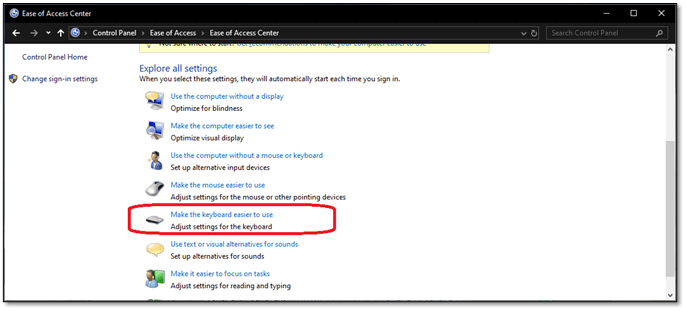
Step 4. Scroll down, find, and uncheck the Turn on Filter Keys option.
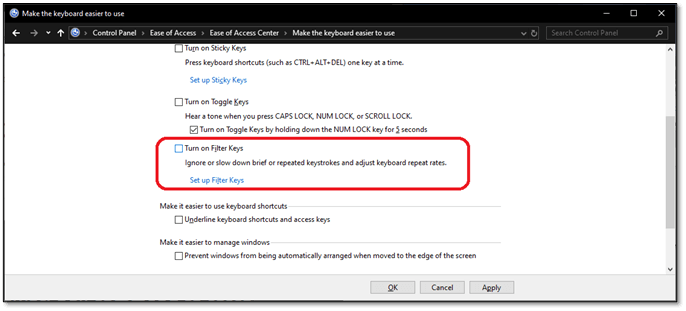
Step 5. Press Apply, then OK.
This will fix the issue if the option is enabled in the first place. If the choice wasn’t allowed, move on to the following method.
Method 2. Registry Editor Fix
In this method, you’re going to a specific section of your registry editor. Therefore, make sure you copy and paste the directory into the registry. Here’s how:
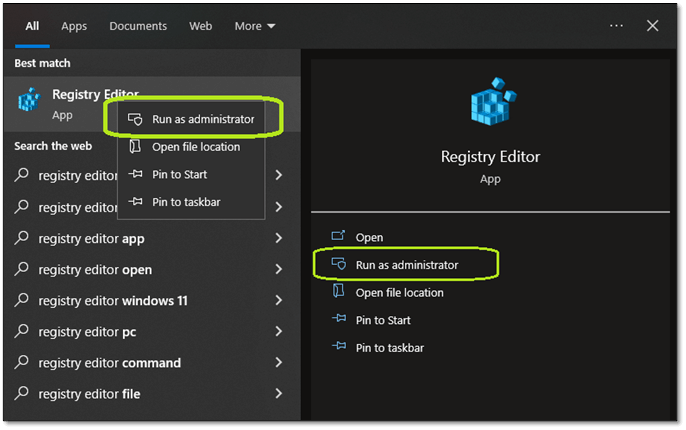
Step 1. Open «Registry Editor» as an administrator.
Step 2. Enter the following address in your registry editor’s bar. «HKEY_LOCAL_MACHINE\SYSTEM\CurrentControlSet\Control\Keyboard Layout»
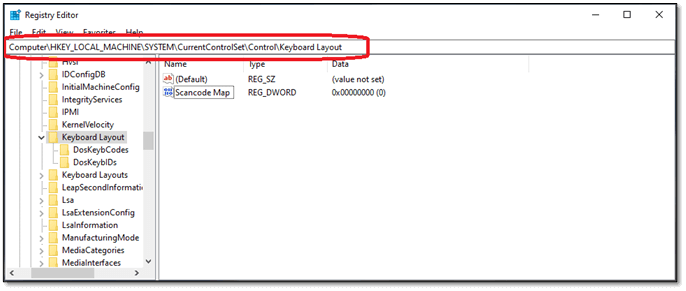
Step 3. Then find and delete the Scancode Map key.
This will most likely fix the issue, as games usually create this registry key to prevent the Windows key from interfering. If this doesn’t work, and you don’t have this crucial entry, move on to the next step.
Method 3. Disable Game Mode
The next step is to disable game mode. This is usually enabled once you open Xbox Game Bar on your computer. However, disabling it is pretty straightforward. Here’s how:
Step 1. Head into system settings.
Step 2. Find «Gaming» and click on it.
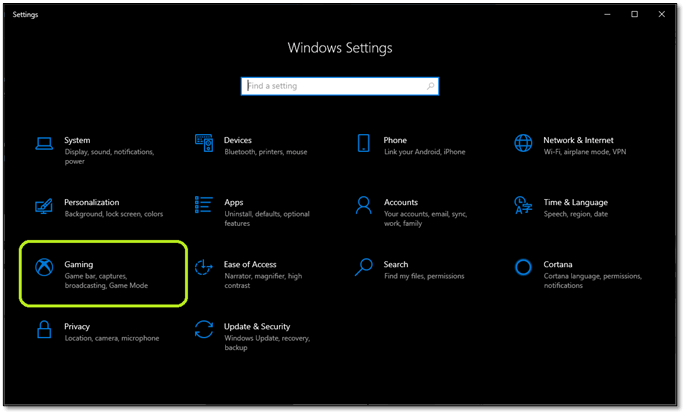
Step 3. Navigate the sidebar and find Game Mode.
Step 4. Toggle «Game Mode Off» and Disable It.

Disabling will prevent Windows settings from stopping the Windows key. Yet, if the issue persists, try the next fix.
Method 4. PowerShell Command
Windows PowerShell is one of the critical components of Windows. It allows you to fix issues that otherwise might seem irreversible. So, here’s how you can use this to fix it:
Step 1. Press the Start menu button and find PowerShell
Step 2. Open PowerShell as Administrator
Step 3. In PowerShell, copy and paste this command.
«Get-AppXPackage -AllUsers | Foreach {Add-AppxPackage -DisableDevelopmentMode -Register «$($_.InstallLocation) \AppXManifest.xml”}”
Step 4. Then press the enter key and let it complete.
Depending on your PC and internet speed, this might take a few minutes. If the Windows key still doesn’t work, try the following method.
Method 5. Perform An SFC Scan
An SFC scannow command will help you find corrupted files in your Windows 10/11. So, here’s how to perform this method:
Step 1. Open CMD as an administrator.
Step 2. Type «SFC /scannow» and press enter.
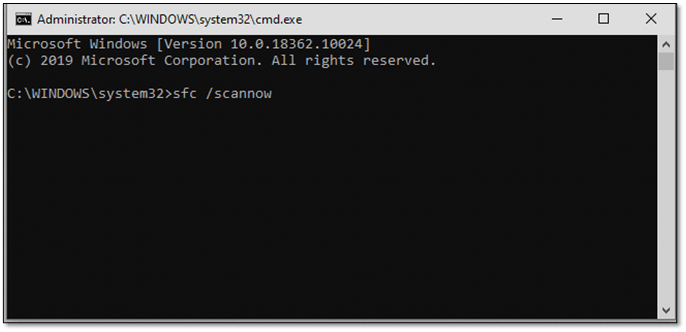
This might take a minute or two, depending on your PC. Once done, restart your device and check if the Windows key works now.
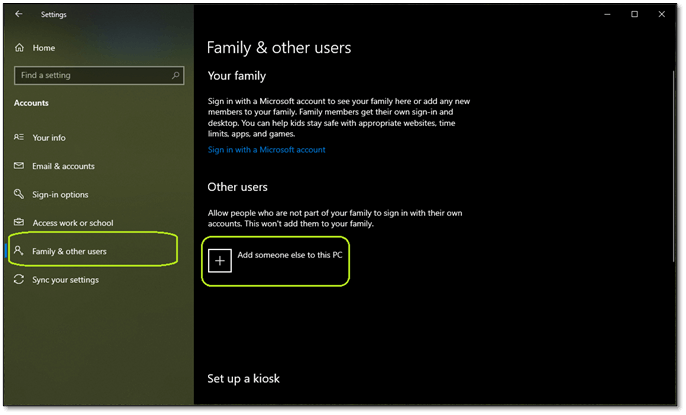
Method 6. Create another User Account
Sometimes, a simple thing like a user account might be causing the issue. Therefore, you must try and create a new account. Here’s how:
- Go to «Settings» and head into «Accounts».
- On the sidebar, find and click «Family & other users».
- Click on «Add someone else to this PC».
- Click on «I don’t have this person’s sign-in information».
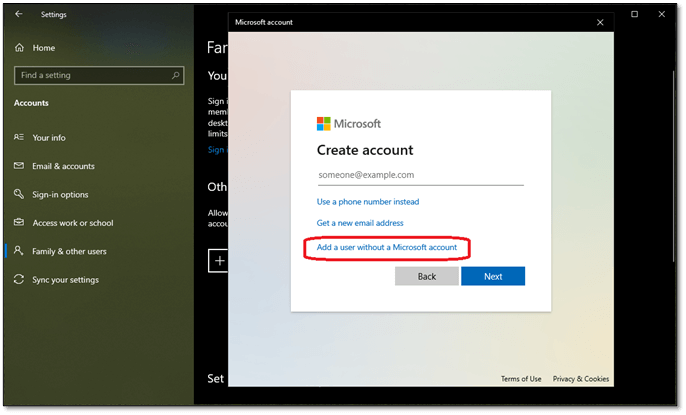
- Then click «Add a user without a Microsoft Account».
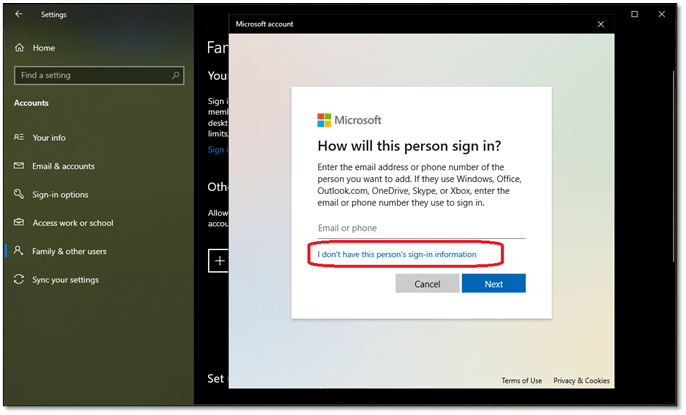
- Enter your Username and password.
Once the user is created, sign out of your account or restart your PC. Then, sign in to the new user and see if the Windows key works. If it is, delete the other users.
Method 7. Use the DISM Command
A corrupted Windows or missing system file is another probable reason the Windows key refuses to work. So, you can seek help from DISM to find and fix any corrupt files. Here’s how:
- Open CMD as administrator
- Enter the following command: «Dism /Online /Cleanup-Image /StartComponentCleanup, Dism /Online /Cleanup-Image /RestoreHealth.»
- Press enter
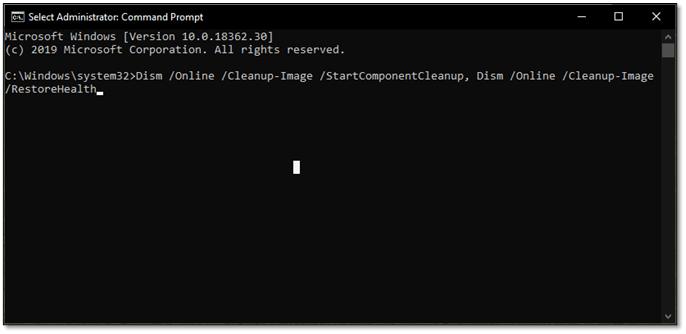
This will replace missing files or fix/reinstall corrupted Windows apps, services, or files. Thus, fixing the issue. If it persists, move on to the next step.
Method 8. Check The Keyboard Layout For the Windows Lock Button
If you have a gaming keyboard, it likely features a Windows lock button. Otherwise, it might have a shortcut to prevent the Windows key from working. Here’s an example:
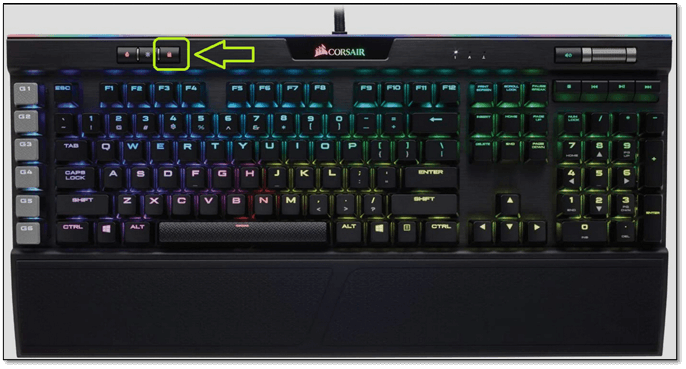
What you see is Corsair’s Windows key, which allows you to lock off the Windows button. This way, you won’t accidentally toggle the start menu when playing games. So, if it’s red like in the image, try pressing it to turn it back on.
Other keyboards might have different keys. Some keyboards require you to press the FN + Windows button to lock/unlock the Windows button. So, check if your keyboard layout has any keys or options like that.
Method 9. Unplug & Plug it Back In
Gaming keyboards also tend to have their memories. This memory allows them to remember the lighting settings and other shortcuts, such as macro keys. So, here’s what you need to do:
- Unplug the keyboard
- Untangle the wire
- Restart the PC
- Plug it back in
This might fix the issue if your keyboard’s driver wasn’t loading correctly. If not, it’s more than likely at this point that your keyboard has a hardware issue.
Method 10. Try Another Keyboard/Replace Your Keyboard
Grab another keyboard or ask a friend to borrow one if all else fails. If the new keyboard has its Windows button working, it’s 100% caused by your previously faulty keyboard. And, if your keyboard is under warranty, try to claim its promise.
Method 11. Replace the Mechanical Key
While you can’t exactly fix the broken Windows button, there are mechanical keyboards that allow you to change individual keys. If you want, you can try to replace one key with another. Here’s how:
Step 1. Pull off the critical cap of your Windows button.
Step 2. Grab the mechanical key with a tweezer and pull it out.

Step 3. Pull another key in the same way. You can try to pull out keys from the Numeric Pad or any other key you don’t commonly use.
Step 4. Replace the pulled-out key.
Step 5. Try to press the start button now.
If this method works, then that particular mechanical key is the issue. Therefore, you should order an individual key instead of the whole keyboard.
Conclusion
These are the most common fixes to ensure your Windows key works again. In many cases, the issue is more related to software than hardware. Because if the keyboard hardware fails, likely, it won’t work again.
However, there are always exceptions. And the best way to find out is by using these 11 methods. So, try each method until you fix your keyboard.