 Boot Menu (меню загрузки) можно вызывать при включении на большинстве ноутбуков и компьютеров, данное меню является опцией BIOS или UEFI и позволяет быстро выбрать, с какого накопителя загрузить компьютер в этот раз. В этой инструкции покажу, как зайти в Boot Menu на популярных моделях ноутбуков и материнских плат ПК.
Описываемая возможность может быть полезной, если вам потребовалось загрузиться с Live CD или загрузочной флешки для установки Windows и не только — не обязательно менять порядок загрузки в БИОС, как правило, достаточно однократного выбора нужного устройства загрузки в Boot Menu. На некоторых ноутбуках это же меню дает доступ и к разделу восстановления ноутбука.
Сначала напишу общие сведения по входу в Boot Menu, нюансы для ноутбуков с предустановленной Windows 10 и 8.1. А потом — конкретно по каждой марке: для ноутбуков Asus, Lenovo, Samsung и других, материнских плат Gigabyte, MSI, Intel и т.п. Внизу есть так же видео, где показывается и поясняется вход в такое меню.
Общая информация по входу в меню загрузки БИОС
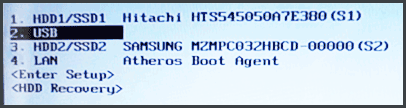
Так же, как для входа в БИОС (или настройки ПО UEFI) при включении компьютера необходимо нажать определенную клавишу, как правило Del или F2, так же и для вызова Boot Menu существует аналогичная клавиша. В большинстве случаев это F12, F11, Esc, но есть и другие варианты, о которых напишу ниже (иногда информация о том, что нужно нажать для вызова Boot Menu появляется сразу на экране при включении компьютера, но не всегда).
Причем, если все что вам требуется — это поменять порядок загрузки и сделать это нужно для какого-то однократного действия (установка Windows, проверка на вирусы), то лучше использовать именно Boot Menu, а не ставить, например, загрузку с флешки в настройках БИОС.

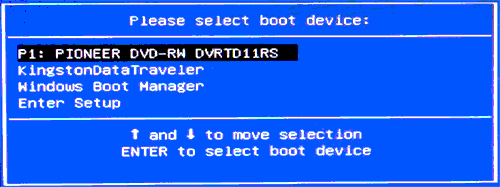
В Boot Menu вы увидите список всех подключенных к компьютеру устройств, с которых в данный момент потенциально возможно загрузка (жесткие диски, флешки, диски DVD и CD), а также, возможно, вариант сетевой загрузки компьютера и запуск восстановления ноутбука или компьютера с резервного раздела.
Особенности входа в Boot Menu в Windows 10 и Windows 8.1 (8)
Для ноутбуков и компьютеров, которые изначально поставлялись с Windows 8 или 8.1, а в скором времени и с Windows 10, вход в Boot Menu с помощью указанных клавиш может не получаться. Связано это с тем, что выключение для этих операционных систем не является в полном смысле этого слова выключением. Это скорее гибернация, а потому меню загрузки может и не открываться при нажатии F12, Esc, F11 и других клавиш.
В этом случае вы можете поступить одним из следующих способов:
- При выборе «Выключение» в Windows 8 и 8.1 удерживать клавишу Shift, в этом случае компьютер должен выключиться полноценно и при включении клавиши для входа в Boot Menu должны сработать.
- Перезагрузите компьютер вместо выключения и включения, при перезагрузке нажмите нужную клавишу.
- Отключите быстрый запуск (см. Как отключить быстрый запуск Windows 10). В Windows 8.1 для этого зайдите в Панель управления (вид панели управления — значки, а не категории), выберите пункт «Электропитание», в списке слева нажмите «Действия кнопок питания» (даже, если это не ноутбук), отключите пункт «Включить быстрый запуск» (для этого может потребоваться нажать «Изменение параметров, которые сейчас недоступны» вверху окна).


Один из указанных способов обязательно должен помочь со входом в меню загрузки, при условии, что все остальное делается правильно.
Вход в Boot Menu на Asus (для ноутбуков и материнских плат)
Практически для всех настольных компьютеров с материнскими платами Asus, вход в меню загрузки осуществляется нажатием клавиши F8 после включения компьютера (тогда же, когда мы нажимаем Del или F9, чтобы зайти в БИОС или UEFI).
А вот с ноутбуками есть некоторая неразбериха. Чтобы зайти в Boot Menu на ноутбуках ASUS, в зависимости от модели, нужно при включении нажать:
- Esc — для большинства (но не для всех) современных и не очень моделей.
- F8 — для тех моделей ноутбуков Asus, название которых начинается с x или k, например x502c или k601 (но не всегда, есть модели на x, где вход в Boot Menu осуществляется клавишей Esc).
В любом случае, вариантов не так много, так что при необходимости можно попробовать каждый из них.
Как зайти в Boot Menu на ноутбуках Lenovo
Практически для всех ноутбуков и моноблоков марки Lenovo для входа в Boot Menu можно использовать клавишу F12 при включении.

Также дополнительные варианты загрузки для ноутбуков Lenovo можно выбрать, нажав маленькую кнопку со стрелкой рядом с кнопкой питания.
Acer
Следующая по популярности модель ноутбуков и моноблоков у нас — это Acer. Вход в Boot Menu на них для разных версий BIOS осуществляется путем нажатия клавиши F12 при включении.
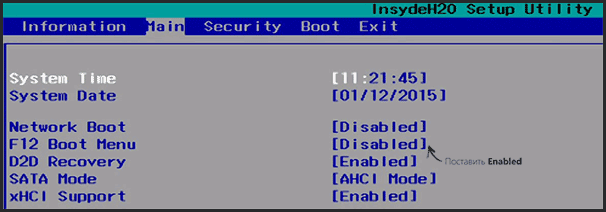
Однако, на ноутбуках Acer есть одна особенность — часто, вход в Boot Menu по F12 на них не работает по умолчанию и для того, чтобы клавиша заработала, необходимо сначала зайти в БИОС, нажав клавишу F2, а потом переключить параметр «F12 Boot Menu» в состояние Enabled, после чего сохранить настройки и выйти из БИОС.
Остальные модели ноутбуков и материнских плат
Для остальных моделей ноутбуков, а также ПК с разными материнскими платами особенностей поменьше, а потому просто приведу клавиши входа в Boot Menu для них в виде списка:
- Моноблоки и ноутбуки HP — клавиша F9 или Esc, а затем — F9
- Ноутбуки Dell — F12
- Ноутбуки Samsung — Esc
- Ноутбуки Toshiba — F12
- Материнские платы Gigabyte — F12
- Материнские платы Intel — Esc
- Материнские платы Asus — F8
- Материнские платы MSI — F11
- AsRock — F11
Кажется, учел все наиболее распространенные варианты, а также описал возможные нюансы. Если вдруг у вас все так же не получается зайти в Boot Menu на каком-либо устройстве, оставляйте комментарий с указанием его модели, я постараюсь найти решение (и не забывайте о моментах, связанных с быстрой загрузкой в последних версиях Windows, о чем я писал выше).
Видео о том, как войти меню устройств загрузки
Ну и, в дополнение ко всему написанному выше, видео инструкция о входе в Boot Menu, возможно, кому-то окажется полезной.
Также может оказаться полезным: Что делать, если БИОС не видит загрузочную флешку в Boot Menu.
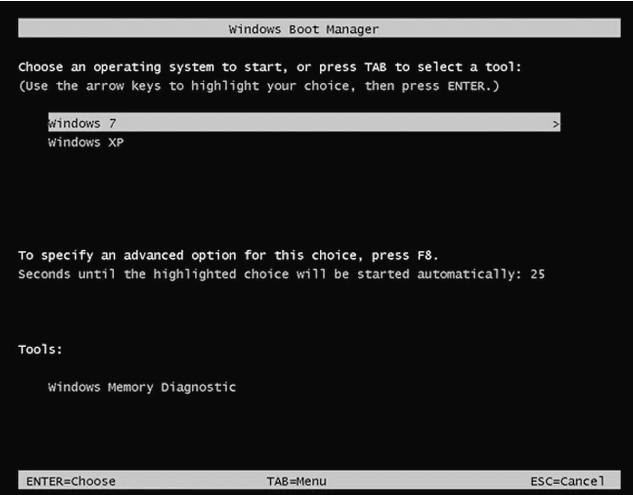
When you use the dual operating system on your Windows, every time the Windows Boot Manager screen comes up asking to choose the operating system to start. This is a great way when using dual boot but if you are using only the OS it slows down the boot process. In this tutorial, we will explain what Windows Boot Manager is and how you can enable or disable the Windows Boot Manager screen in Windows 10.
What is Windows Boot Manager?
Windows Boot Manager commonly known as BOOTMGR is a small piece of software that loads from volume boot code. It is essential for booting Windows. Furthermore, the Windows Boot Manager is hidden and located in the root directory. Winload.exe is executed by BOOTMGR essential for the Windows boot process.
Usually, the disk partition that doesn’t have a drive letter and is often labeled as System Reserved has BOOTMGR. If you don’t have a system reserved partition, BOOTMGR will be located on the C drive.
BootMGR is missing is the most common error faced by Windows users. To resolve it, you can see that our article on BOOTMGR is missing.
Now that we know what Windows Boot Manager is, let’s move further to know why we need to disable it and how to disable the Windows Boot Manager.
The Need to Disable Windows Boot Manager
If you are using dual OS, Windows Boot Manager gives an option to choose the operating system. However, when there’s only one OS this slows down the boot process. Therefore, to reduce the wait time we should disable the Windows Boot Manager.
However, the Windows Boot Manager cannot be completely removed but we can disable it. All this can be done via the System Configuration (msconfig.exe) tool. Here’s how to do this:
How to Enable/Disable Windows Boot Manager on Windows 10?
To reduce wait time and to speed up the boot process on Windows 10 use the given methods to disable Windows 10 boot manager.
Tip: Be careful while using the steps explained below any unnecessary change made might lead to a mess.
Method 1: Use Command Prompt
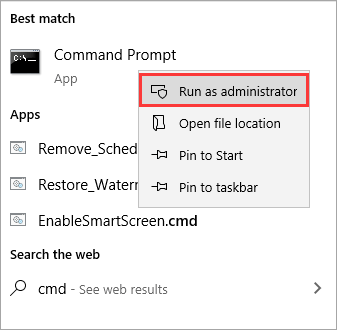
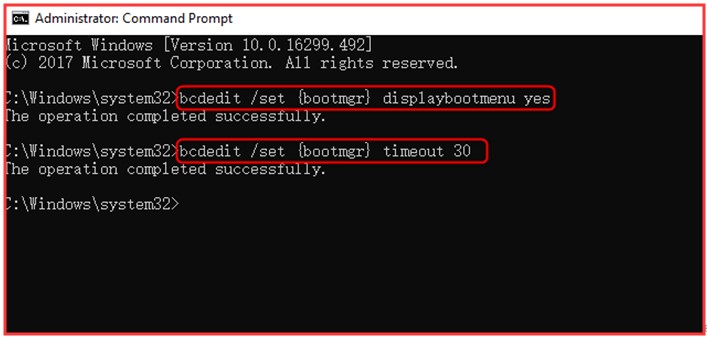
Step 1: Type cmd in the Cortana search box, right-click Command Prompt and select Run as administrator.
Step 2: Enter the following commands one by one in the command prompt window and press the Enter key after entering each command.
- bcdedit /set {bootmgr} displaybootmenu yes
- bcdedit /set {bootmgr} timeout 30
Tip: Here, the timeout followed by the number tells for how long the boot manager will be displayed. The timeout value is in seconds.

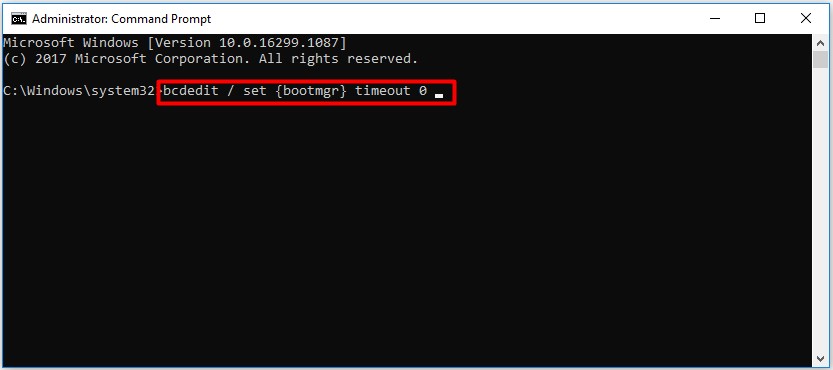
Step 3: To disable Windows Boot Manager, enter bcdedit /set {bootmgr} timeout 0 and press Enter.

Alternatively, to disable BOOTMGR you can use bcdedit /set {bootmgr} displaybootmenu no command and press Enter.
Remember: If you use the above command you cannot use below Method 2
Method 2: Change System Properties
Editing system properties will help enable or disable the Windows Boot Manager.
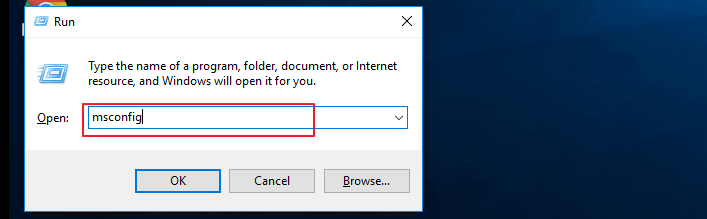
Step 1: Press Windows + R to open the Run dialog box.
Step 2: Here, type sysdm.cpl and click OK.

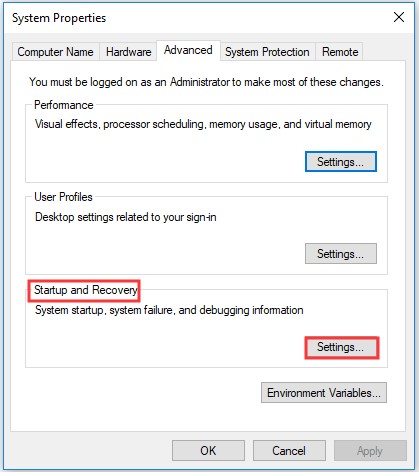
Step 3: This will open the System Properties window. Here select Advanced option > Settings under Startup and Recovery option.

Step 4: Checkmark the option Time to display list of operating systems box and set the time value. Click OK to save the changes.

Step 5: To disable BOOTMGR, uncheck Time to display the list of operating systems box or edit the timer to 0 and click OK.
Using these simple steps, you can easily enable or disable Windows Boot Manager on Windows 10. In addition to this, if you are facing a problem with permissions to allow a dual operating system to read further.
Usually, when the secure boot option is enabled you are not allowed to boot Windows when more than 1 OS is installed. Therefore, to allow dual boot you’ll need to disable secure boot.
What is a Secure boot?
Secure boot is a feature of the Unified Extensible Firmware Interface (UEFI), a replacement for BIOS. It is a security gate with a more advanced interface and enough technical options. Secure boot analyses codes before they are executing if a code has genuine digital signatures, Secure Boot will let it pass. However, if the digital signatures are unrecognized it will be blocked by Secure Boot from running and the system will require a restart.
Therefore, to use a dual operating system sometimes you might need to disable Secure Boot. However, keep in mind we do not recommend disabling Secure Boot as it helps keep you safe.
Disabling Secure Boot will allow you to perform the following operations:
- Booting Windows from external device USB, etc.
- Booting Windows using password recovery tools
Steps to disable Secure Boot on Windows 10
1. Type Advanced Startup in Cortana search bar. Select Change Advanced Startup options.

2. Now under the Settings window click on Recovery option in the left pane > Restart now under Advanced startup.

3. This will restart your Windows 10 in an advanced mode where you will get various advanced options.
Click Troubleshoot.4. Next, click on the Advanced options.5. Here, select UEFI Firmware Settings. This will restart your system click on restart on the next screen.6. Your system will now restart in BIOS. Here click on the security tab under BIOS settings.
7. Choose the Secure Boot option using the up and down arrow key.
8. Next, use the arrow keys to change Secure Boot from Enabled to Disabled.
9. Press enter, save the settings and exit.
Wasn’t it simple? Do share your feedback in the comments box. If you find this article helpful, share it with others and follow us on the social network to stay updated with the latest articles, tutorials, and tech news.
Frequently Asked Questions –
Q1. What is Windows Boot Manager?
Windows Boot Manager is a legitimate software provided by Microsoft. It is a UEFI based small in size but the crucial piece of software to set up the boot environment.
Q2. How do I get to Windows Boot Manager?
To access Windows Boot Manager, you need to head to the Start Menu> Settings > Update & Security> Recovery. Under Advanced Startup, click on the Restart button and it will reboot your PC. That’s where you see the Windows Boot Manager in action to help your device boot up.
Q3. Do I need Windows Boot Manager?
Yes, you need Windows Boot Manager on your Windows PC to help you boot up the device properly. Do not remove it from the computer or else the computer can malfunction or fail to boot.
Q4. What happens if I delete Windows Boot Manager?
If you deleted Windows Boot Manager from your computer, it will not function properly and also the Windows version logo will not appear on the screen. If you have more than one drive on your device and you want to stop seeing the Windows Boot Manager menu, you can remove a partition.
Help! Boot Manager Keeps Popping Up
«Hi, my boot manager keeps popping up every time I start my laptop. Is there any way to make it go back to normal so that it can just start automatically without going into the boot manager screen?»

What Is Windows Boot Manager (BOOTMGR Definition)
Windows Boot Manager (BOOTMGR) is a tool for booting the operating system. When our computer has multiple operating systems installed, it calls up the Boot Manager in Windows 10/8/7. When the computer starts, you can choose the system you want to start.
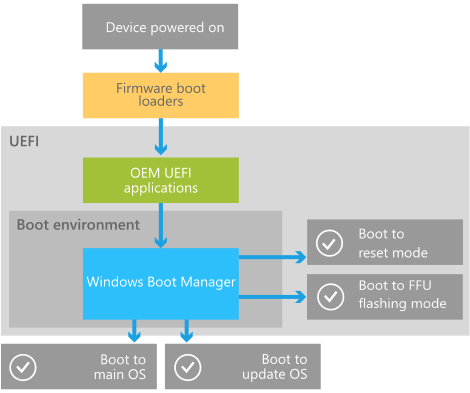
Inside the boot environment, individual boot applications started by the Boot Manager provide functionality for all customer-facing scenarios before the device boots. The following picture illustrates the process at a high level. (The picture is from Microsoft)
As mentioned at the beginning, Windows 10 always enters the Windows Boot Manager interface when booting. What should you do to fix it? You cannot remove the Windows Boot Manager. However, you can reduce the time that it waits for you to answer. Thus, you can use Command-Line to enable or disable Windows Boot Manager or use the System Configuration tool to modify the default behavior.
Solution 1. Enable or Disable Windows Boot Manager with CMD
You must run as administrator to disable or enable Windows Boot Manager with command prompt. Follow the steps below to enable or disable Windows Boot Manager.
Step 1. Next to the Windows Start menu, in the «Search Windows» box, type cmd.
Step 2. On the search result, right-click on the «Command Prompt» and select «Run as administrator».
Step 3. Once the command prompt pops up, type in the following command and press «Enter» after you type each command.
- bcdedit /set {bootmgr} displaybootmenu yes
- bcdedit /set {bootmgr} timeout 30.
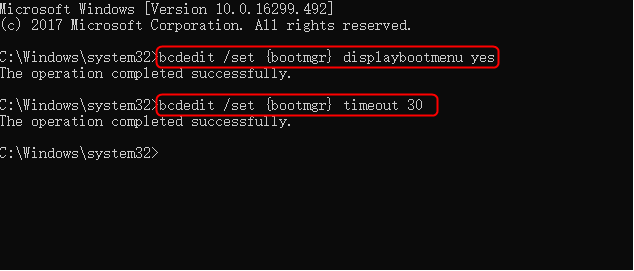
Timeout determines how long the boot manager is displayed. You can specify the timeout value in seconds according to your requirement.
Step 4. If you intend to disable Windows Boot Manager, type bcdedit / set {bootmgr} timeout 0 and hit «Enter».

Solution 2. Modify Windows Boot Manager with System Configuration
If you are not familiar with CMD, you can also open System Configuration to modify BOOTMGR. Here are the steps:
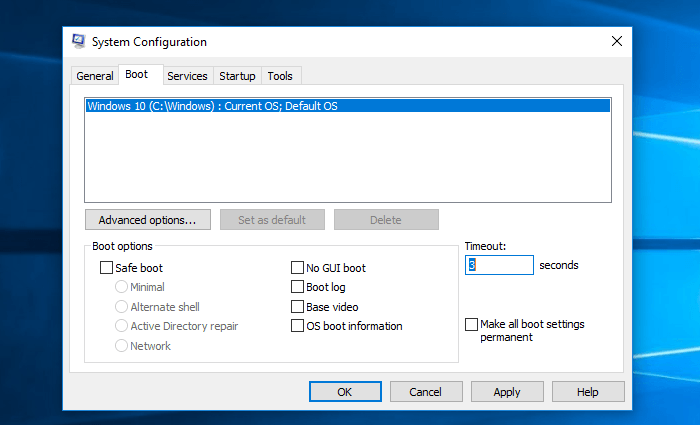
Step 1. Press Windows + R key, input msconfig, and hit «Enter» to open the System Configuration utility.
Step 2. Select the «Boot» tab on the System Configuration window that opens.
Step 3. Adjust the Timeout time to the lowest possible time, in seconds, which is probably 3.
Bonus Tip — How to Safeguard Your Data in Windows 10/8/7
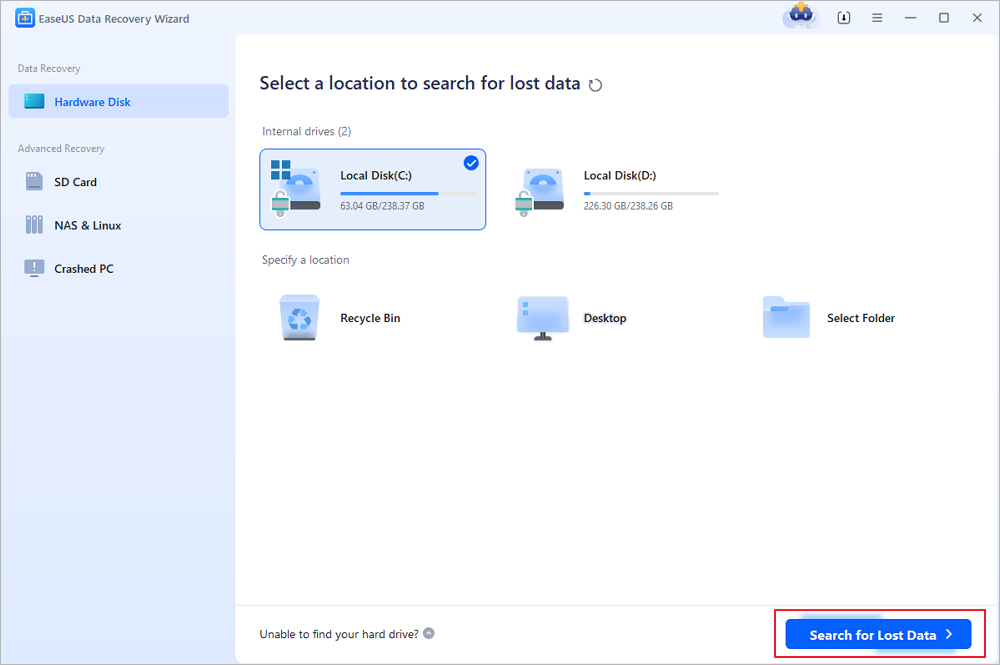
To avoid extra data loss problems during the process, you are advised to protect your data first. You can back up files with file backup software. If the data have gone forever, you can run EaseUS EaseUS Data Recovery Wizard to get them back. EaseUS Data Recovery Wizard recovers the essential data from any disaster.
Restore data with EaseUS data recovery software.
Step 1. Select a location and start scanning
Launch EaseUS Data Recovery Wizard, hover on the partition/drive where the deleted files were stored. Click «Scan» to find lost files.
Step 2. Select the files you want to recover
When the scanning has finished, select the deleted files you want to recover. You can click on the filter to display only the file types you want. If you remember the file name, you can also search in the «Search files or folders» box, which is the fastest way to find the target file.

Step 3. Preview and recover deleted files
Preview the recoverable files. Then, select files you want to restore and click «Recover» to store the files at a new storage locations instead of the disk where the data was previously lost.

Conclusion
If you encounter the Windows Boot Manager interface when booting up, you don’t have to worry about it. The most likely reason is that the old system residual files are not deleted. You can refer to the above methods to delete them and the issue will be repaired.
![]()
Download Article
A quick guide to find the Boot menu on Windows to recover or repair
![]()
Download Article
- Using a Keyboard
- Using Windows 11, 10, and 8
- Using Windows 7 and Vista
- Using Windows XP
- Q&A
|
|
|
|
Are you trying to get to the Windows Boot menu through the menu or with a key? If you need to access the Boot menu, you can press the F8 key before the Windows starts. You can also open the Boot menu from the Start menu if you’re already logged into your device. Knowing how to access the Boot menu can help troubleshoot your computer if it’s experiencing issues. This wikiHow will show you how to get into the Boot menu on Windows 11, 10, 8, or 7.
Things You Should Know
- Turn on your computer and press the function key for your PC model.
- To reach the menu from Windows, click «Start» → Power button → hold «Shift» and click «Restart». Click «Troubleshoot» → «Advanced options».
- Use the Boot menu to find actions you can use to repair or troubleshoot issues with Windows.
-

1
Turn on your Windows computer. To access the Boot menu, you’ll need to press a key before the operating system fully loads.[1]
- If your computer is on, shut it down first. You can also restart it.
-
2
Press and hold the Boot menu key. This will vary depending on your device. Here’s a list of common BIOS keys by manufacturer:
- Acer: Del or F2
- Asus: F9
- Dell: F12
- HP: Esc or F10
- Lenovo: F1 or F2
- Samsung: F2
- You must press this key before the Windows logo appears. When done correctly, your computer will start in Safe mode.


Advertisement
-
1
Click the
button. It’s usually at the bottom-left corner of the screen.
- On Windows 11, this will be in the bottom center of the screen.
-
2
Click
. This will be underneath the cog icon.
- A pop-up menu will open.
-
3
Hold ⇧ Shift as you click Restart. You must hold Shift, otherwise your computer will perform a regular restart.
- The computer will power off and back on. Instead of booting to the desktop, you’ll see a blue menu titled “Choose an option.”
-
4
Click Troubleshoot. This will be underneath Continue.
-
5
Click Advanced Options. You can find this at the very bottom.
-
6
Click Startup Settings. You are now at the Windows boot (Startup Settings) menu.
- You can now use the Advanced Options menu to repair your device, or boot from another drive.


Advertisement
-
1
Press Alt+F4. This will open the Shut Down Windows menu.
-
2
Click the drop-down menu. The options will expand.
-
3
Select Restart. This will be next to Shut down.
-
4
Click OK. The computer will now shut down and restart. As soon as the computer restarts, you will need to act quickly—be ready.
-
5
Press and hold F8 as soon as the computer restarts. You’ll need to press it before the Windows logo appears. Continue holding this key until you see the Advanced Boot Options menu.
- If Windows boots to the desktop, repeat this process to try again.


Advertisement
-
1
Press Ctrl+Alt+Del. This will open the Windows Security menu.
-
2
Click Shut Down…. You can find this next to Log Off….
-
3
Click the drop-down menu. This will expand the options.
-
4
Click Restart. This will be next to Shut down.
-
5
Click OK. The computer will now restart. As soon as the computer restarts, you will need to act quickly—be ready.
-
6
Press F8 repeatedly as soon as the computer powers on. Continue tapping this key until you see the Advanced Boot Options menu—this is the Windows XP boot menu.
- If Windows boots to the desktop, repeat this process to try again.


Advertisement
Add New Question
-
Question
My Lenovo turbo boost laptop hangs by showing boot menu when switching on, what to do?

Amin Moghoomi
Community Answer
Try finding your hard drive in the list. And you can try a Windows installation disk to check your hard drive.
-
Question
I want to boot up using my old Windows XP Pro Disk and use it to format my hard drive, which doesn’t have windows XP on it. Can this be done?
Yes, it can. Insert Your disk. Press the bios key. This depends on your computer. Change the boot order. Save the changes. Reboot your computer. When you see «Press Any Key To Boot From CD», press a key. When you get to «Where Would You Like To Install Windows?», select the drive, press Enter, click «Format As Ntfs» Or «Format As Fat».
Ask a Question
200 characters left
Include your email address to get a message when this question is answered.
Submit
Advertisement
Thanks for submitting a tip for review!
About This Article
Thanks to all authors for creating a page that has been read 249,332 times.
Is this article up to date?
-
Home
-
Knowledge Base
- What Is Windows Boot Manager and How to Enable/Disable It
By Amy | Follow |
Last Updated
This post mainly tells you some information about Windows boot manager and how to enable and disable it. Besides, you will get some extra information about it.
What Is Windows Boot Manager
Windows Boot Manager (BOOTMGR), a small piece of software, is loaded from the volume boot code that is a part of the volume boot record. It enables you to boot Windows 10/8/7 or Windows Vista operating system. Besides, MiniTool will offer more information to you.
The configuration data that BOOTMGR requires can be found in the Boot Configuration Data (BCD) store, which is a registry-like database. The database replaces the boot.ini file used in old Windows versions like Windows XP.
The BOOTMGR file itself is both read-only and hidden, which is located in the root directory of the partition. It is marked as “Active” in Disk Management. In most Windows PCs, this partition is labelled as “System Reserved” without hard drive letter.
If there’s no the “System Reserved” partition, probably the BOOTMGR is located on the primary hard drive (in most cases it’s C drive). The boot manager will execute winload.exe, which is the system loader that is used to continue the Windows boot process.
How to Enable/Disable Windows 10 Boot Manager
Based on the above description, you can know that Windows boot manager Windows 10 is beneficial to your computer. Additionally, if you have multiple operating systems, you can choose the target operating system and enable Windows Manager when booting your computer.
However, as it can unnecessarily slow down the boot process when it waits to ask you which operating system to boot to, you may want to disable it.
Tip: If you don’t want to choose which operating system to boot to and always like to start the same one, you can pre-select the one you always want to start.
Actually, you are unable to delete Windows boot manager. What you can do is to reduce the time that it waits on the screen for your answer which operating system you would like to start. You can utilize the given methods to enable/disable Windows 10 boot manager.
Tip: You should be careful when using system configuration data. Don’t do some unnecessary changes. That will lead to more mess.
Method 1: Utilize Command Prompt
To enable/disable BOOTMGR via Command Prompt, you need to have administrator privilege to perform. If you don’t have this access, it is suggested that you use Renee PassNow to create one before following the steps below.
Step 1: Type cmd in the search box, and then right click Command Prompt and choose Run as administrator.
Step 2: Type the following commands in the Prompt and hit the Enter key after typing each one command.
- bcdedit / set {bootmgr} displaybootmenu yes
- bcdedit / set {bootmgr} timeout 30
Tip: The timeout decides the time of boot manager displayed. You are able to specify the timeout value in seconds based on your requirement.
Step 3: If you want to disable Windows Boot Manager, you need to type bcdedit / set {bootmgr} timeout 0 and hit Enter.
You can also use the bcdedit / set {bootmgr} displaybootmenu no command to disable BOOTMGR, but by doing so you cannot use the Method 2.
Method 2: Change System Properties
Alternatively, you can change system properties to enable or disable Windows Boot Manager. Here are steps for you.
Step 1: Open the Run dialog window by pressing Win plus R keys.
Step 2: Type sysdm.cpl and click OK to continue.

Step 3: When the System Properties window pops up, choose the Advanced option. Then click on the Settings under the Startup and Recovery option.
Step 4: In the pop-up window, select the Time to display list of operating systems box and set the time value. After that, click OK to save the changes.
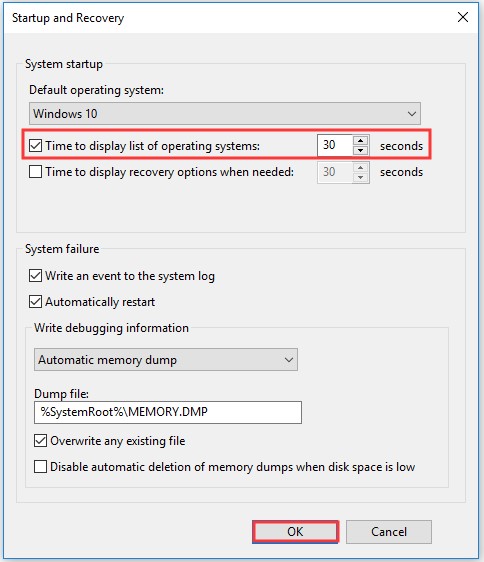
Step 5: If you want to disable BOOTMGR, cancel Time to display list of operating systems box or set the time value as 0 and click OK to finish the operation.

The common boot error in Windows is the BOOTMGR is missing error. The Boot Configuration Data store is safer than the boot options in previous. That is because it enables users who are in Administrator group to lock the BCD store partition and gives some rights to other users to decide which ones can manage boot options.
Only if you are in the Administrators group, you can edit the boot options in Windows Vista and more advanced Windows versions utilizing BCDEdit.exe tool included in those versions of Windows. On the contrary, if you’re using older versions of Windows, use the Bootcfg and NvrBoot tools instead.
About The Author

Position: Columnist
Having writing articles about computer tech for a long time, I am rather experienced especially on the aspect of computer optimization, PC enhancement, as well as tech terms explanation. The habit of looking through tech forums makes me a great computer issues collector. And then, many articles related to these issues are released, which benefit plenty of users. Professional, effective, and innovative are always the pursuit of an editing worker.