The boot menu shows up every time you turn on a PC where two or more Windows operating systems are installed. For instance, if you have installed Windows 10 and Windows 7 in dual boot setup, you will get the boot menu where you can either select the non-default operating system or let the boot menu to automatically boot into the default operating system.
By default settings, the most recently installed or most recently upgraded operating system is the default operating system in the boot menu.
However, at times, after installing or upgrading an operating system, you might want to change the boot order to set or change the default operating system.
In Windows 10, if you need to change the default boot order, you can do so without the help of third-party tools.
The following are the four ways out there to change the boot order in Windows 10.
Method 1 of 4
Change the boot order in Windows 10 via System Configuration
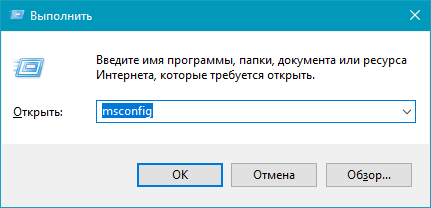
Step 1: Type msconfig in the Start/taskbar search field and then press the Enter key to open the System Configuration dialog.
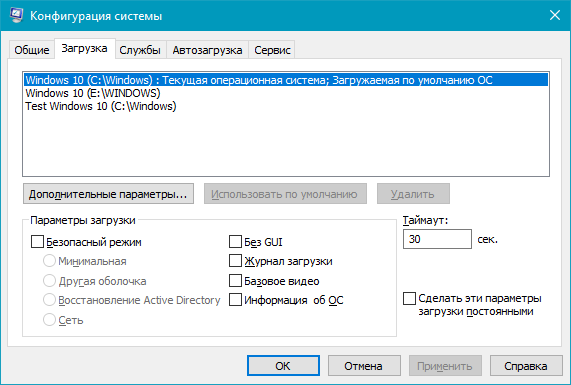
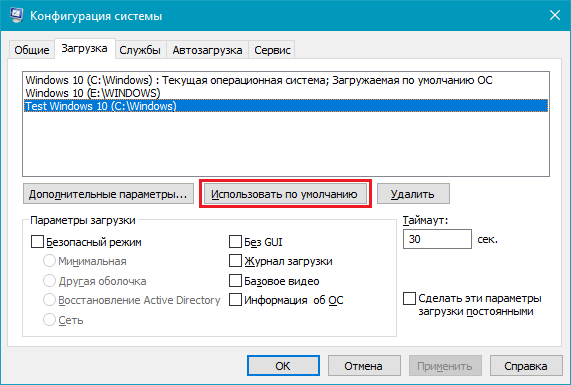
Step 2: Switch to the Boot tab. Select the operating system that you want to set as the default and then click Set as default button. Click the Apply button.
Here, you can also change the default 30 seconds waiting period to the time of your choice.
Method 2 of 4
Change the boot order in Windows 10 via advanced options
Step 1: Close all running programs. Restart your PC.
Step 2: When you see the boot menu (Choose an operating system) screen, click the Change defaults or choose others.
Step 3: Next, you will get the Options screen. Here, click Choose a default operating system tile.
Step 4: On the Choose a default operating system screen, you can see the default operating system. The entry at the top of the list is usually the default operating system.
To change the default operating system, simply click on the tile that you want to set as the default operating system in the boot menu. For instance, I am clicking on Windows 10 entry to make it the default operating system.
That’s all! You will not see any confirmation message.
Instead, you will be taken back to the Options screen where you can click Change the timer tile if you wish to change the default 30 seconds of the boot menu to 5, 10, or 15 seconds.
To exit, click the Back icon. You will now get Choose an operating system screen. Here, the default operating system will appear at the top of the list. Click on an entry to boot into it.
Method 3 of 4
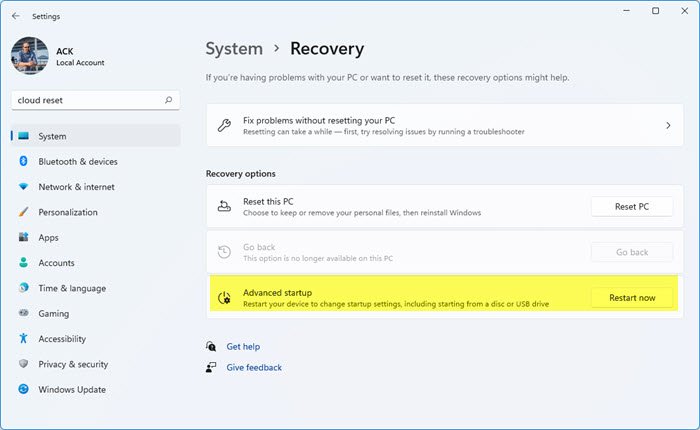
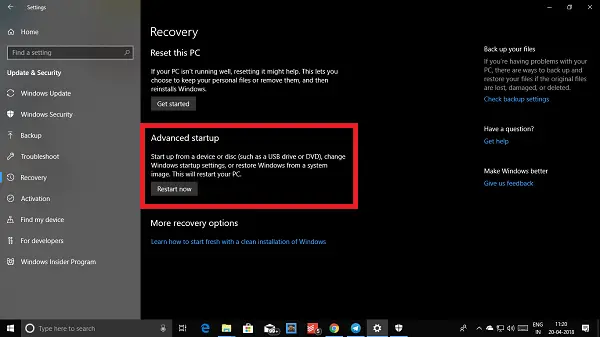
Step 1: Open the Settings app. Navigate to Update & security > Recovery.
Step 2: Click the Restart now button in the Advanced startup section.
Step 3: Your PC will restart, and you will get Choose an option screen after the restart. Click Use another operating system tile.
Step 4: On the Choose an operating system screen, click Change defaults.
Step 5: Next, you will see the Options screen. Here, click Choose a default operating system tile.
Step 6: Finally, click on the OS entry that you want to set as default to make it the default.
You will now see the Options screen. Click the Back icon to go back to Choose an operating system screen. Here, you can see the default operating system. The default one appears at the top of the list.
Click on an entry to boot into it.
Method 4 of 4
Change the boot order in Windows 10 using EasyBCD
EasyBCD is one of the must-have tools for dual-boot PC users. With EasyBCD, you can easily change not just the default boot order but also add a new operating system to the boot menu.
Here is how to use the EasyBCD to change the boot order in Windows 10.
Step 1: Download EasyBCD and install the same. The free version is for personal and non-commercial use only.
Step 2: Run, EasyBCD. Click the Edit Boot Menu button on the left pane.
Step 3: In the Modify Menu Entries section, select an entry and then click the Up or Down icons to move it up or down.
To change the default operating system, simply click the checkbox next to it.
Here you can also change the countdown time from the default 30 seconds to something else, or you can make the boot menu wait until the user selects an entry.
Finally, click the Save settings button.
Download Windows Speedup Tool to fix errors and make PC run faster
When your PC boots up, the first thing that loads up is the UEFI Firmware or the BIOS. It does a lot of things which also includes the option to which hardware to use to boot the Windows. If you want to boot from a USB drive or an external drive, you need to change the boot order on Windows 11/10. The usual default is set to the first hard drive connected to the PC.
Prior to Windows 11/10, it was possible only by rebooting your PC and then press a unique key like F2 or DEL on your keyboard to get into BIOS. In Windows 10, Microsoft has inbuilt a recovery system that allows you to do many things. One of the options is to boot into BIOS making it a lot easier in case you always miss pressing the key.
In this guide, we will show how you can boot into Windows 11/10 firmware settings (UEFI/BIOS), and change the boot order easily.
Windows 11/10 Recovery System allows you to get into your UEFI/BIOS settings from the OS and change your boot order. You can choose to boot from a USB drive or DVD Drive. This comes in handy during fresh installation or upgrading using an ISO.
Windows 11 users need to press Win+I to open Settings > System Recovery and click on Restart now button against Advanced Startup.
Windows 10 users, open Settings > Update & Security > Recovery Advanced Startup and click on Restart now.
This feature lets you:
- Boot Windows from a device or disk (such as a USB drive or DVD).
- Change your PC’s Firmware Settings.
- Configure Windows Startup Settings.
- Restore Windows from a System Image.
When you click on Restart Now, it will reboot your PC, and offer you all these Advanced Options. Click, and wait till you get these options. Select Troubleshoot > Advanced Options. This screen offers further options which include System Restore, Startup repair, Go back to the previous version, Command Prompt, System Image Recovery, and UEFI Firmware Settings.
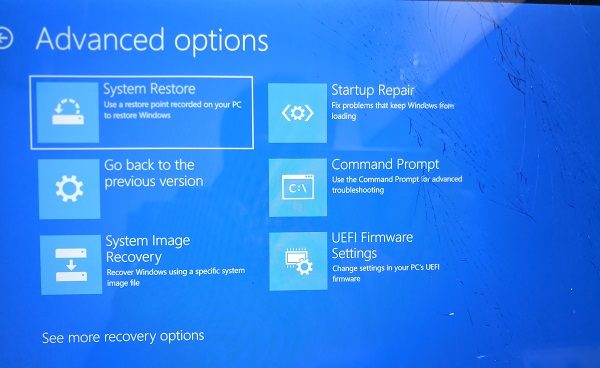
Select UEFI Firmware Settings, and it will let you restart your PC. Once the computer boots up, it will take you to the Firmware settings.
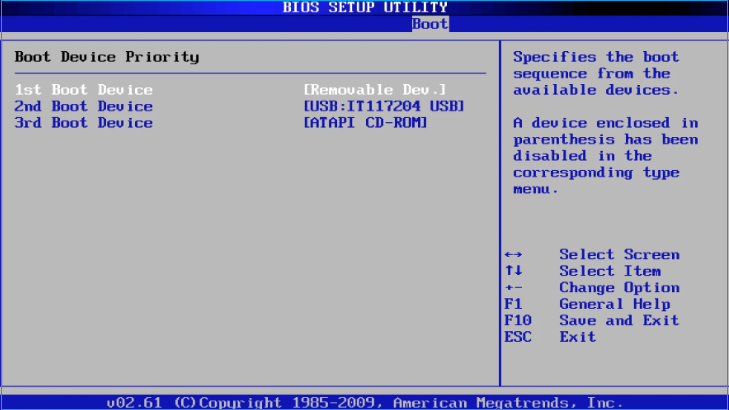
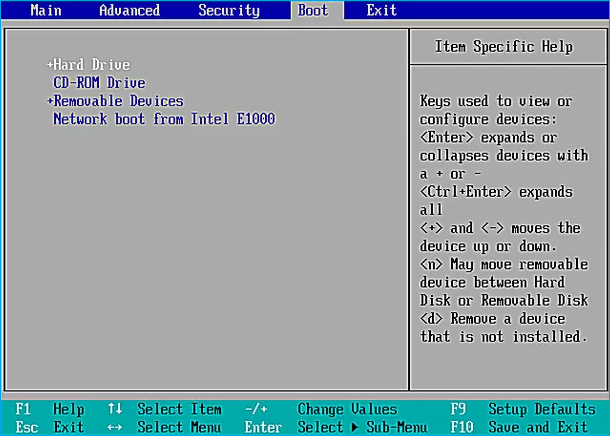
- Switch to Boot Tab.
- Here you will see Boot Priority which will list connected hard drive, CD/DVD ROM and USB drive if any.
- You can use the arrow keys or + & – on your keyboard to change the order.
- Save and Exit.

Now when you boot it will follow the sequence which you have set in your BIOS or UEFI Firmware Settings.
See: How to change Boot Menu Timeout in Windows
This comes in very handy when you want to boot from a DVD drive that has Windows 11/10 Installation files or if you have another Windows installed on a secondary hard disk.
Read: How to change default operating system in Windows
Note: It seems if you have a Bluetooth keyboard, it will not work here. You will need a hard-wired keyboard to navigate and change the options. Also, the touch doesn’t work either.
Read: Change Time to display the list of operating systems & Recovery Options in Windows.
Anand Khanse is the Admin of TheWindowsClub.com, a 10-year Microsoft MVP (2006-16) & a Windows Insider MVP (2016-2022). Please read the entire post & the comments first, create a System Restore Point before making any changes to your system & be careful about any 3rd-party offers while installing freeware.
Knowing how to change the boot order in Windows 10 can be a useful tool for troubleshooting and optimizing the performance of your computer. Follow these steps to change the boot order in Windows 10:
- Press the Windows key + R to open the Run window.
- Enter msconfig and click OK.
- Go to the Boot tab.
- Select the boot option you want to move up or down in the list.
- Click the up or down arrow buttons to move the boot option up or down in the list.
- Click Apply and then OK.
How Do I Change My BIOS Boot Order?
Changing BIOS boot order requires access to the system BIOS. The BIOS (Basic Input/Output System) is a chip on the motherboard that stores information about the computing devices’s hardware and configuration settings. To change the boot order, the BIOS must be accessed and modified.

To access the BIOS, you will need to reboot your computer and press a special key to enter the setup. Depending on the manufacturer, this key is usually F1, F2, F10, Esc, or Delete. Once inside the BIOS, you need to find the Boot menu and select the option to change the boot order.
The exact steps will vary depending on the type of BIOS, but usually, you can use the arrow keys to navigate to the boot order and select the boot device you wish to use. Once you have changed the boot order, you will need to save the changes and reboot the system. Usually, you can save the changes by pressing the F10 key.
When prompted, confirm the changes and let the computer boot. It should now boot from the device you selected. If you have any problems accessing the BIOS or changing the boot order, you may need to contact your computer’s manufacturer or read the documentation that came with the computer.
How Do I Change The Boot Order In Windows 10 Without BIOS?
Changing the boot order in Windows 10 without BIOS is a straightforward process. To do this, open the ‘Run’ dialog box by pressing the Windows logo key and ‘R’ key simultaneously. Enter ‘msconfig’ in the box and click ‘OK’. This will open the System Configuration window. Under the ‘Boot’ tab, you’ll see the Boot options. Select the Operating System you want to boot first and click the ‘Move Up’ button.
If you want to select multiple OSs, use the ‘Ctrl’ key while selecting them. Once you are done, click ‘OK’ and then ‘Exit Without Restart’ to apply the changes. The next time you boot your PC, the selected OS will boot first.
How Do I Change The UEFI Boot Order In Windows 10?
Changing the UEFI boot order in Windows 10 is an important task that can be done to customize the startup process of your computer. UEFI, or Unified Extensible Firmware Interface, is a type of firmware used during the boot process and is the successor to BIOS. You can change the UEFI boot order in Windows 10 to customize the order in which your computer’s operating system boots.
To change the UEFI boot order in Windows 10, you will need to access the UEFI firmware settings in the Windows 10 Advanced Startup Options menu. This menu can be accessed by pressing the «Shift» and «Restart» keys simultaneously while on the Windows 10 home screen. Once in the Advanced Startup Options menu, you will need to select the «UEFI Firmware Settings» option.
After selecting this option, the UEFI settings menu will open. From this menu, you can select the «Boot» tab and then select the boot order you would like to use. Once the desired boot order is selected, you can save your changes and restart your computer to begin using the new boot order. It is important to note that the UEFI boot order can also be changed from outside of Windows 10 by accessing the UEFI firmware settings from the system’s BIOS or UEFI menu.
To do this, you will need to press the appropriate key to enter the BIOS or UEFI menu when your computer is starting up. Once in the BIOS or UEFI menu, you can select the boot order you would like to use and save your changes before exiting.
How Do I Fix An Incorrect Boot Order?
Fixing an incorrect boot order is a relatively easy process that requires access to the Basic Input/Output System (BIOS). This is a low-level system used to configure the computer’s hardware before booting an operating system. To fix the boot order, you must first enter the BIOS.
To do this, turn on the computer and look for a prompt on the screen that says something like “Press F2 to Enter Setup”. Press the indicated key to enter the BIOS menu. Once in the BIOS, you should see a menu with several options. Look for a menu that says something like “Boot Order”. Select this option to view the order in which the computer tries to boot different devices.
You can change the order by selecting an item and using the arrow keys to move it up or down. When you’re done, save the changes and exit the BIOS. The computer should now boot from the correct device.
How To Change Boot Order In Windows 10 From Command Prompt
Changing the boot order in Windows 10 is a relatively simple process. The boot order determines which devices will be checked for bootable files. The order can be changed in the BIOS or UEFI settings of your computer. Here is how to change the boot order in Windows 10 from the Command Prompt. First, open the Command Prompt with administrative privileges. To do this, press the Windows key and type «cmd». Right-click the command prompt icon and select «Run as administrator».
Next, type the following command: bcdedit /set {bootmgr} bootsequence {bootorder} and press enter. Replace {bootorder} with the desired boot order. For example, if you wanted the hard drive to be the first device checked, you would enter bcdedit /set {bootmgr} bootsequence {bootorder} HD0. Once you have entered the command, the changes will take effect immediately. You can also set the boot order from the BIOS/UEFI settings of your computer.
To access this page, restart your computer and press the appropriate key for your system. This key is usually displayed on the first page of the BIOS/UEFI settings. Once you are in the BIOS/UEFI settings, you can select the boot order option and change it to the desired order. Changing the boot order in Windows 10 can be done easily from the Command Prompt or the BIOS/UEFI settings. It is important to make sure that your boot order is set correctly in order to ensure that your computer will boot properly.
Change Boot Order Windows 11
Changing the boot order in Windows 10 is a simple process and is beneficial for many reasons. It allows you to choose which drive the computer will boot from first, allowing you to boot from a USB drive or an external disk, for example. It also allows you to choose which operating system you would like to boot into when you have multiple ones installed. To change your boot order, follow these steps:
1. Open the “Start Menu” and type “msconfig” in the search field and hit enter.
2. You will then see the “System Configuration” window. Click on the “Boot” tab.
3. On the “Boot” tab, you will see a list of all of the bootable devices. You can select the device you want to boot from first by clicking on it and then clicking the “Move Up” button.
4. When you are finished, click “OK” to save your changes.
5. You will then be prompted to restart your computer for the changes to take effect.
6. Once your computer has restarted, it should now boot from the device you selected. It is important to note that any changes you make to the boot order will only be temporary.
If you want to make the changes permanent, you will need to go into your BIOS and change the settings there. For most computers, you can access the BIOS by pressing the F2 or DEL key on your keyboard when your computer starts up.
How To Change Boot Order Without Bios
Changing the boot order in Windows 10 is a simple process that does not require accessing the BIOS. The boot order determines which devices your computer will try to boot from first. This means that if you want to boot from a USB drive, CD/DVD, or another hard drive you can change the boot order so that your computer will look for those devices first. To change the boot order in Windows 10:
- Open the Settings app by pressing the Windows key + I on your keyboard.
- Next, click on «Update & Security»
- Once the «Update & Security» window is open, click on the «Recovery» tab on the left side of the window.
- Under «Advanced startup», click on the «Restart now» button.
- Once your system has restarted you should be taken to the «Choose an option» screen. Click on the «Troubleshoot» option.
- On the next screen, click on the «Advanced options» option.
- On the next screen, click on the «UEFI Firmware Settings» option.
- Finally, click on the «Restart» button to open the UEFI settings.
Once you are in the UEFI settings, you can navigate to the «Boot» tab and change the boot order as needed. Once you have changed the boot order, make sure to save your changes and exit the UEFI settings. Your changes should take effect the next time your computer boots up.
Change Uefi Boot Order Windows 10 Command Line
UEFI (Unified Extensible Firmware Interface) is a type of system firmware that provides a modern interface for computer hardware configuration and a secure boot environment for your Windows 10 operating system. It provides an easy way to change the boot order of your computer to select the boot device you want to use.
This article explains how to change the boot order in Windows 10 using the command line. In order to change the boot order in Windows 10, you need to open Command Prompt as an administrator. To do this, press the Windows + X keys, then select “Command Prompt (Admin)” from the list. Once the Command Prompt window is open, type in the following command to list all the boot entries in your system: bcdedit /enum all This command will provide a list of all the boot entries, including the Windows Boot Manager (BOOTMGR) and the Windows Boot Loader (BOOTMGR).
To see the current boot order, type the following command: bcdedit /enum active This command will list all the boot entries that are currently active in the system. To change the boot order, type the following command followed by the desired entry number: bcdedit /bootsequence {entry_number} For example, to make the Windows Boot Loader the first boot option, type the following command: bcdedit /bootsequence {bootmgr} Once you have changed the boot order, you can restart your computer to see the changes take effect.
If you want to revert the changes, you can type the following command: bcdedit /deletevalue {bootmgr} This will delete the entry from the boot order and restore the original boot order.
Unable To Change Boot Order In Bios Windows 10
The boot order is the sequence of devices that your computer will attempt to boot from when you turn it on. You may need to change the boot order in Windows 10 if you want to boot from a USB drive, CD/DVD, or floppy disk. You can change the boot order through the computer’s basic input/output system (BIOS) or UEFI.
To change the boot order in Windows 10, you’ll need to access the BIOS or UEFI. To access the BIOS, you typically have to press a specific key or a combination of keys during the boot process. The exact key or combination of keys will vary from system to system, so you may need to do a little research to find out which one is correct for your computer. Once you’ve accessed the BIOS/UEFI, you can use the arrow keys to navigate to the “Boot” tab.
From there, you should be able to change the order of the boot devices. After making the changes, you can save and exit the BIOS/UEFI. Your computer should now boot from the device that you set as the primary device.
How To Change Boot Order In Windows 10 Hp Laptop
If you own an HP laptop running Windows 10, you may want to change the boot order of your system. This is helpful if you want to boot from a CD or USB drive, or you want to change the order in which your operating system and applications launch. Changing the boot order can be easily done in Windows 10 using the built-in system configuration utility, also known as MSConfig.
- Press the «Windows + R» keys on your laptop keyboard to open the «Run» dialog box.
- Type «MSConfig» in the dialog box and press «Enter» to open the System Configuration utility.
- Click on the «Boot» tab and you will see the list of all hard drives, CDs and USB drives connected to your laptop.
- Use the «Up» and «Down» buttons to change the boot order.
- After you have changed the order, click «OK» to save the changes.
- You may be asked to restart your laptop for the changes to take effect.
That’s it! Now the new boot order you have specified will be applied. Every time you start your laptop, it will boot according to the order you have specified. If you ever need to change the boot order again, simply follow these steps to do so.
Change Boot Order Windows 10 UEFI
The boot order of a computer can be changed in Windows 10 through the Unified Extensible Firmware Interface (UEFI) settings. This is the firmware code that runs before an operating system is loaded and is used to control the boot process. By changing the boot order, you can set the computer to boot from a different device such as a USB drive or DVD.
To change the boot order in Windows 10, you must first enter the UEFI settings. To do this, you will need to restart your computer and press the appropriate key (usually F2 or Delete) to access the UEFI setup screen. Once you are in the UEFI setup screen, you will need to navigate to the Boot tab. Here, you will be able to view the current boot order and change it by moving the devices up and down in the list.
Once you have changed the boot order, you will need to save the settings and exit the UEFI setup screen. Your computer should then boot according to the new boot order when it is restarted.
Change Boot Order Windows 10 Dell
Changing the boot order on a Windows 10 Dell computer is a quick and easy process. You can do this by accessing the BIOS setup utility. The BIOS setup utility is a program built into the computer’s motherboard that allows you to change certain settings, including the boot order. To access it, turn on or restart your computer and press the F2 key when the Dell logo appears.
Once in the BIOS setup utility, you can change the boot order from the main menu. You’ll see a list of the available drives that your computer can boot from. You can change the order of these drives by using the arrow keys on your keyboard. Make sure the drive you want to boot from is at the top of the list.
Once done, press the F10 key to save your changes and exit the BIOS setup utility. Your computer will now boot from the drive you have selected, instead of the default drive. If you ever need to change the boot order again, you can follow the same steps.
Wrap up
To wrap up, we have seen that changing the boot order in Windows 10 can be done quite easily. This process is essential for booting from a specific device, or for troubleshooting any issues with the boot process. To change the boot order, all you need to do is enter the BIOS, find the boot menu, and adjust the order to the desired configuration. With a few simple steps, you can get your system to boot from the device of your choice.
Sometimes, we need to change the boot drive for some reason. However, not every user knows the process of how to change the Boot drive of Windows 10. If you are one of those newbies looking to change the boot drive of your computer system for the first time? Don’t worry this guide will help you to change your boot drive using the recovery tool and BIOS settings.
Before we go any further, let us help you understand what a boot drive is and what are the most common reasons to replace a boot drive.
What Is A Boot Drive?
A boot drive is a storage device containing the computer operating system. It is used to boot a computer in the form of a CD-ROM drive, USB flash disk, floppy disc drive, and DVD drive. A hard disk is the most common type of boot drive.
The operating system is pre-installed in a new computer, and you can directly boot it. On the other hand, an old computer needs to replace the disk to upgrade its storage and functionality. However, it is not possible to boot a computer unless the necessary boot files are stored on the disk. Due to the following reasons, you may need to change the boot drive in your windows computer:
- Windows Installation: If you want to install a new operating system to a formatted drive, you will need to use it as a bootable device. You must copy the Windows installer to the disk and pick it as a boot drive to activate the installation.
- Upgrade HDD to SSD: If you are looking to upgrade the performance of your computer/laptop using a new SSD, you will need to move the boot drive into it.
- Need a Recovery Drive: If your hard drive is damaged or failing, you can use a new disk to recover the data operating the windows tool. It will help you to give a kick start to your computer even if it does not start. To do so, you will need to change the recovery drive to boot your computer with no data loss.
- Operate Bootable Antivirus: When powerful malware or virus hits your system, it stops you from using the Windows operating system and other programs. The only way to fix the problem is to use combat bootable antivirus stored on a hard drive or flash drive.
No matter what is the reason for changing the boot drive, we will help you anyway. Follow the methods and steps to change the Boot drive Windows 10.
As we mentioned earlier, there are three easy ways to change the boot drive. One is using a professional boot tool, and the other is Advanced Options and System Configuration. Go through the given methods by following the step-by-step guide.
- Method 1. Change the Boot Drive via a Third-Party Tool
- Method 2. Change the Boot Drive via Advanced Options
- Method 3. Change the Boot Drive via System Configuration
Method 1. Change the Boot Drive via a Third-Party Tool
If you are not familiar with the operation of Windows, a third-party smart tool — EaseUS Partition Master, can enable you to change the boot drive under UEFI easily. The tool provides a quick and easy operation, even if you are new to knowing how to change the boot drive in Windows 10.
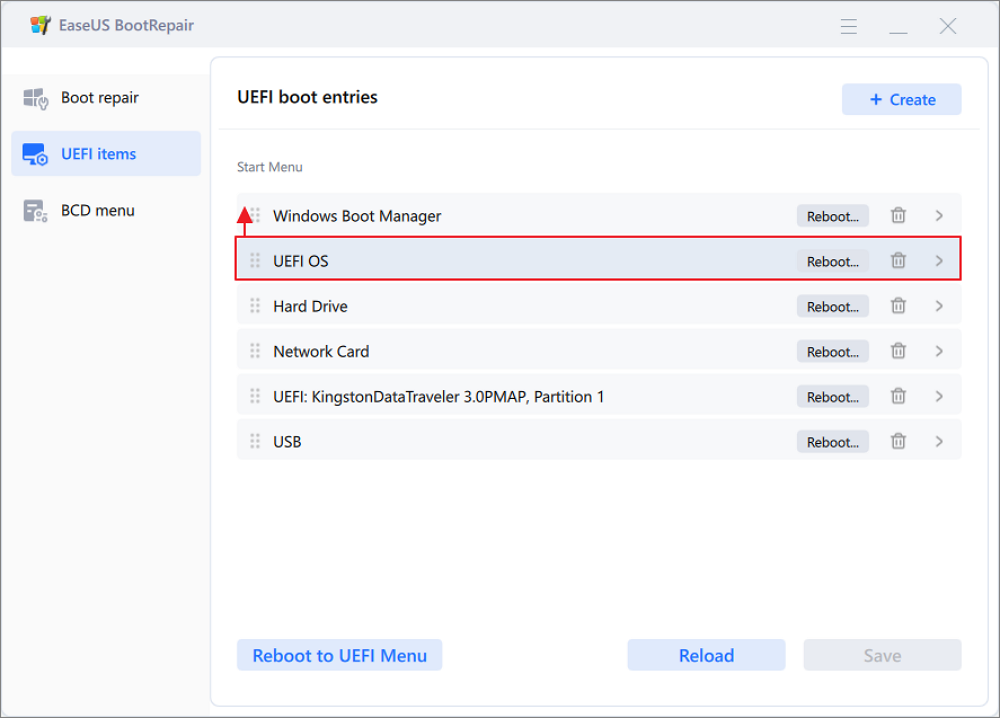
Step 1. When you enter the WinPE interface, launch EaseUS Partition Master WinPE Edition and navigate to the «Boot Repair» section in «Toolkit.»
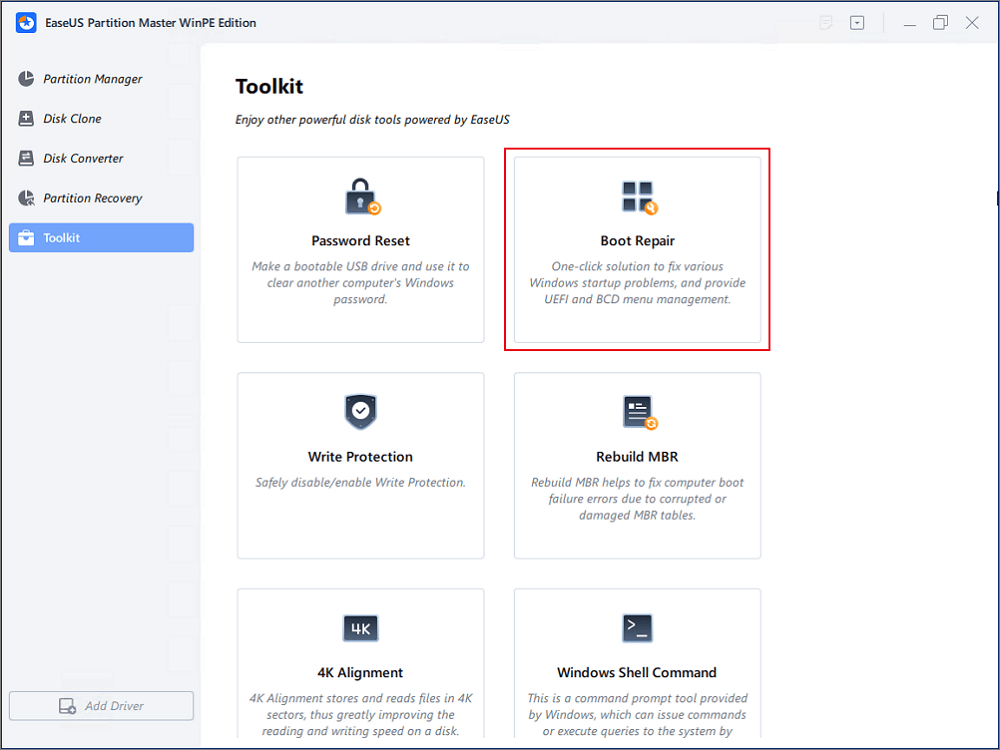
Step 2. Go to the «UEFI items» tab and change the boot order by dragging the drive to the first position.
Step 3.Click «Save» to apply the changes. Then, your OS is set to boot from the new hard drive.
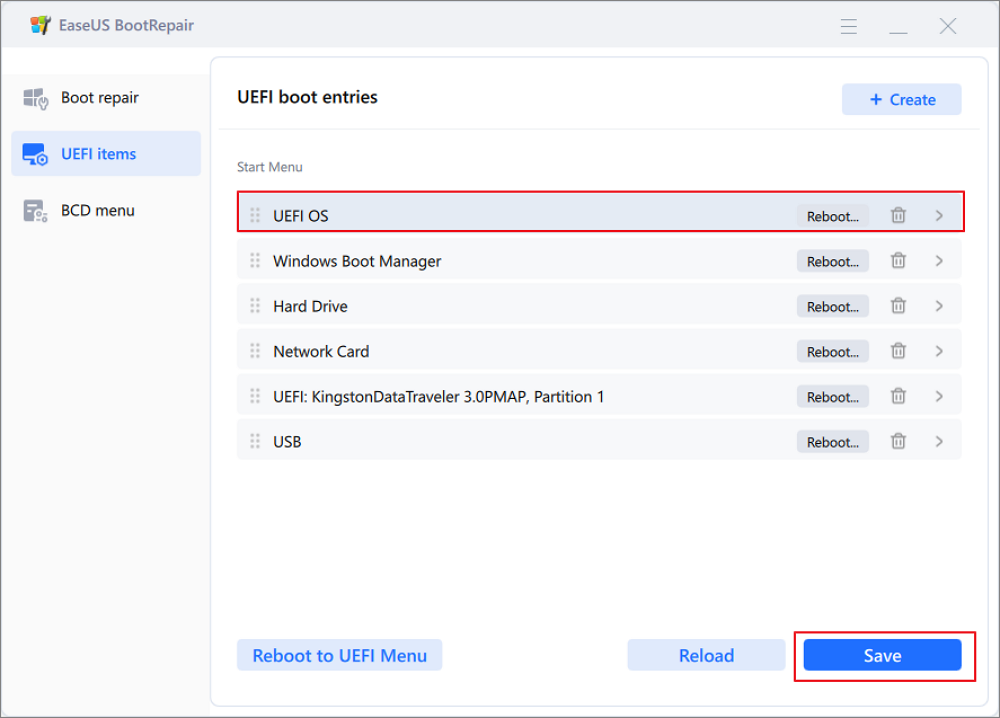
Note:If you hit on the «Reboot» button after the drive, the OS can boot from this disk at the next time for once.
In addition, as a wonderful Windows boot repair tool, EaseUS Partition Master offers some additional advanced features such as repairing the boot drive, fixing the computer’s blue screen, and other issues. Download it, and you can use it any time you meet the errors.
Method 2. Change the Boot Drive via Advanced Options
The easiest way to change the boot drive is to enter UEFI firmware via advanced options. Here are the steps to follow:
Step 1: Explore the Settings by clicking the gear icon on the left side of the Windows screen.
Step 2: Click the «Update & Security» option.
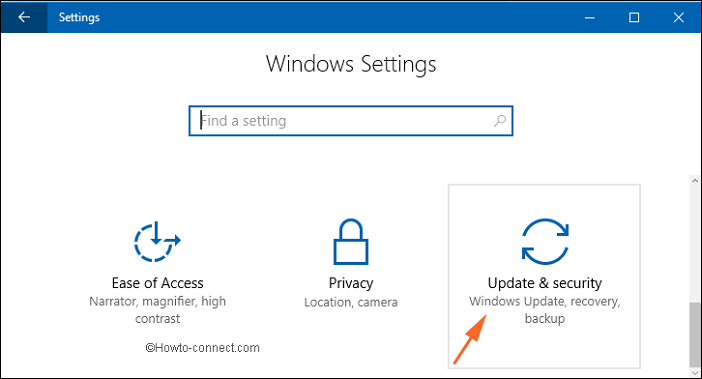
Step 3: Select «Recovery» from the left side menu, then tap «Restart Now.»
Step 4: Select the Troubleshoot option, then click «Advanced Options.»
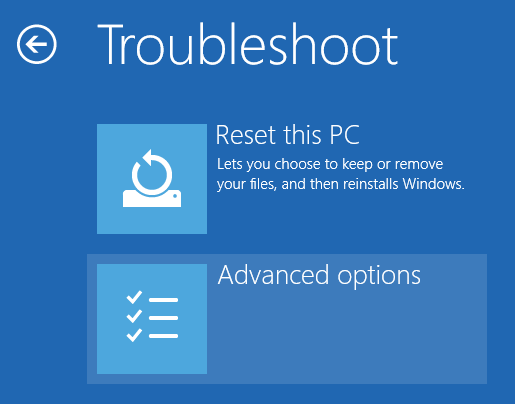
Step 5. In the end, choose «UEFI Firmware Settings» to make changes.
Step 6. It will restart your computer. Once the system boots up, it will take you to the Firmware settings.
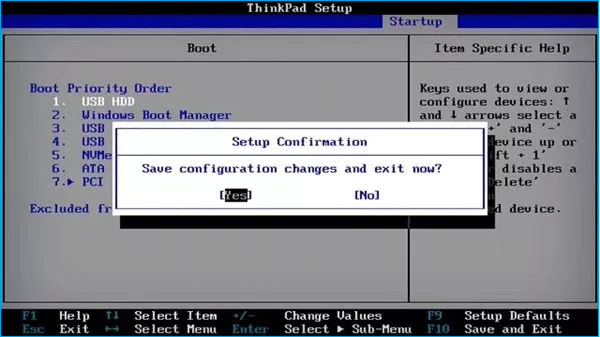
Step 7. Switch to Boot Tab and select your desired boot drive from the list and place it on the top.
Note: Use the arrow keys or the + & — buttons to change the boot order.
Step 8. Press F10 to Save and Exit.
Method 3. Change the Boot Drive via System Configuration
You can also change your boost drive through the diskpart command in System Configuration. Use the BIOS settings or UEFI firmware by pressing any compatible Function key from F1 to F12.
Note: Different computers/laptops access BIOS from different Fn keys. Restart the computer to log in to BIOS settings and go through the steps below:
Step 1. Press the correct function key to access the BIOS Setup
Step 2. Hit Enter to access the Boot submenu.
Note: All the BIOS utilities may differ a little but the menu settings are generally listed horizontally. You will get the menu option at the top, hardware options in the middle, and BIOS modification at the bottom of the screen.
Step 3. To find the Boot order and select the drive, use the Arrow key to push the drive in the first place. To move the gadget up or down, press the + and — keys.
Step 4. Change the Boot order accordingly, and press the F10 key to choose «Save and Exit.»
Step 5. Select «Yes» to confirm your changes and start your computer.
Concluding Thoughts
Changing your boot drive gives you multiple advantages to enjoy the efficient and definitive functionality of the computer system. You should not feel annoyed if you have not gone through the boot drive changing process. Thus, we have added the essential information about how to change Boot Drive Windows 10. Simply choose any of the mentioned methods, and follow each step correctly.
FAQs about Changing Boot Drive Windows 10
Follow the FAQ section for additional queries about how to change boot Drive Windows 10.
1. Why I cannot use SSD to boot?
You cannot use the SSD to boot due to the failure of resetting the boot order in the BIOS utility. Connect your SSD, then restart your computer. Press the correct function key to open the BIOS menu. Use + and — keys to move up and down. Choose the SSD and press F10 to save and exit.
2. How do I fix no bootable devices found?
Reconnect the device and restart your computer. After restart, press the relevant key, Esc, Del, or F1…F12 to open BIOS settings. Go to the boot tab and change the boot order. To do so, use the Arrow key and place the hard drive in the first position.
3. Does the boot drive have to be a C drive?
Generally, the computer system uses the C drive as the boot drive, but you can change the boot drive from BIOS settings.
Инженеры Microsoft реализовали в Windows хранилище загрузки, известное ещё как Boot Configuration Data (BCD), и меню загрузки. Первое содержит в себе идентификаторы загрузчиков всех имеющихся на ПК операционных систем, а второе считывает их и выводит в виде перечня ОС, доступных для запуска. Это значительно облегчает жизнь пользователю, на компьютере которого стоит несколько систем. Ему не нужно что-то мудрить, чтобы переключиться между ними. Достаточно перезагрузить компьютер и выбрать нужную из представленного списка. Как и другие части ОС Windows, меню загрузки поддаётся настройке. В этом руководстве перечислены доступные способы редактирования данного раздела.
Примечание: практически все действия, описанные в этом руководстве, нужно выполнять из-под учётной записи с правами администратора. В противном случае вы должны знать пароль от неё.
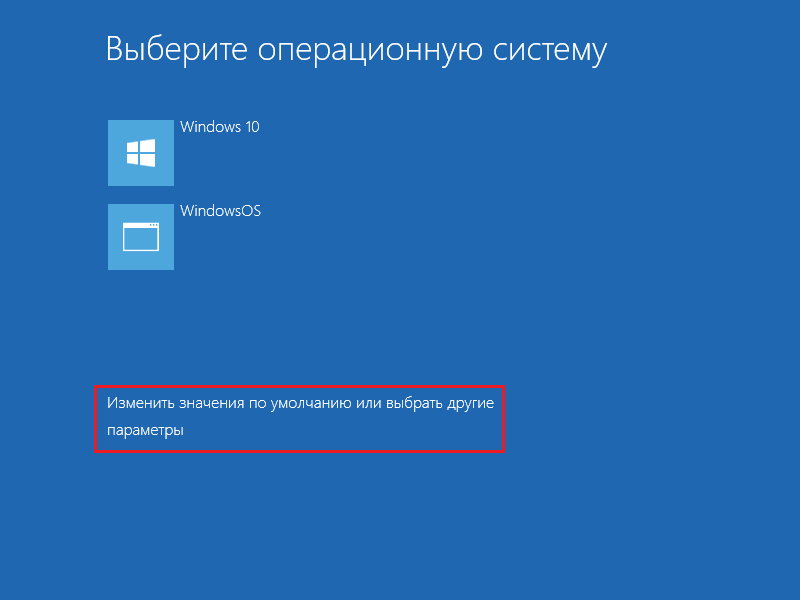
Редактирование меню загрузки Windows 10 в окне загрузчика
Меню загрузки Windows 10 обладает небольшим разделом настроек. Он предоставляет минимальный набор опций — изменение значения таймера автоматического запуска основной системы, смена ОС, загружаемой по умолчанию, а также дополнительный раздел с режимами старта системы и функцией выключения компьютера.
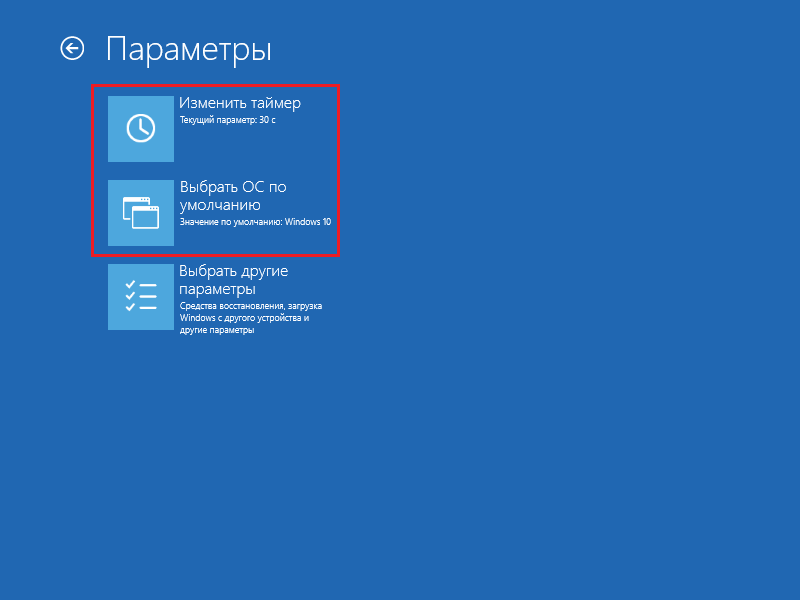
- Чтобы получить доступ к этим настройкам, вам нужно нажать на пункт Изменить значения по умолчанию или выбрать другие параметры во время отображения экрана со списком доступных для запуска систем.

- Далее вам остаётся нажать на пункт Изменить таймер, чтобы установить время отсрочки автоматической загрузки системы (5 и 30 секунд, а также 5 минут) или же на Выбрать ОС по умолчанию, чтобы указать, какую систему стоит грузить по завершению таймаута.
Редактирование меню загрузки Windows 10 в параметрах системы
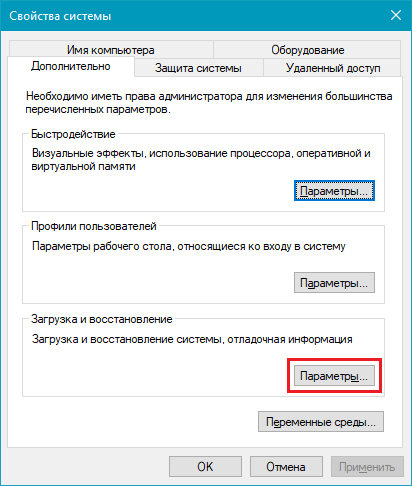
В дополнительных параметрах системы, зайти в которые можно через свойства ОС, находится раздел Загрузка и восстановление. Он хранит в себе небольшой список функций для редактирования меню загрузки, который подойдёт нетребовательным пользователям. Так с его помощью вы можете выбрать, какая операционная система будет загружаться по умолчанию, выставить время отображения списка установленных систем или вовсе выключить таймаут, а также активировать вывод вариантов восстановления.
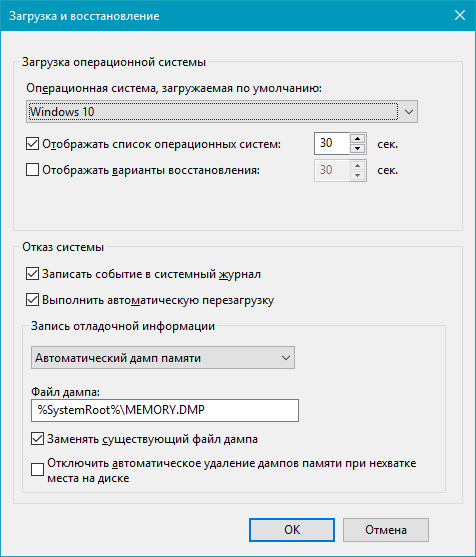
Чтобы попасть в указанный раздел, вам нужно сделать следующее:
- Нажмите на сочетание Win + Pause (Break).
- Кликните по ссылке Дополнительные параметры системы, расположенную в левой части окна.

- Под заголовком Загрузка и восстановление щёлкните на кнопку Параметры.


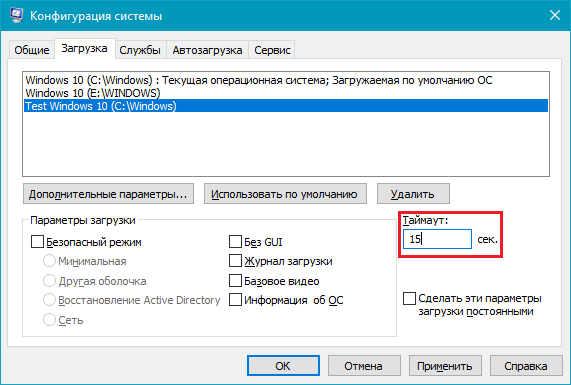
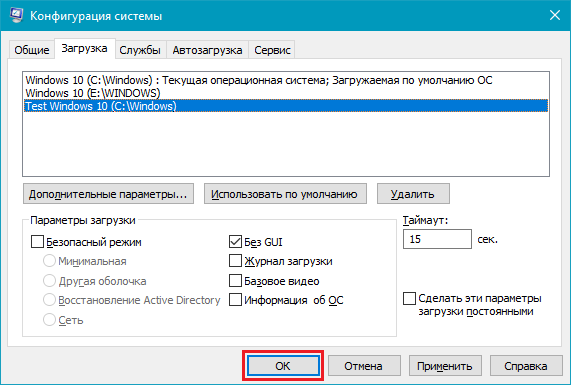
Редактирование меню загрузки Windows 10 в Конфигурация системы
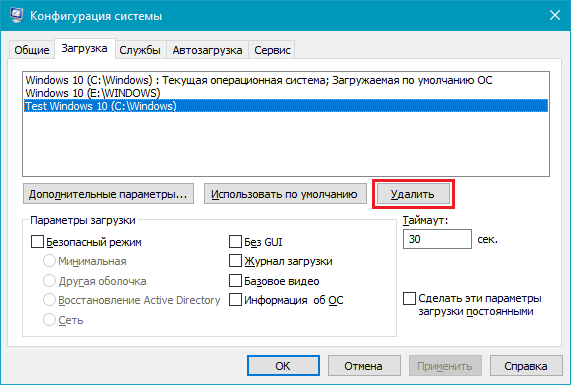
Если вам необходимо немного больше возможностей по настройке, вы можете попробовать утилиту Конфигурация системы. Помимо упомянутых настроек, она предлагает функцию удаления загрузочных записей операционных систем, опцию для вывода информации об ОС, возможность запустить Windows без графической оболочки, выбрать параметры загрузки безопасного режима и ещё несколько второстепенных функций.
Отредактировать меню загрузки с помощью Конфигурация системы можно следующим образом:
- Нажмите Win + R и введите msconfig. Появится окно утилиты.

- Откройте вкладку Загрузка.

- Выберите из списка интересующую вас запись. Если вы желаете избавиться от неё, нажмите на кнопку Удалить.
- Хотите пометить ОС в качестве основной? Кликните по кнопке Использовать по умолчанию.
- В случае необходимости, установите предпочитаемое время таймаута.
- Нажмите на ОК и перезагрузите компьютер, чтобы система применила изменения.
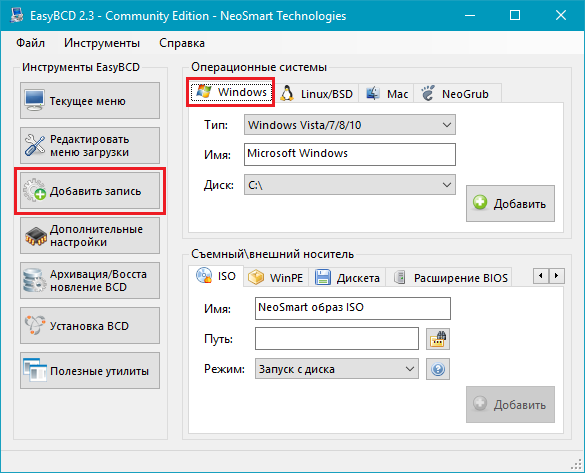
Как отредактировать меню загрузки Windows 10 с помощью EasyBCD
EasyBCD — бесплатная утилита, предоставляющая широкий выбор возможностей для редактирования меню загрузки. В сравнении с ней все стандартные системные инструменты (кроме Командной строки) смотрятся весьма примитивно.
Эта компактная программа позволяет:
- Удалять ОС из списка доступных для запуска.
- Добавлять новые записи Windows (в том числе и устаревших), Linux / BSD, Mac.
- Добавлять записи для установки систем с помощью ISO-образов или отдельных разделов жёсткого диска.
- Переименовывать записи операционных систем.
- Выставлять систему по умолчанию.
- Изменять положение записей в списке.
- Устанавливать язык меню загрузки.
- Выбирать оболочку интерфейса загрузчика (Metro или более раннюю от Windows Vista / 7).
- Выставлять длительность таймаута.
- Архивировать и восстанавливать настройки хранилища загрузки (BCD).
- Просматривать содержимое BCD и меню загрузки.
Интерфейс программы полностью локализован на русский, а сама она достаточно простая в использовании и не требует от пользователя никаких сверхъестественных способностей.
Как добавить запись системы в меню загрузки
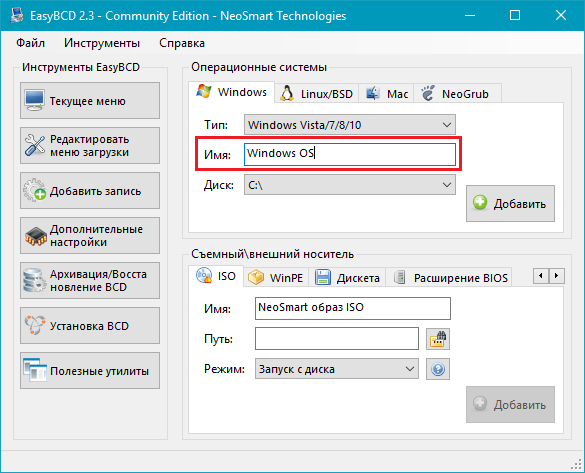
- Скачайте и установите EasyBCD. Во время установки укажите, что вы будете использовать программу в личных целях, а не в коммерческих.
Примечание: для редактирования меню загрузки в старших версиях Windows может понадобиться EasyBCD 1.7.2. - Запустите программу и выберите язык интерфейса.
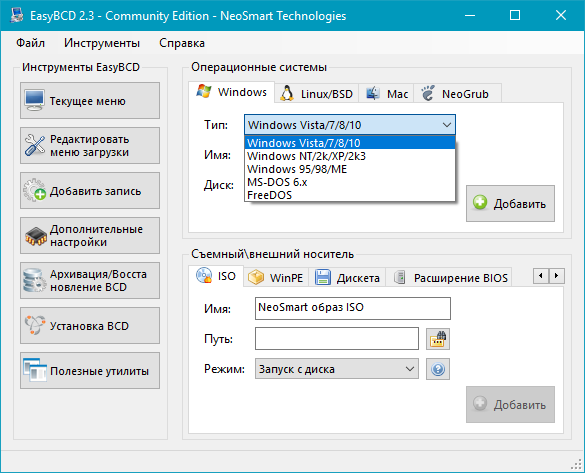
- Нажмите на Добавить запись и выберите вкладку Windows.

- Напротив пункта Тип выберите Vista / 7 / 8 / 10. Если добавляемая запись должна загружать более старую версию «винды», разверните выпадающий список и кликните по подходящему варианту.
- В поле Имя укажите предпочитаемое название записи.
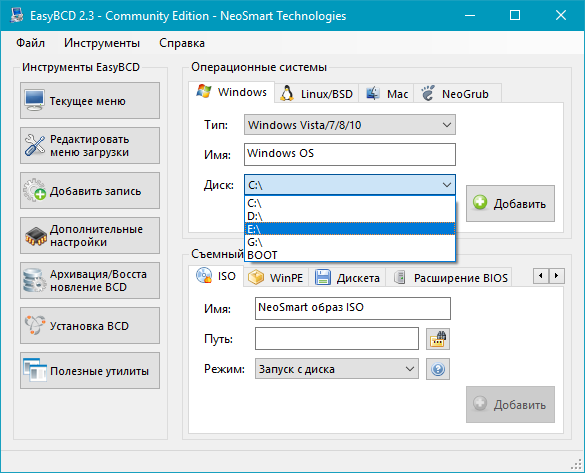
- Напротив пункта Диск откройте список разделов жёсткого диска и выберите тот, где установлена ОС, к которой вы хотите восстановить доступ.
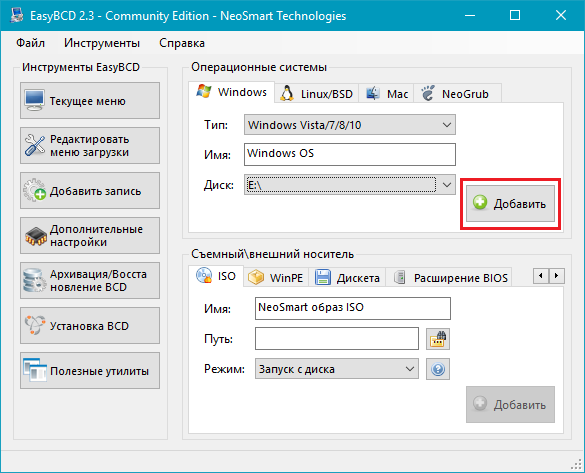
- Нажмите на Добавить.
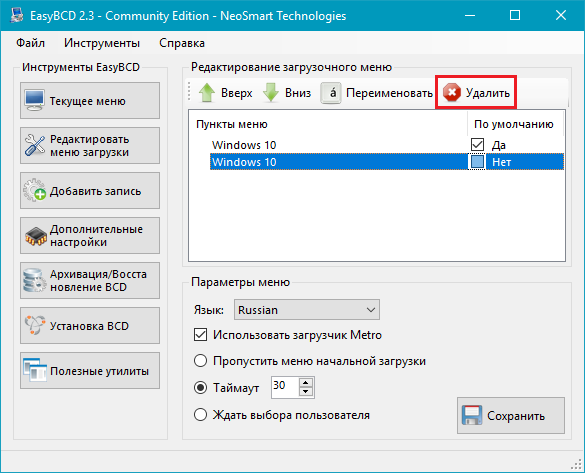
Как удалить запись системы из меню загрузки
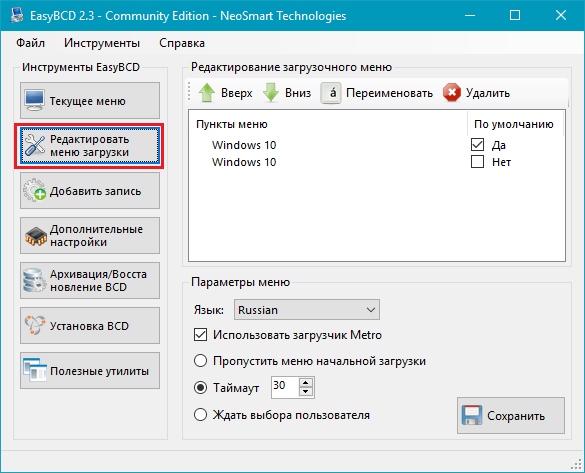
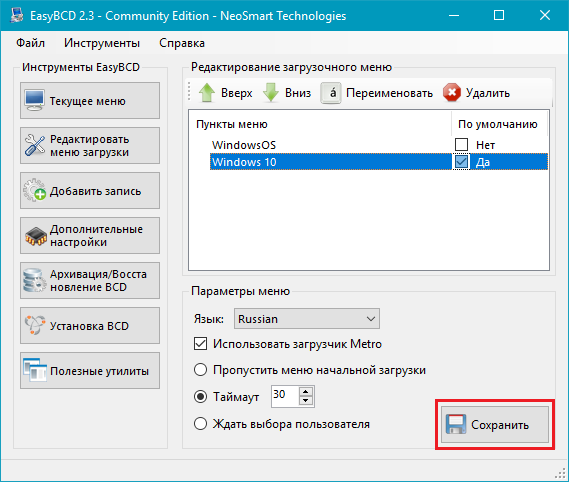
- В программе нажмите на Редактировать меню загрузки.
- Из списка записей выберите нужную и нажмите на Удалить. Подтвердите своё действие.
- Кликните по кнопке Сохранить.
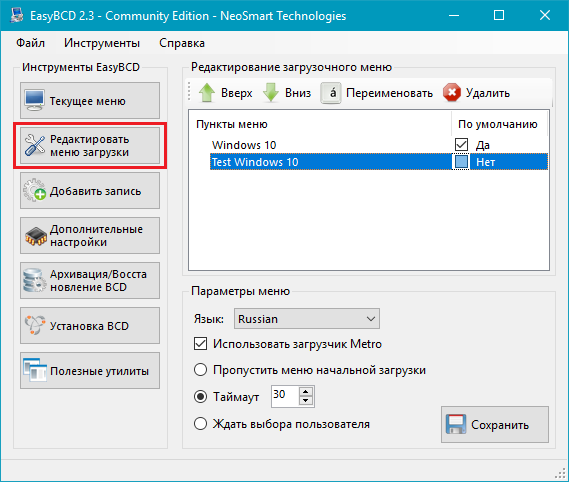
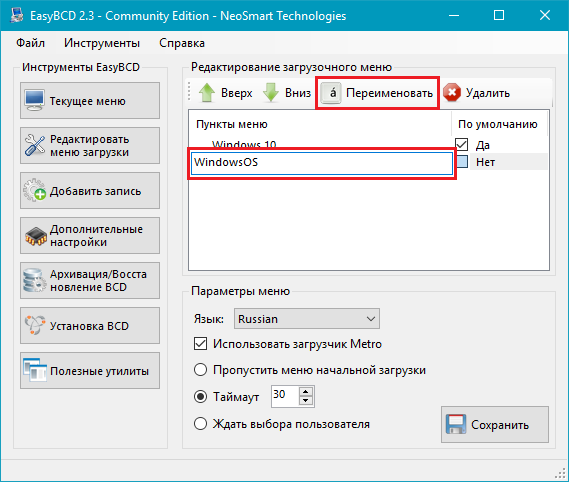
Как переименовать запись системы в меню загрузки
- В разделе редактирования загрузочного меню кликните по записи, имя которой вы хотите сменить.

- Нажмите на кнопку Переименовать и введите новое название.
- Сохраните данное изменение.
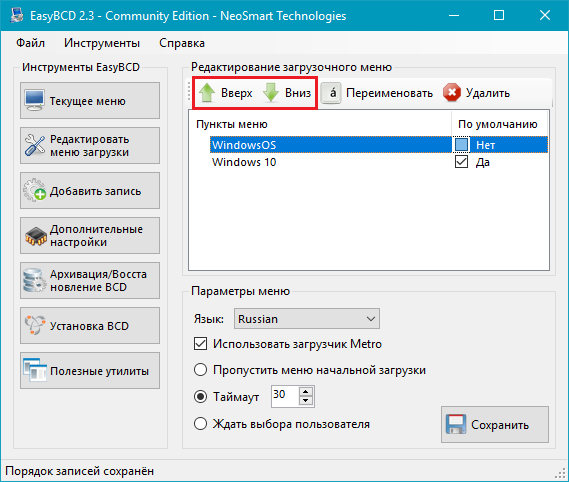
Как переместить запись системы в меню загрузки
- Выберите из списка пункт, позицию которого нужно сменить.
- Используя кнопки Вверх и Вниз измените положение в списке.
- Нажмите на Сохранить.
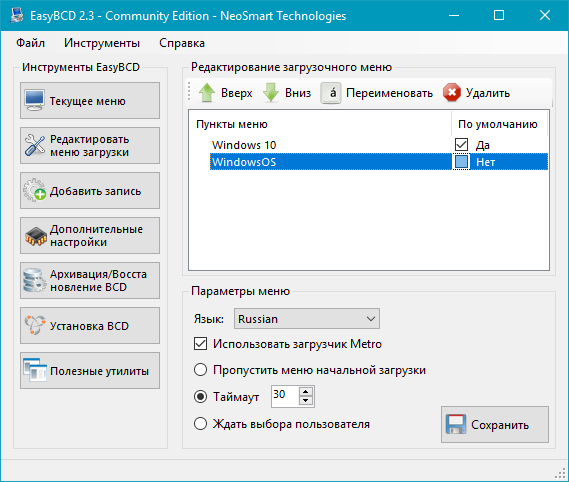
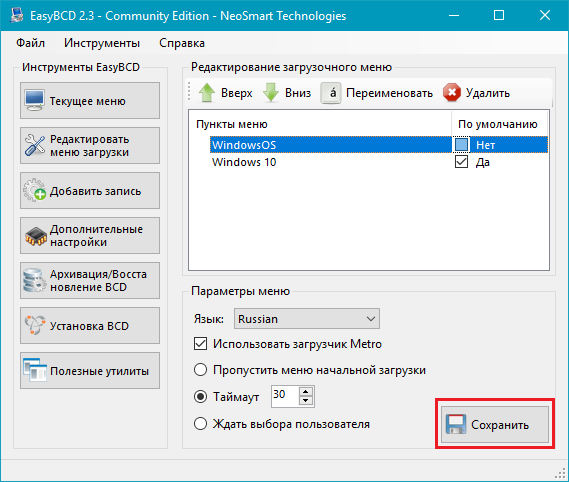
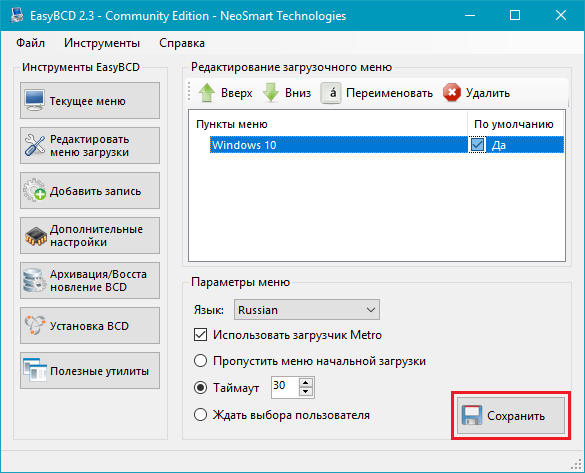
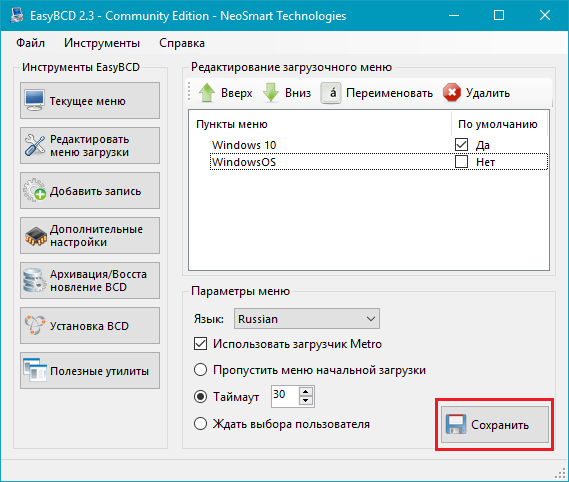
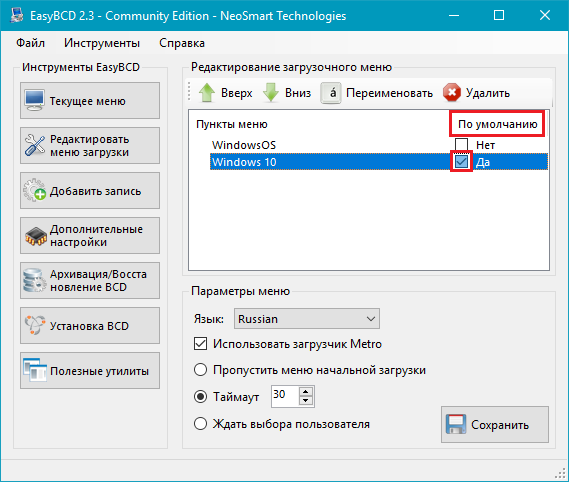
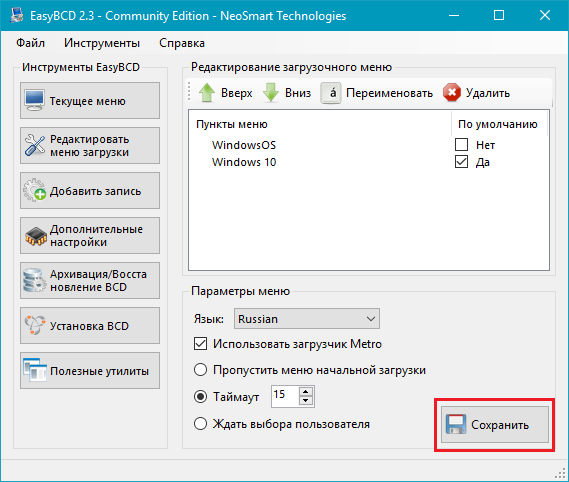
Как выбрать систему для загрузки по умолчанию
- В столбце По умолчанию установите галочку напротив нужной операционной системы.
- Сохраните изменения.
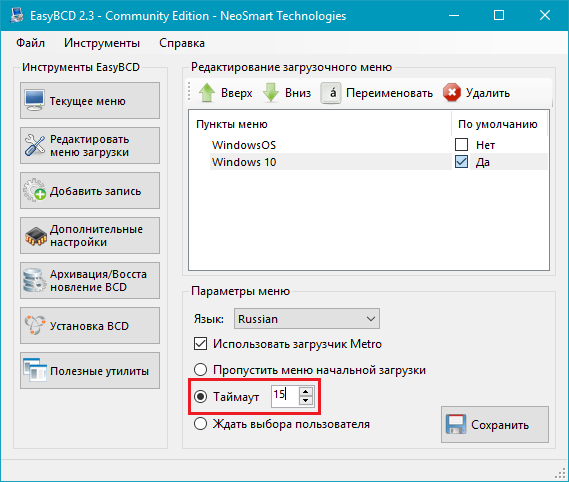
Как изменить время отображения меню загрузки
- Возле пункта Таймаут нажмите на поле и введите оптимальное для вас время. Учтите, что в меню загрузки оно измеряется в секундах.
- После внесения изменений кликните по кнопке Сохранить.

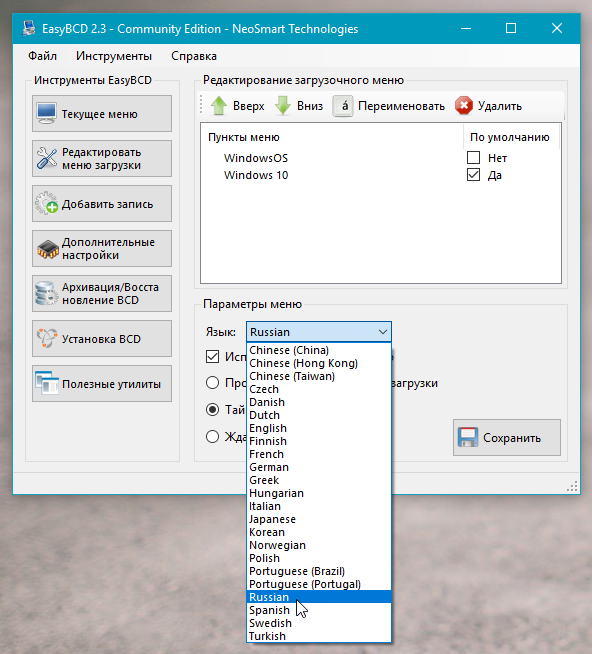
Как изменить язык меню загрузки
- Найдите пункт Язык, разверните список возле него и выберите нужное вам наречие.

- Сохраните внесенные изменения.
Как отредактировать меню загрузки Windows 10 с помощью командной строки
Если вы не доверяете сторонним программам и стараетесь пользоваться исключительно системными инструментами, тогда вам стоит опробовать способы редактирования меню загрузки Windows 10 с помощью командной строки.
Создание или восстановление резервной копии хранилища загрузки Windows
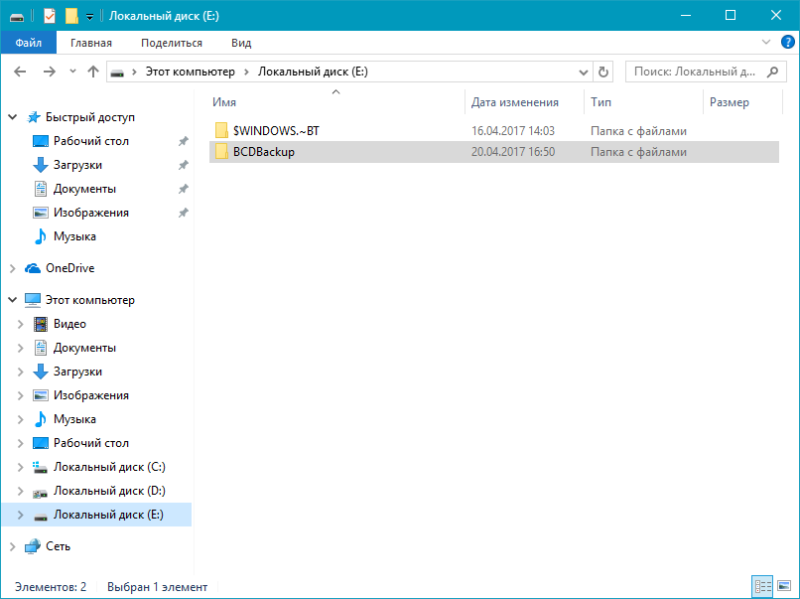
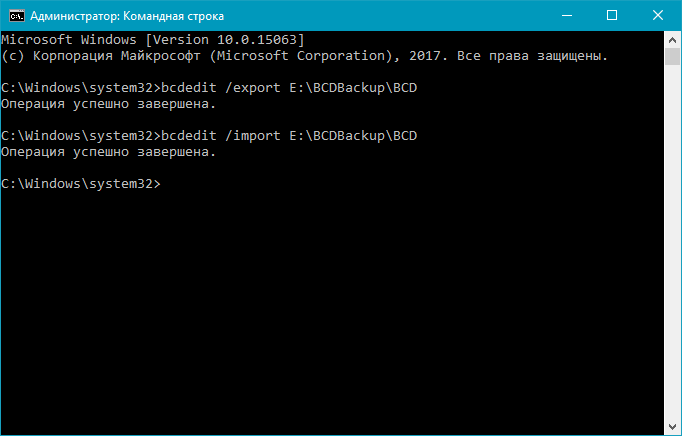
Перед выполнением всех действий создайте резервную копию хранилища загрузки, чтобы вы могли восстановить его в случае необходимости. Создать бекап BCD вы можете следующим образом:
- На любом не системном разделе создайте папку BCDBackup.

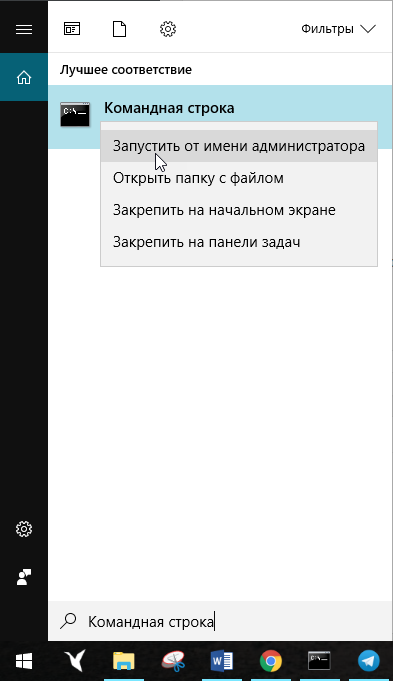
- Запустите командную строку с правами администратора. Для этого нажмите на Win + S, введите Командная строка, кликните правой кнопкой мышки по результату и выберите Запустить от имени администратора.

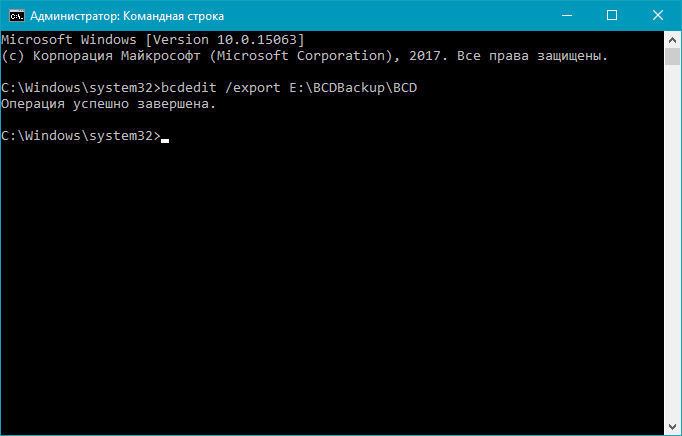
- Введите команду bcdedit /export E:\BCDBackup\BCD, где E — буква раздела, на котором находится созданная ранее папка.

- Для восстановления рабочей копии BCD вам нужно ввести bcdedit /import E:\BCDBackup\BCD, где Е — буква раздела, содержащего каталог с резервной копией хранилища загрузки.
Как добавить запись системы в меню загрузки
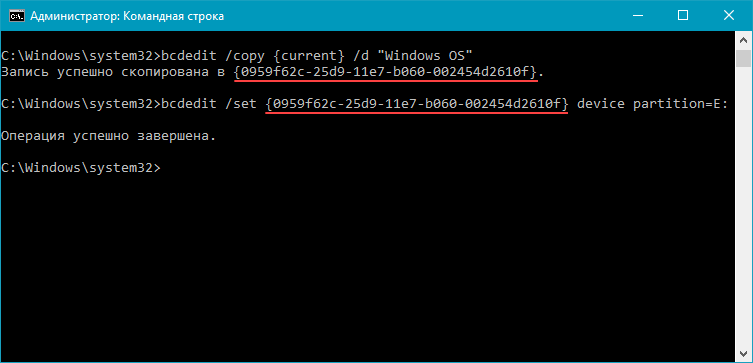
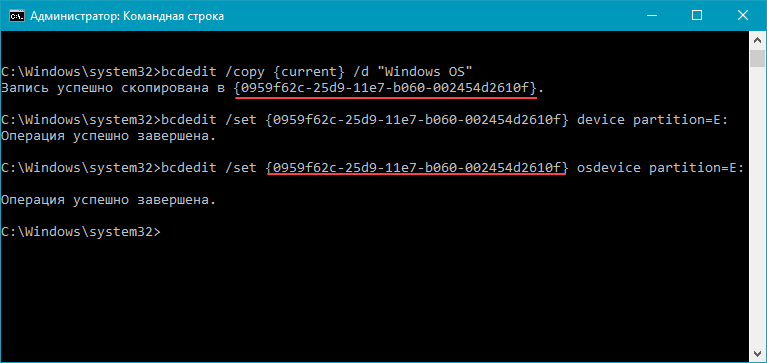
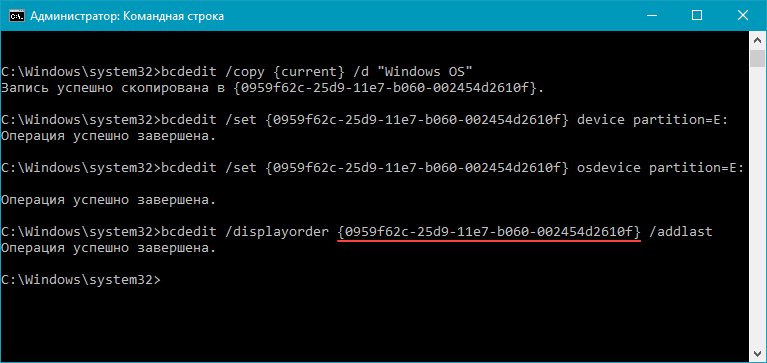
- Всё в ту же командную строку, запущенную от имени администратора, введите bcdedit /copy {current} /d «Windows OS», где Windows OS — произвольное название новой записи. В результате вы должны получить сообщение об успешном копировании существующей записи в новую, а также её уникальный идентификатор.

- Далее наберите bcdedit /set {ИД} device partition=E:, где ИД — идентификатор новой записи, созданной в процессе выполнения предыдущего пункта, а Е — буква локального диска, на котором расположены файлы другой операционной системы. Чтобы не допустить ошибку при вводе длинного ID, скопируйте его в эту команду вместе с фигурными скобками.

- Следом введите bcdedit /set {ИД} osdevice partition=E:, где ИД — код созданной записи, а E — буква раздела, содержащего системные файлы другой ОС.

- В конце всего этого процесса введите команду bcdedit /displayorder {ИД} /addlast, где ИД — код ранее созданной записи операционной системы. Эта команда должна добавить новую запись в самый низ списка ОС, доступных для запуска из меню загрузки.

Как удалить запись системы из меню загрузки
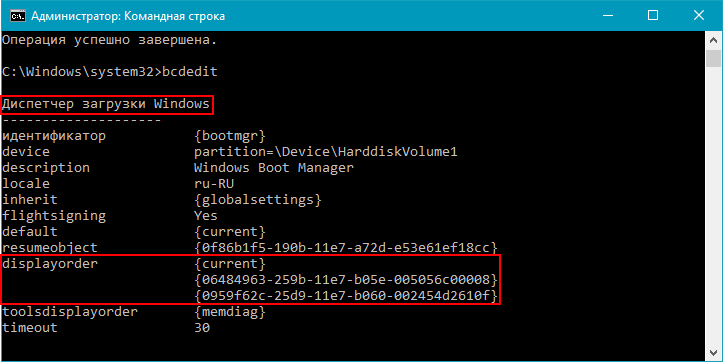
- Введите команду bcdedit, чтобы получить список всех записей установленных ОС. Обратите внимание на пункт displayorder в разделе Диспетчер загрузки Windows. В нём перечислены уникальные коды всех операционных систем. Их порядок точно такой же, как и пунктов установленных систем в меню загрузки.

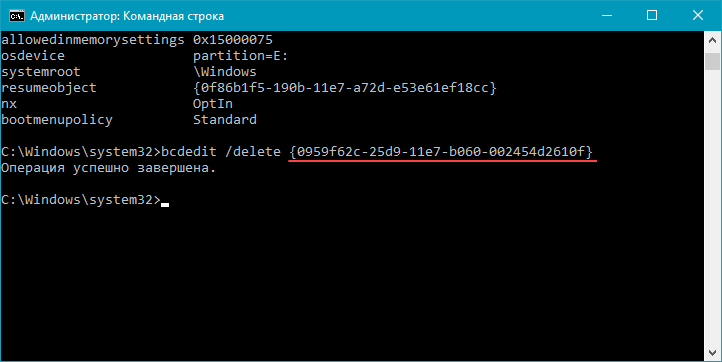
- Наберите команду bcdedit /delete {ИД}. Вместо ИД вам нужно вставить код записи, которую собираетесь удалить. Его вы можете получить из пункта displayorder. Данная команда уберёт запись не только из диспетчера загрузок, но и из хранилища. Если нужно удалить запись с именем (к примеру, {default}), а не в виде комбинации букв и цифр, тогда команда должна выглядеть так: bcdedit /delete {ИД} /f. Как и во всех остальных случаях, на место ИД нужно вставить идентификатор.

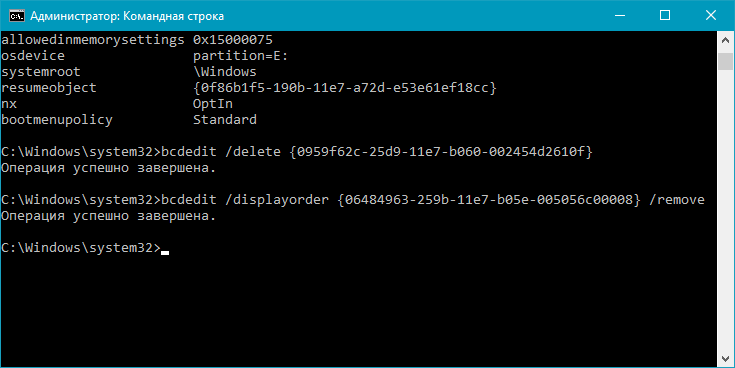
- Если вы желаете лишь на время исключить её из списка, тогда выполните команду bcdedit /displayorder {ИД} /remove. Запись исчезнет из него, но при этом останется в хранилище, что позволит при необходимости восстановить её.

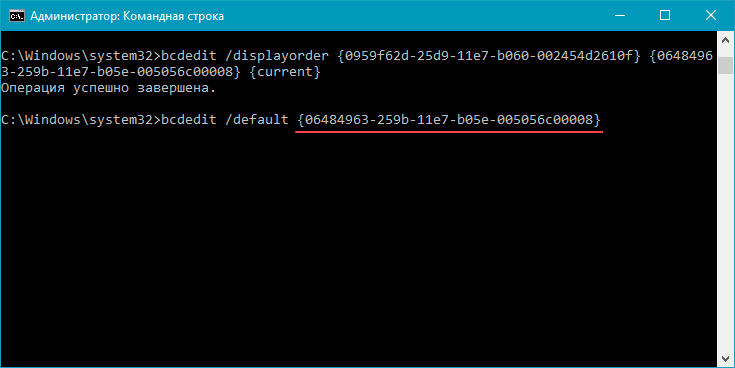
Как изменить порядок отображения систем в меню загрузки
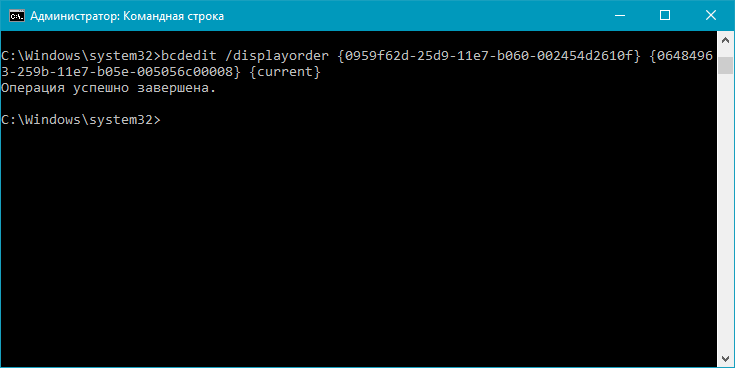
Для редактирования положения записей в загрузчике используйте команду bcdedit /displayorder {ИД2} {ИД1} {ИД3}. Вместо всех ИД укажите реальные коды записей в той последовательности, в которой вы хотите видеть их во время запуска компьютера.
Как выбрать систему для загрузки по умолчанию
Всё, что вы должны сделать, это выполнить команду bcdedit /default с указанием кода системы в фигурных скобках.
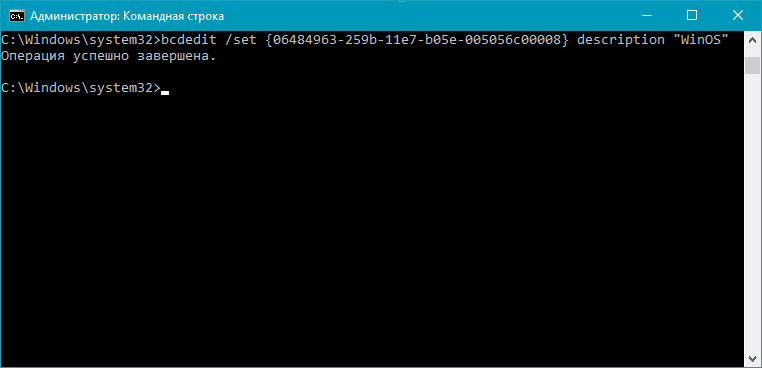
Как переименовать систему в меню загрузки
Для изменения названия операционной системы используйте команду bcdedit /set {ИД} description «Новое имя».
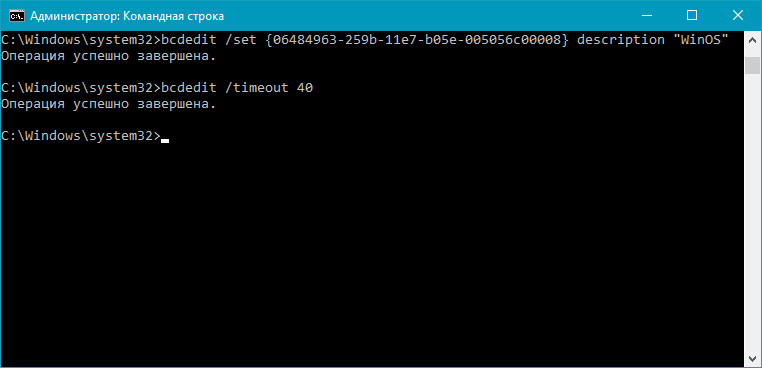
Как изменить время отображения меню загрузки
Чтобы установить оптимальное время отображения меню загрузки наберите команду bcdedit /timeout time, где time — время таймаута в секундах.
 Вот, собственно, и все основные способы редактирования меню и хранилища загрузки в операционной системе Windows 10.