Если на вашем устройстве Windows черный или пустой экран, попробуйте сделать следующее:
-
Чтобы разокрутить экран, используйте одно из следующих клавиш: Windows клавиша с логотипом + P или CTRL+ALT+DEL.
-
Для черного экрана используйте следующее сочетания клавиш: Windows клавиши с логотипом + CTRL+SHIFT+B .
Дополнительные сведения см. в теме Устранение ошибок черного или пустого экрана.
Если у вас surface, см. также: Surface не будет включаться и не выключяться из спящий режим.
Нужна дополнительная помощь?
Нужны дополнительные параметры?
Изучите преимущества подписки, просмотрите учебные курсы, узнайте, как защитить свое устройство и т. д.
В сообществах можно задавать вопросы и отвечать на них, отправлять отзывы и консультироваться с экспертами разных профилей.
Booting in safe mode may be an option
by Madalina Dinita
Madalina has been a Windows fan ever since she got her hands on her first Windows XP computer. She is interested in all things technology, especially emerging technologies… read more
Updated on
- The Windows 10 black screen after login usually occurs after upgrading your OS.
- The solutions for fixing the black screen after login starts with installing dedicated repair software.
- If the computer screen goes black after login, you can also try to log in without seeing what you type.
- Another solution is to tweak some start-up options in Windows 10.
You have found this guide because you are experiencing the Windows 10 or 11 black screen after login in. We will show you how to fix it.
A free upgrade for your Windows is quite possibly the best thing that Microsoft could give you – and that is exactly what they did with Windows 10 and 11.
However, the free upgrade did not go smoothly for every. As you would expect, Microsoft software does not always work as intended for all the thousands of different hardware combinations.
Today we attempt to fix one such problem, which might have been caused by the massive diversity of hardware components Windows operates.
Why is my screen black after I log in?
You upgraded your Windows 10, and it worked brilliantly – until you restarted and hit the login screen.
All you can see is a black screen with your cursor, there are multiple causes for this problem, but the most common reason involves you having an Intel on-chip GPU and a standalone AMD/Nvidia GPU combination. Such combinations are usually found in laptops due to their battery-saving advantages.
In other cases, it is a problem with your Windows OS preventing your desktop and icons from loading if you get a black screen after logging in. Typically, it’s a program that starts up automatically.
Additionally, it’s possible that the crucial procedures required to load the computer’s display are not loaded properly at startup.
Furthermore, it may occur if your computer is short on storage space or malware has compromised the firmware.
Here are a few variations to this error:
How we test, review and rate?
We have worked for the past 6 months on building a new review system on how we produce content. Using it, we have subsequently redone most of our articles to provide actual hands-on expertise on the guides we made.
For more details you can read how we test, review, and rate at WindowsReport.
- Windows 10 black screen after login no desktop show up – In this case, you will not be able to view your desktop after logging in. you should drain the battery and restart the computer.
- Computer screen goes black but computer still running – If it does not come up after a few minutes, press the power key for about 10 seconds, then restart the computer.
- Windows 10 black screen for 5 minutes after login – You may wait it out in this case. Then try and update all your drivers as soon as the screen turns on.
- Windows 10 black screen with cursor after login – In case of this issue, try restarting the computer after disconnecting all non-critical peripherals and try disabling the startup apps.
- Windows 10 black screen before login – When getting a black screen before login, booting into Safe Mode will allow you to fix things.
Let us now show you some of the best resolutions.
How do I fix a black screen on Windows 10 after login?
1. Use a third-party repair solution
Black screen errors are less common and dangerous than blue screen errors but have similar behavior and manifestation.
You can treat and troubleshoot them with the same tools and procedures. That is why you can use the following solution, even though it’s meant for fixing Blue screen issues.
2. Try to log in blindly
- When you are on the black screen, wait for your mouse cursor to appear.
- Once you have the cursor, press Control on your keyboard – this will put the focus on the login password field.
- Now type your password. You can’t see it, but you must do it anyway.
- Once typed, hit Enter, and voila, you are logged into Windows.
- If your desktop does not appear after 30 seconds, try pressing Windows Key + P, press the Down Arrow key twice, and hit Enter.
After that, you should be logged in to Windows, and your screen should appear.
3. Disable Fast Boot on your PC
3.1 Enter Safe Mode
- Restart your PC several times during the boot sequence.
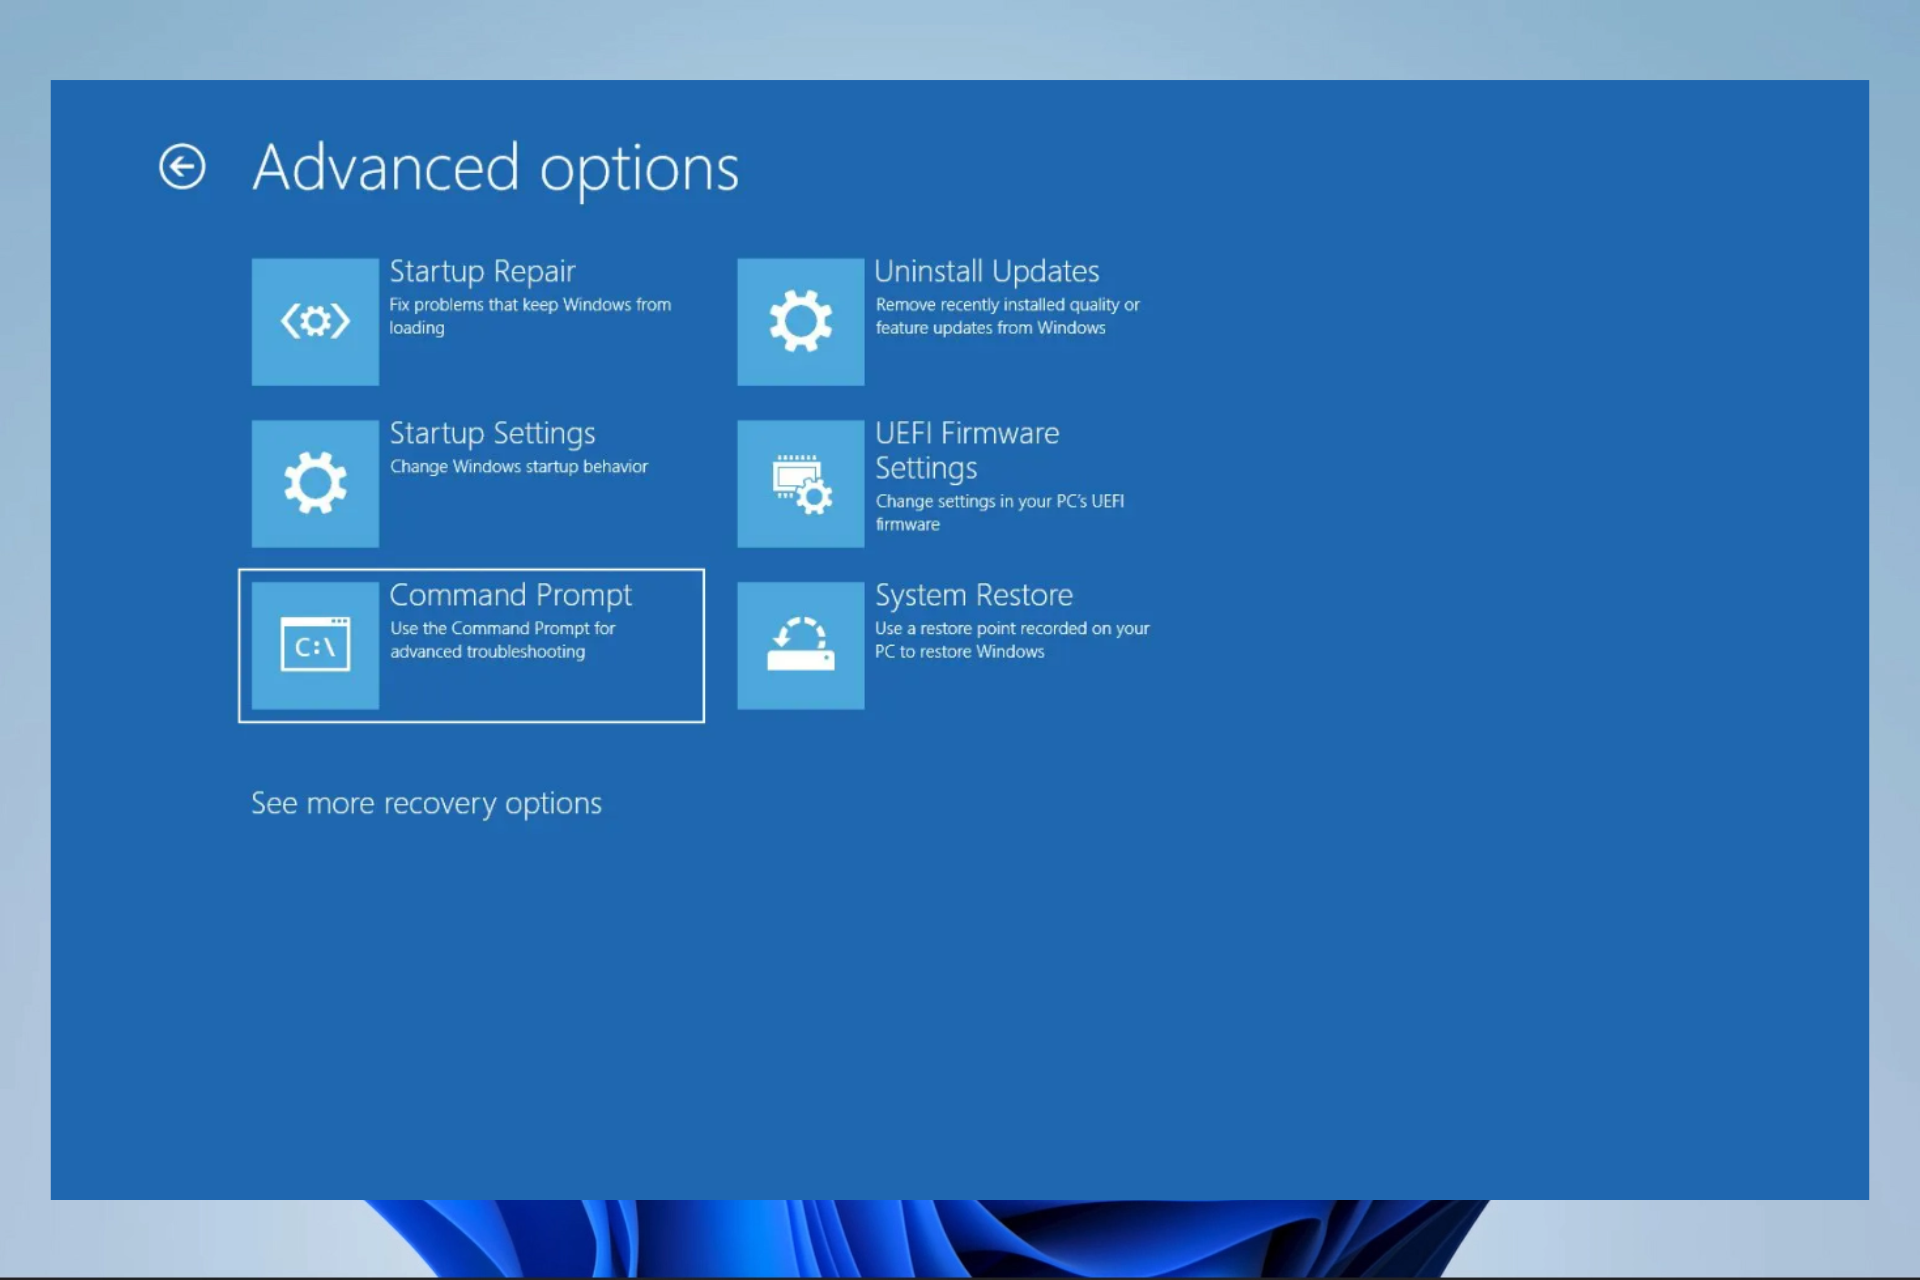
- Now choose Troubleshoot.

- Select Advanced options, click on Startup Settings, and click Restart.
- Once your PC restarts, you’ll be presented with options. Select any version of Safe Mode by pressing the appropriate key.

3.2 Disable Fast Boot
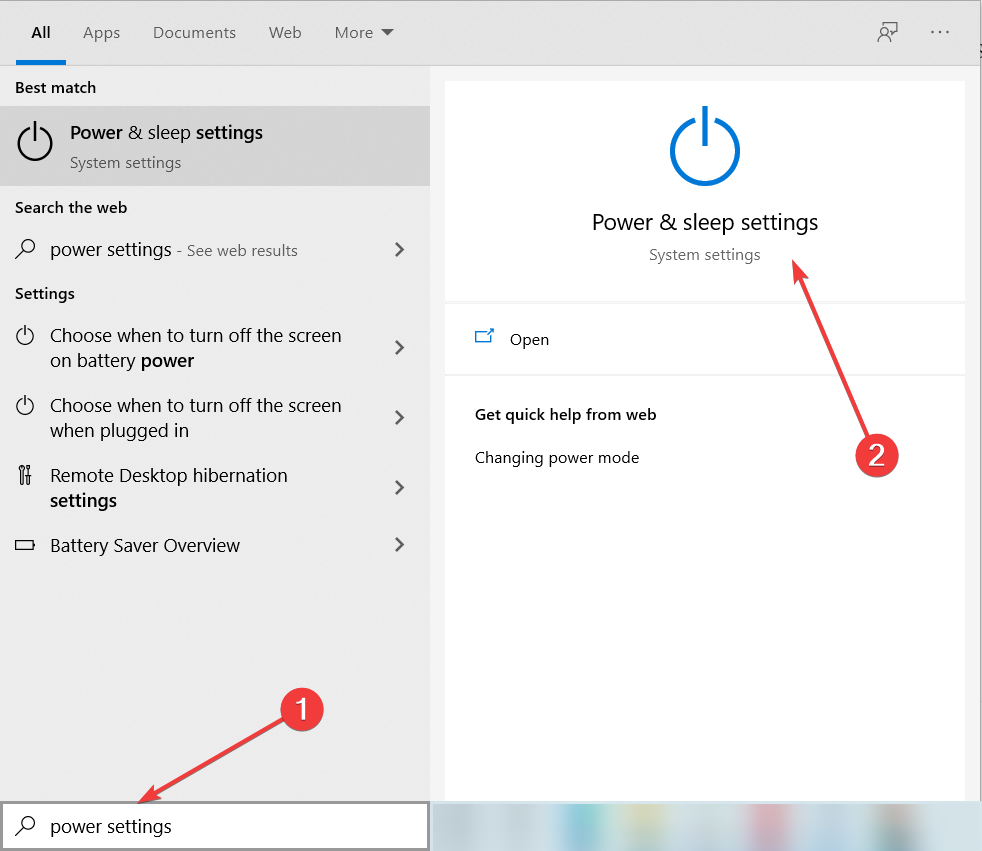
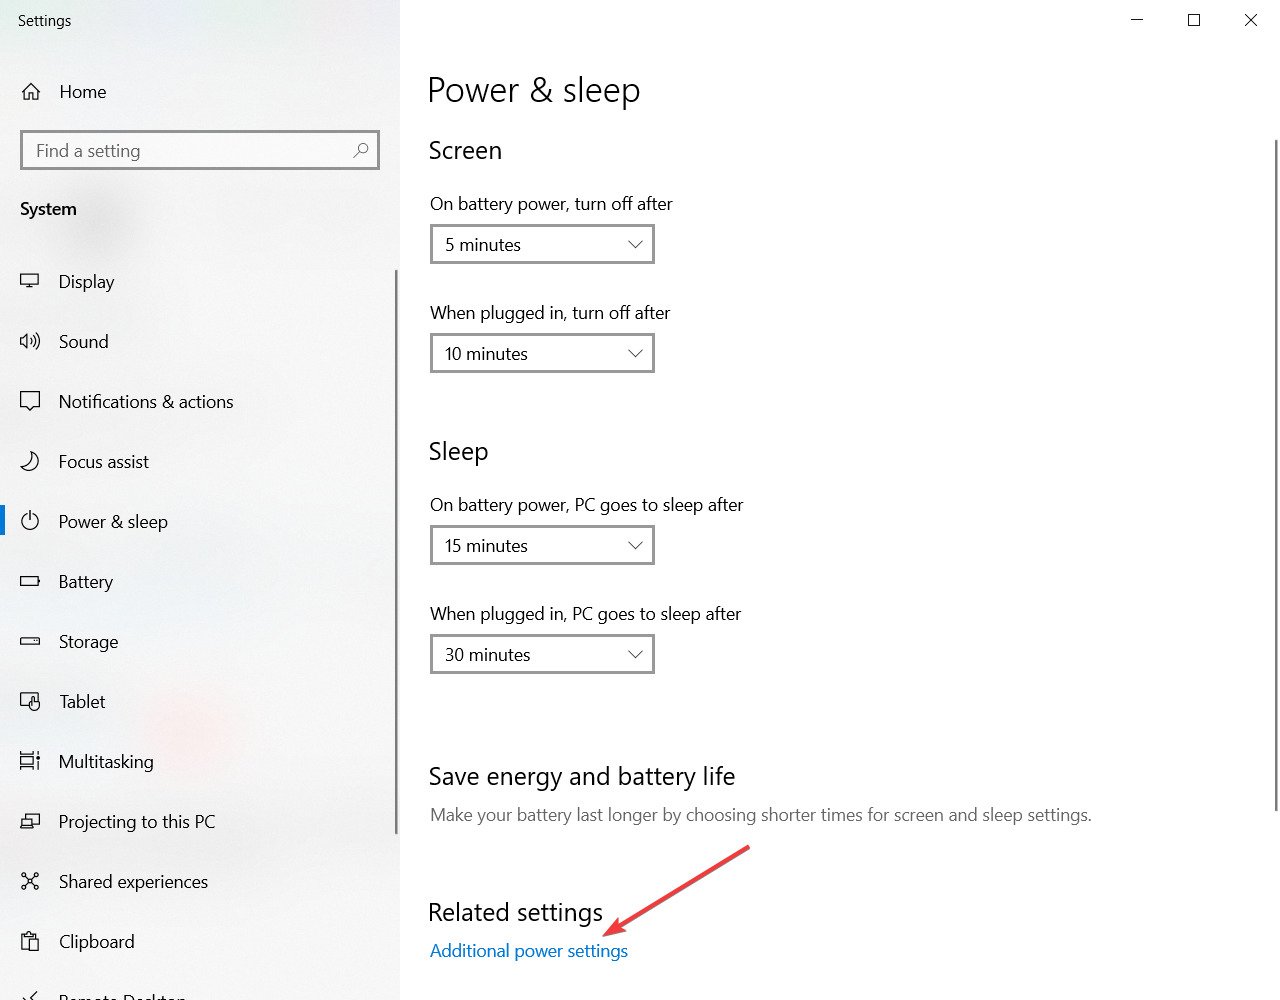
- Press Windows Key + S and type power settings.
- Now select Power & sleep settings from the list.

- Scroll down to the Related settings section and click Additional power settings.

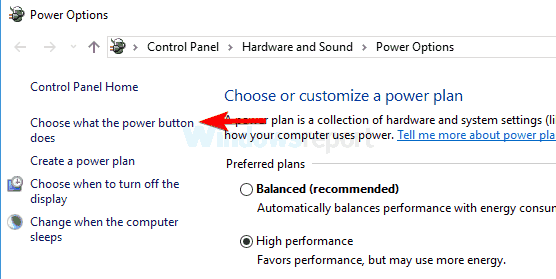
- When the Power Options window appears, click Choose what the power button does option from the left pane.

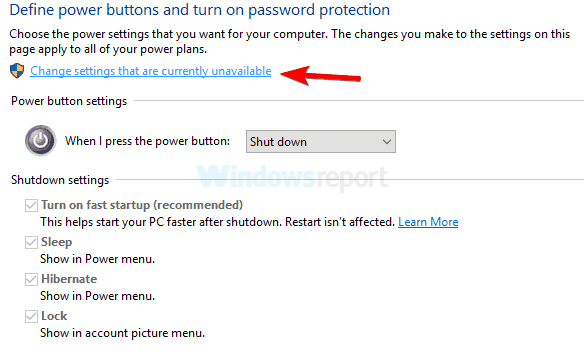
- Now click Change settings that are currently unavailable.

- Uncheck Turn on fast startup (recommended) option and click Save changes.

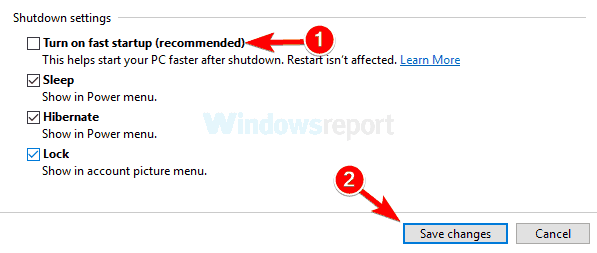
After disabling this feature, restart your PC and check if the problem is still there. Remember that disabling Fast Startup might cause your PC to boot slightly slower, but at least the issue should be resolved.
The issue might be the Fast Boot feature if you get a black screen after sign-in on Windows 10. This is a valuable feature since it will allow you to start your PC faster, but sometimes this feature can cause problems.
To fix the issue, you need to disable Fast Startup. However, since you can’t access Windows, you’ll have to do that from Safe Mode.
4. Try your hand at Startup Repair
- Restart your PC a couple of times during the boot sequence.
- Go to Troubleshoot, select Advanced options and click on Startup Repair.

- Follow the instructions on the screen to complete the process.
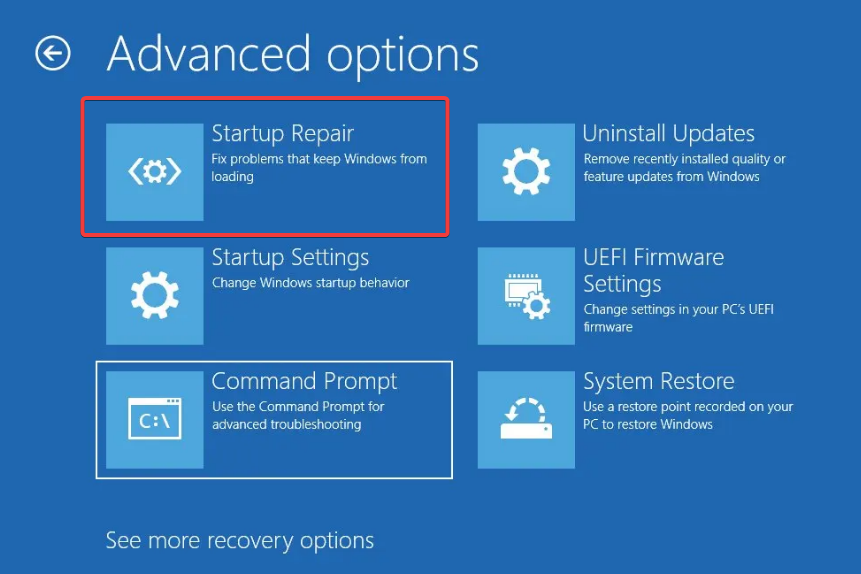
Once the process is finished, the problem should be resolved.
If you’re stuck on a black screen after sign-in in, you might be able to solve the problem simply by performing a Startup Repair, so follow the steps above.
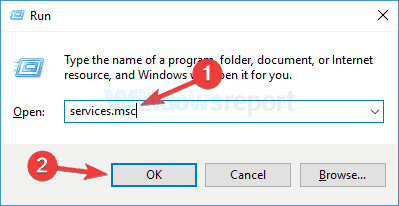
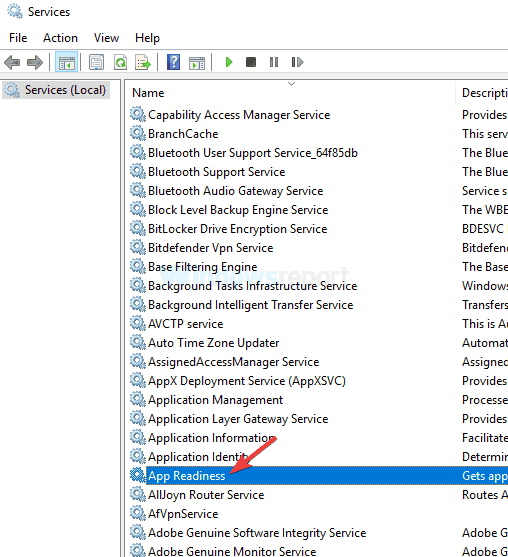
5. Disable App Readiness service
- Press Windows Key + R, and enter services.msc, then press Enter, or click OK.

- Locate the App Readiness service on the list and double-click it to open its properties.

- Set Startup type to Disabled and click Apply and OK to save the changes.

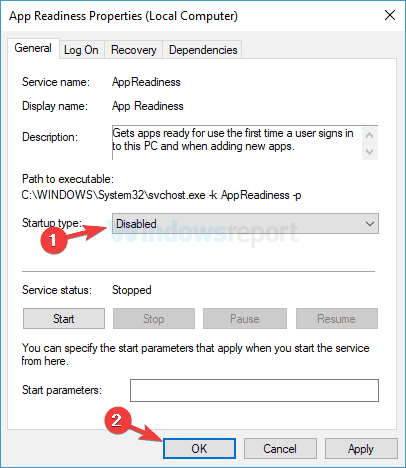
After disabling this service, restart your PC and check if the problem is still there. Remember that this is just a workaround, so you’ll probably have to enable this service someday.
As you know, Windows uses various services to work correctly, but sometimes certain services can cause a black screen after sign-in.
Usually, the App Readiness service is the culprit, and to fix the problem, you need to disable it.
6. Remove your laptop battery (if possible)
- Disconnect your laptop from the adapter and remove the battery. Check the laptop manual if you don’t know how to remove the battery.
- Once the battery is removed, hold down the power button for 30-60 seconds, or even more.
- Now put the battery back in your laptop and start it again.
Several users reported a black screen after signing in on their laptops, but you can quickly fix this annoying issue. According to users, you must remove your laptop battery and drain the remaining power.
This is a relatively simple procedure, and several users claim it works, so try it out. But, of course, this is only if your laptop has a removable battery.
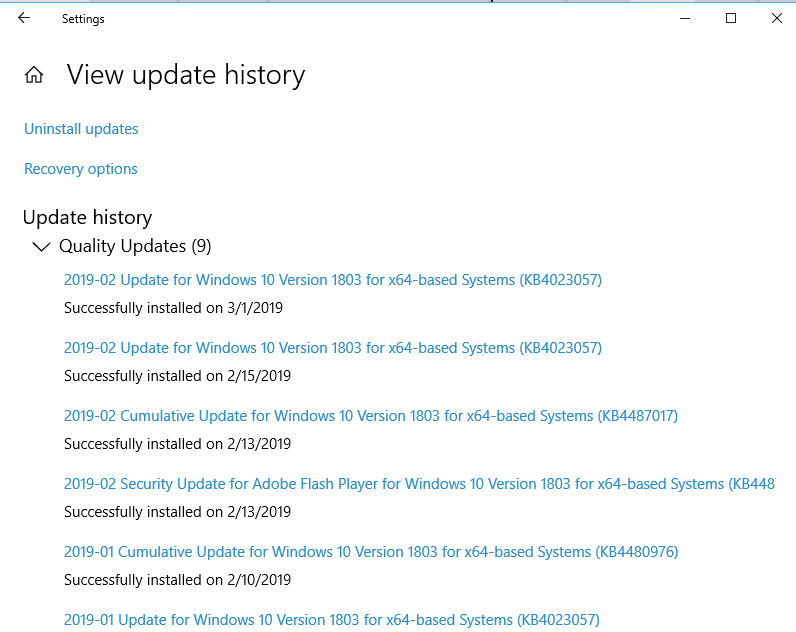
7. Remove the problematic update
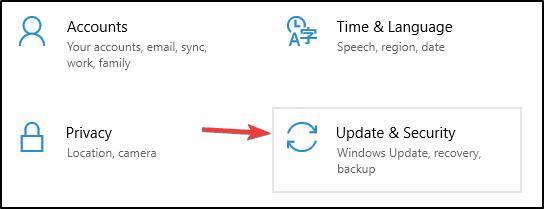
- Use Windows Key + I shortcut to open the Settings app.
- Go to the Update & Security section.

- Now select View update history.
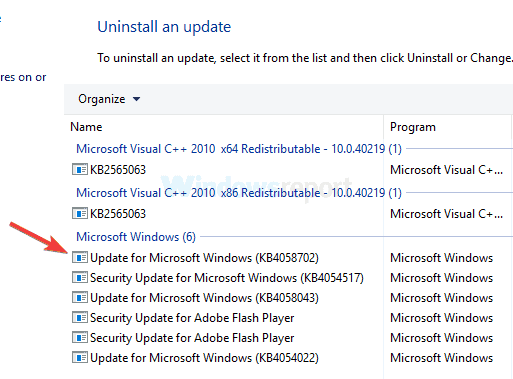
- A list of recent updates will appear. Memorize a couple of recent updates and click Uninstall updates.

- Double-click the update you want to uninstall and follow the instructions on the screen to complete the process.


After you remove the problematic update, check if the problem is still there.
If this issue started after a Windows Update, the update is likely causing a black screen after sign-in.
To fix this issue, you must go to Safe Mode and remove the problematic update.
Keep in mind that Windows tends to install the missing updates automatically, so if the update was the problem, be sure to block Windows from installing the automatic updates.
- Fix: Screen Goes Off When Plugging in the Charger on Windows 11
- Security Settings Blocked Self-signed Application [Fix]
- Dell Laptop Black Screen: 5 Ways to Quickly Fix it
How can I fix Windows 11 black screen after login?
We recommend starting in safe mode and trying a Startup repair. However, most of the solutions that work in Windows 10 will fix a Windows 11 black screen after the login issue.
The UI may differ slightly in a few cases, but generally, it should be about the same process. So pick what solution you prefer from those mentioned above and try on Windows 11.
How do I fix a black screen on startup?
Remove your laptop battery following the steps in solution six above.
Alternatively, you should shut down your computer and unplug any external devices. This applies to your mouse, keyboard, external hard drive, and other devices. Check if you still receive the black screen after restarting your computer. If not, try plugging every device individually until you identify the issue.
Also, note that before exploring anything complicated, you should verify that the monitor is responsive since you may not have powered it on in the first place.
Finally, if you have a PC, ensure the monitor cables are connected since this could easily be overlooked while powering up your computer.
Sometimes, your monitor may be damaged, and you will need a new monitor.
The black screen can be a big problem on your PC since it will prevent you from accessing Windows. However, we hope that you managed to solve this issue by using one of our solutions.
In the comments section below, let us know what worked for you (not necessarily from our list).
![]()
Windows 10 Black Screen After Login is among the most common issues faced by Windows 10 users on their system. There are lots of ways by which you can fix this black screen after login Windows 10 issue and different forums/websites out there recommend different methods in order to get the problem resolved. So let’s check out everything about the Windows 10 Black Screen After Login article.

If you too are facing the Windows 10 black screen after login issue and want a quick resolution, then in this black screen after login Windows 10 article we have compiled a list of the easiest and 100% working solutions for the issue. Now let’s get to know more about this Windows 10 Black Screen After Login guide.
So here we are showing you all the methods and solutions for fixing and solving this type of Windows 10 Black Screen after Login Error Issue from your Devices permanently. So just check it out,
1. Check if your Windows 10 Device is Still Active

The most probable reason as to why you are suddenly seeing a Windows 10 black screen after login might be due to your display suddenly becoming unresponsive.
To check whether your Windows 10 system is still active and responsive, press the Windows key + Shift key + Ctrl key + “B” key. Once you press all the keys at once, you will be able to hear a “BEEP” sound and your display with either dim or quickly blink in order to refresh the display.
In case you are using a tablet powered by Windows 10, then instead of the key sequence mentioned above, you can also press the Volume Down + Volume Up buttons at once in order to initiate the “BEEP” sound and display refresh.
2. Check if your Windows 10 Device is Projecting to a Different Screen
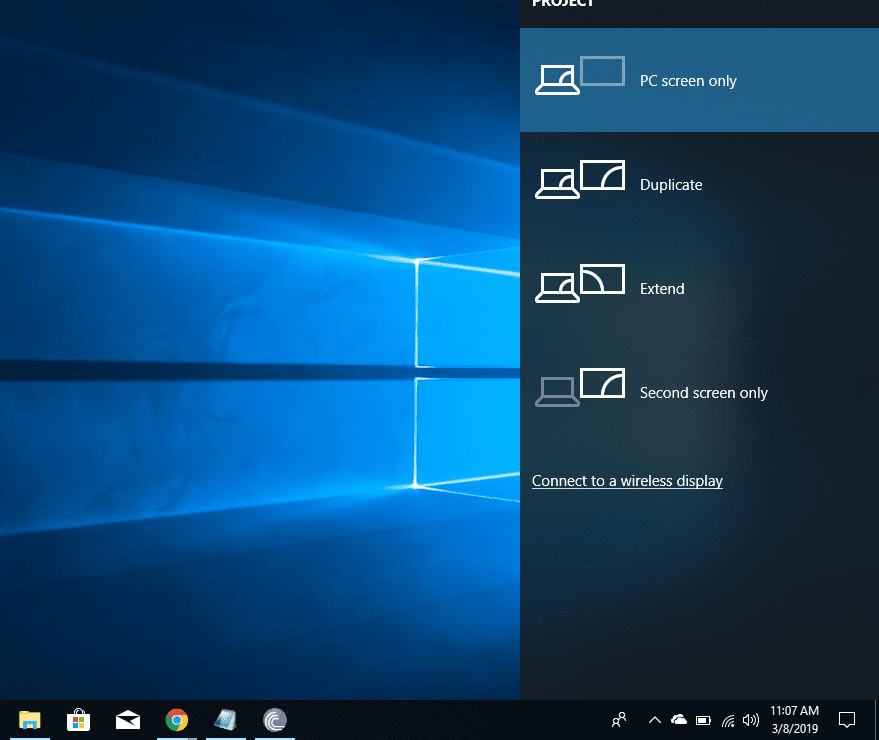
If you earlier projected to a secondary display or projector from your Windows 10 system and then forgot to switch back to your system’s main display to view content, then that might be the reason why you are experiencing the Windows 10 Black Screen after Login issue.
In this case, you need to change the setting so as to project content to your main display only.
To do the same, press the Windows key + “P” key on your keyboard and from the menu that appears, select the option that says “PC Screen Only”. This should resolve the error you are facing.
3. Restart Windows Explorer on your System
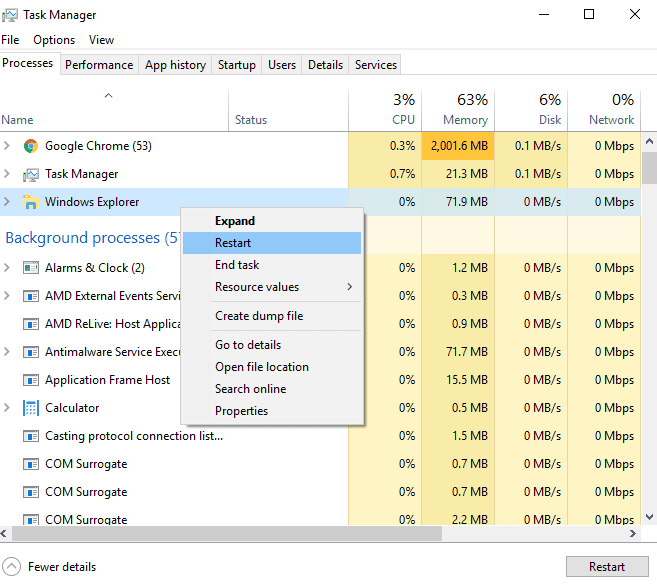
Another method to fix the Windows 10 Black Screen after Login issue is to restart the Windows Explorer task on your Windows 10 system. Please keep in mind that you can only follow this method if you are facing the cursor displayed on the screen along with parts of the display itself.
Below are the steps you need to follow in order to restart Windows Explorer:
- Press the Delete key + Alt key + Ctrl key on your keyboard.
- From the menu that appears, click on “Task Manager”.
- A new task manager window will now open.
- Switch to the “Process” tab.
- Within this tab, find the “Windows Explorer” process. Using your mouse, right-click on this option.
- A drop-down menu will now appear and from this menu, click on “Restart”.
The Windows Explorer task will restart on your system, and this should resolve the Windows 10 Black Screen after Login issue.
4. Restart Your System
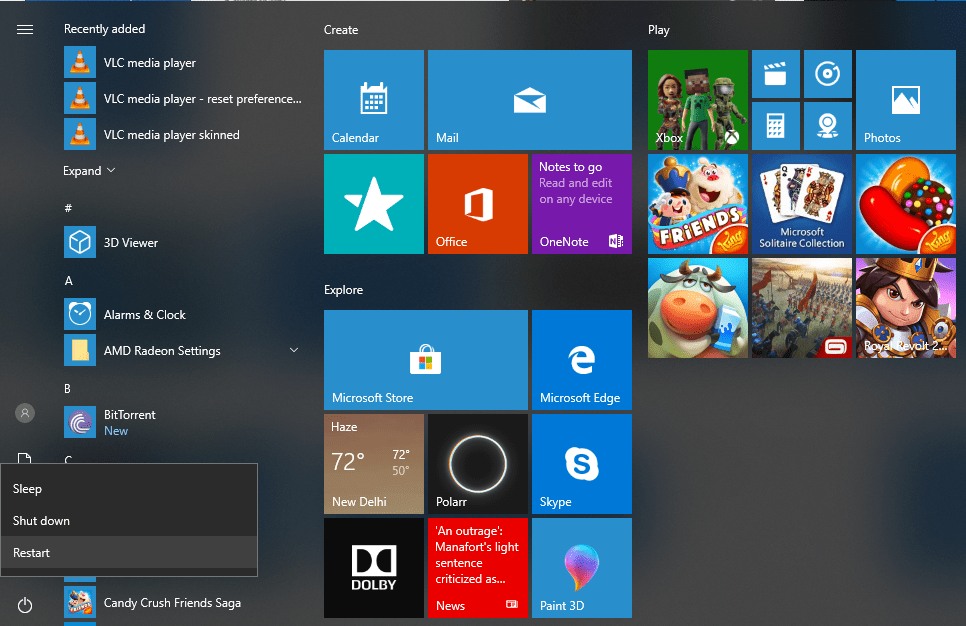
Another easy way to fix the Windows 10 black screen after login error is by simply restarting your system.
Restarting your system will restart any faulty processes, services, or programs that may have caused the error in the first place.
Before you restart your system, make sure to save any work that you were currently doing so that you do not lose the progress after the system restarts.
5. Boot into Safe Mode
If none of the above methods works, then you can try rebooting your Windows 10 system in safe mode.
If you are wondering what is Safe Mode in Windows, it is a boot mode incorporated within the Windows operating system. When a computer boots in Safe Mode, only the essential programs and services required to run Windows are loaded. This makes it easy to troubleshoot and resolve most of the issues related to the Windows operating system.
If you wish to boot your Windows 10 system into safe mode, all you have to do is follow these steps:
- First of all, power OFF your device.
- Now, press the power button to turn your device ON.
- As soon as you see the Windows logo or manufacturer logo (whichever comes first), press the power button again and turn OFF your device.
- Repeat steps 2 and step 3 two more times.
- The last time your system boots up, do not press any key.
- You will now enter the winRE (Windows Recovery Environment) mode.
- Within the winRE menu, click on “Troubleshoot”.
- Then click on “Advanced Options”.
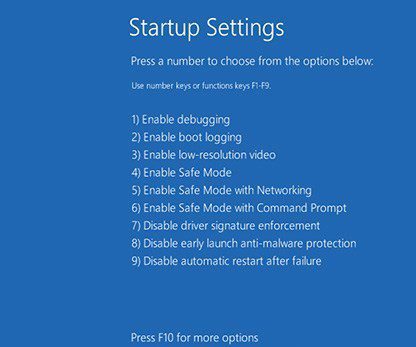
- Now, click on “Startup Settings”.
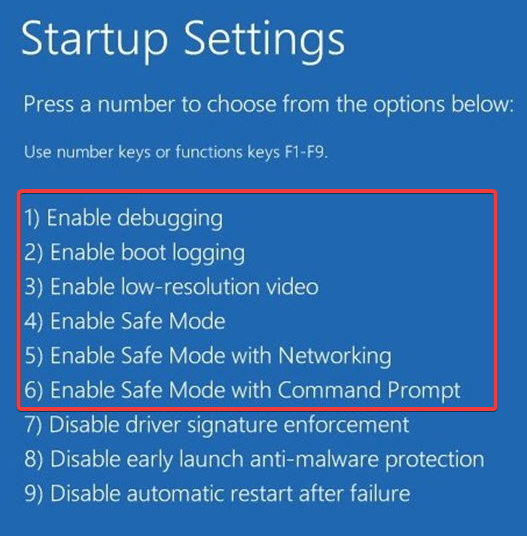
- And in the new window that appears, click on the “Restart” button located on the bottom right side of the display.
- After the restart, you will see a list of options Press F5 to select the “Safe Mode with Networking” option.
And that is it. Your system has now successfully booted into Safe Mode.
6. Rollback Display Drivers to the Previous Version
Maybe the latest update of the display drivers installed on your system might be causing the error that you are facing.
Therefore, in order to resolve the error, you can try reverting the display drivers installed on your system to an older version. Below is how you can easily roll back display drivers in Windows 10.
- Press the Windows key + “R” key on your keyboard to launch the Run window.
- When the Run window opens up, type in “devmgmt — Msc” and press Enter.
- The Device Manager window will now open.
- Within the devices listed on the left side of the window, look for “Display Adapters” and expand this option.
- Right-click using your mouse on each driver that appears inside the Display Adapters section.
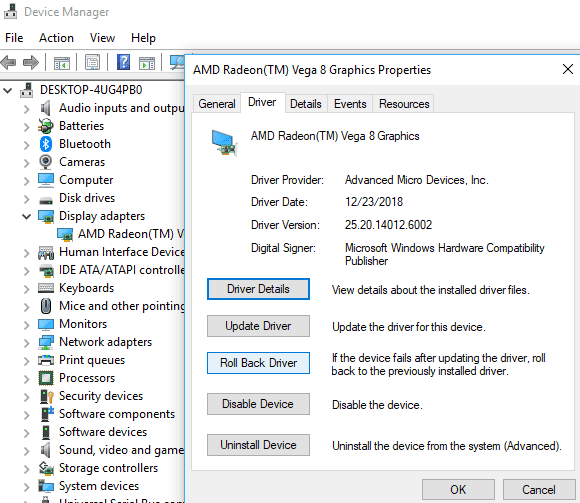
- From the drop-down menu that now appears, click on “Properties”.
- When the Properties window launches, switch to the “Driver” tab from the top.
- Click on the option that says “Roll Back Driver”.
- Click on “OK”.
And you have now reinstalled an older version of the display driver on your system. Restart your PC and the Windows 10 Black Screen After Login issue should get resolved.
7. Reinstall the Display Drivers
If rolling back display drivers did not resolve the Windows 10 Black Screen after Login issue, then maybe reinstalling the display drivers on your system must help and below is how you can do the same.
- Press the Windows key + “R” key on your keyboard.
- Type in “devmgmt.msc” (without quotes) and press Enter.
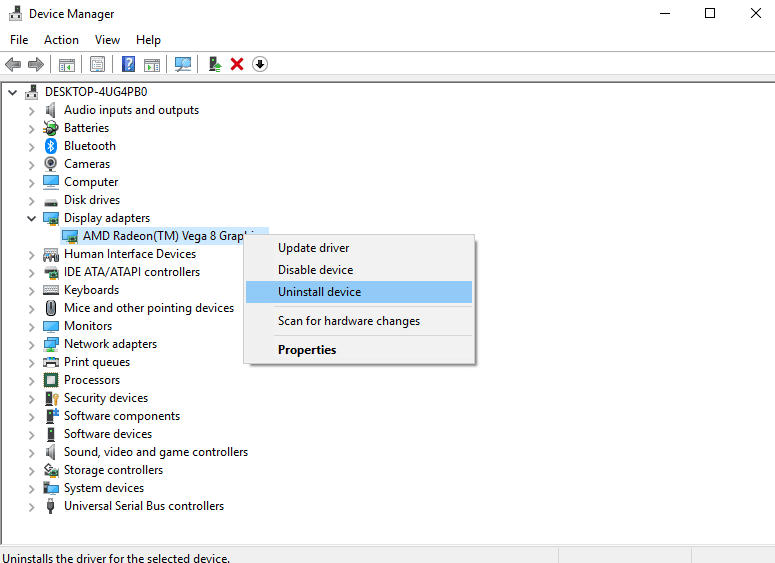
- Within the Device Manager window that opens up, find “Display Adapters” and expand the option.
- Find the display driver installed on your device within the expanded Display Adapters option and using your mouse, right-click on the same.
- Click on the option that says “Uninstall Device”.
- In the pop-up box that appears, tick the “Delete the driver software for this device” option and then click on the “Uninstall” button.
- Restart your device.
After uninstalling the display drivers and rebooting your machine, the latest version of the display drivers should be installed on your device which should resolve the issue.
8. Uninstall any Third-Party Antivirus Software
In some cases, even third-party antivirus software that is installed on your Windows 10 system can also cause the Windows 10 Black Screen after Login issue.
To determine whether the antivirus software installed on your system is causing the issue, temporarily uninstall the antivirus software from your system and if the Windows 10 Black Screen after Login issue gets resolved, try installing some other third-party antivirus software.
Apart from antivirus software, if you had recently installed some other third-party software just before the Windows 10 Black Screen after Login issue started appearing, then try uninstalling that software as well.
9. Uninstall any Recent Windows Update
If you had installed any Windows update recently, then you can try uninstalling the same to check whether the Windows 10 Black Screen after Login issue gets resolved.
In order to uninstall the recent Windows update, first, you need to boot your system into Safe Mode by following the steps mentioned in Section 5 above.
After booting into Safe Mode, follow the steps below to uninstall any recent Windows updates that were installed on your system.
- Click on the search bar present in the bottom left side of the taskbar, and search for “Settings”.
- From within the search results, click on the Settings app.
- When the Settings window launches, click on “Update & Security”.
- Now, click on “Windows Update”, and then on “View Your Update History”.
- You then have to click on “Uninstall Updates” and then select the recent update you wish to uninstall from your system.
- Finally, click on the “Uninstall” button.
And now the update(s) you selected will be uninstalled from your Windows 10 device.
Conclusion:
We hope that one of the 9 different ways described above to fix the Windows 10 Black Screen after Login problem was effective for you. So this is all about the Windows 10 Black Screen After Login article guide.
Hope you like this Windows 10 Black Screen After Login from here now. In case your Windows 10 Black Screen After Login issue is still not resolved, do mention details about the problem you are currently facing and the steps you took to resolve the issue in the comment below. We will surely look into it and help you to fix the error you are facing. If you enjoy checking or reading the Windows 10 Black Screen after Login then please do share Windows 10 Black Screen after Login with others as well also.
Many of the users have been facing a black screen issue where only a cursor is visible after logging in to their Windows accounts. This could be a peculiar issue to face as it renders you unable to navigate your PC using GUI elements.
There could be several reasons why you are facing these issues. Fortunately, the issue is well documented, and there are a plethora of methods you can try to resolve these errors. However, before you dive into this guide to troubleshoot the issue away, do take a look at the culprits of this issue to avoid any possibility of it happening again.
What Causes a Black Screen of Death?
The list of potential issues that can cause the black screen after logging in to Windows problem:
- Unplugged/ improperly plugged cables to the monitor.
- Graphics driver issue.
- Third-party services interfering with Windows startup.
- Damaged system files.
1. Check Monitor Cables
Note: This method only applies to users having a desktop computer.
First things first, before you go down the troubleshooting rabbit hole, you need to make sure that your monitor has a power cable and display cable connected properly to it. Make sure you disconnect all the cables and reattach them just to be sure.
2. Restart Your PC
Restarting your PC might seem very elementary or unnecessary. However, sometimes there could have been an issue with the update, or a third-party service/software might be creating an issue, and a simple restart can resolve it.
If you have a laptop computer, press and hold the Power button to force shut down the computer. Wait for a couple of seconds, and then turn it back on.
In case you have a desktop computer, you can either press the physical power button on the CPU unit, or you can pull the plug and start afresh.
3. Disconnect All Peripherals
Many users have been able to resolve the issue by disconnecting all the attached peripherals to their computers except the keyboard and mouse.
There can be issues with the driver of a connected peripheral or its services interfering with the startup of Windows.
Restart your PC after disconnecting all the additional peripherals to check if this resolves the issue for you.
4. Reset Windows Explorer
Another method you can try is to reset the Windows Explorer. It is the process that renders everything that you see on your screen, and hence, restarting it might fix the issue for you.
However, do note many of the users on the Microsoft Forum were not able to see the process in their Task Manager. If that’s the case with you as well, jump to the next task.
After logging in, press Ctrl+Shift+Esc on your keyboard. This should bring up the Task Manager on your screen.
After that, ensure you are on the ‘Processes’ tab and then click on the ‘Run new task’ option.

After that, type explorer.exe in the text box provided and click ‘OK’.

You should now be able to see your Desktop screen. If not, move on to the next solution.
5. Try these Keyboard Shortcuts
To resolve the black screen issue, try the following keyboard shortcuts:
Windows logo key+PorCtrl+Alt+Delto wake the screen.Windows logo key+Ctrl+Shift+Bto restart the video driver and fix the black screen issue.
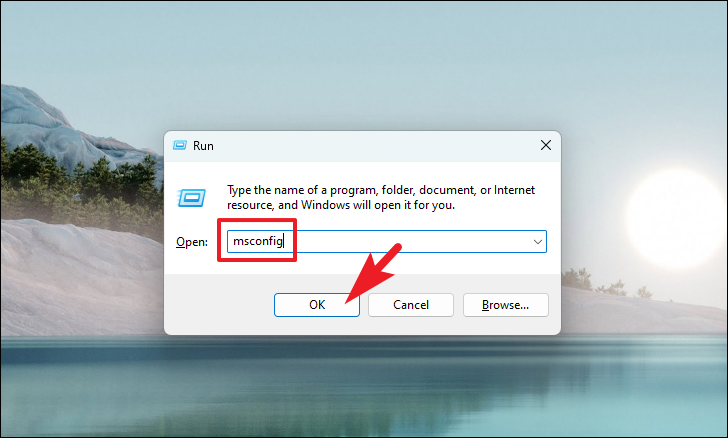
6. Clean Boot Your PC
Clean boot allows you to start your PC with minimal services and software. This eliminates the possibility of a third-party service or software causing an issue at the time of Windows startup.
There’s a possibility that your issue might prevent you from following the steps below. In that case, simply mosey on to the next fix to get into Windows Recovery Options.
First, press the Windows+R keys together on your keyboard to bring up the Run command utility. Then, type msconfig and hit Enter on your keyboard to proceed.
After that, click on the ‘Selective startup’ option and then click select the ‘Load system services’ option.
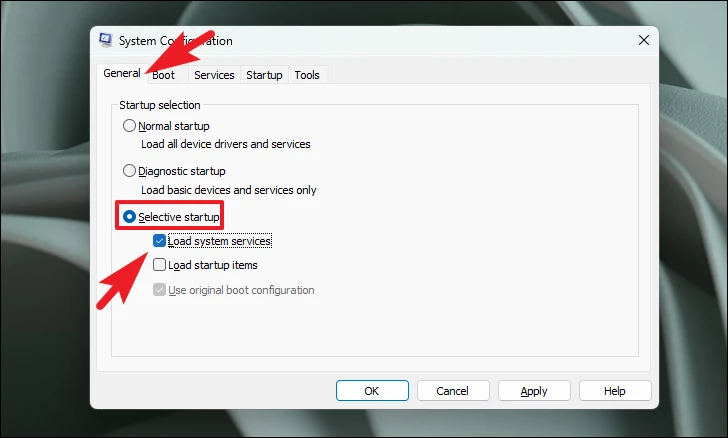
Then, click on the ‘Services’ tab and click on the checkbox preceding the ‘Hide all Microsoft services’ option. Then, click the ‘Disable all’ button to disable all but Microsoft services.

Next, click the ‘Apply’ button to save the changes and click ‘OK’ to close the window.
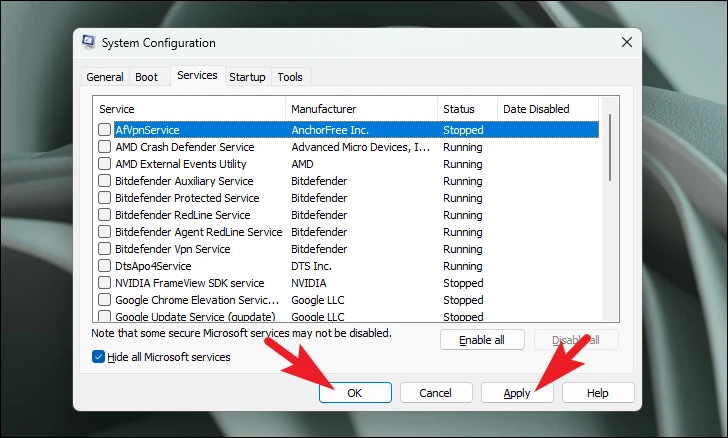
Now, restart your PC and check if the Desktop is loading all fine. If it does, you can check which service is causing the issue by enabling all third-party services one by one.
7. Boot into Safe Mode with Internet
First, power on your system, and at the first signal of boot up, press and hold the power button again for at least 20 seconds to shut down the system. If you are working with a Desktop PC, you can pull the plug on your PC.
Now, repeat the aforementioned process three times, and on the fourth time, allow your PC to boot up without any interruption. This will load the Windows Recovery Environment.
Note: For the Internet to work in Safe Mode, you might need to connect your PC with a wired connection if the Wi-Fi doesn’t work.
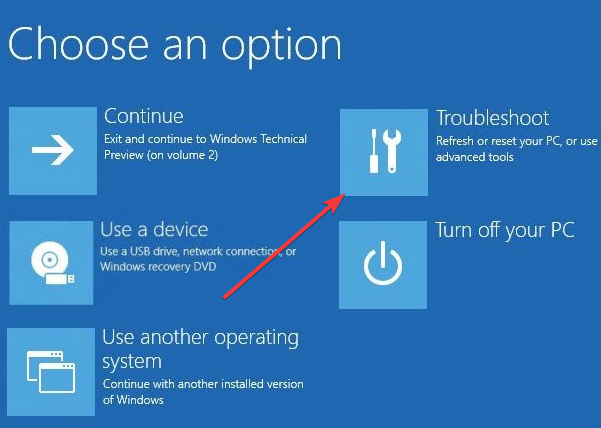
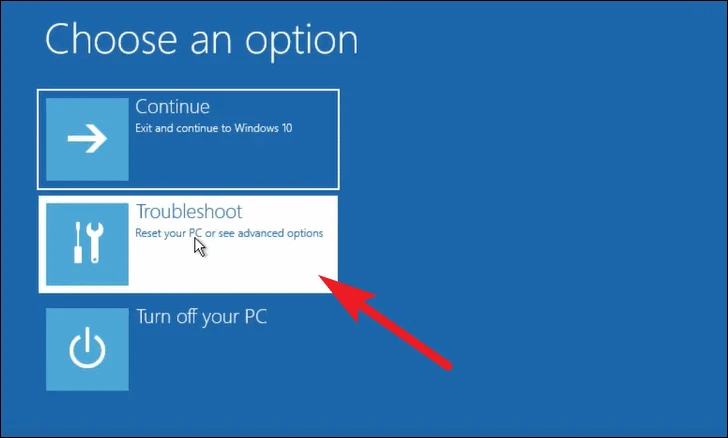
Once the Windows Recovery Environment has been loaded, you can see the ‘Choose an option’ screen. Locate and click on the ‘Troubleshoot’ tile to proceed.

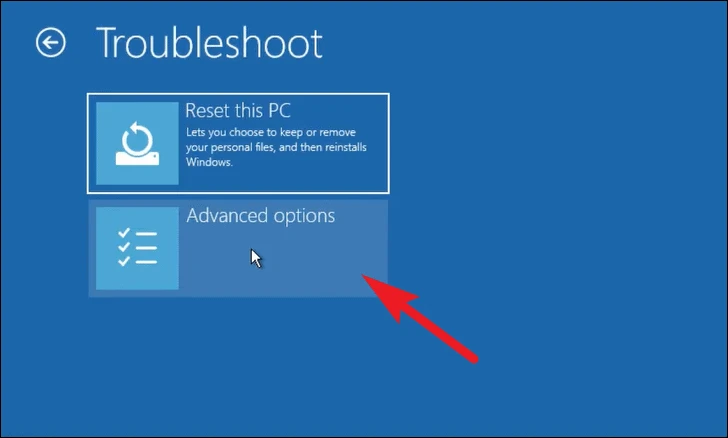
After that, from the ‘Troubleshoot’ screen, click on the ‘Advanced options’ tile to proceed.

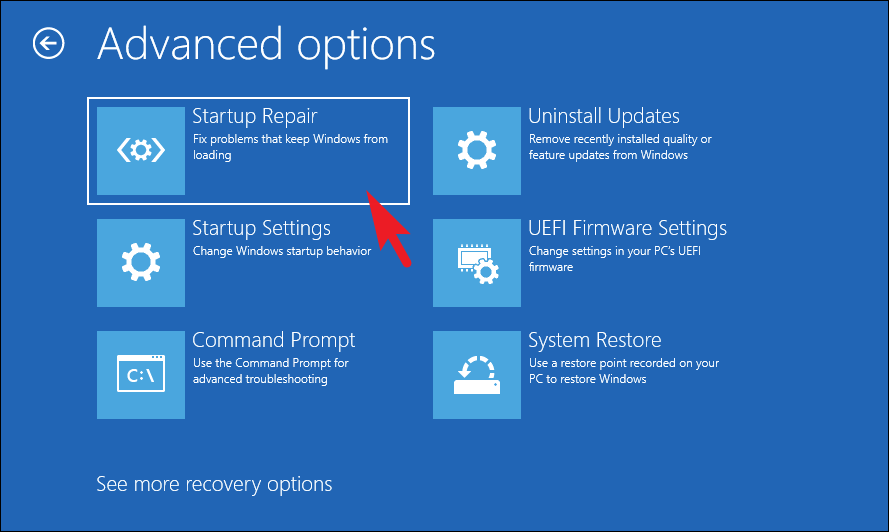
Now, locate and click on the ‘Startup Settings’ tile to continue.

Then, on the next screen, click on the ‘Restart’ button present in the bottom right section of the screen to boot into the Safe Mode on your PC.

Once restarted, you will see a numbered list of the modes available. Make sure you press the number for the option ‘Safe Mode with Networking’ as it will allow you Internet access.
Update Graphics Driver
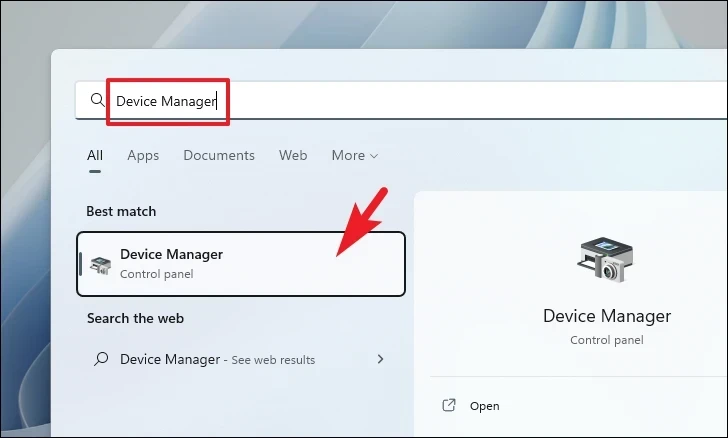
First, head to the Start Menu and type Device Manager to perform a search. Then, from the search results, click on the ‘Device Manager’ tile to proceed.
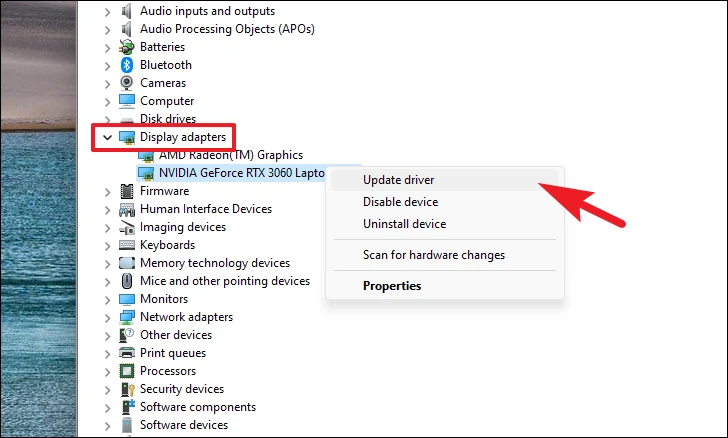
After that, double-click the ‘Display Adapters’ option to expand the section. Then, right-click on the component listed under it and select the ‘Update driver’ option. This will open a separate window on your screen.
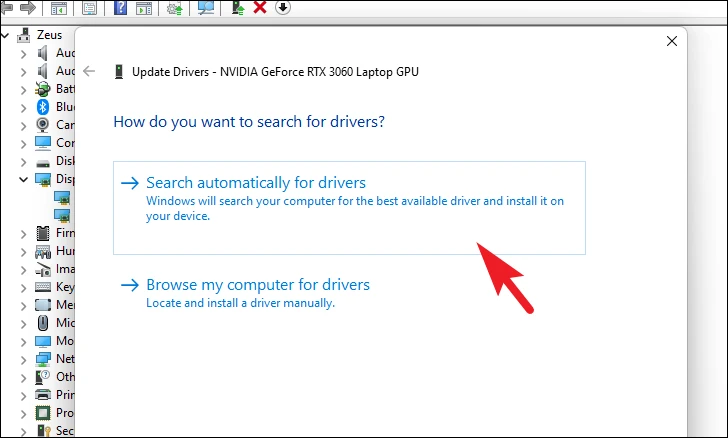
Next, click the ‘Search automatically for drivers’ option to let Windows search for a driver for you. Otherwise, if you have already downloaded a driver package, click the ‘Browse my computer for drivers’ option.
If you had previously updated the Graphics Driver and then started facing the issue, try rolling back the updates instead.
Perform Automatic Repair
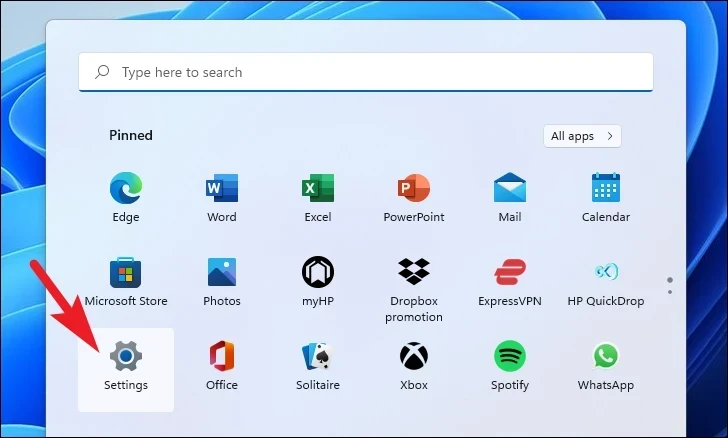
First, head to the Start Menu and click on the ‘Settings’ tile.
After that, ensure you have selected the ‘System’ tab from the left sidebar.
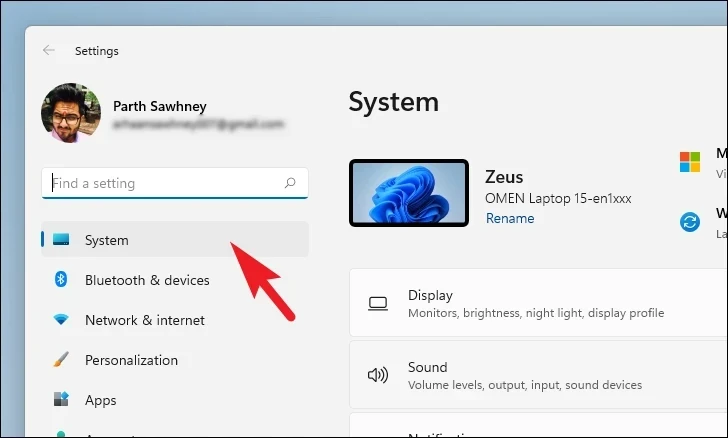
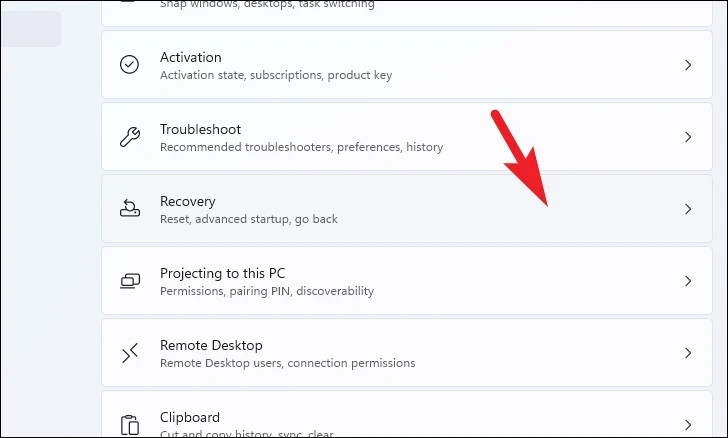
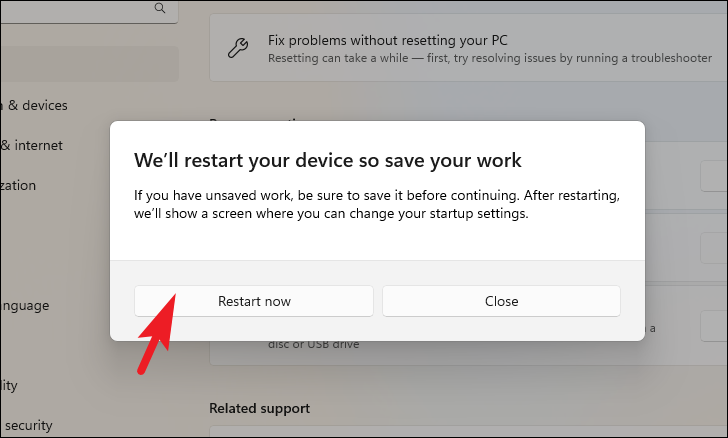
Then, from the right section of the window, scroll down and click on the ‘Recovery’ tile to proceed.
Afterward, locate and click the ‘Restart now’ button to proceed. This will bring a separate window to your screen.
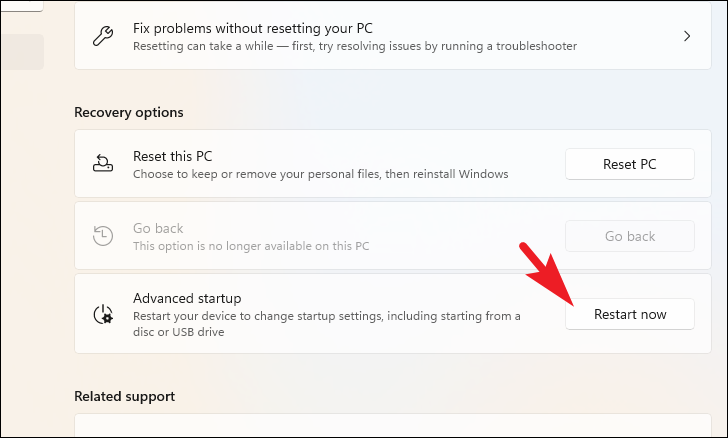
Next, click on the ‘Restart’ button from the alert to restart your PC immediately.
Once the PC restarts, click the ‘Troubleshoot’ tile to proceed.
After that, click on the ‘Advanced options’ tile.
Then, click on the ‘Startup Repair’ tile to commence the process.
You may be prompted to select your user account and provide credentials for it. Once entered, Windows will run the diagnostics and repair any issues found.
Edit Registry Files
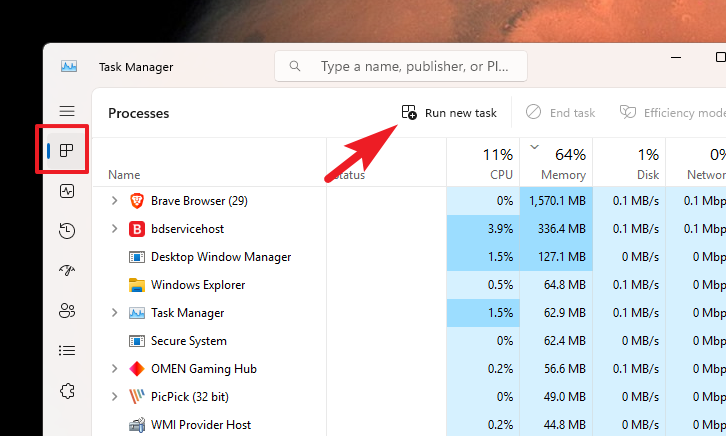
After logging, press Ctrl+Shift+Esc to bring up the Task Manager window. Make sure you are on the ‘Processes’ tab. Then, click ‘Run new task’.
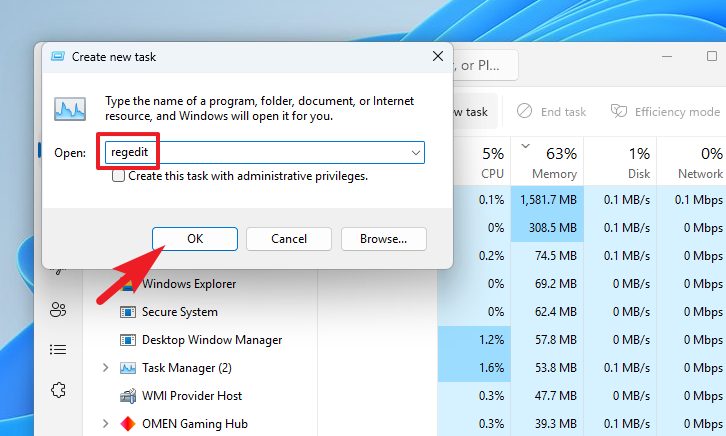
Next, type regedit in the text field given. Then, click ‘OK’ to launch the Registry Editor.
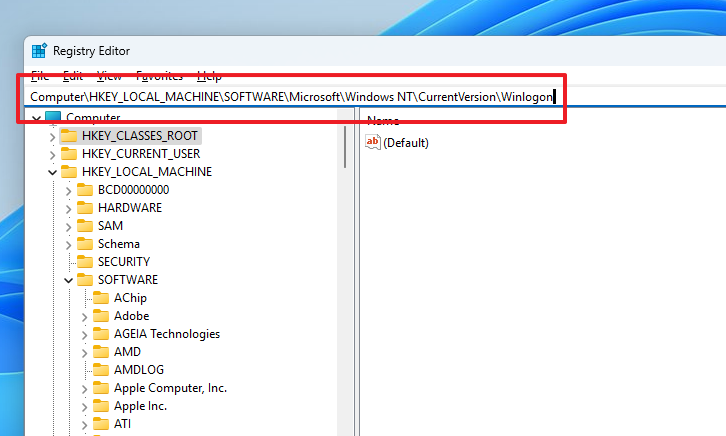
Then, type or copy+paste the below-mentioned directory in the address bar and hit Enter to navigate to it.
Computer\HKEY_LOCAL_MACHINE\SOFTWARE\Microsoft\Windows NT\CurrentVersion\Winlogon
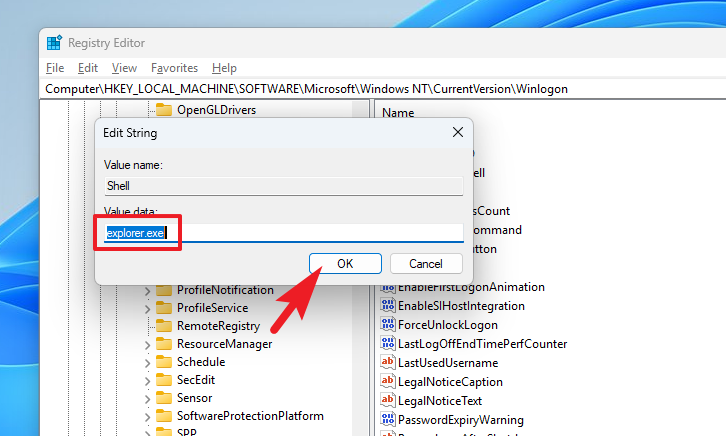
After that, locate the ‘Shell’ DWORD file on the right section of the window and double-click on it.
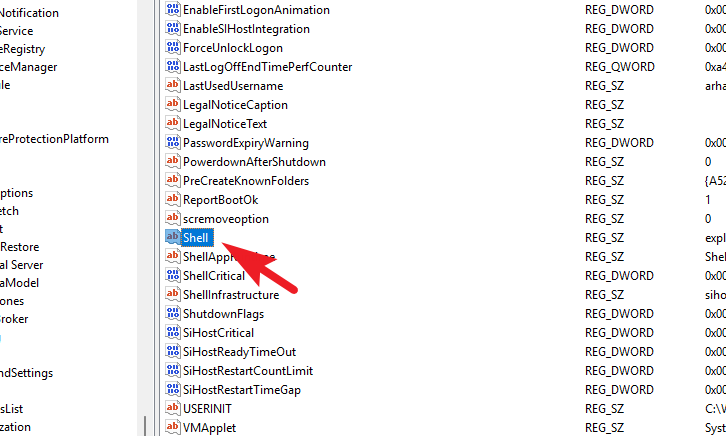
Finally, overwrite the ‘Value’ field with explorer.exe and click ‘OK’ to save the changes. Now, restart your PC and check if this resolved the issue for you.
Repair WinRE Image
WinRE stands for Windows Recovery Environment; if the image is corrupted or damaged, it may hinder the resetting process on your PC.
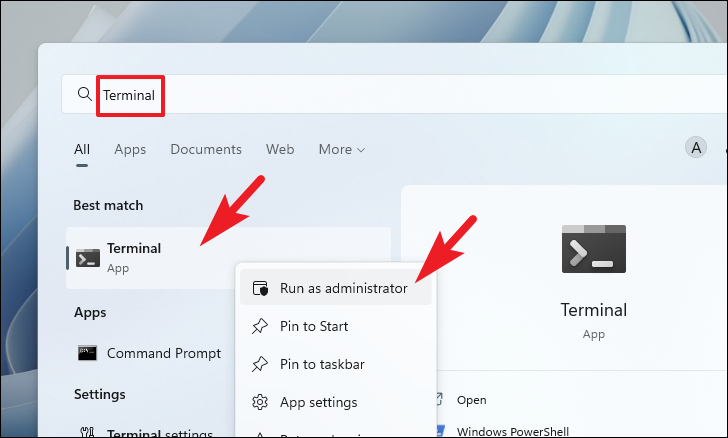
First, head to the Start Menu and type Terminal to perform a search. Then, right-click on the ‘Terminal’ tile and select the ‘Run as admininstrator’ option.
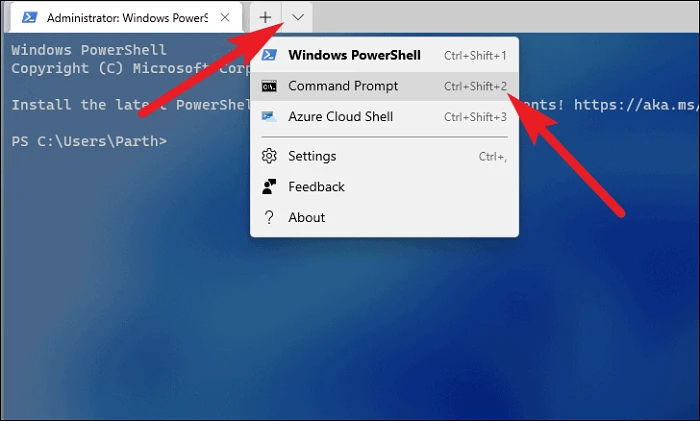
After that, click on the chevron (downward arrow) and select the ‘Command Prompt’ option.
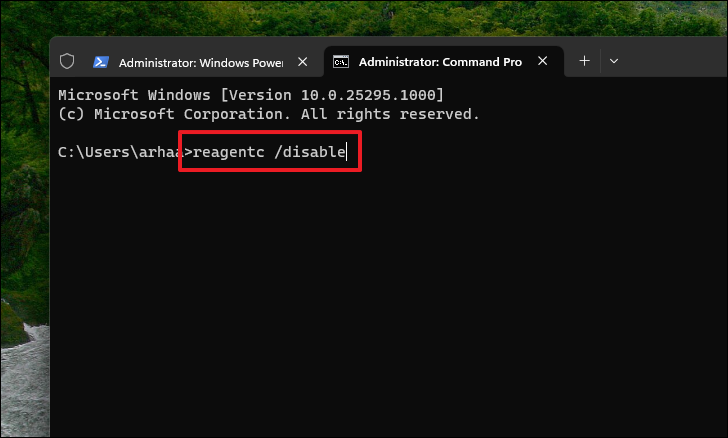
Then, on the Command Prompt tab, type or copy+paste the below-mentioned code and hit Enter on your keyboard to execute the command.
reagentc /disable
After that, restart your PC and launch the elevated Command Prompt, as shown previously in this section.
Now, on the Command Prompt window, type or copy+paste the below-mentioned command and hit Enter to execute.
reagentc /enable
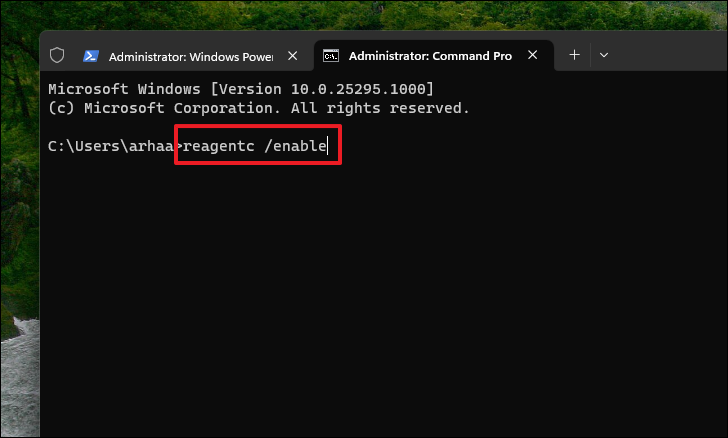
If your PC still doesn’t seem to start, Boot into the safe mode with the Internet again, as shown in the section earlier, and continue with the methods mentioned below.
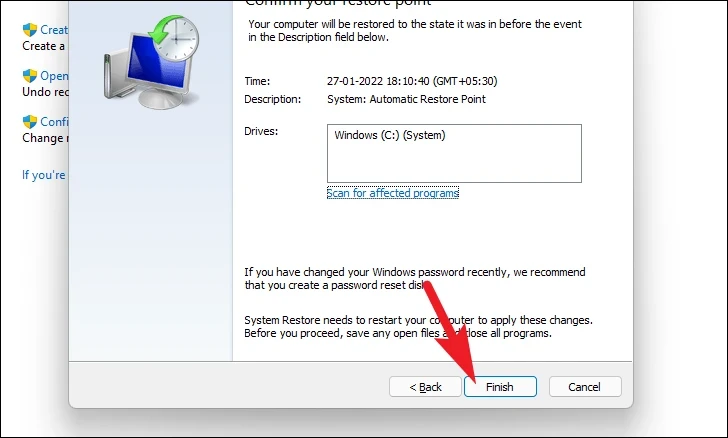
8. Roll Back to a System Restore
If you have created a system restore point previously, you can easily roll back to it instead of resetting the PC. In case you are factory resetting the computer giveaway, you can initiate the process after restoring your PC.
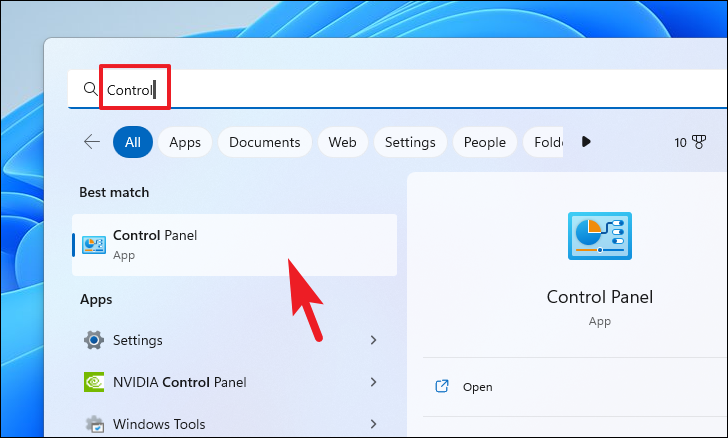
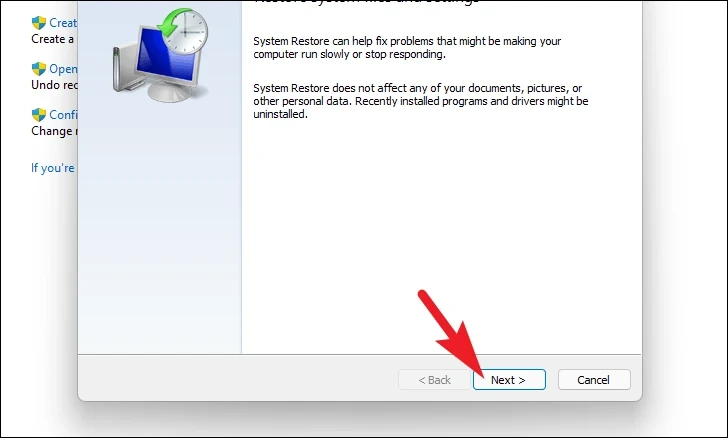
Open the Start Menu and type Control. Now, click on the ‘Control Panel’ tile from the search results.
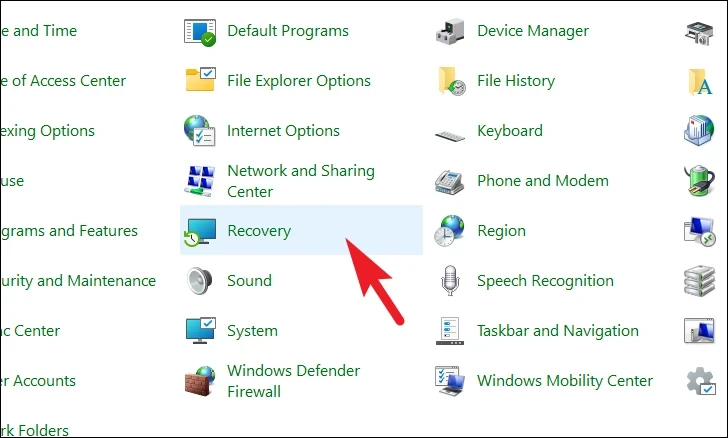
After that, locate and click on the ‘Recovery’ tile from the grid of icons.
Next, click on the ‘Open System Restore’ option from the list. This will open a separate window on your screen.
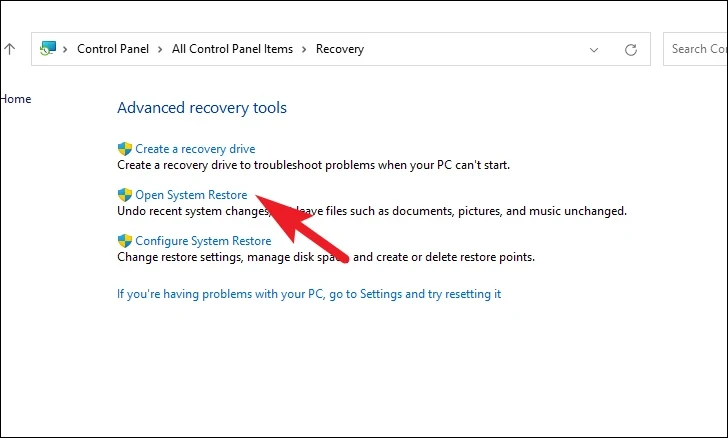
From the separately opened window, click on the ‘Next’ button.
All created system restore points will be listed on the screen. Click to select the desired one and then click on the ‘Next’ button to initiate the rolling back process.
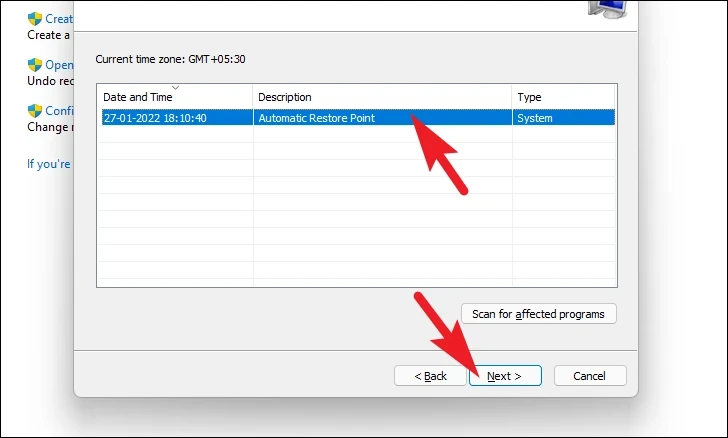
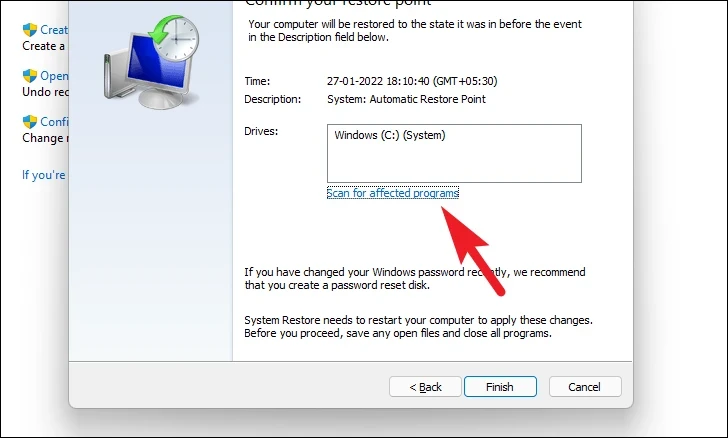
Next, a list of drives the rollback will impact will be displayed, along with the timestamp of the restore point created. You can also check the programs that will be affected; click on the ‘Scan for the affected programs’ button. A new window will appear on the screen.
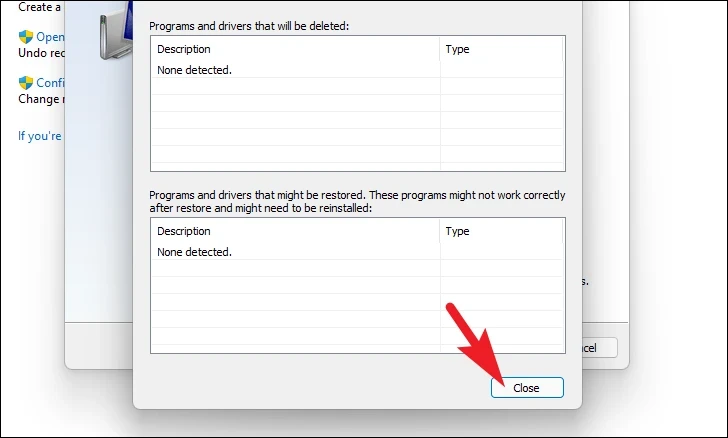
On the new window, you can view the programs that will be deleted and the ones that will be restored (since no programs will be affected on the test PC, the list in the screenshot below is empty). Click on the ‘Close’ button to navigate to the previous window.
Finally, click the ‘Finish’ button to initiate the rollback process.
9. Fresh Install Windows 11
If even system restores fail to resolve the problem for you, the only option you have is to install Windows 11 on your computer fresh. You will first need to create an installation media if you have not already created it. Once you have the installation media, follow the below-mentioned steps.
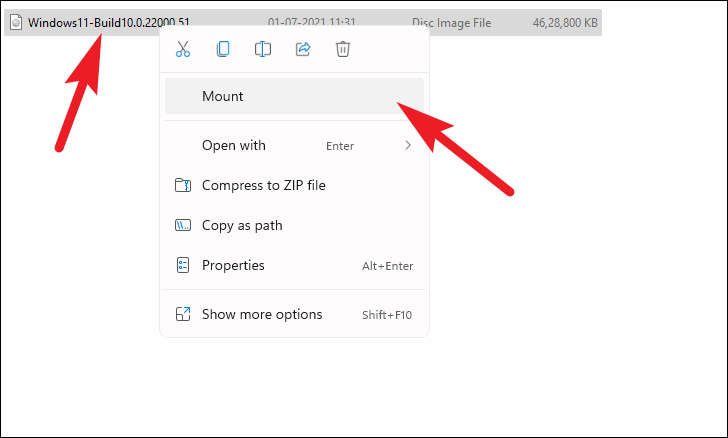
There are mainly 2 ways to install Windows 11 on your computer fresh, either from the bootable USB or by mounting the ISO file. To showcase the process, we will be using the ISO file. Though the steps vary a little in the bootable USB method, the overall process remains the same.
Once you have downloaded the ISO file, navigate to the folder and right-click on the file. Then, select the ‘Mount’ option.
After that, head to the mounted drive and double-click on the setup.exe to run the installer.

On the installer window, click on the ‘Next’ button.

After that, read the EULA (End User License Agreement) and click the ‘Accept’ button.

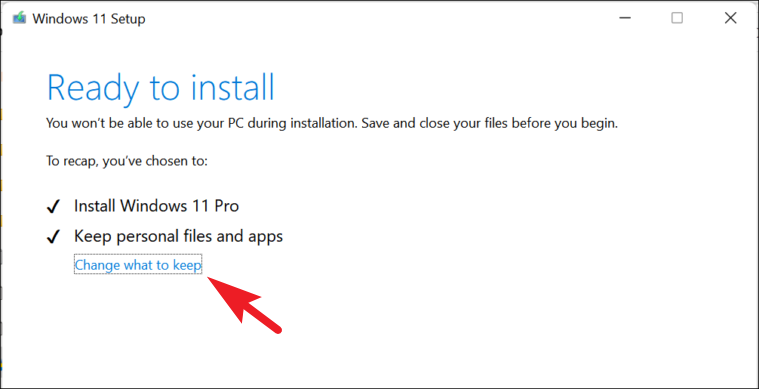
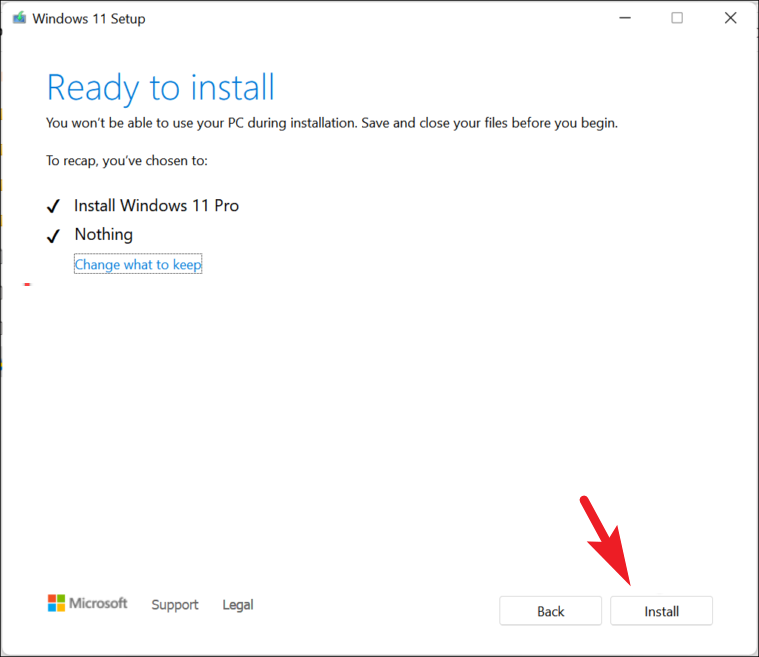
Once done, the installer will display the currently chosen configuration on the screen. To customize, click on the ‘Change what to keep’ option.
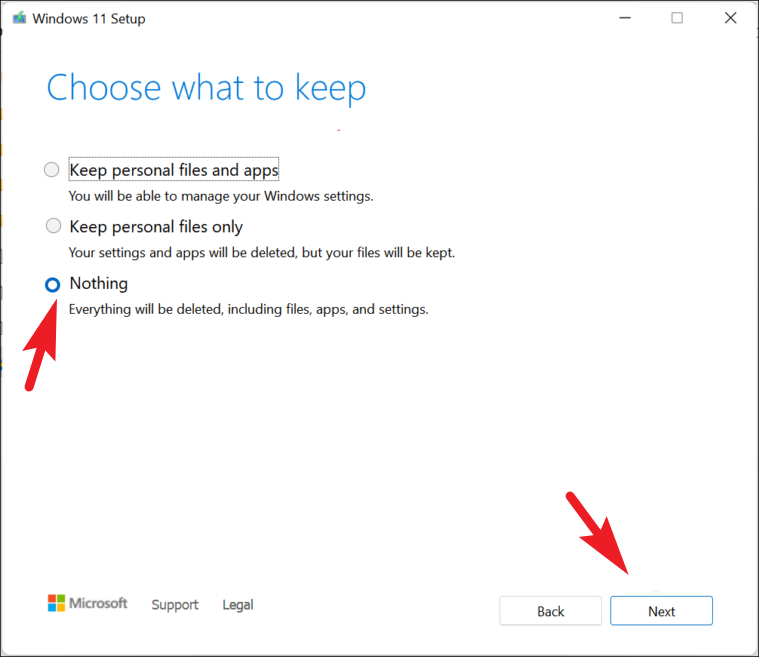
On the next screen, it is best to choose the ‘Nothing’ option in order to eradicate the problem once and for all. Then, click on the ‘Next’ option.
Finally, click on the ‘Install’ button on the installer window.
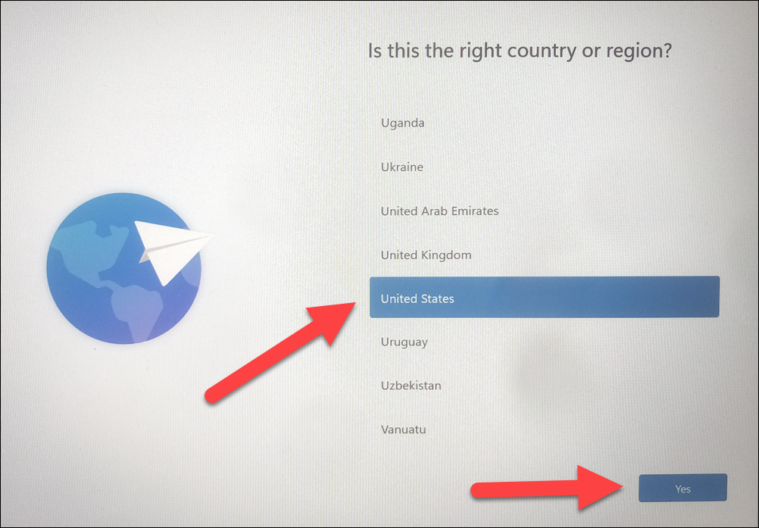
Once the installation is complete, you will have to go through the OOBE (Out of the Box Experience), which is a one-time setup of Windows 11.
The first screen on the OOBE will be for region selection. Select your country from the provided list and click the ‘Yes’ button.
After that, select the keyboard layout according to your region. This can be important because if a wrong layout is selected, some of the keys might function differently from what is intended. This can be changed later, though. Once selected, click on the ‘Yes’ button to proceed.

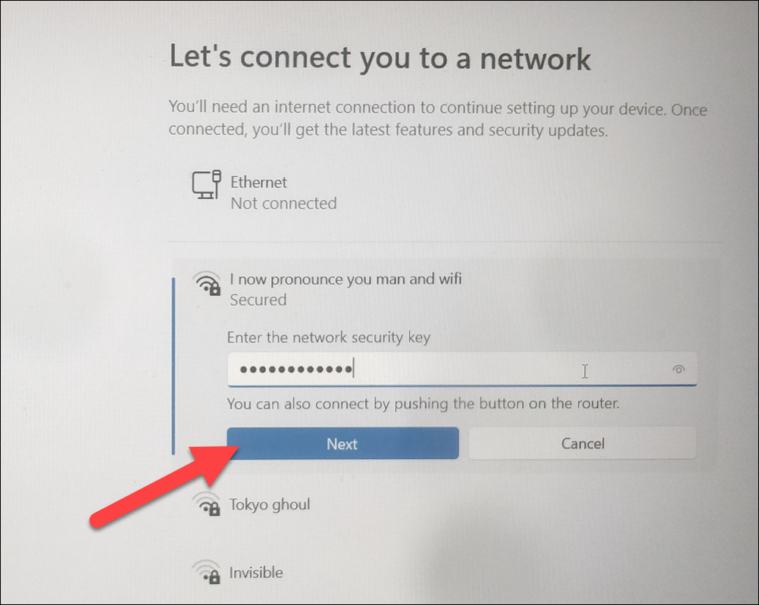
On the next screen, you will need to connect to a wireless network. Select one from the list and provide a password for authentication. Once connected, click on the ‘Next’ button.
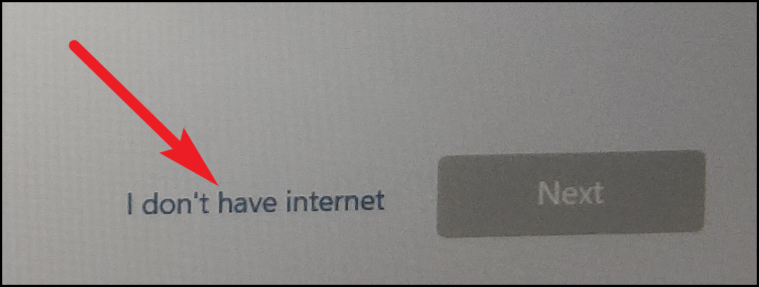
In case you do not have access to the Internet at present, click on the ‘I don’t have Internet’ button.
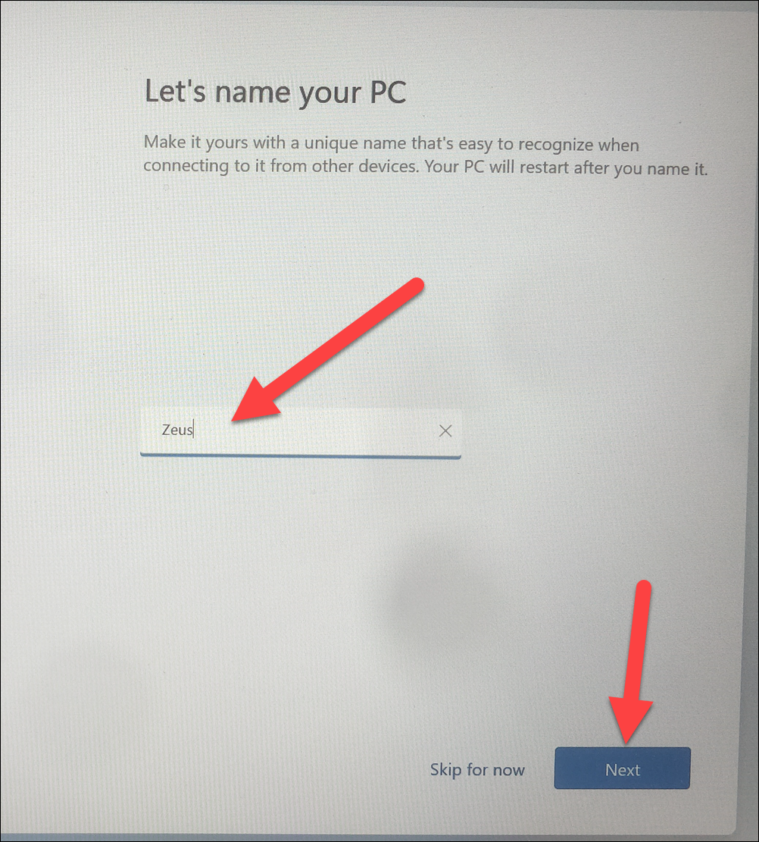
On the next screen, provide the name of your PC and then click on the ‘Next’ button.
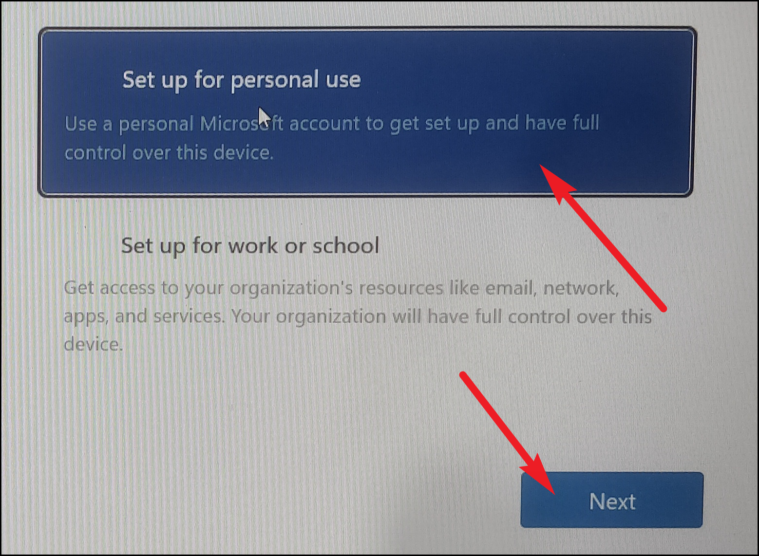
After that, if your institution or organization creates your user account, click ‘Set up for work for school’. Otherwise, select ‘Set up for personal use’ and click ‘Next’. You will need to provide your Microsoft account credentials on the next screen.
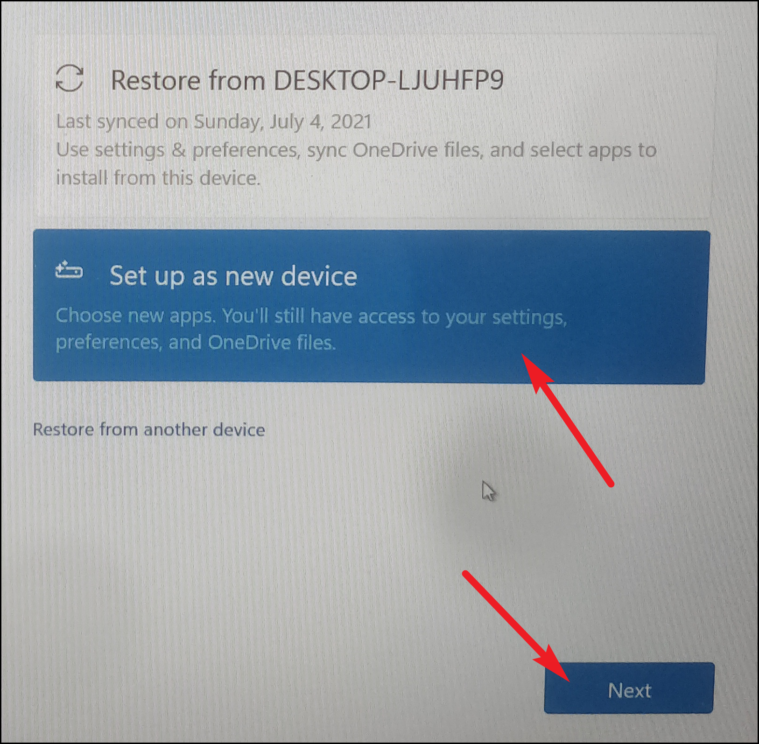
After you are signed in, click on the ‘Setup as new device’ option to ensure no issues are carried forward in the fresh install.
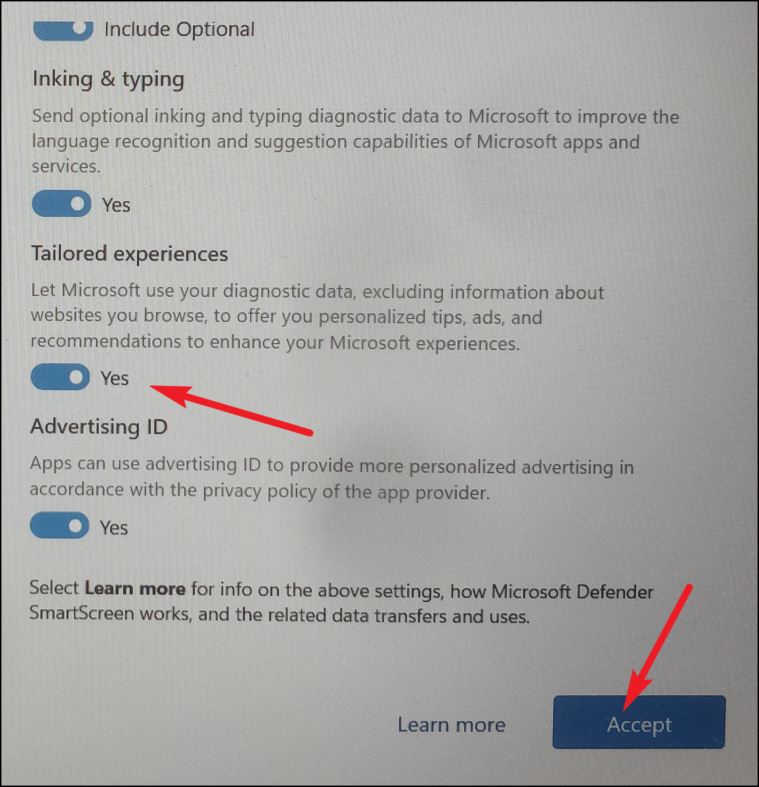
On the next page, read all the privacy settings and toggle each per your requirement. They are not compulsory, so choose as you please. Then, click on the ‘Accept’ button.
Afterward, Windows 11 allows you to choose for which purpose you wish to use the PC. Select one from the list by clicking on the following checkbox. Windows will suggest tips and tricks, and you can click the ‘Skip’ button to move to the next screen.

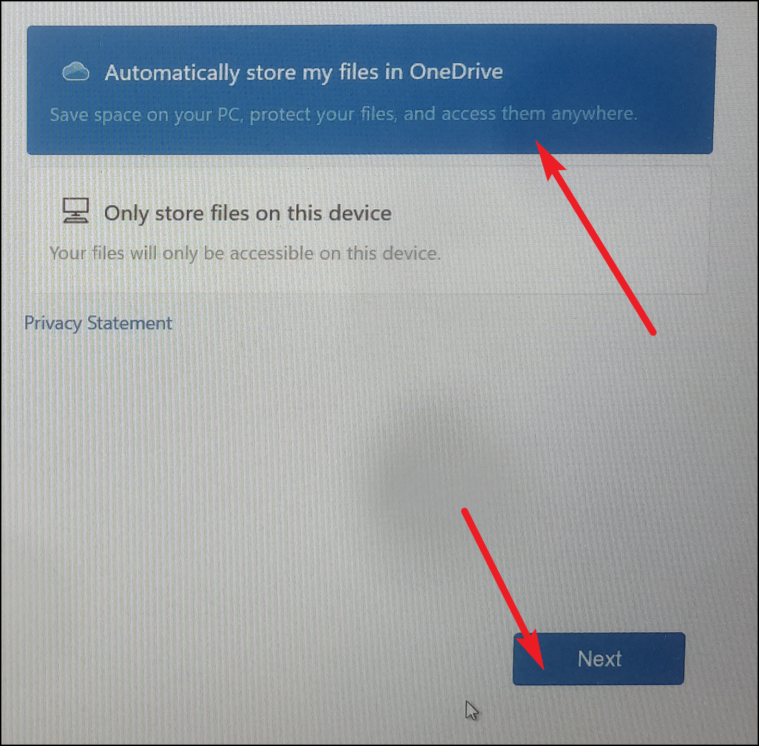
Next, choose if you wish to use OneDrive to store your files. If not, click on the ‘Only store files on this device’ option and click the ‘Next’ button.
On the next screen, you might be prompted to opt for the ‘Microsoft 365’ service. You can either buy the service or try it for free. However, you can also choose to skip it by clicking on the ‘No thanks’ button.
The setup is now complete. Since it is a fresh install, you will hopefully not face any of the previous issues on your computer.
A black screen issue can be very vexing. However, using the methods mentioned above, you should be able to resolve it and get things working like clockwork again.
After logging in to the computer, instead of showing up your desktop, you might encounter a black screen with only a movable cursor, or, sometimes not even it.
Incorrectly opened or corrupted Windows explorer process is likely to cause Windows black screen after login. Besides corrupted windows explorer, Display drivers, third party antivirus and also windows updates are well known to cause the issue.
Restarting the process is usually a patch if you can access the Task Manager. However, in such scenarios, Windows can be unresponsive, requiring some other not-so-convenient fixes.
Table of Contents
Pressing Windows + Ctrl + Shift + B keys will refresh the graphics driver. A beep sound with a flickering screen will appear. Windows will also try to re-initialize the screen during that time.
If the black screen is caused by a frozen display drivers, this should fix the issue and your screen should be back alive.
Power Cycle
If the computer doesn’t respond to the previous key combination, Windows is being unresponsive. It can be caused by various reasons, from faulty peripheral devices to misconfigured firmware.
An efficient method to fix so would be to perform a power cycle which will help to reinitialize the I/O devices.
- Detach all the peripherals attached to the computer and turn it off.
- Disconnect the computer from its power source. Remove the battery in case of a laptop.
- Press and hold the power button for more than 20 seconds to drain all the charges from the components.
- Reconnect the power source and boot up the computer.
- Check if it resolves the issue.
Restart Windows Explorer
Windows Explorer is responsible for handling the visible GUI elements on your desktop. If it’s opened improperly, you can restart the process from the task manager.
- Press Ctrl + Shift + Enter keys to open Task Manager.
- Search for Windows Explorer, and right-click on it and then, click on the Restart option.


If Windows Explorer isn’t running at all, create a new task and run it.
- Open Task Manager.
- Click on Run new task.
- Type
explorer.exeand hit Enter.


Enter Safe Mode
The above solution would work if only the Task Manager showed up. But if task manager doesn’t open, try to boot into safe mode to perform other fixes.
- Force restart your computer three times by holding the power button.
- You will Enter the Advanced Startup menu on the third attempt. Choose Troubleshoot from there.

- Then go to Advanced Options > Advanced Startup Options > Startup Settings

- Press the 4 or F4 key to open Safe mode.


If the Safe Mode doesn’t load as well, skip to the System Restore solution.
Roll-back Display Driver
Some bugs within the display drivers may cause the black screen issue if you have recently updated Windows. Rolling back the Display driver might solve the problem of such a case.
- Type Device Manager on Windows Search and hit Enter.
- Double-click on the Display adapters category to expand it.

- Right-click on the driver within the category and choose Properties.

- Go to the Driver tab and hit the Rollback button.

- Click Yes to confirm and restart your computer.


Reinstall Display Drive
If rolling back the driver didn’t work, try reinstalling the display driver. It will fix the issue if the cause is corrupt driver files.
- Open Device Manager and expand the Display adapters category.
- Right-click on the driver and choose Uninstall device.

- Hit the Uninstall button on the prompt.
- Restart the computer, and Windows should automatically install the driver upon restart.
- Check if it fixes the problem.

Remove Antivirus Software
Since antivirus attaches themselves to the kernel, it usually has permission to handle all running processes. Thus, they can stop essential processes like explorer.exe from loading, which causes the black screen issue.
So, you can enter the safe mode and remove the active third-party antivirus software. Since antivirus programs operate on kernel mode, they cannot be removed like any normal programs.
However, the general methods would be to,
- Open Anti-Virus program.
- In the dashboard, find and select settings.
- There has to be some option to disable/remove the program.
Uninstall Recent Updates
Before moving to system restore, if you remember installing a Windows update recently, you can uninstall it to check if the issue solves.
- Open Settings from the start.
- Go to Windows update and then, Update history.

- Click on Uninstall updates.

- Then, click Uninstall on the latest update from the list.

- Hit the Uninstall button to confirm.
- Restart Windows and inspect if it solves the issue.


System Restore
If nothing above fixes your problem, other changes in the registry can be a possible cause. It usually is because of some application or malware tweaking the registry. If you’re exactly aware of the changes, better to perform a system restore to a healthy point.
- Force restart your computer three times, and Windows will enter Advance boot options on the third attempt.
- Go to Troubleshoot > Advanced options > System Restore

- Click on the Next button and choose a restore point.

- Hit Next and then, the Finish button.


System Reset
A system reset will bring your computer back to factory mode. All the default settings will be restored and the registry will be reset as well.
So, you can perform a system reset on your device if you are unable to restore the system to a point or it didn’t work.
- Open Windows Advanced boot options as above.
- Go to Troubleshoot and then, Reset this PC.

- Choose Remove Everything.

- Hit the Reset button and wait till the process ends.


Clean Installation
Since no other solution worked, you will now be left with your last bid of clean installing Windows. It will delete everything and install a fresh copy on Windows, and resolving issues will corrupt installation files.
- Create a bootable USB with Windows 11 ISO file and insert it into your computer.
- Click the Next button on the setup.
- Proceed with the Install now button.

- Choose I don’t have a product key.

- Click on the Next button, select your Edition of Windows and then, Next again.
- Choose I accept the license terms and hit Next.

- Select Custom: Install Windows only (advanced)

- Pick your current OS partition and click on Delete which would unallocated that space.
- Now, choose the unallocated space and hit Next to install Windows on that partition.


