Are you trying to access your BIOS on Windows 10 but don’t want to shut down or restart your PC? You’re in luck, as this guide will show you how to access BIOS Windows 10 without the need for a restart.
- Go to Settings > Update & Security > Recovery > Advanced Startup > Restart Now
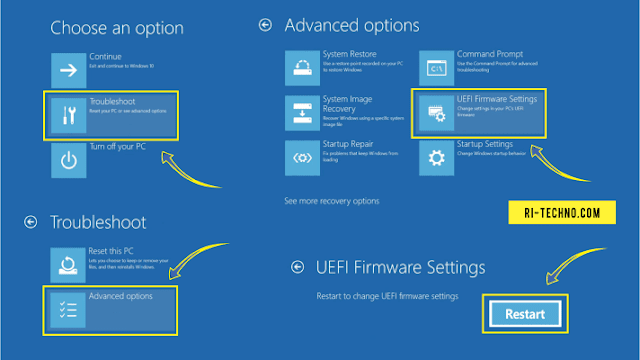
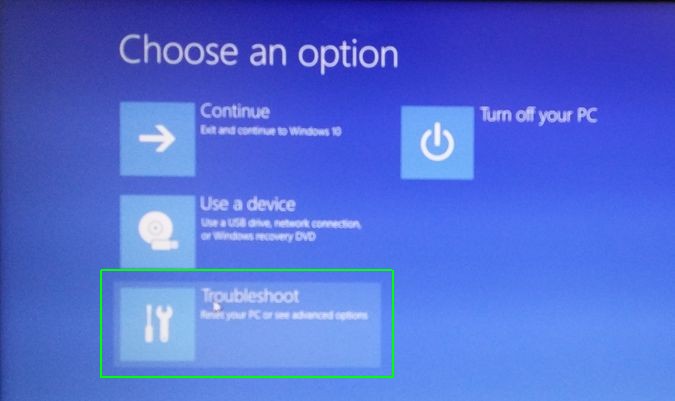
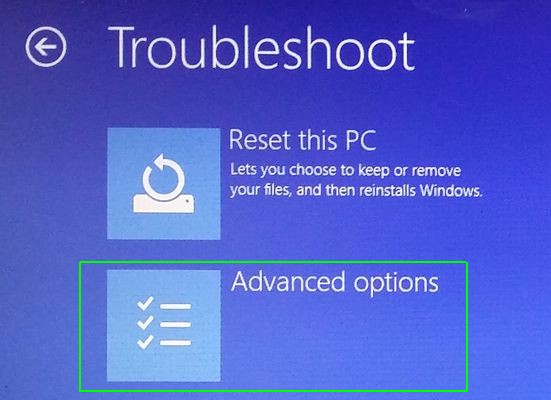
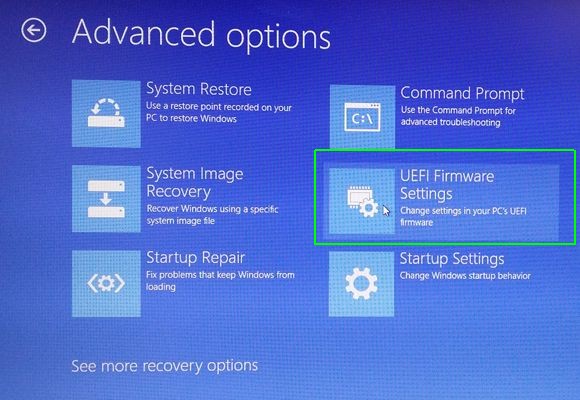
- You will then be prompted to choose an option, select Troubleshoot > Advanced Options > UEFI Firmware Settings > Restart
- After restarting, your PC should automatically enter the BIOS setup utility
How Do I Force My Computer To Boot Into BIOS?
Accessing the BIOS of your computer is essential to change basic system settings. The BIOS (Basic Input/Output System) is the first software that runs when a computer starts up. It can be used to change the boot order of your system, overclock your hardware, or even to reset the administrator password. To force your computer to boot into BIOS, you will need to access the BIOS setup utility.
Step-by-Step Tutorial:
- Restart your computer and press the F2 key repeatedly while the computer is booting up.
- If the F2 key doesn’t work, you can try pressing the DEL key or F12 key. However, the F2 key is the most common key used.
- Once you are in the BIOS setup utility, you can use the arrow keys to navigate and select the option you want to configure.
- Use the F5 or F6 keys to select the setting you wish to modify. If you are unsure, read the descriptions in the BIOS to determine which settings you need to change.
- Save your settings and exit the BIOS. The computer will then boot from the device you have selected.
It is important to note that some computers require you to press a different key to access the BIOS. If the F2 key does not work, you can try pressing the DEL key or F12 key. Also, some computers do not have a dedicated BIOS key. In this case, you will need to press a different key, such as the ESC key, to access the BIOS setup utility. Once you have accessed the BIOS setup utility, you can use the arrow keys to navigate and select the option you want to configure.
If you are unsure which settings to change, read the descriptions in the BIOS to determine which settings you need to modify. Once you have made the changes, save your settings and exit the BIOS. Your computer will then boot from the device you have selected.
How Do I Force BIOS In Windows 10?
In Windows 10, you can force a BIOS restart by using a few keystrokes. This is especially useful if you are having trouble getting your computer to boot into the BIOS or if you’ve accidentally changed some settings in the BIOS that you need to undo. To force a restart in the BIOS, you will need to press and hold the power button on your computer for 5-10 seconds. This will cause your computer to shut down, and when it powers back up it will restart in the BIOS.
Once you are in the BIOS, you can look around and make any changes that you need to. However, it is important to be careful when making changes in the BIOS, as incorrect settings can cause problems with your computer. When you are done making changes, save the settings and exit the BIOS. Your computer will then boot normally into Windows 10.
How Do I Get To The Boot Menu Without Restarting?
Accessing the boot menu without restarting can be done by entering the BIOS (Basic Input/Output System). This is a system that acts as an intermediary between your hardware and software, allowing for precise control of your system’s operations.
To access the BIOS, you must first shut down your PC. Once the PC is shut down, start it up again, but press a specific key at the start. This key will vary depending on your PC’s manufacturer, so you may need to do some research to find the appropriate key for your system. Common keys are Delete, F2, F10, and Esc.
Once you have entered the BIOS, you can navigate through the menu to find the boot menu. On some systems, this menu will be labeled “Boot Settings” or “Boot Options”. You can then select the boot order and the system will boot from the appropriate device without having to restart.
If you are having difficulty accessing the boot menu without restarting, you can also try using a bootable USB drive. This will allow you to boot into a different operating system that can then be used to modify your system’s boot options.
Is There Another Way To Enter BIOS?
Entering a computer’s BIOS (basic input/output system) can be done in several different ways. It is important to be familiar with the various methods for entering the BIOS, as this will allow for easy access when troubleshooting or updating the computer.
One of the most common methods for entering the BIOS is through the use of a keyboard shortcut. There are several different shortcuts depending on the computer’s make and model, but the most common one is the “F2” key. This can be used to access the BIOS settings menu on most desktop and laptop computers.
Another way to enter the BIOS is by using the computer’s power button. Many computers will have a special key combination that needs to be pressed in order to access the BIOS. This key combination is usually something like “Ctrl + Alt + Delete” or “Ctrl + Alt + F2” and must be pressed while the computer is booting up.
Finally, some computers will have a dedicated BIOS entry button. This is usually a physical button located near the power button or on the side of the computer. This button will allow for easy access to the BIOS settings without having to use a keyboard shortcut or a power button key combination.
In conclusion, there are several different ways to access the BIOS settings on a computer. By being familiar with the various methods, it will be much easier to troubleshoot or update the computer.
How To Enter Bios Windows 10 On Startup
If your Windows 10 PC has become unresponsive and you need to access the BIOS without restarting, there are several ways to do it. This guide will show you how to enter the BIOS or Advanced Startup Options without restarting.
First, the easiest and most direct way to access the BIOS without restarting is to use the Windows Key + X shortcut. Simply press these two keys together and a menu will appear with several options. Select the “Run” option and type “msconfig” into the search box. This will open the System Configuration window, where you can access the BIOS settings.
Another way to access the BIOS without restarting is to use the Advanced Boot Options menu. To access this menu, press the F8 key while your PC is booting up. This will open a menu with several options, including the “Advanced Boot Options”. From here, you can access the BIOS settings.
Finally, you can also access the BIOS without restarting by using the Boot Menu. To access this menu, press the F12 key while your PC is booting up. This will open a menu with several boot options, including the “Boot Menu”. From here, you can access the BIOS settings.
These are all the ways you can access the BIOS without restarting your Windows 10 PC. Just remember to use the appropriate key for your machine.
How To Enter Bios Windows 10 Without Uefi
Entering the BIOS (Basic Input Output System) on Windows 10 is necessary if you want to perform advanced system-level tweaks and modifications. BIOS is the in-depth settings menu that allows you to change the basic settings of your computer, like the boot order, system time and date, and security settings.
The traditional method of accessing the BIOS involves restarting your computer and pressing a specific key while the system is starting up. This key is usually one of the function keys (F1, F2, F3, etc.), the ESC, Delete, or a combination of keys like Ctrl + Alt + Enter, or the Windows key + R. However, this method does not always work for Windows 10 computers with UEFI BIOS.
Fortunately, there is an easy way to enter the BIOS without restarting your computer. To do this, open the “Run” dialog by pressing the Windows key + R. Then, type “msconfig” into the dialog box and press Enter. This will open the System Configuration window.
Next, go to the “Boot” tab and click the “Advanced Options” button. This will open a new window. Here, you can find an option to enter the BIOS. Simply check the “Enter Setup” checkbox and click “OK”.
Your computer will then restart into the BIOS and you can configure the settings. Once you are done, simply press the F10 key to save and exit the BIOS. Your computer will then boot into Windows 10 as normal.
How To Access Bios Windows 10 Without Restarting Reddit
Accessing the BIOS on a Windows 10 computer without restarting can be done in a few simple steps. To begin, you will need to press and hold the Shift key on your keyboard, then click the Restart option in the Start menu. This will bring you to the Advanced Startup Options menu. From here, you can choose Troubleshoot, followed by Advanced Options, and then UEFI Firmware Settings. Finally, you will be able to access the BIOS settings.
Once you are in the BIOS settings, you will be able to make any changes or adjustments you need in order to customize your system. This could involve changing the boot order, configuring hardware settings, or making other tweaks to the way your computer functions. Once you are done making changes, you can save your changes and exit the BIOS.
In conclusion, accessing the BIOS on a Windows 10 computer without restarting can be done in a few simple steps. By pressing and holding the Shift key on your keyboard, then clicking the Restart option in the Start menu, you can bring up the Advanced Startup Options menu. From here, you can choose Troubleshoot, followed by Advanced Options, and then UEFI Firmware Settings to access the BIOS settings. Once you are in the BIOS, you can make any necessary changes or adjustments, save them, and then exit the BIOS.
How To Enter Bios Windows 11
The BIOS (Basic Input Output System) is the first program that runs when a computer starts. It is an important part of the computer’s system, as it manages the data flow between the hardware and the operating system. It is also used to access and configure various low-level settings, such as the system clock, boot order, and memory settings.
Fortunately, accessing the BIOS on Windows 10 is quite simple. Here are the steps you need to take in order to access the BIOS without restarting your computer:
- Press the Windows key + R to open the Run dialog box.
- Type “msinfo32” into the Run box and then press Enter.
- The System Information window will appear. On the left pane, click on System Summary.
- In the right pane, look for the BIOS Version/Date field. You can now see the BIOS version and date.
- To access the BIOS, press the Windows key + X or Right-click on the Windows Start button and then select “Run”.
- In the Run dialog box, type “msconfig” and then press Enter.
- The System Configuration window will appear. Go to the Boot tab and then click on the “Advanced Options” button.
- Check the “Enable Debugging” box and then click on the “OK” button.
- The “Advanced Boot Options” window will appear. Select “Enable Debugging” and then click on the “OK” button.
- The BIOS setup screen will appear. You can now make any changes you need to the BIOS settings.
How To Enter Bios Windows 10 On Startup Hp
Entering BIOS on Windows 10 can be done without restarting the computer. Depending on the type of computer you are using, there are several ways to access BIOS in Windows 10.
One of the most common ways to access BIOS in Windows 10 is through a simple keyboard command. Upon starting the computer, press the Esc key, Delete key, F1 key, or F2 key. This will bring up a menu that will allow you to enter the BIOS setup.
Another way to access BIOS in Windows 10 is through the Advanced Startup options. This can be done by pressing the Windows key and then simultaneously pressing the I key. This will open the Settings window. From the Settings window, you can select the Update & Security option and then select the Recovery option. From there, click on the Advanced Startup option and then select the Restart Now option. This will bring up the Advanced Boot Options menu. From there, you can select the Troubleshoot option and then select the Advanced Options option. Finally, you can select the UEFI Firmware Settings option, which will allow you to enter the BIOS setup.
These are the two most common ways to access BIOS in Windows 10 without restarting the computer. Depending on the type of computer you are using, there may be other ways to access BIOS.
How To Enter Bios Without Restarting Windows 11
If you want to access the BIOS settings on your Windows 10 device without restarting, there are multiple methods you can use. It is important to note that the exact steps used to enter the BIOS setup may vary depending on the make and model of your computer.
Method 1: Use the Advanced Startup Options
This method is the easiest and most commonly used to enter the BIOS setup. To use it, simply press the Windows key+I to open the Settings window, then click Update & Security. After that, click Recovery and then Advanced Startup. The next window will offer you the “Restart Now” option. Just click it and your computer will restart and enter the Advanced Startup Options window. Here, select Troubleshoot, then Advanced Options, then UEFI Firmware Settings. The last step is to click the “Restart” button and your computer will boot into the BIOS setup.
Method 2: Use the Command Prompt
This method is slightly more complicated than the first one, but it is still quite simple. To use it, open the Command Prompt window as an administrator, then type the command “shutdown.exe /r /o” and press Enter. Your computer will restart and enter the Advanced Startup Options window. Here, select Troubleshoot, then Advanced Options, then UEFI Firmware Settings. The last step is to click the “Restart” button and your computer will boot into the BIOS setup.
Method 3: Use the Run Command
This method is the most complicated of the three, but it can still be used to enter the BIOS setup. To use it, open the Run window by pressing the Windows key+R, then type “msconfig” and press Enter. In the System Configuration window, go to the Boot tab, then click the “Advanced Options” button. Here, check the “Enable Debugging” option and click “OK”. Finally, click “Restart” and your computer will boot into the BIOS setup.
How To Enter Bios Without Restarting Windows 7
Most computers come with a built-in BIOS (Basic Input/Output System), which is a program that allows you to access and change your computer’s hardware settings. On Windows 10, accessing the BIOS or UEFI (Unified Extensible Firmware Interface) can be necessary for various tasks like configuring new hardware peripherals or setting up the device for first use.
To access the BIOS without restarting your computer, you can use the advanced startup options menu. To open it, open the Start menu, then go to Settings > Update & Security > Recovery > Advanced Startup > Restart Now.
Once you’re in the Advanced Startup screen, click Troubleshoot > Advanced Options > UEFI Firmware Settings. Then click Restart. Your computer will restart and you will be able to access the BIOS.
In the BIOS, you can adjust settings related to the date and time, system performance and security. You can also adjust settings related to the boot order, which determines what devices your computer boots from when it starts up. Be careful when making changes in the BIOS, as incorrect settings can cause your computer to stop working.
Can’t Access Bios Windows 10
If you are looking for a way to access your BIOS on Windows 10 without having to restart your computer, then you are in luck. There are several ways to access the BIOS depending on the type of system you have.
For most Windows 10 systems you can access the BIOS by pressing the “F2” key as soon as the system restarts. If you are using an older system, you may need to press “Del” or “Ctrl + Alt + Esc” instead. Once you press the correct key, your system will boot into the BIOS.
Alternatively, you can also access the BIOS using the Advanced Startup menu. To do this, press the “Windows” key + “I” to open the Settings menu. Then navigate to “Update & Security” and select “Recovery” from the left panel. Under the “Advanced Startup” section, click on “Restart Now” and your system will boot into the BIOS.
You can also access the BIOS from the Command Prompt. Open the Command Prompt as an administrator and type in the command “shutdown /r /o”. This will restart your system and boot into the BIOS.
Finally, you can also access the BIOS using the Windows 10 Control Panel. Open the Control Panel and click on “System and Security”. Then select “Advanced System Settings” and click on the “Restart” button. Select “Restart to BIOS” and your system will boot into the BIOS.
How To Enter into BIOS Settings without Restart or pressing any Keys
To conclude, accessing BIOS in Windows 10 is fairly straightforward and simple. Everyone should be able to do it without having to restart their computer. All you need to do is locate the right key to press, enter the BIOS menu, and then make the necessary changes. With this knowledge, you can now access the BIOS in Windows 10 without having to restart your computer.
Windows 10 gives you many configuration options directly within the operating system, but on every laptop or desktop, there are some settings you can only change in the BIOS (basic input/output system). This software is built right into your computer’s motherboard, and it controls everything from the boot order of your drives to preboot security options to whether the Fn key on your keyboard activates a function key or a media control.
However, since the BIOS is a pre-boot environment, you can’t access it directly from within Windows. On some older computers (or those deliberately set to boot slowly), you can hit a function key such as F1 or F2 at power-on to enter the BIOS.
However, most computers made in the past four years boot Windows 10 far too quickly to listen for a keypress at startup. To access your BIOS on a Windows 10 machine, you must follow these steps.
How to enter the BIOS on a Windows 10 PC
1. Navigate to Settings. You can get there by clicking the gear icon on the Start menu.
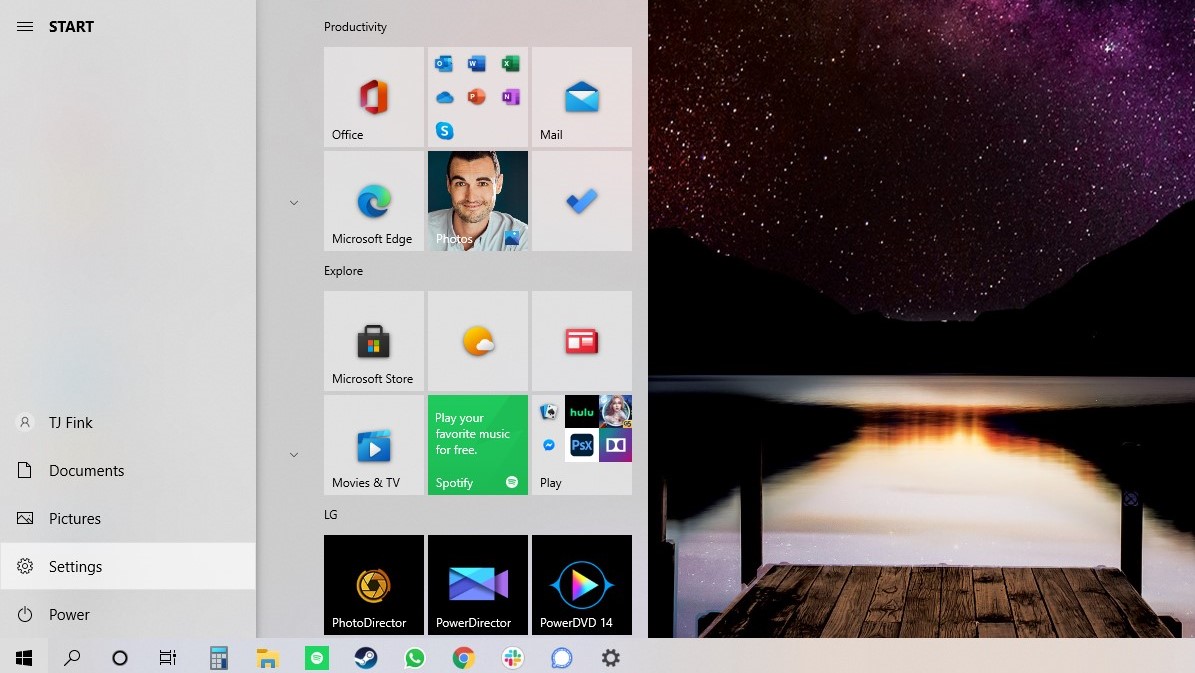
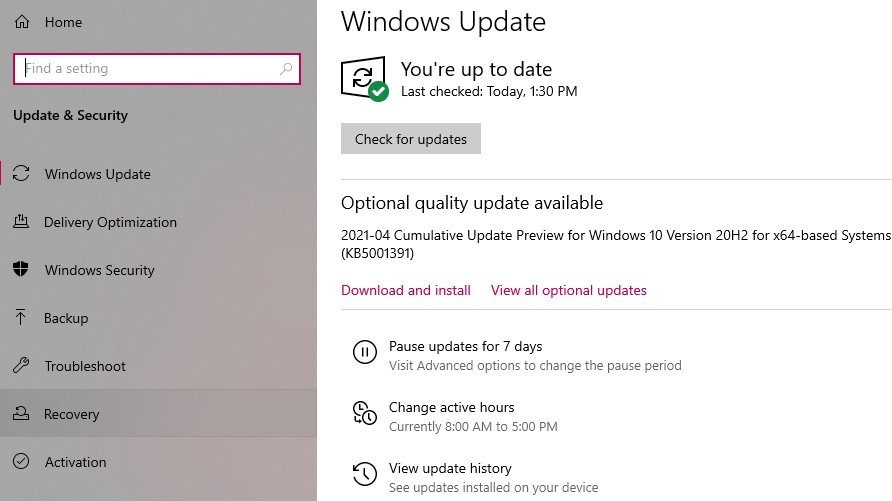
2. Select Update & Security.

3. Select Recovery from the left menu.
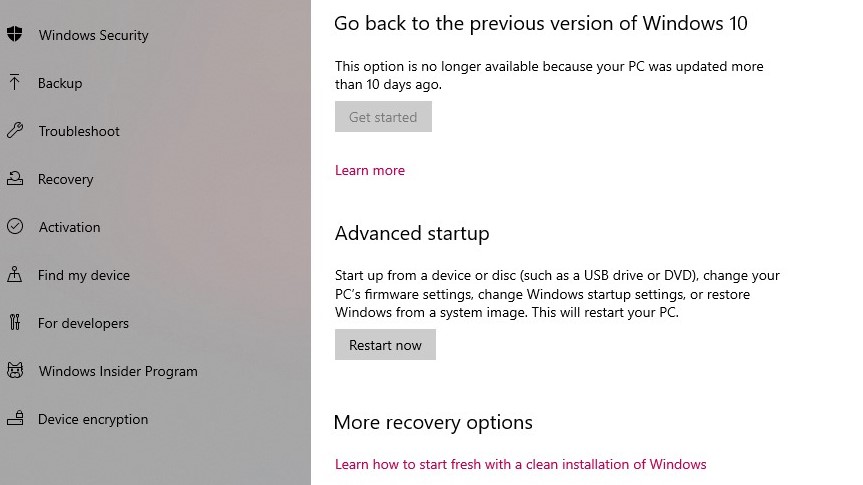
4. Click Restart Now under Advanced startup. The computer will reboot to a special menu.
5. Click Troubleshoot.
6. Click Advanced options.
7. Select UEFI Firmware Settings. If you don’t see this icon, then press Startup Settings instead. When your PC is restarting, tap F1 (or F2) to access the BIOS.
8. Click Restart.
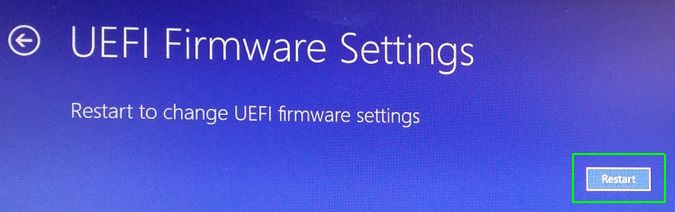
Your system will restart and take you to the BIOS.
Get our in-depth reviews, helpful tips, great deals, and the biggest news stories delivered to your inbox.
 Доброго времени!
Не многие пользователи знают, что в UEFI (BIOS) можно войти без использования и нажатия спец. клавиш (тех же Delete или F2). Это очень может выручить, если вы перебрали все возможные кнопки, а компьютер никак не реагирует на ваши нажатия…
Отмечу, что воспользоваться этим способом можно только при условиях, что:
- у вас установлена современная ОС Windows 8, 8.1, 10, 11 (в остальных данной возможности нет);
- ваша мат. плата должна поддерживать UEFI (если ваш ПК/ноутбук не старше 3-4 лет — то наверняка поддержка есть!);
- ОС должна загружаться и «хоть как-то» работать (если же ОС не установлена — рекомендую ознакомиться со справочной статьей с кнопками входа в BIOS для устройств разных производителей).
*
Итак, теперь ближе к теме…
*
Из Windows 11
Все действия рассмотрю по шагам (для большей наглядности и доступности).
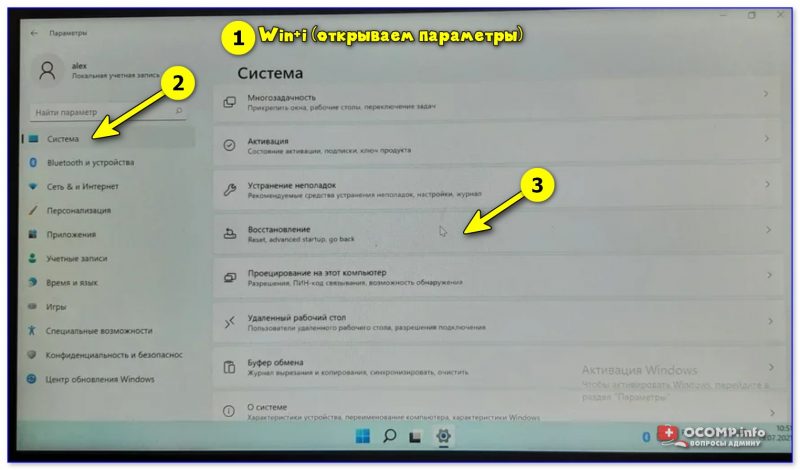
- для начала необходимо открыть параметры Windows и перейти в раздел «Система / восстановление» (сочетание клавиш Win+i // либо Win+R, и команда «ms-settings:» (без кавычек));

Открываем параметры Windows 11 — вкладку восстановление
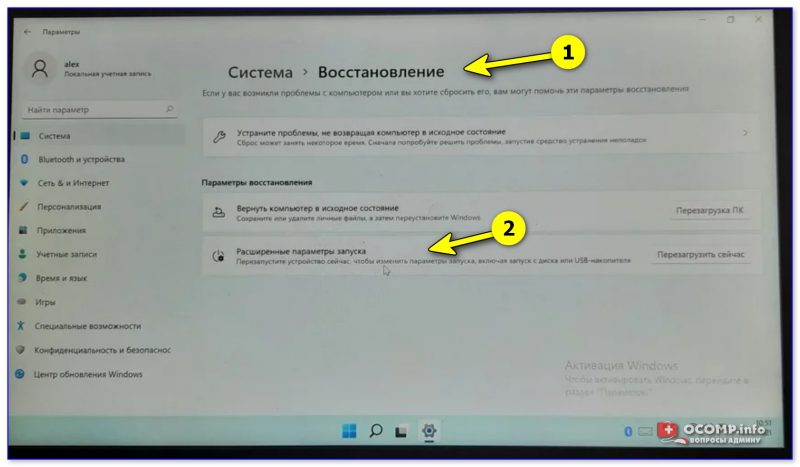
- далее согласиться на перезагрузку и запуск ПК с расширенными параметрами. См. пример ниже на фото; 👇

Расширенные параметры запуска
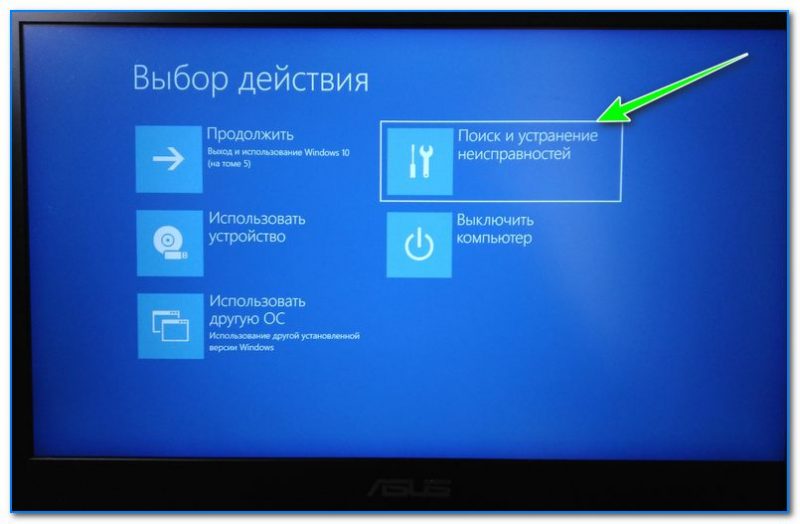
- после перезагрузки появится «синее меню»: в нем нужно будет выбрать вариант «Поиск и устранение неисправностей / доп. параметры / Параметры встроенного ПО UEFI»; 👇

Параметры встроенного ПО
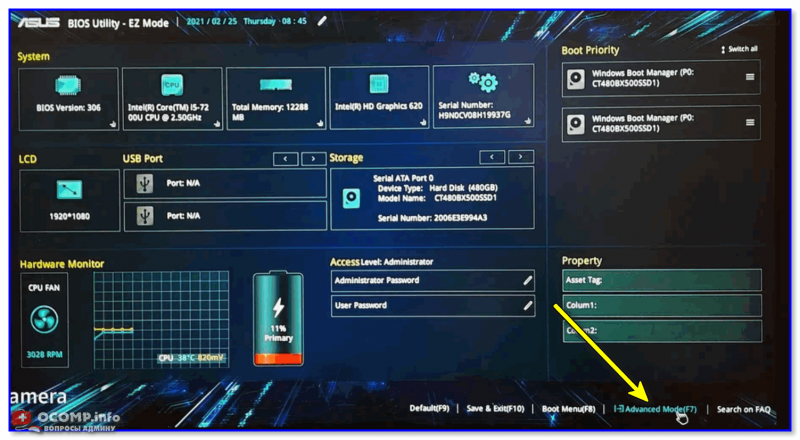
- ну и после еще одной перезагрузки — появится окно BIOS (UEFI). Можно приступить к настройкам! 👌

UEFI (Asus) — Advanced Mode

*
Из Windows 10
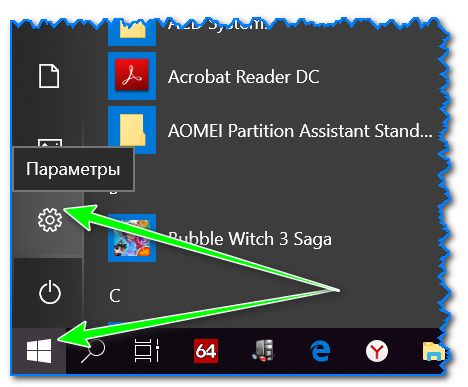
- Сначала необходимо зайти в параметры Windows (можно использовать сочетание Win+i, можно воспользоваться меню ПУСК);

Параметры (Windows 10)
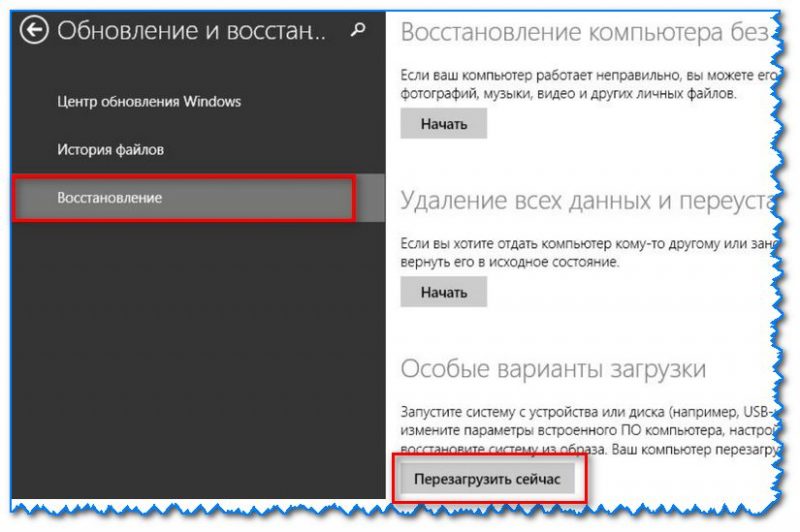
- далее необходимо открыть раздел «Обновление и безопасность/Восстановление» и найти подраздел «Особые варианты загрузки»: нажать в нем кнопку «Перезагрузить сейчас». См. пример ниже (цифры 1, 2, 3); 👇

Обновление и безопасность — восстановление (кликабельно)
- после чего откройте раздел «Поиск и устранение неисправностей»;

Выбор действия (Windows 10)
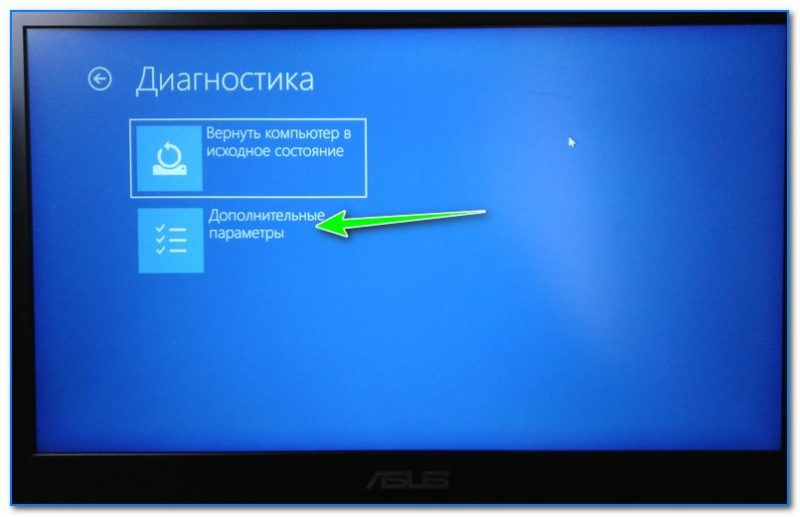
- затем подраздел «Дополнительные параметры»;

Диагностика — доп. параметры
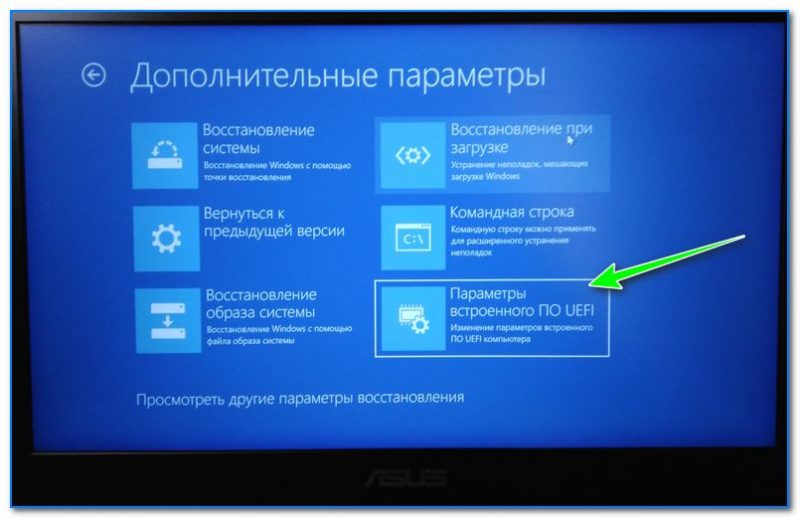
- далее вкладку «Параметр встроенного ПО UEFI» (пример на фото ниже 👇);

Параметры встроенного ПО
- ну и последнее, что осталось — это согласиться на перезагрузку; 👇

Перезагрузить
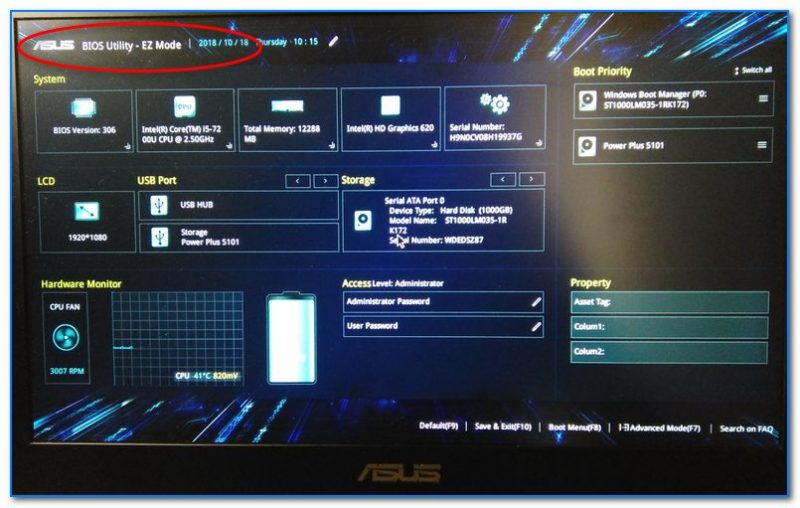
- после перезагрузки компьютера (ноутбука) у вас автоматически будет осуществлен вход в настройки UEFI (пример ниже 👇). Никаких кнопок дополнительно нажимать не нужно!

BIOS Utility — вход выполнен


*
Из Windows 8, 8.1
В принципе действия аналогичны, правда, интерфейс несколько отличается от Windows 10.
- сначала передвиньте ползунок мышки вправо, чтобы появилось боковое меню: выберите «Параметры» (см. скрин ниже 👇);

Windows 8 — параметры
- далее щелкните по ссылке «Изменение параметров компьютера»;

Изменение параметров компьютера
- затем откройте раздел «Обновление и восстановление»;

Обновление и восстановление
- после чего в разделе «Восстановление» найдите подраздел «Особые варианты загрузки» и щелкните по кнопке «Перезагрузить сейчас»; 👇

Восстановление — перезагрузить сейчас
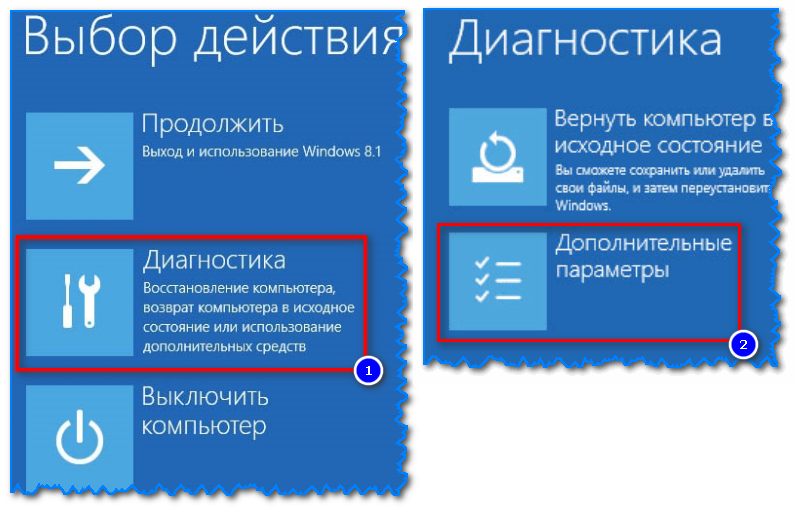
- далее компьютер будет перезагружен, и вы увидите меню с выбором действия: откройте вкладку «Диагностика», затем «Доп. параметры»; 👇

Выбор действия — диагностика
- затем «Параметры встроенного ПО UEFI» и согласитесь на перезагрузку: после нее компьютер сам автоматически откроет настройки UEFI (BIOS). 👇

Параметры встроенного ПО (Windows


*
С помощью командной строки, меню ПУСК
👉 Командная строка
- открываем командную строку (если не знаете как — см. вот эту инструкцию);
- далее нужно ввести команду shutdown.exe /r /o и нажать Enter;

shutdown.exe в командной строке
- после чего увидите сообщение, что через минуту ваш сеанс будет завершен;

Ваш сеанс будет завершен
- по прошествии этой минуты, вы увидите меню с выбором действия (дальше действия аналогичны предыдущим описываемым шагам, см. выше). 👇
Выбор действия


*
Меню ПУСК
Еще один альтернативный вариант — это зайти в меню ПУСК, нажать по кнопке «Выключения», после зажать клавишу SHIFT и выбрать вариант «Перезагрузка». Дальнейшие действия аналогичны предыдущим шагам.

SHIFT + Перезагрузка
*
Дополнения по теме приветствуются…
Удачной работы.
👋
Первая публикация: 18.10.2018
Корректировка: 9.07.2021


 Иногда пользователю необходимо зайти в БИОС (UEFI) для настроек тех или иных параметров, например, чтобы поставить загрузку с флешки в БИОС. На современных системах при включении сделать это не всегда получается — компьютер или ноутбук включается слишком быстро.
В этой пошаговой инструкции подробно о способах зайти в БИОC/UEFI на компьютере или ноутбуке, один из которых обязательно должен сработать на вашей системе.
Вход в БИОС с помощью клавиши при включении
Стандартный способ зайти в БИОС — нажать предназначенную для этого клавишу при включении компьютера или ноутбука. Лучше нажимать после включения многократно, так как иначе можно пропустить «нужный момент». Сама клавиша обычно указана на экране при загрузке в сообщении: «Press КЛАВИША to enter Setup».

Для большинства ПК и ноутбуков это следующие клавиши:
- Для ПК — обычно Del (Delete). Но возможны варианты, например F10 или F
- Для ноутбуков — обычно F2 (иногда нужно нажимать, удерживая клавишу Fn). Эта клавиша используется на ноутбуках ASUS, Acer, Gigabyte, Lenovo (кроме некоторых ThinkPad, где используется F1, Fn+F1 либо нажатие Enter и F1), Dell (также может быть F12), и многих других. На MSI это может быть клавиша F2 или Del. На HP вариантов больше: чаще всего Esc и F10, но возможны F2, F12, F1 или DEL в зависимости от модели ноутбука.
- На моноблоках и брендовых ПК может использоваться как Del, так и клавиша, аналогичная клавише входа в БИОС на ноутбуке этой же марки.
На некоторых системах с Windows 11 из-за включенной функции «Быстрый запуск» при включении не удается использовать клавишу для входа в БИОС/UEFI. В такой ситуации попробуйте использовать клавишу не после завершения работы и включения, а после перезагрузки системы через меню Пуск (при перезагрузке быстрый запуск не используется).
Учитывайте, что при включении ПК некоторые беспроводные клавиатуры могут не работать: реже это касается клавиатур, подключаемых по радиоканалу, почти всегда — Bluetooth клавиатур.
Как зайти в БИОС/UEFI Windows 11 через расширенные параметры запуска
В случае, если вход в БИОС с использованием клавиши выполнить не удается, можно попробовать использовать «Расширенные параметры запуска». Шаги будут следующими:
- В Windows 11 зайдите в Параметры — Система — Восстановление. Нажмите кнопку «Перезагрузить сейчас» в пункте «Расширенные параметры запуска». Вместо этого также можно открыть меню Пуск, нажать кнопку выключения, а затем, удерживая клавишу Shift нажать «Перезагрузка».

- После перезагрузки вы попадете в среду восстановления Windows 11. Выберите пункт «Поиск и устранение неисправностей», перейдите в «Дополнительные параметры» и нажмите «Параметры встроенного ПО UEFI».

- Подтвердите перезагрузку. После неё вы должны будете автоматически попасть в параметры UEFI вашего ПК или ноутбука, при условии, что система установлена в режиме UEFI.


Как правило, один из этих способов срабатывает, при условии, что клавиатура исправна и обнаруживается компьютером. Если же войти в БИОС не получается, подробно опишите ситуацию в комментариях: модель устройства (материнской платы или ноутбука), детали проблемы — решение должно найтись.
How To Access BIOS in Windows 11 | 5 Easy Methods
Key Points
- Windows 11 is the latest version of the popular Microsoft operating system.
- Accessing the Windows 11 BIOS gives users various options and settings to customize their system.
- The BIOS (Basic Input/Output System) controls the basic operations of the computer, such as power management and system startup.
- You may need to access the Windows 11 BIOS for several reasons, such as troubleshooting or installing new hardware.
- You can take a few key steps to access the BIOS on a Windows 11 machine, including restarting your computer.
- Making changes to your BIOS settings is a delicate process, and it’s important to be sure of the changes you make before saving.
Microsoft is responsible for developing and maintaining the Windows operating system. The company has released several versions of Windows, including Windows 7, 8, 10, and 11. The latest operating system from Microsoft, Windows 11, was released in 2021 and was designed to provide users with a reliable, secure, and user-friendly experience.
As part of the Windows operating system, Microsoft includes several features that make it easier for users to manage their computers, such as a built-in Windows Update service for keeping the system up to date with security patches and feature updates. Accessing the BIOS can be essential when you need to make changes to the system. Fortunately, Microsoft has made it easy to access the BIOS on Windows 11 machines with just a few steps.

What Is BIOS?
The BIOS (Basic Input/Output System) is a key part of Windows 11 and all other operating system versions. It controls various hardware components, including the processor, memory, hard drive, and more. It is also responsible for loading the operating system when you turn on your computer. To make changes to your BIOS settings, you must first access it.
When to Use BIOS
Now that you know what BIOS is, you may wonder when to use it. There are a few key reasons why accessing the BIOS might be necessary. For example, accessing the BIOS is essential if you need to install new hardware or update the system’s firmware. It can also be helpful in troubleshooting problems, as you may be able to make a few changes in the BIOS that will help resolve the issue.
There are other reasons you may need to access the BIOS on your Windows 11 computer. For example, you may need to change the boot order of your system to boot from a USB or CD drive. You may also need to enable certain features or change the settings for your processor, memory, and other hardware components. Regardless of the reason for accessing the BIOS, it can be a helpful tool for managing your system. Learning how to access the BIOS on Windows 11 is an important skill that all users should have.
How to Get to the BIOS in Windows 11
1. Computer Start-Up
The BIOS is the first thing that runs when you start up your computer. It is responsible for preparing the hardware and loading the operating system, so it can be accessed during this process. When you start your computer, you will usually see a message on the screen telling you which key to press to access the BIOS settings. This is often the F2 key, but it could be different depending on your computer’s manufacturer.
If your computer boots up quickly, it can be straightforward to miss the message. If this happens, there are other ways to access the BIOS.
2. Windows Settings
You can access the BIOS from the Windows Settings menu on your computer. To do this, click on the Start menu and go to Settings. Once here, click on “Update”, and then select “Recovery.” Under “Advanced Startup”, select “Restart Now.” This will restart your computer and bring you to the BIOS menu.
3. UEFI Firmware Settings
If your computer has UEFI (Unified Extensible Firmware Interface) installed, you can access the BIOS settings through this. To do this, open the Start menu and search for “UEFI Firmware Settings.” This will bring up the BIOS settings menu.
4. Restart Your Computer
You can also access the BIOS settings by restarting your computer. To do this, press and hold down the Shift key while you click on the Restart option in the Start menu. This will restart your computer and take you to the Windows Recovery Environment. From the Windows Recovery Environment, navigate to Troubleshoot > Advanced Options > UEFI Firmware Settings. This will take you to the BIOS menu.
5. Make a Shortcut
Finally, you can create a shortcut on your desktop that will take you directly to the BIOS settings. To do this, right-click on the desktop and select New > Shortcut. Enter the following command: “shutdown /r /o /f /t 00” and click Next. Give the shortcut a name, like “BIOS Settings”, and click Finish.
You may find that one or more of these methods work better for you than the others. Whatever method you choose, be sure to save your settings after making changes to ensure that they stay in effect. This will help prevent any unexpected problems from occurring when you restart your computer. Once you become familiar with the process, it will become second nature to you.
Wrap Up
Contrary to what some may have believed, accessing the BIOS in Windows 11 is quite easy. You can quickly and easily make changes to your BIOS settings with just a few simple steps. Whether you need to change the boot order of your system or enable certain features, the above methods should help you do so.
It is important to note that making changes to the BIOS can be risky if you don’t know what you are doing. You should consult a professional or the manufacturer’s website before making any changes. Doing so will help to ensure that your system is stable and that you don’t make any irreversible mistakes. With the right approach, you can easily access and modify the BIOS settings on your Windows 11 computer.
Contents
- 1 How To Access BIOS in Windows 11 | 5 Easy Methods
- 2 What Is BIOS?
- 3 When to Use BIOS
- 4 How to Get to the BIOS in Windows 11
- 5 Wrap Up