
Организация резервного копирования, одна из первых по важности задач, стоящих перед системным администратором. Однако многие вспоминают о нем только тогда, когда эти резервные копии внезапно понадобятся. В данной статье мы рассмотрим организацию резервного копирования для популярной серверной платформы Windows Server 2003.
Научиться настраивать MikroTik с нуля или систематизировать уже имеющиеся знания можно на углубленном курсе по администрированию MikroTik. Автор курса, сертифицированный тренер MikroTik Дмитрий Скоромнов, лично проверяет лабораторные работы и контролирует прогресс каждого своего студента. В три раза больше информации, чем в вендорской программе MTCNA, более 20 часов практики и доступ навсегда.
Перед тем, как приступить к практической части нашей статьи, необходимо усвоить немного теории. А именно базовые принципы, которые должны лежать в основе вашей политики резервного копирования. Многие начинающие админы путают резервное копирование с обеспечением отказоустойчивости, думая что наличие «зеркала» или RAID5 избавляет их от необходимости делать резервные копии. Но это не так. Отказоустойчивость предупреждает потерю данных в случае аппаратных сбоев, никак при этом не защищая от программных и человеческого фактора. Сбой в программе способен разрушить БД сразу на всех дисках RAID, то же самое произойдет и с ошибочно удаленными данными.
Как видим, резервное копирование никоим образом не заменяет и не дополняет необходимость обеспечения отказоустойчивости, а является независимой операцией, преследующей совершенно иные цели. А именно обеспечить сохранность данных от логических ошибок и человеческого фактора.
Ответом на следующий вопрос должен быть перечень данных подлежащих резервному копированию, частота создания резервных копий и период в течении которого они должны хранится. Для одних данных будет достаточно еженедельного копирования, для других потребуется ежедневное. Для оперативно меняющихся и активно используемых данных вполне хватает одной резервной копии, для других, когда ошибка может быть замечена по прошествии более длительного периода времени желательно иметь резервные копии за период превышающий время обнаружения ошибки. При этом следует соблюдать «золотую середину», помня что резервные копии «продукт скоропортящийся» и устанавливать разумные сроки. Например, для активно использующейся базы 1С резервная копия месячной давности уже не представляет особой практической ценности, а только занимает место на диске.
Ну и последний вопрос, где хранить резервные копии. На наш взгляд наиболее оптимально использовать внешний жесткий диск подключенный через USB или eSATA. И безусловно не стоит хранить резервные копии на одном логическом диске с основными данными, хотя ниже, в практическом примере мы поступим именно так. Но одно дело пример, для ознакомления с технологией, а совсем другое ее применение в производственных целях. Будьте благоразумны, не подвергайте себя неоправданным рискам.
На этом закончим с теорией и перейдем к практике. Для решения поставленной задачи мы будем использовать штатные инструменты предоставляемые нам операционной системой. Это позволит избежать необоснованных расходов на дополнительное ПО и повысит надежность системы в целом (мы считаем что каждое лишнее приложение на сервере вносит дополнительный риск сбоев). Да и зачем изобретать велосипед, когда все уже придумано до нас.
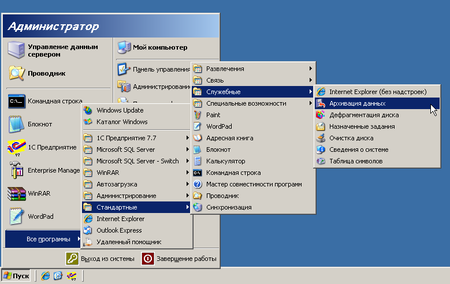 Пуск — Стандартные — Служебные — Архивация данных. В открывшемся в режиме мастера приложении последовательно выбираем: Архивация файлов и параметров, затем Предоставить возможность выбора объектов для архивации.
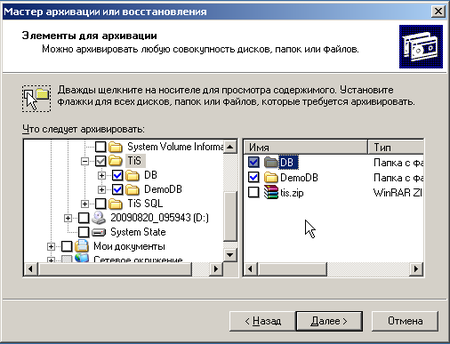 В следующем окне выбираем файлы и папки для которых мы хотим создать резервные копии. Не стоит пытаться объять необъятное и одним махом архивировать все данные. Более разумно создать отдельные задания для каждого типа данных, это позволит более гибко управлять как параметрами архивации, так и восстановления, а также избежать таких ситуаций, когда вместе с нужными документами случайно «восстановили» ненужные, уничтожив результат труда за последний день / несколько дней / неделю. Далее предстоит указать месторасположение и наименование архива, после чего с основными настройками будет закончено.
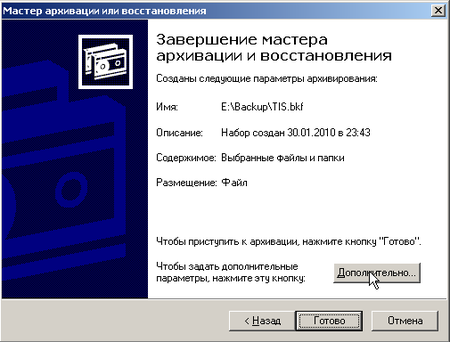
Но не спешите жать кнопку Готово. Самое время перейти к настройке дополнительных параметров.
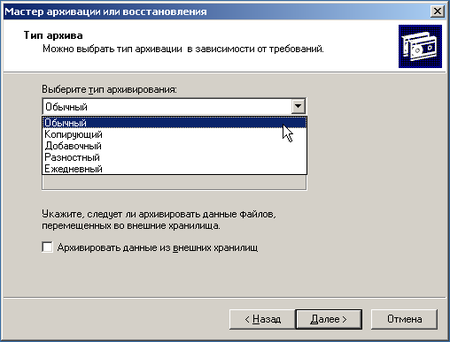 На этом этапе мы можем выбрать тип архивации в зависимости от типа данных и наших требований. Так как в нашем примере архивируются базы 1С, то мы выбрали Обычный способ, так как при активной работе затрагиваются практически все файлы БД. Для папки с офисными документами более подойдет Добавочный способ, позволяющий архивировать только вновь измененные или созданные файлы. Следующим шагом следует указать: добавить ли данный архив к существующим или перезаписать его. В нашем случае была выбрана опция перезаписать, в активно используемой 1С базе ошибки как правило выявляются сразу и необходимости иметь множество резервных копий как правило нет.
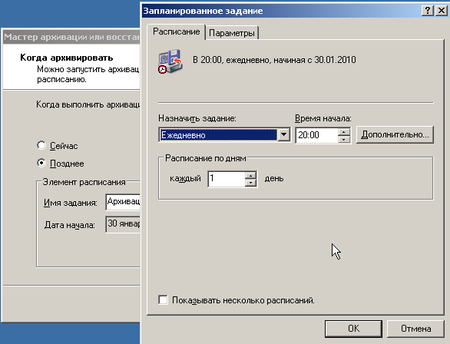
Наконец мы добрались до логического завершения, настройки расписания для резервного копирования. Мастер архивации предложит нам выполнить архивацию немедленно или создать задание для планировщика. Естественно, что нас интересует последний вариант. Мы настроили ежедневное выполнение задания в 20:00, когда в офисе гарантированно никого не будет. Затем следует перейти в Панель управления — Назначенные задания и щелкнув правой кнопкой мыши выбрать Выполнить.
 Если все сделано правильно мы увидим окно как на рисунке выше и в папке для резервных копий должен появится файл архива.
Восстановление данных можно выполнить двойным щелчком по файлу архива, либо запустив Архивацию данных и выбрав вручную необходимый файл. Мастер последовательно предложит нам выбрать файлы для восстановления (не обязательно восстанавливать весь архив целиком), место для восстановления (есть возможность восстановить файлы по их изначальному расположению либо в отдельную папку) и, в дополнительных опциях, настройки перезаписи уже существующих файлов. Для баз 1С, во избежание коллизий и разрушения БД, следует выбирать полную перезапись, для архива документов, в случае удаления отдельных файлов можно восстановить только их, не затрагивая существующие.
Мы рассмотрели самый простой способ, организацию ежедневного копирования с перезаписью архива, попробуем усложнить условия. Допустим нам требуется ежедневное копирование с сохранением архивов за неделю. Ничего сложного в этом нет, все решается на уровне планировщика. Для начала откроем и изменим существующее задание.
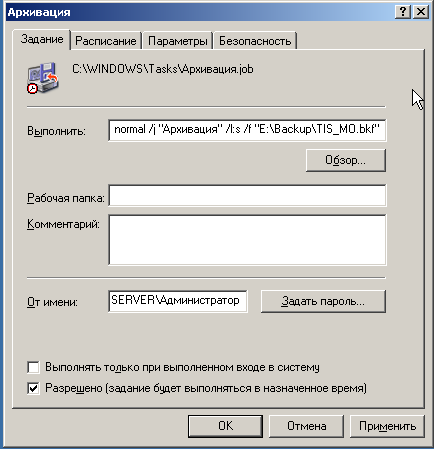
В строке Выполнить изменим имя создаваемого файла архива, добавив сокращенное наименование дня недели (МО — Monday — Понедельник и т.д.).
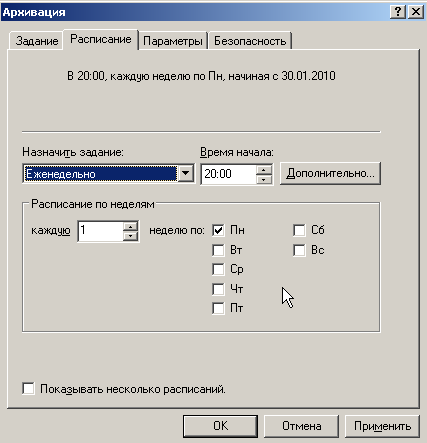
На закладке Расписание назначим заданию еженедельное исполнение по Понедельникам в 20:00 с перезаписью существующего архива. Теперь скопируем это задание (перетянуть на свободное место ПКМ) и изменим его для Вторника, аналогично поступим для Среды и т.д. В итоге получим пять заданий, выполняющихся каждое в свой день недели с понедельника по пятницу. Последовательно запустим их и убедимся в корректности работы.
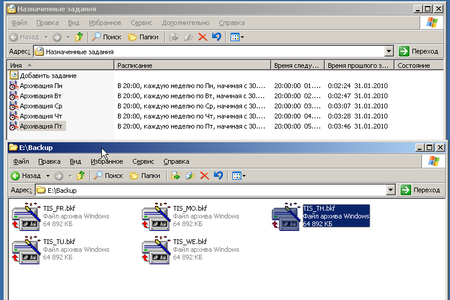
В результате мы должны получить пять архивов на каждый день недели. Таким же способом можно задать любое расписание для архивации данных, либо скомбинировать любые варианты. Например в добавок к ежедневному архиву создавать еженедельный по пятницам и т.п.
В любом случае не забывайте, что грамотно настроенное резервное копирование залог сохранности и бесперебойного доступа к вашим данным.
Научиться настраивать MikroTik с нуля или систематизировать уже имеющиеся знания можно на углубленном курсе по администрированию MikroTik. Автор курса, сертифицированный тренер MikroTik Дмитрий Скоромнов, лично проверяет лабораторные работы и контролирует прогресс каждого своего студента. В три раза больше информации, чем в вендорской программе MTCNA, более 20 часов практики и доступ навсегда.
Windows Server 2003 Backup is a comprehensive backup and recovery solution that helps protect your business-critical data. Windows Server 2003 Backup provides an easy-to-use wizard interface that guides you through the process of creating a backup job.
You can use Windows Server 2003 Backup to create a backup job that backs up your entire server, including the operating system, applications, and data. You can also use Windows Server 2003 Backup to create a backup job that backs up only specific folders or files.
Windows Server 2003 Backup includes the following features:
-Backs up the entire server, including the operating system, applications, and data
-Backs up specific folders or files
-Enables you to restore an entire server, specific folders or files, or individual items
-Creates backup jobs that can be run automatically or on demand
-Backups can be stored on local or network drives
Windows Server 2003 Backup is included with Windows Server 2003. You can use it to create backups of your server’s data, applications, and operating system.
Contents
- 1 How do I create a backup image in Windows Server 2003?
- 2 Can Veeam backup Windows Server 2003?
- 3 Does Windows Server have backup software?
- 4 How do I backup my Windows server?
- 5 How do I backup my server files?
- 6 Where are Windows server backups located?
- 7 Where does Windows Server Backup store files?
How do I create a backup image in Windows Server 2003?
Creating backups is an important part of any administrator’s job, and Windows Server 2003 provides several ways to create backups. One way to create a backup is to use the Backup utility that is included with Windows Server 2003. This utility allows you to create backups of files, folders, or entire disks.
To create a backup image using the Backup utility, you first need to create a backup job. To do this, open the Backup utility and click the New Job button. The New Job dialog box will appear. In the Job Type list, select Backup Image.
In the Backup Set list, select the disk or folders that you want to back up. If you want to back up the entire disk, select the disk in the list. If you want to back up specific folders, select the folders in the list.
In the Backup Options area, you can choose to back up the files and folders in the backup set using either the NTFS file system or the FAT file system. You can also choose to compress the backup set.
In the Backup Destinations area, you can choose the location where you want to save the backup image. You can save the image to a local disk, to a network location, or to a removable disk.
When you are finished selecting the options, click the OK button. The backup job will be created and the Backup utility will start backing up the files and folders to the backup image.
Can Veeam backup Windows Server 2003?
Yes, Veeam can backup Windows Server 2003.
Windows Server 2003 is a legacy server operating system that is no longer supported by Microsoft. However, many organizations are still using this operating system due to its stability and reliability. If you are one of these organizations and are looking for a reliable way to backup your data, Veeam is a good option.
Veeam is a backup and Availability solution that helps organizations protect their data and virtual infrastructure. It supports a wide range of operating systems, including Windows Server 2003. Veeam can backup your data quickly and easily, and helps you ensure that your data is always available when you need it.
If you are looking for a way to backup your data on Windows Server 2003, Veeam is a good option. Veeam is reliable and easy to use, and can backup your data quickly and easily.
Does Windows Server have backup software?
Windows Server doesn’t come with a backup software pre-installed, but there are several commercial and open source options available.
Windows Server Backup is a built-in feature that allows you to create backups of your server’s files and folders. It’s not as comprehensive as some of the commercial backup software options, but it’s free and easy to use.
There are a number of commercial backup software options available, such as Norton Ghost, Acronis True Image, and Carbonite. These options typically offer more features and options than the Windows Server Backup, but they also tend to be more expensive.
There are also a number of open source backup software options available, such as Amanda, Bacula, and FreeNAS. These options typically don’t offer as many features as the commercial options, but they are free to use.
How do I backup my Windows server?
Backing up your Windows server is essential for protecting your data in the event of a system failure. In this article, we will show you how to create a backup plan and backup your server using Windows Server Backup.
Creating a Backup Plan
When creating a backup plan, it is important to think about what data needs to be backed up and how often the backups need to be performed. You should also decide on a backup destination, such as an external hard drive, network location, or cloud storage provider.
Backing up your server’s data is important, but it is also important to create a system image backup. A system image backup is a copy of your entire server, including the operating system, installed programs, and your data. This backup can be used to restore your server if it is damaged or fails.
To create a system image backup in Windows Server 2012, open the Server Manager and navigate to the Tools menu. Select the Windows Server Backup option and click the Create A System Image button.
The Windows Server Backup tool will open and you will be prompted to select the backup destination. Select the location where you want to save the backup and click the Next button.
The next step is to select the files and folders that you want to include in the backup. by default, the entire server is selected. If you only want to backup specific files and folders, uncheck the box next to the server name and check the boxes next to the files and folders that you want to include.
Click the Next button and the backup will begin. The backup process can take some time, so be patient.
Backing Up Your Server
To back up your server using Windows Server Backup, open the Server Manager and navigate to the Tools menu. Select the Windows Server Backup option and click the Backup Once button.
The Windows Server Backup tool will open and you will be prompted to select the backup destination. Select the location where you want to save the backup and click the Next button.
The next step is to select the files and folders that you want to include in the backup. by default, the entire server is selected. If you only want to backup specific files and folders, uncheck the box next to the server name and check the boxes next to the files and folders that you want to include.
Click the Next button and the backup will begin. The backup process can take some time, so be patient.
Restoring Your Server
If your server fails and needs to be restored, you can use the system image backup that you created earlier. To restore your server, open the Server Manager and navigate to the Tools menu. Select the Windows Server Backup option and click the Recover Once button.
The Windows Server Backup tool will open and you will be prompted to select the backup destination. Select the location where you want to save the backup and click the Next button.
The next step is to select the files and folders that you want to restore. by default, the entire server is selected. If you only want to restore specific files and folders, uncheck the box next to the server name and check the boxes next to the files and folders that you want to restore.
Click the Next button and the restore process will begin. The restore process can take some time, so be patient.
How do I backup my server files?
When it comes to server backups, there are a variety of factors to consider. One of the most important is deciding what to back up. Generally, you’ll want to back up everything on your server, including the operating system, files, and databases.
There are a few different ways to back up your server. The most common is to use a backup software program. These programs can automate the backup process, making it easy to back up your server on a regular basis. Another option is to use a cloud-based backup service. This option can be useful if you need to restore your server files from a remote location.
Regardless of which backup method you choose, it’s important to make sure your backups are reliable and up-to-date. Backing up your server is a critical part of keeping your data safe and secure.
Where are Windows server backups located?
Windows server backups can be stored in a variety of locations, depending on the configuration of the server and the backup software used. The most common locations for Windows server backups are on the server’s local hard drive, on a network drive, or on a removable storage device.
When configuring a Windows server to back up to a local hard drive, the backup files will be stored on the C: drive by default. If the C: drive is full or if you want to store the backups on a different drive, you can specify a different location by using the Backup utility. To do this, open the Backup utility, click on the Backup tab, and then click on the Change button. In the Backup Location dialog box, select the drive you want to use and then click on the OK button.
If you want to back up your Windows server to a network drive, you can do so by using the Backup utility or by using the Windows Server 2008 Remote Backup feature. To use the Backup utility, open the Backup utility, click on the Backup tab, and then click on the New Backup Job button. In the New Backup Job dialog box, select the type of backup you want to create (Full, Differential, or Incremental), select the computer you want to back up, and then click on the Next button. In the Backup Destination dialog box, select the network drive you want to use and then click on the OK button.
If you want to use the Windows Server 2008 Remote Backup feature, open the Server Manager console, click on the Backup And Restore link, and then click on the Configure Remote Backup link. In the Remote Backup dialog box, select the computer you want to back up, select the type of backup you want to create (Full, Differential, or Incremental), and then click on the Next button. In the Backup Destination dialog box, select the network drive you want to use and then click on the OK button.
Windows server backups can also be stored on a removable storage device, such as a CD or DVD. To do this, open the Backup utility, click on the Backup tab, and then click on the New Backup Job button. In the New Backup Job dialog box, select the type of backup you want to create (Full, Differential, or Incremental), select the computer you want to back up, and then click on the Next button. In the Backup Destination dialog box, select the removable storage device you want to use and then click on the OK button.
Where does Windows Server Backup store files?
Windows Server Backup stores backup files on the local computer or on a remote network share. The default location is \Windows\System32\WBEM\Backup. You can change the location of the backup files by using the Backup command-line tool.
Tags: Server 2003 BackupWindows Server 2003Windows Server 2003 BackupWindows Server Backup
Система Windows Server 2003 является одной из наиболее популярных операционных систем для серверов в мире. В то же время, она также подвержена различным рискам и угрозам, которые могут привести к потере данных или неполадке системы. Поэтому резервное копирование системы Windows Server 2003 является крайне важной задачей для обеспечения безопасности и надежности работы сервера.
Резервное копирование системы Windows Server 2003 позволяет сохранить все важные данные и настройки сервера, а также облегчает восстановление системы в случае сбоя или вирусной атаки. Для этого существует несколько методов резервного копирования, включая полное резервное копирование, инкрементное и дифференциальное резервное копирование.
При полном резервном копировании все данные на сервере копируются в один файл, что занимает больше места и времени. При инкрементном резервном копировании копируются только измененные или добавленные данные с момента последнего полного или инкрементного резервного копирования. Дифференциальное резервное копирование также копирует только измененные данные, но сохраняет историю изменений с каждым дифференциальным копированием.
Важно помнить, что основным принципом резервного копирования является создание нескольких копий данных и их хранение на разных носителях или в разных физических местах. Также рекомендуется регулярно проверять работоспособность созданных резервных копий и обновлять их при необходимости.
В заключение, резервное копирование системы Windows Server 2003 является ключевой процедурой для обеспечения безопасности данных и бесперебойной работы сервера. Выбор метода резервного копирования зависит от требований и возможностей организации. Но в любом случае, регулярность и надежность создания резервных копий являются основными принципами эффективного резервного копирования.
Содержание
- Резервное копирование системы Windows Server 2003:
- Значение и важность резервного копирования
- Методы резервного копирования в Windows Server 2003
- Советы по резервному копированию системы Windows Server 2003
Резервное копирование системы Windows Server 2003:
Существует несколько методов резервного копирования в Windows Server 2003:
| Метод | Описание |
|---|---|
| Полное копирование | Копируются все файлы и папки на сервере. Позволяет восстановить систему полностью, но требует большой объем дискового пространства. |
| Инкрементное копирование | Копируются только измененные файлы со времени последнего резервного копирования. Требует меньше дискового пространства, но процесс восстановления может быть более сложным. |
| Дифференциальное копирование | Копируются только измененные файлы с момента последнего полного копирования. Позволяет быстрее выполнить восстановление системы, чем инкрементное копирование, но требует больше дискового пространства. |
Для эффективного резервного копирования важно создать расписание, чтобы резервные копии выполнялись регулярно и автоматически. Также рекомендуется хранить резервные копии на отдельных носителях, таких как внешние жесткие диски или сетевые серверы, чтобы защитить данные от повреждения или потери.
Не забывайте также о тестировании процесса восстановления из резервной копии. Проверьте, что копия действительно восстанавливает систему и данные без ошибок.
Значение и важность резервного копирования
Значение резервного копирования заключается в следующем:
- Обеспечение безопасности данных: регулярные резервные копии позволяют защитить данные от физической порчи, случайного удаления или уничтожения. Это особенно актуально для бизнесов, которые хранят ценные и конфиденциальные данные.
- Восстановление системы: при сбое сервера или потере данных можно использовать резервные копии для восстановления системы в рабочее состояние. Это сокращает время простоя и помогает минимизировать потери.
- Соответствие законодательству: в некоторых сферах деятельности есть требование сохранять резервные копии данных в течение определенного времени. Необходимость резервного копирования может быть обусловлена законодательством охраны персональных данных или требованиям финансовой отчетности.
- Сохранение конфигурации системы: резервные копии не только восстанавливают данные, но и сохраняют конфигурацию сервера. Это может включать установленные программы, настройки сервера и другие важные параметры. Восстановление системы с сохраненной конфигурацией может существенно сэкономить время и усилия при восстановлении.
Важность резервного копирования нельзя недооценивать. Отсутствие резервных копий может привести к потере важных данных, простою системы и дополнительным затратам на восстановление. Поэтому рекомендуется создавать регулярные резервные копии и обеспечивать их надежное хранение.
Методы резервного копирования в Windows Server 2003
1. Полное резервное копирование (Full Backup)
Этот метод предполагает создание копии всех данных, находящихся на сервере. Он включает в себя все файлы и настройки системы, что позволяет восстановить сервер полностью в случае сбоя или потери данных. Однако, данный метод требует больших ресурсов и занимает много времени.
2. Инкрементное резервное копирование (Incremental Backup)
При использовании данного метода создаются копии только тех данных, которые были изменены или добавлены после последнего резервного копирования. Таким образом, инкрементное резервное копирование занимает меньше времени и ресурсов, чем полное копирование. Однако, при восстановлении данных понадобится восстановить не только последнюю инкрементальную копию, но и все предыдущие.
3. Дифференциальное резервное копирование (Differential Backup)
Метод дифференциального копирования также копирует только измененные или добавленные данные после последнего резервного копирования. Однако в отличие от инкрементального, дифференциальное копирование при восстановлении данных требует только последней дифференциальной копии и первоначальной полной копии. Это делает процесс восстановления проще и быстрее.
4. Копирование логического тома (Volume Shadow Copy)
Windows Server 2003 также предоставляет возможность создания теневых копий логических томов. Это позволяет создавать копии данных на основе «снимков» состояния файловой системы в определенный момент времени. Такие копии можно использовать для восстановления отдельных файлов или папок без необходимости полного восстановления сервера.
Выбор метода резервного копирования зависит от масштабов и требований системы, а также от доступных ресурсов. Некоторые системы могут использовать комбинацию нескольких методов для обеспечения наилучшей защиты данных.
Советы по резервному копированию системы Windows Server 2003
| 1. Планируйте резервное копирование | Планирование резервного копирования поможет вам определить, какие данные и системные файлы необходимо сохранить, а также выбрать подходящий метод резервного копирования. |
| 2. Используйте несколько источников хранения данных | Для увеличения надежности резервного копирования рекомендуется использовать несколько различных источников хранения данных, таких как внешние жесткие диски или удаленные серверы. |
| 3. Проверяйте резервные копии | Регулярная проверка резервных копий поможет убедиться, что данные записаны корректно и могут быть успешно восстановлены в случае необходимости. |
| 4. Автоматизируйте процесс резервного копирования | Использование автоматического программного обеспечения для резервного копирования поможет избежать забывчивости и находиться в соответствии с заданным графиком. |
| 5. Храните резервные копии в надежном месте | Очень важно хранить резервные копии в безопасном месте, чтобы предотвратить их потерю, повреждение или несанкционированный доступ к данным. |
Следование этим советам поможет вам эффективно выполнить резервное копирование системы Windows Server 2003 и обеспечить безопасность вашего сервера и данных.
Backup Windows Server 2003: A Comprehensive Guide
Introduction
Backing up your Windows Server 2003 is crucial for the safety and stability of your data and system. In this article, we will delve into the various methods and best practices for creating backups of your Windows Server 2003. We will explore both manual and automated backup techniques, as well as discuss the importance of creating a backup schedule and the different types of backups available.
Why Backup?
Before we dive into the specifics, let’s first understand why backing up your Windows Server 2003 is essential. A backup provides you with a copy of your data, applications, and settings, allowing you to restore them in case of data loss, system failure, or disaster. By having regular backups, you protect yourself from potential data loss, minimize downtime, and ensure business continuity.
Manual Backup Techniques
Let’s start with manual backup techniques that you can employ to safeguard your Windows Server 2003.
1. File-Level Backup: This is the most basic type of backup that involves manually copying important files and folders to an external storage device or network location. Though this method is simple, it is time-consuming and can be error-prone if you miss any critical files or directories.
2. System State Backup: Windows Server 2003 allows you to create a backup of the system state, which includes important system files, registry settings, and Active Directory if applicable. You can perform this backup using the built-in Backup Utility or third-party tools like Acronis True Image or Norton Ghost. It’s important to note that a system state backup does not include user files, applications, or settings.
Automated Backup Techniques
While manual backups are viable for small-scale systems, larger environments require automated backup solutions for efficiency and convenience. Below are some automated backup methods for Windows Server 2003.
1. Full Server Backup: This technique involves creating a complete image of your server, including the operating system, applications, settings, and data. You can use tools like Windows Server Backup (previously known as NTBackup), Acronis Backup, or Symantec Backup Exec. A full server backup provides a comprehensive snapshot of your server, allowing for easy recovery in case of a disaster.
2. Incremental Backup: This method backs up only the changes made since the last backup, reducing the time and storage space required. To perform an incremental backup, you need to have a previous full server backup. This type of backup provides more flexibility and quicker recovery times when compared to full server backups, especially for larger data sets.
3. Differential Backup: Similar to incremental backups, differential backups only save the changes made since the last full backup. However, unlike incremental backups, differential backups accumulate all changes made since the full backup. This means that each subsequent differential backup becomes larger, increasing storage requirements over time but simplifying the recovery process.
Creating a Backup Schedule
Having a consistent backup schedule ensures that your data is protected effectively without disrupting your regular business operations. Here are a few key factors to consider when creating a backup schedule for your Windows Server 2003.
1. Frequency: Determine how often you need to perform backups based on your data’s criticality and the frequency of changes. For critical data, daily or even hourly backups may be necessary, while less critical data can be backed up less frequently.
2. Retention: Decide how long you want to keep backups. Retention periods can vary depending on your industry’s regulations or internal policies. Ensure that you have enough storage capacity to accommodate your retention requirements.
3. Testing: Regularly validate the integrity of your backups through restoration tests. A backup without a working restore process is practically useless. Testing ensures that you can successfully recover your data when needed, minimizing any potential downtime during recovery.
Conclusion
Backing up your Windows Server 2003 is essential for data protection, system recovery, and business continuity. By considering manual and automated backup techniques, creating a suitable backup schedule, and ensuring regular testing, you can safeguard your critical data and applications from potential disasters. Remember, having a solid backup strategy is a proactive measure that can save you significant time, money, and stress in the long run.
In this article, you will find an overview of Windows Server 2003 backup and recovery options using either the built-in NTBackup tool (backup app for Windows 2000, Windows XP and Windows Server 2003.
Since NTBackup does not support image-based backups, we will also take a brief look at the differences between a file-level system data copy and an image-based backup.
What Is System Image Backup?
System image backup is a byte-to-byte copy of selected drive partitions with all corresponding file systems and boot metadata. You can even use this copy for exact recovery of the entire drive. This backup type helps in most disaster recovery scenarios, or it can be used as a part of a server maintenance procedure.
For more information on System Image Backup please refer to our guide:
Further reading System Image Backup and Recovery Guide
Why You Need to Back Up Windows Server and How MSP360 Helps
Discover the ins and outs of a server backup strategy using MSP360 Backup.

Windows Server 2003 Image Backup with Built-In NTBackup
The built-in tool NTBackup does not support image-based backups — it only allows you to create a file-level backup covering all necessary data to restore from scratch. This copy combines full data backup with a few configuration files that you can use when booting from a Windows installation CD. This technology is called Automated System Recovery (ASR) and it is built into Windows Server 2003 as a part of the NTBackup tool that allows performing bare-metal restores in the event any local system disaster strikes.
Here is a quick guide on how to perform an ASR backup:
1Run NTBackup by typing ntbackup in the Run menu. Click Backup Wizard (Advanced) on the start screen.
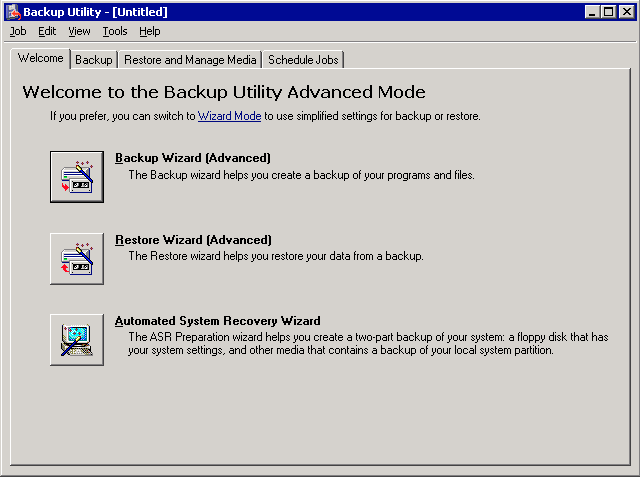
2Click the Automated Recovery Wizard button and proceed. You will need to select the target backup file — we suggest using the separate (or even external) drive for such a backup.
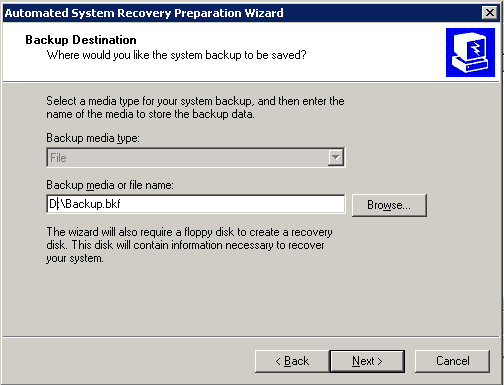
3Now click Next and then Finish to start the backup.
4On the next step, you will be asked to insert a floppy disk. As in 2018, that is an extremely outdated technology, here is a workaround. If you do not have a floppy disk at the moment of the ASR wizard run, you can copy these files later under the path: %windir%\repair.
5After the wizard is completed, ensure that you copied the contents of the %windir%\repair folder somewhere outside the system. This folder contains a few small files (asr.sif and asrpnp.sif) that are necessary for ASR recovery.
Limitations of NTBackup for Windows 2003
Built-in Windows backup software is a powerful tool for a daily routine, but it has a few drawbacks you should remember:
- You need to use a floppy drive during the restore process since Windows uses it to save pre-restore info such as disk configuration information and system signature. Though there is a workaround, you can use Remote Installation Server instead of a recovery floppy.
- ASR does not have scheduling out of the box. You need to manually configure such backups using scripting including separately created .SIF files.
- ASR is not intended to be used for server migration purposes, so any attempt to recover the system on another hardware can require additional efforts such as a hard drive’s controller drivers installation.
Summary
Windows 2003 does not have a built-in tool supporting image-based backups, but you can still use the ASR feature that creates a file-level data copy and allows you to use it for bare-metal recovery. This feature has a few peculiarities, such as the necessity to use a floppy drive. So we suggest choosing modern third-party backup tools with the support of an image-based backup.
MSP360 Managed Backup.
Simple. Reliable.
Powerful cross-platform backup and disaster recovery that leverages the public cloud to enable a comprehensive data protection strategy.